

Parkside PSS 250 A1 User Manual

ORBITAL SANDER PSS 250 A1
ORBITAL SANDER
Operation and Safety Notes
Translation of original operation manual
PLANSLIPMASKIN
Bruksanvisning och säkerhetsanvisningar
Översättning av bruksanvisning i original
SCHWINGSCHLEIFER
Bedienungs- und Sicherheitshinweise
Originalbetriebsanleitung
TASOHIOMAKONE
Käyttö- ja turvaohjeet
Alkuperäisen käyttöohjeen käännös
RYSTEPUDSER
Brugs- og sikkerhedsanvisninger
Oversættelse af den originale driftsvejledning
3

Before reading, unfold the page containing the illustrations and familiarise yourself with all functions of the
device.
Käännä ennen lukemista kuvallinen sivu esiin ja tutustu seuraavaksi laitteen kaikkiin toimintoihin.
Vik ut bildsidan och ha den till hands när du läser igenom anvisningarna och gör dig bekant med
apparatens / maskinens funktioner.
Før du læser, vend siden med billeder frem og bliv bekendt med alle apparatets funktioner.
Klappen Sie vor dem Lesen die Seite mit den Abbildungen aus und machen Sie sich anschließend mit allen
Funktionen des Gerätes vertraut.
GB / IE Operation and Safety Notes Page 5
FI Käyttö- ja turvaohjeet Sivu 15
SE Bruksanvisning och säkerhetsanvisningar Sidan 23
DK Brugs- og sikkerhedsanvisninger Side 31
DE / AT / CH Bedienungs- und Sicherheitshinweise Seite 41
1
11
10
6
A
2
3
4
5
6
78
B C
9
D E F
12

Table of contents
Introduction
Intended use ..................................................................................................................Page 6
Features .........................................................................................................................Page 6
Delivery contents ...........................................................................................................Page 6
Technical Data ..............................................................................................................Page 7
General safety advice for electrical power tools
1. Workplace safety .....................................................................................................Page 7
2.
Electrical safety .........................................................................................................Page 7
3. Personal safety ..........................................................................................................Page 8
4.
Careful handling and use of electrical power tools ...............................................Page 8
Appliance-specific safety Instructions ...........................................................................Page 9
Original ancillaries / and accessories ..........................................................................Page 10
Operation
Switching On and Off ..................................................................................................Page 10
Setting the oscillation speed .........................................................................................Page 10
Attaching a sanding pad ..............................................................................................Page 10
Vacuuming dust .............................................................................................................Page 10
Instructions, tips and tricks ............................................................................................Page 11
Maintenance and Cleaning ........................................................................Page 11
Service centre ........................................................................................................Page 12
Warranty ...................................................................................................................Page 12
Disposal ......................................................................................................................Page 12
Declaration of Conformity / Manufacturer....................................Page 13
5 GB/IE
Introduction
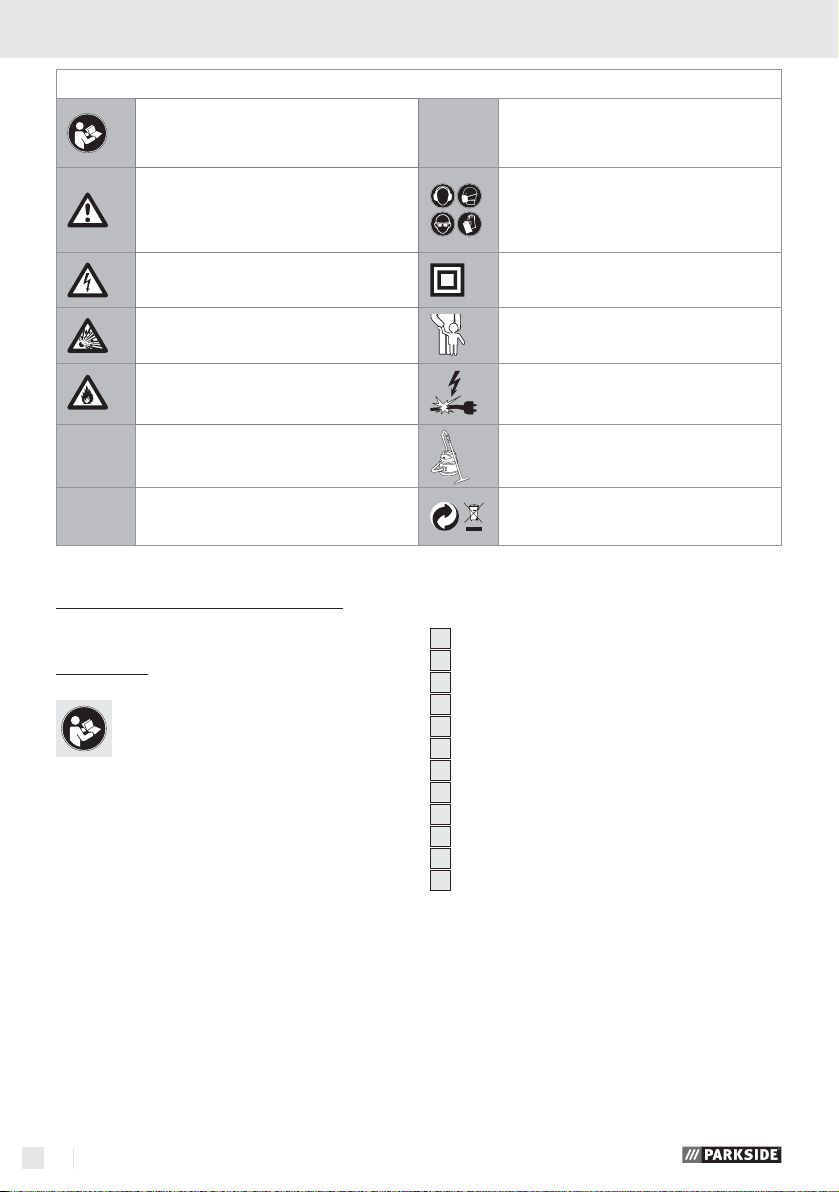
The following pictograms are used in these operating instructions / on the device:
Read instruction manual!
Observe caution and safety notes!
Caution – electric shock!
Danger to life!
Risk of explosion!
Risk of fire!
n
V
0
No load speed Dust hazard!
Volt (AC)
~
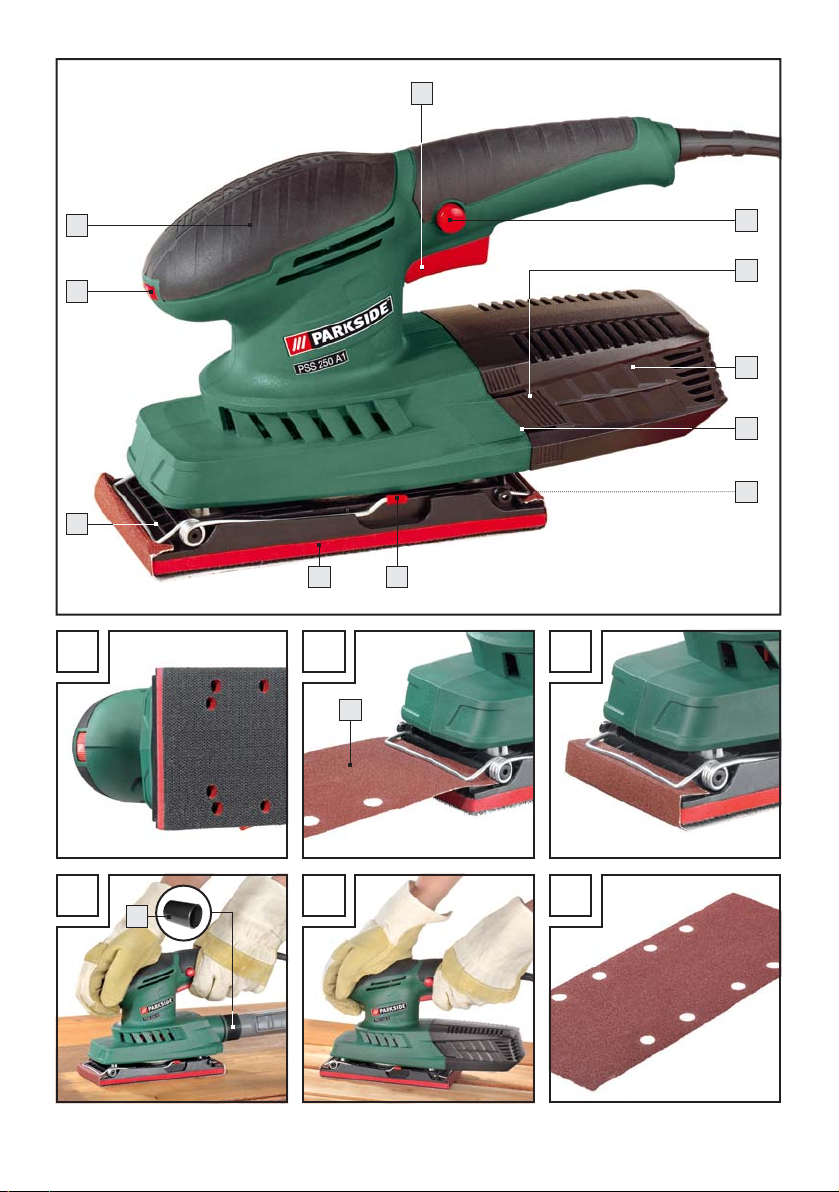
Orbital sander PSS 250 A1
Introduction
Before using the appliance for the first time
familiarize yourself with all functions of
the appliance and inform yourself about
the correct handling of electrical tools. Please read
the following operating instructions carefully. Retain
these instructions for future reference. Additionally,
pass them on to whoever might acquire the appliance at a future date.
W
1
2
3
4
5
6
7
8
9
10
11
12
Watts (Effective power)
Wear hearing protection, dust protection
mask, protective glasses and protective
gloves.
Safety class II
Keep children away from electrical
power tools!
Risk of loss of life by electric shock from
damaged mains lead or mains plug!
Dispose packaging and appliance in
an environmentally-friendly way!
Features
ON / OFF switch
Locking button for the ON / OFF switch
Release button
Dust collection box
Connection (vacuum dust extraction)
Clamping bars
Tensioning lever
Sanding plate
Sanding Pad
Oscillation speed selection
Grip surface
Reducer
Intended use
The oscillating sander is suited for dry sanding of
wood, plastics and paints. Any other use or modification is considered improper use and involves significant accident risks. The manufacturer declines to
accept responsibility for damage(s) arising out of
usage contrary to the instructions specified below.
The appliance is not meant for commercial use.
6 GB/IE
Delivery contents
1 Orbital sander PSS 250 A1
1 Sanding sheet (Grit 120), see Fig. F
1 Dust collection box
1 Reducer, see Fig. D
1 Operating manual
Introduction / General safety advice for electrical power tools
Technical Data
Nominal voltage: 230 V~ 50 Hz
Nominal power: 250 W
Idle speed: n
Idle oscillation speed: n
Sanding sheet dimensions: Hook and loop fastening
Protection class: II /
Noise and vibration data:
Measured values for noise are determined in accordance with EN 60745. The A-weighted noise level
of the electrical power tool are typically:
Sound pressure level: 79 dB(A)
Sound power level: 90 dB(A)
Uncertainty K: 3 dB
7000 - 12000 rpm
0
14000 - 24000 rpm
0
93 x 185 mm
Clamp fastening
93 x 230 mm
General safety advice for
electrical power tools
WARNING!
and instructions! Failure to observe the safety
advice and instructions may result in electric shock,
fire and / or serious injury.
Keep all the safety advice and instructions
in a safe place for future reference!
The term “electrical tool” used in the safety advice
refers to electrical tools powered by mains electricity (by means of a mains lead) and electrical tools
powered by rechargeable batteries (without a
mains lead).
Read all the safety advice
1. Workplace safety
Wear ear protection!
Evaluated acceleration, typical:
Hand / arm vibration ah = 10,2 m / s
Uncertainty K = 1,5 m / s
WARNING!
2
The vibration level given in
2
these instructions has been measured in accordance
with a standardised measurement procedure specified
in EN 60745 and can be used to compare devices.
Different uses of the device give rise to different
vibration levels and in many cases they may exceed
the values given in these instructions. It is easy to
underestimate the vibration load if the electrical power
tool is used regularly in particular circumstances.
Note: If you wish to make an accurate assessment
of the vibration loads experienced during a particular
period of working, you should also take into account
the intervening periods of time when the device is
switched off or is running but is not actually in use.
This can result in a much lower vibration load over
the whole of the period of working.
a) Keep your working area clean and
well lit. Untidy or poorly lit working areas
can lead to accidents.
b)
Do not work with the device
in potentially explosive environments in which there are
inflammable liquids, gases or dusts.
Electrical power tools create sparks, which can
ignite dusts or fumes.
c)
Keep children and other
people away while you are
operating the electrical tool.
Distractions can cause you to lose control of
the device.
2. Electrical safety
a)
The mains plug on the device must match
the mains socket. The plug must not
be modified in any way. Do not use
an adapter plug with devices fitted
with a protective earth. Unmodified
plugs and matching sockets reduce the risk of
electric shock.
b) Avoid touching earthed surfaces such
as pipes, radiators, ovens and refrigerators with any part of your body.
7 GB/IE

General safety advice for electrical power tools
There is an increased risk of electric shock if
your body is earthed
c) Keep the device away from rain or
moisture. Water entering an electrical device
increases the risk of electric shock.
d)
device, to hang up the device or to pull
e) When working outdoors with an
f) Use a residual current device (RCD)
Do not use the mains lead for
any purpose for which it was
not intended, e.g. to carry the
the mains plug out of the mains socket.
Keep the mains lead away from heat,
oil, sharp edges or moving parts of the
device. Damaged or tangled mains leads
increase the risk of electric shock.
electrical power tool always use extension cables that are also approved
for use outdoors. The use of an extension
cable suitable for outdoor use reduces the risk
of electric shock.
for protection if operating the electrical power tool in a moist environment
is unavoidable. The use of an RCD reduces
the risk of electric shock.
.
Accidents can happen if you carry the device
with your finger on the ON / OFF switch or with
the device switched on.
d) Remove any setting tools or spanners
before you switch the device on. A tool
or spanner left attached to a rotating part of a
device can lead to injury.
e) Avoid placing your body in an unnat-
ural position. Keep proper footing
and balance at all times. By doing this
you will be in a better position to control the
device in unforeseen circumstances.
f) Wear suitable clothing. Do not wear
loose clothing or jewellery. Keep your
hair, clothing and gloves clear of moving parts. Loose clothing, jewellery or long
hair can become trapped in moving parts.
g) If vacuum dust extraction and collection
devices are fitted do not forget to
that they are properly connected and
correctly used. The use of these devices
reduces the hazard presented by dust.
check
4. Careful handling and use
of electrical power tools
3. Personal safety
a) Remain alert at all times, watch what
you are doing and always proceed
with caution. Do not use the device if
you are tired or under the influence of
drugs, alcohol or medication. One mo
of carelessness when using the device can lead
to serious injury.
b)
personal protective equipment such as dust
c) Avoid unintentional operation of the
8 GB/IE
Wear personal protective
equipment and always wear
safety glasses. The wearing of
masks, non-slip safety shoes, safety helmets or
ear protectors, appropriate to the type of electrical power tool used and work undertaken,
reduces the risk of injury.
device. Check that the electrical power
tool is switched off before you connect
it to the mains, pick it up or carry it.
ment
a) Do not overload the device. Always
use an electrical power tool that is
intended for the task you are undertaking. By using the right electrical power
tool for the job you will work more safely and
achieve a better result.
Do not use an electrical power tool if
b)
its switch is defective. An electrical power
tool that can no longer be switched on and off
is dangerous and must be repaired.
c) Pull the mains plug from the socket
before you make any adjustments to
the device, change accessories or when
the device is put away. This precaution is
intended to prevent you from unintentionally
starting the device.
d) When not in use always ensure that
electrical power tools are kept out of
reach of children. Do not let anyone use
the device if he or she is not familiar
with it or has not read the instructions
General safety advice for electrical power tools
and advice. Electrical power tools are dan-
gerous when they are used by inexperienced
people.
e)
Look after the device carefully. Check
that moving parts are working properly and move freely. Check for any
parts that are broken or damaged
enough to detrimentally affect the
functioning of the device. Have damaged parts repaired before you use
the device. Many accidents have their origins
in poorly maintained electrical power tools.
f) Keep cutting tools clean and sharp.
Carefully maintained cutting tools with sharp
cutting edges are less likely to jam and are
easier to control.
g) Use the electrical power tool, accesso-
ries, inserted tools etc. in accordance
with these instructions and advice, and
the stipulations drawn up for this particular type of device. In doing this, take
into account the working conditions
and the task in hand. The use of electrical
power tools for purposes other than those intended can lead to dangerous situations.
Appliance-specific
safety Instructions
To avoid the risk of injury or fire as well
as health risks:
When working outdoors, connect the
appliance via a residual current circuit-breaker with a maximum breaking current of 30 mA.
Only use an extension cord certified
for use outdoors.
S
ecure the workpiece firmly. Use clamps /
vices to firmly hold the workpiece. It is
thus better secured than just with your hand.
In case of danger, immediately pull
the power plug from the socket.
Always run the power cord away
from the appliance to the rear.
DANGER OF FIRE FROM FLYING
SPARKS! Abrading metal creates
flying sparks. For this reason, always
make sure that nobody is placed in any danger
and that there are no inflammable materials
near the working area.
Any harmful / noxious dusts generated from
rise to dusts that are hazardous to health, the
Ensure sufficient ventilation when work-
Do not soak materials or surfaces to be
Avoid sanding of lead-based paints or
Material containing asbestos may not
The appliance is designed for dry sur-
Never work on moistened materials
Always hold the appliance firmly with
Never support your hands next to or
Always switch off the appliance and
Always pull the power plug out of the
WARNING!
sanding represent a risk to the health of the
person operating the device and to anyone
near the work area.
sander must be connected to a suitable external
dust extraction device.
Wear protective glasses and
ing on plastics, paints, lacquers, etc.
worked with liquids containing sol
other materials that are hazardous to
health.
be worked on. Asbestos is considered a
carcinogen.
face sanding of wood, plastic, metal
and smoothing compounds as well as
painted surfaces.
or wet surfaces. Water entering an electri-
cal device increases the risk of electric shock.
two hands while working (see also
Fig. D, E).
in front of the device or on the surface
being worked as there is a risk of injury in the event of slipping.
allow the sanding pad
a stop before setting down the oscillating sander.
socket for all work pauses, before any
work on the appliance (e.g. changing
the sanding paper) and when not in use.
NOXIOUS FUMES!
WARNING!
When sanding wood and in particular
when working on materials that give
DUST HAZAR
a dust mask!
9
to come to
D!
vents.
9 GB/IE
General safety advice for electrical power tools / Operation
The appliance must always be kept
clean, dry and free of oil or lubricating greases.
Original ancillaries / and
accessories
Only use accessories and tools that
are specified in the operating instructions. The use of tools and accessories other
than those recommended in the operating instructions could lead to an increased risk of
personal injury for you.
Operation
Switching On and Off
Switching on intermittent function:
Press the ON / OFF switch
Switching off intermittent function:
Release the ON / OFF switch
Switching on continuous operation :
Press the ON / OFF switch 1, hold it pressed
and press the locking button
Switching off continuous operation:
Press the ON / OFF switch 1 then release it
again.
Setting the oscillation speed
You can set the desired oscillation speed as needed with the oscillation speed selector
The required oscillation speed depends on the material being worked and can be determined through
practical tests.
Attaching a sanding pad
1
.
1
.
2
.
10
.
9
NOTE: Before attaching a new sanding pad
remove dust and dirt from the sanding plate
,
8
.
Sanding sheets with hook and loop fastening:
Fix one side of the sanding sheet
one side of the backing plate
Then attach the sanding sheet
ing plate
8
and press it firmly into place.
9
flush with
8
.
9
to the back-
Sanding sheets without hook and loop
fastening:
Open the two clamping levers
Push one end of the sanding sheet
the open clamping bar
7
.
6
and clamp the
9
under
sheet firmly in place by locking the clamping
7
lever
back in place.
Repeat this procedure at the other end.
Various materials require different grit values. You
can read which grit value is best suited for which
work in our recommendations under “Instructions, tips
and tricks”.
Vacuuming dust
WARNING!
FIRE HAZARD!
A risk of fire exists when working with
electrical appliances that have a dust
collection box
4
or can be attached to a vacuum
cleaner via an external suction adapter! Under certain conditions the sanding dust in the dust box (or
in the vacuum’s dust bag) may self-ignite, e.g. as a
result of flying sparks generated when abrading
metals or metal objects left in wood. This can happen especially if the wood dust has paint particles
on it or is mixed with other chemical substances
and the sanded material is hot after extensive working. You should therefore avoid overheating of
products being sanded as well as the appliance
and always empty the dust collection box
4
or
the dust bag of the vacuum cleaner before work
pauses.
WARNING!
Before performing work on the
appliance, always disconnect the power.
10 GB/IE
Wear a dust mask!
Operation / Maintenance and cleaning
Vacuuming dust with the dust
collection box
Attach the dust collection box:
Push the dust collection box
4
on to the device.
Remove the dust collection box:
Press the release button(s)
collection box
4
off the device.
NOTE: Always empty the dust collection box
3
and pull the dust
4
in due time and shake any remaining dust out; this
will ensure optimal vacuum performance.
Dust extraction using an external
vacuum extraction device
Connecting:
For vacuum dust removal using a vacuum
cleaner, push the suction hose of a vacuum
cleaner approved for use as a dust extraction
device (e.g. a workshop vacuum cleaner) into
the connection
5
– see Fig. D.
NOTE: If it is necessary to use the reducer
12
piece
nection
, push the reducer piece into the con-
5
.
Removing:
Pull the hose of the dust extraction device off
the connection
5
or off the reducer piece 12,
if one is used.
The following table offers some values, which are
for information only and may simplify the selection
of a sanding pad
9
.
Wood Sanding Pad / Grit
Sanding of wood 40 - 240
Pre-sanding, e.g. of
40, 60
rough, unplaned
beams and boards
Surface sanding 80, 100, 120
Fine sanding of hard
180, 240
woods
Paints / Lacquers Sanding Pad / Grit
Sanding of paint /
40 - 320
lacquer coats or
base coats such
as filler and
smoothing compound
Sanding off paint 40, 60
Sanding off primer
80, 100, 120
coats
Final sanding of base
180, 240, 320
coats before painting
Maintenance and Cleaning
Instructions, tips and tricks
Move the oscillating sander parallel, in flat
circles or alternating between lengthwise and
side-to-side motions.
Do not press down with the oscillating sander.
The sanding pads become clogged, which reduces the sanding performance.
Clean the sanding pad
9
occasionally with
the vacuum cleaner.
The removal performance and therefore the re-
sult of your work are determined by the correct
selection of the speed and sanding pad
9
grit.
Never sand different materials with the same
sanding pad
9
(e.g. wood then metal).
WARNING!
DANGER OF INJURY! Before
performing any work on the appliance, disconnect
the power plug.
Clean the appliance regularly, preferably always
immediately after use.
Do not use any sharp objects for cleaning the
appliance. Never permit fluids to permeate inside the appliance.
Use a cloth to clean the casing. Never use petrol,
solvents or cleansers that damage plastics.
A vacuum cleaner is required for thorough
cleaning of the appliance.
Ventilation openings must never be obstructed.
Remove adhering sanding dust with a brush.
11 GB/IE

Service centre / Warranty / Disposal
Service centre
The warranty for this appliance is for 3
years from the date of purchase. The appliance has been manufactured with care
and meticulously examined before delivery. Please retain your receipt as proof
of purchase. In the event of a warranty
claim, please make contact by telephone
with our Service Department. Only in this
way can a post-free despatch for your
goods be assured.
The warranty covers only claims for material and
maufacturing defects, but not for transport damage,
for wearing parts or for damage to fragile components, e.g. buttons or batteries. This product is for
private use only and is not intended for commercial
use.
WARNING!
repaired only by qualified specialist
personnel using original manufacturer
parts only. This will ensure that your device
remains safe to use.
WARNING!
lead needs to be replaced, always
have the replacement carried out by
the manufacturer or its service centre.
This will ensure that your device remains safe
to use.
Have your device
If the plug or mains
Warranty
GB
DES UK LTD
Tel.: 0871 5000 700 (£ 0.10 / minute)
e-mail: support.uk@kompernass.com
IE
Kompernass Service Ireland
Tel: 1850 930 412 (0,082 EUR/Min.)
Standard call rates apply.
Mobile operators may vary.
e-mail: support.ie@kompernass.com
Disposal
The packaging is made from environ-
mentally-friendly material and can be
disposed off at your local recycling plant.
Do not dispose of electrical
appliances in normal household
refuse!
According to European Directive 2002 / 96 / EC
for used electrical and electronic appliances and
its adoption into national laws, worn-out electrical
tools must be collected separately and subjected to
an environmentally friendly recycling procedure.
Your local communal or municipal authorities can
provide information on how to dispose of the wornout appliance.
The warranty is void in the case of abusive and improper handling, use of force and internal tampering not carried out by our authorized service branch.
Your statutory rights are not restricted in any way
by this warranty.
The warranty period will not be extended by repairs
made unter warranty. This applies also to replaced
and repaired parts. Any damage and defects extant
on purchase must be reported immediately after
unpacking the appliance, at the latest, two days after
the purchase date. Repairs made after the expiration
of the warranty period are subject to payment.
12 GB/IE

Declaration of Conformity /
Manufacturer
We, Kompernaß GmbH, the person responsible for
documents: Mr Felix Becker, Burgstr. 21, D-44867
Bochum, Germany, hereby declare that this product
complies with the following standards, normative
documents and EU directives:
Machinery Directive
(2006 / 42 / EC)
EU Low Voltage Directive
(2006 / 95 / EC)
Electromagnetic Compatibility
(2004 / 108 / EC)
Applicable harmonized standards
EN 60745-1:2009
EN 60745-2-4:2009
EN 62233:2008
EN 55014-1:2006
EN 55014-2/A2:2008
EN 61000-3-2:2006
EN 61000-3-3:2008
Declaration of Conformity / Manufacturer
IEC 60745-1:2006
IEC 60745-2-4/A1:2008
Type / Machine designation:
Orbital sander PSS 250 A1
Date of manufacture (DOM): 07 - 2010
Serial number: IAN 54381
Bochum, 31.07.2010
Hans Kompernaß
- Managing Director -
We reserve the right to make technical modifications
in the course of product development.
13 GB/IE

14

Sisällysluettelo
Aluksi
Määräystenmukainen käyttö ........................................................................................Sivu 16
Varustus .........................................................................................................................Sivu 16
Toimitukseen kuuluu ......................................................................................................Sivu 16
Tekniset tiedot ................................................................................................................Sivu 17
Sähkötyökaluja koskevat yleiset turvaohjeet
1. Työpaikkaturvallisuus ...............................................................................................Sivu 17
2.
Sähköturvallisuus ...................................................................................................... Sivu 17
3. Henkilöiden turvallisuus ............................................................................................Sivu 18
4.
Sähkötyökalujen huolellinen käsittely ja käyttö ...................................................... Sivu 18
Tasohiomakoneen laitekohtaiset turvallisuusohjeet ..................................................... Sivu 19
Alkuperäiset varaosat / lisälaitteet ............................................................................... Sivu 19
Käyttö
Päälle- ja poiskytkentä ..................................................................................................Sivu 20
Värähtelytaajuuden säätö ............................................................................................Sivu 20
Hiomapaperin kiinnittäminen .......................................................................................Sivu 20
Pölyn imeminen .............................................................................................................Sivu 20
Työskentelyohjeita, vinkkejä ja niksejä ........................................................................Sivu 21
Huolto ja puhdistus ........................................................................................... Sivu 21
Huolto...........................................................................................................................Sivu 21
Takuu ............................................................................................................................ Sivu 21
Hävittäminen ......................................................................................................... Sivu 22
Vaatimustenmukaisuusvakuutus / Valmistaja .......................... Sivu 22
15 FI
Aluksi
Tässä käyttöohjeessa / laitteessa käytetään seuraavia kuvakkeita:
Lue käyttöohje!
Huomioi varoitus- ja turvaohjeet!
Varo sähköiskua! Hengenvaara! Suojausluokka II
Räjähdysvaara! Pidä lapset loitolla sähkötyökalusta!
Palonvaara!
n
V
0
Tyhjäkäyntikierrosluku Pölyvaara!
Voltti (Vaihtojännite)
~
Tasohiomakone PSS 250 A1
Aluksi
Tutustu ennen käyttöönottoa laitteeseen,
sen käyttöohjeisiin ja sähkölaitteita kos-
keviin yleisiin turvallisuusohjeisiin. Lue
tämä käyttöopas huolella. Säilytä käyttöopas huolellisesti. Saatat myöhemmin tarvita sen tietoja. Jos
luovut laitteesta, anna uudelle omistajalle myös
kaikki laitteen asiakirjat.
Määräystenmukainen käyttö
W
1
2
3
4
5
6
7
8
9
10
11
12
Watti (Vaikutusteho)
Pidä ja kuulonsuojainta, hengitys- /
pölysuojanaamaria, suojakäsineitä ja
suojalaseja.
Tarkista, että laite, verkkojohto ja verkkopistoke ovat moitteettomassa kunnossa!
Hävitä pakkaus ja laite
ympäristöystävällisesti!
Varustus
PÄÄLLE- / POIS-kytkin
PÄÄLLE- / POIS-kytkimen lukituspainike
Avauspainike
Pölynkeruulaatikko
Liitäntä (imu)
Kiinnityslista
Kiristysvipu
Hiomalevy
Hiomapaperi
Värähtelytaajuuden esivalinta
Tarttumapinta
Supistuskappale
Tasohiomakone soveltuu puun, muovien ja maalien
kuivaan hiontaan. Kaikki muunlainen käyttö tai
muutosten teko laitteeseen on määräystenvastaista
ja voi aiheuttaa huomattavia tapaturmavaaroja.
Laitteen kaikkea muuta käyttöä tai muuttamista
pidetään ei-määräystenmukaisena ja se aiheuttaa
huomattavan onnettomuusvaaran. Valmistaja ei ota
mitään vastuuta määräystenvastaisesta käytöstä aiheutuneista vahingoista.
16 FI
Toimitukseen kuuluu
1 tasohiomakone PGG 250 A1
1 hiomapaperi (karkeus 120), katso kuva F
1 pölynkeruulaatikko
1 supistuskappale, katso kuva D
1 käyttöohje
 Loading...