

Parkside PMNF 1350 B2 Translation Of The Original Instructions
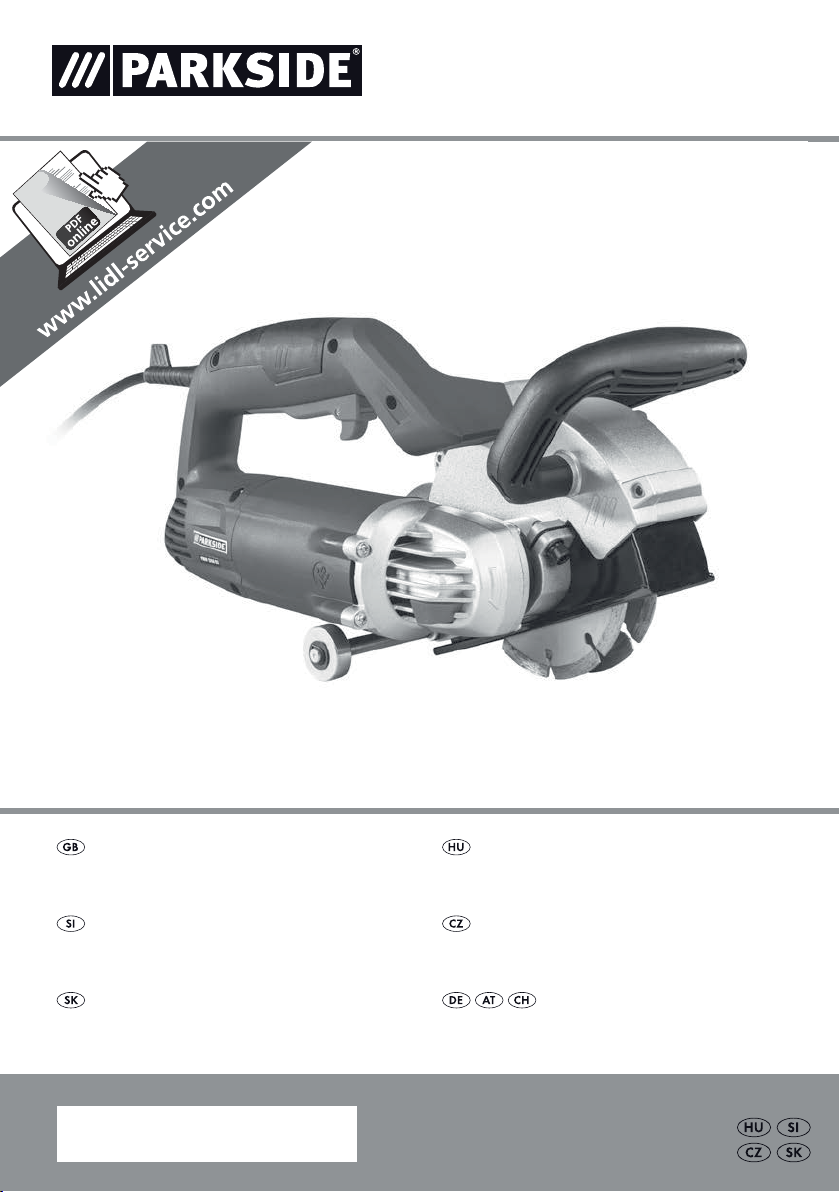
WALL CHASER PMNF 1350 B2
WALL CHASER
Translation of the original instructions
REZKALNIK ZIDNIH UTOROV
Prevod originalnega navodila za uporabo
DRÁŽKOVACIA FRÉZA DO MURIVA
Preklad originálneho návodu na obsluhu
IAN 280254
FALHORONYMARÓ
Az originál használati utasítás fordítása
DRÁŽKOVACÍ FRÉZA DO ZDIVA
Překlad originálního provozního návodu
MAUERNUTFRÄSE
Originalbetriebsanleitung

Before reading, unfold both pages containing illustrations and familiarise yourself with all functions of the
device.
Olvasás előtt kattintson az ábrákat tartalmazó mindkét oldalra és végezetül ismerje meg a készülék
mindegyik funkcióját.
Pred branjem obe strani s slikami odprite navzven in se nato seznanite z vsemi funkcijami naprave.
Před čtením si odklopte obě dvě strany s obrázky a potom se seznamte se všemi funkcemi přístroje.
Pred čítaním si odklopte obidve strany s obrázkami a potom sa oboznámte so všetkými funkciami prístroja.
Klappen Sie vor dem Lesen die beiden Seiten mit den Abbildungen aus und machen Sie sich anschließend
mit allen Funktionen des Gerätes vertraut.
GB Translation of the original instructions Page 1
HU Az originál használati utasítás fordítása Oldal 13
SI Prevod originalnega navodila za uporabo Stran 27
CZ Překlad originálního provozního návodu Strana 39
SK Preklad originálneho návodu na obsluhu Strana 51
DE / AT / CH Originalbetriebsanleitung Seite 63
0
I
A B
C D
E

14
13
17
14
13
5
F
Ok
5
17
✓
✗
G
5
14
13
14
17
Ok

Contents
Introduction ...........................................................2
Intended use ...................................................................... 2
Features ......................................................................... 2
Package contents ..................................................................2
Technical data .................................................................... 2
General Power Tool Safety Warnings .....................................3
1. Work area safety ................................................................ 3
2. Electrical safety ................................................................. 3
3. Personal safety .................................................................. 3
4. Power tool use and care .......................................................... 4
5. Service ........................................................................ 4
Safety instructions for abrasive cutting appliances ......................................... 4
Further safety instructions for abrasive cutting applications .................................. 6
Supplementary notes ............................................................... 7
Original accessories/auxiliary equipment ...............................................7
Before use ............................................................7
Setting the cut width of the diamond cutting discs ......................................... 7
Replacing the diamond cutting discs (see Figures A - F) .....................................8
Setting the groove depth ............................................................ 8
Attaching the dust extraction adapter .................................................. 8
Operation ............................................................8
Switching on and off ...............................................................8
Handling the wall grinder. . . . . . . . . . . . . . . . . . . . . . . . . . . . . . . . . . . . . . . . . . . . . . . . . . . . . . . . . . . . 9
Maintenance and cleaning ...............................................9
Disposal ..............................................................9
Kompernass Handels GmbH warranty ...................................10
Service ..............................................................11
Importer ............................................................11
Translation of the original Conformity Declaration ..........................11
PMNF 1350 B2
GB │ 1 ■

WALL CHASER PMNF 1350 B2
Introduction
Congratulations on the purchase of your new appliance. You have selected a high-quality product. The
operating instructions are part of this product. They
contain important information on safety, usage and
disposal. Before using the product, familiarise yourself with all handling and safety guidelines. Use the
product only as described and for the range of applications specified. Please also pass these operating
instructions on to any future owner.
Intended use
The wall grinder (standard nomenclature: abrasive
cutting appliance), hereinafter referred to as the
appliance, is designed for making cuts or slits
(without the use of water) in firmly supported and
primarily mineral materials such as concrete or masonry, using the guide carriage and in combination
with an approved industrial dust extractor. Any
other usage of or modification to the appliance
is deemed to be improper and carries the risk of
serious personal injury. Not for commercial use.
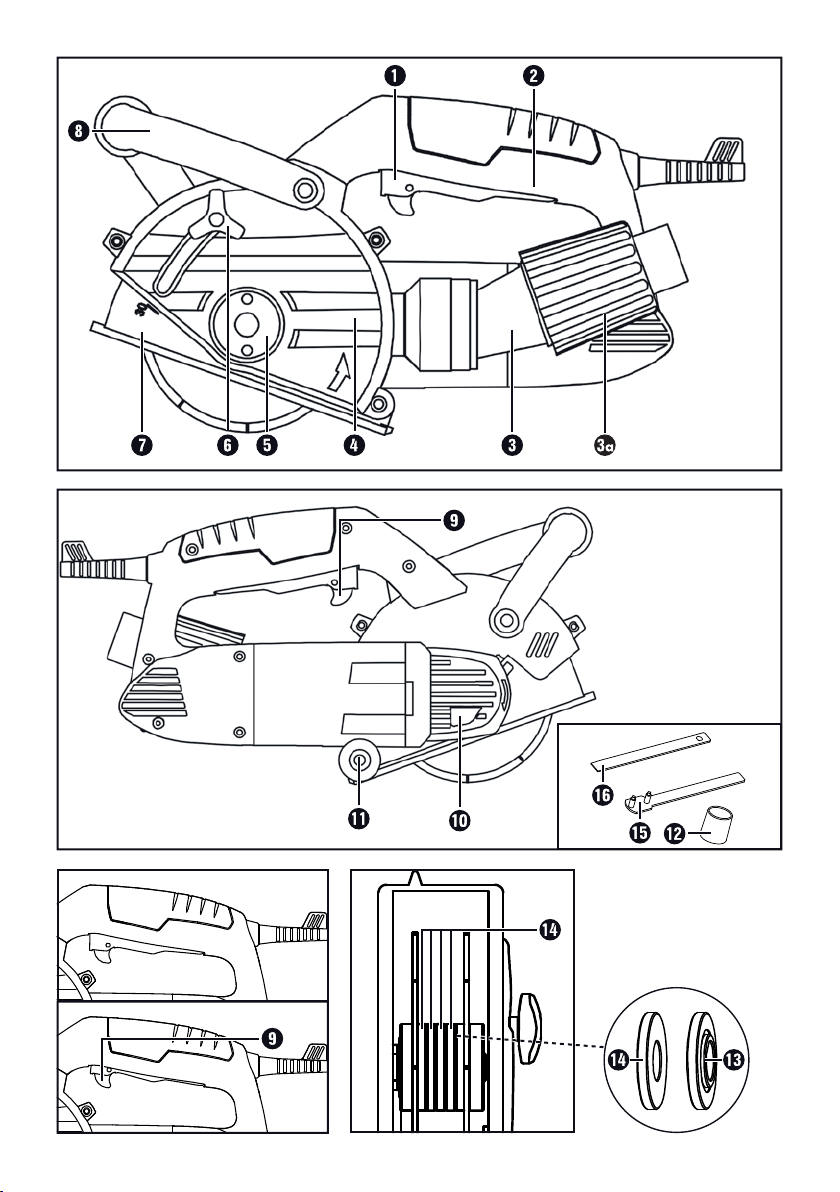
Features
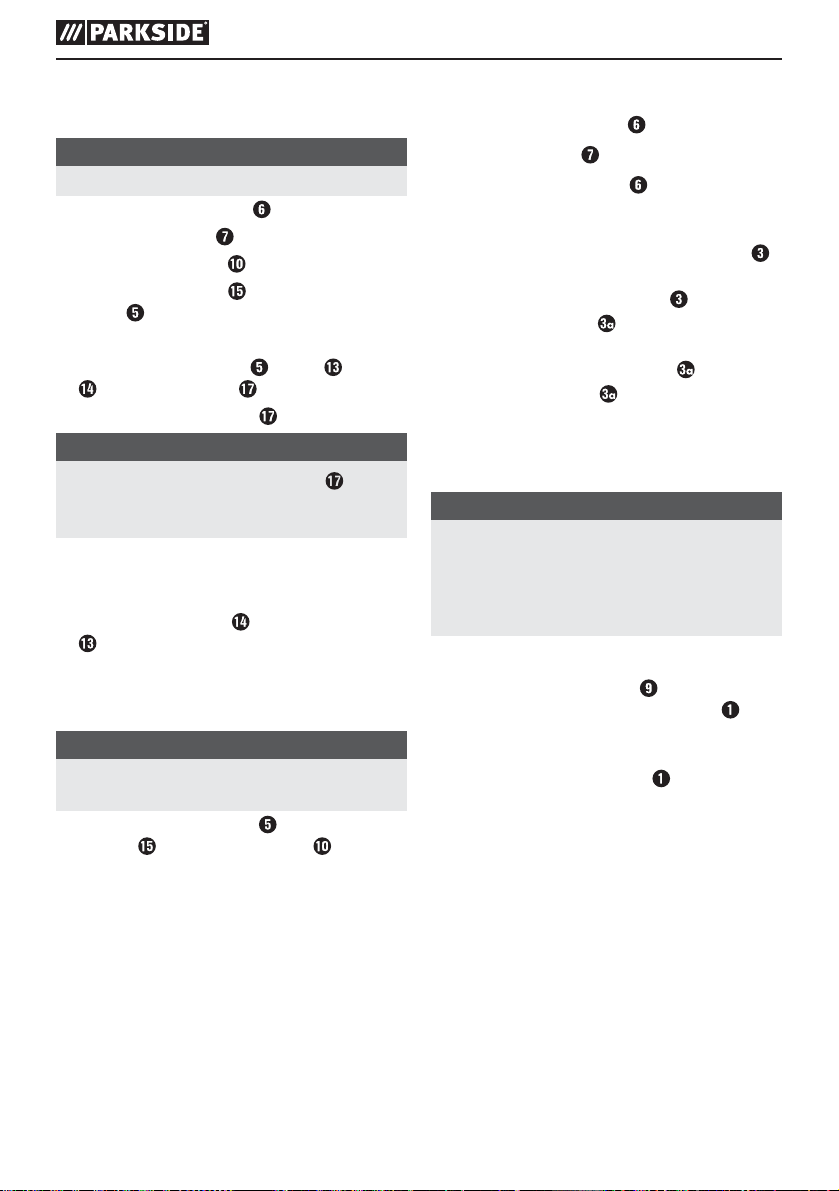
ON/OFF switch
Handle
Dust extraction adapter
Union nut
Blade guard
Locking flange (with thread)
Locking screw for the depth stop
Depth stop
Additional handle
Safety lock-out
Spindle lock
Roller
Reducer
Flange
Blotters
Face spanner
Hand chisel
Backing flange
Package contents
1 wall chaser
2 cutting discs (pre-fitted)
1 face spanner
1 dust extraction adapter (pre-fitted)
1 reducer (for use with the dust extraction adapter
and a dust extractor hose of ∅ 32 mm)
1 hand chisel
1 operating manual
Technical data
Input voltage: 230 V ~ 50 Hz
(alternating current)
Power consumption: 1350 W
Rated speed: n 9000 rpm
Disc sizes Ø: 125 mm
Central fixing bore: 22.23 mm
Groove depth: 0–30 mm
Groove widths: min. 8mm to max. 26mm
Thread: M14
Protection class: II /
Weight: approx. 4 kg
Noise and vibration data:
The noise and vibration values have been
determined in accordance with EN60745.
Sound pressure level L
Uncertainty KpA: 3 dB
Sound power level L
WA
Uncertainty KWA: 3 dB
Total vibration values (vector total of three directions) determined in accordance with EN 60745.
Details of vibration values (when cutting off a
concrete plate):
Main handle: ah = 5.450 m/s
Uncertainty K = 1.5 m/s
Auxiliary handle: ah = 4.737 m/s
Uncertainty K = 1.5 m/s
(double insulation)
: 98.0 dB(A)
pA
: 109.0 dB(A)
2
2
2
2
■ 2 │ GB
PMNF 1350 B2

NOTE
► The vibration level specified in these instruc-
tions has been measured in accordance with
a standardised measuring procedure specified
in EN 60745 and can be used to make equipment comparisons. The specified vibration
emission value can also be used to make an
initial exposure estimate.
WARNING!
► The vibration level varies in accordance with
the use of the power tool and may be higher
than the value specified in these instructions
in some cases. There is a risk of underestimation of the vibration load if the power tool is
used regularly in this manner. Try to keep the
vibration loads as low as possible. Measures
to reduce the vibration load are, e.g. wearing
gloves and limiting the working time. Wherein
all states of operation must be included (e.g.
times when the power tool is switched off and
times where the power tool is switched on but
running without load).
General Power Tool
Safety Warnings
WARNING!
► Read all safety warnings and all instruc-
tions. Failure to follow the warnings and
instructions may result in electric shock, fire
and/or serious injury.
Save all warnings and instructions for future
reference.
The term "power tool" in the warnings refers to your
mains-operated (corded) power tool or battery-operated (cordless) power tool.
1. Work area safety
a) Keep work area clean and well lit. Cluttered
or dark areas invite accidents.
b) Do not operate power tools in explosive
atmospheres, such as in the presence of
flammable liquids, gases or dust. Power tools
create sparks which may ignite the dust or
fumes.
c) Keep children and bystanders away while
operating a power tool. Distractions can cause
you to lose control.
2. Electrical safety
a) Power tool plugs must match the outlet.
Never modify the plug in any way.
Do not use any adapter plugs with earthed
(grounded) power tools. Unmodified plugs
and matching outlets will reduce risk of electric
shock.
b) Avoid body contact with earthed or grounded
surfaces, such as pipes, radiators, cookers and
refrigerators. There is an increased risk of elec-
tric shock if your body is earthed or grounded.
c) Do not expose power tools to rain or wet
conditions. Water entering a power tool will
increase the risk of electric shock.
d) Do not abuse the cord. Never use the cord
for carrying, pulling or unplugging the power
tool. Keep cord away from heat, oil, sharp
edges or moving parts. Damaged or entangled
cords increase the risk of electric shock.
e) When operating a power tool outdoors, use
an extension cord suitable for outdoor use.
Use of a cord suitable for outdoor use reduces
the risk of electric shock.
f) If operating a power tool in a damp location
is unavoidable, use a residual current device
(RCD) protected supply. Use of an RCD reduc-
es the risk of electric shock.
3. Personal safety
a) Stay alert, watch what you are doing and
use common sense when operating a power
tool. Do not use a power tool while you are
tired or under the influence of drugs, alcohol
or medication. A moment of inattention while
operating power tools may result in serious
personal injury.
b) Use personal protective equipment. Always
wear eye protection. Protective equipment such
as dust mask, non-skid safety shoes, hard hat,
or hearing protection used for appropriate
conditions will reduce personal injuries.
PMNF 1350 B2
GB │ 3 ■

c) Prevent unintentional starting. Ensure the
switch is in the off-position before connecting
to power source and/or battery pack, picking
up or carrying the tool. Carrying power tools
with your finger on the switch or energising
power tools that have the switch on invites
accidents.
d) Remove any adjusting key or wrench before
turning the power tool on. A wrench or a key
left attached to a rotating part of the power tool
may result in personal injury.
e) Do not overreach. Keep proper footing and
balance at all times. This enables better control
of the power tool in unexpected situations.
f) Dress properly. Do not wear loose clothing or
jewellery. Keep your hair, clothing and gloves
away from moving parts. Loose clothes, jew-
ellery or long hair can be caught in moving
parts.
g) If devices are provided for the connection of
dust extraction and collection facilities, ensure
these are connected and properly used.
Use of dust collection can reduce dust-related
hazards.
4. Power tool use and care
a) Do not force the power tool. Use the correct
power tool for your application. The correct
power tool will do the job better and safer at
the rate for which it was designed.
b) Do not use the power tool if the switch does
not turn it on and off. Any power tool that cannot be controlled with the switch is dangerous
and must be repaired.
c) Disconnect the plug from the power source
and/or the battery pack from the power tool
before making any adjustments, changing
accessories, or storing power tools. Such
preventive safety measures reduce the risk of
starting the power tool accidentally.
d) Store idle power tools out of the reach of
children and do not allow persons unfamiliar
with the power tool or these instructions to
operate the power tool. Power tools are
dangerous in the hands of untrained users.
e) Maintain power tools. Check for misalignment
or binding of moving parts, breakage of parts
and any other condition that may affect the
power tool’s operation. If damaged, have the
power tool repaired before use. Many acci-
dents are caused by poorly maintained power
tools.
f) Keep cutting tools sharp and clean. Properly
maintained cutting tools with sharp cutting edges
are less likely to bind and are easier to control.
g) Use the power tool, accessories and tool bits
etc. in accordance with these instructions, taking into account the working conditions and
the work to be performed. Use of the power
tool for operations different from those intended
could result in a hazardous situation.
5. Service
a) Have your power tool serviced by a qualified
repair person using only identical replacement
parts. This will ensure that the safety of the
power tool is maintained.
Safety instructions for abrasive
cutting appliances
a) The blade guard, which is a part of the power
tool, must be attached securely and set in a
way that ensures maximum safety, i.e. the
smallest possible amount of the grinding tool
is exposed to the operator. Ensure that you
and anyone else in the vicinity remain outside
of the range of the rotating grinding disc. The
blade guard is designed to protect the operator
from fragments and accidental contact with the
grinding tool.
b) Use only diamond-coated cutting discs for
your power tool. Just because you can attach
the accessories to your power tool, does not
ensure they are safe to use.
c) The maximum speed of the accessory tool
used must be at least as high as the maximum
speed specified for the power tool. Accessories
which rotate faster than the maximum permissible
rate can break and throw pieces into the air.
■ 4 │ GB
PMNF 1350 B2

d) Grinding tools should only be used for the
recommended applications. For example:
Never grind with the side surface of a cutting
disc. Cutting discs are designed to remove
material with the edge of the disc. Any lateral
application of force on these grinding tools can
lead to breakage.
e) Always use an undamaged clamping flange
of the correct size and shape for the selected
grinding disc. Suitable flanges support the
grinding disc and reduce the risk of disc breakage.
f) The external diameter and thickness of the
accessory tool used must comply with the
dimensions of your power tool. Incorrectly
dimensioned accessory tools cannot be sufficiently shielded or controlled.
g) Grinding discs and flanges must fit precisely
onto the grinding spindle of your power tool.
Accessory tools which do not fit precisely on
the grinding spindle of the power tool will rotate
unevenly, vibrate severely and can lead to a
loss of control.
h) Do not use damaged grinding discs. Check
the grinding discs before each use for chips
and cracks. If the power tool or grinding disc
is dropped, check to see if it either are damaged, or use an undamaged grinding disc.
After checking and inserting the grinding
disc, ensure that you and any other people
in the vicinity remain outside of the range of
the rotating grinding disc, and allow the tool
to rotate at maximum speed for one minute.
Damaged grinding discs usually break during
this test period.
i) Wear personal protective equipment.
Depending on the application, ensure that
you use full face protection, eye protection
or goggles. If required, use a dust mask, ear
protectors, protective gloves or special apron
to protect you from grindings and material
particles. Eyes should be protected from flying
debris that may be generated during certain
applications. Dust or filter masks must filter
any dust created by the application. If you are
exposed to loud noise for any length of time,
you can suffer a hearing loss.
j) Ensure that other people remain at a safe dis-
tance to your workspace. Anyone who enters
the workspace must wear personal protective
equipment. Fragments of the workpiece or bro-
ken accessory tools can fly off and cause injury
– even outside the immediate working area.
k) Hold power tool by the insulated gripping
surfaces, when performing an operation
where the accessory tool may contact hidden
wiring or its own cord. Contact with a "live"
wire may make exposed metal parts of the power tool "live" and could give the operator an
electric shock.
l) Keep the power cord away from any rotating
accessories. If you lose control of the appliance,
the cord may get cut or caught and your hand or
arm could get caught in the rotating accessory
tool.
m) Never put the power tool down until the acces-
sory tool has come to a complete standstill.
The rotating accessory tool could come into
contact with the surface and cause you to lose
control of the power tool.
n) Do not leave the power tool running whilst
carrying it. Accidental contact between your
clothing and the rotating accessory tool could
cause your clothing to get caught and the accessory tool to penetrate a part of your body.
o) Clean the ventilation slits of your power tool
regularly. The engine fan draws dust into the
housing and a strong accumulation of metal
dust can cause electrical hazards.
p) Do not use the power tool in the vicinity of
flammable materials. Sparks can ignite such
materials.
q) Do not use any accessory tools which require
liquid coolant. The use of water or other liquid
coolants may lead to electric shock.
PMNF 1350 B2
GB │ 5 ■

Further safety instructions for
abrasive cutting applications
Kickback and corresponding safety instructions
Kickback - causes and corresponding safety
instructions
▯ Kickback is a sudden reaction caused when a
rotating grinding disc catches or jams. Catching
or jamming causes the rotating accessory tool
to stop abruptly. If this happens, an uncontrolled
power tool turns rapidly against the direction
of rotation of the accessory tool caught in the
blockage.
▯ If, for example, a grinding disc catches or jams,
the edge of the grinding disc that is projecting
into the workpiece can get caught and break
off the grinding disc or cause a kickback. The
grinding disc can then fly in the direction of the
operator or away from him, depending on the
direction of rotation of the disc at the blockage.
This can also break grinding discs.
A kickback is caused by incorrect use or misuse
of the power tool. This can be avoided by taking
proper precautions as given below.
a) Hold the power tool firmly in both hands and
position your arms so they can absorb the
force of a kickback. Always use the additional
handle, if available, so you have the maximum
control over the kickback force or reaction
torques at full speed. By taking adequate pre-
cautions, the operator can stay in control of the
kickback and reaction torques.
b) Never hold your hand close to a rotating
accessory tool. The accessory tool could hit
your hand in the case of a kickback.
c) Avoid the area in front of and behind the rotat-
ing cutting disc. The kickback will force the power
tool in the opposite direction to the direction of
rotation of the grinding disc at the blockage.
d) Take special care when working around
corners, sharp edges, etc. Avoid allowing
the accessory tool to bounce back from the
workpiece or jam. The rotating accessory tool
is more likely to jam in corners or sharp edges
or if it bounces. This can cause a loss of control
or kickback.
e) Do not use a toothed or chain saw blade or
segmented diamond-coated disc with more
than 10 mm wide slits. Such accessory tools
cause a kickback or loss of control over the
power tool.
f) Avoid cutting disc jams or excessive contact
pressure. Do not make any excessively deep
cuts. Overloading the cutting disc increases the
stress and likelihood of tilting or jamming and
thus the possibility of kickback or breakage of
the grinding tool.
g) If the cutting disc jams or you stop working,
switch the tool off and hold it steady until the
disc has completely stopped turning. Never
attempt to pull a rotating cutting disc out of a
cut. This could lead to kickback. Identify and
remove the cause of the jam.
h) Do not switch the power tool back on as long
as it is in the workpiece. Allow the cutting disc
to reach its full speed before you carefully
continue the cut. Otherwise, the disc may jam,
jump out of the workpiece or cause kickback.
i) Support panels or large workpieces to reduce
the risk of the cutting disc jamming and causing
a kickback. Large workpieces can bend under
their own weight. The workpiece must be supported on both sides, namely in the vicinity of
the cut and also at the edge.
j) Be particularly careful when making "pocket
cuts" into existing walls or other obscured
areas. The inserted cutting disc may cut into
gas or water pipes, electrical wiring or other
objects that can cause kickback.
■ 6 │ GB
PMNF 1350 B2
Supplementary notes
Before use
Approved cutting disc designs:
segmented diamond-coated discs with slits
between the segments with a maximum size
of 10 mm and a negative cutting angle:
Disc diameter: 125 mm
Disc thickness: 2.1 mm
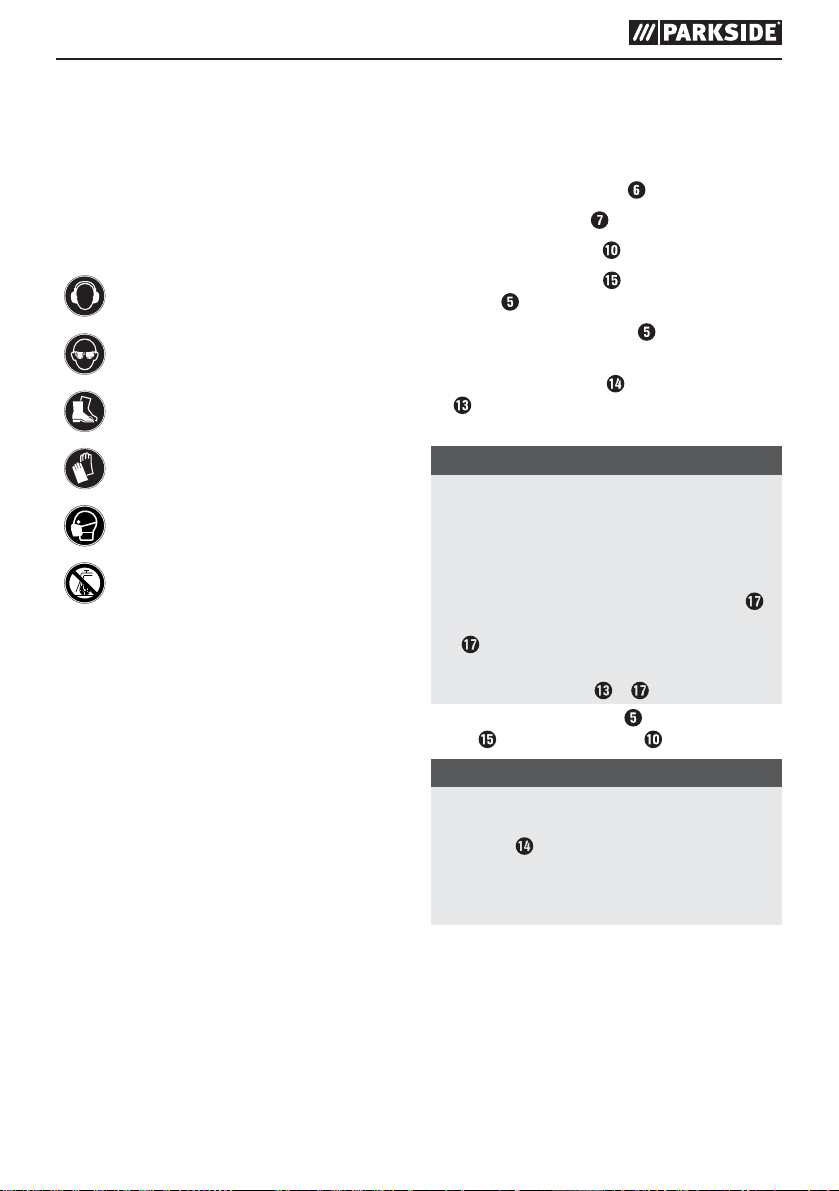
Wear hearing protection!
Wear safety goggles!
Wear safety shoes!
Wear protective gloves!
Wear a dust mask!
Not approved for wet grinding!
Original accessories/auxiliary
equipment
■ Only use the accessories and additional equip-
ment that are specified in the operating instructions and are compatible with the appliance.
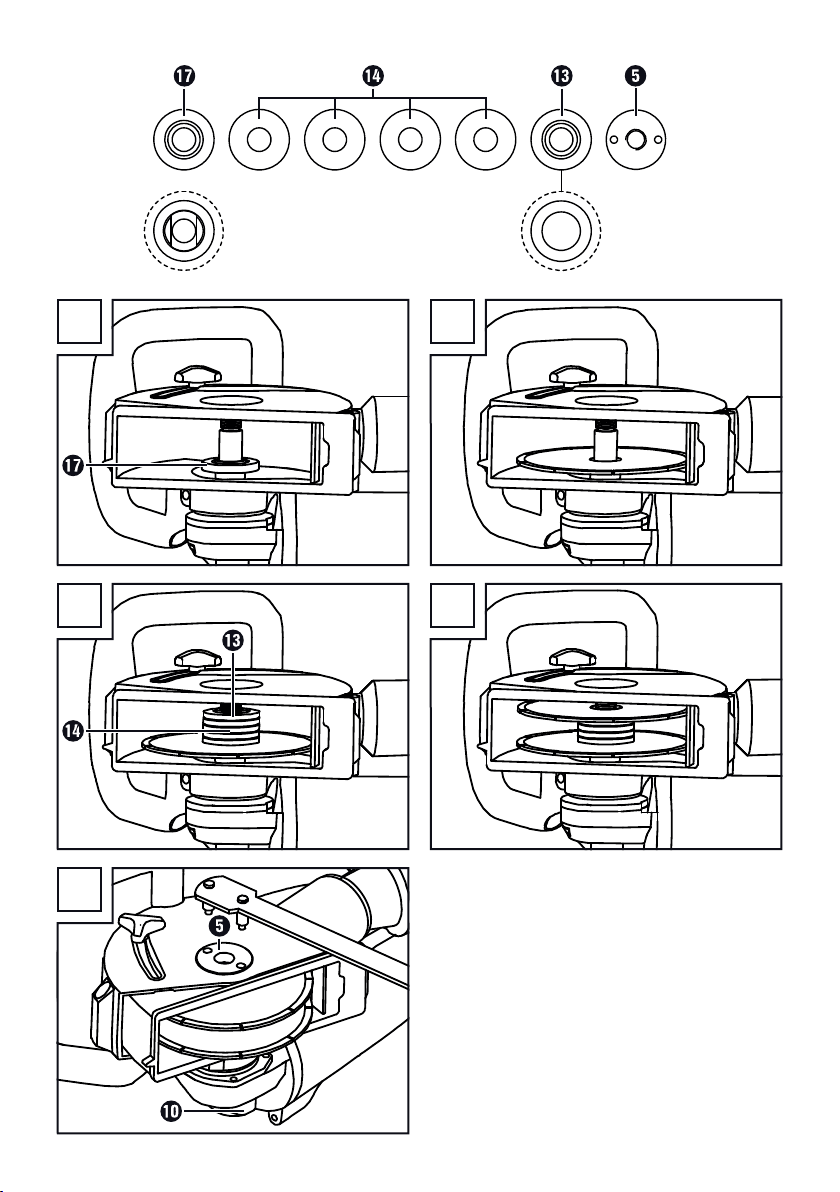
Setting the cut width of the diamond
cutting discs
♦ Loosen the locking screw .
♦ Push the depth stop
♦ Press the spindle lock
♦ Use the face spanner
flange .
♦ Remove the locking flange
♦ Set the desired cut width in accordance with
the number of blotters
is set in place as the top intermediate layer
(see fig. F).
NOTE
► There are several spacer washers available
for you. Ensure that the groove width is the total
of the spacer washers between the diamond
cutting discs and the thickness of the cutting
discs.
► Please make sure that the backing flange
is fixed well on the shaft. The backing flange
must rotate with shaft.
► Please make sure that diamond disc fixed
well on the flanges
♦ Tighten the locking flange
ner . Press the spindle lock while doing this.
NOTE
► When setting a cut width that is smaller than
the maximum cut width, you must use the
blotters
the cutting discs since the fixing flange cannot
fix the discs alone on the spindle due to the
thread length (see fig. G).
on the fixing flange side for fixing
upwards.
and hold it down.
to loosen the locking
.
. Ensure that the flange
+ .
using the face span-
PMNF 1350 B2
GB │ 7 ■
Replacing the diamond cutting discs
(see Figures A - F)
NOTE
► Replace diamond cutting discs only in pairs.
♦ Loosen the locking screw
♦ Push the depth stop
♦ Press the spindle lock and hold it down.
♦ Use the face spanner
flange
♦ Take off all removable parts from the spindle.
♦ Clean the locking flange
♦ Attach the backing flange
NOTE
► Make sure that the backing flange
♦ Attach the first diamond cutting disc (see
Fig. B).
♦ Set the desired cut width in accordance with
the number of blotters
and F).
♦ Attach the second diamond cutting disc
(see Fig. D).
NOTE
► Make sure that the cutting discs are correctly
♦ Tighten the locking flange
spanner . Press the spindle lock while
doing this (see Fig. E).
.
and backing flange thoroughly.
correctly attached by ensuring that it rotates
together with the spindle.
is set in place as the top blotter (see Fig. C
attached to the flanges.
.
upwards.
to loosen the locking
, flange , blotters
(see Fig. A).
is
. Ensure that the flange
using the face
Setting the groove depth
♦ Loosen the locking screw .
♦ Set the depth stop
♦ Tighten the locking screw
to the desired depth.
.
Attaching the dust extraction adapter
♦ Push the pins of the dust extraction adapter
into the recesses on the dust extraction connector.
♦ Lock the dust extraction adapter
♦ Loosen the union nut
♦ Push the pipe of the extraction device far enough
into the opening on the union nut
♦ Tighten the union nut
.
fully.
by turning it.
.
Operation
Switching on and off
NOTE
► Always switch the appliance on before making
contact with the material, then apply it to the
workpiece. The wall grinder is equipped with
an electronic smooth start. The motor starts
with a delay.
Switching the appliance on:
♦ Activate the safety lock-out
page). Then press the ON/OFF switch .
Switching the appliance off:
♦ Release the ON/OFF switch
(see fold-out
.
■ 8 │ GB
PMNF 1350 B2
Handling the wall grinder
CAUTION!
► This appliance is designed for dry cutting only!
♦ Use a service line detector to check the internal
and external walls for concealed power, gas and
water supply lines before using the wall chaser.
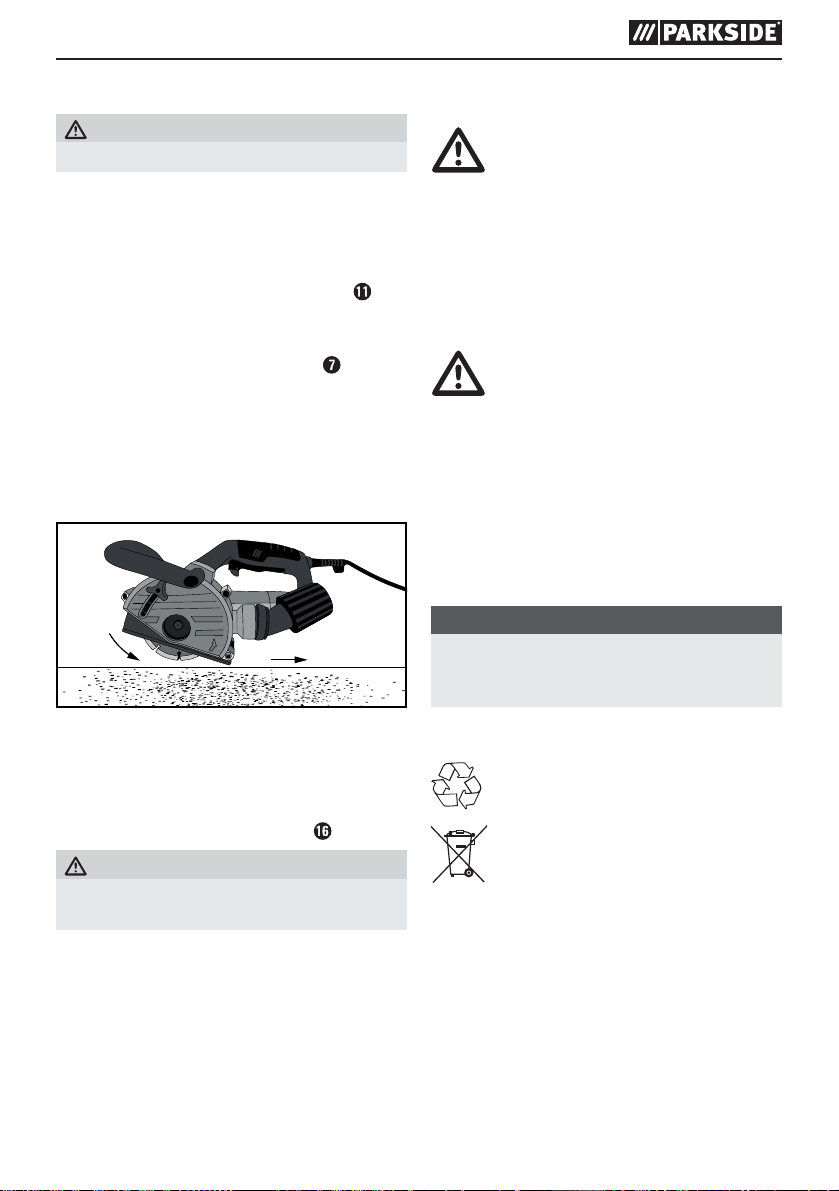
♦ Select the desired groove width.
♦ 1.) Position the appliance with the roller
against the brick wall.
♦ 2.) Now switch the appliance on and plunge
it into the masonry until the stop
contact.
♦ 3.) Then mill the groove in the masonry; pay
attention to the milling direction. The appliance must always run in reverse rotation.
Otherwise the appliance could be pushed
out of the cut in an uncontrolled manner.
2
1
makes
3
Maintenance and cleaning
WARNING! RISK OF INJURY! Switch
the appliance off and remove the
power plug before commencing
any work to the appliance.
■ The appliance must always be kept clean, dry
and free from oil or grease.
■ Use a soft, dry cloth to clean the housing.
Never use petrol, solvents or cleansers which
can damage plastic.
WARNING! If the connecting cable
needs to be replaced, this must be
carried out by the manufacturer or
an authorised representative in order
to avoid safety hazards.
■ Grinding tools are to be treated with care and
transported carefully. Grinding tools should be
stored in such a way that they are not exposed
to mechanical damage or harmful environmental
influences.
■ Never allow liquids to get into the appliance.
NOTE
► Replacement parts not listed (such as carbon
brushes, switch) can be ordered via our
service hotline.
♦ At the end of the groove, swivel the appliance
out of the groove and only then switch the
appliance off.
♦ Now break out the resulting bar between the
two grooves using the hand chisel
CAUTION!
► Materials containing asbestos must not be
machined!
.
PMNF 1350 B2
Disposal
The packaging is made from environmen-
tally friendly material and can be
disposed off at your local recycling plant.
Do not dispose of power tools in
European Directive 2012/19/EU requires that
worn-out power tools be collected separately and
recycled in an environmentally compatible manner.
Please consult your local authorities regarding
suitable disposal of worn out power tools.
your normal household waste!
GB │ 9 ■

Kompernass Handels GmbH
warranty
Dear Customer,
This appliance has a 3-year warranty valid from
the date of purchase. If this product has any faults,
you, the buyer, have certain statutory rights. Your
statutory rights are not restricted in any way by the
warranty described below.
Warranty conditions
The validity period of the warranty starts from the
date of purchase. Please keep your original receipt
in a safe place. This document will be required as
proof of purchase.
If any material or production fault occurs within
three years of the date of purchase of the product,
we will either repair or replace the product for you
at our discretion. This warranty service is dependent
on you presenting the defective appliance and
the proof of purchase (receipt) and a short written
description of the fault and its time of occurrence.
If the defect is covered by the warranty, your product
will either be repaired or replaced by us. The repair
or replacement of a product does not signify the
beginning of a new warranty period.
Warranty period and statutory claims for
defects
The warranty period is not prolonged by repairs
effected under the warranty. This also applies to
replaced and repaired components. Any damage
and defects present at the time of purchase must
be reported immediately after unpacking. Repairs
carried out after expiry of the warranty period shall
be subject to a fee.
Scope of the warranty
This appliance has been manufactured in accordance
with strict quality guidelines and inspected meticulously prior to delivery.
The warranty covers material faults or production
faults. The warranty does not extend to product parts
subject to normal wear and tear or fragile parts such
as switches, batteries, baking moulds or parts made
of glass.
The warranty does not apply if the product has been
damaged, improperly used or improperly maintained.
The directions in the operating instructions for the
product regarding proper use of the product are
to be strictly followed. Uses and actions that are
discouraged in the operating instructions or which
are warned against must be avoided.
This product is intended solely for private use and
not for commercial purposes. The warranty shall be
deemed void in cases of misuse or improper handling,
use of force and modifications/repairs which have
not been carried out by one of our authorised
Service centres.
Warranty claim procedure
To ensure quick processing of your case, please
observe the following instructions:
■ Please have the till receipt and the item number
(e.g. IAN 12345) available as proof of purchase.
■ You will find the item number on the type plate,
an engraving on the front page of the instructions
(bottom left), or as a sticker on the rear or
bottom of the appliance.
■ If functional or other defects occur, please
contact the service department listed either by
telephone or by e-mail.
■ You can return a defective product to us free of
charge to the service address that will be provided
to you. Ensure that you enclose the proof of
purchase (till receipt) and information about
what the defect is and when it occurred.
■ 10 │ GB
You can download these instructions
along with many other manuals,
product videos and software on
www.lidl-service.com.
PMNF 1350 B2
Service
WARNING!
■ Have the power tool repaired by the service
centre or a qualified electrician and only
using genuine replacement parts. This will
ensure that the safety of the appliance is
maintained.
WARNING!
■ Always ensure that the power plug or
the mains cable is replaced only by the
manufacturer of the appliance or by an
approved customer service provider. This
will ensure that the safety of the appliance is
maintained.
NOTE
► Replacement parts not listed (such as carbon
brushes, switches) can be ordered via our
service hotline.
Service Great Britain
Tel.: 0871 5000 720 (£ 0.10/Min.)
E-Mail: kompernass@lidl.co.uk
IAN 280254
Importer
Please note that the following address is not the
service address. Please use the service address
provided in the operating instructions.
KOMPERNASS HANDELS GMBH
BURGSTRASSE 21
44867 BOCHUM
GERMANY
www.kompernass.com
Translation of the original
Conformity Declaration
We, KOMPERNASS HANDELS GMBH, documents officer: Mr. Semi Uguzlu, BURGSTR. 21,
44867 BOCHUM, GERMANY, hereby declare that
this product complies with the following standards,
normative documents and EC directives:
Machinery Directive
(2006/42/EC)
EMC (Electromagnetic Compatibility)
(2014/30/EU)
RoHS Directive
(2011/65/EU)*
*The manufacturer is solely responsible for issuance of
the declaration of conformity. The object of the declaration described above is in conformity with Directive
2011/65/EU of the European Parliament and of the
Council of 8 June 2011 on the restriction of use of
certain hazardous substances in electrical and electronic
equipment.
Applied harmonised standards:
EN 60745-1:2009/A11:2010
EN 60745-2-22:2011/A11:2013
EN 55014-1:2006/A2: 2011
EN 55014-2:2015
EN 61000-3-2:2014
EN 61000-3-3:2013
Type designation of machine:
Wall chaser PMNF 1350 B2
Year of manufacture: 08 - 2016
Serial number: IAN 280254
Bochum, 06/09/2016
Semi Uguzlu
- Quality Manager The right to effect technical changes in the context
of further development is reserved.
PMNF 1350 B2
GB │ 11 ■

■ 12 │ GB
PMNF 1350 B2

Tartalomjegyzék
Bevezető .......................................................14
Rendeltetésszerű használat ................................................... 14
Felszereltség ............................................................... 14
A csomag tartalma .......................................................... 14
Műszaki adatok ............................................................14
Általános biztonsági előírások elektromos kéziszerszámokhoz ..........15
1. A munkaterület biztonsága .................................................15
2. Elektromos biztonság ......................................................15
3. Személyi biztonság ....................................................... 16
4. Az elektromos kéziszerszám használata és kezelése ............................. 16
5. Szerviz .................................................................17
A vágókorongos csiszolóval kapcsolatos biztonsági utasítások ........................ 17
A vágással kapcsolatos további biztonsági utasítások ...............................18
Kiegészítő utasítások ........................................................19
Eredeti tartozékok / kiegészítő eszközök .........................................19
Üzembe helyezés előtt ............................................20
A gyémánt vágókorongok vágási szélességének beállítása ..........................20
Gyémánt vágókorongok cseréje (lásd az A-F ábrákat) ..............................20
Horonymélység beállítása .................................................... 20
A porelszívó adapter felszerelése ..............................................21
Használat ......................................................21
Be- / kikapcsolás ........................................................... 21
A falhoronymaró használata ..................................................21
Karbantartás és tisztítás ..........................................22
Ártalmatlanítás ..................................................22
JÓTÁLLÁSI TÁJÉKOZTATÓ ..........................................23
Szerviz .........................................................25
Gyártja ........................................................25
Az eredeti megfelelőségi nyilatkozat fordítása .......................25
PMNF 1350 B2
HU │ 13 ■
FALHORONYMARÓ
PMNF 1350 B2
Bevezető
Gratulálunk új készüléke megvásárlásához.
Vásárlásával kiváló minőségű termék mellett döntött. A használati útmutató a termék része. Fontos
tudnivalókat tartalmaz a biztonságra, használatra
és ártalmatlanításra vonatkozóan. A termék használata előtt ismerkedjen meg valamennyi használati útmutatóval és biztonsági figyelmeztetéssel. Csak
a leírtak szerint és a megadott célokra használja
a készüléket. A készülék harmadik személynek
történő továbbadása esetén adja át a készülékhez
tartozó valamennyi leírást is.
Rendeltetésszerű használat
A falhoronymaró (más néven vágó-csiszoló gép)
- a továbbiakban készülék - vezetőszános stabil
felfekvéssel és engedélyezett ipari porszívóhoz
csatlakoztatva, elsősorban ásványi alapanyagok
(pl. beton vagy falazat) víz nélküli leválasztására
vagy bevágására használható. Minden egyéb
felhasználási mód vagy a gép módosítása rendeltetésellenesnek minősül és jelentős balesetveszélyt
rejt magában. A gép nem ipari használatra készült.
Felszereltség
BE/KI kapcsoló
markolat
porelszívó adapter
hollandi anya
védőburkolat
szorítókarima (menetes)
rögzítőcsavar a mélységütközőhöz
mélységütköző
pótmarkolat
kapcsolózár
orsóretesz
futógörgő
szűkítőelem
karima
köztes réteg
csavarkulcs
kézi véső
támasztókarima (befogókarima)
A csomag tartalma
1 falhoronymaró
2 vágókorong (felszerelve)
1 csavarkulcs
1 elszívóadapter (felszerelve)
1 szűkítő (az elszívóadapterrel és egy ∅ 32 mm
porszívótömlővel történő használathoz)
1 kézi véső
1 használati útmutató
Műszaki adatok
Névleges feszültség: 230 V ∼ 50 Hz
(váltóáram)
Névleges
teljesítményfelvétel: 1350 W
Névleges fordulatszám: n 9000 min
Korong Ø: 125 mm
Befogó furat: 22,23 mm
Horonymélység: 0–30 mm
Horonyszélességek: min. 8 mm -
max. 26 mm
Menet: M14
Védelmi osztály: II / (dupla szigetelés)
Súly: kb. 4 kg
Zaj- és rezgésinformációk:
A zaj- és rezgésértékek az EN 60745 szabványnak megfelelően kerültek meghatározásra.
Hangnyomásszint L
: 98,0 dB(A)
pA
Bizonytalansági érték KpA: 3 dB
Hangerőszint L
: 109,0 dB(A)
WA
Bizonytalansági érték KWA: 3 dB
Viseljen hallásvédőt!
A zaj halláskárosodást okozhat.
Rezgés összértéke (három irány vektorösszege),
az EN 60745 szabvány szerint mérve:
Rezgésértékre vonatkozó adat (betonlap levágása
esetén):
Markolat: a
= 5,450 m/s
h
2
Bizonytalansági érték K = 1,5 m/s
Pót-markolat: ah = 4,737 m/s
Bizonytalansági érték K = 1,5 m/s
-1
2
2
2
■ 14 │ HU
PMNF 1350 B2
TUDNIVALÓ
► Jelen használati útmutatóban megadott rez-
gésszint az EN 60745 szabvány által meghatározott szabványos mérési eljárással lett
meghatározva és felhasználható a készülékek
összehasonlítására. A megadott rezgés kibocsátási érték a kitettség előzetes megbecsüléséhez is felhasználható.
FIGYELMEZTETÉS!
► A rezgésszint az elektromos kéziszerszám al-
kalmazásától függően változik és egyes esetekben a jelen útmutatókban megadott érték
felett lehet. A rezgésterhelés alulbecsült lehet,
ha az elektromos kéziszerszámot rendszeresen így használják. Próbálja a rezgésterhelést
a lehető legalacsonyabb szinten tartani.
A rezgésterhelés csökkentésére tett intézkedések például a kesztyű viselése az eszköz
használata során és a munkaidő korlátozása.
Ebben az esetben a működési ciklus minden
részét figyelembe kell venni (például amikor
az elektromos kéziszerszám ki van kapcsolva,
és amikor bár be van kapcsolva, de terhelés
nélkül fut).
Általános biztonsági
előírások elektromos
kéziszerszámokhoz
FIGYELMEZTETÉS!
► Olvassa el az összes biztonsági előírást és
utasítást. A biztonsági előírások és utasítások
figyelmen kívül hagyása áramütést, tüzet és/
vagy súlyos sérüléseket okozhat.
Őrizze meg az összes biztonsági előírást és
utasítást későbbi használatra.
A biztonsági előírásokban használt „elektromos
kéziszerszám“ kifejezés hálózatról (hálózati kábelen át) üzemeltetett elektromos kéziszerszámokra
és akkumulátoros elektromos kéziszerszámokra
(hálózati kábel nélkül) vonatkozik.
1. A munkaterület biztonsága
a) Tartsa tisztán és jól megvilágítva a munkate-
rületét. A rendetlenség és a rosszul megvilágított
munkaterület balesetet okozhat.
b) Ne dolgozzon a készülékkel olyan robba-
násveszélyes környezetben, ahol gyúlékony
folyadékok, gázok vagy porok vannak. Az
elektromos kéziszerszámok szikráznak, amik
meggyújthatják a port vagy gőzöket.
c) Az elektromos kéziszerszám használata köz-
ben ne engedjen közel gyermekeket és más
személyeket. Ha elterelik a figyelmét, elveszít-
heti uralmát a készülék felett.
2. Elektromos biztonság
a) A készülék hálózati csatlakozójának illenie
kell a csatlakozóaljzatba. A csatlakozót semmilyen módon nem szabad megváltoztatni.
A védőföldelt elektromos kéziszerszámokat
ne használja adapterrel. A módosítatlan csatla-
kozó és a megfelelő csatlakozóaljzat használata
csökkenti az elektromos áramütés veszélyét.
b) Ügyeljen arra, hogy teste ne érintkezzen föl-
delt felülettel, mint például csővezeték, fűtőtest,
tűzhely vagy hűtőszekrény felületével. Az áram-
ütés kockázata nagyobb, ha teste földelve van.
c) Óvja az elektromos kéziszerszámot esőtől
vagy nedves környezettől. Növeli az áramütés
kockázatát, ha víz kerül az elektromos készülékbe.
d) Ne használja a vezetéket rendeltetésellenes
célra, az elektromos kéziszerszámot ne vigye
és ne akassza fel a kábelnél fogva vagy ne a
kábelnél fogva húzza ki a csatlakozót az aljzatból. Tartsa távol a vezetéket hőtől, olajtól,
éles szegélyektől vagy mozgó alkatrészektől.
A sérült vagy összecsavarodott vezeték növeli
az áramütés kockázatát.
e) Ha a szabadban dolgozik az elektromos ké-
ziszerszámmal, akkor csak olyan hosszabbító
kábelt használjon, ami kültérre is engedélyezett. A kültéri használatra alkalmas hosszabbító
kábellel csökkentheti az áramütés veszélyét.
PMNF 1350 B2
HU │ 15 ■

f) Ha az elektromos kéziszerszám nedves helyen
való használata elkerülhetetlen, használjon
hibaáram védőkapcsolót. A hibaáram védőkap-
csoló használata csökkenti az áramütés veszélyének kockázatát.
3. Személyi biztonság
a) Legyen mindig figyelmes, figyeljen arra, amit
tesz és hozzáértéssel végezze a munkát az
elektromos kéziszerszámmal. Ne használjon
elektromos kéziszerszámot, ha fáradt, vagy
ha kábítószer, alkohol vagy gyógyszer hatása
alatt áll. Az elektromos kéziszerszám haszná-
latakor már egy pillanatnyi figyelmetlenség is
komoly sérüléseket okozhat.
b) Viseljen személyes védőfelszerelést és mindig
vegyen fel védőszemüveget. Az elektromos kéziszerszám jellegének és használatának megfelelő személyes védőfelszerelés, például pormaszk,
csúszásmentes biztonsági cipő, védősisak vagy
fülvédő csökkenti a személyi sérülések veszélyét.
c) Előzze meg a készülék véletlenszerű bekap-
csolását. Győződjön meg arról, hogy az
elektromos kéziszerszám ki van kapcsolva,
mielőtt a villamos hálózatra és/vagy az akkumulátorra csatlakoztatja, illetve kézbe veszi
vagy viszi. Balesetet okozhat, ha a készülék
hordozása közben az ujja a be-/kikapcsolón
van vagy a készülék már bekapcsolt állapotban
van, amikor csatlakoztatja az áramellátásra.
d) Távolítsa el a beállításhoz használt szerszá-
mokat vagy csavarkulcsokat az elektromos
kéziszerszám bekapcsolása előtt. A készülék
forgó részében maradt szerszám vagy kulcs
balesetet okozhat.
e) Kerülje a normálistól eltérő testtartást. Vegyen
fel biztonságos álló helyzetet és tartsa meg
folyamatosan az egyensúlyát. Ily módon vá-
ratlan helyzetekben is jobban úrrá tud lenni a
készüléken.
f) Viseljen alkalmas ruházatot. Ne viseljen bő
ruházatot vagy ékszert. Tartsa távol a haját,
ruháját és kesztyűjét a mozgó részektől.
A laza ruházat, az ékszer vagy a hosszú haj
beleakadhat a mozgó részekbe.
g) Amennyiben a készülékhez porelszívó és por-
gyűjtő berendezés is szerelhető, akkor győződjön meg arról, hogy azok csatlakoztatva
vannak és használatuk helyesen történik.
A porelszívó alkalmazása csökkentheti a por
általi veszélyeztetést.
4. Az elektromos kéziszerszám
használata és kezelése
a) Ne terhelje túl a készüléket. A munkájának
megfelelő elektromos kéziszerszámot használja. A megfelelő elektromos kéziszerszámmal
jobban és biztonságosabban tud dolgozni az
adott teljesítményt igénylő területen.
b) Ne használjon olyan elektromos kéziszerszá-
mot, amelyiknek hibás a kapcsolója. A nem
be- és kikapcsolható elektromos kéziszerszám
használata veszélyes és meg kell javíttatni.
c) Húzza ki a csatlakozót az aljzatból, mielőtt
módosítja a készülék beállításait, tartozékokat cserél vagy elteszi a készüléket. Ezzel a
megelőző biztonsági intézkedéssel megakadályozható az elektromos kéziszerszám véletlen
bekapcsolása.
d) A nem használt elektromos kéziszerszámot
gyermekektől elzárva tárolja. Ne engedje,
hogy olyan személyek használják a készüléket, akik nem ismerik annak használatát, vagy
nem olvasták az erre vonatkozó utasításokat.
Az elektromos kéziszerszámok veszélyesek, ha
tapasztalatlan személyek használják azokat.
e) Gondosan ápolja az elektromos kéziszer-
számokat. Ellenőrizze, hogy a mozgó részek
tökéletesen működnek és nincsenek beszorulva, részei nincsenek eltörve vagy olyannyira
megsérülve, hogy az befolyásolná az elektromos kéziszerszám működését. A készülék
használata előtt javíttassa meg a sérült részeket. A rosszul karbantartott elektromos kéziszer-
számok sok balesetet okoznak.
f) A vágószerszámokat tartsa mindig élesen és
tisztán. A gondosan karbantartott éles vágóeszközök kisebb valószínűséggel szorulnak be és
könnyebben irányíthatók.
■ 16 │ HU
PMNF 1350 B2

g) Az elektromos kéziszerszámot, a tartozékokat,
a betétszerszámokat stb. a használati utasításnak megfelelően használja. Vegye figyelembe
a munkakörülményeket és az elvégzendő
feladatot. Az elektromos kéziszerszám rendel-
tetésétől eltérő használata veszélyes helyzeteket
teremthet.
5. Szerviz
a) Az elektromos kéziszerszámot csak szakkép-
zett szakemberrel és csak eredeti cserealkatrészekkel javíttassa. Ezzel biztosíthatja az
elektromos kéziszerszám hosszan tartó biztonságos működését.
A vágókorongos csiszolóval kapcsolatos biztonsági utasítások
a) Az elektromos kéziszerszámhoz tartozó vé-
dőburkolatot biztosan kell felhelyezni és úgy
kell beállítani, hogy megfelelő biztonságot
nyújtson, vagyis a csiszolótest lehető legkisebb fedetlen része mutasson a kezelő felé.
Önnek és a közelben tartózkodó személyeknek a forgó csiszolókorong síkján kívül kell
tartózkodniuk. A védőburkolatnak meg kell
védenie a kezelőt a törmelékektől és a csiszolótesttel való véletlen érintkezéstől.
b) Az elektromos kéziszerszámhoz kizárólag
gyémántborítású vágókorong használható.
Csak mert a tartozékot az elektromos kéziszerszámhoz tudja rögzíteni, még nem garantálja
annak biztonságos használatát.
c) A cserélhető szerszám megengedett legna-
gyobb fordulatszámának legalább olyan magasnak kell lennie, mint az elektromos kéziszerszámon megadott legnagyobb fordulatszám.
A megengedettnél gyorsabban forgó tartozék
összetörhet, darabjai pedig szétrepülhetnek.
d) A csiszolótest kizárólag az ajánlott felhasz-
nálási célra használható. Például: Soha ne
csiszoljon a vágókorong oldalfelületével.
A vágókorongokat a korong élével történő anyagleválasztásra tervezték. Oldalirányú erőhatás
könnyen széttörheti ezeket a csiszolótesteket.
e) Kizárólag ép és a kiválasztott csiszolókorong-
nak megfelelő méretű és alakú befogókarimát
használjon. A megfelelő karima megtámasztja
a csiszolókorongot és csökkenti a csiszolókorong
törésének veszélyét.
f) A cserélhető szerszám külső átmérőjének és
vastagságának meg kell felelnie az Ön elektromos kéziszerszáma méreteinek. A nem meg-
felelő méretű cserélhető szerszámokat nem lehet
megfelelően leárnyékolni vagy irányítani.
g) A csiszolókorongnak és a karimának pontosan
az Ön elektromos kéziszerszáma csiszolóorsójára kell illeszkednie. Az olyan cserélhető
szerszámok, amelyek nem illeszkednek pontosan
az elektromos kéziszerszám csiszolóorsójára,
nem forognak egyenletesen, erősen vibrálnak és
előfordulhat, hogy a kezelő ezáltal elveszíti uralmát a készülék felett.
h) Ne használjon sérült csiszolókorongot. Minden
használat előtt ellenőrizze a csiszolókorong
esetleges kopását és repedéseit. Ha az elektromos kéziszerszám vagy a csiszolókorong
leesett, ellenőrizze azok épségét vagy használjon ép csiszolókorongot. A csiszolókorong ellenőrzését és behelyezését követően tartózkodjon
Ön és a közelben tartózkodó személyek csak
a forgó csiszolókorong síkján kívül és járassa a
készüléket egy percen keresztül a legmagasabb
fordulatszámmal. A sérült csiszolókorongok leg-
többször már a tesztelés során eltörnek.
i) Viseljen személyi védőfelszerelést. Alkalma-
zástól függően, viseljen teljes arcvédőt, szemvédőt vagy védőszemüveget. Szükség esetén
viseljen porvédő maszkot, hallásvédőt, védőkesztyűt vagy speciális kötényt, ami megvédi
Önt az apró csiszolási és anyagmaradványoktól. Védje a szemét a kirepülő idegen testekkel
szemben, amelyek a különböző alkalmazások
során keletkezhetnek. A por- vagy légzésvédő
maszkoknak ki kell szűrniük a használat során
keletkező port. A hosszú ideig tartó, hangos zaj
halláskárosodást okozhat.
j) Ügyeljen arra, hogy más személyek biztonsá-
gos távolságban legyenek az Ön munkaterületétől. A munkaterületre belépő személyeknek személyi védőfelszerelést kell viselniük.
A munkadarab, illetve a törött cserélhető szerszámok letört darabjai könnyen kirepülhetnek
PMNF 1350 B2
HU │ 17 ■

és még a közvetlen munkaterületen kívül is sérüléseket okozhatnak.
k) A készüléket csak a szigetelt markoló felü-
leténél fogja meg, ha olyan munkát végez,
ahol a betétszerszám rejtett kábelekbe vagy
a készülék saját hálózati kábelébe ütközhet.
A feszültség alatt álló vezetékkel való érintkezés
feszültség alá helyezheti a készülék fém alkatrészeit is, ez pedig elektromos áramütést okozhat.
l) Tartsa távol a hálózati vezetéket a forgó
cserélhető szerszámoktól. Ha elveszíti uralmát
a készülék felett, előfordulhat, hogy a készülék
elvágja a hálózati kábelt vagy beleakad a
hálózati kábelbe és keze vagy karja a forgó
betétszerszámhoz ér.
m) Soha ne tegye le addig az elektromos kézi-
szerszámot, amíg a betétszerszám teljesen le
nem állt. A forgó betétszerszám hozzáérhet a
támasztó felülethez, ami által elveszítheti uralmát az elektromos kéziszerszám felett.
n) Ne működtesse az elektromos kéziszerszámot
miközben viszi. A forgó cserélhető szerszám
véletlenül befoghatja a ruháját és a cserélhető
szerszám a testébe fúródhat.
o) Rendszeresen tisztítsa meg az elektromos
kéziszerszám szellőzőnyílásait. A motor ventilátora port szív a készülékházba és a felhalmozódó fémpor elektromos veszélyt okozhat.
p) Ne használja az elektromos kéziszerszámot
gyúlékony anyagok közelében. A szikrák
könnyen begyújthatják ezeket az anyagokat.
q) Ne használjon olyan cserélhető szerszámo-
kat, amelyek hűtőfolyadékot igényelnek. Víz
vagy más hűtőfolyadék használata áramütést
okozhat.
A vágással kapcsolatos további
biztonsági utasítások
Visszaütés és megfelelő biztonsági utasítások
Visszaütés - okok és megfelelő biztonsági utasítások
▯ A visszaütés egy beakadt vagy blokkolt forgó
csiszolókorong hirtelen reakciója. A beakadás
vagy blokkolás következtében hirtelen megállhat a forgásban lévő cserélhető szerszám.
Ennek következtében az irányítatlanná vált
elektromos kéziszerszám az említett blokkolási
ponton a cserélhető szerszám forgásirányával
szemben felgyorsul.
▯ Ha például egy csiszolókorong beékelődik vagy
blokkolódik a munkadarabban, akkor a csiszolókorong munkadarabba süllyedő széle beakadhat
és ezáltal kitörheti a csiszolókorongot vagy viszszaüthet. A csiszolókorong - a korong blokkolási
ponton felvett forgásirányától függően - ebben
az esetben a kezelő felé vagy vele ellentétes
irányba mozog. Ennek során a csiszolókorong
akár ki is törhet.
A visszaütés az elektromos kéziszerszám helytelen
vagy hibás használatából ered. Az alábbiakban leírt
megfelelő óvintézkedésekkel mindez megelőzhető.
a) Tartsa erősen az elektromos kéziszerszámot,
majd testével és karjaival vegyen fel olyan
testhelyzetet, hogy ellensúlyozni tudja a
visszacsapó erőket. Amennyiben rendelkezésre áll, használja mindig a pót-markolatot,
hogy a lehető legjobban tudja irányítani a
visszaütés következtében fellépő erőt vagy
a felfutáskor tapasztalható reakciónyomatékot. A kezelő személy a megfelelő biztonsági
óvintézkedésekkel biztonságosan uralhatja a
visszaütés következtében fellépő erőt vagy a
reakcióerőt.
b) Soha ne nyúljon a forgó cserélhető szerszá-
mok közelébe. Visszaütés esetén a cserélhető
szerszám kézsérülést okozhat.
c) Kerülje el a forgó vágókorong előtti és
mögötti területet. A visszaütés az elektromos
kéziszerszámot a csiszolókorong mozgásával
ellentétes irányba viszi a blokkolási ponton.
■ 18 │ HU
PMNF 1350 B2

d) Sarkok, éles peremek stb. közelében foko-
zott óvatossággal dolgozzon. Előzze meg a
cserélhető szerszámok munkadarabról való
visszapattanását, illetve beszorulását. A forgó
cserélhető szerszám sarkokban, éles szegélyeken vagy ha visszaütődik, könnyen beékelődik.
Ennek következtében elveszítheti uralmát a
készülék felett vagy a készülék visszaüthet.
e) Ne használjon láncos, vagy fogazott fűrész-
lapot, illetve 10 mm-nél szélesebb nyílásokkal
rendelkező szegmentált gyémántkorongot.
Az ilyen cserélhető szerszámok visszaüthetnek
vagy a kezelő elveszítheti uralmát az elektromos kéziszerszám fölött.
f) Kerülje a vágókorong blokkolását vagy a túl
erős felületre nyomást. Ne vágjon túl mélyre.
A vágókorong túlterhelése növeli az igénybevételt
és az elferdülés vagy a beékelődés valószínűségét és ezáltal egy visszaütés vagy a csiszoló
test törésének lehetőségét.
g) A vágókorong beszorulása vagy a munka
félbeszakítása esetén, kapcsolja ki a készüléket és tartsa nyugodtan a korong teljes
leállásáig. Soha ne próbálja meg kihúzni a
még mozgó vágókorongot a vágatból, mert
visszaütés lehet a következménye. Keresse
meg, majd szüntesse meg a beékelődés okát.
h) Ne kapcsolja vissza addig az elektromos
kéziszerszámot, amíg az a munkadarabban
van. Hagyja, hogy a vágókorong elérje a teljes fordulatszámot, mielőtt óvatosan folytatja
a vágást. Ellenkező esetben, előfordulhat, hogy
beakad a vágókorong, kiugrik a munkadarabból vagy visszaütést okoz.
i) Támassza alá a lemezeket vagy a nagyobb
méretű munkadarabokat, ezzel jelentősen
csökkentheti a beszorult vágókorong visszaütésének veszélyét. A nagy munkadarabok
már saját tömegük alatt is elhajolhatnak.
A munkadarabokat a korong mindkét oldalán,
vagyis a vágás közelében és a peremnél is alá
kell támasztani.
j) Legyen különösen óvatos meglévő falban
vagy más be nem látható területen végzett
„zsebvágás“ esetén. Az anyagba hatoló vá-
gókorong gáz- vagy vízvezetékek, elektromos
vezetékek vagy egyéb tárgyak vágása esetén
visszaütést okozhat.
Kiegészítő utasítások
Engedélyezett vágókorong-konstrukciók:
szegmentált gyémánttal kirakott tárcsa, a szegmensek között maximum 10 mm réssel és negatív
vágószöggel:
Tárcsaátmérő: 125 mm
Tárcsa vastagság: 2,1 mm
Viseljen hallásvédőt!
Viseljen védőszemüveget!
Viseljen biztonsági lábbelit!
Viseljen védőkesztyűt!
Viseljen légzésvédőt!
Nem használható nedves csiszoláshoz!
Eredeti tartozékok / kiegészítő
eszközök
■ Csak olyan tartozékokat és kiegészítő esz-
közöket használjon, amelyek szerepelnek a
használati útmutatóban, illetve amelyek befogója kompatibilis a készülékkel.
PMNF 1350 B2
HU │ 19 ■
 Loading...