

Parkside PFBS 12 A1, 279872 Translation Of The Original Instructions

IAN 279872
CORDLESS MULTI-GRINDER PFBS 12 A1
CORDLESS MULTI-GRINDER
Translation of the original instructions
FINBORRSLIP
Översättning av bruksanvisning i original
AKKUKÄYTTÖINEN S
PIENOISPORAKONE
Alkuperäisen käyttöohjeen käännös
AKKU-FEINBOHRSCHLEIFER
Originalbetriebsanleitung

GB Translation of the original instructions Page 1
FI Alkuperäisen käyttöohjeen käännös Sivu 15
SE Översättning av bruksanvisning i original Sidan 31
DE / AT / CH Originalbetriebsanleitung Seite 45
Before reading, unfold the page containing the illustrations and familiarise yourself with all functions of
the device.
Käännä ennen lukemista kuvallinen sivu esiin ja tutustu seuraavaksi laitteen kaikkiin toimintoihin.
Vik ut bildsidan och ha den till hands när du läser igenom anvisningarna och gör dig bekant med
apparatens / maskinens funktioner.
Klappen Sie vor dem Lesen die Seite mit den Abbildungen aus und machen Sie sich anschließend mit allen
Funktionen des Gerätes vertraut.
A
B
10a

PFBS 12 A1
GB
│
1 ■
Contents
Introduction ......................................................2
Intended use ................................................................ 2
Features ................................................................... 2
Package contents ............................................................ 2
Technical details ............................................................. 2
General Power Tool Safety Warnings ................................3
1. Work area safety .......................................................... 3
2. Electrical safety ........................................................... 3
3. Personal safety ............................................................ 4
4. Power tool use and care .................................................... 4
5. Use and handling of the cordless electrical power tool ............................. 5
6. Service .................................................................. 5
Safety instructions for all applications ............................................ 5
Additional safety instructions for all applications .................................... 7
Supplementary safety instructions for grinding and abrasive cutting ..................... 8
Supplementary safety instructions for working with wire brushes. . . . . . . . . . . . . . . . . . . . . . . . 8
Safety guidelines for battery chargers ............................................ 9
Use .............................................................9
Charging the battery pack ..................................................... 9
Attaching/disconnecting the battery pack to/from the appliance ...................... 10
Checking the battery charge level ..............................................10
Changing/inserting the tool/collet chuck. . . . . . . . . . . . . . . . . . . . . . . . . . . . . . . . . . . . . . . . . 10
Switching on and off/setting speed range ........................................ 10
Notes on working with materials/tools/speed range ............................... 10
Tips and tricks .............................................................. 12
Maintenance and cleaning .........................................12
Disposal ........................................................13
Kompernass Handels GmbH warranty ..............................13
Service ................................................................... 14
Importer ..................................................................14
Translation of the original Conformity Declaration .....................14

PFBS 12 A1
■ 2
│
GB
CORDLESS MULTI-GRINDER
PFBS 12 A1
Introduction
Congratulations on the purchase of your new appliance. You have selected a high-quality product.
The operating instructions are part of this product.
They contain important information about safety,
usage and disposal. Before using the product, please
familiarise yourself with all operating and safety
instructions. Use the product only as described and
for the range of applications specified. Please also
pass these operating instructions on to any future
owner.
Intended use
This cordless precision drill/sander is intended for
drilling, milling, engraving, polishing, cleaning,
grinding, cutting of materials such as wood, metal,
plastics, ceramics and stone in dry rooms using
the corresponding attachments (as supplied). Any
other usage of or modification to the appliance is
deemed to be improper and carries a significant
risk of accidents. The manufacturer accepts no
responsibility for damage(s) attributable to misuse.
This appliance is not intended for commercial use.
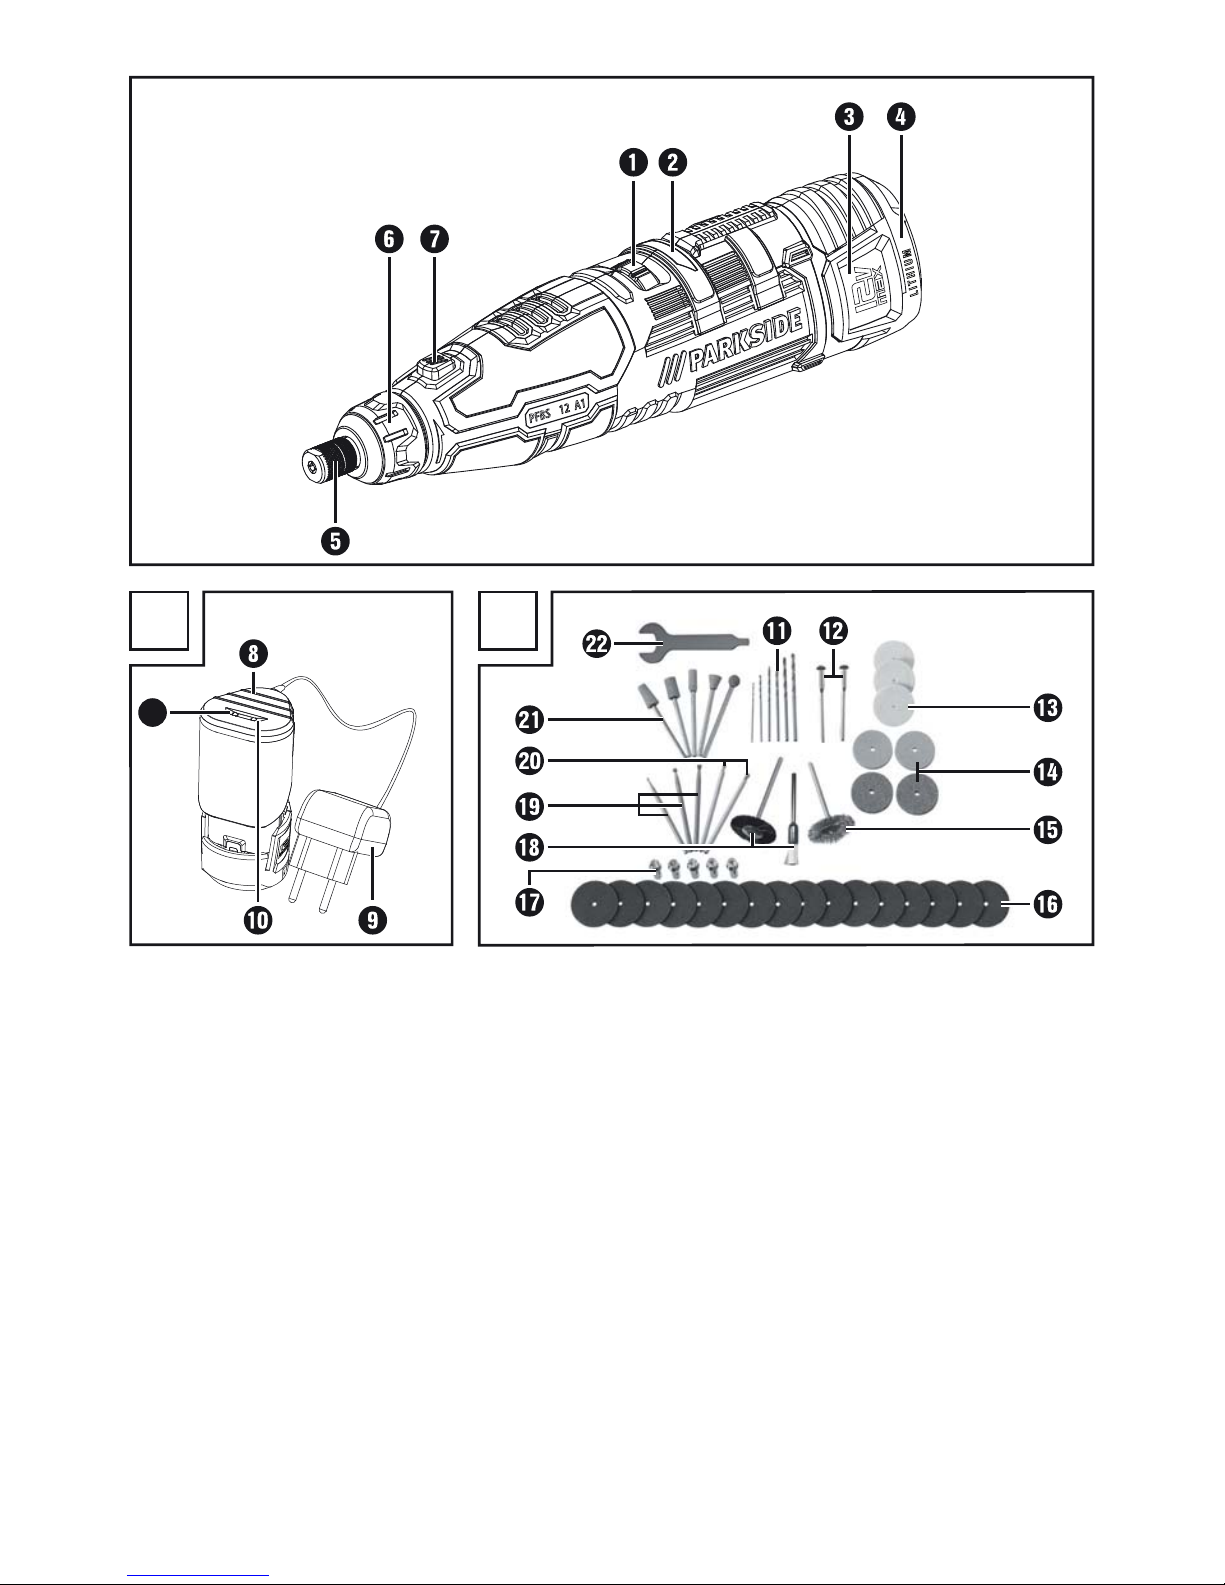
Features
Cordless precision drill/sander:
ON/OFF switch/control dial
Battery LED
Battery release button
Battery pack
Tensioning nut
Cap nut
Spindle lock
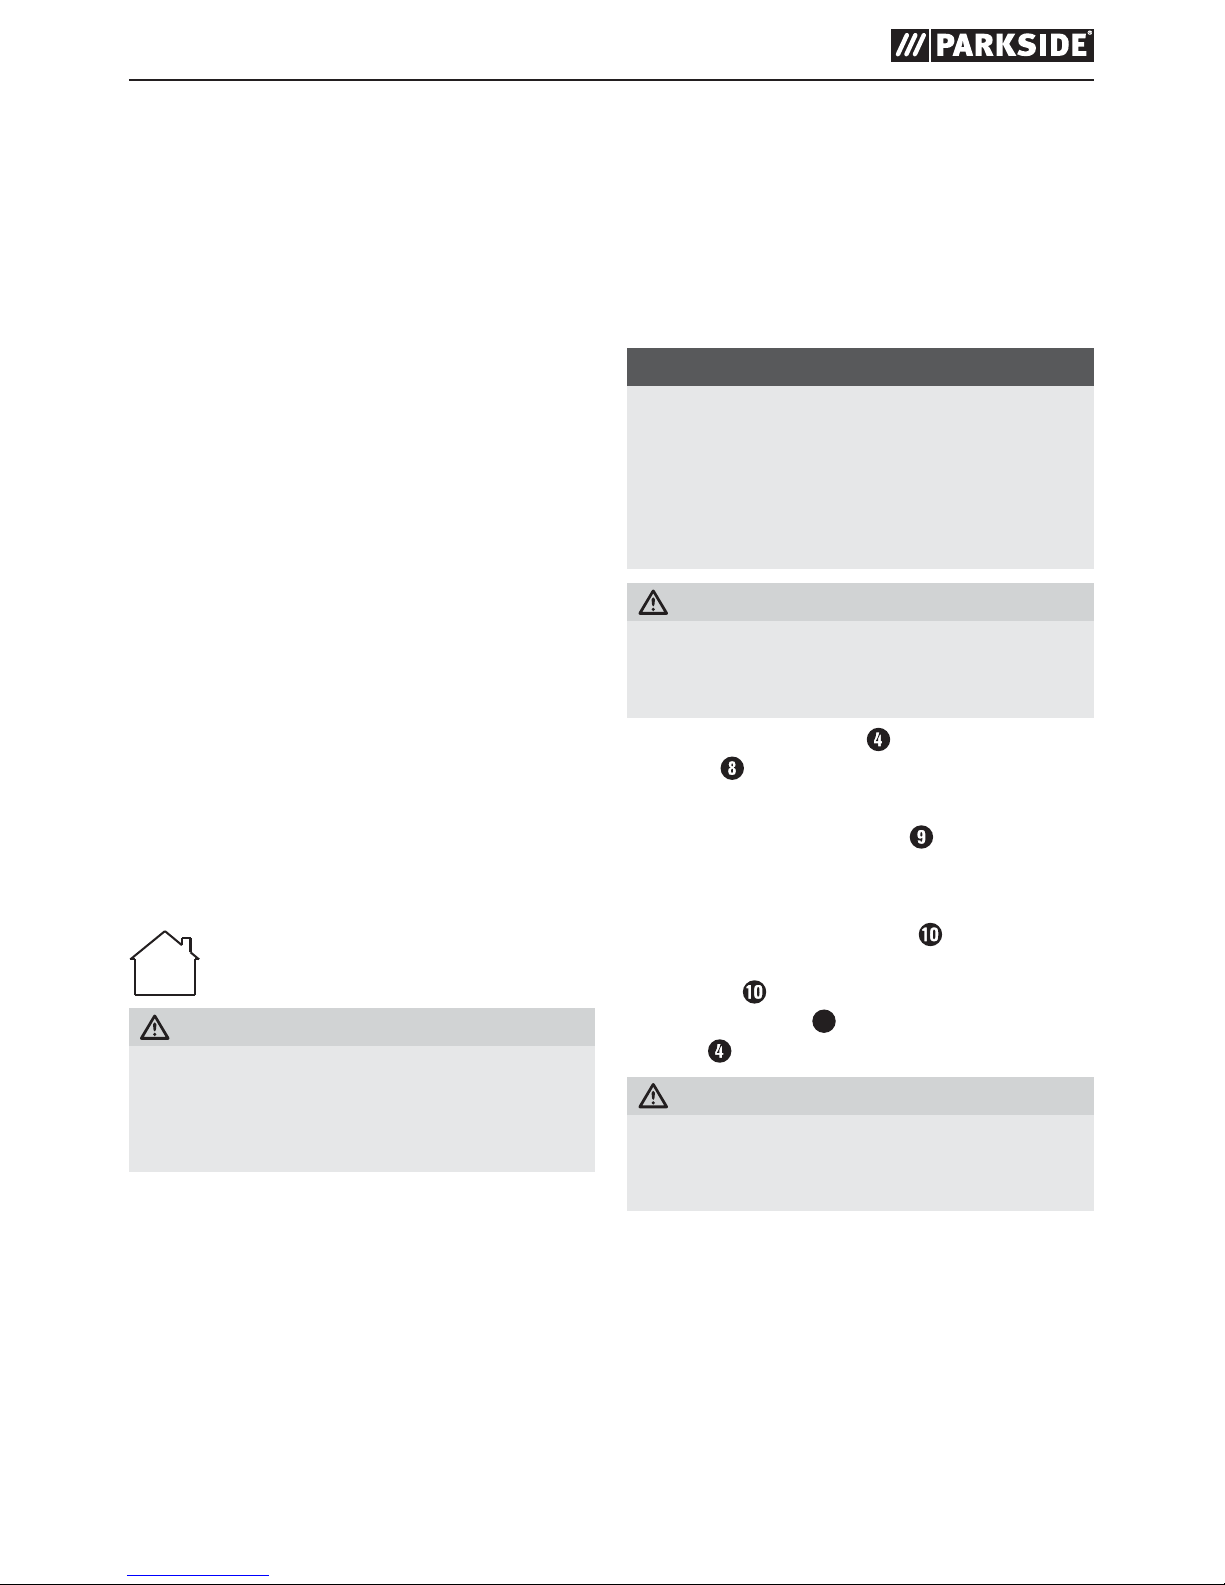
Battery charger (see Fig. A):
Charger cradle
Mains adapter
Red charge status indicator
10a
Green charge status indicator
Accessories (See Fig. B):
6 HSS drill bits
2 mandrels as tool holders
3 polishing discs
4 grinding discs
1 metal brush
16 cutting discs
5 collet chucks
2 synthetic brushes
3 milling bits
2 engraving bits
5 grinding bits
1 combination spanner
Package contents
1 cordless multi-grinder
1 charger cradle with mains adapter
1 accessories set (50 pieces)
1 set of operating instructions
Technical details
Model PFBS 12 A1:
Rated voltage: 12 V
(DC)
Rated idle speed: n 5000–25000 rpm
Max. disc ø: 25mm
Chuck clamping
range:
max. ø 3.2 mm
Battery pack PFBS 12 A1-1:
INPUT:
Rated voltage: 12 V
(DC)
Capacity: 1300 mAh
Type: LITHIUM ION
Battery charger PFBS 12 A1-2:
Primary (input):
Rated voltage: 100–240 V∼, 50–60 Hz
(alternating current)
Rated power
consumption: 0.3 A
Secondary (output):
Rated voltage:
14.5 V
(DC)
Rated current: 450 mA
Charging time: approx. 3 hours
Protection class: II / (double insulation)

PFBS 12 A1
GB
│
3 ■
Noise emission value:
Noise measurement value determined in accordance
with EN 60745. The A-rated noise level of the tool
is typically:
Sound pressure level: L
pA
= 60.5 dB (A)
Uncertainty: K
pA
= 3 dB
Sound power level: L
WA
= 71.5 dB (A)
Uncertainty K: K
WA
= 3 dB
Wear hearing protection!
Total vibration value:
a
h
= 1.07 m/s
2
Uncertainty K: 1.5 m/s
2
NOTE
► The vibration level specified in these instruc-
tions has been measured in accordance with
a standardised measuring procedure and can
be used to make equipment comparisons. The
specified vibration emission value can also
be used to make an initial exposure estimate.
WARNING!
► The vibration level varies in accordance with
the use of the power tool and may be higher
than the value specified in these instructions
in some cases. Regular use of the power tool
in such a way may cause the user to underestimate the vibration. Try to keep the vibration
loads as low as possible. Measures to reduce
the vibration load are, e.g. wearing gloves
and limiting the working time. All states of
operation must be taken into account (e.g.
times when the power tool is switched off and
times where the power tool is switched on but
running without load).
General Power Tool
Safety Warnings
WARNING!
► Read all safety warnings and all
instructions. Failure to follow the
warnings and instructions may result
in electric shock, fire and/or serious
injury.
Save all warnings and instructions for future
reference.
The term "power tool" in the warnings refers to your
mains-operated (corded) power tool or battery-operated (cordless) power tool.
1. Work area safety
a) Keep work area clean and well lit.
Cluttered or dark areas invite accidents.
b) Do not operate power tools in explosive atmo-
spheres, such as in the presence of flammable
liquids, gases or dust. Power tools create sparks
which may ignite the dust or fumes.
c) Keep children and bystanders away while
operating a power tool. Distractions can cause
you to lose control.
2. Electrical safety
a) Power tool plugs must match the outlet. Never
modify the plug in any way. Do not use any
adapter plugs with earthed (grounded) power
tools. Unmodified plugs and matching outlets
will reduce risk of electric shock.
b) Avoid body contact with earthed or grounded
surfaces, such as pipes, radiators, ranges and
refrigerators. There is an increased risk of elec-
tric shock if your body is earthed or grounded.
c) Do not expose power tools to rain or wet
conditions. Water entering a power tool will
increase the risk of electric shock.
d) Do not abuse the cord. Never use the cord
for carrying, pulling or unplugging the power
tool. Keep cord away from heat, oil, sharp
edges or moving parts. Damaged or entangled
cords increase the risk of electric shock.

PFBS 12 A1
■ 4
│
GB
e) When operating a power tool outdoors, use
an extension cord suitable for outdoor use.
Use of a cord suitable for outdoor use reduces
the risk of electric shock.
f) If operating a power tool in a damp location
is unavoidable, use a residual current device
(RCD) protected supply. Use of an RCD re-
duces the risk of electric shock.
3. Personal safety
a) Stay alert, watch what you are doing and
use common sense when operating a power
tool. Do not use a power tool while you are
tired or under the influence of drugs, alcohol
or medication. A moment of inattention while
operating power tools may result in serious
personal injury.
b) Use personal protective equipment.
Always wear eye protection.
Protective equipment such as dust mask,
non-skid safety shoes, hard hat, or hearing
protection used for appropriate conditions will
reduce personal injuries.
c) Prevent unintentional starting. Ensure the
switch is in the off-position before connecting
to power source and/or battery pack, picking
up or carrying the tool. Carrying power tools
with your finger on the switch or energising power
tools that have the switch on invites accidents.
d) Remove any adjusting key or wrench before
turning the power tool on. A wrench or a key
left attached to a rotating part of the power tool
may result in personal injury.
e) Do not overreach. Keep proper footing and
balance at all times. This enables better control
of the power tool in unexpected situations.
f) Dress properly. Do not wear loose clothing or
jewellery. Keep your hair, clothing and gloves
away from moving parts. Loose clothes, jew-
ellery or long hair can be caught in moving
parts.
g) If devices are provided for the connection of
dust extraction and collection facilities, ensure
these are connected and properly used. Use of
dust collection can reduce dust-related hazards.
4. Power tool use and care
a) Do not force the power tool. Use the correct
power tool for your application. The correct
power tool will do the job better and safer at
the rate for which it was designed.
b) Do not use the power tool if the switch does
not turn it on and off. Any power tool that cannot be controlled with the switch is dangerous
and must be repaired.
c) Disconnect the plug from the power source
and/or the battery pack from the power tool
before making any adjustments, changing
accessories, or storing power tools.
Such preventive safety measures reduce the risk
of starting the power tool accidentally.
d) Store idle power tools out of the reach of
children and do not allow persons unfamiliar
with the power tool or these instructions to
operate the power tool. Power tools are dan-
gerous in the hands of untrained users.
e) Maintain power tools. Check for misalignment
or binding of moving parts, breakage of parts
and any other condition that may affect the
power tools operation. If damaged, have the
power tool repaired before use. Many acci-
dents are caused by poorly maintained power
tools.
f) Keep cutting tools sharp and clean. Properly
maintained cutting tools with sharp cutting
edges are less likely to bind and are easier to
control.
g) Use the power tool, accessories and tool bits,
etc. in accordance with these instructions,
taking into account the working conditions
and the work to be performed. Use of the
power tool for operations different from those
intended could result in a hazardous situation.

PFBS 12 A1
GB
│
5 ■
5. Use and handling of the cordless
electrical power tool
a) Charge a rechargeable battery unit using only
the charger recommended by the manufacturer. Chargers are often designed for a partic-
ular type of rechargeable battery unit. There is
the danger of fire if other types of rechargeable
battery units are used.
b) Only the rechargeable battery units supplied
are to be used with an electrical power tool.
The use of other rechargeable battery units
may lead to the danger of injury or fire.
c) When they are not being used, store re-
chargeable battery units away from paper
clips, coins, keys, nails, screws or other small
metal objects that could cause the contacts
to be bridged. Short-circuiting the contacts of
a rechargeable battery unit may result in heat
damage or fire.
d) Fluids may leak out of rechargeable battery
units if they are misused. If this happens, avoid
contact with the fluid. If contact occurs, flush
the affected area with water. Seek additional
medical help if any of the fluid gets into your
eyes. Escaping battery fluid may cause skin
irritation or burns.
CAUTION! RISK OF EXPLOSION!
Never charge non-rechargeable
batteries!
Protect the rechargeable battery from
heat, for example from continuous
exposure to sunlight, fire, water and
moisture. There is a risk of explosion.
6. Service
a) Have your power tool serviced by a qualified
repair person using only identical replacement parts. This will ensure that the safety of
the power tool is maintained.
Safety instructions for all applications
General safety instructions for grinding, sandpaper sanding, working with wire brushes,
polishing, milling and abrasive cutting:
a) This power tool is intended for use as a grinder,
sandpaper sander, wire brush, polisher, milling
machine and abrasive cutting appliance.
Please follow all safety instructions, instructions,
diagrams and data that you receive with the
appliance. If you do not observe the following
instructions, this can lead to electrical shock, fire
and/or serious injuries.
b) Do not use any accessories that have not been
provided or recommended by the manufacturer for this power tool. Just because you can
attach the accessories to your power tool, does
not ensure they are safe to use.
c) The permissible speed of the accessory tool
used must be at least as high as the maximum
speed specified for the power tool. Accessories
that rotate faster than the permissible rate can
break and throw pieces into the air.
d) The external diameter and thickness of the
accessory tool used must comply with the dimensions of the power tool. Incorrectly dimen-
sioned accessory tools cannot be sufficiently
shielded or controlled.
e) Grinding discs, sanding drums or other ac-
cessories must match the grinding spindle or
collet chuck of your power tool exactly. Ac-
cessory tools which do not fit precisely into the
take-up of the power tool will rotate unevenly, vibrate severely and can lead to a loss of control.
f) Discs, grinding cylinders, cutting tools or other
accessories mounted on a mandrel must be
completely inserted in the collet or chuck.
Any "protrusion" or exposed parts of the
mandrel between the grinding tool and the
collet or chuck must be kept to a minimum.

PFBS 12 A1
■ 6
│
GB
If the mandrel is not sufficiently tightened or the
grinding tool protrudes too far, the tool could
come loose and been thrown out at high speed.
g) Never use damaged accessory tools. Before
each use, check accessory tools such as
grinding discs for chips or cracks, sanding
drums for cracks, wearing or excessive wear
and tear and wire brushes for loose or broken
wires. If the power tool or the accessory
tool in use is dropped, check to see if it is
damaged or use an undamaged accessory
tool. When you have checked and inserted
the accessory tool, ensure that you and any
other people in the vicinity remain outside of
the range of the rotating accessory tool and
allow the tool to rotate at maximum speed for
one minute. Damaged accessory tools usually
break during this test period.
h) Wear personal protective equipment.
Depending on the application, ensure that
you use full face protection, eye protection
or goggles. If required, use a dust mask, ear
protectors, protective gloves or special apron
to protect you from grindings and material
particles. Protected your eyes from flying debris
that may be created during certain applications.
Dust or filter masks must be used to filter any
dust created by the application. If you are exposed to loud noise for any length of time, you
may suffer hearing loss.
i) Ensure that other people remain at a safe
distance to your workspace. Anyone who
enters the workspace must wear personal
protective equipment. Fragments of the work-
piece or broken accessory tools can fly off
and cause injury – even outside the immediate
working area.
j) Hold the power tool only by the insulated
gripping surfaces when performing an operation where the accessory tool may contact
hidden wiring or its own cord. Contact with
a live cable can also make metal parts of the
appliance live and could result in an electric
shock.
k) Always hold the power tool firmly. When
running up to full speed, the torque of the
motor can cause the power tool to twist.
l) If possible, use clamps to hold the workpiece
in position. Never hold a small workpiece
in one hand and the power tool in the other
while you are using it. By clamping small work-
pieces, you keep both hands free for better
control of the power tool. When cutting round
workpieces such as dowels, rods or pipes, be
aware that these can roll away and this can
cause the tool to jam and be thrown towards
you.
m) Hold the power cord away from any rotating
accessories. If you lose control of the appliance, the cord may get cut or caught and your
hand or arm could get caught in the rotating
accessory tool.
n) Never put the power tool down until the
accessory tool has come to a complete standstill. The rotating accessory tool can come into
contact with the surface and cause you to lose
control of the power tool.
o) When changing accessory tools or changing
settings, tighten the collet nut, the chuck or
other fixing elements tightly. Loose fixing ele-
ments can shift unexpectedly and lead to loss of
control; unfixed, rotating components will fly off
violently.
p) Do not leave the power tool running whilst
carrying it. Accidental contact between your
clothing and the rotating accessory tool could
lead to physical injury.
q) Clean the ventilation slits of your power tool
regularly. The engine fan draws dust into the
housing and a strong accumulation of metal
dust can cause electrical hazards.
r) Do not use the power tool in the vicinity of
flammable materials. Sparks can ignite such
materials.
s) Do not use any accessory tools which require
liquid coolant. The use of water or other liquid
coolants may lead to electric shock.

PFBS 12 A1
GB
│
7 ■
Additional safety instructions for all
applications
Kickback and corresponding safety instructions
Kickback is a sudden reaction caused when a
rotating accessory tool, e.g. grinding disc, abrasive
band, wire brush, etc., catches or jams. Catching
or jamming leads to an abrupt stop of the rotating
accessory tool. If this happens, an uncontrolled
power tool will turn rapidly against the direction
of rotation of the accessory tool.
If, for example, a grinding disc catches or jams,
the edge of the grinding disc that is projecting into
the workpiece can get caught and break off the
grinding disc or cause a kickback. The grinding
disc can then fly in the direction of the operator
or away from him, depending on the direction of
rotation of the disc at the blockage. This can also
break grinding discs.
A kickback is caused by incorrect use or misuse
of the power tool. This can be avoided by taking
proper precautions as given below.
a) Hold the power tool firmly in both hands and
position your body and arms so they can
absorb the force of a kickback. By taking
adequate precautions, the operator can stay in
control of the kickback forces.
b) Take special care when working around
corners, sharp edges, etc. Avoid allowing the
accessory tool to bounce back from the workpiece or jam in the workpiece. The rotating
accessory tool is more likely to jam in corners or
sharp edges or if it rebounds off them. This can
cause a loss of control or kickback.
c) Do not use toothed saw blades. Such acces-
sories often cause a kickback or loss of control
over the power tool.
d) Always move the accessory tool in the same
direction in the material in which the cutting
edge leaves the material (in other words, the
same direction in which the dust is thrown out).
Guiding the power tool in the wrong direction
will cause the cutting edge of the accessory tool
to jump out of the workpiece which can lead to
the accessory tool being pulled in this direction.
e) Always fix the workpiece when using rotary
files, cutting discs, high-speed milling tools or
hard-metal tools. Even a minimal tilting in the
groove can cause these tools to jam and lead
to a kickback. When the cutting disc jams, it
usually breaks. When a rotary file, high-speed
milling tool or hard-metal milling tool jams, the
accessory tool can jump out of the groove and
lead to loss of control of the power tool.

PFBS 12 A1
■ 8
│
GB
Supplementary safety instructions
for grinding and abrasive cutting
Special safety instructions for grinding and
abrasive cutting
a) Use only the grinding accessories approved
for your power tool and only for the recommended applications. Example: Never grind
with the side surface of a cutting disc. Cutting
discs are designed to remove material with the
edge of the disc. Any lateral application of
force on these grinding tools can lead to breakage.
b) Use only undamaged mandrels of the correct
size and length and without undercut on
the shoulder for conical and straight pencil
grinders. Using an appropriate mandrel re-
duces the risk of breakages.
c) Avoid cutting disc jams or excessive contact
pressure. Do not make any excessively deep
cuts. Overloading the cutting disc increases the
stress and likelihood of tilting or jamming and
thus the possibility of kickback or breakage of
the grinding tool.
d) Avoid putting your hand in the area in front
of or behind the rotating cutting disc. When
you move the cutting disc away from your hand,
it is possible, in the event of a kickback, that the
power tool along with the rotating disc could be
thrown out directly towards you.
e) If the cutting disc jams or you stop working,
switch the tool off and hold it steady until the
disc has completely stopped turning. Never
attempt to pull a rotating cutting disc out of
a cut. This could lead to kickback. Identify and
remove the cause of the jam.
f) Do not switch the power tool back on as long
as it is in the workpiece. Allow the cutting disc
to reach its full speed before you carefully
continue the cut. Otherwise, the disc may jam,
jump out of the workpiece or cause kickback.
g) Support panels or large workpieces to reduce
the risk of the cutting disc jamming and causing a kickback. Large workpieces can bend
under their own weight. The workpiece must be
supported on both sides, namely in the vicinity
of the cut, and also at the edge.
h) Be particularly careful when making "pocket
cuts" into existing walls or other obscured
areas. The inserted cutting disc may cut into
gas or water pipes, electrical wiring or other
objects that can cause kickback.
Supplementary safety instructions
for working with wire brushes
Special safety instructions for working with
wire brushes:
a) Be aware that the brush can lose wire bristles
even during normal operation. Do not overstress the wires by applying excessive pressure
to the brush. The wire bristles can easily penet-
rate light clothing and/or skin.
b) Allow the brush to run at working speed for
at least one minute before applying it to the
workpiece. Ensure that no one is standing in
front of or in line with the brush during this
time. Loose pieces of wire could fly off during
the run-in period.
c) Aim the rotating steel brush away from your-
self. When working with these brushes, small
particles and minute pieces of wire can fly off
at great speed and pierce skin.
PFBS 12 A1
GB
│
9 ■
Safety guidelines for battery
chargers
■ This appliance may be used by
children aged 8 years and above
and by persons with limited physical,
sensory or mental capabilities or
lack of experience and knowledge,
provided that they are under supervision or have been told how to
use the appliance safely and are
aware of the potential risks. Do not
allow children to use the appliance
as a plaything. Cleaning and user
maintenance tasks may not be carried out by children unless they are
supervised.
■ To avoid potential risks, damaged
mains cables should be replaced
by the manufacturer, their customer
service department or a similarly
qualified person.
The charger is suitable for indoor use
only.
WARNING!
■ Do not operate the appliance with a dam-
aged cable, power cable or power plug.
A damaged power cable poses a threat of
fatal electric shock.
Use
■ Never use the appliance for other purposes
and only original parts/accessories. Using
attachments or accessory tools other than those
recommended in the operating instructions can
lead to a risk of injury.
Charging the battery pack
NOTE
► A new battery pack or a battery pack which
has not been used for a long time will need
to be charged before first use/reuse. It will
reach its full capacity after 3–5 charge
cycles. The charging process lasts around
180 minutes.
CAUTION! RISK OF INJURY!
► Always unplug the appliance before you
remove the battery pack from or connect the
battery pack to the charger.
♦ Insert the battery pack
into the charger
cradle . It can only be inserted with the
correct polarity.
♦ Connect the mains adapter
to a mains
power socket.
♦ As long as the battery pack is charging, the
red battery charge indicator
lights up. Once
charging is completed, the red battery charge
indicator goes off and the green battery
charge indicator
10a
lights up. The battery
pack is ready for use.
CAUTION!
► Never recharge a battery pack again imme-
diately after charging. There is a risk that the
battery pack will become overcharged.

PFBS 12 A1
■ 10
│
GB
Attaching/disconnecting the battery
pack to/from the appliance
Inserting the battery pack:
♦ Push the ON/OFF switch
to the "OFF"
position.
♦ Insert the battery pack
into the appliance
until it clicks into place.
Removing the battery pack:
♦ Press the two battery release buttons
on
the side of the appliance at the same time and
remove the battery pack .
Checking the battery charge level
If the appliance is switched on, the status/remaining charge will be shown on the battery LED 2 as
follows:
RED / ORANGE / GREEN = maximum charge
RED / ORANGE = medium charge
RED = low charge – charge the battery
Changing/inserting the tool/collet
chuck
♦ Press the spindle lock and hold it down.
♦ Turn the tensioning nut
until the lock clicks
into place.
♦ Undo the tensioning nut
from the thread
using the combination spanner .
♦ Remove any tool which is inserted.
♦ First push the intended tool through the tensioning
nut
before inserting it into the appropriate
collet chuck for the tool shaft.
♦ Press the spindle lock
and hold it down.
♦ Push the collet chuck
into the thread insert
and screw the tensioning nut
tight with the
combination spanner .
NOTE
► Use the screwdriver side of the combination
spanner
to undo and tighten the screw on
the mandrel
.
Switching on and off/setting speed
range
Switching on/setting the speed range:
♦ Set the ON/OFF switch with the speed control
to a position between "1" and "MAX".
Switching off:
♦ Set the ON/OFF switch with the speed control
to the "OFF" position .
Notes on working with materials/
tools/speed range
■ Use the milling bits for working on steel and
iron at maximum speed.
■ Determine the rotational speed range for working
on zinc, zinc alloys, aluminium, copper and lead
by trying it out on test pieces.
■ Use a low rotational speed for work on plastics
and materials with a low melting point.
■ Use a high rotational speed for working on
wood.
■ Carry out cleaning, polishing and buffing work
in the medium speed range.
The following are recommendations only and not
binding. When carrying out practical work, carry
out your own tests to see which tool and which
settings are ideal for the material you are working
on.
PFBS 12 A1
GB
│
11 ■
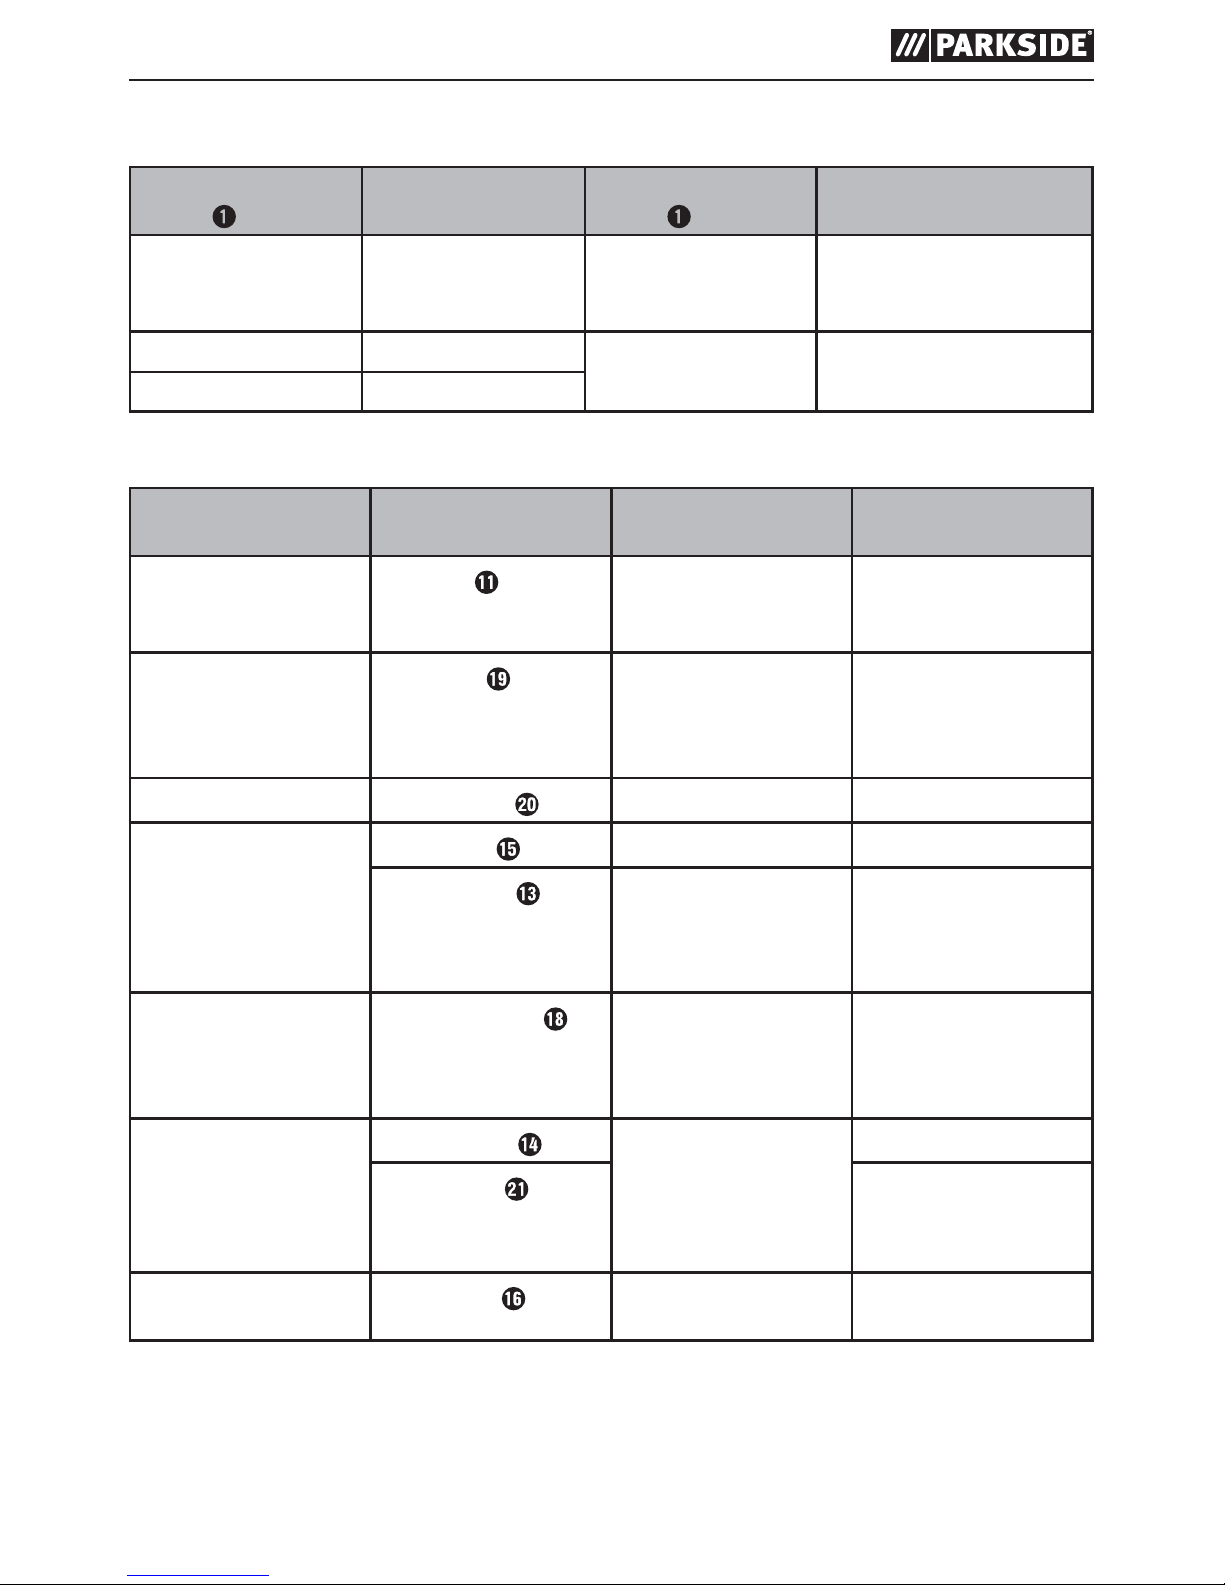
Setting a suitable rotational speed:
Number on the speed
control
Material being
worked
Number on the speed
control
Material being
worked
1–3 Plastics and materials
with a low melting
point
6 Hardwood
4–5 Stone, ceramics Max Steel
5 Soft wood, metal
Application examples/selecting a suitable tool:
Function Accessories Use Protrusion
(min–max) mm
Drilling
HSS drills
Working wood 18–25, using the
smallest drill, the
protrusion is 10 mm
Milling
Milling bits
Various jobs; e.g.
creating recesses,
hollows, forms,
grooves or slits
18–25
Engraving
Engraving bits
Labelling, handicraft 18–25
Polishing, rust removal
CAUTION!
Exert only slight pressure when applying the
tool to the workpiece.
Metal brush
Rust removal 9–15
Polishing discs
Various metals and
plastics, especially
precious metals such as
gold and silver
12–18
Cleaning
Synthetic brushes
e.g. cleaning hard-toaccess plastic housings
or the area around a
door lock
9–15
Grinding
Grinding discs
Grinding work on
stone, wood, fine work
on hard materials such
as ceramics or alloyed
steel
12–18
Grinding bits
10
Disconnecting
Cutting discs
metal
Working metal, plastic
and wood
12–18

PFBS 12 A1
■ 12
│
GB
■ Note that the maximum diameter of the grind-
ing assembly, and of grinding cones and pencil
grinders with a thread insert, may not exceed
55mm and the maximum diameter for sandpaper sanding accessories may not exceed
80mm.
NOTE
► The max. permissible length of a mandrel is
33 mm.
■ Store the accessories in the original box or store
the accessory components somewhere else to
protect them from damage.
■ Store the accessories somewhere dry and not
in the vicinity of aggressive media.
Tips and tricks
■ If you exert too much pressure, the fitted tool
can break and/or the workpiece could be damaged. You will achieve optimum working results
by moving the tool over the workpiece at a
steady speed and while exerting light pressure.
■ When carrying out cutting work, hold the appli-
ance firmly with both hands.
■ Observe the data and the information in the
table to prevent the end of the spindle from
touching the perforated base of the grinding
tool.
Maintenance and cleaning
The appliance is maintenance-free.
■ Remove all dirt from the appliance. Use a dry
cloth to do this.
■ At the beginning and end of an extended
period of non-use, charge the battery pack
fully.
■ If a lithium-ion battery is to be stored for an
extended period, the charge level should be
checked regularly. The optimum charge level is
between 50% and 80%. The optimum storage
environment is cool and dry.
WARNING!
■ Have the power tool repaired by the service
centre or a qualified electrician and only
using genuine replacement parts. This will
ensure that the safety of the appliance is
maintained.
WARNING!
■ Always ensure that the power plug or
the mains cable is replaced only by the
manufacturer of the appliance or by an
approved customer service provider. This
will ensure that the safety of the appliance is
maintained.
NOTE
► Replacement parts not listed (such as the
rechargeable battery, battery charger) can
be ordered via our service hotline.

PFBS 12 A1
GB
│
13 ■
Disposal
The packaging is made from environment-
ally friendly material and can be disposed of at your local recycling plant.
Do not dispose of power tools in
your normal household waste!
European Directive 2012/19/EU requires that
worn-out power tools be collected separately and
recycled in an environmentally compatible manner.
Do not dispose of batteries in your
normal domestic waste!
WARNING!
■ Remove the battery before disposal.
Defective or worn-out rechargeable batteries must
be recycled according to Directive 2006/66/EC.
Take the battery pack and/or
appliance to a nearby collection facility.
Please consult your local authorities regarding
suitable disposal of worn out power tools/battery
packs.
Kompernass Handels GmbH
warranty
Dear Customer,
This appliance has a 3-year warranty valid from
the date of purchase. If this product has any faults,
you, the buyer, have certain statutory rights. Your
statutory rights are not restricted in any way by the
warranty described below.
Warranty conditions
The validity period of the warranty starts from the
date of purchase. Please keep your original receipt
in a safe place. This document will be required as
proof of purchase.
If any material or production fault occurs within
three years of the date of purchase of the product,
we will either repair or replace the product for you
at our discretion. This warranty service is dependent
on you presenting the defective appliance and
the proof of purchase (receipt) and a short written
description of the fault and its time of occurrence.
If the defect is covered by the warranty, your product
will either be repaired or replaced by us. The repair
or replacement of a product does not signify the
beginning of a new warranty period.
Warranty period and statutory
claims for defects
The warranty period is not prolonged by repairs
effected under the warranty. This also applies to
replaced and repaired components. Any damage
and defects present at the time of purchase must
be reported immediately after unpacking. Repairs
carried out after expiry of the warranty period shall
be subject to a fee.
Scope of the warranty
This appliance has been manufactured in accordance with strict quality guidelines and inspected
meticulously prior to delivery.
The warranty covers material faults or production
faults. The warranty does not extend to product
parts subject to normal wear and tear or fragile
parts such as switches, batteries, baking moulds or
parts made of glass.
The warranty does not apply if the product has
been damaged, improperly used or improperly
maintained. The directions in the operating
instructions for the product regarding proper use
of the product are to be strictly followed. Uses
and actions that are discouraged in the operating
instructions or which are warned against must be
avoided.
This product is intended solely for private use and
not for commercial purposes. The warranty shall be
deemed void in cases of misuse or improper handling,
use of force and modifications/repairs which have
not been carried out by one of our authorised
Service centres.

PFBS 12 A1
■ 14
│
GB
Warranty claim procedure
To ensure quick processing of your case, please
observe the following instructions:
▯ Please have the till receipt and the item number
(e.g. IAN 12345) available as proof of purchase.
▯ You will find the item number on the type plate,
an engraving on the front page of the instructions
(bottom left), or as a sticker on the rear or bottom
of the appliance.
▯ If functional or other defects occur, please
contact the service department listed either by
telephone or by e-mail.
▯ You can return a defective product to us free of
charge to the service address that will be provided
to you. Ensure that you enclose the proof of
purchase (till receipt) and information about
what the defect is and when it occurred.
You can download these instructions
along with many other manuals,
product videos and software on
www.lidl-service.com.
Service
Service Great Britain
Tel.: 0871 5000 720 (£ 0.10/Min.)
E-Mail: kompernass@lidl.co.uk
IAN 279872
Importer
Please note that the following address is not the
service address. Please use the service address
provided in the operating instructions.
KOMPERNASS HANDELS GMBH
BURGSTRASSE 21
44867 BOCHUM
GERMANY
www.kompernass.com
Translation of the original
Conformity Declaration
We, KOMPERNASS HANDELS GMBH, documents officer: Mr. Semi Uguzlu, BURGSTR. 21,
44867 BOCHUM, Germany, hereby declare that
this product complies with the following standards,
normative documents and the EC directives:
Machinery Directive
(2006/42/EC)
EC Low Voltage Directive
(2014/35/EU)
EMC (Electromagnetic Compatibility)
(2014/30/EU)
RoHS Directive
(2011/65/EU)
Applied harmonised standards:
EN 60745-1:2009/A11:2010
EN 60745-2-23:2013
EN 55014-1:2006/A2:2011
EN 55014-2:2015
EN 60335-1:2012/A11:2014
EN 60335-2-29:2004/A2:2010
EN 61000-3-2:2014
EN 61000-3-3:2013
EN 62233:2008
Type designation of machine:
Cordless multi-grinder PFBS 12 A1
Year of manufacture: 07 - 2016
Serial number: IAN 279872
Bochum, 08/06/2016
Semi Uguzlu
- Quality Manager The right to effect technical changes in the context
of further development is reserved.

PFBS 12 A1
FI │ 15 ■
Sisällysluettelo
Johdanto .......................................................16
Määräystenmukainen käyttö .................................................. 16
Laitteen osat ...............................................................16
Toimitussisältö .............................................................. 16
Tekniset tiedot .............................................................. 16
Sähkötyökaluja koskevia yleisiä turvallisuusohjeita ...................17
1. Työpaikan turvallisuus .....................................................17
2. Sähköturvallisuus ......................................................... 17
3. Henkilöiden turvallisuus .................................................... 18
4. Sähkötyökalun käyttö ja käsittely ............................................. 18
5. Akkutyökalun käyttö ja käsittely ..............................................19
6. Huolto ................................................................. 19
Turvallisuusohjeet kaikkiin käyttöihin ............................................. 19
Lisää turvallisuusohjeita kaikkiin käyttöihin ........................................21
Lisää turvallisuusohjeita hiontaan ja katkaisuhiontaan ............................... 22
Lisäohjeita turvalliseen teräsharjalla työskentelyyn. . . . . . . . . . . . . . . . . . . . . . . . . . . . . . . . . . 22
Latureita koskevat turvallisuusohjeet ............................................. 23
Käyttö .........................................................23
Akun lataaminen ........................................................... 23
Akun asettaminen laitteeseen ja irrottaminen laitteesta .............................. 24
Akun varaustilan tarkastaminen ................................................24
Työkalun/kiristysholkin asentaminen/vaihtaminen ..................................24
Päälle ja pois päältä kytkentä / kierrosluvun säätäminen ............................ 24
Materiaalintyöstöä/työkalua/kierrosnopeusaluetta koskevia ohjeita ................... 24
Vinkkejä ja ohjeita .......................................................... 26
Huolto ja puhdistus ...............................................26
Hävittäminen ...................................................27
Kompernass Handels GmbH:n takuu ................................27
Huolto ....................................................................28
Maahantuoja ..............................................................28
Alkuperäisen vastaavuusvakuutuksen käännös ......................29

PFBS 12 A1
■ 16 │ FI
AKKUKÄYTTÖINEN PIENOISPORAKONE PFBS 12 A1
Johdanto
Onnittelut uuden laitteen hankinnasta. Olet valinnut
laadukkaan tuotteen. Käyttöohje on osa tätä tuotetta. Se sisältää turvallisuutta, käyttöä ja hävittämistä
koskevia tärkeitä ohjeita. Tutustu ennen tuotteen
käyttöä kaikkiin käyttö- ja turvallisuusohjeisiin. Käytä tuotetta vain kuvatulla tavalla ja vain mainittuihin
käyttötarkoituksiin. Kun luovutat tuotteen eteenpäin,
liitä mukaan kaikki tuotetta koskevat asiakirjat.
Määräystenmukainen käyttö
Akkukäyttöistä pienpora- ja hiomakonetta (mukana
toimitettuine) lisävarusteineen voidaan käyttää materiaalien kuten puun, metallin, muovin, keramiikan
tai kiven poraamiseen, jyrsimiseen, kaivertamiseen,
kiillottamiseen, puhdistamiseen, hiomiseen ja
katkaisemiseen kuivissa tiloissa. Laitteen muu käyttö
tai muuttaminen on määräystenvastaista, ja siihen
liittyy huomattava tapaturmariski. Valmistaja ei ota
mitään vastuuta määräystenvastaisesta käytöstä
aiheutuneista vahingoista. Laitetta ei ole tarkoitettu
ammattikäyttöön.
Laitteen osat
Akkukäyttöinen pienpora- ja hiomakone:
Virtakytkin / kierrosnopeuden säätö
Akkuvarauksen LED-merkkivalo
Akun vapautuspainike
Akku
Kiristysmutteri
Liitosmutteri
Karan lukitus
Akkulaturi (ks. kuva A):
Latausteline
Verkkovirtalaturi
Lataustilan merkkivalo punainen
10a
Lataustilan merkkivalo vihreä
Lisävarusteet (ks. kuva B):
6 HSS-poraa
2 kiinnitystuurnaa työkalun kiinnittämistä varten
3 kiillotuslaikkaa
4 hiomalaikkaa
1 metalliharja
16 katkaisulaikkaa
5 kiristysholkkia
2 muoviharjaa
3 jyrsinpäätä
2 kaiverruspäätä
5 hiontapäätä
1 kiintolenkki
Toimitussisältö
1 akkukäyttöinen pienoisporakone
1 latausteline ja verkkovirtalaturi
1 lisävarustesetti (50 osaa)
1 käyttöohje
Tekniset tiedot
Malli PFBS 12 A1:
Nimellisvirta: 12 V (tasavirta)
Nimelliskierrosluku
tyhjäkäynnillä: n 5000 - 25000 / min
-1
Laikkojen halkaisija maks.: 25 mm
Poraistukan kiristysalue:
maks. Ø 3,2 mm
Akku PFBS 12 A1-1:
TULO/input:
Nimellisjännite: 12 V
(tasavirta)
Kapasiteetti: 1300 mAh
Tyyppi: LITIUMIONI
Laturi PFBS 12 A1-2:
Ensisijainen (tulo/input):
Nimellisjännite: 100–240 V∼, 50–60 Hz
(vaihtovirta)
Nimellisottoteho: 0,3 A
Toissijainen (lähtö/output):
Nimellisjännite: 14,5 V
(tasavirta)
Nimellisvirta: 450 mA
Latauksen kesto: n. 3 tuntia
Suojausluokka: II /
(kaksoiseristys)
 Loading...