

DRUCKLUFT-SCHLAUCHTROMMEL / AIR HOSE REEL
ENROULEUR DE TUYAU PNEUMATIQUE PDST 10 B3
DRUCKLUFT-SCHLAUCHTROMMEL
Originalbetriebsanleitung
ENROULEUR DE
TUYAU PNEUMATIQUE
Traduction des instructions d’origine
BĘBEN NA WĄŻ NA
SPRĘŻONE POWIETRZE
Tłumaczenie oryginalnej instrukcji obsługi
NAVÍJACÍ BUBON
S TLAKOVOU HADICOU
Preklad originálneho návodu na obsluhu
IAN 345881_2004
AIR HOSE REEL
Translation of the original instructions
PERSLUCHT-SLANGHASPEL
Vertaling van de originele gebruiksaanwijzing
BUBEN S TLAKOVOU HADICÍ
Překlad originálního provozního návodu

Klappen Sie vor dem Lesen die Seite mit den Abbildungen aus und machen Sie sich anschließend mit allen
Funktionen des Gerätes vertraut.
Before reading, unfold the page containing the illustrations and familiarise yourself with all functions of
the device.
Avant de lire le mode d‘emploi, ouvrez la page contenant les illustrations et familiarisez-vous ensuite avec
toutes les fonctions de l‘appareil.
Vouw vóór het lezen de pagina met de afbeeldingen open en maak u vertrouwd met alle functies van het
apparaat.
Przed przeczytaniem proszę rozłożyć stronę z ilustracjami, a następnie proszę zapoznać się z wszystkimi
funkcjami urządzenia.
Před čtením si otevřete stranu s obrázky a potom se seznamte se všemi funkcemi přístroje.
Pred čítaním si odklopte stranu s obrázkami a potom sa oboznámte so všetkými funkciami prístroja.
DE / AT / CH Originalbetriebsanleitung Seite 1
GB/IE Translation of the original instructions Page 11
FR / BE Traduction des instructions d’origine Page 21
NL / BE Vertaling van de originele gebruiksaanwijzing Pagina 33
PL Tłumaczenie oryginalnej instrukcji obsługi Strona 43
CZ Překlad originálního provozního návodu Strana 53
SK Preklad originálneho návodu na obsluhu Strana 63

A
B C
D E

Inhaltsverzeichnis
Einleitung .............................................................. 2
Bestimmungsgemäßer Gebrauch ........................................................2
Ausstattung .........................................................................2
Lieferumfang ........................................................................2
Technische Daten ....................................................................2
Sicherheitshinweise ..................................................... 3
Restrisiko .............................................................. 4
Vor der Inbetriebnahme .................................................4
Montage .............................................................. 4
Montageort finden ...................................................................4
Druckluft-Schlauchtrommel montieren .....................................................5
Inbetriebnahme ........................................................5
Druckluft-Schlauchtrommel an eine Druckluftquelle anschließen ................................5
Druckluft-Schlauchtrommel an ein Druckluftwerkzeug anschließen ..............................5
Druckluft-Schlauchtrommel verwenden ....................................................5
Schlauch abrollen ....................................................................6
Schlauch aufrollen ...................................................................6
Schlauchstopper einstellen .............................................................6
Wartung und Reinigung .................................................. 6
Entsorgung ............................................................7
Garantie der Kompernaß Handels GmbH ...................................7
Service ................................................................ 9
Importeur .............................................................9
Original-Konformitätserklärung ...........................................9
PDST 10 B3
DE│AT│CH
│
1 ■

DRUCKLUFTSCHLAUCHTROMMEL
PDST 10 B3
Einleitung
Wir beglückwünschen Sie zum Kauf Ihres neuen
Gerätes. Sie haben sich damit für ein hochwertiges
Produkt entschieden. Die Bedienungsanleitung ist
Teil dieses Produkts. Sie enthält wichtige Hinweise
für Sicherheit, Gebrauch und Entsorgung. Machen
Sie sich vor der Benutzung des Produkts mit allen
Bedien- und Sicherheitshinweisen vertraut. Benutzen Sie das Produkt nur wie beschrieben und für
die angegebenen Einsatzbereiche. Händigen Sie
alle Unterlagen bei Weitergabe des Produkts an
Dritte mit aus.
Bestimmungsgemäßer Gebrauch
Die Druckluft-Schlauchtrommel dient in Verbindung
mit einem Kompressor zur Energieversorgung
von Druckluftwerkzeugen. Die Druckluft-Schlauchtrommel fungiert ausschließlich zum Transport von
Druckluft. Sie ist nicht dazu geeignet, Flüssigkeiten
zu transportieren. Benutzen Sie das Produkt nur
wie beschrieben und für die angegebenen Einsatzbereiche. Bewahren Sie diese Anleitung gut auf.
Händigen Sie alle Unterlagen bei Weitergabe des
Produkts an Dritte ebenfalls mit aus. Jegliche Anwendung, die von der bestimmungsgemäßen Verwendung abweicht ist untersagt und potentiell
gefährlich. Schäden durch Nichtbeachtung oder
Fehlanwendung werden nicht von der Garantie
abgedeckt und fallen nicht in den Haftungsbereich
des Herstellers. Das Gerät wurde für den Hausgebrauch konzipiert und darf nicht kommerziell oder
industriell genutzt werden.
Symbole auf dem Druckluftwerkzeug
WARNING!
Vor der Inbetriebnahme die
Bedienungsanleitung lesen.
Tragen Sie eine Staubschutzmaske.
Tragen Sie einen Augenschutz.
Tragen Sie einen Gehörschutz.
Tragen Sie Schutzhandschuhe
Ausstattung
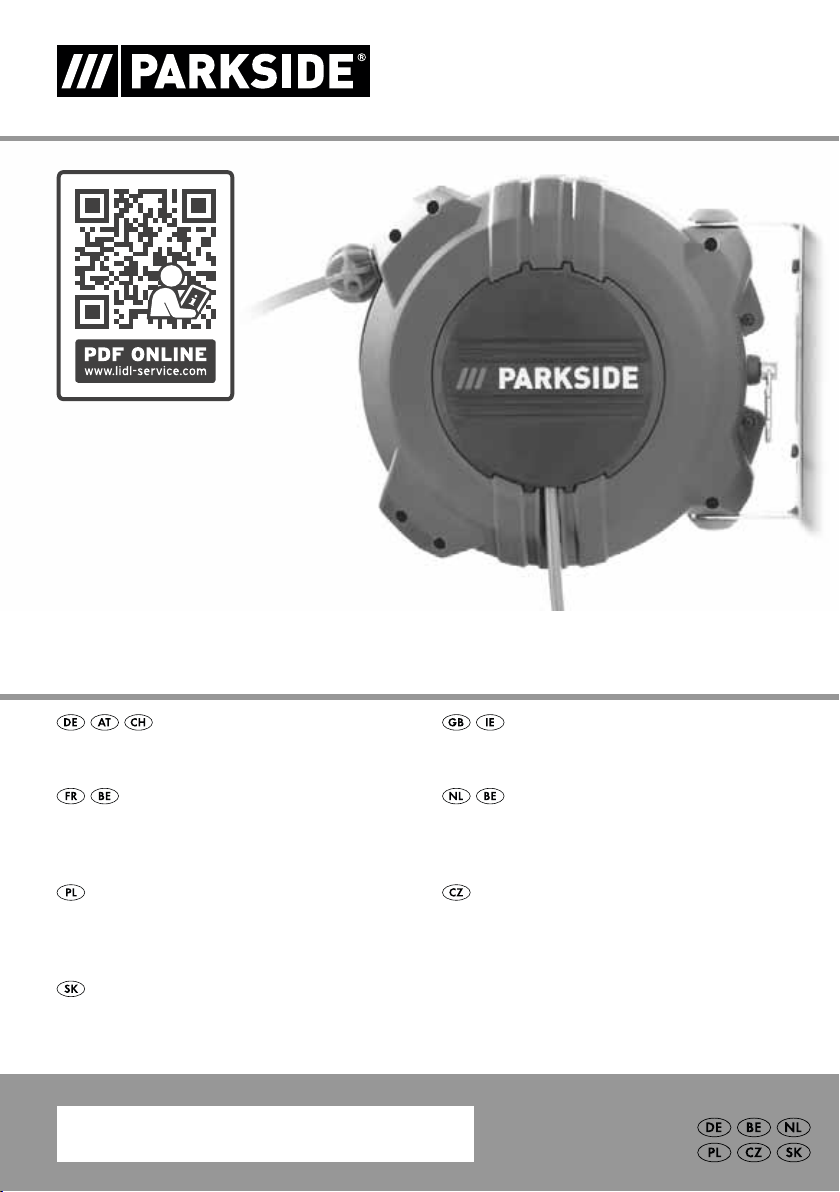
Trommelgehäuse
Schwenkbarer Befestigungsbügel
Haken zum Aufhängen
Schlauchstopper
Druckluft-Schlauch für Druckluftwerkzeug
Schnellkupplung
Druckluftanschluss
Schrauben
Befestigungsschrauben
Montagezubehör
Montageschrauben
- Dübel
Lieferumfang
1 Druckluft-Schlauchtrommel
1 Montagezubehör
(2x Montageschrauben, 2x Dübel)
1 Bedienungsanleitung
Technische Daten
Arbeitsdruck max. 10bar
Aufrollsystem Automatik
Länge Druckluftschlauch 10 m
Druckluft-Anschlussgröße 1/4“ = 6,35 mm
Gewicht ca. 1,7 kg
■ 2 │ DE
│AT│
CH
PDST 10 B3

WARNING!
Sicherheitshinweise
WARNUNG!
► BITTE LESEN SIE VOR DEM GEBRAUCH DIE
BEDIENUNGSANLEITUNG SORGFÄLTIG
DURCH. SIE IST BESTANDTEIL DES GERÄTES
UND MUSS JEDERZEIT VERFÜGBAR SEIN!
■ Dieses Gerät kann von Personen ab 16 Jahren
und darüber sowie von Personen mit verringerten physischen, sensorischen oder mentalen
Fähigkeiten oder Mangel an Erfahrung und
Wissen benutzt werden, wenn sie beaufsichtigt
oder bezüglich des sicheren Gebrauchs des
Gerätes unterwiesen wurden und die daraus
resultierenden Gefahren verstehen. Kinder dürfen
nicht mit dem Gerät spielen. Reinigung und
Benutzerwartung dürfen nicht von Kindern ohne
Beaufsichtigung durchgeführt werden.
■ In Verbindung mit einem Kompressor dient die
Druckluft-Schlauchtrommel zur Energieversorgung von Druckluftwerkzeugen. Die DruckluftSchlauchtrommel fungiert ausschließlich zum
Transport von Druckluft. Sie ist nicht dazu geeignet, Flüssigkeiten zu transportieren.
■ Die Druckluft-Schlauchtrommel ist aufgrund
derVorrichtung für die Montage an einer
geeigneten Wand oder Decke vorgesehen;
eine montagefreie Benutzung ist nicht erlaubt.
■ Die Druckluft-Schlauchtrommel ist nicht für den
gewerblichen, industriellen oder handwerklichen Gebrauch entwickelt worden. Vorgesehen ist dieses Produkt lediglich für die private
Nutzung. Die Druckluft-Schlauchtrommel darf
ausschließlich gemäß ihrer Bestimmung verwendet werden. Jede weitere, abweichende Benutzung ist untersagt!
■ Bestandteil der bestimmungsgemäßen Verwen-
dung ist auch die Berücksichtigung der in der
Bedienungsanleitung enthaltenen Sicherheitshinweise sowie der Montageanleitung. Für
Schäden, die durch nicht bestimmungsgemäßen
oder falschen Gebrauch entstanden sind übernimmt der Hersteller oder Händler keine Haftung.
■ Nur für dieses Produkt geeignetes Zubehör darf
verwendet werden. Personen, welche die Druckluft-Schlauchtrommel verwenden und ggf. Wartungsarbeiten durchführen, sind dazu verpflichtet sich mit dieser vertraut zu machen. Weiterhin
müssen sie über potentielle Gefahren informiert
sein. Die geltenden Unfallverhütungs vorschriften
sind korrekt und gewissenhaft einzuhalten.
■ Jegliche Veränderungen an der Druckluft-
Schlauchtrommel schließen eine Haftung des
Herstellers und damit verbundene Schäden aus.
■ Montieren Sie die Druckluft-Schlauchtrommel,
bevor Sie sie benutzen, um das Verletzungsrisiko auf ein Minimum zu reduzieren.
■ Verwenden Sie die Druckluft-Schlauchtrommel
ausschließlich mit Druckluft. Es ist nicht erlaubt,
die Druckluft-Schlauchtrommel mit Flüssigkeiten
zu benutzen.
■ Lassen Sie den Schlauch immer kontrolliert
aufrollen, denn die Druckluft-Schlauchtrommel
ist mit einer Spannfeder für den Aufrollmechanismus ausgestattet. Ein sich aufrollender
Schlauch kann bei nicht korrekter Verwendung
Verletzungen hervorrufen. Bei Beschädigung
des Aufrollmechanismus, ist die DruckluftSchlauchtrommel direkt außer Betrieb zu nehmen und durch einen Spezialisten zu reparieren. Öffnen Sie keineswegs selbst das Gehäuse
der Druckluft-Schlauchtrommel.
■ Benutzen Sie nur Zubehör in einwandfreiem
Zustand, das für die Verwendung mit der Druckluft-Schlauchtrommel vorgesehen ist.
■ Überschreiten Sie niemals den maximalen
Arbeitsdruck der Druckluft-Schlauchtrommel
oder den des verwendeten Druckluftwerkzeugs.
■ Schließen Sie die Druckluft-Schlauchtrommel nur
an Druckluftleitungen an, wenn sichergestellt ist,
dass ein Überschreiten des maximal zulässigen
Arbeitsdrucks um mehr als 10 % verhindert ist
(z. B. durch einen Druckminderer).
PDST 10 B3
DE│AT│CH
│
3 ■

■ Halten Sie den Druckluftschlauch immer von
scharfen Kanten, Hitze und Öl fern.
■ Überprüfen Sie immer den Druckluftschlauch,
bevor Sie die Druckluft-Schlauchtrommel verwenden.
■ Verwenden Sie die Druckluft-Schlauchtrommel
nur in Verbindung mit einem Kompressor.
Der Betrieb mit Pressluftflaschen ist untersagt.
■ Die Verwendung von Druckluftwerkzeugen mit
brennbaren Gasen ist untersagt. Es besteht
Explosionsgefahr!
■ Die Druckluft-Schlauchtrommel darf nicht für
andere Zwecke verwendet werden.
■ Lagern Sie die Druckluft-Schlauchtrommel nicht
in Reichweite von Kindern.
■ Niemals die Druckluft-Schlauchtrommel bzw.
deren Schläuche gegen Menschen oder Tiere
richten.
■ Bei Reparaturen sind ausschließlich Originaler-
satzteile zu benutzen. Nicht originale Ersatzteile
können schwere Beschädigungen hervorrufen.
■ Bei Durchführung von Wartungs-, Einstell- und
Reparaturarbeiten trennen Sie immer zuerst die
Druckluft-Schlauchtrommel von der Druckluftversorgung.
■ Veränderungen an der Druckluft-Schlauch-
trommel sind untersagt.
■ Verwenden Sie die Druckluft-Schlauchtrommel
nur, wenn sie sich in einem makellosen Zustand
befindet. Im Zweifelsfall lassen Sie sich vor der
Benutzung erst von einem Spezialisten beraten.
■ Lassen Sie Reparaturen nur von qualifizierten
Fachleuten durchführen.
■ Transportieren Sie die Druckluft-Schlauch-
trommel niemals durch Greifen an den
Schläuchen.
■ Halten Sie den Schlauch immer fest im Griff,
wenn Sie ihn von der Druckluftquelle oder einem Druckluftwerkzeug lösen.
Restrisiko
Auch wenn Sie das Gerät vorschriftsmäßig bedienen,
bleiben immer Restrisiken bestehen. Folgende
Gefahren können im Zusammenhang mit der Bauweise und Ausführung dieser Druckluft- Schlauchtrommel auftreten:
– Gefahr durch herumschlagende Druckluft-
schläuche.
– Sturzgefahr durch herumliegende Druckluft-
schläuche.
Vermindern Sie das Restrisiko, indem Sie das Gerät
sorgfältig und vorschriftsmäßig benutzen.
Vor der Inbetriebnahme
■ Nehmen Sie alle Teile aus der Verpackung und
kontrollieren Sie, ob die Druckluft-Schlauchtrommel oder die Einzelteile Schäden aufweisen. Ist
dies der Fall, benutzen Sie die DruckluftSchlauchtrommel nicht. Wenden Sie sich an den
Hersteller über die angegebene Serviceadresse.
■ Entfernen Sie alle Schutzfolien und sonstige
Transportverpackungen.
■ Prüfen Sie, ob die Lieferung vollständig ist.
Montage
Montageort finden
■ Montieren Sie die Druckluft-Schlauchtrommel an
einer geeigneten Decke oder Wand, der montagefreie Gebrauch der Druckluft-Schlauchtrommel ist nicht zulässig.
■ Wählen Sie den Ort für die Montage der
Druckluft-Schlauchtrommel so, dass dieser kein
Hindernis darstellt.
■ Bei Deckenmontage sollte auf eine Montage-
höhe von mind. 2,5 Meter geachtet werden.
■ Für die Montage benötigen Sie folgende Hilfs-
mittel: eine Bohrmaschine, einen geeigneten
Bohrer sowie einen Schraubendreher.
■ 4 │ DE
│AT│
CH
PDST 10 B3

Druckluft-Schlauchtrommel
montieren
WARNUNG! VERLETZUNGSGEFAHR!
► Inkorrekte Montage der Druckluft-Schlauch-
trommel kann zu Verletzungen führen.
■ Stellen Sie sicher, dass sich keine Leitungen
oder Rohre am Montageort befinden. Verwenden Sie dazu ggf. einen Detektor oder
nehmen Sie Kontakt zu einem Fachmann auf.
■ Beachten Sie auch die Sicherheitshinweise zu
der verwendeten Bohrmaschine.
HINWEIS! BESCHÄDIGUNGSGEFAHR!
► Inkorrekte Montage kann zu Beschädigungen
führen.
■ Stellen Sie sicher, dass das Trägermaterial am
Montageort das Gewicht der DruckluftSchlauchtrommel trägt. Bei Fragen wenden Sie
sich an einen Spezialisten.
1. Verwenden Sie den schwenkbaren Befestigungsbügel als Schablone. Den Befestigungsbügel können Sie von der DruckluftSchlauchtrommel trennen, nachdem Sie die
beiden Schrauben durch Drehen gegen den
Uhrzeigersinn entfernt haben (siehe Abb. C).
Markieren Sie dazu die Position der Bohrungen
auf dem Trägermaterial mit einem Stift.
2. Bohren Sie die benötigten Löcher für die Montage
in das Trägermaterial.
3. Montieren Sie den Befestigungsbügel mit
geeignetem Befestigungsmaterial (siehe
Montagezubehör -).
4. Befestigen Sie die Druckluft-Schlauchtrommel
wieder an dem Befestigungsbügel.
Drehen Sie dazu die Schrauben, die Sie in
Schritt 1 entfernt haben, wieder im Uhrzeigersinn fest. (siehe Abb. C)
Inbetriebnahme
Druckluft-Schlauchtrommel an eine
Druckluftquelle anschließen
♦ Stecken Sie den Druckluftanschluss der
Druckluft -Schlauchtrommel in die Schnellkupplung der Druckluftquelle.
Druckluft-Schlauchtrommel an ein
Druckluftwerkzeug anschließen
HINWEIS! BESCHÄDIGUNGSGEFAHR!
► Unkorrekter Umgang mit der Druckluft-
Schlauchtrommel kann zu Beschädigungen
führen.
■ Beachten Sie immer den maximalen Arbeits-
druck der Druckluft-Schlauchtrommel und die
Vereinbarkeit der verwendeten Anschlussstücke.
Über die Schnellkupplung des DruckluftSchlauches kann dieser sofort über den Lufteinlass eines Druckluftwerkzeugs mit diesem verbunden werden.
Druckluft-Schlauchtrommel
verwenden
WARNUNG! VERLETZUNGSGEFAHR!
► Die Druckluft-Schlauchtrommel ist mit einem
Rücklaufmechanismus ausgestattet. Dieser
wird durch eine starke Feder betrieben.
Bei unkorrektem Aufrollen des DruckluftSchlauchs kann es zu Verletzungen
kommen.
■ Lassen Sie den Druckluft-Schlauch niemals
unkontrolliert zurückschnellen.
■ Bei beschädigtem Rücklaufmechanismus neh-
men Sie die Druckluft-Schlauchtrommel umgehend außer Betrieb. Lassen Sie den entstandenen Schaden durch einen Spezialisten
reparieren.
■ Die Druckluft-Schlauchtrommel besitzt einen
Arretierungs- und Rücklaufmechanismus. Dadurch wird ein leichtes Ausziehen und
Rückführen des Druckluft-Schlauches
ermöglicht.
PDST 10 B3
DE│AT│CH
│
5 ■

■ Diese Arretierung erzeugt beim Auf- und Ab-
rollen ein knarrendes Geräusch. Dies ist kein
Fehler. Sollte sich das Geräusch nach zahlreichen Anwendungen und/oder bei Problemen
mit dem Mechanismus verändern, nehmen Sie
fachmännische Hilfe in Anspruch oder wenden
Sie sich an den Kundendienst.
Schlauch abrollen
♦ Ziehen Sie den Druckluft-Schlauch sorgsam
auf die gewünschte Arbeitslänge für das Druckluftwerkzeug aus dem Trommelgehäuse. Wenn
Sie den Druckluft-Schlauch nach einem Klickgeräusch loslassen, rastet die Arretierung bei
dieser Länge ein.
Schlauch aufrollen
♦ Durch einen kurzen Zug am Druckluft-
Schlauch können Sie die Arretierung lösen.
♦ Achten Sie darauf, dass Sie den Druckluft-
Schlauch kontrolliert zurück in das Trommelgehäuse aufrollen.
Schlauchstopper einstellen
Die Position des Schlauchstoppers kann eingestellt werden und unterbricht das Aufrollen des
Druckluft-Schlauches auf der gewünschten
Länge. Zum Verstellen des Schlauchstoppers
benötigen Sie einen Kreuzschlitz-Schraubendreher
(nicht im Lieferumfang enthalten).
♦ Lösen Sie die Befestigungsschrauben mit
dem Kreuzschlitz-Schraubendreher
(sieheAbb.D).
♦ Schieben Sie den Schlauchstopper entlang
des Druckluft-Schlauches auf die gewünschte
Position.
♦ Ziehen Sie die Befestigungsschrauben
wieder an.
Wartung und Reinigung
HINWEIS
► Die Druckluft-Schlauchtrommel muss für ein
einwandfreies Funktionieren sowie für die
Einhaltung der Sicherheitsanforderungen
regelmäßig gewartet und überholt werden.
Unsachgemäßer und falscher Betrieb können
zu Ausfällen und Schäden am Gerät führen.
■ Benutzen Sie niemals scharfe und/oder krat-
zende Reinigungs- bzw. Lösungsmittel. Diese
könnten die Kunststoffteile der DruckluftSchlauchtrommel beschädigen.
■ Achten Sie darauf, dass niemals Wasser in das
Innere der Druckluft-Schlauchtrommel gelangt.
Achten Sie darauf, dass das Gehäuse und der
Druckluftschlauch staub- und schmutzfrei bleibt.
Reiben Sie dafür regelmäßig die DruckluftSchlauchtrommel mit einem sauberen Tuch ab.
■ Bevor Sie den Druckluftschlauch in das Ge-
häuse zurückführen, reinigen Sie nach Möglichkeit den Druckluftschlauch für die weitere
Verwendung.
■ Reinigen Sie die Druckluft-Schlauchtrommel
sowie den Schlauch in regelmäßigen Abständen mit einem feuchten Tuch und ein wenig
Schmierseife.
■ 6 │ DE
│AT│
CH
PDST 10 B3

Entsorgung
Die Verpackung besteht aus umweltfreundlichen Materialien. Sie kann in
den örtlichen Recyclebehältern entsorgt
werden.
Werfen Sie das Gerät nicht in den Hausmüll!
Möglichkeiten zur Entsorgung des ausgedienten
Gerätes erfahren Sie bei Ihrer Gemeinde- oder
Stadtverwaltung.
Entsorgen Sie die Verpackung umweltgerecht. Beachten Sie die Kennzeichnung auf den verschiedenen Verpack-
ungsmaterialien und trennen Sie diese
gegebenenfalls gesondert. Die Verpackungsmaterialien sind gekennzeichnet mit Abkürzungen (a) und
Ziffern (b) mit folgender Bedeutung: 1–7: Kunststoffe,
20–22: Papier und Pappe, 80–98: Verbundstoffe
Möglichkeiten zur Entsorgung des aus-
gedienten Produkts erfahren Sie bei
Ihrer Gemeinde- oder Stadtverwaltung.
Das Produkt ist recycelbar, unterliegt
einer erweiterten Herstellerverantwor-
tung und wird getrennt gesammelt.
Garantie der
Kompernaß Handels GmbH
Sehr geehrte Kundin, sehr geehrter Kunde,
Sie erhalten auf dieses Gerät 3 Jahre Garantie ab
Kaufdatum. Im Falle von Mängeln dieses Produkts
stehen Ihnen gegen den Verkäufer des Produkts
gesetzliche Rechte zu. Diese gesetzlichen Rechte
werden durch unsere im Folgenden dargestellte
Garantie nicht eingeschränkt.
Garantiebedingungen
Die Garantiefrist beginnt mit dem Kaufdatum. Bitte
bewahren Sie den Kassenbon gut auf. Dieser wird
als Nachweis für den Kauf benötigt.
Tritt innerhalb von drei Jahren ab dem Kaufdatum
dieses Produkts ein Material- oder Fabrikationsfehler
auf, wird das Produkt von uns – nach unserer Wahl
– für Sie kostenlos repariert, ersetzt oder der Kaufpreis erstattet. Diese Garantieleistung setzt voraus,
dass innerhalb der Dreijahresfrist das defekte Gerät und der Kaufbeleg (Kassenbon) vorgelegt und
schriftlich kurz beschrieben wird, worin der Mangel
besteht und wann er aufgetreten ist.
Wenn der Defekt von unserer Garantie gedeckt ist,
erhalten Sie das reparierte oder ein neues Produkt
zurück. Mit Reparatur oder Austausch des Produkts
beginnt kein neuer Garantiezeitraum.
PDST 10 B3
DE│AT│CH
│
7 ■

Garantiezeit und gesetzliche
Mängelansprüche
Die Garantiezeit wird durch die Gewährleistung
nicht verlängert. Dies gilt auch für ersetzte und
reparierte Teile. Eventuell schon beim Kauf vorhandene Schäden und Mängel müssen sofort nach
dem Auspacken gemeldet werden. Nach Ablauf
der Garantiezeit anfallende Reparaturen sind kostenpflichtig.
Garantieumfang
Das Gerät wurde nach strengen Qualitätsrichtlinien
sorgfältig produziert und vor Auslieferung gewissenhaft geprüft.
Die Garantieleistung gilt für Material- oder Fabrikationsfehler. Diese Garantie erstreckt sich nicht auf
Produktteile, die normaler Abnutzung ausgesetzt
sind und daher als Verschleißteile angesehen werden können oder für Beschädigungen an zerbrechlichen Teilen, z. B. Schalter oder Teile, die aus Glas
gefertigt sind.
Diese Garantie verfällt, wenn das Produkt beschädigt, nicht sachgemäß benutzt oder gewartet wurde.
Für eine sachgemäße Benutzung des Produkts sind
alle in der Bedienungsanleitung aufgeführten
Anweisungen genau einzuhalten. Verwendungszwecke und Handlungen, von denen in der Bedienungsanleitung abgeraten oder vor denen gewarnt wird, sind unbedingt zu vermeiden.
Das Produkt ist nur für den privaten und nicht für
den gewerblichen Gebrauch bestimmt. Bei missbräuchlicher und unsachgemäßer Behandlung,
Gewaltanwendung und bei Eingriffen, die nicht
von unserer autorisierten Serviceniederlassung
vorgenommen wurden, erlischt die Garantie.
Garantiezeit gilt nicht bei
■ normaler Abnutzung der Akkukapazität
■ gewerblichen Gebrauch des Produktes
■ Beschädigung oder Veränderung des Produktes
durch den Kunden
■ Missachtung der Sicherheits- und Wartungs-
vorschriften, Bedienungsfehler
■ Schäden durch Elementarereignisse
Abwicklung im Garantiefall
Um eine schnelle Bearbeitung Ihres Anliegens zu
gewährleisten, folgen Sie bitte den folgenden Hinweisen:
■ Bitte halten Sie für alle Anfragen den Kassen-
bon und die Artikelnummer (z.B.IAN123456)
als Nachweis für den Kauf bereit.
■ Die Artikelnummer entnehmen Sie bitte dem
Typenschild am Produkt, einer Gravur am Produkt, dem Titelblatt der Bedienungsanleitung
(unten links) oder dem Aufkleber auf der Rückoder Unterseite des Produktes.
■ Sollten Funktionsfehler oder sonstige Mängel
auftreten, kontaktieren Sie zunächst die nachfolgend benannte Serviceabteilung telefonisch
oder per E-Mail.
■ Ein als defekt erfasstes Produkt können Sie dann
unter Beifügung des Kaufbelegs (Kassenbon)
und der Angabe, worin der Mangel besteht und
wann er aufgetreten ist, für Sie portofrei an die
Ihnen mitgeteilte Serviceanschrift übersenden.
Auf www.lidl-service.com können Sie
diese und viele weitere Handbücher,
Produktvideos und Installationssoftware herunterladen.
■ 8 │ DE
│AT│
CH
Mit diesem QR-Code gelangen Sie direkt auf die
Lidl-Service-Seite (www.lidl-service.com) und können mittels der Eingabe der Artikelnummer (IAN)
345881_2004 Ihre Bedienungsanleitung öffnen.
PDST 10 B3
Service
Service Deutschland
Tel.: 0800 5435 111 (Kostenfrei
aus dem dt. Festnetz/Mobilfunknetz)
E-Mail: kompernass@lidl.de
Service Österreich
Tel.: 0820 201 222 (0,15 EUR/Min.)
E-Mail: kompernass@lidl.at
Service Schweiz
Tel.: 0842 665566 (0,08 CHF/Min.,
Mobilfunk max. 0,40 CHF/Min.)
E-Mail: kompernass@lidl.ch
IAN 345881_2004
OriginalKonformitätserklärung
Wir, KOMPERNASS HANDELS GMBH, Dokumentenverantwortlicher: Herr Semi Uguzlu,
BURGSTR. 21, 44867 BOCHUM, DEUTSCHLAND, erklären hiermit, dass dieses Produkt mit
den folgenden Normen, normativen Dokumenten
und EG-Richtlinien übereinstimmt:
Maschinenrichtlinie
(2006/42/EG)
Typ/Gerätebezeichnung
Druckluft-Schlauchtrommel PDST 10 B3
Herstellungsjahr: 07–2020
Importeur
Bitte beachten Sie, dass die folgende Anschrift
keine Serviceanschrift ist. Kontaktieren Sie zunächst
die benannte Servicestelle.
KOMPERNASS HANDELS GMBH
BURGSTRASSE 21
44867 BOCHUM
DEUTSCHLAND
www.kompernass.com
Seriennummer: IAN 345881_2004
Bochum, 17.07.2020
Semi Uguzlu
- Qualitätsmanager Technische Änderungen im Sinne der Weiterent-
wicklung sind vorbehalten.
PDST 10 B3
DE│AT│CH
│
9 ■

■ 10 │ DE
│AT│
CH
PDST 10 B3

Contents
Introduction ...........................................................12
Intended use .......................................................................12
Features ..........................................................................12
Package contents ...................................................................12
Technical specifications ..............................................................12
Safety instructions .....................................................13
Residual risk ..........................................................14
Before use ............................................................14
Installation ...........................................................14
Finding an installation site ............................................................14
Mounting the compressed air hosereel ..................................................15
Commissioning ........................................................15
Connecting the compressed air hose reel to a compressed air source ..........................15
Connecting the compressed air hose reel to a compressed air tool .............................15
Using the compressed air hose reel .....................................................15
Unrolling the hose ..................................................................16
Rolling up the hose ..................................................................16
Adjusting the hose stopper ............................................................16
Maintenance and cleaning ...............................................16
Disposal ..............................................................17
Kompernass Handels GmbH warranty ....................................17
Service ...............................................................18
Importer .............................................................18
Original Declaration of Conformity ....................................... 19
PDST 10 B3
GB│IE
│
11 ■

AIR HOSE REEL PDST 10 B3
Introduction
Congratulations on the purchase of your new
appliance. You have chosen a high-quality product.
The operating instructions are part of this product.
They contain important information about safety,
usage and disposal. Before using the product,
please familiarise yourself with all of the operating
and safety instructions. Use the product only as
described and for the range of applications specified. Please also pass these operating instructions
on to any future owner.
Intended use
The compressed air hose reel is used in conjunction
with a compressor to supply compressed air tools
with power. The compressed air hose reel is exclusively for transporting compressed air. It is not suitable for transporting liquids. Use the product only
as described and for the range of applications
specified. Please keep these instructions in a safe
place for future reference. Pass all relevant documents to any future owner. Any use which deviates
from the intended use is prohibited and potentially
dangerous. Damage caused by failure to observe
the instructions or misuse is not covered by the
warranty and does not fall under the manufacturer's
liability. The appliance is designed for domestic use
and must not be used for commercial or industrial
purposes.
Symbols on the compressed air tool
WARNING!
Read the operating instructions
before use.
Wear a dust mask.
Wear protective goggles.
Wear hearing protection.
Wear protective gloves.
Features
Drum housing
Pivoting mounting bracket
Hook for hanging
Hose stopper
Compressed air hose for compressed air tools
Quick-release coupling
Compressed air connection
Screws
Fastening screws
Mounting accessories
Mounting screws
- Wall plugs
Package contents
1 air Hose Reel
1 mounting accessories
(2x mounting screws, 2x wall plugs)
1 set of operating instructions
■ 12 │ GB
│
Technical specifications
Working pressure max. 10bar
Rewind system Automatic
Length of compressed air hose 10 m
Compressed air connection size 1/4" = 6.35 mm
Weight approx. 1.7 kg
IE
PDST 10 B3

WARNING!
Safety instructions
WARNING!
► PLEASE READ THE OPERATING INSTRUC-
TIONS CAREFULLY BEFORE USE. THEY ARE
A PART OF THIS APPLIANCE AND MUST BE
AVAILABLE AT ALL TIMES!
■ This appliance may be used by people aged
16 years and above and by people with limited
physical, sensory or mental capabilities or lack
of experience and knowledge, provided that
they are under supervision or have been told
how to use the appliance safely and are aware
of the potential risks. Do not allow children to
use the appliance as a toy. Cleaning and user
maintenance tasks may not be carried out by
children unless they are supervised.
■ The compressed air hose reel is used in conjunc-
tion with a compressor to supply compressed
air tools with power. The compressed air hose
reel is exclusively for transporting compressed
air. It is not suitable for transporting liquids.
■ The compressed air hose reel is designed to be
mounted on a suitable wall or ceiling; use
without mounting is not permitted.
■ The compressed air hose reel has not been
developed for commercial or industrial use or
use in workshops. This product is intended for
private use only. The compressed air hose reel
must only be used for its intended purpose.
Any other use deviating from this is prohibited!
■ Proper use also involves compliance with the
safety instructions as well as the assembly
instructions contained in the operating instructions. The manufacturer or dealer accepts no
liability for damage caused by improper or
incorrect use.
■ Use only accessories suitable for this product.
People who use the compressed air hose reel
and carry out any maintenance work must
familiarise themselves with it. They must also be
informed of potential hazards. The applicable
accident prevention regulations must be
observed correctly and conscientiously.
■ The manufacturer shall not be liable for
damage resulting from modifications made to
the compressed air hose reel.
■ Mount the compressed air hose reel before
using it to minimise the risk of injury.
■ The compressed air hose reel must only be used
with compressed air. Do not use the
compressed air hose reel with liquids.
■ Always allow the hose to roll up in a controlled
manner, since the compressed air hose reel
rewind mechanism is equipped with a tension
spring. A hose can cause injury while rolling up
if not used correctly. If the rewind mechanism is
damaged, the compressed air hose reel must be
taken out of operation immediately and repaired
by a specialist. Do not open the housing of the
compressed air hose reel yourself.
■ Only use accessories that are in perfect
condition and are designed for use with the
compressed air hose reel.
■ Never exceed the maximum working pressure of
the compressed air hose reel or the compressed
air tool being used.
■ Do not connect the compressed air hose reel to
compressed air lines until you have ensured that
the maximum permissible working pressure
cannot be exceeded by more than 10% (e.g.
by using a pressure reducer).
PDST 10 B3
GB│IE
│
13 ■

■ Always keep the compressed air hose away
from sharp edges, heat and oil.
■ Always check the compressed air hose before
using the compressed air hose reel.
■ The compressed air hose reel must only be used
in conjunction with a compressor. Operation
with compressed air cylinders is prohibited.
■ The use of pneumatic tools with flammable
gases is prohibited. There is a risk of an
explosion!
■ The compressed air hose reel must not be used
for other purposes.
■ Do not store the compressed air hose reel within
reach of children.
■ Never point the compressed air hose reel or its
hoses at people or animals.
■ Always use original spare parts for repairs.
Non-original spare parts can cause serious
damage.
■ When carrying out maintenance, adjustment
and repair work, always disconnect the
compressed air hose reel from the compressed
air supply first.
■ Do not make any modifications to the
compressed air hose reel.
■ Do not use the compressed air hose reel unless
it is in perfect condition. If in doubt, consult a
specialist before using the appliance.
■ Have all repairs carried out by qualified
professionals.
■ Never transport the compressed air hose reel
by holding onto the hoses.
■ Always hold the hose firmly in place when
disconnecting it from the compressed air source
or a compressed air tool.
Residual risk
Even if the appliance is operated properly, there
will still be residual risks. The following hazards
may occur in connection with the construction and
design of this compressed air hose reel:
– Danger caused by compressed air hoses
thrashing around.
– Risk of tripping due to compressed air hoses
lying around.
Reduce the residual risks by using the appliance
carefully and in accordance with the instructions.
Before use
■ Remove all parts from the packaging and check
whether the compressed air hose reel or the
individual parts are damaged. If this is the case,
do not use the compressed air hose reel.
Contact the manufacturer at the specified
service address.
■ Remove all protective films and other transport
packaging.
■ Check that the delivery is complete.
Installation
Finding an installation site
■ Mount the compressed air hose reel on a suit-
able ceiling or wall; use of the compressed air
hose reel without mounting is not permitted.
■ Select a location for mounting the compressed
air hose reel where it will not cause an obstruction.
■ With ceiling mounting, a mounting height of at
least 2.5 metres should be observed.
■ You will need the following tools to mount the
appliance: a drill, a suitable drill bit and a
screwdriver.
■ 14 │ GB
│
IE
PDST 10 B3

Mounting the compressed air
hosereel
WARNING! RISK OF INJURY!
► Incorrect installation of the compressed air
hose reel can lead to injuries.
■ Make sure that there are no cables or pipes at
the installation site. If necessary, use a detector
or contact a specialist.
■ Also observe the safety instructions for the drill
that is used.
NOTE! RISK OF DAMAGE!
► Incorrect installation can lead to damage.
■ Make sure that the support material (wall) at
the installation location is strong enough to
support the weight of the compressed air hose
reel. If you have any questions, please contact
a specialist.
1. Use the pivoting mounting bracket as a
template. You can disconnect the mounting
bracket from the compressed air hose reel
after you have removed the two screws by
turning them anticlockwise (see fig. C).
Mark the position of the holes on the support
material with a pencil.
2. Drill the holes required for mounting in the
support material.
3. Mount the mounting bracket with suitable
fixing material (see mounting accessories
-).
4. Reattach the compressed air hose reel to the
mounting bracket.
To do this, screw the screws that you
removed in step 1 back in clockwise (see Figure
C)
Commissioning
Connecting the compressed air hose
reel to a compressed air source
♦ Plug the compressed air connection of the
compressed air hose reel into the quick coupling
of the compressed air source.
Connecting the compressed air hose
reel to a compressed air tool
NOTE! RISK OF DAMAGE!
► Improper handling of the compressed air
hose reel can lead to damage.
■ Never exceed the maximum working pressure
of the compressed air hose reel and ensure that
the connectors used are compatible.
The compressed air hose can be immediately
connected to the compressed air tool via the air
inlet of the compressed air tool using the quick
coupling.
Using the compressed air hose reel
WARNING! RISK OF INJURY!
► The compressed air hose reel is equipped
with a return mechanism. This is operated by
a strong spring. If the compressed air hose
rolls up incorrectly, injuries may occur.
■ Never allow the compressed air hose to
spring back in an uncontrolled way.
■ If the return mechanism is damaged, stop using
the compressed air hose reel immediately.
Have the damage repaired by a specialist.
■ The compressed air hose reel has a locking and
return mechanism. This makes it easy to pull out
and return the compressed air hose.
PDST 10 B3
GB│IE
│
15 ■

■ The locking device generates a clicking noise
when rolling up and unrolling. This is not a fault.
If the noise changes after using the equipment
numerous times and/or if there are problems
with the mechanism, seek expert assistance or
contact customer service.
Unrolling the hose
♦ Pull the compressed air hose carefully out
ofthe drum housing to the desired working
length for the pneumatic tool. If you release
thecompressed air hose after a click, the
locking device engages at this length.
Rolling up the hose
♦ A short pull on the compressed air hose
releases the lock.
♦ Make sure that the compressed air hose
rolls back into the drum housing in a
controlled manner.
Adjusting the hose stopper
The position of the hose stopper can be
adjusted and interrupts the rolling up of the
compressed air hose to the desired length. You
will need a Phillips screwdriver (not included) to
adjust the hose stopper.
♦ Undo the fastening screws with the Phillips
screwdriver (see fig. D).
♦ Slide the hose stopper along the
compressed air hose to the desired position.
♦ Retighten the fastening screws.
Maintenance and cleaning
NOTE
► The compressed air hose reel must be
serviced regularly and overhauled to ensure
proper functioning and compliance with
safety requirements. Improper and incorrect
operation can lead to failures and damage
tothe appliance.
■ Never use harsh and/or abrasive cleaning
agents or solvents. These could damage the
plastic parts of the compressed air hose reel.
■ Never allow water to get inside the compressed
air hose reel. Make sure that the housing and the
compressed air hose remain free of dust and dirt.
To ensure this is the case, wipe the compressed
air hose reel regularly with a clean cloth.
■ Before returning the compressed air hose to the
housing, clean the compressed air hose for
further use if possible.
■ Clean the compressed air hose reel and the
hose with a damp cloth and a little soap at
regular intervals.
■ 16 │ GB
│
IE
PDST 10 B3
Disposal
The packaging consists of environmentally friendly material. It can be
disposed of in local recycling
containers.
Do not dispose of the appliance in the normal
domestic waste!
Your local community or municipal authorities can
provide information on how to dispose of the
worn-out appliance.
Dispose of the packaging in an environmentally friendly manner. Note
the labelling on the packaging and
separate the packaging material
components for disposal if necessary. The packaging material is labelled with abbreviations (a)
and numbers (b) with the following meanings:
1–7: plastics, 20–22: paper and cardboard,
80–98: composites.
Your local community or municipal
authorities can provide information on
how to dispose of the worn-out product.
The product is recyclable, subject to
extended producer responsibility and
is collected separately.
Kompernass Handels GmbH
warranty
Dear Customer,
This appliance has a 3-year warranty valid from the
date of purchase. If this product has any faults, you,
the buyer, have certain statutory rights. Your statutory rights are not restricted in any way by the
warranty described below.
Warranty conditions
The warranty period starts on the date of purchase.
Please keep your receipt in a safe place. This will
be required as proof of purchase.
If any material or manufacturing fault occurs within
three years of the date of purchase of the product,
we will either repair or replace the product for you
or refund the purchase price (at our discretion).
This warranty service requires that you present the
defective appliance and the proof of purchase
(receipt) within the three-year warranty period,
along with a brief written description of the fault
and of when it occurred.
If the defect is covered by the warranty, your
product will either be repaired or replaced by us.
The repair or replacement of a product does not
signify the beginning of a new warranty period.
Warranty period and statutory claims for
defects
The warranty period is not prolonged by repairs
effected under the warranty. This also applies to
replaced and repaired components. Any damage
and defects present at the time of purchase must be
reported immediately after unpacking. Repairs
carried out after expiry of the warranty period shall
be subject to a fee.
PDST 10 B3
GB│IE
│
17 ■
Scope of the warranty
This appliance has been manufactured in accordance with strict quality guidelines and inspected
meticulously prior to delivery.
The warranty covers material faults or production
faults. The warranty does not extend to product
parts subject to normal wear and tear or to fragile
parts which could be considered as consumable
parts such as switches or parts made of glass.
The warranty does not apply if the product has
been damaged, improperly used or improperly
maintained. The directions in the operating instructions for the product regarding proper use of the
product are to be strictly followed. Uses and
actions that are discouraged in the operating
instructions or which are warned against must be
avoided.
This product is intended solely for private use and
not for commercial purposes. The warranty shall be
deemed void in cases of misuse or improper
handling, use of force and modifications / repairs
which have not been carried out by one of our
authorised Service centres.
The warranty period does not apply to
■ Normal reduction of the battery capacity
overtime
■ Commercial use of the product
■ Damage to or alteration of the product by the
customer
■ Non-compliance with safety and maintenance
instructions, operating errors
■ Damage caused by natural hazards
Warranty claim procedure
To ensure quick processing of your case, please
observe the following instructions:
■ Please have the till receipt and the item number
(e.g.IAN12345) available as proof of purchase.
■ You will find the item number on the type plate
on the product, an engraving on the product,
on the front page of the operating instructions
(below left) or on the sticker on the rear or
bottom of the product.
■ If functional or other defects occur, please
contact the service department listed either by
telephone or by e-mail.
■ You can return a defective product to us free of
charge to the service address that will be
provided to you. Ensure that you enclose the
proof of purchase (till receipt) and information
about what the defect is and when it occurred.
You can download these instructions
along with many other manuals,
product videos and installation software at www.lidl-service.com.
This QR code will take you directly to the Lidl
service page (www.lidl-service.com) where you
can open your operating instructions by entering
the item number (IAN) 345881_2004.
Service
Service Great Britain
Tel.: 0800 404 7657
E-Mail: kompernass@lidl.co.uk
Service Ireland
Tel.: 1890 930 034
(0,08 EUR/Min., (peak))
(0,06 EUR/Min., (off peak))
E-Mail: kompernass@lidl.ie
IAN 345881_2004
Importer
Please note that the following address is not the
service address. Please use the service address
provided in the operating instructions.
KOMPERNASS HANDELS GMBH
BURGSTRASSE 21
44867 BOCHUM
GERMANY
www.kompernass.com
■ 18 │ GB
│
IE
PDST 10 B3

Original Declaration of Conformity
We, KOMPERNASS HANDELS GMBH, document officer: Mr Semi Uguzlu, BURGSTR. 21,
44867 BOCHUM, GERMANY, hereby declare that this product complies with the following standards,
normative documents and EC directives:
Machinery Directive
(2006/42/EC)
Type/appliance designation
Air Hose Reel PDST 10 B3
Year of manufacture: 07–2020
Serial number: IAN 345881_2004
Bochum, 17/07/2020
Semi Uguzlu
- Quality Manager We reserve the right to make technical changes in the context of further product development.
PDST 10 B3
GB│IE
│
19 ■

■ 20 │ GB
│
IE
PDST 10 B3

Table des matières
Introduction ...........................................................22
Utilisation conforme à l'usage prévu ....................................................22
Équipement ........................................................................22
Matériel livré ......................................................................22
Caractéristiques techniques ...........................................................22
Consignes de sécurité ...................................................23
Risque résiduel ........................................................24
Avant la mise en service ................................................24
Montage ............................................................. 24
Déterminer le lieu de montage .........................................................24
Monter l'enrouleur de tuyau à air comprimé ..............................................25
Mise en service ........................................................25
Branchement de l'enrouleur de tuyau à air comprimé à une source d'air comprimé ................25
Branchement de l'enrouleur de tuyau à air comprimé à un outil à air comprimé ...................25
Utilisation de l'enrouleur de tuyau àair comprimé ..........................................25
Dérouler le tuyau ...................................................................26
Enrouler le tuyau ....................................................................26
Réglage de la butée d'arrêt du tuyau ....................................................26
Maintenance et nettoyage ...............................................26
Recyclage ............................................................27
Garantie pour Kompernass Handels GmbH pour la Belgique ..................27
Garantie pour Kompernass Handels GmbH pour la France ....................28
Service après-vente ....................................................30
Importateur ...........................................................30
Déclaration de conformité d'origine .......................................31
PDST 10 B3
FR│BE
│
21 ■

ENROULEUR DE TUYAU
PNEUMATIQUE PDST 10 B3
Introduction
Nous vous félicitons pour l'achat de votre nouvel
appareil. Vous venez ainsi d'opter pour un produit
de grande qualité. Le mode d'emploi fait partie de
ce produit. Il contient des remarques importantes
concernant la sécurité, l'utilisation et le recyclage.
Avant d'utiliser le produit, veuillez vous familiariser
avec toutes les consignes d'utilisation et avertissements de sécurité. N'utilisez le produit que conformément aux descriptions et pour les domaines
d'utilisation indiqués. Si vous cédez le produit à un
tiers, remettez-lui également tous les documents.
Utilisation conforme à l'usage prévu
L'enrouleur de tuyau à air comprimé s'utilise avec
un compresseur pour alimenter en énergie des outils
à air comprimé. L'enrouleur de tuyau est uniquement destiné au transport d'air comprimé. Il n'est
pas destiné à transporter des liquides. N'utilisez
le produit que conformément aux descriptions et
pour les domaines d'utilisation indiqués. Conservez
soigneusement ce mode d'emploi. Si vous cédez
le produit à un tiers, remettez-lui également tous
les documents. Toute utilisation qui diverge de
l'utilisation conforme est interdite et potentiellement
dangereuse. Les dommages engendrés par le
non-respect ou une utilisation non conforme ne sont
pas pris en charge par la garantie et le fabricant
ne saurait en être tenu responsable. L'appareil a
été conçu pour un usage domestique et ne doit pas
être utilisé pour un usage commercial ou industriel.
Symboles sur l'outil à air comprimé
WARNING!
Veuillez lire le mode d'emploi avant la
mise en service.
Portez un masque anti-poussières.
Portez une protection oculaire.
Portez une protection auditive.
Portez des gants de protection
Équipement
Boîtier de l'enrouleur
Étrier de fixation pivotant
Crochet de suspension
Butée d'arrêt du tuyau
Tuyau à air comprimé pour outil à air comprimé
Raccord rapide
Raccord d'air comprimé
Vis
Vis de fixation
Accessoires de montage
Vis de montage
- Chevilles
Matériel livré
1 enrouleur de tuyau pneumatique
1 accessoires de montage
(2x vis de montage, 2x chevilles)
1 mode d'emploi
■ 22 │ FR
│
BE
Caractéristiques techniques
Pression de service max. 10 bars
Système d'enroulement Automatique
Longueur du tuyau à air
comprimé 10 m
Taille du raccord d'air
comprimé 1/4“ = 6,35 mm
Poids env. 1,7 kg
PDST 10 B3

WARNING!
Consignes de sécurité
AVERTISSEMENT!
► VEUILLEZ LIRE ATTENTIVEMENT LE MODE
D'EMPLOI AVANT D'UTILISER LE PRODUIT. IL
FAIT PARTIE INTÉGRANTE DE L'APPAREIL ET
DOIT CONSTAMMENT ÊTRE DISPONIBLE !
■ Cet appareil peut être utilisé par des personnes
à partir de 16 ans et par des personnes ayant
des capacités physiques, sensorielles ou mentales réduites ou disposant de peu d'expérience
et/ou de connaissances, à condition qu'elles
soient surveillées ou qu'elles aient été initiées
à l'utilisation sécurisée de l'appareil et qu'elles
aient compris les dangers en résultant. Ne pas
laisser les enfants jouer avec l'appareil. Ne pas
laisser un enfant effectuer un nettoyage ou une
opération d'entretien sans surveillance.
■ L'enrouleur de tuyau à air comprimé s'utilise
avec un compresseur pour alimenter en énergie
des outils à air comprimé. L'enrouleur de tuyau
est uniquement destiné au transport d'air
comprimé. Il n'est pas destiné à transporter des
liquides.
■ L'enrouleur de tuyau à air comprimé est doté
d'un système permettant son montage sur un
mur ou un plafond prévu à cet effet, toute utilisation sans l'avoir monté est interdite.
■ L'enrouleur de tuyau à air comprimé n'est pas
conçu pour une utilisation commerciale, industrielle ou artisanale. Ce produit est uniquement
destiné à une utilisation privée. L'enrouleur de
tuyau à air comprimé doit être utilisé uniquement pour l'utilisation prévue. Toute autre
utilisation est interdite !
■ Le respect des consignes de sécurité contenues
dans le mode d'emploi ainsi que de la notice
de montage fait également partie d'une utilisation conforme à celle prévue. Le fabricant ou
commerçant décline toute responsabilité pour
des dommages survenus suite à une utilisation
non conforme ou contraire à celle prévue.
■ Utiliser uniquement des accessoires adaptés à
ce produit. Les personnes utilisant l'enrouleur
de tuyau à air comprimé et réalisant, le cas
échéant, la maintenance, s'engagent à se
familiariser avec l'appareil. Elles doivent par
ailleurs être informées des risques potentiels. Les
règles de prévention des accidents doivent être
respectées consciencieusement.
■ Le fabricant se dégage de toute responsabilité
en cas de modification de l'enrouleur de tuyau
à air comprimé et de dommages conséquents.
■ Avant de l'utiliser, montez l'enrouleur de tuyau à
air comprimé afin de réduire au maximum les
risques de blessures.
■ Utilisez l'enrouleur de tuyau à air comprimé
uniquement avec de l'air comprimé. Il est interdit
d'utiliser l'enrouleur de tuyau à air comprimé
avec des liquides.
■ Enroulez le tuyau toujours de manière
contrôlée, car le mécanisme d'enroulement de
l'enrouleur de tuyau à air comprimé dispose
d'un ressort de tension. Un tuyau qui s'enroule
peut provoquer des blessures en cas d'utilisation
incorrecte. En cas d'endommagement du mécanisme d'enroulement, mettez immédiatement
l'enrouleur de tuyau à air comprimé hors service
et faites-le réparer par un spécialiste. N'ouvrez
jamais vous-même le boîtier de l'enrouleur de
tuyau à air comprimé.
■ N'utilisez que des accessoires en parfait état de
fonctionnement et destinés à être utilisés avec
l'enrouleur de tuyau à air comprimé.
■ Ne dépassez jamais la pression de service
maximale autorisée pour l'enrouleur de tuyau à
air comprimé ou l'outil à air comprimé que vous
utilisez avec ce dernier.
■ Ne branchez l'enrouleur de tuyau à air compri-
mé à des conduites d'air comprimé que si vous
êtes sûr que la pression de travail maximale
autorisée ne peut être dépassée de plus de
10% (par ex. au moyen d'un détendeur).
PDST 10 B3
FR│BE
│
23 ■

■ Tenez toujours l'enrouleur de tuyau à air com-
primé éloigné de bords acérés, de la chaleur et
de l'huile.
■ Vérifiez toujours le bon état du tuyau à air
comprimé avant d'utiliser l'enrouleur de tuyau à
air comprimé.
■ Utilisez l'enrouleur de tuyau à air comprimé
uniquement avec un compresseur. Il est interdit
de l'utiliser avec des bouteilles d'air comprimé.
■ Il est interdit d'utiliser des outils à air comprimé
avec des gaz inflammables. Risque d'explosion!
■ N'utilisez jamais l'enrouleur de tuyau à air
comprimé à d'autres fins.
■ Rangez l'enrouleur de tuyau à air comprimé
hors de portée des enfants.
■ Ne dirigez jamais l'enrouleur de tuyau à air
comprimé et son tuyau sur des personnes ou
des animaux.
■ Lorsque vous effectuez des réparations, utilisez
exclusivement des pièces de rechange d'origine. Des pièces de rechange non d'origine
risquent de provoquer de graves dommages.
■ Avant d'effectuer des travaux de maintenance,
de réglage ou de réparation, débranchez
toujours en premier l'enrouleur de tuyau à air
comprimé de l'alimentation en air comprimé.
■ Il est interdit d'apporter des modifications à
l'enrouleur de tuyau à air comprimé.
■ N'utilisez l'enrouleur de tuyau à air comprimé
que s'il est en parfait état de fonctionnement.
En cas de doute, demandez conseil à un
spécialiste avant l'utilisation.
■ Ne faites effectuer les réparations que par des
spécialistes qualifiés.
■ Ne transportez jamais l'enrouleur de tuyau à air
comprimé par le tuyau.
■ Tenez toujours fermement le tuyau lorsque vous
le débranchez de la source d'air comprimé ou
d'un outil à air comprimé.
Risque résiduel
Des risques résiduels demeurent même si vous utilisez cet appareil conformément aux instructions. Les
risques suivants peuvent survenir en fonction de la
construction et du modèle de l'enrouleur de tuyau à
air comprimé :
– Risque de mouvements incontrôlés des tuyaux
à air comprimé.
– Risque de chute en raison de tuyaux à air
comprimé qui trainent.
Pour réduire les risques résiduels, utilisez l'appareil
avec précaution et conformément aux instructions.
Avant la mise en service
■ Sortez toutes les pièces de l'emballage et
vérifiez si l'enrouleur de tuyau à air comprimé
ou les différentes pièces présentent des dommages. Si c'est le cas, n'utilisez pas l'enrouleur
de tuyau à air comprimé. Veuillez-vous adresser
au fabricant à l'adresse de service après-vente
indiquée.
■ Enlevez tous les films de protection ainsi que
les autres emballages de transport.
■ Vérifiez si la livraison est complète.
Montage
Déterminer le lieu de montage
■ Montez l'enrouleur de tuyau à air comprimé
contre un plafond ou un mur adapté. Il est interdit
d'utiliser l'enrouleur de tuyau à air comprimé s'il
n'est pas monté.
■ Choisissez un endroit pour le montage de l'en-
rouleur de tuyau à air comprimé où l'enrouleur
ne constitue pas un obstacle.
■ En cas de montage au plafond, respectez une
hauteur de montage d'au moins 2,5 mètres.
■ Vous aurez besoin des outils suivants pour le
montage : une perceuse, un foret adapté et une
tournevis.
■ 24 │ FR
│
BE
PDST 10 B3

Monter l'enrouleur de tuyau à air
comprimé
AVERTISSEMENT!
RISQUE DE BLESSURES!
► Un montage non conforme de l'enrouleur de
tuyau à air comprimé peut engendrer des
blessures.
■ Assurez-vous qu'aucun tube ou conduit ne se
trouve au niveau de l'emplacement de montage.
Utilisez le cas échéant un détecteur ou contactez un spécialiste.
■ Veuillez également tenir compte des consignes
de sécurité de la perceuse utilisée.
REMARQUE ! RISQUE DE DOMMAGES !
► Un montage incorrect peut entraîner des
dommages.
■ Assurez-vous que le matériau support sur
l'emplacement de montage peut supporter le
poids de l'enrouleur de tuyau à air comprimé.
Si vous avez des questions, demandez conseil
à un spécialiste.
1. Utilisez l'étrier de fixation pivotant comme
gabarit. Vous pouvez séparer l'étrier de
fixation de l'enrouleur de tuyau d'air comprimé après avoir enlevé les deux vis en les faisant tourner dans le sens antihoraire (voir fig. C).
Marquez pour cela au crayon la position des
trous sur le matériau support.
2. Percez dans le matériau support les trous nécessaires au montage.
3. Montez l'étrier de fixation à l'aide du matériel
de fixation adapté (voir accessoires de montage -).
4. Fixez à nouveau l'enrouleur de tuyau à air
comprimé à l'étrier de fixation.
Pour cela, tournez à nouveau les vis, que
vous aviez enlevées à l'étape 1, dans le sens
horaire. (voir fig. C)
Mise en service
Branchement de l'enrouleur de tuyau
à air comprimé à une source d'air
comprimé
♦ Branchez le raccord d'air comprimé de
l'enrouleur de tuyau à air comprimé dans le
raccord rapide de la source d'air comprimé.
Branchement de l'enrouleur de
tuyau à air comprimé à un outil à air
comprimé
REMARQUE ! RISQUE DE DOMMAGES !
► Toute utilisation non correcte de l'enrouleur
de tuyau à air comprimé peut entraîner des
dommages.
■ Respectez toujours la pression de service
maximale de l'enrouleur de tuyau à air comprimé ainsi que la compatibilité des pièces de
raccordement utilisées. Le raccord rapide du
tuyau à air comprimé permet de le raccorder
directement à l'arrivée d'air d'un outil à air
comprimé.
Utilisation de l'enrouleur de tuyau
àair comprimé
AVERTISSEMENT!
RISQUE DE BLESSURES!
► L'enrouleur de tuyau à air comprimé est doté
d'un dispositif de rappel. Ce dernier est actionné par un ressort puissant. L'enroulement
incorrect du tuyau à air comprimé peut
provoquer des blessures.
■ Ne laissez jamais s'enrouler le tuyau à air
comprimé de manière incontrôlée.
■ Mettez l'enrouleur de tuyau à air comprimé
immédiatement hors service si le mécanisme
de rappel est endommagé. Faites réparer le
dommage survenu par un spécialiste.
■ L'enrouleur de tuyau à air comprimé dispose
d'un mécanisme d'arrêt et d'un mécanisme de
rappel. Cela permet de dérouler et d'enrouler
facilement le tuyau à air comprimé.
PDST 10 B3
FR│BE
│
25 ■

■ Ce dispositif d'arrêt produit un bruit de cliquetis
lorsque vous déroulez ou enroulez le tuyau. Il
ne s'agit pas d'un défaut. Si le bruit se modifie
au fil des nombreuses utilisations et/ou si le mécanisme pose un problème, demandez conseil
à un spécialiste ou adressez-vous au service
après-vente.
Dérouler le tuyau
♦ Déroulez le tuyau à air comprimé du boîtier
de l'enrouleur avec soin à la longueur de travail
souhaitée pour l'outil à air comprimé. Si vous
relâchez le tuyau à air comprimé après un
clic, le mécanisme d'arrêt bloque le tuyau à
cette longueur.
Enrouler le tuyau
♦ Tirez d'un coup sec sur le tuyau à air compri-
mé pour débloquer le mécanisme d'arrêt.
♦ Veillez à ce que le tuyau à air comprimé
s'enroule de manière contrôlée dans le boîtier
de l'enrouleur.
Réglage de la butée d'arrêt du tuyau
Vous pouvez régler la position de la butée
d'arrêt du tuyau pour stopper l'enroulement du
tuyau à air comprimé à la longueur souhaitée.
Vous aurez besoin d'un tournevis cruciforme pour
régler la butée d'arrêt du tuyau (non compris
dans la livraison).
♦ Desserrez les vis de fixation avec le
tournevis cruciforme (voir fig. D).
♦ Faites glisser la butée d'arrêt du tuyau le
long du tuyau à air comprimé jusqu'à la
position souhaitée.
♦ Resserrez les vis de fixation.
Maintenance et nettoyage
REMARQUE
► La maintenance et les réparations de l'en-
rouleur de tuyau à air comprimé doivent être
effectuées régulièrement afin d'en garantir le
bon fonctionnement ainsi que le respect des
consignes de sécurité. Toute utilisation non
conforme et incorrecte risque d'endommager
l'appareil et de causer des pannes.
■ N'utilisez jamais de détergents ou de solvants
agressifs et/ou abrasifs. Cela risquerait d'endommager les composants en plastique de
l'enrouleur de tuyau à air comprimé.
■ Veillez à ce que l'eau ne pénètre jamais à l'in-
térieur de l'enrouleur de tuyau à air comprimé.
Veillez à ce qu'il n'y ait pas de poussière et
d'impuretés dans le boîtier et dans le tuyau à
air comprimé. Frottez pour cela régulièrement
l'enrouleur de tuyau à air comprimé à l'aide
d'un chiffon propre.
■ Nettoyez le tuyau à air comprimé avant de
l'enrouler dans le boîtier. Nettoyez si possible
le tuyau à air comprimé pour la prochaine
utilisation.
■ Nettoyez régulièrement l'enrouleur de tuyau à
air comprimé à l'aide d'un chiffon humide et
d'un peu de savon doux.
■ 26 │ FR
│
BE
PDST 10 B3

Recyclage
L'emballage se compose de matériaux
respectueux de l'environnement. Il peut
être éliminé dans les conteneurs de
recyclage locaux.
Ne jetez pas l'appareil avec les ordures
ménagères!
Renseignez-vous auprès de votre mairie ou des
services de votre commune pour connaître les possibilités de recyclage de votre appareil usagé.
Recyclez l’emballage d’une manière
respectueuse de l’environnement. Observez le marquage sur les différents
matériaux d’emballage et triez-les séparément si nécessaire. Les matériaux d’emballage
sont repérés par des abréviations (a) et des
numéros (b) qui ont la signification suivante :
1–7 : Plastiques, 20–22 : Papier et carton,
80–98 : Matériaux composites.
Renseignez-vous auprès de votre
commune ou des services administratifs
de votre ville pour connaître les possibi-
lités de recyclage du produit usagé.
Le produit récyclable doit être trié ou
rapporté dans un point de collecte
pour être recycle.
Garantie pour
Kompernass Handels GmbH
pour la Belgique
Chère cliente, cher client,
Cet appareil est garanti 3 ans à partir de la date
d’achat. Si ce produit venait à présenter des vices,
vous disposez de droits légaux face au vendeur de
ce produit. Vos droits légaux ne sont pas restreints
par notre garantie présentée ci-dessous.
Conditions de garantie
La période de garantie débute à la date d’achat.
Veuillez bien conserver le ticket de caisse. Celui-ci
servira de preuve d’achat.
Si dans un délai de trois ans suivant la date
d’achat de ce produit, un vice de matériel ou de
fabrication venait à apparaître, le produit sera
réparé, remplacé gratuitement par nos soins ou le
prix d’achat remboursé, selon notre choix. Cette
prestation sous garantie nécessite, dans le délai de
trois ans, la présentation de l’appareil défectueux
et du justificatif d’achat (ticket de caisse) ainsi que
la description brève du vice et du moment de son
apparition.
Si le vice est couvert par notre garantie, vous
recevrez le produit réparé ou un nouveau produit
en retour. Aucune nouvelle période de garantie ne
débute avec la réparation ou l’échange du produit.
Période de garantie et réclamation légale
pour vices cachés
L’exercice de la garantie ne prolonge pas la
période de garantie. Cette disposition s’applique
également aux pièces remplacées ou réparées. Les
dommages et vices éventuellement déjà présents à
l’achat doivent être signalés immédiatement après
le déballage. Toute réparation survenant après la
période sous garantie fera l’objet d’une facturation.
Étendue de la garantie
L’appareil a été fabriqué avec soin conformément
à des directives de qualité strictes et consciencieusement contrôlé avant sa livraison.
PDST 10 B3
FR│BE
│
27 ■

La prestation de la garantie s’applique aux vices de
matériel et de fabrication. Cette garantie ne s’étend
pas aux pièces du produit qui sont exposées à une
usure normale et peuvent de ce fait être considérées
comme pièces d’usure, ni aux détériorations de
pièces fragiles, par ex. interrupteurs ou pièces en
verre.
Cette garantie devient caduque si le produit est
détérioré, utilisé ou entretenu de manière non
conforme. Toutes les instructions listées dans le
manuel d’utilisation doivent être exactement respectées pour une utilisation conforme du produit. Des
buts d’utilisation et actions qui sont déconseillés
dans le manuel d’utilisation, ou dont vous êtes
avertis doivent également être évités.
Le produit est uniquement destiné à un usage privé
et ne convient pas à un usage professionnel. La
garantie est annulée en cas d’entretien incorrect
et inapproprié, d’usage de la force et en cas d’intervention non réalisée par notre centre de service
après-vente agréé.
La période de garantie ne s’applique pas
dans les cas suivants
■ usure normale de la capacité de l’accu
■ utilisation commerciale du produit
■ détérioration ou modification du produit par
leclient
■ non-respect des consignes de sécurité et de
maintenance, erreur d’utilisation
■ dommages causés par des événements
élémentaires
Procédure en cas de garantie
Afin de garantir un traitement rapide de votre
demande, veuillez suivre les indications suivantes :
■ Veuillez avoir à portée de main pour toutes
questions le ticket de caisse et la référence article (par ex.IAN12345) en tant que justificatif
de votre achat.
■ Vous trouverez la référence sur la plaque signa-
létique sur le produit, une gravure sur le produit,
sur la page de garde du mode d’emploi (en
bas à gauche) ou sur l’autocollant au dos ou
sur le dessous du produit.
■ Si des erreurs de fonctionnement ou d’autres
vices venaient à apparaître, veuillez d’abord
contacter le département service clientèle cité
ci-dessous par téléphone ou par e-mail.
■ Vous pouvez ensuite retourner un produit enre-
gistré comme étant défectueux en joignant le
ticket de caisse et en indiquant en quoi consiste
le vice et quand il est survenu, sans devoir
l’affranchir à l’adresse de service après-vente
communiquée.
Sur www.lidl-service.com, vous
pourrez télécharger ce mode
d’emploi et de nombreux autres
manuels, vidéos produit et logiciels
d’installation.
Grâce à ce code QR, vous arriverez directement sur le site Lidl service après-vente
(www.lidl-service.com) et vous pourrez ouvrir votre
mode d’emploi en saisissant votre référence (IAN)
345881_2004.
Garantie pour
Kompernass Handels GmbH
pour la France
Chère cliente, cher client,
Cet appareil est garanti 3 ans à partir de la date
d’achat. Si ce produit venait à présenter des vices,
vous disposez de droits légaux face au vendeur de
ce produit. Vos droits légaux ne sont pas restreints
par notre garantie présentée ci-dessous.
Conditions de garantie
La période de garantie débute à la date d’achat.
Veuillez bien conserver le ticket de caisse. Celui-ci
servira de preuve d’achat.
Si dans un délai de trois ans suivant la date
d’achat de ce produit, un vice de matériel ou de
fabrication venait à apparaître, le produit sera
réparé, remplacé gratuitement par nos soins ou le
prix d’achat remboursé, selon notre choix. Cette
prestation sous garantie nécessite, dans le délai de
trois ans, la présentation de l’appareil défectueux
et du justificatif d’achat (ticket de caisse) ainsi que
la description brève du vice et du moment de son
apparition.
■ 28 │ FR
│
BE
PDST 10 B3

Si le vice est couvert par notre garantie, vous
recevrez le produit réparé ou un nouveau produit
en retour. Aucune nouvelle période de garantie ne
débute avec la réparation ou l’échange du produit.
Période de garantie et réclamation légale
pour vices cachés
L’exercice de la garantie ne prolonge pas la
période de garantie. Cette disposition s’applique
également aux pièces remplacées ou réparées. Les
dommages et vices éventuellement déjà présents à
l’achat doivent être signalés immédiatement après
le déballage. Toute réparation survenant après la
période sous garantie fera l’objet d’une facturation.
Étendue de la garantie
L’appareil a été fabriqué avec soin conformément
à des directives de qualité strictes et consciencieusement contrôlé avant sa livraison.
La prestation de la garantie s’applique aux vices de
matériel et de fabrication. Cette garantie ne s’étend
pas aux pièces du produit qui sont exposées à une
usure normale et peuvent de ce fait être considérées
comme pièces d’usure, ni aux détériorations de
pièces fragiles, par ex. interrupteurs ou pièces en
verre.
Cette garantie devient caduque si le produit est
détérioré, utilisé ou entretenu de manière non
conforme. Toutes les instructions listées dans le
manuel d’utilisation doivent être exactement respectées pour une utilisation conforme du produit. Des
buts d’utilisation et actions qui sont déconseillés
dans le manuel d’utilisation, ou dont vous êtes
avertis doivent également être évités.
Le produit est uniquement destiné à un usage privé
et ne convient pas à un usage professionnel. La
garantie est annulée en cas d’entretien incorrect
et inapproprié, d’usage de la force et en cas d’intervention non réalisée par notre centre de service
après-vente agréé.
Article L217-16 du Code de la consommation
Lorsque l‘acheteur demande au vendeur, pendant
le cours de la garantie commerciale qui lui a été
consentie lors de l‘acquisition ou de la réparation
d‘un bien meuble, une remise en état couverte par
la garantie, toute période d‘immobilisation d‘au
moins sept jours vient s‘ajouter à la durée de la
garantie qui restait à courir. Cette période court à
compter de la demande d‘intervention de l‘acheteur ou de la mise à disposition pour réparation
du bien en cause, si cette mise à disposition est
postérieure à la demande d‘intervention.
Indépendamment de la garantie commerciale
souscrite, le vendeur reste tenu des défauts de
conformité du bien et des vices rédhibitoires dans
les conditions prévues aux articles L217-4 à L21713 du Code de la consommation et aux articles
1641 à 1648 et 2232 du Code Civil.
Article L217-4 du Code de la consommation
Le vendeur livre un bien conforme au contrat et
répond des défauts de conformité existant lors de
la délivrance. Il répond également des défauts de
conformité résultant de l‘emballage, des instructions de montage ou de l‘installation lorsque celleci a été mise à sa charge par le contrat ou a été
réalisée sous sa responsabilité.
Article L217-5 du Code de la consommation
Le bien est conforme au contrat :
1° S´il est propre à l‘usage habituellement attendu
d‘un bien semblable et, le cas échéant :
– s‘il correspond à la description donnée
par le vendeur et posséder les qualités que
celui-ci a présentées à l‘acheteur sous forme
d‘échantillon ou de modèle ;
– s‘il présente les qualités qu‘un acheteur peut
légitimement attendre eu égard aux déclarations publiques faites par le vendeur, par le
producteur ou par son représentant, notamment
dans la publicité ou l‘étiquetage ;
2° Ou s‘il présente les caractéristiques définies
d‘un commun accord par les parties ou être
propre à tout usage spécial recherché par
l‘acheteur, porté à la connaissance du vendeur
et que ce dernier a accepté.
PDST 10 B3
FR│BE
│
29 ■

Article L217-12 du Code de la consommation
L‘action résultant du défaut de conformité se prescrit
par deux ans à compter de la délivrance du bien.
Article 1641 du Code civil
Le vendeur est tenu de la garantie à raison des
défauts cachés de la chose vendue qui la rendent
impropre à l‘usage auquel on la destine, ou qui
diminuent tellement cet usage que l‘acheteur ne
l‘aurait pas acquise, ou n‘en aurait donné qu‘un
moindre prix, s‘il les avait connus.
Article 1648 1er alinéa du Code civil
L‘action résultant des vices rédhibitoires doit être
intentée par l‘acquéreur dans un délai de deux ans
à compter de la découverte du vice.
Les pièces détachées indispensables à l’utilisation
du produit sont disponibles pendant la durée de la
garantie du produit.
La période de garantie ne s’applique pas
dans les cas suivants
■ usure normale de la capacité de l’accu
■ utilisation commerciale du produit
■ détérioration ou modification du produit par
leclient
■ non-respect des consignes de sécurité et de
maintenance, erreur d’utilisation
■ dommages causés par des événements
élémentaires
Procédure en cas de garantie
Afin de garantir un traitement rapide de votre
demande, veuillez suivre les indications suivantes :
■ Veuillez avoir à portée de main pour toutes
questions le ticket de caisse et la référence article (par ex. IAN 12345) en tant que justificatif
de votre achat.
■ Vous trouverez la référence sur la plaque signa-
létique sur le produit, une gravure sur le produit,
sur la page de garde du mode d’emploi (en
bas à gauche) ou sur l’autocollant au dos ou
sur le dessous du produit.
■ Si des erreurs de fonctionnement ou d’autres
vices venaient à apparaître, veuillez d’abord
contacter le département service clientèle cité
ci-dessous par téléphone ou par e-mail.
■ Vous pouvez ensuite retourner un produit enre-
gistré comme étant défectueux en joignant le
ticket de caisse et en indiquant en quoi consiste
le vice et quand il est survenu, sans devoir
l’affranchir à l’adresse de service après-vente
communiquée.
Sur www.lidl-service.com, vous
pourrez télécharger ce mode
d’emploi et de nombreux autres
manuels, vidéos produit et logiciels
d’installation.
Grâce à ce code QR, vous arriverez directement sur le site Lidl service après-vente
(www.lidl-service.com) et vous pourrez ouvrir votre
mode d’emploi en saisissant votre référence (IAN)
345881_2004.
Service après-vente
Service France
Tel.: 0800 919270
E-Mail: kompernass@lidl.fr
Service Belgique
Tel.: 070 270 171 (0,15 EUR/Min.)
E-Mail: kompernass@lidl.be
IAN 345881_2004
Importateur
Veuillez tenir compte du fait que l’adresse suivante
n’est pas une adresse de service après-vente.
Veuillez d’abord contacter le service mentionné.
KOMPERNASS HANDELS GMBH
BURGSTRASSE 21
44867 BOCHUM
ALLEMAGNE
www.kompernass.com
■ 30 │ FR
│
BE
PDST 10 B3

Déclaration de conformité d'origine
Nous soussignés, KOMPERNASS HANDELS GMBH, responsable du document: M. Semi Uguzlu,
BURGSTR. 21, 44867 BOCHUM, ALLEMAGNE, déclarons par la présente que ce produit est en
conformité avec les normes, documents normatifs et directives CE suivants:
Directive relative aux machines
(2006/42/CE)
Type/désignation de l'appareil
Enrouleur de tuyau pneumatique PDST 10 B3
Année de fabrication: 07–2020
Numéro de série: IAN 345881_2004
Bochum, le 17/07/2020
Semi Uguzlu
-Responsable qualitéSous réserve de modifications techniques à des fins de perfectionnement.
PDST 10 B3
FR│BE
│
31 ■

■ 32 │ FR
│
BE
PDST 10 B3

Inhoud
Inleiding .............................................................. 34
Gebruik in overeenstemming met bestemming .............................................34
Onderdelen .......................................................................34
Inhoud van het pakket ...............................................................34
Technische gegevens ................................................................34
Veiligheidsvoorschriften ................................................35
Restrisico .............................................................36
Vóór de ingebruikname .................................................36
Montage ............................................................. 36
Montagelocatie bepalen .............................................................36
Perslucht-slanghaspel monteren ........................................................37
Ingebruikname ........................................................37
Perslucht-slanghaspel aansluiten opeen persluchtbron ......................................37
Perslucht-slanghaspel aansluiten opeen persluchtgereedschap ...............................37
Perslucht-slanghaspel gebruiken ........................................................37
Slang afrollen ......................................................................38
Slang oprollen .....................................................................38
Slangstop instellen ..................................................................38
Onderhoud en reiniging ................................................. 38
Afvoeren .............................................................39
Garantie van Kompernaß Handels GmbH ..................................39
Service ...............................................................40
Importeur ............................................................40
Originele conformiteitsverklaring ......................................... 41
PDST 10 B3
NL│BE
│
33 ■

PERSLUCHT-SLANGHASPEL
PDST 10 B3
Inleiding
Hartelijk gefeliciteerd met de aankoop van uw
nieuwe apparaat. U hebt hiermee gekozen voor
een hoogwaardig product. De gebruiksaanwijzing
maakt deel uit van dit product. Deze bevat belangrijke aanwijzingen voor veiligheid, gebruik en
afvoer. Lees alle bedienings- en veiligheidsvoorschriften voordat u het product in gebruik neemt.
Gebruik het product uitsluitend op de voorgeschreven wijze en voor de aangegeven doeleinden.
Geef alle documenten mee als u het product
overdraagt aan een derde.
Gebruik in overeenstemming met
bestemming
De perslucht-slanghaspel dient in combinatie met
een compressor voor de energievoorziening van
persluchtgereedschappen. De perslucht-slanghaspel dient uitsluitend voor het transport van
perslucht. Hij is niet geschikt voor het transport van
vloeistoffen. Gebruik het product uitsluitend op
de voorgeschreven wijze en voor de aangegeven
doeleinden. Berg deze gebruiksaanwijzing zorgvuldig op. Geef alle documenten mee als u het product doorgeeft aan een derde. Elke toepassing die
afwijkt van het beoogde gebruiksdoel, is verboden
en potentieel gevaarlijk. Schade door niet-naleving
of verkeerde toepassing wordt niet gedekt door de
garantie en valt niet onder de aansprakelijkheid
van de fabrikant. Het apparaat is bedoeld voor
huishoudelijk gebruik en mag niet worden gebruikt
voor commerciële of industriële doeleinden.
Symbolen op het persluchtapparaat
Lees de gebruiksaanwijzing zorgvuldig
WARNING!
door voordat u het apparaat in gebruik
neemt.
Draag een stofmasker.
Draag oogbescherming.
Draag gehoorbescherming.
Draag veiligheidshandschoenen.
Onderdelen
Haspelbehuizing
Draaibare bevestigingsbeugel
Haak voor ophangen
Slangstop
Persluchtslang voor persluchtgereedschap
Snelkoppeling
Persluchtaansluiting
Schroeven
Bevestigingsschroeven
Montagetoebehoren
Montageschroeven
- Pluggen
Inhoud van het pakket
1 perslucht-slanghaspel
1x montagetoebehoren
(2x montageschroef, 2x plug)
1 gebruiksaanwijzing
■ 34 │ NL
│
BE
Technische gegevens
Werkdruk max. 10 bar
Oprolsysteem Automatisch
Lengte persluchtslang 10 m
Perslucht-aansluitmaat 1/4" = 6,35 mm
Gewicht ongeveer 1,7 kg
PDST 10 B3

WARNING!
Veiligheidsvoorschriften
WAARSCHUWING!
► LEES DE GEBRUIKSAANWIJZING
AANDACHTIG DOOR VOORDAT U HET
APPARAAT IN GEBRUIK NEEMT. HIJ MAAKT
DEEL UIT VAN HET APPARAAT EN MOET TE
ALLEN TIJDE BESCHIKBAAR ZIJN!
■ Dit apparaat mag worden gebruikt door perso-
nen vanaf 16jaar en door personen met beperkte fysieke, zintuiglijke of geestelijke vermogens of gebrek aan ervaring of kennis, mits ze
onder toezicht staan of over het veilige gebruik
van het apparaat zijn geïnstrueerd en de daaruit
voortkomende gevaren hebben begrepen.
Kinderen mogen niet met het apparaat spelen.
Kinderen mogen geen reiniging en gebruikersonderhoud zonder toezicht uitvoeren.
■ In combinatie met een compressor dient de
perslucht-slanghaspel voor de energievoorziening van persluchtgereedschappen. De
perslucht-slanghaspel dient uitsluitend voor het
transport van perslucht. Hij is niet geschikt voor
het transport van vloeistoffen.
■ De perslucht-slanghaspel is vanwege zijn
uit voering bestemd voor montage aan een
geschikte wand of plafond; gebruik zonder
montage is niet toegestaan.
■ De perslucht-slanghaspel is niet bestemd voor
commercieel, industrieel of ambachtelijk gebruik.
Het product is uitsluitend bestemd voor privégebruik. De perslucht-slanghaspel mag uitsluitend
in overeenstemming met de bestemming worden
gebruikt. Elk ander, hiervan afwijkend gebruik
is verboden!
■ Tot het gebruik in overeenstemming met de be-
stemming moet ook het in acht nemen van de
veiligheidsvoorschriften en de montagehandleiding in de gebruiksaanwijzing worden gerekend. De fabrikant of leverancier aanvaardt
geen aansprakelijkheid voor schade die voortvloeit uit gebruik dat niet in overeenstemming is
met de bestemming of uit incorrect gebruik.
■ Alleen voor dit product geschikte accessoires
mogen worden gebruikt. Personen die de perslucht-slanghaspel gebruiken en eventueel onderhoudswerkzaamheden uitvoeren, zijn verplicht
zich hiermee vertrouwd te maken. Bovendien
moeten ze zijn geïnformeerd over potentiële
gevaren. De toepasselijke voorschriften ter
voorkoming van ongevallen dienen correct en
nauwgezet te worden nageleefd.
■ Bij elke wijziging aan de perslucht-slanghaspel
vervalt de aansprakelijkheid van de fabrikant
voor daaruit voortvloeiende schade.
■ Monteer de perslucht-slanghaspel voordat u
deze gebruikt, om risico op letsel tot een minimum te beperken.
■ Gebruik de perslucht-slanghaspel uitsluitend met
perslucht. Het is niet toegestaan de persluchtslanghaspel te gebruiken met vloeistoffen.
■ Laat de slang altijd gecontroleerd oprollen,
aangezien de perslucht-slanghaspel is voorzien
van een spanveer voor het oprolmechanisme.
Een zich oprollende slang kan bij verkeerd gebruik letsel veroorzaken. Bij beschadiging van
het oprolmechanisme moet de perslucht-slanghaspel meteen buiten gebruik worden genomen
en door een specialist worden gerepareerd.
Open in geen geval zelf de behuizing van de
perslucht-slanghaspel.
■ Gebruik alleen accessoires in onberispelijke
toestand die zijn bestemd voor gebruik in
combinatie met de perslucht-slanghaspel.
■ Overschrijd nooit de maximale werkdruk van de
perslucht-slanghaspel of die van het gebruikte
persluchtgereedschap.
■ Sluit de perslucht-slanghaspel alleen aan op
persluchtleidingen wanneer zeker is dat overschrijding van de maximaal toegestane druk
met meer dan 10% niet mogelijk is, bijv. door
een drukregelaar.
PDST 10 B3
NL│BE
│
35 ■

■ Houd de persluchtslang altijd uit de buurt van
scherpe randen, hitte en olie.
■ Controleer de persluchtslang altijd voordat u
de perslucht-slanghaspel gebruikt.
■ Gebruik de perslucht-slanghaspel alleen in
combinatie met een compressor. Het gebruik
met persluchtcilinders is verboden.
■ Het gebruik van persluchtgereedschappen met
brandbare gassen is verboden. Er bestaat
explosiegevaar!
■ De perslucht-slanghaspel mag niet voor andere
doeleinden worden gebruikt.
■ Berg de perslucht-slanghaspel niet op plaatsen
op waar kinderen er bij kunnen.
■ Richt de perslucht-slanghaspel resp. de slang
ervan nooit op mensen of dieren.
■ Bij reparaties mogen uitsluitend originele
vervangingsonderdelen worden gebruikt.
Niet-originele vervangingsonderdelen kunnen
ernstige beschadigingen tot gevolg hebben.
■ Bij uitvoering van onderhouds-, instel- en repa-
ratiewerkzaamheden moet altijd eerst de perslucht-slanghaspel worden losgekoppeld van de
persluchttoevoer.
■ Wijzigingen aan de perslucht-slanghaspel zijn
verboden.
■ Gebruik de perslucht-slanghaspel uitsluitend
wanneer die zich in onberispelijke toestand
bevindt. Laat u in geval van twijfel voorafgaand
aan gebruik door een specialist adviseren.
■ Laat reparaties alleen uitvoeren door gekwalifi-
ceerde vakmensen.
■ Transporteer de perslucht-slanghaspel nooit
door de slang vast te pakken.
■ Houd de slang altijd stevig vast wanneer u hem
losmaakt van de persluchtbron of een persluchtgereedschap.
Restrisico
Ook wanneer u dit apparaat volgens de voorschriften bedient, blijven er altijd risico's bestaan. De
volgende gevaren kunnen door de constructie en
uitvoering van de perslucht-slanghaspel optreden:
– Gevaar door rondzwiepende persluchtslang.
– Gevaar voor struikelen door rondslingerende
persluchtslang.
U kunt het restrisico verminderen door het apparaat zorgvuldig en volgens de voorschriften te
gebruiken.
Vóór de ingebruikname
■ Haal alle onderdelen uit de verpakking en
controleer de perslucht-slanghaspel en de afzonderlijke onderdelen op eventuele beschadiging. Gebruik de perslucht-slanghaspel niet bij
beschadiging. Neem contact op met de fabrikant
via het vermelde serviceadres.
■ Verwijder alle beschermfolie en overige ver-
zendverpakking.
■ Controleer of het geleverde pakket volledig is.
Montage
Montagelocatie bepalen
■ Monteer de perslucht-slanghaspel op een ge-
schikt plafond of geschikte wand. Gebruik van
de perslucht-slanghaspel zonder dat deze is
gemonteerd, is niet toegestaan.
■ Kies de montagelocatie voor de perslucht-slang-
haspel zodanig dat deze geen obstakel vormt.
■ Bij montage aan een plafond moet een mon-
tagehoogte van minimaal 2,5 meter worden
aangehouden.
■ Voor de montage hebt u de volgende hulpmid-
delen nodig: een boormachine, een passend
boortje en een schroevendraaier.
■ 36 │ NL
│
BE
PDST 10 B3

Perslucht-slanghaspel monteren
WAARSCHUWING! LETSELGEVAAR!
► Incorrecte montage van de perslucht-
slanghaspel kan letsel tot gevolg hebben.
■ Vergewis u ervan dat zich geen leidingen of
buizen op de montagelocatie bevinden.
Gebruik daarvoor zo nodig een detectieapparaat of raadpleeg een vakman.
■ Neem de veiligheidsvoorschriften voor de
gebruikte boormachine in acht.
OPMERKING!
GEVAAR VOOR BESCHADIGING!
► Incorrecte montage kan beschadigingen tot
gevolg hebben.
■ Vergewis u ervan dat het dragermateriaal
opde montagelocatie het gewicht van de
perslucht-slanghaspel kan dragen. Raadpleeg
bij vragen een specialist.
1. Gebruik de draaibare bevestigingsbeugel
als sjabloon. De bevestigingsbeugel kunt u
losmaken van de perslucht-slanghaspel nadat
ude beide schroeven door linksom draaien
hebt verwijderd (zie afb. C).
Markeer daarvoor de positie van de boorgaten
op het dragermateriaal met een pen.
2. Boor de benodigde gaten voor de montage in
het dragermateriaal.
3. Monteer de bevestigingsbeugel met geschikt bevestigingsmateriaal (zie montagetoebehoren -).
4. Bevestig de perslucht-slanghaspel weer op de
bevestigingsbeugel.
Draai daarvoor de schroeven, die u in stap 1
had verwijderd, rechtsom weer vast (zie afb. C).
Ingebruikname
Perslucht-slanghaspel aansluiten
opeen persluchtbron
♦ Steek de persluchtaansluiting van de pers-
lucht-slanghaspel in de snelkoppeling van de
persluchtbron.
Perslucht-slanghaspel aansluiten
opeen persluchtgereedschap
OPMERKING!
GEVAAR VOOR BESCHADIGING!
► Een verkeerde omgang met de perslucht-
slanghaspel kan beschadigingen tot gevolg
hebben.
■ Neem altijd de maximale werkdruk van de
perslucht-slanghaspel en de geschiktheid van
de gebruikte aansluitelementen in acht. Via de
snelkoppeling van de persluchtslang kan de
slang rechtstreeks op de luchtinlaat van een
persluchtgereedschap worden aangesloten.
Perslucht-slanghaspel gebruiken
WAARSCHUWING! LETSELGEVAAR!
► De perslucht-slanghaspel is voorzien van
een terugloopmechanisme. Dit werkt met
een sterke veer. Bij verkeerd oprollen van de
persluchtslang bestaat er kans op letsel.
■ Laat de persluchtslang nooit ongecontroleerd
inrollen.
■ Als het terugloopmechanisme beschadigd is,
moet de perslucht-slanghaspel onmiddellijk buiten
gebruik worden genomen. Laat de ontstane
schade repareren door een specialist.
■ De perslucht-slanghaspel is voorzien van een
vergrendelings- en terugloopmechanisme. Dit
maakt gemakkelijk uittrekken en terugleiden van
de persluchtslang mogelijk.
PDST 10 B3
NL│BE
│
37 ■

■ De vergrendeling produceert bij het oprollen en
afrollen een kraakgeluid. Dit is geen fout.
Als het geluid na langdurig gebruik en/of bij
problemen met het mechanisme verandert,
raadpleegt u een vakman of neemt u contact
op met de klantenservice.
Slang afrollen
♦ Trek de persluchtslang voorzicht uit de
haspelbehuizing tot de gewenste werklengte
voor het persluchtgereedschap. Wanneer u
de persluchtslang na een klikgeluid loslaat,
wordt de vergrendeling bij deze lengte geactiveerd.
Slang oprollen
♦ Door kort aan de persluchtslang te trekken
kunt u de vergrendeling losmaken.
♦ Zorg ervoor dat u de persluchtslang gecon-
troleerd oprolt in de haspelbehuizing.
Slangstop instellen
De positie van de slangstop kan worden in-
gesteld; deze onderbreekt het oprollen van de
persluchtslang wanneer de gewenste lengte
is bereikt. Om de slangstop te verstellen, hebt
u een kruiskopschroevendraaier nodig (niet meegeleverd).
♦ Draai de bevestigingsschroeven los met de
kruiskopschroevendraaier (zie afb.D).
♦ Schuif de slangstop langs de persluchts-
lang op de gewenste positie.
♦ Draai de bevestigingsschroeven weer vast.
Onderhoud en reiniging
OPMERKING
► De perslucht-slanghaspel moet regelmatig
worden onderhouden en gereviseerd om de
correcte werking ervan te garanderen en
aan de veiligheidsvoorschriften te voldoen.
Ondeskundig of verkeerd gebruik kan uitval
en beschadiging van het apparaat tot gevolg
hebben.
■ Gebruik nooit scherpe en/of krassende
schoonmaak- resp. oplosmiddelen. Deze
kunnen de kunststof onderdelen van de perslucht-slanghaspel beschadigen.
■ Let er op dat er nooit water in de perslucht-
slanghaspel binnendringt. Zorg ervoor dat
de behuizing en de persluchtslang vrij blijven
van stof en vuil. Wrijf daarvoor de pers luchtslanghaspel regelmatig schoon met een schone
doek.
■ Voordat u de persluchtslang terugleidt in de
behuizing, reinigt u voor zover mogelijk de
persluchtslang voor verder gebruik.
■ Reinig de perslucht-slanghaspel en de slang
periodiek met een vochtige doek en wat
smeerzeep.
■
■ 38 │ NL
│
BE
PDST 10 B3

Afvoeren
De verpakking bestaat uit milieuvriendelijke materialen. De verpakking kan
in de plaatselijke kringloopcontainers
worden gedeponeerd.
Deponeer het apparaat niet bij het normale
huisvuil!
Informatie over het afvoeren van het afgedankte
apparaat krijgt u bij uw gemeentereinigingsdienst.
Voer de verpakking af overeenkomstig
de milieuvoorschriften. Let op de
aanduiding op de verschillende verpak-
kingsmaterialen en voer ze zo nodig
gescheiden af. De verpakkingsmaterialen zijn voorzien van afkortingen (a) en cijfers (b) met de volgende betekenis: 1–7: kunststoffen, 20–22: papier
en karton, 80–98: composiet materialen.
Meer informatie over het afvoeren van
het afgedankte product kunt u inwinnen
bij de gemeentereiniging.
Het product is recycleerbaar; er is een
uitgebreide producentenverantwoordelijkheid op van toepassing en het afval
wordt gescheiden ingezameld.
Garantie van
Kompernaß Handels GmbH
Geachte klant,
U hebt op dit apparaat 3 jaar garantie vanaf
de aankoopdatum. In geval van ge breken in dit
product hebt u wettelijke rechten tegenover de
verkoper van het product. Deze wettelijke rechten
worden door onze hierna beschreven garantie niet
beperkt.
Garantievoorwaarden
De garantieperiode geldt vanaf de datum van
aankoop. Bewaar de kassabon zorgvuldig. U hebt
hem nodig als bewijs van aankoop.
Als er binnen drie jaar vanaf de aankoopdatum
van dit product een materiaal- of fabricagefout
optreedt, wordt - naar onze keuze - het product
door ons kosteloos gerepareerd of vervangen of
wordt de koopprijs terugbetaald. Voorwaarde voor
deze garantie is dat het defecte apparaat en het
aankoopbewijs (kassabon) binnen de termijn van
drie jaar worden overlegd en dat kort wordt omschreven waaruit het gebrek bestaat en wanneer
het is opgetreden.
Wanneer het defect door onze garantie wordt
gedekt, krijgt u het gerepareerde product of
een nieuw product retour. Met de reparatie of
vervanging van het product begint er geen nieuwe
garantieperiode.
Garantieperiode en wettelijke aanspraken
bij gebreken
De garantieperiode wordt door deze waarborg
niet verlengd. Dat geldt ook voor vervangen en gerepareerde onderdelen. Eventueel al bij aankoop
aanwezige schade en gebreken moeten meteen na
het uitpakken worden gemeld. Voor reparaties na
afloop van de garantieperiode worden kosten in
rekening gebracht.
Garantieomvang
Het apparaat is op basis van strenge kwaliteitsnormen met de grootst mogelijke zorg vervaardigd
en voorafgaand aan de levering nauwkeurig
gecontroleerd.
PDST 10 B3
NL│BE
│
39 ■

De garantie geldt voor materiaal- of fabricagefouten. Deze garantie geldt niet voor productonderdelen die onderhevig zijn aan normale slijtage en
die daarom als slijtonderdelen worden beschouwd,
of voor schade aan breekbare onderdelen zoals
schakelaars of onderdelen die van glas zijn
gemaakt.
Deze garantie vervalt wanneer het product is
beschadigd, ondeskundig is gebruikt of is gerepareerd. Voor deskundig gebruik van het product
moeten alle in de gebruiksaanwijzing beschreven aanwijzingen precies worden opgevolgd.
Gebruiksdoeleinden en handelingen die in de
gebruiksaanwijzing worden afgeraden of waarvoor wordt gewaarschuwd, moeten beslist worden
vermeden.
Het product is uitsluitend bestemd voor privégebruik en niet voor bedrijfsmatige doeleinden. Bij
verkeerd gebruik en ondeskundige behandeling, bij
gebruik van geweld en bij reparaties die niet door
ons erkend servicefiliaal zijn uitgevoerd, vervalt de
garantie.
Garantieperiode geldt niet bij
■ normale afname van de accucapaciteit
■ commercieel/bedrijfsmatig gebruik van het
product
■ beschadiging of modificatie van het product
door de klant
■ niet-naleving van de veiligheids- en onderhouds-
voorschriften, bedieningsfouten
■ schade door natuurrampen
Afhandeling bij een garantiekwestie
Voor een snelle afhandeling van uw aanvraag
neemt u de volgende aanwijzingen in acht:
■ Houd voor alle aanvragen de kassabon en het
artikelnummer (bijv.IAN12345) als aankoopbewijs bij de hand.
■ Het artikelnummer vindt u op het typeplaatje
van het product, op het product gegraveerd,
op de titelpagina van de gebruiksaanwijzing
(linksonder) of op de sticker op de achter- of
onderkant van het product.
■ Als er fouten in de werking of andere gebreken
optreden, neemt u eerst contract op met de hierna genoemde serviceafdeling, telefonisch of
viae-mail.
■ Een als defect geregistreerd product kunt u dan
zonder portokosten naar het aan u doorgegeven serviceadres sturen. Voeg het aankoopbewijs
(kassabon) bij en vermeld waaruit het gebrek
bestaat en wanneer het is opgetreden.
Op www.lidl-service.com kunt u deze
en vele andere handleidingen,
productvideo‘s en installatiesoftware
downloaden.
Met deze QR-code gaat u direct naar de website
van Lidl Service (www.lidl-service.com) en kunt
u met het invoeren van het artikelnummer (IAN)
345881_2004 de gebruiksaanwijzing openen.
Service
Service Nederland
Tel.: 0900 0400223 (0,10 EUR/Min.)
E-Mail: kompernass@lidl.nl
Service België
Tel.: 070 270 171 (0,15 EUR/Min.)
E-Mail: kompernass@lidl.be
IAN 345881_2004
Importeur
Let op: het volgende adres is geen serviceadres.
Neem eerst contact op met het opgegeven serviceadres.
KOMPERNASS HANDELS GMBH
BURGSTRASSE 21
44867 BOCHUM
DUITSLAND
www.kompernass.com
■ 40 │ NL
│
BE
PDST 10 B3

Originele conformiteitsverklaring
Wij, KOMPERNASS HANDELS GMBH, documentverantwoordelijke: de heer Semi Uguzlu, BURGSTR.21,
44867 BOCHUM, DUITSLAND, verklaren hierbij dat dit product voldoet aan de volgende normen, normatieve documenten en EU-richtlijnen:
Machinerichtlijn
(2006/42/EC)
Type/apparaatbeschrijving:
Perslucht-slanghaspel PDST 10 B3
Productiejaar: 07–2020
Serienummer: IAN 345881_2004
Bochum, 17-07-2020
Semi Uguzlu
- Kwaliteitsmanager Technische wijzigingen vanwege verdere ontwikkeling voorbehouden.
PDST 10 B3
NL│BE
│
41 ■

■ 42 │ NL
│
BE
PDST 10 B3

Spis treści
Wstęp. . . . . . . . . . . . . . . . . . . . . . . . . . . . . . . . . . . . . . . . . . . . . . . . . . . . . . . . . . . . . . . . 44
Zastosowanie zgodne zprzeznaczeniem ................................................44
Wyposażenie ......................................................................44
Zakres dostawy ....................................................................44
Dane techniczne ....................................................................44
Wskazówki bezpieczeństwa .............................................45
Pozostałe czynniki ryzyka ..............................................46
Przed uruchomieniem ..................................................46
Montaż ..............................................................46
Znalezienie miejsca montażu ..........................................................46
Montaż zwijacza węża pneumatycznego ................................................47
Uruchomienie .........................................................47
Podłączanie zwijacza węża pneumatycznego do źródła zasilania sprężonym powietrzem .........47
Podłączanie zwijacza węża pneumatycznego do narzędzia pneumatycznego ...................47
Korzystanie ze zwijacza węża pneumatycznego ..........................................47
Odwijanie węża ....................................................................48
Zwijanie węża .....................................................................48
Ustawianie stopera węża pneumatycznego ..............................................48
Konserwacja iczyszczenie. . . . . . . . . . . . . . . . . . . . . . . . . . . . . . . . . . . . . . . . . . . . . . . 48
Utylizacja ............................................................49
Gwarancja Kompernaß Handels GmbH ....................................49
Serwis ...............................................................50
Importer .............................................................50
Oryginalna deklaracja zgodności .........................................51
PDST 10 B3
PL
│
43 ■

BĘBEN NA WĄŻ NA
SPRĘŻONE POWIETRZE
PDST 10 B3
Wstęp
Gratulujemy zakupu nowego urządzenia. Wybrany
produkt charakteryzuje się wysoką jakością.
Instrukcja obsługi stanowi część niniejszego
produktu. Zawiera ona ważne informacje na temat
bezpieczeństwa, użytkowania iutylizacji. Przed
rozpoczęciem użytkowania produktu zapoznaj się
ze wszystkimi wskazówkami dotyczącymi obsługi
i bezpieczeństwa. Produkt należy użytkować wyłącznie zgodnie zzamieszczonym tu opisem oraz
wpodanym zakresie zastosowań. Wprzypadku
przekazania produktu osobie trzeciej należy dołączyć do niego również całą dokumentację.
Zastosowanie zgodne
zprzeznaczeniem
Zwijacz węża pneumatycznego jest stosowany
w połączeniu ze sprężarką do zasilania energią
narzędzi pneumatycznych. Zwijacz węża pneumatycznego przeznaczony jest wyłącznie do transportu sprężonego powietrza. Nie jest przystosowany
do transportu płynów. Produkt należy użytkować
wyłącznie zgodnie zzamieszczonym tu opisem
oraz wpodanym zakresie zastosowań. Instrukcję
obsługi należy przechowywać w bezpiecznym
miejscu. Wprzypadku przekazania urządzenia
innej osobie należy dołączyć do niego również
całą dokumentację. Każde użycie niezgodne z
przeznaczeniem jest zabronione i potencjalnie
niebezpieczne. Uszkodzenia spowodowane nieprzestrzeganiem lub niewłaściwym użytkowaniem
nie są objęte gwarancją i nie podlegają odpowiedzialności producenta. Urządzenie jest przeznaczone do użytku domowego i nie może być używane
do celów komercyjnych lub przemysłowych.
Symbole umieszczone na narzędziu
pneumatycznym
WARNING!
Przed uruchomieniem przeczytać
instrukcję obsługi.
Załóż maskę przeciwpyłową.
Załóż ochronę oczu.
Załóż ochronniki słuchu.
Załóż rękawice ochronne.
Wyposażenie
Obudowa zwijacza
Wychylny pałąk mocujący
Zaczep do zawieszania
Stoper węża
Wąż pneumatyczny do narzędzi
pneumatycznych
Szybkozłączka
Przyłącze sprężonego powietrza
Śruby
Śruby mocujące
Akcesoria montażowe
Śruby montażowe
- Kołki
Zakres dostawy
1 bęben na wąż na sprężone powietrze
1 akcesoria montażowe
(2x śruby montażowe, 2x kołki)
1 instrukcja obsługi
Dane techniczne
Ciśnienie robocze maks. 10 barów
System zwijania Automatyczny
Długość węża
pneumatycznego 10 m
Rozmiar przyłącza
sprężonego powietrza 1/4“ = 6,35 mm
Masa około 1,7 kg
■ 44 │ PL
PDST 10 B3

WARNING!
Wskazówki
bezpieczeństwa
OSTRZEŻENIE!
► PRZED UŻYCIEM NALEŻY DOKŁADNIE
PRZECZYTAĆ INSTRUKCJĘ OBSŁUGI. JEST
ONA CZĘŚCIĄ SKŁADOWĄ URZĄDZENIA
IMUSI BYĆ ZAWSZE DOSTĘPNA!
■ To urządzenie może być używane przez
osoby od 16.roku życia oraz przez osoby
o zmniejszonych zdolnościach fizycznych,
sensorycznych lub umysłowych lub też osoby
nieposiadające odpowiedniego doświadczenia
i/lub wiedzy, wyłącznie pod nadzorem lub
po przeszkoleniu w zakresie bezpiecznego
użytkowania urządzenia oraz potencjalnych
zagrożeń. Dzieciom nie wolno bawić się urządzeniem. Czyszczenie i konserwacja przez
użytkownika nie mogą być wykonywane przez
dzieci bez nadzoru.
■ Zwijacz węża pneumatycznego stosowany w
połączeniu ze sprężarką służy do zasilania
energią narzędzi pneumatycznych. Zwijacz
węża pneumatycznego działa wyłącznie do
transportu sprężonego powietrza. Nie jest przystosowany do transportu płynów.
■ Zwijacz węża pneumatycznego jest ze wzglę-
du na konstrukcję przeznaczony do montażu
na odpowiedniej ścianie lub suficie; stosowanie
bez montażu jest niedozwolone.
■ Zwijacz węża pneumatycznego nie został za-
projektowany do użytku komercyjnego, przemysłowego ani rzemieślniczego. Ten produkt jest
przeznaczony wyłącznie do użytku prywatnego. Zwijacz węża pneumatycznego może być
używany tylko zgodnie z jego przeznaczeniem.
Każde inne, różniące się od tego zastosowanie
jest zabronione!
■ Częścią zastosowania zgodnego z przezna-
czeniem jest również uwzględnienie instrukcji
bezpieczeństwa zawartych w instrukcji obsługi
oraz instrukcji montażu. Producent lub sprzedawca nie ponosi odpowiedzialności za szkody spowodowane niewłaściwym lub nieprawidłowym użytkowaniem.
■ Można stosować wyłącznie akcesoria od-
powiednio przeznaczone dla tego produktu.
Osoby, które korzystają ze zwijacza węża
pneumatycznego i wykonują wszelkie prace
konserwacyjne, są zobowiązane do zapoznania się z instrukcją. Muszą również posiadać
wiedzę o potencjalnych zagrożeniach. Należy
dokładnie i sumiennie przestrzegać obowiązujących przepisów z zakresu bezpieczeństwa i
higieny pracy (BHP).
■ Jakiekolwiek modyfikacje zwijacza węża pneu-
matycznego wykluczają wszelką odpowiedzialność producenta i za związane z tym szkody.
■ Zamontuj zwijacz węża pneumatycznego
przed jego użyciem, aby ograniczyć ryzyko
urazów do minimum.
■ Zwijacz węża pneumatycznego stosuj wyłącz-
nie ze sprężonym powietrzem. Zabronione jest
stosowanie zwijacza węża pneumatycznego z
płynami.
■ Zawsze pozwól, aby wąż zwijał się w sposób
kontrolowany, ponieważ zwijacz węża pneumatycznego jest wyposażony w sprężynę naciągową mechanizmu nawijania. Zwijający się
wąż może spowodować obrażenia ciała, jeśli
nie będzie prawidłowo używany. W przypadku
uszkodzenia mechanizmu nawijania zwijacz
węża pneumatycznego musi zostać od razu
wyłączony z użytkowania i naprawiony przez
specjalistę. Nie wolno samodzielnie otwierać
obudowy zwijacza węża pneumatycznego.
■ Używaj wyłącznie akcesoriów znajdujących się
w nienagannym stanie, które są przeznaczone
do użytku ze zwijaczem węża pneumatycznego.
■ Nigdy nie przekraczaj maksymalnego ciśnienia
roboczego zwijacza węża pneumatycznego lub
zastosowanego narzędzia pneumatycznego.
■ Zwijacz węża pneumatycznego podłączaj wy-
łącznie do przewodów pneumatycznych tylko
wtedy, gdy zagwarantowane jest, że maksymalne dopuszczalne ciśnienie robocze nie zostanie
przekroczone o więcej niż 10 % (np. przez
reduktor ciśnienia).
■ Wąż pneumatyczny trzymaj zawsze z dala od
ostrych krawędzi, wysokich temperatur i oleju.
PDST 10 B3
PL
│
45 ■

■ Zawsze sprawdzaj wąż pneumatyczny przed
użyciem zwijacza węża pneumatycznego.
■ Zwijacz węża pneumatycznego stosuj tylko w
połączeniu ze sprężarką. Praca w połączeniu
z butlami ze sprężonym powietrzem jest zabroniona.
■ Stosowanie narzędzi pneumatycznych w po-
łączeniu z gazami palnymi jest zabronione.
Niebezpieczeństwo eksplozji!
■ Zwijacza węża pneumatycznego nie wolno
używać do innych celów.
■ Nie przechowuj zwijacza węża pneumatyczne-
go w miejscu dostępnym dla dzieci.
■ Nigdy nie kieruj zwijacza węża pneumatyczne-
go lub jego węży na ludzi lub zwierzęta.
■ Do napraw należy używać wyłącznie orygi-
nalnych części zamiennych. Nieoryginalne
części zamienne mogą spowodować poważne
uszkodzenia.
■ Podczas wykonywania prac konserwacyjnych,
regulacyjnych i naprawczych należy zawsze
najpierw odłącz bęben węża pneumatycznego
od zasilania sprężonym powietrzem.
■ Modyfikacje zwijacza węża pneumatycznego
są zabronione.
■ Zwijacza węża pneumatycznego należy
używaj tylko wtedy, gdy znajduje się on w nienagannym stanie. W razie wątpliwości, przed
użyciem skonsultuj się ze specjalistą.
■ Naprawy mogą być wykonywane wyłącznie
przez wykwalifikowanych specjalistów.
■ Nigdy nie transportuj zwijacza węża pneuma-
tycznego trzymając go za węże.
■ Podczas odłączania węża od źródła sprężonego
powietrza lub narzędzia pneumatycznego
zawsze mocno go trzymaj.
Pozostałe czynniki ryzyka
Nawet jeśli używa się tego urządzenia prawidłowo, zawsze występują pozostałe czynniki ryzyka.
Poniższe zagrożenia mogą powstać w związku
z konstrukcją i wykonaniem tego zwijacza węża
pneumatycznego:
– Niebezpieczeństwo spowodowane uderzają-
cym w niekontrolowany sposób na boki wężem
sprężonego powietrza.
– Niebezpieczeństwo upadku na skutek potknię-
cia się o leżące wokół węże pneumatyczne.
Zmniejsz pozostałe czynniki ryzyka, stosując urządzenie ostrożnie i zgodnie z instrukcją.
Przed uruchomieniem
■ Wyjmij wszystkie elementy z opakowania i
sprawdź, czy zwijacz węża pneumatycznego
lub jego poszczególne części nie są uszkodzone. Jeśli tak jest, nie wolno używać zwijacza
węża pneumatycznego. Skontaktuj się z producentem przez wskazany adres serwisu.
■ Usuń wszystkie folie ochronne i inne opakowa-
nia transportowe.
■ Sprawdź, czy dostawa jest kompletna.
Montaż
Znalezienie miejsca montażu
■ Zwijacz węża pneumatycznego zamontuj na
odpowiednim suficie lub ścianie; korzystanie
ze zwijacza węża pneumatycznego bez jego
zamontowania jest zabronione.
■ Wybierz miejsce montażu zwijacza węża
pneumatycznego tak, aby nie stanowił on
przeszkody.
■ W przypadku montażu sufitowego należy
przestrzegać wysokości montażu wynoszącej
co najmniej 2,5 metra.
■ Do montażu potrzebne są następujące środki
pomocnicze: wiertarka, odpowiednie wiertło i
wkrętak.
■ 46 │ PL
PDST 10 B3

Montaż zwijacza węża
pneumatycznego
OSTRZEŻENIE!
NIEBEZPIECZEŃSTWO OBRAŻEŃ!
► Nieprawidłowy montaż zwijacza węża
pneumatycznego może prowadzić do
obrażeń ciała.
■ Upewnij się, że w miejscu montażu nie znajdują
się żadne kable ani rury. W razie potrzeby
użyj do tego detektora lub skorzystaj z pomocy
specjalisty.
■ Przestrzegaj również wskazówek bezpieczeń-
stwa dla używanej wiertarki.
WSKAZÓWKA!
NIEBEZPIECZEŃSTWO USZKODZEŃ!
► Nieprawidłowy montaż może prowadzić
douszkodzeń.
■ Upewnić się, że podłoże montażowe w miejscu
montażu jest w stanie utrzymać ciężar zwijacza
węża pneumatycznego. W razie jakichkolwiek
pytań skorzystaj z pomocy specjalisty.
1. Użyj wychylnego pałąka mocującego jako
szablonu. Pałąk mocujący można odłączyć
od zwijacza węża pneumatycznego po wykręceniu dwóch śrub, obracając je w lewo
(patrz rys. C).
Zaznaczyć ołówkiem położenie otworów na
podłożu montażowym.
2. Wywierć wymagane otwory do montażu w
podłożu montażowym.
3. Zamontuj pałąk mocujący za pomocą
odpowiednich materiałów mocujących (patrz
akcesoria montażowe -).
4. Zamocuj zwijacz węża pneumatycznego
ponownie w pałąku mocującym.
Dokręć w tym celu śruby, które zostały
wykręcone w kroku 1, obracając je w prawo.
(patrz rys. C)
Uruchomienie
Podłączanie zwijacza węża
pneumatycznego do źródła zasilania
sprężonym powietrzem
♦ Podłącz przyłącze sprężonego powietrza
zwijacza węża pneumatycznego do szybkozłączki źródła zasilania sprężonym powietrzem.
Podłączanie zwijacza węża
pneumatycznego do narzędzia
pneumatycznego
WSKAZÓWKA!
NIEBEZPIECZEŃSTWO USZKODZEŃ!
► Nieprawidłowa obsługa zwijacza węża pneu-
matycznego może spowodować uszkodzenia.
■ Należy zawsze przestrzegać maksymalnego
ciśnienia roboczego zwijacza węża pneumatycznego oraz zgodności zastosowanych
złączy. Za pomocą szybkozłączki węża
pneumatycznego, wąż pneumatyczny może
być natychmiast podłączony do wlotu powietrza narzędzia pneumatycznego.
Korzystanie ze zwijacza węża
pneumatycznego
OSTRZEŻENIE!
NIEBEZPIECZEŃSTWO OBRAŻEŃ!
► Zwijacz węża pneumatycznego jest wyposa-
żony w mechanizm powrotnego nawijania.
Jest on napędzany za pomocą mocnej
sprężyny. Nieprawidłowe zwijanie węża
pneumatycznego może prowadzić do
obrażeń ciała.
■ Nigdy nie dopuść do niekontrolowanego zwija-
nia się węża pneumatycznego.
■ Jeśli mechanizm powrotny jest uszkodzony,
należy natychmiast wyłączyć zwijacz węża
pneumatycznego z użytkowania. Zleć naprawę
uszkodzenia specjaliście.
■ Zwijacz węża pneumatycznego posiada
mechanizm blokujący i powrotny. Umożliwia to
łatwe rozwijanie i zwijanie węża pneumatycznego.
PDST 10 B3
PL
│
47 ■

■ Ta blokada generuje odgłos grzechotania
podczas zwijania i rozwijania. Nie jest to
żaden błąd w działaniu. Jeśli hałas zmienia się
po wielu zastosowaniach i/lub problemach z
mechanizmem, należy zwrócić się o pomoc do
specjalisty lub skontaktować się z serwisem.
Odwijanie węża
♦ Wyciągnij wąż pneumatyczny ostrożnie
z obudowy zwijacza do żądanej długości
roboczej dla narzędzia pneumatycznego. Gdy
puścisz wąż pneumatyczny po słyszalnym
kliknięciu, na tej długości wąż się zablokuje.
Zwijanie węża
♦ Przez krótkie pociągnięcie węża pneuma-
tycznego można zwolnić blokadę.
♦ Należy uważać na to, aby wąż pneuma-
tyczny w kontrolowany sposób zwinął się
do obudowy zwijacza węża .
Ustawianie stopera węża
pneumatycznego
Pozycję węża pneumatycznego można ustawić
co spowoduje przerwanie zwijania węża pneumatycznego na żądanej długości. Do zmiany ustawienia stopera węża pneumatycznego potrzebny jest wkrętak krzyżakowy (brak w zestawie).
♦ Za pomocą wkrętaka krzyżakowego odkręć
śruby mocujące (patrz rys.D).
♦ Przesuń stoper węża pneumatycznego
wzdłuż węża pneumatycznego do żądanej
pozycji.
♦ Dokręć ponownie śruby mocujące.
Konserwacja iczyszczenie
WSKAZÓWKA
► Zwijacz węża pneumatycznego musi być
regularnie serwisowany i remontowany w
celu zapewnienia prawidłowego działania
i zgodności z wymogami bezpieczeństwa.
Nienależyta i nieprawidłowa obsługa
może prowadzić do awarii i uszkodzenia
urządzenia.
■ Nigdy nie używaj ostrych i/lub drapiących
środków czyszczących lub rozpuszczalników.
Mogą one uszkodzić plastikowe części zwijacza węża pneumatycznego.
■ Nie dopuść do przedostania się wody do
wnętrza zwijacza węża pneumatycznego. Zadbaj o to, aby obudowa i wąż pneumatyczny
pozostawał czysty i niezakurzony. W tym celu
regularnie wycieraj zwijacz węża pneumatycznego czystą szmatką.
■ Przed zwinięciem węża pneumatycznego do
obudowy oczyść, o ile to możliwe, wąż pneumatyczny na potrzeby dalszego użytkowania.
■ Zwijacz węża pneumatycznego i wąż należy
czyścić w regularnych odstępach czasu
wilgotną szmatką z odrobiną mydła.
■
■ 48 │ PL
PDST 10 B3

Utylizacja
Opakowanie składa się w całości z
materiałów przyjaznych środowisku.
Można je wyrzucić do właściwych
pojemników na surowce wtórne.
Nie wyrzucaj urządzenia do zwykłych śmieci
domowych!
Informacje na temat utylizacji zużytego urządzenia
można uzyskać w najbliższym urzędzie gminy lub
miasta.
Opakowania należy utylizować
w sposób przyjazny dla środowiska.
Przestrzegaj oznaczeń na różnych
materiałach opakowaniowych i w razie
potrzeby zutylizuj je zgodnie z zasadami segregacji odpadów. Materiały opakowaniowe są oznaczone skrótami (a) icyframi (b) wnastępujący
sposób: 1–7: tworzywa sztuczne, 20–22: papier
itektura, 80–98: kompozyty.
Informacje na temat możliwości utylizacji
wysłużonego produktu można uzyskać
w najbliższym urzędzie gminy lub miasta.
Produkt można poddać recyklingowi,
podlega rozszerzonej odpowiedzialno-
ści producenta i jest zbierany w ramach
systemu segregacji odpadów.
Gwarancja
Kompernaß Handels GmbH
Szanowny Kliencie,
To urządzenie objęte jest 3-letnią gwarancją, licząc
od daty zakupu. W przypadku wad tego produktu,
masz gwarantowane ustawowo prawa w stosunku
sprzedawcy. Te ustawowe prawa nie są ograniczone przez nasze opisane poniżej warunki
gwarancji.
Warunki gwarancji
Okres gwarancji rozpoczyna się od daty zakupu.
Należy zachować paragon. Jest on wymagany
jako dowód zakupu.
Jeżeli w ciągu trzech lat od daty zakupu produktu
ujawni się w nim wada materiałowa lub produkcyjna, produkt zostanie wedle naszego uznania
nieodpłatnie naprawiony, wymieniony na nowy
lub zostanie zwrócona jego cena. Warunkiem
spełnienia tego świadczenia gwarancyjnego jest
dostarczenie w trakcie tego trzyletniego okresu
uszkodzonego urządzenia wraz z dowodem zakupu (paragonem) oraz krótkim opisem wady i daty
jej wystąpienia.
Jeżeli wada jest objęta naszą gwarancją, otrzymasz
z powrotem naprawiony lub nowy produkt.
Okres gwarancji i ustawowe roszczenia
gwarancyjne
Wykonanie usługi gwarancyjnej nie przedłuża
okresu gwarancji. Dotyczy to również wymienionych i naprawionych części. Wszelkie szkody i
wady wykryte w chwili zakupu należy zgłosić
bezpośrednio po rozpakowaniu urządzenia. Po
upływie okresu gwarancji wszelkie naprawy są
wykonywane odpłatnie.
Zakres gwarancji
Urządzenie zostało starannie wyprodukowane
i poddane przed wysyłką skrupulatnej kontroli
jakości.
Gwarancja obejmuje wady materiałowe lub produkcyjne. Niniejsza gwarancja nie obejmuje części
produktu, podlegających normalnemu zużyciu, ani
uszkodzeń części łatwo łamliwych, np. przełączników , lub części wykonanych ze szkła.
PDST 10 B3
PL
│
49 ■

Niniejsza gwarancja traci swoją ważność, jeśli
produkt został uszkodzony, nie używano go prawidłowo lub nie serwisowano należycie. W celu
zapewnienia prawidłowego stosowania produktu
należy ściśle przestrzegać wszystkich instrukcji
wymienionych w instrukcjach obsługi. Należy
bezwzględnie unikać zastosowania oraz postępowania, których odradza się w instrukcji obsługi lub
przed którymi się w niej ostrzega.
Produkt przeznaczony jest wyłącznie do użytku
domowego, a nie do zastosowań komercyjnych.
Niewłaściwe użytkowanie urządzenia, używanie go
w sposób niezgodny z jego przeznaczeniem, użycie
siły lub ingerencja w urządzenie, dokonywana
poza naszymi autoryzowanymi punktami serwisowymi, powodują utratę gwarancji.
Okres gwarancji nie ma zastosowania
wnastępujących przypadkach
■ normalne zużycie pojemności baterii
■ komercyjne wykorzystanie produktu
■ uszkodzenie lub modyfikacja produktu przez
klienta
■ nieprzestrzeganie przepisów bezpieczeństwa
ikonserwacji, błędy w obsłudze
■ szkody spowodowane zjawiskami naturalnymi
Realizacja zobowiązań gwarancyjnych
W celu zapewnienia szybkiego załatwienia sprawy, postępuj zgodnie z poniższymi wskazówkami:
■ W przypadku wszelkich pytań przygo-
tuj paragon fiskalny oraz numer artykułu
(np.IAN12345) jako dowód zakupu.
■ Numer artykułu można znaleźć na tabliczce
znamionowej na produkcie, wygrawerowany
na urządzeniu, zapisany na stronie tytułowej
instrukcji obsługi (w dolnym lewym rogu) lub na
naklejce ztyłu bądź na spodzie urządzenia.
■ W przypadku wystąpienia błędów działania
lub innych wad, prosimy o kontakt z odpowiednim działem serwisu telefonicznie lub przez
e-mail.
■ Zarejestrowany jako wadliwy produkt możesz
wtedy wraz z dołączonym dowodem zakupu
(paragonem) oraz opisem i datą wystąpienia
usterki wysłać nieodpłatnie na przekazany
wcześniej adres serwisu.
Na stronie www.lidl-service.com
możesz pobrać te i wiele innych
instrukcji, filmów o produktach oraz
oprogramowanie instalacyjne.
Za pomocą tego kodu QR możesz przejść
bezpośrednio na stronę serwisu Lidl
(www.lidl-service.com), gdzie możesz otworzyć
instrukcję obsługi, wpisując numer artykułu (IAN)
345881_2004.
Serwis
Serwis Polska
Tel.: 22 397 4996
E-Mail: kompernass@lidl.pl
IAN 345881_2004
Importer
Pamiętaj, że poniższy adres nie jest adresem
serwisu. Skontaktuj się najpierw z odpowiednim
punktem serwisowym.
KOMPERNASS HANDELS GMBH
BURGSTRASSE 21
44867 BOCHUM
NIEMCY
www.kompernass.com
■ 50 │ PL
PDST 10 B3

Oryginalna deklaracja zgodności
Firma KOMPERNASS HANDELS GMBH, osoba odpowiedzialna za sporządzenie dokumentacji:
Semi Uguzlu, BURGSTR. 21, 44867 BOCHUM, NIEMCY, oświadcza niniejszym, że produkt ten jest
zgodny znastępującymi normami, dokumentami normatywnymi oraz dyrektywami WE:
Dyrektywa maszynowa
(2006/42/EC)
Typ/nazwa urządzenia
Bęben na wąż na sprężone powietrze PDST 10 B3
Rok produkcji: 07–2020
Numer seryjny: IAN 345881_2004
Bochum, 17.07.2020
Semi Uguzlu
- dyrektor ds. jakości Zastrzegamy sobie prawo do wprowadzania zmian technicznych wramach procesu udoskonalania
produktu.
PDST 10 B3
PL
│
51 ■

■ 52 │ PL
PDST 10 B3

Obsah
Úvod ................................................................54
Použití vsouladu surčením ............................................................54
Vybavení .........................................................................54
Rozsah dodávky ....................................................................54
Technické údaje ....................................................................54
Bezpečnostní pokyny ...................................................55
Zbytkové riziko ........................................................ 56
Před uvedením do provozu ..............................................56
Montáž ..............................................................56
Vyhledání místa montáže .............................................................56
Montáž navijáku hadice na stlačenývzduch ..............................................57
Uvedení do provozu .................................................... 57
Připojení navijáku hadice nastlačený vzduch ke zdroji stlačeného vzduchu ......................57
Připojení navijáku hadice na stlačený vzduch k pneumatickému nářadí .........................57
Použití navijáku hadice nastlačenývzduch ...............................................57
Odvíjení hadice ....................................................................58
Navíjení hadice ....................................................................58
Nastavení hadicové zarážky ..........................................................58
Údržba a čištění .......................................................58
Likvidace .............................................................59
Záruka společnosti Kompernass Handels GmbH ............................59
Servis ................................................................60
Dovozce ..............................................................60
Originální prohlášení oshodě ............................................61
PDST 10 B3
CZ
│
53 ■

BUBEN S TLAKOVOU HADICÍ
PDST 10 B3
Úvod
Blahopřejeme vám kzakoupení vašeho nového
přístroje. Rozhodli jste se tím pro vysoce kvalitní
výrobek. Návod kobsluze je součástí tohoto výrobku. Obsahuje důležité informace obezpečnosti,
použití a likvidaci. Před použitím výrobku se seznamte se všemi provozními a bezpečnostními pokyny.
Výrobek používejte pouze předepsaným způsobem
a pro uvedené oblasti použití. Při předávání výrobku
třetím osobám předejte spolu sním ityto podklady.
Použití vsouladu surčením
Naviják hadice na stlačený vzduch slouží ve spojení s kompresorem k napájení pneumatického nářadí energií. Výhradní funkcí navijáku hadice na stlačený vzduch je doprava stlačeného vzduchu. Není
určen k přepravě kapalin. Výrobek používejte pouze předepsaným způsobem a pro uvedené oblasti
použití. Tento návod dobře uschovejte. Při předávání výrobku třetím osobám předejte i tyto podklady.
Jakékoli použití, které překračuje rozsah používání
k určenému účelu, je zakázané a je potenciálně
nebezpečné. Na škody, které vzniknou v důsledku
nedodržování pokynů nebo nesprávným použitím,
se nevztahuje záruka a nespadají do odpovědnosti
výrobce. Přístroj byl navržen pro domácí používání
a nesmí se používat v komerční nebo průmyslové
sféře.
Symboly na pneumatickém nářadí
WARNING!
Před uvedením do provozu je nutné si
přečíst návod kobsluze.
Používejte ochrannou masku proti prachu.
Používejte ochranu očí.
Používejte ochranu sluchu.
Používejte ochranné rukavice
Vybavení
kryt bubínku
otočný upevňovací třmen
hák k zavěšení
hadicová zarážka
pneumatická hadice pro pneumatické nářadí
rychlospojka
přípojka stlačeného vzduchu
šrouby
upevňovací šrouby
Montážní příslušenství
montážní šrouby
- hmoždinky
Rozsah dodávky
1 buben s tlakovou hadicí
1 montážní příslušenství
(2x montážní šroub, 2x hmoždinka)
1návod kobsluze
■ 54 │ CZ
Technické údaje
Pracovní tlak max. 10bar
Navíjecí systém Automatický
Délka hadice na stlačený
vzduch 10 m
Velikost přípojky stlačeného
vzduchu 1/4“ = 6,35 mm
Hmotnost cca 1,7 kg
PDST 10 B3

WARNING!
Bezpečnostní pokyny
VÝSTRAHA!
► PŘED POUŽITÍM SI PROSÍM POZORNĚ
PŘEČTĚTE NÁVOD K OBSLUZE.
JE SOUČÁSTÍ PŘÍSTROJE A MUSÍ BÝT
NEUSTÁLE K DISPOZICI!
■ Osoby ve věku od 16let a osoby somezenými
fyzickými, smyslovými nebo mentálními schopnostmi či nedostatkem zkušeností a znalostí
mohou používat tento přístroj pouze tehdy,
pokud jsou pod dohledem nebo byly poučeny
obezpečném používání přístroje a porozuměly
ztoho vyplývajícímu nebezpečí. Děti si nesmí
spřístrojem hrát. Čištění a uživatelskou údržbu
nesmí provádět děti bez dozoru.
■ Ve spojení s kompresorem slouží naviják hadice
na stlačený vzduch k napájení pneumatického
nářadí energií. Výhradní funkcí navijáku hadice
na stlačený vzduch je doprava stlačeného
vzduchu. Není určen k přepravě kapalin.
■ Vzhledem k zařízení je naviják hadice na stlače-
ný vzduch určen k montáži na vhodnou stěnu
nebo strop. Používání v nepřimontovaném stavu
není přípustné.
■ Naviják hadice na stlačený vzduch není konci-
pován pro komerční, průmyslové nebo živnostenské používání. Tento výrobek je určen pouze
k soukromému používání. Naviják hadice na
stlačený vzduch se smí používat pouze v souladu s určeným účelem. Jakékoli další odlišné
používání je zakázáno!
■ Součástí použití v souladu s určením je také
respektování bezpečnostních pokynů v návodu
k obsluze a montážního návodu. Výrobce ani
obchodník nepřebírá ručení za škody vzniklé v
důsledku použití kjinému účelu nebo vzniklé
nesprávnou obsluhou.
■ Pro tento výrobek se smí používat pouze příslu-
šenství, které je pro něj vhodné. Osoby, které
naviják hadice na stlačený vzduch používají
a případně provádějí jeho údržbu, jsou povinny
se s ním podrobně seznámit. Dále musí znát
potenciální nebezpečí. Platné bezpečnostní
předpisy se musí přesně a svědomitě dodržovat.
■ Každá úprava provedená u navijáku hadice na
stlačený vzduch vede k zániku záruky výrobce
na škody vzniklé v jejím důsledku.
■ Před použitím navijáku hadice na stlačený
vzduch jej namontujte, abyste snížili nebezpečí
zranění na minimum.
■ Naviják hadice na stlačený vzduch používejte
výhradně v kombinaci se stlačeným vzduchem.
Je zakázáno používat naviják hadice na stlačený
vzduch v kombinaci s kapalinami.
■ Hadici při navíjení vždy kontrolujte, neboť navi-
ják hadice na stlačený vzduch je vybaven napínací pružinou pro navíjecí mechanismus. Navíjející se hadice může při nesprávném používání
způsobit zranění. V případě poškození mechanismu navíjení naviják hadice na stlačený
vzduch okamžitě vyřaďte z provozu a nechejte
jej opravit odborníkem. V žádném případě sami
neotvírejte pouzdro navijáku hadice na stlačený
vzduch.
■ Příslušenství, které je určené k používání s navi-
jákem hadice na stlačený vzduch, musí být při
používání v bezvadném stavu.
■ Nikdy nepřekračujte maximální pracovní tlak
navijáku hadice na stlačený vzduch nebo použitého pneumatického nářadí.
■ Naviják hadice na stlačený vzduch připojujte k
vedení stlačeného vzduchu pouze v případě,
pokud je zajištěno, že je zabráněno překročení
maximálního přípustného pracovního tlaku o
více než 10% (např. prostřednictvím redukčního
ventilu).
PDST 10 B3
CZ
│
55 ■

■ Hadici na stlačený vzduch udržujte vždy mimo
dosah ostrých hran, zdrojů tepla a oleje.
■ Před použitím navijáku hadice na stlačený
vzduch hadici na stlačený vzduch vždy
zkontrolujte.
■ Naviják hadice na stlačený vzduch vždy použí-
vejte ve spojení s kompresorem. Provoz s tlakovou nádobou je zakázán.
■ Používání pneumatického nářadí s hořlavými
plyny je zakázáno. Hrozí nebezpečí výbuchu!
■ Naviják hadice na stlačený vzduch se nesmí
používat pro jiné účely.
■ Neskladujte naviják hadice na stlačený vzduch
v dosahu dětí.
■ Nikdy nemiřte naviják hadice na stlačený
vzduch nebo jeho hadici na člověka nebo na
zvíře.
■ Na opravy navijáku se musí používat výhradně
originální náhradní díly. Neoriginální náhradní
díly mohou způsobit závažná poškození.
■ Při provádění údržby, nastavení a oprav vždy
nejdříve odpojte naviják hadice na stlačený
vzduch od přívodu stlačeného vzduchu.
■ Je zakázáno provádět úpravy navijáku hadice
na stlačený vzduch.
■ Naviják hadice na stlačený vzduch používejte
pouze v případě, že je v bezvadném stavu.
V případě pochybností se před použitím nejprve
poraďte s odborníkem.
■ Opravy nechte provádět pouze kvalifikovanými
odborníky.
■ Nikdy nepřepravujte naviják hadice na stlačený
vzduch uchopením za hadice.
■ Při odpojování od zdroje stlačeného vzduchu
nebo od pneumatického nářadí hadici vždy
pevně držte.
Zbytkové riziko
I když tento přístroj správně obsluhujete, vždy
zůstanou zbytková rizika. Následující nebezpečí
mohou vzniknout v souvislosti s konstrukcí a provedením tohoto navijáku hadice na stlačený vzduch:
– Nebezpečí způsobené rychle se pohybující
volnou hadicí na stlačený vzduch.
– Nebezpečí pádu přes hadice na stlačený
vzduch nedbale položené na podlaze.
Zabraňte zbytkovému riziku tím, že budete přístroj
používat svědomitě a podle předpisů.
Před uvedením do provozu
■ Vyjměte z balení všechny díly a zkontrolujte,
zda naviják hadice na stlačený vzduch nebo
jeho jednotlivé části nejsou poškozeny. Pokud
ano, naviják hadice na stlačený vzduch nepoužívejte. Obraťte se na výrobce prostřednictvím
adresy zákaznického servisu.
■ Odstraňte všechny ochranné fólie a přepravní
obaly.
■ Zkontrolujte, zda je dodávka kompletní.
Montáž
Vyhledání místa montáže
■ Naviják hadice na stlačený vzduch namontujte
na vhodnou stěnu nebo strop. Používání navijáku
hadice na stlačený vzduch v nepřimontovaném
stavu není přípustné.
■ Místo montáže navijáku hadice na stlačený
vzduch zvolte tak, aby nepředstavoval překážku.
■ V případě montáže na strop je nutné dodržovat
montážní výšku alespoň 2,5 metru.
■ K montáži potřebujete tyto pomůcky: vrtačku,
vhodný vrták a také šroubovák.
■ 56 │ CZ
PDST 10 B3

Montáž navijáku hadice na
stlačenývzduch
VÝSTRAHA! NEBEZPEČÍ ZRANĚNÍ!
► Nesprávná montáž navijáku hadice na
stlačený vzduch může vést ke zraněním.
■ Ujistěte se, že se v místě montáže nenacházejí
žádné trubky ani kabely. Použijte k tomu detektor nebo se obraťte na odborníka.
■ Dodržujte také bezpečnostní pokyny k použité
vrtačce.
UPOZORNĚNÍ! NEBEZPEČÍ POŠKOZENÍ!
► Nesprávná montáž může vést kpoškození.
■ Ujistěte se, že nosný materiál v místě montáže
unese hmotnost navijáku hadice na stlačený
vzduch. V případě dotazů se obraťte na
odborníka.
1. Otočný upevňovací třmen použijte jako
šablonu. Upevňovací třmen můžete z navijáku
hadice na stlačený vzduch odmontovat odšroubováním obou šroubů proti směru pohybu
hodinových ručiček (viz obr. C).
Tužkou si označte polohu otvorů na nosném
materiálu.
2. Vyvrtejte do nosného materiálu potřebné otvory
k montáži.
3. Namontujte upevňovací třmen pomocí vhodného upevňovacího materiálu (viz montážní
příslušenství -).
4. Naviják hadice na stlačený vzduch opět připevněte k upevňovacímu třmenu.
K tomuto účelu opět zašroubujte šrouby,
které jste v kroku 1 odstranili, ve směru pohybu
hodinových ručiček. (viz obr.C)
Uvedení do provozu
Připojení navijáku hadice
nastlačený vzduch ke zdroji
stlačeného vzduchu
♦ Zasuňte přípojku stlačeného vzduchu navijá-
ku hadice na stlačený vzduch do rychlospojky
zdroje stlačeného vzduchu.
Připojení navijáku hadice na
stlačený vzduch k pneumatickému
nářadí
UPOZORNĚNÍ! NEBEZPEČÍ POŠKOZENÍ!
► Nesprávná manipulace s navijákem hadice
na stlačený vzduch může vést kpoškození.
■ Vždy dodržujte maximální pracovní tlak navijá-
ku hadice na stlačený vzduch a kompatibilitu
použitých připojovacích kusů. Hadici na stlačený vzduch lze ihned připojit k pneumatickému
nářadí prostřednictvím jeho přívodu vzduchu
pomocí rychlospojky.
Použití navijáku hadice
nastlačenývzduch
VÝSTRAHA! NEBEZPEČÍ ZRANĚNÍ!
► Naviják hadice na stlačený vzduch je vybaven
vratným mechanismem. Tento mechanismus je
ovládán silnou pružinou. V případě nesprávného navíjení hadice na stlačený vzduch
může dojít ke zranění.
■ Nikdy nenechávejte hadici na stlačený
vzduch nekontrolovaně samu navíjet.
■ Pokud dojde k poškození vratného mechanismu,
okamžitě vyřaďte naviják hadice na stlačený
vzduch z provozu. Vzniklé poškození nechejte
opravit odborníkem.
■ Naviják hadice na stlačený vzduch je vybaven
aretačním mechanismem a mechanismem vratného chodu. Tím je zajištěno snadné odvíjení
a navíjení hadice na stlačený vzduch.
PDST 10 B3
CZ
│
57 ■

■ Tato aretace vytváří při odvíjení a navíjení zvuk
řehtačky. Nejedná se o závadu. Pokud by se
tento zvuk po četném používání a/nebo při
problémech s mechanismem změnil, poraďte se
s odborníkem nebo se obraťte na zákaznický
servis.
Odvíjení hadice
♦ Opatrně vytáhněte hadici na stlačený vzduch
v pracovní délce potřebné pro pneumatické
nářadí z pouzdra bubnu. Pokud hadici na
stlačený vzduch po zaznění cvaknutí pustíte,
aretace hadici na této délce zajistí.
Navíjení hadice
♦ Hadici na stlačený vzduch uvolníte
z aretace krátkým zatáhnutím.
♦ Dbejte na to, abyste hadici na stlačený
vzduch navíjeli zpět do pouzdra
navijáku kontrolovaným pohybem.
Nastavení hadicové zarážky
Je možné nastavit polohu hadicové zarážky
a tím se přeruší navíjení hadice na stlačený
vzduch v požadované délce. K přestavení hadicové zarážky potřebujete křížový šroubovák
(není součástí dodávky).
♦ Křížovým šroubovákem uvolněte upevňovací
šrouby (viz obr.D).
♦ Přesuňte hadicovou zarážku podél hadice
na stlačený vzduch na požadované místo.
♦ Opět utáhněte upevňovací šrouby.
Údržba a čištění
UPOZORNĚNÍ
► Pro zajištění bezvadné funkce navijáku hadice
na stlačený vzduch a pro dodržení bezpečnostních požadavků je nutné pravidelně
provádět jeho údržbu a revizi s opravami.
Neodborný a nesprávný provoz může vést
kporuchám a k poškození přístroje.
■ Nikdy nepoužívejte ostré nebo drsné čisticí
prostředky nebo rozpouštědla. Mohly by
poškodit plastové části navijáku hadice na
stlačený vzduch.
■ Dejte pozor, aby se do navijáku hadice na
stlačený vzduch nikdy nedostala voda. Dbejte
na to, že pouzdro navijáku a hadice na stlačený vzduch nesmí být zaprášené ani znečištěné.
Z tohoto důvodu pravidelně otírejte naviják
hadice na stlačený vzduch čistou textilií.
■ Předtím než navinete hadici na stlačený vzduch
do pouzdra, pokud možno ji vyčistěte pro další
používání.
■ Naviják hadice na stlačený vzduch i hadici
na stlačený vzduch v pravidelných intervalech
vyčistěte vlhkým hadrem a trochou mazlavého
mýdla.
■ 58 │ CZ
PDST 10 B3

Likvidace
Obal je zekologických materiálů. Lze
ho zlikvidovat vmístních recyklačních
kontejnerech.
Přístroj nevyhazujte do domovního odpadu!
Informace omožnostech likvidace vysloužilého
přístroje vám poskytne obecní nebo městský úřad.
Obal zlikvidujte ekologicky.
Dbejte na označení na různých obalových materiálech a v případě potřeby
tyto obaly roztřiďte. Obalové materiály
jsou označeny zkratkami (a) a číslicemi (b) s následujícím významem: 1–7: plasty, 20–22: papír a
lepenka, 80–98: kompozitní materiály.
Informace o možnostech likvidace
vysloužilého výrobku vám podá správa
vašeho obecního nebo městského úřadu.
Výrobek je recyklovatelný, podléhá
rozšířené odpovědnosti výrobce a je
shromažďován odděleně.
Záruka společnosti
Kompernass Handels GmbH
Vážená zákaznice, vážený zákazníku,
na tento přístroj získáváte záruku v trvání 3 let od
data zakoupení. V případě závad tohoto výrobku
máte zákonná práva vůči prodejci výrobku. Tato
zákonná práva nejsou omezena naší níže uvedenou zárukou.
Záruční podmínky
Záruční doba začíná plynout dnem nákupu. Dobře
uschovejte pokladní doklad. Tento doklad je potřebný jako důkaz o koupi.
Pokud se do tří let od data zakoupení tohoto výrobku vyskytne vada materiálu nebo výrobní závada,
pak Vám podle našeho uvážení výrobek zdarma
opravíme, vyměníme nebo uhradíme kupní cenu.
Předpokladem této záruky je, že bude během tříleté lhůty předložen vadný přístroj a doklad o koupi
(pokladní doklad) a stručně se popíše, v čem závada spočívá a kdy se vyskytla.
Vztahuje-li se na závadu naše záruka, obdržíte
zpět buď opravený nebo nový produkt. Opravou
nebo výměnou výrobku nezačne plynout nová
záruční doba.
Záruční doba a zákonné nároky vyplývající
ze závad
Záručním plněním se záruční doba neprodlužuje.
To platí i pro vyměněné a opravené součásti.
Poškození nebo vady vyskytující se případně již
při nákupu se musí oznámit ihned po vybalení. Po
uplynutí záruční doby podléhají veškeré opravy
zpoplatnění.
PDST 10 B3
CZ
│
59 ■

Rozsah záruky
Přístroj byl vyroben pečlivě podle přísných směrnic
kvality a před expedicí byl svědomitě vyzkoušen.
Záruka se vztahuje na materiálové nebo výrobní
vady. Tato záruka se nevztahuje
na součásti výrobku, které jsou vystaveny běžnému
opotřebení, a proto je lze považovat za spotřební
díly, nebo na poškození křehkých součástí, jako
jsou např. spínače nebo díly, které jsou vyrobeny
ze skla.
Tato záruka zaniká, pokud je výrobek poškozen,
nebyl řádně používán nebo udržován. Pro zajištění
správného používání výrobku se musí přesně dodržovat všechny pokyny uvedené v návodu k obsluze. Účelům použití a úkonům, které se v návodu
k obsluze nedoporučují nebo se před nimi varuje,
je třeba se bezpodmínečně vyhnout.
Výrobek je určen pouze pro soukromé účely a ne
pro komerční použití. Při nesprávném a neodborném používání, při použití násilí a při zásazích,
které nebyly provedeny našimi autorizovanými
servisními provozovnami, záruční nároky zanikají.
Záruční lhůta neplatí v těchto případech
■ normální opotřebení kapacity akumulátoru
■ komerční použití výrobku
■ poškození nebo změna výrobku zákazníkem
■ nedodržení bezpečnostních předpisů
a předpisů údržby, chyby obsluhy
■ škody vlivem přírodních živlů
Vyřízení v případě záruky
Pro zajištění rychlého Vaší žádosti postupujte podle
následujících pokynů:
■ Pro všechny dotazy mějte připraven pokladní
lístek a číslo výrobku (např. IAN 12345) jako
doklad o koupi.
■ Číslo výrobku naleznete na typovém štítku na
výrobku, rytině na výrobku, na titulní straně
návodu k obsluze (vlevo dole) nebo na nálepce
na zadní nebo spodní straně výrobku.
■ Pokud by se měly vyskytovat funkční vady
nebo jiné závady, kontaktujte nejprve níže
uvedené servisní oddělení telefonicky nebo
e-mailem.
■ Výrobek, zaevidovaný jako vadný výrobek pak
můžete při přiložení dokladu o nákupu (pokladní lístek) a při uvedení, v čem spočívá vada a
kdy k ní došlo, poslat výrobek pro Vás bez poštovného na adresu, kterou Vám oznámí servis.
Na webových stránkách
www.lidl-service.com si můžete stáhnout tyto a mnoho dalších příruček,
videí o výrobku a instalační software.
Pomocí kódu QR se dostanete přímo
na stránku servisu Lidl (www.lidl-service.com) a
můžete pomocí zadání čísla výrobku
(IAN)345881_2004 otevřít svůj návod k obsluze.
Servis
Servis Česko
Tel.: 800143873
E-Mail: kompernass@lidl.cz
IAN 345881_2004
Dovozce
Dbejte prosím na to, že následující adresa není
adresou servisu. Kontaktujte nejprve uvedený
servis.
KOMPERNASS HANDELS GMBH
BURGSTRASSE 21
44867 BOCHUM
NĚMECKO
www.kompernass.com
■ 60 │ CZ
PDST 10 B3

Originální prohlášení oshodě
My, společnost KOMPERNASS HANDELS GMBH, osoba odpovědná za dokumentaci: pan Semi Uguzlu,
BURGSTR. 21, 44867 BOCHUM, DEUTSCHLAND/NĚMECKO, prohlašujeme, že tento výrobek je ve
shodě snásledujícími normami, normativními dokumenty a směrnicemi ES:
Směrnice ostrojních zařízeních
(2006/42/EC)
Typ/označení přístroje
Buben s tlakovou hadicí PDST 10 B3
Rok výroby: 07–2020
Sériové číslo: IAN 345881_2004
Bochum, 17.07.2020
Semi Uguzlu
- manažer kvality Technické změny ve smyslu dalšího vývoje jsou vyhrazeny.
PDST 10 B3
CZ
│
61 ■

■ 62 │ CZ
PDST 10 B3

Obsah
Úvod ................................................................64
Použitie na určený účel ...............................................................64
Vybavenie ........................................................................64
Rozsah dodávky ....................................................................64
Technické údaje ....................................................................64
Bezpečnostné pokyny ..................................................65
Zvyškové riziko .......................................................66
Pred uvedením do prevádzky ............................................66
Montáž ..............................................................66
Nájdenie miesta na montáž ...........................................................66
Montáž navíjacieho bubna napneumatickú hadicu ........................................67
Uvedenie do prevádzky ................................................67
Pripojenie navíjacieho bubna na pneumatickú hadicu k zdroju stlačeného vzduchu ...............67
Pripojenie navíjacieho bubna na pneumatickú hadicu kpneumatickému náradiu ..................67
Používanie navíjacieho bubna napneumatickú hadicu ......................................67
Odvíjanie hadice ...................................................................68
Navíjanie hadice ...................................................................68
Nastavenie zastavovača hadice .......................................................68
Údržba ačistenie ......................................................68
Likvidácia ............................................................69
Záruka spoločnosti Kompernass Handels GmbH ............................69
Servis ................................................................70
Dovozca ..............................................................70
Originálne vyhlásenie o zhode ...........................................71
PDST 10 B3
SK
│
63 ■

NAVÍJACÍ BUBON
S TLAKOVOU HADICOU
PDST 10 B3
Úvod
Srdečne vám gratulujeme kukúpe nového prístroja.
Touto kúpou ste sa rozhodli pre výrobok vysokej
kvality. Návod na obsluhu je súčasťou tohto výrobku. Obsahuje dôležité upozornenia týkajúce sa
bezpečnosti, používania a likvidácie. Pred použitím
výrobku sa oboznámte sovšetkými pokynmi na
obsluhu a bezpečnostnými pokynmi. Výrobok používajte iba podľa opisu a vuvedených oblastiach
použitia. Pri postúpení výrobku tretej osobe odovzdajte spolu sním aj všetky podklady.
Použitie na určený účel
Navíjací bubon s pneumatickou hadicou sa používa
v spojení s kompresorom na napájanie pneumatického náradia. Navíjací bubon s pneumatickou
hadicou sa používa výlučne na prepravu stlačeného vzduchu. Nie je vhodný na prepravu tekutín.
Výrobok používajte iba podľa opisu a vuvedených
oblastiach použitia. Tento návod na obsluhu starostlivo uschovajte. Pri odovzdávaní výrobku tretej
osobe sním odovzdajte taktiež všetky podklady.
Akékoľvek použitie, ktoré sa líši od určeného použitia, je zakázané a potenciálne nebezpečné. Na
škody spôsobené zanedbaním alebo nesprávnym
použitím sa nevzťahuje záruka a nespadajú do
zodpovednosti výrobcu. Prístroj bol navrhnutý na
domáce použitie a nesmie sa používať komerčne
alebo priemyselne.
Symboly na pneumatickom náradí
WARNING!
Pred uvedením do prevádzky si prečítajte návod na obsluhu.
Používajte protiprachovú masku.
Používajte ochranu očí.
Používajte ochranu sluchu.
Používajte ochranné rukavice
Vybavenie
Teleso bubna
Otáčateľný upevňovací strmeň
Hák na zavesenie
Zastavovač hadice
Pneumatická hadica pre pneumatické náradie
Rýchlospojka
Prípojka stlačeného vzduchu
Skrutky
Upevňovacie skrutky
Montážne príslušenstvo
Montážne skrutky
- Hmoždinky
Rozsah dodávky
1 navíjací bubon s tlakovou hadicou
1 montážne príslušenstvo
(2x montážne skrutky, 2x hmoždinka)
1 návod na obsluhu
■ 64 │ SK
Technické údaje
Pracovný tlak max. 10 bar
Systém samonavíjania automatický
Dĺžka hadice na
stlačený vzduch 10 m
Veľkosť prípojky na
stlačený vzduch 1/4“ = 6,35 mm
Hmotnosť cca 1,7 kg
PDST 10 B3

WARNING!
Bezpečnostné pokyny
VÝSTRAHA!
► PRED POUŽITÍM SI POZORNE PREČÍTAJTE
NÁVOD NA OBSLUHU. NÁVOD NA
OBSLUHU JE SÚČASŤOU PRÍSTROJA
A MUSÍ BYŤ NEUSTÁLE K DISPOZÍCII!
■ Tento prístroj môžu používať osoby staršie ako
16 rokov, ako aj osoby sozníženými fyzickými,
zmyslovými alebo mentálnymi schopnosťami
alebo s nedostatkom skúseností avedomostí, ak
sú pod dohľadom alebo ak boli o bezpečnom
používaní prístroja poučené apochopili z toho
vyplývajúce nebezpečenstvá. Deti sa nesmú
hrať sprístrojom. Deti nesmú vykonávať čistenie
a používateľskú údržbu bez dohľadu.
■ Navíjací bubon s pneumatickou hadicou slúži
v spojení s kompresorom na napájanie pneumatického náradia. Navíjací bubon s pneumatickou hadicou sa používa výlučne na prepravu
stlačeného vzduchu. Nie je vhodný na prepravu tekutín.
■ Navíjací bubon na pneumatickú hadicu vďaka
zariadeniu je určený na montáž na vhodnú
stenu alebo strop; použitie navíjacieho bubna
bez montáže nie je povolené.
■ Navíjací bubon na pneumatickú hadicu nebol
vyvinutý na komerčné, priemyselné alebo remeselné použitie. Tento výrobok je určený iba na
súkromné použitie. Navíjací bubon na pneumatickú hadicu sa smie používať výlučne podľa
jeho určenia. Akékoľvek iné, odlišné použitie je
zakázané!
■ Súčasťou používania na určený účel je tiež
zohľadnenie bezpečnostných pokynov, obsiahnutých v návode na obsluhu, ako aj návodu
na montáž. Za škody, ktoré vzniknú v dôsledku
nesprávneho používania alebo používania v
rozpore surčením, výrobca ani predajca nepreberá žiadne ručenie.
■ Pre tento výrobok sa smie používať iba vhodné
príslušenstvo. Osoby, ktoré používajú navíjací
bubon na pneumatickú hadicu a v prípade potreby vykonávajú údržbárske práce, sú povinné
sa oboznámiť s návodom na obsluhu. Okrem
toho musia byť informované o možných nebezpečenstvách. Platné predpisy úrazovej prevencie sa musia dodržiavať presne a svedomito.
■ Akékoľvek zmeny na navíjacom bubne s pne-
umatickou hadicou budú mať za následok
vylúčenie zodpovednosti výrobcu za súvisiace
škody.
■ Navíjací bubon s pneumatickou hadicou na-
montujte pred použitím, aby ste minimalizovali
riziko zranenia.
■ Navíjací bubon s pneumatickou hadicou použí-
vajte výlučne so stlačeným vzduchom. Používanie navíjacieho bubna s pneumatickou hadicou
s tekutinami nie je povolené.
■ Hadicu vždy nechajte navíjať kontrolovaným
spôsobom, pretože navíjací bubon na pneumatickú hadicu je vybavený upínacou pružinou pre
navíjací mechanizmus. Navíjajúca sa hadica
môže pri nesprávnom použití spôsobiť zranenia. Ak je navíjací mechanizmus poškodený,
navijak na pneumatickú hadicu z ihneď vyraďte
z prevádzky a nechajte ho opraviť špecialistom.
Teleso navíjacieho bubna na pneumatickú hadicu
v žiadnom prípade neotvárajte sami.
■ Používajte iba príslušenstvo v bezchybnom
stave, ktoré je určené na použitie s navíjacím
bubnom na pneumatickú hadicu.
■ Nikdy neprekračujte maximálny pracovný tlak
navíjacieho bubna na pneumatickú hadicu
alebo použitého pneumatického náradia.
■ Navíjací bubon na pneumatickú hadicu sa smie
pripájať len k takým pneumatickým vedeniam,
pri ktorých je zabezpečené zabránenie prekročenia maximálneho povoleného pracovného
tlaku o viac ako 10 % (napr. redukčným ventilom).
PDST 10 B3
SK
│
65 ■

■ Pneumatickú hadicu vždy uchovávajte mimo
dosahu ostrých hrán, tepla a oleja.
■ Pred použitím navíjacieho bubna na pneuma-
tickú hadicu vždy skontrolujte pneumatickú
hadicu.
■ Navíjací bubon na pneumatickú hadicu použí-
vajte iba v spojení s kompresorom. Prevádzka
s fľašami so stlačeným vzduchom je zakázaná.
■ Používanie pneumatického náradia s horľavými
plynmi je zakázané. Hrozí nebezpečenstvo
výbuchu!
■ Navíjací bubon na pneumatickú hadicu sa
nesmie používať na iné účely.
■ Navíjací bubon na pneumatickú hadicu neucho-
vávajte v dosahu detí.
■ Navíjacím bubnom na pneumatickú hadicu,
resp. jeho hadicami nemierte na osoby ani
zvieratá.
■ Na opravy používajte výlučne originálne ná-
hradné diely. Iné ako originálne náhradné diely
môžu spôsobiť vážne poškodenie.
■ Pri údržbárskych, nastavovacích a opravárskych
prácach vždy najskôr odpojte navíjací bubon
na pneumatickú hadicu od napájania stlačeným vzduchom.
■ Akékoľvek úpravy na navíjacom bubne na
pneumatickú hadicu sú zakázané.
■ Navíjací bubon na pneumatickú hadicu po-
užívajte iba v bezchybnom stave. V prípade
pochybnosti sa pred použitím najprv poraďte
so špecialistom.
■ Opravy smú vykonávať iba kvalifikovaní odbor-
níci.
■ Nikdy neprenášajte navíjací bubon na pneuma-
tickú hadice uchopením za hadicu.
■ Pri odpájaní hadice od zdroja stlačeného
vzduchu alebo pneumatického náradia vždy
pevne uchopte hadicu.
Zvyškové riziko
Aj keď sa prístroj obsluhuje podľa predpisov, vždy
zostanú zvyškové riziká. V súvislosti s konštrukciou
a vyhotovením tohto navíjacieho bubna na pneumatickú hadicu môžu vzniknúť nasledovné riziká:
– Nebezpečenstvo v dôsledku nekontrolovaného
vymrštenia pneumatickej hadice.
– Nebezpečenstvo pádu v dôsledku dookola
ležiacich pneumatických hadíc.
Zabráňte zvyškovému riziku tak, že prístroj budete
používať starostlivo a podľa predpisov.
Pred uvedením do prevádzky
■ Vyberte všetky diely z obalu a skontrolujte, či
navíjací bubon na pneumatickú hadicu alebo
jednotlivé diely nie sú poškodené. V takomto
prípade navíjací bubon na pneumatickú hadicu
nepoužívajte. Obráťte sa na výrobcu alebo
na uvedenú servisnú adresu.
■ Odstráňte všetky ochranné fólie a ostatné
prepravné obaly.
■ Skontrolujte, či je dodávka kompletná.
Montáž
Nájdenie miesta na montáž
■ Navíjací bubon na pneumatickú hadicu na-
montujte na vhodný strop alebo stenu, použitie
navíjacieho bubna na pneumatickú hadicu bez
montáže nie je povolené.
■ Nájdite miesto na montáž navíjacieho bubna
na pneumatickú hadicu tak, aby nepredstavoval
prekážku.
■ Pri montáži na strop by ste mali venovať pozor-
nosť montážnej výške min. 2,5 metra.
■ Na inštaláciu potrebujete nasledovné pomôcky:
vŕtačku, vhodný vrták, ako aj skrutkovač.
■ 66 │ SK
PDST 10 B3

Montáž navíjacieho bubna
napneumatickú hadicu
VÝSTRAHA!
NEBEZPEČENSTVO PORANENIA!
► Nesprávna montáž navíjacieho bubna na
pneumatickú hadicu môže spôsobiť zranenie.
■ Uistite sa, že na mieste montáže sa nenachá-
dzajú žiadne vedenia alebo rúry. Na tento účel
v prípade potreby použite detektor kovov alebo
kontaktujte odborníka.
■ Dodržiavajte tiež bezpečnostné pokyny použitej
vŕtačky.
UPOZORNENIE!
NEBEZPEČENSTVO POŠKODENIA!
Nesprávna montáž môže to viesť kpoško-
►
deniam.
■ Uistite sa, že nosný materiál v mieste montáže
unesie hmotnosť navíjacieho bubna na pneumatickú hadicu. V prípade otázok sa obráťte na
zákaznícky servis.
1. Použite otočný upevňovací strmeň ako šab-
lónu. Upevňovací strmeň môžete oddeliť od
navíjacieho bubna pneumatickej hadice po
odstránení dvoch skrutiek otáčaním proti
smeru hodinových ručičiek (pozri obr. C).
Na tento účel označte polohu otvorov na nosnom materiáli ceruzkou.
2. Vyvŕtajte do nosnému materiálu potrebné otvory
pre montáž.
3. Namontuje upevňovací strmeň pomocou
vhodného upevňovacieho materiálu (pozri
montážne príslušenstvo -).
4. Znovu upevnite navíjací bubon na pneumatickú
hadice k upevňovaciemu strmeňu.
K tomu znovu utiahnite skrutky, ktoré ste v 1
kroku odstránili, otáčaním v smere hodinových
ručičiek. (pozri obr. C)
Uvedenie do prevádzky
Pripojenie navíjacieho bubna
na pneumatickú hadicu k zdroju
stlačeného vzduchu
♦ Zasuňte prípojka stlačeného vzduchu
navíjacieho bubna na pneumatickú hadicu do
rýchlospojky zdroja stlačeného vzduchu.
Pripojenie navíjacieho bubna
na pneumatickú hadicu
kpneumatickému náradiu
UPOZORNENIE!
NEBEZPEČENSTVO POŠKODENIA!
► Nesprávna manipulácia s navíjacím bubnom
na pneumatickú hadicu môže mať za následok poškodenie.
■ Vždy dodržiavajte maximálny pracovný tlak
navíjacieho bubna na pneumatickú hadicu a
kompatibilitu použitých prípojok. Pomocou rýchlospojky pneumatickej hadice môžete pneumatickú hadicu ihneď spojiť prostredníctvom
prívodu vzduchu pneumatického náradia.
Používanie navíjacieho bubna
napneumatickú hadicu
VÝSTRAHA!
NEBEZPEČENSTVO PORANENIA!
► Navíjací bubon na pneumatickú hadicu je
vybavený vratným mechanizmom. Tento
vratný mechanizmus je prevádzkovaný silnou
pružinou. Pri nesprávnom navinutí pneumatickej hadice môže dôjsť kúrazom.
■ Nikdy nenechávajte pneumatickú hadicu
nekontrolovateľne a rýchlo navinúť späť.
■ Ak je vratný mechanizmus poškodený, okamžite
odstavte navíjací bubon na pneumatickú hadicu
z prevádzky. Vzniknuté poškodenie nechajte
opraviť špecialistom.
■ Navíjací bubon na pneumatickú hadicu má
blokovací a vratný mechanizmus. To umožňuje
ľahké vytiahnutie a vrátenie pneumatickej
hadice do východiskovej polohy.
PDST 10 B3
SK
│
67 ■

■ Táto aretácia vytvára pri navíjaní a odvíjaní vŕz-
gajúci zvuk. To nie je žiadna chyba. Ak sa hluk
zmení po viacerých použitiach a/alebo ak sa
vyskytnú problémy s mechanizmom, vyhľadajte
odbornú pomoc alebo kontaktujte zákaznícky
servis.
Odvíjanie hadice
♦ Pneumatickú hadicu opatrne vytiahnite
z telesa bubna na požadovanú pracovnú dĺžku
pre pneumatické náradie. Ak pneumatickú
hadicu po kliknutí pustíte, aretácia sa zaistí
vtejto dĺžke hadice.
Navíjanie hadice
♦ Krátkym potiahnutím za pneumatickú hadicu
môžete uvoľniť aretáciu.
♦ Dbajte na to, aby ste pneumatickú hadicu
navíjali späť do telesa valca kontrolovaným
spôsobom.
Nastavenie zastavovača hadice
Polohu zastavovača hadice môžete nastaviť a
tým sa navíjanie pneumatickej hadice preruší
na požadovanej dĺžke. Na nastavenie zastavovača hadice potrebujete krížový skrutkovač (nie je
súčasťou dodávky).
♦ Uvoľnite upevňovacie skrutky krížovým
skrutkovačom (pozri obr. D).
♦ Posuňte zastavovač hadice pozdĺž pneuma-
tickej hadice na požadovanú polohu.
♦ Upevňovacie skrutky znovu utiahnite.
Údržba ačistenie
UPOZORNENIE
► Navíjací bubon na pneumatickú hadicu
sa musí pravidelne udržiavať a opravovať,
aby sa zaručila bezchybná funkcia, ako aj
dodržiavanie bezpečnostných požiadaviek.
Neodborná a nesprávna prevádzka môže
viesť k poruchám a poškodeniam prístroja.
■ Nikdy nepoužívajte ostré a/alebo drsné čis-
tiace prostriedky, resp. rozpúšťadlá. Tieto by
mohli poškodiť plastové časti navíjacieho bubna na pneumatickú hadicu.
■ Dbajte na to, aby sa do vnútra navíjacieho
bubna na pneumatickú hadicu nedostala voda.
Dbajte na to, aby teleso a pneumatická hadica
boli vždy bez prachu a nečistôt. Navíjací bubon na pneumatickú hadicu pravidelne utierajte
čistou utierkou.
■ Pred spätným navinutím pneumatickej hadice
do telesa vyčistite pneumatickú hadicu, pokiaľ
je to možné, na ďalšie použitie.
■ Navíjací bubon na pneumatickú hadicu, ako
aj pneumatickú hadicu pravidelne čistite navlhčenou utierkou a malým množstvom mazacieho
mydla.
■ 68 │ SK
PDST 10 B3

Likvidácia
Obal pozostáva výlučne z materiálov,
ktoré neškodia životnému prostrediu.
Môže sa zlikvidovať v miestnych
nádobách na recyklovaný odpad.
Prístroj nevyhadzujte do komunálneho
odpadu!
Informácie o možnostiach likvidácie prístroja, ktorý
doslúžil, dostanete na obecnej alebo mestskej
správe.
Obal zlikvidujte ekologicky.
Dbajte na označenie na rôznych obalových materiáloch a trieďte ich osobitne.
Obalové materiály sú označené skratkami (a) a číslicami (b) s nasledujúcim významom:
1–7: plasty, 20–22: papier a lepenka,
80–98: kompozitné materiály.
Informácie o možnostiach likvidácie
výrobku, ktorý doslúžil, získate od
svojej obecnej alebo mestskej samo-
správy.
Produkt je recyklovateľný, podlieha
rozšírenej zodpovednosti výrobcu a
zbiera sa oddelene.
Záruka spoločnosti
Kompernass Handels GmbH
Vážená zákazníčka, vážený zákazník,
natento prístroj máte záruku 3roky od dátumu
zakúpenia. V prípade nedostatkov tohto výrobku
máte práva vyplývajúce zo zákona voči predajcovi
tohto výrobku. Tieto Vaše práva vyplývajúce zo zákona nie sú obmedzené našou zárukou, uvedenou
nižšie.
Záručné podmienky
Záručná doba začína plynúť dátumom zakúpenia.
Prosím, uschovajte si pokladničný blok. Tento bude
potrebný ako dôkaz ozakúpení.
Ak v priebehu troch rokov od dátumu zakúpenia
tohto výrobku dôjde k chybe materiálu alebo
výrobnej chybe, výrobok vám – podľa nášho
uváženia – bezplatne opravíme, vymeníme alebo
uhradíme kúpnu cenu. Podmienkou tohto záručného plnenia je, že počas trojročnej lehoty sa poškodený prístroj a doklad o zakúpení (pokladničný
blok) predloží so stručným opisom, v čom spočíva
nedostatok prístroja a kedy sa vyskytol.
Ak je chyba pokrytá našou zárukou, zašleme Vám
späť opravený alebo nový výrobok. Opravou
alebo výmenou výrobku nezačína plynúť žiadna
nová záručná doba.
Záručná doba a zákonné nároky
na odstránenie chýb
Záručná doba sa záručným plnením nepredĺži. To
platí aj pre vymenené aopravené diely. Poškodenia a chyby zistené prípadne už pri kúpe, sa musia
hlásiť okamžite po vybalení. Po uplynutí záručnej
doby podliehajú prípadné opravy poplatku.
PDST 10 B3
SK
│
69 ■

Rozsah záruky
Prístroj bol starostlivo vyrobený v súlade s prísnymi
smernicami kvality a pred dodaním bol svedomito
preskúšaný.
Záručné plnenie sa vzťahuje na chyby materiálu
alebo výrobné chyby. Táto záruka sa nevzťahuje
na časti výrobku, ktoré sú vystavené bežnému
opotrebovaniu a preto ich možno pokladať za
rýchlo opotrebiteľné diely, ani na poškodenia krehkých dielov, ako sú napríklad spínače alebo diely
vyrobené zo skla.
Táto záruka zaniká v prípade poškodenia výrobku
neodborným používaním alebo neodbornou
údržbou. Na správne používanie výrobku sa
musia presne dodržiavať všetky pokyny, uvedené
v návode na obsluhu. Bezpodmienečne sa musí
zabrániť použitiu alebo úkonom, ktoré sa v návode
na obsluhu neodporúčajú alebo pred ktorými sa
varuje.
Výrobok je určený len na súkromné použitie a
nie na priemyselné používanie. Zárukazaniká pri
nesprávnom aneodbornom zaobchádzaní, pri použití násilia apri zásahoch, ktoré neboli vykonané
naším autorizovaným servisom.
Záručná doba neplatí pri
■ normálnom opotrebovaní kapacity akumulátora
■ komerčnom používaní výrobku
■ poškodení alebo zmene výrobku zákazníkom
■ nerešpektovaní predpisov týkajúcich sa
bezpečnosti a údržby, chybách obsluhy
■ škodách v dôsledku elementárnych udalostí
Vybavenie v prípade záruky
Na zaručenie rýchleho vybavenia Vašej žiadosti
postupujte podľa nasledujúcich pokynov:
■ Na všetky otázky majte pripravený pokladničný
doklad a číslo výrobku (napr.IAN12345) ako
doklad o nákupe.
■ Číslo výrobku nájdete na typovom štítku na vý-
robku, na gravúre na výrobku, na titulnej stránke
návodu na obsluhu (dole vľavo) alebo ako nálepku na zadnej alebo spodnej strane výrobku.
■ Ak dôjde k funkčným poruchám alebo iným
nedostatkom, kontaktujte najprv nižšie uvedené servisné oddelenie telefonicky alebo
e-mailom.
■ Výrobok, zaevidovaný ako poruchový, môžete
potom spolu s dokladom o nákupe (pokladničný
blok) a uvedením popisu chyby a dátumu, kedy k
nej došlo, bezplatne odoslať na adresu servisného strediska, ktorá Vám bude oznámená.
Na webovej stránke www.lidl-service.com si môžete stiahnuť tieto a
mnoho ďalších príručiek, videá o
výrobkoch a inštalačný softvér.
Pomocou tohto QR-kódu sa dostanete priamo na
stránku servisu Lidl (www.lidl-service.com) a pomocou zadania čísla výrobku (IAN)345881_2004
otvoríte váš návod na obsluhu.
Servis
Servis Slovensko
Tel. 0850 232001
E-Mail: kompernass@lidl.sk
IAN 345881_2004
Dovozca
Majte na pamäti, že nižšie uvedená adresa nie je
adresou servisného strediska. Najprv kontaktujte
uvedené servisné stredisko.
KOMPERNASS HANDELS GMBH
BURGSTRASSE 21
44867 BOCHUM
NEMECKO
www.kompernass.com
■ 70 │ SK
PDST 10 B3

Originálne vyhlásenie o zhode
My, spoločnosť KOMPERNASS HANDELS GMBH, osoba zodpovedná za dokumentáciu:
pán Semi Uguzlu, BURGSTR. 21, 44867 BOCHUM, DEUTSCHLAND/NEMECKO vyhlasujeme,
že tento výrobok je vsúlade snasledovnými normami, normatívnymi dokumentmi a smernicami ES:
Smernicao strojových zariadeniach
(2006/42/EC)
Typ/označenie prístroja:
Navíjací bubon s tlakovou hadicou PDST 10 B3
Rok výroby: 07–2020
Sériové číslo: IAN 345881_2004
Bochum, 17.07.2020
Semi Uguzlu
‒ Manažér kvality ‒
Technické zmeny vzmysle ďalšieho vývoja sú vyhradené.
PDST 10 B3
SK
│
71 ■

■ 72 │ SK
PDST 10 B3

KOMPERNASS HANDELS GMBH
BURGSTRASSE 21
44867 BOCHUM
GERMANY
www.kompernass.com
Stand der Informationen · Last Information Update · Version des informations
Stand van de informatie · Stan informacji · Stav informací · Stav informácií:
07 / 2020 · Ident.-No.: PDST10B3-072020-1
IAN 345881_2004
8
 Loading...