

Panasonic SV-AV10A, SV-AV10R, D-Snap SV-AV100, SVAV100P - SD MULTI MEDIA TERMINAL, SV AV100 - D-Snap Camcorder - 0.8 MP Operating Instructions Manual
SD Video Camera
Operating Instructions
Model No. SV-AV100
For USA assistance. please call:1-800-211-PANA(7262) or send e-mail to:consumerproducts@panasonic.com
For Canadian assistance. please call:1-800-561-5505 or visit us at www.panasonic.ca
PP
Before use, please read these instructions completely.
VQT0F57

Before opening the CD-ROM package, please read the following.
bеЗ=rлЙк=iбЕЙелЙ=^ЦкЙЙгЙен
You (“Licensee”) are granted a license for the Software defined in this End User License Agreement
(“Agreement”) on condition that you agree to the terms and conditions of this Agreement. If Licensee
does not agree to the terms and conditions of this Agreement, promptly return the Software to
Matsushita Electric Industrial Co., Ltd. (“Matsushita”), its distributors or dealers from which you
made the purchase.
Article 1 License
Licensee is granted the right to use the Software, including the information recorded or described on
the CD-ROM, instruction manuals, and any other media provided to Licensee (collectively
“Software”), but all applicable rights to patents, copyrights, trademarks and trade secrets in the
Software are not transferred to Licensee.
Article 2 Use by a Third Party
Licensee may not use, copy, modify, transfer or allow any third party, whether free of charge or not,
to use, copy or modify the Software, except as expressly provided for in this Agreement.
Article 3 Restrictions on Copying the Software
Licensee may make a single copy of the Software in whole or in part solely for back-up purpose.
Article 4 Computer
Licensee may use the Software only on one computer, and may not use it on more than one
computer.
Article 5 Reverse Engineering, Decompiling or Disassembly
Licensee may not reverse engineer, decompile, or disassemble the Software, except to the extent
either of them is permitted under law or regulation of the country where Licensee resides.
Matsushita, or its distributors will not be responsible for any defects in the Software or damage to
Licensee caused by Licensee’s reverse engineering, decompiling, or disassembly of the Software.
Article 6 Indemnification
The Software is provided “AS-IS” without warranty of any kind, either expressed or implied,
including, but not limited to, warranties of non-infringement, merchantability and/or fitness for a
particular purpose. Further, Matsushita does not warrant that the operation of the Software will be
uninterrupted or error free. Matsushita or any of its distributors will not be liable for any damage
suffered by Licensee arising from or in connection with Licensee’s use of the Software.
Article 7 Export Control
Licensee agrees not to export or re-export to any country the Software in any form without the
appropriate export licenses under regulations of the country where Licensee resides, if necessary.
Article 8 Termination of License
The right granted to Licensee hereunder will be automatically terminated if Licensee contravenes
any of the terms and conditions of this Agreement. Upon termination hereof, Licensee must destroy
the Software and related documentation together with all the copies thereof at Licensee’s own
expense.
O

`зенЙенл
End User License Agreement.......... 2
Information for Your Safety............... 4
Introduction...................................... 7
mêÉé~ê~íáçå
Standard Accessories...................... 8
Optional Accessory.......................... 9
Controls and Components ............. 10
Power Supply................................. 12
Fitting the Camera on
the AV Cradle................................ 13
Inserting a Memory Card............... 14
Using the LCD Monitor .................. 15
Turning the Power On/Selecting
Operation Modes.......................... 17
Using the Menu Screen ................. 18
List of Menus ................................. 19
Setting Date and Time ................... 22
^Зо~еЕЙЗ=cмеЕнбзел
Zoom In/Out Functions...................35
Backlight Compensation
Function ........................................35
Adjusting White Balance ................36
Manual Exposure Adjustment ........37
Manual Focus Adjustment..............37
Recording in Special Situations
(Program AE)................................ 38
Digital Electronic Image
Stabilizer Function.........................39
Wind Noise Reduction Function..... 39
Using the Play Menu Functions...... 40
Playing Back on
an external device.........................54
Recording pictures supplied from
an external device.........................55
Adjusting Brightness and
Color Level on the LCD Monitor.... 24
_~лбЕ=cмеЕнбзел
Before Recording operation........... 25
Clean Up Function ......................... 26
Recording Motion Images
(MPEG2)....................................... 27
Recording Motion Images
(MPEG4)....................................... 28
Playing Back Motion Images
(MPEG2)....................................... 29
Playing Back Motion Images
(MPEG4)....................................... 30
Adjusting the Volume ..................... 31
Recording Still Pictures.................. 32
Storing on the PC...........................56
Using the DVD Video Recorder
with a Hard Disk............................57
lе=~=mЙклзе~д=`згймнЙк
About the supplied software...........58
USB Driver .....................................59
MediaStage for AV100 ................... 60
Installing MediaStage
& USB Driver................................. 61
Installing USB Driver ......................62
Connecting with the PC..................63
Starting the Software .....................64
Disconnecting
the USB Cable safely....................64
If you no longer need software
Playing back Still Pictures.............. 33
Play Back All of the Still Pictures
One by One (Slide Show) ............. 34
(Uninstall)...................................... 64
Constructing a Folder when the
Memory Card is used with a PC ...65
P

lнЬЙкл
Charge the built-in battery for
maintaining the date information...66
Using the Optional Earphones .......66
Dear Customer,
We would like to take this opportunity to
thank you for purchasing this Panasonic SD
Video Camera. Please read these
Operating Instructions carefully and keep
them handy for future reference.
Using Accessories..........................67
After Use ........................................69
Indications (Recording Mode) ........70
Indications (Playback Mode) ..........72
Notes & Precautions.......................75
Notes and Hints..............................78
Before Requesting Service.............86
Specifications.................................89
Limited Warranty
(For U.S.A. Only)...........................91
Customer Services Directory
(For U.S.A. Only)...........................93
Index...............................................94
pé~åáëÜ=nìáÅâ=rëÉ=dìáÇÉL
dì∞~=Éëé~¥çä~=é~ê~=Éä=ìëç=
ê•éáÇç
Alimentación eléctrica ....................95
Cómo encajar la cámara
en el soporte .................................96
Inserción de la Tarjeta
de memoria ...................................97
Encendido/Selección de
fеСзкг~нбзе=Сзк=vзмк=
p~СЙну
WARNING
TO REDUCE THE RISK OF FIRE OR
SHOCK HAZARD AND ANNOYING
INTERFERENCE, USE ONLY THE
RECOMMENDED ACCESSORIES AND
DO NOT EXPOSE THIS EQUIPMENT TO
RAIN OR MOISTURE. DO NOT REMOVE
THE COVER (OR BACK); THERE ARE
NOT USER SERVICEABLE PARTS
INSIDE. REFER SERVICING TO
QUALIFIED SERVICE PERSONNEL.
Notice:
This product has parts that contain a small
amount of mercury. It also contains lead in
some components. Disposal of these
materials may be regulated in your
community due to environmental
considerations. For disposal or recycling
information please contact your local
authorities, or the Electronics Industries
Alliance: <http://www.eiae.org.>
los modos de funcionamiento .......98
Grabación de imágenes
dinámicas/imágenes estáticas ......99
Reproducción de imágenes
dinámicas/imágenes estáticas ......99
Q
IMPORTANT
Please respect all copyrights.
Whatever you have recorded and created
can be used for your personal
entertainment only. Under copyright
laws, other materials cannot be used
without obtaining permission from the
holders of the copyrights.
≥Injury or material damage resulting
from any kind of use that is not in
accordance with the operating
Instructions are the sole responsibility
of the user.
≥Please note that the actual controls and
components, menu items, etc. of your SD
Video Camera may look somewhat
different from those shown in the
illustrations in these Operating
Instructions.
Extremely high precision technology is
employed to produce the LCD Monitor
screen featuring a total of approximately
123,000 pixels. The result is more than
99.99% effective pixels with a mere
0.01% of the pixels inactive or always lit.
However, this is not a malfunction and
does not affect the recorded picture.
≥After long operation, this device can get
warm. This is not a malfunction. The
cautions label is stuck on the surface of
the SD Video Camera.
≥The manufacturer shall in no event be
liable for the loss of recordings due to
malfunction or defect of this SD Video
Camera, its accessories or Memory Card.
≥
:
SD logo is a trademark.
≥The SD Video Camera uses copyright-
protected technologies and is protected by
the patented technologies and intellectual
properties of Japan and the U.S. To use
these copyright-protected technologies,
authorization of the Macrovision Company
is required. It is prohibited to disassemble
or modify the SD Video Camera.
≥(l 00) indicates the page to be referred
to.
≥Note that the SD Video Camera may not
play back data recorded or created on
another product and another product may
not play back data recorded on the SD
Video Camera.
≥The nameplate of the SD Video Camera is
fixed on the bottom of the battery
compartment.
U.S. Patent Nos. 4,631,603, 4,577,216, 4,819,098, and 4,907,093.
This product incorporates copyright protection technology that is protected by U.S.
patents and other intellectual property rights. Use of this copyright protection technology
must be authorized by Macrovision, and is intended for home and other limited consumer
uses only unless otherwise authorized by Macrovision. Reverse engineering or
disassembly is prohibited.
A lithium ion/polymer battery that is recyclable powers the product you
RBRC
Li-ion
have purchased. Please call 1-800-8-BATTERY for information on how to
TM
recycle this battery.
R

FCC Note: (U.S. only)
This equipment has been tested and found to comply with the limits for a Class B
digital device, pursuant to Part 15 of the FCC Rules. These limits are designed to
provide reasonable protection against harmful interference in a residential
installation. This equipment generates, uses, and can radiate radio frequency energy
and, if not installed and used in accordance with the instructions, may cause harmful
interference to radio communications. However, there is no guarantee that
interference will not occur in a particular installation. If this equipment does cause
harmful interference to radio or television reception, which can be determined by
turning the equipment off and on, the user is encouraged to try to correct the
interference by one or more of the following measures:
≥Reorient or relocate the receiving antenna.
≥Increase the separation between the equipment and receiver.
≥Connect the equipment into an outlet on a circuit different from that to which the
receiver is connected.
≥Consult the dealer or an experienced radio/TV technician for help.
FCC Caution: To assure continued compliance, follow the attached
installation instructions and use only shielded interface
cables with ferrite core when connecting to a computer or
peripheral devices.
Any changes or modifications not expressly approved by the
party responsible for compliance could void the user’s
authority to operate this equipment.
Trade Name: Panasonic
Model No.: SV-AV100
Responsible party: Matsushita Electric Corporation of America One Panasonic
Way, Secaucus, NJ 07094
Support Contact: Panasonic Consumer Electronics Company
1-800-211-PANA(7262)
This device complies with Part 15 of the FCC Rules. Operation is subject to the
following two conditions: (1) This device may not cause harmful interference, and (2)
this device must accept any interference received, including interference that may
cause undesired operation.
This Class B digital apparatus complies with Canadian ICES-003.
SV-AV100
S

fенкзЗмЕнбзе
This SD Video Camera can record MPEG2/
MPEG4 motion images and still pictures.
Additionally, using the viewer software,
MediaStage for AV100 (supplied
accessory), the MPEG2/MPEG4 motion
images data can be edited on the personal
computer.
ª About Using an SD Memory
Card
This product is capable of recording in the
MPEG2 format, producing video quality that
is comparable to digital camcorders. To
achieve this level of performance, large
amounts of data must be written to the SD
card in real time.
ª Charging the Battery
Be sure to charge the supplied battery
before use.
≥Refer to Page 12 for the procedures to
attach and charge the battery.
ª Clock setting
Prior to use the clock in this SD Video
Camera needs to be set. Please turn to
page 22 for additional information.
The read and write speed of the SD card
may differ from manufacturer to
manufacturer. In MPEG2 motion image
recording, SD card with the high-speed
transmission rate of 10 MB/s is needed. The
use of SD cards other than the above may
result in the following error message: [This
card cannot record in the MPEG2 mode.]
For additional information on other brand
cards that are known to be compatible,
please visit this web site:
For USA
<http://www.panasonic.com/d-snap>
For Canada
<http://www.panasonic.ca/english/
accessories/storagemedia/>
T
mêÉé~ê~íáçå
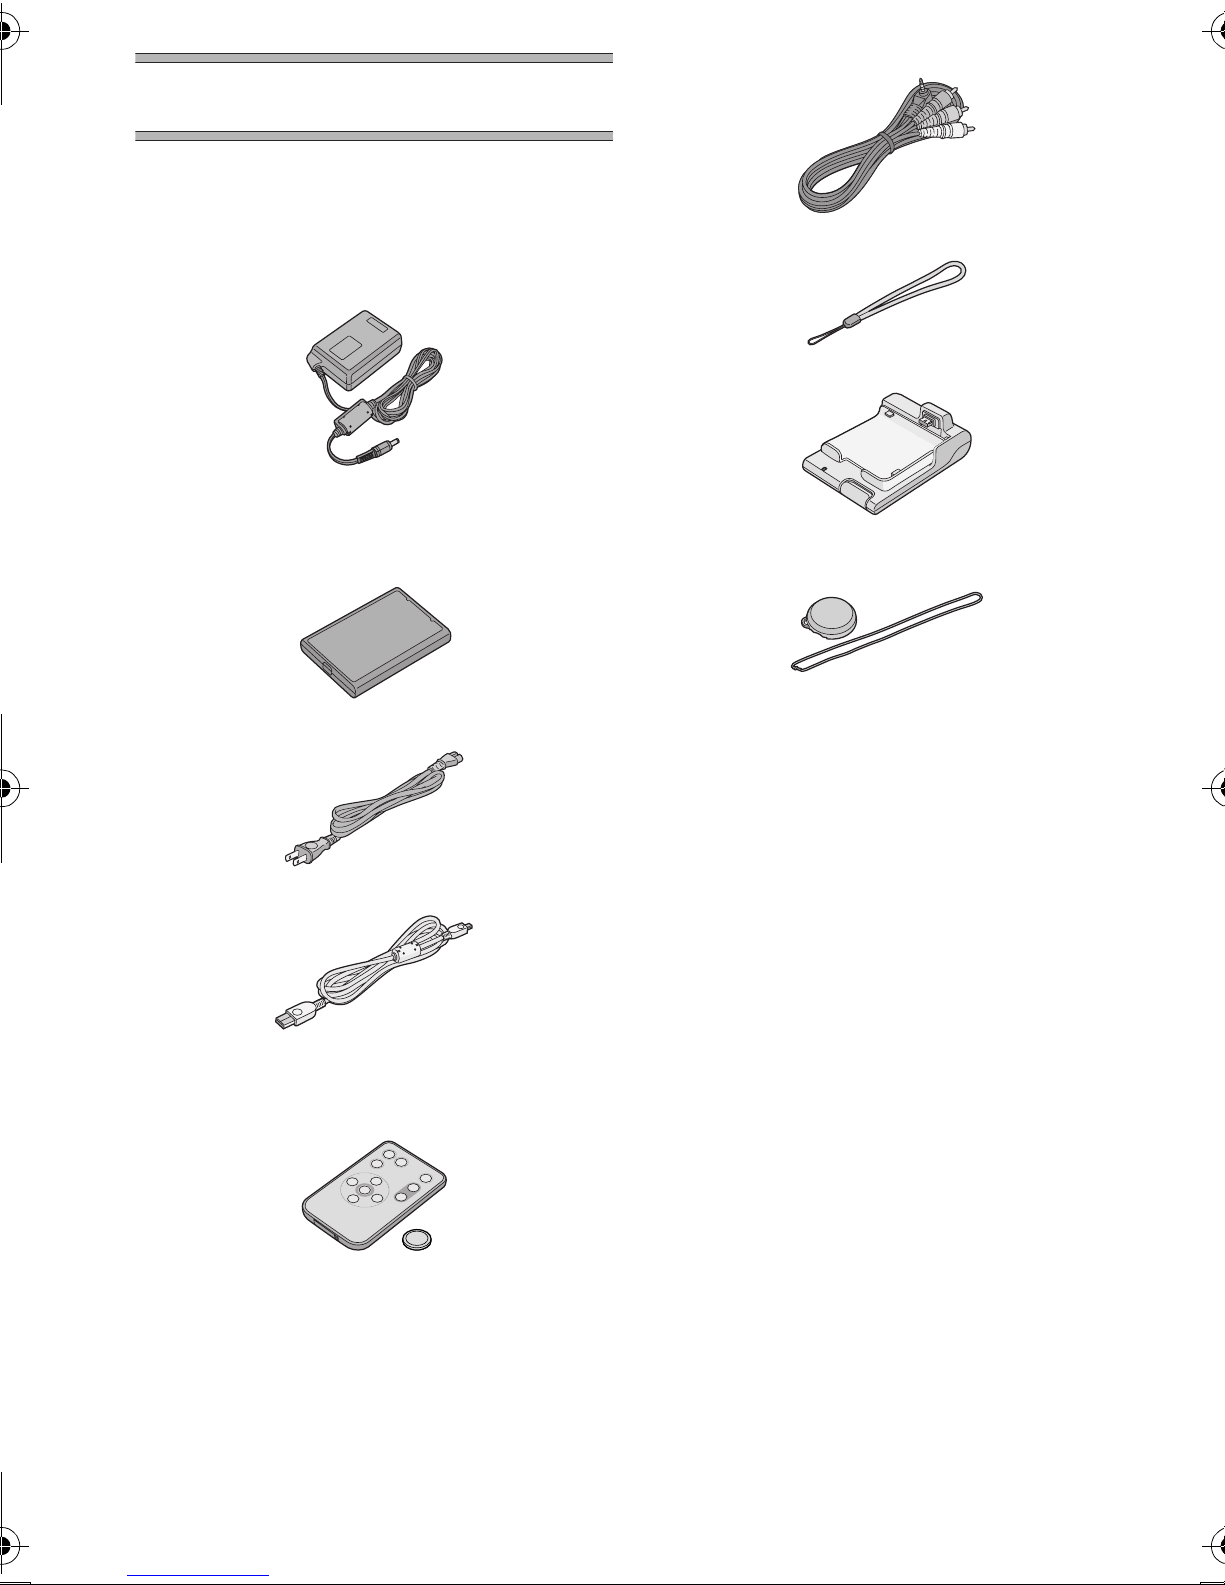
pн~еЗ~кЗ=^ЕЕЙллзкбЙл
6 AV Cable (K2KC4CB00009) (l 54, 55)
1 AC Adaptor (VSK0617) (l 12)
≥Supplies power to the SD Video
Camera.
2 Battery Pack (CGA-S302A) (l 12)
≥Supplies power to the SD Video
Camera.
3 AC Cord (K2CA2EA00002) (l 12)
7 Hand Strap (VFC4012) (l 68)
8 AV Cradle (VSK0653) (l 13)
9 Lens Cap (VGQ7448) and
Lens Cap Cord (VFC4035) (l 68)
4 USB Cable (K2KZ4CB00002) (l 63)
5 Remote Controller (N2QACC000005)
and Button-Type-Battery (CR2025)
(l 68)
U
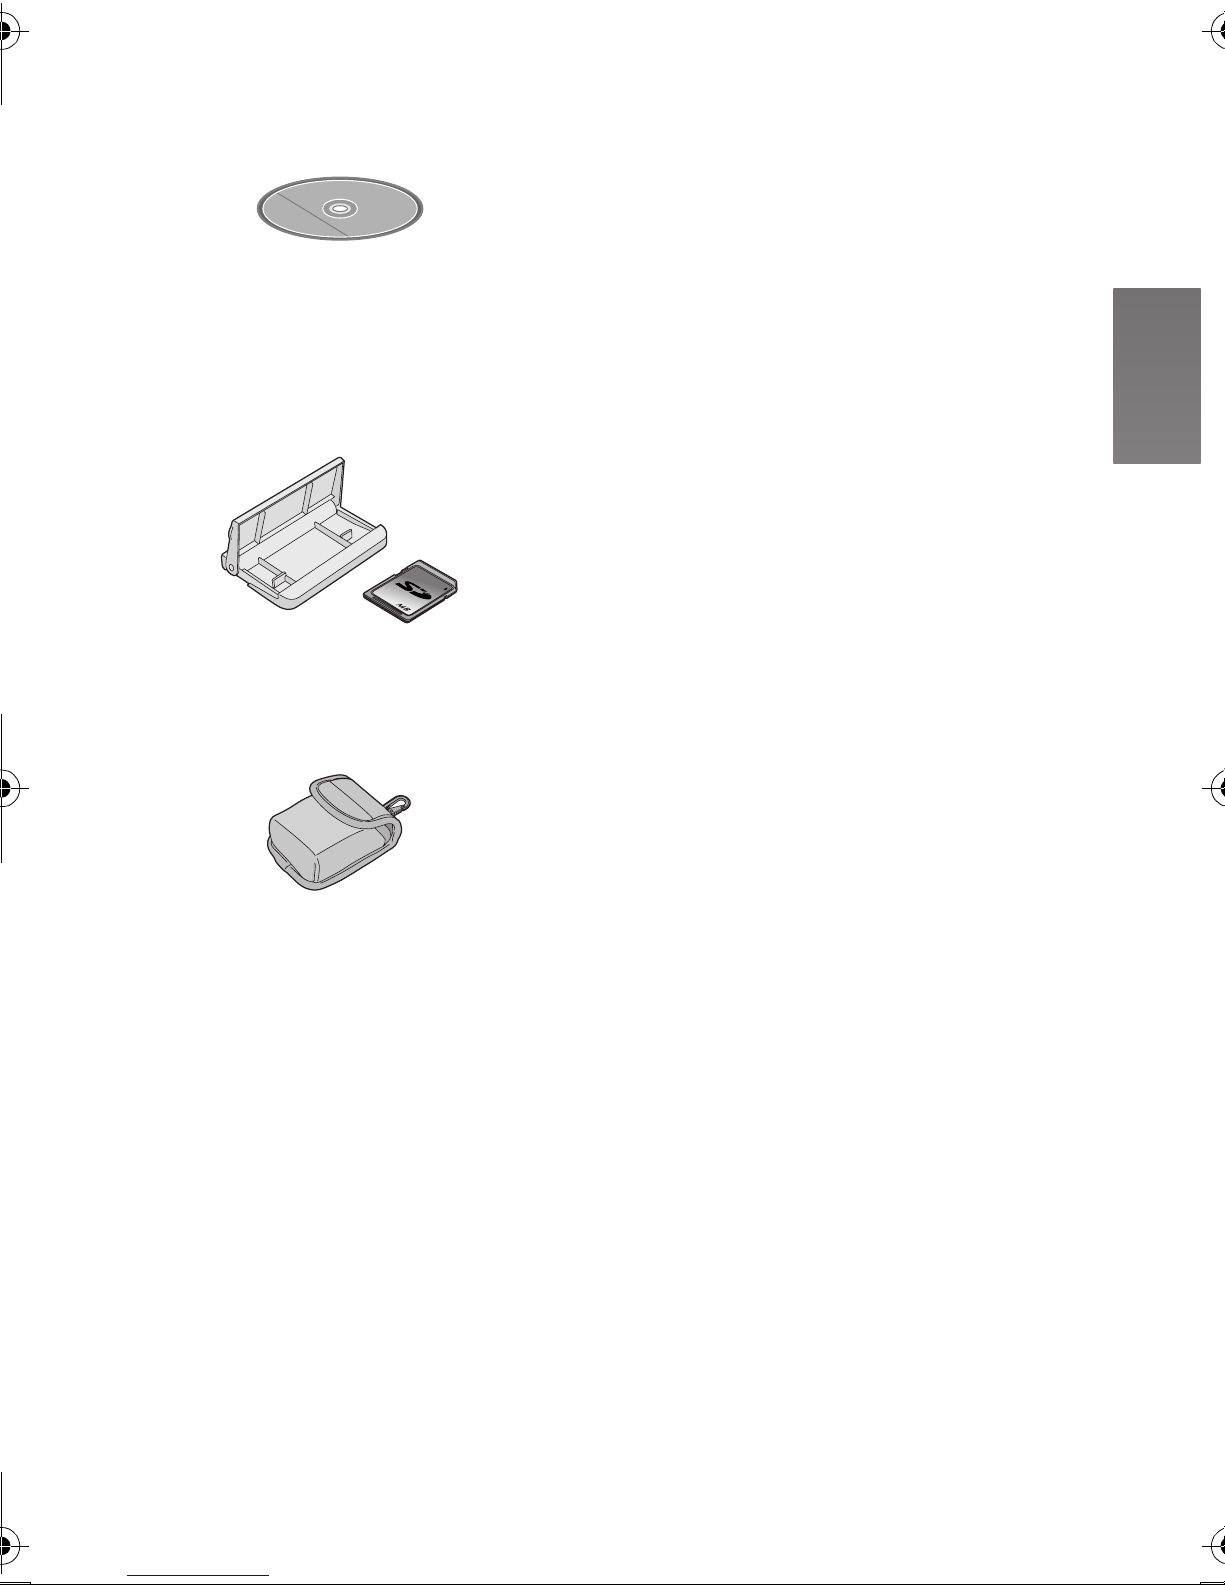
10 CD-ROM (l 58)
MediaStage for AV100,
USB Driver, DirectX,
Adobe Acrobat Reader
≥For using the MediaStage, refer to the
PDF manual. This manual describes
installation only.
11 Card Case/Movie Stand (VFC4032)
(l 69) and SD Memory Card
(512 MB) (RP-SDH512VE0) (l 14)
512
12 Wearable Carry Case (VFC4020)
≥Put the SD Video Camera in the
Wearable Carry Case supplied after
use or when carrying it.
lйнбзе~д=^ЕЕЙллзку
1 Battery Pack (CGA-S302A/1B) (l 12)
≥Supplies power to the SD Video
Camera.
V
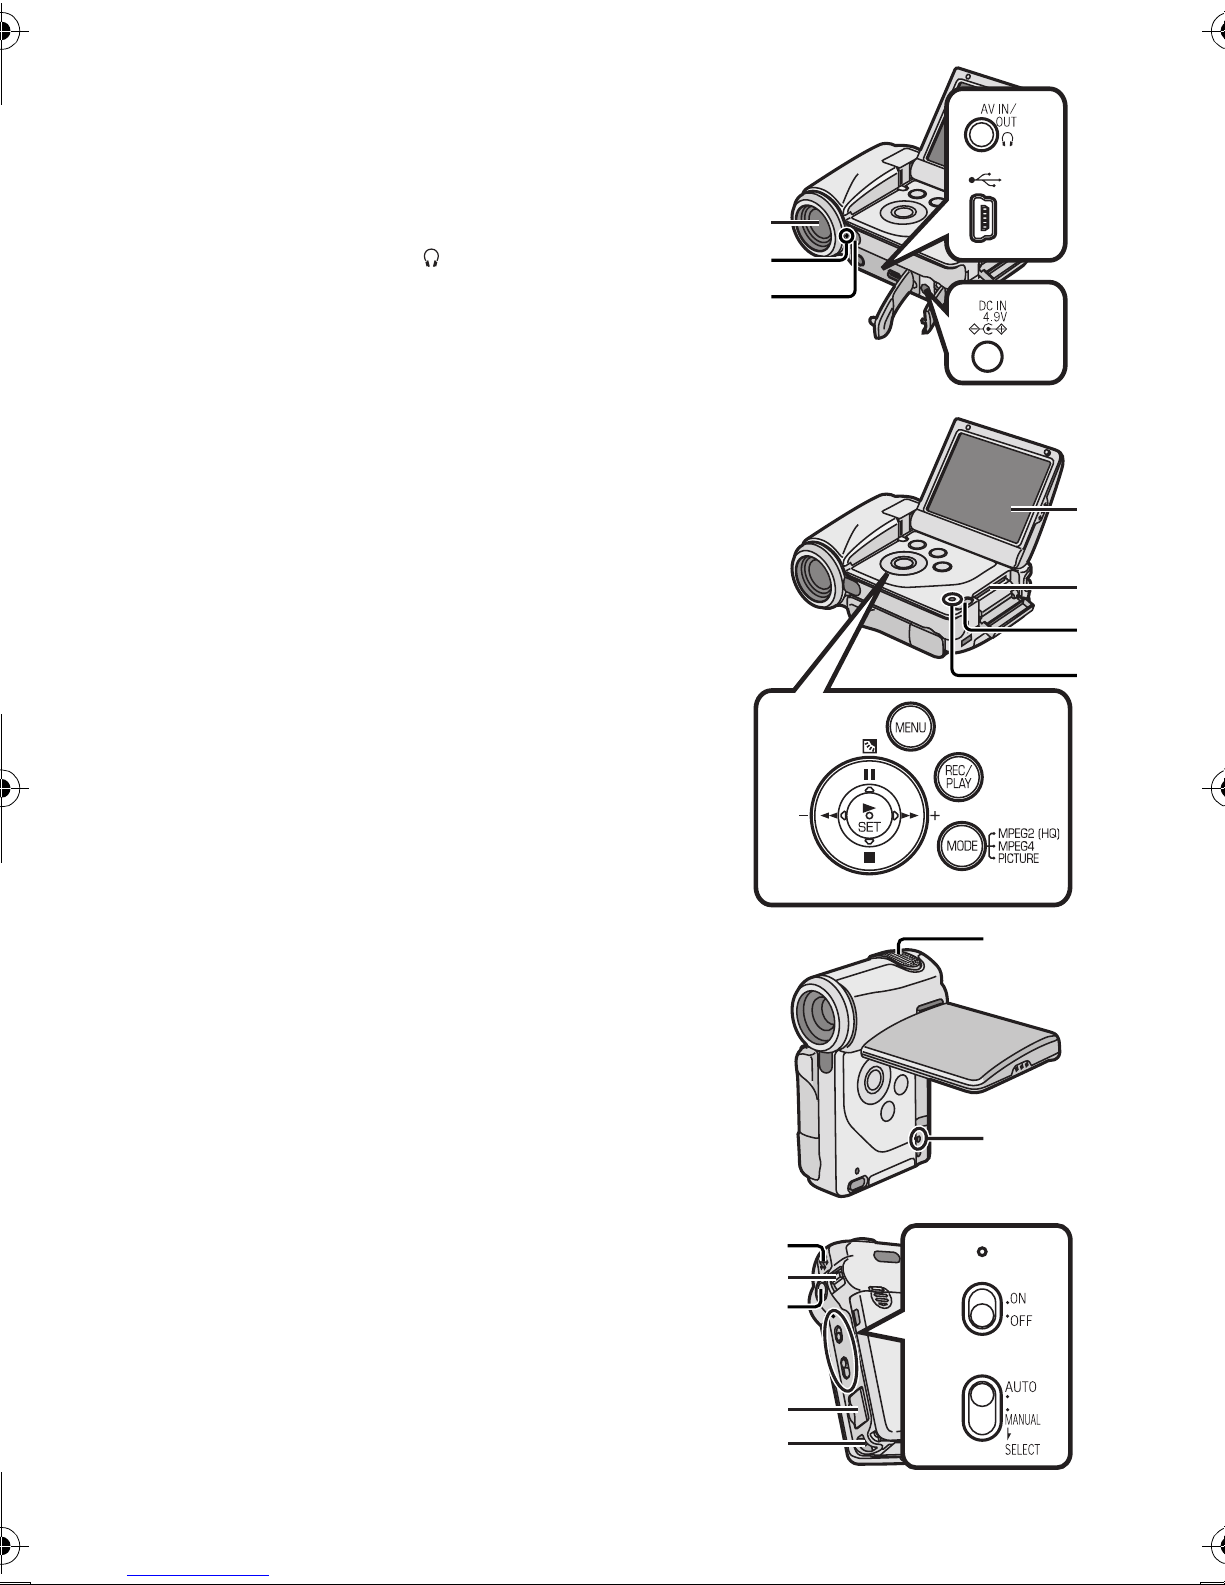
`зенкздл=~еЗ=`згйзеЙенл
1 Lens (l 76)
2 Recording Lamp (l 19)
3 Remote Control Sensor (l 68)
4 AV Input/Output Terminal [AV IN/OUT]
(l 54, 55)
Earphone Terminal [ ] (l 66)
5 USB Terminal (l 63)
6 DC Input Socket [DC IN 4.9V] (l 12)
7 LCD Monitor (l 15)
8 Memory Card Slot (l 14)
9 Card Slot Cover Open Lever (l 14)
10 Card Access Lamp [ACCESS] (l 79)
11 Multi-function Button
Operating/Select Function
[6/;/5/∫/1 SET] (l 18, 29, 30, 33)
Backlight Compensation [
12 Menu Button [MENU] (l 18)
13 Recording/Playback Mode Selector Button
[REC/PLAY] (l 17)
14 Mode Selector Button [MODE] (l 17)
15 Microphone (built-in, stereo)
16 Reset Button [RESET] (l23, 87)
17 Speaker
18 Zoom Lever [T/W] (l 35)
Volume Adjustment Lever [rVOLs] (l 31)
19 Recording Start/Stop Button (l 27, 28, 32, 55)
20 AV Cradle Connector [MULTI] (l 13)
21 Strap Holder (l 68)
22 Power Lamp (l 12)
23 Power Switch [ON/OFF] (l 17)
24 Auto/Manual Selector Switch [AUTO/MANUAL/
SELECT] (l 36, 37)
ª] (l 35)
1
2
3
4
5
6
7
8
9
10
12
13
11
14
15
NM
17
18
19
20
21
16
22
Í
23
24

25 White Balance Sensor (l 36)
26 Battery Compartment (l 12)
27 Battery Compartment Cover (l 12)
28 DC Input Socket [DC IN 4.9V] (l 13)
29 AV Input/Output Terminal [AV IN/OUT]
(l 54, 55)
30 Tray
31 Power Lamp [Í] (l 13)
32 Release Button (l 13)
33 Device Connector (l 13)
34 Mode Selector Button [MODE] (l 17)
35 Recording/Playback Mode Selector Button
[REC/PLAY] (l 17)
36 Menu Button [MENU] (l 18)
37 Multi-function Button
Operating/Select Function
[6/;/5/∫/1 SET] (l 18, 29, 30, 33)
38 Recording Start/Stop Button (l 27, 28, 32, 55)
39 Zoom Button [T/W] (l 35)
Volume Adjustment Button [rVOLs] (l 31)
25
30
26
27
28 29
33
31
32
34
35
36
37
38
39
NN
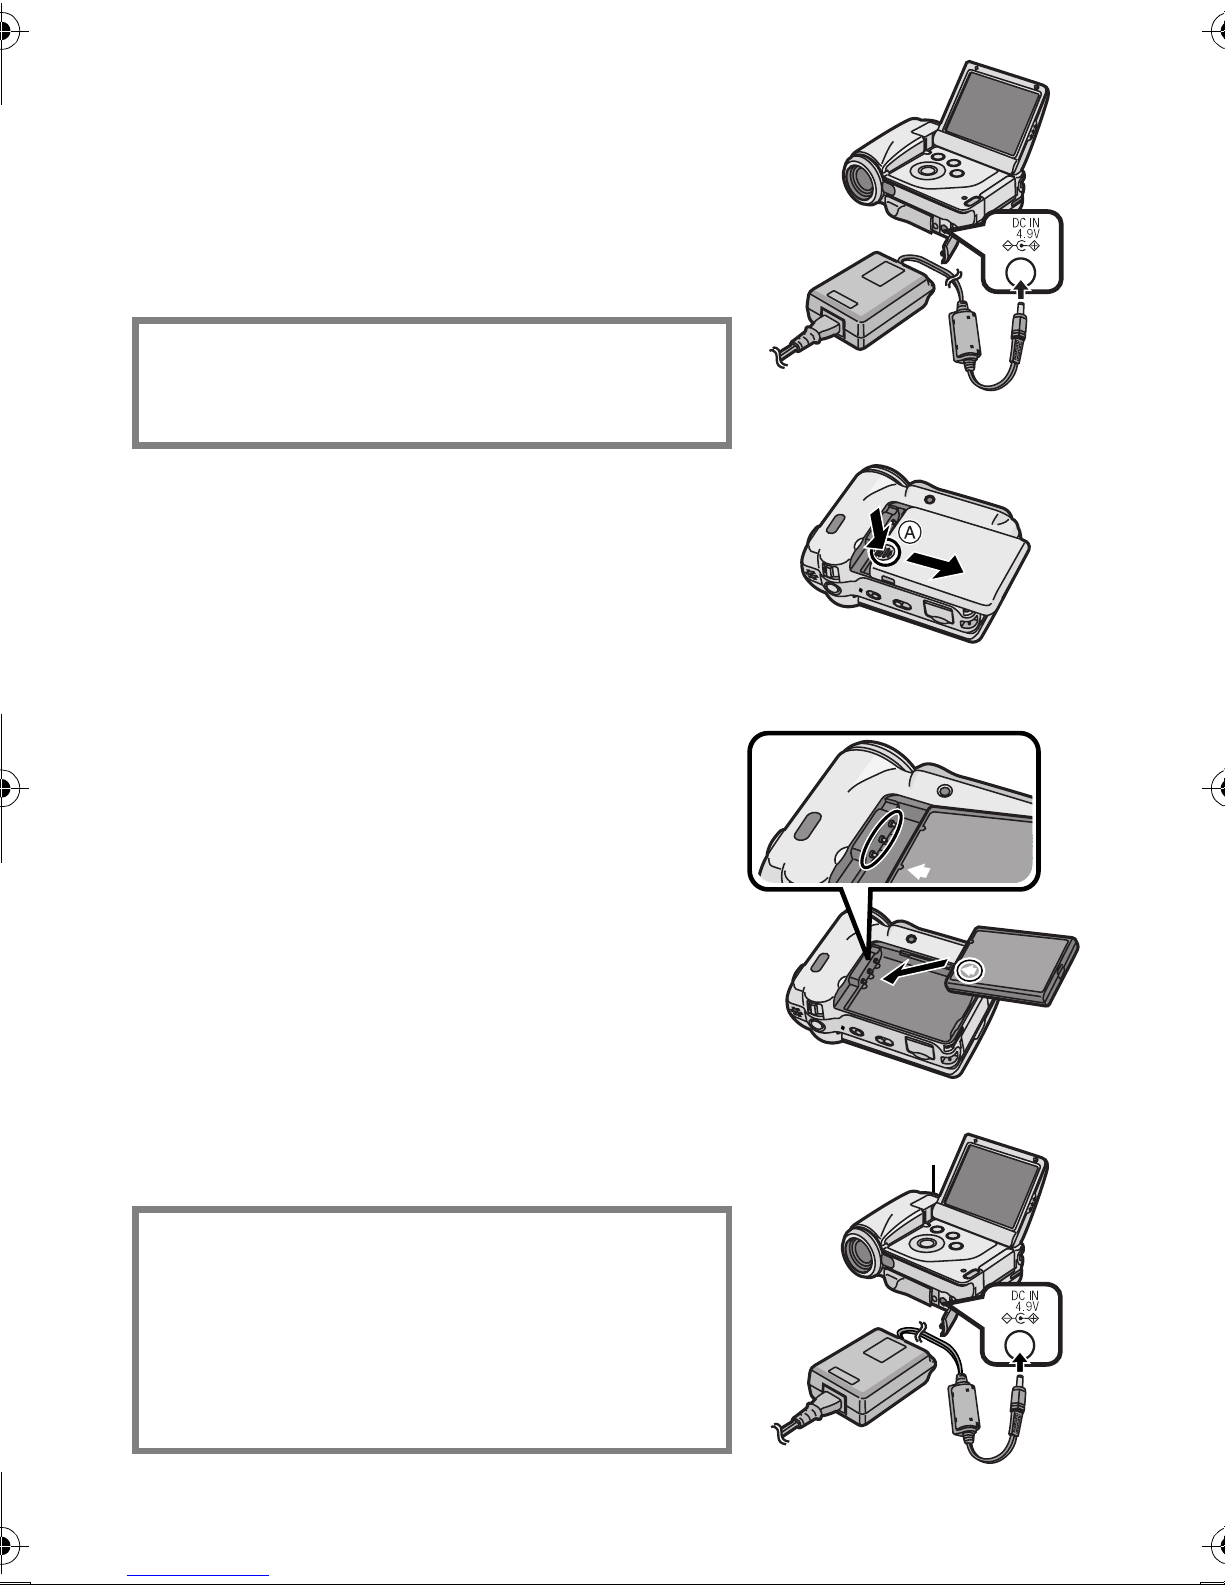
mзпЙк=pмййду
ª Using AC Adaptor
N Open the DC Input Socket Cover and
connect the DC Input Lead to the [DC IN
4.9V] socket on the SD Video Camera.
O Connect the AC Cord to the AC Adaptor
and the AC Main socket.
THE SOCKET OUTLET SHALL BE
INSTALLED NEAR THE EQUIPMENT AND
SHALL BE EASILY ACCESSIBLE.
N
O
ª Charging the Battery
Be sure to charge the supplied battery before use.
1 While pressing the A part, slide it to
remove the Battery Compartment Cover.
2 Press the terminals of the battery onto
the terminals of the Battery Compartment
and set the battery.
≥Fit the battery with its label facing upward.
≥After the battery is set, close the cover.
3 Connect the DC Input Lead to the [DC IN
4.9V] socket on the SD Video Camera.
4 Connect the AC Cord to the AC Adaptor
and the AC Main socket.
≥Power Lamp 1 flashes, and Charging starts.
≥When recharging, turn the power of the SD Video
Camera off.
5 Wait until Power Lamp 1 goes off.
1
2
≥When recharging is completed, Power Lamp 1
goes off.
≥If the Power Lamp flashes quickly (or slowly) when
recharging, recharging is not normal. (l 78)
CAUTION
Danger of explosion if battery is incorrectly
replaced.
Replace only with the same or equivalent type
recommended by the manufacturer.
Dispose of used batteries according to the
manufacturer’s instructions.
≥For other notes, see pages 76, 78.
NO
1
3
4
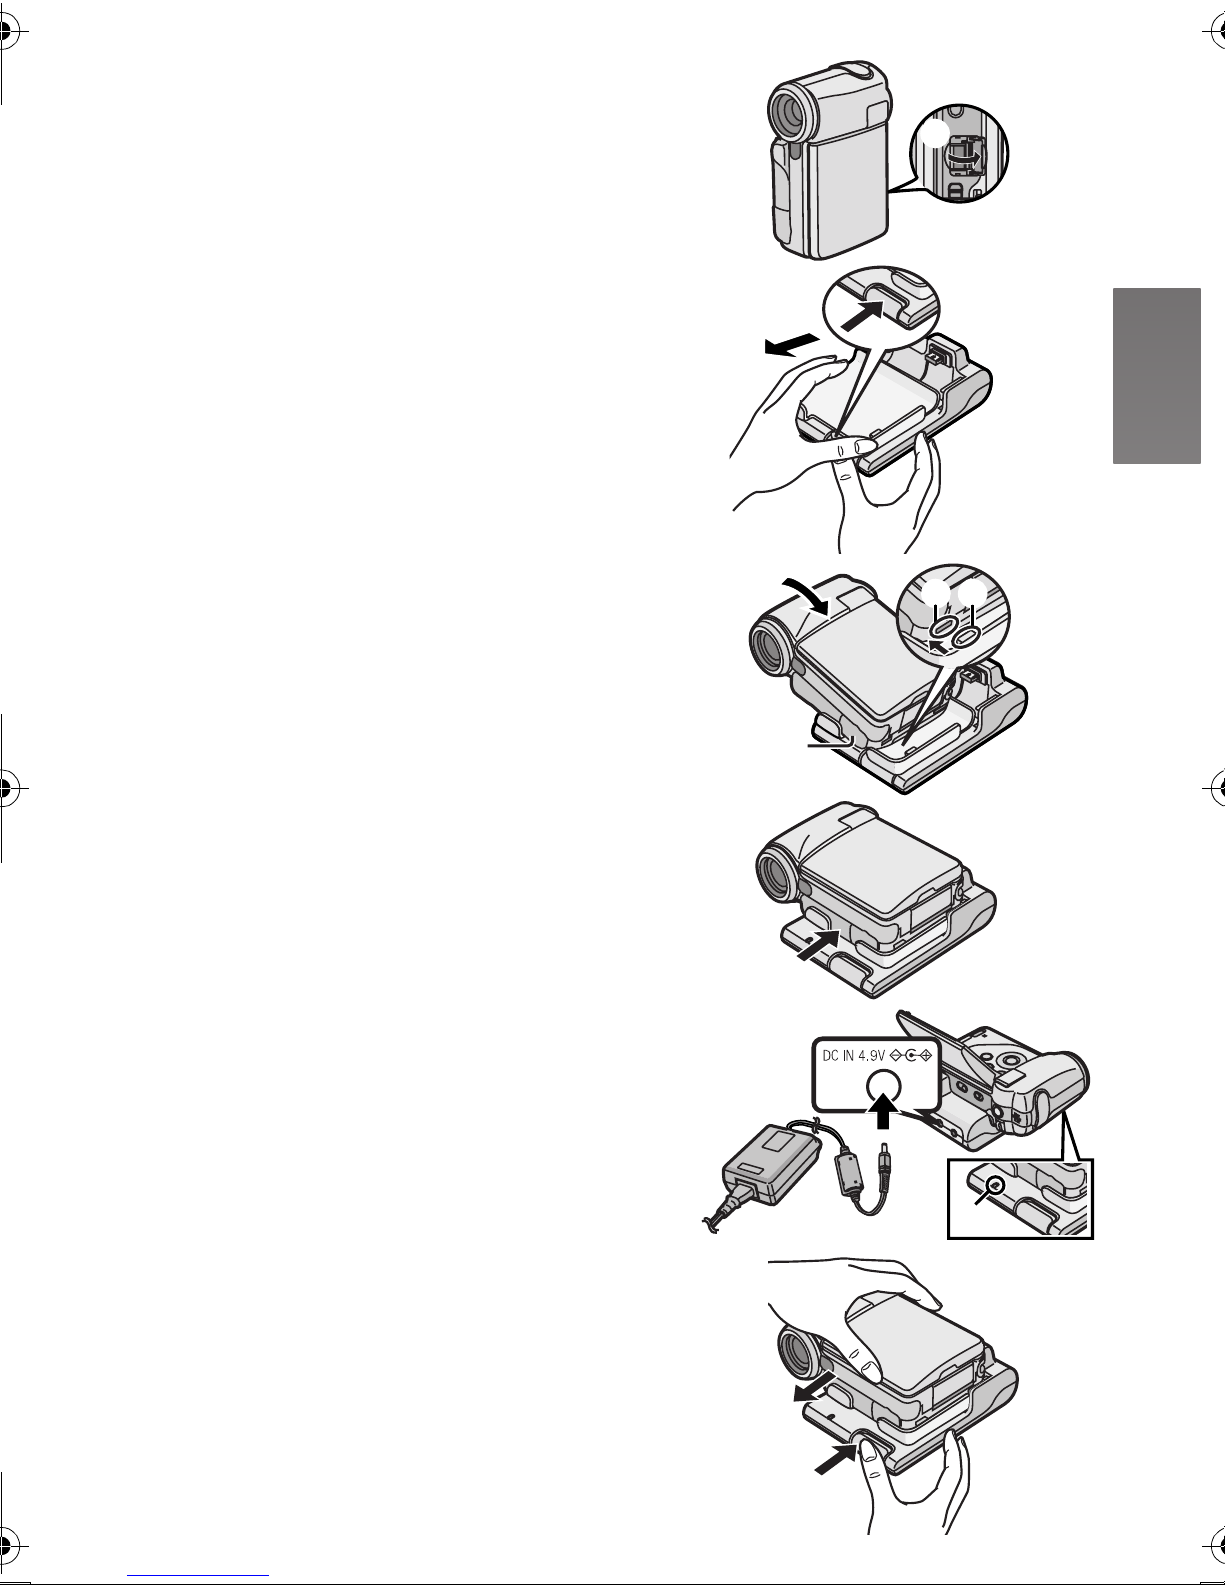
cбннбеЦ=нЬЙ=`~гЙк~=зе=нЬЙ=^s=
`к~ЗдЙ
Fitting the Camera on the AV Cradle eases charging.
The AV Cradle allows the Camera to be connected to
the external device, such as a TV in order for the
pictures on this Device to be viewed on the TV.
N
A
≥The charging configuration is the same as the one for
connecting the DC Input Lead to the SD Video
Camera. (l 12)
N Open the [MULTI] Cover. A
O While pressing the Release Button, pull
out the tray.
P Place the SD Video Camera on the AV
Cradle.
≥If the DC Input Socket cover B is open, it is not
possible to fit the SD Video Camera on the AV
Cradle.
≥The grooves 1 of the SD Video Camera fit in the
leading protrusions 2.
Q Push the tray until you hear it click.
R Connect the DC Input Lead to the
[DC IN 4.9V] socket on the AV Cradle.
O
P
Q
12
B
S Connect the AC Cord to the AC Adaptor
and the AC Main socket.
≥Power Lamp C flashes, and Charging starts.
≥When recharging, turn the power of the SD Video
Camera off.
≥When recharging is completed, Power Lamp
goes off.
≥Be sure to turn the SD Video Camera off before
fitting it on the AV Cradle.
≥If the AV Cable or AC Adaptor is connected to the SD
Video Camera, it is not possible to fit the SD Video
Camera on the AV Cradle.
Remove the SD Video Camera from the AV Cradle
While pressing the Release Button 1, pull out the tray
and remove the SD Video Camera 2.
≥For other notes, see page 79.
C
RIS
C
2
1
NP

fелЙкнбеЦ=~=jЙгзку=`~кЗ
An SD Memory Card can be used for this SD Video
Camera.
N Open the LCD Monitor and slide the Card
Slot Cover Open Lever to open the Card
Slot Cover.
O Hold the Memory Card placing the cut off
N
corner
1 at the front with the label 2
facing up, and then insert it fully into the
Memory Card Slot horizontally.
≥Turn off the SD Video Camera before inserting/
removing a Card.
P Close the Card Slot Cover securely.
ª Removing the Memory Card
Open the Card Slot Cover and press the center of
the Card
≥After removing the Card, close the Card Slot
≥The SD Video Camera may be damaged if the
≥Keep the SD Memory Card out of the reach of
children to prevent swallowing.
A and then pull it straight out B.
Cover.
Card is forced out when the Card is fully inserted.
O
1
2
A
B
≥For other notes, see page 79.
NQ
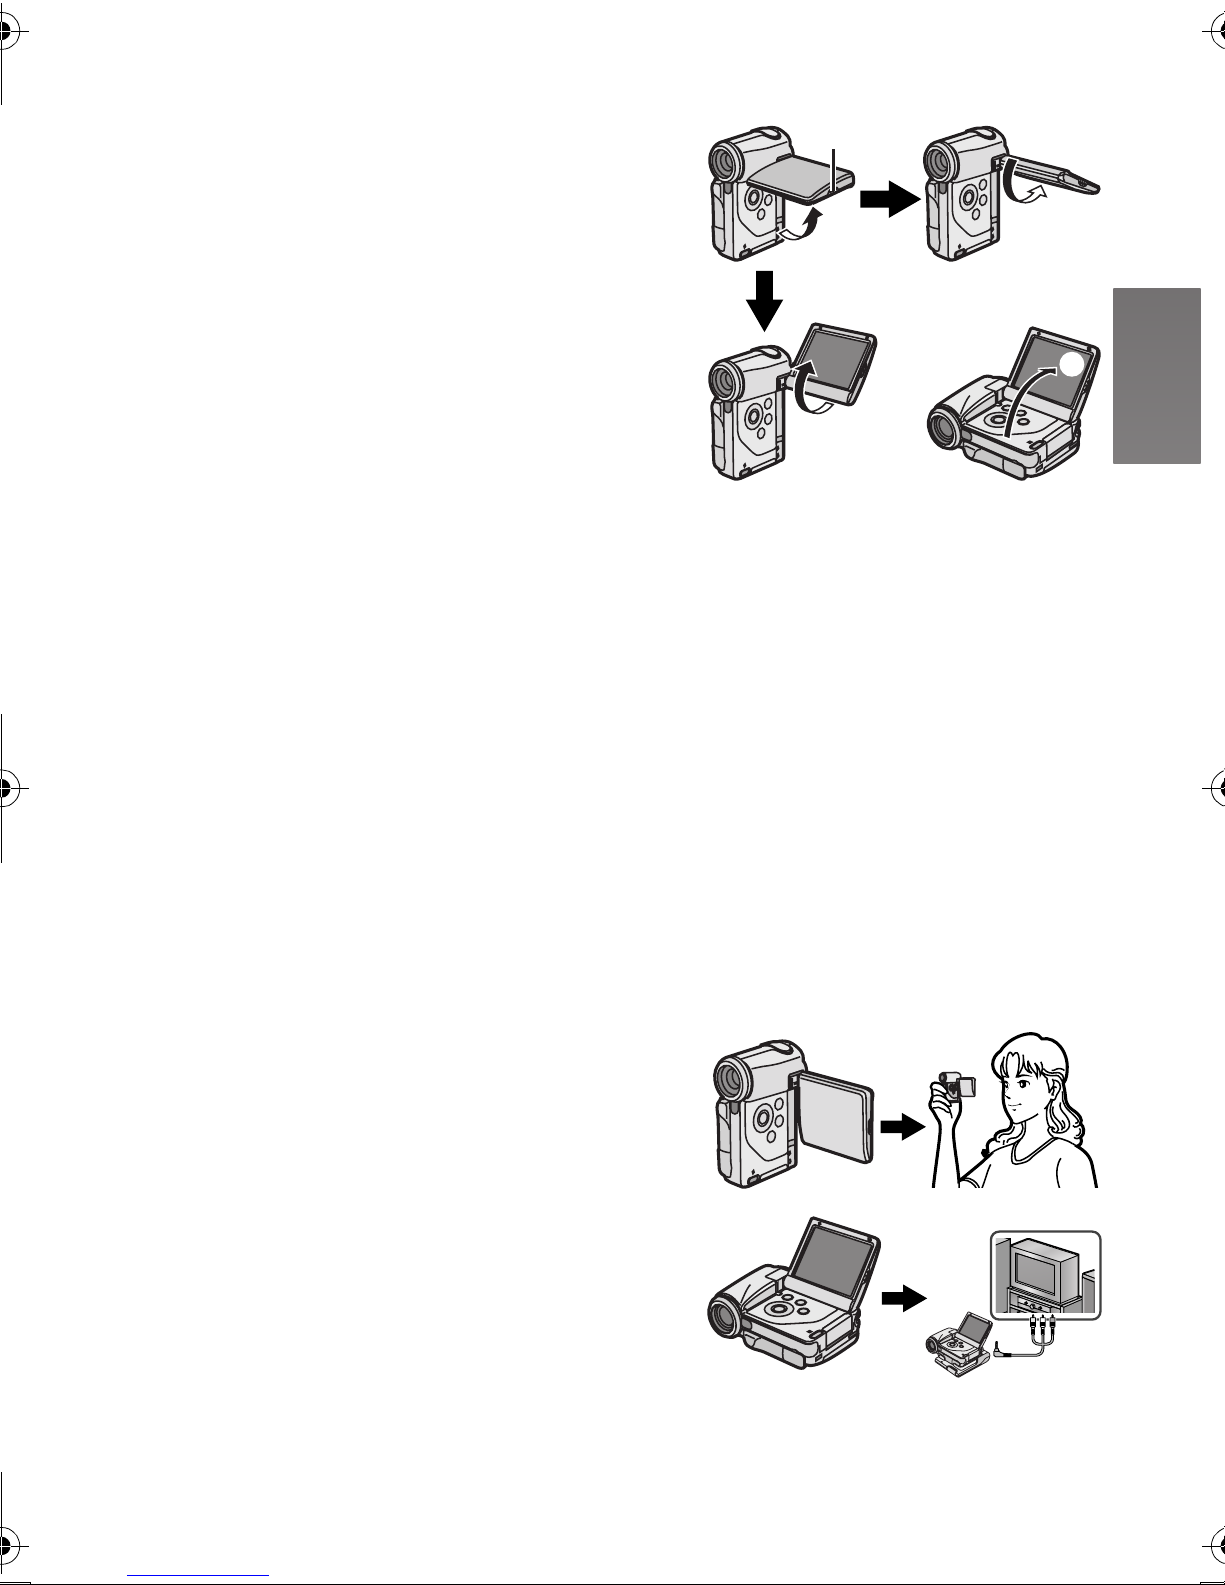
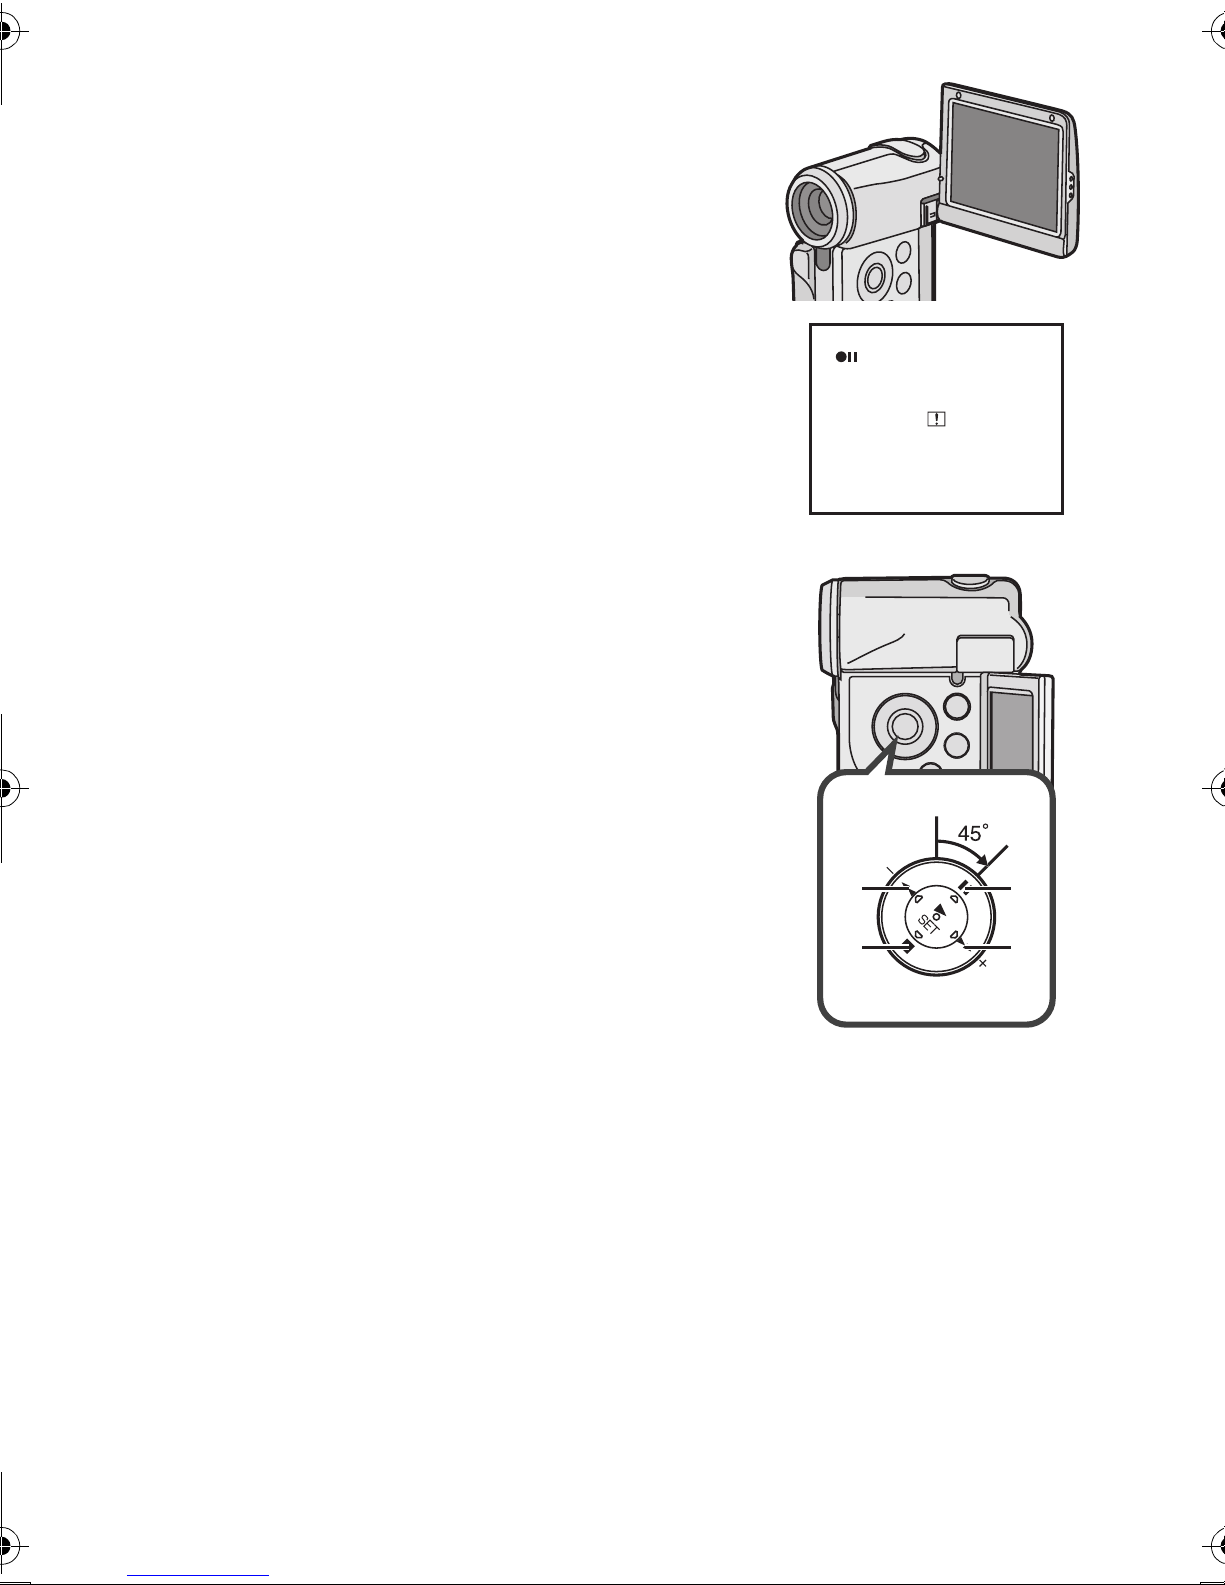
rлбеЦ=нЬЙ=i`a=jзебнзк
Record and play the video image while viewing the
LCD Monitor.
N Put your finger on the groove 1 to open
the LCD Monitor.
O Adjust the LCD Monitor angle according
to the desired recording/playing angle.
≥The LCD Monitor can rotate up to the angles
illustrated.
1: Up to 90
2: Up to 130
3: Up to 140
4: Up to 130
≥Forcefully rotating the LCD Monitor beyond these
ranges will damage the SD Video Camera.
≥If the position of the LCD Monitor is set to 2 or 4,
when you select the Recording Mode only the
indication which is limited (REC pause [¥;], REC
[¥] or Warning [°]) appears on screen display.
If you desired the indication returned to normal, set
position of the LCD Monitor to 1 or 3.
≥The LCD image may appear slightly brighter than the
actual recorded image. This is done intentionally to
provide better visibility when the camera is used
outdoors in bright sunlight.
° maximum
° maximum
° maximum
° maximum
NIO
1
3
1
4
2
≥For other notes, see page 79.
ª Vertical Style and Horizontal Style
This SD Video Camera can be used in 2 styles.
1 Vertical Style: Use mainly when recording.
2 Horizontal Style: Use mainly when playing back.
1
2
NR
ª Portrait Picture Recording
By opening the LCD Monitor and turning it so that it
faces forward (to the lens side), you can let the subject
in front of the SD Video Camera monitor the shot while
shooting is in progress.
≥If you set the LCD Monitor to this position, an image
on the LCD Monitor will be reversed when displayed.
However, recording images are recorded normally.
≥If a general Warning indication [°] appears, return
the LCD Monitor to the Vertical style in order to verify
contents. (l 71)
ª Using the Multi-function Button
In this SD Video Camera, the Multi-function Button is
tilted to the right to 45 degrees in order to make it easy
to do operation in both the Vertical and Horizontal
Style.
Move the cursor and selection of the item on the
display by the Multi-function Button of main unit:
A: 6 (LEFT)
B: ∫ (DOWN)
C: ; (UP)
D: 5 (RIGHT)
B
CA
D
NS
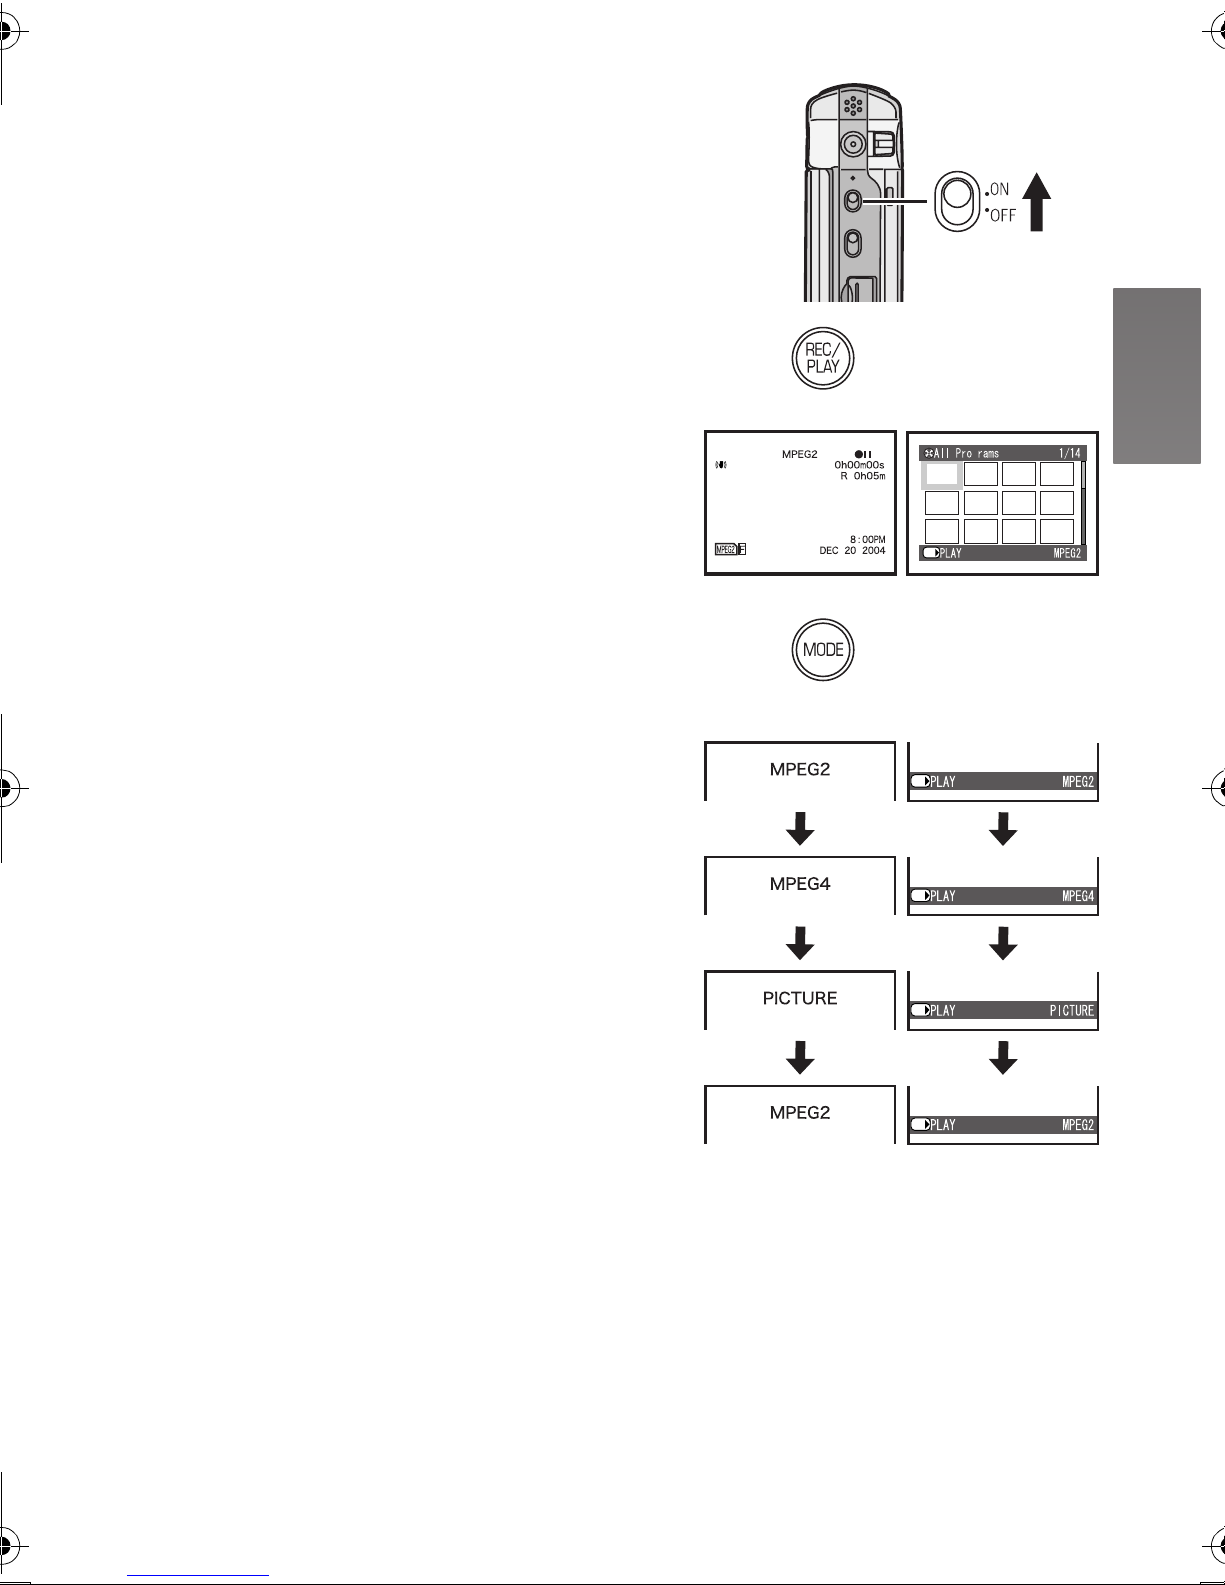
qмкебеЦ=нЬЙ=mзпЙк=lеL
pЙдЙЕнбеЦ=lйЙк~нбзе=jзЗЙл
N
Select a desired mode on the mode selection screen.
N Set the Power Switch to [ON].
≥The SD Video Camera is turned on.
O Press the [REC/PLAY] Button to select
Recording Mode or Playback Mode.
1: Recording Mode
2: Playback Mode
P Press the [MODE] Button to select a
Operation Mode.
≥Every time the [MODE] Button is pressed, the
Operation Mode changes as follows.
1: Recording Mode
2: Playback Mode
≥For other notes, see page 79.
ª About the Operation Modes
Six operation modes are provided as follows.
Motion image [MPEG2]:
Motion image (MPEG2 format) recording mode
(l 27)
Motion image (MPEG2 format) playback mode
(l 29)
Motion image [MPEG4]:
Motion image (MPEG4 format) recording mode
(l 28)
Motion image (MPEG4 format) playback mode
(l 30)
Still picture [PICTURE]:
Still picture (JPEG format still picture) recording
mode (l 32)
Still picture (JPEG format still picture) playback mode
(l 33)
Í
O
12
g
g
SET/
SET/
P
12
SET/
SET/
SET/
SET/
≥When you use the battery to supply the power with
the SD Video Camera, it is automatically turned off if
you leave it for more than approx. 5 minutes without
any operation.
NT
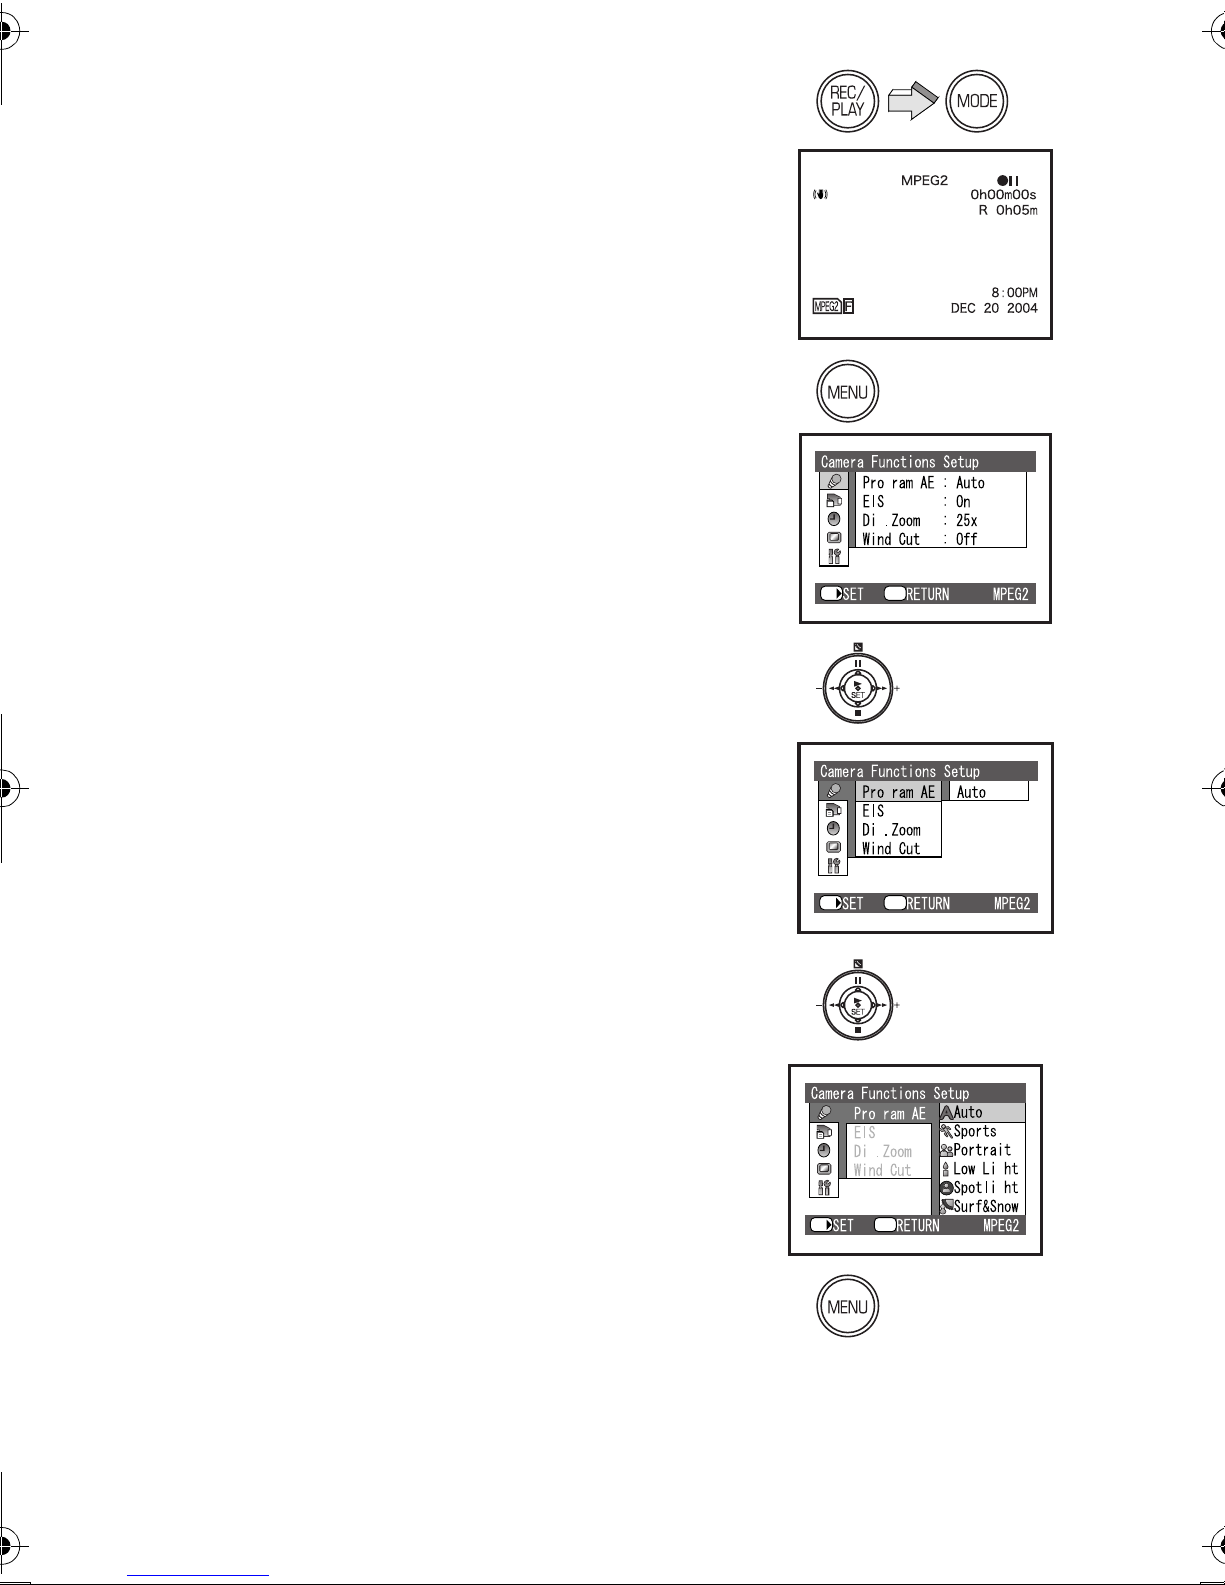
rлбеЦ=нЬЙ=jЙем=pЕкЙЙе
Allows the functions usable in the selected mode to be
set from the menu.
N Select a desired mode. (l 17)
O Press the [MENU] Button.
≥The Main Menu in the selected mode is
displayed.
P Press the ;/∫ side of the Multi-function
Button to select a desired Main Menu and
press the [1 SET] Button.
≥The Sub-Menu in the selected mode is
displayed.
N
O
g
Q Press the ;/∫ side of the Multi-function
Button to select a desired Sub-Menu and
then press the [1 SET] Button.
R Press the ;/∫ side of the Multi-function
Button to select a desired item and then
press the [1 SET] Button.
S Press the [MENU] Button.
≥Menu screen disappears, and the selected item
is now being set.
Return to the menu one before
Press the 6 side of the Multi-function Button.
≥Press the [MENU] Button when playing back the
motion image or still picture to edit the file being
played back.
≥When you do not perform operation the menu screen
automatically disappears if you leave it for more than
approx. 1 minutes.
P
QIR
SET/
SET/
g
Menu
g
g
Menu
g
≥For other notes, see page 79.
NU
S
SET/
g
g
g
Menu
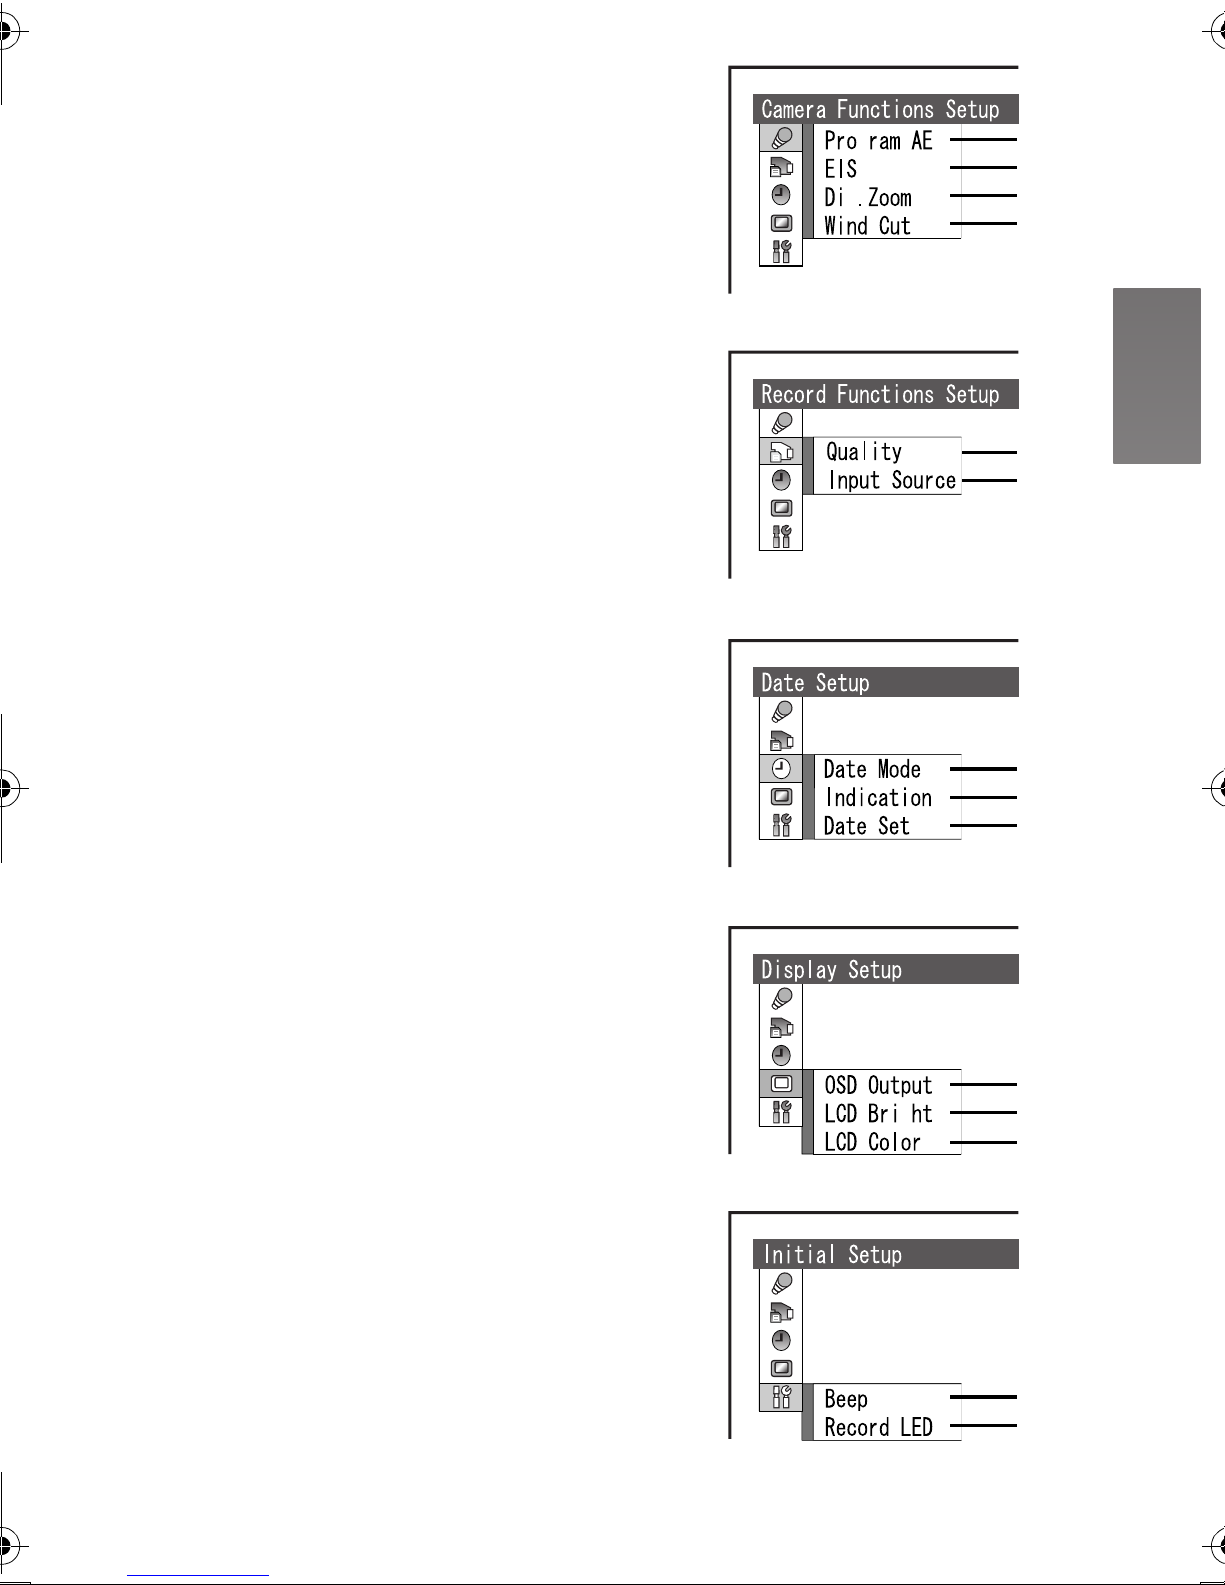
iáëí=çÑ=jÉåìë
The menu images used differ slightly from the actual
menus. These are offered for simplified illustration
purposes.
ª Recording Mode
Camera Functions Setup
1 Auto Exposure Mode [Program AE] (l 38)
2 Image Stabilizer [EIS] (l 39)
3 Digital Zoom [Dig. Zoom] (l 35)
4 Wind Noise Reduction [Wind Cut] (l 39)
≥This function appears [MPEG2] mode and
[MPEG4] mode.
Record Functions Setup
5 Picture Quality [Quality] (l 27, 28, 32)
6 Input Source [Input Source] (l 55)
Date Setup
7 Date and Time Indication Mode [Date Mode]
(l 23)
8 Date and Time Indication [Indication] (l 23)
9 Date and Time Setting [Date Set] (l 22)
g
g
1
2
3
4
5
6
Display Setup
10 OSD Indication [OSD Output] (l 25)
11 LCD Brightness Adjustment [LCD Bright]
(l 24)
12 LCD Color Adjustment [LCD Color] (l 24)
Initial Setup
13 Beep Sound [Beep]
≥This SD Video Camera will emit sound when the
power switch is changed over, the REC Button is
pressed, or other operations are engaged. If you
do not need operating sound, you can switch it
off.
14 Recording LED [Record LED]
≥The Recording Lamp which is on the front of the
SD Video Camera lights while recording, and
also flashes during remote control receiving.
When [Record LED] set to [Off], the Recording
Lamp will not light.
7
8
9
10
g
11
12
13
14
NV
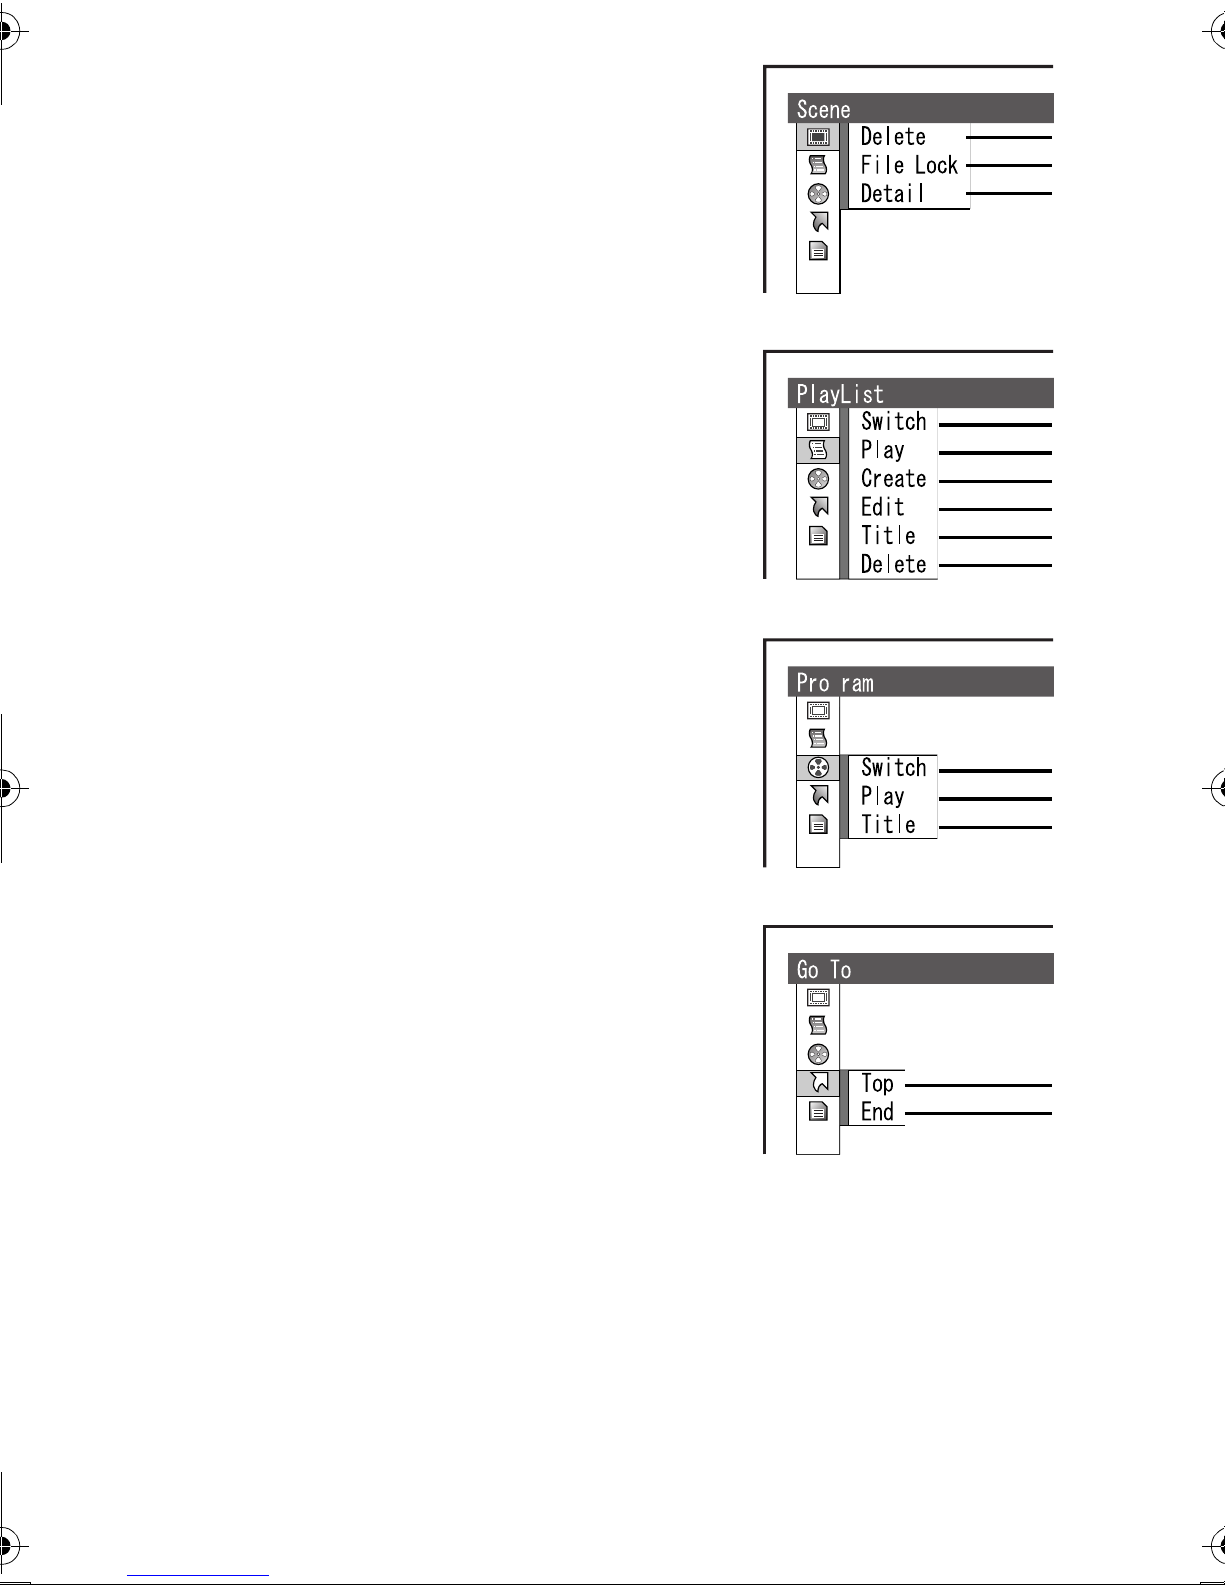
ª Playback Mode
[MPEG2/MPEG4] mode
Scene
1 Deleting a Scene [Delete] (l 40)
2 Setting the Lock [File Lock] (l 41)
3 Scene Detail [Detail] (l 41)
PlayList*
4 Selecting and switching a Play List [Switch]
(l 43)
5 Playing back the Play List [Play] (l 44)
6 Creating the Play List [Create] (l 43)
7 Editing the Play List [Edit] (l 44)
8 Edit a title of the Play List [Title] (l 46)
9 Deleting a Play List [Delete] (l 47)
Program*
10 Switching a Program [Switch] (l 48)
11 Playing back the Program [Play] (l 48)
12 Edit a title of the Program [Title] (l 49)
Go To
13 Go to Top of List [Top] (l 50)
14 Go to End of List [End] (l 50)
ETC.
ETC.
1
2
3
4
5
6
7
8
9
g
*[MPEG2] mode only.
10
11
12
ETC.
13
14
ETC.
OM
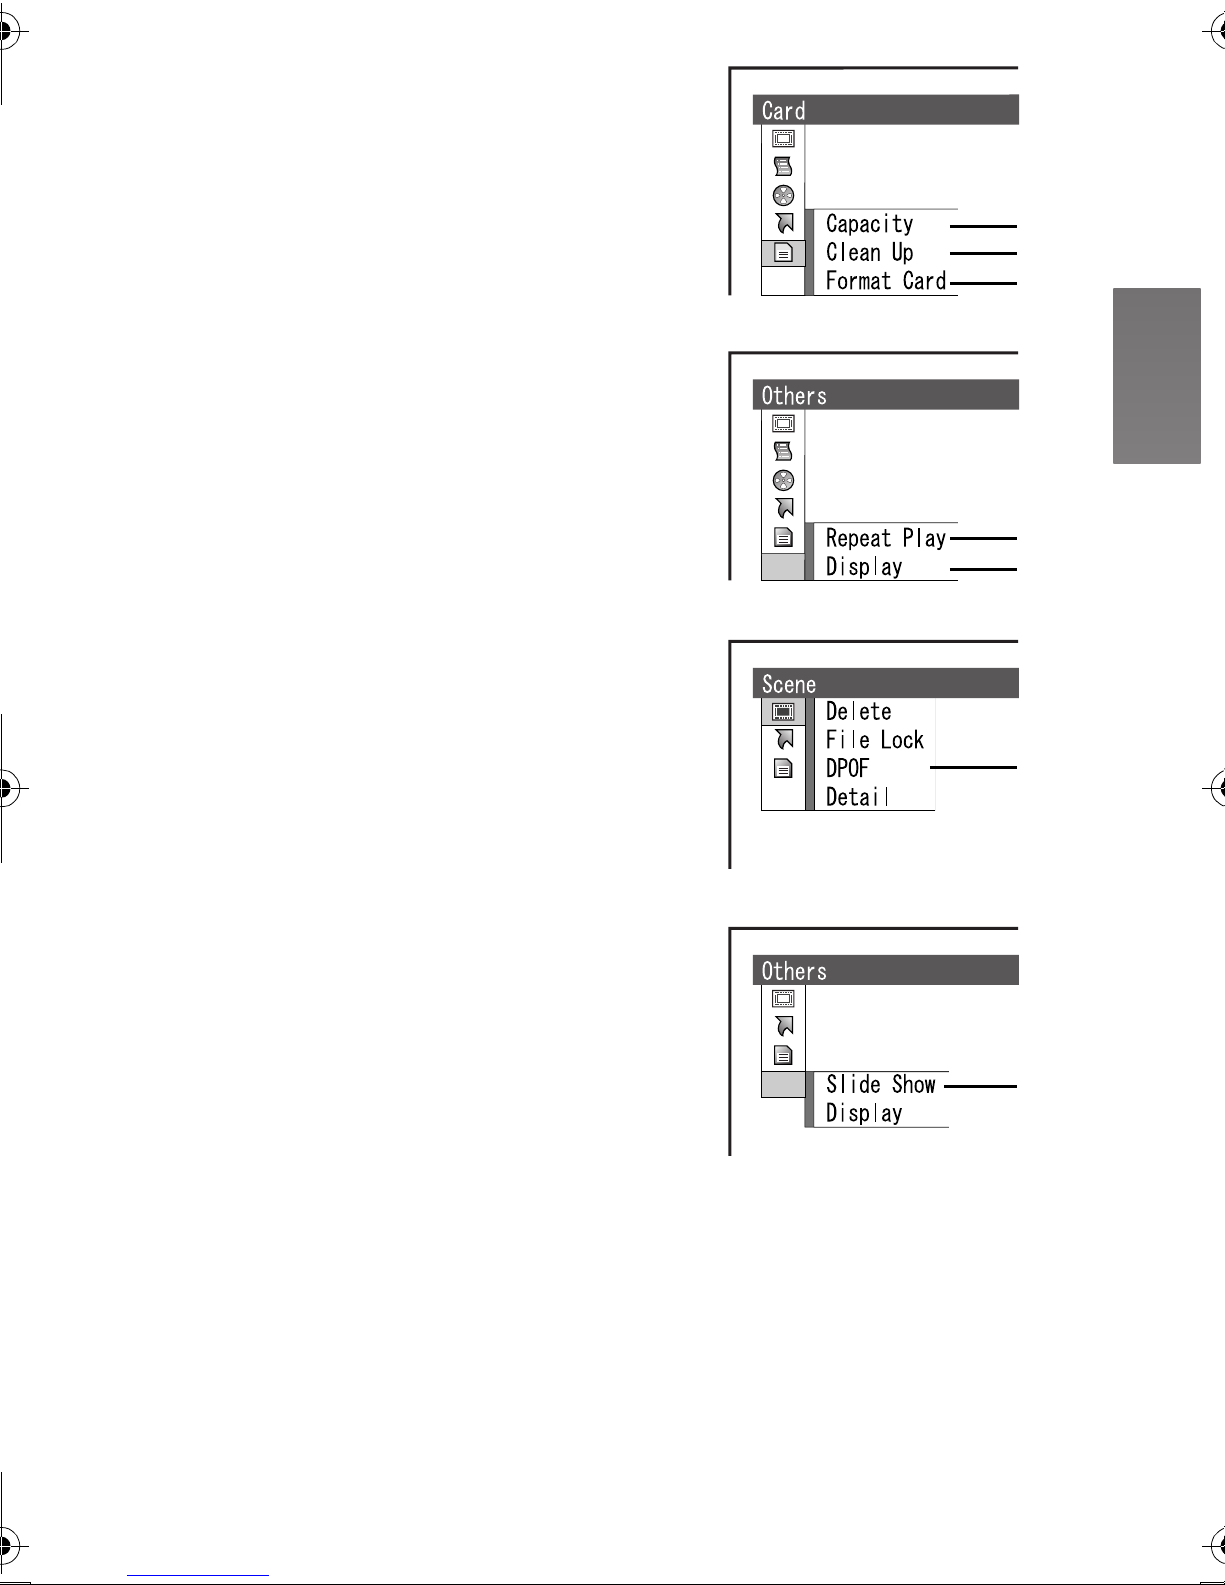
Card
15 Capacity of a Card [Capacity] (l 51)
16 Recover writing speed of the data to a Card
[Clean Up] (l 26)
17 Formatting a Card [Format Card] (l 51)
Others
18 Setting a Repeat Playback [Repeat Play] (l 52)
19 Display Mode [Display] (l 53)
[PICTURE] mode
Scene
20 Setting DPOF [DPOF] (l 42)
Others
21 Setting a Slide Show [Slide Show] (l 53)
≥The other functions of [PICTURE] mode are the
same as those of [MPEG4] mode.
ETC.
ETC.
ETC.
15
16
17
18
19
20
ETC.
21
ON

pЙннбеЦ=a~нЙ=~еЗ=qбгЙ
At the time of purchase of the SD Video Camera,
the date and time are not set. First, set the date
and time, then use the SD Video Camera.
N Press the [REC/PLAY] Button to select
Recording Mode.
O Press the [MENU] Button and select [Date
Setup] and then press the [1 SET]
Button.
P Select [Date Set] and press the [1 SET]
Button.
Q Press the ;/∫/6/5 side of the
Multi-function Button to set the desired
Date and Time.
≥6/5: Select the item
≥;/∫: Change the value
≥Year will cycle in the order shown below.
2003, 2004, ..., 2079, 2003, ...
R Press the [1 SET] Button.
N
O
PIQ
SET/
Menu
≥A verification message appears.
S Select [YES] and press the [1 SET]
Button.
≥If [NO] is selected, returns to step 4.
≥For other notes, see page 79.
RIS
SET/
SET/
Menu
OO
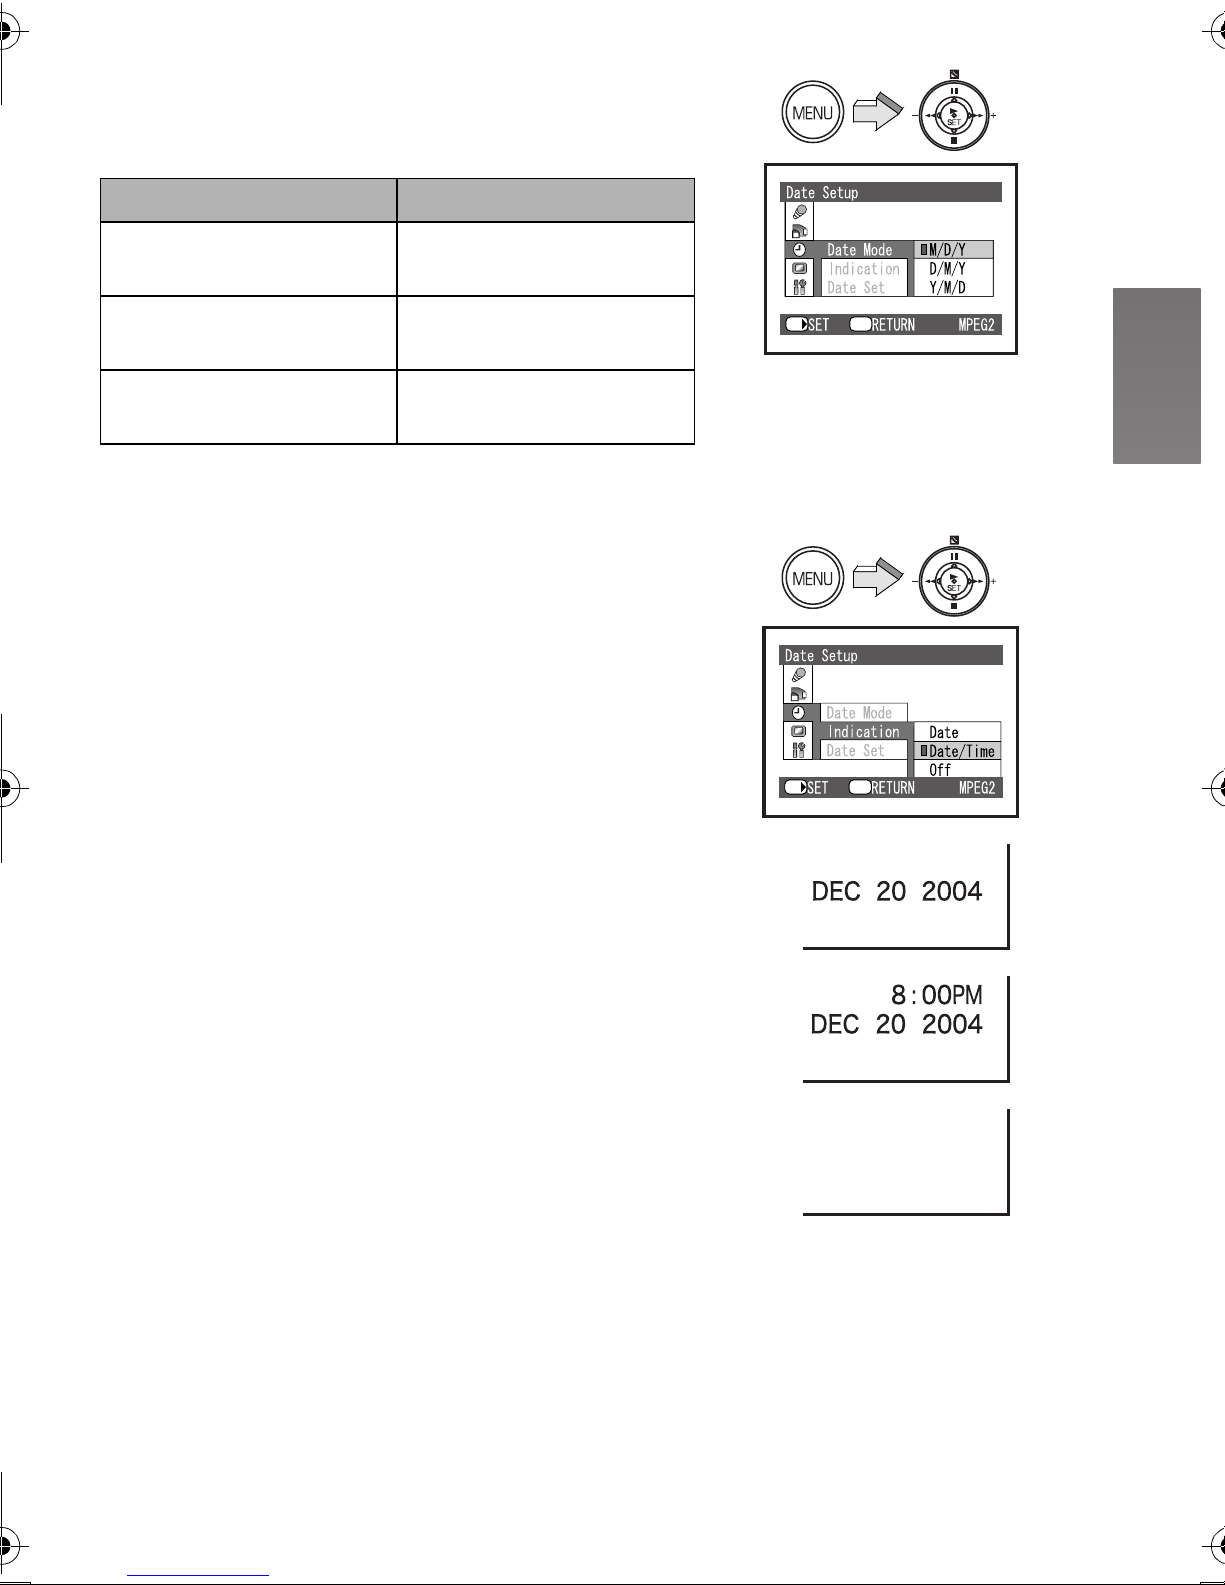
ª Change of the Date Display Mode
Select a desired mode on [Date Mode] in
[Date Setup].
Date Mode Display
M/D/Y
D/M/Y
Y/M/D
DEC 20 2004
8:00PM
20:00
20. 12. 2004
20:00
2004. 12. 20
ª Change of the Date/Time Indication
Mode
Select a desired mode on [Indication] in
[Date Setup].
1: [Date]
2: [Date/Time]
3: [Off]
≥When battery and AC adaptor are not attached and
the [RESET] Button is pressed, the date and time will
be set to [JAN 1 2003 12:00AM].
≥When the built-in battery has been exhausted, set
the date and time after the battery has charged.
(l 66)
1
SET/
SET/
Menu
Menu
2
3
OP
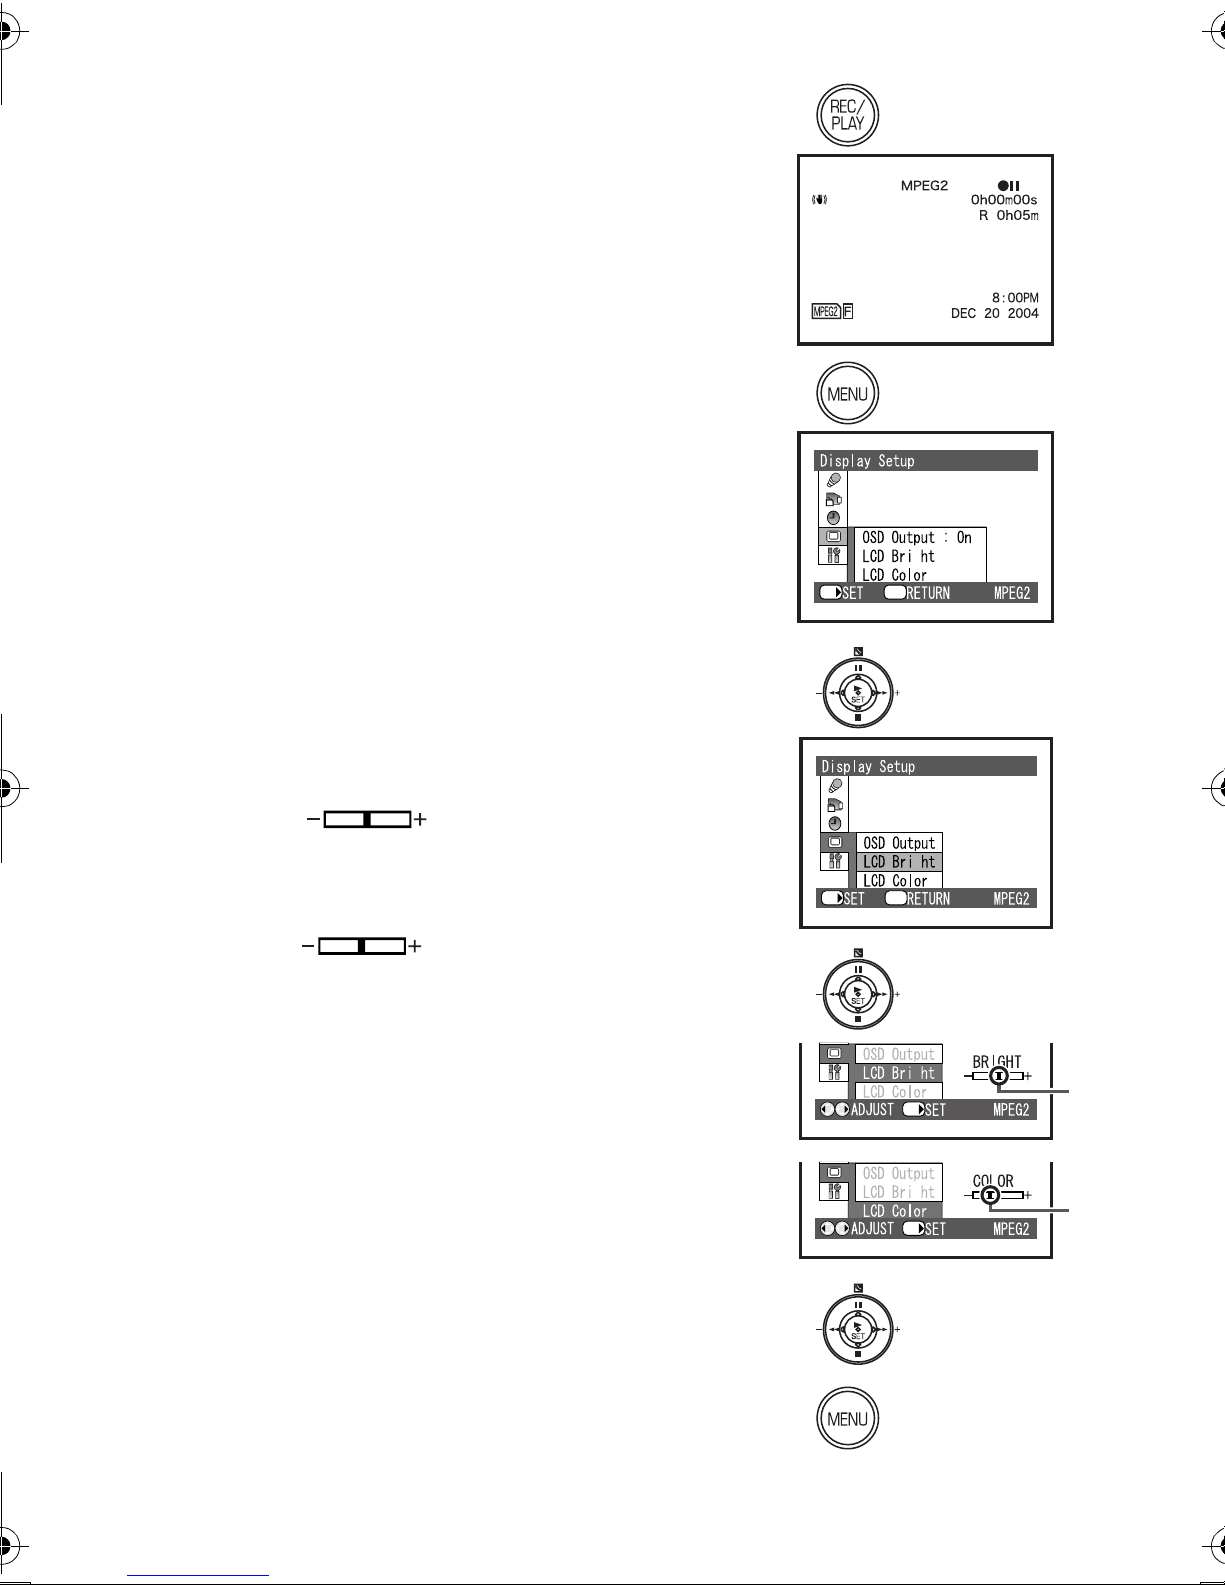
^ЗамлнбеЦ=_кбЦЬнеЙлл=~еЗ=
`здзк=iЙоЙд=зе=нЬЙ=i`a=
jзебнзк
LCD Brightness [LCD Bright]
Adjusts the brightness of the image on the LCD
screen.
LCD Color Level [LCD Color]
Adjusts the color saturation of the image on the LCD
screen.
N Press the [REC/PLAY] Button to select
Recording Mode.
O Press the [MENU] Button.
P Select [Display Setup] and press the
[1 SET] Button.
Q Select [LCD Bright] or [LCD Color] and
press the [1 SET] Button.
N
O
PIQ
SET/
g
Menu
R Press the 6/5 side of the
Multi-function Button for adjustment.
≥If [LCD Bright] 1 is selected.
[BRIGHT ] indication appears, the
brightness can be increased by moving the [?]
to the right.
≥If [LCD Color] 2 is selected.
[COLOR ] indication appears, the
color can become darker by moving the [?]
the right.
S Press the [1 SET] Button.
T Press the [MENU] Button.
≥These adjustments do not affect the recorded
images.
A
B to
R
1
2
SET/
g
Menu
g
A
SET/
g
B
SET/
OQ
S
T

_~лбЕ=cмеЕнбзел
_ЙСзкЙ=oЙЕзкЗбеЦ=зйЙк~нбзе
Do not cover the sensor with your hand when using the
Remote Control and recording pictures.
1Remote Control Sensor
2White Balance Sensor
ª MPEG2/MPEG4 Motion Image
MPEG stands for Moving Picture Experts Group. It is
the name of the standard for the compression and
extension of a digital motion image and sound enacted
by ITU-TS (International Telecommunications UnionTelecommunication Standardization Sector) and ISO
(International Standardization Organization).
The picture data is transferred at a rate of about
30 frames per 1 second under MPEG2 format.
Therefore, you can enjoy a beautiful and smooth
motion image.
The picture data of MPEG4 is inferior to those of
MPEG 2 in smoothness because the number of the
frames transferred in MPEG4 is less than that in
MPEG2. However, it is suitable for use in PC because
the transfer rate is higher.
1
2
N
ª OSD Indication on LCD Monitor
This SD Video Camera can appear or disappear
indications on the LCD Monitor. (l 70)
N Press the [REC/PLAY] Button to select
Recording Mode and set the operation
mode.
O Press the [MENU] Button and select [OSD
Output] on [Display Setup] to [On] and
press the [1 SET] Button.
≥OSD Indications appears on LCD Monitor.
≥If you select [Off] the OSD Indication which is limited
appears on LCD Monitor.
O
SET/
g
Menu
OR
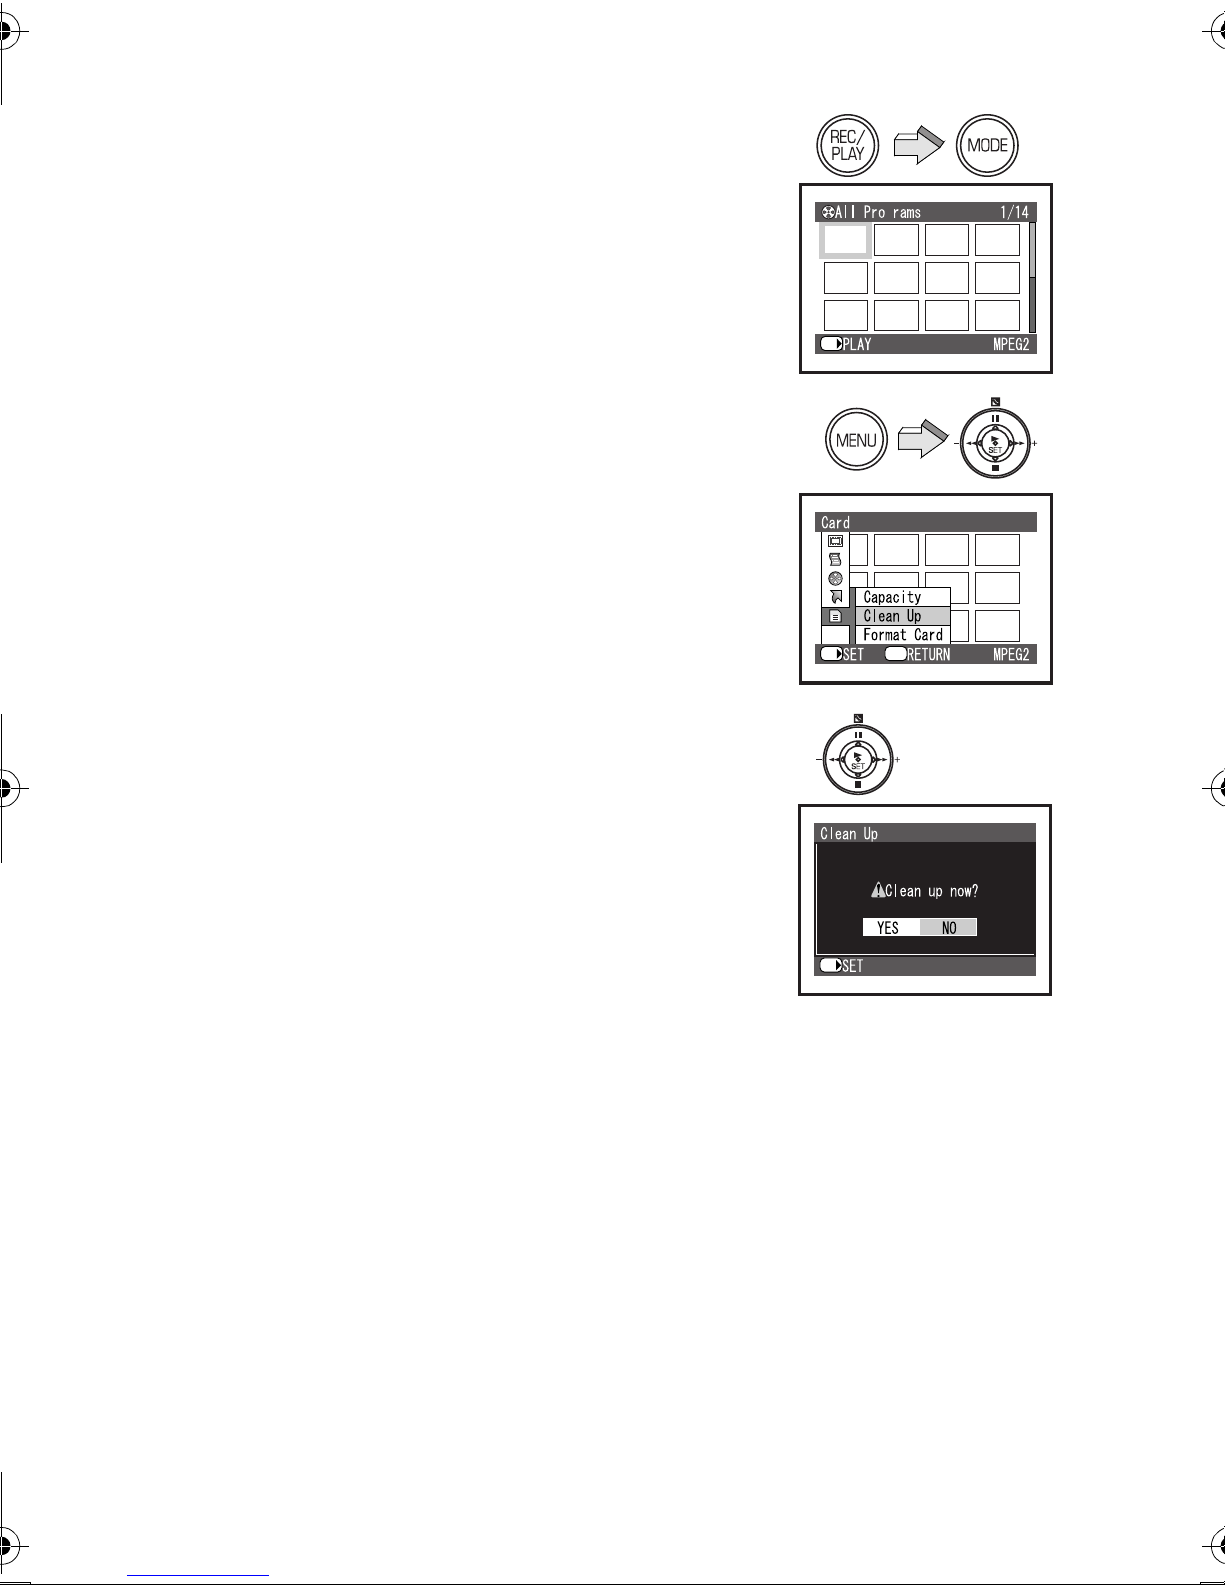
`дЙ~е=rй=cмеЕнбзе
Generally, if you repeatedly write data on a Memory
Card, the data writing speed is decreased by the
characteristic of the Memory Card.
To recover the data writing speed on available SD
Memory Card, [Clean Up] function is installed in this
unit.
When repeating write data on an SD Memory Card, it
may be suddenly stopped while recording MPEG2
motion images. In this case, an error message [Record
Stopped. Clean up in no data area?] appears. Be sure
to use the function. (l 73)
[Clean Up] is a function to recover the writing speed on
the free space of the SD Memory Card. It may take
time to finish its process.
≥Be sure to clean up the SD Memory Card before
use.
N Press the [REC/PLAY] Button to select
N
O
SET/
ETC.
SET/
g
Menu
Playback Mode and set the operation
mode.
O Press the [MENU] Button and select
[Clean Up] on [Card] and press the
[1 SET] Button.
P The confirmation screen appears and
then select [YES] and press the [1 SET]
Button.
≥Clean up is carried out.
≥Even if the [Clean Up] function is performed,
existing data on the card is not erased.
≥While card is being cleaned, you should not remove
the Memory Card or turn off the power.
≥[Clean Up] function may be unable to activate
according to the kind of card which use. (l 27)
P
SET/
OS
oЙЕзкЗбеЦ=jзнбзе=fг~ЦЙл=
EjmbdOF
You can record motion images in high quality on the
Memory Card. Therefore, it is suitable for recording
important pictures.
In MPEG2 motion image recording, SD Memory
Card with the high-speed transmission rate of
10 MB/s is needed. Be sure to check available
SD Memory Card on the following web site.
For USA <http://www.panasonic.com/d-snap>
For Canada <http://www.panasonic.ca/english/
accessories/storagemedia/>
[FINE]: 256 MB or more
[NORM]: 32 MB or more
≥You cannot record MPEG2 motion images on a card
other than the above.
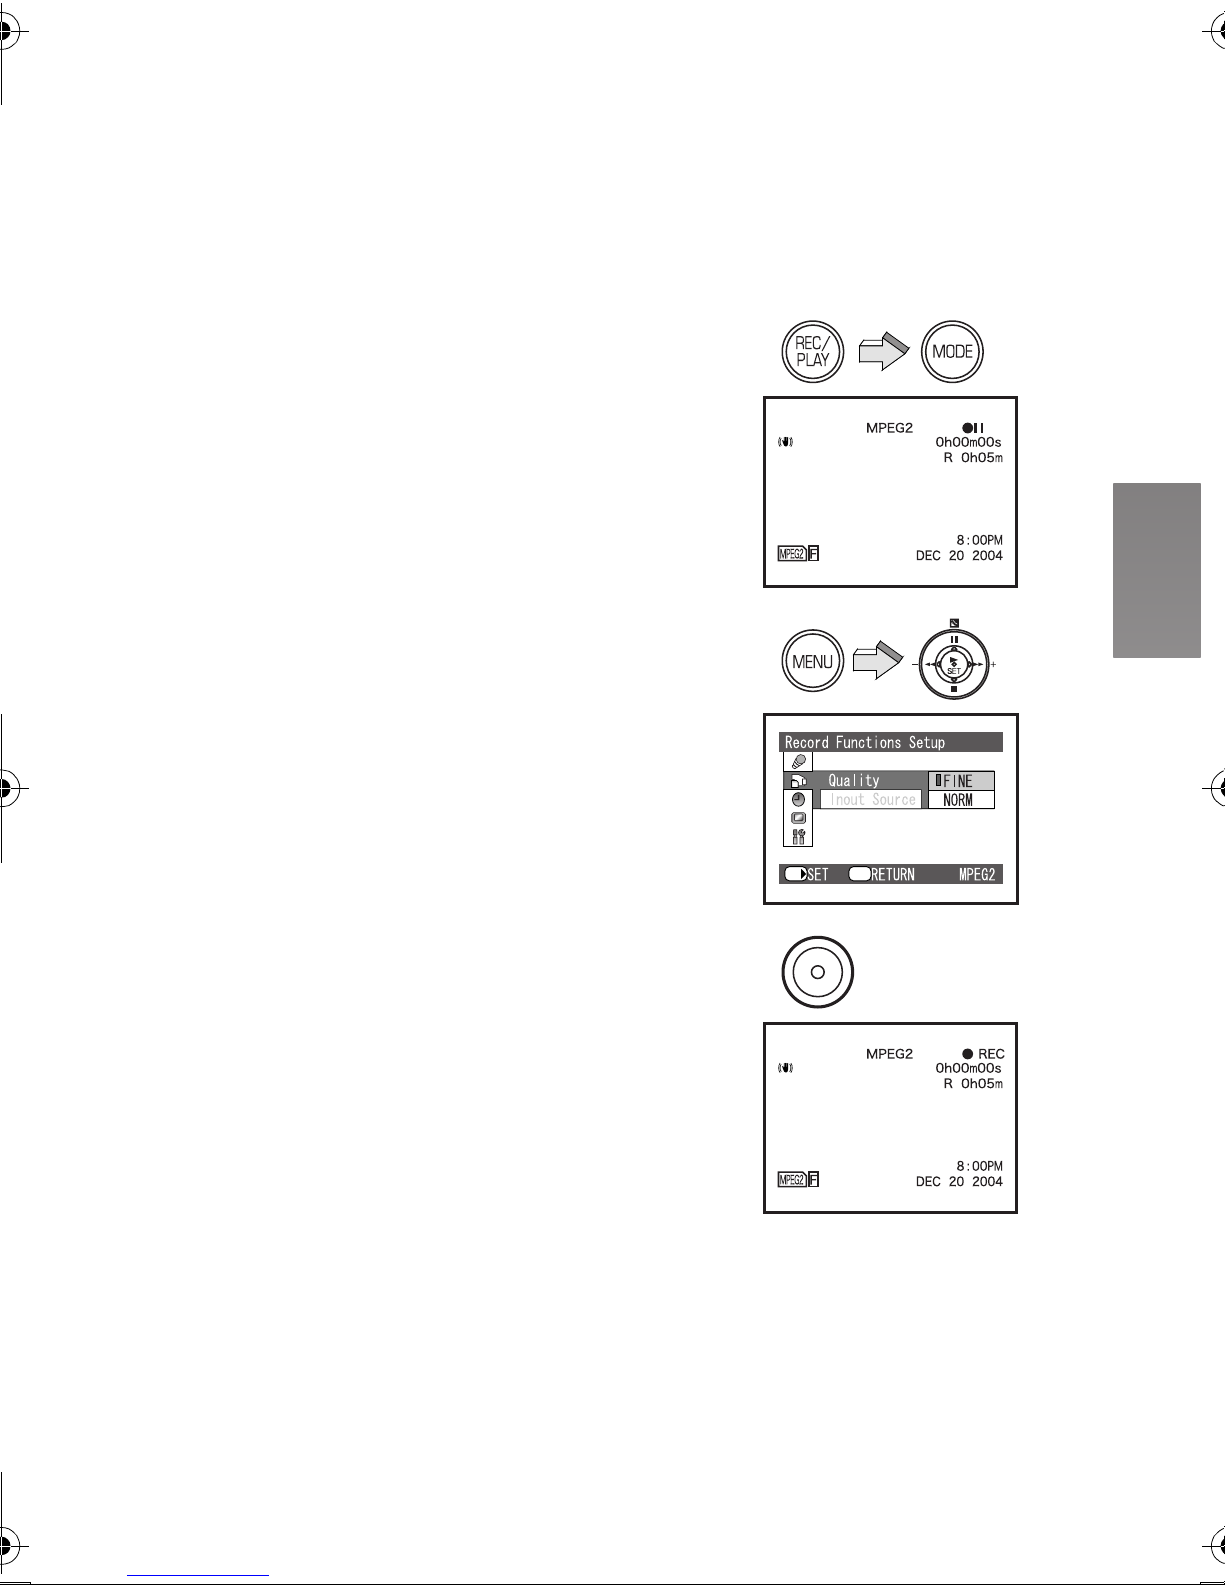
N Press the [REC/PLAY] Button to select
N
Recording Mode and set the operation
mode to [MPEG2].
O Press the [MENU] Button and set [Quality]
on [Record Functions Setup] to desired
picture quality and then press the
[1 SET] Button.
≥Select one of [FINE] or [NORM].
[FINE]: High image quality 704 k 480 pixels
[NORM]: Normal image quality 352 k 480 pixels
≥Press the [MENU] Button after completing the
setting.
P Press the Recording Start/Stop Button.
≥Recording starts.
≥While recording the motion image, press the
Recording Start/Stop Button to stop recording.
≥Be sure to clean up the SD Memory Card before
use. (l 26)
≥If you use a 32-128 MB available SD Memory Card,
when you select [Quality] on [Record Functions
Setup] to [FINE] of the MPEG2 motion image
recording mode, an error message [This card cannot
record in MPEG2 FINE mode.] appears on the LCD
Monitor. If you use a MultiMediaCard, an unavailable
SD Memory Card, or an 8 MB and 16 MB SD
Memory Card, when you select the MPEG2 motion
image recording mode, an error message [This card
cannot record in MPEG2 mode.] appears on the LCD
Monitor.
O
P
SET/
Menu
≥For other notes, see page 80.
OT
oЙЕзкЗбеЦ=jзнбзе=fг~ЦЙл=
EjmbdQF
MPEG4 recording provides less visual quality than
MPEG2 recording. It is recommended when long
recording durations are needed. Since the file size is
much smaller than MPEG2, it’s ideal if the recording
needs to be sent as an E-mail attachment.
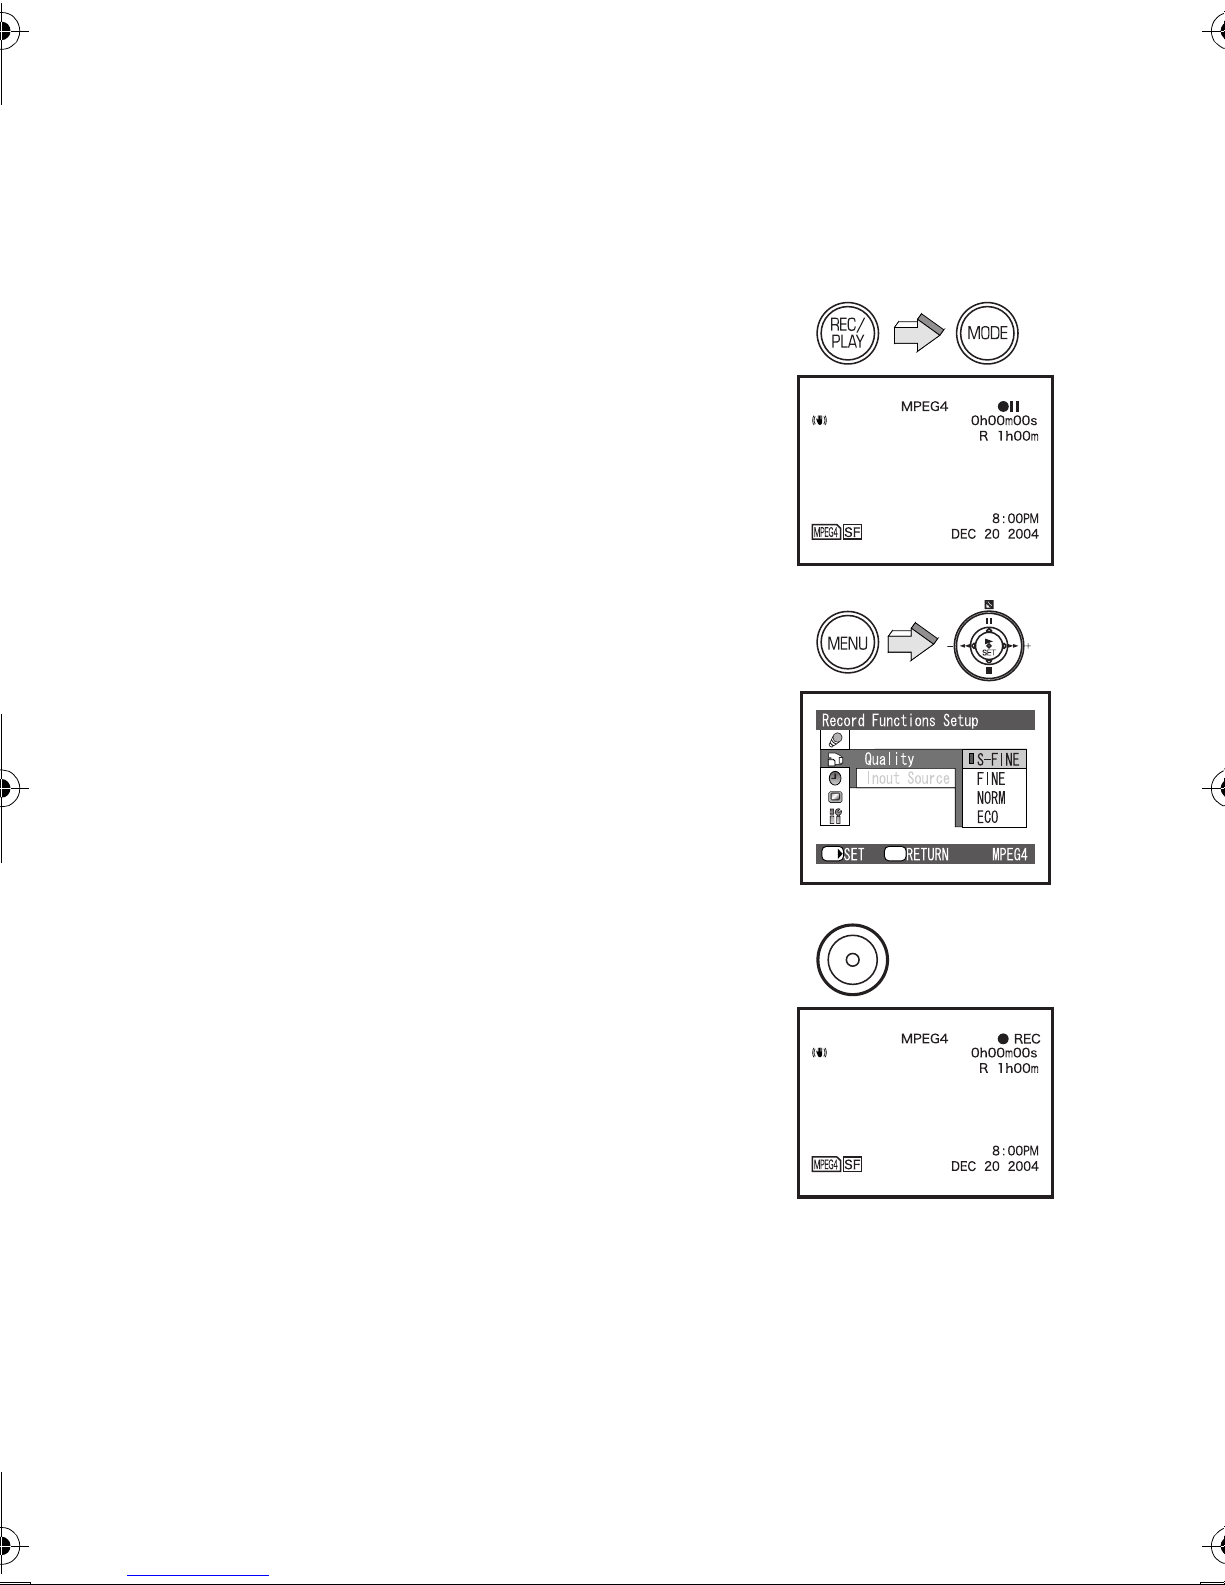
N Press the [REC/PLAY] Button to select
Recording Mode and set the operation
mode to [MPEG4].
O Press the [MENU] Button and set [Quality]
on [Record Functions Setup] to desired
picture quality and then press the
[1 SET] Button.
≥Select one of [S-FINE], [FINE], [NORM], or
[ECO].
[S-FINE]: Super high image quality 320 k 240
pixels, 15fps
[FINE]: High image quality 320 k 240 pixels,
12fps
[NORM]: Normal image quality 176 k 144 pixels,
12fps
[ECO]: Low image quality 176 k 144 pixels, 6fps
≥Press the [MENU] Button after completing the
setting.
N
O
SET/
Menu
P Press the Recording Start/Stop Button.
≥Recording starts and Recording Lamp lights up.
≥While recording the motion image, press the
Recording Start/Stop Button to stop recording.
≥The sounds recorded will be in monaural.
≥For other notes, see page 80.
P
OU
mд~убеЦ=_~Ев=jзнбзе=fг~ЦЙл=
EjmbdOF
Plays back motion images recorded on the Memory
Card.
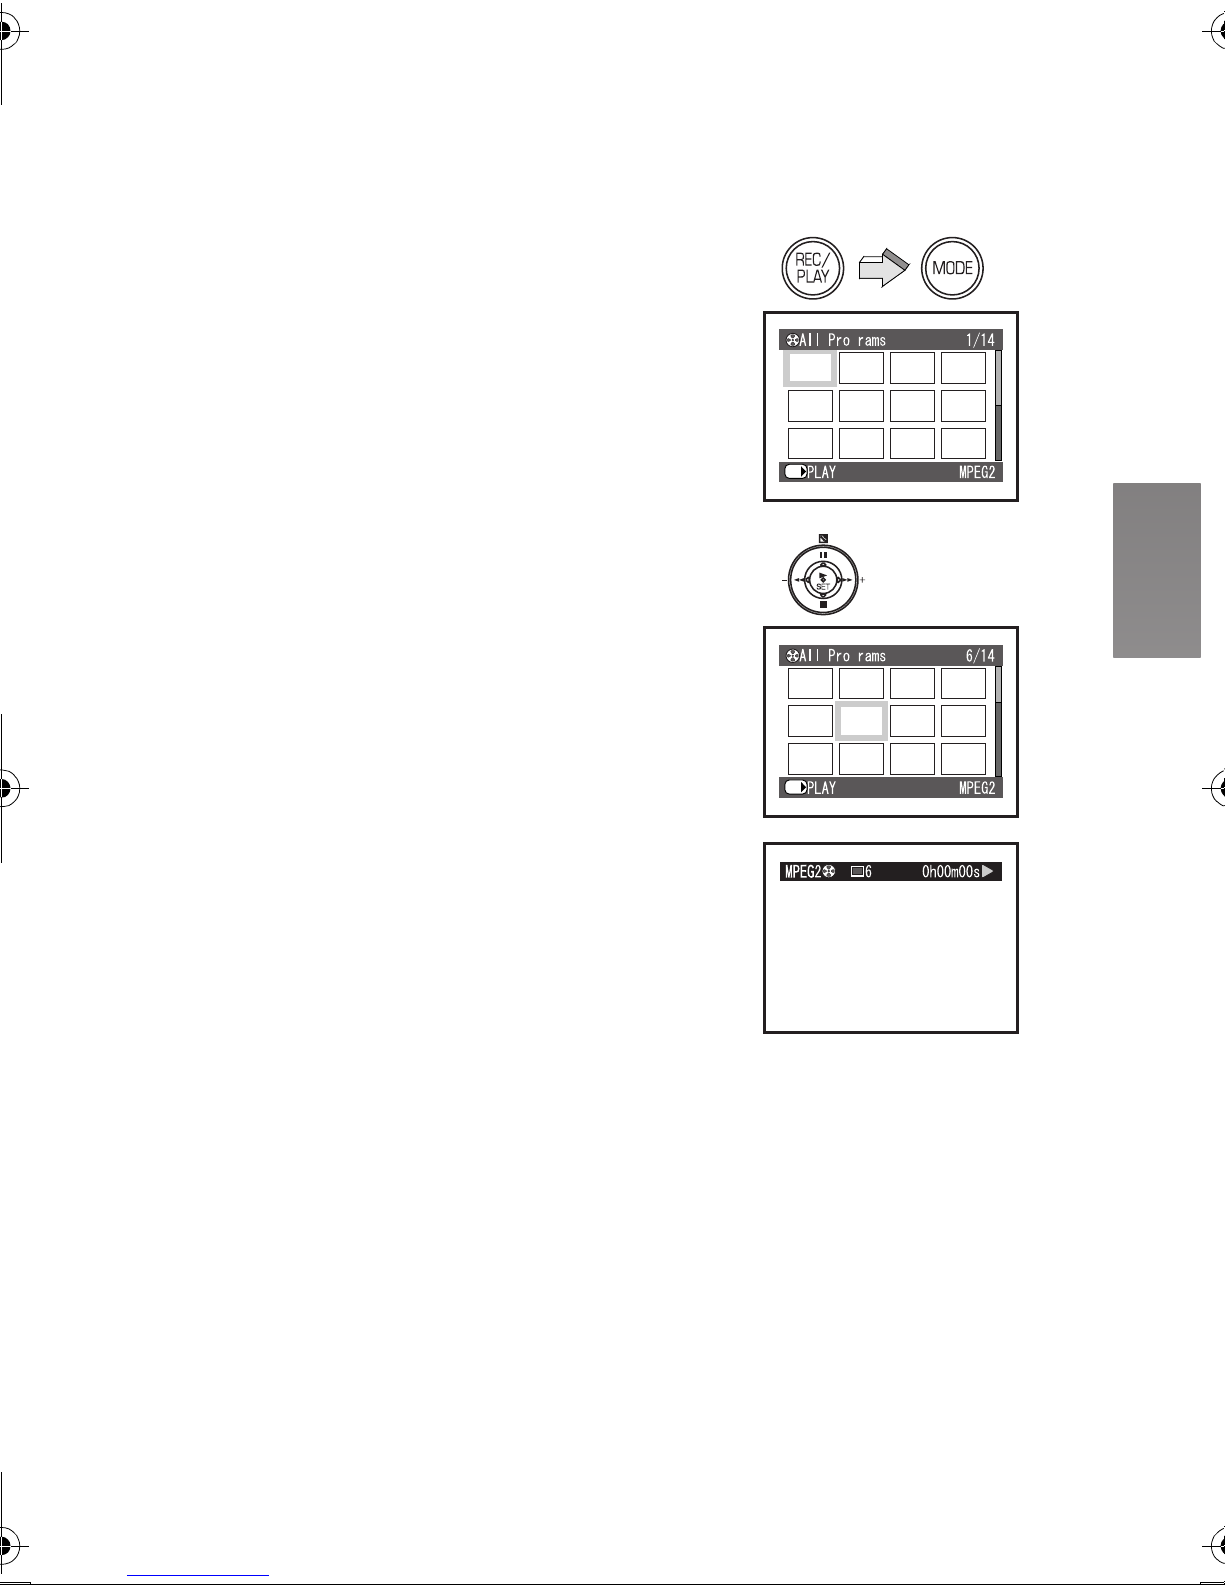
N Press the [REC/PLAY] Button to select
Playback Mode and set the operation
mode to [MPEG2].
≥Motion image files recorded on the Memory Card
are displayed in the index picture screen.
O Press the ;/∫/6/5 side of the
Multi-function Button to select a desired
file.
P Press the [1 SET] Button.
≥A motion image file is played back.
≥After playing back continuously from the selected
file to the last file, the display will pause at the
last scene of the last file.
ª Operation during Playback
[∫]: Stop (Reverts to the index picture
screen.)
[;]: Pause (Press during playing.)
[6], [5]: Finding the beginning of a file (Tap this
button.)
[6], [5]: Rewinding/fast forwarding (Press and
hold this button for more than 1
second.)
During pause
[6], [5]: Go back/advance one frame (Tap this
button.)
Go back: Playback at intervals of
0.5 seconds.
Advance: Playback at intervals of
0.03 seconds.
[6], [5]: Backward/forward Slow playback
(Press and hold this button for more
than 1 second.)
Backward: Playback at intervals of
0.5 seconds.
Forward: Playback at intervals of
0.03 seconds.
≥You cannot hear sounds other than normal playback.
≥For other notes, see page 80.
N
g
SET/
OIP
g
SET/
OV
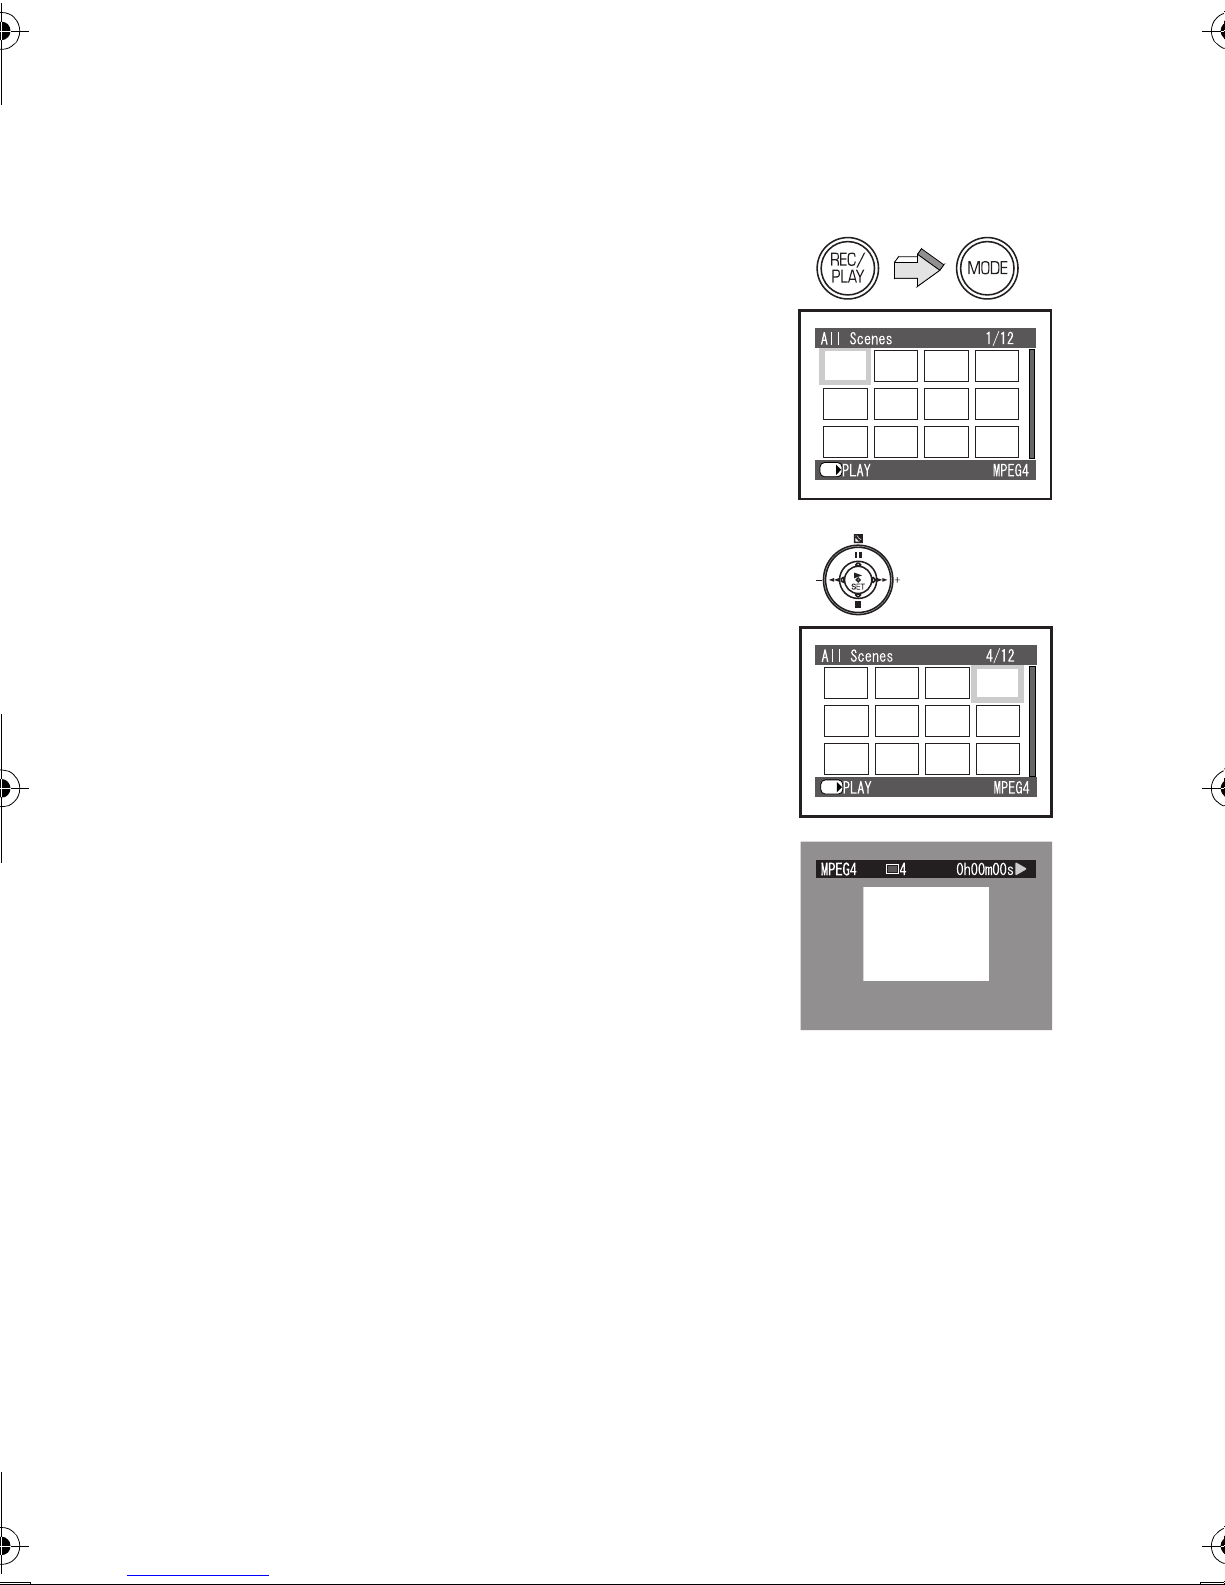
mд~убеЦ=_~Ев=jзнбзе=fг~ЦЙл=
EjmbdQF
Plays back motion images recorded on the Memory
Card.
N Press the [REC/PLAY] Button to select
Playback Mode and set the operation
mode to [MPEG4].
≥Motion image files recorded on the Memory Card
are displayed in the index picture screen.
O Press the ;/∫/6/5 side of the
Multi-function Button to select a desired
file.
P Press the [1 SET] Button.
≥A motion image file is played back.
≥After playing back continuously from the selected
file to the last file, the display will pause at the
last scene of the last file.
≥The size of a playback screen changes with recorded
quality of image.
ª Operation during Playback
[∫]: Stop (Reverts to the index picture
screen.)
[;]: Pause (Press during playing.)
[6], [5]: Finding the beginning of a file (Tap this
button.)
[6], [5]: Rewinding/fast forwarding (Press and
hold this button for more than 1
second.)
N
SET/
OIP
SET/
≥When you keep rewinding/fast forwarding, it
becomes the beginning of a file/next file and returns
to normal playback. If you continue rewinding/fast
forwarding again, press the [6]/[5] Button.
≥For other notes, see page 81.
PM
 Loading...