

Page 1
Teclmics
CD Stereo System
SC-CH750/950
Operating Instructions
Before operating this unit, piease read these instructions compieteiy.
[ffl
The photograph shows the SC-CH950 model.
CHOmU. AUDIO
RQT1783-L
(o1d§®
F1292P0
Page 2

Thank you for purchasing this product.
For optimum performance and safety, piease read
these instructions carefully.
These operating instructions are appiicabie to the following systems.
These operating instructions are appiicabie to models
SC-CH95d and SC-CH750.
These operating instructions, however, fundamentaliy
expiain the operation of model SC-CH950.
System
SC-CH950
SC-CH750
Sound processor Tuner amplifier
SH-CH950
SH-CH750 SA-CH750
SA-CH950
Table of Contents
Suggestions for Safety
Before Use
Concerning the Remote Control
Preparations
Front Panel Controls and Functions
Remote Control Unit Controls
and Functions..........................................................22
Basic Operating Procedure
Setting the Time of Day
Listening to Radio Broadcasts
Listening to Compact Discs
Listening to Tapes
Easy Play
.....................................................................
.................................................................
....................................................................
................................................
................................
.......................
......................................
.............................................
................................
.....................................
...........
...........................................37
14
24
25
26
30
41
Compact disc player
SL-CH950 RS-CH950 SB-CH950
SL-CH750
4
4
5
6
Making a Recording
Edit-Recording from Compact Discs
Changing the Tone ................................................. 53
Using the Dolby Pro-Logic Surround
(Only for model SC-CHOisO) .........................
Using the Timer..........................................................64
Enjoying the Microphone Mixing
Using an External Unit .............................................72
Concerning the Display............................................74
Care & Use ................................................................ 75
Troubleshooting Guide.............................................78
Technical Specifications
Cassette deck
RS-CH750
..................................................
..........................................
Speakers
SB-CH750
.....................
..............
.............
42
46
.61
70
80
Page 3

CAUTION!
THIS PRODUCT UTILIZES A LASER.
USE OF CONTROLS OR ADJUSTMENTS OR PER
FORMANCE OF PROCEDURES OTHER THAN THOSE
SPECIFIED HEREIN MAY RESULT IN HAZARDOUS
RADIATION EXPOSURE.
(Back of product)
DANGERInviiiMi
laser radwtiontMhen
AVOID DIRECT EX
POSURE TO BEAM.
(Inside of product)
THIS TUNER/RECEIVER IS CAPABLE OF RECEIVING THE NEW AM STEREO BROADCASTS FROM THE AM BAND
RADIO STATIONS. HOWEVER LIKE MANY TUNERS AND RECEIVERS CURRENTLY AVAILABLE ON THE MARKET
IT WILL REPRODUCE THIS AM STEREO SIGNAL ONLY IN AM MONO, WHICH, IN EFFECT, IS OF NO LESSER
QUALITY THAN YOUR EXISTING AM MONO TUNER/RECEIVER.
DO NOT OPEN COVERS AND DO NOT REPAIR YOUR
SELF. REFER SERVICING TO QUALIFIED PERSONNEL.
3
Page 4

■ Use a standard AC wall outlet
1. Use from an AC power source of high voltage, such as that
used for an air conditioner, is very dangerous.
A fire might be caused by such a connection:
2. A DC power source cannot be used.
Be sure to chec^ the power source carefully, especially on a
ship or other placé where DC is used.
■ Grasp the plug when disconnecting the power
supply cord
1. Wet hands are dangerous.
A dangerous electric shock may result if the plug is touched by
wet hands.
2. Never place heavy items on top of the power suppiy cord,
nor force It to bend sharply.
■ Place the unit where it will be well ventilated
Place this unit at least 10 cm (4") away from wall surfaces, etc.
Be careful that curtains and similar materials do not obstruct the
ventilation holes.
■ Avoid places such as the following:
In direct sunlight or in other places where the temperature is
high.
In places where there is excessive vibration or humidity.
Such conditions might damage the cabinet and/or other component
parts and thereby shorten the unit’s service life.
■ Be sure to place the unit on a flat, level surface.
If the surface is inclined, a malfunction may result.
■ Never attempt to repair nor reconstruct this
urilt
A serious electric shock might occur if this unit is repaired, dis
assembled or reconstructed by unauthorized persons, or if the
internal parts are accidentally touched.
■ Take particular care if children are present
Never permit children to put anything, especially metal, inside this
unit. A serious electric shock or malfunction could occur if articles
such as coins, needles, screwdrivers, etc. are inserted through the
ventilation holes, etc. of this unit.
■ If water is spilled on the unit
Be extremely careful if water is spilled on the unit, because a fire or
serious electric shock might occur. Immediately disconnect the
power cord plug, and consult with your dealer.
■ Avoid spray-type insecticides
Insecticides might cause cracks or “cloudiness” in the cabinet and
plastic parts of this unit. The gas used in such sprays might,
moreover, be ignited suddenly.
■ Never use aicohol or paint thinner
These and similar chemicals should never be used, because they
might cause flaking or cloudiness of the cabinet finish.
■ Disconnect the power supply cord if the unit
will not be used for a long time
If the unit is left for a long time with the power ON, this not only will
shorten its useful operation life, but also may cause other trouble.
Before Use
(For the areas except for Australia and New Zealand)
Be sure to disconnect the mains cord before adjusting the voltage
selector.
Use a minus (-) screwdriver to set the voltage selector (on the
bottom of the tuner amplifier) to the voltage setting for the area in
which the unit will be used.
■ If trouble occurs
If, during operation, the sound is interrupted or indicators no longer
illuminate, or if an abnormal odour or stTK>ke is detected, im
mediately disconnect the power cord plug, and contact with your
dealer or an Authorized Service Center.
(If the power supply in your area is 117 V or 120 V, set to the
“127 V" position.)
Note that this unit will be seriously damaged if this setting is not
made correctly. (There is no voltage selector for some countries;
the correct voltage is already set.)
Page 5
Goncerning the Remote Control
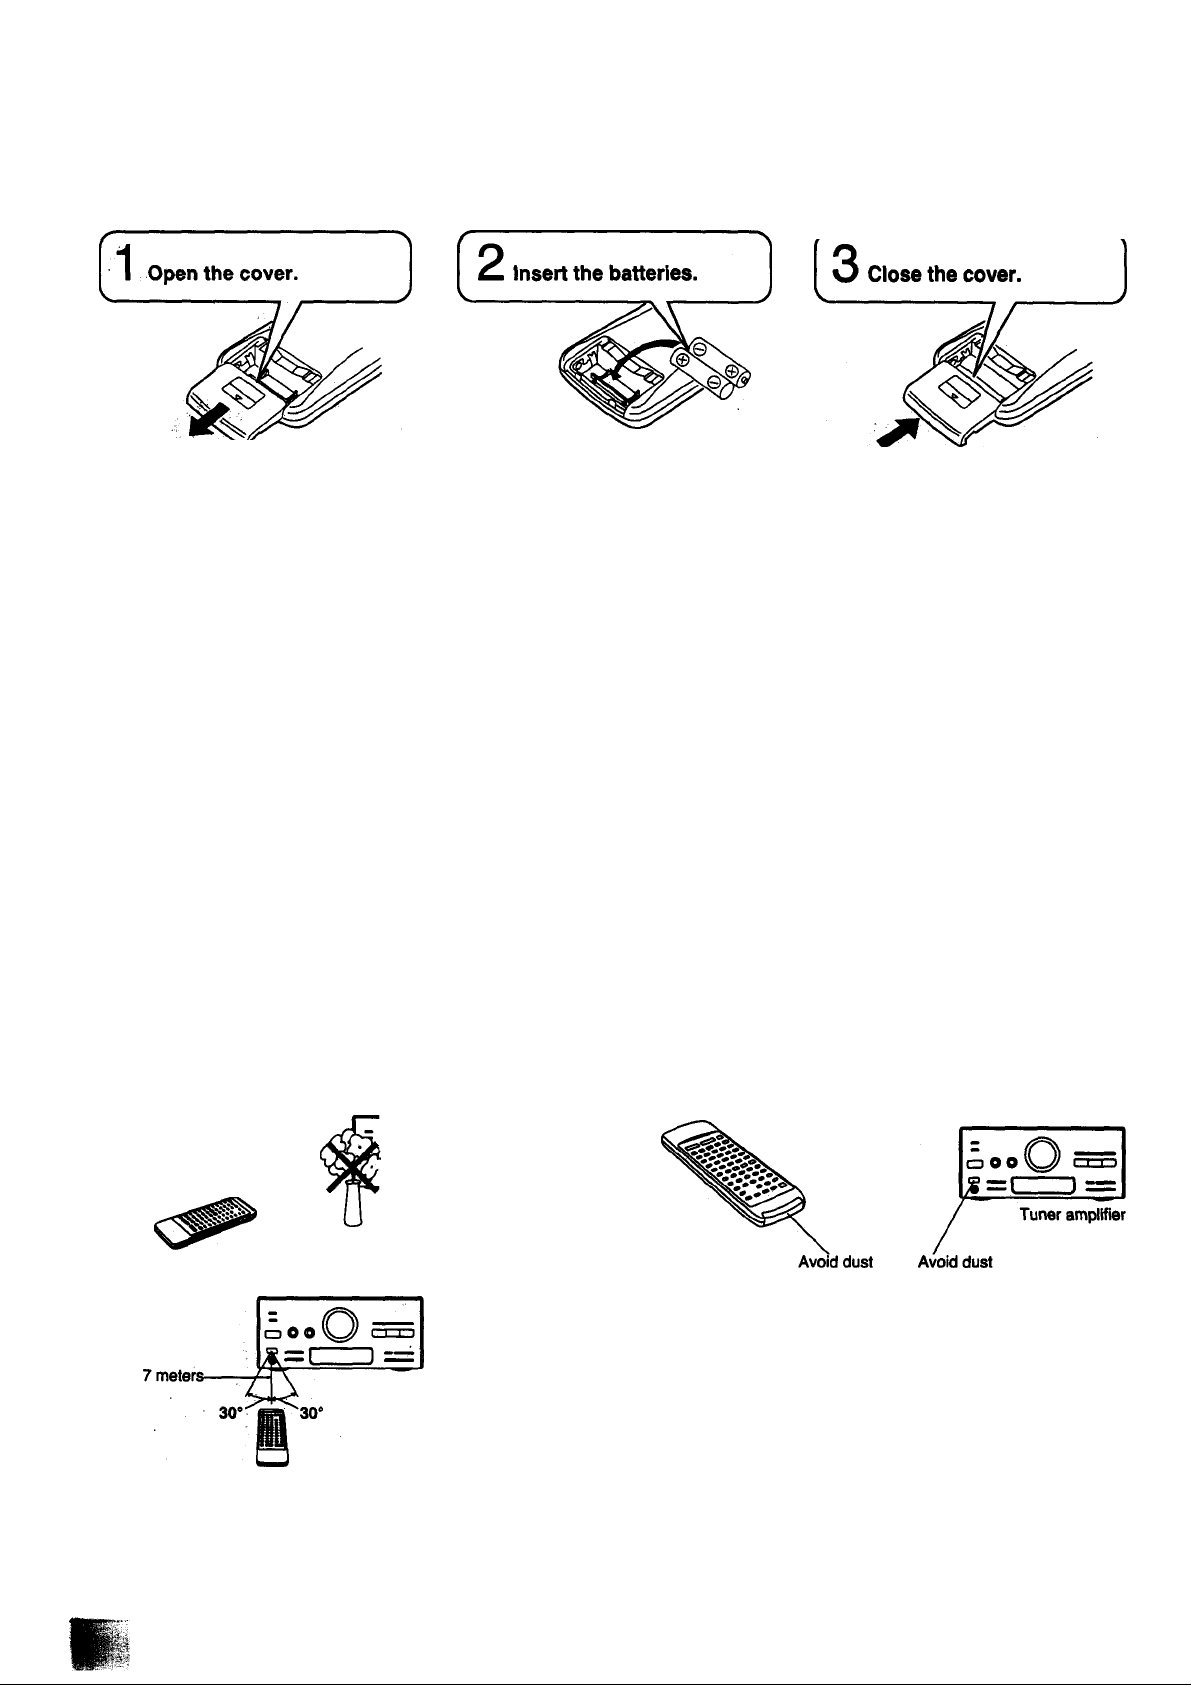
Battery installation
%
1 Open the cover.
Press gently and slide the cover out.
Insert the batteries included with this system.
When you need to replace these batteries, use two UM-4
“AAA”, lEC R03 (1.5 V) or equivalent batteries.
Use of batteries
Be sure that you insert the batteries so that their positive (+)
and negative (-) polarities match the polarities indicated in the
compartment. Batteries installed incorrectly may leak and
cause damage.
Refer to “Use of batteries” below for additional information.
3 Close the cover.
Do not mix old and new batteries or batteries of different types
(carbon and alkaline, etc.).
The average battery life is about one year. Although the battery life
varies depending on how often the device is used, you should
generally replace the batteries about once a year.
Replace the batteries if commands from the remote control trans
mitter do not operate the unit even when the transmitter is held
close to the front panel.
Never subject batteries to excessive heat or flame; do not attempt
to disassemble them; and be sure they are not short-circuited.
If you will not be using the remote control for a long period of time,
remove the batteries and store them in a cool, dark place.
Operation notes
oo
Tuner amplifier
Aim the remote control's transmission window toward the tuner
amplifier's sensor. Avoid any obstacles.
If a battery leaks, remove all batteries and dispose of them properly.
Thoroughly clean the battery compartment before inserting new
batteries.
If the leaking electrolyte comes into contact with skin or clothes,
flush with water immediately.
Keep batteries out of reach of children.
Do not use rechargeable-type (nickel-cadmium) batteries.
Do not attempt to recharge alkaline or carbon batteries.
Always remove old, weak, or worn-out batteries promptly and dis
pose of them properly.
Do not dispose of used batteries in household rubbish.
Be sure the transmission window and the tuner amplifier's sensor
are free from dust. Excessive dust might prevent reception.
Tuner amplifier
Use the remote control within a 60 degree angle from the tuner
amplifier.
The reachable distance is within 7 meters directly facing toward the
tuner amplifier.
If direct sunlight or other strong light source strikes the remote
control signal sensor part of the tuner amplifier, it may impair the
remote control's operation. If there is a problem, place the tuner
amplifier away from the light source.
If this system is installed in a rack with glass doors, the glass doors'
thickness or color might make it necessary to use the remote
control a shorter distance from the system.
C
V
Page 6
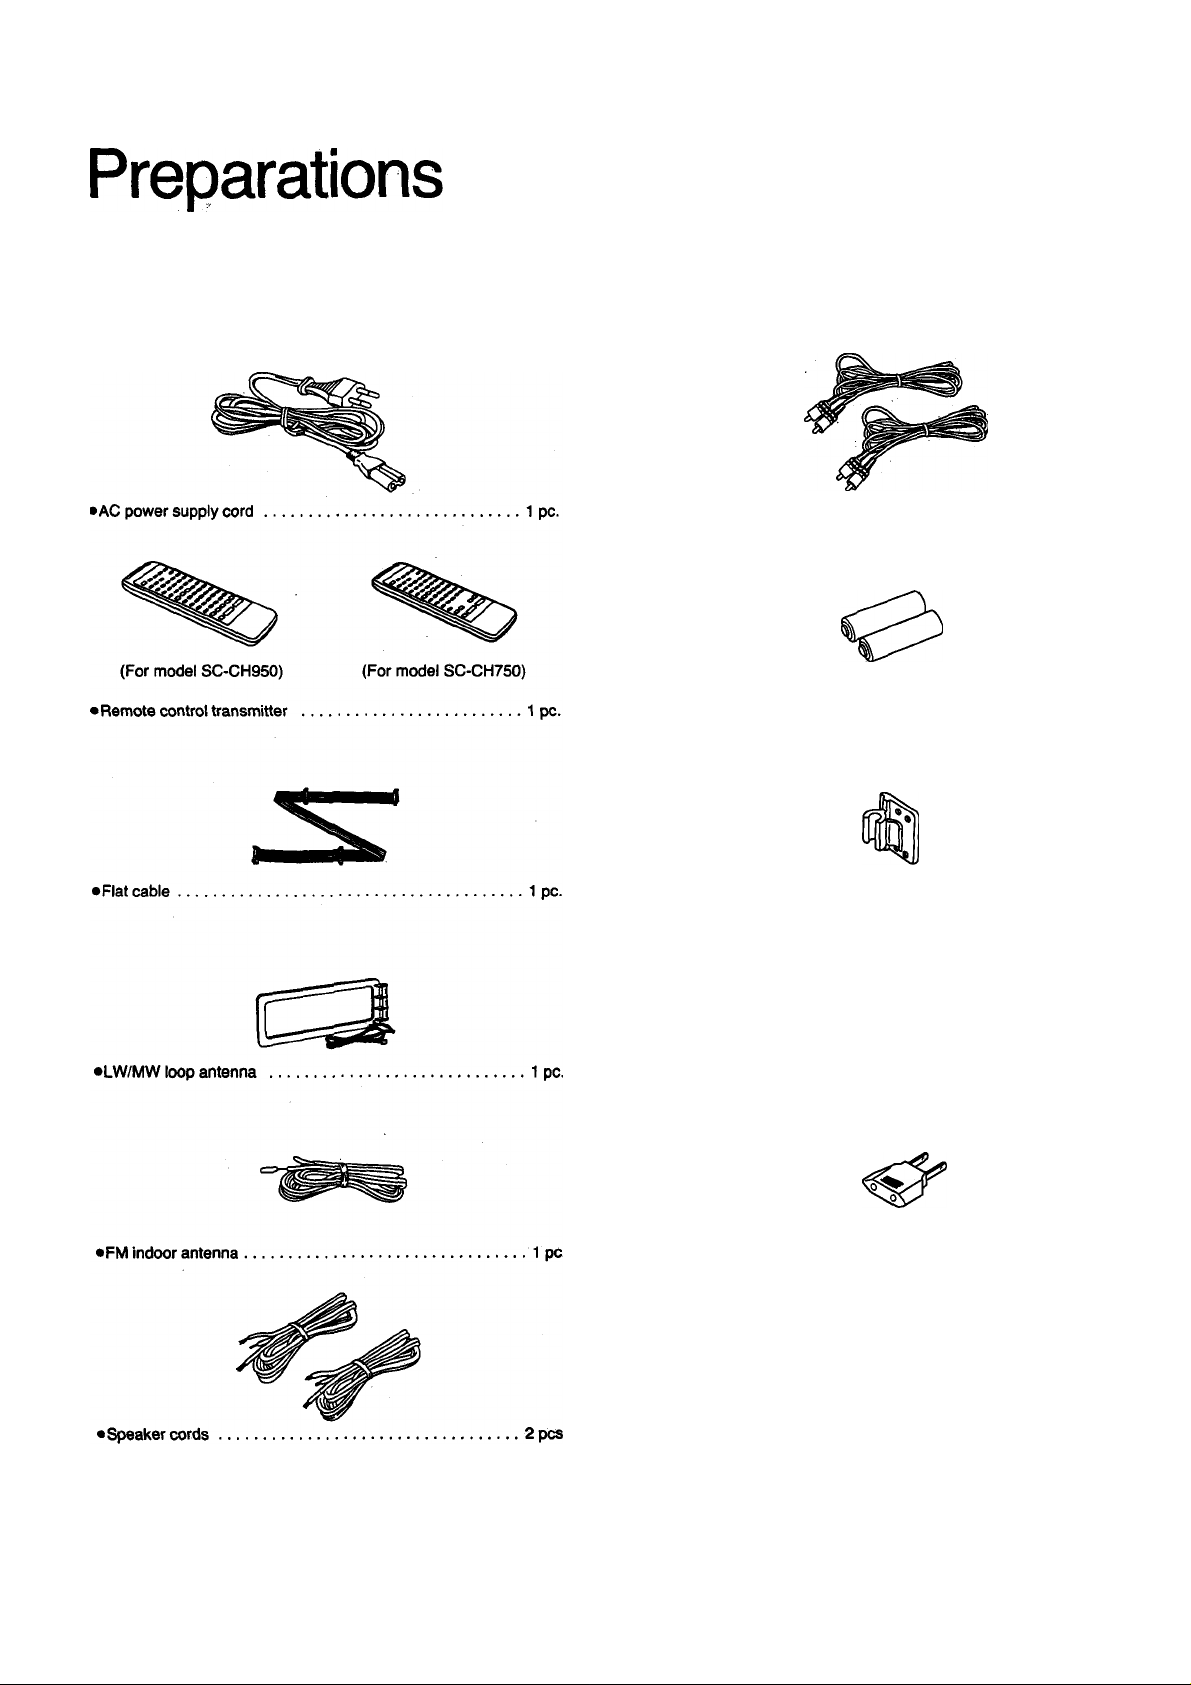
Supplied accessories
Check the packing carton for these accessories.
•Surround speaker cords
•Remote control batteries
UM-4, AAA, R03............
•Antenna holder...............................................................1 pc.
•Mounting screws...........................................................2 pcs.
...............................................
2 pcs.
.2 pcs.
• Power plug adaptor
(For areas except Australia, New Zealand)
Note:
The configurations of AC power suppiy cord differ according to
area.
.............
....................................... 1 pc.
5
Page 7
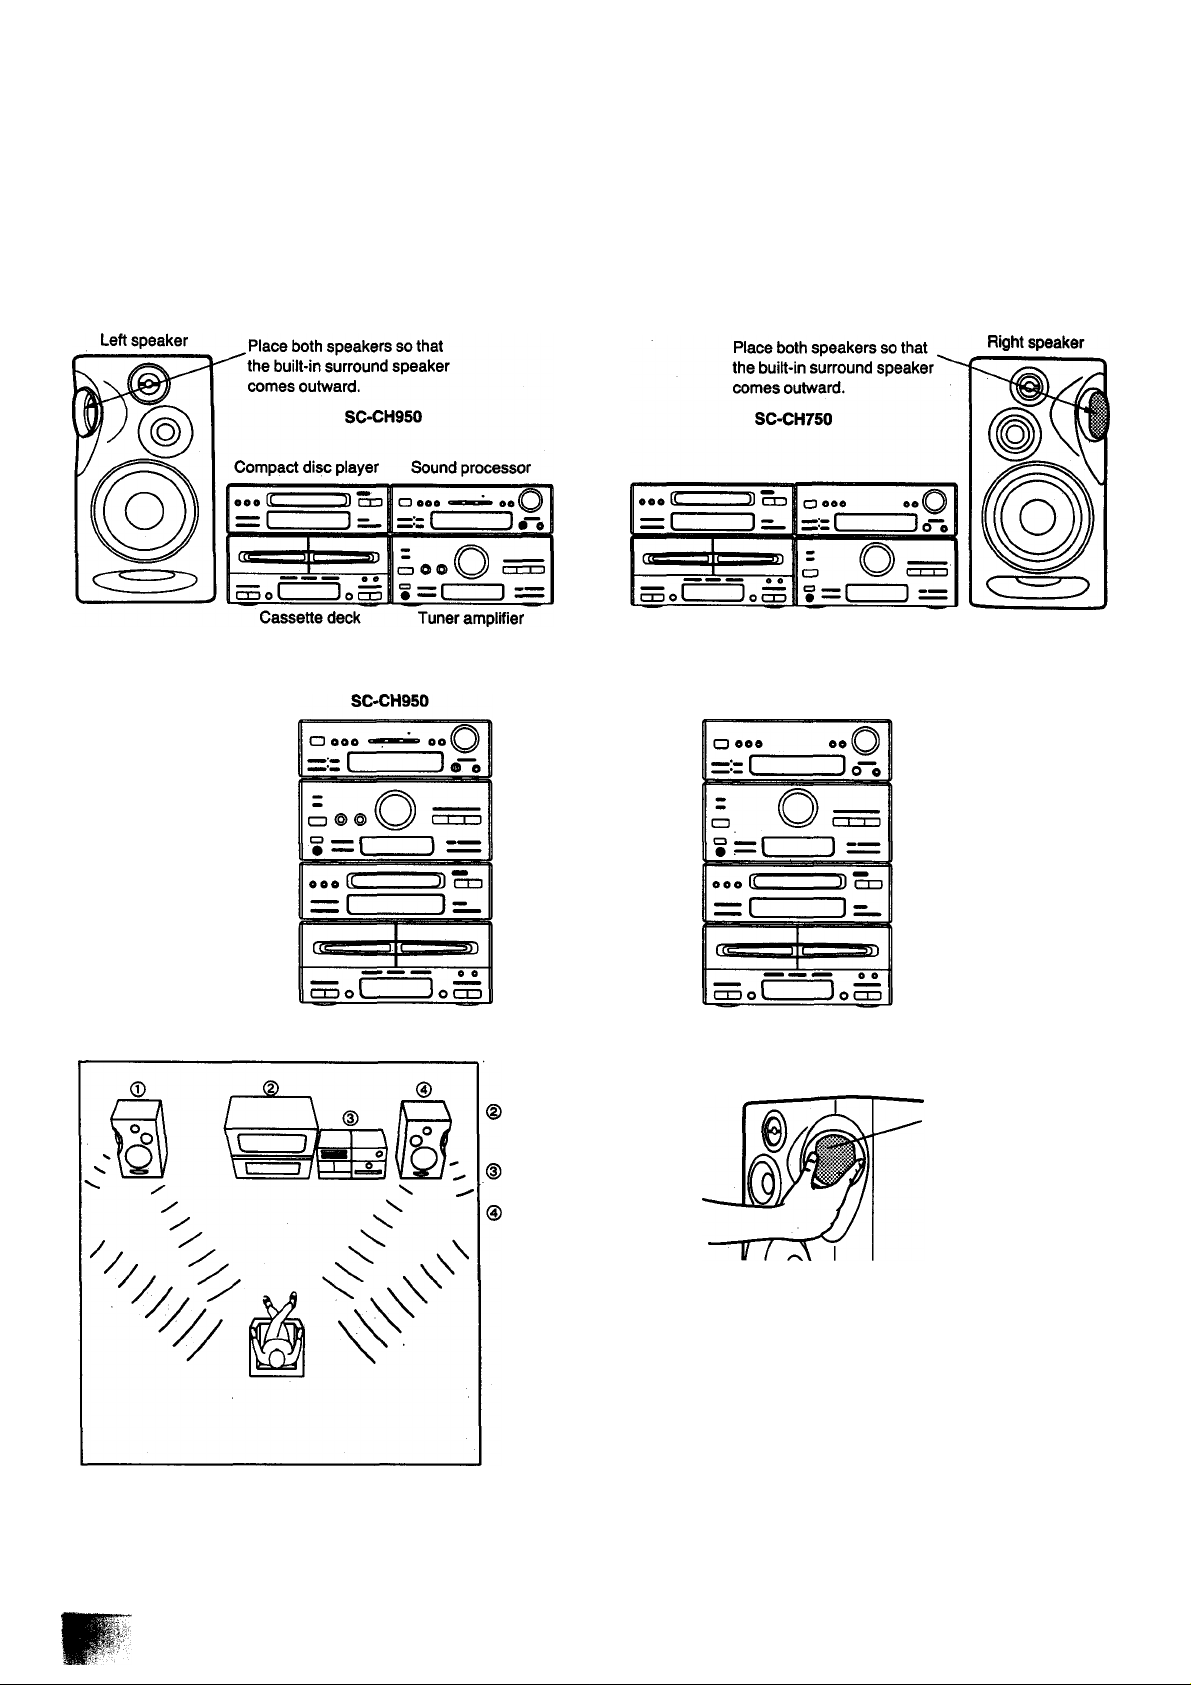
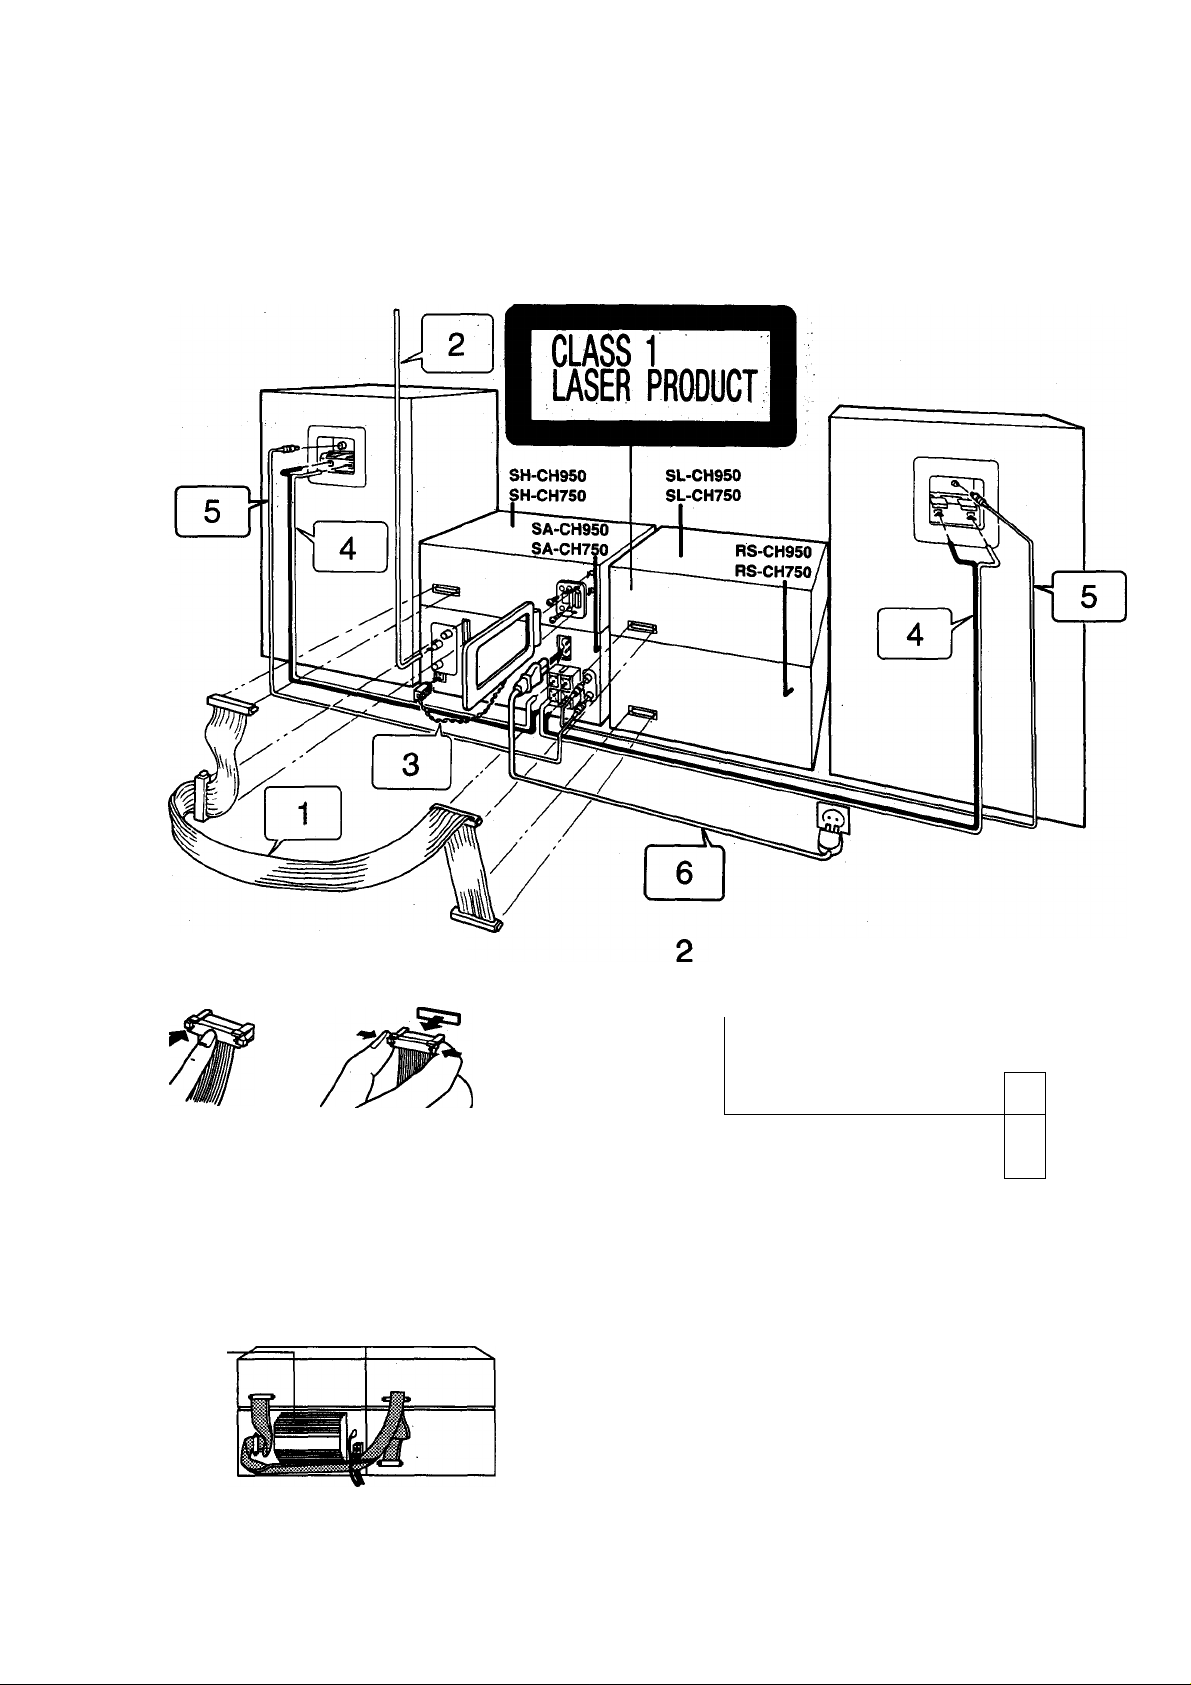
stacking the components
Install the various components as shown below.
■ Horizontal stacking
Vertical stacking
SC-CH750
Sound processor
System layout
Tuner amplifier
Compact disc player
Cassette deck
© Left speaker
Television set
(not included)
(For model SC-CH750):
■ Built-in surround sound
speaker
When you select the SFP mode, you can get the surround sound
effect.
Install the speakers as illustrated left, and adjust the angle of the
built-in surround speakers as you like.
To produce a better stereo sound, install both speakers away from
the system.
This speaker system has built-in surround speaker, so you can
easily enjoy the surround sound.
Page 8
Preparations
Connections
(continued)
1 Connect the flat cable.
Connecting Disconnecting
Hold the connector with the recessed part up and press in at
the center until you hear a click.
First connect the blue-colored connector to the terminal of the
sound processor (A), then connect the rest in the order B, C,
D.
Route the cable horizontally (underneath the heat outlet grille)
so that the side with the white-color lead is positioned at the
front.
After connection, fold and press the cable as flat to the back of
the unit as possible.
Heat outlet grille
Do not try connecting or disconnecting the fiat cabie
while the power is switched to ON.
Connect the FM indoor antenna.
Install the antenna on a wall at a height and in a direction
which result in the best reception.
1—Adhesive tape
-—FM indoor antenna
(included)
The tip of the internal antenna wire should not come into
contact with any metal objects.
When you cannot get a good reception with this FM indoor
antenna, we recommend you install an FM outdoor antenna
(not included. See page 10). Disconnect the FM indoor an
tenna if you install an FM outdoor antenna.
FM ANT
o
75Q
[m
Page 9
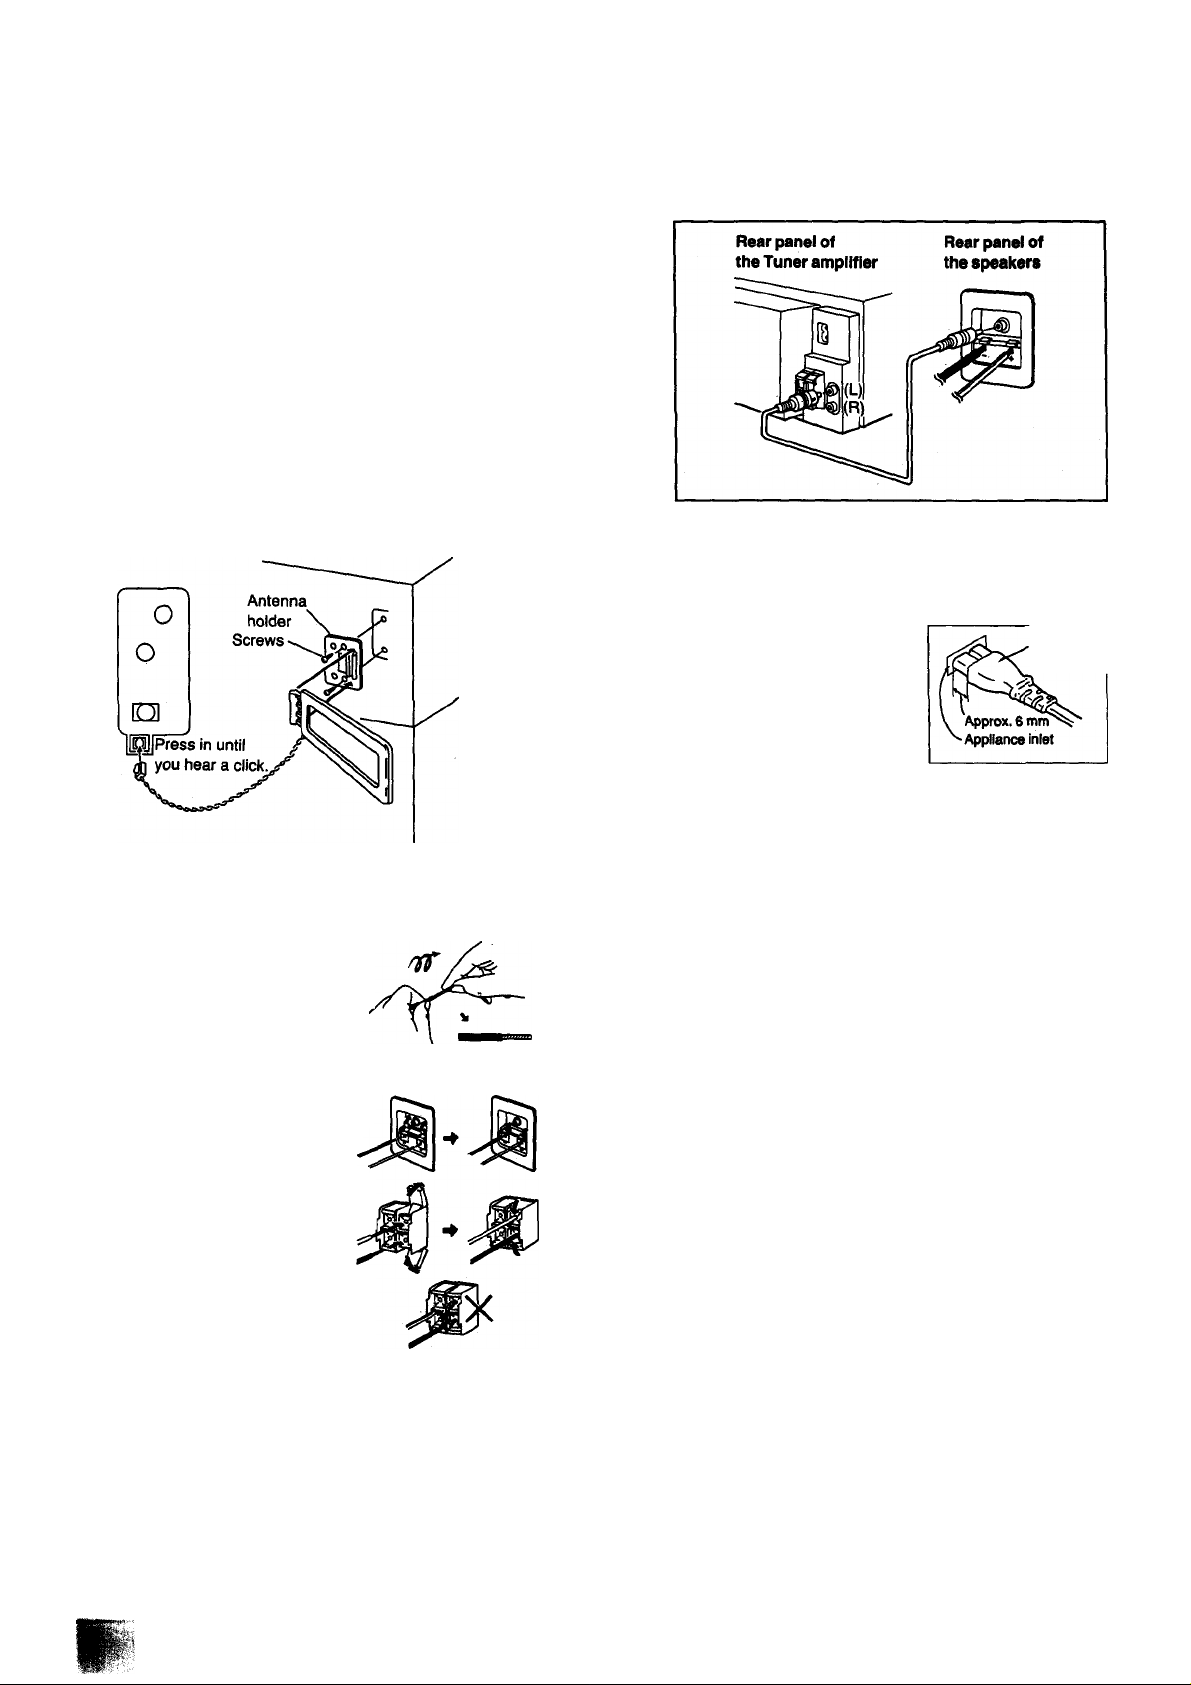
Connect the LW/MW loop antenna.
1. Attach the antenna holder with screws (included) to the rear
panel of the sound processor.
2. Clamp the antenna to the antenna holder and connect the
antenna terminal to the rear panel of the tuner amplifier.
3. Position the loop for the best reception.
You may attach the LW/MW antenna holder to a rack or other
structure.
Notes:
•To minimize noise pickup, keep the LW/MW loop antenna
away from the speaker cable, power cord, and metal sur
faces.
•For better reception, keep the LW/MW loop antenna cord
along the heat prevention cover, and away from the flat
cable.
5 Connect the surround speaker cord.
Connect the AC power supply cord after you have connected all other cables and cords.
For areas except Australia, New Zealand
Insertion of Connector
Even when the connector is per
fectly inserted, depending on the
type of inlet used, the front part of
the connector may jut out as
shown in the drawing.
However there is no problem
using the unit.
Connector
4 Connect the speaker cables.
Connection of speaker cables
1. Strip off the outer covering, and
twist the center conductor.
Make sure the bare ends of the wires are not unraveled.
(If they are, twist them tight again.)
2. insert the wire to the rear panel
of the speakers, and then pull
down the lever.
3. Insert the wire to the rear panel
of the tuner amplifier, and closej
the lever.
Notes:
•To prevent damage to circuitry,
never short-circuit positive {+)
and negative (-) speaker wires.
•Be sure to connect only positive (red) wires to positive
(-«-) terminals and negative (black) wires to negative
(-) terminals.
For areas except Australia, New Zealand
If the power plug will not fit your socket, use the power
plug adaptor (included).
Et
Note:
•Be sure to connect speaker cables before connecting the AC
power supply cord.
Page 10
Preparations
Connections (continued)
(continued)
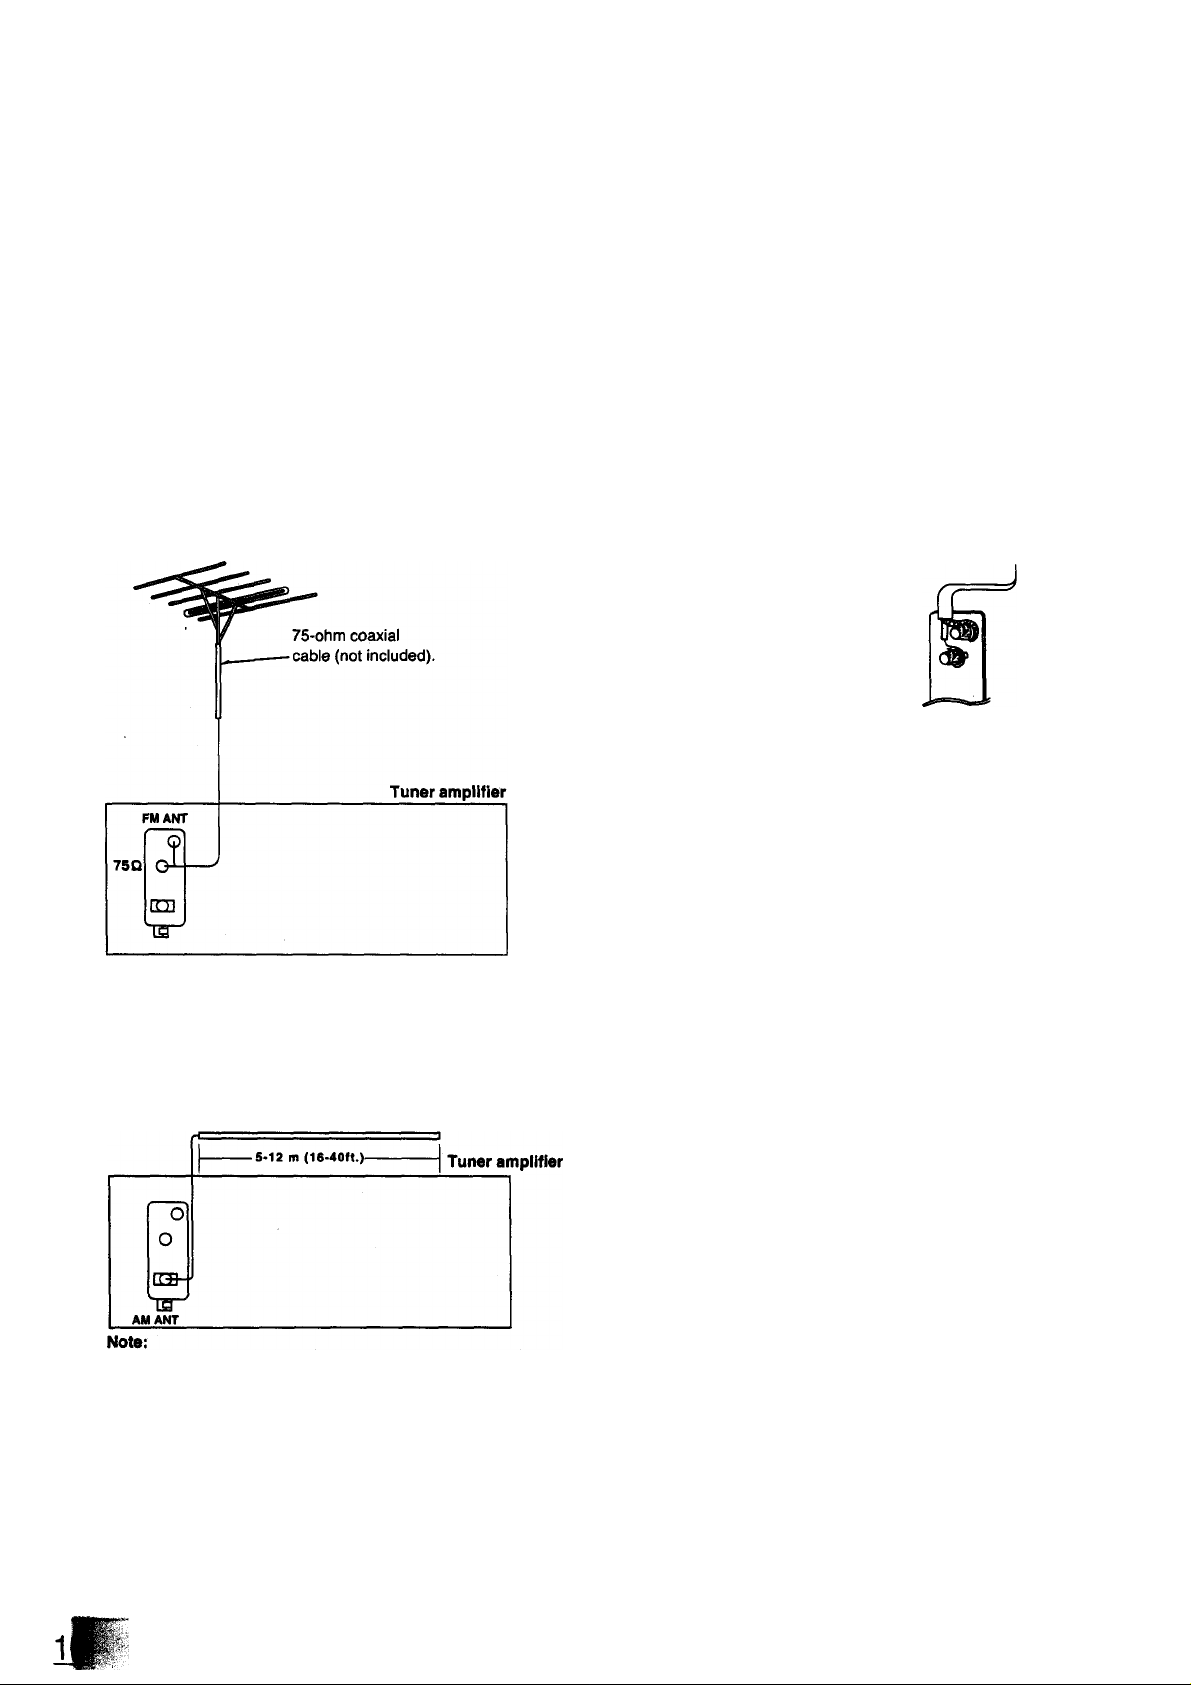
■ Optional antenna connections FM outdoor antenna (not included)
It the FM indoor antenna does not provide satisfactory reception of
FM broadcasts, use an outdoor antenna.
You may need an outdoor antenna if you use this system in a
mountainous region or inside a reinforced-concrete building, etc.
An outdoor antenna should be installed by a competent technician
only.
FM outdoor antenna
How to connect 75-ohm coaxial cable (not Included)
(FM outdoor antenna)
1. Remove a piece of
the outer vinyl sheath rfrom the end of the cable.
2. Bundle the shield braid,
and remove a piece
of the inner vinyl sheath
covering the core wire.
3. Connect the core wire
and the shield braid.
30 mm
— 15 mm
LW/MW outdoor antenna (not included)
An outdoor antenna may be required in a mountainous region, or if
this system is located inside a reinforced-concrete building, etc.
Run 5 to 12 m of vinyl-covered wire horizontally along a window or
other convenient location.
Do not remove the LW/MW loop antenna.
Page 11
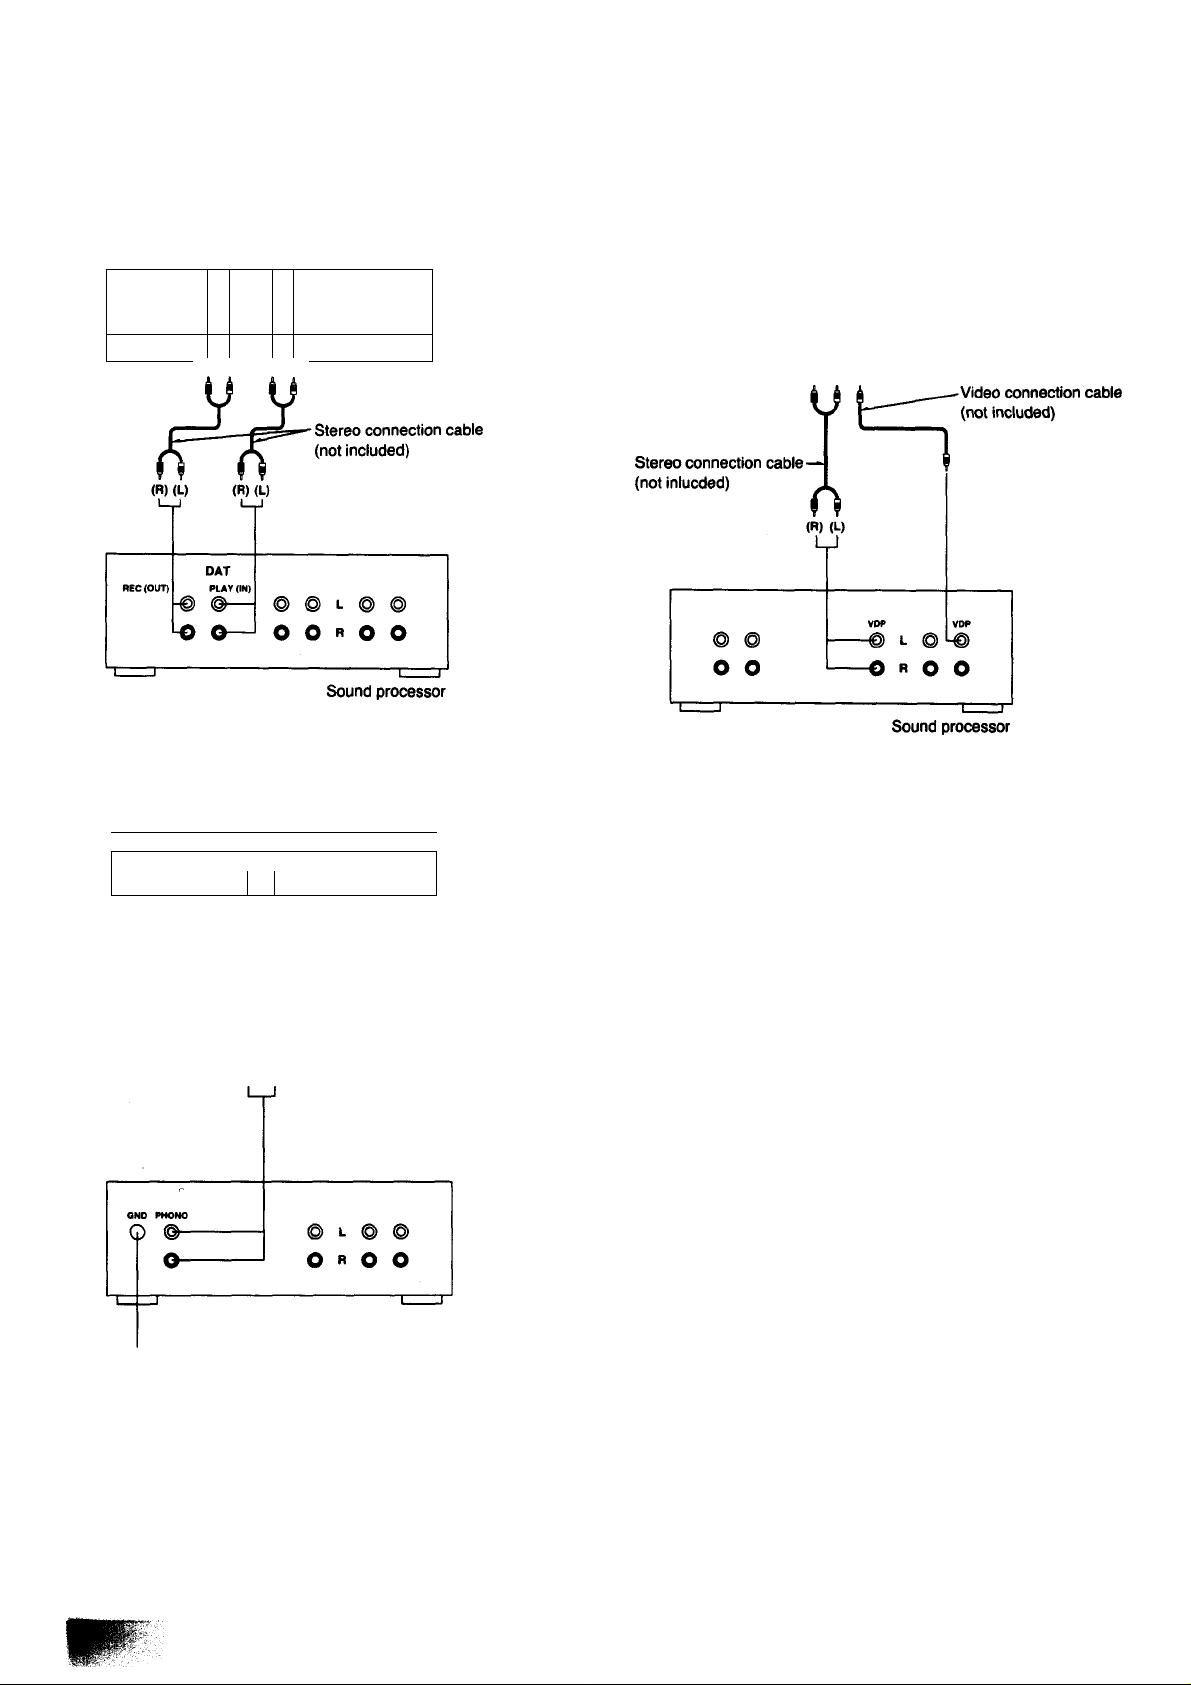
■ External unit connection DAT (digital audio tape deck)
DAT (not included)
ANALOG *
'
-------
'
4PU
» C
(R) (L) (R) (L)
T 01
) <
JTP
> cUT)
Analog player
Analog player (not Included)
z
___________________
OUTPUT
(
p
> (j
Video disc piayer
Video disc player (not included)
Mino VtOEO
OUTPUT OUTPUT
1
___
1
[pool
<R) (L)
Note:
When using the microphone, please refer to the page 71.
\
(R) (L)
k i
L-— Stereo connection cable
jr (not included)
f f
(R) (L)
Sound processor
“GND" terminal
This terminal is for a ground wire use.
11
Page 12
Preparations
Connections (continued)
■ External unit connection (continued)
(continued)
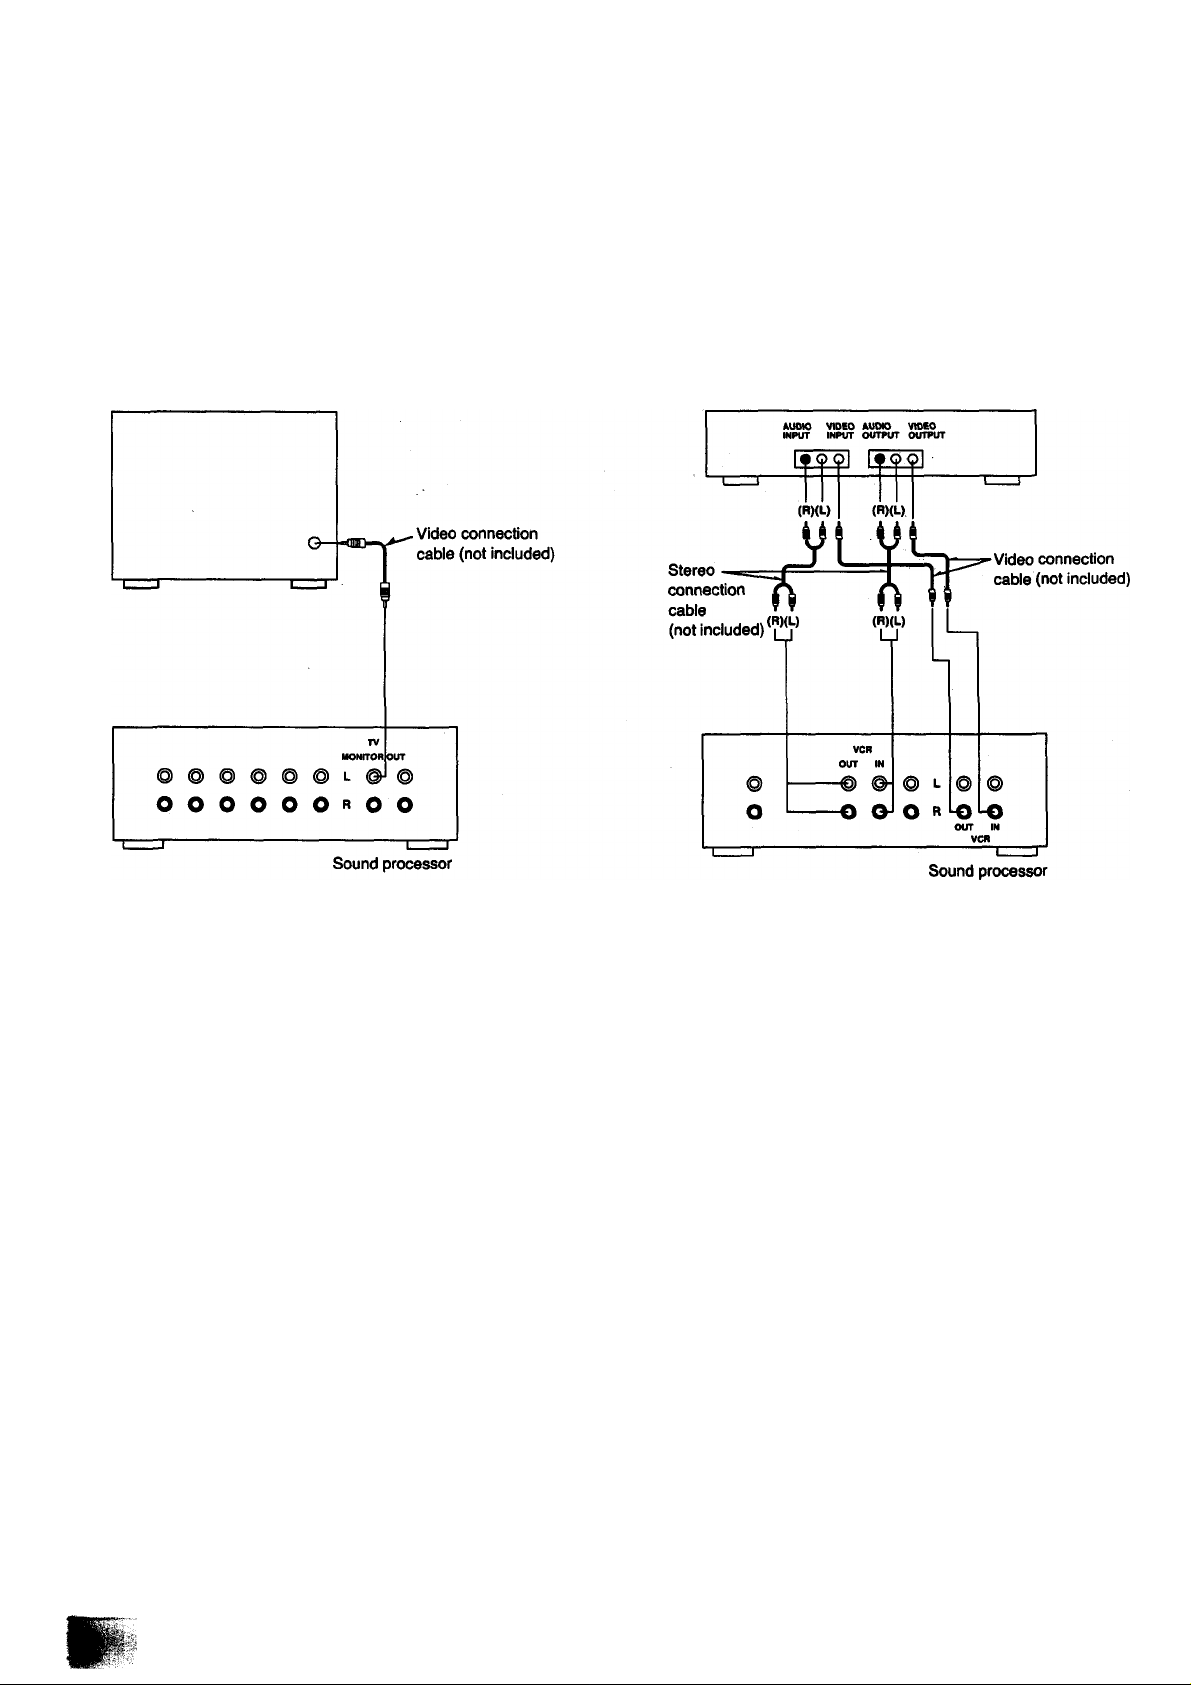
Television
Television set (not included)
Video deck
Hi-Fi video deck (not included)
When you use a monaural video deck, connect It with monaural
video connection cable.
Page 13
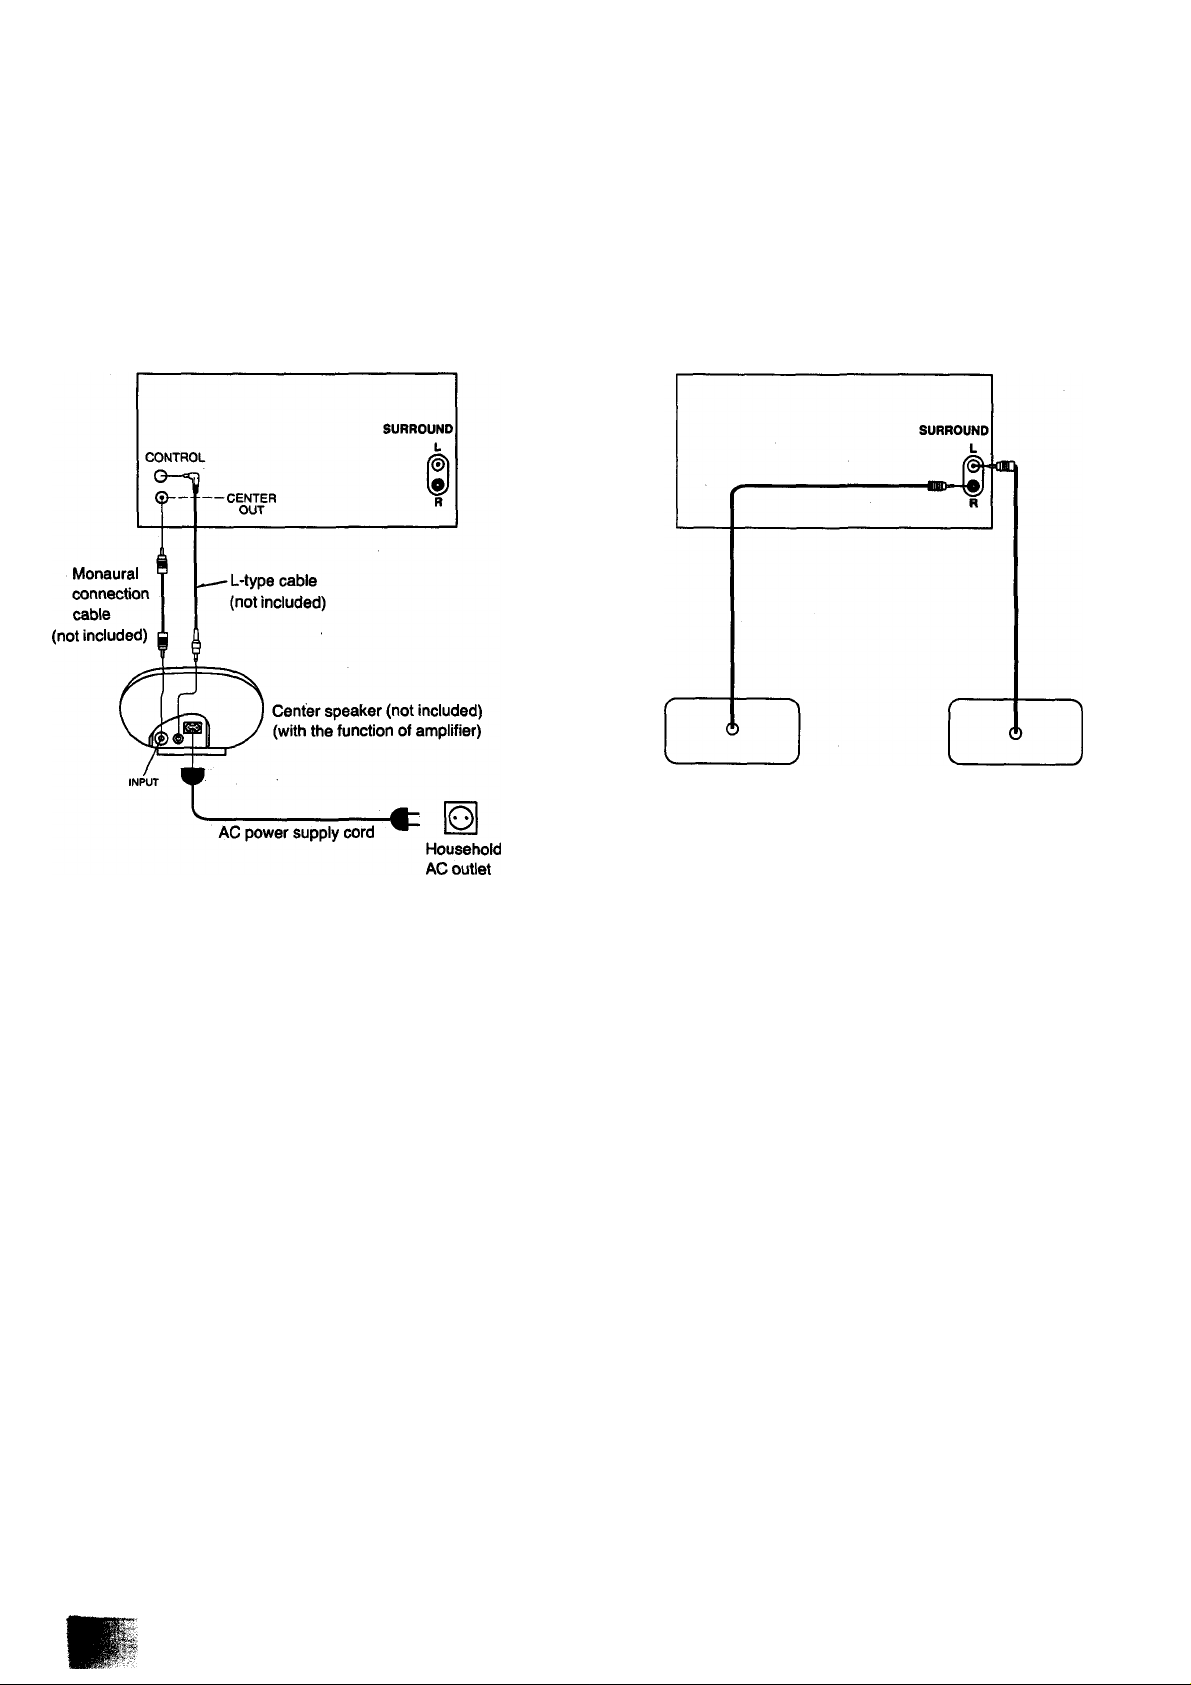
Center speaker (Only for model SC-CH950)
Surround speaker
Tuner amplifier
Note:
When you use a center speaker which has not a built-in amplifier,
connect it to an another amplifier.
Tuner amplifier
Right speaker
(not included)
Notes:
•Install each speaker left and right at the back of the listening
space.
•Disconnect the surround speaker cords provided for model (see
step 5 on page 9) when connecting the optional surround speaker
system.
Left speaker
(not included)
13
Page 14
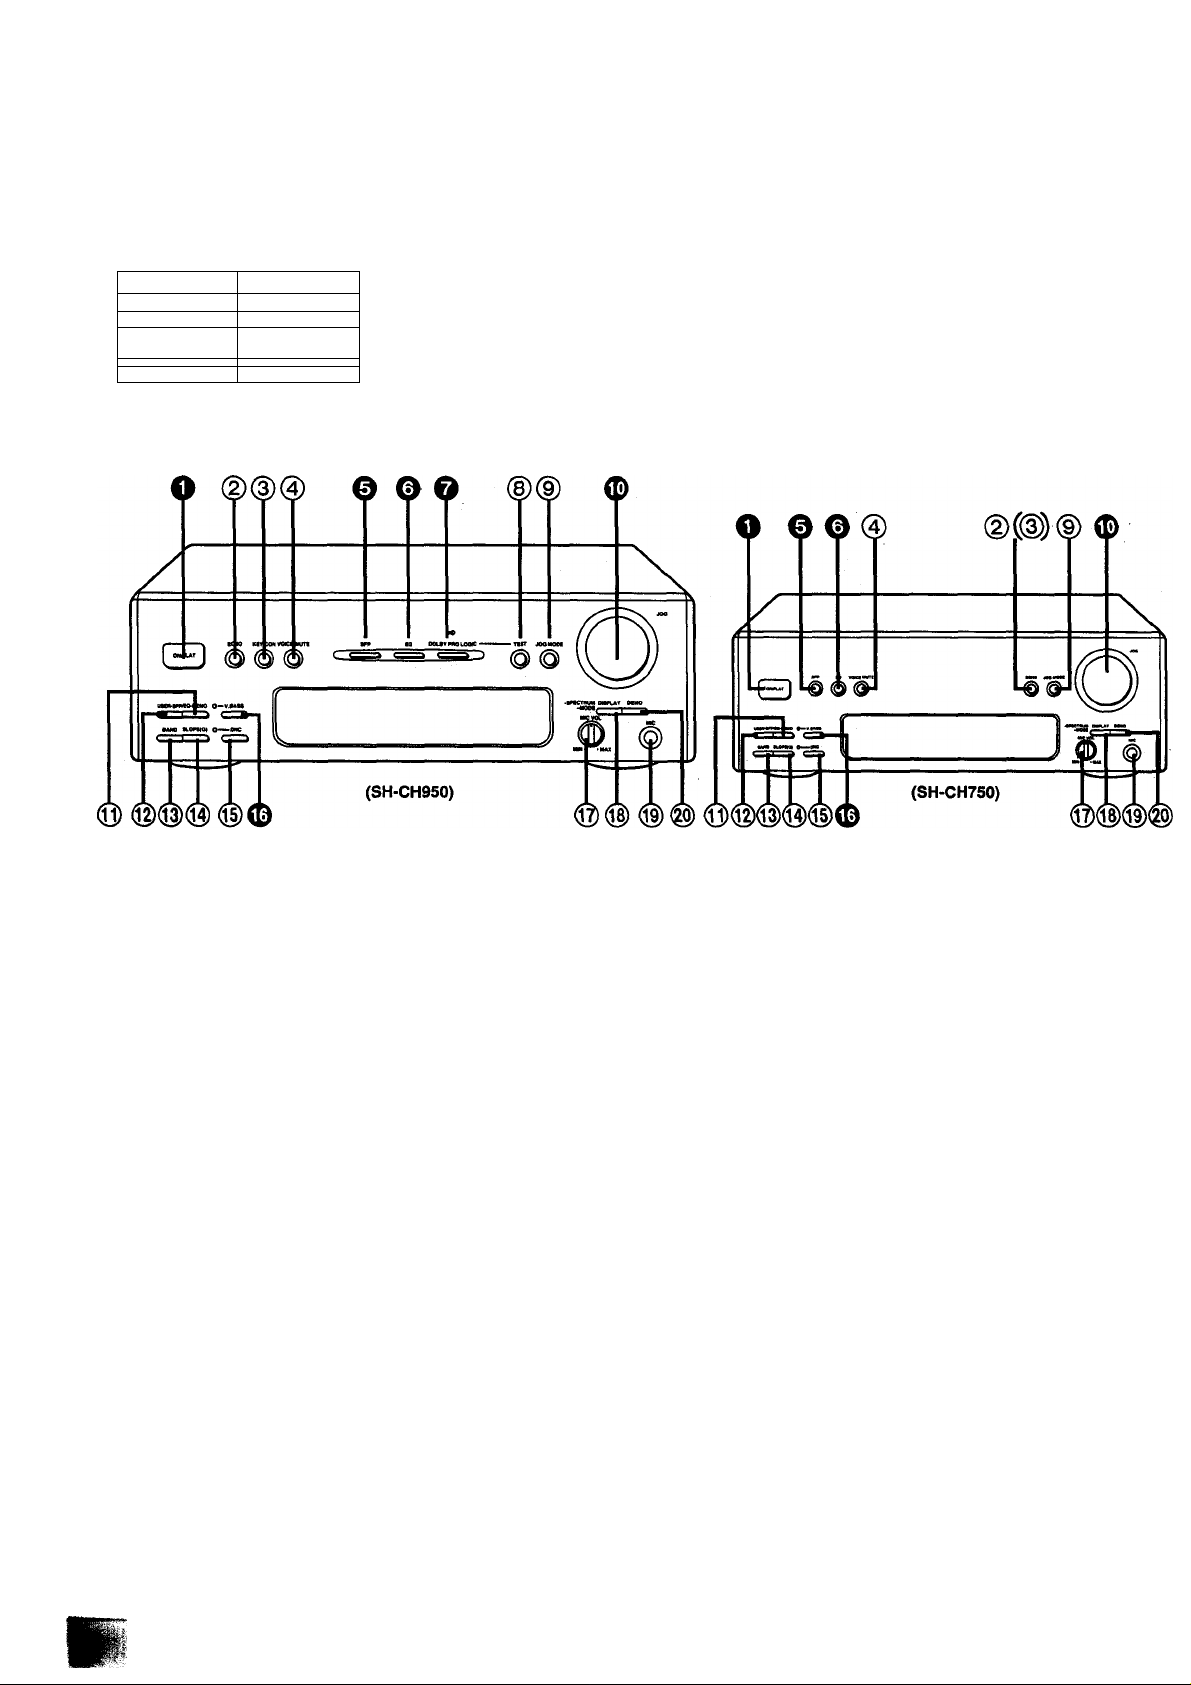
Front Panel Controls and Functions
Sound processor section
l]>' ...
Oeee «*1^
=s=r---------------iX
— 1 1 -
•o,® are only for
model SH-CH950.
•(For model SH-CH750)
For Australia and New Zealand, @ Is KEY CON instead of
ECHO.
• =1 1 =
The functions indicated by the numbers with biack background (for
example O) can also be activated from the remote control.
(See pages 22-23.)
o ON/FLAT button (ON/FLAT)
Press to switch the EQ (equalizer curve) or SFP (simulated
listening environment) or Dolby Pro-Logic mode (Only for
model SH-CH950) on or flat.
(g) Echo button (ECHO)
(For model SH-CH750, only for the area except for
Australia and New Zealand)
Press to adjust the reverberation sound when in performing
“Karaoke".
(3) Key control button (KEY CON)
(For model SH-CH750, only for Australia and New Zea
land)
Use to adjust key level when performing “Karaoke”.
® Voice mute button (VOICE MUTE)
Press to perform “KARAOKE” (microphone mixing with an
accompaniment). (See page 70.)
0 SFP mode button (SFP)
Press to select the desired simulated listening environment.
(See page 55.)
0 EQ mode button (EQ)
Press to select the desired equalizer mode. (See page 54.)
0 Dolby Pro-Logic button and indicator
(DOLBY PRO LOGIC)
(Only for model SH-CH950)
Press to select the desired Dolby Pro-Logic mode.
(See page 61.)
Test signal transmission button (TEST)
(Only for model SH-CH950)
Press to transmit the test signal to adjust the output level of the
speakers. (See page 62.)
(D Jog mode button (JOG MODE)
Press this button to select the desired adjustment mode.
(See page 58.)
0 Jog control (JOG)
Turn to adjust the level of equalizer curve, simulated listening
environment, and specific frequency shift, and so on.
(See pages 56-58.)
0 Memory button (MEMO)
Press to store the desired equalizer curve or simulated listen
ing environment.
® User button (USER)
Press to select the desired “USER” number. (See page 59.)
@ Frequency band select button (BAND)
Press to select the desired equalizer frequency band.
(See page 58.)
@ Slope (Q) select button [SLOPE (Q)]
Press to select “narrow” or “wide” mode of the cunre slope.
(See page 58.)
@ Digital noise cleaner button and Indicator
(DNC)
Press to reduce the noise on a tape or FM broadcast.
(See page 60.)
Page 15
0 V. Bass button and indicator (V. BASS)
Press to boost the dynamic low-frequency ranges.
(See page 60.)
Microphone volume control (MIC VOL)
Use to adjust the microphone volume level.
@ Display mode select button
(DISPLAY, -SPECTRUM, -MODE)
Use to select one of 5 spectrum modes.
Press and hold to extinguish the equalization curve.
(See page 74.)
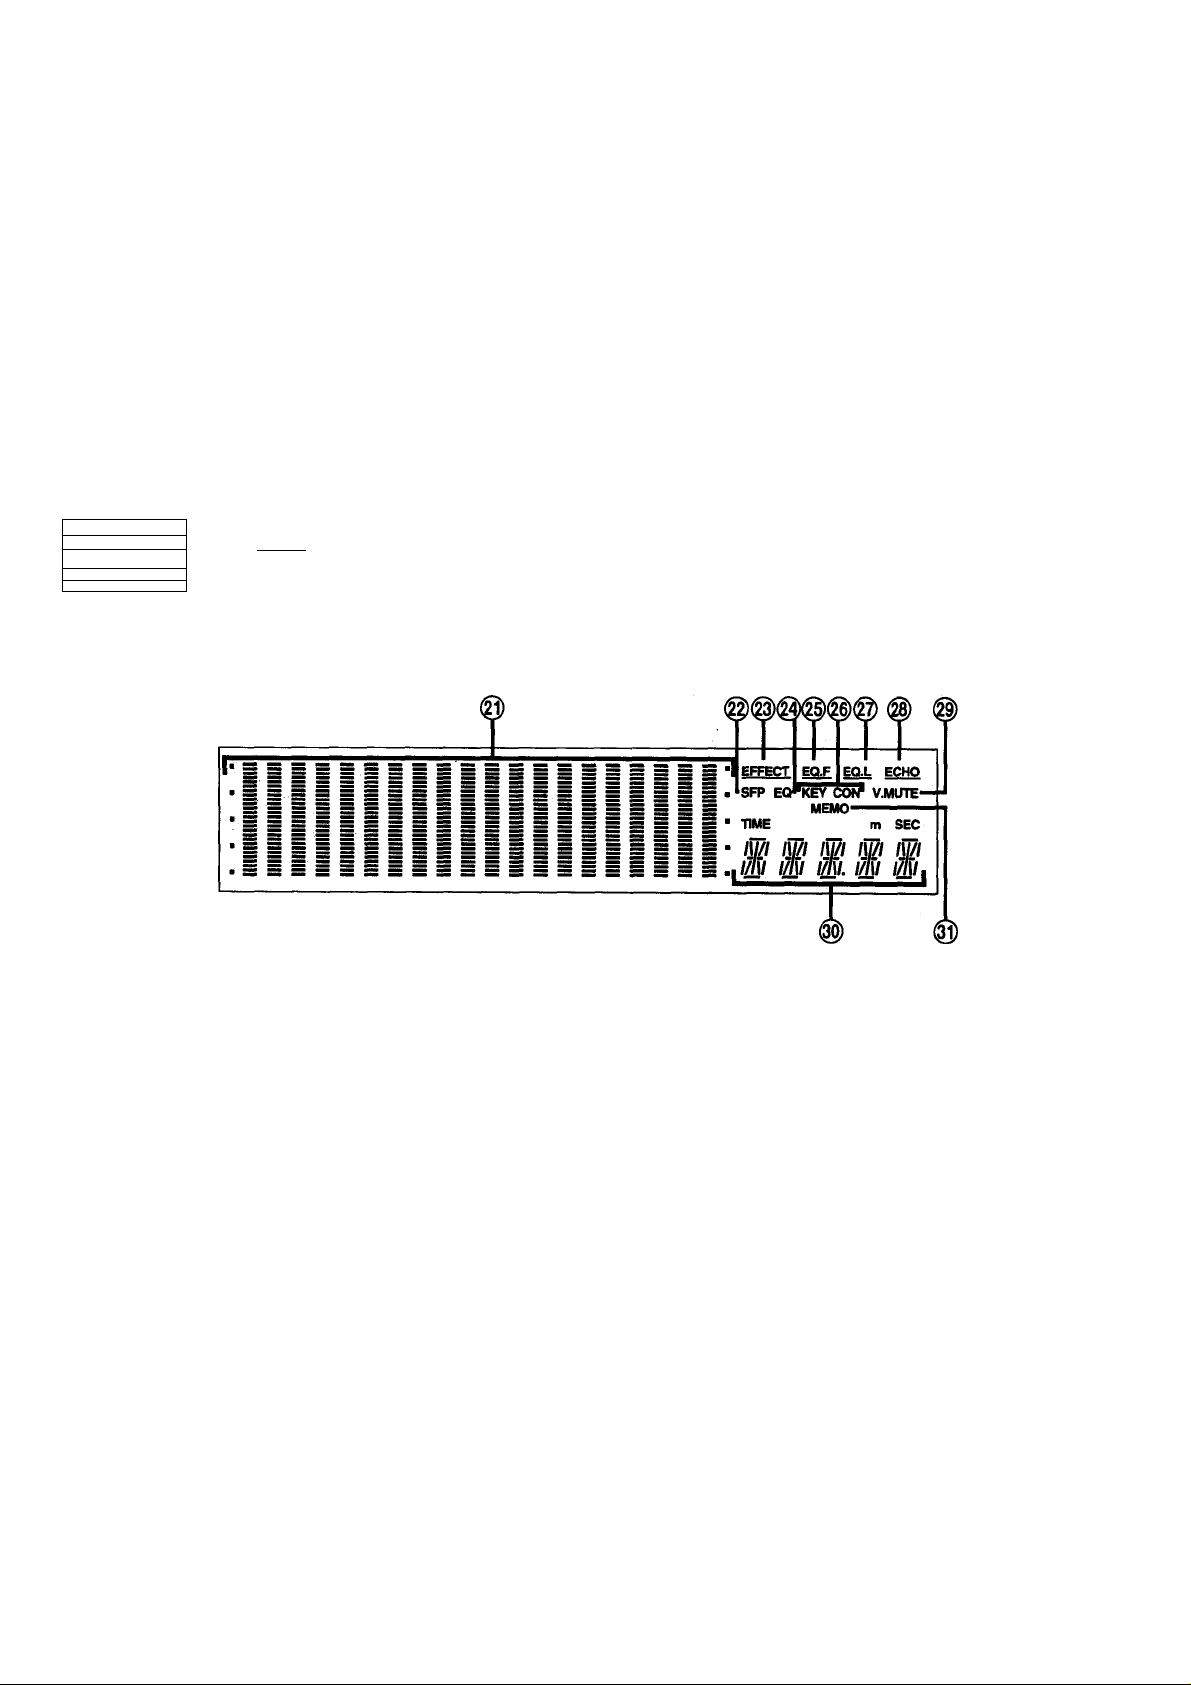
Display section
------
L ■ ...
1^'"—
Ji CD
I-
13<s~.
ooo'
S=C
— r
(3) Microphone jack (MIC)
Plug microphone cord into this jack.
(^ Demonstration button (DEMO)
Use for reference of the adjustments of equalization curves
and SFP mode sounds. The pre-programmed equalization
curves and SFP mode sounds will be heard sequentially for
adjustment example. (See page 53.)
Multi level display
Shows the equalization/spectrum analysis level.
(g) SFP mode indicator (SFP)
Lights when you select the SFP mode [HALL, LIVE, DISCO,
CHRCH, THTER (Only for model SH-CH750)].
(g) Effect indicator (EFFECT)
Lights when you select EFFECT mode by pressing JOG
MODE.
@ Equalizer mode indicator (EQ)
Lights when you select the equalizer mode (HEAVY, CLEAR,
SOFT, HP ST, CAR).
(§) Equalizer frequency indicator (EQ. F)
Lights when you select EQ. F mode by pressing JOG MODE.
@ Key control indicator (KEY CON)
(For model SH-CH7S0, only for Australia and New Zea
land)
Lights when you press KEY CON to adjust the key level while
in the “Karaoke” mode.
@ Equalizer level Indicator (EQ. L)
Lights when you select EQ. L mode by pressing JOG MODE.
Echo indicator (ECHO)
(For model SH-CH750, only for the area except for
Australia and New Zealand)
Lights when you press ECHO to adjust the reverberation
sound while in the “Karaoke” function.
(||) Voice mute indicator (V. MUTE)
Lights when you activate the "Karaoke" function.
@) Sound mode display
Shows the sound mode you select or the length of the rever
beration sound, delay time (Only for model SH-CH950), etc.
® Memory indicator (MEMO)
Lights when you store the desired curve or simulated listening
environment.
15
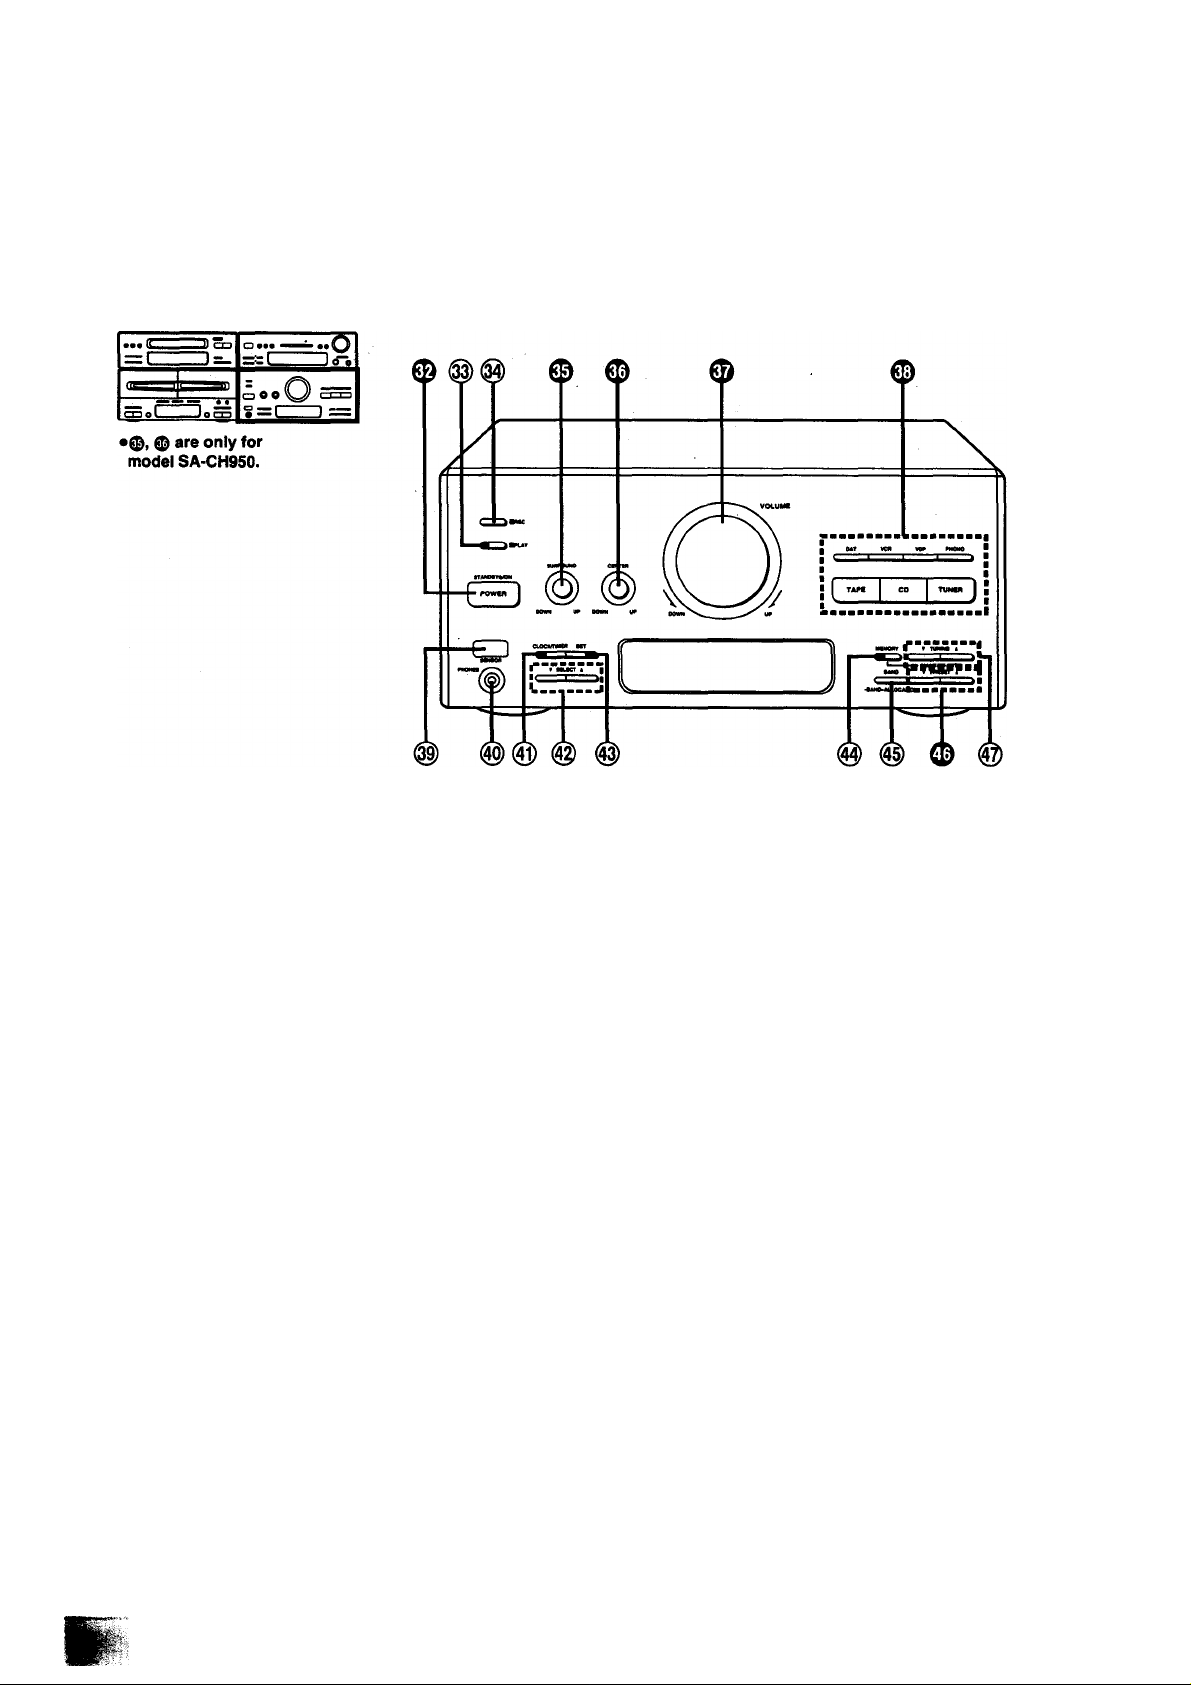
Page 16
Front Panel Controls and Functions
(continued)
Tuner amplifier section
0 Power “STANDBY 6/ON” switch
(POWER, STANDBY Cl)/ON)
This switch switches ON and OFF the secondary circuit power
oniy. The unit is in the "standby" condition when this switch is
set to the STANDBY (!) position. Regardless of the switch
setting, the primary circuit is always "live” as long as the
power cord is connected to an electrical outlet.
@ Timer piay button (□ PLAY)
Press to confirm, exit or reset the play timer.
(See pages 64-65.)
@ Timer recording button (Q REC)
Press to confirm, exit or reset the record timer.
(See pages 66-67.)
0 Surround speaker ievel controi (SURROUND)
(Only for model SA-CH950)
Turn to adjust the volume level of the surround speaker.
0 Center speaker ievei control (CENTER)
(Only for model SA-CH950)
Turn to adjust the volume level of the center speaker.
0 Volume level controi (VOLUME)
Turn to adjust the volume level.
Note that — dB is the lowest volume setting and 0 dB is the
highest.
0 input select buttons
(TAPE, CD, TUNER, DAT, VCR, VDP, PHONO)
Press to select the sound source.
@) Headphones jack (PHONES)
Plug headphones cord into this jack.
@ Clock/timer button (CLOCK/TIMER)
Press to select the clock set mode or desired timer mode.
@ Timer select buttons (T SELECT A)
Use when setting the current time and timer.
@ Setting button (SET)
Press to set the present time in the clock mode, or set the
various selection in the timer mode. (See pages 25,64-68.)
(3> Preset memory button
(MEMORY, -MANUAL, -AUTO)
Press to put a broadcast station into the memory.
(See pages 27-28.)
@ Band select/allocatlon change button
(BAND, -BAND -ALLOCATION)
Press to select the MW, LW or FM radio band.
Press and hold to change the MW frequency step.
0 Preset tuning buttons (T PRESET A)
Use to select channel number for a broadcast station which
has been stored in the tuner's memory.
@ Tuning buttons (▼ TUNING A)
Use to tune in a desired broadcast station.
@ Remote control signal sensor (SENSOR)
Receives the signals from the remote control.
Page 17
Display section
' i'—“
Oeee eeCl
------------------
cdOO caro
• =l
---------------
iX
1 =
— 1 J- =s(
cpol ■ JeCD
•®, ® are only for model
SA-CH9S0.
' ^NMONIUEWEDTHUFRISAT^LEEP
f ! HrecbCplaypn 0(№
«■■■■■■■À«
'^^iTi \Tn iTi- iTl iB/iiite'*®"“
,ijH ÙI & Œ': ŒI
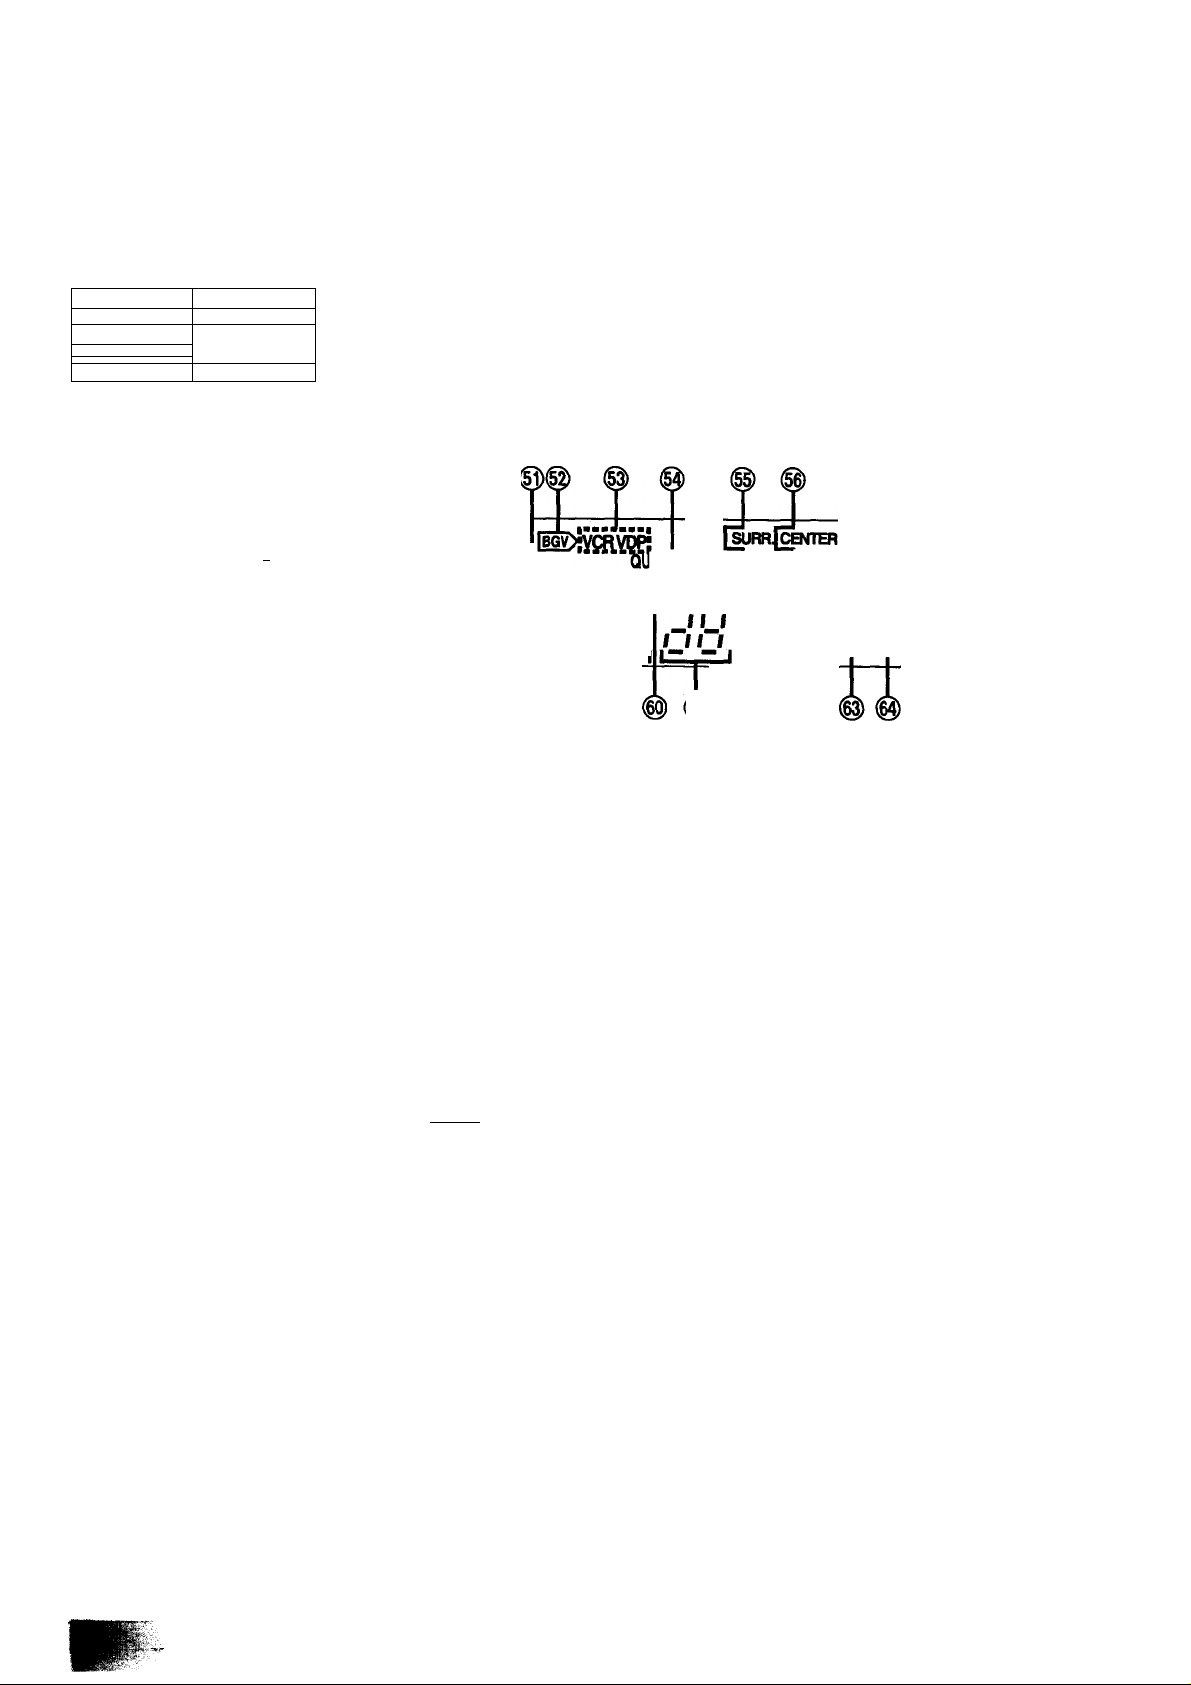
@) Timer mode indicators (□ REC, □ PLAY)
H REC: Lights when you have set the record timer mode.
0 PLAY: Lights when you have set the play timer mode.
VOLUME
lARTZLOCK =
BALANCE
= MAX
= MIN
MUTING
g) @
|§) Center level display (CENTER)
(Only for model SA-CH950)
Shows the volume level of the center speaker.
@ Day indicators (SUN-SAT)
Shows the day of the week or the day the timer has been set
for.
@ Sleep timer indicator (SLEEP)
Lights when you have set thé sleep timer mode.
0 Timer on/off indicator (ON, OFF)
Lights together with the setting time to show the timer ON time
and OFF time.
@ BGV (background visual) indicator ( |bgv> )
Lights when listening to audio sound source.
@ Visual source indicators (VCR, VOP)
Lights to show it is possible to enjoy BGV (Back Ground
Visual) if you connect video deck or video disc player to this
system. (See page 73.)
Ig) Quartz lock indicator (QUARTZLOCK)
Lights when you precisely tune in a broadcast station.
@ Surround level display (SURR.)
(Only for model SA-CH950)
Shows the volume level of the surround speakers.
(g) Volume level display (VOLUME, MAX, MIN)
Shows the volume level.
@) FM STEREO/MONO indicator
(MONO, STEREO)
"STEREO” lights when an FM stereo broadcast is being re
ceived. If you press FM mode button on the remote control to
select monaural mode, “MONO” lights.
(g) Alpha-numeric display
Shows the selected source, present time, and the contents of
the timer setting, received frequencies, volume level.
@) Memory indicator (MEMO)
Lights when the preset memory button is pressed.
@ Preset channel display
Shows the preset channel you select.
@ Channel indicator (CH)
Lights when the unit is in the preset tuning mode.
@ Balance display (L, R, BALANCE)
Shows the left-right volume balance.
g) Muting Indicator (MUTING)
Lights when you activate the muting mode.
17
Page 18
Front Panel Controls and Functions
(continued)
Compact disc player section
•••It-
o ••• •• Cj
1-
=ai )X
aOO'i
s=c
© @ ®
r-"'-rr-Ti
"f
@ Fit edit button (J. FiT)
Press to activate the fit editing mode. (See pages 48-49.)
&
C
0 0
J
4^ ► )
p9^
— 1 >1
mmmm*
0 Piay button (>)
Press to start disc play and synchro start function.
@ Sequentiai CD recording button (ALBUM)
Press to activate the sequential CD recording mode.
(See pages 46-47.)
(||) Last fade edit button (LAST FADE)
Press to activate the fade out editing mode.
(See pages 50-51.)
d) Stop button (□)
Press to stop the disc play.
(D Disc tray open/ciose button
(A OPEN/CLOSE)
Press to open and close the disc tray.
@ Random play button (RANDOM)
Press to play the disc's tracks in random order. (See page 34.)
@ Search buttons (■^■^, P-P>)
Press and hold to find the desired point on the track while in
the play mode.
^ Repeat button (REPEAT)
Press to activate the repeat mode. (See page 36.)
^ Pause button (I I)
Press to stop the disc play temporarily.
® Skip buttons (F44, ^)
Press to skip tracks.
Page 19
Display section
... It
— 1 1 —
n-lftl 2=1
----
1
-----------
1'
II n-i
o ••• —••
=S=l Irf-.
oOO O'
--------------
\r^
luLi
¡rp
¡uLi
•ilL
L...
1 =
T’ T’ 'T'
lLi Lij
lLi lLi
u£j
lIi
T*
¡H] 'iT
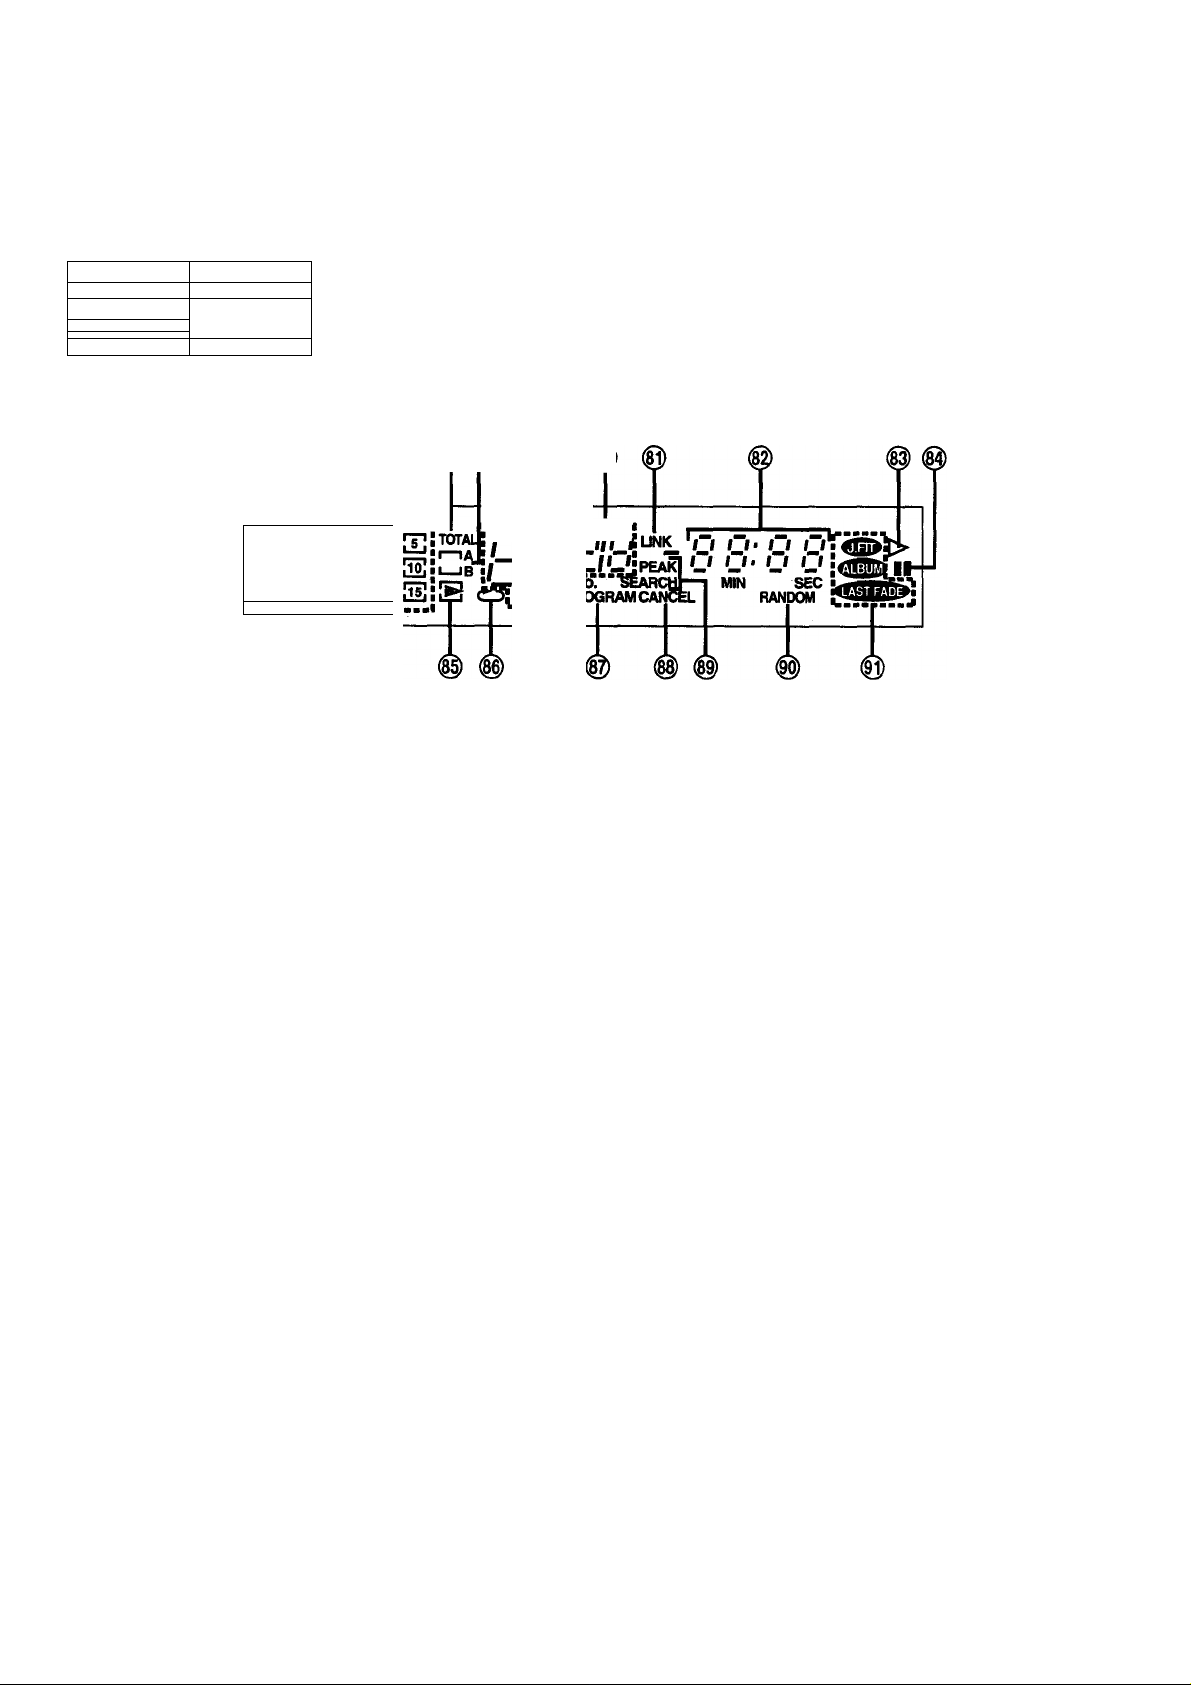
@ Matrix display
Shows the total number of tracks on a disc, and shows the
current playing track by flashing.
■ ■ ■ ■ ■■■ ■■ ■ «■ ■
@ Pause indicator (II)
Lights when you press the pause button to stop the disc play
temporarily.
@ Total tracks indicator (TOTAL)
Lights to show the total number of tracks edited on side A and
B when you use the edit-recording from a compact disc.
@ Tape side indicator (A, B)
Shows which side of the cassette tape (A or B) will be re
corded on when you use the edit-recording from a compact
disc.
@ Track number dispiay
Shows the total number of tracks,
and current playing or
recording track number.
Program number dispiay
Lights together with the program indicator to show the pro
grammed order.
Link indicator (LINK)
Lights to show the disc link is possible when you use the
edit-recording from a compact disc.
Time display
Shows the total playing time on the disc, and elapsed play time
of the current track.
Play indicator (>)
Lights when you play a compact disc.
@ Over indicator (^)
Lights if there are 16 or more tracks on a disc.
Repeat mode indicator (O)
Lights during the repeat mode of a compact disc.
@ Program indicator (PROGRAM)
Lights during program play mode of a compact disc.
@ Program cancel indicator (CANCEL)
Lights when you cancel a program.
@ Peak search indicator (PEAK SEARCH)
In the edit-recording mode, lights when the compact disc
player is automaticaiiy scanning the peak level on a disc.
When peak search ends, “PEAK” flashes to indicate the peak
level of a compact disc.
@ Random play indicator (RANDOM)
Lights during the random play mode.
0 Edit mode indicators
(J. FIT, ALBUM, LAST FADE)
J. FIT; Lights when you activate the fit editing mode.
ALBUM: • Lights when you activate the sequential CD
recording mode.
LAST FADE: Lights when you activate the fade out editing
mode.
19
Page 20
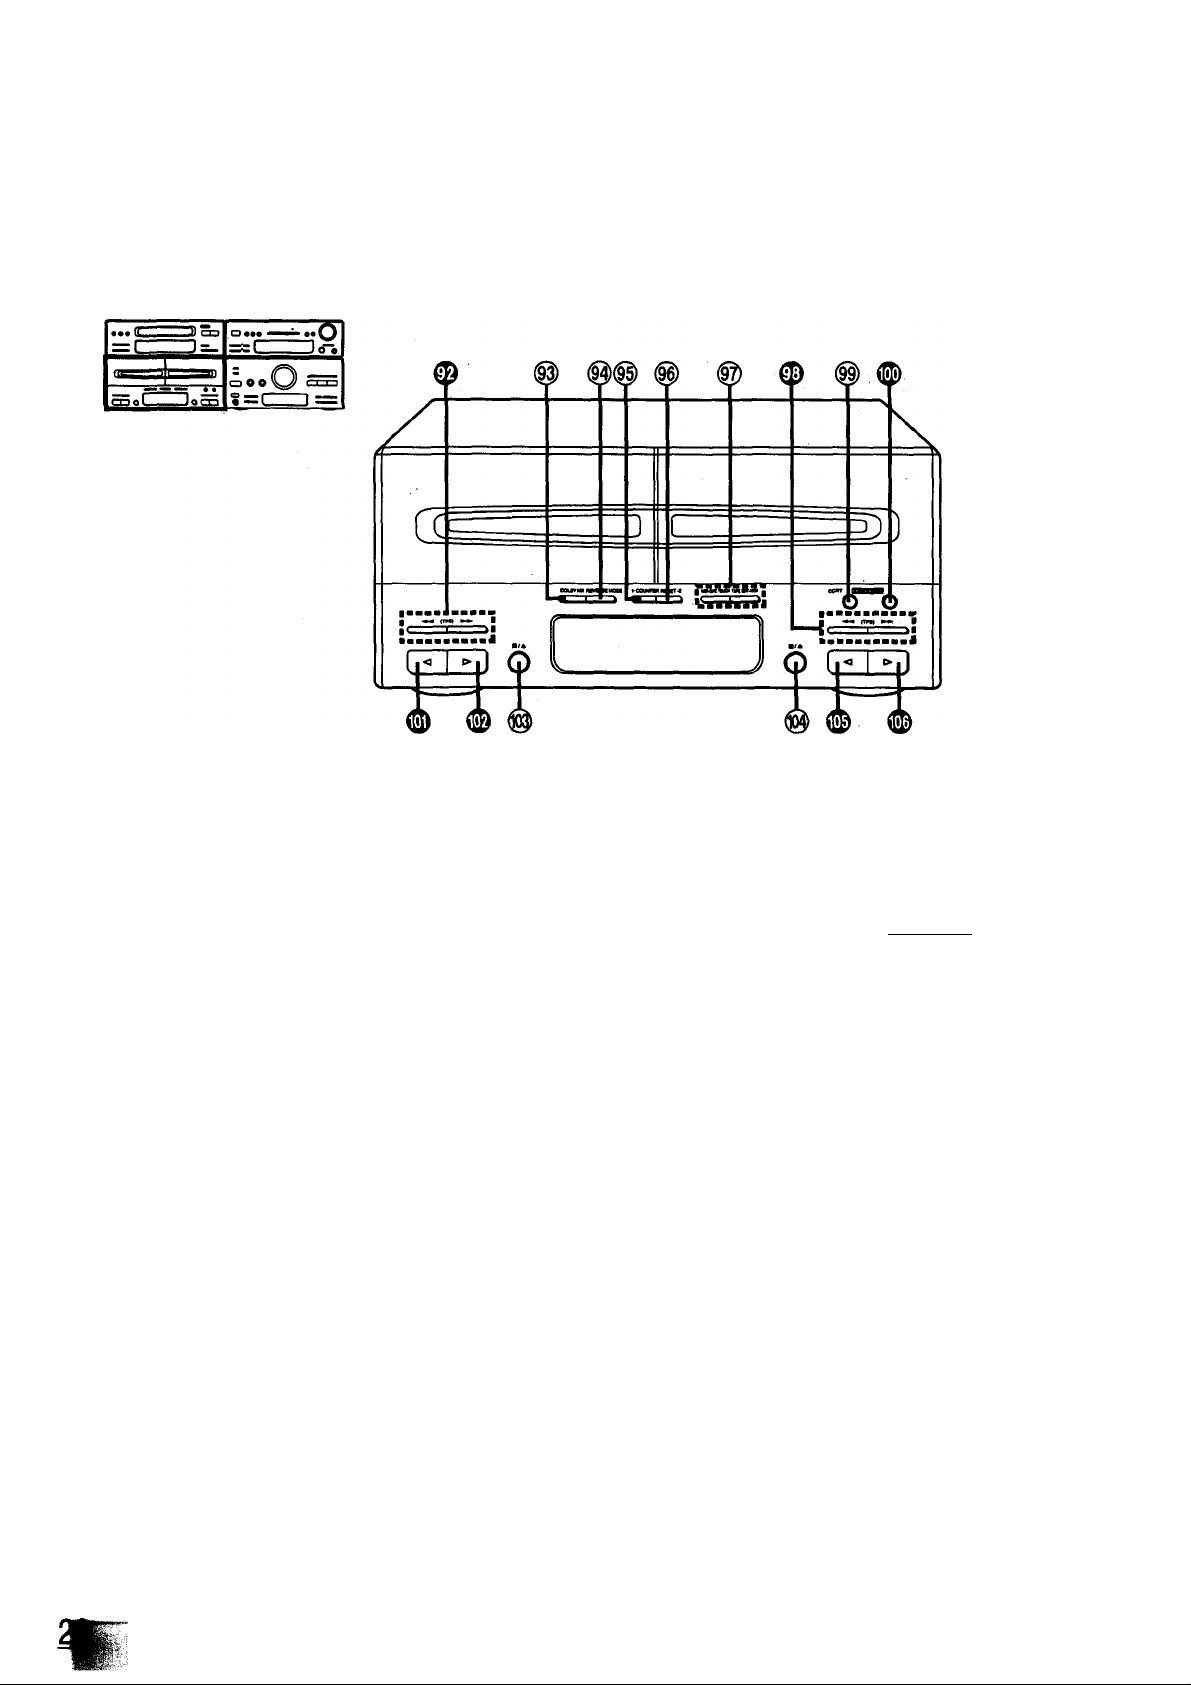
Front Panel Controls and Functions
(continued)
Cassette deck section
0 Deck 1 fast-forward/rewind/tape program sen
sor (TPS) buttons
[◄◄ (TPS) ►►]
Press to advance or rewind the tape, or to quickly search for
the beginning of a program while the tape is being played.
@) Dolby noise reduction button
(DOLBY NR)
Press to reduce hissing noise on the tape. This system has
both the Dolby B-type and Dolby C-type noise reduction.
@ Reverse mode select button and indicators
(REVERSE MODE)
Press to select the reverse mode (for playback and recording).
Deck 1 counter reset button
(COUNTER RESET 1)
Press to reset the tape counter indicator to “0000”.
@ Deck 2 counter reset button
(COUNTER RESET 2)
@ One-touch tape edit buttons (NOR, HIGH)
Press to start the tape-to-tape recording. (See page 45.)
0 Deck 2 fast-forward/rewind/tape program sen
sor (TPS) buttons [◄◄ (TPS) ►►]
(^ CCRT (computer control record tuning) but
ton (CCRT)
Press to adjust the recording level, equalizer and bias before
recording. (See pages 42-43.)
0 Record pause button (EigaMihtj )
Press to put deck 2 into the record standby mode.
0 Deck 1 reverse-side playback button (<)
Press to start the playback in the reverse direction.
0 Deck 1 forward-side playback button (>)
Press to start the playback in the forward direction.
Deck 1 stop/cassette holder open button
(■/A)
Press to stop the tape or open the cassette holder.
Deck 2 stop/cassette holder open button
(■/A)
0
Deck 2 reverse-side playback button (<I)
Press to start the playback or recording in the forward di
rection.
0 Deck 2 forward-side playback button (>)
Press to start the playback or recording in the reverse di
rection.
Page 21

Display section
(|§) Deck 1 remote indicator (iR.C.i)
Lights to show that you can operate deck 1 with remote
controi.
Doiby noise reduction indicators (0,B )
Lights to show the type of Dolby noise reduction you select.
Reverse mode indicators (^=^, ,o o)
Lights to show the reverse mode you select.
(
0 1
) CCRT indicator (CCRT, BIAS, LEVEL, EQ)
Lights when CCRT function is activated.
(
0 1
) Edit indicator (i^nit>)
Lights when you are editing CD or making a tape-to-tape
recording.
(01) CD indicator (CD)
Lights together with the edit indicator when you are editing CD.
(
0 1
) Tape edit indicators (NOR, HI)
Lights together with the edit indicator when you are making a
tape-to-tape recording.
(0|) Recording indicator ((313)
Lights when in the recording or recording standby mode.
(01) Deck 2 remote indicator f 15(53 )
Lights to show that you can operate deck 2 with remote
control.
(01) Deck 1 play indicator (PLAY)
Lights when you play the cassette tape.
Flashes when you quickly search for the beginning of a pro
gram while the tape Is being played (TPS).
(^ Deck 1 tape travel direction indicator (<, D>)
Lights to show the direction of the tape travel.
Deck 1 tape counter
Show the amount of tape movement.
(Ol) Deck 2 tape counter
(Ol) Deck 2 play indicator (PLAY)
Lights when you play or record the cassette tape.
Flashes when you quickly search for the beginning of a pro
gram while the tape is being played (TPS), or while in the
recording standby mode.
@ Deck 2 tape travel direction indicator (<, >)
21
Page 22
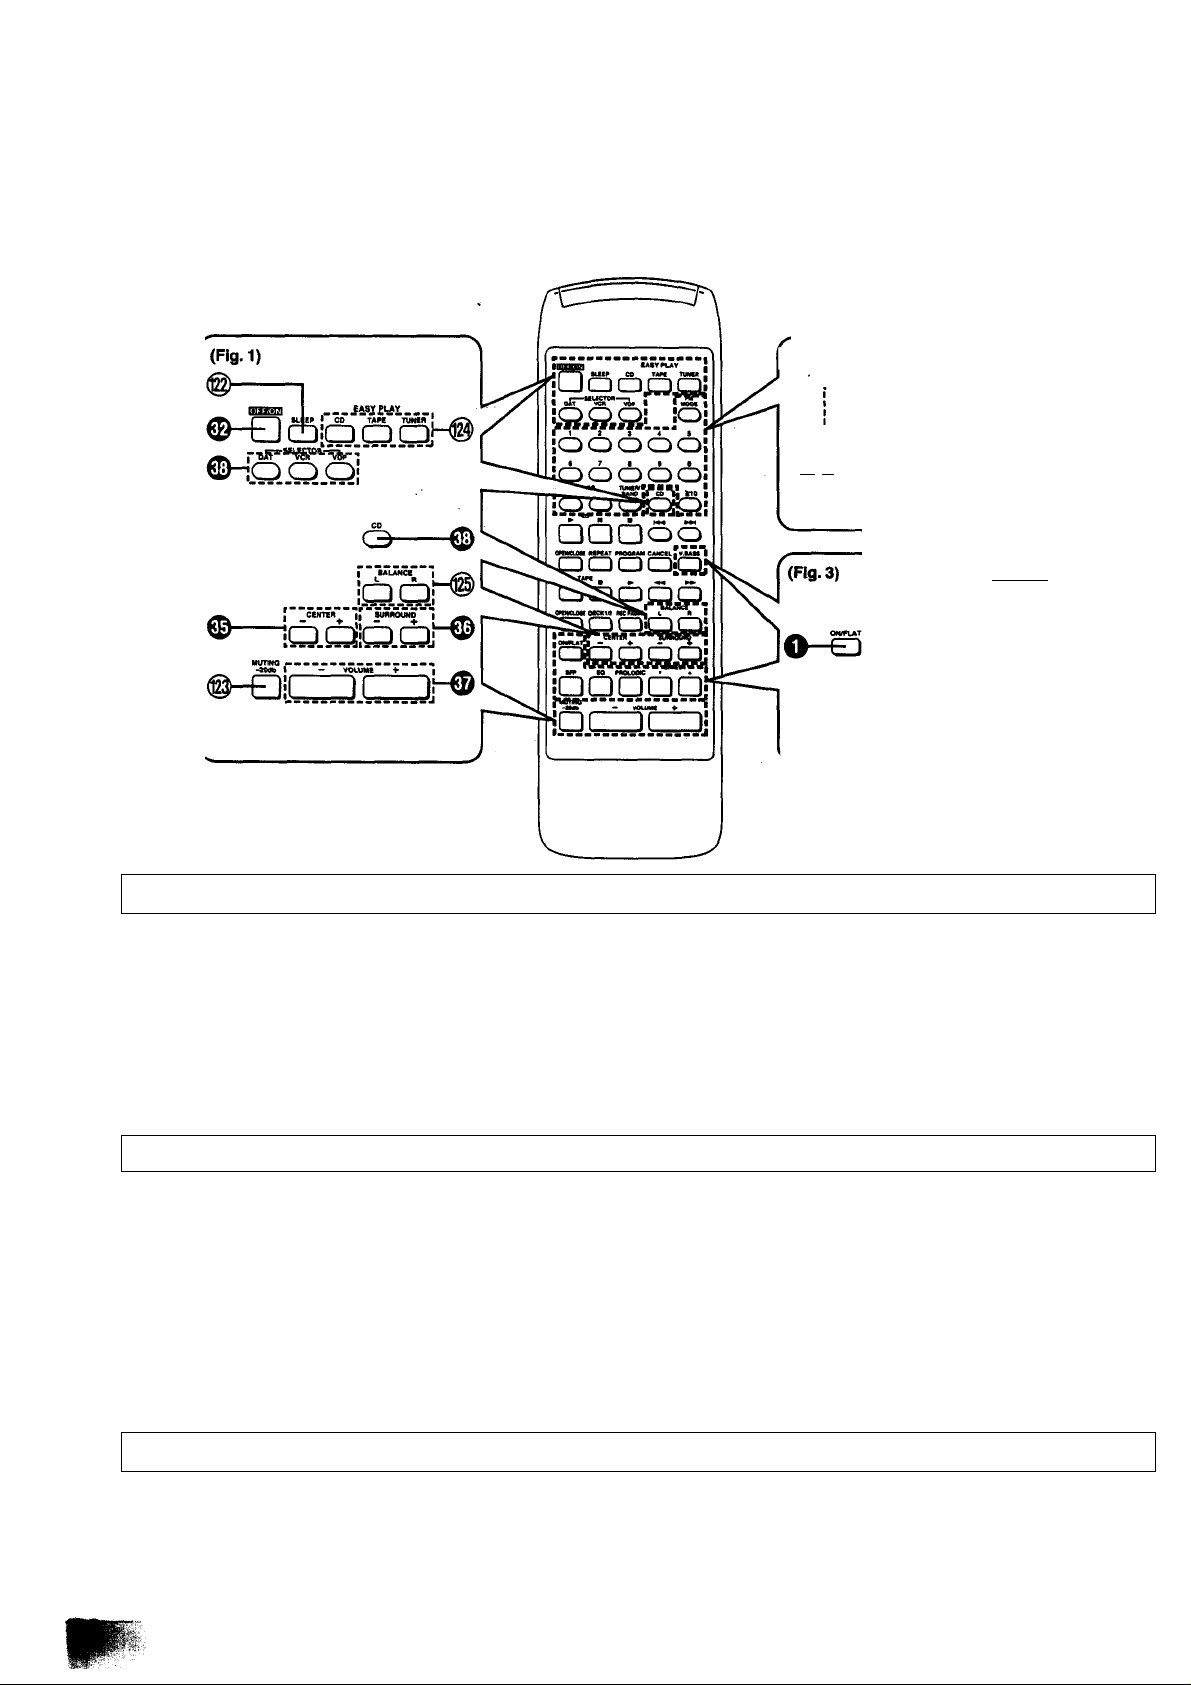
Remote Control Unit Controls and
Functions
(Fig. 2)
oooooi
•®, 0 are only for model SA-CH950.
Common operation controls (Fig. i)
The functions of buttons ®, 0,0,0 and 0 are identical to those
described under "Tuner amplifier section” on page 16.
(§) Sleep timer button (SLEEP)
Press when you want the system to turn itself off.
/fs I »»WtSCT* j BAND I ^0 I
VP KO MOL<
.OOlcj
~!
0
!
VJAW —
(3HD
niT
•O Is only for model SH-CH950.
@) Easy play buttons (EASY PLAY)
Use to start the play directly from the power standby condition.
Volume balance buttons (BALANCE, L, R)
Press to adjust the volume balance.
@) Muting button (MUTING -20 dB)
Press to temporarily attenuate (mute) the volume level.
Tuner controls (Fig. 2)
The functions of buttons 0 is identical to these described under
“Tuner amplifier section" on page 16.
@ FM mode button (FM MODE)
Press to switch the FM listening mode (Stereo or monaural)
during FM broadcasts. (See page 26.)
(@ Preset-tuning buttons (1-0, >10)
Use to tune in broadcast stations which have been preset in
the unit’s memory.
Sound processor controls (Fig. 3)
The functions of buttons 0> @< ©• 0> ® and 0 are identical to
those described under “Sound processor section" on page 14.
@) Tuner input/band select button
(TUNER/BAND)
Use to select tuner source and desired band (FM or MW, LW).
Page 23
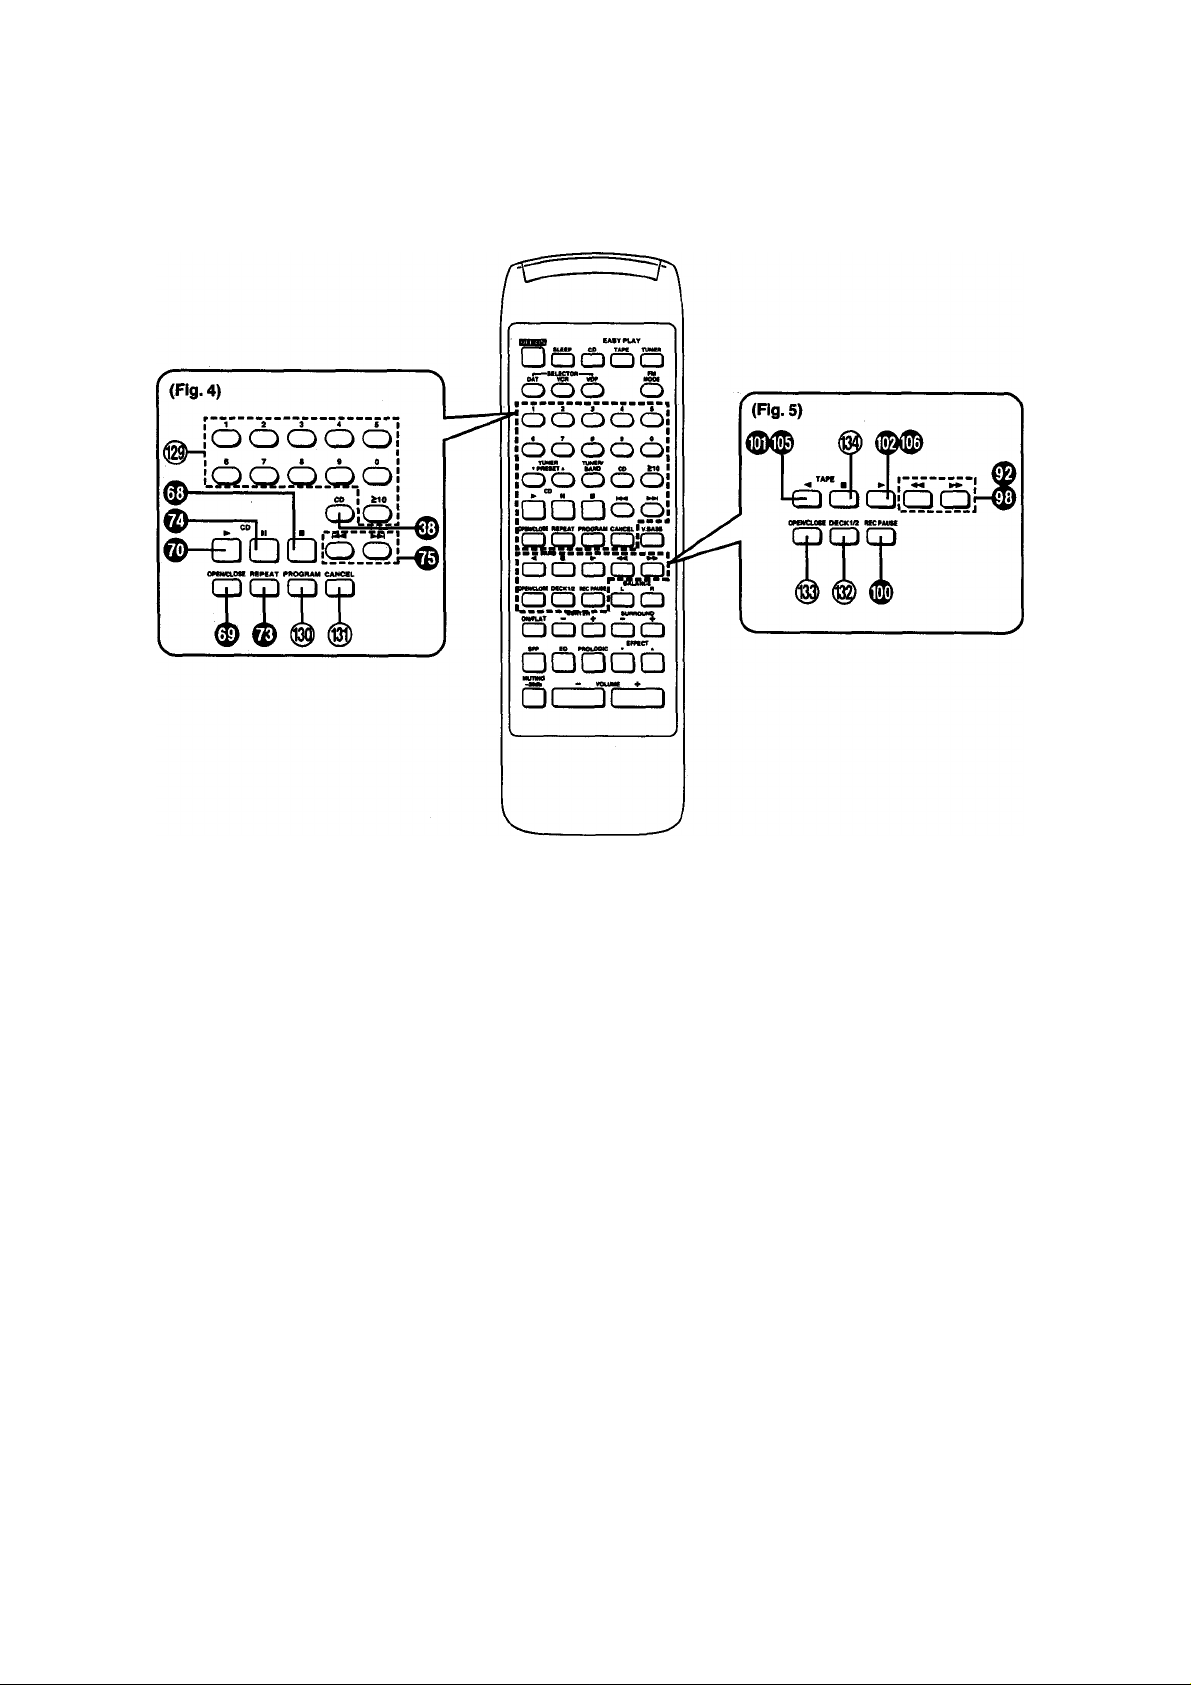
Compact disc controls (Fig. 4)
The functions of buttons ® and 0 are identical to
those described under "Compact disc piayer section” on page 18.
@ Numeric buttons (1-0, >10)
Use to specify the compact disc's track.
Cassette deck controls (Fig. 5)
The functions of buttons 0,0,9,0, #. 0 and 0 are identical to
those described under “Cassette deck section” on page 20.
(§) Deck 1/deck 2 select button (DECK 1/2)
Press to select the deck that you can operate with remote
control.
Program button (PROGRAM)
Press to activate the program piay mode. You can then enter
specific tracks using the numeric buttons.
Cancel button (CANCEL)
Press to cancel the program.
Cassette holder open/close button
(OPEN/CLOSE)
Press to open and close the cassette holder.
Stop button (0)
Press to stop the tape.
23
Page 24
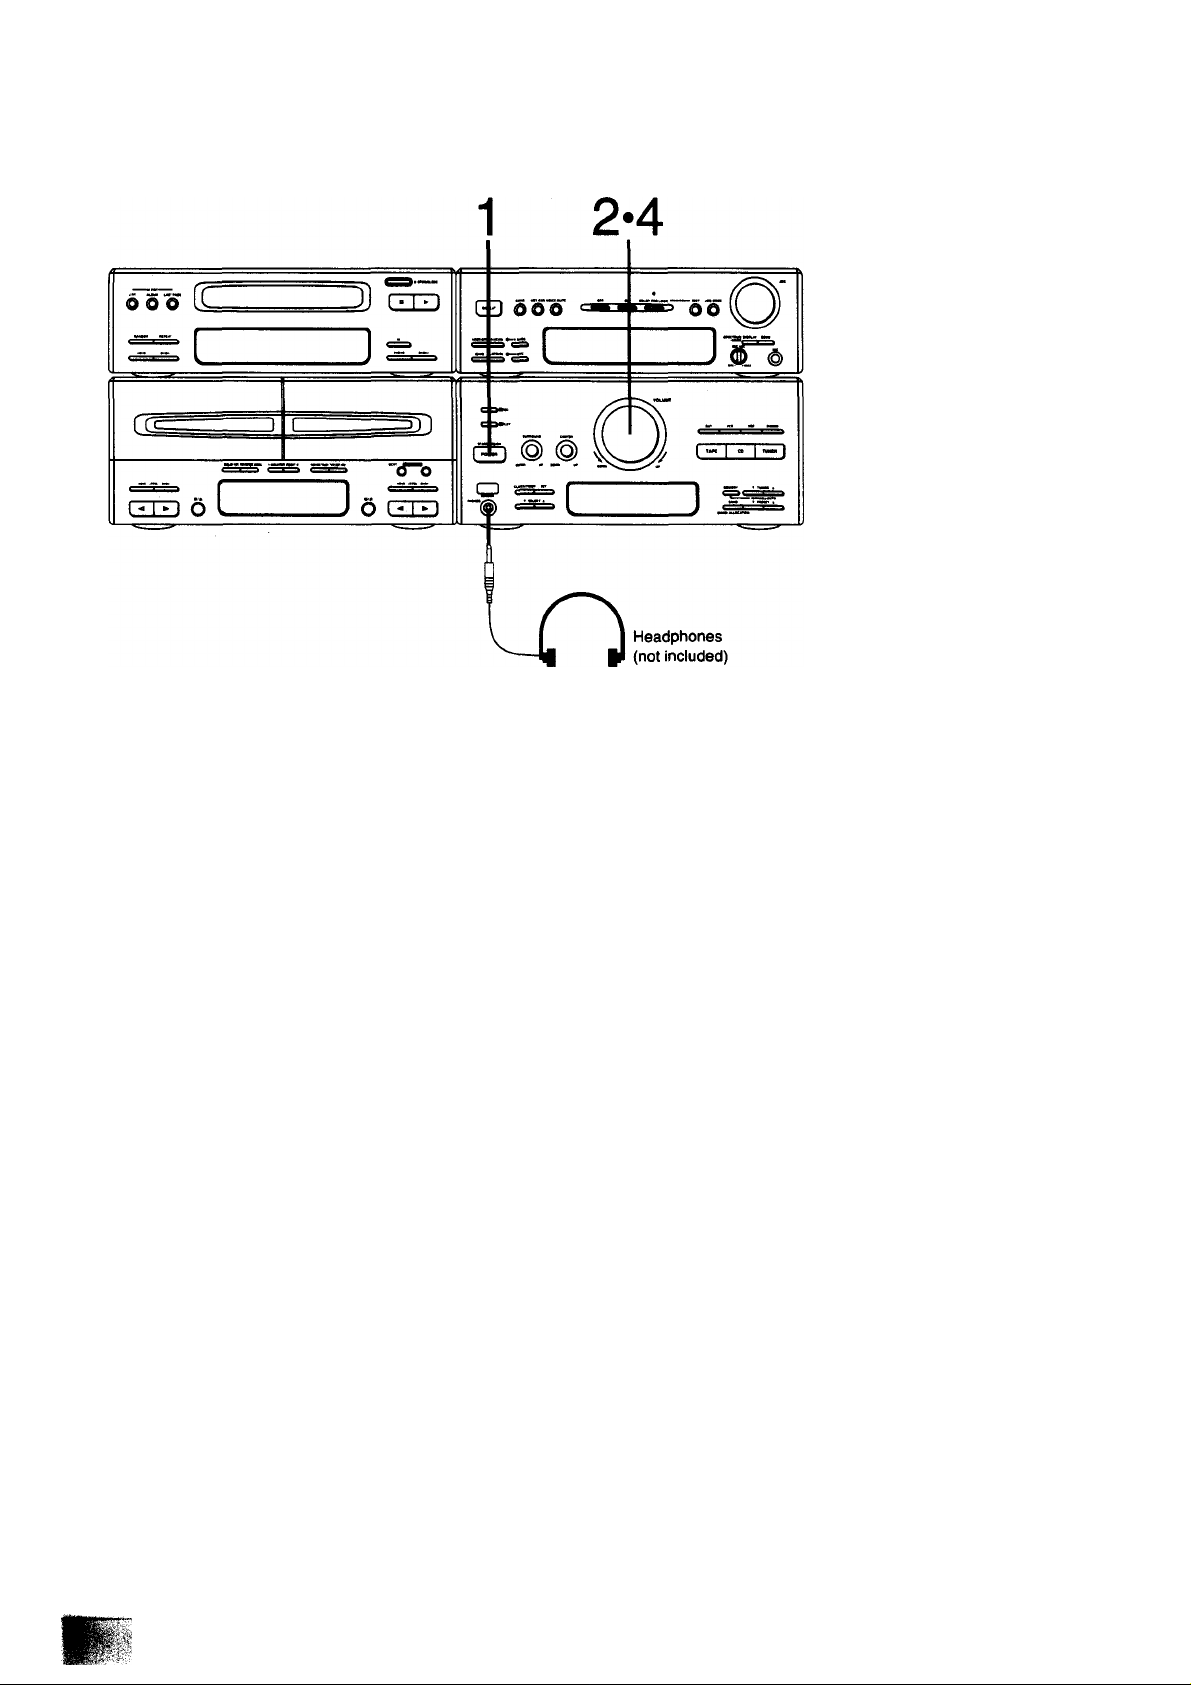
Basic Operating Procedure
nodbñQ
63Ò è
Ó¿)(±»Ó¿5
<±)ó¿3cb<±)
OÒÙoò
■sQsaa
ss; _ ■ ■
ssòs
güüd'b
Qci3tízi
-raoB
□
QQ
(Also availble from the remote control)
1 Press POWER STANDBY 0 /ON to switch on
the power.
2
Adjust the volume level to about —60 dB.
Start the sound source.
3
CD: See page 30.
TUNER: See page 26.
Cassette deck: See page 37.
4 Adjust the volume level as you like.
Note:
Before you set the system to the standby mode, be sure to reduce
the volume level to prevent the extremely high output from the tuner
amplifier from damaging the speakers.
How to adjust the left-right volume balance
(Only from the remote control)
Press one of BALANCE (L or R).
BALANCt
L R
QQ
How to mute the volume
(Only from the remote control)
Press MUTING on the remote control.
-zoos
□
r Ti
I II
MUTING indicator appears on the display.
Cancel the muted state by pressing the muting button once again or
reduce the volume level to the minimum position and then reset to
the desired volume.
G^vca
uuwcx MUTING
How to use headphones
Reduce the volume level.
Connect the headphones to the headphones jack.
Avoid listening for prolonged periods of time to prevent hearing
damage.
Plug type; Stereo mini
Pressing BALANCE buttons simultaneously vrill restore the ba
lance to the center position.
Perform fine balance adjustment while playing the selected music
source. The balance display is only a rough quick.
24
Page 25
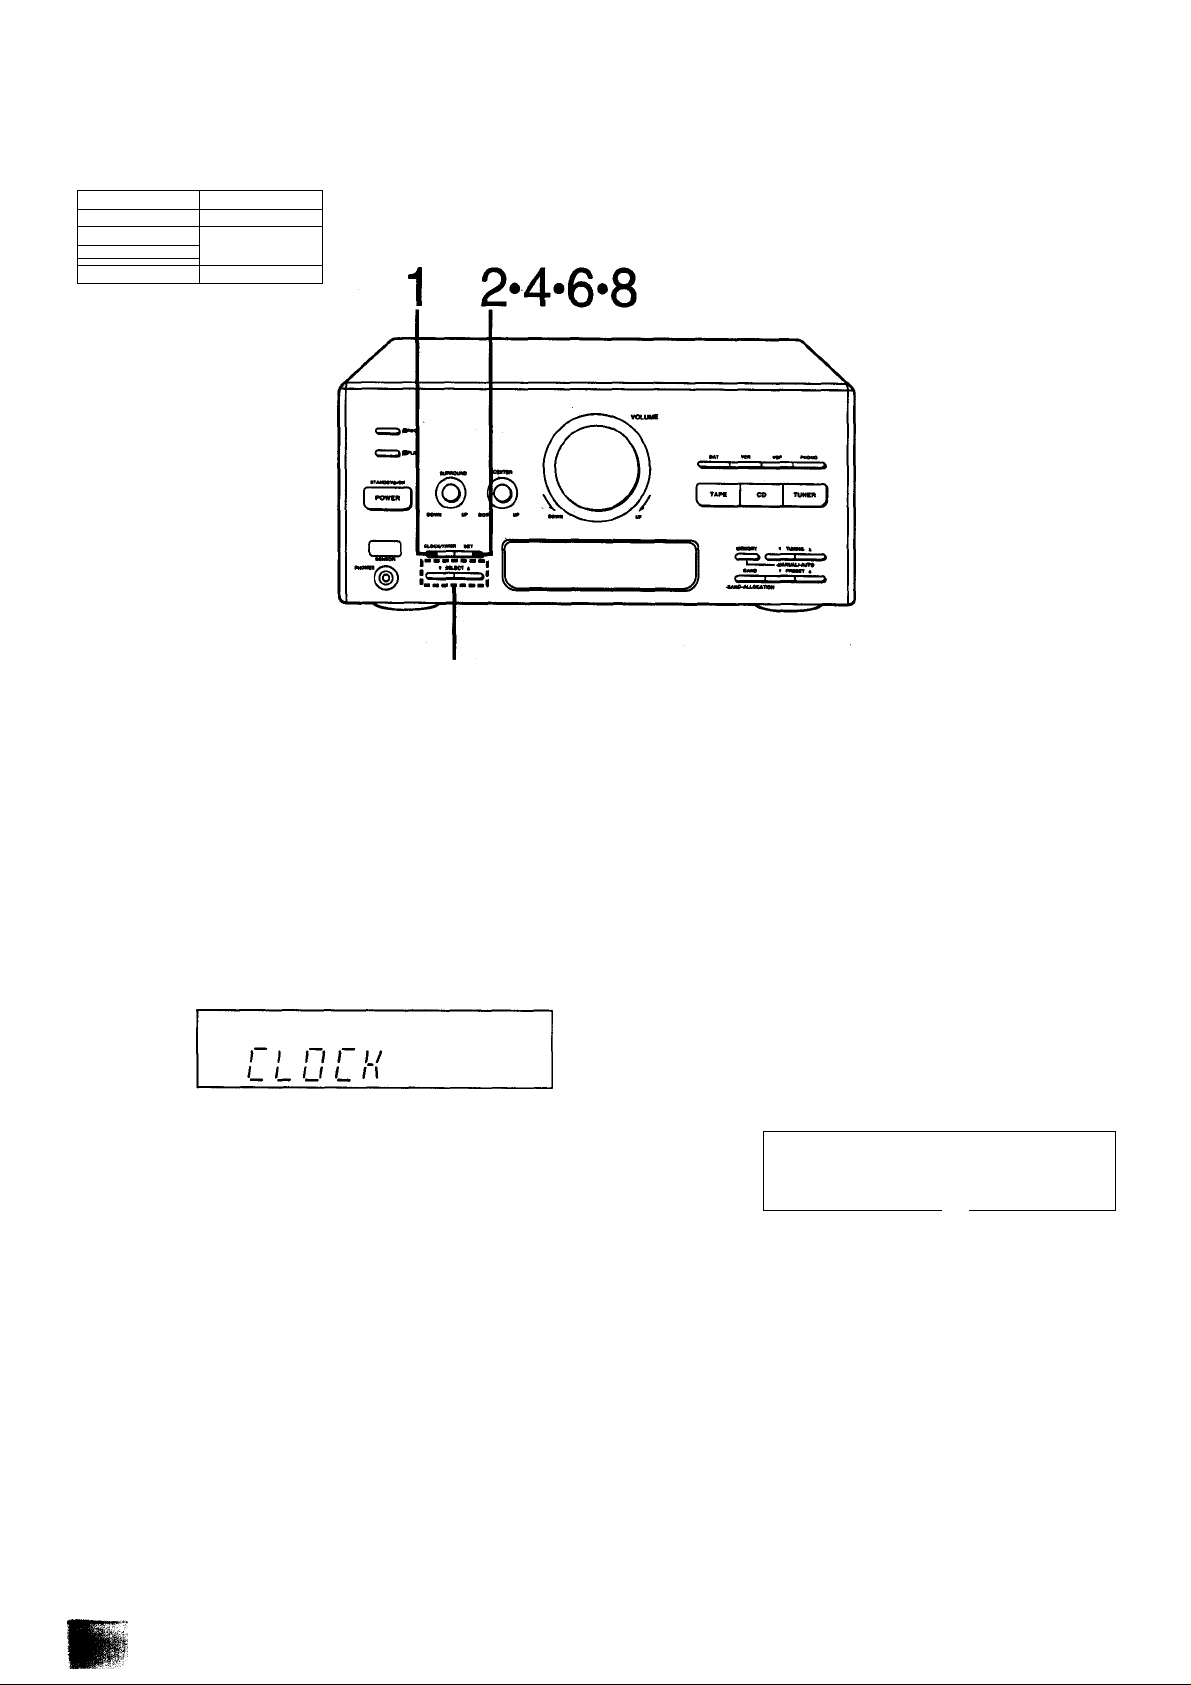
Setting the Time of Day
-----
1'
----
m
Jom
r-t ( .. ..J
o oo CT-] 1
Z 1 1 ...........
...
3-5-7
— I
mol—
These instructions expiain how to set the time for 16:25 (4:25 p.m.)
on Wednesday.
Switch on the power.
1 Press CLOCKH-IMER to select “CLOCK”.
The display will show CLOCK.
The display will return to what was previously indicated if you
allow 7 or more seconds to elapse before you accomplish the
next operation.
2 Press SET.
The day indicator will start to flash.
iV4-
--SUN —
//■////
3 Press one of the SELECT buttons to select
“WED”.
vl
• — WED—
''IN
Flashing
I I- I I I I
/_/' u u.
4 Press SET.
5 Press one of the SELECT buttons to select
“16”.
Going from 23:59 to 0:00 on the hour display will not change
the day display.
\ L/
_______
_ / / ■ j. / / /
I u- u u.
6
Press SET.
7
Press one of the SELECT buttons to select
“25”.
Going from 59 to 00 on the minute display will not change the
hour display.
WB)
\
II ■ ii~
1 U-
Flashing-
8 Press SET to finish setting the time.
After about 2 seconds, the display will return to what it were
before entering the clock setting mode.
To display the clock again, press CLOCK/TIMER. The display will
show “CLOCK”, and then clock will appear for 5 seconds.
“E” appears on the display if the power cord has been once discon
nected or there has been a power failure. If this happens, reset the
time.
/
L.
X"
25
Page 26
Listening to Radio Broadcasts
Manual tuner operation
CactbaS
632) a
OC±)<±)Ci5Cb
c±>oc5c±)(i)
dbse)6
□ □□o6
"aassa
daaaa
SHsaa
QaaoS)
□oadb
Sc3t±D
1 Press BAND to select FM or MW or LW.
Each time you press BAND, “FM", “MW”, “LW" will be
displayed in order.
STIREO
FI1
Press one of TUNING to tune in to the desired
broadcast.
The display will show the frequency in which you have tuned.
• If you have tuned in an FM stereo broadcast, the FM stereo
indicator will appear.
• If you can't receive the desired broadcast or can’t tune in the
desired frequency in the MW broadcast, you may need to
change the “allocation" setting. (See right.)
■ If noise is excessive in the FM mode
(Only from the remote control)
Press FM MODE.
MONO-
FI1
n n r n
O O. O U
n n l~ n
r I /_/, /■■/1 I “
QUART2L0CK
BALANCE
liov)vcw
■ MW allocation settings
This unit comes equipped with an electronic digital tuner that di
vides the broadcast band into many small steps. These steps match
VOUMi
=
R =MIN
the assignable broadcast frequencies and intervals in between.
Each country allocates (assigns) broadcast bands according to their
particular needs.
By adjusting the allocation, you can enable this tuner to receive MW
broadcasts allocated in 9 kHz steps.
1. Press BAND to select MW.
2. Press and hold BAND for approximately 3 seconds.
To return to the original frequency indication, repeat steps 1 to 2
above.
Lights
The sound will then be heard in monaural. If the broadcast signal is
weak, or if there is a large amount of Interference, you will get a
clearer sound using FM MODE.
26
Page 27

Automatic memory presetting
When you preset broadcast frequencies to the memory, you can
then easily select any of those broadcast frequencies by pressing
one of the preset-tuning buttons on the unit or remote control. There
are two methods for presetting broadcast frequencies in the mem
When this method is used, the frequencies of the selected broad
cast stations are automatically preset (in sequence from lower to
higher frequencies) into memory; “channels" 1 to 39 are available
for the presetting of FM stations, and "channels” 21 to 39 are
available for MW stations, and “channels" 31 to 39 are available for
LW stations.
When you preset a broadcast station to a channel that has already
been preset, the prior presetting will be erased, so if, for example,
FM frequencies are preset to channel 1 to 39 and then MW frequen
cies are preset, the first MW frequency will be preset to channel 29
(thus erasing the FM presetting to channel 29), the second MW
frequency will be preset to 30 (erasing FM 30), and so on.
Switch ON the power.
(Step 1 also available from the remote control)
1 Press BAND to select FM.
Each time you press BAND, "FM”, “MW”, “LW’ will appear in
order.
2 Press and hold one of the TUNING until the
display shows the lowest frequency.
Press TUNING momentarily to stop changing frequencies
when the displayed frequency approaches the lowest fre
quency. Tap TUNING a few times until the lowest frequency is
reached.
ory; the automatic method (see below) and the manual method.
(See page 28.) Select whichever method you prefer. When you
memorize a new frequency on a preset channel, it cancels the
frequency previously memorized on that preset channel.
3 Press and hold MEMORY to start the memory.
Keep MEMORY depressed until MEMO indicator starts flash
ing, then release the button.
I857>VCB
\ I /
r/i/f LJ I I I /
rll U I.
After completing the memory presetting, MEMO indicator will
go out and the display will show the last preset frequency.
n II I l"/^‘
If I "iff I
MEMO indicator will flash.
4 Press BAND to select MW, and follow steps 2,
3.
Repeat above procedure tor LW broadcast station preset.
To confirm the stations which are preset to each channel, press one
of PRESET. Each time you press it, the display will show in which
channel you have preset the broadcast station.
Use the manual memory (see page 28) if the signal strength is low,
preventing the station from being memorized with the auto memory,
or if the signal strength is excessive, causing the frequency to drift.
27
Page 28

Listening to Radio Broadcasts (continued)
Manual memory presetting
When this method is used, you can freeiy preset .stations to any
desired channel.
(Steps 1 and 4 also available from the remote control)
1 Press BAND to select FM or MW or LW.
Each time you press BAND, “FM”, “MW”, “LW” wiii appear in
order.
2 Press one of TUNING to tune to the desired
broadcast.
(See “Automatic scanning” right.)
Each time you press one of TUNING, the frequency display
will change as follows:
FM; 0.05 MHz step
MW; 9 kHz, 10 kHz step
LW: 9 kHz
3 Press MEMORY momentarily.
MEMO indicator will illuminate.
-------------
You can preset FM stations in monaurai position. (See page 26.)
5 Press MEMORY momentarily.
Once the desired station has been memorized, MEMO indica
tor will no longer illuminate.
The channel indicator will stop flashing.
■ Automatic scanning
You can make an automatic tuning using TUNING.
Press and hold one of TUNING until the displayed
frequency begins to change.
T TUHIHQ t
c
The changing of the displayed frequency will be automatically
stopped if a broadcast station frequency is located during the tuning
process.
I^VCR WU»«
OUMT Loa(| >■ ■“
Tm O O ri n
I 11 U U. U U
The channel indicator will flash.
4 Press one of PRESET to select the desired
preset channel.
I^vot
^
rn iO U. U
n n n n
1
Frequency Preset Flashing
” 1
channel
"l
»X~ = -
ft Smm
MMANCS
VOUM
L MM
To cancel the automatic scanning, press one of TUNING once
again.
When there is excessive interference, the automatic scanning may
not function.
Page 29

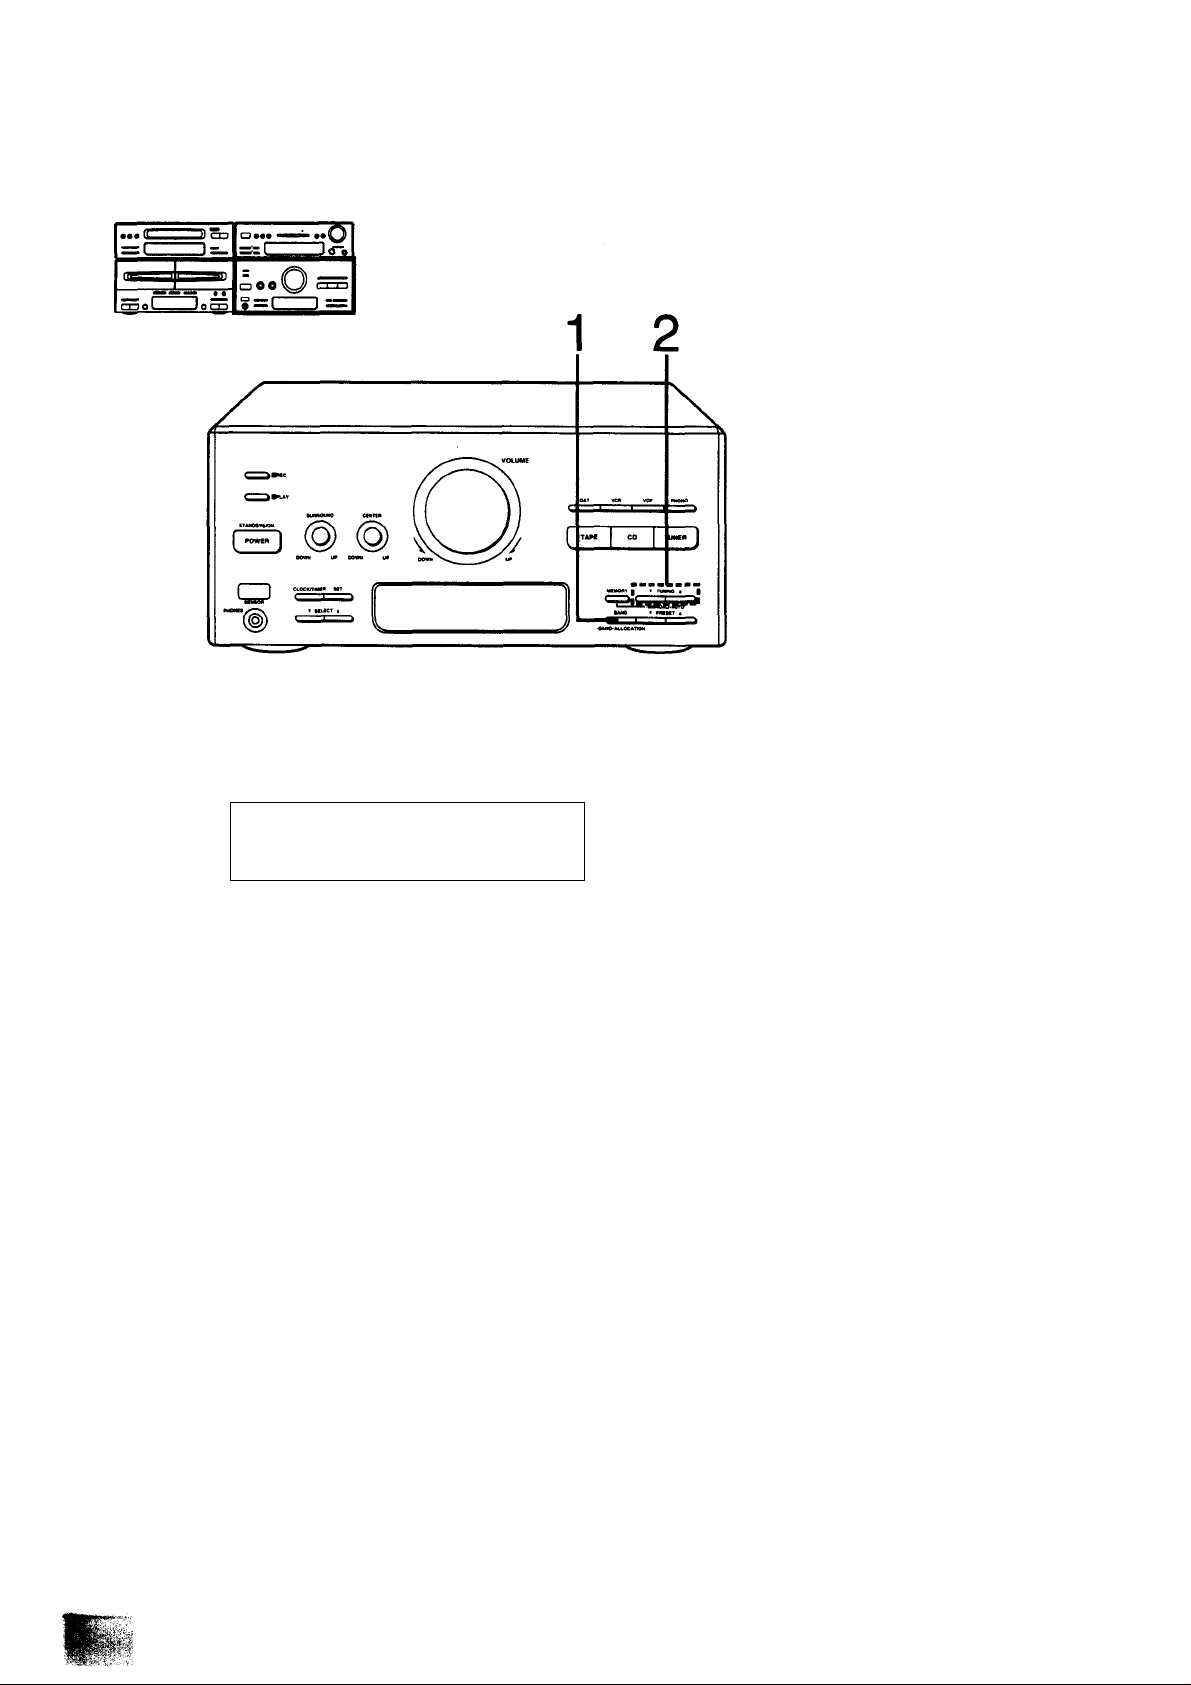
Memory tuner operation (to listen to broadcast stations preset into memory)
□ ••• «•
—r 1-
f ....
cool Jocgj
1
____
OOolQ) CXD
• =1
-------------
JiTi
1 =
□a* a a
.s5S2>.-A
•ócbóó3
2
Switch on the power and be sure you’ve completed the steps ot
“Automatic memory presetting" on page 27 or “Manual memory
presetting” on page 28.
■ From the main unit
(Aiso avaiiabie from the remote control)
Press one of PRESET to seiect the desired preset channei.
The selected preset channel will appear on the display.
VGUM
n Smn
■MANCE
STEREO
r-h
B^VCR
OUMIZLOCK
1 11 1 1 1 n
O -.1. U
1
Preset channel
CM
□nmòò
■saaaa
1
a“aaaa
aasc5£>
aaacSBi
ùùCSdb
5cz3t±3
■ From the remote control
1 Press TUNER/BAND.
2 Press one of the preset-tuning buttons corre
sponding to the preset channel you wish to
tune in.
To select a preset channel between 1 and 9:
Press the appropriate preset-tuning button 1 -9 directly.
To select a two-digit preset channel:
First press >10 and then a preset-tuning button 1-0.
For example:
Preset channel 13: EZilHIHI]
Preset channel 20:
Preset channel 35: rSioT-fT|-|Tl
■ Most recent memory
The most recent memory system remembers the broadcast station
last tuned In when you switch the power to standby mode or select
other functions. When you switch the tuner back on, the last tuned
station will be on.
The programmed settings will stay In the memory for approximately
2 weeks, even if the power cord is disconnected.
29
Page 30

Listening to Compact Discs
Sequential play
Sequential play refers to play beginning with the-first track and
continuing in order to the last track.
Inn-1
3««« MMW ••
ssd
]<i~.
:1 1=^
-------
“no disc” appears on the display If you have not set a disc into the
disc tray.
(Steps 2,3 also available from the remote control)
1 Press OPEN/CLOSE to open the disc tray.
Insert the disc with label facing up.
Do not put your finger through the hole in the middle of the disc
holder. It could get caught when the holder closes.
1-2
Press the CD play button.
Disc play begins from the first track on the disc.
The frames above and below the track currently playing wili
flash while the track Is played and go out at the end of that
track.
The track currently Elapsed play
Flashes playing time
Label must face up.
2 Press OPEN/CLOSE to close the disc tray.
When the disc tray is closed, the disc rotates, and the total
number of tracks and total playing time both appear on the
display.
Total number of tracks Total playing time
E S S S E / /“
E E E E ES I i~i
|ñ¡ SS SS SS ss S
When there are 16 or more tracks on the disc, ^ will appear.
“i—iTtXt i¿i ili JLi
TsT S E Í2 5S
52 S SS S 5S S
Play stops automatically when the last track on the disc fin
ishes playing. (The display returns to the total number of
tracks and total playing time indications.)
Notes:
•If you press the CD play button instead of OPEN/CLOSE after
inserting a disc, the tray will close and play will start directly from
the track 1, but the total tracks and total playing time will not be
displayed.
•The toteti playing time which appears on the display includes the
time between tracks, hence there may sometimes be a difference
of several seconds between this time and the playing time indi
cated in the liner notes that comes with the disc.
lit I I
n
Page 31

■ To temporarily stop the disc play
(Also available from the remote control)
Press the pause button.
II
The pause Indicator will appear.
n. n c
$ S S S 3S
S3 SJ 5SI 53 ¡SS !3
To play again, press the CD play button.
■ To Stop the disc play
(Also available from the remote control)
Press the stop button.
The player switches to the stop mode and the total number of tracks
and total playing time will appear.
III I I ri
31
Page 32

Listening to Compact Discs
Direct access play
(Only from the remote control)
Direct access allows you to start sequential play from a specific
track to the last track on the disc.
(continued)
1 Press CD. 2 Press the numeric button to select the desired
track number.
To select a track between 1 and 9:
Press the appropriate numeric button 1-9 directly.
To select a two-digit track:
First press >10 and then a numeric button 1-0.
For example:
Track no. 13; I aio l-|T|-|T|
Track no. 20: riioT-fTI-in
Track no. 35: [Tio'l-ITI-fsl
Play will start with the track you select, continued through the last
track on the disc, and automatically stop at the end.
____
Page 33

Program play
(Only from the remote control)
This function allows you to program up to 20 tracks on a disc in any
order you choose.
1
CANCEL
a
1 Press CD.
2 Press PROGRAM.
PROGRAM indicator will appear on the display.
1 2 9 4 S
• 7 • 9 10
Press the numeric button to select the track
you want to play.
Programmed the programmed
Programmed track.
number
________
To select a track between 1 and 9:
Press the appropriate numeric button 1-9 directly.
To select a two-digit track:
First press >10 and then a numeric button 1-0.
For example:
Track no. 13: [WHlHI]
Track no. 20: | aio h-fTI-in
Track no. 35: | ^io j-fJI-fsl
order
n
l~l
PROGRAM
=l
n* i“i
Total playing time of
tracks
D O
•FULL appears on the track display when you try to program
more than 20 tracks.
•—:— appears on the time display when the total play time of
the programmed tracks exceeds 99 minutes 59 seconds. In
this case, the display will not show the total time.
4
Repeat Step 3 until you have completed the program.
Press the CD play button.
5
The program play will begin from the first track you pro
grammed.
■ To clear a programmed track
1. Press CANCEL.
CANCEL indicator will light.
2. Press the numeric button of the track you want to cancel.
3. Press CANCEL.
R
CANCEL indicator will go off.
■ To add the entry
You can add the entry in the play or stop mode.
Press the numeric button corresponding to the track to be added.
■ To cancel program play Press PROGRAM.
CD
The compact disc player resumes sequential play mode.
33
Page 34

Listening to Compact Discs
Random play
The microcomputer will automatically select a sequence of tracks to
be played in random order.
(continued)
— l
--------
CX3
..
1-
O ••• «OBP •• Ci
=!=t - iX
aOe\JI C3=a
Jam
g = l
-------
1 =
Press RANDOM in the stop mode.
S IE. S S S m. r
S-E-S S 5S ;
SUSlSSSSSS nAcx RAN
1 1 >
XMM
■ To cancei random piay
1
Press RANDOM once again to go off RANDOM indicator.
RANDOM
RANDOM indicator lights.
Random play will start.
During program play mode, the tracks will be played randomly in the
programmed tracks.
RANDOM indicator on the display will go off and the compact disc
player resumes the sequential play mode.
Page 35

Special features
• ••
---------------
Jj m
o*** **C^
-1 j-
- L
mol - , Jem
=Sl Irf-.
oOO^^ r [ 1 1
y = 1 1 =
■ Search function
You can search rapidly forward or backward on the disc for specific
sections.
While in play mode, press and hold one of the search buttons.
Release the button when you have reached the desired point.
^ ; You can search forward.
C
□ : You can search backward.
At first the search is slow, and then becomes more rapid if the
button is kept depressed.
The volume level will drop to about Va of normal.
During program play and random play, search will take place within
the track being played.
■ Skip function
(Also available from the remote control)
Press either C □ or C
:> until you reach
the desired track.
^ : You can skip forward.
□: You can skip backward.
In sequential play/program play mode;
^ : You can skip as many tracks as the number of time
you press the button.
You can skip to the beginning of the track being
played. If you press this button again quickly, you can
skip to the beginning of the previous track.
Note that in a backward skip, the current track is
included in the count.
In program play mode, you can skip only within the programmed
tracks.
In random play mode:
^: You can skip to the beginning of a random track.
c
□: You can skip to the beginning of the current track.
35
Page 36

Listening to Compact Discs
(continued)
ii?* 1 1 =_
PTiftL
■ Repeat function
(Also available from the remote corrtrol)
This function repeats the play of all tracks.
Press REPEAT before or during piay.
REPEAT
L
Oe*» ■
ooev
JocX)
8=c:
E S 2 S S /
E E S E g
E OS E E (^Dtimck
J<r,
C O* Z
I, I I I
■ To cancei repeat piay
Press REPEAT once again.
REPEAT
I ~ ^
(*") indicator on the display will go off.
indicator will appear on the display.
If you press REPEAT while program play is taking place, the CD
player will repeat only the programmed tracks.
You can enjoy the same track over and over if you press REPEAT
when only one track is programmed.
36
Page 37

Listening to Tapes
To play back prerecorded cassettes
You can use either deck 1 or deck 2 for tape playback by following
the same steps. (This page shows an example using deck 1.)
... I(
2— **
mol . Jon-I
o««« «
1-
oOO V
g=C
Jd%
4 13 2
nodbsa
63S 6
cbcbcbdKij
o*o5a<3
opcBa
cfTacjaB
HcSSdcdB)
QGGOb
(Step 4 also available from the remote control)
1 Press the deck 1 stop/cassette holder open
button, and then insert the cassette you wish
to play.
Insert the cassette with the exposed tape facing down.
The cassette holder will automatically close.
You can use normal, chrome and metal tapes for playback.
This deck automatically identifies the kind of tape loaded, and
sets the equalization accordingly.
(Auto tape selector function)
2 Press REVERSE MODE.
Each time you press, one of the reverse modes' indicator will
light to show which mode you select.
T~* : The player plays one side only, and then the tape
automatically stops.
The player plays both sides 8 times, and then the
tape automatically stops.
a
Press DOLBY NR if the cassette you want to
play was recorded with Dolby noise reduction
B or C mode.
Each time you press, the Dolby noise reduction indicators (B
or C) will light.
If the tape was not recorded in a DOLBY NR mode, press
DOLBY NR to go off the Dolby noise reduction indicator (B or
C).
Press one of the playback buttons to start
playback.
>: The forward side (front side) will play.
<: The reverse side will play.
The display indicates which tape is playing.
To operate with the remote control when you load cassettes in
both decks, press DECK 1/2 to select the deck you want to
use.
Deck 1 or Deck 2 remote indicator ((SQ) will illuminate to
show which deck you can operate.
GO
When you load a cassette Into only one of the two
decks:
The player playaboth sides of the tape, then automat
ically stops.
When you load cassettes into both decks:
The player plays both sides (forward and reverse) of
the tape in deck 1, and then both sides of the tape in
deck 2. (Sequential tape play—see page 39.)
37
Page 38

Listening to Tapes
■ To stop tape playback
(Also available from the remote control)
Press the deck Istop/cassette holder open
button.
■/A
■ To close the cassette holder
(When you want to close the cassette holder without inserting the
cassette tape)
(continued)
Press CLOSE.
CLOSE
■ Full auto-stop
When the tape reaches the end, the tape transport will automati
cally stop.
■ About the Dolby Noise Reduction system
Using Dolby NR reduces tape hiss in the high-frequency range. It
boosts the level of the high-frequency during recording, and iowers
it by the same amount during playback, simultaneously reducing
high-frequency noise incurred during the recording process.
B type:
Noise is reduced to about ^/b. Use this type when playing a tape in
the Dolby NR mode.
Ctype:
Noise is reduced to about Vio. Use this type when recording and
piaying back a high quaiity, high dynamic range source such as a
CD or FM broadcast.
Dolby noise reduction and HX Pro headroom extension
manufactured under license from Dolby Laboratories Li
censing Corporation. HX Pro originated by Bang & Olufsen.
“DOLBY”, the double-D symbol OD and "HX PRO” are
trademarks of Dolby Laboratories Licensing Corporation.
Press
Page 39

Sequential tape play
You can listen to two tapes consecutively with the procedure below.
(Step 4 also available from the remote control)
1 Load cassettes in decks 1 and 2.
Load with the side that you wish to listen to first facing you in
deck 1.
2 Press REVERSE MODE to set the OO mode.
Lights
4 Press deck 1 forward-side playback button
(>) to start playback.
Two tapes will play back as follows:
Forward
side of tape
in deck 1
Reverse
side of tape
in deck 1
(
Forward side
of tape in
deck 2
Reverse \
side of tape
In deck 2 /
[
|"| ri
n n
1.1 #.i
cx?
i"i 1*1 i“i n
i.f f.i #.i
lES III
O 1.1
Press DOLBY NR if the cassette you want to piay was recorded with Dolby noise reduction B or C mode.
The Dolby noise reduction indicator (B or C) will light,
if the tape was not recorded in a Dolby NR mode, press the
Dolby noise reduction button and the Dolby noise reduction
indicator (B or C) will go off.
Notes:
•You cannot select Dolby NR for deck 1 and deck 2 respec
tively.
•We recommend that you use cassettes of the same type
(Dolby noise reduction) in both decks.
After repeating above operation 8 times, the tape will automatically
stop.
You can also start playback from a position other than the forward
side of the tape in deck 1.
■ To Stop sequential tape play
(Also available from the remote control)
Press the stop/cassette holder open button In which the tape Is currently playing.
39
Page 40

Listening to Tapes (continued)
----
)J C-T3
— r-
S£
__ _
_
.....
1..
Oeee «
OOO V
g=C
To find the beginning of a program
(TPS: tape program sensor)
(Also available from the remote control)
Press (TPS) button while the tape is
playing.
While a TPS operation is taking place, PLAY indicator will flash.
If the forward side (O) of the tape is playing:
3 ..The tape will play from the beginning of the next
program.
□ ..The tape will rewind to the beginning of the present
program. Then the program will play again.
If the reverse side (<) of the tape is playing:
The reverse operation should take place;
L
Notes:
TPS (Tape Program Sensor) is the function that searches for the
silent passage in a tape program. So, it may fail to operate correctly
in the following situations;
•When there is no dead space between tape programs (for exam
ple, when you are playing a tape recorded from a microphone).
•When the interval between programs (dead space) is less than
4 seconds.
•When there is a particular low-level passage or silent passage in
the middle of a program.
•When there are less than 10 seconds from the point where TPS
starts to the beginning of the program.
•When there are less than 10 seconds from the point where TPS
starts to the beginning of the next program.
•When a tape has been recorded with fade-ins (the function that
increases the volume level gradually at the beginning of a pro
gram) and fade-outs (the function that decreases the volume level
gradually at the end of a program).
..The tape will rewind to the beginning of the present
program. Then the program will play again.
□ ..The tape will play from the beginning of the next
program.
To fast forward or rewind the tape
(Also available from the ramote control)
Press M-4 (TPS) button while the tape is stopped.
(TPS) I
The tape will start moving at high speed in the direction of the arrow.
Page 41

Easy Play
(Only from the remote control)
If you set a compact disc or cassette tape(s) in advance, you can
start play directly by pressing one of the easy play buttons from the
power standby condition.
Listening to compact discs
Press the easy play button marked “CD”.
CD
Easy play will start with the fade-in function. (See “What is fade-in”
below.)
ocbcbcbcb
djcbdxicb
d5b5*<S
□ddoo
•acsTsoa
cibcfaacf)
asi3c5a
E3t5&(5&
(3C)Cic5b
Qc=3till
The play will start from the first track.
CO TAPE
aaa
EASY PLAY
a
Listening to tapes
Press the easy play button marked “TAPE”.
TAPE
a
Listening to radio broadcasts
Press the easy play button marked “TUNER”.
TUNER
Q
What is fade>in
When you set the volume level under -60 dB last, the easy play will
start vinth volume increasing to -60 dB gradually (fade-in). When
you set the volume level over -58 dB last, the play will start with
volume increasing gradually up to the volume level you set last.
The playback will automatically start under the same conditions
(tape direction and reverse mode) last set when the power was
switched to standby condition.
When tapes have been loaded in both decks, deck 1 has priority.
You can receive the station last tuned in when the power was
switched to standby condition.
Gradually increasing the volume level
Over -58 dB
Under -60 dB
Beginning of the sound
41
Page 42

Making a Recording (Deck 2 only)
To record from the desired source
Although you can record a compact disc using theioliowing proce
dure, we recommend that you use the compact disc edit-recording
procedure to record a compact disc. (See “Edit-Recording from
Compact Discs” on pages 46-52.)
o ••• ■
aoeV
^=C
(Steps 5 and 6 also available from the remote control)
Switch on the power.
Check that the tape's erasure prevention tabs (see page 75) are
intact, and then insert the cassette into deck 2.
Check that sound processor’s display shows “FLAT”.
(See page 54.)
You cannot record on the leader tape (the first few revolutions) so
take up the leader tape in advance. (See page 44.)
1
Press the deck 2 stop/cassette holder open
button to load a cassette in deck 2.
When making a Dolby NR recording, press the
DOLBY NR so that the Dolby NR indicator (B
or C) lights.
Press REVERSE MODE to select the reverse
mode you want to use.
•;—^ ; One side will record, and then the tape will stop
automatically at the tape end.
: Both sides will record (forward side-» reverse side),
then the tape will stop automatically at the tape
end.
When making a CCRT recording, press CCRT
so that the CCRT indicator lights.
(See page 43.)
Start of the setting
(After about 30 seconds) ri
Finish of the setting
••O
CCRT
CCRT
«Aft
LEVEL
EQ
2 3
To make a tape-to-tape recording, see “Tape-to-tape recording
from deck 1 to deck 2" on page 45.
You can use normal, chrome and metal tapes for recording.
The deck automatically identifies the kind of tape loaded, and sets
the bias (for recording) and equalization accordingly.
1 45 6
Press REC PAUSE to put the cassette deck
into the recording standby mode; then select
the desired sound source.
Lights Flashes
When you record from the radio:
After pressing REC PAUSE;
1. Press BAND to select FM or MW or LW.
2. Press one of PRESET to select desired broadcast station.
Be sure you've completed the steps of “Automatic memory
presetting” on page 27 or “Manual memory presetting" on
page 28.
Using the remote control, you can select the desired broad
cast station directly by pressing one of the preset tuning
buttons.
When you record from the compact disc:
Be sure to select the tape direction in advance. When you
want to change the tape direction, press opposite play button,
and then press the stop button.
After pressing REC PAUSE;
Press the CD play button.
The recording will automatically start when you press the CD
play button (Synchro start function).
Your attention is drawn to the fact recording prerecorded
tapes or discs on other published or broadcast material may
infringe copyright laws.
Page 43

b Press one of the playback buttons to start
recording, then start playing the source to be
recorded.
>: When recording on either the forward side or both sides
<: When recording only on the reverse side
■ To stop recording from a compact disc
(Also available from the remote control)
Press the CD stop button on the CD player or the
deck 2 stop/cassette holder open button on the
cassette deck.
After recording of the compact disc has completed, the cas
sette deck will create a non-recorded passage of about
4 seconds, and then go into the recording standby state.
Note:
Do not connect or disconnect the microphone while recording. It
breaks the recording.
■ To briefly interrupt recording from the radio
(Also available from the remote control)
When you want to cut an unnecessary part while recording;
Press REC PAUSE.
The cassette deck will go into the recording standby state.
To resume recording, press the playback button corresponding to
the direction in which recording is taking place.
■ To briefiy interrupt recording from a compact
disc
(Also available from the remote control)
When you want to cut an unnecessary track while recording;
Press the pause button on the compact disc
player.
II
f"
(On the CD player)
(On the cassette deck)
■/±
Li
When you press the CD stop button, the cassette deck will create a
non-recorded passage of about 4 seconds, and then go into the
recording standby state.
CCRT recording function
CCRT (Computer Control Record Tuning) is the function which
identifies the quality of the tape (concerning bias, level, equalizer)
automatically and sets the most desirable recording condition. After
the setting has completed, the sound processor display shows
"SET”, “OK”.
The CCRT setting will remain in the system’s memory even after
the power is switched to the standby mode.
Notes:
•When you activate the CCRT setting, the test signal will be re
corded on the tape. Please note that the previous recording will be
erased.
•Do not press any input select button while the CCRT setting.
•Do not insert or remove the cassette tape after the CCRT setting
has completed. It cancels the CCRT setting.
•The CCRT setting may not be possible with the old cassette tape
or at around the end of the cassette tape. (The CCRT frame starts
to flash.) In this case, press REC PAUSE to cancel the CCRT
setting (the CCRT indicator goes off), and proceed to the next
step.
The cassette deck will create a non-recorded passage of about
4 seconds, and then go into the recording standby state.
Press one of the skip buttons until you reach the desired track, and
then press the CD play button on the CD player to resume re
cording.
■ To Stop recording from the radio
(Also available from the remote control)
Press the deck 2 stop/cassette hoider open but
ton on the cassette deck.
m±
■ To cancel the CCRT setting on the way
Press the deck 2 stop/cassette holder open
button.
■/a
■ To cancel the CCRT after the CCRT setting has
completed
Press CCRT.
CCRT/
43
Page 44

Making a Recording
■ To record with desired tone quality
You can make a recording with the equalizer or simulated listening
environment effect. (See pages 54-59.)
When playing back such recordings, press ON/FLAT on the sound
processor to set “FLAT".
■ To erase a recorded sound (Deck 2)
When you make a new recording on a previously recorded tape, the
new recording will automatically erase what was previously re
corded. To erase a recorded sound without making a new record
ing, perform the following steps.
Note:
Be sure to disconnect the microphone from the microphone jack
before following the steps.
[Steps 5) and 6) also available from the remote control]
1) Press the TAPE input select button on the tuner amplifier.
2) Press DOLBY NR so that “B” or “C" is turned off.
3) Insert the recorded tape into the cassette holder of deck 2.
4) Select the desired reverse mode.
5) Press REC PAUSE.
6) Press the playback button corresponding to the side to be
erased.
(continued)
■ Concerning the leader tape
The leader tape is the first few revolutions that is no recordings can
be made.
(recordings can be made) (No recordings can be made)
Page 45

Tape-to-tape recording from deck 1 to deck 2
The recording level and the noise reduction effect of the original
(playback) tape will be recorded on the new tape just as they were
in the original recording.
(Step 3 also available from the remote control)
1
Insert the playback cassette Into deck 1 and
the cassette you are recording on (the editing
tape) into deck 2.
Check that the tape's erasure prevention tabs (see page 75)
are intact, and then insert the cassette into deck 2.
You cannot record on the leader tape (the first few revolutions)
so take up the leader tape in advance. (See page 44.)
Select the desired reverse mode.
Each time you press, one of the reverse mode indicators will
light to show which mode you select.
: Single-sided recording
Two-sided recording (forward side-» reverse side)
In case the length of a tape loaded in deck 2 is longer
than a tape in deck 1, deck 1 repeats the playback
until deck 2 completes the two-sided recording.
(8 times max.)
OO
Set the tape direction to ([> FWD) of deck 1
and deck 2.
Confirm that both decks are set to (>) tape direction. If (<)
When making a CCRT recording, press CCRT
Two-sided recording (forward side-» reverse side)
indicator light, first press > play button, and press the stop
button.
so that the CCRT indicator lights.
(See page 43.)
Press one of the ONE TOUCH TAPE EDIT
(NORMAL or HIGH) to start recording with the
desired editing speed.
NOR: When you wish to monitor the sound while re(NORMAL) cording
HIGH: When you virish to record at high speed
(about 2.0 times normal speed)
After the recording has finished, the both decks will stop.
•Some TV sets generate noise that could be recorded during
tape-to-tape recording. To prevent the possibility of this, do not
use this system close to a TV set.
• Do not press CO edit recording buttons (J. FIT, ALBUM, LAST
FADE) while tape-to-tape recording is in progress. It changes the
tape-to-tape recording to the CD edit recording mode.
•For optimum results, use an editing tape of the same or higher
quality than the playback tape.
■ To stop the tape-to-tape recording
(Also available from the remote control)
Press the deck 2 stop/cassette holder open
button.
■/a
Both decks will stop.
■ To enjoy another source while recording
Press one of the input select buttons on the tuner
amplifier, and start the sound source.
You can change the volume level and tone quality without affecting
the recording.
45
Page 46

Edit-Recording from Compact Discs
You can edit up to 20 tracks.
Using the edit-recording safeguards against a break in the continu
ity of the sound when the recording changes from one side of the
tape to the other.
Before recording, the cassette deck will automatically rewind the
tape to the beginning and make a non-recorded passage of about
10 seconds, then stop.
Sequential CD recording (ALBUM)
The tape length indicated on the cassette tape is slightly shorter
than the actual tape length. In this sequential editing mode, the
cassette deck will fast-forward and rewind the tape in order to make
a rough estimate of the tape length. After making an estimate, the
cassette deck starts recording to calculate the actual tape length.
If the system determines it is possible to record one more track on
side A, the cassette deck rewinds the tape side A to the end of the
last track recorded and the first track assigned on the tape side B
will be recorded on the tape side A.
So you don't have to set the cassette tape to the starting position
before recording.
In any of the following edit-recording functions, you can record with
desired tone and effect.
See pages 54-59.
When playing back such recordings, press ON/FLAT on the sound
processor to set to FLAT.
A tape such as follows will be made;
First-arranged
(Side A) 11 i„t«ek
(Side B) 11 5th 11 6th
Re-arranged
(Side A) 11 i«t
(Side B) 11 6th 11
2nd II 3rd I I 4th
7th
3rd
7th
~1 I eth
~1 I Wh
4th
Switch on the power.
1 Load a cassette in deck 2.
Check that the tape's erasure prevention tabs (see page 75)
are intact, and then insert the cassette into deck 2.
When making a Dolby NR recording, press DOLBY NR to
select “B” or “C”.
46
2 Press REVERSE MODE to select the “<=^”
reverse mode for automatic two-sided re
cording.
3 Press OPEN/CLOSE to load a disc.
Page 47

4 Press ALBUM.
ALBUM indicator wili iight.
The recording wiil start after the foiiowing steps.
1. The CCRT function will activate automatically.
(See page 43.)
2. The cassette deck will fast-forward and then rewind the
tape to measure its rough length.
3. The cassette deck will automatically advance the tape be
yond the leader tape, and then stop.
4. The compact disc player automatically scans for the peak
(highest) level of the entire disc (ATLS; see below) and
then recording will start.
The tracks assigned on tape side A
The tracks assigned on tape side B
When edit-recording has finished, the deck automatically enters the
recording standby mode.
■ To specify the tracks to be edited
When you want to specify the tracks to be edited, program tracks
using the program play procedure. (See page 33.)
After completing the step 3 on the previous page;
1. Press PROGRAM on the remote control, and then specify the
tracks to be recorded in the desired sequence.
2. Press ALBUM.
Notes:
•You can program up to 20 tracks.
"PULL” appears on the display if you try to program more than
20 tracks.
•"Err” appears on the display when you specify the track of more
than track number 20.
■ To cancei sequentiai CD recording
(Also available from the remote control)
Press the deck 2 stop button on the cassette deck.
You can specify the tracks to be recorded in the desired sequence
using the program play function. (See right.)
When LINK indicator lights, you can record the tracks of another
disc in succession. (See page 52.)
Notes:
•You cannot record the tracks of more than track number 20 using
the sequential CD recording.
•Use a tape of under 99 minutes.
About Automatic Tape Level Setting (ATLS)
Since compact discs generally have a wide dynamic range, careful
setting of the recording level is required to achieve optimum record
ing results.
This system automatically scans (fast search) for the peak (highest)
level of the entire disc, and the tape deck then sets the appropriate
recording level. During this period, the peak level sound will not be
heard.
It takes about 80 seconds to complete ATLS with a compact disc of
60 minutes.
The compact disc player also stops.
47
Page 48

Edit-Recording from Compact Discs
(continued)
Fit editing (J. FiT)
The system specifies the track order that fits on tape side "A".
Like the sequential CD recording, first the system estimates thé
length of the cassette tape. After making an estimate, the cassette
deck starts recording to calculate the actual tape length.
If the amount of blank tape is too great, the compact disc player
selects a different track order that best fits on tape side "A", and
then the cassette deck rewinds the tape side A to the point where
re-recording will start.
O ••• •• Cj
=al iX
1-
* • •
A tape such as follows will be made:
First-arranged
(Side A) lllrttrackll 2nd
(Side B) 11 4th
Re-arranged
(Side A) il~
(SideB) 11
1st
4th
2nd 11 3rd
3rd II ath
Sth 7th
7th I
irithi I
J
Switch on the power.
1
Load a cassette in deck 2.
Check that the tape’s erasure prevention tabs (see page 75)
are intact, and then insert the cassette into ded( 2.
When making a Dolby NR recording, press DOLBY NR to
select “B" or “C".
Select the “ctd” reverse mode for automatic
2
two-sided recording.
Press OPEN/CLOSE on the CD player to load
3
a disc.
Press J. FIT.
J. FIT indicator will light.
The recording will start after the following steps.
1. The CCRT function will activate automatically.
(See page 43.)
2. The cassette deck will fast-forward and then rewind the
tape to measure its rough length.
3. The cassette deck will automatically advance the tape be
yond the leader tape, and then stop.
4. The compact disc player automatically scans for ttie peak
(highest) level of the entire disc (ATLS; see page 47) and
then recording will start.
Lights
4*.^ a. ,±, i ,
kStd ¿J b2j I
When edit-recording has finished, the deck automatically enters the
recording standby mode.
You can specify the tracks to be recorded using the program play
function. (See next page.)
When LINK indicator lights, you can record the tracks of another
disc in succession. (See page 52.)
Notes:
•You cannot record the tracks of more than track number 20 using
the fit editing.
•Use a tape of under 99 minutes.
w
Page 49

■ To specify the tracks to be edited
When you want to specify the tracks to be edited, program tracks
using the program play procedure. (See page 33.)
After completirig the step 3 on the previous page:
1. Press PROGRAM on the remote control, and then specify the
tracks to be recorded.
2. Press J. FIT.
The track order may change so that the system happens to
rearrange it.
Note:
You can program up to 20 tracks.
“FULL” appears on the display if you try to program more than
20 tracks.
■ To cancei fit editing
(Also available from the remote control)
Press the deck 2 stop/cassette holder open but
ton on the cassette deck.
The compact disc player also stops.
49
Page 50

Edit-Recording from Compact Discs
(continued)
Fade out editing (LAST FADE)
Fade out editing allows for automatic recording of compact disc
tracks in order. At the end of side A of the tape, a track that cannot
be recorded completely will be faded out, and then recorded from
the beginning of side "B".
During recording, silent gaps of approximately 4 seconds are auto
matically inserted between tracks (auto space function).
-:z(
o OO 1 11:3
5-S-
----------------
1 J =-
1
--------
—i»—
FRaI S = l J =
------
iX
A tape such as follows will be made: Faded out at the
(Side A) II 1st track 1
(Side Bln I 5th 7th
silent gaps of 4 sec. end of side A
1 2nd 11 3rd 11 ith II StiiN
The track that has faded out at the end of side A
8th
1
9th N
Switch on the power.
1 Load a cassette in deck 2.
Check that the tape's erasure prevention tabs (see page 75)
are intact, and then insert the cassette into deck 2.
When making a Dolby NR recording, press DOLBY NR to
select “B” or “C".
2 Seiect the reverse mode for automatic
two-sided recording.
3 Press OPEN/CLOSE on the CD player to load
a disc.
4 Press LAST FADE.
LAST FADE indicator will light.
The recording will start after the following steps.
1. The CCRT function will activate automaticaliy.
(See page 43.)
2. The cassette deck will automatically rewind the tape and
then advance the tape beyond the leader tape, and then
stop.
3. The compact disc player automatically scans for the peak
(highest) levei of the entire disc (ATLS; see page 47) and
then recording will start.
Lights
SEE I
When edit-recording has finished, the deck automatically enters the
recording standby mode.
You can specify the tracks to be recorded in the desired sequence
using the program play function. (See next page.)
When LINK indicator lights, you can record the tracks of another
disc in succession. (See page 52.)
n. -i j
50
Page 51

■ To specify the tracks to be edited
When you want to specify the tracks to be edited, program tracks
using the program piay procedure. (See page 33.)
After completing the step 3 on the previous page:
1. Press PROGRAM on the remote controi, and then specify the
tracks to be recorded in the desired sequence.
2. Press LAST FADE.
■ To cancei fade out editing
(Also available from the remote control)
Press the deck 2 stop/cassette holder open but
ton on the cassette deck.
■ /A
Note:
You can program up to 20 tracks.
"FULL" appears on the dispiay if you try to program more than
20 tracks.
The compact disc piayer also stops.
51
Page 52

Edit-Recording from Compact Discs
(continued)
To record from another disc on the remaining biank portion of the tape (LINK)
The automatic link function allows you to link tracks from another
disc on the remainder of the tape.
•••
-
---------
“
---------
-
n-ioL. Jor-m
Make sure that LINK indicator lights after editing the compact
disc.
-
O ••• •
^ o e
a O O '
s=c
1 Press OPEN/CLOSE to replace the disc with
another disc.
Note;
When you record from the same disc in succession, press
PROGRAM to select desired tracks instead of pressing
OPEN/CLOSE.
•—»A
The time remaining on tape
UNK 11
1 ” “l i'"i. 1 i i"i
M4 ~ SEC
3 If you record from more discs, follow the
above procedure.
Notes:
•When the first disc has been edited using the last fade editing,
tracks to be recorded on the tape will not be displayed, but it is
possible to record from another disc.
•When the display shows “0:00", you cannot record from another
disc. Press the stop button on the compact disc player to cancel
the edit mode.
• If the time remaining on the tape is shorter than the tracks to be
recorded, you cannot record the tracks. Replace the disc with the
tracks shorter than the time remaining on the tape or press the
stop button on the compact disc player to cancel the edit mode.
2 Press the CD play button.
The system assigns tracks to be recorded on the remainder of
the tape and displays the results.
Tracks to be recorded on tape side A
The compact disc player automatically scans for the peak
(highest) level of the entire disc (ATLS; see page 47), and then
recording will start with the same editing mode of the first disc.
52
LINK indicator
1—ia1 f
• /
TRACK
l"l * l“l 1
•5* “ SEC
■ To specify the tracks to be edited
When you want to specify the tracks to be recorded on the blank,
program tracks using the program play procedure. (See page 33.)
After completing the step 1 left;
1. Press PROGRAM on the remote control, and then specify the
tracks to be recorded in the desired sequence.
2. Press the CD play button.
>
Page 53

Changing the Tone
This system has 5 different equalization curves (EQ) and 4 (5 for
model SH-CH750) simulated listening environments (SFP) pre
programmed.
Demonstration function
This unit comes with a factory programmed demonstration mode
(adjustment example). Use this function for reference of the adjust
ments of equalization curves and simulated listening environments.
Switch on the power.
While playing the desired source,
Press DEMO.
DEMO
The sound mode will be switched as follows:
(For model SH-CH950):
V. BASS-
t
Paramétrique EQ mode
In the parametiique EQ mode, equalizer changes its frequency
level from low to high.
(For model SH-CH750):
5 SFP modes
t
Paramétrique EQ mode FLAT mode
In the paramétrique EQ mode, equalizer changes its frequency
level from low to high.
CCRT mode
5 EQ modes
---
> 4 SFP modes ■
- FLAT mode<------
5 EQ modes
I
■ To cancel the demonstration Press DEMO once again.
DEMO
The demonstration mode is cancelled and the display switches to
the original display mode.
Note:
Do not start recording while the demonstration function is taking
place.
53
Page 54

Changing the Tone
(continued)
To retrieve the equalization curves preprogrammed to this system (EQ)
(Also available from the remote control)
While playing the desired source,
Press EQ to select the desired equalization curve.
Each press of EQ advances the equalization curve setting in the
following sequence.
HEAVY—CLEAR—SOFT
t i
CAR-
-----------------
You can record with desired equalization curves. To playback such
recordings, press ON/FLAT to select FLAT.
■ To cancel the equalization curves
(Also available from the remote control)
Press ON/FLAT to select FLAT.
ON/FLATON/FLATj
FLAT display will appear.
About equalization curves preprogrammed to this system (EQ)
HP ST
UJ CLEAR
Use to clarify the treble range of jazz, etc.
I I o o
l_ /_(_<< 11
[3] SOFT
Use to listen to background music, etc.
C n C T
-f U t I
[4] HP ST (HEADPHONES STEREO)
Use to record a tape for playback using the stereo cassette player
(Headphones Stereo).
• I I n r T
.lit II
5] CAR (CAR STEREO)
Use to record a tape for playback using the car audio system (Car
Stereo).
* OBI MA
■ ■ ■ • n
• t~ Q Q
.nit
[T] HEAVY
Use to add “punch" to rock and other music.
54
¥
Ill I I I / I I
I I l_ I I V _i
Page 55

To retrieve the simulated listening environments preprogrammed to this system (SFP)
(Also available from the remote control)
____
““ » « •
a««« ••Cj
=tL
.....
ooev^
SFP
SFP
[l] LIVE
Use primarily for vocal pieces to add gloss to the vocals.
—)-
—1
1
1' —"
Press SFP to select the desired simulated listen
ing environments.
Each press of SFP advances the simulated listening environment
setting in the following sequence.
' • ' T Ч c
HALL
----
LIVE-
-DISC|D
Ì
(THTER)-
-CHRCH
(THTER) is for model SH-CH750 only.
You can record with desired simulated listening environment effect.
To playback such recordings, press ON/FLAT to select FLAT.
■ To cancel the simulated listening environments
(SFP)
(Also available from the remote control)
Press ON/FLAT to select FLAT.
ON/FLÀT
_____
^
FLAT display will appear.
■ About simulated listening environments (SFP)
preprogrammed to this system
[T] HALL
Use to impart a deep bass and spread which will make you feel as
if you were in a large concert hall.
• WET «0/ lOL
• are
• u 0 f f
. h h (_ (_
[3] DISCO
Use to create powerful bass sounds found in discos.
Ill> i Ы 0
4j CHRCH (CHURCH)
When listen to the sound of the pipe organ, harpsichord, etc., this
mode is most efective to create the rich reverberations as If you
were in the church.
Ш ■ __
^ THTER (THEATER)
(For model SH-CH750 only)
This mode is effective for the movie soft.
Powerful and dynamic sound space available in the movie theater
can be realized.
* BKI sox
• <“ и p г и
. (_ n П (_ n
55
Page 56

Changing the Tone
To increase or decrease the equalizer effect
(Also available from the remote control. For step 2, press one
of EFFECT to adjust the effect.)
You can increase or decrease the effect of the equalization curve in
seven steps.
(continued)
••• If
a3oL__
___
loco
1-
ooe'
S=C
1
Example: HEAVY
1 Press EQ to select the desired equalization
curve.
Each press of EQ advances the equalization curve setting in
the following sequence.
HEAVY—CLEAR— SOFT
t
CAR—HP ST-
(SH-CH7S0)
■ To cancel the equalizer effect «
(Also available from the remote control)
Press ON/FLAT.
OtWLAT
The flat display will appear.
2 Turn JOG to adjust the effect.
: To increase the effect
: To decrease the effect
Such adjustments will not affect the preprogrammed equalization
curves.
C ' Q T
I (_ n I
Page 57

To adjust the reverberation sound
(Also available from the remote control. For step 2, press one
of EFFECT to adjust the effect.)
You can adjust the reverberation sound of the desired simulated
listening environments (SFP).
1 Press SFP to select the desired simulated lis
tening environment.
Each press of SFP advances the simulated listening environ
ment setting in the following sequence.
HALL—►LIVE-
t
(THTER)-i
(THTER) is for model SH-CH750 only.
------
-DISCO
-CHRCH
2 Turn JOG to adjust the reverberation sound.
O' : To increase the effect
■ To decrease the effect
The shape of the equalization curve will change as you adjust the
reverberation sound.
Such adjustments will not affect the preprogrammed simulated
listening environment.
You can adjust the reverberation sound within the range described
below.
HALL: 1.2-3.2 sec.
LIVE: 10-50 mm. sec.
DISCO: 0.5-2.5 sec.
CHRCH: 3.5-5.5sec.
(THTER): 10-30 mm. sec.
(THTER) is for model SH-CH7S0 only.
■ To cancel the reverberation sound
(Also available from the remote control)
Press ON/FLAT.
OtUFLAT
The flat display will appear.
flRl
57
Page 58

Changing the Tone
(continued)
To adjust the specific frequency of the equaiization curve or simuiated iistening environment
Select the desired equalization curve or simulated listening environ
ment before proceeding to step. (See pages 54-55.)
o ••• —
1-
=at
mol —lorn
1 5 3 2-4
1 Press BAND to select the frequency band to
be adjusted.
Each press of BAND advances the frequency band setting
LOW, HIGH1, HIGH2 in sequence.
LOW: 63 Hz-220 Hz
HIGH1.HIGH2: 315 Hz-16 kHz
2 Turn JOG to select the frequency band you
want to adjust.
• vwr EQ.F SOL
• vr
• u T C I
. n i o n I
3 Press JOG MODE to select EQ. L (equalizer
level) mode.
The bar under EQ. L lights.
4 Turn JOG to adjust the equalizer level.
O Press SLOPE (Q) to select the preferred slope,
“narrow” or “wide”.
The curve slope selection changes from “narrow" to “wide”
each time SLOPE (Q) is pressed.
^ “narrow” mode: Only the center frequency that is
. flashing will be boosted.
/ \ “wide” mode: Adjacent frequency level will be also
boosted together with the center fre
quency.
When you want to adjust another frequency band in suc
cession;:
1. Press BAND to select the frequency band to be adjusted.
2. Press JOG MODE to select EQ. F (equalizer frequency) mode.
3. Follow the steps 2-5.
■ To shift the curve slope
The curve slope can be shifted only within the range of
63 Hz-220 Hz (LOW) or 315 Hz-16 kHz (HIGH1-HIGH2).
1. Press JOG MODE to select EQ. F (equalizer frequency) mode.
The bar under EQ. F lights.
2. Shift the curve slope using JOG.
USER” display will appear.
■ To adjust the reverberation sound
(Only when you select SFP mode)
1. Press JOG MODE to select EFFECT mode.
The bar under EFFECT lights.
2. Adjust the reverberation sound using JOG. (See page 57.)
Page 59

To store the desired equalization curves (EQ) or simulated listening environments (SFP)
a ••• »»Cj
=S=l Já-.
“
-----------f-----------
m o i —, ) Q m
After creating your own equalization curves or simulated listening
environments, you can store them into the system’s memory
(“USER” mode). You can store up to 5 types of “USER” mode.
--
a OO 1-1,1 J
• =l J =
3 2-4
4 Press MEMO once again.
1 Adjust the desired equalization curve or simu
lated listening environment.
(See page 58.)
2 Press MEMO.
MEMO indicator lights.
USER display flashes.
3 Press USER to select a “USER” number of
your choice.
Each press of USER advances the “USER” number in the
following sequence.
USER1—►USER2—USERS
USERS—USER4-
USER modes will stay in the system’s memory for approximately
2 weeks even If the system is in the standby condition.
When you memorize a new curve and so on, it cancels the USER
mode previously memorized on that USER number.
■ To retrieve USER modes from the memory
Press USER until the desired USER number ap
pears.
USER
59
Page 60

Changing the Tone (continued)
DNC
V.BASS
To listen with augmented bass (V. BASS)
(Also available from the remote control)
While playing the desired source,
Press V. BASS to ON.
•^OpV.BASS
-- ----- ----- ----- V
V. BASS indicator will light, and the following display will appear.
Hill I-I l -l
Note:
You cannot make a recording with the V. BASS effect.
While recording, V. BASS indicator goes off, and after recording, it
will light again.
I I n T
I I I I I
To reduce the noise on a tape or FM
stereo broadcast
(DNC—Digital Noise Cleaner)
Press DNC to ON.
■^O^DNC
DNC indicator lights.
Notes:
•You cannot record with the DNC effect.
While recording, DNC indicator goes off, and after finishing, it will
light again.
•DNC may not be effective when you use with originally less-noise
product such as CD.
•DNC is not effective while the Dolby Pro-Logic system to ON.
For your reference:
If you use DNC with a tape which was recorded with a Dolby NR (B
or C), noise reduction effect will increase.
■ To cancel the V. BASS effect
(Also available from the remote control)
Press V. BASS once again to go off the V. BASS indicator.
O-V.BASS
V. BASS indicator will go off.
60
■ To cancel the DNC effect
Press DNC once again to go off the DNC indi
cator.
O—DNC
DNC indicator will go off.
Page 61

Using the Dolby Pro-Logic Surround
(Only for model SC-CH950)
What is the Dolby Pro-Logic Surround System layout
The Dolby Pro-Logic Surround System recreates, in your home, the
powerful and dynamic sound space of a movie theater. It is suitable
for Dolby Pro-Logic encoded source materials.
This speaker system has built-in surround speaker, so you can
easily enjoy the surround sound.
To get the more dynamic sound while enjoying the Dolby Pro-Logic
Surround, connect the rear surround speaker system (not in
cluded).
You can adjust the bass/treble sound, and delay time.
(See page 63.)
Select "PHNTM” (PHANTOM) of the Dolby Pro-Logic mode when
not connecting optional center speaker to this system. (See below.)
About the Dolby Pro-Logic mode
There are following 4 modes of the Dolby Pro-Logic mode.
Select the appropriate mode according to the type of the speaker
setting you use.
[T] NORM (NORMAL)
Select this mode when using a center speaker that Is smaller than
the front speakers. (In this case, the low frequency of the center
speaker channel Is played through the front speakers.)
• WCT nr iot
The system layout below is an example for the good sound effect.
0 Left speaker
(D Television set (not Included)
® Center speaker (not included)
@ This system
(D Right speaker
® Surround speakers (not included)
WIDE
Select this mode when using a center speaker that is the same size
of the front speakers. (In this case, it is necessary to connect
another amplifier to this system.)
3J PHNTM (PHANTOM)
Select this mode when not using the center speaker. (In this case,
the center speaker channel sound is played through the front
speakers.)
tmcT ffts HU.
.IS- -SB.
3 ST (3 channel stereo)
Select this mode when using center speaker’only. In this case,
disconnect the surround speaker cables.
>ai” . -ai.
.
................................
-II I.
0 U ni T n/i
1 l i(V I I t
• WCT sor tax
:3
5 r
Manufactured under license from Dolby Laboratories Licens
ing Corporation.
“Dolby” and the double-D symbol are trademarks of Dolby
Laboratories Licensing Corporation.
61
Page 62

Using the Dolby Pro-Logic Surround
(Only for model SC-CH950) (continued)
Adjusting the output level of each speaker
— 1
r-nol
a eeCj
1-
s=i ~ iX
doov
1 2-4
Example: When you select “PHNTM” (PHANTOM) mode
Be sure to disconnect the microphone from the microphone jack.
Switch on the power.
(Steps 1 and 3 also availble from the remote control)
1 Press DOLBY PRO LOGIC to select Dolby Pro-
Logic Surround modes.
Select an appropriate mode according to the types of speaker
setting you use. (See page 61.)
Each press of DOLBY PRO LOGIC advance Dolby Pro-Logic
indicators as follows.
NORM—»WIDE
t I
3 ST •«—PHNTM
Front speaker
(left).
[Center speaker] Front speaker
-(right)
When you select any mode except for PHNTM, the test signal
will also sound from the center speaker after the front speaker
(left).
Output level of the front speaker (left)
d Adjust the output level of the speakers.
While standing in the listening area, adjust the volume of each
speaker as same as the front speakers.
Output level of the surround speakers will be displayed on the
tuner amplifier display. You can adjust the volume of surround
speakers within the range of ±20 dB.
When you select any mode except for PHNTM, adjust the
volume of the center speaker as the same.
-bIIiIIb. ■ ■ .■ • O U HI T m
aliSI*
Surround speaker (left) Surround speaker (right)
Note:
When you select the mode except for PHNTM, center speaker
level display will also appear.
Press TEST to sound the test signal.
Be sure to set the V. Bass to off for the correct adjusting.
Test signal will sound for about 2 seconds from each speaker
as follows;
Front speaker (left)
T
Both surround speakers <-
---------
' I III a .1 11IV I I I
—> [Center speaker]
-Front speaker (right)
I
4 Press TEST to stop the test signal.
■ To cancel the Dolby Pro-Logic mode
(Also available from the remote control)
Press ON/FLAT.
ON/FLAT
The flat display will appear.
Page 63

... I(_
— 1 1-
o*** mmCj
=:=! )X
aOO^JI azcD
s=i
---------
1 =
1*7
3-2
Adjusting the bass/treble sound
Press DOLBY PRO LOGIC to select an appro
priate mode according to the types of speaker
setting you use.
(See page 61.)
Press BAND to select BASS or TREBL.
Each press of BAND advances the display as follows:
FLAT—»
t
TREBL
BASS: Bass sound
TREBL: Treble sound
Equalization curve will appear in the Dolby Pro-Logic output
level display.
BASS
3 Turn JOG to adjust the level.
You can adjust the level within the range of ±10 dB.
■ To adjust the delay time in succession
1. Press JOG MODE to select EFFECT mode.
The bar under EFFECT lights.
2. Adjust the delay time using JOG.
Adjusting the deiay time
(Also available from the remote control. For step 2, press one
of EFFECT to adjust the delay time.)
1 Press DOLBY PRO LOGiC to seiect an appro
priate mode according to the types of speaker
setting you use.
(See page 61.)
2 Turn JOG to adjust the deiay time.
You can adjust bassAreble sound in succession. If necessary,
proceed to step 2 left.
■ To cancei the ievel adjustment
Press BAND to seiect “FLAT”.
BAND
63
Page 64

Using the Timer
Setting the play timer
You can use this timer function to switch the system to play the
desired sound source at a desired time from the power standby
condition.
Have you read and completed “Setting the Time
of Day” on page 25? If not, please complete these
sections before continuing.
The following example shows how to set the play timer for: from
6:30 to 7:40 everday from Monday through Friday, plays CD at
-48 dB.
Note:
If you make an error, press CLOCK/TIMER to return to step 2.
Switch on the power.
1 Adjust the voiume ievei for the timer piay.
The timer play will start with the volume level you set at this
step.
=
BALANCE
H BMM
VOLUME
L MAX
VCUJME
_
SSMM
MAI
[gv>VCn
till
1 u U 11
/ TI
Select “El PLAY" of the timer.
CLOCIOTIMER © Press CLOCK/TIMER.
^ I Each time you press, the display will
change “CLOCK", “Q REC”, “E
PLAY", "SLEEP", in order.
SAT
QPUYON
/“• till
1 I-III!
Select the day.
There are following five types of timer play operation;
•One day from Sunday to Saturday
•Everyday from Sunday to Saturday
•Everyday from Monday to Saturday
•Everyday from Monday to Friday
•Saturday and Sunday only
Each time you press one of SELECT, five types display above
will appear in order.
T SELECT A © Press one of SELECT to select
I ^ “MON-FRI".
X
■ MONTUEWEOIHUPn —
X 1 DMUVON
ri‘ III!
1 I- INI
SET
I Press SET.
4 Set the ON time.
T SELECT t ©Press one Of SELECT to select "6'
@ Press SET.
T SELECT i
^ (D Press one of SELECT to select “30"
VOLUME
SMM
MAX
The dispiay will return to what was previously indicated if you allow
7 or more seconds to elapse before you accomplish the next
operation.
SET @ Press SET.
M
SET
® Press SET.
Page 65

When the day setting automatically advances after mak
ing the ON time setting;
This system retains the ON/OFF time settings until you make
a new setting. In case you make a new ON time setting which
is later than the previous OFF time setting, the system auto
matically advances the day you set on the step 3. When you
reset the OFF time, the day setting will return to the original
setting.
■ To confirm the piay timer
Press E] PLAY to show □ PLAY on the display.
■SPLAY
While in the timer standby mode, press Q PLAY twice.
5 Set the OFF time.
T SELECT A 0 Press one of SELECT to select "7”.
t I ^
, KJ u
SET '
---------
V (5) Press SET.
f SELECT A
1 \ (.3} rT6SS 0n6 0< wtLcO 1 10 SOIOCl 40 <
Qplay
h '1 u
C
@ Press SET.
Select the desired source.
For the timer play on the CD player, you can set sequential
play only.
For timer play on the tape, you can operate both decks 1 and
2 by the timer. When you load cassettes in both decks, deck 1
has priority.
f SELECT À
I
© Press one of SELECT to select the de
sired source. Each time you press, the
display shows “CD”, "TAPE” and
“TUNER” in order.
HONTUEWEDTHUFMl
>^PUWONy
r Tl
1- 11
"X
SET
I
@ Press SET.
' * When you select TUNER, select a de
sired preset channel using SELECT,
and then press SET.
MONTUEWEDTHum VOUAK
(SPWY 1 Off “**
HaNTUCWEOtNUFn 1 VOUWi
ZLftn -
vouac
The display will show the ON time, OFF time, the source you select,
and the volume level in 3 seconds step.
Note;
When the play timer is functioning, do not press H PLAY to confirm
the timer setting. It cancels the timer-off time setting.
■ To exit the play timer mode
Press □ PLAY to go off □ PLAY.
(
.......
REPLAY
The play timer will not function, but the play timer setting will stay in
the memory.
To reset the timer setting after above operation, first press El PLAY
to display El PLAY, and then press POWER STANDBY (!)/ON to
switch the power to standby mode.
■ To enjoy the desired source after the timer set
ting is completed
1. Press POWER STANDBY (i>/ON to on.
2. Select the desired source.
Be sure to press POWER STANDBY (*)/ON to standby mode.
MAX
Even if you change the volume level or music source, the timer play
will start with the preset condition.
Sum
Be sure that you’ve set a compact disc or cassette tape before
proceeding to the step 7.
7 Press POWER STANDBY (!) /ON to switch the
power to standby mode.
Please confirm Q PLAY indicator appears on the display.
The timer play will start at the preset time with volume
gradually increasing up to the volume level you preset.
Notes;
•If the power is on, the timer will not function. The system must be
in the standby mode.
•The play timer will function until you exit the play timer mode.
(See right.)
65
Page 66

Using the Timer
Setting the record timer
You can use this timer function to switch the system to record the
radio at a desired time from the power standby condition.
(continued)
Have you read and completed “Setting the Time of Day” on page 25? If not, please complete these sections before continuing.
The following example shows how to set the record timer for: from
18:30 to 20:00 on Saturday, recording FM preset channel no. 3.
Note:
If you make an error, press CLOCK/TIMER to return to step 1.
Switch on the power.
1 Select “□ REC” of the timer.
CLOCK/TIMER © Press CLOCK/TIMER.
□
The display will return to what was previously indicated If you
allow 7 or more seconds to elapse before you accomplish the
next operation.
SET @ Press SET.
Each time you press, the display will
change "CLOCK”, “□ REC”, "H
PLAY”, “SLEEP”, in order.
Select the day.
There are following five types of the record timer operation;
•One day from Sunday to Saturday
•Everyday from Sunday to Saturday
•Everyday from Monday to Saturday
• Everyday from Monday to Friday
•Saturday and Sunday only
Each time you press one of SELECT, five types display above
will appear in order.
T SELECT i 0 Press one of SELECT to select “SAT".
C
-v+v-
— SAT —
Dwc ^ loit»
I ”/■ n n
11
_ ■ u u
SET
Set the ON time.
T SELECT A ©Press one of SELECT to select “18”.
SET
T SELECT A
@ Press SET.
@ Press SET.
® Press one of SELECT to select "30”.
66
SET
® Press SET.
Page 67

When the day setting automatically advances after mak
ing the ON time setting;
This system retains the ON/OFF time settings until you make
a new setting. In case you make a new ON time setting which
is later than the previous OFF time setting, the system auto
matically advances the day you set on the step 3. When you
reset the OFF time, the day setting will return to the original
setting.
4 Set the OFF time.
T SELECT i 0 Press one of SELECT to select "20".
Notes:
•If the power is on, the timer will not function. The system must be
in the standby mode.
•While timer recording is taking place, the volume level will be
automatically muted.
•Once the record timer operation finishes, it clears the record timer
mode. (For exception, see below.)
•Only when you select the record timer mode that functions every
day from Sunday to Saturday, the record timer mode will not be
cancelled until you exit the record timer. To prevent the accidental
erasure of recording, press Q REC to clear the record timer mode
after the timer recording has finished.
■ To confirm the record timer
Press El REC to show Q REC on the display.
SET
C
T SELECT i
SET
I Press SET.
) Press one of SELECT to select “00".
I ~
@ Press SET.
5 Select the desired preset channel.
T SELECT 1 ® Press one of SELECT to select the de
sired preset channel.
SET
Be sure to prepare for recording in the cassette deck before
proceeding to step 6.
Press POWER STANDBY (!)/ON to switch the power to standby mode.
Please confirm □ REC indicator appears on the display.
(D Press SET.
QREC
While in the timer standby mode, press Q REC twice.
Each time you press, the display changes to show the ON time,
OFF time, the broadcast band you select, in 3 seconds step:
Note:
When the record timer is functioning, do not press Q REC to
confirm the timer setting.
It cancels the timer-off time setting.
■ To exit the record timer modes
Press □ REC to go off □ REC.
r ^BREC
The record timer will not function, but the record timer setting will
stay in the memory.
To reset the timer setting after above operation, first press Q REC
to display E REC, and then press POWER STANDBY CD/ON to
switch the power to standby mode.
■ To enjoy the desired source after the timer set
ting is completed
1. Press POWER STANDBY (!) /ON to on.
2. Select the desired source.
When listening to a cassette tape, use the deck 1.
After enjoying the source, press POWER STANDBY (!)/ON to
standby mode.
Even if you change the music source, the timer recording will start
with the preset source.
67
Page 68

Using the Timer
To use the sleep timer
(continued)
You can use this timer function to switch the power to the standby
mode at a desired time (within a range of 1 minute to 120 minutes
from the present time).
...11
r-nnl
The following example shows how to set the sleep timer for; switch
ing the power to the standby mode after 30 minutes.
t -
J
1
__
loco
I ■ «»Q
l<r~-
CLOCK/riMER . SET
1(
It is convenient to use the sleep timer function when you want to fall
asleep while listening.
a-
532> è
ócbci)d>d3
diÓ<Ì)CfDCÌ>
cfòSaS
□ÙÙòo
sssaa
cfTaaac)
asa àia
ScSìbcSò
ùùiaób
Scz3tÌD
The sleep time set by the steps above will stay in the system’s
memory.
While the source is being played,
1 Select the “SLEEP” of the timer.
CLOCK/TIMER
Lights'
The display will return to what was previously indicated if you
allow 7 or more seconds to elapse before you accomplish the
next operation.
SET (D Press SET.
Flashing'
® Press CLOCK/TIMER.
Each time you press, the display will
change "CLOCK”, "Q REC”, “□
PLAY", “SLEEP”, in order.
2 Set the length of time you would like the sys
tem to operate before it shuts off (Sleep time).
T SELECT i ® Press one of SELECT to select the de-
V I i sired length of time.
If you want to operate the system again on the same sleep
time previously set, just press SLEEP on the remote control.
When you want to change the time setting, follow the above
procedure from the beginning.
■ To confirm the time remaining on the sleep
timer
Press CLOCK/TIMER to select “SLEEP”.
CLOCK/TIMER
C
□
The display shows “SLEEP”, and then the time remaining on the
sleep timer will show.
■ To cancel the sleep timer mode
Press SLEEP on the remote control to go off the
SLEEP indicator.
a
68
SET
@ Press SET.
Page 69

■ To use each timer mode in conjunction
For example, to go to sleep listening to a FM broadcast, and
wake up the next morning listening to a compact disc.
1. Make a play timer setting for a compact disc.
(Follow steps 1 to 6 on pages 64-65.)
2. Tune In your desired band and station, and adjust the volume
level.
3. Press CLOCK/TIMER to select SLEEP timer, and set the sleep
time.
For example, to go to sleep listening to a compact disc, and
then to make a timer recording from a radio broadcast.
For example, to make a timer recording from a radio broadcast
white sleeping, and wake up the next morning listening to a
cassette tape.
1. Make a record timer setting.
(Follow steps 1 to 5 on pages 66-67.)
2. Make a play timer setting for deck 1.
Be sure to set the timer recording off before the timer play will begin.
For example, to go to sleep listening to a tape, and wake up the
next morning listening to a compact disc, and make a timer
recording from a radio broadcast while going out.
1. Make a record timer setting.
(Follow steps 1 to 5 on pages 66-67.)
2. Play a compact disc, and adjust the volume level.
3. Press CLOCK/TIMER to select SLEEP timer, and set the sleep
time.
Be sure to set the sleep timer off before the timer recording will
begin.
Timer sequence of priority
Sleep timer, record timer, play timer is the timer operation of priority
in order. Be sure not to make each timer setting overlap.
If programmed times overlap among play timer, record timer and
sleep timer settings, timer operation is as follows;
When the record timer and the sleep timer setting has over
lapped:
The sleep timer setting has priority, so the record timer will not
function.
SLEEP TIMERl
23:30
REC TIMERl—
0:00
0:30
1:00
1. Make a record timer setting.
(Follow steps 1 to 5 on pages 66-67.)
2 Make a play timer setting for a compact disc.
Be sure to set the play timer off before the timer recording will
begin.
3. Start playing a tape in deck 1, and adjust the volume level.
Be sure to select “ " reverse mode.
4. Press CLOCK/TIMER to select SLEEP timer, and set the sleep
time.
When the OFF (or ON) time of the record timer and the ON (or
OFF) time of the play timer is same, both timer will function.
When record timer and play timer setting has overlapped:
The record timer setting has priority, so the play timer will not
function.
5:00
REC TIMERfl
PLAY TIMERl—
6:00
6:30
-H
7:00
Page 70

Enjoying the Microphone Mixing
Using the “KARAOKE" feature
This function mutes the vocal track on a compact di.sc or so but
leaves the accompaniment allowing you to enjoy "KARAOKE”
(singing with an accompaniment).
...li
-------------
mol
—II3) m
_ _
1
s— ••
-----
I-
-------
lorn
a ••• ••
=^i jX
oQOV
e r“
■ Microphone mixing Switch on the power.
1 Connect the microphone to the MiC jack.
Be sure to reduce the microphone level before connecting.
2
Start piaying a compact disc.
3
Press VOiCE MUTE to ON.
V. MUTE indicator lights.
.!■
The singing voice is muted.
■ ¡■if .L Pi J
4 Start microphone mixing.
The singing voice on the microphone will mix with sound of the
compact disc.
5 Adjust the microphone ievei.
To cancel the “KARAOKE” mode, press VOICE MUTE again.
The display wilt change to the previous setting.
■ To change the key of the tune
(For model SH-CH750, only for Australia and New Zealand)
1. Press KEY CON.
KEY CON indicator will light.
2. Adjust the key using JOG.
You can adjust the key within the range of -3.0 to +3.0 in
0.5 step.
To cancel, press KEY CON again.
■ To adjust the reverberation sound
(For model SH-CH750, only for the area except for Australia and
New Zealand)
1. Press ECHO.
The ECHO indicator will light.
2. Adjust the reverberation sound using JOG.
You can adjust the reverberation sound within the range of
0.2 seconds to 1.6 seconds.
To cancel, press ECHO again.
Notes:
•This function may not be effective according to the type of music.
•This function is not effective with compact discs or cassette tapes
made for “KARAOKE” use. When you use such compact discs or
cassette tapes, press VOICE MUTE to go off the display showed
in the step 3. (See left.)
•If you hear strange noises (squealing or howling) during mixing,
move the microphone farther away from the speakers or turn
down the volume on the tuner amplifier and microphone volume.
•When you are not using the microphone, disconnect it from the
MIC jack, and turn down the microphone volume level to MIN.
•You cannot use this function with a compact disc made from a
monaural source.
•You cannot change the tone quality (equalizer curve or simulated
listening environment) while using this function.
Page 71

------ 11
O«*«
=S= l J rf-.
aOoO*
• =»
-------------
) =
■ To make a recording your “KARAOKE” perfor
mance
1 Connect the microphone to the MIC jack. 2 Insert the cassette for recording in deck 2. 3 Press REC PAUSE to put the cassette deck
into the recording standby mode.
4 Press VOICE MUTE.
Do not press VOICE MUTE when you use a compact disc
originally made for “KARAOKE” use.
5 Start playing a compact disc.
The recording will automatically start by the synchro-start
function.
6 Start “KARAOKE”.
To play back the tape recorded in “KARAOKE” mode, press VOICE
MUTE to go off the display showed in the step 3 on page 70.
Notes:
•When you playback the tape recorded with "KARAOKE” function
press VOICE MUTE [also ECHO (For model SH-CH750, only for
the area except for Australia and New Zealand), KEY CON (For
model SH-CH750, only for Australia and New Zealand) if they
were ON] to OFF.
•You cannot change the tone quality (equalizer curve or simulated
listening environment) while using this function.
•You cannot record with “KARAOKE” function using DNC,
V. BASS or cassette tapes or compact discs originally made for
“KARAOKE” use.
! Using the “KARAOKE’
disc piayer
1. Connect the microphone to the MIC jack of this unit, not to the
MIC jack of the video disc player.
2. Adjust the microphone level using MIC VOL on this unit.
Note:
When you want to use two microphones, connect microphones to
MIC jacks on the video disc player. Be sure to reduce the
microphone volume level of the video disc player. Then adjust the
overall level using the main volume on model SC-CH750/
SC-CH950.
feature with a video
71
Page 72

Using an External Unit
Listening to an externai source
You can connect DAT, video cassette recorder, video (jisc player or
analog turntable to this system.
1 Press one of the input select buttons to select
the external source connected to this system.
DAT: Digital audio tape
VCR: Video cassette recorder
VDP: Video disc player
PHONO: Analog turntable
The selected source will be displayed.
The shows an example when you select VDP.
/ / Tl I I
1/ ±1 I
2 start playing the external source which is
connected to the system.
See the instruction manual of the unit concerned for operating
instructions.
■ Recording from an external source
1. Press one of input select buttons to select the external source
connected to this system.
2. Press REC PAUSE to put the cassette deck into the recording
standby mode.
3. Press one of the playback buttons to start recording and start
playing the source to be recorded.
|: When recording on either the forward side or both
J sides.
: When recording only on the reverse side.
■ To briefly interrupt recording
Press REC PAUSE.
The cassette deck will go into the recording standby mode.
To resume recording, press the playback button corresponding to
the direction in which recording is taking place.
■ To Stop recording
Press the deck 2 stop/cassette holder open but
ton on the cassette deck.
■ To record on a DAT tape or video tape
start recording on a DAT or VCR, and then start playing the source
to be recorded.
You cannot record the sound with the equalizer curve or simulated
listening environment, and V.bass effect on a DAT or video tape.
■ To switch an external visual source (VCR, VDP)
from this system
1. Press the power switch of a TV connected to this system to ON.
2. Select “VIDEO” mode of a TV.
3. Press an input select button (VCR or VDP) connected to this
system.
Page 73

To enjoy BGV (Back Ground Visual)
You can listen to a desired audio source while watching video
picture and so on.
o*** ••C3
1-
oOO ozo
1
1 Press one of the input select buttons to select
the external video source connected to this
system.
VCR: Video cassette recorder
VDP; Video disc player
The selected source will be displayed.
The display shows an example when you select VDP.
VOLUMi
L MAX
1/ Tl n
U ±t 1
■AUUCC
2 Press one of the input select buttons to select
the desired audio source, and start playing.
BGV indicator will illuminate.
MLANCt
VOLUMi
L MAI
= _
n saw
liSvy VDP
r
Tl
i_
11
■ To record the audio source on a video tape
After following above procedure, start recording on a video deck.
73
Page 74

Concerning the Display
About the spectrum display modes
The spectrum analyzer shows the level of each sound range with
four types of display described below. (Q] appears only when you
select the V. BASS mode.)
a ••• ••
= C J=-
a=[—-)X
oOO'^
g=t
-------
1
Press DISPLAY momentarily.
DISPLAY
Each time you press DISPLAY, the spectrum display will change as
follows.
in Bar-type display
This display indicates the strength of the sound in each tonal range.
iilllllliiiiiiliiiii:
m Peak-hold display
The peak sound value of each sound range remains on the display
for about 1 second after it occurs.
;iÌÌÌÌ|jÌI::iiihiiìì;
m Aurora display
The peak sound value of each sound range appears in inverted
form.
m V. Bass-mode display
This display appears only when you select the V. BASS mode.
(See page 60.) It shows the strength of the augmented bass level.
Note;
When you press V. BASS to ON in any display modes, the bar-type
display will be switched to appear.
■ To display the equalization curve together with
the spectrum analysis display
Press and hold DISPLAY.
DISPLAY
The equalization curve will appear.
To resume the previous mode, press and hold DISPLAY once
again.
;!!ij||l!i!!!!!MMii;
Page 75

Gare & Use
Concerning Cassette Tapes
■ Selection of cassette tapes
Cassette tape exceeding 90 minutes
These tapes are handy for their long playback and recording time
but be careful about repeatedly stopping and starting, rewinding
and fast forwarding these tapes in short intervals as they are thin,
tend to stretch and may become entangled in the machine.
Do not use the following types of tapes in this unit.
Fe-Cr tapes (TYPE UI)
This type emphasizes the high-frequency range, making it impossi
ble to obtain a flat frequency response.
Metal tape without detection holes in the cassette
Recordings will be very distorted. (There is no problem during
playback, however.)
■ To prevent erasure of recorded sounds
Remove the erase-prevention tabs (thus preventing recording).
■ Tape slack
Tape slack may cause the tape to break.
■ Improper tape storage
You can damage tape if you store it in the following ways;
•In high temperature [35°C (95°F) or higher] or high humidity (80%
or higher) areas.
• In a strong magnetic field (near a speaker, on top of a TV, etc.).
This can erase a recording.
•In direct sunlight.
Cover the slot with adhesive tape.
75
Page 76

Care & Use
I Concerning Compact Discs
(continued)
Only compact discs having this mark can be
used with this system.
■ Handling precautions
•To open the compact disc case, gently press the sides of the top,
holding the top at both sides and pull up.
To remove the disc from the case, press the center holder and lift
the disc holding it by the edges.
•To return the disc to the case, insert the disc with label facing up
and press downward at the center.
•Hold compact discs by the edges so you will not soil the surface
with fingerprints. Fingerprints, dirt, and scratches can cause skip
ping and distortion.
ûm
Dien’AL AUDIO
•If you are taking the disc from a cold to a warm environment,
moisture may form on the disc. Wipe this off with a soft, dry,
lint-free cloth before using the disc.
•Do not write on the label side with a ball-point pen or other writing
instrument.
■ Storage precautions
•Be sure to store discs in their cases to protect them from dust,
scratches, and warping.
•Do not place or store discs in the following places:
1) Locations exposed to direct sunlight.
2) Humid or dusty locations.
3) Locations directly exposed to a heat outlet or heating appli
ance.
4) In the glove compartment or rear ledge of an automobile.
•Do not use record cleaning sprays, benzine, thinner, static elec
tricity prevention liquids, or any other solvent.
•If the surface is soiled, wipe gently with a soft, damp (water only)
cloth.
•Always move the cloth directly outward from the center of the disc,
not in a circular motion as with standard phonograph records.
(Correct)
(Incorrect)
Page 77

Maintenance
■ Head care
To assure good sound quality for recording and playback, be sure
to clean the heads after approximately every 10 hours of use.
1. Press the stop/cassette holder open button to open the cassette
holder.
2. Switch the power of this unit to standby mode.
3. Clean the heads, pinch roller and the capstan shaft of each deck
with a cotton swab (or with a soft, lint-free cloth) slightly mois
tened with alcohol.
Do not use any solution other than alcohol for head cleaning.
■ Head demagnetization
•In order to maintain good sound quality during recording and
playback, it is recommended that the heads should be demagne
tized if distortion or poor sound quality persist after cleaning the
heads.
• If the heads become magnetized, they could create noise in
recordings, loss of high-frequency response, or erasure of valu
able recordings. Several types of head demagnetizers are avail
able and may be purchased at local electronics supply stores.
Follow the instructions that are supplied with the device.
•Do not bring any type of metal objects or tools such as magnetic
screwdrivers in contact with the head assembly.
■ Maintenance of external surfaces
•To clean this unit, use a soft, dry cloth.
For very dirty surfaces, dip a soft cloth in a weak soap-and-water
solution and wring well. After cleaning, wipe with a soft, dry cloth.
•Never use alcohol, paint thinner, benzine, or a chemically treated
cloth to clean this unit.
Such chemicals may damage the system's finish.
77
Page 78

Troubleshooting Guide
Before requesting service for this unit, check the chart below for a possibie cause of the probiem you are experiencing. Some simple checks or a
minor adjustment on your part may eliminate the problem and restore proper operation.
If you are in doubt about some of the check points, or if the remedies indicated in the chart do not soive the problem, refer to the directory of
Authorized Service Centers (enclosed with this unit) to locate a convenient service center, or consult your dealer for instructions.
Problem
Problems common to all systems
There is no sound when the
power is ON.
The iocation of the various
musicai instruments is not
weii defined.
The ieft and right sounds
are reversed.
Oniy one speaker is
emitting sound.
There is no sound when a
source is being piayed.
Volume is set too low.
The (+) and (-) connections to one of the
speakers are reversed.
The left and right connections to the speaker are
reversed.
The left and right connections to the each unit are
reversed.
One of the wires of the speaker cord is
disconnected.
The (+) and (-) wires of the speaker cords are
shorted.
While listening to FM broadcasts
There Is a “rushing” noise
during a stereo broadcast
which Is not audible during
a monaural broddcast.
You hear axcessive noise
during a stereo broadcast,
and occasionally the sound
disappears.
The stereo indicator of the
tuner amplifier flickers and
does not light completely.
The sound during a stereo
broadcast is highly distored.
The transmitting station is a long distance away.
The instailation location and orientation of the
antenna are unsuitable.
The transmitting station is a long distance away.
The power of the TV set or VCR is ON.
There is a building or mountain nearby. [Distortion
is caused by interference between the signal from
the transmitting station (direct wave) and the
signal reflected from the building or mountain
(reflected wave).]
Probable cause(s)
Suggested remedy
Adjust the volume level with the volume control on
the tuner amplifier.
Connect the speaker cord correctly.
Connect the speaker cord correctly.
Connect the each unit's cord correctly.
Connect the speaker cord correctly.
Switch the system to the standby mode, and
reconnect the speaker cords so that they are not
shorted.
Then switch on the power.
•If you are using an indoor antenna, change to an
outdoor antenna.
•If you are using a high-grade outdoor antenna, try
changing the installation location, height, and
orientation.
Try switching off the TV set or VCR.
Use a high-grade outdoor antenna, and install it in a
good location, height, and orientation for reception.
While listening to MW/LW broadcasts
You hear an unusual beat
sound.
You hear a low-frequehcy
hum.
You are using the system at the same time you
are playing a TV set.
The antenna wire is near the power cord. Separate the antenna wire from the power cord.
Switch off the TV set, or use the system farther away
from it.
Page 79

Problem
Probable cause(s)
When there is a television set nearby
The picture on the TV
disappears or stripes
appear on the screen.
The location and orientation of the antenna are
incorrect.
The wiring at the back of the system is unsuitable.
Suggested remedy
If you are using an indoor antenna, change to an
outdoor antenna.
Separate the antenna wire of the TV set from the
system.
While listening to ta
Sound is iow, intermittent,
or poor quaiity, noisy,
scratchy, or unsteady.
The deck does not enter the
recording mode.
pes
Heads are dirty.
The Dolby noise reduction is set in the wrong
position.
The erase-prevention tabs are removed from the
cassette.
While listening to compact discs
The tray does not close
when you load a disc and
press the OPEN/CLOSE
button.
The display will not show
the total number of tracks
and total time when you
load a disc. Disc play does
not start when you press
the play button.
A certain part of the disc
cannot be played.
The disc is not positioned correctly in the disc tray.
The disc is not positioned correctly in the disc tray.
The disc is loaded upside down.
The disc is dirty.
The disc is scratched.
The disc is badly warped.
The disc is a nonstandard one.
There is condensation inside the disc player.
The disc is dirty.
The disc is scratched.
Clean the heads.
Set it to match the Dolby NR recording mode.
Attach tape to cover the space left by removal of the
erase-prevention tabs.
Reinsert the disc.
Reload the disc.
Wipe the disc with a soft cloth.
Replace the disc with a new one.
Replace the disc with a different one.
Switch the power ON, and then wait for
20-30 minutes before using the disc player.
Clean the disc with a soft cloth.
Skip the scratched part of the disc (skip play).
While using the remote control
The system cannot be
operated with the remote
control.
The batteries are installed in the reverse polarity.
The batteries are worn.
Re-insert the batteries in the correct polarity.
Replace the batteries with new batteries.
79
Page 80

Technical
SOUND PROCESSOR
(DIN 45 500)
■ Pre Amp. Sections
Input sensitivity and impedance
PHONO 2.5 mV/47 kO
CD, TUNER, TAPE 150 mV/10 kil
VCR, VDP, DAT (input with RCA PIN) 250 mV/17 kO
MIC 0.7 mV/10 kO
Output level
VCR, DAT REC OUT 150 mV/1.5 kO
■ Dolby Pro-logic (Only for model SH-CH950), Equalizer, SFP
section
Dolby Pro-Logic Surround
(Only for model SH-CH950)
MODE
Delay time
Tone control
BASS
TREBLE
Equalizer
Center frequency
LOW
HIGH 1,2
Level control
LOW, HIGH 1,2
(Q) Control
NARROW
WIDE
Fixed mode
SFP
(SH-CH950):
(SH-CH750):
EQ (5 modes)
Frequency response
PHONO
(RIAA STANDARD CURVE) 30 Hz-15 kHz/+1.0, -1.5 dB
CD, TUNER, TAPE
VCR, VDP, DAT
S/N
PHONO
TUNER,TAPE
CD, VCR, VDP, DAT
MIC ECHO
(For SH-CH7S0, only for the area except
for Australia and New Zealand)
Key control
(For SH-CH750, only for Australia and
New Zealand)
MONITOR
VCR REC OUT
■ General
Dimensions (WxHxD)
Weight
(SH-CH950):
(SH-CH750):
PHNTM (PHANTOM), 3 ST (3 STEREO)
315, 450, 630, 800,1 k, 1.25 k, 1.6 k,
2.2 k, 3.15 k, 4.5 k, 6.3 k, 8 k, 10 k, 16 k(Hz)
HALL, LIVE, DISCO, CHRCH (CHURCH)
HALL, LIVE, DISCO, CHRCH (CHURCH),
HEAVY, CLEAR, SOFT, HP ST, CAR
85 dB (IHF, at full scale Input, IHF A)
88 dB (IHF, at full scale Input, IHF A)
95 dB (IHF, at full scale input, IHF A)
NORM (NORMAL), WIDE,
15-30 m sec.
±10 dB
±10 dB
63, 80,100,125, 160, 220 (Hz)
±12 dB
1.8
0.7
THTER (THEATER)
20 Hz-20 kHz/-2dB
20 Hz-20 kHz/-2dB
64 dB (DIN)
71 dB (DIN)
75 dB (DIN)
0.2-1.6 sec.
-300 to +300 cent.
1 V/750
1 V/750
270x 89.5x270 mm
2.0 kg
1.9 kg
TUNER AMPLIFIER
(DIN 45 500)
■ Main Amp. Section
Power output
DIN1 kHzTHD1%,
both channel driven
(SA-CH950): 2x 60 W (60)
(SA-CH7S0): 2x50 W (60)
SFP, Dolby Pro-Logic mode 1 kHz THD1%
(Only for model SA-CH950)
MAIN 2x55 W (60)
SURROUND 2x7 W (80)
Total harmonic distortion
Rated power at 1 kHz 1 % (60)
Half power at 1 kHz
(SA-CH9S0): 0.07% (60)
(SA-CH7S0): 0.09% (60)
Load Impedance
MAIN 6-80
SURROUND 80
S/N (rated power) 84 dB
Frequency response 40 Hz-30 kHz (-3 dB)
■ FM Tuner Section
Frequency range
Sensitivity
S/N26dB
S/N
MONO
Stereo separation at 1 kHz
Antenna terminal(s)
■ AM Tuner Section
Frequency range
MW
(For Australia and New Zealand)
(For others) 531-1602 kHz (9 kHz steps)
LW
(For Australia and New Zealand)
(For others) 153-279 kHz (9 kHz steps)
Sensitivity (S/N 20 dB)
MW 500 pV/m
LW 50 pV
■ Timer Section
Clock
Function
Setting
■ General
Power consumption
(SA-CH950): 190W
(SA-CH750): 175W
Power supply
(For Australia and New Zealand) AC 50/60 Hz, 230 V-240 V
(For others) AC 50/60 Hz, 110/127/220/240 V
Dimensions (WxHxD) 270x119x334 mm
Weight
(SA-CH9S0): 6.1 kg
(SA-CH750): 5.5 kg
87.50 MHz-108.00 MHz (0.05 MHz steps)
1.8 pV (IHF, usable)
1.5 pV (750)
70dB(75dB, IHF)
35 dB
750 (unbalanced)
522-1611 kHz (9 kHz steps)
530-1620 kHz (10 kHz steps)
530-1600 kHz (10 kHz steps)
144-288 kHz (9 kHz steps)
Quartz-lock type
24-hour programmable; Play timer (1 time)
Rec timer (1 time)
Sleep (120 min. 1 min. intervals)
1 minute-23 hours 59 minutes (1 min. intervals)
8
Page 81

CD PLAYER
SPEAKER SYSTEM
(DIN 45 500)
■ Audio
DA converter 1 bit2DACMASH
■ Pickup
Wavelength
Laser power
■ General
Dimensions (WxHxD)
Weight
No hazardous radiation is emitted
(with safety protection)
270x89.5x258.5 mm
780 nm
2.1 kg
CASSETTE DECK
Deck system
Track system
Recording system
Erasing system
Tape speed
Bias frequency
Heads
DECK 1 (playback)
DECK 2 (record/playback) Permalloy head
(erasure) Double gap ferrite head
Motors
Wow and flutter
Fast forward and rewind time
Frequency response (When Dolby NR OFF, CCRT ON)
NORMAL
CrO>
METAL
S/N (CrOi type tape)
Dolby NR off
Dolby B NR on
Dolby C NR on
■ General
Dimensions (WxHxD)
Weight
Stereo cassette deck
4-track, 2-channel
AC bias
AC erase
4.8 cm/sec. (1% ips)
80 kHz
Permalloy head
DC servo motor
0.1%(WRMS)
Approx. 110 seconds
with C-60 cassette tape
20 Hz-17 kHz
30 Hz-15 kHz (DIN)
20 Hz-18 kHz
30 Hz-17 kHz (DIN)
20 Hz-20 kHz
30 Hz-19 kHz (DIN)
56dB(A-WTD)
66dB(CCIR)
74dB(CCIR)
270x119x262 mm
3.3 kg
[SB-CH950]
Type
Speaker(s)
Impedance
MAIN
SURROUND
Input power
MAIN
SURROUND
Output Bound preasure
Crosa over frequency
Frequency range
■ General
DImenaiona (WxHxD)
Weight
[SB-CH750]
туре
Speaker(a)
Impedance
MAIN
SURROUND
Input power
MAIN
SURROUND
Output aound preaaure level
Croaa over frequency
Frequency range
■ General
DImenaiona (WxHxD)
Weight
Notes:
1. Specifications are subject to change without notice.
Weight and dimensions are approximate.
2. Total harmonic distortion is measured by the digital spectrum
analyzer.
3 way/surround, 4 speakers, bass-reflex
Woofer 17 cm cone type
Midrange 2.5 cm dome type
Tweeter dome type
Surround 8 cm cone type
120 W (music), 60 W (DIN)
20 W (music), 10 W (DIN)
level 86dB/W(1.0m)
1.5 kHz, 6 kHz
33 Hz-25 kHz (-16 dB)
238x416x288 mm
6.0 kg
3 way/surround, 4 speakers, bass-reflex
Woofer 17 cm cone type
Midrange 2.5 cm dome type
Tweeter dome type
Surround 7 cm cone type
120 W (music), 60 W (DIN)
10 W (music), 5 W (DIN)
86dB/W(1.0m)
1.8 kHz, 6 kHz
33 Hz-22 kHz (-16 dB)
240x416x293 mm
60
80
60
80
5.5 kg
81
Page 82

28
ошэ|Л|
Page 83

83
Page 84

Matsushita Electric Industrial Co., Ltd.
Central P.O. Box 288, Osaka 530-91, Japan
Printed in Japan
RQT1783-L
Page 85

SC-CH55(V650
DCC
How to use a DCC
(not included) (non fournie)
Utilisation d’une platine DCC
ANALOG
SC-CH75Q/950
ANALOG INPUT
INPUT OUTPUT
(R) (L) (H) (L)
fHf
(R) (L) (R) (L)
Q Q Q
I I
DCC
I I
SA-CH750/950
= -.(H)
CD O V q
-=Zl J
OAT/DCC
t >
You can connect a DCC (Digital com
pact cassette deck) to the models
SC-CH550,650,750 and 950.
■ To connect a DCC to these systems
Connect a DCC to the DAT/DCC terminal of the
sound processor.
(Refer to the left.)
■ To operate a DCC
Press DAT/DCC input select button, then operate a
DCC.
For model SC-CH750/950, it is also available from the
remote control:
Press DAT input select button.
(Refer to the left.)
Cómo utilizar una DCC
(no incluida)
Usted podrá conectar una DCC (platina
digitai compacta) a los modelos
SC-CH550,650,750 y 950.
■ Para conectar una DCC a estos sis
temas
Conecte una DCC al terminal DAT/DCC del proce
sador de sonido.
(Consulte los diagramas de la izquierda.)
■ Para utilizar una DCC
Pulse el botón selector de entrada DAT/DCC y luego
ponga en funcionamiento la DCC.
Para el modelo SC-CH750/950, esto puede reali
zarse también con el mando a distancia:
Pulse el botón selector de entrada DAT.
(Consulte los diagramas de la izquierda.)
On pourra raccorder une platine DCC
(platine à cassette compacte numé
rique) aux modèles SC-CH550,650,750
et 950.
■ Raccordement d’une platine DCC à
ces chaînes
Raccorder la platine DCC à la prise DAT/DCC du
processeur de signal.
(Voir à gauche.)
■ Fonctionnement d’une platine DCC
Appuyer sur le sélecteur d'entrée DAT/DCC et faire
fonctionner la platine DCC.
Sur le modèle SC-CH750/950, il est également possi
ble de la piloter avec la télécommande:
Appuyer sur le sélecteur d’entrée DAT.
(Voir à gauche.)
Gebrauch eines DCC-Decks
(nicht mitgeliefert)
Ein DCC-Deck (Digital-Kompakt-cas-
settendeck) kann an die Modelle
SC-CH550, -650, -750 und -950 ange-
schiossen werden.
■ Anschließen eines DCC-Decks an
diese Anlagen
Das DCC-Deck an die Buchse “DAT/DCC” des
Klangprozessors anschließen.
(Siehe die Abbildung links.)
■ Betrieb eines DCC-Decks
Die Eingangswahltaste “DAT/DCC” drücken und mit
dem Betrieb des DCC-Decks beginnen.
Bei den Modelien SC-CH750 und -950 kann diese
Funktion auch am Fembedienungsgeber aktiviert
werden:
Die Eingangswahltaste “DAT” drücken.
(Siehe die Abbildung links.)
 Loading...