

Page 1
Panasonic
CD Stereo System
SC-CH11
Operating Instructions
EB Printed in Singapore
? ■■ ■■ :
...........................
. .—-il' - J ■ -i
nCOMMCr
mm
DIGITAL AUDIO
Notes:
•Specifications differ according to the area code.
•The “EB" area code, for example, indicates United Kingdom
specifications.
•The “EB" indication is shown on the packing case and serial
number tag.
Before connecting, operating, or adjusting this product, please read
these instructions completely and carefutty.
RQT1537-1B
F0392P0
Page 2

Thank you for purchasing this product.
For optimum performance and safety, piease read
these instructions carefully.
Table of Contents
Suggestions for Safety........................................3
For United Kingdom
Concerning the Remote Control
..........................................
.............................
Preparations....................................................
Front Panel Controls and Functions
........................
Remote Control Unit Controls and
Functions .................................................. 13
Setting the Time of Day..................................... 15
Basic Operating Procedure
Listening to Radio Broadcasts
................................
.............................
16
17
CAUTION!
THIS PRODUCT UTILIZES A LASER.
USE OF CONTROLS OR ADJUSTMENTS OR PER
FORMANCE OF PROCEDURES OTHER THAN THOSE
SPECIFIED HEREIN MAY RESULT IN HAZARDOUS
RADIATION EXPOSURE.
DO NOT OPEN COVERS AND DO NOT REPAIR YOUR
SELF. REFER SERVICING TO QUALIFIED PERSONNEL.
Listening to Compact Discs
3
4
5
8
Listening to Tapes
..........................................
Making a Recording
Edit-Recording from Compact Discs
Changing the Tone Quality.................................44
................................
.........................................
......................
22
31
35
38
Using the Timer.............................................. 46
Using an External Unit
Care & Use
...................................................
.....................................
53
54
Troubleshooting Guide...................................... 57
Technical Specifications
(Back of product)
....................................
59
OANGER-Invisible
laser radiftion whan
DIRECT EX
POSURE TO BEAM.
(Inside ot product)
THIS MUSIC SYSTEM IS CAPABLE OF RE
CEIVING THE NEW AM STEREO BROADCASTS
FROM THE AM BAND RADIO STATIONS.
HOWEVER LIKE MANY MUSIC SYSTEM CUR
RENTLY AVAILABLE ON THE MARKET IT WILL
REPRODUCE THIS AM STEREO SIGNAL ONLY
IN AM MONO, WHICH, IN EFFECT, IS OF NO
LESSER QUALITY THAN YOUR EXISTING AM
MONO MUSIC SYSTEM.
Page 3

Suggestions for Safety
■ Use a standard AC wall outlet
1. Use from an AC power source of high voltage, such as that
used for an air conditioner, is very dangerous.
A fire might be caused by such a connection.
2. A DC power source cannot be used.
Be sure to check the power source carefully, especially on a
ship or other place where DC is used.
■ Grasp the plug when disconnecting the power supply cord
1. Wet hands are dangerous.
A dangerous electric shock may result if the plug is touched by
wet hands.
2. Never place heavy items on top of the power supply cord,
nor force it to bend sharply.
■ Place the unit where it will be well ventilated
Place this unit at least 10 cm (4") away from wall surfaces, etc.
■ Avoid places such as the following:
In direct sunlight or in other places where the temperature is
high.
In places where there is excessive vibration or humidity.
Such conditions might damage the cabinet and/or other component
parts and thereby shorten the unit’s service life.
■ Be sure to place the unit on a flat, level surface
If the surface is inclined, a malfunction may result.
■ Never attempt to repair nor reconstruct this unit
A serious electric shock might occur if this unit is repaired, dis
assembled or reconstructed by unauthorized persons, or if the
internal parts are accidentally touched.
■ Take particular care if children are present
Never permit children to put anything, especially metal, inside this
unit. A serious electric shock or malfunction could occur if articles
such as coins, needles, screwdrivers, etc. are inserted through the
ventilation holes, etc. of this unit.
■ If water Is spilled on the unit
Be extremely careful if water is spilled on the unit, because a fire or
serious electric shock might occur. Immediately disconnect the
power cord plug, and consult with your dealer.
■ Avoid spray-type insecticides
Insecticides might cause cracks or "cloudiness" in the cabinet and
plastic parts of this unit. The gas used in such sprays might,
moreover, be ignited suddenly.
■ Never use alcohol or paint thinner
These and similar chemicals should never be used, because they
might cause flaking or cloudiness of the cabinet finish.
■ Disconnect the power supply cord if the unit will not be used for a long time
If the unit is left for a long time with the power ON, this not only will
shorten its useful operation life, but also may cause other trouble.
■ If trouble occurs
If, during operation, the sound is interrupted or indicators no longer
illuminate, or if an abnormal odour or smoke is detected, imme
diately disconnect the power cord plug, and contact with your
dealer or an Authorized Service Center.
For United Kingdom
("EB” area code model only)
The "EB" indication is shown on the serial number tag.
Important
THE WIRES IN THIS MAINS LEAD ARE COLOURED IN ACCOR
DANCE WITH THE FOLLOWING CODE.
BLUE: NEUTRAL
BROWN: LIVE
As the colours of the wires in the mains lead of this apparatus may
not correspond with the coloured markings identifying the terminals
in your plug proceed as follows. The wire which is coloured BLUE
must be connected to the terminal which is marked with the letter N
or coloured BLACK.
The wire which is coloured BROWN must be connected to the
terminal which is marked with the letter L or coloured RED.
Under no circumstances must either of the above wires be con
nected to the earth terminal of a three pin plug.
Page 4

Concerning the Remote Control
Battery installation
1 open the cover
Press gently and slide the cover out.
2
Insert the batteries included with this system.
•When you need to replace these batteries, use two UM-4
‘‘AAA’’, lEC R03 (1.5 V) or equivalent batteries.
Use of batteries
• Do not mix old and new batteries or batteries of different types
(carbon and alkaline, etc.).
•The average battery life is about one year. Although the battery
life varies depending on how often the device is used, you should
generally replace the batteries about once a year.
•Replace the batteries if commands from the remote control trans
mitter do not operate the unit even when the transmitter is held
close to the front panel.
•Never subject batteries to excessive heat or flame; do not attempt
to disassemble them; and be sure they are not short-circuited.
•If you will not be using the remote control for a long period of time,
remove the batteries and store them in a cool, dark place.
Operation notes
•Be sure that you insert the batteries so that their positive (+)
and negative (-) polarities match the polarities indicated in
the compartment. Batteries installed incorrectly may leak
and cause damage.
• Refer to “Use of batteries” for additional information,
3
Close the cover.
•If a battery teaks, remove all batteries and dispose of them prop
erly. Thoroughly clean the battery compartment before inserting
new batteries.
If the leaking electrolyte comes into contact with skin or clothes,
flush with water immediately.
•Keep batteries out of the reach of children.
• Do not use rechargeable-type (nickel-cadmium) batteries.
•Do not attempt to recharge alkaline or carbon batteries.
•Always remove old, weak, or worn-out batteries promptly and
dispose of them properly.
• Do not dispose of used batteries in household rubbish.
Aim the remote control transmission window toward the amplifier's
sensor. Avoid any obstacles.
• Use the remote control within a 60-degree angle of the amplifier.
•The reachable distance is within 6 meters directly facing toward
the amplifier.
•Be sure the transmission window and the amplifier's sensor are
free from dust. Excessive dust might prevent reception.
• If direct sunlight or other strong light source strikes the remote
control signal sensor part of the amplifier, it may impair the remote
control’s operation. If there is a problem, place the amplifier away
from the light source.
• If this system is installed in a rack with glass doors, the glass
doors' thickness or color might make it necessary to use the
remote-control transmitter a shorter distance from the system.
Page 5
Preparations
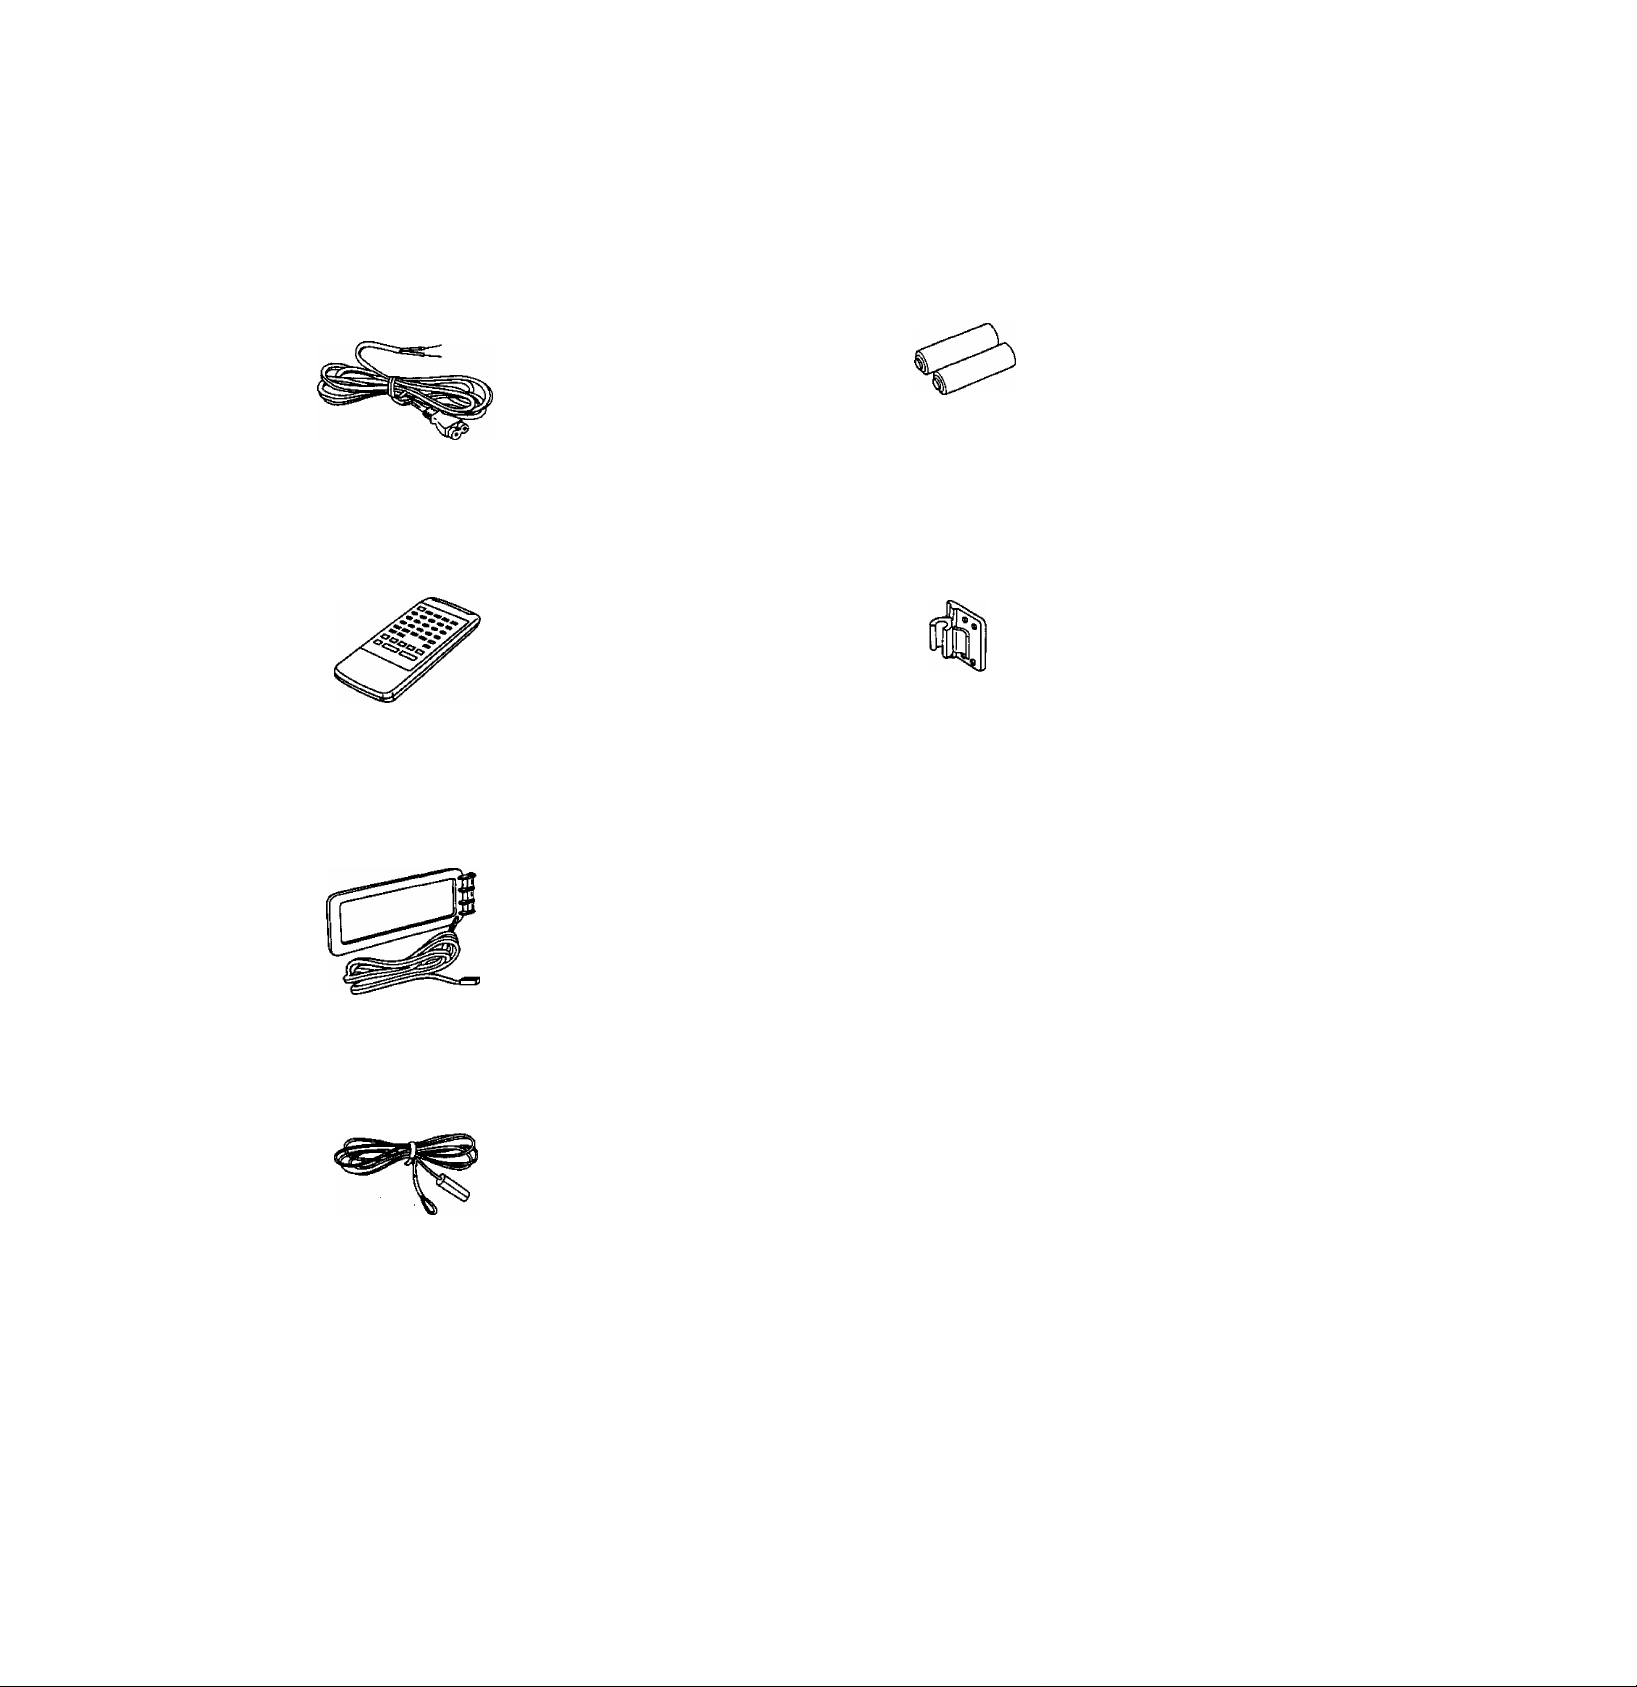
Supplied accessories
Check the packing carton for these accessories.
AC power supply cord 1 pc.
Remote control transmitter
RAK-SC307WM 1 pc.
LW/MW loop antenna 1 pc.
Remote control batteries (UM-4, AAA, R03) 2 pcs.
Antenna holder 1 pc.
Mounting screws 2 pcs.
FM indoor antenna 1 pc.
Attachment plug 1 pc.
(For United Kingdom only)
Note:
The configuration of AC power supply cord and FM indoor antenna
differ according to area.
Page 6
Preparations
Connections
2 3 4
(?) -Í
Da-a
e®
a Ù
(continued)
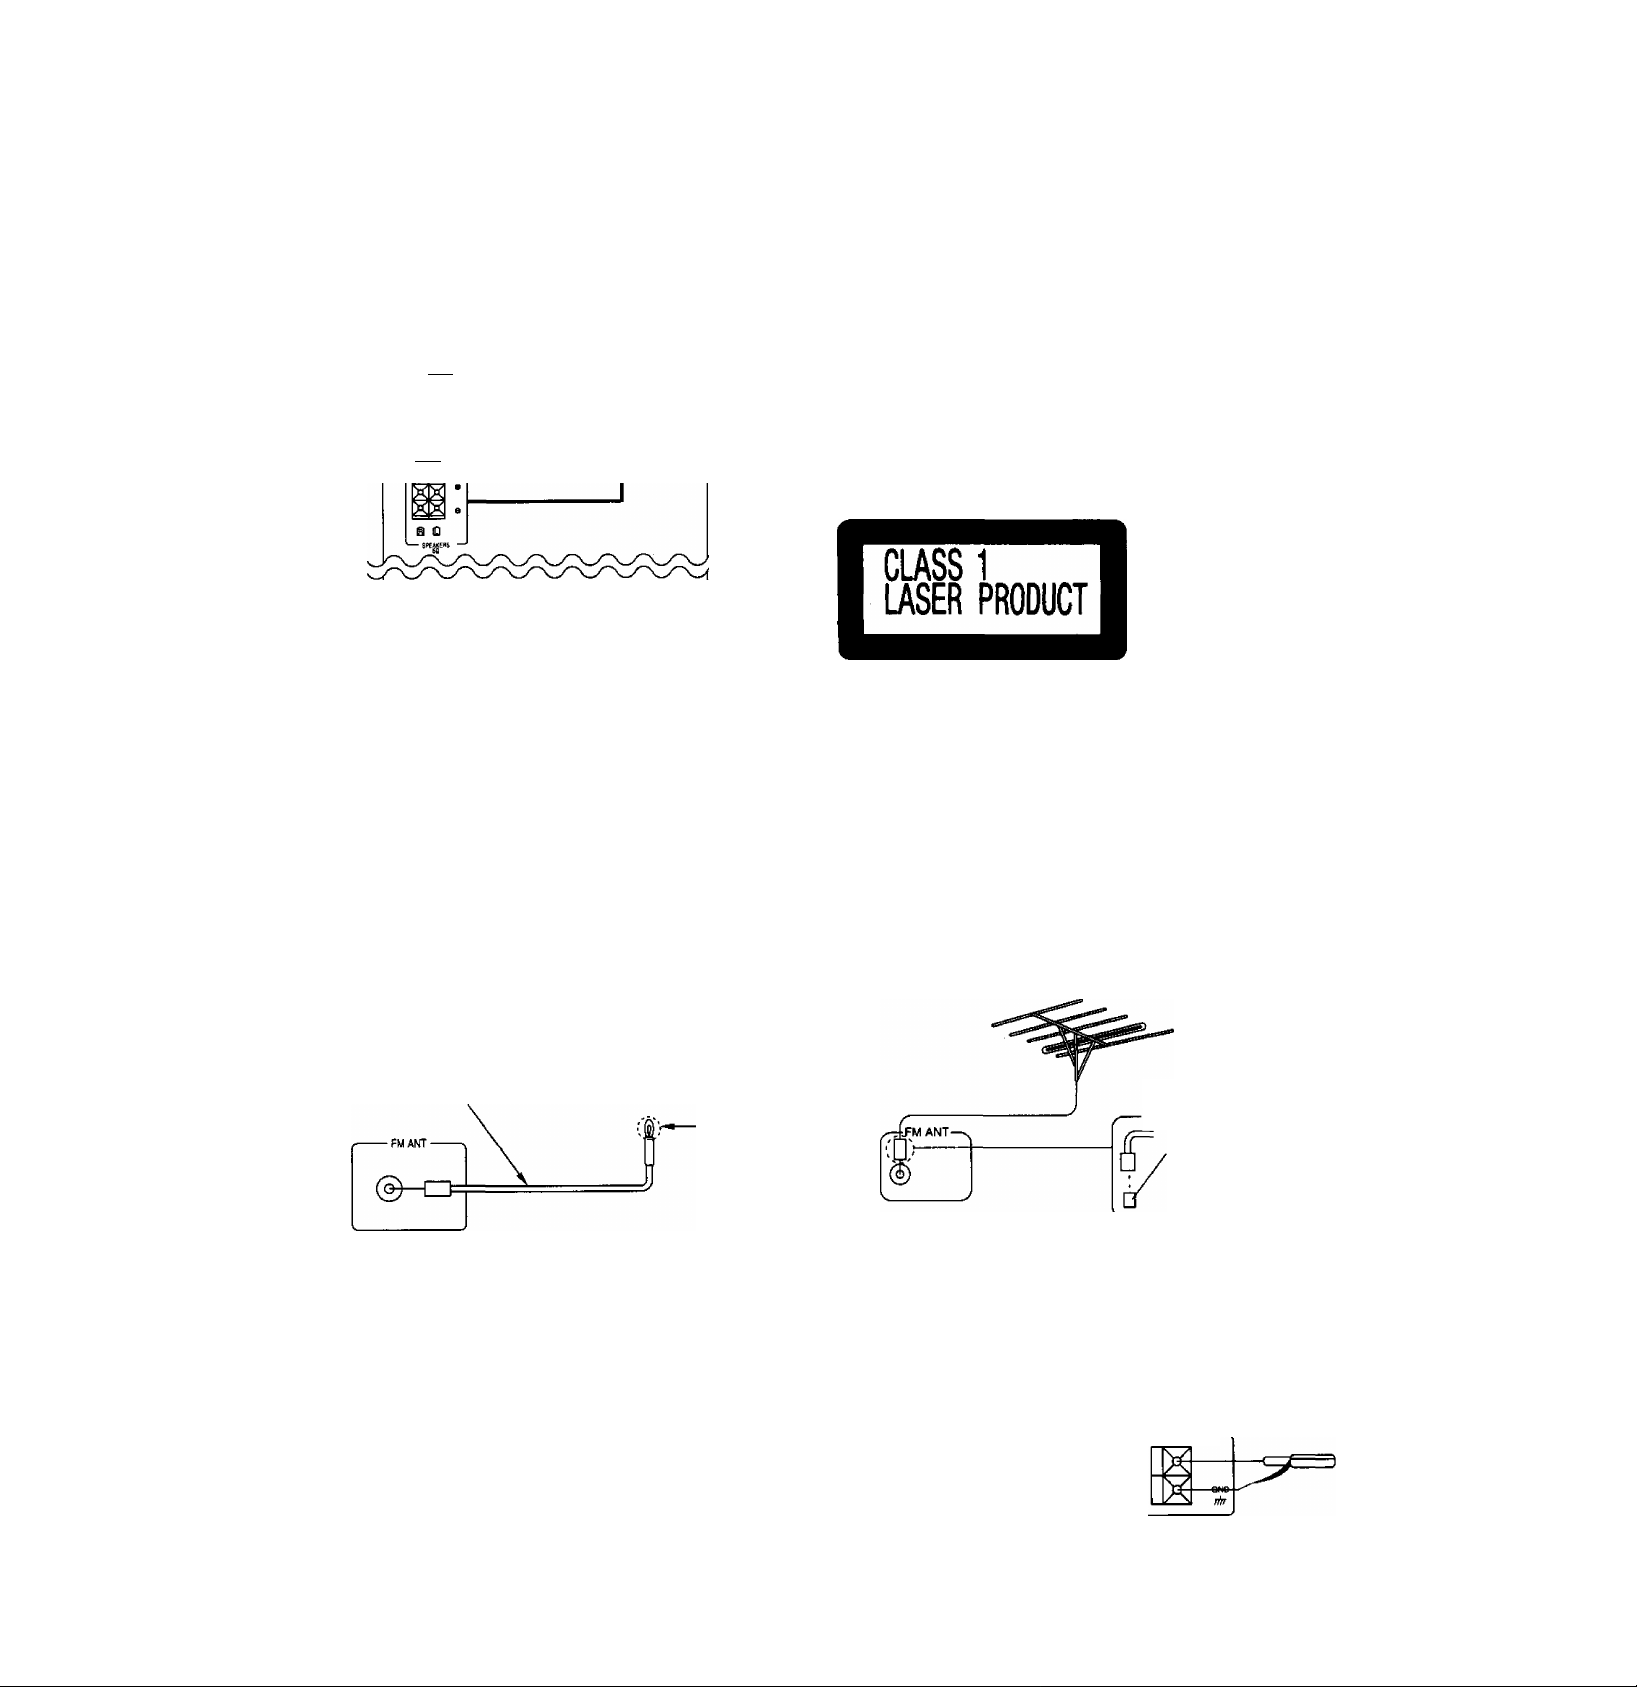
Connect the FM indoor antenna provided with this system.
Tack or tape this antenna to a wall. If you use a tack, be sure
it does not contact the Internal antenna wire. Experiment with
the height and direction of the antenna until you achieve the
best reception.
For best reception and sound quality:
Use an FM outdoor antenna. If you use an FM outdoor an
tenna, disconnect the indoor antenna.
Connecting the FM indoor antenna
FM indoor antenna (included)
Tack or
tape to wall
■ FM outdoor antenna (not included)
If the FM indoor antenna does not provide satisfactory reception of
FM broadcasts, use an outdoor antenna.
You may need an outdoor antenna if you use this system in a
mountainous region or inside a reinforced-ooncrete building, etc.
An outdoor antenna should be installed by a competent technician
only.
FM outdoor antenna (not included)
75-Ohm coaxial
cable (not included)
For Untted Kingdom—
Use the attachment
plug (included).
For areas except for United Kingdom
(i) Remove a piece of the outer
vinyl sheath from the end.
® Bundle the shield braid, and
remove a piece of the inner
vinyl sheath covering the
core wire.
Tilt the lever back and insert
the core wire and the shield
braid.
0 Close the lever and pull the
cable gently to be sure that it
is secured.
30 mm
15 mm
-FM ANT(750)
Page 7
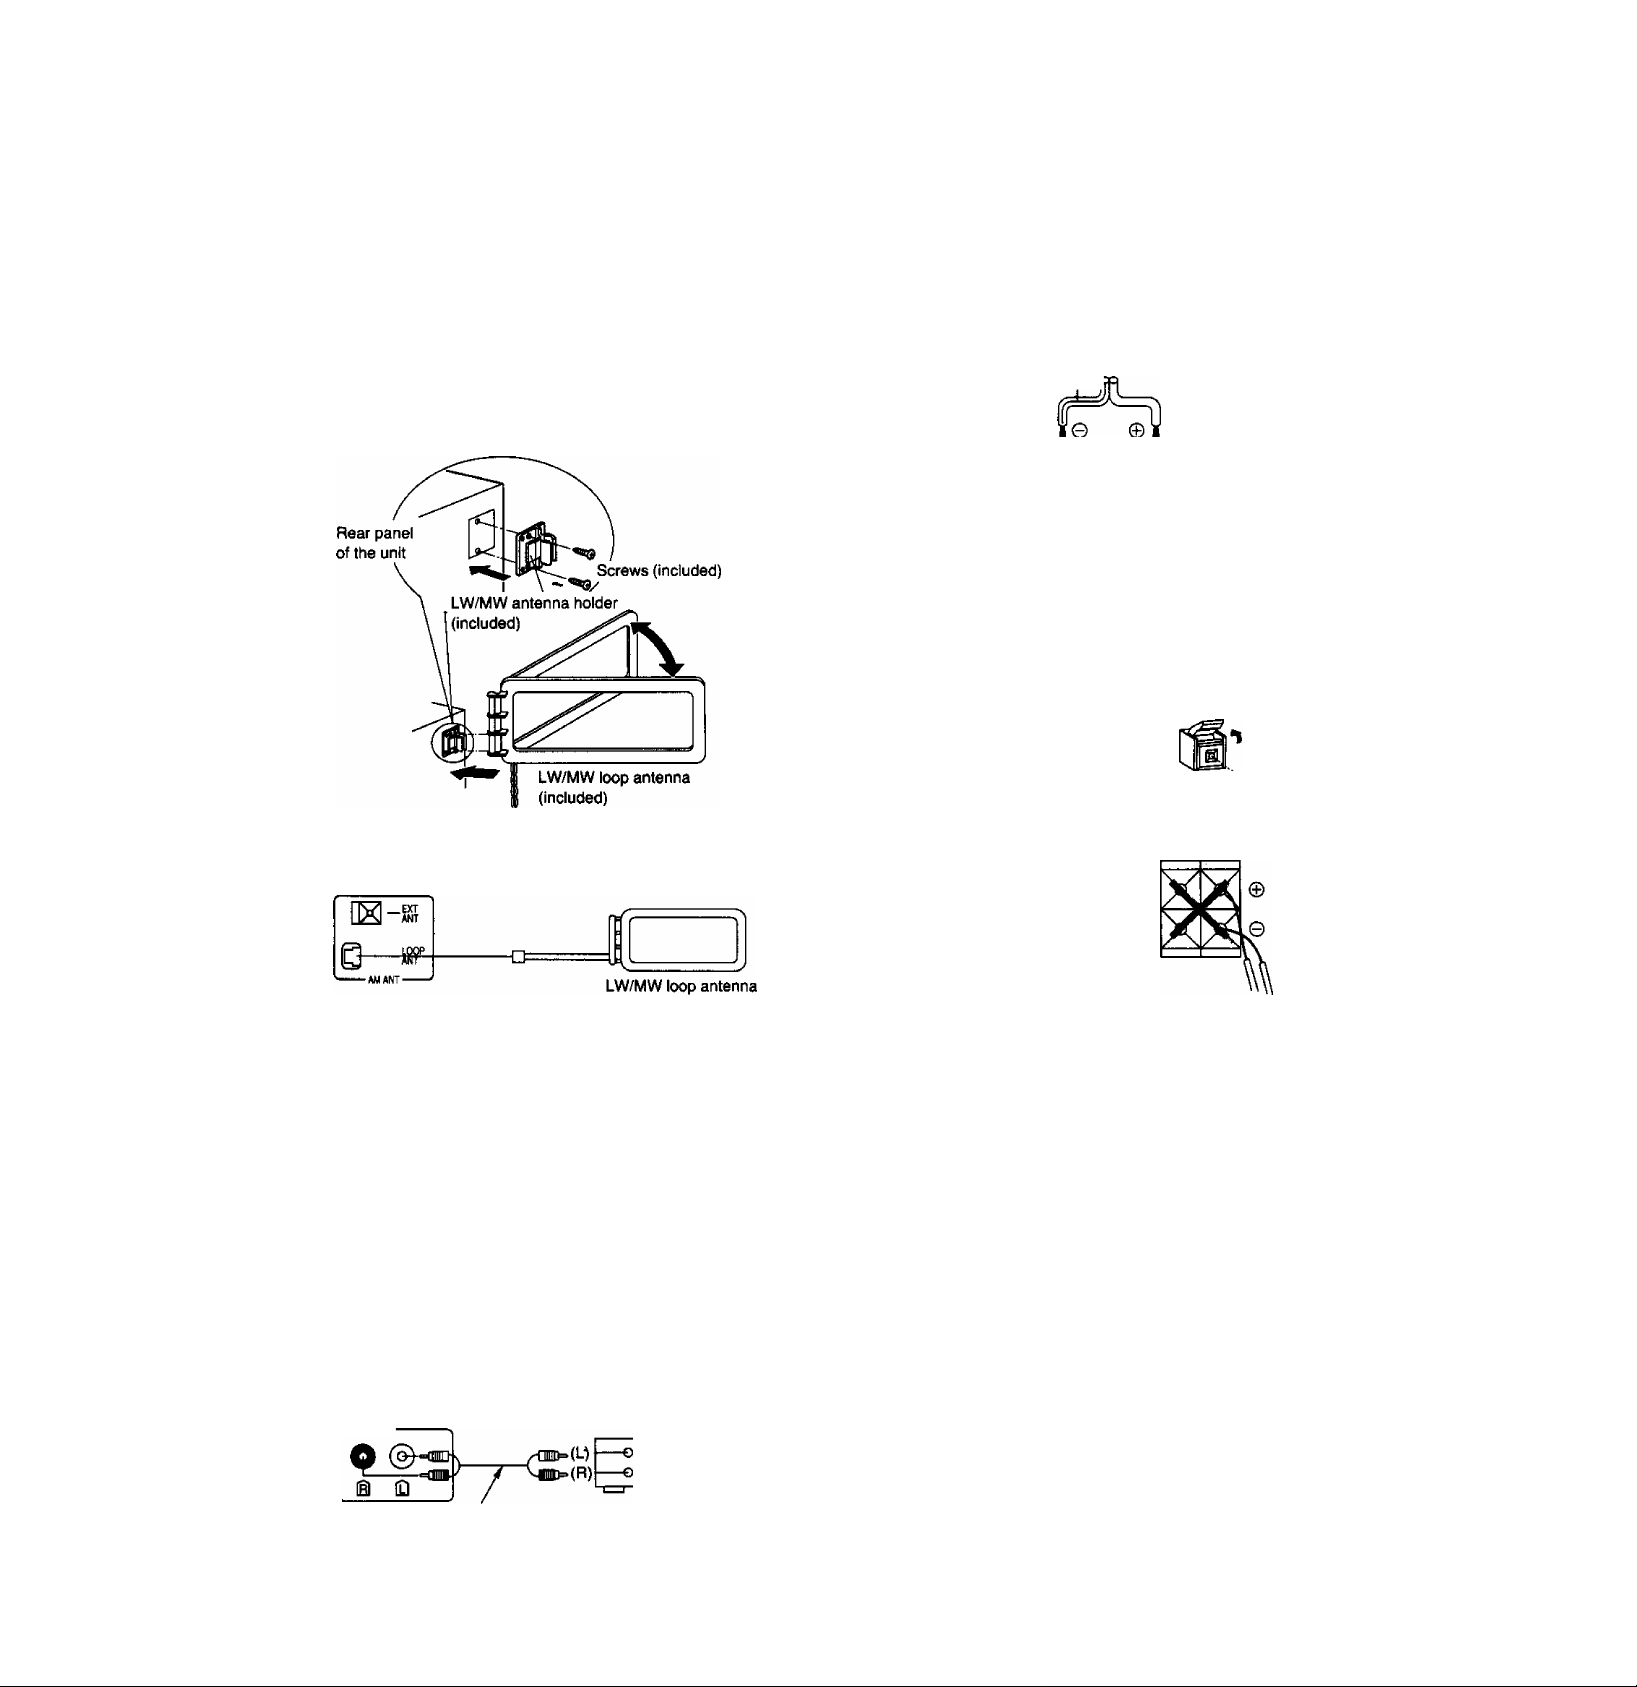
Connect the LW/MW loop antenna provided
with this system.
You must connect this antenna to receive LW/MW broadcasts.
Connect the LW/MW loop antenna to the AM antenna termi
nal. (The indication AM used here includes both MW and LW.)
You may attach the LW/MW antenna holder to the rear panel
of the system or to a rack or other structure.
Clamp the antenna to the holder and position the loop for the
best reception. To minimize noise pickup, keep the loop an
tenna away from the speaker cable, power cord, and metal
surfaces.
Connect the speaker cables [for right (R) and
left (L) channels].
Match the two wires from the left and right speaker cables with
the same colored levers of the speaker terminals, then insert
the wires into the respective terminals.
r‘ ■ ‘ ■ -s.
Notes:
•Connect speaker cables before connecting the AC power
•The load impedance of any speaker used with this unit must
For areas except for United Kingdom
Be sure to connect the striped wire to the negative
terminals. „ .
supply.
be 6 ohms.
Striper
Connection of speaker cables
1. Strip off the outer c
covering, and twist the
center conductor.
2. Tilt the lever back and
insert the wire.
15 mm
Twist
Connecting the LW/MW loop antenna:
(included)
Connecting the LW/MW outdoor antenna (not Included)
You may need an outdoor antenna if you use this system in a
mountainous region or inside a reinforced-concrete building,
etc.
IS-*-
LOOP
0-
3
Connect an external unit, such as audio tape
ANT
--------------------5-12 m
Run between 5 and 12 m
of vinyl-covered wire
horizontally along a
window or other
convenient location.
----------------------------
deck (for playback only) or output terminals of
a VCR or TV (not included).
Connecting external units:
3. Close the lever and pull
the wire gently to be sure
that it is secure.
Notes:
To prevent damage to
circuitry, never short-circuit
positive (H-) terminals and
negative (-) speaker wires.
Be sure to connect only
positive (-!-} wires to positive
(-I-) terminals and negative
(-) wires to negative (-)
terminals.
5
Connect the AC power supply cord after you
X
have connected all other cables and cords.
Note:
Configuration of the AC outlet and AC power supply cord
differ according to area.
For United Kingdom
•t<7
Fit a suitable plug to the AC power
supply cord.
/
Household
AC outlet
-AUX'
Stereo connection cable
(not included)
L /AUDIO'S
R kOUT )
Video cassette recorder
(not included)
Page 8
Front Panel Controls and Functions
The functions indicated by the numbers with black background (for
example O) can also be activated from the remote control transmit
ter, (See page 13.)
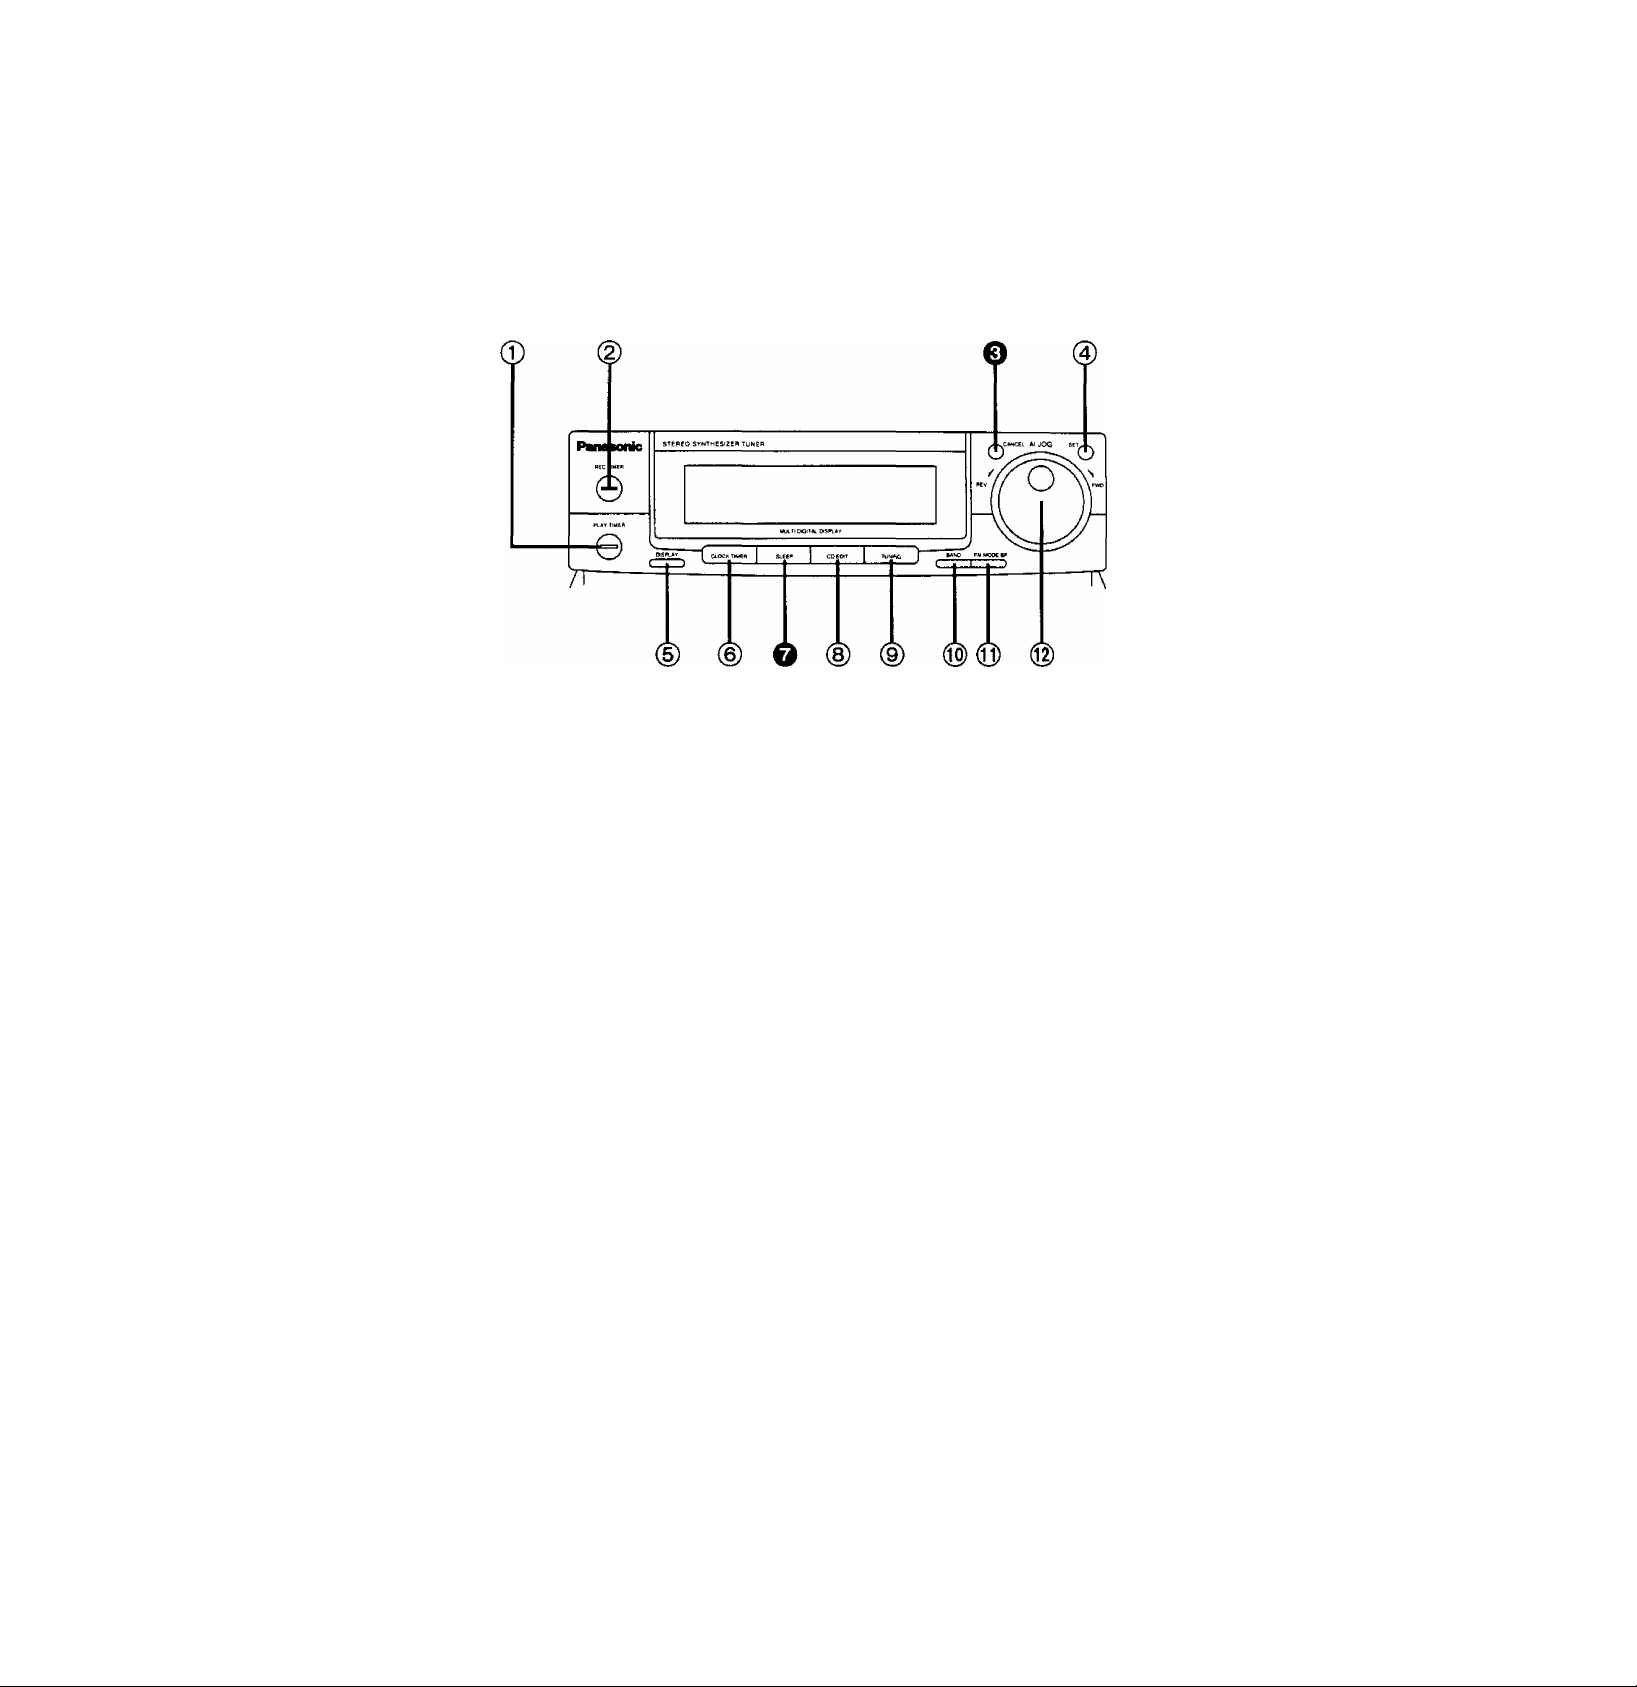
Tuner
■ Tuner control
© Timer play button (PLAY TIMER)
Use for timer play (when you want play to begin automatically
at a preset time).
(2) Timer recording button (REC TIMER)
Use for timer recording (when you want to begin recording
automatically at a preset time).
0 Cancel button (CANCEL)
Press to cancel the contents chosen with the jog dial.
0 Set button (SET)
Press to set various functions.
0 Display select button (DISPLAY)
Press to select the display (mode display, clock, tape counter,
etc.).
@
Clock/timer button (CLOCK/TIMER)
Use to select the desired timer mode or to adjust the clock.
0 Sleep timer button (SLEEP)
Press when you want the system to turn itself off.
0 Compact disc edit-recording mode select
button (CD EDIT)
Press to select the desired edit-recording mode.
0 Tuning mode select button (TUNING)
Press to select the preset, manual or auto tuning mode.
0 Band select button (BAND)
Press to select the LW, MW or FM radio band.
0 FM mode/beat proof button (FM MODE/BP)
Press to select the FM listening mode (stereo or monaural)
during FM broadcasts or to reduce the unwanted beat signals
(whistle) during recording of a LW/MW broadcast.
@
Jog dial (Al JOG)
Use to select the contents of the mode, i.e., select tracks in CD
player mode or stations in the tuner mode, as well as many
other functions.
8
Page 9
Front Panel Controls and Functions
(continued)
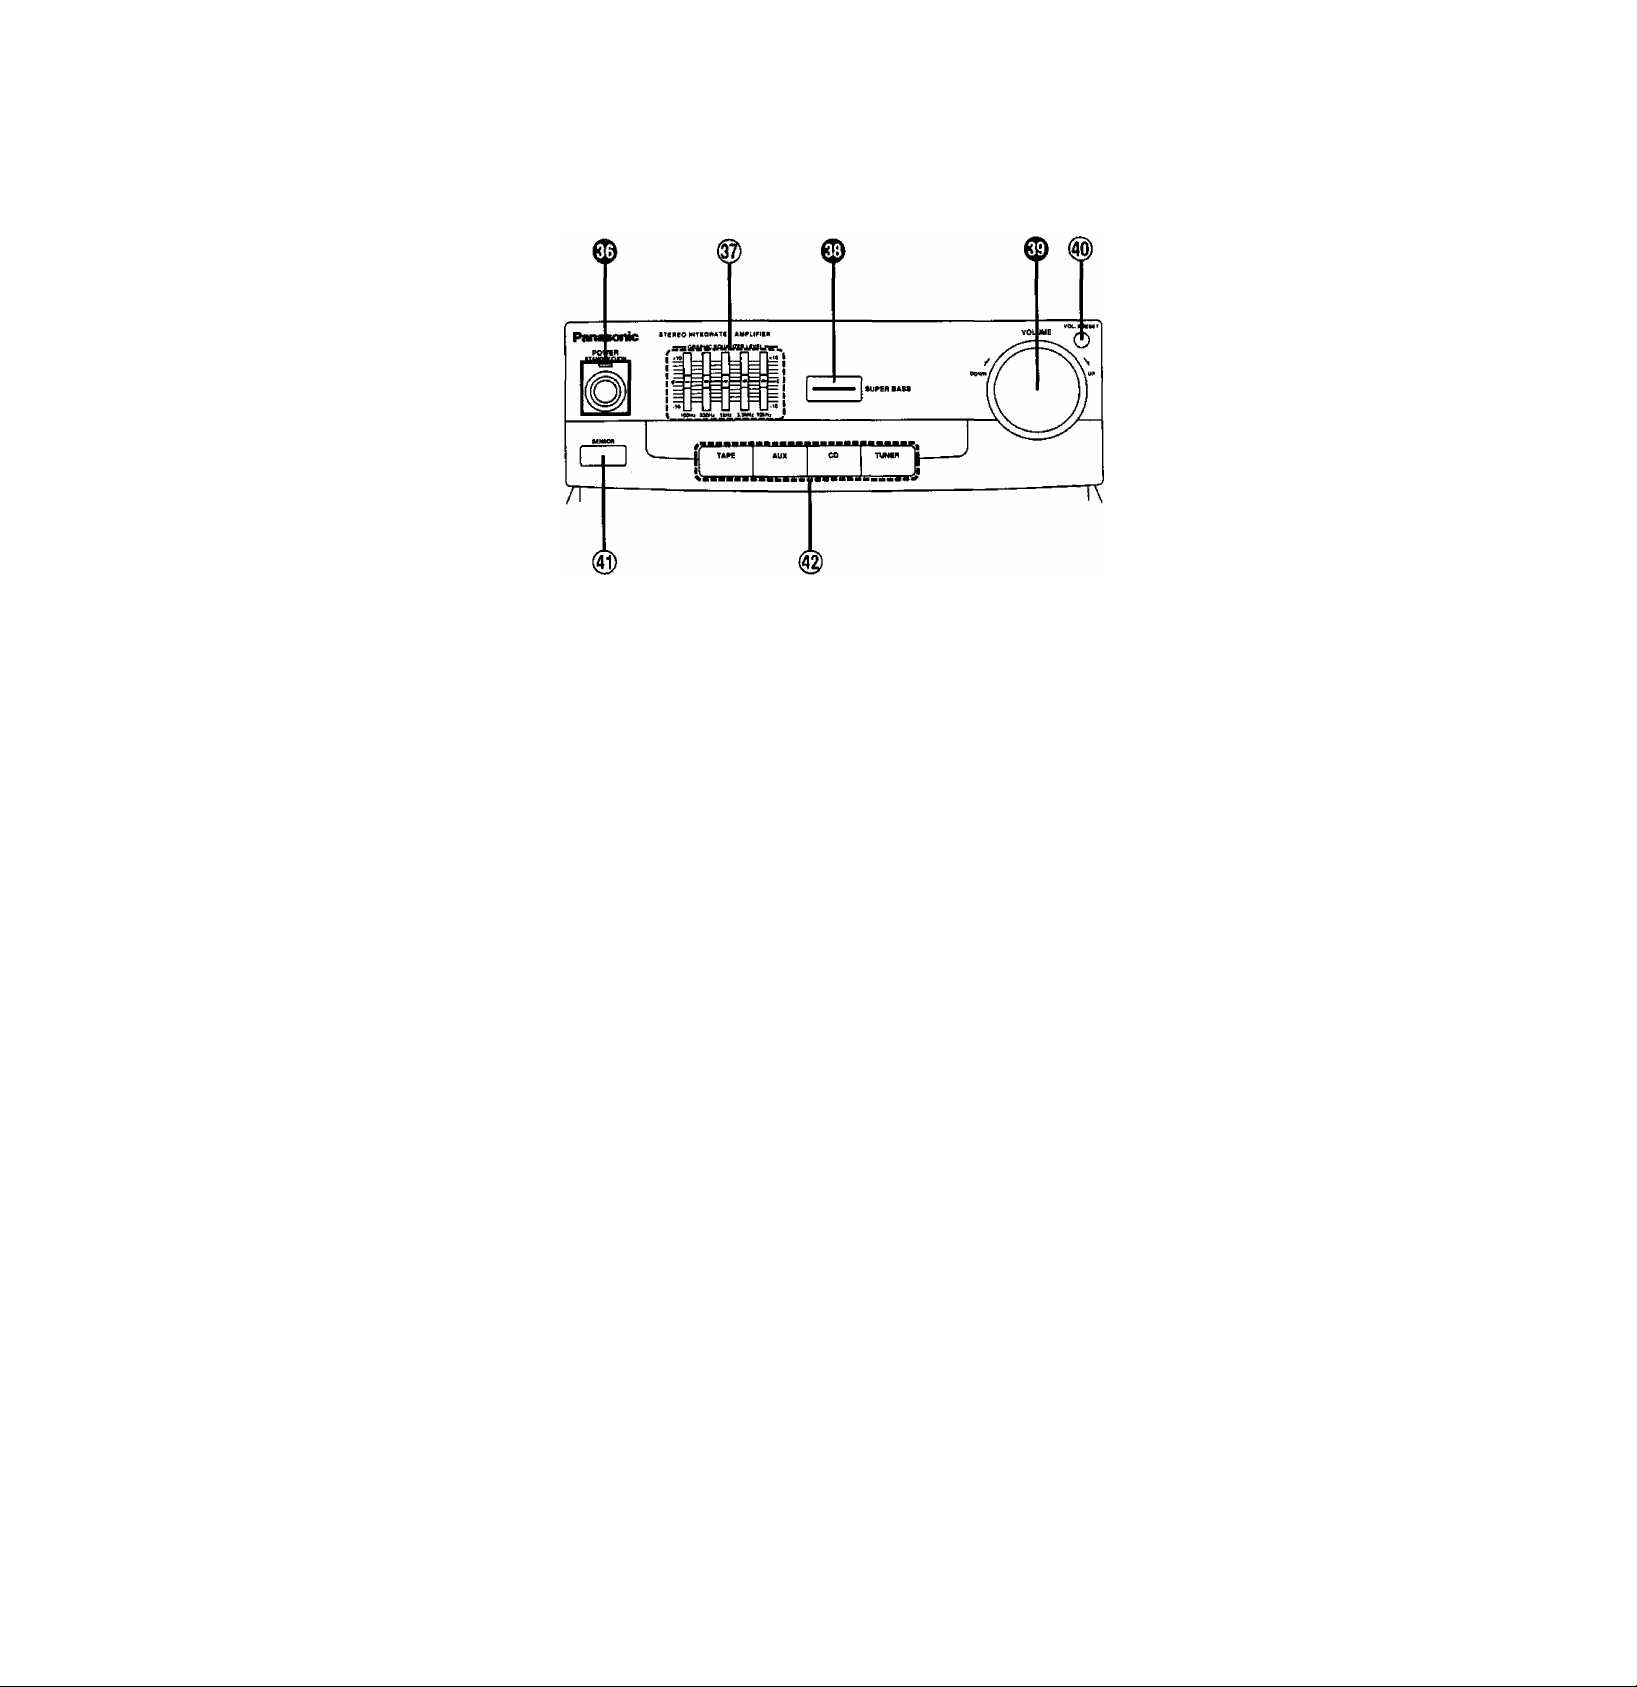
Amplifier
■ Amplifier controls
0 Power “STANDBY c!)/ON” switch and indica
tor (POWER STANDBY (!)/ON)
This switch switches ON and OFF the secondary circuit power
only. The unit is in the "standby” condition when this switch is
set to the STANDBY (!) position. Regardless of the switch
setting, the primary circuit is always “live” as long as the
power cord is connected to an electrical outlet.
•The indicator will illuminate when the unit is in "STANDBY"
condition.
@ Equalizer controls
(GRAPHIC EQUALIZER LEVEL)
Use to adjust the equalization level.
These controls are for compensation of tonal quality. By sliding
the controls at each of the indicated frequencies in the
direction, the tonal quality is increased, and by sliding them in
thedirection, the tonal quality is decreased.
(See page 44.)
0 Super bass button (SUPER BASS)
Press to boost the dynamic low-frequency ranges.
0 Volume level control (VOLUME)
Turn to adjust the volume level.
When turning the control, the alphanumeric display shows the
volume level.
Note that — dB is the lowest volume setting and 0 dB is the
highest.
® Volume preset button (VOL PRESET)
Use to preset volume for timer piay.
(@ Remote control signal sensor (SENSOR)
Receives the signals from the remote control.
® Input select buttons (TAPE, AUX, CD, TUNER)
Press to select the sound source.
10
Page 10
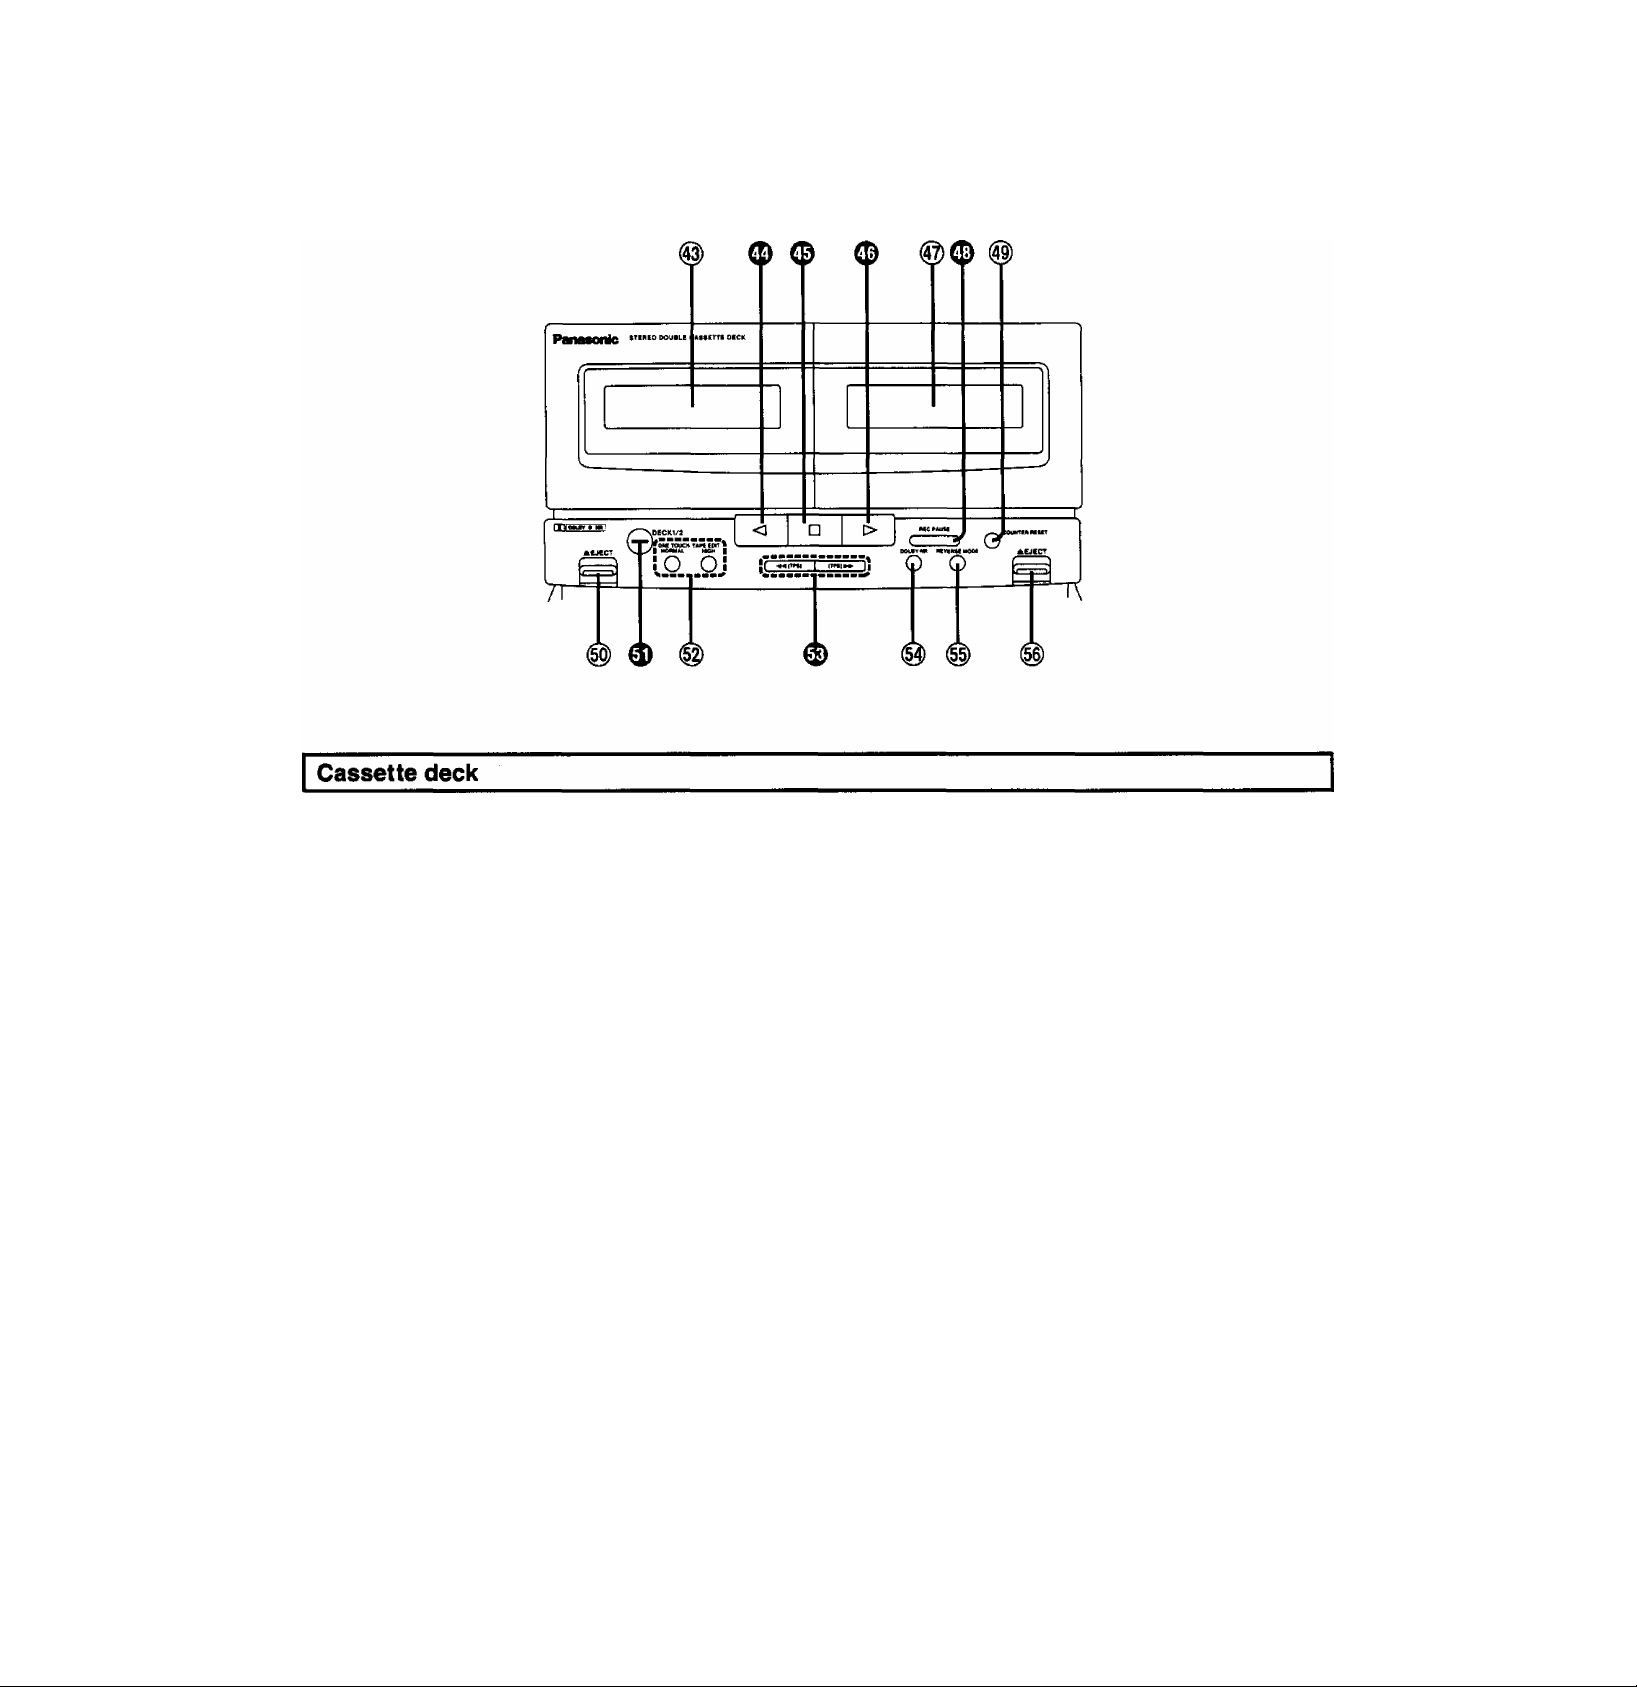
® Deck 1 cassette holder Ф Reverse-side playback button (<l)
Press to start the playback or recording (deck 2) in the reverse
direction.
Ф Stop button (□)
Press to stop the tape.
Ф Forward-side playback button (>)
Press to start the playback or recording (deck 2) in the forward
direction.
@ Deck 2 cassette holder
Ф Record/record standby button (REG PAUSE)
Press to put deck 2 into the record standby mode.
® Tape counter reset button (COUNTER RESET)
Press to reset the tape counter indicator to 000.
(|^ Deck 1 cassette eject button
Press to open the deck 1 cassette holder.
(A
EJECT)
0 Deck 1/deck 2 select button (DECK 1/2)
Press to select the deck to be operated.
@ One-touch tape edit buttons
(ONE TOUCH TAPE EDIT)
Press to start the tape-to-tape recording.
® Fast-forward/rewind/tape program sensor
(TPS) buttons [◄◄ (TPS), (TPS) ►►]
Press to advance or rewind the tape, or to quickly search for
the beginning of a track while the tape is being played.
@ Dolby noise reduction button (DOLBY NR)
Use to reduce the hissing noise heard from the tape. This
system has the Dolby B<type noise reduction system.
(g)
Reverse mode seiect button
(REVERSE MODE)
Press to select the reverse mode (for playback and recording).
@ Deck 2 cassette eject button (^ EJECT)
Press to open the deck 2 cassette holder.
11
Page 11
Front Panel Controls and Functions
(continued)
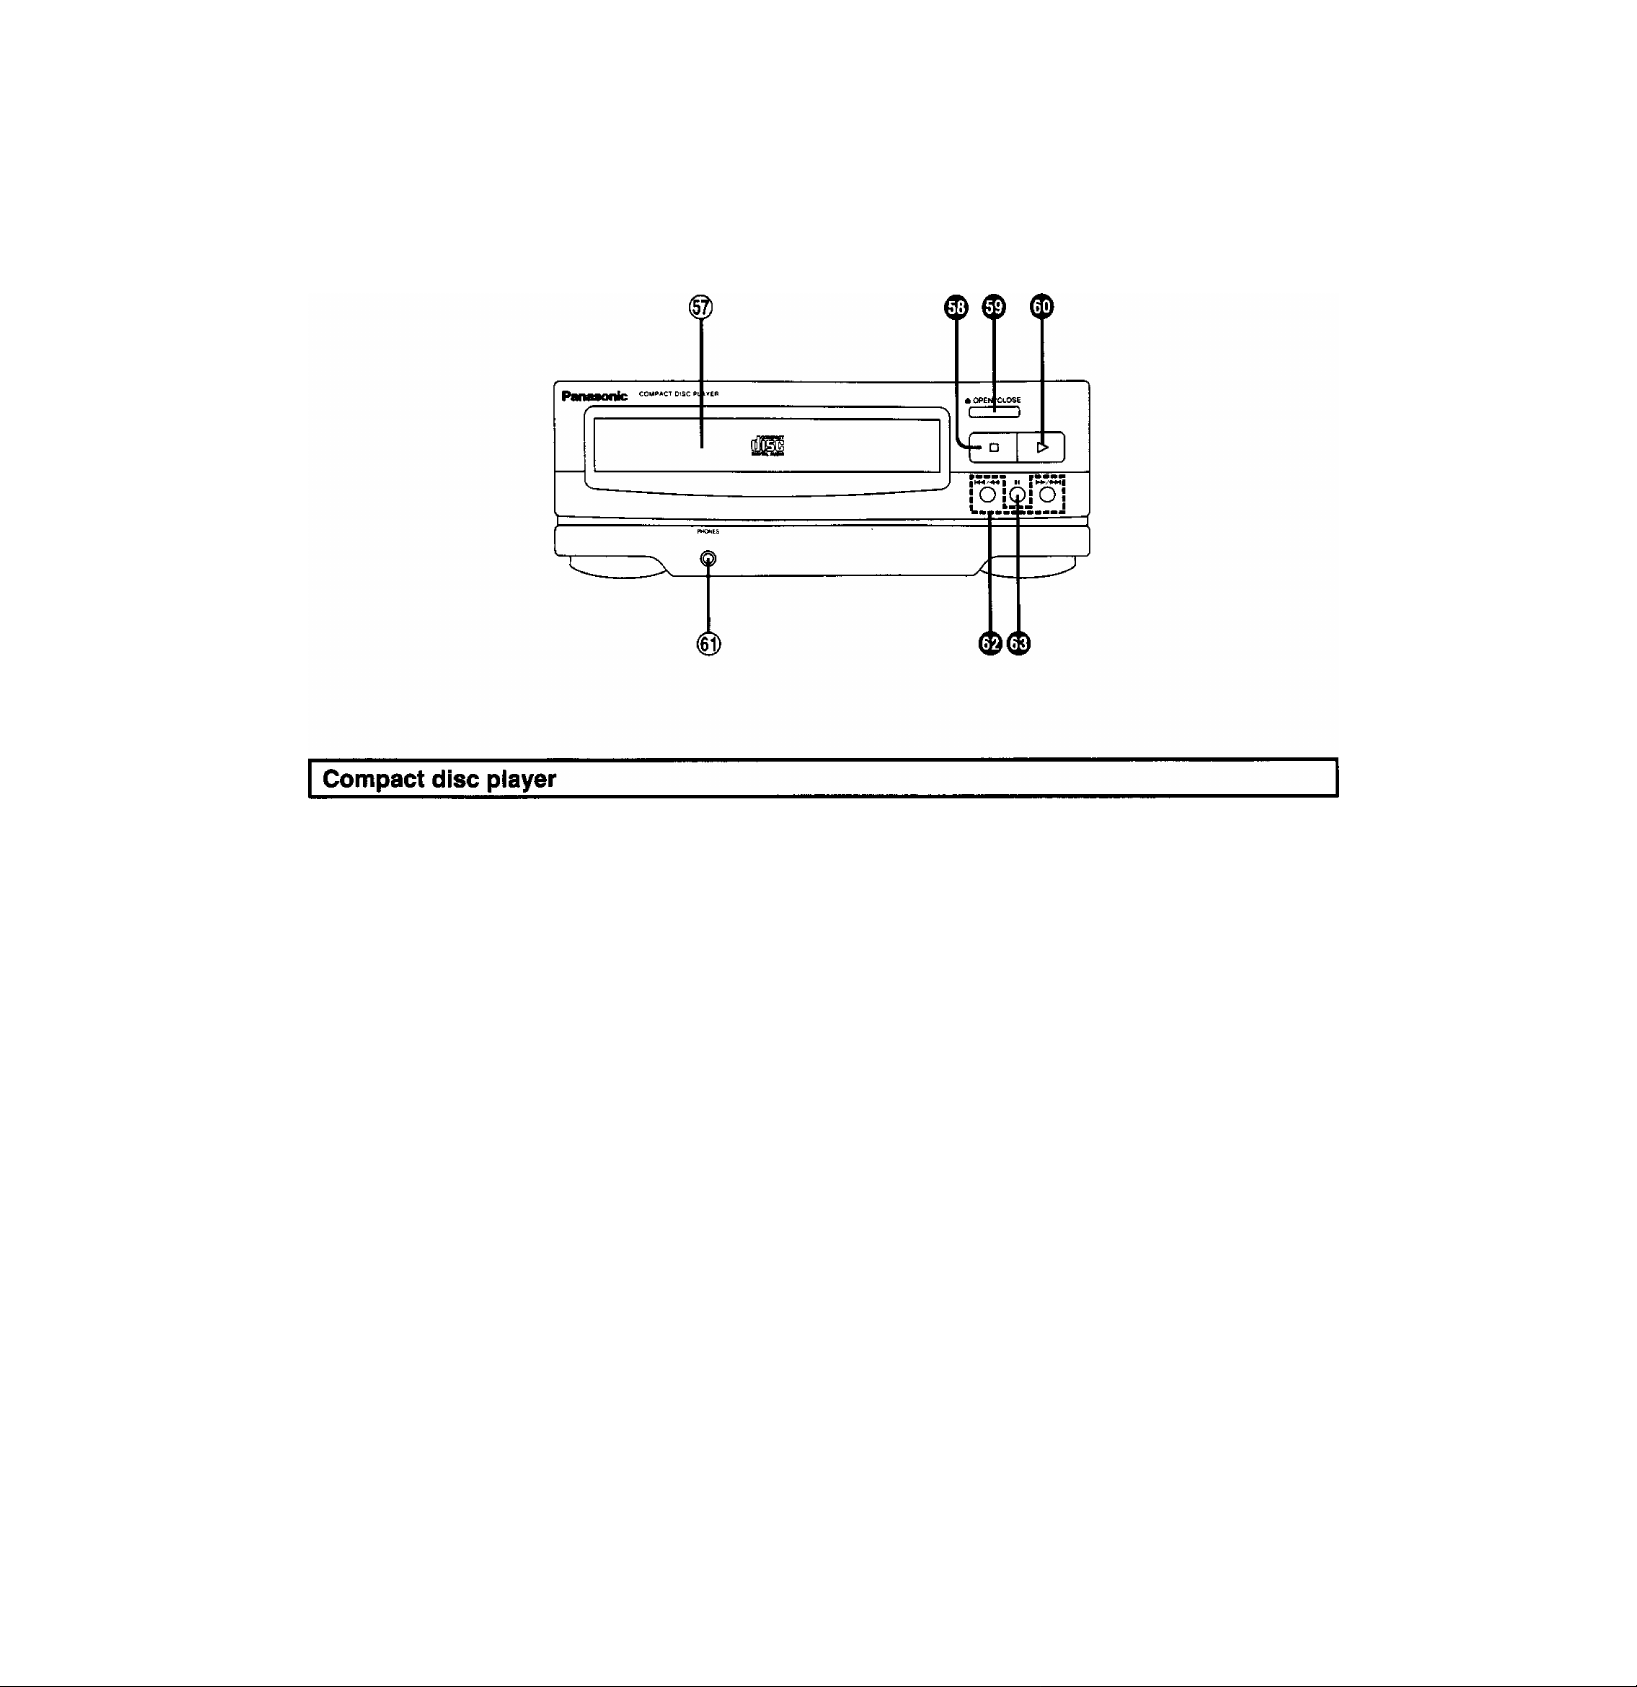
@
Disc tray
Stop button (□)
Press to stop the disc play.
® Disc tray open/ciose button OPEN/CLOSE)
Press to open and close the disc tray.
® Piay button (>)
Press to start disc play.
@ Headphones jack (PHONES)
Plug headphones cord into this jack.
® Skip/search buttons ( • ►►/►►! )
Press to move forward or backward through the tracks on a
disc, or to hear disc sound at high speed while searching in the
play mode.
0 Pause button (II)
Press to stop the disc play temporarily.
12
Page 12
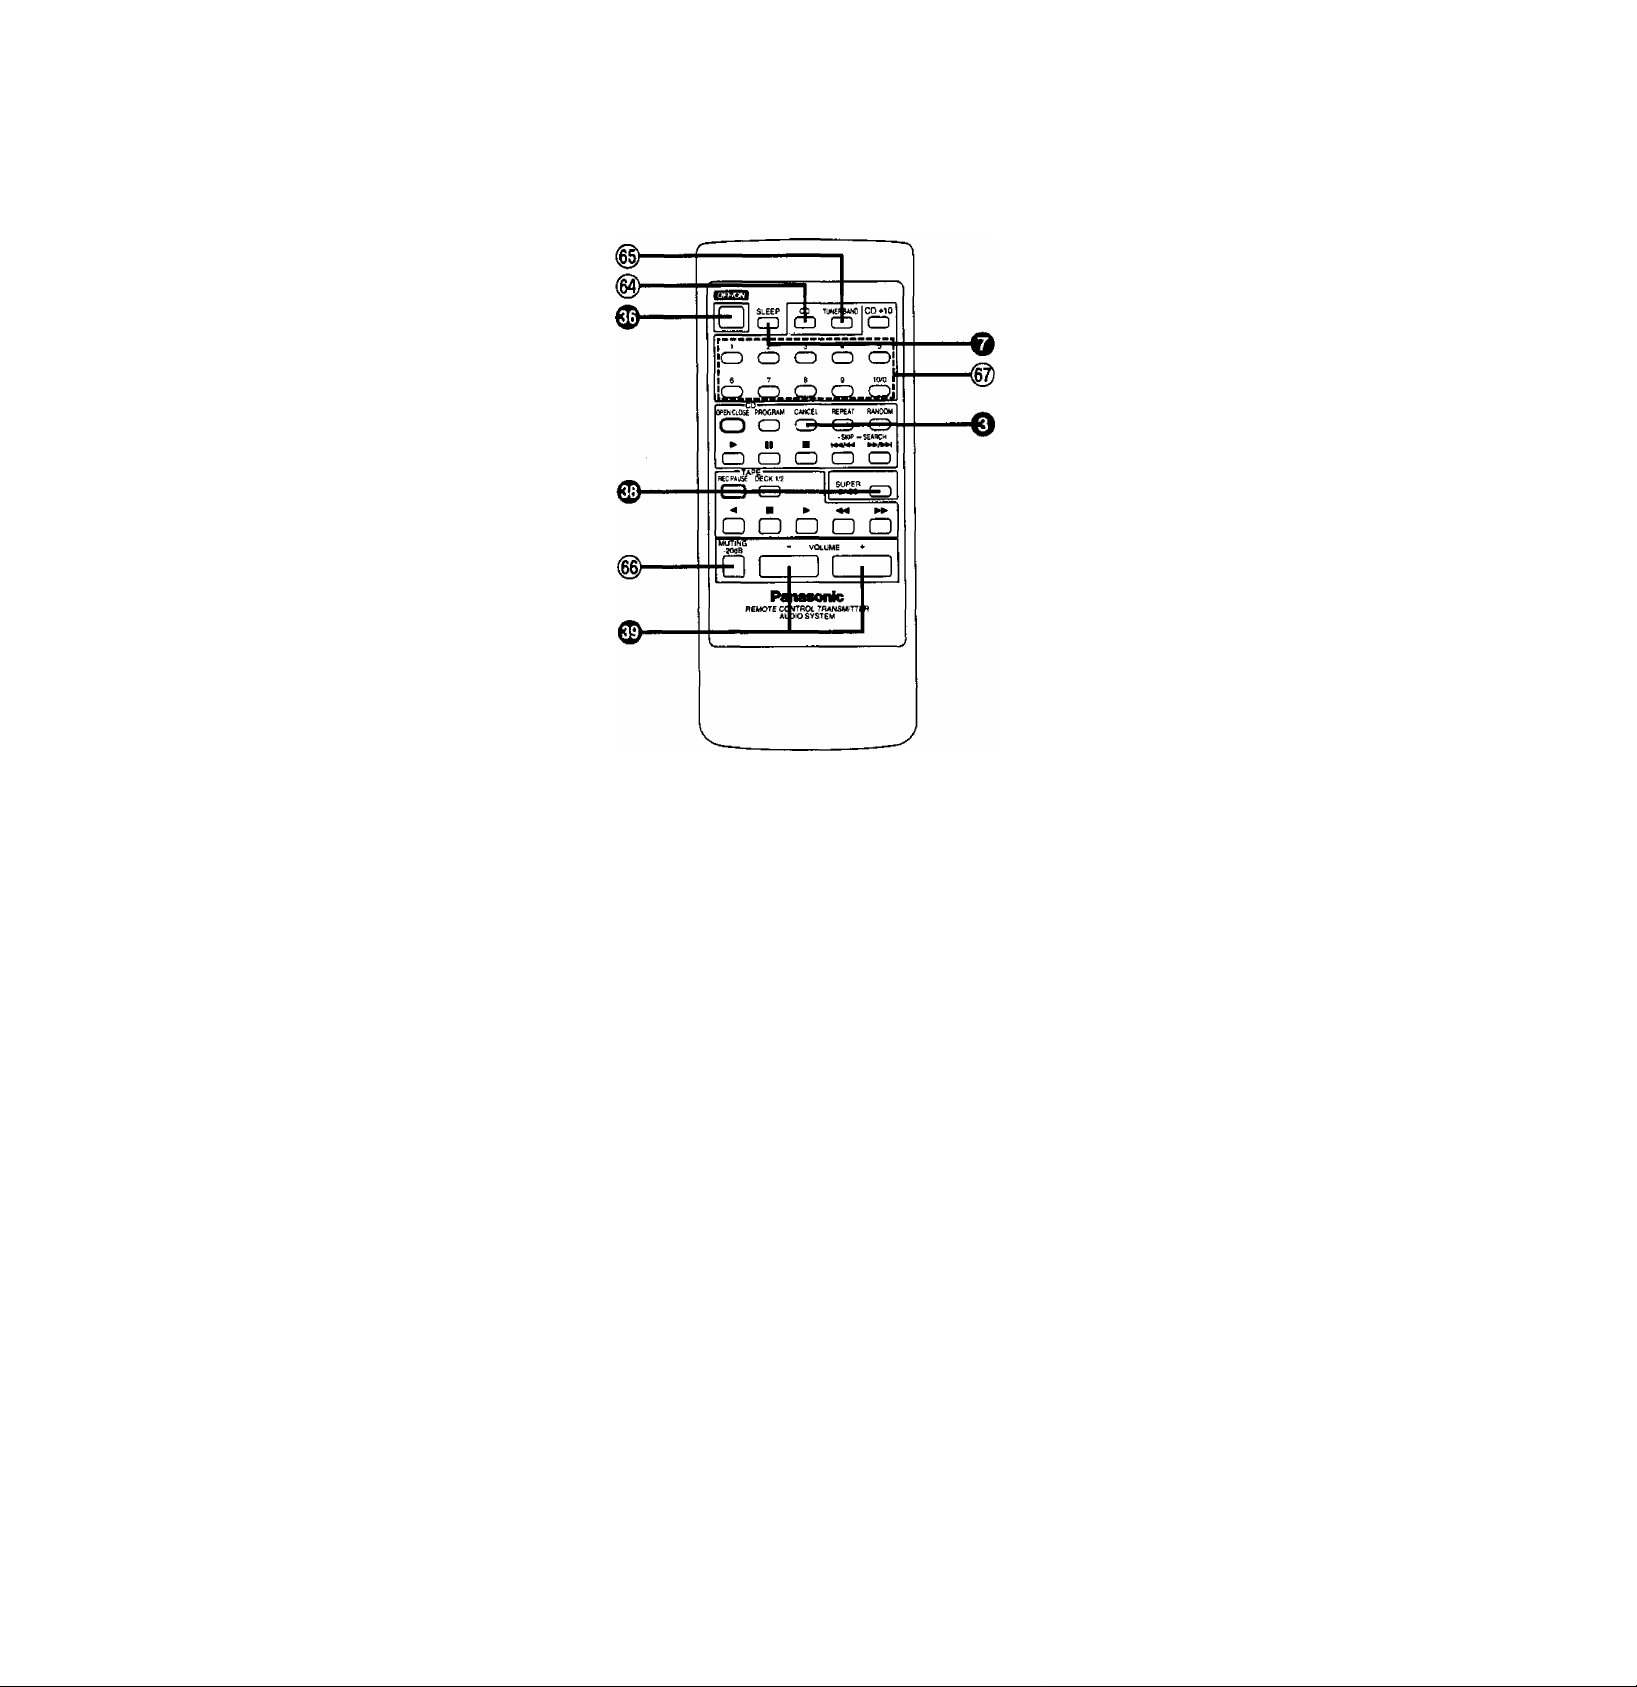
Remote Control Unit Controls and
Functions
Common operation controls
The function description of buttons and ® is as described
under “Amplifier controls" on page 10.
@ CO input select button (CD)
Press to select the CD source.
(||) Tuner Input select button (TUNER/BAND)
Press to select the tuner source.
@ Muting button (MUTiNG -20 dB)
Press to temporarily attenuate (mute) the volume level.
Tuner controls
The function description of buttons O and O described under
“Tuner control” on page 8.
@ Preset-tuning buttons (1-10/0)
Press to select the preset channel of the tuner.
13
Page 13
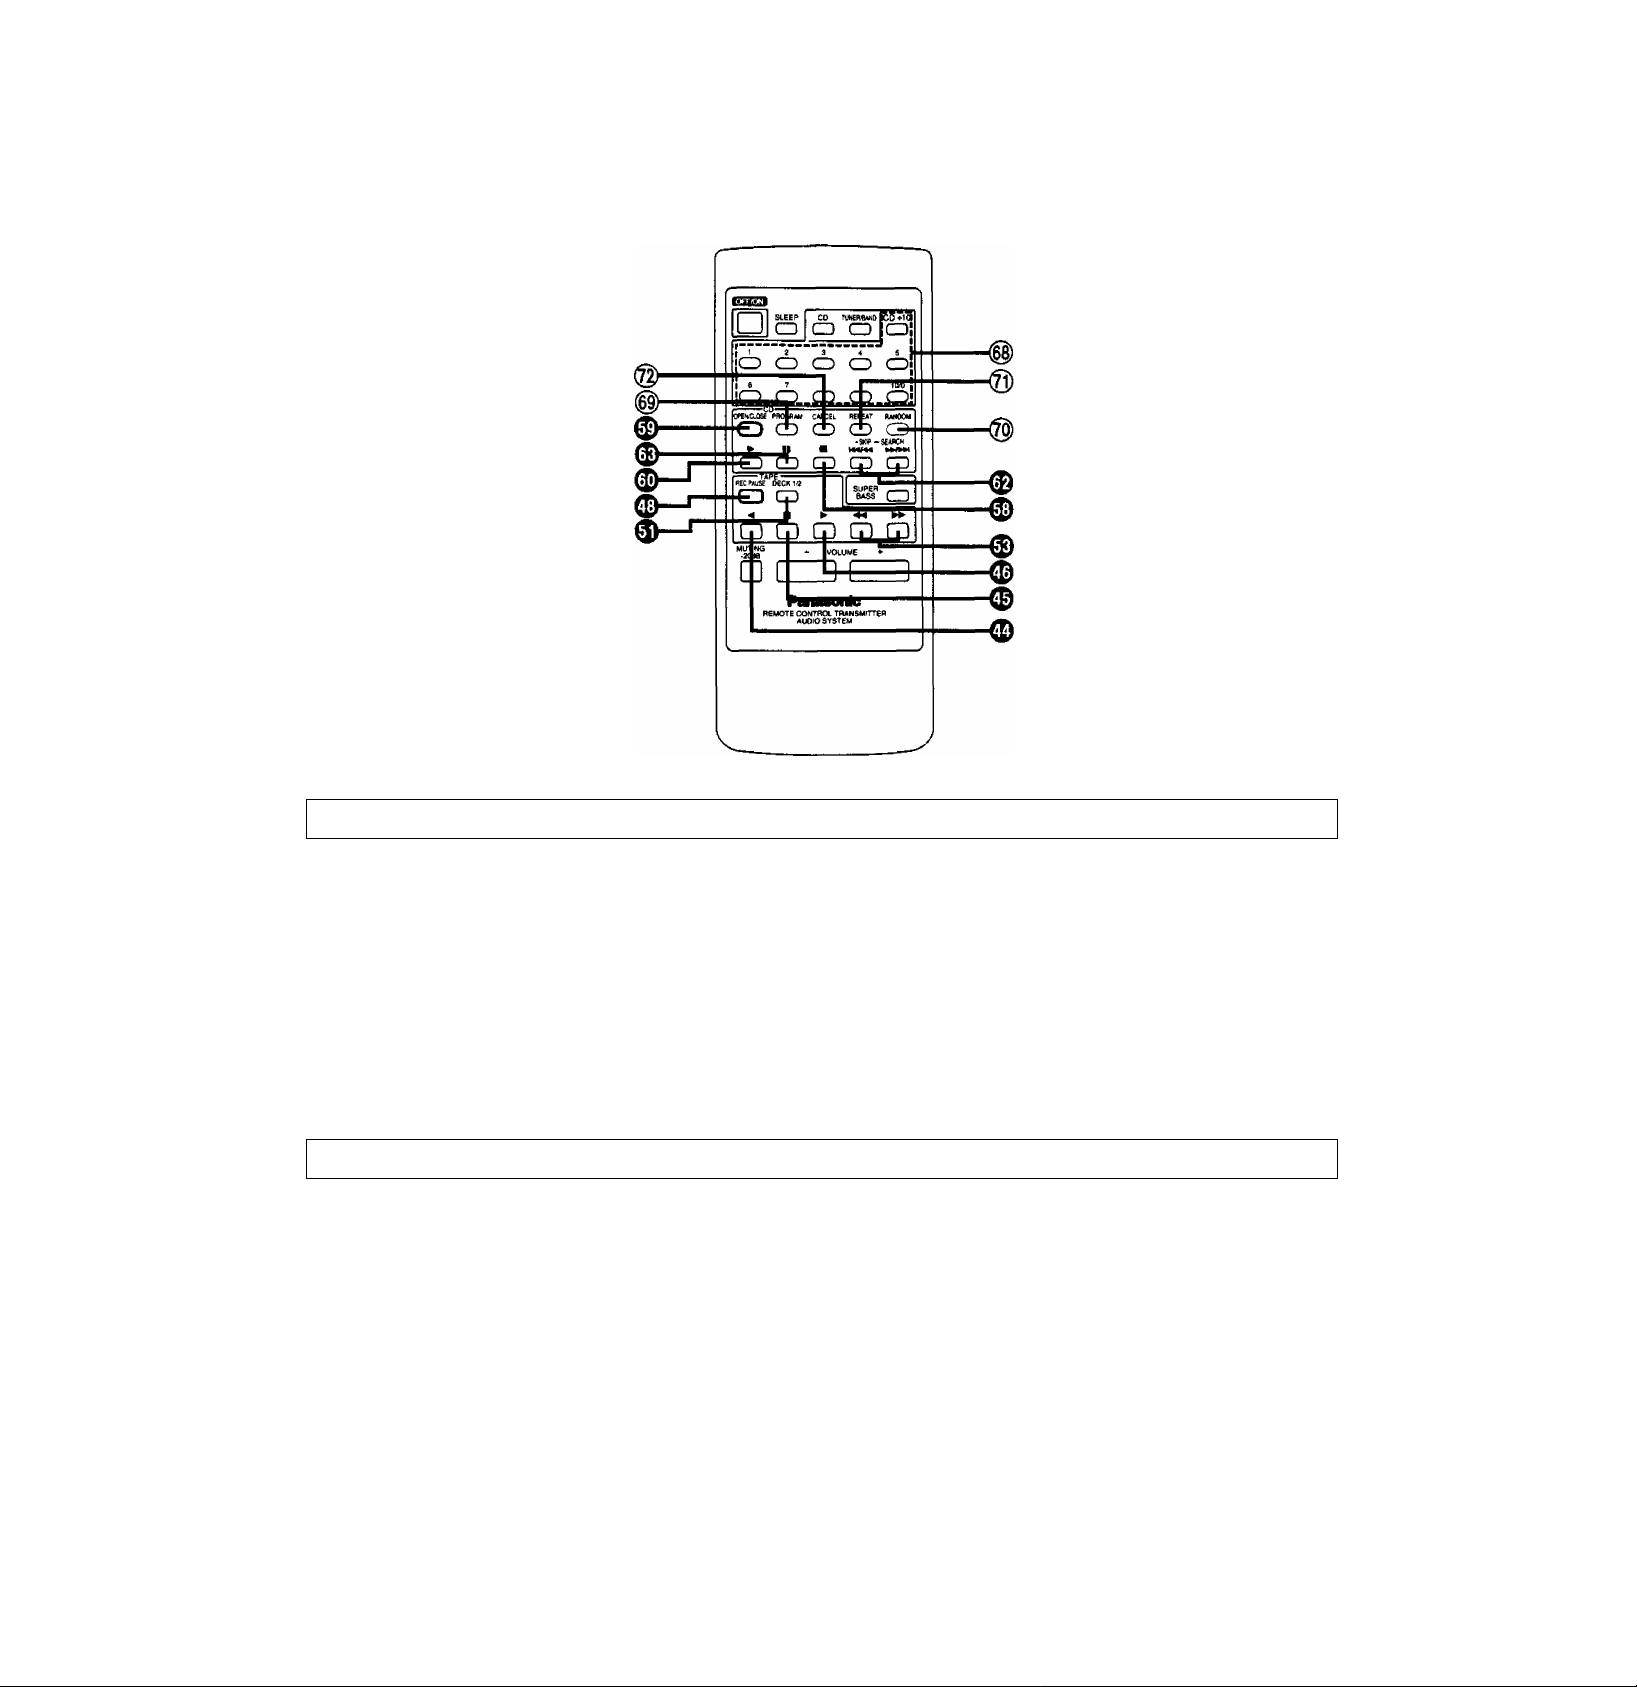
Remote Control Unit Controls and
Functions (continued)
Compact disc controls
The function description of buttons ® and ® is as
described under "Compact disc player" on page 12.
@
Numeric buttons (1-10/0, +10)
Use to specify the compact disc’s track.
@ Program button (PROGRAM)
Press to activate the program play mode. You can then enter
specific tracks using the numeric buttons.
@ Random button (RANDOM)
Press to play the disc's tracks in random order.
Cassette deck controls
■ Cassette deck section
The function description of buttons O, (Ei,
described under “Cassette deck” on page 11.
and ® is as
® Repeat button (REPEAT)
Press to activate the repeat mode.
® Cancel button (CANCEL)
Press to change the program. (See page 27.)
14
Page 14
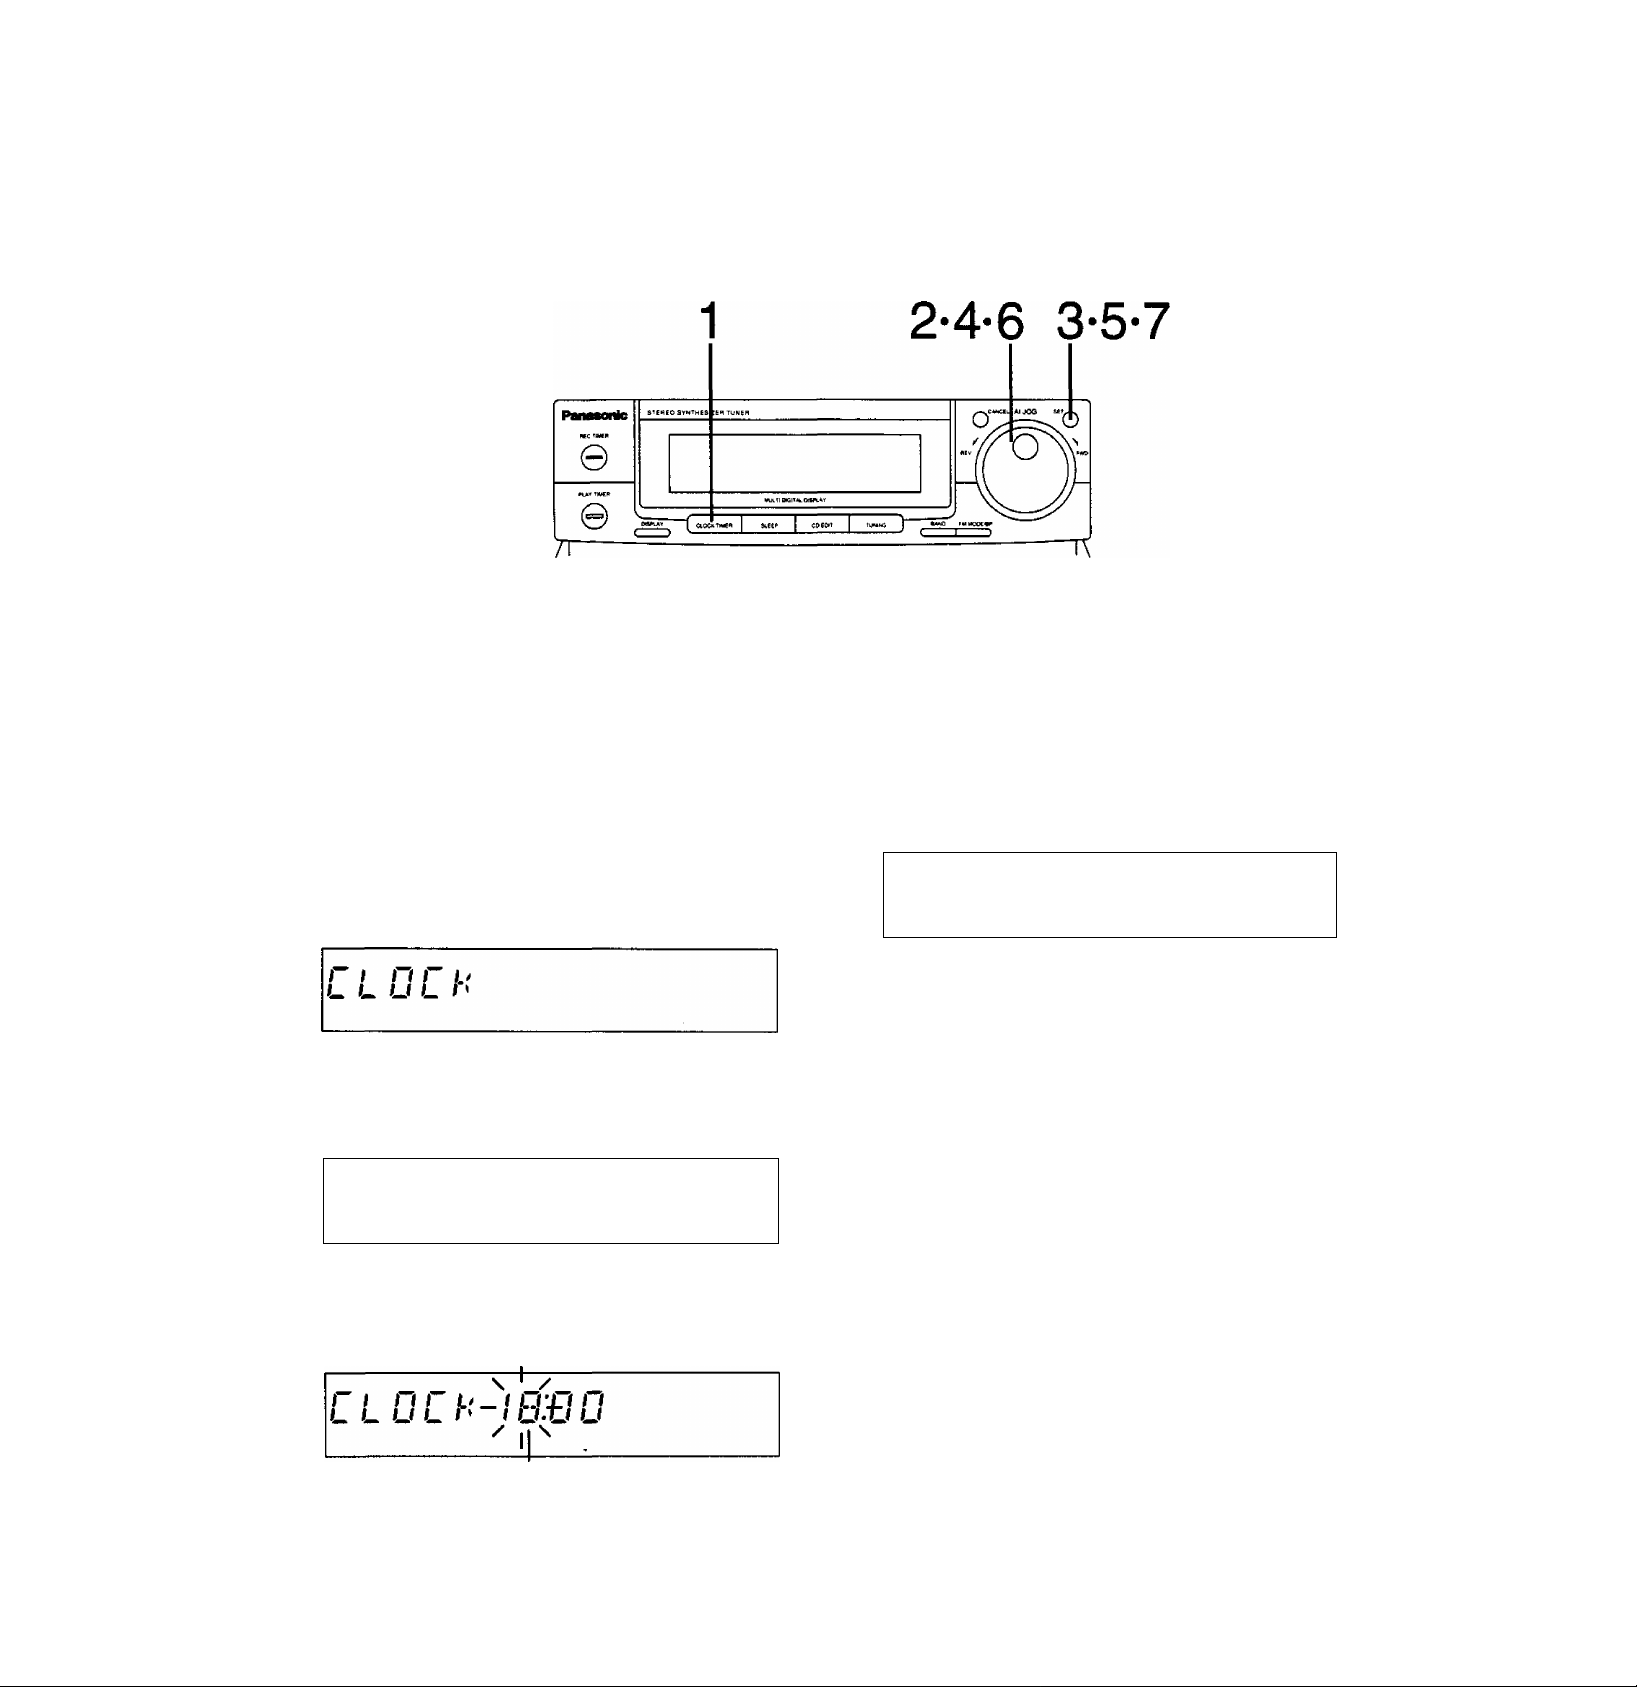
Setting the Time of Day
These instructions explain how to set the time of 18:20.
Switch on the power.
1
Press CLOCKH'IMER.
2
Select the CLOCK mode by turning the Jog
dial.
The display will change to P-TIMER, R-TIMER, SLEEP, and
CLOCK.
The display will return to what was previously indicated if you
allow 10 or more seconds to elapse before you accomplish the
next operation.
3
Press SET.
\
r 1
4
n
i-
u
Turn the jog
Turn ciockwise to increase numbers and counterciockwise to
decrease.
dial
/
n
ntl
U'U
u
Fiashing
to the correct hour.
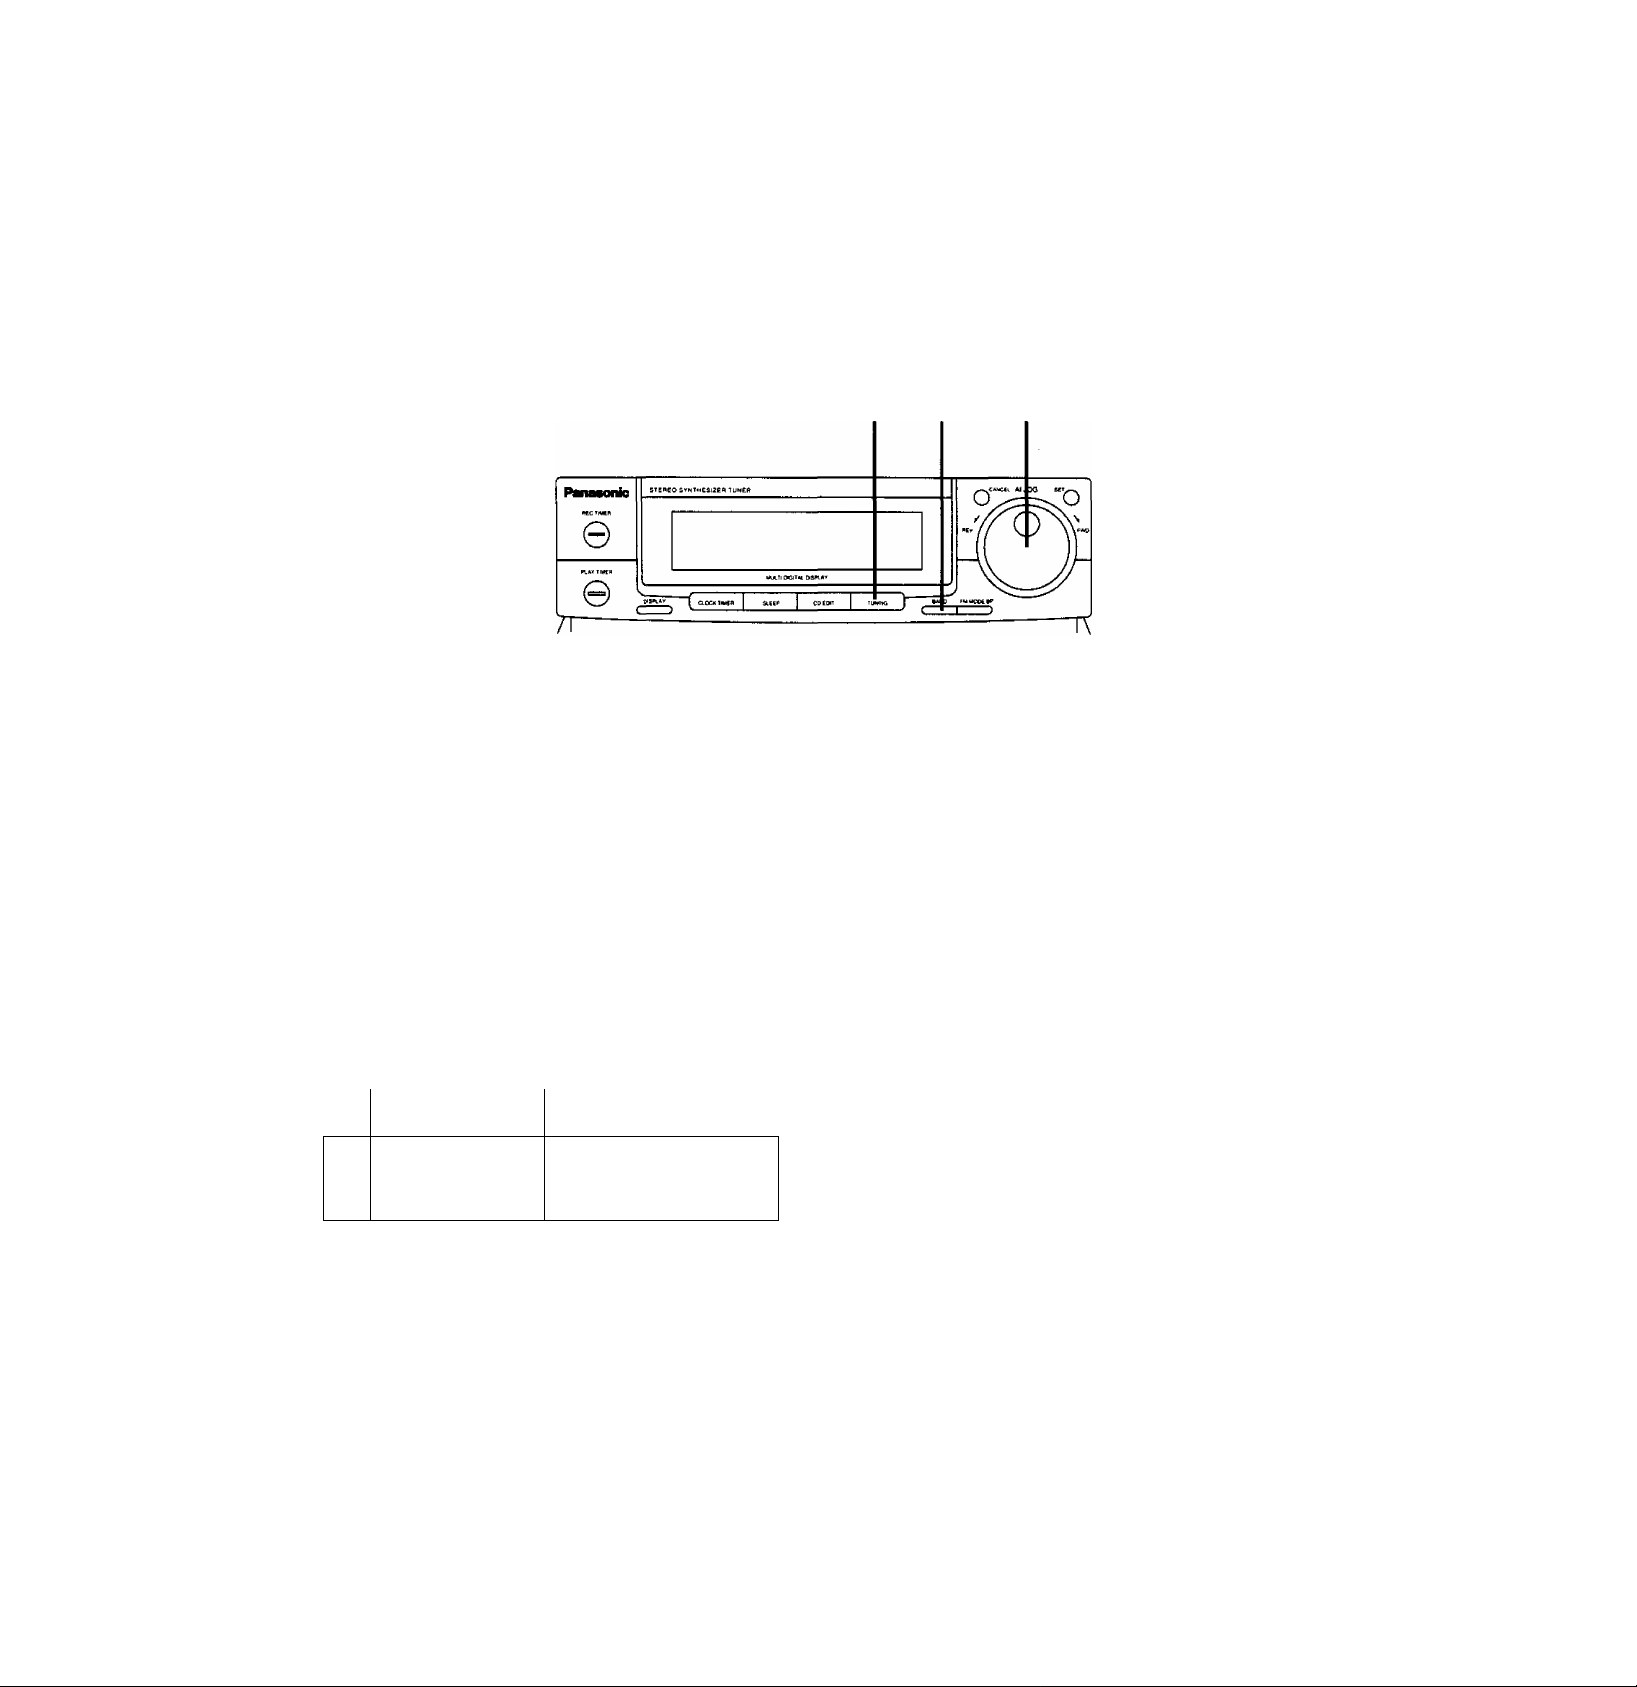
5
Press SET.
6 Turn the Jog dial to the correct minute.
Going from 59 to 00 on the minute dispiay wiii not change the
hour dispiay.
--------
^
^
-----------------------------
r 1 n r o
Í * L.I i_ 1'
7
Press SET.
•The display will change to the previous display.
• Pressing SET resets the clock to “0” seconds.
Note:
"E" appears on the display if the power cord has been once discon
nected or there has been a power failure. If this happens, reset the
time.
n_
L.I
''
r
__________________
Fiashing
Fiashing
15
Page 15

Basic Operating Procedure
(Also available from the remote control. Follow the procedure
described below.)
1
Press POWER STANDBY (!) /ON to switch on
the power.
2
Select the sound source by pressing TAPE,
CD or TUNER.
The display of the selected mode will appear. If you press a
different sound source while listening to a compact disc or
tape, the disc or tape automatically stops playing.
•When selecting the tape mode from the remote control,
press ◄/► on TAPE instead.
The deck will automatically start playing.
3
Start the sound source.
4
Adjust the volume level.
The memory backup function will retain the volume level and
sound source.
Note:
Before you set the system to the standby mode, be sure to reduce
the volume level to prevent the extremely high output from the
amplifier from damaging the speakers.
How to mute the volume
Press the muting button on the remote control.
MUTING
•20dB
□
The muting indicator appears on the display.
•This lowers the volume level by 20 dB (approximately Vio).
•Cancel the muted state by pressing the muting button once again
or reduce the volume level to the minimum position and then reset
to the desired volume.
How to use headphones (not included)
Reduce the volume level.
Connect the headphones to the headphones jack.
•When you connect the headphones, the speakers will automati
cally cut off.
•Avoid listening for prolonged periods of time to prevent hearing
damage,
•Plug type: Stereo mini
16
Page 16
Listening to Radio Broadcasts
Manual tuner operation (to tune to broadcasts by using the jog dial)
2 3 4
1
Press the TUNER input select button.
2
Press TUNING to select the MANUAL tuning
mode.
• Every time you press this button, MANUAL, PRESET and
(AUTO) modes alternately appear.
•AUTO will appear only when the FM mode is selected.
3
Press the band-select button to select FM, LW
or MW.
The display will show which band you selected.
Received band Received frequencies
MAX*
m .
VOLUME
F 1 t
P ~l
O
I-
Q n
J U
MHZ
4
Turn the jog dial to tune in the desired broad
cast.
The display will show the frequency to which you have tuned.
•If you have tuned in an FM stereo broadcast, the FM stereo
indicator will appear.
17
Page 17

Listening to Radio Broadcasts
Automatic tuner operation only for FM
Only for FM broadcasting station, you can automatically tune in the
FM station by simply turning the jog dial.
(continued)
RmttBonic
SreqEO
©
0
^
___
71
------
1
Press the TUNER input select button.
2
Press the band-select button to select FM.
A/l
1
f
Press TUNING to select the AUTO tuning
3
C
1
Q
"1
n n
f
MHi
o
mode.
Every time you press this button, MANUAL, PRESET and
AUTO modes alternately appear.
MAX'
MM .
VOLUME
Tl C«CltM. DtS^At
4
Turn the Jog dial clockwise or counterclock
wise and then release It.
The display frequency begins to change.
: Clockwise for the frequency upward.
^ : Counterclockwise for the frequency downward.
The changing of the displayed frequency wilt be automatically
stopped if the broadcast station is located.
18
Page 18

Memory presetting
When you preset broadcast frequencies to the memory, you can
then easily select any of those broadcast frequencies by pressing
one of the preseMuning buttons on the remote control or by using
the jog dial.
You can Input up to 30 radio stations (10 FM, 10 LW and 10 MW)
into the tuner's preset memory.
(When you memorize a new frequency on a preset channel, it
cancels the frequency previously memorized on that preset
channel.)
4-6
Switch on the power.
1
Press the band-select button to select FM, LW
or MW.
2
Press TUNING to select the MANUAL or AUTO
tuning mode.
•Every time you press this button, the MANUAL, PRESET
and (AUTO) modes alternately appear.
•AUTO will appear only when the FM mode is selected.
3
Tune In your favorite station using the Jog
dial.
Turn the jog dial until the correct frequency and the quartz lock
indicator appear on the display.
4
Press SET to activate the program indicator.
The program indicator will flash for about 10 seconds.
5
Turn the jog dial to select the desired preset
channel while the program indicator Is
flashing.
: The channel number will increase from 1 to 10.
^ : The channel number will decrease from 10 to 1.
c
It/f
I f
C33
— PHOGAAH —
Channel number
Q Q I n
U O' t U HH.
Press SET.
The program indicator will disappear.
7
Repeat steps 3 through 6 to memorize a sta
tion in each of the remaining preset channels.
19
Page 19

Listening to Radio Broadcasts
Memory tuner operation (to listen to broadcast stations preset into memory)
Switch on the power and be sure you've completed the steps of
“Memory presetting" on page 19.
(continued)
■ From the main unit
1
Press the band-select button to select FM, LW or MW.
F
2
Press TUNING to select PRESET.
3
Turn the jog dial to select the desired preset
it/l
1
t
O
"i
P n
p
1 • ^
LmJ
MHl
HAX'
VOLUME
channel.
The selected preset channel will appear on the display.
C
r
;
cP
Preset channel
OUMIZ LOCK
Q
1
O ! n
U
U‘ f U
«HI
liUt*
■ Sm
VOLUME
■ if noise is excessive in the FM mode Press FM MODE/BP to monaural position.
FM MODE^P
LZl—>
You will be in the monaural position when the FM STEREO indica
tor goes out.
The sound will then be heard in monaural. If the broadcast signal is
weak, or if there is a large amount of interference, you will get a
clearer sound using the FM mode/beat proof button.
20
Page 20

l_J
1
o o o o o
e T s 9
f-j C-D O oi!
lygri CLOSE PnOGflAU CANCEL REPEAT RaWOW
CD CD O O O
a o □ o a
-----
PECI’ALiSE №CK1,'S
O a
□ D a a Q
□
■ From the remote control
1 Press TUNER/BAND to select FM, LW or MW.
CD TUfmAKOCD4>10
SLEEP
linil J
TaK-=
REMOTE CONTROL TRANSMITTER
AUDIO SYSTEM
a
-SKIP -SEARCH
2 Press the numeric button corresponding to
the preset channel you wish to tune in.
■ Most recent memory
The most recent memory system remembers the broadcast station
last tuned to when you switch the power to standby mode or select
other functions. When you switch the tuner back on, the last tuned
station will be on.
The presets will stay in the memory for approximately 2 weeks,
even if there is an interruption.
21
Page 21

Listening to Compact Discs
Sequential play
Sequential play refers to play beginning with the first track and
continuing in order to the last track.
(Also available from the remote control.)
2*3 4
1
Press the CD input select button.
2
Press OPEN/CLOSE to open the disc tray.
Insert the disc with label facing up.
Do not put your finger through the hole in the middle of the disc
tray, it could get caught when the tray closes.
Label must face up.
Press OPEN/CLOSE to close the disc tray.
When the disc tray is closed, the disc rotates, and the total
number of tracks and total playing time both appear on the
display panel.
Total playing time
Total number of tracks
1
r Tt 1 U C .J
□DCECEtBCriCBGOCECEQlD
When there are 13 or more tracks on the disc, will ap
pear.
— — 1 — _
±t
lì Ji
ll.
n C
u J
s
[SI-as •-
;
Press the CD play button.
Disc play begins from the first track on the disc. The pickup (a
laser device that reads the information on the disc surface)
moves across the disc as the disc is played.
•The number of the track being played will flash while the
track is played and go out at the end of that track.
The track number currently playing flashes.
• Play stops automatically when the last track on the disc
finishes playing. (The display returns to the total number of
tracks and total playing time indications.)
Note:
If you press the play button instead of OPEN/CLOSE after
inserting a disc, the tray will close and play will start directly
from the track 1, but the total tracks and total playing time will
not be displayed.
VOLUME
22
Page 22

■ To temporarily stop the disc play
(Also available from the remote control.)
Press the pause button.
II
O
The track number display and the elapsed time will start flashing.
Press the play or pause button to play again.
■ To stop the disc play
(Also available from the remote control.)
Press the stop button.
The player switches to the stop mode and the total number of tracks
and total playing time are displayed.
23
Page 23

Listening to Compact Discs
Direct access play
(continued)
Direct access allows you to start sequential play from a specific
track to the last track on the disc.
2 3
Make sure the player is not in the program mode when using direct
access.
CEI TUMEn BMiO
1
2
SLEEP
Q
o o o o o
6 7 B i 1(V0
!)PEB CLOSE PRtXiUM CWCEL BEFEBT nWCOU
O o o o o
^ II ■ KWM FMW
a CD a CD a
-----
BECFBJ5E OECKt'E
TbW
€D a
---
=
a a
i l
-SWP-SEBBW
fl*ss I1
__
a □ □ o □
□ ] C
■ From the main unit
1
Press the CD input select button.
2
Turn the Jog diai to select the track where you
want to begin play.
r
Tt
m CH CD GO (BCEIQDCECDQSICniQa^ MN »
3
Press the play button.
Play begins with the selected track, continues to the last track,
and automatically stops.
D
MAX*
'
VOLUME
■ From the remote control
1
Press the CD input select button.
2
Press a numeric button to select the desired
track number.
To select a track between 1 and 10:
Press the appropriate numeric button 1-10/0 directly.
To select a two-digit track over 10:
First press +10 and then a numeric button 1-10/0.
For example:
Track no. 13; EUtU
Track no. 20: [Ti5ll+i0lFi^
Track no. 35: (TToi InkTol [Ti^ fsl
Play will start with the track you select, continue through the
last track on the disc, and automatically stop at the end.
Note:
You cannot use direct access if the system is in the program mode.
24
Page 24

Program play
This function allows you to program up to 36 tracks on a disc in any
order you choose.
_______________________
2 3
■ From the main unit
1
Press the CD Input select button.
2
Turn the jog dial to select the track you want
to play.
The former display will return if you allow 6 seconds to elapse
before accomplishing the next operation.
If this happens, repeat this step.
3
Press SET.
The program indicator will appear on the display.
r
Tt
U M
The display will show the programmed order for about 1 sec
ond:
Then it will display the whole play time.
4
Repeat steps 2 and 3 for each track you wish
Z)
CD
C 'U Q
Q. ^ U
to program in sequence.
Program indicator
5
Press the CD play button.
Program play will begin from the first track you programmed.
■ Program memory function
The player will retain the programmed tracks until you cancel the
program play mode by opening the compact disc tray or by pressing
the cancel button (see page 27). The player will retain the pro
grammed tracks approximately for 2 weeks, even if there is a power
interruption.
r Tt
JJ
cn CD
-■
P
PROGRAM
n-zt
C?
U-C 3
MAX*
MN .
VOLUME
r
Tt
CD QD
PHOiBAM T
i
The programmed tracks
Zi ri'Zi Zt
C U'C D
Total playing time of the programmed tracks
25
Page 25

Listening to Compact Discs
(continued)
3
5
■ From the remote control
1
Press the CD input select button.
2
Press PROGRAM.
The program indicator will appear on the display.
r Tt i u
U JLI 1 .1 -I.U If
03 ID CD CE m QD
PROORAM)
Program indicator
C D'H c
m m m iTffi fm íT?i fc>
Press the numeric buttons to select the track numbers.
To select a track between 1 and 10:
Press the appropriate numeric button 1-10/0 directly.
To select a twoHiigit track over 10:
First press +10 and then a numeric button 1-10/0.
For example:
Track no. 13: PMOlin
Track no. 20:1+
Track no. 35: l+ÍÓII+iOlí+iOirsl
Notes:
• ERROR appears on the track display when you program a
nonexistent track.
•FULL appears on the track display when you have tried to
program more than 36 tracks to indicate that you cannot
program more than 36 tracks.
•--:- appears on the time display when the total play time of
the programmed tracks exceeds 99 minutes. In this case, the
display will not show the total time.
101
1+101 [TÓ7SI
UN ,
VOLUME
4 Repeat step 3 until you have completed the
program.
5
Press the CD play button.
The program play will begin from the first track you pro
grammed.
26
Page 26

CdMfACT OIK PL.LVIII
o o
i
r □ t
o o ©
->czz::='
PROGRAM
CD
CANCEL
o
■ Changing the program
(Also available from the remote control.)
Press CANCEL (front panel or remote control) in
the stop mode.
CANCEL -CANCEL
O/o
Each time you press the cancel button, you will cancel the last track
in the programmed sequence.
Example:
When you have programmed tracks 3, 5 and 7, the tracks will be
canceled in the sequence of 7, 5 and 3.
Note:
It is not possible to clear only the tracks located in the middle
program (such as the third of five tracks).
■ To add the entry
You can add the entry in the stop mode.
From the main unit
In the stop mode, turn the jog dial to select the desired track and
then press SET.
From the remote control
In the stop mode, press the desired numeric button.
■ To confirm the program
(Also available from the remote control.)
While in stop mode, press the sklp/search button.
o o
Each time you press the skip/search button, the display shows the
next track in the program sequence.
■ To cancel program play
1. Press PROGRAM on the remote control in the stop mode.
The program indicator will flash for several seconds.
2. Press CANCEL while the program indicator is flashing.
The program indicator goes out and the program is cleared.
Note;
When you press OPEN/CLOSE to open the disc tray, the program
play is cancelled.
27
Page 27

Listening to Compact Discs
Random play (only from the remote control)
The microcomputer will automatically select a sequence of tracks to
be played In random order.
Note:
You cannot use random play in combination with program play.
(continued)
1
Press the CD input select button.
2
Press RANDOM on the remote control while player is In the stop mode.
The random indicator will light on the display, and random play
will start.
Random indicator
r Tl 1
±1 1
m Ul CD GD CQ [£i CD
t n*n t
1
[E [E 35M№
RANDOM <
U‘U 1
MAX*
MN .
VOLUME
■ To cancel random play
Press RANDOM once again to end random play.
RANDOM
CD
The random indicator on the display will go out.
• =
28
Page 28

special features
O O
1
COMPACT 01 sc PLATEti
■ Skip function
(Also available from the remote control.)
While in play mode, press or ►►/*
skip button momentarily until you locate the de
sired track.
Pickup skips forward.
O The pickup will skip as many tracks as the number of
times you press the button.
Pickup skips backward.
Pressing this button once moves the pickup to the begin
ning of the track being played. If you press the button
repetitively, the pickup will skip as many tracks as the
number of times you press the button.
*OPI
C=
® o ®
X
_______
■ Search function
(Also available from the remote control.)
While in play mode, press and hold one of the
search buttons. Release the button when you
have reached the desired point.
Q Pickup moves forward.
Q Pickup moves backward.
•At first, the pickup will move slowly and then rapidly if you hold the
button in.
•The volume level will drop to about Va of normal.
In program or random play mode:
•If you press the >*•/*** skip button during program or random
play, the pickup will skip from one track to another in the pro
grammed sequence.
•If you press the skip button during random play, the
pickup skips backward to the beginning of the current track, not to
the previous track.
In program and random play modes:
A search will take place only within the track being played.
29
Page 29

Listening to Compact Discs
REPEAT
o
(continued)
■ Repeat function
This function repeats the play of all tracks.
(only from the remote control)
Press REPEAT before or during play.
REPEAT
If you press REPEAT while program play is taking place, the player
will repeat only the programmed tracks.
You can enjoy the same track over and over if you press REPEAT
when only one track is programmed.
■ To cancel repeat play Press REPEAT once again.
REPEAT
o
The repeat indicator on the display will go out.
m
Page 30

Listening to Tapes
You can use either deck 1 or deck 2 for tape playback by following
the same steps.
To play back prerecorded cassettes
12Press the TAPE input select button.
Press EJECT, and then Insert the cassette you
wish to play.
• Insert the cassette with the exposed tape facing down.
•You can use normal, chrome and metal tapes for playback.
This deck automatically identifies the kind of tape loaded,
and sets the equalization accordingly. (Auto tape selector
function)
•To reset the tape counter to 000, first press the DECK 1/2 to
seiect the deck you are going to use and press the counter
reset button.
When the system reverses to play the reverse side of the
tape, the counter will count backward (000, 999, 998...).
3
Press REVERSE MODE.
Each time you press, the display will show one of three re
verse mode indicators.
: The player plays one side only, and then the tape
automatically stops.
• The player plays both sides, and then the tape
automatically stops.
If you start playback in the reverse mode, the player
plays back only one side.
CltD : When you load a cassette into only one of the
two decks;
The player plays both sides of the tape repeatedly
until you press the stop button.
When you load cassettes Into both decks;
The player plays both sides (forward and reverse)
of the tape in deck 1, and then both sides of the tape
in deck 2. Playback will continue until you press the
stop button. (See page 33.)
Press DOLBY NR if the cassette you want to
play was recorded with Dolby noise re
duction.
•The Dolby NR indicator lights.
• If the tape was not recorded In a Dolby NR mode, press
DOLBY NR again. The Dolby NR indicator will go out.
Press one of the play buttons to start play
back.
(Also available from the remote control.)
> : The forward side (front side) will play.
< : The reverse side will play.
The display indicates which tape is playing.
П
T p p p
III/ L
n 1
и и 1 1
CZD
Г ool'ev
•When you load cassettes in both decks, press DECK 1/2 to select
the deck you want to use.
•You can reverse the direction of play manually during playback by
pressing the opposite playback button.
>
MAX-
MM .
J VOLUME
31
Page 31

Listening to Tapes
■ To stop playback
(Also available from the remote control.)
Press the stop button.
■ Full auto-stop
When the tape reaches the end, the tape transport will automati
cally stop. However, if you have set the reverse mode select button
to CZ!D in the playback mode, the auto-stop function will not
operate.
■ About the Dolby Noise Reduction system
Using Dolby NR reduces tape hiss in the high-frequency range. It
boosts the level of the high-frequency program content during re
cording, and lowers it by the same amount during playback, simul
taneously reducing high-frequency noise incurred during the
recording process.
This system has the Dolby 8-type of noise-reduction system. With
Dolby B, noise is reduced to about one-third. If you are playing a
tape that was recorded with Dolby NR, use the Dolby NR mode
during playback.
(continued)
Dolby noise reduction manufactured under license from
Dolby Laboratories Licensing Corporation.
“DOLBY" and the double-D symbol GO are trademarks of
Dolby Laboratories Licensing Corporation.
X
32
Page 32

Listening to two tapes consecutively
(Steps 5 and 6 also available front the remote control.)
4 32
1
Press the TAPE input select button.
2
Load cassettes in decks 1 and 2.
Load with the side that you wish to iisten to first facing you in
deck 1.
T p D c:
i ri 1 f_
3
Press REVERSE MODE to set the
n n n
u u u
_
C^D
MAX*
mode.
T G o p
i ri r C
4
Press DOLBY NR if the cassette you want to
n n n
U U U
_
play was recorded with Dolby noise
duction.
The Dolby NR indicator will appear on the display when Dolby
NR is on.
5
Press DECK 1/2 to select deck 1.
The deck 1 indicator will appear.
VOLUME
MAX-
MN .
VOLUME
re-
6 Press the forward>side playback (O) button to
start playback.
The two tapes will play back as follows:
Forward '
side of tape
In deck 1 y
T D D c
i ri r C
Reverse \
side of tape y
in deck 1 /
n n
1
U U t t
Forward ^
side of tape
in deck 2 /
Reverse
side of tape
In deck 2
czo
i OOLBVHR
MAX-
>
■S
Hite . «S
VOLUME
■ To stop the tape midway
Press the stop button.
□
•You can also start playback from a position other than the forward
side of the tape in deck 1 by pressing the opposite playback
button.
•When you load cassettes in both decks, the deck 1/2 indicator will
show which deck you loaded last.
•When you switch on the power, the deck 1 indicator will always
appear.
TRPE
n n n
u u u
ESSD
_
1 DOLBY HR 1 VOLUME
mu*
33
Page 33

Listening to Tapes
(continued)
A
7r
•TlRtO DOU«Lt CAtttrt« diCN
/"“^DECta/a
t*Ftl!
O o O O
To find the beginning of a program
(TPS: tape program sensor)
(Also available from the remote control.)
Press the fasMorward/rewind (TPS) button while
the tape is playing.
[ (TPS) I I (TPS)»» I
A
□
(TPSI»>- ]
To fast forward or rewind the tape
Press the fasMorward/rewind (TPS) button while the tape is stopped.
[ (TPS) I I (TPS)»» ]
The tape will start moving at high speed in the direction of the arrow
(■4-4, regardless of which direction mode it is in.
O"
«•tWWDt >tJtCT
A
If the forward side (i>) of the tape is playing:
1
The tape will play from the beginning of the next program.
D The tape will rewind to the beginning of the present
program. Then the program will play again.
T q o c
111/
If the reverse side (<) of the tape is playing:
The reverse of the above will take place.
While a TPS operation is taking place, the play indicator will flash.
Note;
The TPS function may sometimes fail to operate correctly in the
following situations:
•When the interval between programs (dead space) is less than
4 seconds.
•When a tape has been recorded with fade-ins and fade-outs.
•When there is a particularly low-level passage or silent passages
in the middle of a program.
•When you are playing a tape recorded from a microphone and
there Is no dead space between tape programs.
•When less than 10 seconds remain until the end of the present
program or start of the next program.
n q
U D
c
1 DOLBY NB 1
MAX'
mt,
VOLUME
To fast forward or rewind the tape while you are playing a tape in
another deck, press DECK 1/2 button to switch to the nonplaying
deck, and then press the fast forward or rewind button.
34
Page 34

Making a Recording
To record from the radio or external source
(Deck 2 only)
Although you can record a compact disc using the following proce
dures, we recommend that you use the compact disc edit-recording
procedure to record a compact disc. (See "Edit-Recording from
Compact Discs" on pages 38-43.)
To make a tape-to-tape recording, see “Tape-to-Tape Recording"
on page 37.
(Steps 4 and 5 also available from the remote control.)
Switch on the power.
1
Press the deck 2 eject button to load a cas
sette in deck 2.
•You cannot record on the leader tape (the first few revolu
tions) so take up the leader tape In advance.
•You can use normal and chrome tapes for recording.
This deck automatically identifies the kind of tape loaded,
and sets the bias (for recording) and equalization accord
(Auto tape selector function)
ingly.
2
When making a Dolby NR recording, press the
DOLBY NR so that the Dolby NR Indicator
appears.
3
Press REVERSE MODE to select the reverse
mode you want to use.
: One side will record, and then the tape will stop
automatically.
: Both sides will record (forward side/reverse side)
"—^ and then the tape will stop automatically.
Press REC PAUSE to put the cassette deck
into the recording standby mode; then press
the Input select button to select your desired
sound source.
The tape direction indicators will flash to show the direction in
which you can record.
ouum LOCK l7gi!TW
tiiaiiaa
t n
1 U MHK -ÌTlS—
Recording ine
Eia
1 dOLBV NR 1
F
5
1 1
Press one of the playback buttons to start
Q Q
O D.
recording and start playing the source to be
recorded.
> : When recording on either the forward side or both
sides.
I < [ : When recording only on the reverse side.
Your attention is drawn to the fact that recording pre-re
corded tapes or discs on other published or broadcast mate
rial may infringe copyright laws.
MAX'
VOLUME
icator
35
Page 35

Tape-to-tape recording from deck 1 to deck 2
The recording level and the noise reduction effect of the original
(playback) tape will be recorded on the new tape just as they were
in the original recording. ^ ^
3 1
1
Insert the playback cassette Into deck 1 and
the cassette you are recording on (the editing
tape) into deck 2.
•Advance the leader tape three or four revolutions.
•You can also use the different types of tapes for each deck 1
and 2.
Press the TAPE input select button.
2
Select the desired reverse mode.
3
: Single-sided recording (fonward side only)
.
: Two-sided recording (forward side/reverse side)
y
Press one of the one-touch tape edit buttons
(NORMAL or HIGH) to select editing speed.
NORMAL: When you wish to monitor the sound white re
HIGH: When you wish to record at a high speed (about
The synchro start function starts tape-to-tape recording.
—
T R P E
If you wish to monitor the sound of the tape with Dolby NR, set the
Dolby NR switch to the ON position (only for normal speed re
cording).
cording
1.7 times normal speed)
n n I
u u t _
>
ZD mm
■ To briefly Interrupt tape-to-tape recording
(Also available from the remote control.)
Press REC PAUSE.
REC PAUSE
t 1
•The cassette deck will go into the pause mode.
•To resume recording, press one of the one-touch tape edit but
tons.
■ To stop the tape-to-tape-recording
(Also available from the rermte control.)
Press the stop button in the deck section.
Both decks will stop.
■ To record another tape on the remaining blank
tape
When the deck 1 completes playing back and stops, the deck 2
enters the recording standby mode;
At that time, replace the original (playback) tape
with a new tape. Then press one of the one-touch
tape edit buttons.
Notes:
•While tape-to-tape recording is in progress, you cannot change
the editing speed.
•Some TV sets generate noise that could be recorded during
tape-to-tape recording. To prevent the possibility of this, do not
use this system close to a TV set.
37
Page 36

Edit-Recording from Compact Discs
You can edit-record up to 36 tracks.
Using the edit-recording safeguards against a break in the continu
ity of the sound when the recording changes from one side of the
tape to the other.
Sequential CD recording (ALBUM)
The system calculates and displays in advance the length of the
tape required to accommodate the recording of all the tracks on the
compact disc in their original sequence. The tracks are then re
corded in their original sequence.
Before recording, the cassette deck will automatically rewind the
tape to the beginning emd make a non-reoorded passage about
10 seconds, then stop.
So you don’t have to set the cassette tape to the starting position
before recording.
Switch on the power.
1
Press the CD Input select button.
2
Press OPEN/CLOSE on the CD player to load
a disc.
In this editing mode, you can use compact discs with up to
36 tracks.
3
Press CD EDIT.
4
Turn the Jog dial to select ALBUM.
The ALBUM, PROGRAM, and FIT displays will appear in
sequence.
5
Press SET.
The length of the tape required to record all the tracks appears
on the display.
■Album edit-recording display
MAX*
bf
/ L
m
OP cr GD cc cc m CB CD an HB
n;
-Edit indicator
In this case, you would need a C-59 or longer tape.
03 ^
El
UM
VOLUME
If the compact disc has 37 or more tracks, ERROR appears
first and then the system will automatically establish the pro
gram edit-recording mode (See page 42). Program up to
36 tracks in the program edit-recording mode, and proceed
with the recording.
6 Load a cassette in deck 2.
•Since, in this case, you need a tape that is at least
59 minutes long, insert a C-60 tape.
Check that the tape's erasure prevention tabs are intact.
Then insert the cassette into deck 2.
•When making a Dolby NR recording, press DOLBY NR.
7
Turn the jog dial to specify the length of the
tape you are using.
38
Page 37

9
Press the CD play button for automatic re
cording.
The recording will start after the following steps.
1. The cassette deck starts to rewind the tape to the begin
ning.
2. The cassette deck forwards the tape making a non-recorded passage of about 10 seconds and stops to enter the
recording standby mode.
3. The compact disc player automatically scans for the peak
(highest) level of the entire disc (ATLS; see page 39.) and
then recording will start.
When edit-recording has finished, the cassette deck automati
cally enters the recording standby mode.
If you want to change something you have set, or if an error has
occurred, press the cancel button.
The system will return to the previous setting mode.
Note:
When it is not possible to record all the tracks even by rearranging
the track sequence, the OVER display will appear.
■ To cancel tape length priority recording (fit edIt-recording)
(Also available from the remote control.)
Press the CD stop button twice.
Q
The CLEAR display will appear.
■ To confirm the piay sequence
(Also available from the remote control.)
You can confirm the play sequence on the display
by pressing the skip/search button In the stop
mode.
o o
41
Page 38

Edit-Recording from Compact Discs
(continued)
Program edit-recording
You can specify the tracks to be recorded in the desired sequence
while checking on the display how much time is left over.
2-4-6
1
Follow tape length priority recording steps 1
through 4 (page 40).
2
Turn the jog dial to select PROGRAM.
The ALBUM, PROGRAM, and FIT displays will appear In
sequence.
3
Press SET.
4 Turn the jog dial to select the length of the
tape you are using.
You can specify the length by the minute.
Program edit mode display Tape length
7»
f
QDGDtDmODtECIJtEtEQfflflSini^'
fina PROORAM
Edit indicator
5
Press SET.
The time remaining on both sides of the tape will appear on the
display.
.J П'П n ZJ i rt t n
D U-U U D U-U U
•r .. C7 n’
L. D
U
Esas
zo
VOLUME
b Turn the jog dial to assign the tracks in se
quence.
You can also assign the tracks using the button on the numeric
button on the remote control.
(See "Program play" on page 25 for detailed instructions.)
7
Press SET.
8 Repeat steps 6 and 7 to complete the pro
gram.
If there is no more time left on tape side A, the system will
select tape side B automatically.
9
Press the CD play button to start recording.
The recording will start after the following steps.
1. The cassette ded( starts to rewind the tape to the begin
ning.
2. The cassette deck fonwards the tape making a non-recorded passage of about 10 seconds and stops to enter the
recording standby mode.
3. The compact disc player automatically scans for the peak
(highest) level of the entire disc (ATLS; see page 39.) and
then recording wll start.
When edit-recording has finished, the deck automatically
enters the recording standby mode.
If you want to change something you have set, or if an error has
occurred, press the cancel button.
The system will return to the previous setting mode.
42
Page 39

To cancel program edlt-recording
) from the remote control.)
press the CD stop button twice.
CZ]
The CLEAR display will appear.
■ To confirm the play sequence
(Also available from the remote control.)
You can confirm the play sequence on the display
by pressing the skip/search button in the stop
mode.
o o
To record another disc on the remaining blank tape
When recording of the first disc has finished, you can record the
tracks of another disc.
After recording and while the cassette deck is in the recording
standby mode;
1) Check the time remaining on tape side B on the display.
2) Press OPEN/CLOSE on the CD player to open the disc tray, and
then replace the disc with the second disc.
To close the tray, press this button again.
3) Turn the jog dial to select the track you want to record.
4) Press SET.
5) Repeat steps 3) and 4) for each track you wish to program until
the whole play time meets the time remaining on tape side B.
6) Press the CD play button.
The synchro start function starts recording.
______________
43
Page 40

15 13 12-14
12 Press VOL PRESET to set the volume level
for timer play.
The volume level display will flash.
Above display shows the timer play setting on the CD player.
13 Adjust the volume level using the volume
level control.
„ C n „1 Ti
O U CJ If
CIlCBCECSQDCIDCZICECBliBnBSa^
y
14 Press VOL PRESET again.
The volume level display will stop flashing and the display
will change to the previous display.
•This presets the volume level into memory.
15 Press one of the input select buttons.
For timer play on the CO player:
Press the CD input select button.
You can use timer play for sequential play or program play.
For program play, specify the desired tracks.
For timer play on the tuner;
Press the TUNER input select button, select the desired
band, and tune in a station.
For timer play on the tape:
Press the TAPE input select button.
You can operate both decks 1 and 2 by the timer. When you
load cassettes in both deck 1 and deck 2, deck 1 has priority
and plays first.
16 Press PLAY TIMER.
The system is switched to power standby mode.
/ n
Í Í
--U
illuminates
The timer indicator will appear on the display.
Play will start at the set time.
To listen to the system after you have set the timer but before
timer pley has taken place:
Press the power switch to on and select the desired source. After
you have finished listening, return the system to the timer setting
mode. (This switches the power to the standby mode.) Even if you
change the volume level after presetting the volume level for the
timer ptay, the timer play will start with the preset volume level.
Notes:
•If the power is on, the timer will not function. The system must be
in the standby mode.
•If you are using the timer to play a compact disc, do not open the
disc holder if you have already programmed tracks. This will
cancel the program and play will start from the first track.
47
Page 41

Using the Timer
(continued)
CANCEL
o
PLAY TIMER
CLOCK/TIMER
■ When you have made a wrong setting on steps 1 to 10 (on page 46)
Press CANCEL.
CANCEL
o
The display will return to the previous step.
■ To confirm timer play
Press CLOCK/TIMER In the power standby mode.
CLOCKH’IMER
Each time you press this button the display wilt change as foltows;
1. P-TIMER
2. ON time and OFF time
3. The source you selected
The volume level display will flash to show the preset volume level.
■ To cancel timer play
Press PLAY TIMER.
PLAY TIMER
The play timer indicator will go out.
The timer play will not occur, but the time ON/OFF setting lor the
timer play will remain in the memory.
4S
Page 42

Setting timer recording
Have you read and completed “Setting the Time
of Day” on page 15? If not, please complete these
sections before continuing.
The following example shows how to set the timer recording func
tion for recording a broadcast from the tuner.
Switch on the power.
1
Follow steps 1 through 11 on page 46 for
setting the timer. In step 2, select R-TIMER
instead of P-TIMER.
2
Press the TUNER Input select button and tune
in the station whose broadcast you want to
record. Then insert a cassette into deck 2.
3
Press REC TIMER.
The system is switched to the standby mode.
The timer recording indicator will appear on the display.
Timer recording will start at the preset time.
TIMER
NEC
I c
1 C-U life
To listen to the system after you have set the timer but before
timer recording has taken place:
Press the power switch to on and select the desired source. After
you have finished listening, return the system to the timer setting
mode. (This switches the power to standby mode.) If you are
listening to a tape, using deck 1 is recommended.
Notes:
•After the timer recording is completed, the setting still remains in
the system’s memory. So after recording, it is recommended to
cancel this mode by pressing REC TIMER to prevent the unex
pected recording.
• If the power is on, the timer will not function. The system must be
in the standby mode.
•While the timer recording is operating, the volume level is auto
matically — dB. If you wish to monitor the sound, adjust the
volume level with the volume levei control.
• It is not possible to set timer recording and timer play simulta
neously. (For example, it is not possible to timer record a program
in the middle of night, and then wake up by timer play the next
morning.)
illuminate
49
Page 43

Using the Timer
(continued)
REC TIMER
©
■ When you have made a wrong setting on steps 1 to 10 (on page 46)
Press CANCEL.
CANCEL
CLOCK/T1MER
o
The display will return to the previous step.
■ To confirm timer recording
Press CLOCK/TIMER in the power standby mode.
CLOCKmMER
C
Each time you press this button, the display will change as follows;
1. R'TIMER
2. ON time and OFF time
3. The source you selected
CANCEL
o
■ To cancel timer recording Press REC TIMER.
REC TIMER
0
The timer recording indicator will go out. The timer recording will not
occur, but the time ON/OFF setting for the timer recording will
remain in the memory.
50
Page 44

To use the sleep timer
You can use this timer function to switch the power to the standby
mode at a desired time (within a range of 1 minute to 120 minutes
from the present time).
Switch on the power.
1
Press CLOCK/TIMER while the sound source
is playing.
2
Turn the jog dial to select SLEEP while the
sound source is playing.
The display will return to the previous indication after 10 sec
onds. Please finish setting within 10 seconds.
3
Press SET.
-------------------------------------------------------
Cl C C p _ P'H n -
J L L U t
4
Turn the jog dial to set the length of time you
^--------------------------------------------------
C ’U
u
^ 1 ^
MUiX'
UM
VOLUME
would like the system to operate before it
shuts off (sleep time).
Use the steep timer to switch the power to the standby mode
automatically in case you fall asleep while listening.
(Step 6 also available from the remote control.)
The sleep timer indicator will appear.
illuminate
SLEEP
r Tl
^-CB CB
The sleep time set by the steps above remains in the system's
memory.
If you want to operate the system again on the same steep time, you
only need to press SLEEP.
CDCEHICBCEtEnBnSQD
Above display shows the sleep timer setting on the CD player.
I rrn
1
U‘U
1
1
MAX*
MM .
VOLUME
■ To confirm the time remaining on the sleep
timer
(Also available from the remote control.)
Press SLEEP.
(3^ ; 0:01-0:02-0:03-0:04...
^ : 2:00-1:59-1:58-1:57...
5
Press SET.
The display will return to the previous display.
SLEEP 03G
Approximately 5 seconds after you activate the sleep timer, the
display will return to show the mode display. If you press SLEEP in
this mode, the display will show the time remaining on the sleep
timer for approximately 5 seconds.
51
Page 45

Using the Timer
(continued)
■ To change the time remaining on the sleep
timer
1
Press SLEEP.
Within 5 seconds, follow with the next operation, or the display
will return to what was previously indicated.
2
Turn the Jog dial to set the desired time.
■ To cancel the sleep timer mode
Press the power switch to put the system in
standby mode or press SLEEP twice.
■ To use the sleep timer in conjunction with the timer play or timer recording operation
For example, to go to sleep listening to a radio broadcast, and
wake up the next morning listening to a compact disc.
1) Set the ON time and OFF time for the timer play.
(See steps 1 to 11 on page 46.)
2) Prepare for the play of a compact disc, and set the volume level
for the timer play.
3) Press PLAY TIMER. This will switch the system to the standby
mode.
4) Press SLEEP and set the desired time for the sleep timer.
This wilt switch the power on, and the sleep timer indicator wiii
light.
5) Tune in your desired band and station, and adjust the volume
level.
For example, to go to sleep listening to a compact disc, and
then to make a timer recording from a radio broadcast.
1) Set the ON time and OFF time lor the timer recording.
(See page 49.)
2) Select the desired band.
3) Load a cassette for recording in ded( 2.
4) Press REC TIMER.
5) Press SLEEP and set the time for the sleep timer.
(Be sure to set the sleep time to be off before the timer recording
starts.)
6) Play the compact disc and adjust the volume level.
52
When the timer play or the timer recording setting overlaps with the
sleep timer setting, the steep timer setting has priority.
Page 46

Using an External Unit
To enjoy an external source
You can connect an output terminal of a VCR or TV to this system.
(See page 7.)
1
Press the AUX Input select button.
2
Operate the unit which Is connected to the
system.
See the operating instructions of the unit concerned.
53
V
Page 47

Care & Use
Maintenance
(continued)
■ Cassette deck head care
To ensure good sound quality for recording and playback, be sure
to clean the heads approximately every 10 hours of use.
1) Turn off the power of the system.
2) Press the eject button to open the cassette holder.
3) Clean the heads, pinch roller, and the capstan shaft with a cotton
swab (or with a soft, lint-free cloth) slightly moistened with iso
propyl alcohol. Do not use any solution other than alcohol for
head cleaning.
■ Cassette deck head demagnetization
•In order to maintain good sound quality during recording and
playback, we recommend that you demagnetize the head assem
bly when there is still distortion or poor sound quality after you
have cleaned the heads.
•If the head assembly becomes magnetized, it could create noise
in your recordings, cause a loss of high-frequency response, or
cause the erasure of valuable recordings. There are several types
of head demagnetizers that you can purchase at local electronics
supply stores.
Follow the instructions that are supplied with the demagnetizer.
• Do not touch the head assembly with any type of metal object or
tool such as a magnetic screwdriver.
■ Maintenance of external surfaces
• Use a soft, dry cloth to clean the cabinet and controis.
If the surfaces are extremely dirty, use a soft cloth, dipped in a
soap-and-water solution or a weak detergent solution. Wring the
cloth well before wiping the surfaces. Then wipe once again with a
soft, dry cloth.
•Never use alcohol, paint thinner, benzine, or a chemically treated
cloth to clean the cabinet or controls. Such chemicals may dam
age the finish of your system.
56
\
Page 48

Troubleshooting Guide
Before requesting service for this unit, check the chart below for a possible cause of the problem you are experiencing. Some simple checks or a
minor adjustment on your part may eliminate the problem and restore proper operation.
If you are in doubt about some of the check points, or if the remedies indicated in the chart do not solve the problem, refer to the directory of
Authorized Service Centers (enclosed with this unit) to locate a convenient service center, or consult your dealer for instructions.
Problem
Probable cause(s)
Probiems common to ali systems
There is no sound when the
power is ON and no bar
appears on the volume
level display.
The location of the various
musical instruments Is not
well defined.
The left and right sounds
are reversed.
Only one speaker is
emitting sound.
There is no sound when a
source is being played.
There is a low-frequency
hum when a source Is
being played.
The ERROR indicator
appears on the display for
about 1 second.
Volume is set too low.
The (+) and {-) connections to one of the
speakers are reversed.
The left and right connections to the speaker are
reversed.
One of the wires of the speaker cord is
disconnected.
The {+) and {-) wires of the speaker cords are
shorted.
A power cord or a fluorescent tight is located near
a connecting cord.
The wrong operation has just taken place.
While listening to FM broadcasts
There is a “rushing" noise
during a stereo broadcast
which is not audible during
a monaural broadcast.
You hear excessive noise
during a stereo broadcast,
and occasionally the sound
disappears.
The stereo indicator of the
tuner flickers and does not
light completely.
The sound during a stereo
broadcast is highly
distorted.
Noise is more likely to appear on a stereo signal
than on a monaural signal.
The installation location and orientation of the
antenna are unsuitable.
The transmitting station is a long distance away.
There Is a building or mountain nearby. [Distortion
is caused by interference between the signal from
the transmitting station (direct wave) and the
signal reflected from the building or mountain
(reflected wave).]
Suggested remedy
Adjust the volume level with the volume control on
the amplifier.
Connect the speaker cord correctly.
Connect the speaker cord correctly.
Connect the speaker cord correctly.
Switch the system to the standby mode, reconnect
the speaker cords so that they are not shorted.
Then switch on the power.
Keep electrical appliances well away from the
connecting cords.
Perform the correct operation of the present step
again.
•If you are using an indoor antenna, change to an
outdoor antenna.
• If you are using a special outdoor antenna, try
changing the installation location, height, and
orientation.
•Try switching off the television or VCR.
•Press the FM mode button to change the reception
from stereo to monaural mode.
While listening to LW/MW broadcasts
You hear an unusual beat
sound.
You hear a low-frequency
hum.
You are using the system at the same time you
are playing a TV set.
The antenna wire is near the power cord. Separate the antenna wire from the power cord.
Switch off the TV set, or use the system farther away
from it.
57
Page 49

T roubleshooting Guide
(continued)
Problem
Probable cause(s)
When there is a television set nearby
The picture on the TV
disappears or stripes
appear on the screen.
While listening to ta
Sound is low, intermittent,
of poor quality, noisy,
scratchy, or unsteady.
The deck section does not
enter the recording mode.
The cassette holder does
not open even by pressing
the eject button.
The location and orientation of the antenna are
incorrect.
The wiring at the back of the system is unsuitabie.
pes
Heads are dirty.
The Dolby NR switch is set in the wrong position.
The erase-prevention tabs are removed from the
cassette.
The AC power cord is disconnected or a power
interruption has taken place during operation.
While listening to compact discs
The tray does not close
when you load a disc and
press the OPEN/CLOSE
button.
The display will not show
the total number of tracks
and total time when you
load a disc.
Disc play does not start
when you press the play
button.
A certain part of the disc
will not play.
The disc is not positioned correctly in the disc tray.
The disc is not positioned correctly in the disc tray.
The disc is loaded upside down.
The disc is dirty.
The disc is scratched.
The disc is badly warped.
The disc is a nonstandard one.
There is condensation inside the disc player.
Suggested remedy
• If an indoor antenna is being used, change to an
outdoor antenna.
•Separate the TV set from the system.
Separate the antenna wire of the TV set from the
system.
Clean the heads.
Set it to match the Dolby recording mode.
Attach tape to cover the space left by removal of the
erase-prevention tabs.
After reconnecting the AC power cord, switch on the
power and then press the eject button.
Reinsert the disc.
Reinsert the disc.
Reload the disc.
Wipe the disc with a soft cloth.
Skip the scratched part of the disc (skip play).
Replace the disc with a new one.
Replace the disc with a different one.
Switch the power ON, then wait for one hour before
using the disc player.
58
While using the remote control
The remote control will not
operate the system.
You have installed the batteries in the reverse
polarity.
The batteries are worn. Replace the batteries with new batteries.
Reinsert the batteries in the correct polarity.
Page 50

Technical Specifications
■ Amplifier section
1 kHz continuous power output
both channels driven
Total harmonic distortion
half power at 1 kHz
Frequency response
AUX
Input sensitivity
AUX
Input impedance
AUX 24 kO
Graphic equalizer ± 10 dB
(100 Hz, 330 Hz, 1 kHz, 3.3 kHz, 10 kHz)
2x20W(THD1%,6Q)
0.07% (60)
30 Hz-30 kHz(-3dB)
250 mV
■ FM tuner section
Frequency range
Sensitivity
Total harmonic distortion
MONO
STEREO
S/N
MONO
Frequency response
Image rejection at 98 MHz
Stereo separation at 1 kHz
Antenna terminals
30 Hz-15 kHz (+0.5 dB, -2dB)
87.50-108.00 MHz
23.3 dBf (4.0 pV, IHF' 58)
0.3%
0.5%
70 dB
40 dB
35 dB
75Q (unbalanced)
■ LW/MW tuner section
Frequency range
MW
LW
Sensitivity
MW (at 999 kHz)
LW(at 252 kHz)
522-1611 kHz
144-288 kHz
250 pV/m
350 pV/m
■ Speaker system
Type
Speakerfs)
Impedance
Input power
For areas except United Kingdom
Output sound pressure level
Cross over frequency
Frequency range
Dimensions (Wx H x D)
Weight
2 way, 2 speakers bass-reflex
14 cm cone type
6 cm cone type
50 W (music)
150 W (PEAK INPUT)
88 dB/W (1.0 m)
50 Hz-22 kHz(-16dB)
180x319x251 mm
■ General
Power consumption
Power supply
Dimensions (WxHxD)
Weight
Notes:
1. Specifications are subject to change without notice.
Weight and dimensions are approximate.
2. Total harmonic distortion is measured by the digital spectrum
analyzer.
This apparatus was produced to BS 600.
~50 Hz, 230-240 V
215x319x338 mm
60
2.8 kHz
3.3 kg
95 W
6.9 kg
■ Cassette deck section
Track system
Heads
Playback
Record/Playback
Erasure
Motor
Recording system
Erase system
Tape speed
Frequency response
NORMAL
CrOa
S/N (CrOi-type tape)
Dolby NR off
Dolby NR on
Wow and Flutter
Fast forward and rewind time
M
CD player section
Sampling frequency
Decoding
Beam Source/wave length
Number of channels
Frequency response
S/N Ratio
Wow and Flutter
Digital filter
D/A converter
Approx, 110
4-track, 2-channel
Solid permalloy
Solid permalloy
Double gap ferrite head
DC servo motor
AC bias, 100 kHz
AC erase, 100 kHz
4.8cm/sec.
40 Hz-14 kHz (-1-3, -6dB)
40 Hz-15 kHz (-H3, -6dB)
52 dB (A-WTD)
61 dB (CCIR)
0.1% (WRMS)
seconds with C-60 cassette tape
44.1 kHz
16-bit linear
Semiconductor laser/780 nm
2-channel, stereo
20 Hz-20 kHz (-M, -2dB)
90 dB Filter (JIS. A)
Below measurable limit
4 times over sampling
'Multi-stage noise shaping
59
Page 51

Matsushita Electric Industrial Co., Ltd.
Central P.O. Box 288, Osaka 530-91, Japan
RQT1537-1B
 Loading...