


ª Recording a Moving Picture (MPEG4)
1, 1, 1 2, 2, 2
TAPE CARD |
MPEG4 |
||
PICTURE |
VOICE |
||
|
|||
4, 3, 3
R:0h20m MPEG4 |
You can record moving pictures for e-mailing on a card. The recorded data can be also played back on Windows Media Player.
Recording from the Movie Camera Lens (Camera Mode)
1Slide the [TAPE/CARD] Selector to [CARD].
2Slide the [PICTURE/MPEG4/VOICE] Selector to [MPEG4].
3Set [MPEG4 MODE] on the [CARD SETUP] Sub-Menu to [FINE] or [NORMAL].
4Press the Recording Start/Stop Button.
≥It takes 2 to 3 seconds to start recording.
≥During recording the [ MPEG4 ] Indication is lit in red.
≥When Remaining Time Indication becomes [R:0h00m], [R:0h00m] indication flashes in red. Recording may not be started.
≥When [MPEG4 MODE] on the [CARD SETUP] Sub-Menu is set to [FINE], the image of the moving picture (MPEG4) looks smooth.
≥The shutter speed is adjusted within the range of 1/50 to 1/500 while recording moving pictures (MPEG4).
≥The picture size of the moving picture (MPEG4) is set to be [176k144]. ≥When attaching to email, we recommend the picture size to be less than
1MB (about 1 minute length).
≥The following functions are disabled:
≥Digital zooming (l 21) ≥Cinema function (l 22) ≥Digital functions (l 27) ≥Title functions (l 45)
≥Fade In/Out Function (l 22)
≥For other notes concerning this item, see page 54.
1 2
|
MPEG4 |
|
TAPE CARD |
PICTURE |
VOICE |
3
Recording from a Cassette (VCR Mode)
1Slide the [TAPE/CARD] Selector to [CARD].
2Slide the [PICTURE/MPEG4/VOICE] Selector to [MPEG4].
3Start playback and press the Recording Start/Stop Button at the desired scene.
Recording from an other equipment
1Slide the [TAPE/CARD] Selector to [CARD].
2Slide the [PICTURE/MPEG4/VOICE] Selector to [MPEG4].
3Input the image from other equipment then press the Recording Start/Stop Button at the desired scene.
ª Recording Voice (Voice Recording Function)
You can record voice data on a card.
1Slide the [TAPE/CARD] Selector to [CARD].
2Slide the [PICTURE/MPEG4/VOICE] Selector to [VOICE].
3Press the Recording Start/Stop Button.
≥Voice from built-in microphone is recorded.
≥It takes 2 to 3 seconds to start recording.
≥The recorded file is automatically locked (to prevent accidental erasure).
≥Voice from external microphone connected to the microphone socket can also be recorded.
≥During recording, the [ VOICE ] Indication appears and is lit in red. ≥If a card is not inserted, the [ VOICE ] Indication flashes in red.
≥When Remaining Time Indication becomes [R:0h00m], [R:0h00m] indication flashes in red. Recording may not be started.
≥For other notes concerning this item, see page 54.
R:0h20m VOICE
41
MPEG4 2, 1 PICTURE  VOICE
VOICE
CAMERA
VCR
CARD P.B
1
MODE

 ON
ON
OFF
MENU
1 3
SHUTTER/IRIS/ VOL/JOG 3, 4
PUSH |
1, 2 |
MULTI/P-IN-P 2, 4
1CARD CONTENTS
PICTURE
MPEG4
VOICE
2100-0012
3
4
MPEG4
2


5
4
VOICE |
5 |
4 |
6PICTURE
|
|
|
|
|
640 |
|
640 |
|
640 |
|
|
|
|
|
640 |
|
640 |
|
640 |
No.25 100-0012
3 4 2
7
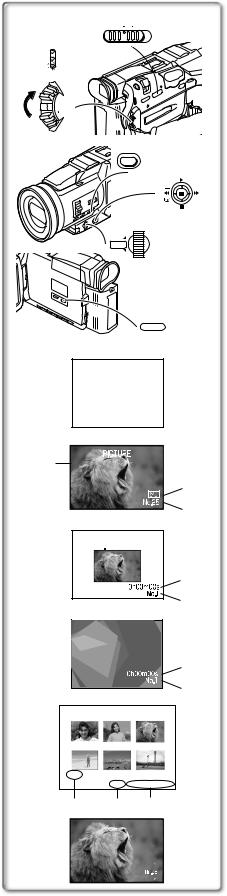
Playing Back a Card
It plays back files recorded on a Card.
≥When you set the Movie Camera to Card Playback Mode, the Card Contents 1 are displayed to inform you which kind(s) of data (still picture, moving picture and/or voice data) are recorded on the Card.
1Set the Movie Camera to Card Playback Mode.
≥The [CARD P.B] Lamp lights up.
≥The file that was recorded last on the Card is displayed.
2Slide the [PICTURE/MPEG4/VOICE] Selector to desired type of data.
3Start Playback.
1: Playing back the File
5: Playing back the next File
6: Playing back the previous File ∫: Stop playing back
;: Pause playing back (When playing back MPEG4 Data or Voice Data, this button doesn't pause playing back within 2 seconds of finishing playing back.)
When [PICTURE] is selected at step2
≥When [SLIDE SHOW] is set to [ALL], pressing [1] makes all the pictures play back continuously.
≥When [SLIDE SHOW] is set to [PRESET], pressing [1] makes Slide Show start.
When [MPEG4] is selected at step2
≥When the object is moving fast or zoom operation is performed, picture may appear to be still or causes mosaic-pattern noise, but this is not a malfunction.
When [VOICE] is selected at step2
≥If the Operation Lever is pushed towards [6] or [5] for 1 or more seconds, it becomes 10k playback and keep pressing for 7 or more seconds, it becomes 60k playback. Releasing the Operation Lever brings back to normal playback.
≥When [MPEG4] or [VOICE] is selected at step 2, during playback, keep pressing [PUSH] Dial until the volume Indication appears and turn it to adjust the volume. (l 30)
2 Folder-File Number (When [PICTURE] or [MPEG4] is selected at step 2.) 3 Picture Size (When [PICTURE] is selected at step 2.)
4 File Number
5 Playback time (When [MPEG4] or [VOICE] is selected at step 2.)
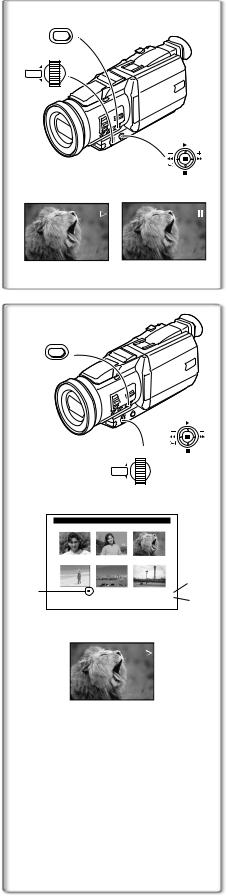
To Select a Desired File and Play It Back
1Slide the [PICTURE/MPEG4/VOICE] Selector to desired type of data.
2Press the [MULTI] Button.
≥The files recorded on the Card are displayed in Multi-Picture Mode. 6
3Turn the [PUSH] Dial and select a desired file.
≥The selected file is marked with a frame.
≥When 7 or more files have been recorded, turn the [PUSH] Dial to display the next file. The Operation Lever (towards [6] or [5]) can be used instead of the [PUSH] Dial.
4Press either the [PUSH] Dial or the [MULTI] Button.
The selected file is shown on the entire screen.
Using File Search Mode
1Set [CARD FUNCTIONS] >> [CARD EDITING] >>
[FILE SEARCH] >> [YES].
≥The File search screen 7 appears.
2Turn the [PUSH] Dial and select the desired file number, and press the [PUSH] Dial.
≥For other notes concerning this item, see page 54.
42

1 2
MPEG4
TAPE CARD |
PICTURE |
VOICE |
4
PHOTO
SHOT
1 |
REC |
|
NOW RECORDING |
|
|
MPEG4 1 PICTURE

 VOICE
VOICE
MENU 3
SHUTTER/IRIS/ VOL/JOG
1 |
PUSH |
|
|
||
|
||
|
||
|
||
|
||
|
|
|
|
|
|
|
|
|
|
|
|
|
|
|
REC |
|
|
|
NOW RECORDING |
|
|
|
|
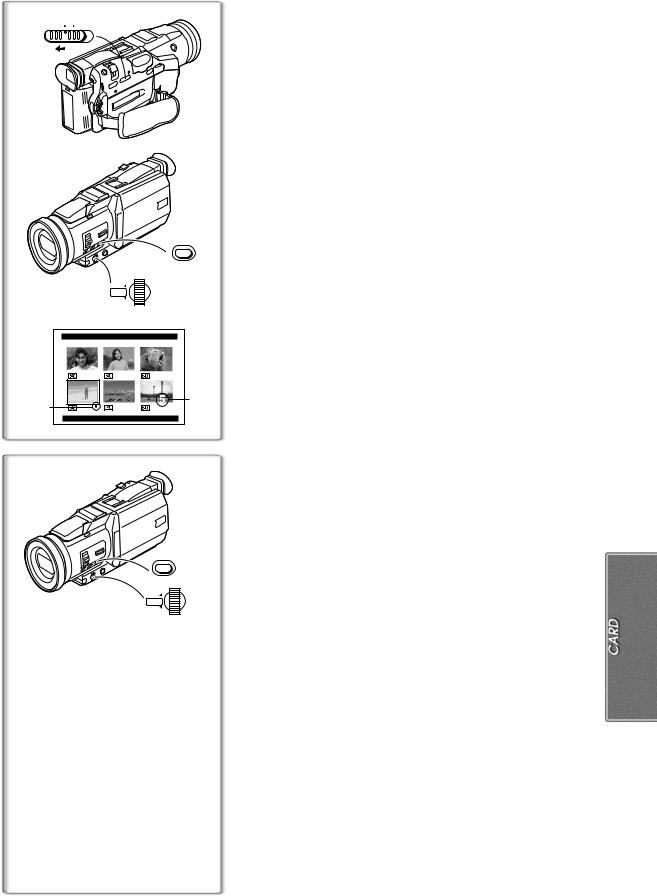
Recording Pictures on a Card to a Tape
Card Images can be recorded on the Tape one at a time or all automatically. After setting to Card Playback Mode, please carry out the following procedures.
To Copy 1 Picture
1Slide the [TAPE/CARD] Selector to [TAPE].
2Slide the [PICTURE/MPEG4/VOICE] Selector to [PICTURE].
3Display a desired picture.
4Press the [PHOTO SHOT] Button.
≥It takes approximately 7 seconds to record a picture to the Tape. ≥During the copying, the Indication 1 appears.
≥When recording to tape, select the tape position before recording. The picture will be recorded to the tape position when the [PHOTO SHOT] Button is pressed at Step 4.
≥When picture with a size other than [640k480] are copied on the cassette, their picture quality will be slightly deteriorated.
≥ Picture size recorded on tape is [640k480]. (Cannot save as mega-pixel still picture)
To Copy All the Pictures
1Slide the [PICTURE/MPEG4/VOICE] Selector to [PICTURE].
2Display the first picture.
≥If a picture other than the first one is displayed, only the subsequent pictures will be copied.
3Set [CARD FUNCTIONS] >> [CARD EDITING] >> [RECORD TO TAPE] >> [YES].
≥It takes 7–11 seconds for each picture to be copy on the Tape. To stop
the copying midway, push the Operation Lever towards [∫]. ≥During the copying, the Indication 1 appears.
≥Moving Picture (MPEG4) and Voice data cannot be recorded from a card to tape.
≥For other notes concerning this item, see page 54.
43
Slide Show
MENU
1
SHUTTER/IRIS/ VOL/JOG
PUSH
2
12
SLIDE |
SLIDE |
The recorded still pictures in the Card can be played back like a Slide Show.
To Play Back All the Pictures Continuously
1Set [CARD FUNCTIONS] >> [CARD EDITING] >> [SLIDE SHOW] >> [YES] >> [SLIDE SHOW] >> [ALL].
≥But, this procedure is unnecessary when editing of a Slide Show (undermentioned reference) is not being done.
2Push the operation Lever towards [1].
≥The [SLIDE!] Indication is displayed. 1
≥All of the pictures are played back for about 5 seconds each.
To Pause the Slide Show
Push the Operation Lever towards [;]. ≥The [SLIDE;] Indication is displayed. 2
~~~~~~~~~~~~~~~~~~~~~~~~
Editing a Slide Show
1, 5
1MENU
1
 2
2
1, 2, 3, 4 SHUTTER/IRIS/ VOL/JOG
1PUSH
1, 2
You can set up a Slide Show or change the content.
To Select Pictures to Play Back in Your Slide Show
1Set [CARD FUNCTIONS] >> [CARD EDITING] >> [SLIDE SHOW] >> [YES] >> [EDIT] >> [YES].
2Turn the [PUSH] Dial to select a picture then press it.
3Turn the [PUSH] Dial to select playback order then press it.
≥This step is skipped when there is no picture that has set for the Slide
Show.
≥Playback Order Indication 1
4Turn the [PUSH] Dial to adjust the playback time then press
it.
≥Playback Time (Second) Indication 2
≥The [¥] Indication 3 is displayed to the picture set. ≥To select the next picture, repeat the Steps 2 to 4 above.
EDIT
3 |
|
No.5 |
|
|
|||
|
|
9SEC |
|
|
PRESS MENU TO RETURN |
|
|
|
5 |
Press the [MENU] Button to end the setup. |
|
To Play Back the Slide Show That Has Been Set |
|
|
You must set [SLIDE SHOW] >> [EDIT] first. |
|
1 |
1 |
Set [CARD FUNCTIONS] >> [CARD EDITING] >> |
|
[SLIDE SHOW] >> [YES] >> [SLIDE SHOW] >> [PRESET]. |
|
|
2 |
|
2 |
Push the Operation Lever towards [1]. |
|
≥The [M.SLIDE!] Indication is displayed. 4
4 |
|
To Verify the Selected Picture |
|
Set [CARD FUNCTIONS] >> [CARD EDITING] >> [SLIDE SHOW] >> |
|
|
M.SLIDE |
|
|
[YES] >> [VERIFY] >> [YES]. |
|
|
|
|
|
|
≥Only the selected pictures are displayed in Multi-Picture Mode in the |
Playback order.
To Delete the Selected Picture
1Set [CARD FUNCTIONS] >> [CARD EDITING] >> [SLIDE SHOW] >> [YES] >> [DELETE] >> [YES].
2Select the picture you wish to delete and press the [PUSH] Dial.
≥The selected picture is marked with a frame.
To Reset the Slide Show Setup
Set [CARD FUNCTIONS] >> [CARD EDITING] >> [SLIDE SHOW] >> [YES] >> [RESET] >> [YES] >> [YES].
≥Slide Show settings are reset.
≥For other notes concerning this item, see page 54.
44

CREATE TITLE
LUMINANCE
RETURN
PRESS MENU TO EXIT
MPEG4 1 PICTURE 
3
PHOTO
SHOT
MENU
 2
2
SHUTTER/IRIS/ VOL/JOG
PUSH 
 2, 4, 5, 6
12
Creating a Title
You can create a title and record on a Card.
1Camera Mode:
Slide the [PICTURE/MPEG4/VOICE] Selector to [PICTURE] and set the Lens to the image you want to use for creating a title.
VCR Mode:
Search for the image you want to use for creating a title and set the Movie Camera to the Still Playback Mode.
2Set [CARD SETUP] >> [CREATE TITLE] >> [YES].
3Press the [PHOTO SHOT] Button.
≥The title is stored.
≥To perform Photoshot again, select [RETURN].
4Select [LUMINANCE] and press the [PUSH] Dial, turn it to adjust the title contrast and press it.
5Select [COLOUR] and press the [PUSH] Dial, turn it to adjust
the colour and press it.
≥The dark portion of the image is missing 1, and the colours of the bright portion change in order the original colour, black, blue, green,
cyan, red, magenta, yellow, and white, after which the bright portion of the image is missing 2 and the colours of the dark portion change in
the above order.
6Select [RECORD] and press the [PUSH] Dial.
≥The title is recorded on the card.
≥For other notes concerning this item, see page 54.
r
1
TITLE
2, 4
MULTI/P-IN-P
3, 4
SHUTTER/IRIS/ VOL/JOG
PUSH
1
TITLE
USR00002.TTL 2
~~~~~~~~~~~~~~~~~~~~~~~~~
Adding a Title
A title can be added to the picture. It is displayed in Camera Mode, VCR Mode and Card Playback Mode.
1Press the [TITLE] Button.
≥The title is displayed.
2Press [MULTI] Button.
≥A list of titles is displayed. 1
3Turn the [PUSH] Dial to select a desired title.
≥The selected title is marked with a frame.
4Press the [PUSH] Dial or [MULTI] Button.
≥The selected title is displayed.
≥Recording and Photoshot Recording can be done with pictures that have titles.
2 File name
To Clear the Title Display
Press the [TITLE] Button.
≥The [ACCESS] Indication appears until the titles are displayed completely. Perform the Recording after the [ACCESS] Indication disappears.
≥The supplied Card contains titles. If an original title has not been created preset title will be displayed.
≥For other notes concerning this item, see page 55.
45

|
|
|
MENU |
1 |
|
|
|
|
|
|
|
SHUTTER/IRIS/ VOL/JOG |
|
|
|
|
PUSH |
1, 2, 3 |
|
|
|
|
||
|
FILE LOCK |
|
|
|
640 |
640 |
640 |
|
|
640 |
640 |
640 |
|
1 |
|
PRESS MENU TO EXIT |
|
||
MENU 1
1
SHUTTER/IRIS/ VOL/JOG
1, 2, 4
PUSH
1, 2
3 PHOTO SHOT
Protecting the Files on a Card
(Lock Setting)
Precious files recorded on a Card can be locked (to prevent accidental erasure). (Even if files are locked, the files will be deleted when the Card is formatted.)
1 Set [CARD FUNCTIONS] >> [CARD EDITING] >> [FILE LOCK] >> [YES].
≥The [FILE LOCK] Menu is displayed.
2Turn the [PUSH] Dial to select [PICTURE] or [TITLE] and press it.
3Turn the [PUSH] Dial to select the file to be locked, and
press it.
≥The selected file is locked and the [ 

 ] Indication 1is attached to the selected files.
≥Files recorded by Voice Recording Function is automatically locked (to
prevent accidental erasure).
≥Press the [PUSH] Dial again to cancel.
≥The SD Memory Card has a write protection switch. (l 55)
≥For other notes concerning this item, see page 55.
~~~~~~~~~~~~~~~~~~~~~~~~
Deleting the Files Recorded on a Card
Using the Movie Camera, you can delete the files recorded on a Card. After the file is deleted, it cannot be restored.
At first, slide the [PICTURE/MPEG4/VOICE] Selector to select the type of data to be erased.
To Select and Delete Files
1Set [CARD FUNCTIONS] >> [ERASE CARD FILE] >> [ERASE FILE BY SELECTION].
≥To erase a title, select [ERASE TITLE BY SELECTION].
2Select the file you wish to delete and press the [PUSH] Dial.
≥The frame around the selected file flashes. ≥To erase 2 files or more, repeat this step.
3Press the [PHOTO SHOT] Button.
≥A verification message appears.
4Select [YES] and press the [PUSH] Dial.
≥The selected file is deleted from the Card.
≥If [NO] is selected, the file selection is cancelled.
≥When you delete Voice File, be sure to cancel the Lock setting before deleting.
≥Do not delete the Voice Files recorded with this Movie Camera using other devices.
≥To erase 2 files or more, repeat 2–4 steps.
To Select and Delete All Pictures
1Set [CARD FUNCTIONS] >> [ERASE CARD FILE] >> [ERASE ALL FILES].
≥A verification message appears.
2Select [YES] and press the [PUSH] Dial.
≥All the files of the selected Card Mode ([PICTURE], [MPEG4] or
[VOICE]) are erased.
≥A locked file cannot be erased.
46
MPEG4
1 PICTURE  VOICE
VOICE
2, 5
MENU
SHUTTER/IRIS/ VOL/JOG
PUSH |
2, 3, 4 |
|
|
DPOF SETTING |
|
(PRINT QUANTITY) |
2 |
1 |
|
|
|
PRESS MENU TO EXIT |
MENU
1
SHUTTER/IRIS/ VOL/JOG
PUSH
Writing Printing Data on a Card
(DPOF Setting)
DPOF Setting Printing data (DPOF Setting), such as the number of images to be printed, can be written to the Card. “DPOF” means Digital Print Order Format.
1Set the [PICTURE/MPEG4/VOICE] Selector to [PICTURE].
2Set [CARD FUNCTIONS] >> [CARD EDITING] >> [DPOF SETTING] >> [YES] >> [VARIABLE].
≥To print all pictures one at a time, select [ALL 1]. When all images are not printed, select [ALL 0].
3Select a desired picture and press the [PUSH] Dial.
≥The number of prints set by DPOF 1 is displayed. ≥The selected picture is marked with a frame.
4Turn the [PUSH] Dial and select the number of pictures to be
printed, and press the [PUSH] Dial.
≥The [¥] indication 2 is displayed in the picture set.
5Repeat Step 3 and 4 and press the [MENU] Button when the setup is completed.
To Verify DPOF Setting
Select [VERIFY] in Step 2 above. The pictures for which 1 or more print is set in DPOF are played back continuously.
≥For other notes concerning this item, see page 55.
~~~~~~~~~~~~~~~~~~~~~~~~~
Formatting a Card
If a Card becomes unreadable by the Movie Camera, formatting it may make it reusable. Formatting erases all the data recorded on a Card.
1 Set [CARD FUNCTIONS] >> [CARD EDITING] >> [CARD FORMAT] >> [YES].
≥Since a confirmation message appears, select [YES] and formatting will be carried out.
≥When the formatting is completed, the screen becomes white.
≥It may not be possible to use the Card which was formatted using this Movie Camera on another unit. In this case, format the Card on the unit which will be using the Card. Take steps to ensure that valuable files are
stored on the personal computer, etc. as well before proceeding.
≥A card formatted with an other equipment (like a Personal Computer) might be unusable or it might take more time for recording. We recommend that you use this equipment to format it.
47
 Loading...