


Video Cassette Recorder
Operating Instructions
VHS
PAL
625 |
|
NV-SV121 Series (S-VHS, Hi-Fi) |
NV-HV61 Series (Hi-Fi) NV-MV21 Series (Mono) |
|
NV-HV51 Series (Hi-Fi) NV-MV16 Series (Mono) |
Super VHS
EJECT
|
|
SUPER LP . 35x JET SEARCH |
TIMER REC |
REC |
|
|
|
3D DNR |
PULL OPEN |
CH |
TBC |
 ET
ET
Before connecting the device, operating it or adjusting settings please read these operating instructions completely; especially the safety precautions on pages 2-3.
Contents |
Page |
Included Accessories |
2 |
Inserting Batteries |
3 |
Safety Precautions |
|
Front Panel VCR |
4 |
Rear Panel VCR |
5 |
Remote control functions |
6- 7 |
Connecting with a 21-pin Scart cable |
8 |
VCR Auto Setup with 21-pin Scart cable |
9 |
Connecting with S-VIDEO cable |
|
VCR Auto Setup with S-VIDEO cable |
10 |
Connecting with RF Coaxial cable |
|
VCR Auto Setup with RF Coaxial cable |
11 |
Channel tuning / Correcting interferences |
|
Setting Time and Date |
|
External Devices |
12 |
Connecting a Set Top Box, satellite receiver, |
|
decoder or a second recorder |
|
Connecting an amplifier, Connecting to theAV3 input 13
Menu |
|
14 |
Manual Setup |
|
15 |
Creating a new station table |
|
|
Changing the name and order of TV stations |
16 |
|
Creating a new station table |
|
17 |
Shipping condition/factory defaults |
|
|
Menu Others |
|
18-19 |
Recording |
|
20 |
Timer recording |
|
21-22 |
Recording with INTELLIGENT TIMER |
|
23 |
Recording with ShowView |
|
24 |
Recording with external recording controls |
25 |
|
Playback |
|
26 |
General convenient functions |
|
27-28 |
NICAM sound system, NTSC playback |
|
29 |
Before requesting service |
|
30 |
Specifications |
|
31 |
Index |
last page |
|

Dear customer
Thank you for your trust and your decision to purchase this top-quality device. Panasonic is one of the leading manufacturers of entertainment electronics devices. We are sure that you will be completely satisfied with this device.
Matsushita Electric Industrial Co., Ltd.
http://www.panasonic.co.jp/global/
VCR |
TV |
|
|
Included |
|
|
|
|
4 |
5 |
6 |
AV LINK |
ccessories |
||||
A! |
|
|
|
|||||
|
AV |
CH |
VOL |
|
|
|
|
|
|
|
TRACKING/V-LOCK |
|
|
|
|
|
|
1 |
2 |
3 |
CH |
|
|
|
|
|
INPUT SEL |
8 |
9 |
EXT LINK |
|
AC Mains Lead |
Batteries |
||
7 |
|
|
|
|
|
|
||
|
0 |
|
|
|
RJA0043-1C |
AA, UM3 or R6 |
||
ShowView |
AUDIO STATUS |
RESET/CANCEL |
|
|||||
PROG |
PROG PLAY |
I-TIMER |
|
|
|
|
|
|
/CHECK |
|
|
|
|
|
|||
MENU |
ENTER |
EXIT |
|
RF Coaxial cable |
Operating Instructions |
|||
JET REW |
|
|
PAUSE/SLOW |
|
|
|
|
|
TIMER |
REC |
REC MODE |
OFF-TIMER |
|
|
Guarantee Card |
||
INDEX |
|
|
|
|
|
|||
|
|
A |
B |
|
|
|
|
|
"Some functions may not be |
|
|
|
|
|
|||
applicable to your VCR." |
|
Remote control N2QAJB000088: NV-SV121, NV-HV61, NV-MV21 |
||||||
|
N2QAJB000088 |
|
||||||
|
VCR/TV |
|
|
|
|
|
|
|
N2QAJB000090: NV-HV51, NV-MV16
Inserting Batteries
The batteries last for about a year, depending on how often you use the remote control unit. Do not mix old with new batteries or batteries of different types. 


! Only use batteries without any harmful substances (lead, cadmium, mercury).
! Do not use rechargeable type batteries. ! Remove the batteries if the remote control unit will remain unused
for longer periods of time. ! Do not heat or short-circuit the batteries. Immediately remove
used-up batteries and replace with batteries of type AA, UM3 or R6. ! Be sure to put in the batteries the right way round (+ and -).
Dispose of batteries, packaging material and the unit according to statutory regulations. They must not be thrown into the household refuse.
NORSK
ADVARSEL:
FOR Å REDUSERE FAREN FOR BRANN, ELEKTRISK STØT ELLER SKADER PÅ PRODUKTET, MÅ DETTE APPARATET IKKE UTSETTES FOR REGN, FUKTIGHET, VANNDRÅPER ELLER VANNSPRUT. DET MÅ HELLER IKKE PLASSERES GJENSTANDER FYLT MED VANN, SLIK SOM BLOMSTERVASER, OPPÅ APPARATET.
ADVARSEL!
!APPARATET MÅ IKKE PLASSERES I EN BOKHYLLE, ET INNEBYGGET KABINETT ELLER ET ANNET LUKKET STED HVOR VENTILASJONSFORHOLDENE ER UTILSTREKKELIGE. SØRG FOR AT GARDINER ELLER LIGNENDE IKKE FORVERRER VENTILASJONSFORHOLDENE, SÅ RISIKO FOR ELEKTRISK SJOKK ELLER BRANN FORÅRSAKET AV OVERHETING UNNGÅS.
!APPARATETS VENTILASJONSÅPNINGER MÅ IKKE DEKKES TIL MED AVISER, BORDDUKER, GARDINER OG LIGNENDE.
!PLASSER IKKE ÅPEN ILD, SLIK SOM LEVENDE LYS, OPPÅ APPARATET.
!BRUKTE BATTERIER MÅ KASSERES UTEN FARE FOR MILJØET.
DETTE APPARATET ER BEREGNET TIL BRUK UNDER MODERATE KLIMAFORHOLD.
Dette apparatet kan under bruk fange opp høyfrekvente forstyrrelser forårsaket av en mobiltelefon som benyttes i nærheten. Hvis slik forstyrrende påvirkning konstateres, bør mobiltelefonen benyttes på større avstand fra dette apparatet.
Utstyret bør plasseres i nærheten av AC-stikkontakten, og støpslet má være lett tilgjengelig hvis det skulle oppstå problemer.
2

Safety Precautions
Keep the VCR away from high temperatures and avoid changes in temperatures.
Avoid magnets or magnetised objects.
Don´t put fingers or other objects inside.
Keep away from liquids.
Keep away from humidity
and dust.
Install the VCR in a horizontal  position. Do not place anything


 heavy on it.


Voltage: Only use power sources complying with the specifications for this device.
AC mains lead protection: Ensure the AC mains lead is connected correctly and not damaged. Poor connection and lead damage can cause fire or electric shock.
Service: Never attempt to repair this unit by yourself. If a problem occurs that is not described in these operating instructions, disconnect the power supply and contact your dealer or an authorised after sales service centre.
The model and serial number of this product can be found on the back of the unit. Please note them and keep for future reference. Model No. Serial No.
WARNING:
TO REDUCE THE RISK OF FIRE, ELECTRIC SHOCK OR PRODUCT DAMAGE, DO NOT EXPOSE THIS APPARATUS TO RAIN, MOISTURE, DRIPPING OR SPLASHING AND THAT NO OBJECTS FILLED WITH LIQUIDS, SUCH AS VASES, SHALL BE PLACED ON THE APPARATUS.
CAUTION!
!DO NOT INSTALL OR PLACE THIS UNIT IN A BOOKCASE, BUILT-IN CABINET OR IN ANOTHER CONFINED SPACE. ENSURE THE UNIT IS WELL VENTILATED. TO PREVENT RISK OF ELECTRIC SHOCK OR FIRE HAZARD DUE TO OVERHEATING, ENSURE THAT CURTAINS AND ANY OTHER MATERIALS DO NOT OBSTRUCT THE VENTILATION VENTS.
!DO NOT OBSTRUCT THE UNIT’S VENTILATION OPENINGS WITH NEWSPAPERS, TABLECLOTHS, CURTAINS, AND SIMILAR ITEMS.
! |
DO NOT PLACE SOURCES OF NAKED FLAMES, SUCH AS LIGHTED CANDLES, ON THE UNIT. |
! |
DISPOSE OF BATTERIES IN AN ENVIRONMENTALLY FRIENDLY MANNER. |
THIS UNIT IS INTENDED FOR USE IN MODERATE CLIMATES.
This product may receive radio interference caused by mobile telephones during use. If such interference is apparent, please increase separation between the product and the mobile telephone.
The socket outlet shall be installed near the equipment and easily accessible or the mains plug or an appliance coupler shall remain readily operable.
3

Front Panel VCR
VCR= Video Cassette Recorder
Detailed information
is available on the Page specified pages.
TIMER REC |
REC |
PULL OPEN |
|
JET REW |
QUICK ERASE |
 AUDIO
AUDIO
S-VIDEO VIDEO L/MONO R
NV-HV61, NV-HV51, NV-MV21, NV-MV16
CH
NV-SV121
Super VHS
|
|
EJECT |
|
|
SUPER LP . 35x JET SEARCH |
TIMER REC |
REC |
|
|
|
3D DNR |
PULL OPEN |
CH |
TBC |
|
|
ET |
CVC super (Crystal View Control super): The picture is automatically adjusted as clear and sharp as possible.
SV121 HV61 HV51 MV21 MV16
Stand-by/on switch /I |
|
|
Stop ends recording, playback, or winding. |
|
TIMER REC |
21 |
|
|
|
Activates the recording timer. |
|
Playback |
26 |
|
21 |
|
|||
REC |
|
|
Fast rewind to the beginning of the tape. |
|
Record |
20 |
JET REW |
27 |
EJECT |
Ejects the cassette. |
28 |
Erases a cassette. |
28 |
|
||||
|
|
|
QUICK ERASE |
|
CH |
Channel selector |
|
Search |
27 |
|
Fast winding |
|||
|
|
|||
|
|
|
|
|
|
|
|
SV121 |
|
3D DNR |
3-Dimensional Digital Noise Reduction |
28 |
TBC |
28 |
|
Time Base Correction: Optimises picture quality |
|||
4 |
|
|
|
|

Rear Panel VCR
AV OUT
VIDEO
|
|
RF IN |
AC IN~ |
AV1(TV) |
AV2 (DECODER/EXT) |
L |
|
|
S VIDEO |
AUDIO |
|
AV2 ( |
R |
RF OUT |
|
|
|
|
1 |
2 3 4 |
5 |
|
|
6 |
7 8 |
SV121SV120 HV61HV60 HV51HV65 MV21H55 MV16H50 MV20 |
|
|
|
|
|
|
|
|
1 |
AC IN~ (Power supply) |
|
|
|
5 |
AV1 (21-pin Scart socket) |
||
|
2 |
S-VIDEO output |
|
|
|
6 |
AV2 (21-pin Scart socket) |
|
|
3 |
VIDEO output |
|
|
|
7 |
RF IN |
= Antenna input |
|
4 |
AUDIO output |
|
|
|
8 |
RF OUT = Antenna output |
|
|
|
L = AUDIO output left channel |
|
|
|
|
|
|
|
|
R = AUDIO output right channel |
|
|
|
|
|
|
SV121SV120 HV61V60 HV51V65 MHV2155 MHV1650 MV20 |
1 |
AC IN~ (Power supply) |
|
4 |
AUDIO output |
|
|
L = AUDIO output left channel |
|
|
R = AUDIO output right channel |
SV121SV120HV61 HV51EC MV21 MV16 |
1 |
AC IN~ (Power supply) |
5 |
AV1 (21-pin Scart socket) |
|
6 |
AV2 (21-pin Scart socket) |
|
7 |
RF IN |
= Antenna input |
8 |
RF OUT = Antenna output |
|
|
|
|
5 |
AV1 (21-pin Scart socket) |
|
6 |
AV2 (21-pin Scart socket) |
|
7 |
RF IN |
= Antenna input |
8 |
RF OUT = Antenna output |
|
SV121 HV61 HV51EG MV21 MV16 |
1 |
AC IN~ (Power supply) |
|
5 |
AV (21-pin Scart socket) |
|
|
|
|
7 |
RF IN = Antenna input |
|
|
|
|
8 |
RF OUT = Antenna output |
5
Remote control functions
TV Controls
Some Panasonic television sets may be controlled with the remote control unit of this VCR.
Television set Stand-by/on switch.
AV |
Selects the TV set's AV port. |
|
CH |
Channel selector. |
|
VOL |
Volume control. |
|
|
VCR Playback Control |
|
|
Normal playback |
26 |
Stop ends recording, playback, or winding.
Eject: Press and hold for more than 3 seconds.
Fast forward/rewind when stopped,
27
search forward or backwards during playback.
PAUSE/SLOW |
Stop a recording session. |
27 |
|
Still playback or Slow Playback. |
|
|
|
|
INDEX |
Search beginning of a recording session. |
27 |
|
||
JET REW |
Fast rewind to beginning of tape. |
27 |
|
VCR
TV
|
|
CH |
VOL |
|
|
AV |
|
|
|
|
|
TRACKING/V-LOCK |
|
|
1 |
2 |
3 |
CH |
|
4 |
5 |
6 |
|
|
AV LINK |
|
|||
7 |
8 |
9 |
|
|
EXT LINK |
|
|||
INPUT SEL |
0 |
|
|
|
|
|
|
|
|
ShowView AUDIO |
STATUS |
RESET/CANCEL |
|
|
PROG |
PROG PLAY |
I-TIMER |
|
|
/CHECK |
|
|||
MENU |
|
|
EXIT |
|
|
ENTER |
|
|
|
JET REW |
|
|
PAUSE/SLOW |
|
INDEX |
|
REC MODE OFF-TIMER |
N2QAJB000088 |
|
TIMER |
REC |
A |
|
|
|
|
|||
|
|
B |
|
|
"Some functions may not be applicable to your VCR."
VCR/TV
N2QAJB000088
N2QAJB000088: NV-SV121, NV-HV61, NV-MV21 N2QAJB000090: NV-HV51, NV-MV16
6

VCR Standard Controls
VCR Stand-by/on switch
Press to switch the unit from on to stand-by mode or vice versa. In stand-by mode, the unit is still consuming a small amount of power.
MENU |
|
Displays the menu. |
14 |
EXIT |
14 |
Quits a menu. |
INPUT SEL
Switches between AV inputs
13
A1, A2, A3 and Tuner (depending on model).
AUDIO |
Audio mode. |
28 |
|
||
AV LINK |
Switches from television reception to the video playback channel. |
|
|
(does not apply to HV51EG, MV21, MV16) |
|
EXT LINK |
Records with external recording control. |
25 |
|
||
STATUS |
Press repeatedly to display the time, |
20 |
|
|
tape counter or tape remain. |
||
|
|
||
RESET/CANCEL |
RESET : Resets the counter to 0:00.00. |
28 |
|
|
CANCEL :Clears an entry you made. |
|
|
|
Select programme storage position or enter |
24 |
|
8 9 |
the ShowView number. E.g.: 18 = |
||
|
|||
TRACKING/V-LOCK |
Channel select buttons. |
|
|
|
|
||
CH |
Tracking control of VCR picture disturbance. |
26 |
|
|
Menu navigation buttons.
ENTER
ENTER: Selecting or storing settings.
VCR Recording Controls
ShowView |
ShowView Menu (does not apply to HV51, MV16). |
24 |
|
|
|||
I-TIMER |
Programming TV programmes broadcasted at the same |
23 |
|
time and on the same channel. |
|||
|
|
||
OFF-TIMER |
Switches the VCR into stand-by mode after a preset |
26 |
|
|
period of time during recording, playback or stop mode. |
||
|
|
||
PROG |
Displays the menu Timer recording. |
21 |
|
/CHECK |
|||
PROG PLAY |
Plays back programmed recordings. |
22 |
TIMER |
Activate the recording timer mode. |
21 |
|
||
REC |
Record |
20 |
|
||
REC MODE |
Sets the tape speed. |
20 |
|
||
A |
Delete highlighted station. |
16 |
|
|
|
B |
Move highlighted station. |
16 |
7
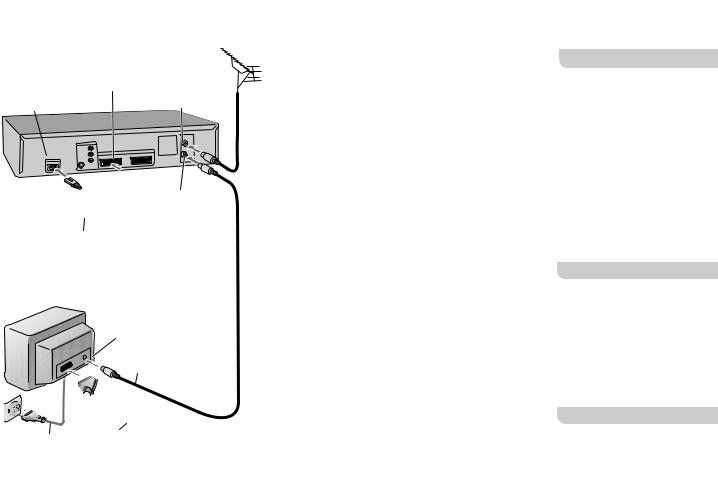
Connecting with a 21-pin Scart cable
1 Antenna
AV1
21-pin Scart socket
RF IN
AC IN~ Antenna input AC IN
VCR
RF OUT
Antenna output
4ACACmainsleadlead
TV
Antenna input
2RF coaxial cable
3 21-pin Scart cable
4 AC mains lead
Follow the steps
described below.
Disconnect power to all devices.
1Connect antenna to the RF IN (Antenna input) connector of the VCR.
2 Connect the VCR’s RF OUT (Antenna output) to the television set’s antenna input connector.
3 Connect the VCR’s AV1 socket
(21-pin Scart socket) to the TV set’s Scart In socket.
4Connect VCR and TV set to the AC mains supply.
VCR Auto Setup with 21-pin Scart cable
(Automatic tuning)
SV121 HV61 HV51 MV21 MV16
D If the Country menu does not appear after turning the device on, you may reset the device to its factory defaults (page 17). Upon doing so the VCR Auto Setup will start again.
!Turn on your television set.
!With the Stand-by/on switch turn on the VCR. The Country menu appears.
!With the arrow buttons
 select the according country, and confirm by pressing ENTER.
Automatic tuning for all receivable TV stations begins. Approximate duration is 5 minutes.
SV121 HV61 HV51 MV21 MV16
If menu Clock set appears
If time and date are not transmitted by a TV station, they must be set manually.
! Enter Time and Date with |
or 1 2 3 ... 0 , then |
save with ENTER. |
|
DMind that a wrong date or time will influence the programmed recording of TV programmes (don't forget to change summer time and winter time).
SV121 HV61 HV51 MV21 MV16
After running the automatic tuning Time and Date must be set manually.
! Enter Time and Date with |
or 1 2 3 ... 0 , then |
save with ENTER. |
|
8
Connecting with S-VIDEO cable.
SV121 Only
1 Follow the steps
Antenna
described below.
RF IN Antenna input
AC IN~ |
AUDIO output |
|
S-VIDEO output |
VCR
RF OUT
Antenna output
5 AC mains lead
4 AUDIO input
TV with S-VIDEO input
TV |
Antenna input |
AUDIO cable
 Disconnect power to all devices.
1Connect antenna to the RF IN (Antenna input) connector of the VCR.
2Connect the VCR’s RF OUT (Antenna output) to the
TV set’s antenna input connector.
3 Connect the VCR´s S-VIDEO output to the S-VIDEO input of your television set.
4 Connect the VCR’s AUDIO output (L/R) to the AUDIO input of your TV set.
S-VIDEO cable |
2 |
3 S-VIDEO input |
RF coaxial cable 5 Connect VCR and television |
5 AC mains lead |
set to the AC mains supply. |
|
VCR Auto Setup with S-VIDEO cable
(Automatic tuning)
This VCR supports the S-VHS format, providing a high picture quality when playing back a S-VHS formatted cassette. When connecting via a S-VIDEO cable, it is still possible to play back cassettes recorded on the conventional VHS system.
SV121 HV61 HV51 MV21 MV16
D If the Country menu does not appear after turning the device on, you may reset the device to its factory defaults (page 17). Upon doing so the VCR Auto Setup will start again.
!Turn on your television set.
!With the Stand-by/on switch turn on the VCR. The Country menu appears.
!With the arrow buttons

 select the according country, and confirm by pressing ENTER.
Automatic tuning for all receivable TV stations begins. Approximate duration is 5 minutes.
If menu Clock set appears
If time and date are not transmitted by a TV station, they must be set manually.
! Enter Time and Date with |
or 1 2 3 ... 0 , then |
save with ENTER. |
|
DMind that a wrong date or time will influence the programmed recording of TV programmes (don't forget to change summer time and winter time).
9
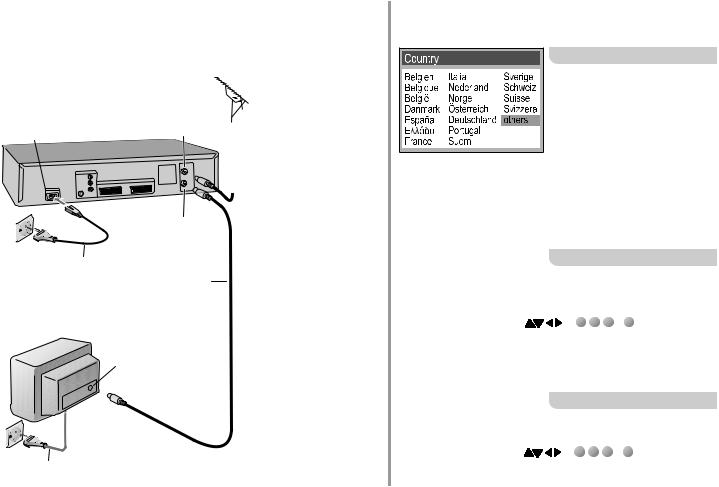
Connecting with RF Coaxial cable
You can connect the VCR to your TV set
by using a RF coaxial cable.
1Antenna
RF IN
Antenna input
AC IN~
VCR
Follow the steps
described below.
Disconnect power to all devices.
1Connect antenna to the RF IN (Antenna input) connector of the VCR.
|
RF OUT |
|
|
Antenna output |
|
|
3AC mains lead |
2 Connect the VCR´s RF OUT |
|
RF coaxial cable |
(Antenna output) to the |
|
television set’s antenna in |
|
|
|
|
|
|
connector. |
TV |
2 Antenna input |
3Connect VCR and television |
|
||
|
|
|
|
|
set to the AC mains supply. |
3AC mains lead
VCR Auto Setup with RF Coaxial cable
(Automatic tuning)
SV121 HV61 HV51 MV21 MV16
DIf the Country menu does not appear after turning the device on, you may reset the device to its
factory defaults (page 17). Upon doing so the VCR Auto Setup will start again.
The Country menu appears.
!With the arrow buttons 


 select the according country, and confirm with ENTER.
Automatic tuning for all receivable TV stations begins. Approximate duration is 5 minutes.
SV121 HV61 HV51 MV21 MV16
If menu Clock set appears
If time and date are not transmitted by a TV station, they must be set manually.
! Enter Time and Date with |
or 1 2 3 ... 0 , then |
save with ENTER. |
|
DMind that a wrong date or time will influence the programmed recording of TV programmes (don't forget to change summer time and winter time).
SV121 HV61 HV51 MV21 MV16
After running the automatic tuning Time and Date must be set manually.
! Enter Time and Date with |
or 1 2 3 ... 0 , then |
save with ENTER. |
|
10
 Loading...