

Page 1
(Household)
(Бытового назначения)
(Побутового призначення)
Машинка для стрижки волосся з можливістю роботи від мережі живлення та кумулятора
Машинка для стрижки волос с возможностью работы от сети и аккумулятора
(Тұрмыстықі)
Желі мен аккумулятордан жұмыс істейтін шаш қырқу машинкасы
English 2
Русский 8
Українська 15
Қазақша 22
Before operating this unit, please read these instructions completely and save them for future use.
Прежде чем использовать этот прибор, внимательно прочитайте данную инструкцию и сохраните её
для дальнейшего использования.
Перш ніж починати користуватись цим приладом, уважно прочитайте дані інструкції та збережіть їх
для подальшого використання.
Осы құралды пайдаланар алдында осы нұсқауларды мұқият оқып шығыңыз және оларды
болашақта қолдануға сақтап қойыңыз.
Operating Instructions
Инструкция по эксплуатации
Інструкція з експлуатації
Пайдалану нұсқаулары
AC/Rechargeable Hair Clipper
Model No.
Модель №
Модель №
ER‑GC70/ER‑GC50
Үлгі №
Page 2
Thank you for choosing a Panasonic Hair Clipper. Please
English
read all instructions before use.
Important
This clipper has a built‑in rechargeable battery. Do not throw into
fire, apply heat, or charge, use, or leave in a high temperature
environment.
Using the clipper
►
Check that the blades are not damaged or deformed before
•
use.
Terminate the usage when there is abnormality or failure.
•
Turn off the appliance before changing the trimming length or
•
removing the comb attachment.
Before each use, apply oil at the places marked with arrows.
•
(See page 6.)
The appliance should not be used on animals.
•
Do not press the blade against the skin.
•
Do not use the clipper for any purpose other than trimming.
•
This appliance is not intended for use by persons (including
•
children) with reduced physical, sensory or mental capabilities,
or lack of experience and knowledge, unless they have been
given supervision or instruction concerning use of the
appliance by a person responsible for their safety. Children
should be supervised to ensure that they do not play with the
appliance.
Charging the clipper
►
Never use the AC adaptor in the bathroom or shower room.
•
Do not use any power cord or AC adaptor other than this AC
•
adaptor (RE9‑49).
Charge the appliance in a location where it will not be exposed
•
to direct sunlight or other heat sources, at temperatures of
5 °C to 35 °C.
Plug in the AC adaptor into a household outlet where there is
•
no moisture and handle it with dry hands.
2
Hold the AC adaptor when disconnecting it from the household
•
outlet. If you tug on the power cord, you may damage it.
Do not damage or deform the power cord. Do not place heavy
•
objects on the power cord or trap it between objects.
Do not use the clipper if the power cord or the AC adaptor is
•
worn, or if the AC adaptor does not fit snugly in the outlet.
The power cord cannot be replaced. If the cord is damaged,
•
the AC adaptor should be scrapped.
Cleaning the clipper
►
Warning
Disconnect the power cord from the clipper before
cleaning it in water to prevent electric shock.
The housing should not be taken apart as this can affect the
•
watertight construction of the appliance.
If you clean the clipper with water, do not use salt water or hot
•
water. Do not soak the clipper in water for a long period of
time.
Clean the housing only with a soft cloth slightly dampened
•
with tap water or soapy tap water. Do not use thinner, benzine,
alcohol or other chemicals.
Clean the power plug regularly to remove any dust or dirt.
•
Storing the clipper
►
Store the clipper in a place with low humidity after use.
•
Do not store the clipper where it will be exposed to direct
•
sunlight or other heat sources.
Store the AC adaptor in a dry area where it is protected from
•
damage.
Keep the oil away from children.
•
Page 3
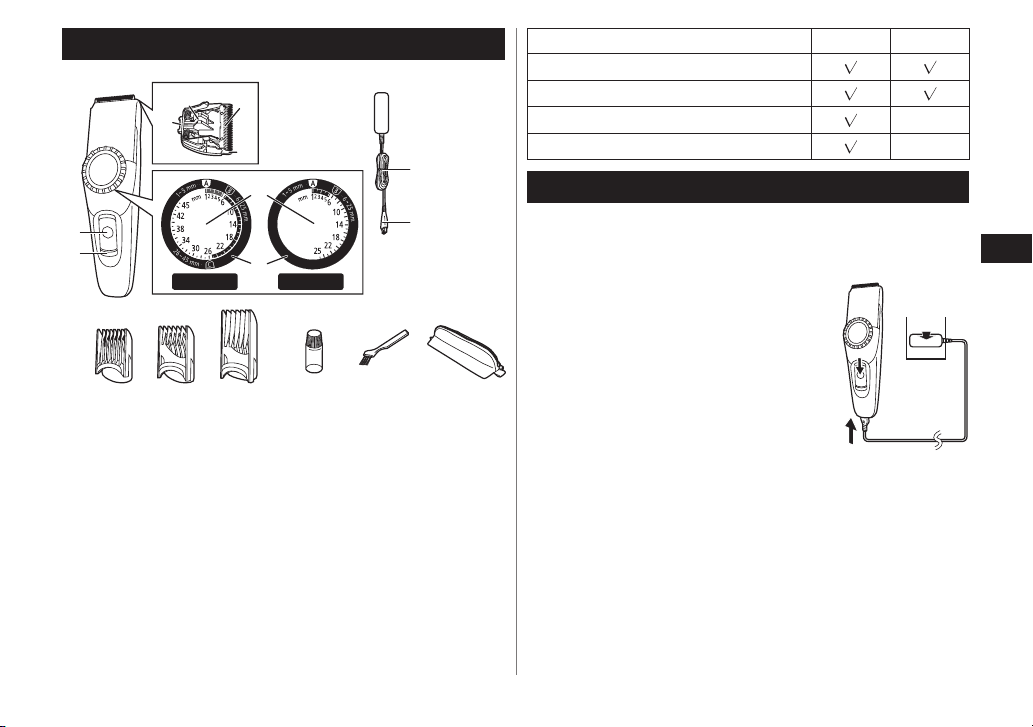
a
b
ER-GC70 ER-GC50
2
3
1
Parts identification
A Main body
1 Dial
a. Scale marks
b. Instruction marks
2 Charge indicator lamp
3 Power switch [0/1]
B Blade block
4 Cleaning lever
5 Moving blade
6 Stationary blade
7 Mounting hook
C Comb attachment [A]
(1 mm to 5 mm)
D Comb attachment [B]
(6 mm to 25 mm)
E Comb attachment [C]
(26 mm to 45 mm)
F AC adaptor (RE9‑49)
G Oil
H Cleaning brush
I Travel pouch
8 Power cord
9 Appliance plug
Accessories ER‑GC70 ER‑GC50
C Comb attachment [A] (1
D
Comb attachment [B] (6 mm to 25 mm)
E
Comb attachment [C] (26 mm to 45 mm)
I Travel pouch
mm to 5 mm)
‑
‑
Charging the clipper
You can fully charge the clipper in 8 hours if it is losing speed.
A full charge supplies enough power for approximately 40 minutes
of use.
1. Slide the power switch on the main
body to the “0” position to turn off
the clipper.
2. Plug in the AC adaptor into a
household outlet.
3. Insert the appliance plug into the
clipper.
The charge indicator lamp lights and
stays on until the AC adaptor is removed
from a household outlet.
4. Disconnect the AC adaptor from an
outlet when charging is completed.
When charging the clipper for the first time or when it has not been
in use for more than 6 months, please charge it for 16 hours (in
order to activate the rechargeable battery). If you charge the
clipper with the battery completely discharged, the charge
indicator lamp may not glow immediately. However, the lamp will
glow normally after charging for a few minutes.
English
3
Page 4
AC operation
English
You can use the clipper while charging, even if the battery
capacity is low.
If the clipper does not work, continue charging it for approx. 1
minute.
1. Cut hair by placing the clipper head
directly on the scalp.
Using
Using comb attachments
1. Slide the power switch on the main body to
the “0” position to turn off the clipper.
2. Make sure there is no damage to the blade.
3. Mount the attachment and adjust the dial.
See pages 4 and 5.•
4. Slide the power switch on the
main body to the “1” position to
turn on the clipper.
After adjusting the trimming length,
make sure the attachment is fixed with
the switch in the “1” position. When
the attachment is mounted correctly,
the dial will not turn with the switch set
to “1”.
5. Cut hair to the correct height by
moving the clipper back against the
flow of the hair.
Do not use the clipper in an inverted position.
This can cut hair too deeply.
Trimming without attachment combs
►
Trimming your hair without an attachment will trim hair length to
approx. 0.5 mm.
4
Installing the attachment comb
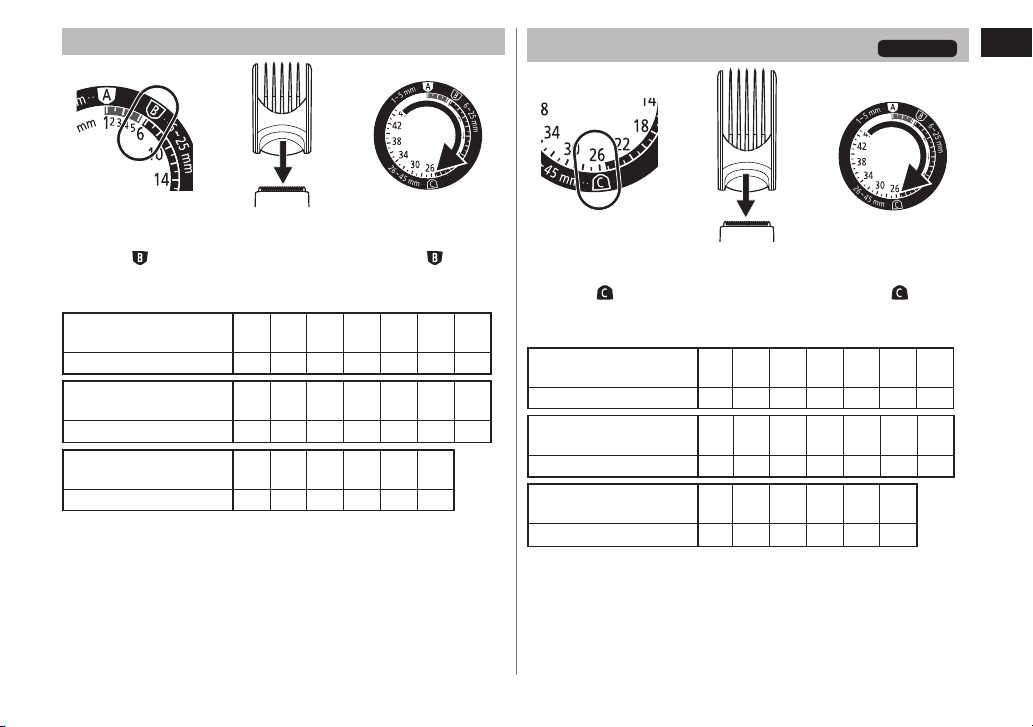
Comb attachment [A] (1 mm to 5 mm)
1. Align the
instruction
mark “ ” to
“1”.
Cutting length (mm)
(estimate)
Scale marks 1 2 3 4 5
•
The dial will turn past the indicator “6” even when the comb
attachment [A] is being used. The clipper will not cut well above
mm, so do not try to cut more than 6 mm with the comb
6
attachment [A] mounted.
Actual hair length will be a little longer than the height you set.
•
2. Mount the
comb
attachment [A]
to the main
body.
1 2 3 4 5
3. Align the
instruction
mark “ ” to
the length you
want to cut.
Page 5
Comb attachment [B] (6 mm to 25 mm)
Comb attachment [C] (26 mm to 45 mm)
ER‑GC70
English
1. Align the
instruction
mark “ ” to
“6”.
Cutting length (mm)
(estimate)
Scale marks 6 • • • 10 • •
Cutting length (mm)
(estimate)
Scale marks
Cutting length (mm)
(estimate)
Scale marks • • 22 • • •
Actual hair length will be a little longer than the height you set.•
2. Mount the
comb
attachment [B]
to the main
body.
6 7 8 9 10 11 12
13 14 15 16 17 18 19
• 14 • • • 18 •
20 21 22 23 24 25
3. Align the
instruction
mark “ ” to
the length you
want to cut.
1. Align the
instruction
mark “ ” to
“26”.
2. Mount the
comb
attachment [C]
to the main
body.
Cutting length (mm)
(estimate)
Scale marks 26
Cutting length (mm)
(estimate)
Scale marks
Cutting length (mm)
(estimate)
Scale marks
Actual hair length will be a little longer than the height you set.•
3. Align the
instruction
mark “ ” to
the length you
want to cut.
26 27 28 29 30 31 32
• • • 30 • •
33 34 35 36 37 38 39
• 34 • • • 38 •
40 41 42 43 44 45
• • 42 •
• 45
5
Page 6
Cleaning
English
Cleaning with brush
1. Disconnect the power cord from the
clipper.
Be sure to set the switch to “0” before you
•
remove the blade.
2. Remove the comb attachment.
3. Hold the main body, place your thumb
against the blades and then push
them away from the main body.
4. Brush off any hair trimmings from the
main body and from around the blade.
5. Brush any hair trimmings out from
between the stationary blade and the
moving blade while pressing down
the cleaning lever to raise the moving
blade.
Cleaning in water
1. Disconnect the power cord from the
clipper.
2. Remove the blade.
3. Rinse off any hair trimmings that are
sticking to the blades with running
water.
4. Rinse out any hair trimmings that are
inside the clipper with running water.
5. Gently shake the clipper 4 or 5 times and then wipe off
any water drops from the clipper and the blade.
6. Place the clipper on a towel with the power switch on
the main body facing downwards to let it dry fully.
Lubrication
Apply the oil to the clipper before and
after each use.
Apply a drop of the oil to the points
indicated by the arrows.
The mark on the left means suitable for cleaning under
an open water tap.
Warning
Disconnect the power cord from the clipper before cleaning
it in water to prevent electric shock.
6
Remounting the blade
Fit the mounting hook into
the blade mounting on the
clipper and then push in until
you hear a click.
Page 7
Blade life
►
Blade life will vary according to the frequency and length of use. It
is expected to be about 2 years when using the clipper twice a
month for 20 minutes each time. If cutting efficiency is reduced
despite proper maintenance, change the blades.
►
Battery life
Battery life will vary according to the frequency and length of use.
If the batteries are charged 3 times a month, the service life will be
approximately 3 years.
It is recommended that the clipper be recharged at least every 6
•
months even when not in regular use because the charge will
drain from the battery and its service life may be shortened.
Disposal of the clipper battery
Remove the built‑in rechargeable battery before disposing of the
clipper. Please make sure that the battery is disposed of at an
officially designated location if there is one. Do not dismantle or
replace the battery so that you can use the clipper again. This
could cause fire or an electric shock. Replace it at an authorized
service center.
•
Disconnect the power cord from the clipper when removing the
battery.
•
Discharge the battery completely before removing it.
•
Be careful not to short the + and – terminals of the battery after
removing it.
•
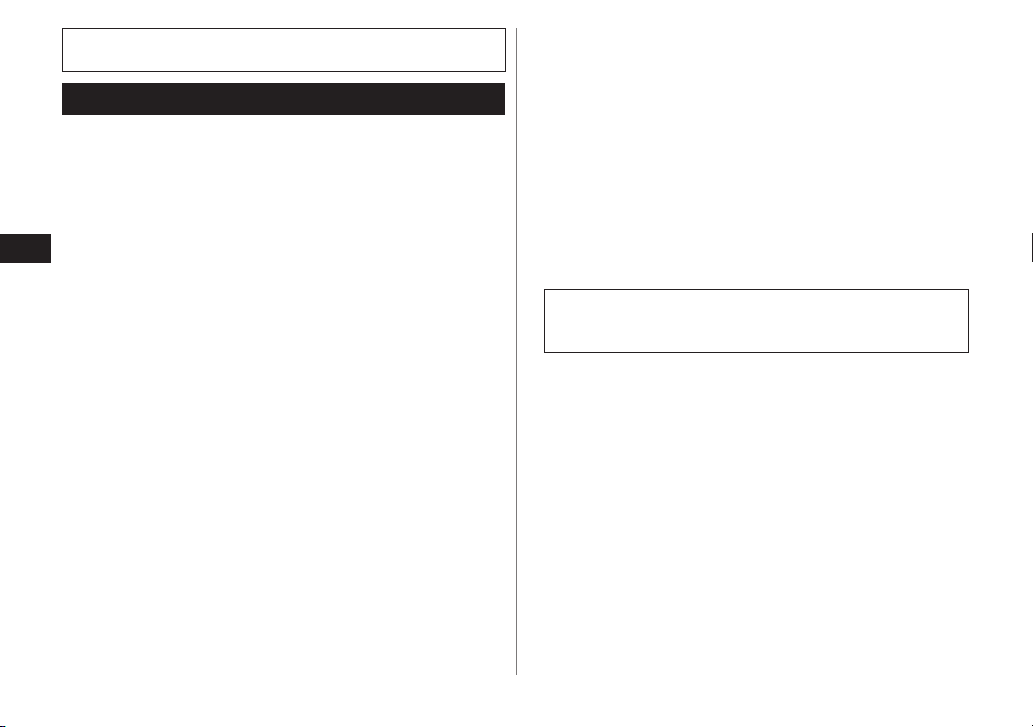
Perform steps 1 to 8 and lift the battery, and then remove it.
1. Disconnect the power cord from the clipper.
2. Remove the blade from the clipper. Remove the 2 screws (a).
3. Remove the screw (b).
4. Detach the dial cover (c), remove the screw (d) and disconnect
the dial (e).
5. Detach the housing (f).
6. Remove the screws (g).
7. Disconnect housing (h).
8. Disconnect the battery chamber (i) and remove the battery (j).
WARNING
Do not attempt to replace the battery for the purpose of
reusing the clipper. This could result in the risk of fire or
electric shock.
Important notice regarding environmental protection
The built‑in rechargeable Nickel‑Metal Hydride battery contains
substances that may be environmentally harmful. Please remove
the battery before discarding your clipper.
For environmental protection and recycling of materials
This clipper contains a Nickel‑Metal Hydride battery. Please
make sure that the battery is disposed of at an officially assigned
location, if there is one in your country.
Specifications
Power source
Motor voltage 1.2
Charging time Approx. 8 hours
This product is intended for household use only.
See the name plate on the AC adaptor.
(Automatic voltage conversion)
V DC
7
English
Page 8
Благодарим Вас за выбор машинки для стрижки волос Panasonic.
Перед использованием прочитайте полностью все инструкции.
Важная информация
Данная машинка оснащена встроенным аккумулятором. Не бросайте
в огонь, не нагревайте, а также не заряжайте, не используйте и не
оставляйте прибор в месте с высокой температурой.
Использование машинки для стрижки
►
Каждый раз перед началом стрижки проверяйте лезвия на
•
предмет деформации или повреждений.
Немедленно прекратите использование в случае нарушения
•
работы или неисправности.
Русский
Отключите прибор, перед тем как регулировать длину стрижки
•
или снять насадку.
Каждый раз перед началом стрижки наносите масло на участки,
•
отмеченные стрелками. (См. страницу 12.)
Запрещается использовать триммер для стрижки шерсти животных.
•
Не прижимайте лезвие к коже.
•
Используйте машинку только по назначению - для стрижки волос.
•
Это устройство не предназначено для использования людьми
•
(включая детей) с ограниченными физическими, сенсорными или
умственными способностями или лицами без соответствующих
знаний и опыта. Использование устройства такими людьми
допускается только под наблюдением лица, отвечающего за их
безопасность, и при условии предоставления с его стороны
чётких инструкций по работе с устройством. Необходимо
следить, чтобы дети не играли с устройством.
Зарядка машинки для стрижки
►
Никогда не используйте адаптер в ванной комнате.
•
Используйте только сетевой шнур с адаптером переменного тока
•
(RE9-49), входящим в комплект.
Не производите зарядку аккумулятора в местах, подверженных
•
воздействию прямых солнечных лучей и других источников
тепла, а также при температуре ниже 5 °C или выше 35 °C.
8
Вставьте адаптер в бытовую розетку. Убедитесь в отсутствии
•
влаги и не прикасайтесь к нему мокрыми руками.
Выключая адаптер переменного тока из розетки, держитесь за
•
его корпус. Не тяните за сетевой шнур, так как это может
повредить его.
Не повреждайте и не деформируйте электрический провод. Не
•
ставьте тяжелые предметы на электрический провод и не
зажимайте его между ними.
Не используйте машинку, если её сетевой шнур или адаптер
•
переменного тока имеют видимые повреждения, а также если
адаптер переменного тока не плотно входит в розетку.
Сетевой шнур замене не подлежит. В случае повреждения шнура
•
адаптер переменного тока необходимо утилизировать.
Очистка машинки для стрижки
►
Предостережение
Прежде чем чистить машинку водой, отсоедините её сетевой
шнур, чтобы избежать поражения электрическим током.
Не следует снимать защитный корпус, так как это может
•
нарушить водонепроницаемые свойства прибора.
При очистке машинки в воде не используйте солёную или
•
горячую воду. Не оставляйте машинку погруженной в воду на
длительное время.
Чистите корпус только мягкой тканью, слегка смоченной водопроводной
•
водой или слабым мыльным раствором. Не используйте растворитель,
бензин, спирт и другие химические вещества.
Выполняйте регулярную очистку вилки сетевого адаптера от
•
грязи и пыли.
Хранение машинки для стрижки
►
После использования храните машинку в сухом месте.
•
Не храните машинку в местах, где она будет подвергаться
•
воздействию прямых солнечных лучей или других источников тепла.
Храните адаптер в сухом надёжном месте, где будет
•
гарантирована его целостность.
Храните смазочное масло в недоступном для детей месте.
•
Page 9
a
b
ER-GC70 ER-GC50
2
3
1
Детали устройства
Аксессуары ER-GC70 ER-GC50
C
Насадка-гребень [A] (от 1 мм до 5 мм)
D Насадка-гребень [В]
E Насадка-гребень [С]
I
Мягкий чехол
(от 6 мм до 25 мм)
(от 26 мм до 45 мм)
-
-
Зарядка машинки для стрижки
Машинка для стрижки полностью заряжается за 8 часов. Заряжайте
машинку, когда скорость её работы падает.
Полный заряд аккумулятора обеспечивает приблизительно 40 минут
непрерывной работы.
1. Переведите выключатель питания на
корпусе машинки в положение “0”,
чтобы выключить её.
2. Вставьте вилку адаптера в
электрическую розетку.
3. Вставьте вилку подключения к
A
Корпус
1
Поворотный переключатель
длины стрижки
a. Шкала
b. Регулировочная метка
2
Индикатор зарядки
3
Выключатель питания [0/1]
B
Блок лезвий
4
Рычаг для очистки
5
Рабочее лезвие
6
Неподвижное лезвие
7
Крепежный зацеп
C
Насадка-гребень [A]
(от 1 мм до 5 мм)
D
E
F
G
H
I
Насадка-гребень [В]
(от 6 мм до 25 мм)
Насадка-гребень [С]
(от 26 мм до 45 мм)
Адаптер сети переменного тока
(RE9-49)
8
Сетевой шнур
9
Вилка подключения к
прибору
Смазочное масло
Чистящая щёточка
Мягкий чехол
прибору в машинку.
Загорится индикатор зарядки и будет
продолжать гореть, пока адаптер будет
оставаться в сети.
4. После полной зарядки машинки
вынимайте адаптер переменного тока
из розетки.
Заряжая машинку впервые, или если она не использовалась дольше
6 месяцев, оставьте её заряжаться на 16 часов (для активации
аккумулятора). При зарядке машинки с полностью разряженным
аккумулятором индикатор зарядки может загореться не сразу, а через
некоторое время. Как правило, индикатор загорается через несколько
минут после начала зарядки.
Русский
9
Page 10

Работа от сети
Во время зарядки машинку можно использовать даже при низком
заряде аккумулятора.
Если машинка не работает, то оставьте её заряжаться в течение 1
минуты.
Использование
Использование насадок-гребней
1. Переведите выключатель питания на
корпусе машинки в положение “0”, чтобы
выключить её.
Русский
2. Убедитесь, что лезвие не повреждено.
3. Установите насадку и отрегулируйте
поворотный переключатель длины стрижки.
См. стр. 10 и 11.
•
4. Переведите выключатель питания
на корпусе машинки в положение
“1”, чтобы включить её.
После выбора нужной длины стрижки
убедитесь, что при закреплении
насадки выключатель находится в
положении “1”. Если насадка
установлена правильно, то поворотный
переключатель длины стрижки
вращаться не будет при выключателе,
установленном в положение “1”.
5. Стрижка волос заданной длины
осуществляется перемещением машинки
против направления роста волос.
В процессе стрижки держите машинку
выключателем вверх и не переворачивайте. В
противном случае волосы могут быть
сострижены слишком коротко.
10
Стрижка без использования насадок
►
Если во время стрижки не будет использоваться насадка, то длина
стрижки составит приблизительно 0,5 мм.
1. Выполняя стрижку, перемещайте
машинку, касаясь кожи головы.
Установка насадки-гребня
Насадка-гребень [A] (от 1 мм до 5 мм)
1.
Установите
регулировочную
метку “ ” на
отметку “1”.
Длина стрижки (мм)
(ожидаемая)
Шкала 1 2 3 4 5
Поворотный переключатель длины стрижки может вращаться
•
дальше отметки “6”, даже если используется насадка-гребень [A].
При использовании насадки-гребня [A] не пытайтесь делать стрижку
длиннее 6
мм, так как в этом случае качество стрижки ухудшается.
2. Установите
насадку-гребень
[A] на корпус
прибора.
1 2 3 4 5
3.
Установите
регулировочную
метку “ ” на
нужную длину
стрижки.
Page 11

Действительная длина стрижки будет немного больше значения,
•
указанного на насадке.
Насадка-гребень [В] (от 6 мм до 25 мм)
1.
Установите
регулировочную
метку “ ” на
отметку “6”.
Длина стрижки (мм)
(ожидаемая)
Шкала 6 • • • 10 • •
Длина стрижки (мм)
(ожидаемая)
Шкала
Длина стрижки (мм)
(ожидаемая)
Шкала
•
Действительная длина стрижки будет немного больше значения,
указанного на насадке.
2. Установите
насадку-гребень
[В] на корпус
прибора.
3.
Установите
регулировочную
метку “ ” на
нужную длину
стрижки.
6 7 8 9 10 11 12
13 14 15 16 17 18 19
• 14 • • • 18 •
20 21 22 23 24 25
• • 22 • • •
Насадка-гребень [С] (от 26 мм до 45 мм)
1.
Установите
регулировочную
метку “ ” на
отметку “26”.
2. Установите
насадку-гребень
[С] на корпус
прибора.
ER‑GC70
3.
Установите
регулировочную
метку “ ” на
нужную длину
стрижки.
Длина стрижки (мм)
(ожидаемая)
Шкала 26 • • • 30 • •
Длина стрижки (мм)
(ожидаемая)
Шкала
Длина стрижки (мм)
(ожидаемая)
Шкала
•
Действительная длина стрижки будет немного больше значения,
указанного на насадке.
26 27 28 29 30 31 32
33 34 35 36 37 38 39
• 34 • • • 38 •
40 41 42 43 44 45
• • 42 • • 45
Русский
11
Page 12

Очистка
Очистка щёточкой
1. Отсоедините сетевой шнур от машинки.
Перед снятием лезвий установите
•
выключатель в положение “0”.
2. Снимите насадку-гребень.
3. Держа корпус триммера, выдвиньте
лезвия большим пальцем.
4. Очистите корпус и лезвия от
состриженных волосков.
Русский
5. Удалите волоски между неподвижным
и рабочим лезвиями. Для этого
нажмите на рычаг очистки, чтобы
поднять рабочее лезвие.
Очистка в воде
Символ, показанный слева, означает, что прибор можно
мыть в проточной водопроводной водой.
Предостережение
Прежде чем чистить машинку водой, отсоедините её сетевой
шнур, чтобы избежать поражения электрическим током.
1. Отсоедините сетевой шнур от
машинки.
2. Снимите лезвие.
3. Смойте струёй проточной воды все
волоски, налипшие на лезвия.
4. Смойте струёй проточной воды все
волоски, попавшие внутрь машинки.
5. Слегка встряхните машинку 4 - 5 раз и сотрите капли воды
с её корпуса и лезвия.
6. Положите машинку на полотенце так, чтобы выключатель
питания на корпусе прибора был направлен вниз, что
позволит ему хорошо просохнуть.
Смазка
Производите смазку машинки каждый раз
до и после использования.
Нанесите несколько капель смазочного
масла в места, отмеченные на рисунке
стрелкой.
Установка лезвия на место
Поместите крепёжный зацеп в
держатель блока лезвий на
машинке и вставьте его до
щелчка.
12
Page 13

Срок годности лезвия
►
Срок эксплуатации лезвия определяется частотой и длительностью
использования машинки для стрижки. При использовании устройства
два раза в месяц по 20 минут ожидаемый срок эксплуатации лезвия
составляет 2 года. Если эффективность стрижки уменьшается,
несмотря на правильный уход за устройством, замените лезвия.
►
Срок эксплуатации аккумулятора
Срок эксплуатации аккумулятора зависит от частоты и
продолжительности использования. Если аккумулятор заряжается 3
раза в месяц, то срок его службы составит около 3 лет.
Рекомендуется заряжать машинку по крайней мере раз в 6 месяцев,
•
даже если она используется нерегулярно, так как это предотвратит
полную разрядку аккумулятора и продлит срок его службы.
Утилизация аккумулятора машинки
Прежде чем утилизировать машинку, извлеките из неё встроенный
аккумулятор. Пожалуйста, проследите за тем, чтобы утилизация
аккумулятора была выполнена в официальном пункте приёма, при
наличии такового в вашем городе. Не разбирайте и не заменяйте
аккумулятор с целью продолжения использования машинки. Это
может привести к возгоранию или поражению электрическим током.
Заменяйте его в уполномоченном сервисном центре.
Прежде чем извлекать аккумулятор из машинки, отключите от
•
прибора сетевой шнур.
Прежде чем извлекать аккумулятор, полностью разрядите его.
•
Не замыкайте положительный (+) и отрицательный (-) полюса
•
аккумулятора после его извлечения.
Выполните шаги с 1 по 8, поднимите аккумулятор, а затем
•
извлеките его.
1. Отсоедините сетевой шнур от машинки.
2. Снимите лезвие с машинки. Выкрутите 2 винта (а).
3. Выкрутите винт (b).
4. Снимите крышку поворотного переключателя длины стрижки (с),
извлеките винт (d) и отсоедините сам переключатель (е).
5. Снимите защитный корпус (f).
6. Выкрутите винты (g).
7. Разберите защитный корпус (h).
8. Разберите аккумуляторный отсек (i) и извлеките аккумулятор (j).
ПРЕДУПРЕЖДЕНИЕ
Не пытайтесь заменить аккумулятор с целью повторного
использования машинки. Это может привести к возгоранию
или поражению электрическим током.
Примечания по охране окружающей среды
Встроенный никель-металлгидридный аккумулятор содержит вредные
для окружающей среды вещества. Пожалуйста, извлеките аккумулятор
перед утилизацией машинки для стрижки.
Охрана окружающей среды и вторичная переработка отходов
В данной машинке используется никель-металлогидридный
аккумулятор. Пожалуйста, проследите за тем, чтобы утилизация
аккумулятора была выполнена в официальном пункте приёма при
наличии такового в Вашей стране.
13
Русский
Page 14

Технические характеристики
Источник питания
Рабочее напряжение
электродвигателя
Время зарядки Прибл. 8 часов
Данное устройство предназначено только для домашнего
использования.
Установленный производителем в порядке п. 2 ст. 5 Федерального
Русский
Закона РФ “О защите прав потребителей” срок службы для данного
изделия равен 7 годам с даты производства при условии, что
изделие используется в строгом соответствии с настоящей
инструкцией по эксплуатации и применимыми техническими
стандартами.
Этот прибор предназначен только для домашнего использования.
Панасоник Электрик Воркс Ванбао (Гуанчжоу) Ко., Лтд.
Ванбао Бейз, Шигуанг Роад, Паниу Дистрикт, Гуанчжоу, Гуандонг,
511495, Китай
Сделано в Китае
Импортёр на территории РФ: ООО <Панасоник Рус>, 117393, Г.
Москва, Профсоюзная, ул., д. 56, 7 этаж.
тел. 8-800-200-21-00
См. табличку номиналов на адаптере переменного тока.
(Автоматическая подстройка под сетевое
напряжение)
1,2 В постоянного тока
14
Page 15

Дякуємо за вибір машинки для стрижки волосся від Panasonic.
Перед використанням ознайомтеся зі всіма інструкціями.
Важлива інформація
Ця машинка обладнана вбудованим акумулятором. Його не можна
кидати в огонь, нагрівати, заряджати, використовувати або залишати
його у місці з високою температурою.
Використання машинки для стрижки
►
Перш ніж використовувати машинку для стрижки волосся,
•
переконайтеся в тому, що її леза не пошкоджені та не
деформовані.
Припиніть користування приладом, якщо він неправильно
•
функціонує або зламався.
Вимикайте апарат перед зміною довжини обрізання або
•
вийманням насадки.
Перед кожним використанням нанесіть на деталі, позначені
•
стрілками, оливу. (Див. стор. 19.)
Не використовуйте пристрій для стрижки тварин.
•
Не притискайте машинку для стрижки волосся до шкіри.
•
Не використовуйте машинку для стрижки волосся для інших
•
цілей, окрім стрижки.
Забороняється користуватися даним пристроєм особам
•
(включаючи дітей) з обмеженими фізичними та розумовими
здібностями, а також особам з браком досвіду, окрім як під
наглядом або після інструктажу щодо використання даного
пристрою, проведеного особами, відповідальними за їх безпеку.
Слідкуйте, щоб діти не гралися пристроєм.
Зарядження машинки для стрижки
►
Ніколи не користуйтеся мережним адаптером у ванній чи душі.
•
Не використовуйте жоден інший шнур живлення або мережний
•
адаптер, окрім цьог
•
Не заряджайте акумулятори під прямим сонячним промінням та
у інших джерел тепла або при температурі нижчій за 5 °C
поблиз
або вищій за 35 °C.
Підключайте адаптер тільки у побутову розетку сухими руками та
•
у місці з нормальною вологістю.
о адаптера (RE9-49).
Вимикаючи прилад з розетки, тримайтесь за мережний адаптер.
•
Не тягніть за шнур живлення, бо це може пошкодити його.
Не пошкоджуйте і не деформуйте шнур живлення. Не розміщуйте
•
на кабелі живлення важкі предмети та не затискайте його між
іншими предметами.
Не користуйтесь машинкою, якщо її шнур живлення або адаптер
•
мають пошкодження, або якщо мережний адаптер не щільно
входить в розетку.
Шнур живлення заміні не підлягає. У разі пошкодження шнура,
•
мережний адаптер необхідно утилізувати.
Чищення машинки для стрижки
►
Увага!
Для уникнення ураження електричним струмом, перед
чищенням машинки у воді відключіть шнур живлення від
розетки.
Не слід знімати захисний корпус, бо це може порушити
•
герметичність пристрою.
При очищенні машинки у воді, не використовуйте солону або
•
гарячу воду. Не занурюйте надовго машинку у воду.
Очищуйте корпус машинки тільки м’якою ганчіркою, злегка
•
зволоженою проточною водою або водою з милом. Не
використовуйте розчинник, бензин, спирт або інші хімічні
речовини.
Регулярно очищуйте шнур живлення для усунення з нього пилу
•
та бруду.
Зберігання машинки для стрижки
►
Після використання зберігайте машинку у місці з низькою
•
вологістю повітря.
Не зберігайте машинку під прямим сонячним промінням або
•
поблизу інших джерел тепла.
Зберігайте адаптер в сухому місці, де він не пошкодиться.
•
Зберігайте оливу у недоступному для дітей місці.
•
15
Українська
Page 16

16
Українська
a
b
ER-GC70 ER-GC50
2
3
1
Будова апарата
A
Корпус
1
Регулятор висоти стрижки
a. Поділки шкали
b. Регулювальна мітка
2
Індикатор стану зарядження
3
Вимикач живлення [0/1]
B
Підрізальний блок
4
Важіль для чищення
5
Рухоме лезо
6
Нерухоме лезо
7
Монтажний гачок
C
Насадка-гребінець [A]
(від 1 мм до 5 мм)
D
E
F
G
H
I
Насадка-гребінець [В]
(від 6 мм до 25 мм)
Насадка-гребінець [С]
(від 26 мм до 45 мм)
Адаптер змінного струму
(RE9-49)
8
Шнур живлення
9
Штекер шнура живлення
Олива
Щіточка для чищення
Футляр для подорожей
Аксесуари ER-GC70 ER-GC50
C
Насадка-гребінець [A] (від 1 мм до 5 мм)
D Насадка-гребінець [В]
(від 6 мм до 25 мм)
E Насадка-гребінець [С]
(від 26 мм до 45 мм)
I
Футляр для подорожей
-
-
Зарядження машинки для стрижки
При зменшенні швидкості машинки її можна повністю зарядити
протягом 8 годин.
Повністю заряджений акумулятор забезпечує безперервну роботу
пристрою протягом приблизно 40 хвилин.
1. Для вимкнення машинки переведіть
вимикач живлення на корпусі в
положення “0”.
2. Вставте мережний адаптер в
електричну розетку.
3. Вставте штекер шнура живлення в
машинку.
Засвітиться індикатор стану зарядження та
горітиме, поки адаптер буде залишатися
увімкненим в розетку.
4. Після повної зарядки машинки
вимкніть мережний адаптер з розетки.
Заряджаючи машинку вперше, або після того, як вона не
використовувалася більше 6 місяців, залиште її заряджатися
протягом 16 годин (для активування акумулятора). Якщо ви
заряджуєте повністю розряжений акумулятор, то індикатор стану
зарядження може засвітитися не відразу. Проте, він засвітиться через
декілька хвилин після початку зарядження.
Page 17

Використання адаптера змінного струму
Машинкою, що заряджається, можна користуватися, навіть якщо
заряд акумулятора недостатній.
Якщо машинка не працюватиме, залиште її заряджатися приблизно
на 1 хвилину.
1. Підрізайте волосся, розміщуючи головку
машинки під прямим кутом до шкіри
голови.
Використання
Використання насадок-гребінців
1. Для вимкнення машинки переведіть вимикач
живлення на корпусі в положення “0”.
2. Перевірте, що лезо не має пошкодження.
3. Встановіть насадку та відрегулюйте висоту
стрижки.
Див. сторінки 17 та 18.
•
4. Для вмикнення машинки
переведіть вимикач живлення на
корпусі в положення “1”.
Після регулювання висоти підстригання
перевірте, що насадка є зафіксована та
вимикач живлення знаходиться у
положенні “1”. Якщо насадка
встановлена правильно, то регулятор
висоти стрижки не буде обертатися,
коли вимикач встановлено на “1”.
5. Підріжте волосся до потрібної довжини,
переміщуючи машинку для стрижки
волосся проти напряму росту волосся.
Не використовуйте машинку для стрижки
волосся у переверненому стані. У цьому
випадку існує небезпека того, що волосся буде
зрізане надто коротко.
Підстригання без використання насадок-гребінців
►
Висота підстригання волосся без насадки складає приблизно 0,5 мм.
Встановлення насадки-гребінця
Насадка-гребінець [A] (від 1 мм до 5 мм)
1. Встановіть
регулювальну
мітку “ ” на
“1”.
Висота стрижки (мм)
(приблизно)
Поділки шкали 1 2 3 4 5
Регулятор висоти стрижки може обертатися за позначку “6”, навіть
•
якщо використовується насадка-гребінець [A]. Проте не слід
намагатися підстригати волосся з використанням насадки-гребінця
[A] на вис
насадкою при висоті вище 6 мм значно погіршується.
Фактична довжина підстриженого волосся буде трохи більшою, ніж
•
та висота, яку ви встановите на машинці.
ту, що перевищує 6 мм, тому що якість стрижки цією
о
2. Встановіть на
корпус насадкугребінець [A].
1 2 3 4 5
3. Встановіть
регулювальну
мітку “ ” на
необхідну
висоту стрижки.
17
Українська
Page 18

18
Українська
Насадка-гребінець [В] (від 6 мм до 25 мм)
Насадка-гребінець [С] (від 26 мм до 45 мм)
ER‑GC70
1. Встановіть
регулювальну
мітку “ ” на
“6”.
2. Встановіть на
корпус насадкугребінець [В].
3. Встановіть
регулювальну
мітку “ ” на
необхідну
висоту стрижки.
Висота стрижки (мм)
(приблизно)
Поділки шкали 6 • • • 10 • •
Висота стрижки (мм)
(приблизно)
Поділки шкали
Висота стрижки (мм)
(приблизно)
Поділки шкали
•
Фактична довжина підстриженого волосся буде трохи більшою, ніж
та висота, яку ви встановите на машинці.
6 7 8 9 10 11 12
13 14 15 16 17 18 19
• 14 • • • 18 •
20 21 22 23 24 25
• • 22 • • •
1. Встановіть
регулювальну
мітку “ ” на
“26”.
2. Встановіть на
корпус насадкугребінець [С].
3. Встановіть
регулювальну
мітку “ ” на
необхідну
висоту стрижки.
Висота стрижки (мм)
(приблизно)
Поділки шкали 26 • • • 30 • •
Висота стрижки (мм)
(приблизно)
Поділки шкали
Висота стрижки (мм)
(приблизно)
Поділки шкали
•
Фактична довжина підстриженого волосся буде трохи більшою, ніж
та висота, яку ви встановите на машинці.
26 27 28 29 30 31 32
33 34 35 36 37 38 39
• 34 • • • 38 •
40 41 42 43 44 45
• • 42 • • 45
Page 19

Очистка
Очистка за допомогою щіточки
1. Від’єднайте шнур живлення від
машинки.
Перш ніж виконати це, переконайтесь у
•
тому, що перемикач знаходиться у позиції
“0”.
2. Зніміть насадку-гребінець.
3. Тримаючи тример за корпус,
розташуйте великий палець на лезах, а
тоді натисніть на них, щоб вийняти їх із
корпуса.
4. Очистіть корпус та ділянку навколо лез
від волосся.
5. Натисніть на важіль для чищення, щоб
підняти рухоме лезо, а тоді очистіть від
волосся ділянку між рухомим та
нерухомим лезами.
Миття у воді
Увага!
Для уникнення ураження електричним струмом, перед
чищенням машинки у воді відключіть шнур живлення від
розетки.
1. Від’єднайте шнур живлення від
машинки.
2. Зніміть лезо.
3. Змийте проточною водою всі залишки
волосся, що прилипли до лез.
4. Змийте проточною водою всі залишки
волосся, що знаходяться всередині
машинки.
5. Легко струсніть машинку 4-5 разів та витріть краплі води з
корпусу машинки та лез.
6. Для просушки покладіть машинку на рушник таким чином,
щоб перемикач на корпусі знаходився знизу.
Змащування
Наносіть оливу на машинку кожного разу
перед та після її використання.
Нанесіть одну краплю оливи на ділянки,
позначені на малюнку стрілочками.
Символ ліворуч означає, що прилад можна мити під
проточною водопровідною водою.
Українська
19
Page 20

20
Українська
Встановлення лез
Розташуйте фіксатор у місце
встановлення леза на корпусі
машинки та натисніть на нього
(він повинен «клацнути»).
Ресурс лез
►
Термін експлуатації леза залежить від частоти та тривалості його
використання. Передбачається, що лезо повинне витримати 2 роки
експлуатації, якщо його використовувати двічі на місяць протягом 20
хвилин. Якщо, незважаючи на правильну експлуатацію, якість
підрізання зменшилась, тоді слід замінити лезо.
Термін експлуатації акумулятора
►
Термін експлуатації акумулятора залежить від частоти та тривалості
користування. Якщо акумулятор заряджається 3 рази на місяць, то
строк його служби становитиме приблизно 3 роки.
Рекомендується заряджати машинку хоча б один раз на 6 місяців,
•
навіть якщо вона не використовується регулярно. Це запобігатиме
розрядці акумулятора та продовжить строк його служби.
Утилізація акумулятора машинки
Перед тим, як викидати машинку, витягніть з неї вбудований
акумулятор. Утилізуйте акумулятор у спеціально призначених для
цього місцях. Не розбирайте та не замінюйте акумулятор для
продовження користування машинкою. Це може призвести до
виникнення пожежі або ураження електричним струмом. Замінюйте
акумулятор в уповноваженому сервісному центрі.
Перед тим, як витягнути акумулятор, відключіть шнур живлення від
•
машинки.
Перш ніж витягувати акумулятор, повністю розрядіть його.
•
Будьте обережні, щоб не закоротити позитивний (+) та негативний (-)
•
полюси акумулятора після його видалення.
Виконайте кроки від 1 до 8, підніміть акумулятор та вийміть його.
•
1.
Від’єднайт
е шнур живлення від машинки.
2. Зніміть лезо з машинки. Викрутіть 2 гвинти (а).
3. Викрутіть гвинт (b).
4. Зніміть кришечку регулятора висоти стрижки (с), викрутіть гвинт (d)
та від’єднайте сам регулятор (е).
5. Від’єднайте захисний корпус (f).
6. Викрутіть гвинти (g).
7. Зніміть захисний корпус (h).
8. Розберіть акумуляторний відсік (i) та витягніть акумулятор (j).
УВАГА!
Не намагайтесь замінити акумулятор з метою подальшого
використання машинки. Це може призвести до виникнення
пожежі або ураження електричним струмом.
Важливе застереження стосовно захисту навколишнього
середовища
Вбудований перезарядний нікель-металогідридний акумулятор містить
речовини, що можуть забруднювати навколишнє середовище. Перед
утилізацією машинки ми просимо Вас вийняти з неї акумулятор.
Інформація щодо захисту довкілля та переробки матеріалів
Дана машинка містить нікель-металогідридний акумулятор.
Обов’язково утилізуйте акумулятор в спеціально призначеному
місці, якщо таке передбачене у вашій країні.
Page 21

Технічні характеристики
Примітка:
Дату виготовлення (рік, місяць) ви можете визначити за
номером, що знаходиться на виробі.
Номер: X X XXXXX
серійний номер
місяць -- 1 -- Січень, 2 -- Лютий ... ,
J -- Жовтень, K -- Листопад,
L -- Грудень
рік (остання цифра номера року ) --
0 -- 2010 , 1 -- 2011 ... ,
9 -- 2019
Джерело живлення
Двигун 1,2 В–
Час зарядження Прибл. 8 годин
Даний виріб призначений тільки для домашнього використання.
Встановлений виробником термін служби (придатності) цього
виробу дорівнює 7 рокам з дати виготовлення за умови, що виріб
використовується у суворій відповідності щодо дійсної інструкції з
експлуатації та технічних стандартів, що застосовуються до цього
виробу.
Дату виготовлення зазначено на виробі.
Panasonic Electric Works Wanbao (Guangzhou) Co., Ltd.
Wanbao Base Shiguang Road, Panyu District, Guangdong, 511495
CHINA
Панасонік Електрік Воркс Ванбао (Гуанчжоу) Ко., Лтд.
Ванбао Бейз Шигуань Роад, Паню Дістрікт, Гуанчжоу, Гуандонг,
511495, Китай
Вироблено в Китаї
Інформаційний центр Panasonic
Міжнародні дзвінки та дзвінки з Києва: +38-0-(44)-490-38-98
Безкоштовні дзвінки зі стаціонарних телефонів в межах України :
0-800-309-880
Див. табличку з номінальними
характеристиками на мережному адаптері.
(Автоматичний регулятор напруги)
Українська
21
Page 22

Panasonic шаш алатын машинкасын таңдағаныңыз үшін
рақмет. Пайдаланбас бұрын барлық нұсқауларды оқыңыз.
Маңызды
Бұл шаш алатын машинка ішінде зарядталатын батарея орнатылған.
Оны өртке тастамаңыз, қыздырмаңыз, сондай-ақ жоғары қызымды
ортада зарядтамаңыз, пайдаланбаңыз немесе қалдырмаңыз.
Ұстараны қолдану
►
Пайдаланар алдында ұстара жүзінің сынбағанын тексеріңіз.
•
Қалыпсыздық немесе ақаулық пайда болу кезінде
•
пайдаланбаңыз.
Қырқу биіктігін өзгертуден немесе тарақ саптамасын алып
•
тастаудан бұрын құралды өшіріңіз.
Пайдаланбас бұрын әрдайым, көрсеткілермен көрсетілген
•
жерлерді майлап отырыңыз. (26-бетті қараңыз.)
Құралды жануарлардың жүнін қырқу үшін пайдалануға
•
болмайды.
Ұстараның жүзін теріге қарсы баспаңыз.
•
Шаш алатын машинканы шашты тегістеуден басқа мақсатта
•
пайдаланбаңыз.
Аталмыш құралды денелік, сенсорлық немесе ақыл-ой қабілеті кем,
•
сондай-ақ тиісті білімі мен тәжірибесі жоқ адамдардың (балаларды
қосқанда) пайдалануына тиым салынған. Мұндай адамдар құралды
тек олардың қауіпсіздігіне жауапты адамдардың қарауымен ғана
пайдалана алады. Балаларға құралмен ойнауды болдырмау
мақсатында бақылау жүргізілу керек.
Ұстараны зарядтау
►
Айнымалы ток адаптерін ешқашан ванна немесе душта
•
Қазақша
пайдаланбаңыз.
Осы адаптерге (RE9-49) арналған желі сымы мен айтымалы тоқ
•
адаптерін ғана қолданыңыз.
Аталмыш құрылғыны қызымы 5 °C-ден 35 °C-ге шейін болып тікелей
•
күн сәулесі түспейтін жерде не жылу көзі жоқ жерде зарядтаңыз.
Айнымалы ток адаптерін тұрмыстық ток желісіне қосқанда,
•
ылғалдың жоқтығын тексеріңіз. Ұстараны су қолмен ұстамаңыз.
Электр қуаты көзінен ажырату кезінде айнымалы ток адаптерін
•
ұстап тұрыңыз. Желі сымынан тартсаңыз, ол зақымдалуы мүмкін.
Электр сым желісіне зақым келтіруге немесе бұзуға болмайды.
•
Электр сымының үстіне ауыр зат қоймаңыз немесе оны
заттардың арасында қыспаңыз.
Желі сымы не айнымалы ток адаптері зақымдалған болса немесе
•
адаптер электр қуаты көзіне жақсылап жалғанбаса, шаш алатын
машинканы пайдаланбаңыз.
Желі сымын ауыстыруға болмайды. Ол бұзылған жағдайда
•
айнымалы ток адаптерін жарамсыз деп табу жөн.
Ұстараны тазалау
►
Ескерту
Электрлік тоғына соғылмас үшін машинканы сумен жумас
бұрын желі сымын тоқ көзінен ажыратыңыз.
Корпусты бөлшектеуге болмайды, себебі ол құралдың су өтпейтін
•
құрылымына әсер етеді.
Егер шаш алатын машинканы сумен жусаңыз, тұзды немесе
•
ыстық суды пайдаланбаңыз. Шаш алатын машинканы ұзақ
уақытқа суға салып қоймаңыз.
Сыртын тек қана суқұбыр суымен немесе сабынды сумен аз
•
ылғалдалған жұмсақ матамен тазалаңыз. Еріткіш, бензин,
алкоголь не басқа химиялық заттарды пайдаланбаңыз.
Тоқ ашасын шаң мен кірден уақтылы тазартып тұрыңыз.
•
Ұстараны сақтау
►
Пайдаланудан соң шаш алатын машинканы құрғақ жерде
•
сақтаңыз.
Шаш алатын машинканы тікелей күн сәулесі түсетін жерде
•
немесе жылу көзі бар жерде сақтамаңыз.
Айнымалы ток адаптерін зақымданудан қорғалған және құрғақ
•
жерде сақтаңыз.
Майды балалардың қолы жетпейтін жерде сақтаңыз.
•
22
Page 23

a
b
ER-GC70 ER-GC50
2
3
1
Құрылғы бөлшектері
Жарақтар ER-GC70 ER-GC50
C
Саптама [A] (1 мм-ден 5 мм-ге шейін)
D Саптама [В]
E Саптама [C]
I
Ұстараны сақтауға арналған қалташа
(6 мм-ден 25 мм-ге шейін)
(26 мм-ден 45 мм-ге шейін)
-
-
Ұстараны зарядтау
Егер шаш алатын машинка жылдамдығы төмендесе, онда оны 8
сағат ішінде толық зарядтау мүмкін.
Аккумулятордың толық заряды үздіксіз жұмыс істегенде шамамен 40 минут.
1. Шаш алатын машинканы сөндіру үшін
құрылғы корпусындағы электр ток
айырып-қосқышын “0” дәрежесіне
жылжытыңыз.
2.
3. Құрылғыға қосу ашасын шаш алатын
A
Құрылғы корпусы
1
Қырқу биіктігін реттегіш
a. Шәкіл белгілері
b. Нұсқау белгілері
2
Зарядтау индикаторы
3
Ток айырып-қосқышы [0/1]
B
Алмас қондырғысы
4
Тазалау ілмегі
5
Жылжымалы алмас
6
Жылжымайтын алмас
7
Бекітілу ілмегі
C
Тарақ саптама [A]
(1 мм-ден 5 мм-ге шейін)
D
E
F
G
H
I
Тарақ саптама [В]
(6 мм-ден 25 мм-ге шейін)
Тарақ саптама [C]
(26 мм-ден 45 мм ге шейін)
Айнымалы тоқ адаптері
(RE9-49)
8
Желі сымы
9
Құрылғыға қосу ашасы
Май
Тазалағыш қылсүрткі
Ұстараны сақтауға арналған
қалташа
4. Зарядталу аяқталғаннан соң
Шаш алатын машинканы бірінші рет зарядтау кезінде немесе 6 айдан
көп уақытта ол пайдаланбаған болса, оны 16 сағат зарядтау тиіс
(зарядталатын батареяны белсендіру үшін). Шаш алатын машинканы
заряды жоқ батареямен зарядтасаңыз, зарядтау индикаторы бір
дегеннен жанбауы мүмкін. Әдетте индикатор зарядтаудың
басталуынан бірнеше минут өткен соң жанады.
Айнымалы тоқ адаптері
Заряд алу кезінде шаш алатын машинканы батарея заряды кем
болса да, пайдалану мүмкін.
Шаш алатын машинка істемесе, оны 1 минут бойы зарядтаңыз.
алы ток адаптерінің ашасын
Айным
электр розеткаға қосыңыз.
машинкаға енгізіңіз.
Айнымалы ток адаптері зарядталғаннан кейін
заряд күйінің индикаторы жанып, жыпылықтайды.
айнымалы ток адаптерін электр қуаты
көзінен ажыратыңыз.
Қазақша
23
Page 24

Пайдалану
Саптамаларды пайдалану
1. Шаш алатын машинканы сөндіру үшін
құрылғы корпусындағы электр ток айырыпқосқышын “0” дәрежесіне жылжытыңыз.
2. Алмаста ешбір зақымның жоғын тексеріңіз.
3. Саптаманы орнатып, қырқу биіктігін
келтіріңіз.
24 және 25-беттерді қараңыз.
•
4. Шаш алатын машинканы қосу үшін
құрылғы корпусындағы электр ток
айырып-қосқышын “1” дәрежесіне
жылжытыңыз.
Қию ұзындығын реттегеннен соң
саптаманың қозғалмауын және айырыпқосқыштың “1” дәрежесінде тұруын
қамтамасыз етіңіз. Саптама дұрыс
біріктірілген болса, айырып-қосқыш “1”
дәрежесінде түрғанда, қырқу биіктігін
реттегіш айланбайды.
5. Шаштың өсу бағытына қарсы шаш
алатын машинканы жылжыту арқылы
шашты қажетті ұзындықта қиыңыз.
Шаш алатын машинканы артқы жағымен
қолданбаңыз. Бұл шашты түбімен қиып жіберуі
мүмкін.
Қазақша
Саптамасыз қию
►
Ұстараны саптамасыз қолданған болсаңыз, ол шашыңызды шамамен
0.5 мм ұзындығында қияды.
1. Шаш алатын машинканы бас терісіне
тигізіп, шашты қиыңыз.
Саптаманы біріктіру
Саптама [A] (1 мм-ден 5 мм-ге шейін)
1. Нұсқау белгісін
“ ” “1”-ге
туралаңыз.
Қию ұзындығы (мм)
(шамамен)
Шәкіл белгілері 1 2 3 4 5
Қырқу биіктігін реттегіш [А] саптаманы пайдаланғанның өзінде де "6"
•
көрсеткішінен аса айланады. [А] саптаманы пайдаланған кезде 6
мм-ден ұзын шашты қимаңыз, әйтпесе бұл шашты қию сапасын
төмендетеді.
Нақты қиылатын шаш ұзындығы сіз орнатқан ұзындықтан сәл
•
асады.
2. Саптаманы [A]
құрылғы
корпусымен
біріктіріңіз.
1 2 3 4 5
3.
Нұсқау белгісін
“ ” қажетті
қию
ұзындығына
туралаңыз.
24
Page 25

Саптама [В] (6 мм-ден 25 мм-ге шейін)
Саптама [C] (26 мм-ден 45 мм-ге шейін)
ER‑GC70
1. Нұсқау белгісін
“ ” “6”-ге
туралаңыз.
2. Саптаманы [B]
құрылғы
корпусымен
біріктіріңіз.
3.
Нұсқау белгісін
“ ” қажетті
қию
ұзындығына
туралаңыз.
Қию ұзындығы (мм)
(шамамен)
Шәкіл белгілері
Қию ұзындығы (мм)
(шамамен)
Шәкіл белгілері
Қию ұзындығы (мм)
(шамамен)
Шәкіл белгілері • • 22 • • •
Нақты қиылатын шаш ұзындығы сіз орнатқан ұзындықтан сәл
•
асады.
6 7 8 9 10 11 12
6 • • • 10 • •
13 14 15 16 17 18 19
• 14 • • • 18 •
20 21 22 23 24 25
1. Нұсқау белгісін
“ ” “26”-ге
туралаңыз.
2. Саптаманы [C]
құрылғы
корпусымен
біріктіріңіз.
3.
Нұсқау белгісін
“ ” қажетті
қию
ұзындығына
туралаңыз.
Қию ұзындығы (мм)
(шамамен)
Шәкіл белгілері 26 • • • 30 • •
Қию ұзындығы (мм)
(шамамен)
Шәкіл белгілері
Қию ұзындығы (мм)
(шамамен)
Шәкіл белгілері
•
Нақты қиылатын шаш ұзындығы сіз орнатқан ұзындықтан сәл
асады.
26 27 28 29 30 31 32
33 34 35 36 37 38 39
• 34 • • • 38 •
40 41 42 43 44 45
• • 42 • • 45
25
Қазақша
Page 26

Тазалау
Қылсүрткімен тазалау
1. Желі сымын шаш алатын машинкадан
ажыратыңыз.
Ұстара жүзін алмас бұрын айырып-
•
қосқыштың «0» белгісіне қойылғанына көз
жеткізіңіз.
2. Тарақ-саптаманы алып тастаңыз.
3. Құрылғы корпусын ұстап тұрып, бас
бармақпен алмасты басып, оны негізгі
бөліктен итеріп шығарыңыз.
4. Құрылғы корпусындағы және алмас
айналасындағы барлық қырқылған
шашты қылсүрткімен алып тастаңыз.
5. Тазалау ілмегін басып, жылжымалы
алмасты көтеріңіз де, тұрақты алмас
пен жылжымалы алмастың арасынан
шашты қылсүрткімен тазалаңыз.
Сумен тазалау
Қазақша
Ескерту
Электрлік тоғына соғылмас үшін машинканы сумен жумас
бұрын желі сымын тоқ көзінен ажыратыңыз.
Сол жақтағы белгі ағын суда тазалауға жарамдылығын
білдіреді.
1. Желі сымын шаш алатын машинкадан
ажыратыңыз.
2. Алмасты алыңыз.
3. Алмастарға жабысқан қырқылған
шашты ағын су астында шайыңыз.
4. Шаш алатын машинка ішіне түскен
шашты сумен жуып тазартыңыз.
5. Шаш алатын машинканы 4-5 рет ақырын сілкіп, шаш
алатын машинка мен алмастағы су тамшыларын сүртіңіз.
6. Шаш алатын машинканы құрылғы корпусындағы электр
ток айырып-қосқышын төменге қаратып сүлгінің үстіне
қойып толық кептіріңіз.
Майлау
Ұстараны қолдану алдында және соңында
май жағыңыз.
Суретте мегзермен көрсетілген орындарға
май тамшысын құйыңыз.
Алмасты қайта орнату
Ілмекті шаш алатын
машинкадағы алмас
қондырғысына қойыңыз да,
шертпе естілгенше итеріңіз.
26
Page 27

Алмастың қолданылу мерзімі
►
Ұстара жүзін пайдалану мерзімі оны қолдану жиілігі мен уақытына
байланысты әртүрлі болады. Шаш алатын машинка айына екі рет 20
минуттан қолданылатын болса, ұстара жүзін екі жылдың ішінде
пайдалануға болады деп күтілуде. Тиісті күтім көрсетілгеніне
қарамастан, қию тиімділігі төмендесе, ұстара жүздерін ауыстырыңыз.
Аккумулятордың қызмет көрсету мерзімі
►
Батареяны пайдалану мерзімі оны қолдану жиілігі мен уақытына
байланысты әртүрлі болады. Егер батареялар айына 3 рет
зарядталса, қолдану мерзімі шамамен 3 жыл болады.
Шаш алатын машинка жиі қолданылмаса да, оны кемінде 6 ай
•
сайын бір рет зарядтап тұрыңыз, өйткені қуаттетікте қуат таусылып
қалады және қолдану мерзімі қысқаруы мүмкін.
Шаш алатын машинка батареясын жою
Шаш алатын машинканы қолданыстан шығарар алдында ішінде
орнатылған зарядталатын батареяны шығарыңыз. Батареяның
өкілетті мекемеде (ондай мекеме болған жағдайда) жойылғанына көз
жеткізіңіз. Шаш алатын машинканы қайта пайдалану үшін батареяны
бөлшектемеңіз немесе алмастырмаңыз. Бұл нәтижеде өртке немесе
қысқа тұйықталуға әкеліп соғуы мүмкін. Оны өкілетті қызмет көрсету
орталығында алмастырыңыз.
Батареяны алғанда желі сымын шаш алатын машинкадан ажыратыңыз.
•
•
Аккумуляторды шығарып алмастан бұрын оның зарядын толық пайдаланыңыз.
•
Аккумуляторды алғаннан кейін «+» және «–» өрістерінің
тұйықталуын болдырмаңыз.
1-8 қадамдарды орындап батареяны көтеріп шығарыңыз.
•
1.
елі сымын шаш алатын машинкадан ажыратыңыз.
Ж
2. Алмасты шаш алатын машинкадан алып тастаңыз. 2 бұранданы (a)
босатып алыңыз.
3. Бұранданы (b) алып тастаңыз.
4. Қырқу реттегішінің қақпағын (c) алып, бұранданы (d) босатып
алыңыз да, реттегішті (e) ажыратыңыз.
5. Корпусты (f) ажыратыңыз.
6. Бұрандаларды (g) босатып алыңыз.
7. Корпусты (h) ажыратыңыз.
8. Батарея бөлігін (i) ажыратып, батареяны (j) шығарып алыңыз.
ЕСКЕРТУ
Шаш алатын машинканы қайта пайдалану үшін батареяны
ауыстыруға әрекет жасамаңыз. Бұл нәтижеде өртке немесе
қысқа тұйықталуға әкеліп соғуы мүмкін.
Қоршаған ортаны қорғауға қатысты маңызды хабарлама
Машинкаға құрылған никельді металгидридті қуаттетігінде қоршаған
ортаға зиянды заттар бар. Ұстараны лақтыратын кезде қуаттетікті
алып тастаңыз.
Қоршаған ортаны қорғау және заттарды қайта өңдеу
Бұл шаш алатын машинка ішінде зарядталатын никелді
металгидридті батарея орнатылған. Батареяның өкілетті мекемеде
(ондай мекеме болған жағдайда) жойылғанына көз жеткізіңіз.
Техникалық сипаттамасы
Қуат көзі
Қозғауыш кернеуі 1,2 В DC (тұрақты тоқ)
Қуаттау уақыты Шамамен 8 сағат
Осы құрылғы тұрмыстық мақсаттарда ғана қолданылады.
Айнымалы тоқ адаптерінің үстіндегі атау
жазылған тақтаны қараңыз.
(Автоматты түрде кернеуді ауыстыру)
27
Қазақша
Page 28

Panasonic Electric Works Wanbao (Guangzhou) Co., Ltd.
http://panasonic.net
F EN, RU, UA, KAZ
Printed in China
0000000000 X0000‑0
 Loading...