

Panasonic DP-C106 Operation Manual

Tools Mode
Transporting the Scanner
The scanner module must be locked when transporting the DP-C106 to
ensure against damage. Locking the module keeps it from sliding and either
damaging itself or causing damage to other parts of the scanner.
Use the following procedure to lock the scanner module:
1. Press the Tools button to display the Tools Main Menu on the Copier
Screen.
2. Using the ( ) ARROW buttons highlight the Admin menu selection.
3. Press the Select button. Password Input is displayed on the Copier
Screen.
4. Using the Numeric Keypad, enter your Administrator Password. The
numbers display as asterisks (*).
If you make a mistake while entering a password, press the Clear button.
5. Once the correct password is entered, the Administrator Menu is
displayed on the Copier Screen.
6. Use the ( ) ARROW buttons to highlight the Transporting Scanner
selection.
7. Press the select button. Transporting Scanner selection is displayed on
the Copier Screen.
8. Use the ( ) ARROW buttons to select On.
The default setting for transporting the scanner is Off. If you do not wish to
transport the scanner at this time, press the Exit button to return to the
Administrator Menu. The Tools Main Menu is displayed on the Copier
Screen. To exit Tools Mode, press the Tools button.
9. The Copier/Printer locks the scanner module. The copier then prompts
you to turn Off the power.
10. Turn the power Off and proceed with moving the scanner.
For directions on turning the power Off, go to the Setting Up the DP-C106
chapter.
Once the scanner module is locked, you cannot return to any copy functions
until the scanner power is switched Off and then On again. This is the only
way to unlock the scanner module.
22–22

23
The following list shows the types of problems identified in this chapter:
• Jam Clearance
• Copy/Print Quality Problems
• Power Problems
• Printer Error Messages
• Printer Error Codes
• Scanner Error Messages
Avoiding Paper Jams
The following conditions cause jams in the Printer.
Problem Solving
• The paper guides in the paper tray are not adjusted to the size of the
paper. Refer to the Loading Paper in the Paper Tray procedure in the
Setting Up the DP-C106.
• The Automatic Document Feeder (ADF) document guides are not
adjusted to the size of the documents. Refer to The Automatic
Document Feeder (ADF) information in the Basic Copying.
• Transparencies are incorrectly loaded in the Bypass Tray. Refer to the
Loading Transparencies into the Bypass Tray procedure.
• Paper not recommended is used. Please use paper weight from 14 to 23
lbs. for Trays and 14 to 48 lbs. for Bypass Tray.
• Whenever possible, load paper to feed long edge first.
CAUTION
DO NOT open the Duplex Unit/Kit unless directed to do so from the Printer
Control Panel. Opening the Duplex Unit/Kit at any other time could create a
paper jam.
23-1
Problem Solving Clearing Paper Jams
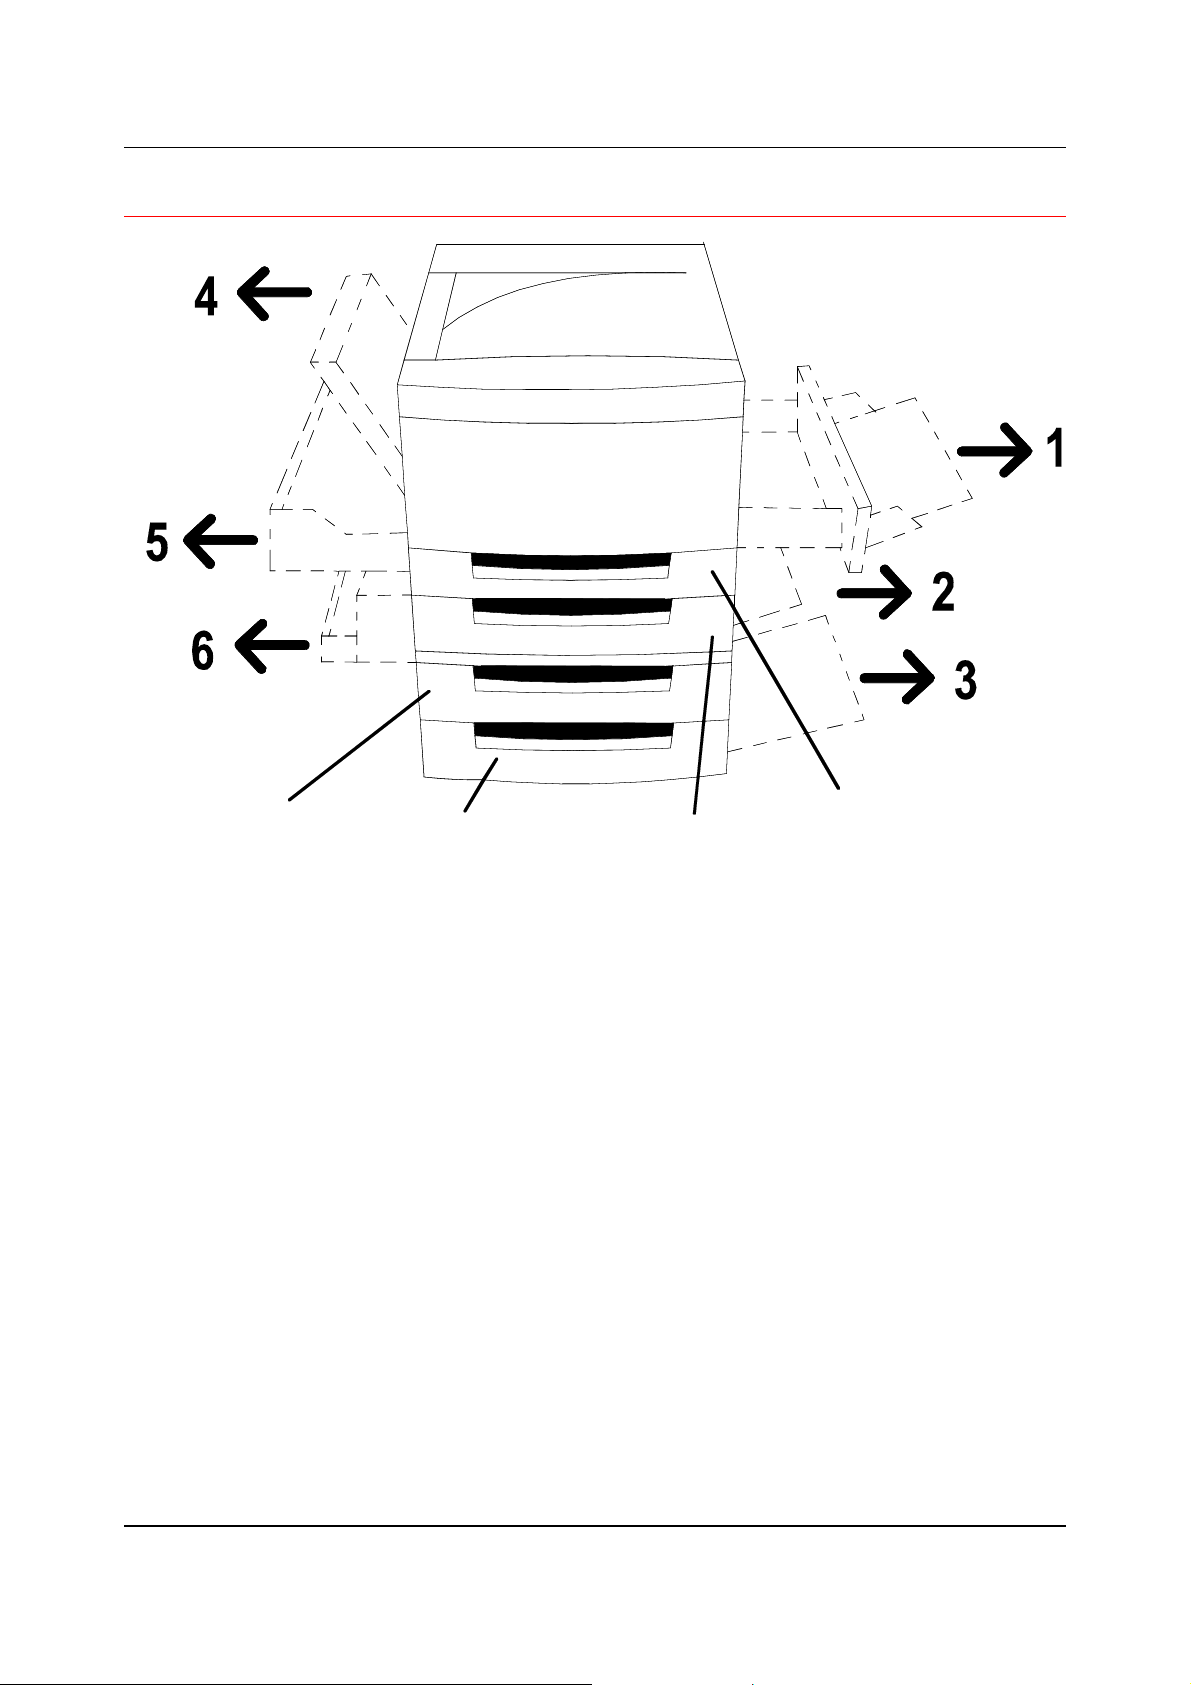
Printer Jam Clearance Areas
C
D
A
B
Area 1: Bypass Tray and Bypass Transport
Area 2: Paper Feed Area from Paper Tray 1 or the Duplex Unit/Kit, when
installed.
Area 3: Paper Feed Area from the System Console, when installed.
Area 4: Top Left-hand Cover
Area 5: Upper Inverter, if installed. Also provides access to the Fuser area.
Area 6: Lower Inverter, if installed
A: Duplex Unit/Kit, if installed
B: Paper Tray 1
C: Paper Tray 2, in the System Console
D: Paper Tray 3, in the System Console
23-2
Clearing Paper Jams Problem Solving
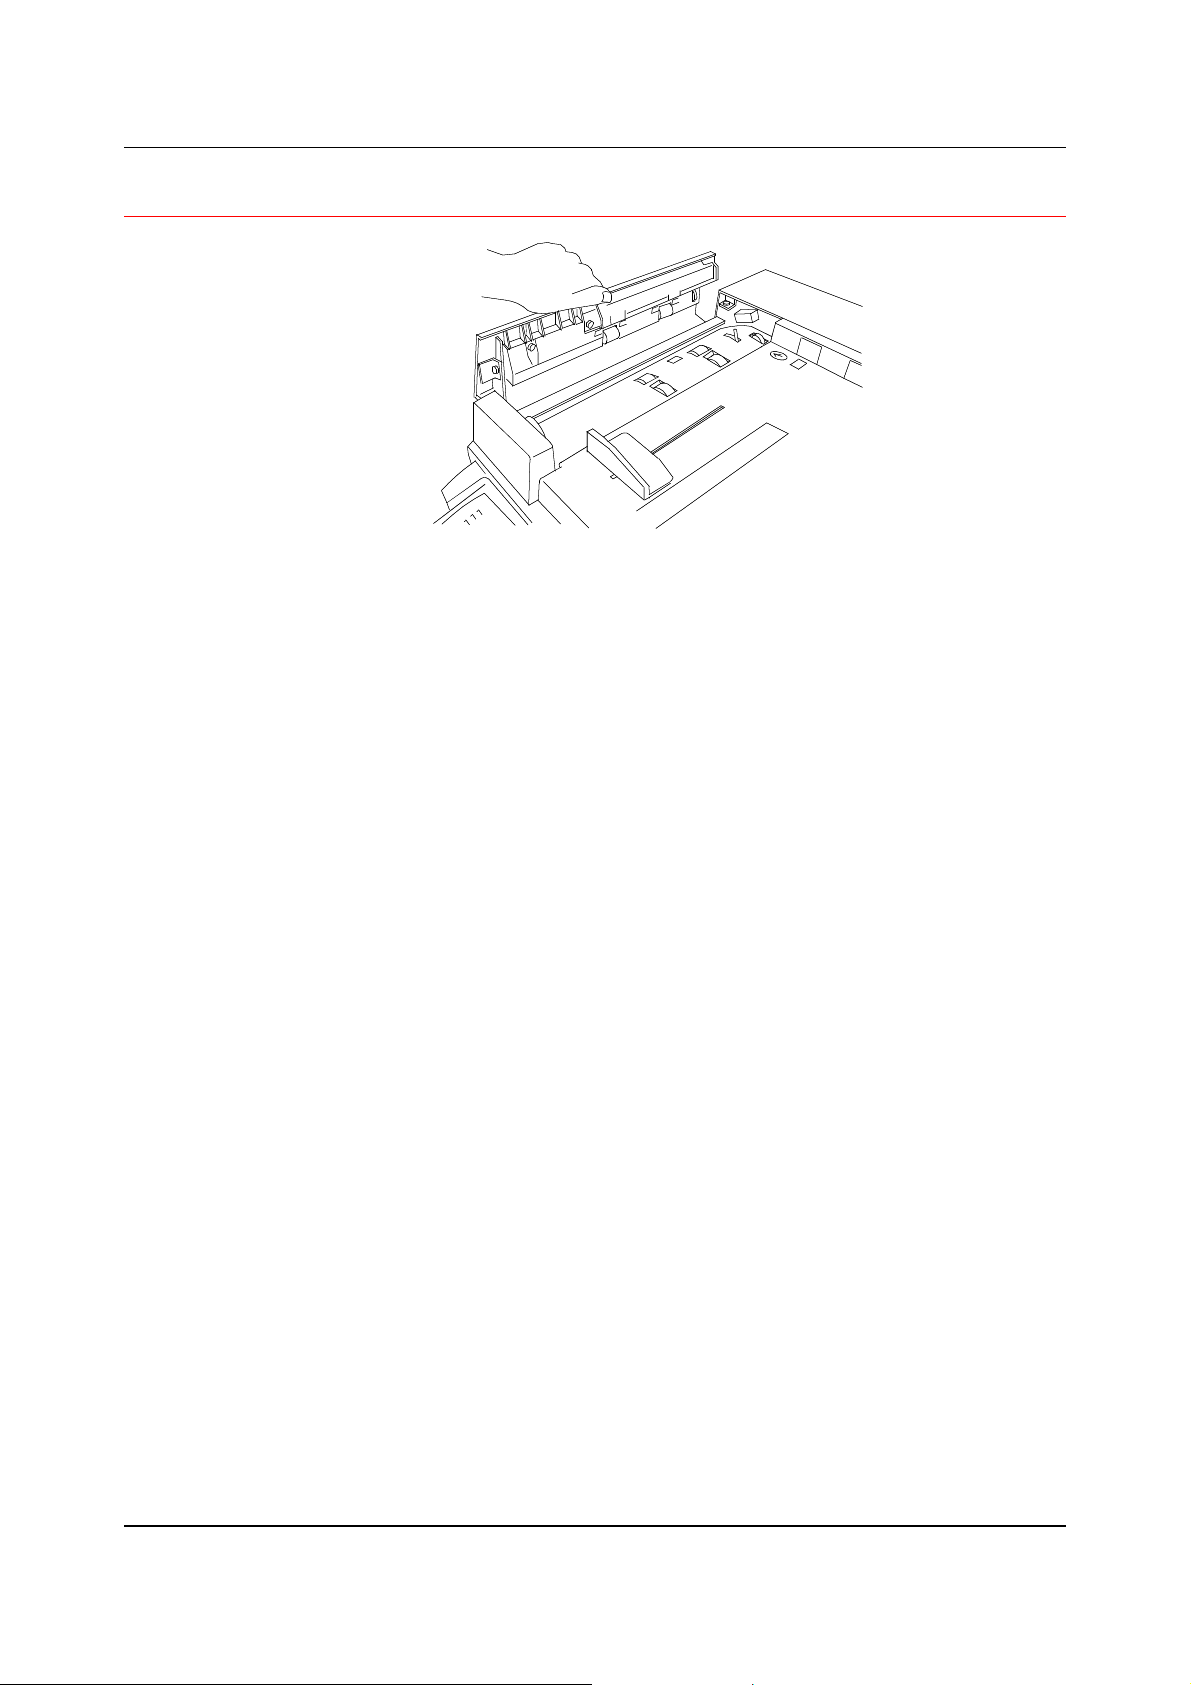
ADF Jam Clearance Area
Lift to open the Left-hand ADF.
23-3

Problem Solving Clearing Paper Jams
This page is intentionally left blank.
23-4
Clearing a Paper Tray Jam Problem Solving
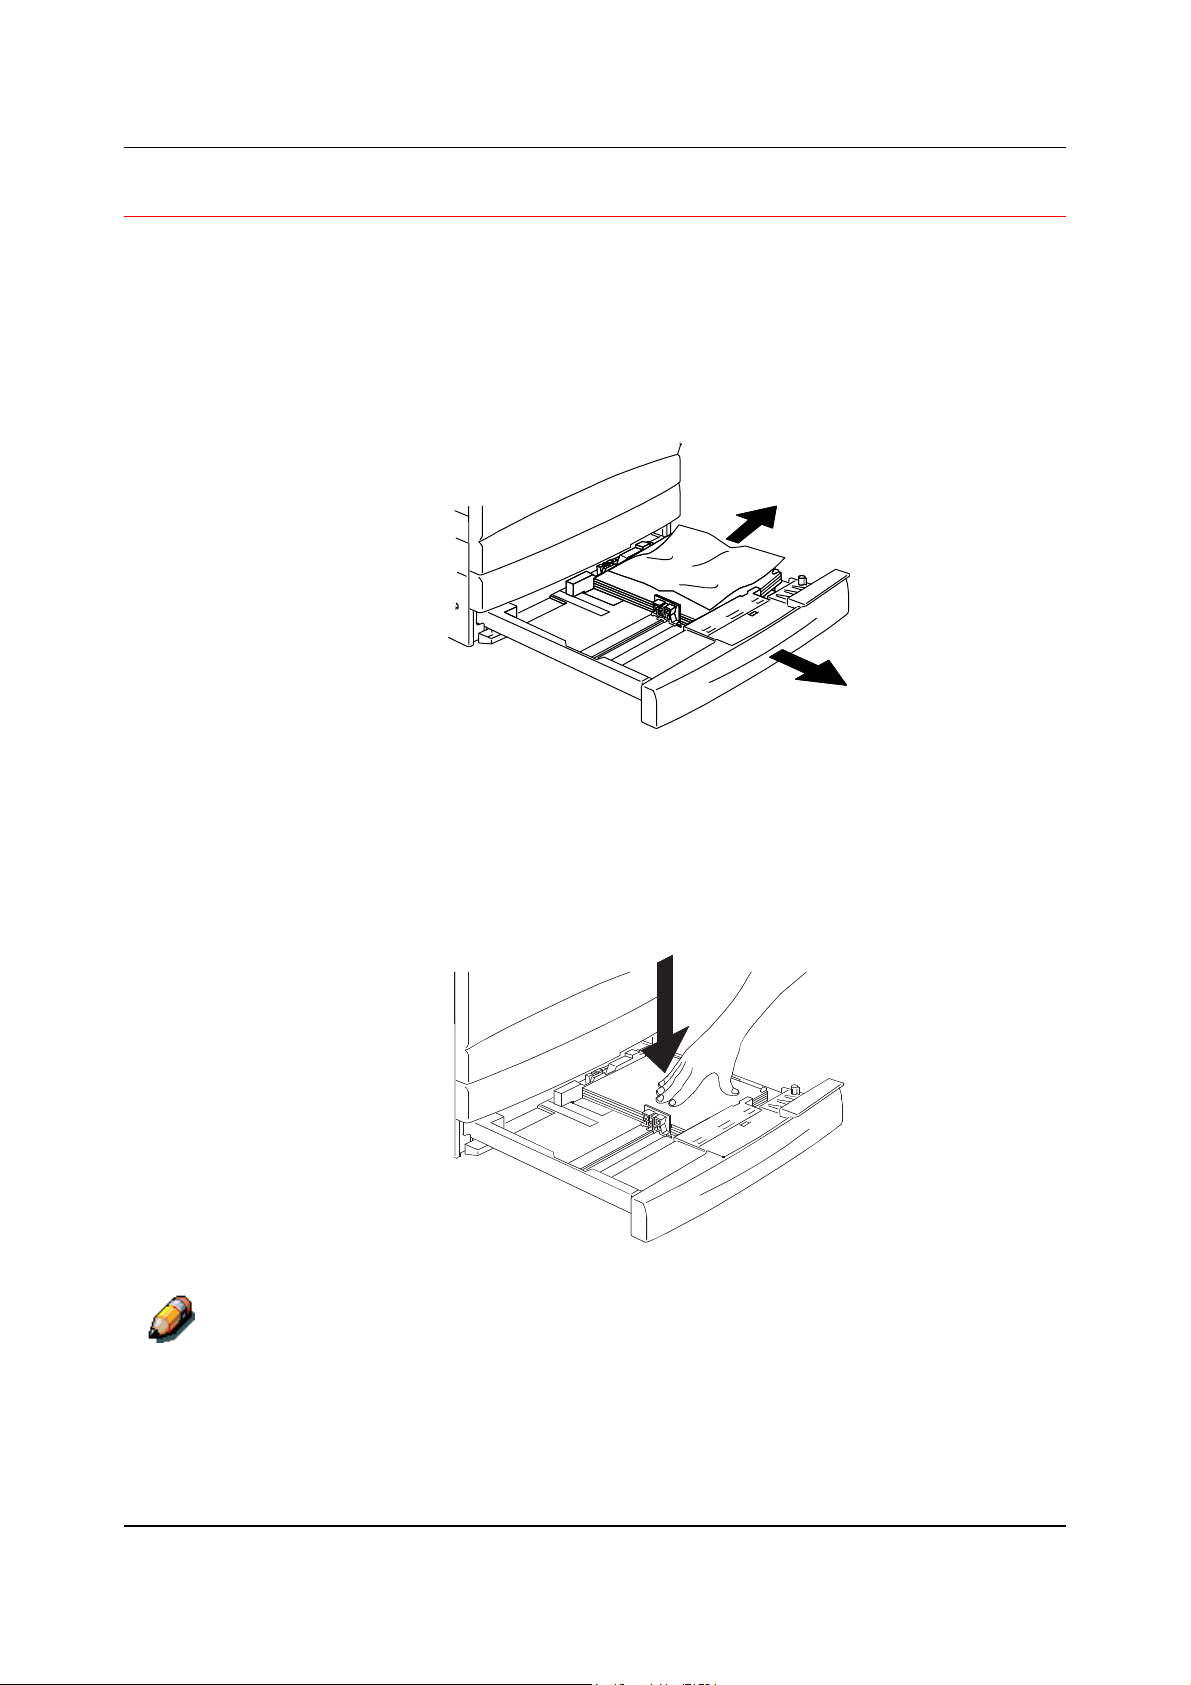
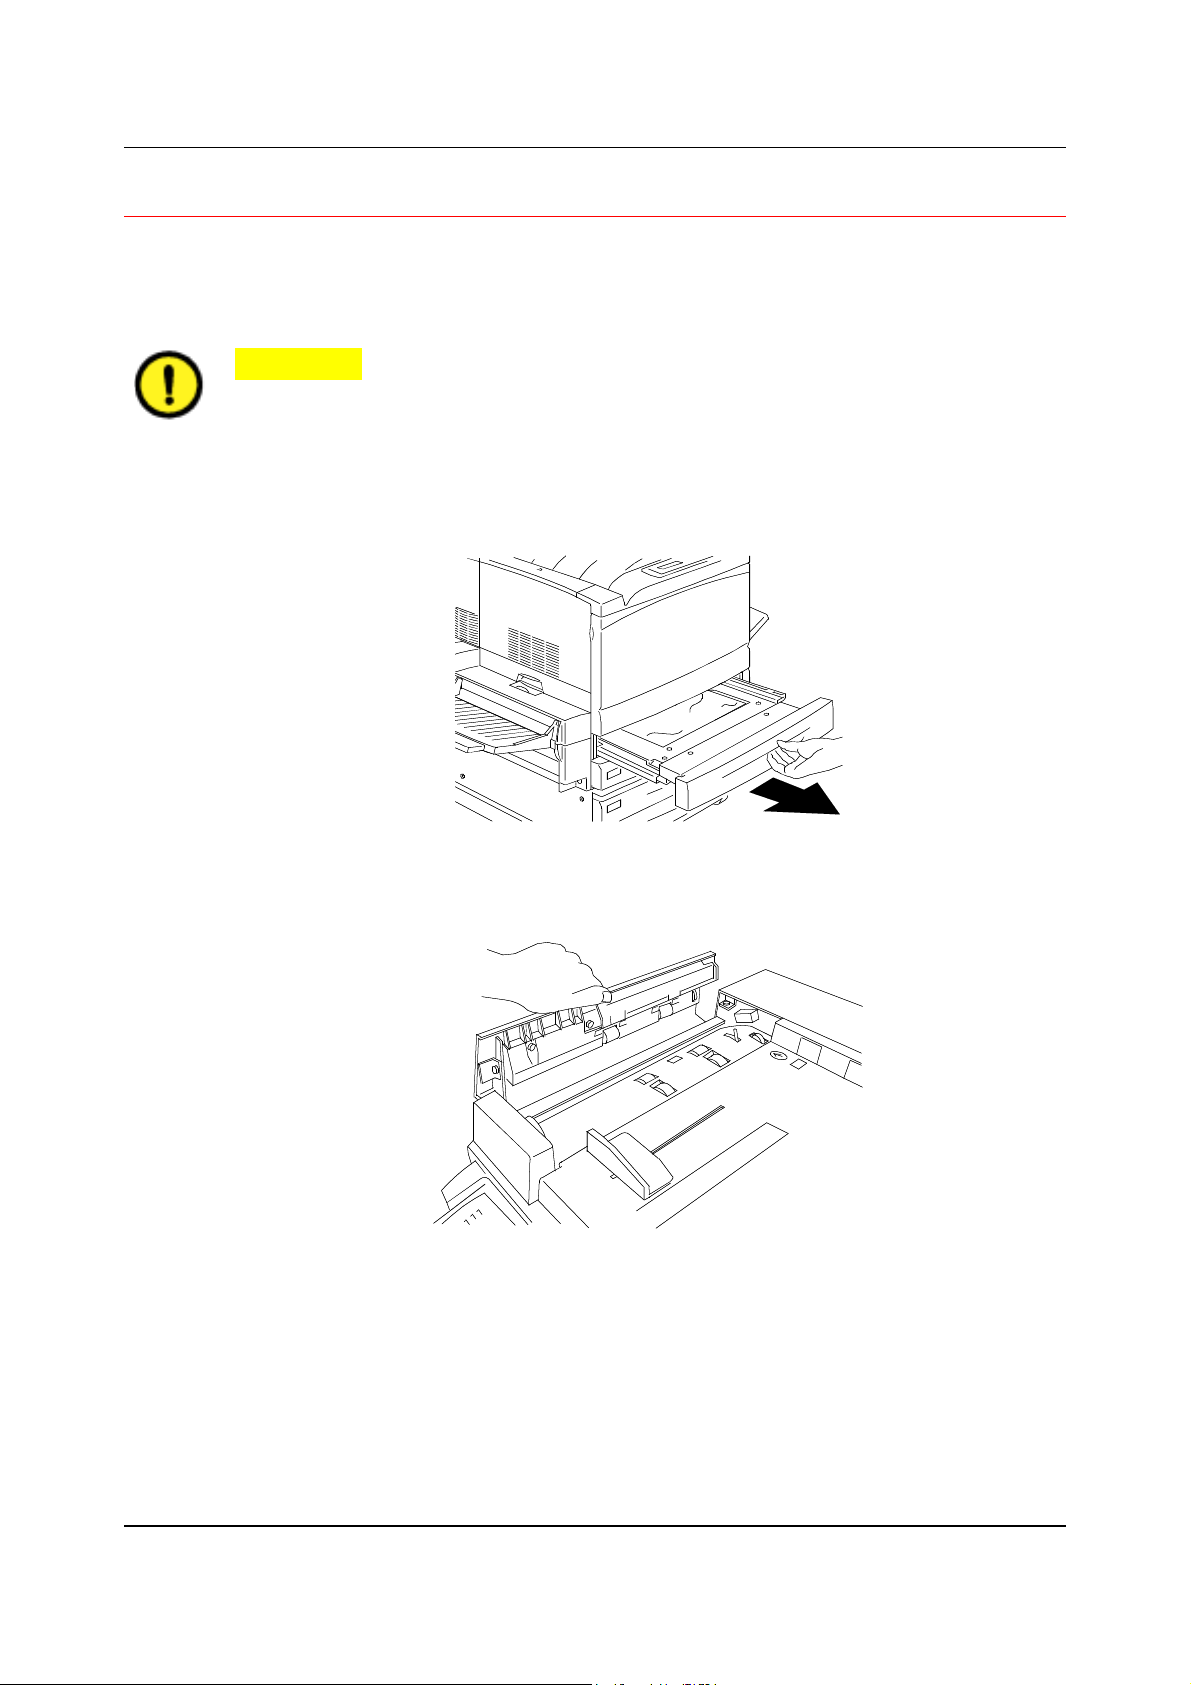
Clearing a Paper Tray Jam
Perform this procedure when the message CHECK LOADING OF TRAY X (1,
2, or 3) is displayed on the Control Panel.
1. Slowly open the Paper Tray all the way. Remove the jammed paper and
any paper that is creased or torn. Ensure that there are no pieces of
torn paper remaining in the tray.
2. Remove the paper stack from the tray, and fluff the edges. Replace the
stock.
3. Ensure that the stack is flush on all four sides.
4. If this is Paper Tray 1, press down on the paper stack until the metal
plate on the bottom of the tray latches into place.
It is not necessary to perform step 4 on Paper Tray 2 and Paper Tray 3.
23-5
Problem Solving Clearing a Paper Tray Jam
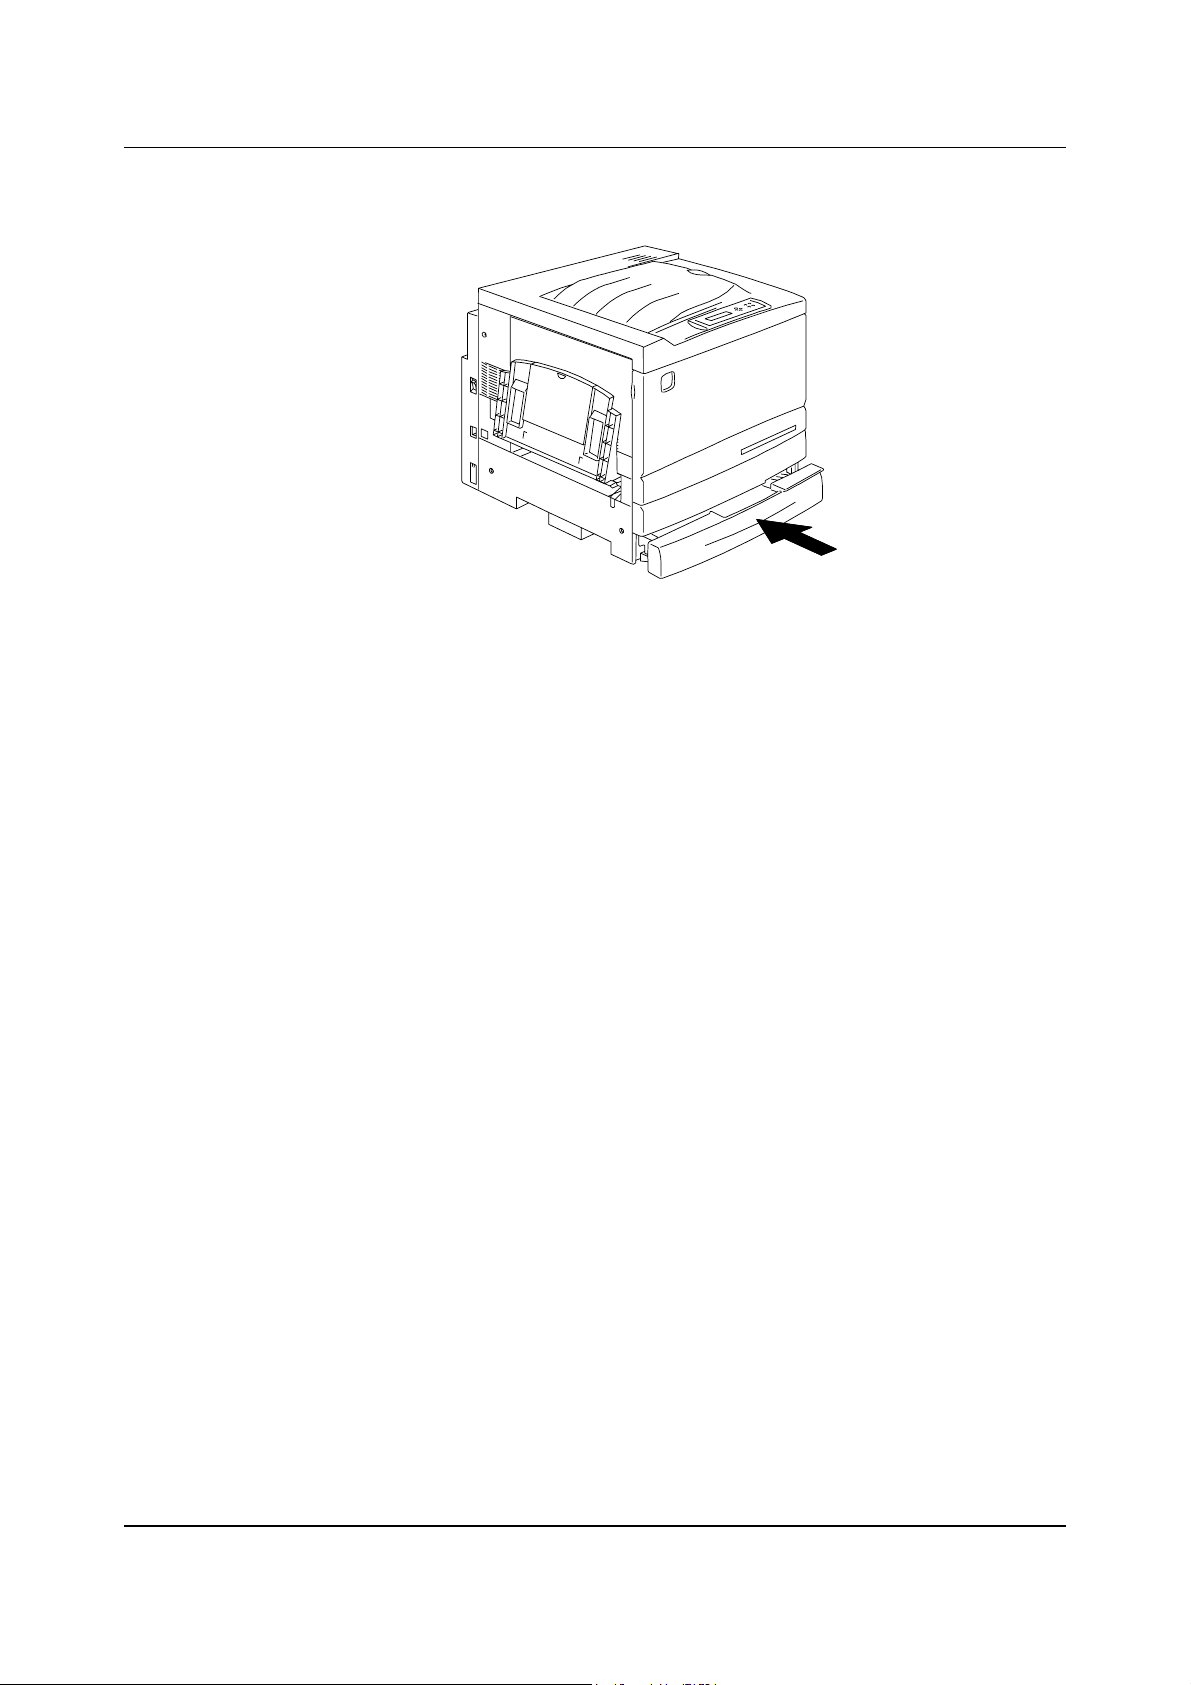
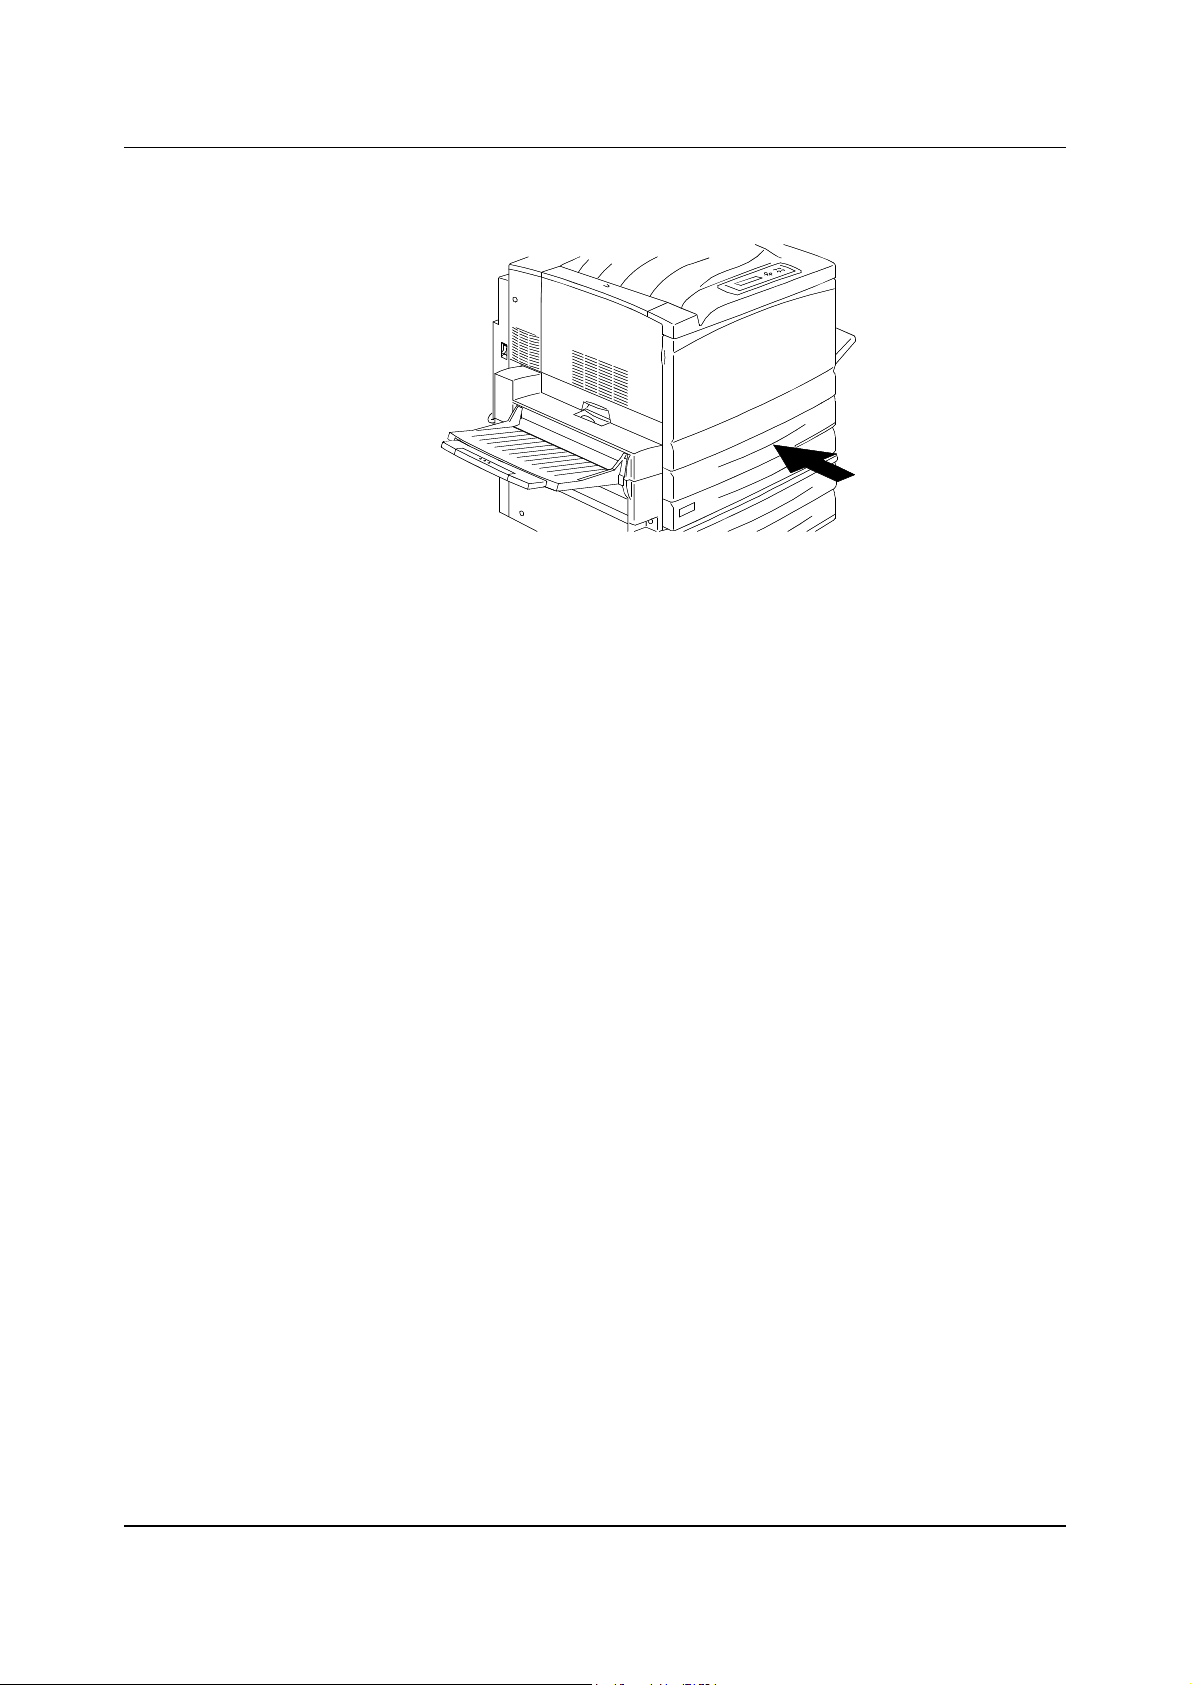
5. Firmly close the Paper Tray.
6. Try running the job again.
7. If the problem still exists, open the tray and turn the stack of paper over.
8. Firmly close the Paper Tray.
23-6
Clearing a Duplex Unit/Kit Jam Problem Solving
Clearing a Duplex Unit/Kit Jam
Perform this procedure only when the message CLEAR DUPLEX UNIT/KIT
JAM is displayed on the Control Panel.
CAUTION
DO NOT open the Duplex Unit/Kit unless directed to do so from the Printer
Control Panel. Opening the Duplex Unit/Kit at any other time could create a
paper jam.
1. Slowly open the Duplex Unit/Kit all the way.
2. Remove the jammed paper and any paper that is creased or torn.
Ensure that there are no pieces of torn paper remaining in the tray.
23-7
Problem Solving Clearing a Duplex Unit/Kit Jam
3. Firmly close the Duplex Unit/Kit.
23-8
Clearing Area 1 Jams Problem Solving
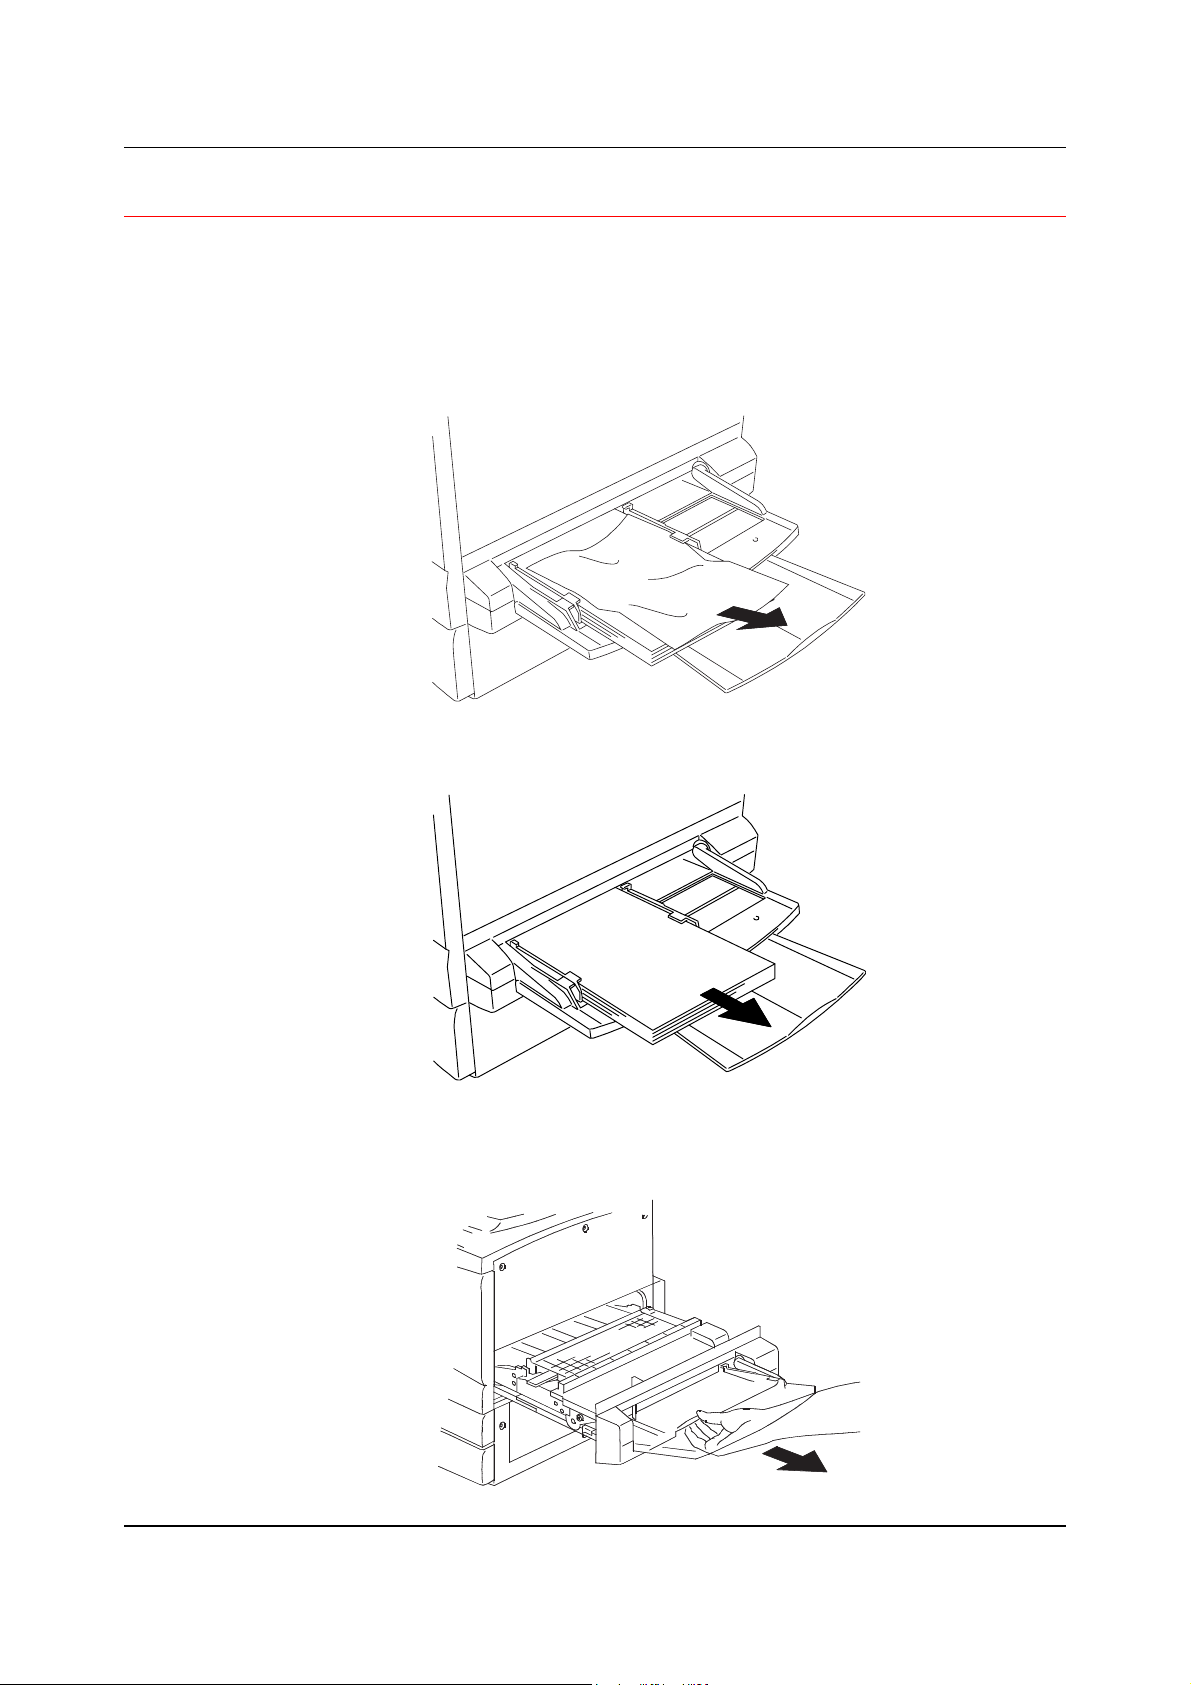
Clearing Area 1 Jams
Perform this procedure when the message CLEAR JAM IN AREA 1 is
displayed on the Control Panel.
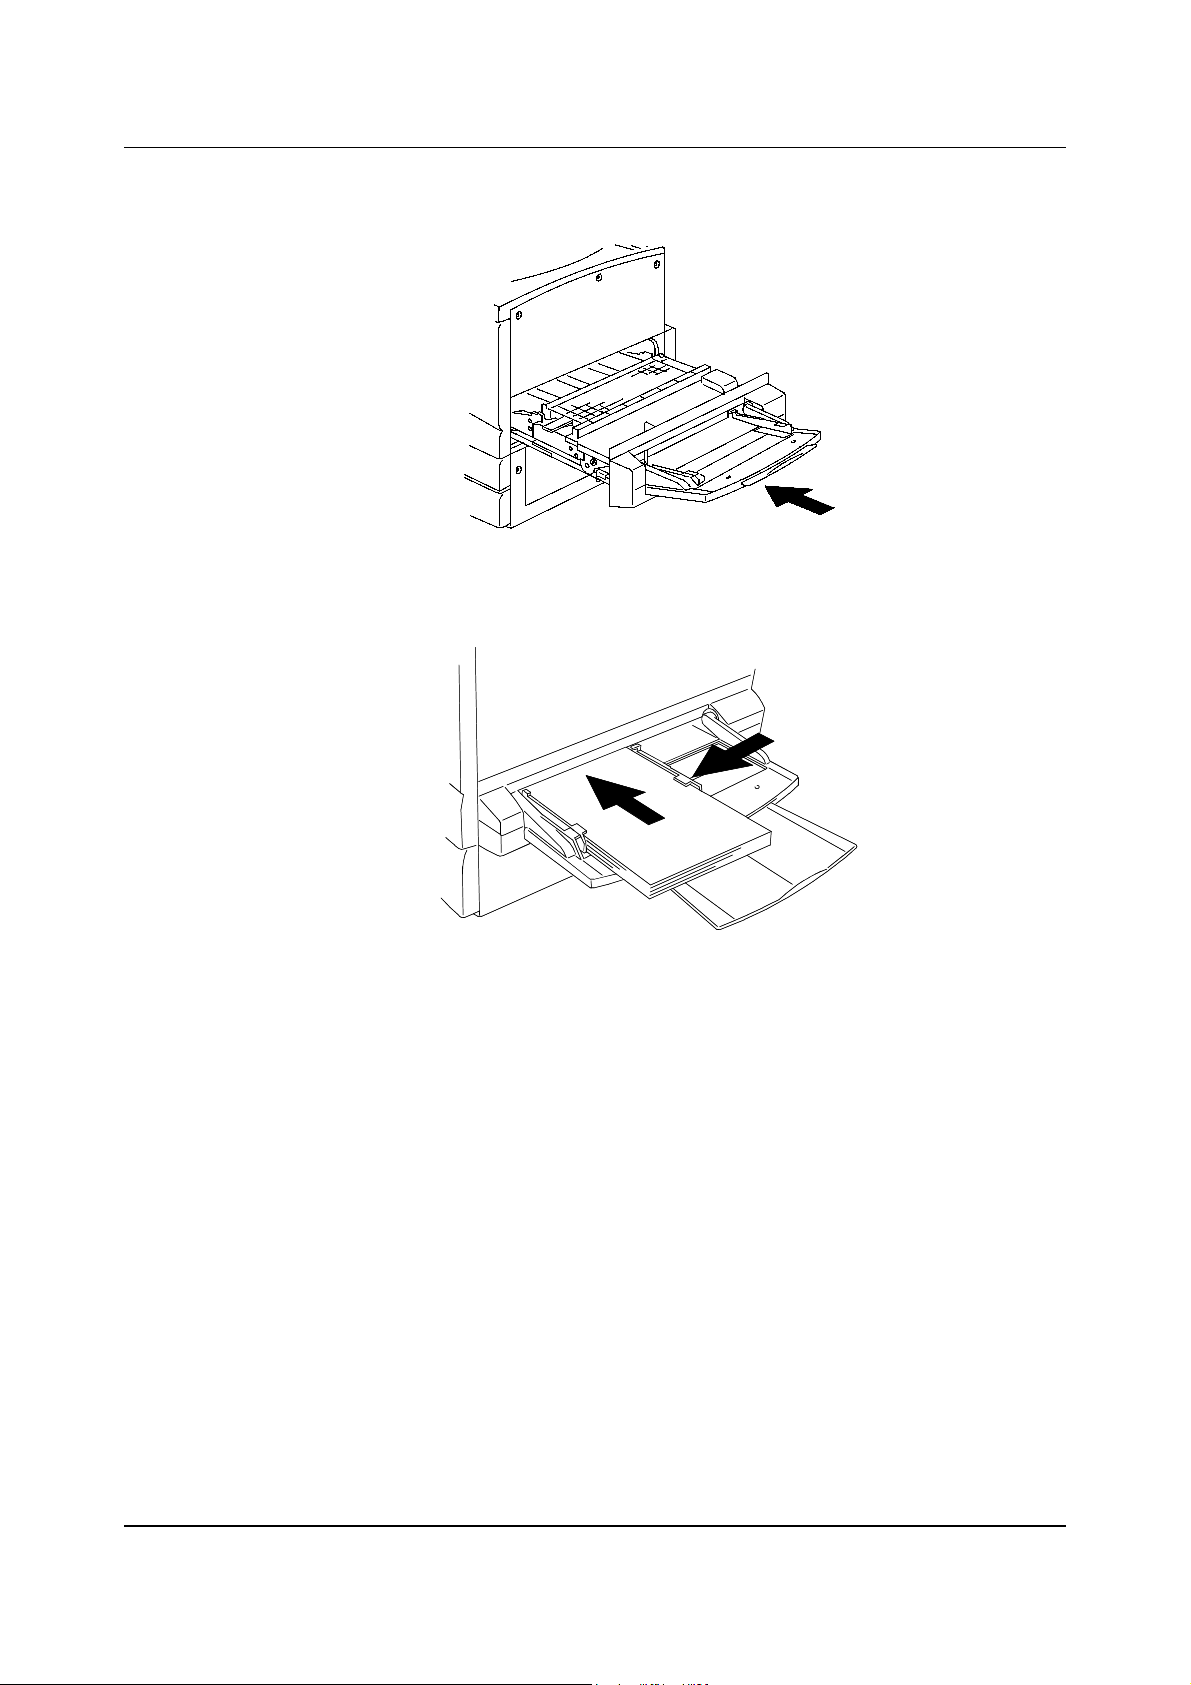
1. Remove any jammed or torn paper or other stock from Area 1, Bypass
Tray. Ensure that there are no pieces of torn stock remaining in the tray.
2. Remove any stock loaded in the Bypass Tray.
3. In order to access a jam in the transport, pull the Bypass Tray all the
way out of the Pinter.
23-9
Problem Solving Clearing Area 1 Jams
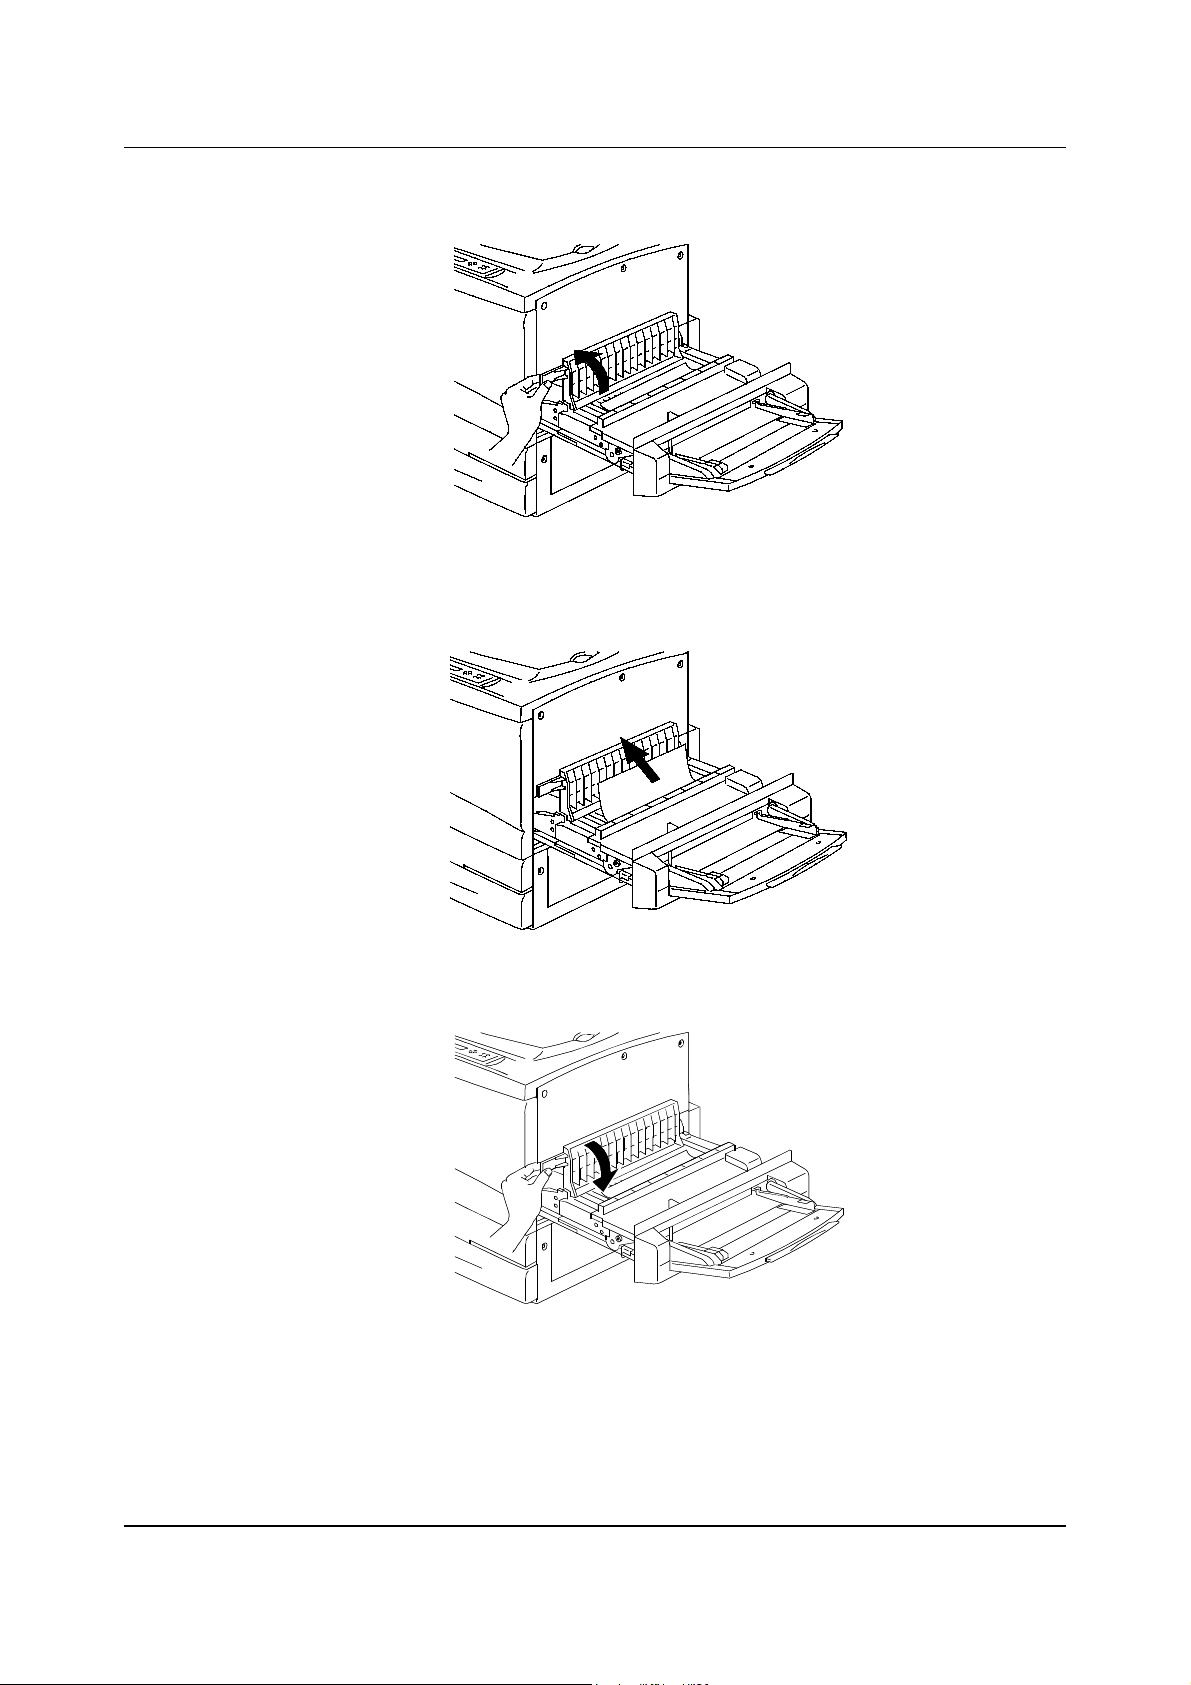
4. Lift the Transport Cover using the handle as shown.
5. Remove any jammed or torn paper as shown below. Ensure that there
are no pieces of torn paper remaining in the transport.
23-10
6. Close the Transport Cover.
Clearing Area 1 Jams Problem Solving
7. Close the Bypass Tray.
8. Reload the Bypass Tray with the desired stock and ensure that the width
guide is adjusted to the size of the stock.
23-11

Problem Solving Clearing Area 1 Jams
This page is intentionally left blank.
23-12
Clearing Area 2 Jams Problem Solving
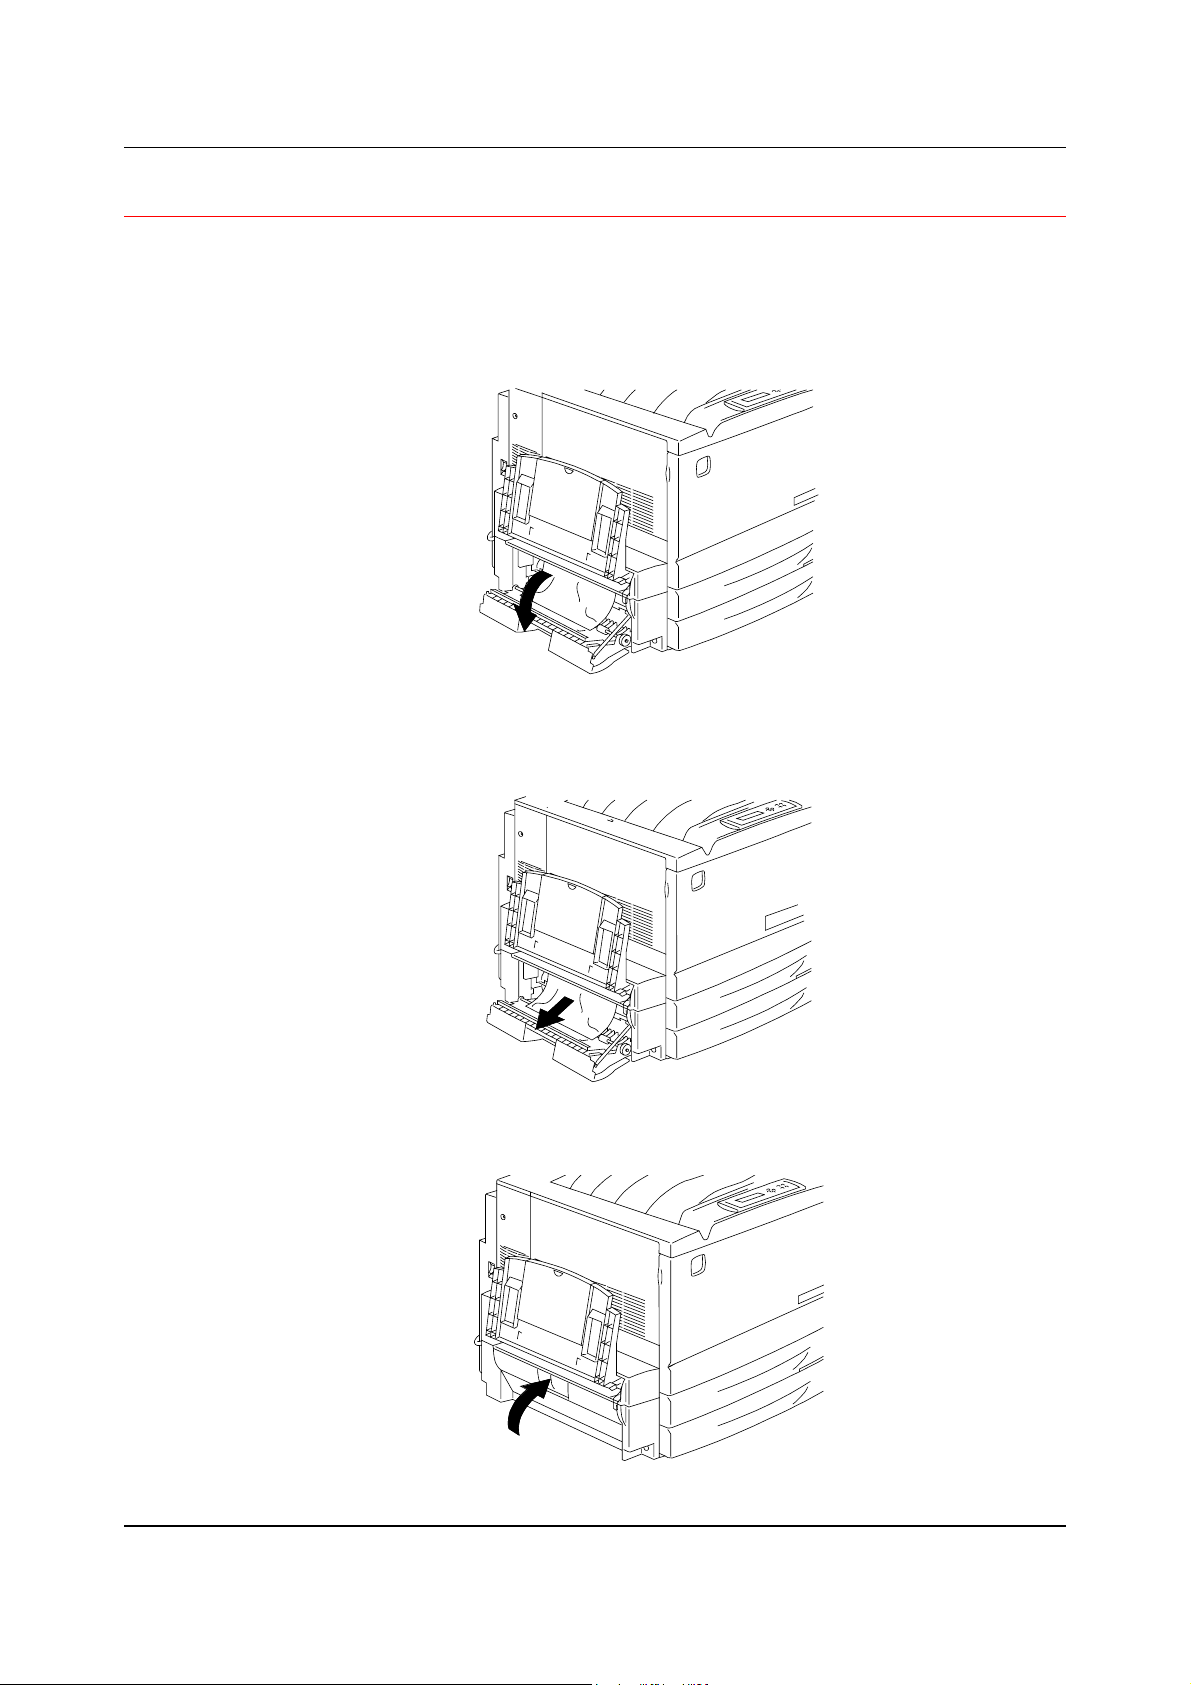
Clearing Area 2 Jams
Perform this procedure when the message CLEAR JAM IN AREA 2 is
displayed on the Control Panel.
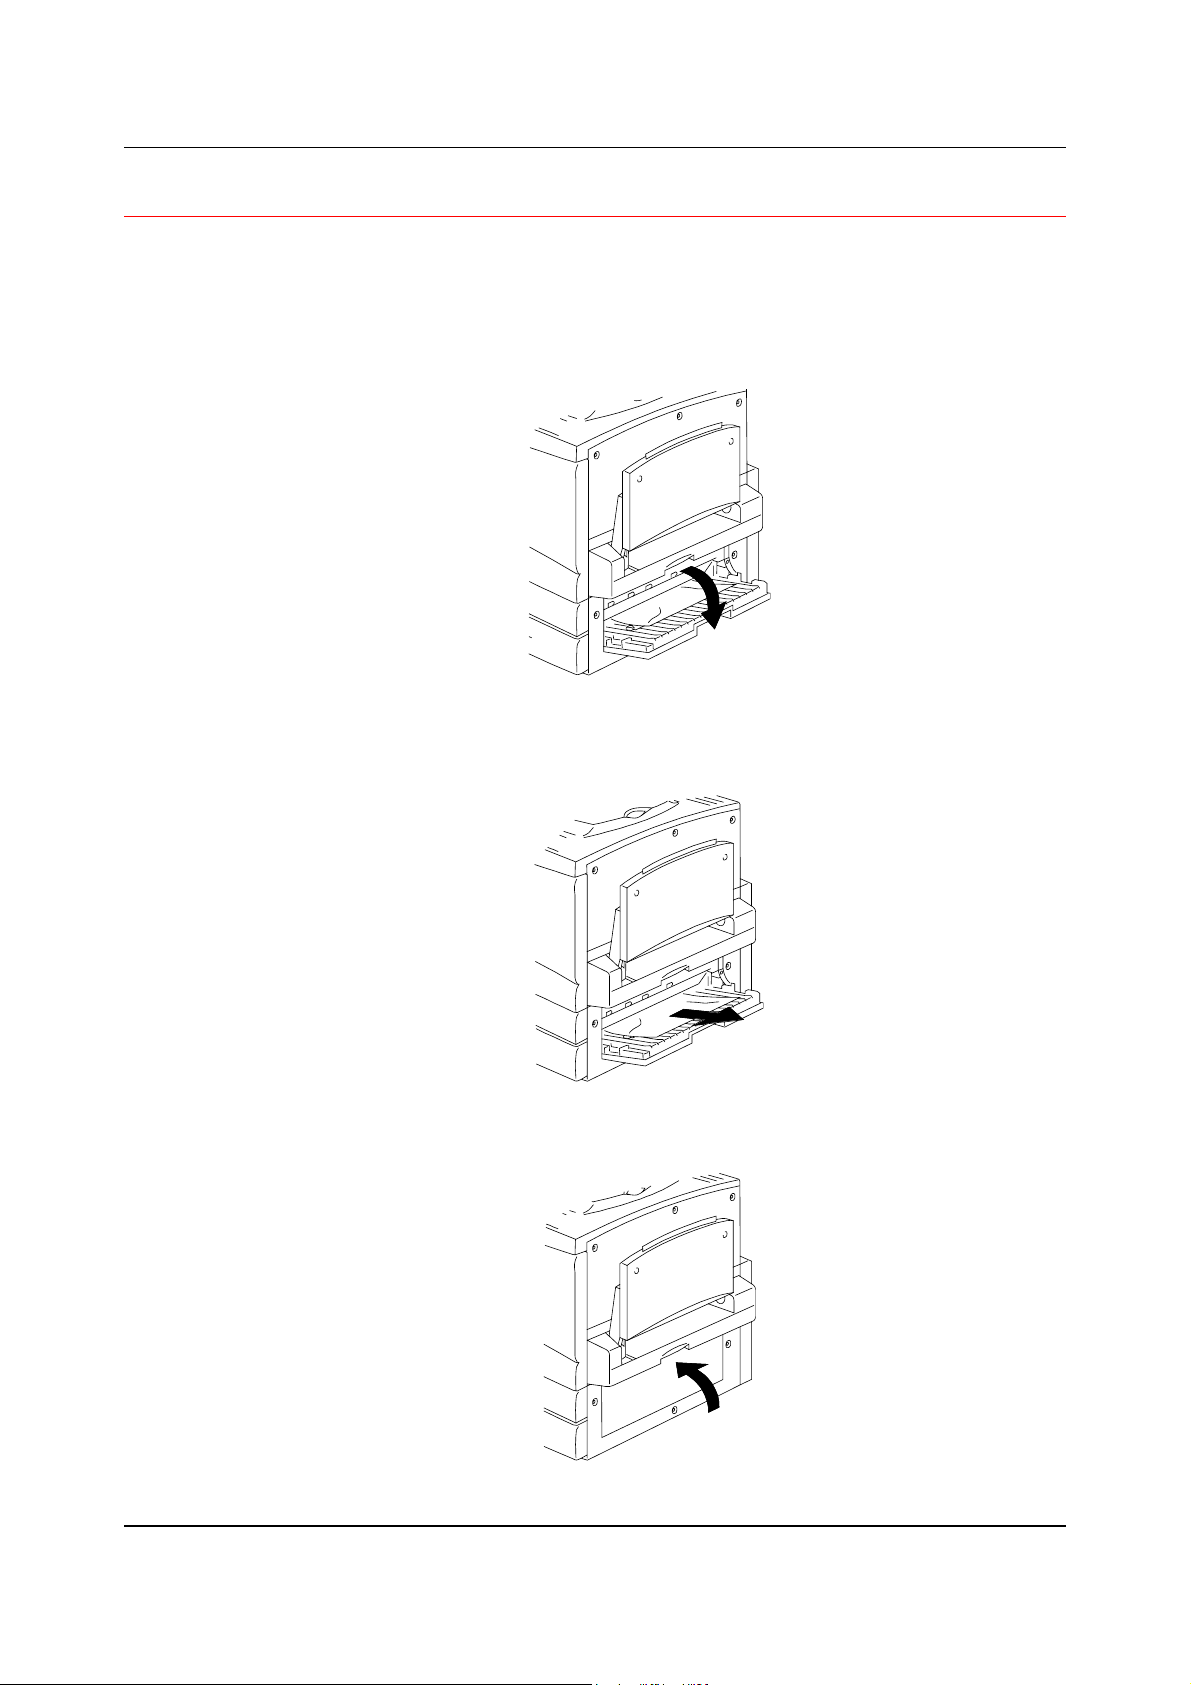
1. Lower the Area 2 Access Cover.
2. Remove any jammed or torn stock from Area 2. Ensure that there are
no pieces of torn stock remaining in the area.
3. Close the Access Cover.
23-13

Problem Solving Clearing Area 2 Jams
This page is intentionally left blank.
23-14
Clearing Area 3 Jams Problem Solving
Clearing Area 3 Jams
Perform this procedure when the message CLEAR JAM IN AREA 3 is
displayed on the Control Panel.
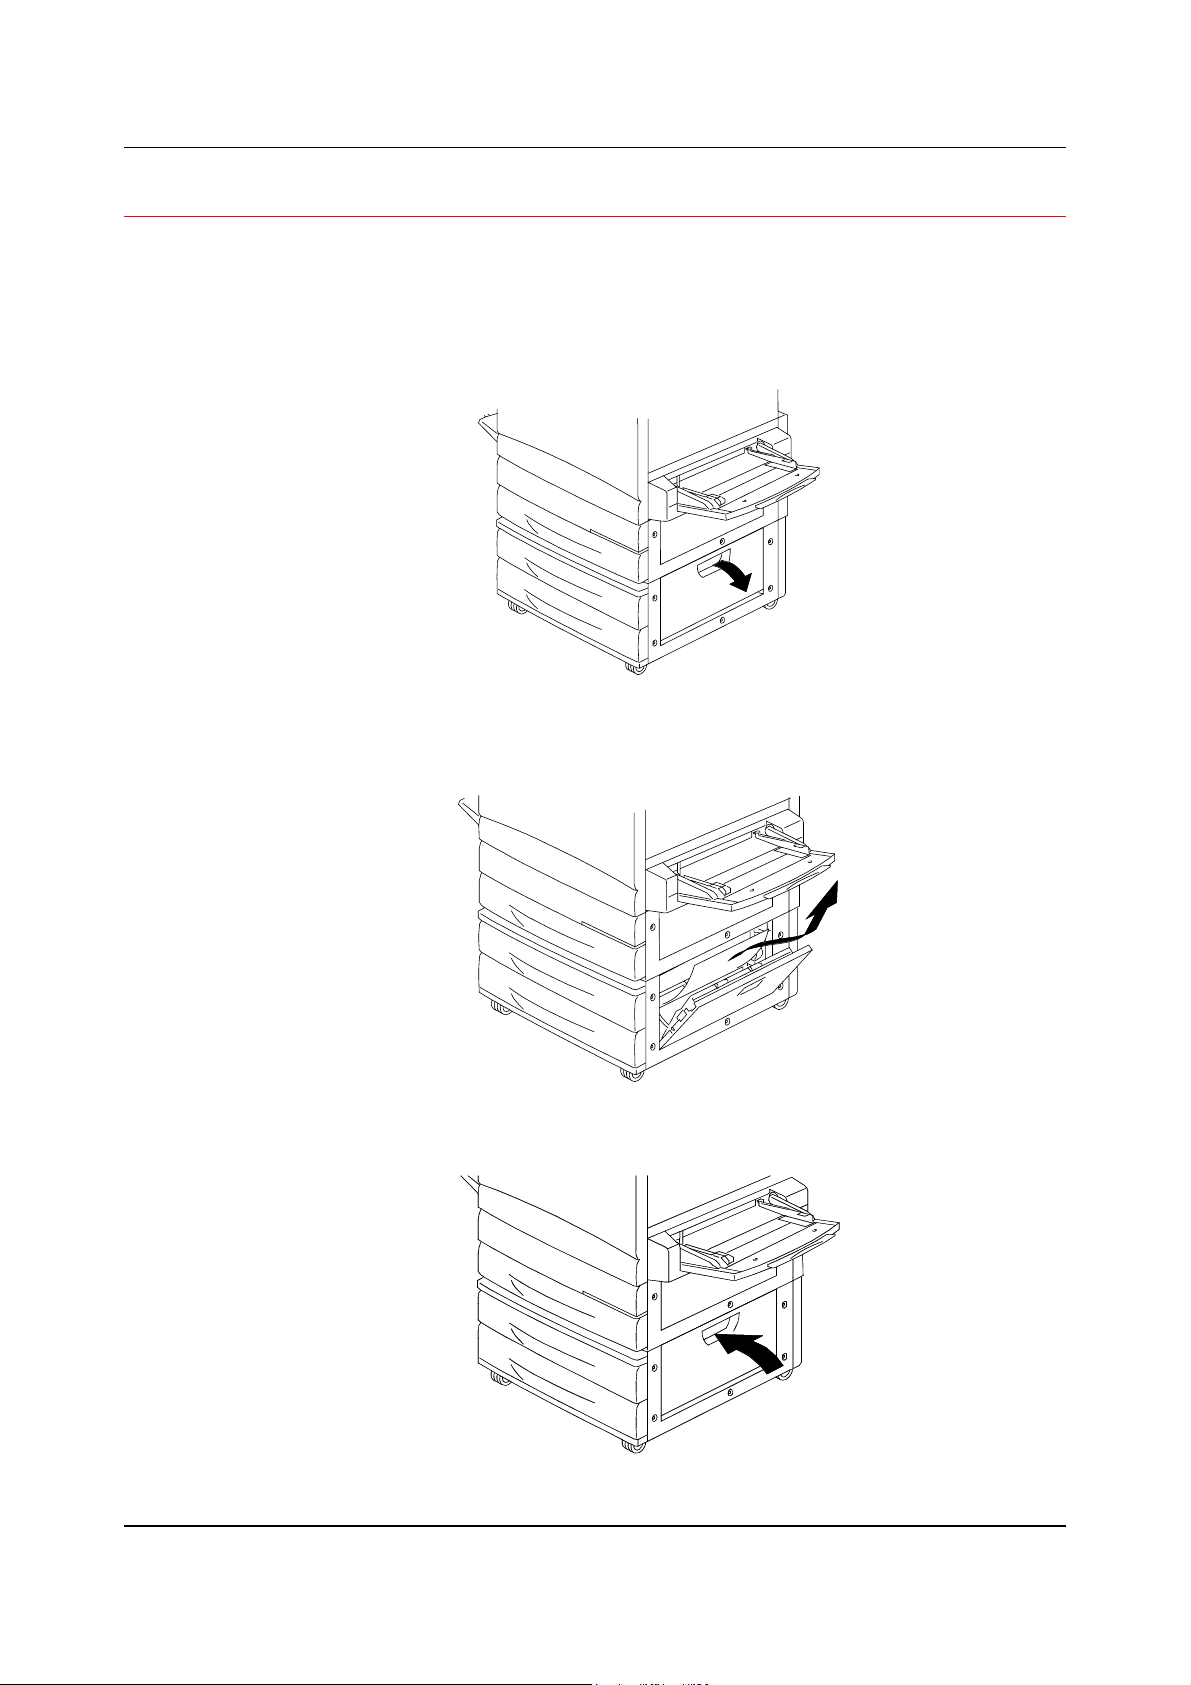
1. Open the Area 3 Access Door.
2. Remove any jammed or torn paper as shown below. Ensure that there
are no pieces of torn paper remaining in the feed area.
3. Close the Access Door.
23-15

Problem Solving Clearing Area 3 Jams
This page is intentionally left blank.
23-16

Clearing Area 4 Jams Problem Solving
Clearing Area 4 Jams
Perform this procedure when the message CLEAR JAM IN AREA 4 is
displayed on the Control Panel.
1. Open the Area 4 Top Left-hand Cover.
2. Remove the jammed paper. If the paper is torn ensure that there are no
pieces of torn paper remaining in the Printer.
3. Close the Top Left-hand Cover.
23-17

Problem Solving Clearing Area 4 Jams
This page is intentionally left blank.
23-18
Clearing Area 5 Jams Problem Solving
Clearing Area 5 Jams
Perform one of the following procedures when the message CLEAR JAM IN
AREA 5 is displayed on the Control Panel.
• If you do not have the Duplex Unit/Kit option installed perform the
Clearing the Fuser Area procedure below.
• If you have the Duplex Unit/Kit option installed, go to the Clearing the
Upper Inverter.
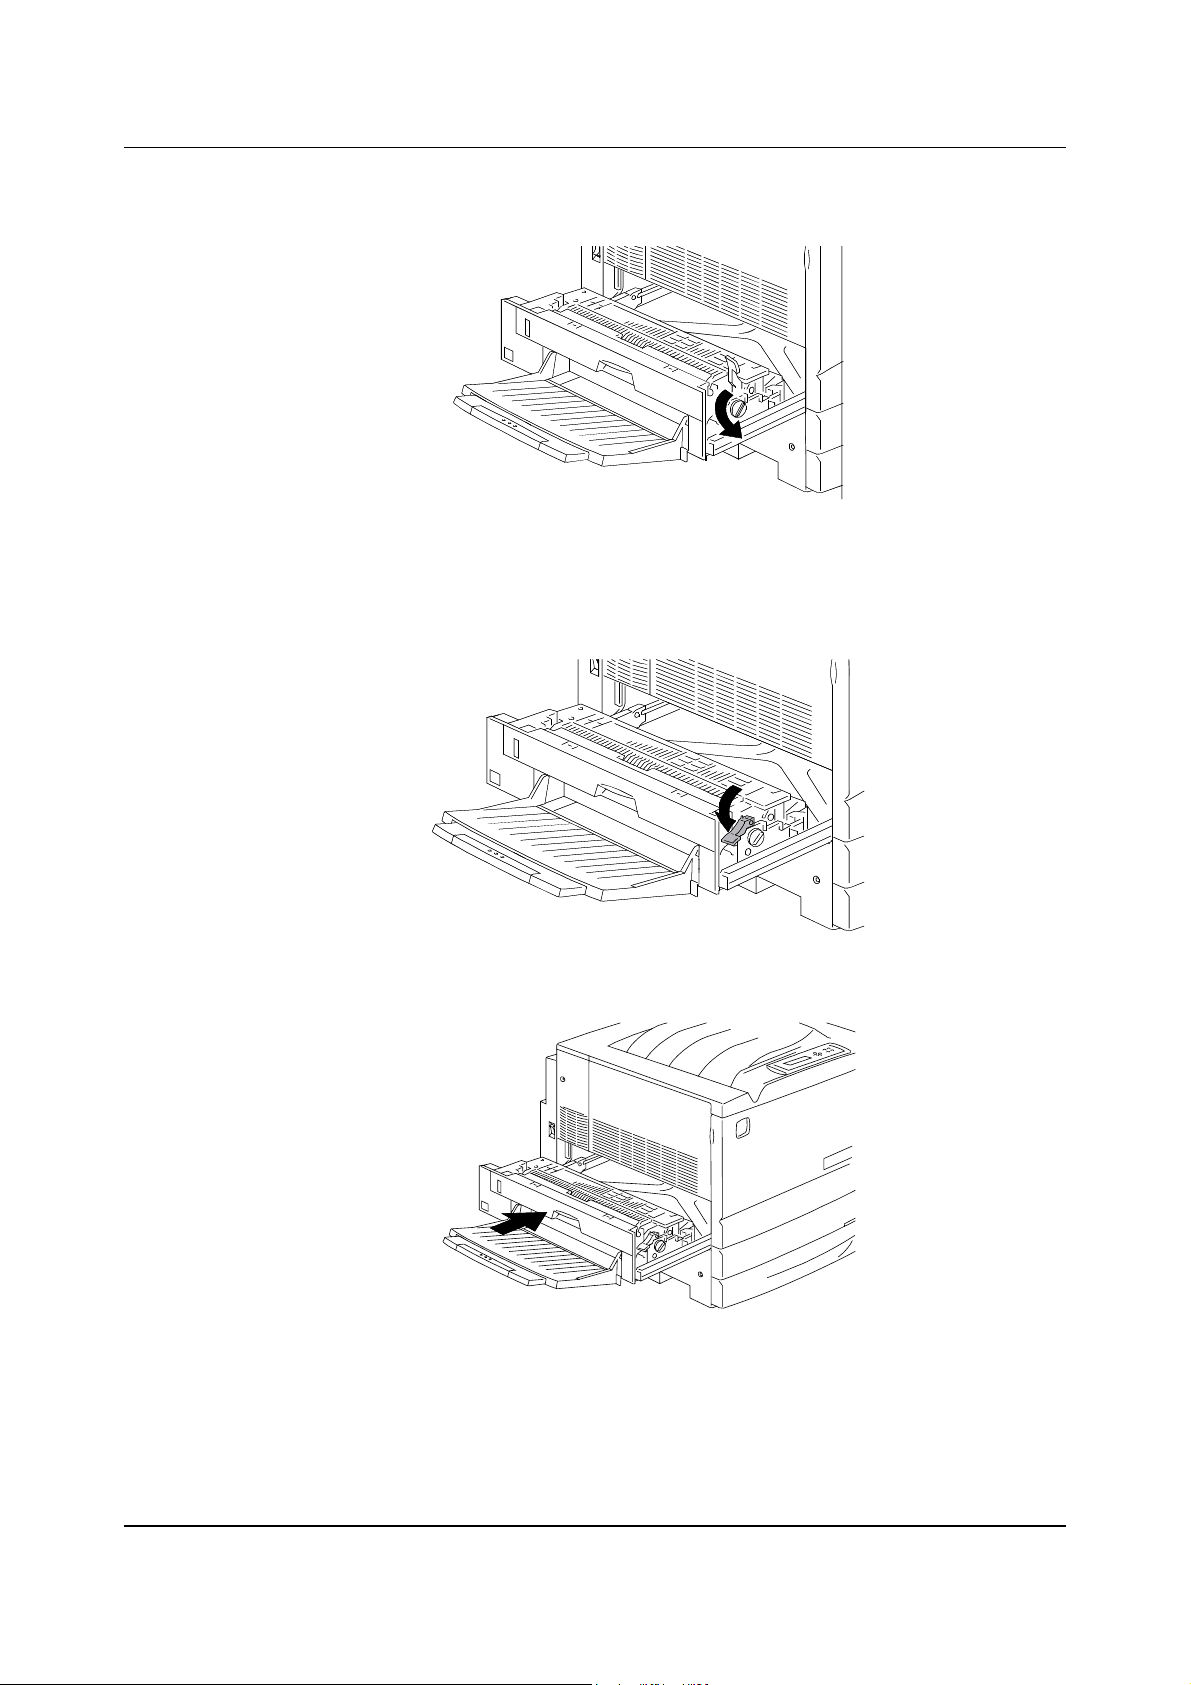
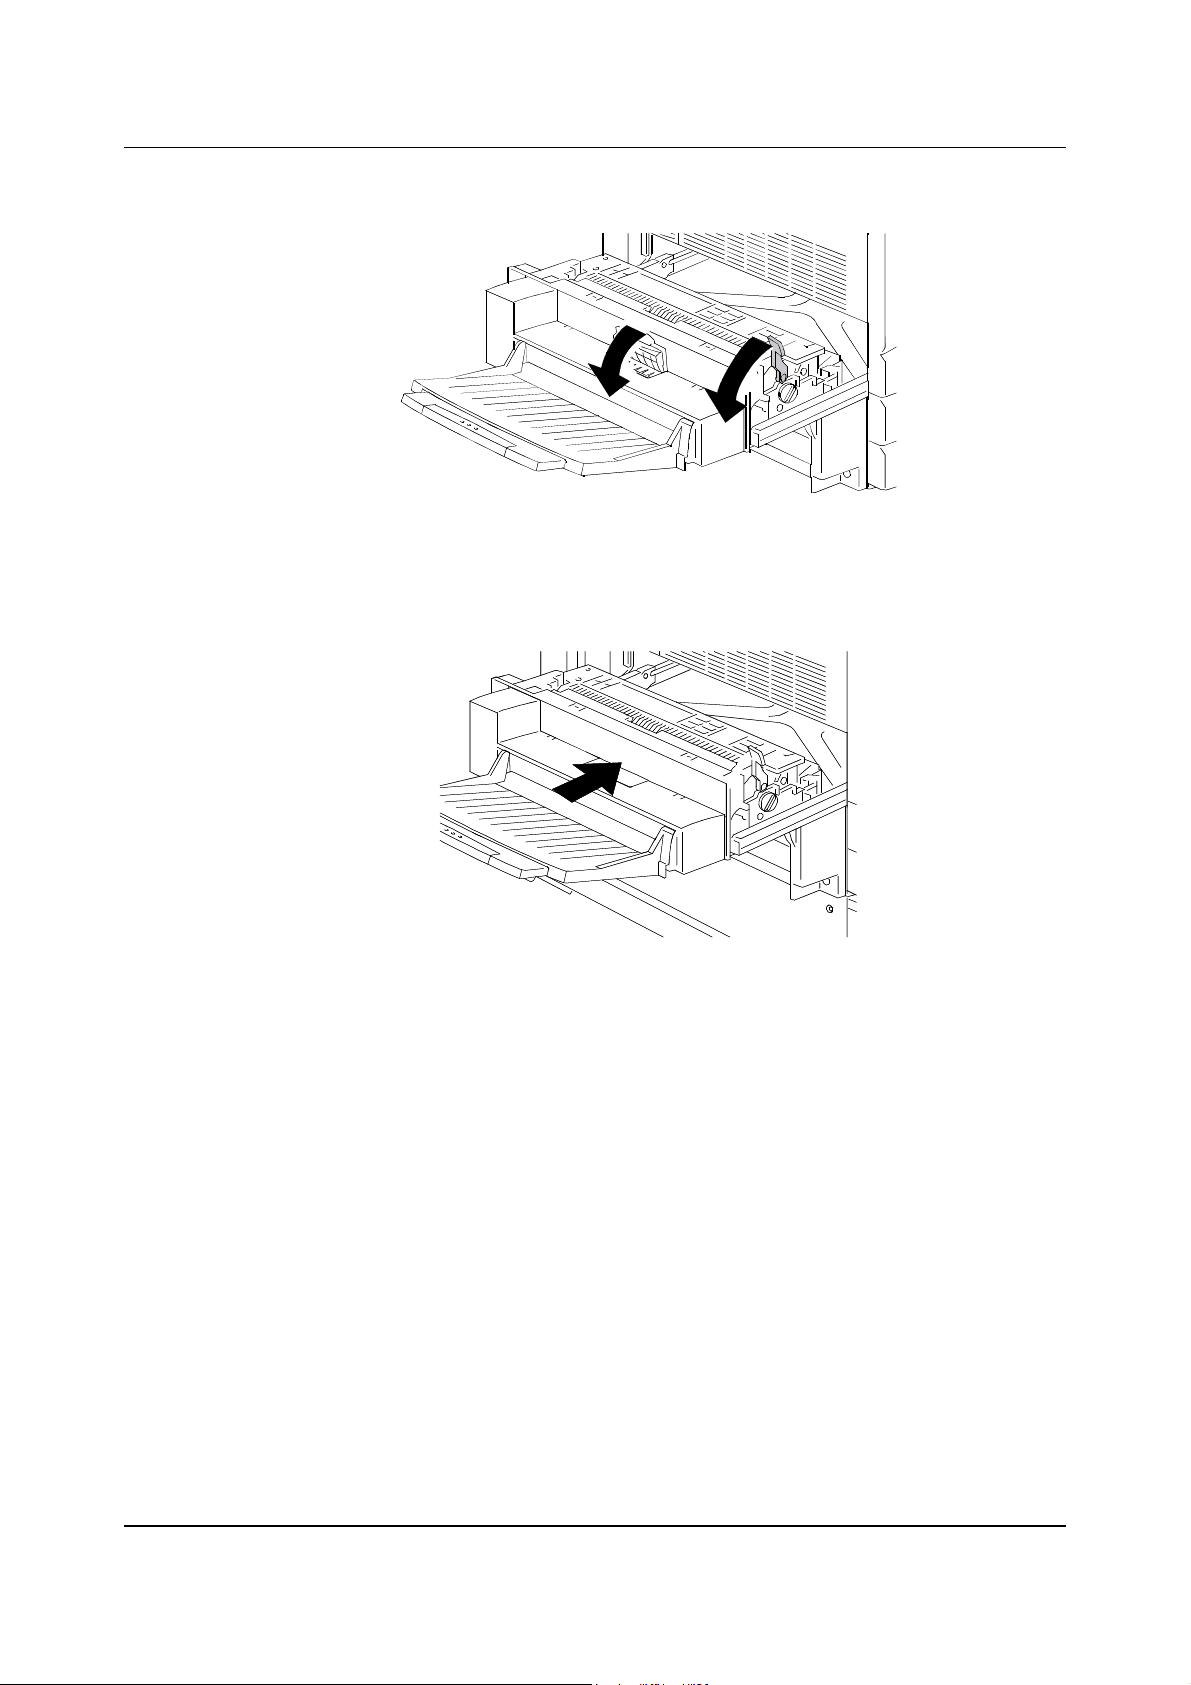
Clearing the Fuser Area
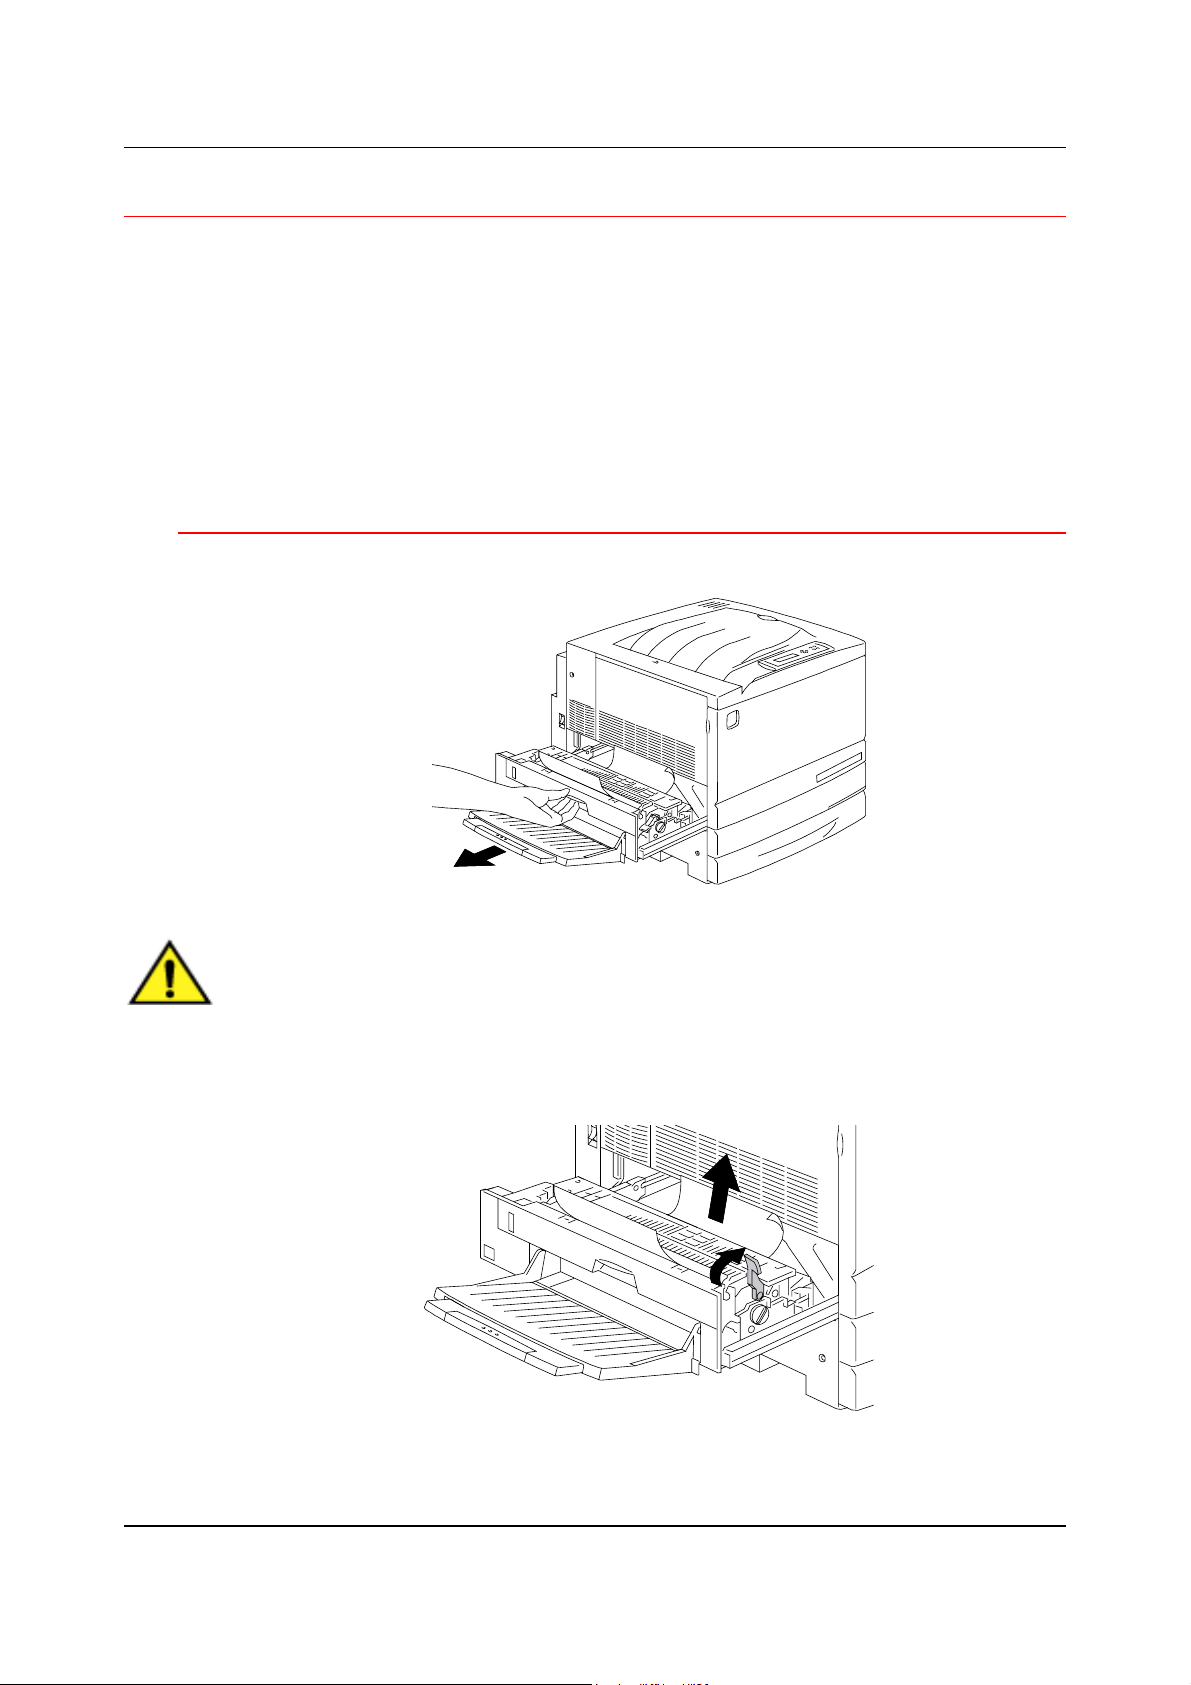
1. In order to access Area 5, pull open the Fuser Area Access Cover.
WARNING
The Fuser may be hot. Use care when reaching into the Fuser area.
2. To release any paper, lift the Green Lever as shown, and gently pull the
paper in the direction of the arrow.
23-19
Problem Solving Clearing Area 5 Jams
3. If the paper is not visible, turn the Green Knob in the direction shown.
4. Ensure that there are no pieces of torn paper remaining in the Fuser
Area.
5. Return the Green Lever to the original position.
23-20
Firmly close the Fuser Area Access Cover.
Clearing Area 5 Jams Problem Solving
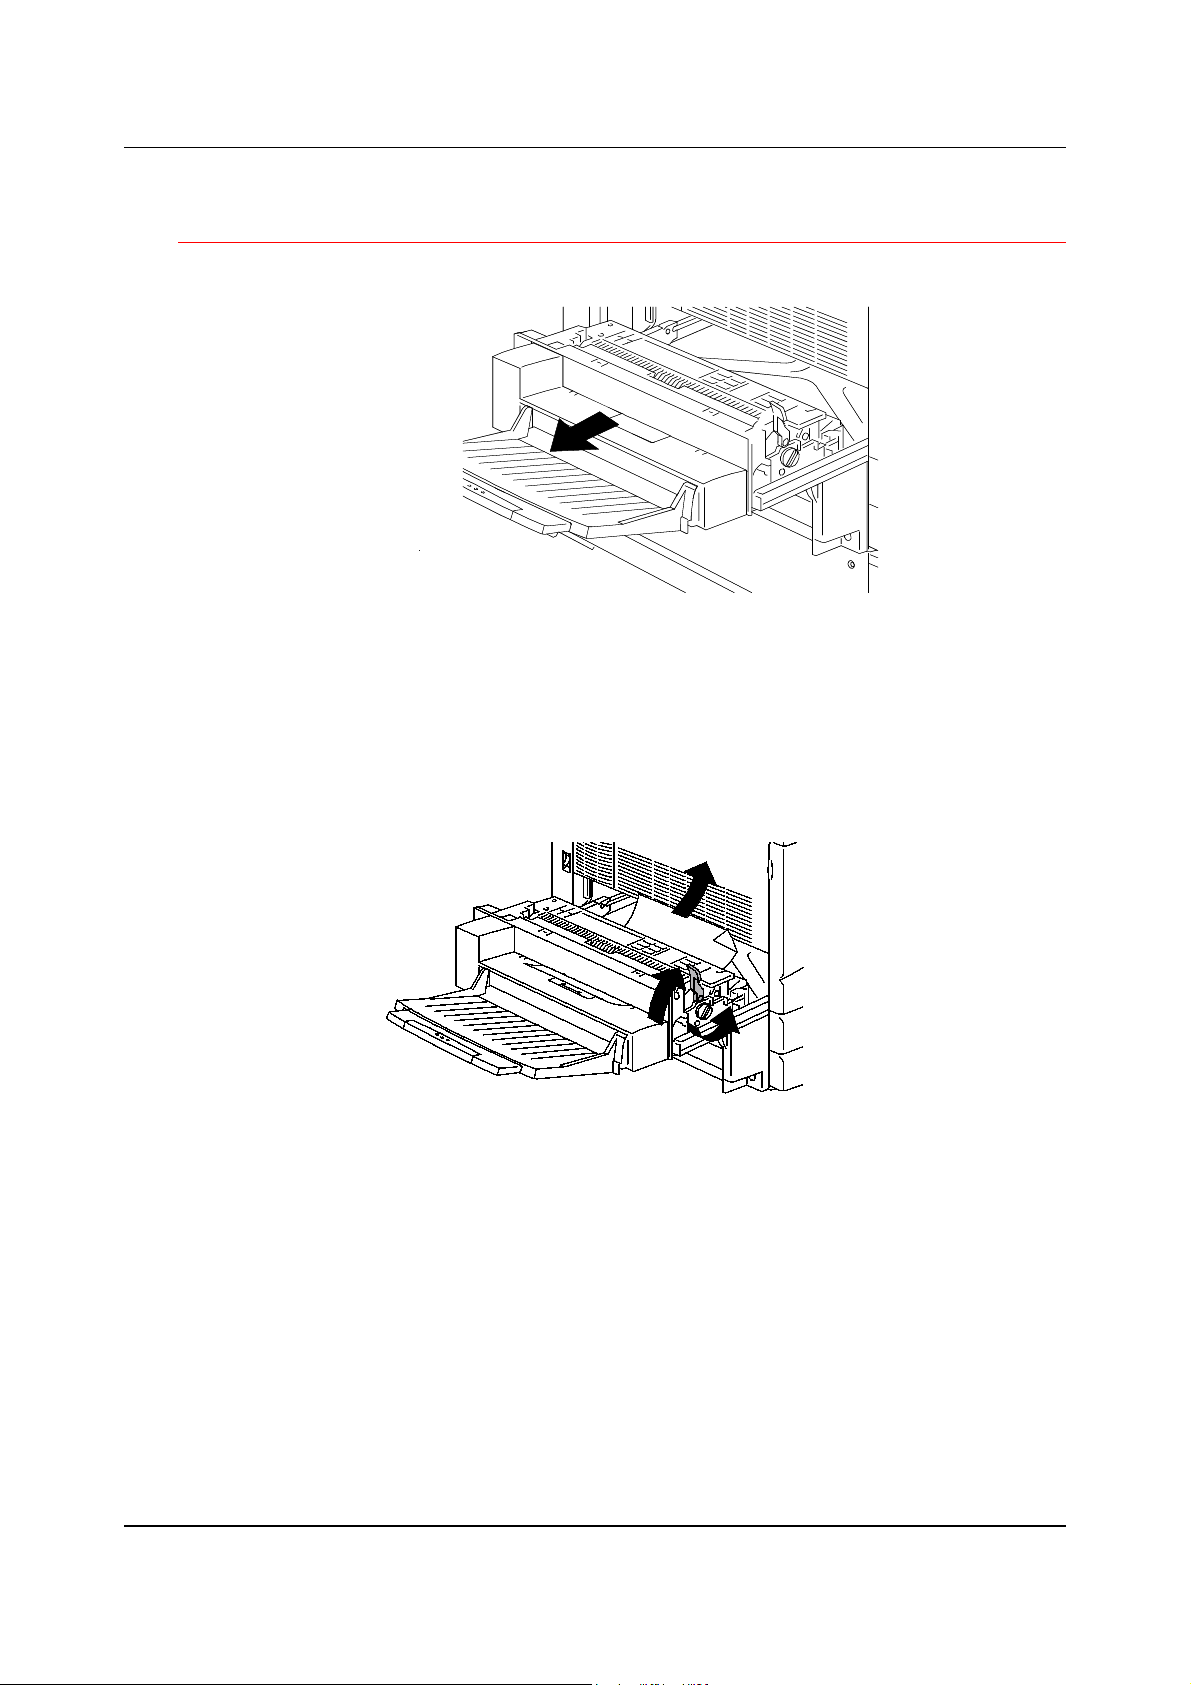
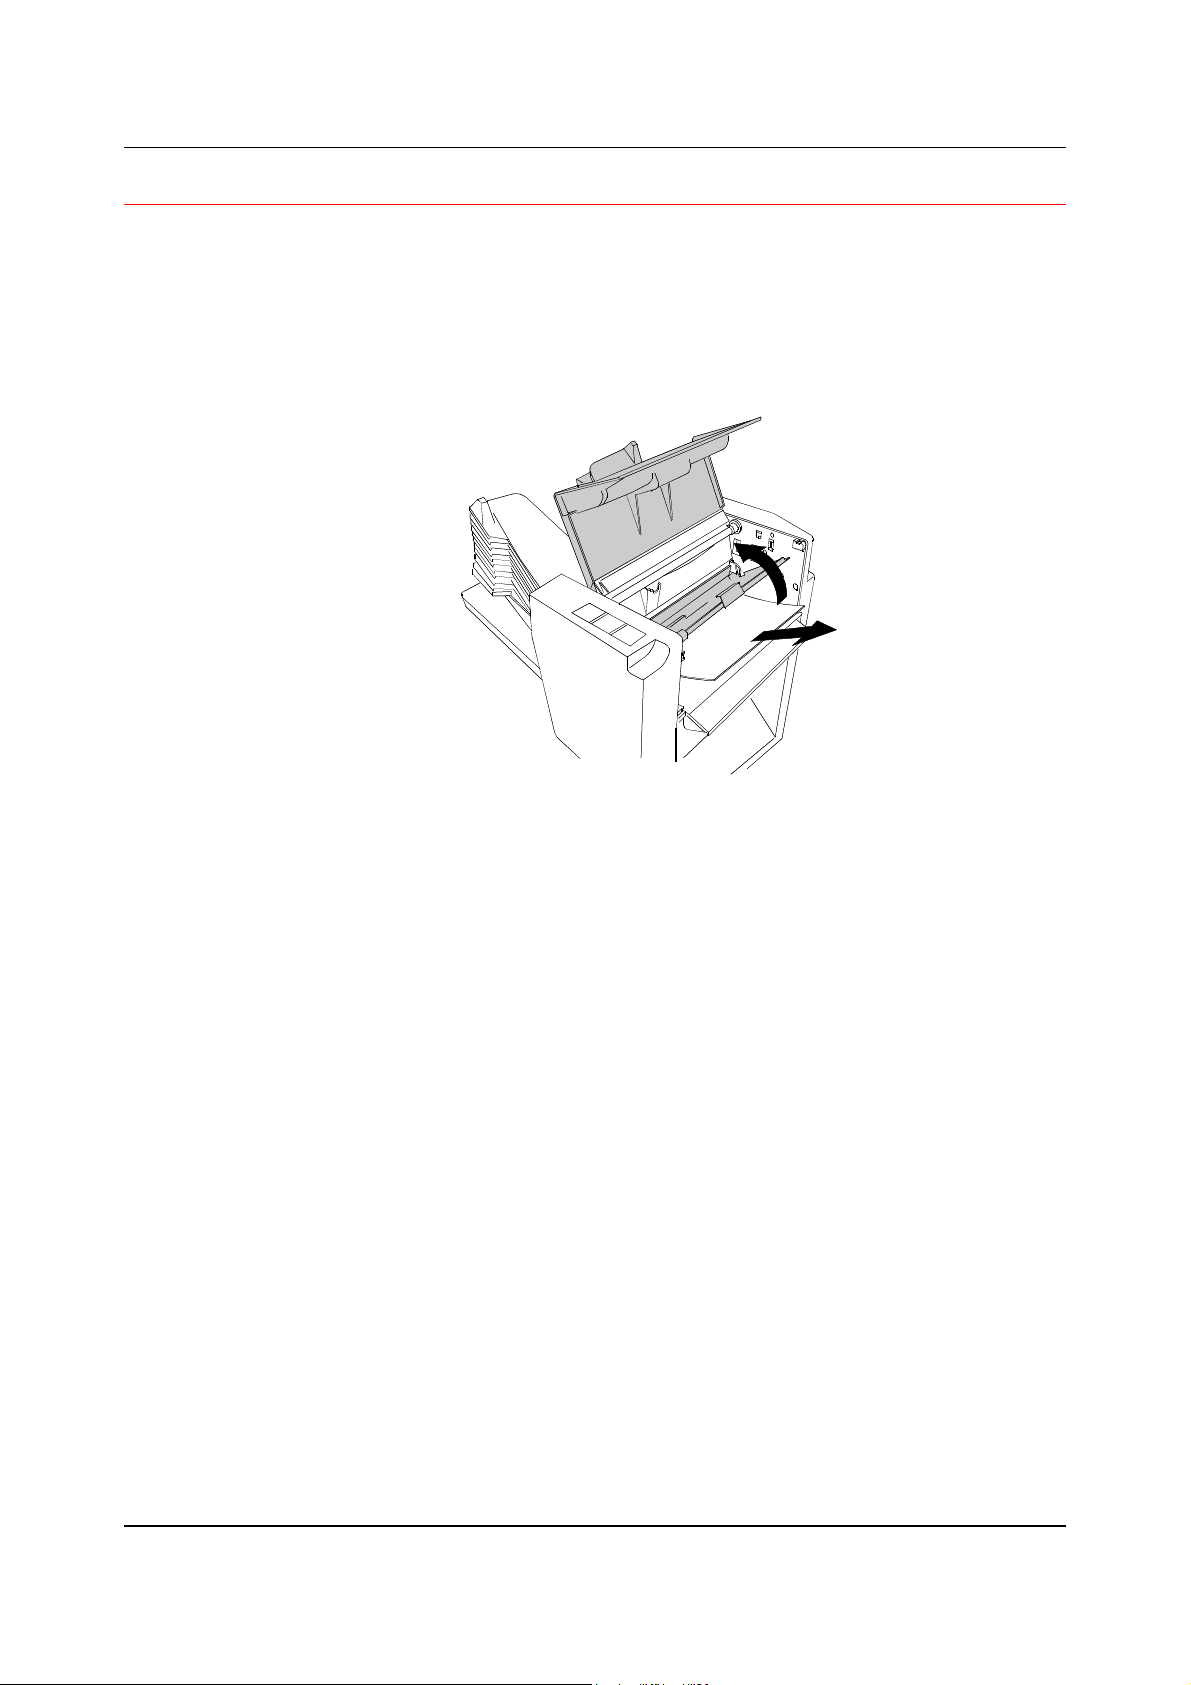
Clearing the Upper Inverter
1. In order to access Area 5, pull open the Upper Inverter.
2. To release any paper, lift the Green Lever, and gently pull the paper in
the direction of the arrow. If the paper is not visible, turn the Green
Knob in the direction of the arrow.
23-21
Problem Solving Clearing Area 5 Jams
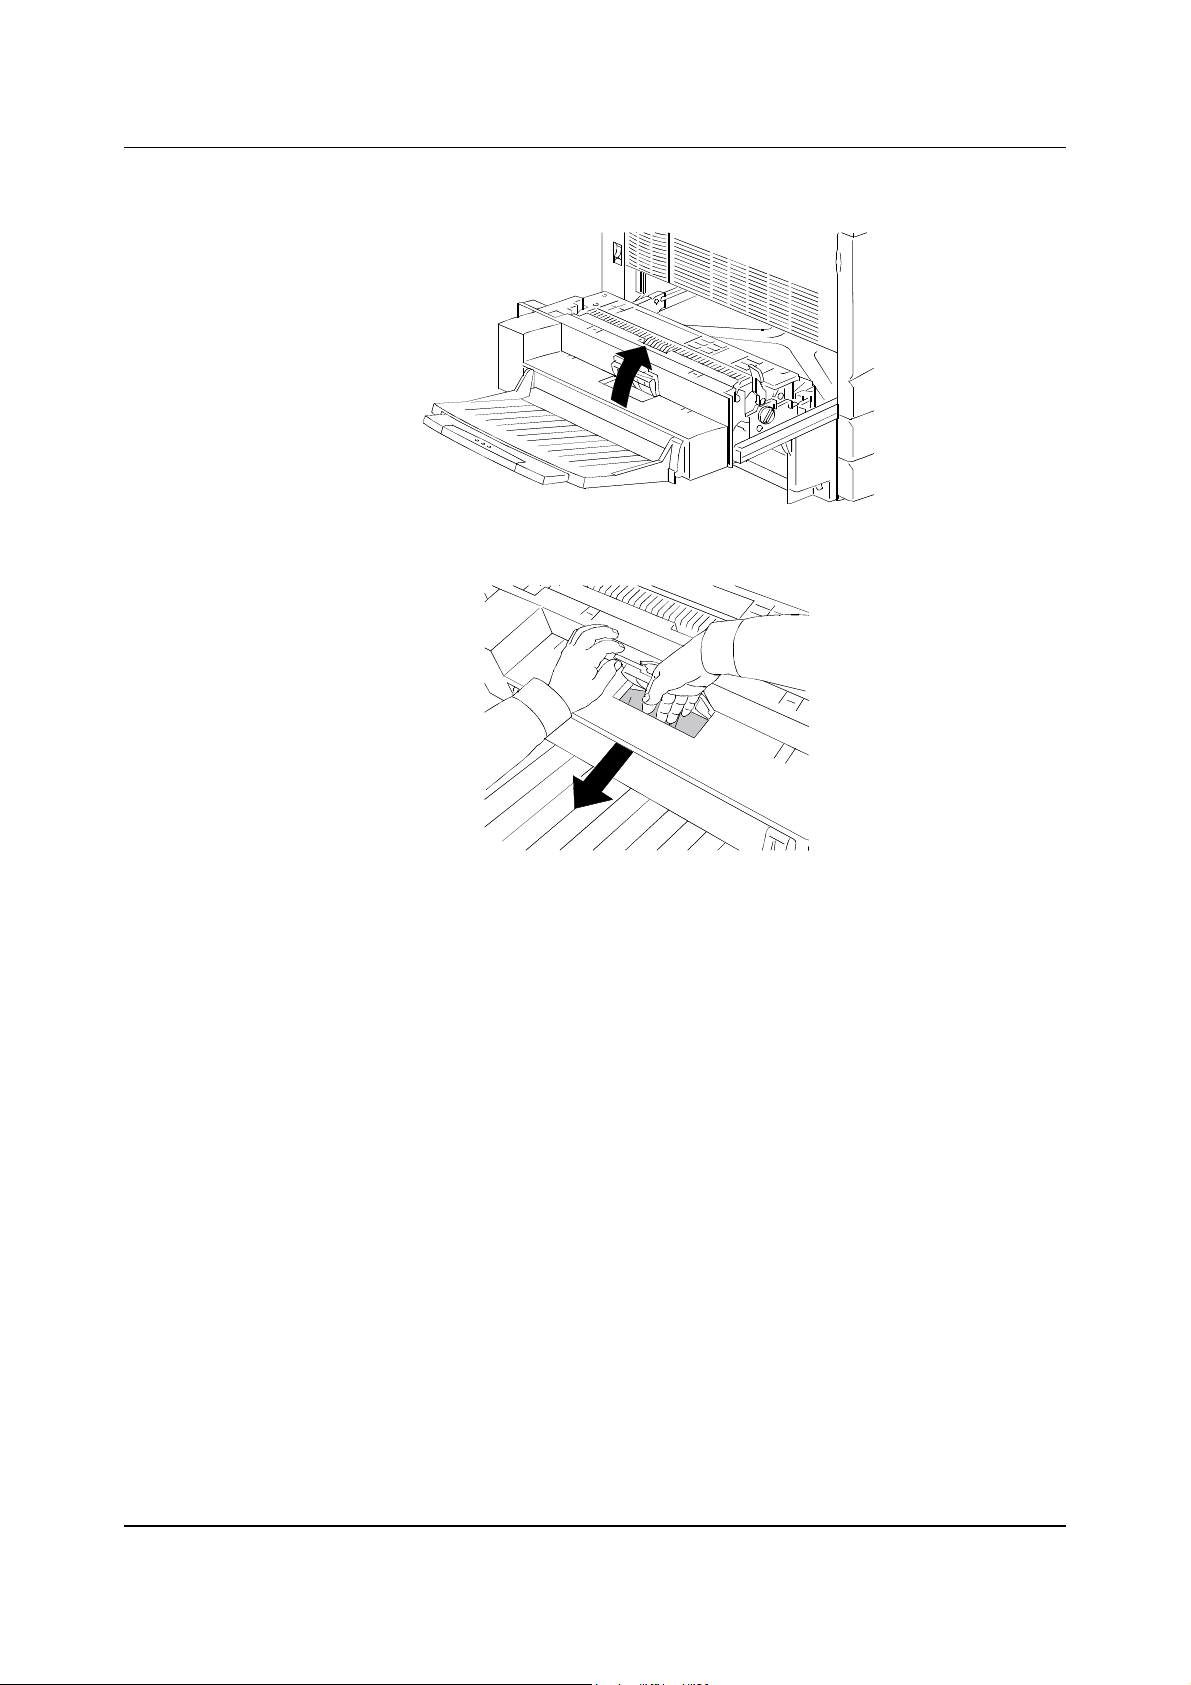
3. Open the small, clear, cover and ensure that all the paper and paper bits
are removed.
a. If paper is visible under the clear cover, hold the cover open and
push the paper toward the paper exit with your fingers.
23-22
Clearing Area 5 Jams Problem Solving
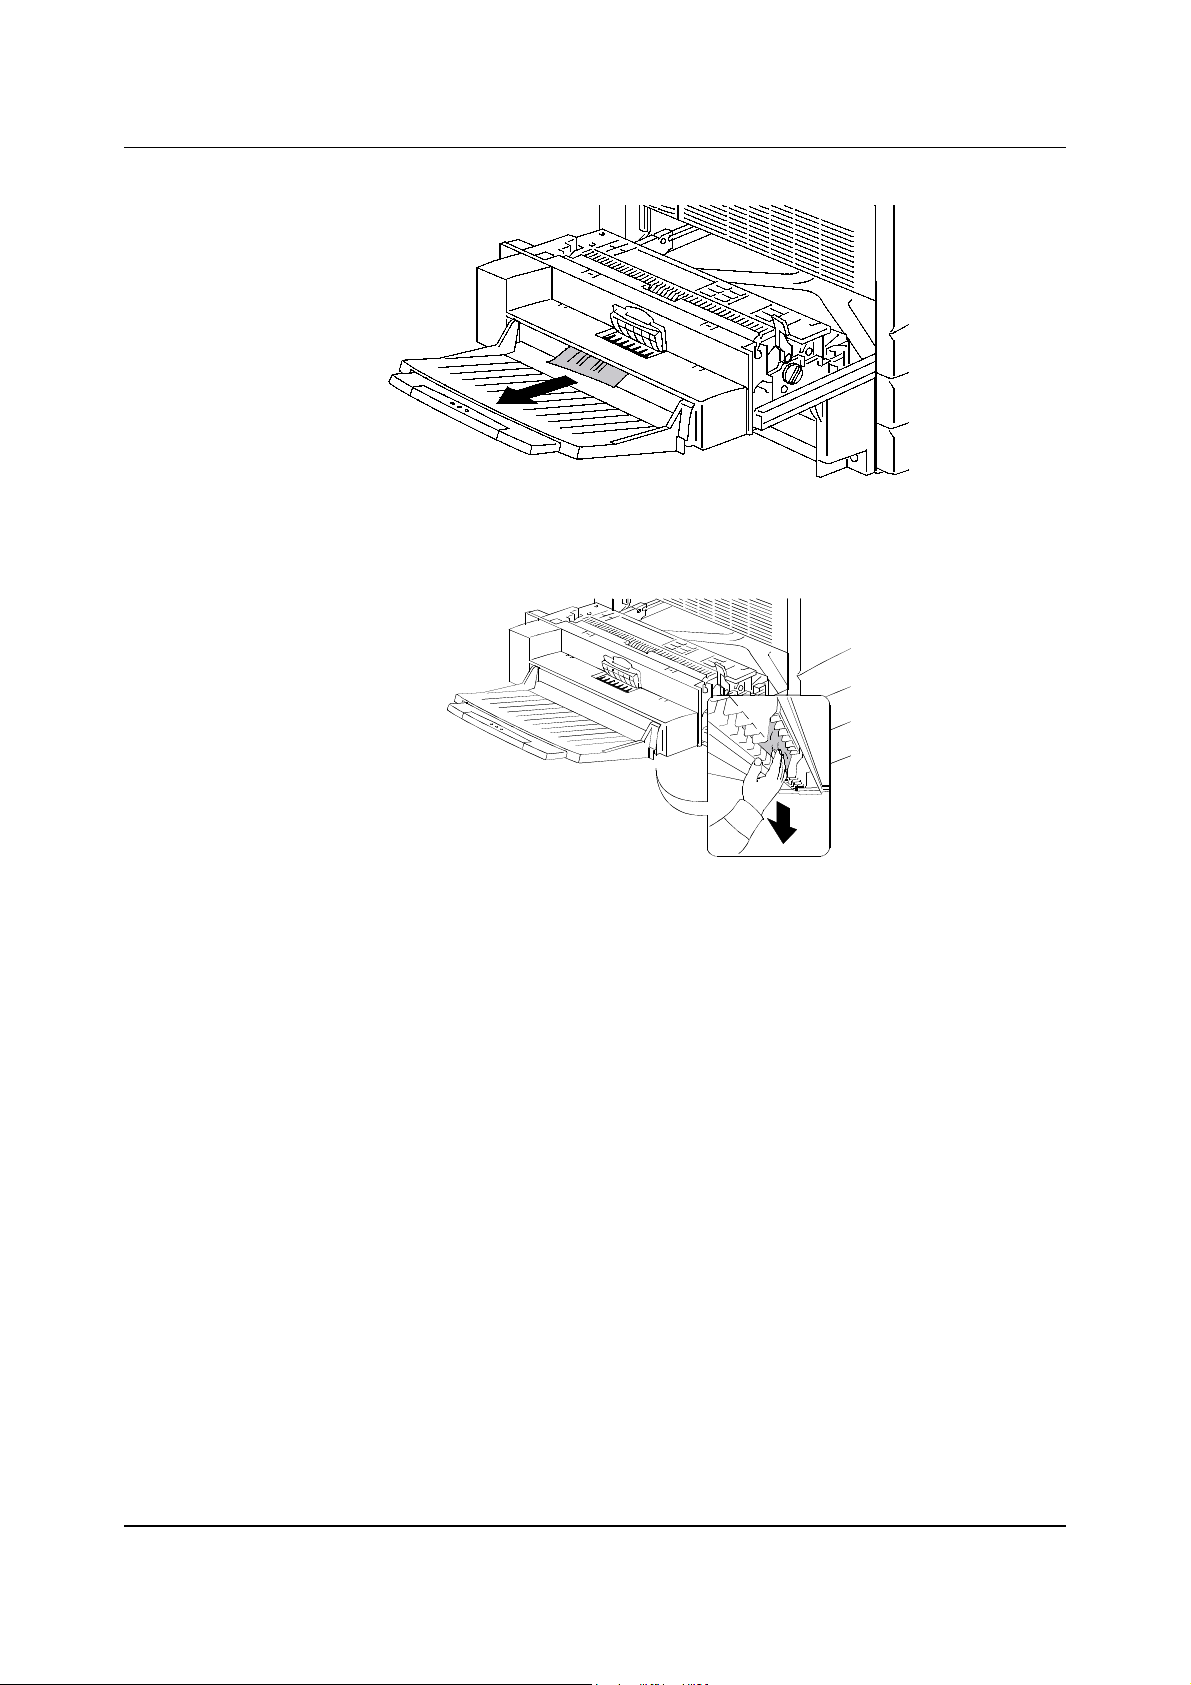
b. Pull the paper in the direction of the arrow shown below.
c. If paper is only partially visible under the cover, check under the
tray for access to the paper.
d. Pull the paper down and remove.
0301112A-W O L
23-23
Problem Solving Clearing Area 5 Jams
4. Close the small clear cover and move the Green Lever to the lower
position.
0
3011 13A-W
OL
5. Firmly close the Upper Inverter.
23-24
Clearing Area 6 Jams Problem Solving
Clearing Area 6 Jams
Perform this procedure when the message CLEAR JAM IN AREA 6 is
displayed on the Control Panel.
1. In order to access Area 6, open the Lower Inverter Cover.
2. Remove the jammed paper. Ensure that there are no pieces of torn
paper remaining in the Lower Inverter.
3. Close the Lower Inverter Cover.
23-25
Problem Solving Clearing Area 6 Jams
Clearing Jams in the 10 Bin Sorter
1. Read the messages that display on the copier and printer control panels.
2. Slide the 10 Bin Sorter to the left away from the DP-C106.
3. Lift the Jam Clearance Cover.
4. Lift the Green Handle and gently remove any sheets that are jammed in
the output area.
5. Close the Jam Clearance Cover.
6. Continue to follow the messages that display in the copier and printer
control panels and clear any additional jams that have occurred in the
DP-C106.
23-26
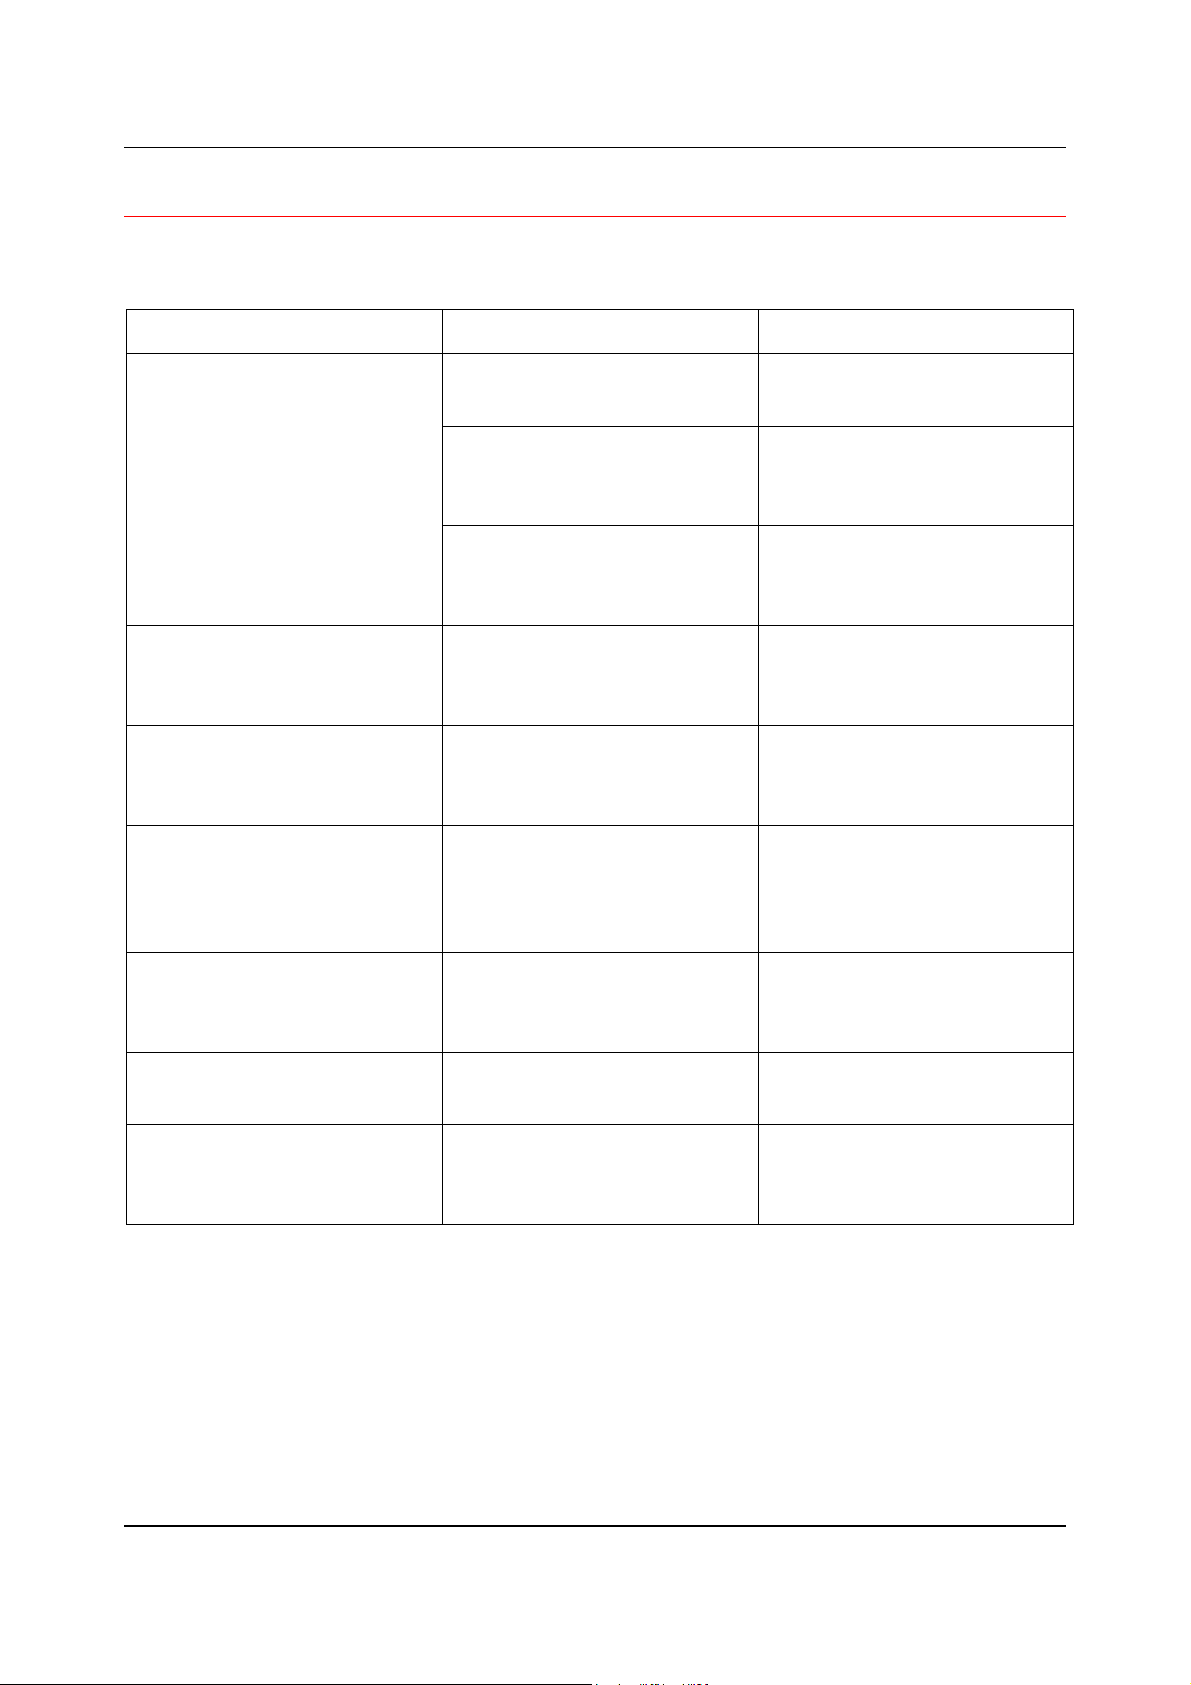
Copy/Print Quality Problems Problem Solving
Copy/Print Quality Problems
If the problem still exists after following the instructions in this table, call your
local Authorized Panasonic Representative.
Description Possible Cause Action
Faded print/copy Printer out of adjustment.
Go to Adjusting the Color in
this section.
The Print/Copy Cartridge is
old or damaged.
Go to Replacing the
Supplies in the
Maintenance section.
If only some colors are
faded, a Toner Cartridge is
old or damaged.
Stray black dots, or white
dots in solid black or color
The Document Glass is
dirty.
areas
Vertical streaks The drum in the Print/Copy
Cartridge is old or
damaged.
Go to Replacing the Toner
Cartridges in the
Maintenance section.
Go to the Cleaning
Procedures in the
Maintenance section.
Go to Replacing the
Print/Copy Cartridge in the
Maintenance section.
Horizontal streaks Dirt in the paper path. Clean the Document Glass,
and make 50 blank copies.
If the problem still exists,
call for service.
Repeating defect The drum in the Print/Copy
Cartridge is old or
damaged.
Toner smears when
The Fuser is not operating. Call for service.
touched
Black pages The Print/Copy Cartridge is
old or damaged.
Go to Replacing the
Print/Copy Cartridge in the
Maintenance section.
Go to Replacing the
Print/Copy Cartridge in the
Maintenance section.
23-27
Problem Solving Copy/Print Quality Problems
Blank pages Sheets of paper are
sticking together.
The Low Toner message
is displayed on the Control
Panel.
The Print/Copy Cartridge is
old or damaged.
Vertical blanks The Print/Copy Cartridge is
old or damaged.
Image is slanted The Paper Guides in the
Paper Tray are not in the
appropriate position.
Remove the paper stack
from the Paper Tray. Fan
the corners of the stack,
and replace it in the Paper
Tray.
Go to Replacing the Toner
Cartridges in the
Maintenance section.
Go to Replacing the
Print/Copy Cartridge in the
Maintenance section.
Go to Replacing the
Print/Copy Cartridge in the
Maintenance section.
Open the Paper Tray and
adjust the Paper Guides to
the size of the paper. For
more information, go to the
Loading the Paper in the
Paper Tray procedure in
the Setting Up the
DP-C106.
The color is too light or too
dark
The ADF guides may not
be in the appropriate
positions.
Color is out of adjustment.
Adjust the ADF guides to
the size of the paper.
Go to the Adjusting the
Color procedure in this
section.
23-28
Adjusting the Printer Color Problem Solving
Adjusting the Printer Color
Perform this procedure if you have color problems such as insufficient
amounts of one or more colors, or excessive amounts of one or more colors.
If a message to replace a Color Toner Cartridge is displayed on the Printer
Control Panel, replace the cartridge BEFORE performing this adjustment.
VisualCal
There are three parts to the VisualCal adjustment. Do not skip any steps or
perform any part out of sequence.
If you wish to stop the VisualCal adjustment, you may press the
CLEAR/STOP button at any time. Pressing the CLEAR/STOP button
returns the menu to READY.
1. Print Limits Page
The limits you select are used by the printer to adjust highlights, and contrasts
to compensate for normal print engine fluctuations.
1. Ensure that READY is displayed on the Printer Control Panel. Any error,
low toner, or paper messages will result in a printing warning to abort
calibration.
2. Press the MENU button repeatedly until VISUALCAL is displayed.
3. Press the ITEM/ENTER button. PRINT LIMITS YES is displayed on the
Control Panel screen.
4. Press the ITEM/ENTER button. PRINTING LIMITS PAGE is displayed
and after a few moments, the page is delivered to the Top Tray.
5. Under your normal lighting, study the BLACK START row.
a. Select the Left-most circle that you can distinguish from the
background and draw a circle around it.
View the page at an angle for the best results.
b. Select the Left-most circle that you can distinguish from the
background on the next row, BLACK END, and draw a circle
around it.
c. If you cannot see any circle in the row, write 9 next to the row.
23-29
 Loading...