

Panasonic DP-8130 Operating Instruction
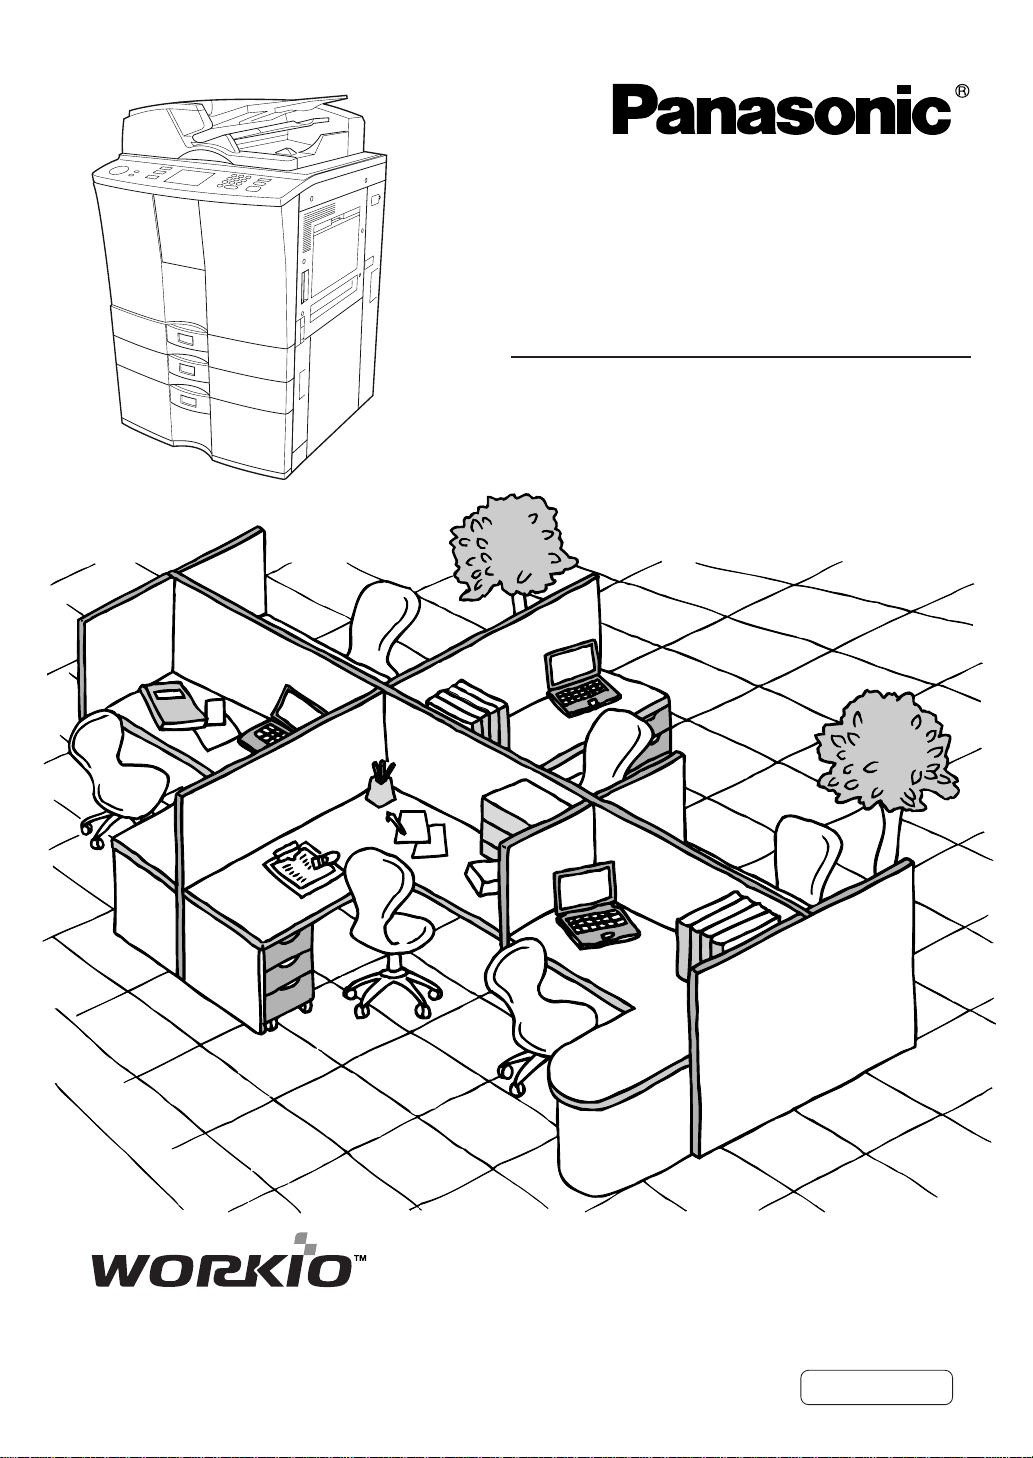
Digital Imaging Systems
Operating Instructions
(For Copy Functions)
Model No. DP-6530/8130
Before operating this equipment, please read these instructions completely
and keep these operating instructions for future reference.
English

Use of Recycled Paper in the Machine
As with all machines and reproduction devices, the use of the appropriate paper ensures the best
image quality of the copies and the machine’s performance and reliability.
Because of the extreme variances in composition and quality of paper from various manufacturers,
consumers should ensure the recycled paper they use is suitable for the machine. In accordance
with the EPA Energy Star Program guidelines, Panasonic recommends the following recycled
papers for use in the machine -
Great White MultiUse 20 paper
Great White MultiUse 24 paper
If you have any questions regarding the use of recycled paper in your machine, contact your
authorized service representative.
FCC NOTICE
This equipment has been tested and found to comply with the limits for a Class A digital device,
pursuant to Part 15 of the FCC Rules. These limits are designed to provide reasonable protection
against harmful interference when the equipment is operated in a commercial environment. This
equipment generates, uses, and can radiate radio frequency energy and, if not installed and used
in accordance with the instruction manual, may cause harmful interference to radio communications.
Operation of this equipment in a residential area is likely to cause harmful interference in which
case the user will be required to correct the interference at his own expense.
WARNING: Changes or modification made to this equipment, not expressly approved by
Panasonic or parties authorized by Panasonic, could void the user's authority
to operate the equipment.
This Class A digital apparatus complies with Canadian ICES-003.
Cet appareil numerique de la classe A est conforme à la norme NMB-003 du Canada.
1

EPA ENERGY STAR ® (MFD)
The United States Environmental Protection Agency (EPA) has introduced a voluntary program, the ENERGY
STAR Program, to encourage the widespread and voluntary use of energy-efficient technologies that enhance
the workplace, improve product performance and prevent pollution. As an
Panasonic has determined that this machine meets the
ENERGY STAR guidelines for energy efficiency.
ENERGY STAR Partner, the
ENERGY STAR guidelines for this class of machine require ENERGY STAR machines to have an 'Off Mode'
feature that automatically turns the machine off after a period of inactivity, ensuring night and weekend shutoff. The machine must also automatically change to a 'Low Power Mode' (Automatic Energy Save) after a period
of time since the last usage.
Specifically, this machine complies with the following requirements ––––
'Off Mode'-
The machine consumes less than 20 watts in the 'Off Mode'.
'Off Mode' Default Time-
The default time for the 'Off Mode' is 90 minutes.
'Automatic Energy Save'-
The machine consumes less than 255 watts (DP-6530)/ 316 watts (DP-8130) while in Energy Save
Mode.
'Automatic Energy Save' Default Time-
The default time before switching to 'Automatic Energy Save Mode' is 15 minutes.
Note1- The default setting for the 'Off Mode' or 'Sleep Mode' and 'Automatic Energy save' can be changed.
Note2- To restart the machine after auto shut off, turn on the power switch. To restart the machine after sleep
mode, press the start key.
Note3- In the sleep mode, if printer data is received, or the start key on the control panel is pressed, the copier
starts warming itself up and prints out the data when it becomes ready.
If you have any questions regarding the use of recycled paper or some recommended types of recycled paper,
please contact your authorized Panasonic dealer.
ENERGY STAR is a USA registered mark.
1
1

1
2
3
4
5
6
PREFACE
Thank you for purchasing the digital imaging system DP-6530/8130.
This Operating Instructions describes the following:
• how to use the digital Digital Imaging System
• how to inspect and carry out maintenance on the digital Digital Imaging System
• how to remedy mechanical and copying problems
Before using the Digital Imaging System, thoroughly read and understand this Operating Instructions.
To ensure that clean copies are made at all times and to keep your Digital Imaging System in optimum
working order, this Operating Instructions should be readily available for future reference.
To ensure correct and safe use of the Digital Imaging System DP-6530/8130, this Operating
Instructions describes safety precautions according to the following three levels of warning:
Before reading this Operating Instructions, you should fully understand the meaning and importance of
these signal words.
Warning .Indicates a potentially hazardous situation which, if not avoided, could result in death,
serious injury, or serious damage, or fire in the equipment or surrounding assets.
Caution ..Indicates a potentially hazardous situation which, if not avoided, may result in minor or
moderate injury, partial damage of the equipment or surrounding assets, or loss of data.
Note ....... Indicates a procedure you should follow to ensure the optimal performance of the digital
imaging system and problem-free copying.
7
8
9
10
11
12
Tip .......... Describes handy information that is useful to know when operating the digital imaging system.
Advice .... Describes an operation you should follow to keep the digital imaging system in good
working order.
User Safety
This digital imaging system does not produce laser radiation hazardous to the user. It is certified as a
Class 1 laser product under the U.S. Department of Health and Human Services (DHHS) Radiation
Performance Standard according to the Radiation Control for Health and Safety Act of 1968.
Protective housing and external covers completely confine the laser light emitted inside the machine.
The laser beam cannot escape from the machine during any phase of user operation.
Regulations implemented on August 2, 1976 by the Bureau of Radiological Health (BRH) of the U.S. Food
and Drug Administration apply to laser products manufactured from August 1, 1976. Laser products
marketed in the United States must comply with these regulations.
CAUTION: Using controls or adjustments or performing procedures, other than those specified herein
may result in hazardous radiation exposure.
2

PREFACE (Cont.)
Features of the DP-6530/8130
The DP-6530/8130 is a digital imaging system which is high-speed, compact and high-durability. The
DP-6530/8130 can read the image in the memory temporarily after scanning, so you can operate sorting/
grouping, etc. as well as processing/editing quietly, quickly and easily. And the combination of various
finishing function such as thick paper and tab paper, etc. makes finishing easier as you request.
The DP-6530/8130 also has the following convenient features, functions and options.
1
The copying speed is 65 copies (LT) per minute for the DP-6530 and 81 copies (LT) per minute for
the DP-8130.
You can scan the originals that you request to copy during printing.
A wide variety of media from thick paper ( up to 110lb. Index) to tab paper, OHP-films, hole
punched paper, etc. are acceptable.
'Finishing mode' and '2-sided copy', which are frequently used, put together to one display (Quick
tab on the touch panel) to access easily.
'Automatic density mode' reads the density of originals automatically and sets the proper copy density.
'Automatic paper selection' reads the size of originals automatically and sets the paper size, and
'Automatic zoom selection' calculates the copy magnification.
Comes with rich editing functions specific to digital such as '2in1/ 4in1’, ‘Annotation’ and ‘Page
Numbering’, etc.
Using the reversing automatic document feeder allows you to copy at once with 'Mixed-sized original
mode' though the original sizes are different.
Loading the page memory and hard disc as standard equipment enables 2 in 1/4 in 1, 'Electronic
sort' and 'Magazine sort' etc.
When using the external LCF (optional), you can make maximum of 7500 copies continuously. (External
LCF: 4000 sheets, drawer: 500 sheets x 2, Tandem LCF: 2500 sheets)
Installing an optional finisher, an optional hole offer quick sorting such as 'Staple', 'Magazine sort'
'Hole punch' of copies automatically.
The optional printer controller also allows you to scan from the touch panel.
2
3
4
5
6
7
8
9
10
11
12
3

TABLE OF CONTENTS
1
2
3
4
5
6
7
8
9
Energy Star .................................................................................................................................. 1
PREFACE..................................................................................................................................... 2
Features of the DP-6530/8130 ....................................................................................................3
TABLE OF CONTENTS ................................................................................................................ 4
DISCLAIMER NOTICE ................................................................................................................. 7
PRECAUTIONS............................................................................................................................ 8
1. Installation................................................................................................................................8
2. General Precautions................................................................................................................ 9
1.BEFORE MAKING COPIES .......................................................................................................... 1-1
1. DESCRIPTION OF THE DIGITAL IMAGING SYSTEMAND THE OPTIONAL EQUIPMENT ..... 1-2
Main Components .................................................................................................................... 1-2
Optional Equipment .................................................................................................................. 1-3
Control Panel ............................................................................................................................ 1-4
Touch Panel .............................................................................................................................. 1-6
2. TURNING ON THE POWER SWITCH ...................................................................................... 1-8
Turning ON the Power Switch/Auto Job Start ........................................................................... 1-8
Controlling the Use of the Machine with Department Codes ................................................... 1-9
2. HOW TO MAKE COPIES................................................................................................................ 2-1
1. GENERAL COPYING PROCEDURES ..................................................................................... 2-2
2. SETTING COPY PAPER ........................................................................................................... 2-4
Acceptable Copy Paper Types and Sizes ................................................................................ 2-4
Handling and Storing Paper ..................................................................................................... 2-5
Changing the Paper Size of the Drawer/Setting the Drawer for Special Uses ........................ 2-6
Acceptable Original Types and Sizes ....................................................................................... 2-9
3. SETTING ORIGINALS............................................................................................................... 2-9
When Placing an Original on the Glass ................................................................................. 2-10
When Using the Reversing Automatic Document Feeder ..................................................... 2-11
4. AUTO JOB START (JOB PRESET) ......................................................................................... 2-13
5. INTERRUPT COPYING .......................................................................................................... 2-14
6. STOPPING THE COPY OPERATION ...................................................................................... 2-15
7. DELETING OR CHANGING ORDER OF PENDING JOBS .................................................... 2-16
10
11
12
4
3. SETTING OF BASIC COPY MODES ............................................................................................. 3-1
1. PAPER SELECTION ................................................................................................................. 3-2
Automatic Paper Selection (APS) ............................................................................................. 3-2
Manual Paper Selection ........................................................................................................... 3-3
2. REDUCTION AND ENLARGEMENT COPYING ...................................................................... 3-4
3. DUPLEX COPYING (1-SIDED, 2-SIDED, BOOK-TYPE) .......................................................... 3-7
4. COPY DENSITY ADJUSTMENT ............................................................................................ 3-11
5. SELECTING ORIGINAL MODE .............................................................................................. 3-13
6. QUICK ACCESS MENU ......................................................................................................... 3-14

TABLE OF CONTENTS (Cont.)
4.USING THE EDITING FUNCTIONS ............................................................................................... 4-1
1. IMAGE SHIFT ............................................................................................................................ 4-2
2. EDGE ERASE ........................................................................................................................... 4-4
3. DUAL-PAGE.............................................................................................................................. 4-5
4. X-Y ZOOM ................................................................................................................................. 4-7
5. IMAGE EDITING........................................................................................................................ 4-8
Trimming/Masking ..................................................................................................................... 4-8
Mirror Image ............................................................................................................................ 4-10
Negative/Positive Reversal..................................................................................................... 4-11
6. 2 IN 1 / 4 IN 1 .......................................................................................................................... 4-12
7. COPYING WITH ANNOTATION .............................................................................................. 4-14
8. PAGE NUMBERING COPYING .............................................................................................. 4-15
9. MAGAZINE SORT (FROM THE EDITING MENU) .................................................................. 4-16
10.COVER COPYING .................................................................................................................. 4-18
11.TAB PAPER MODE ................................................................................................................. 4-20
12.DOCUMENT STORAGE ......................................................................................................... 4-26
13.OVERLAY ................................................................................................................................ 4-28
14.SHARPNESS ADJUSTMENT ................................................................................................. 4-31
15.DIRECTION OF DUPLEX COPY IMAGES (Rotation) ............................................................ 4-32
5.USING SPECIAL FUNCTIONS ...................................................................................................... 5-1
1. CONTINUOUS ORIGINAL FEEDING / SINGLE ORIGINAL FEEDING..................................... 5-2
2. MIXED-SIZED ORIGINALS ....................................................................................................... 5-4
3. JOB MEMORY........................................................................................................................... 5-5
4. BYPASS COPYING ................................................................................................................... 5-8
Bypass Copying on Standard Size Paper .............................................................................. 5-10
Bypass Copying on Non-Standard Size Paper ...................................................................... 5-11
5. WEEKLY TIMER ...................................................................................................................... 5-13
6. SETTING THE “OTHER” SIZE KEY......................................................................................... 5-14
7. SETTING THE DATE AND TIME ............................................................................................. 5-15
8. SETTING THE AUTOMATIC ENERGY SAVE MODE .............................................................. 5-16
9. SETTING THE AUTOMATIC OFF-MODE ................................................................................ 5-17
10.SWITCHING LANGUAGES ..................................................................................................... 5-18
11.USER SELECTION (Initial settings) ....................................................................................... 5-19
12.DEPARTMENT CODES .......................................................................................................... 5-20
13.ENTERING LETTERS ............................................................................................................. 5-29
1
2
3
4
5
6
7
8
9
6. SELECTING FINISHING MODES
(USING THE OPTIONAL FINISHERS) .............................................................. 6-1
1. FINISHING MODES AND FINISHERS (OPTIONAL) ................................................................ 6-2
2. SORT/GROUP COPYING ......................................................................................................... 6-3
3. STAPLE SORTING (OPTIONAL) .............................................................................................. 6-4
4. MAGAZINE SORT & SADDLE STITCH MODE (BOOKLET MODE) ........................................ 6-6
5. HOLE PUNCH MODE (OPTIONAL) ......................................................................................... 6-8
10
11
12
5

1
2
3
4
5
6
7.WHEN THE GRAPHIC SYMBOLS FLASH ON THE TOUCH PANEL ........................................... 7-1
1. DESCRIPTION OF THE FLASHING GRAPHIC SYMBOLS...................................................... 7-2
2. ADD PAPER SYMBOL .............................................................................................................. 7-3
Adding Paper to the Drawers ................................................................................................... 7-3
Adding Paper to the Tandem LCF (Large Capacity Feeder).................................................... 7-4
Adding Paper to the External LCF (Large Capacity Feeder) (Optional) .................................. 7-5
3. REPLACE TONER BOTTLE
4. CLEAR PAPER
Reversing Automatic Document Feeder ............................................................................. 7-10
Inside of the Machine ........................................................................................................... 7-12
Bypass Guide ....................................................................................................................... 7-15
External LCF (Optional) ....................................................................................................... 7-15
Hole Punch Unit (Optional) .................................................................................................. 7-16
Finisher (Optional) ............................................................................................................... 7-17
Saddle-Stitch Unit (Optional) ............................................................................................... 7-18
5. ADDING STAPLES (OPTIONAL) ............................................................................................. 7-20
6. REMOVING JAMMED STAPLES (OPTIONAL) ........................................................................ 7-24
7. DISPOSING OF ACCUMULATED PUNCHED PAPER BITS (OPTIONAL) ............................. 7-27
8. CALL SERVICE
8.MAINTENANCE ............................................................................................................................ 8-1
1. DAILY INSPECTION.................................................................................................................. 8-2
2. SIMPLE TROUBLESHOOTING................................................................................................. 8-3
SYMBOL .................................................................................................. 7-9
SYMBOL / PERIODIC MAINTENANCE MESSAGE ................................. 7-28
SYMBOL ............................................................................... 7-6
7
8
9
10
11
12
9. SPECIFICATIONS &OPTIONS ...................................................................................................... 9-1
1. DP-6530/8130 SPECIFICATIONS ............................................................................................ 9-2
2. SPECIFICATIONS OF OPTIONS .............................................................................................. 9-4
3. PACKING LIST .......................................................................................................................... 9-6
4. INDEX ....................................................................................................................................... 9-7
6

DISCLAIMER NOTICE
The following notice sets out the exclusions and limitations of liability of Panasonic (including its employees,
agents and sub-contractors) to any purchaser or user ("User") of the DP-6530/8130, including its accessories,
options and bundled software ("Product")
1. The exclusions and limitations of liability referred to in this notice shall be effective to the fullest extent
permissible at law. For the avoidance of doubt, nothing in this notice shall be taken to exclude or limit
Panasonic's liability for death or personal injury caused by Panasonic negligence's or Panasonic's
fraudulent misrepresentation.
2. All warranties, conditions and other terms implied by law are, to the fullest extent permitted by law,
excluded and no such implied warranties are given or apply in relation to the Products.
3. Panasonic shall not be liable for any loss, cost, expense, claim or damage whatsoever caused by any
of the following:
(a) use or handling of the Product otherwise than in accordance with the manuals, including but not
limited to Operating Instructions, Users' Guide, and/or incorrect or careless handling or use of the
Product;
1
2
3
4
(b) any cause which prevents the Product from operating or functioning correctly which arises from or
is attributable to either acts, omissions, events or accidents beyond the reasonable control of
Panasonic including without limitation acts of God, war, riot, civil commotion, malicious or deliberate
damage, fire, flood, or storm, natural calamity, earthquakes, abnormal voltage or other disasters;
(c) additions, modifications, disassembly, transportation, or repairs by any person other than service
representatives authorized by Panasonic; or
(d) use of paper, supplies or parts other than those recommended by Panasonic.
4. Subject to paragraph 1, Panasonic shall not be liable to Customer for:
(a) loss of profits; loss of sales or turnover; loss of or damage to reputation; loss of production; loss of
anticipated savings; loss of goodwill or business opportunities; loss of customers; loss of, or loss of
use of, any software or data; loss under or in relation to any contract; or
(b) any special, incidental, consequential or indirect loss or damage, costs, expenses, financial loss or
claims for consequential compensation;
whatsoever and howsoever caused which arise out of or in connection with the Product or the use or
handling of the Product even if Panasonic is advised of the possibility of such damages.
Panasonic shall not be liable for any loss, cost, expense, claim or damage caused by any inability to
use (including, but not limited to failure, malfunction, hang-up, virus infection or other problems) which
arises from use of the Product with hardware, goods or software which Panasonic has not directly or
indirectly supplied.
5
6
7
8
9
10
11
12
7
1
2
3
4
5
PRECAUTIONS
1. Installation
The DP-6530/8130 should be installed by a qualified service representative.
Note: The packing material should be disposed of properly.
1
To obtain the best possible results, this machine should be used in conjunction with a
dedicated AC power line with the following ratings.
2
115 V - 60 Hz, 16 A
Notes:
1. The use of other appliances or other equipment on the same line as this machine may adversely
affect performance and copy quality.
2. Be sure to use a 3-conductor, grounded wall outlet.
3. In areas, except USA and Canada, where a 2-pin plug is used, the machine must be grounded for
safety.
Never ground it to a gas pipe, a water pipe, or any other object not suitable for grounding.
4. The power supply cord is used as the main disconnect device, ensure that the socket-outlet is
located/installed near the equipment and easily accessible.
After a suitable place has been selected for installation of the DP-6530/8130, please do
not change it. Avoid excessive heat, dust, vibration and direct sunlight.
3
Also, provide proper ventilation as the machine emits a small amount of ozone.
6
7
8
9
10
11
Notes:
1. The recommended environmental range for use is as follows:
• Temperature: 10~30 °C/50~86 °F
• Humidity: 20~85 % RH (Non condensing)
2. To insure optimal operation, allow clearances of at least 31.5” on the left, 31.5” on the right and 3.9”
behind (refer to the illustration below).
3.9"
31.5"
31.5"
The socket outlet should be near the equipment and be easily accessible.
12
8
PRECAUTIONS (Cont.)
2. General Precautions
Handle and use the machine gently and carefully.
• Do not place anything on the paper drawers or the original feeding tray.
1
• Never allow the power cable to be trampled on or pinched between hard objects, otherwise an
accident or electrical trouble might occur.
• Do not allow any metal items such as paper clips to fall into the machine.
Be sure to turn OFF the power switch (unless using the weekly timer mode):
• When you leave your office at night.
2
• If a power failure occurs.
Caution: When turning OFF the power switch, be sure to do so only after the machine cycling
has come to a complete stop.
Be sure to disconnect the power-cord plug:
• When you do not intend to use the machine for an extended period of time.
Be sure to turn OFF the power switch immediately and call for service:
• If an unusual noise is heard from the machine.
• If the outside of the machine becomes unusually hot.
• If any part of this machine is damaged, or if it has been dropped.
• If the machine has been exposed to rain or liquid.
It is recommended that only supplies made or designated by Panasonic be used for
the DP-6530/8130 in order to optimize copy quality. All supplies should be stored in a
3
cool, dry area.
For optimum performance, it is recommended that 20 lb Bond xerographic bond paper of high quality
be used. Paper of lower quality may contain inherent properties such as excess paper dust and may
lead to premature servicing.
1
2
3
4
5
6
7
WARNING:
1. Do not apply force or place heavy objects (8.82 lb or more) on the original glass. Breaking the
glass may cause personal injury.
2. Do not place heavy objects on the machine. They may fall and injure you.
3. Do not lean on, apply force or place heavy objects on the Finisher (optional). Personal injury
or property damage may result.
4. Do not place some objects or step on the external LCF (Large Capacity Feeder) (optional).
They may fall and injure you.
8
9
10
11
12
9
1
2
3
4
5
6
7
Explanatory Label
CLASS 1 LASER PRODUCT
APPAREIL A LASER DE CLASSE 1
LASER KLASSE 1
PRODUCTO DE LASER DE CLASE 1
Certification Label
PRODUCT IS CERTIFIED BY THE
MANUFACTURER TO COMPLY WITH DHHS
RULE 21 CFR SUBCHAPTER J APPL I CABLE
AT THE DATE OF MANUFACTURE.
MANUFACTURED:
Warning Label
PS
<
>
JS
M
8
9
10
11
12
10
High Temperature Warning Areas

PRECAUTIONS (Cont.)
2. General Precautions (Cont.)
Fixing the adjusters (stoppers)
There are four adjusters (stoppers) located in front and rear bottom
(two adjusters each) of the machine. After moving/installing the
machine, be sure to turn the adjusters clockwise to fix them firmly
on the ground.
* To unlock the adjusters when moving the machine, turn them
counterclockwise.
If the machine is not steady, it may fall over and result in
personal injury.
1
2
3
To lock
To unlock
4
5
6
7
8
9
10
11
12
11


1. BEFORE MAKING COPIES
1. DESCRIPTION OF THE DIGITAL IMAGING SYSTEM
1
2
AND THE OPTIONAL EQUIPMENT.......... 1-2
- Main Components ...................................................................................... 1-2
- Optional Equipment .................................................................................... 1-3
- Control Panel ............................................................................................. 1-4
- Touch Panel ............................................................................................... 1-6
2. TURNING ON THE POWER SWITCH ..................................... 1-8
- Turning ON the Power Switch/Auto Job Start ............................................. 1-8
- Controlling the Use of the Machine with Department Codes...................... 1-9
- Controlling the Use of the Machine with the Optional Key Copy Counters .. 1-10
3
4
5
6
7
8
9
10
11
12
1-1

1
1. DESCRIPTION OF THE DIGITAL IMAGING SYSTEM AND THE OPTIONAL EQUIPMENT
Main Components
2
3
4
5
6
7
Original Scales
Control Panel
Drawers
Paper Size Indicator
Reversing Automatic Document Feeder
Operating Instructions Pocket
(Back Side)
Power Switch
Original Glass
Bypass Cover
Bypass Guide
Feed Side Cover
Tandem LCF
(Large Capacity Feeder)
Touch Panel Contrast Adjustment Volume
(Back Side of the Control Panel)
* When adjusting the contrast of the touch panel,
pull the toner bottle holder out, and turn the
volume on the backside of the control panel.
8
9
10
11
12
1-2
Exit Cover
Front Cover
Toner Bottle
Transfer Unit
Transfer Unit Lever
BEFORE MAKING COPIES
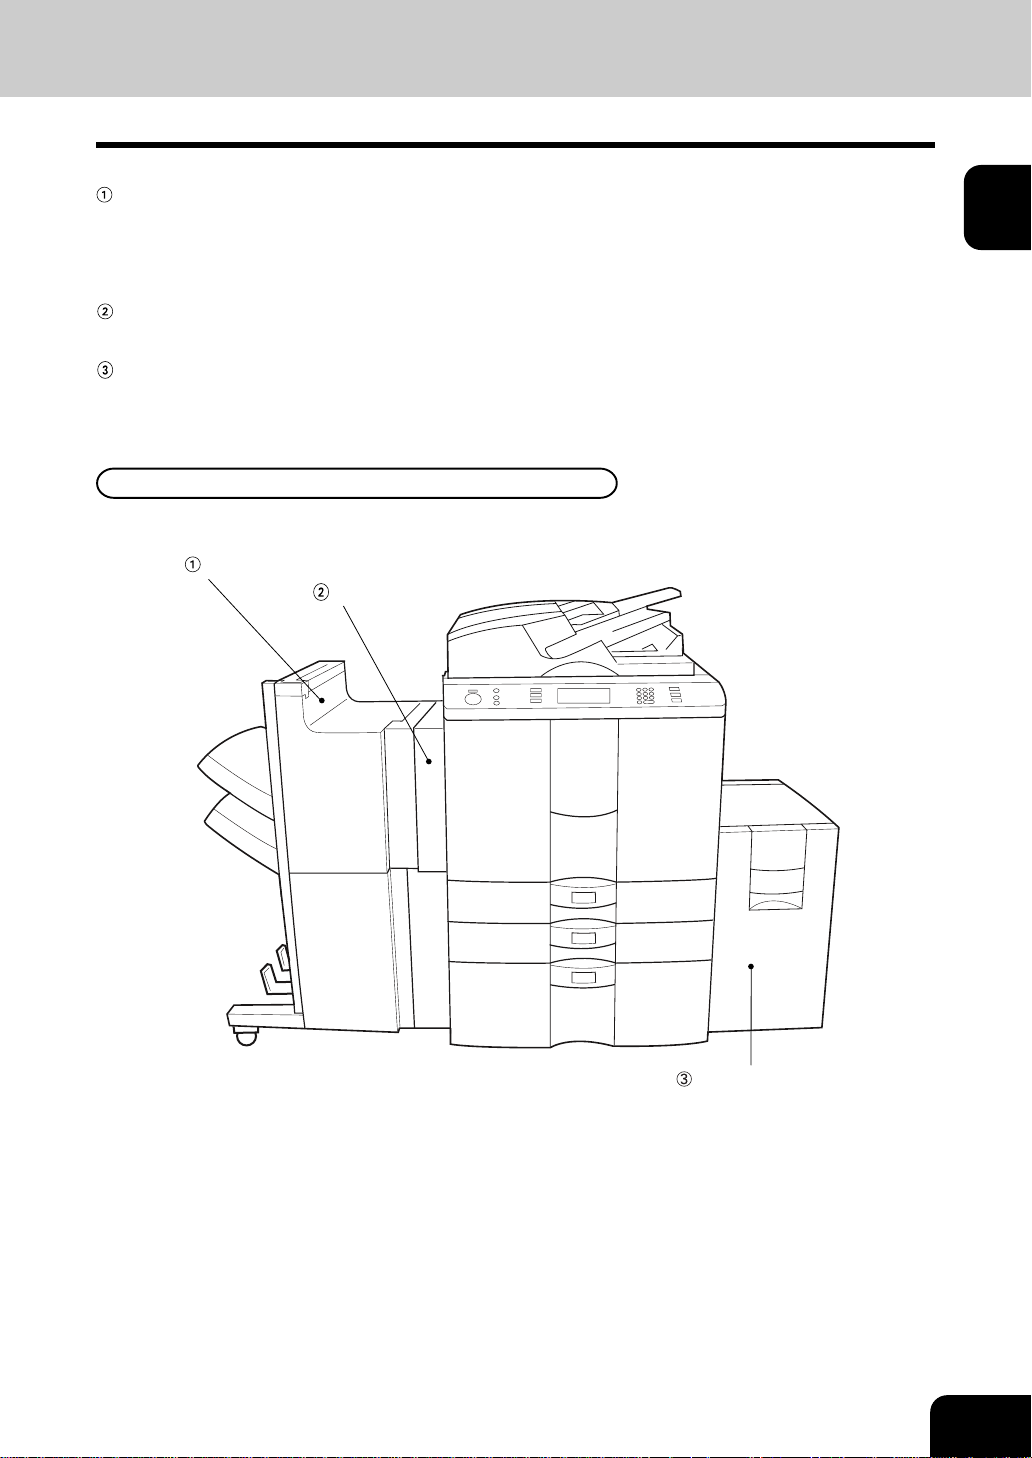
Optional Equipment
Finisher
2-Bin Finisher (DA-FS810)
2-Bin Saddle-Stitch Finisher (DA-FS815)
Enables the use of sort, group and staple modes, plus the hole punch (available when the optional hole
punch unit is installed) and saddle-stitch model.
Hole punch unit (DA-SP81)
Makes punching holes on copies for binding in notebooks.
External LCF (Large Capacity Feeder) (DA-MA810)
Feeds up to 4000 sheets of LT-sized paper (20 lb Bond) (recommended by Panasonic) continuously.
Optional Equipment Configuration
Finisher
Hole Punch Unit
1
2
3
4
5
6
External LCF
(Large Capacity Feeder)
7
8
9
10
11
12
1-3
1
2
3
4
5
1. DESCRIPTION OF THE DIGITAL IMAGING SYSTEM AND THE OPTIONAL EQUIPMENT (Cont.)
Control Panel
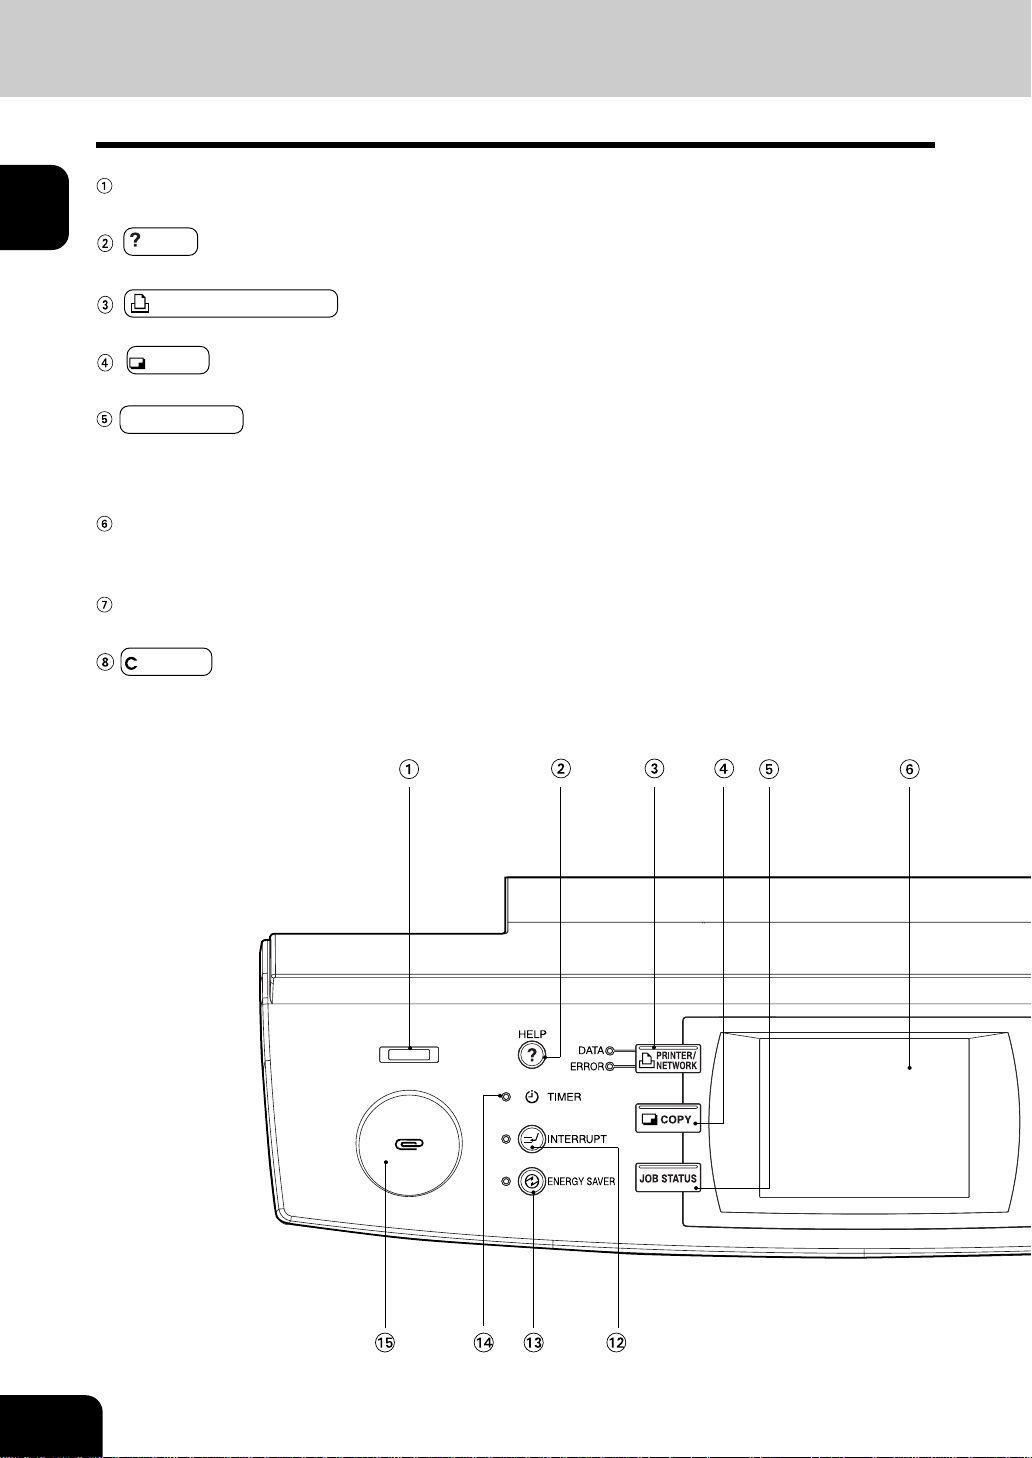
Total Counter
Shows the total of copied paper since the set up of the machine.
HELP key
When this key is pressed, the appropriate operation procedures are displayed.
PRINTER/NETWORK key
Press this key to switch between the printer and the network (optional) functions.
COPY key
Press this key to select the copy functions.
JOB STATUS key
Press this key to monitor the statuses of 1) Job list, 2) Deleting jobs, 3) Moving jobs, 4) Copying status
and 5) Setting drawers. This key flashes in case of 1) No paper in the drawers, 2) Incorrect drawer
setting, 3) Full of paper in the finisher and 4) Hole punching dust bin is full
Touch Panel
Displays the machine conditions, operating procedures, and various instructions and information to the
user in text and illustrations.
Digital keys
Use these keys to enter the number of copies you want to make and so on.
6
7
8
9
10
11
CLEAR key
Use this key to correct numbers entered with the digital keys such as an incorrect copy quantity.
12
1-4
BEFORE MAKING COPIES
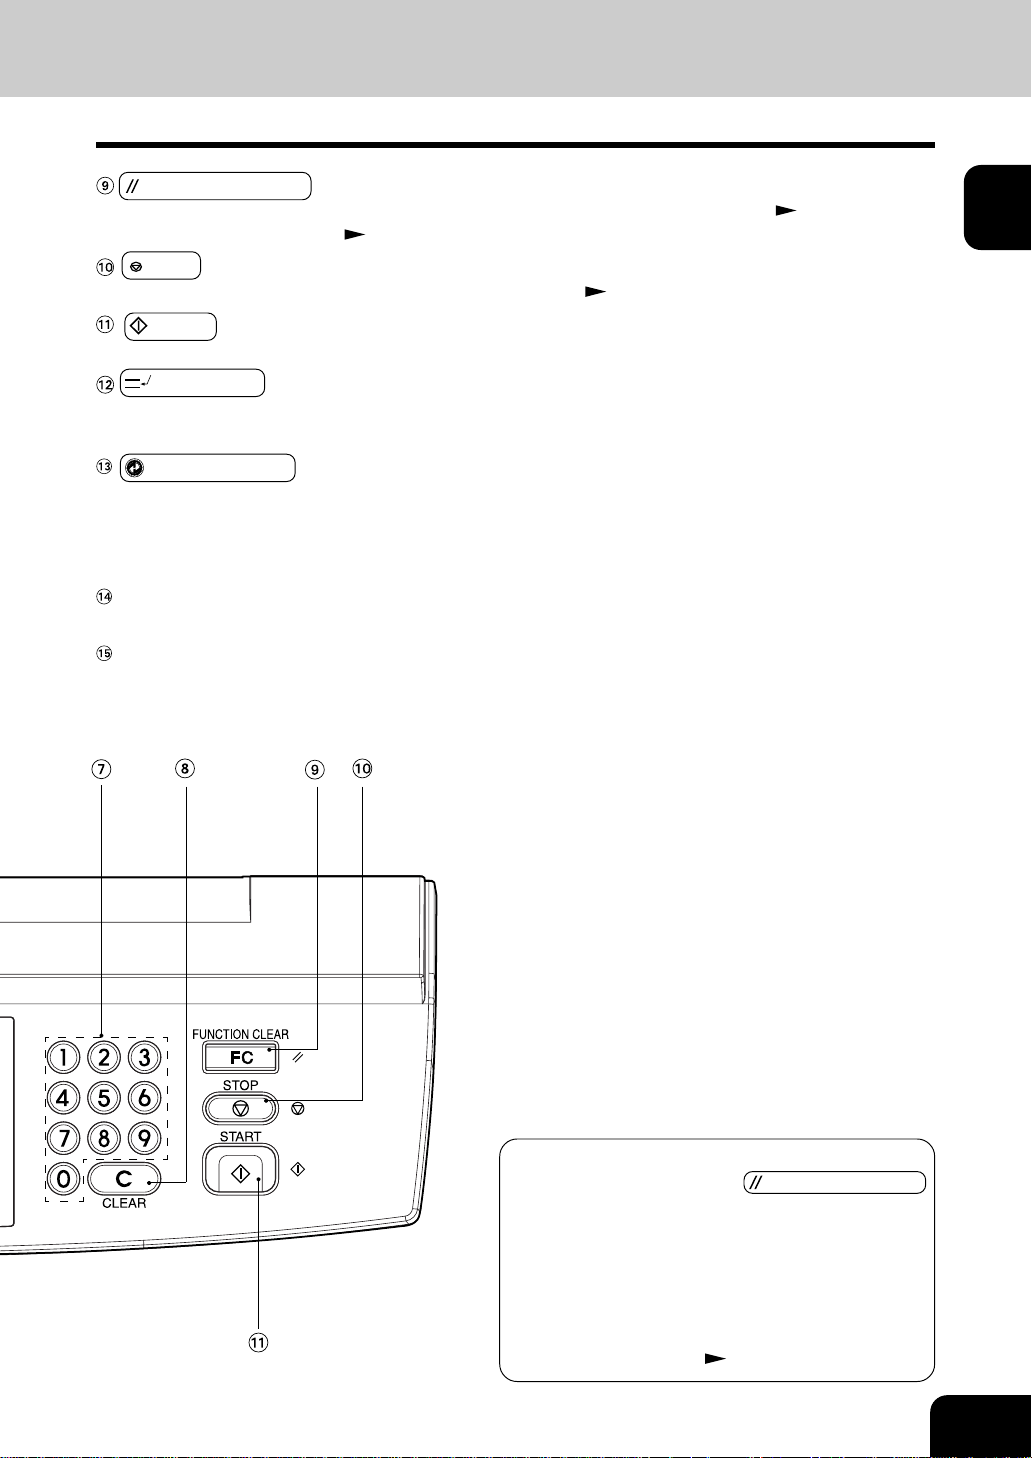
FUNCTION CLEAR key
When this key is pressed, all selected copy modes are cleared to default settings.
* Automatic Function Clear
STOP key
Use this key to stop an ongoing scan and copy operation.
START key
Press this key to start copying.
INTERRUPT key
While copying is already in progress, press this key when you want to make copies of different originals.
Pressing the key again will return you to the previous copy job.
ENERGY SAVER key
When you are not going to use the machine for a while, press this key, which automatically turns off all
display lamps. To resume copying, press this key again.
If you press this key when the optional printer controller is installed, the power supply to the printer
board is not cut off, which allows automatic return of the device when it receives printer data.
TIMER Lamp
TIMER lamp lights when the weekly timer is being used.
Clip Tray
Put clips or staples unfastened out of originals.
Right bottom of this page
Page 2-15
Page 2-2
1
2
3
4
5
6
Automatic Function Clear
Even if you do not press the
key, within the specified period of time after copying
is finished or after the last key is pressed in a copy
procedure, the automatic function clear mode will
work to clear all settings to defaults, and the basic
screen or the quick screen will be displayed.
While the department management function is
being operated, the display returns to the department code input screen.
FUNCTION CLEAR
Page 1-9
7
8
9
10
11
12
1-5
1. DESCRIPTION OF THE DIGITAL IMAGING SYSTEM AND THE OPTIONAL EQUIPMENT (Cont.)
Touch Panel
1
2
3
4
5
6
7
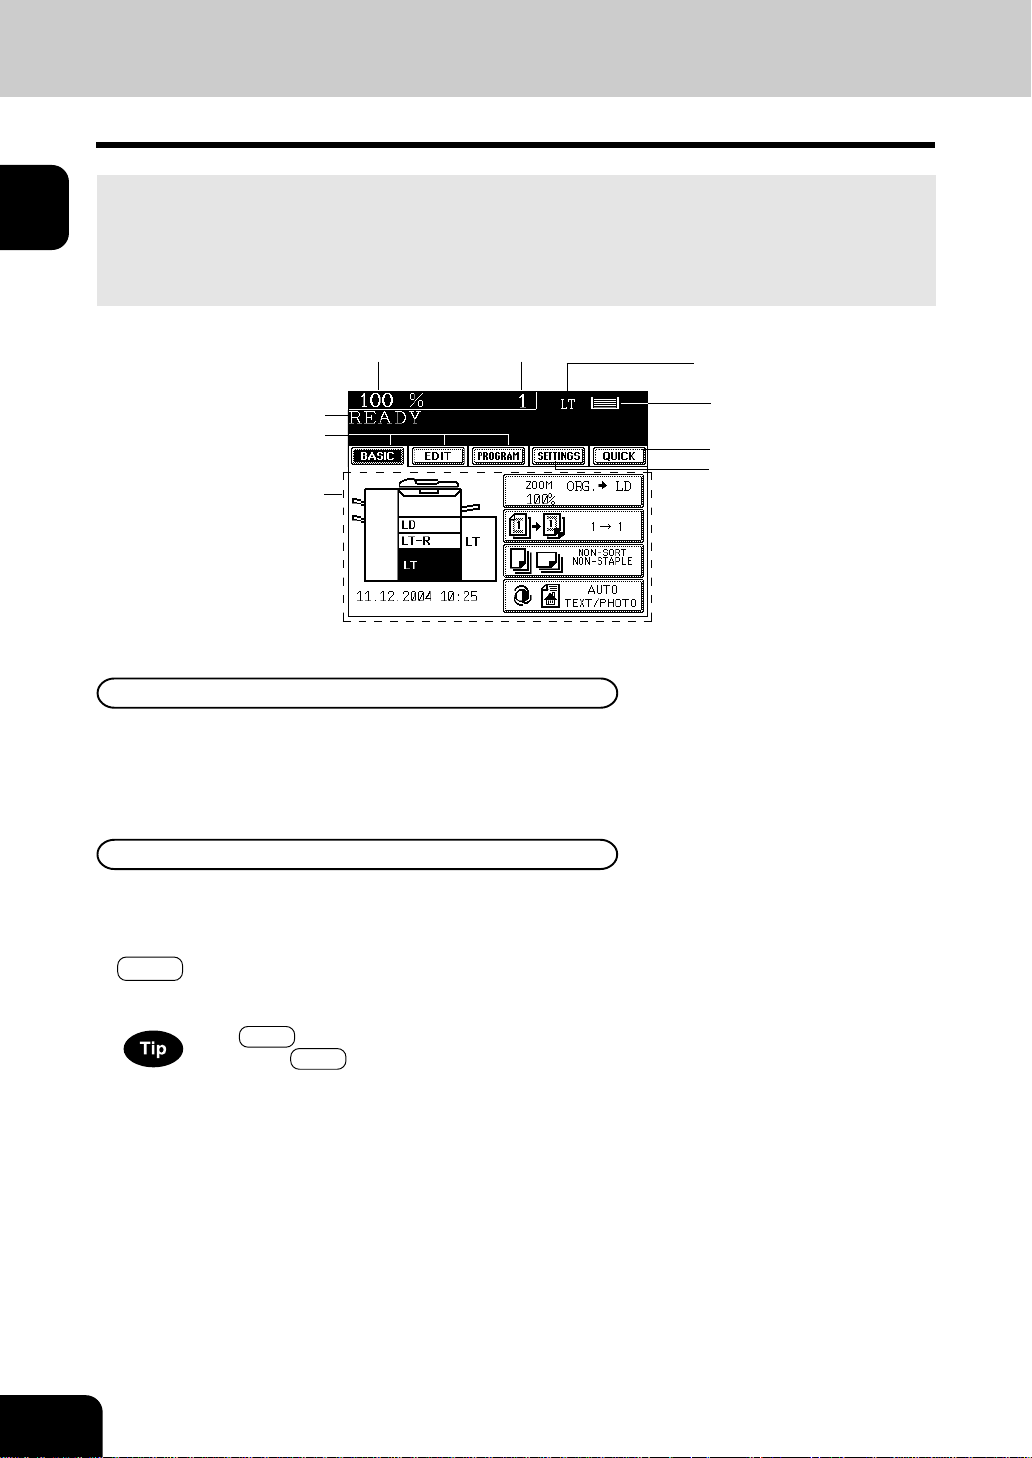
When the power is turned on, and ‘READY’ is displayed, the following basic screen is shown on the touch
panel.
On the screen, currently set functions, selected functions and the machine status are shown using
messages and illustrations.
* The contents of the touch panel screens on this manual show a machine equipped with full-options.
Reproduction ratio
Message
Index keys
Function setting area
Message Display
The following information is shown on the touch panel:
Machine status, operational instructions, cautionary messages, reproduction ratios, total copy quantity,
paper size of a selected drawer and amount of paper in a selected drawer.
Total copy quantity
Currently selected drawer size
Remaining paper level
Quick access key
Set functions confirmation key
8
9
10
11
12
1-6
Touch-keys
Various function items are touch-key selectable. Press any key lightly with your finger.
- Index keys
Used for switching between Basic, Editing, and Program menus.
- QUICK (Quick access) key
Frequently used finishing mode and duplex copying can be simultaneously set on one screen. This screen
is also easier for visually impaired persons to see by displaying black letters on white background.
The Quick (Quick access) key is not indicated on the touch panel in the initial setting.
To use the Quick (Quick access) key, contact your authorized service representative.
- Function setting area
This is where you select or set various functions.
BEFORE MAKING COPIES
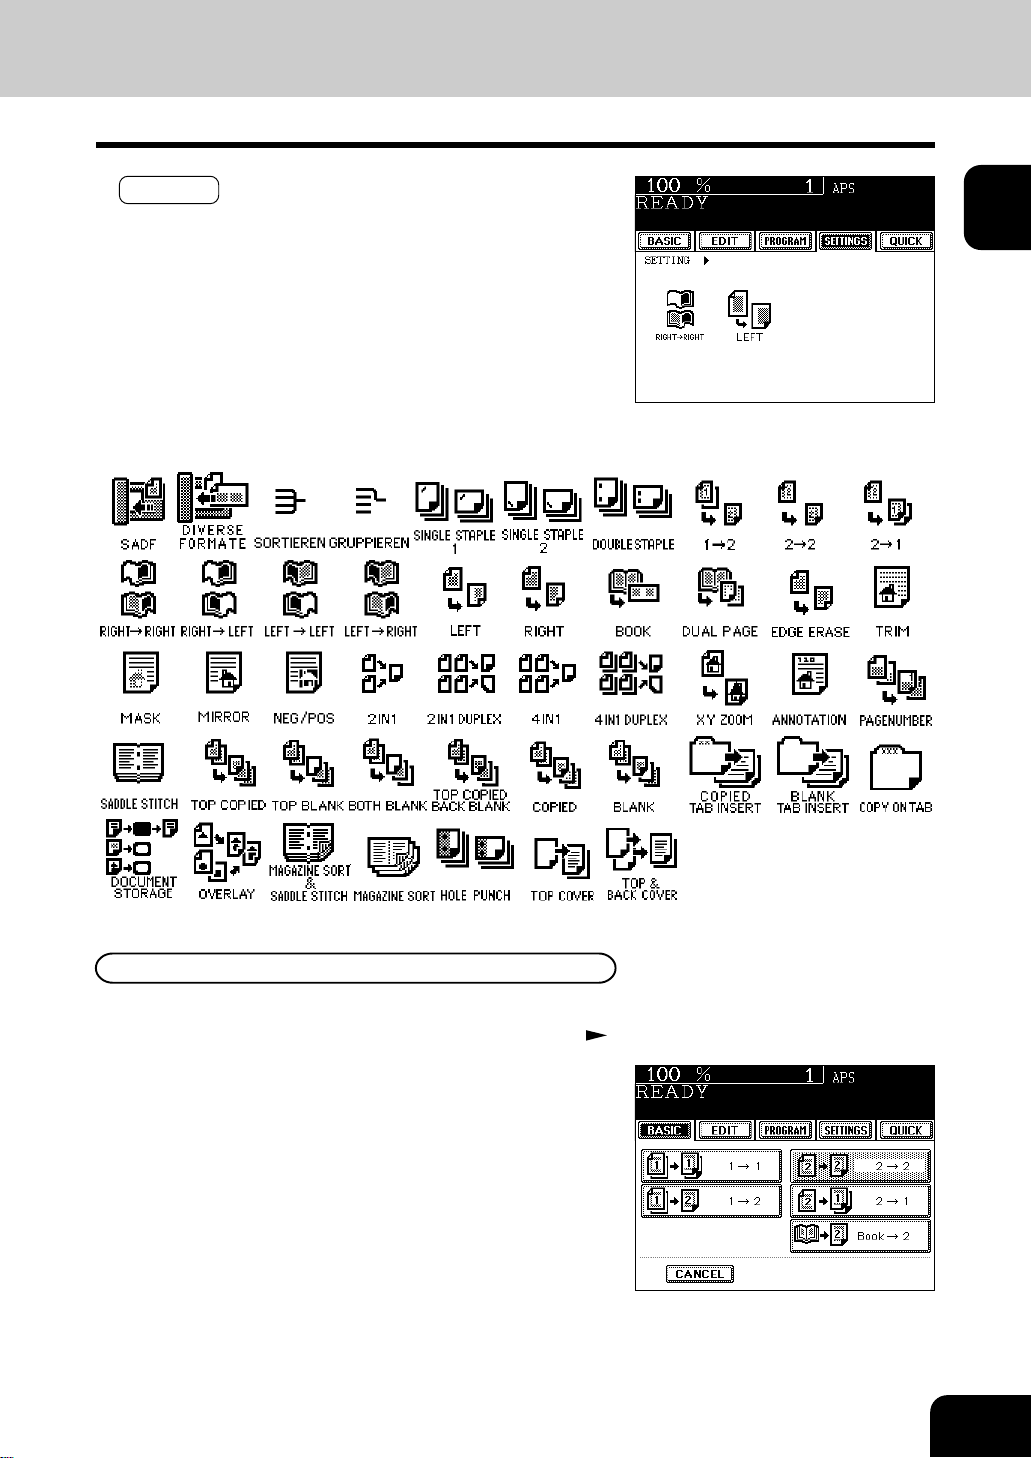
- SETTINGS (set functions confirmation) key
This key allows you to confirm the functions that have been
set. (The display shown on the right is an example.)
The icons displayed on the screen are as follows (some icons may not appear on the screen):
1
2
3
4
5
6
Clearing the Functions Selected
If you press any key that is half-tone shaded, the function selected is cleared. Also, if the machine is left
inactive for approx. 45 seconds, the automatic function clear ( Page 1-4) works and the settings will be
cleared.
7
8
9
10
11
12
1-7
1
2
3
4
5
2. TURNING ON THE POWER SWITCH
Turning ON the Power Switch/Auto Job Start
Turning ON the Power Switch
Turn ON the power switch.
- This message appears on the message panel of the Basic
1
Screen:
Wait Warming Up
- Time of warming up:
Approx. 160 seconds
When “READY” appears, the machine is ready for
copying.
2
6
7
8
9
10
11
12
- When selecting “Quick” of “Initial Screen” on the User
Selection (
While the machine is warming up, place the original on the glass,
select the desired copy modes and press the
The machine starts scanning the originals.
READY
When this message appears, copying will automatically start.
Up to 5 jobs can be stored in the memory. Place the originals for
the 6th job on the original glass or the reversing automatic
document feeder and press the
message will appear:
Auto Start
Page 5-19), the right menu is displayed.
Auto Job Start
START key.
START key. The following
1-8
While the above message is displayed, stopping printing due to
paper jam, etc. Cancels the job of auto start. To clear this status,
press the FUNCTION CLEAR or the STOP key.
BEFORE MAKING COPIES

Controlling the Use of the Machine with Department Codes
With the use of department codes, you can restrict machine users as well as manage copy volumes
made by individual groups or departments of your company.
* Registering, changing and deleting a department code
* The department codes and the key copy counters (
When the department code function is in use, the
screen shown on the right appears immediately
1
after the power switch is turned on or the auto-clear
is carried out.
Key in a registered department code (5-digit).
- The machine will be ready for copying.
2
If the following message remains displayed,
Enter Department code
the department code you have entered may be incorrect. Key
in the correct code.
Page 5-20
Page 1-10) cannot be used together.
1
2
3
4
5
6
7
After Copying is Finished
If the department control function is in use, be sure to press the
panel twice after finishing copying. The display returns to the department code input screen and the
department code function will remain active.
FUNCTION CLEAR key on the control
8
9
10
11
12
1-9


2. HOW TO MAKE COPIES
1. GENERAL COPYING PROCEDURES .................................... 2-2
1
2
2. SETTING COPY PAPER .......................................................... 2-4
- Acceptable Copy Paper Types and Sizes ................................................... 2-4
- Handling and Storing Paper ....................................................................... 2-5
- Changing the Paper Size of the Drawer/
Setting the Drawer for Special Uses ............... 2-6
3. SETTING ORIGINALS ............................................................. 2-9
- Acceptable Original Types and Sizes ......................................................... 2-9
- When Placing an Original on the Glass ................................................... 2-10
- When Using the Reversing Automatic Document Feeder ........................ 2-11
4. AUTO JOB START (JOB PRESET)........................................ 2-13
5. INTERRUPT COPYING ......................................................... 2-14
6. STOPPING THE COPY OPERATION .................................... 2-15
7. DELETING OR CHANGING ORDER OF PENDING JOBS ... 2-16
3
4
5
6
7
8
9
10
11
12
2-1
1
2
3
4
5
6
7
8
9
10
11
12
1. GENERAL COPYING PROCEDURES
After placing, or confirming that there is, paper in the drawers, place the originals. When the START
key is pressed with any settings unchanged, copies are made in the initial (default) settings *
make copies as desired by setting different copy modes.
The initial (default) settings of the machine at the time of installation are as shown below.
*1 The copy modes that are automatically set when the power is turned on, when the energy-saving
mode is cleared or when the
the initial (default) settings.
Initial (default) settings
Reproduction ratio. ...100% Copy quantity ......1
Automatic paper selection 1-sided copies from 1-sided originals
Auto image density Standard mode (original image type)
Non-sort Non-staple mode Continuous original feed mode
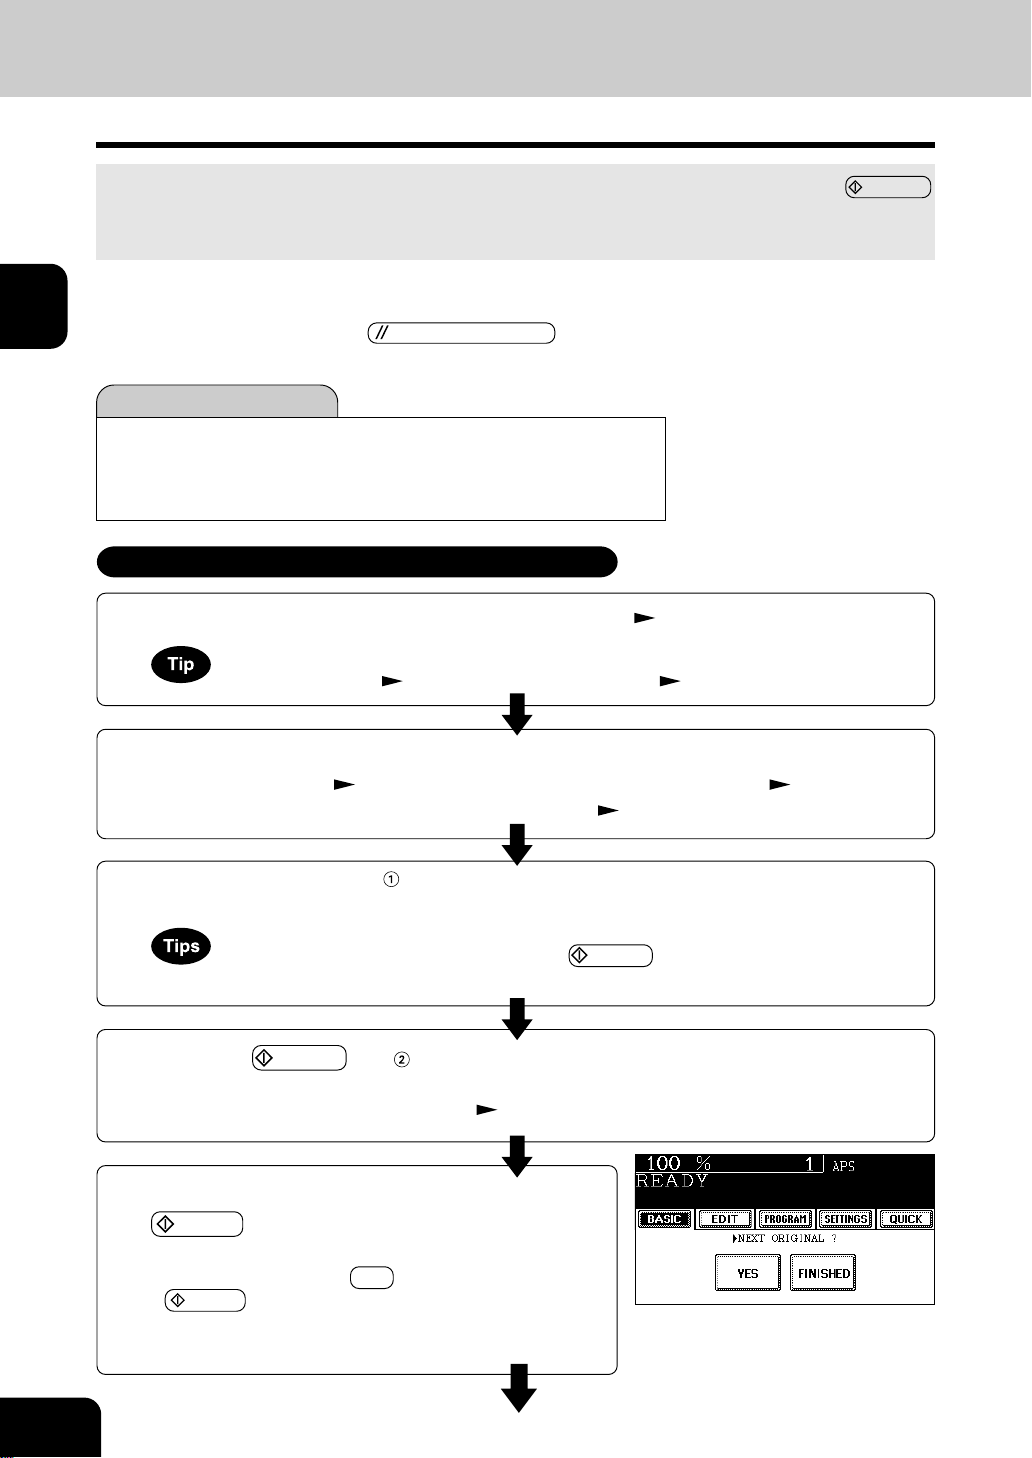
Copying Procedure
Place paper in the drawer(s). - Acceptable copy paper Page 2-4
1
Place the original(s).
- Acceptable originals Page 2-9 - When placing an original on the glass Page 2-10
2
- When using the reversing automatic document feeder Page 2-11
When the desired paper is not placed in any of the drawers or the large capacity feeder :
- Setting the drawer
FUNCTION CLEAR key is pressed on the control panel are called
Page 2-6 - Bypass copying Page 5-8
1
. You can
2-2
Select the copy modes ( in the illustration on the page on the right).
- Use the touch panel and the digital keys.
3
- Selecting multiple copy modes may be restricted depending on their combination.
- Copy modes cannot be changed after the
when originals are divided into multiple sets when fed).
Press the START key ( in the illustration on the page on the right).
- When the reversing automatic document feeder is used and
4
the continuous feed mode is selected (
Place the next original (2nd side) and press the
5
HOW TO MAKE COPIES
START key.
- Set the first page of your originals first.
- You can also press the YES key before pressing the
START key to perform the same operation.
(See the comment on the right)
- Repeat this step for the subsequent originals.
Page 5-2), copying begins.
START key is pressed (including the case
• The above display will not appear for
Single-sided copying when Non-Sort
or Non-Staple is selected.
Once the final original has been scanned, press the FINISHED key.
- When the reversing automatic document feeder is used, and the single-feed mode is selected,
6
the procedure is slightly different from the above. Procedure of using the single-feed mode
Page 5-3
- After starting copying, press the JOB STATUS key on the control panel, then press the
STATUS key on the touch panel to indicate which drawer is in use. When paper runs out
of each drawer, the empty drawer will flash.
1
2
3
4
5
6
7
Exiting Copy Papers
The paper exits with its printed side down except in the following
cases.
When paper is exited with its printed side up:
- When ‘Non-sort / Non-staple’ mode is selected for setting
the original on the original glass.
- When the paper size is not set for bypass copying.
When Coming Across the Situations below
To make multiple sets of copies:
- Key in the copy quantity.
- To correct the input copy quantity, press the CLEAR key.
When the paper has run out in the middle of copying:
JOB STATUS key flashes. Press this key to check which
drawer is flashing and add papers.
To stop a copy operation Page 2-15
When this message appears “Wait ”:
The machine may automatically go into the adjustment mode.
It will soon start working. Do not turn OFF the power. Just wait
for a while.
8
9
10
11
12
2-3
1
2
3
4
5
6
7
8
9
10
11
12
2. SETTING COPY PAPER
Acceptable Copy Paper Types and Sizes
For optimum copy quality, use the paper recommended by Panasonic. Consult your service technician for
details.
Feeder
Drawers
Paper Type
Plain Paper
(17- 20 lb Bond)
Thick 1
( - 90 lb Index)
Thick 2
( -110 lb Index)
Paper Size
(Standard size)
LD, LG, LT, LT -R, ST-R, COMP
1
/8” x 14”), 13” LG (81/2” x13”)
(10
1
8.5” SQ (8
/2” x 81/2”)
Remarks
500 sheets (20 lb Bond)
NOTE: LD: Ledger, LG:
Legal, LT: Letter, LT-R:
Letter-R, ST-R: Invoice-R
Tandem LCF
External LCF
(optional)
Sheet Bypass
Tab paper
Plain Paper
(17 - 20 lb Bond)
Thick 1
(-90 lb Index)
Thick 2
(-110 lb Index)
Plain Paper
(17 - 20 lb Bond)
Thick 1
(-90 lb Index)
Thick 2
(-110 lb Index)
Plain Paper
(17- 20 lb Bond)
Thick 1
(-90 lb Index)
Thick 2
(-110 lb Index)
Tracing Paper
Tab paper
OHP film
(Standard size)
LT
(Standard size)
LT
(Standard size)
LT
(Standard size)
LD, LG, LT, LT -R, ST-R,COMP, 13”
LG, 8.5” SQ
(Non-Standard size)
Length: 3.9” - 12”
Width: 5.8” - 18”
(Standard size)
LT
(Standard size)
LT
Only the 2nd drawer can
be set *1
2500 sheets (20 lb Bond)
4000 sheets (20 lb Bond)
100 sheets (20 lb Bond)
*1
*1
*1, *2
2-4
*1: Automatic duplex copying is not available.
*2: Available only when non-sort non-staple mode. Staple and hole punch is not available.
- Paper between 20 lb Bond and 110 lb Index can be copied if the thick mode is used.
- The following sizes of paper can be used for hole punch: LG, LT-R (2 holes, 0.315” diameter), LD, LT
( 3 holes, 0.315” diameter)
- “Maximum capacity” refers to the number of sheets when the paper recommended by Panasonic is set.
HOW TO MAKE COPIES

Handling and Storing Paper
Pay attention to the following points:
- Avoid using paper that is specially treated or paper that was printed on another machine, and also
avoid performing double copying on the same side of paper; this may cause a malfunction.
- Do not use paper with creases, wrinkles, curled paper, paper prone to curling, smooth paper, or
tough paper; this may cause paper misfeeds.
- Paper should be wrapped in its wrapping paper and stored in a damp-free place.
- To prevent paper from being folded or bent, store it evenly on a flat surface.
1
2
3
4
5
6
7
8
9
10
11
12
2-5
1
2
3
4
5
6
7
8
9
10
11
12
2. SETTING COPY PAPER (Cont.)
Changing the Paper Size of the Drawer/Setting the Drawer for Special Uses
The paper size of the drawers of the machine can be changed to desired size. The drawers can also be
set for cover sheet, insertion, tab paper, thick paper and special sheets.
Changing the Paper Size of the Drawer
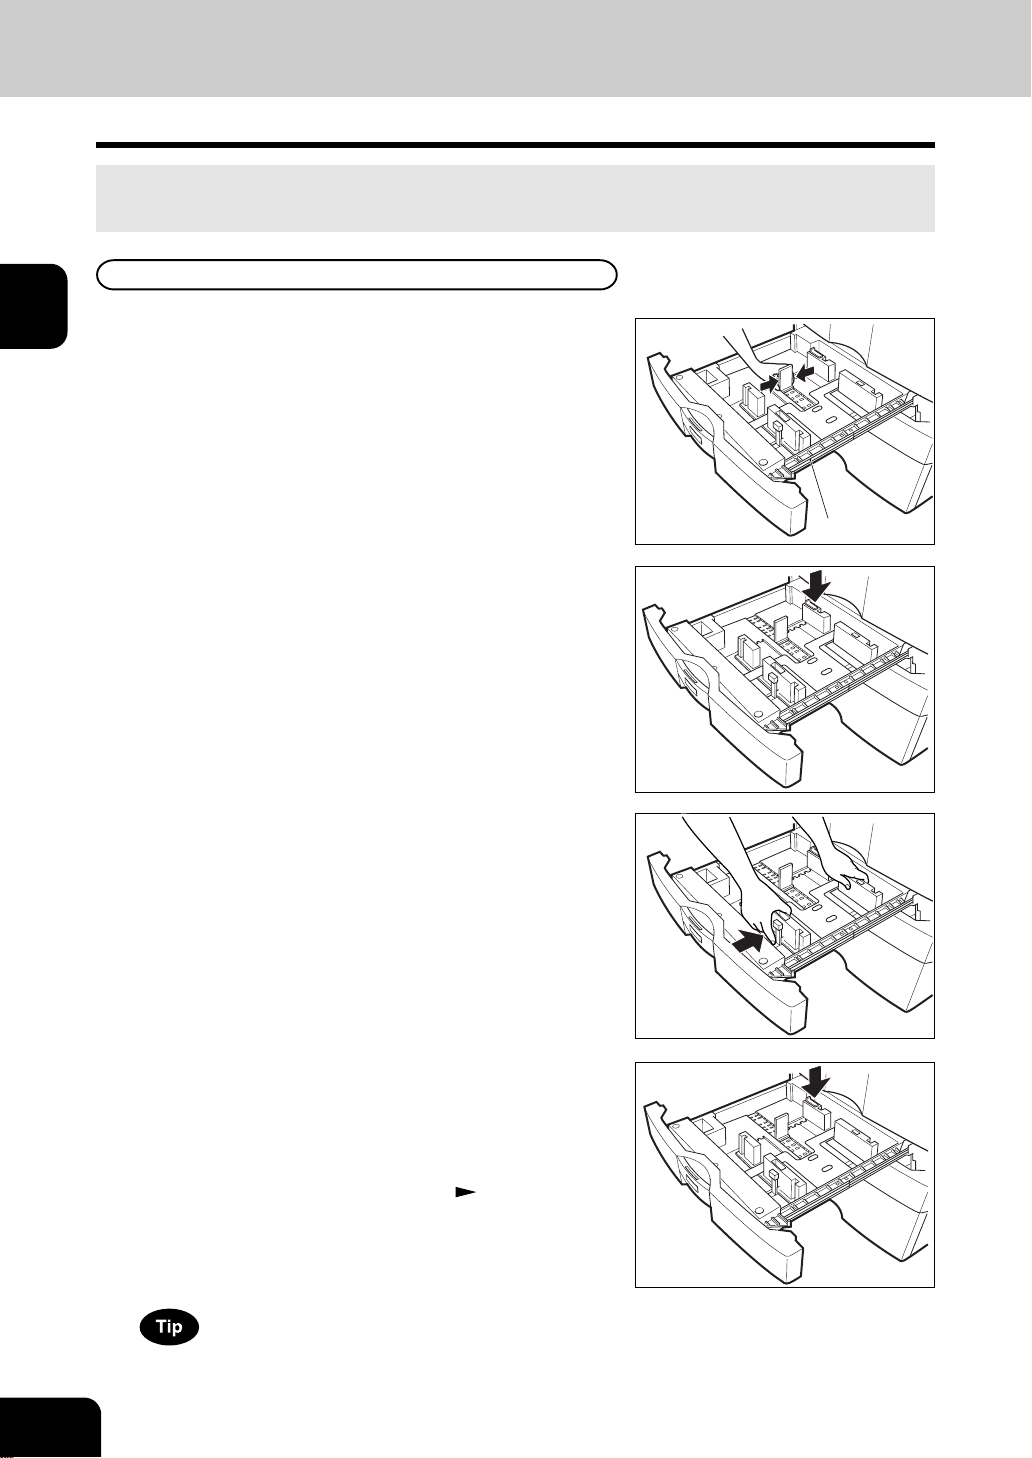
Pull out the drawer toward you.
- Do not touch the slide rail of the drawer.
1
Push the lower part of the width guide in the direction of
the arrow to remove it, and reinstall the width guide
2
at the desired paper size (indicated on the bottom
surface of the drawer).
Push the arrow part (right side) of the size selection
lever to unlock it.
3
While pushing the size selection lever in the direction of
the arrow, set the side guide to the desired paper
4
width.
- Adjust the side guides with both hands.
Slide rail
2-6
Push the arrow part (left side) to lock the size selection
lever.
5
Place paper in the drawer(s).
- Place the paper in face down.
6
- Notes for placing paper in the drawer. Page 7-3, step 2
Push the drawer straight into the machine until it
comes to a stop.
7
- Be sure to push the drawer carefully and fully in.
Be careful not to let your fingers be caught when closing
the drawer.
HOW TO MAKE COPIES
 Loading...