

Panasonic DMR E50 User Manual
DVD Video Recorder
Operating Instructions
Model No. DMR-E50
EB
Before connecting, operating or adjusting this product,
please read these instructions completely.
Please keep this manual for future reference.
Web Site: http://www.panasonic-europ e.com
RQT6996-B

Contents
Contents...................................................................................... 2
Control reference guide ............................................................. 4
Remote control.............................................................................4
Main unit................................... ............... ........................... .......... 4
The unit’s display.......................................................................... 5
Warning and Important Informati on.................. .............. .......... 6
Dear Customer............................................................................ 7
Checking the Accessories......................................................... 7
The remote control.............................................................. ....... 8
Batteries........................................................................................8
Use ...............................................................................................8
Television operation...................................................................... 9
Discs..........................................................................................10
Discs you can use.......................................................................10
Discs you can use for recording and play................................... 10
Play-only discs............................................................................10
Discs that cannot be played........................................................11
Audio format logos....................................... ............................ ... 11
Types of disc for the type of connected TV ................................11
Connections (with Scart le a ds ).............. ............................ ..... 12
Connections (without Scart leads)............. .............................13
Connections (with S-Vide o cable)................................. .......... 14
Recording from Set Top Boxes (STB) or
other Satellite Receivers (SAT)............................................. 15
Auto Setup (with Q Link Function s ).................. .............. ........ 16
To Set Up this DVD Recorder with a brand-new Q Link TV....... 16
To Set Up this DVD Recorder with an existing Q Link TV.......... 17
Auto Setup (without Q Link Functions).................................. 17
Removing Interference ............................................................... 18
Video Plus+ Codes for Satellite Receivers/Cable TV ............ 18
Selecting TV screen type.............. ........................... ................ 19
Playing discs.............................................................................20
Erasing a programme that is being p l a yed.................................20
Quick View (Play t1.3) ..............................................................21
Starting play from where you stopped it (Resume Function) ...... 21
Fast forward and rewind—SEARCH........................................... 21
Slow-motion play.......... ..............................................................21
Frame-by-frame viewing............................................................. 21
Skipping......................................................................................22
Starting play from a selected programme, title, chapter or track 22
Manual Skip.............................................................. .. .. .. .. .. ..... .. .22
Selecting an amount of time to skip—Time Slip......................... 22
Changing audio................................................................. .. ..... .. .23
Marking places to play again—MARKER ................................... 24
Using menus to play MP3 discs.................................................. 25
Recording television programmes... ............................. .......... 26
Flexible recording mode (FR).....................................................27
One Touch Recording—Specify a time to stop recording........... 27
Playing while you are recording............... ............... ................ 29
Playing from the beginning of the programme you are recording—
Chasing play ............................................................................29
Simultaneous recording and play ............................................... 29
Checking the recording during recording (TIME SLIP)............... 30
Watching the television while recording...................................... 30
Using the FUNCTIONS window...............................................30
About the FUNCTIONS window .................................................30
Using the FUNCTIONS window.................................................. 30
Timer recording .............. ............... .......................................... .32
Using VIDEO Plus+ number to make ti mer recording ................32
Manual programming..................................................................34
To check programmes................................................................ 35
Starting and canceling programmes.............. ............... ..............35
To clear a timer recording programme ....................................... 35
Recording from a video cassette player.................................36
To select the TV system (PAL/NTSC)........................................36
Entering titles...................................................... .............. ........ 37
DISC INFORMATION.................... .............. ............... ............... .37
Enter Title........................................ .............. ............................ .37
Disc Protection......................... ........................... ............... .........38
Releasing disc protection.................... .............. ............... ...........38
Erase all programmes................................................................. 39
Format.........................................................................................39
Finalize—Creating DVD-Video.................................................... 40
Using the DIRECT NAVIGATOR...............................................41
Selecting programmes to p la y................... ............... ...................41
Erasing programmes ...................................................................42
Entering and editing programme titles ........................................42
Checking programme contents...................................................42
Protecting programmes...............................................................43
Releasing programme protec tio n................................. .............. .43
Erasing parts of a programme............................... ......................44
Dividing programmes..................................................................44
Using PLAY LIST to edit programmes....................................45
Displaying PLAY LIST.............. ........................... ............... .........45
Creating PLAY LIST....................................................................46
Playing PLAY LIST.................................... ........................... .......47
Playing Scenes ...........................................................................47
Adding Scenes to a PLAY LIST..................................................48
Moving a Scene..........................................................................48
To re-edit a PLAY LIST Scene....................................................49
Erasing a Scene from a PLAY LIST............................................49
Copying PLAY LIST..................... ............................ .............. .....50
Erasing a PLAY LIST................... ............................ ...................50
Titling PLAY LIST........................................................................50
Checking PLAY LIST’s contents.................................................50
Using DISPLAY menus.............................................................51
Common procedures...................................................................51
Disc menu.................................... ...............................................51
Play menu...................... ...................................................... .......52
Picture menu........... ............... ........................... ............... ...........52
Sound menu.............................................. .... .. .. .. .. ....... .. .. .. .. .. .. ...52
Repeat play .................................................................................53
Child Lock.................. ....................................................... .........54
To activate the Child Lock...........................................................54
To cancel the Child Lock.............................................................54
Connecting external equipments ............................................54
Enjoying more powerful sound ....................................................54
Connecting a digital amplifier or system component [A].............55
Connecting an analog amplifier or system component [B] ..........55
Connecting a Decoder ................................................................56
Connecting a satellite receiver or digital receiver........................56
Connecting a video cassette recorder.........................................57
Changing the unit’s settings.................................................... 58
Common procedures...................................................................58
Summary of settings ................................................................... 59
Entering a password (Ratings)....................................................62
Digital output...............................................................................62
Remote Setting........................ ........................... ............... .........63
Operating other Panasonic DVD equipment with
the remote control.....................................................................63
Clock Settings................................ .............................................64
Channel Settings.........................................................................65
Changing the Owner ID...............................................................67
Shipping Condition..................................................................... .67
Status displays.......................................... ........................... .....68
Changing the information dis p layed.......... ............................. .....68
Display examples............. .............. .............................................68
Maintenance and Handling.............................................. .........69
Maintenance................................................................................69
Disc handling............................................................................ ...69
Glossary.....................................................................................70
Self-diagnosis............................................................................72
Error displays ............................................................................73
Troubleshooting guide.............. ............... ........................... .....74
Specifications............................................................................77
Index........................................ .... .. .. ..... .. .. .. .. .. .. .. .. ..... .Back Cover
2
Keep this page open as you read through the Operating Instructions. Refer to it for the control and component names and numbers which
RETURN
FUNCTIONS
PROG/CHECK
DISPLAY
TIME SLIP
TIMER
F Rec
INPUT SELECT
ERASE
AUDIO
POSITION MEMORY
MARKER
STAT U S
DISPLAY
REC MODE
FRAME
appear in the text.
The illustration shows DMR-E50EB for the United Kingdom.
1
VIDEO IN
N
I
S-VIDEO
AV
3
DVD/TV
DVD
TV
Í Í
VIDEO Plus+ AV
DIRECT TV REC
123
4
5
789
CANCEL
0
SKIP
STOP
PAUSE
AUDIO I N
L/MONO
R
DVD
6
VOLUME
-/- -
SLOW/SEARCH
TV
REC
CH
B@JN <
OPEN/CLOSE
OPEN/CLOSE
CH
CH
TIME SLIP
REC MODE
TIME SLIP
REC
ERASE
EXT LINK
TIMER REC
/a1.3
I7E
Hold both sides of the remote control’s cover to open it. (You can
also open it by pressing on the center of it and sliding it down.)
DIRECT NAVIGATOR
TOP
MENU
FUNCTIONS
PROG/CHECK
TIMER
PLAY LIST
MENU
ENTER
A B C D
RETURN
MANUAL SKIP TIME SLIP
3
Control reference guide
ENTER
ENTER
ENTER
123
789
0
-/- -
4
5
6
ENTER
Remote control
(1) DVD on/of f button (Í, DVD) . . . . . . . . . . . . . . . . . . . . . . 17
≥To switch the unit from on to standby mode or vice versa. In
the standby mode, the unit is still connected to the mains.
≥In standby mode, the unit is still consuming a small amount
of power.
(2) VIDE O Pl u s + button (VI D EO Pl us+ ) . . . . . . . . . . . . . . . . 32
(3) Television inp ut mode selector (AV). . . . . . . . . . . . . . . . 9
(4) Numeric buttons (0–9, – /– –) . . . . . . . . . . . . . . . . . . . . . 9
≥When selecting a title, chapter, track, programme, or play list
Example: “5”: [0] )[5]
Example: “15”: [1] )[5]
≥When selecting a page of play list scene and item of MP3
Example: “5”: [0] )[0] )[5]
Example: “15”: [0] )[1] )[5]
≥When selecting a television channel
Example: “5”: [5]
Example: “15”: [ ] )[1] )[5]
/
(5) Cancel button (CANCEL). . . . . . . . . . . . . . . . . . . . . . . . . 24
(6) Skip buttons (:, 9, SKIP). . . . . . . . . . . . . . . . . . . . 22
(7) Stop button (∫). . . . . . . . . . . . . . . . . . . . . . . . . . . . . . . . . 20
(8) Pause button (;) . . . . . . . . . . . . . . . . . . . . . . . . . . . . . . . 20
(9) Top menu and Direct Navigator button
(TOP MENU, DIRECT NAVIGATOR). . . . . . . . . . . . . . 20, 41
(10)Cursor buttons (3, 4, 2, 1)/
Enter button (ENTER) . . . . . . . . . . . . . . . . . . . . . . . . . . . 20
(11)Function button (FUNCTIONS) . . . . . . . . . . . . . . . . . . . . 30
(12)Timer recording button ( , TIMER). . . . . . . . . . . . . . . . 32
(13)Manual programming and check b utton
(PROG/CHECK) . . . . . . . . . . . . . . . . . . . . . . . . . . . . . . . . 34
(14)T V on /off button (Í, TV) . . . . . . . . . . . . . . . . . . . . . . . . . 9
(15)DVD/ TV switch (DVD, TV) . . . . . . . . . . . . . . . . . . . . . . . . . 8
(16)Recording button (¥, REC) . . . . . . . . . . . . . . . . . . . . . . . 26
(17)Direct TV recording button (¥, DIRECT TV REC) . . . . . 28
(18)Channel up/down buttons (W, X, CH). . . . . . . . . . . . . . . 26
(19)T V volu m e up /down buttons (r, s, VOLUME). . . . . . . . 9
(20)S low/Search buttons (6, 5, SLOW/SEARCH) . . . . 21
(21)Play/t1.3 button (1) . . . . . . . . . . . . . . . . . . . . . . . . . . . . 20
(22)Menu and Play List button (MENU, PLAY LIST). . . . 20, 45
(23)Return button (RETURN). . . . . . . . . . . . . . . . . . . . . . . . . 16
(24)Manual skip button (MANUAL SKIP) . . . . . . . . . . . . . . . 22
(25)T ime slip button (T IME SLIP) . . . . . . . . . . . . . . . . . . . . . 30
(26)Recording mode button (REC MODE) . . . . . . . . . . . . . . 26
(27)Flexible recording button (F Rec). . . . . . . . . . . . . . . . . . 27
(28)Status display button (STATUS) . . . . . . . . . . . . . . . . . . . 68
(29)Input select button (INPUT SELECT) . . . . . . . . . . . . . . . 36
(30)Erase button (ERASE) . . . . . . . . . . . . . . . . . . . . . . . . 20, 47
(31)Aud io but ton (AUDIO) . . . . . . . . . . . . . . . . . . . . . . . . . . . 23
(32)Frame advance and frame reverse buttons
(2;, ;1, FRAME) . . . . . . . . . . . . . . . . . . . . . . . . . . . . . 21
(33)[C] button . . . . . . . . . . . . . . . . . . . . . . . . . . . . . . . . . . . . . 9
(34)D i s play button (DISPLAY) . . . . . . . . . . . . . . . . . . . . . . . . 51
(35)Marker button ( MA R KER) . . . . . . . . . . . . . . . . . . . . . . . . 2 4
(36)Position memor y butt on (POSITION MEMORY) . . . . . . 21
Page
Main unit
(37)R e m o t e c o ntrol signal sensor . . . . . . . . . . . . . . . . . . . . 8
(38)Disc tray . . . . . . . . . . . . . . . . . . . . . . . . . . . . . . . . . . . . . . 20
(39)Disc tray open/close button (<, OPEN/CLOSE). . . . . . 20
(40)External link button (EXT LINK). . . . . . . . . . . . . . . . . . . 28
(41)Standby indicator
≥When the unit is connected to the AC mains lead, this
indicator lights up in standby mode and goes out when the
unit is turned on.
(42)AV3 input terminals (AV3). . . . . . . . . . . . . . . . . . . . . . . . 57
(43)Display . . . . . . . . . . . . . . . . . . . . . . . . . . . . . . . . . . . . . . . 5
(44)Time slip indicator (TIME SLIP)
≥While both recording and play are activated, this indicator
lights up.
(45)Skip/Slow/Search buttons (:/6, 5/9) . . . . . . 21
Buttons such as
1 function the same as the controls on the
remote control.
ªEntering titles
(page 37)
≥To enter characters
Use [3, 4, 2, 1] (10) to select the character you want to
enter and press [ENTER] (10).
≥To erase characters
Press [;] (8). (You can also erase characters by using
[3, 4, 2, 1] (10) to select “ERASE” and pressing [ENTER]
(10).)
PAUSE
≥To finish entering the title
Press [∫] (7). (You can also finish entering the title by using
[3, 4, 2, 1] (10) to select “SET” and pressing [ENTER]
(10).)
STOP
Page
≥To enter a space
You may enter a space by pressing [-/--] (4) and then press
[ENTER] (10).
4
The unit’s display
Control reference guide (continued)
Rotating (REC): recording
Stopped (REC): recording paused
Stopped (STOP):
play stopped with the resume function
(1)
(2)
(3)
Rotating (REC, PLAY):
recording and playing simultaneously or
Time Slip is in progress
Stopped (STOP):
play stopped without the resume function
(4)
(5)
Rotating (PLAY): playing
Stopped (PLAY): play paused
(6)
(1) Recording indicator (REC)
On:
while r e c o rding
(2) Timer programme display
On:
when a programme for timer recording is on
Flashes:
when there are less than 10 minutes to go before timer
recording is programmed, but the unit is not on standby.
(pages 32 and 34)
(3) Disc type
DVD-RAM: DVD-RAM
DVD-R: DVD-R
DVD-V: DVD-Video
VCD: Video CD
CD: Audio CD, MP3 disc
(4) The display mode of the main display section
GRP: group number
TITLE: title number
TRACK: track number
CHAP: chapter number
PG: programme number
PL: play list number
(5) Recording mode (pages 26 and 33)
XP: High-quality mode
SP: Normal mode
LP: Long play mode
EP: Extra long play mode
XP SP LP EP (all on):
FR mode (in flexible recording or in timer recording)
(7)
(8)
(6) Extern al link display (page 28)
On:
when a linked timer recording with external equipment is in
standby mode, or being performed
(7) Channel
1, 2, 3, ....., 99 / A1, A2, A3, A4
(8) Main display section
Timer recording
Recording and play counter
Remaining recording time
Current time
Title, track, chapter, group
Miscellaneous messages
etc.
≥Remaining recording time:
(For example)
1 hour )Displayed as “R 1:00”
5
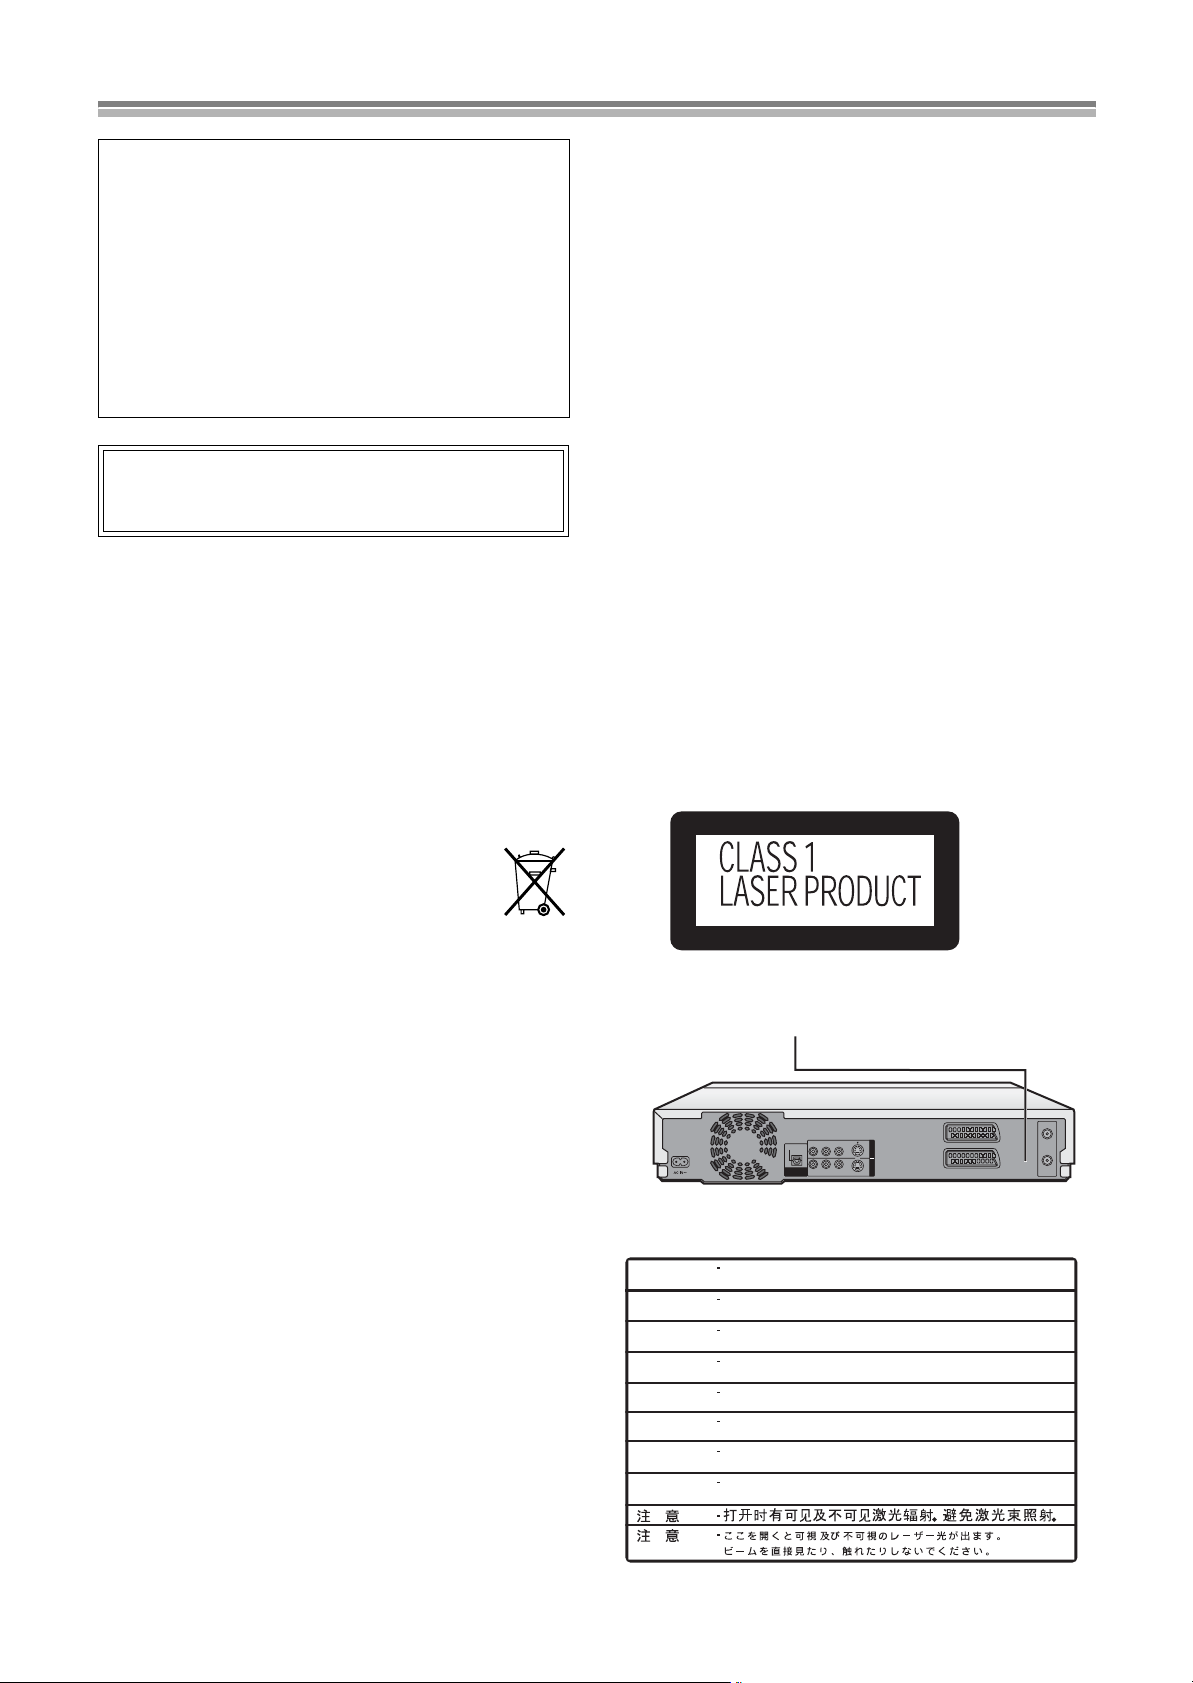
Warning and Important Information
CAUTION!
THIS PRODUCT UTILIZES A LASER.
USE OF CONTROLS OR ADJUSTMENTS OR
PERFORMANCE OF PROCEDURES OTHER THAN THOSE
SPECIFIED HEREIN MAY RESULT IN HAZARDOUS
RADIATION EXPOSURE.
DO NOT OPEN COVERS AND DO NOT REPAIR YOURSELF.
REFER SERVICING TO QUALIFIED PERSO N NEL.
WARNING:
TO REDUCE THE RISK OF FIRE, ELECTRIC SHOCK OR
PRODUCT DAM AG E, DO NOT EXPOSE THI S EQ U I PMENT
TO RAIN, MOISTURE, DRIPPING OR SPLASHING AND
ENSURE THAT NO OBJECTS FILLED WITH LIQUIDS, SUCH
AS VASES, SHALL BE PLACED ON THE EQUIPMENT.
As this equipment gets hot during use, operate it in a well
ventilated place;
do not install this equipment in a confined space such as
a book case or similar unit.
Important
Your attention is drawn to the fact that the recording of
pre-recorded tapes or discs or other published or broadcast
material may infringe copyright laws.
For your safety
Do not remove outer cover.
Touching internal parts of the unit is dangerous, and may seriously
damage it.
To prevent electric shock, do not remove cover. There are no user
serviceable parts inside. Refer all servicing to qualified service
personnel.
For your safety, be sure not to connect or handle the equipment
with wet hands.
Disposal of old equipment
Batteries, packaging and old equipment should not be
disposed of as domestic waste, but in accordance with
the applicable regulations.
Cautions before you operate t his unit
≥Do not place in an enclosed area so that the rear
cooling fan and the cooling vents on the side are covered up.
Avoid:
≥Humidity and dust.
≥Extreme heat such as direct sunlight.
≥Magnets or electromagnetic objects.
≥Touching internal parts of the unit.
≥Water or some other liquid.
≥Lightning. (Disconnect the aerial plug from the unit during
lightning storms.)
≥Anything heavy on the unit.
≥Connecting or handling the equipment with wet hands.
≥Using a cell phone near the unit because doing so may cause
noise to adversely affect the picture and sound.
Do:
≥Wipe the unit with a clean and dry cloth.
≥Install the unit in a horizontal position.
≥Keep the unit, TV and other equipment switched off until you
have finished all connections.
VIDEO Plus+ and PlusCode are registered trademarks of
Gemstar Development Corporation.
The VIDEO Plus+ system is manufactured under license from
Gemstar Development Corporation.
MPEG Layer-3 audio decoding technology licensed from
Fraunhofer IIS and Thomson multimedia.
Notes on these instructions
These operating instructions describe operations mainly using the
remote control. If the name of the button is the same, the operation
described can also be performed with the main unit.
The contents of the screens used in these instructions may not
necessarily match what you will see on your screen.
Displays
The displays shown in these instructions are examples only. Actual
displays depends on the disc being played.
Manufactured under license from Dolby Laboratories.
“Dolby”, “Pro Logic” and the double-D symbol are trademarks of
Dolby Laboratories.
“DTS” and “DTS Digital Out” are trademarks of Digital Theater
Systems, Inc.
LUOKAN 1 LASERLAITE
KLASS 1 LASER APPARAT
RF IN
RF OUT
(FDA 21 CFR)
(IEC60825-1)
DEL
ÅPNES.
Inside of unit
DANGER
CAUTION
ATTENTION
ADVARSEL
VARO!
VARNING
ADVARSEL
VORSICHT
R - AUDIO - L VIDEO
S-VIDEO
OPTICAL
DIGITAL AUDIO OUT
(PCM/BIT STREAM)
VISIBLE AND INVISIBLE LASER RADIATION WHEN OPEN.
AVOID DIRECT EXPOSURE TO BEAM.
VISIBLE AND INVISIBLE LASER RADIATION WHEN OPEN.
AVOID EXPOSURE TO BEAM.
RAYONNEMENT LASER VISIBLE ET INVISIBLE EN CAS D’OUVERTURE.
EXPOSITION DANGEREUSE AU FAISCEAU.
SYNLIG OG USYNLIG LASERSTRÅLING VED
UNDG
Å UDSÆTTELSE FOR STRÅLING.
AVATTAESSA OLET ALTTIINA N
LASERSÄTEILYLLE. ÄLÄ KATSO SÄTEESEEN.
SYNLIG OCH OSYNLIG LASERSTRÅLNING NÄR DENNA
ÄR ÖPPNAD. BETRAKTA EJ STRÅLEN.
SYNLIG OG USYNLIG LASERSTRÅLING
UNNG
Å EKSPONERING FOR STRÅLEN.
SICHTBARE UND UNSICHTBARE LASERSTRAHLUNG, WENN ABDECKUNG
GEÖFFNET. NICHT DEM STRAHL AUSSETZEN.
R - AUDIO - L VIDEO
S-VIDEO
AV4 INOUT
ÄKYMÄTÖN
NÅR
AV1 (TV)
AV2 (DECODER/EXT)
ÅBNING.
DEKSEL
RQLS0233
6

Dear Customer
Checking the Accessories
May we take this opportunity to thank you for purchasing this
Panasonic DVD Video Recorder.
We would particularly advise that you carefully study the Operating
Instructions before attempting to operate the unit and that you note
the listed precautions.
Caution for AC Mains Lead
For your safety please read the following text carefully
This appliance is supplied with a moulded three-pin mains plug for
your safety and convenience.
A 5-ampere fuse is fitted in this plug.
Should the fuse need to be replaced please ensure that the
replacement fuse has a rating of 5-amperes and it is approved by
ASTA or BSI to BS 1362.
Check for the ASTA mark Ï or the BSI mark Ì on the body of the
fuse.
If the plug contains a removable fuse cover you must ensure that it
is refitted when the fuse is replaced.
If you lose the fuse cover, the plug must not be used until a
replacement cover is obtained.
A replacement fuse cover can be purchased from your local
Panasonic Dealer.
IF THE FITTED MOULDED PLUG IS UNSUITABLE FOR THE
SOCKET OUTLET IN YOUR HOME THEN THE FUSE SHOULD
BE REMOVED AND THE PLUG CUT OFF AND DISPOSED OF
SAFELY. THERE IS A DANGER OF SEVERE ELECTRICAL
SHOCK IF THE CUT OFF PLUG IS INSERTED INTO ANY
-AMPERE SOCKET.
13
If a new plug is to be fitted please observe the wiring code as
shown below.
If in any doubt, please consult a qualified electrician.
Check that you have the accessories shown
Tick off as you
unpack the
accessories.
∏AC Mains lead
RJA0053-3X
∏RF lead to connect VCR and TV
K2KF2BA00001
or
K1TWACC00001
∏Batteries for the
Remote Control
R6 size
∏Guarantee Card
∏Quick Start Guide
∏Audio/Video Cable
K2KA6CA00001
∏Remote Control
EUR7615KR0
IMPORTANT
The wires in this mains lead are coloured in accordance with the
following code:
Blue; Neutral, Brown; Live
As the colours of the wires in the mains lead of this appliance may
not correspond with the coloured markings identifying the terminals
in your plug, proceed as follows:
The wire which is coloured BLUE must be connected to the
terminal in the plug which is marked with the letter N or coloured
BLACK.
The wire which is coloured BROWN must be connected to the
terminal in the plug which is marked with the letter L or coloured
RED.
Under no circumstances should either of these wires be connected
to the earth terminal of the three pin plug, marked with the letter E
or the Earth Symbol Ó.
How to replace the Fuse
≥There are two types of the AC mains lead assembly:
A and B as shown.
1 Open the fuse compartment with a screwdriver.
2 Replace the fuse and fuse cover.
A
TYPE
12
For United Kingdom and Republic of Ireland
www.panasonic.co.uk
(For UK and Republic of Ireland customers only)
≥Order accessory and consumable items for your product with
ease and confidence by telephoning our Customer Care Centre
Mon-Friday 9:00am-5:30pm. (Excluding public holidays.)
≥Or go on line through our Internet Accessory ordering application.
≥Most major credit and debit cards accepted.
≥All enquiries transactions and distribution facilities are provided
directly by Panasonic UK Ltd.
≥It couldn’t be simpler!
Customer Care Centre
For UK customers: 08705 357357
For Republic of Ireland customers: 01 289 8333
TYPE
B
12
7
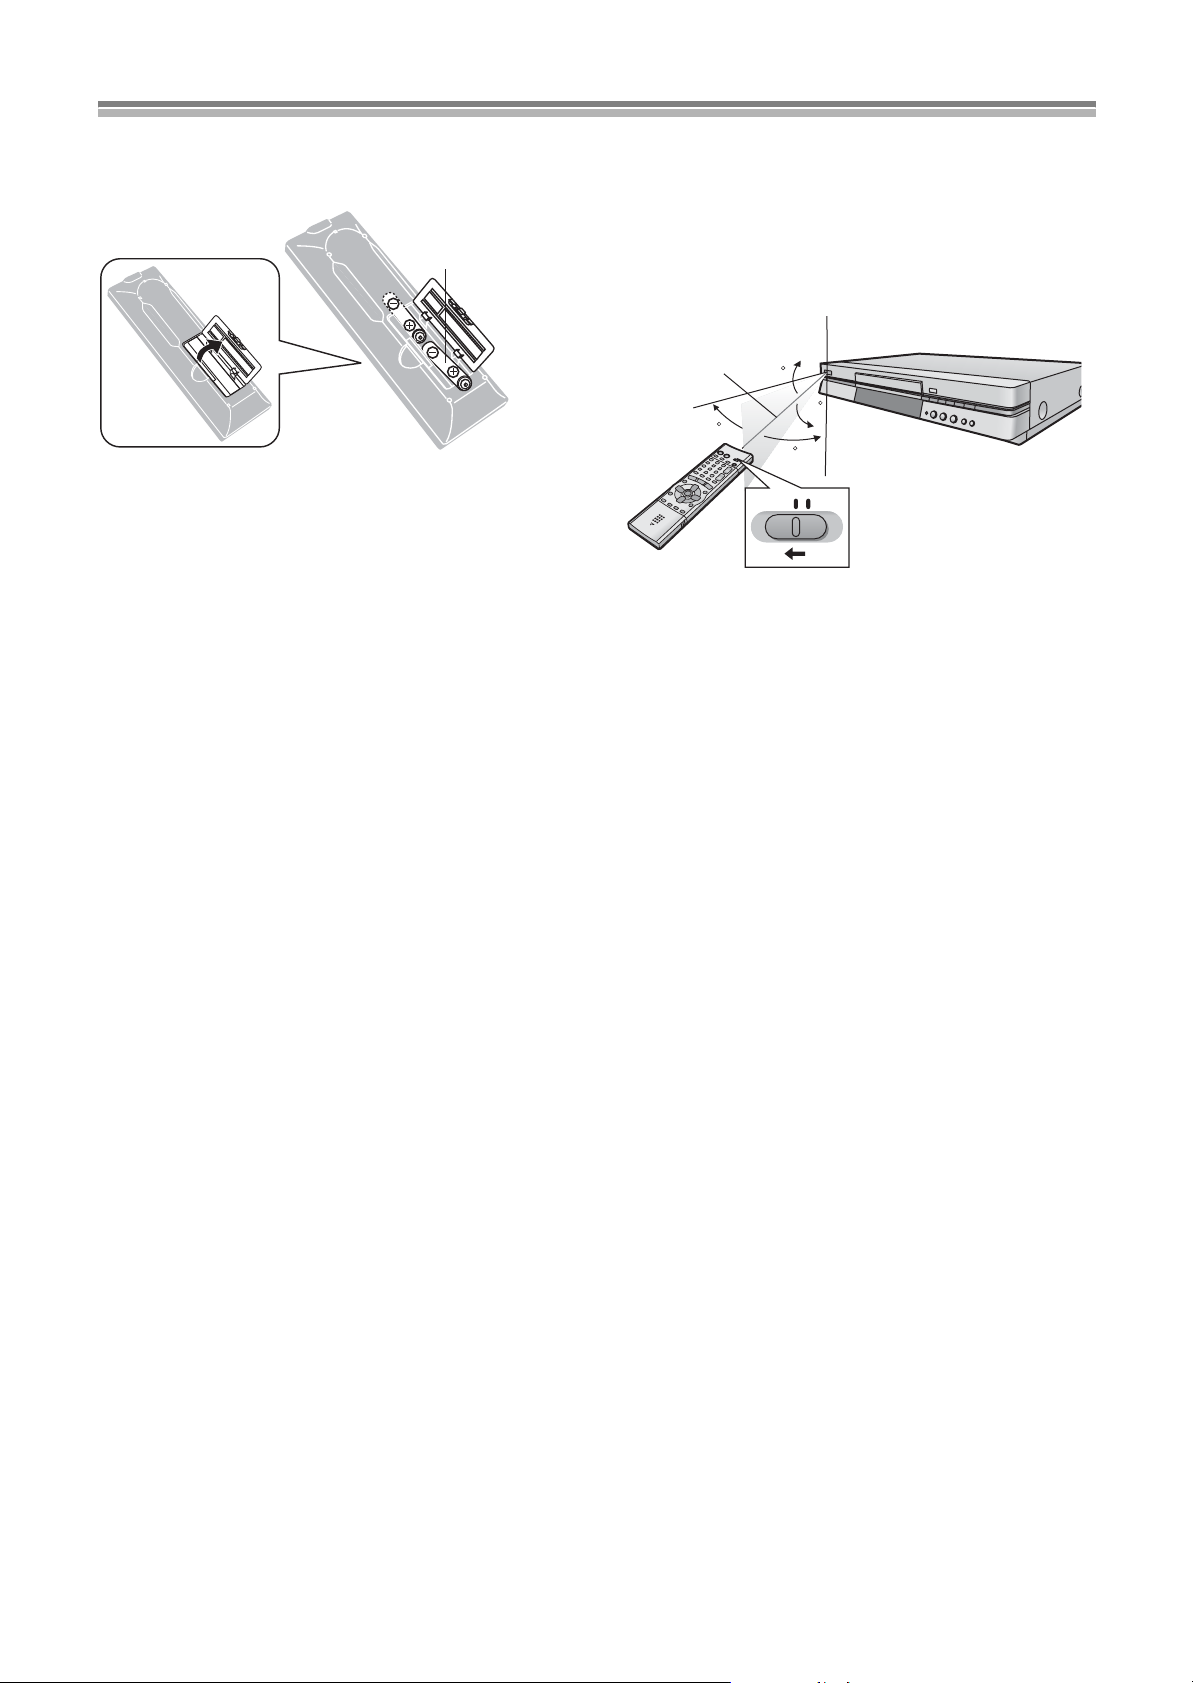
The remote control
Batteries
≥Insert so the poles (- and +) match those in the remote control.
≥Do not use rechargeable type batteries.
R6, AA, UM-3
Do not;
≥mix old and new batteries.
≥use different types at the same time.
≥heat or expose to flame.
≥take apart or short circuit.
≥attempt to recharge alkaline or manganese batteries.
≥use batteries if the covering has been peeled off.
Mishandling of batteries can cause electrolyte leakage which can
damage items the fluid contacts and may cause a fire.
If electrolyte leaks from the batteries, consult your dealer.
Wash thoroughly with water if electrolyte comes in contact with any
part of your body.
Remove if the remote control is not going to be used for a long
period of time. Store in a cool, dark place.
Replace if the unit does not respond to the remote control even
when held close to the front panel.
Use
Aim at the sensor, avoiding obstacles, at a maximum range of 7 m
directly in front of the unit.
≥Keep the transmission window and the unit’s sensor free from
dust.
≥Operation can be affected by strong light sources, such as direct
sunlight, and the glass doors on cabinets.
(1)
(2)
30
(1) Remote control signal sensor
(2) 7 m
(3) Switch [DVD, TV] (15) to “DVD”.
Do not;
≥put heavy objects on the remote control.
≥take the remote control apart.
≥spill liquids onto the remote control.
(3)
20
DVD
20
30
TV
8

The remote control (continued)
T elevision operation
You can control televisions by changing the remote control code.
Preparation
≥Turn on the television.
≥Switch [DVD, TV] (15) to “TV”.
1 Refer to the chart below for the code for your
television.
2 Press and hold [TV, Í] (14) and enter the two-digit
code with the numeric buttons (4).
≥For example: 01, press [0] )[1].
≥After entering the code, test the remote control by turning on
the television and changing channels.
Note
≥If there is more than one code, repeat the procedure until you find
the code that allows correct operation.
≥Repeat this procedure after you change the batteries.
≥If your television brand is not listed or if the code listed for your
television does not allow control of your television, this remote is
not compatible with your television.
List of TVs Compatible with the unit’s Remote Control
Brand: Code
Panasonic 01, 02, 03, 04, 44
AIWA 35
AKAI 27, 30
BLAUPUNKT 09
BRANDT 10, 15
BUSH 05, 06
CURTIS 31
DESMET 05, 31, 33
DUAL 05, 06
ELEMIS 31
FERGUSON 10
GOLDSTAR/LG 31
GOODMANS 05, 06, 31
GRUNDIG 09
HITACHI 22, 23, 31, 40, 41, 42
INNO HIT 34
IRRADIO 30
ITT 25
JVC 17, 39
LOEWE 07
METZ 28, 31
MITSUBISHI 06, 19, 20
MIVAR 24
NEC 36
NOKIA 25, 26, 27
NORDMENDE 10
ORION 37
PHILIPS 05, 06
PHONOLA 31, 33
PIONEER 38
PYE 05, 06
RADIOLA 05, 06
SABA 10
SALORA 26
SAMSUNG 31, 32, 43
SANSUI 05, 31, 33
SANYO 21
SBR 06
SCHNEIDER 05, 06, 29, 30, 31
SELECO 06, 25
SHARP 18
SIEMENS 09
SINUDYNE 05, 06, 33
SONY 08
TELEFUNKEN 10, 11, 12, 13, 14
THOMSON 10, 15
TOSHIBA 16
WHITE WESTINGHOUSE 05, 06
Operation: Button
On and off: [TV, Í] (14)
Video input mode: [AV] (3)
Channels: [W, X, CH] (18)
Volume: [i, j, VOLUME] (19)
Numeric: [0-9, -/--] (4)
ªThe 3 methods for switching to the AV input on your
Panasonic TV
Your Panasonic TV uses one of 3 different methods for switching
between TV reception and the AV input(s). Perform the operations
steps listed for the switching methods A, B and C below to
determine which one your Panasonic TV uses.
A
1) Switch [DVD, TV ] (15) to “TV”.
2) Press [AV] (3) to switch to the AV input.
Each press of [AV] (3) switches between “TV reception” and
“AV input(s)”.
B (for the remote control code No.44)
1) Switch [DVD, TV ] (15) to “TV”.
2) Press [AV] (3).
Colour bars for selecting the AV input appear on the TV
screen.
3) Follow the instructions displayed on the TV screen to select
the desired AV input from the displayed colour bars for the AV
input by pressing [A] (29), [B] (28), [C] (33) or [D] (34) on the
remote control.
C (for the remote control code No.01)
1) Switch [DVD, TV ] (15) to “TV”.
2) Press [AV] (3).
The last previously selected AV input indication appears on the
TV screen. The indications for selecting another AV input also
appear, but they disappear a few seconds later.
3) Before the indications for selecting another AV input
disappear, press [A] (29), [B] (28), [C] (33) or [D] (34) to
select the desired AV input.
With the following four buttons, you can move and select as
follows:
[A] (29): Move left
[B] (28): Move down
[C] (33): Move up
[D] (34): Move right
9

Discs
Discs you can use
The features you can use with the different types of discs are
indicated as follows.
[RAM] [DVD-R] [DVD-V] [CD] [VCD] [MP3]
Audio
CDs
Video
CDs
MP3
discs
DVD-RAM
DVD-R
For your reference
≥[DVD-R] indicates DVD-R that have not yet been finalized
(page 4 0) and can still be recorded on.
≥DVD-R that have been finalized can use the same features as
DVD-Video. (Refer to features indicated [DVD-V].)
DVD-Video
Discs you can use for recording and play
Logos for the discs you can record on and play
Disc
type
DVDRAM
DVDR
The manufacturer accepts no responsibility and offers no
compensation for loss of recorded or edited material due to a
problem with the unit or disc, and accepts no responsibility
and offers no compensation for any subsequent damage
caused by such loss.
Examples of causes of such losses are
(1) A disc recorded and edited with this unit is played in a DVD
(2) A disc used as described in (1) and then played again in this
(3) A disc recorded and edited with a DVD Recorder or computer
Note
≥This unit is compatible with the Content Protection for
Recordable Media (CPRM) system so you can record broadcasts
that allow one copy, such as some CATV broadcasts, onto
4.7 GB/9.4 GB DVD-RAM (these are CPRM compatible). It is not
possible to record onto DVD-R or 2.8 GB DVD-RAM.
≥Do not allow the disc to become dirty or scratched. Fingerprints,
dirt, dust, and scratches on the recording surface may make it
impossible to use the disc for recording.
≥If you use DVD-RAM cartridges, you can protect your recordings
with the write protected tab (page 73). With the tab in this
position, you cannot record to the disc, delete programmes with
the direct navigator, edit with the play list screen, or format the
disc.
≥This unit is compatible with both non-cartridge and cartridge
DVD-RAM, but cartridge-type discs give better protection to your
valuable recordings.
For your reference
≥DVD-RAM recorded on this unit cannot be played on
incompatible players (including players manufactured by
Panasonic).
≥Using a Panasonic DVD-RAM, you can record broadcasts that
allow you to make one copy, such as some satellite broadcasts.
≥This unit cannot record PAL signals to discs containing NTSC
signals or vice versa.
Logo Regulation
[4.7 GB / 9.4 GB,
12 cm (5z)]
[2.8 GB 8 cm (3z)]
4.7 GB for
General Ver.2.0
Recorder or computer disc drive manufactured by another
company.
unit.
disc drive manufactured by another company is played in this
unit.
Indication used
in instructions
[RAM]
[DVD-R]
≥This unit cannot record to discs containing both PAL and NTSC
signals. Play of discs recorded with both PAL and NTSC on
another unit is not guaranteed.
Play-only discs
Discs you can play-only and their logos
Disc
type
DVDVideo
Audio
CD
Video
CD
CD – – [MP3]
Logo Video system
PAL / NTSC [DVD-V]
– [CD]
PAL / NTSC [VCD]
Region Management Information (DVD-Video only)
Region number are allocated to DVD players and
software according to where they are sold.
≥For the United Kingdom : “2”
DVD-Video can be played on this unit if their region
number is the same or includes the same number, or if
the DVD is marked “ALL”. Confirm the region number for
this unit before choosing discs. The number for this unit
is indicated on the rear panel of the unit.
Playing CD-R and CD-RW
This unit can play CD-DA (digital audio), MP3 and Video
CD format, audio CD-R and CD-RW that have been finalized
completion of recording.
It may not be able to play some CD-R or CD-RW due to the
condition of the recording.
Note
≥The producer of the material can control how these discs are
played. This means that you may not be able to control play of a
disc with some operations described in these operating
instructions. Read the disc’s instructions carefully.
Indication used
in instructions
2
ALL
2
3
upon
4
10
Discs (continued)
Discs that cannot be played
≥DVD-Video with a region number other than the number for this
unit or “All”
≥Some DVD-R
≥DVD-RAM (2.6 GB/5.2 GB)
≥DVD-ROM
≥DVD-RW
≥DVD-Audio
≥iRW
≥CD-ROM
≥CDV
≥CD-G
≥CVD
≥SVCD
≥SACD
≥MV-Disc
≥PD
≥Photo CD
≥Divx Video Disc, etc.
≥Play of non-standard Video CDs and Super Video CDs is not
guaranteed.
DVD-R
You can play DVD-R on compatible DVD players by finalizing
[the process that allows recordings on DVD-R to be played on
compatible DVD players, (page 40)] them on this unit,
effectively making them into DVD-Video.
ªBefore finalizing
You can record onto the available space on the disc and perform
editing functions, such as giving titles to discs and programmes
and erasing programmes.
You cannot record to or edit DVD-R with this unit if it was recorded
with another unit, whether it is finalized or not.
You cannot record over parts that have been recorded.
Erasing programmes will not increase the disc’s available time.
ªAfter finalizing
The video and audio is recorded according to the DVD-Video
specifications, and your very own DVD-Video is created.
≥The titles you entered with this unit appear as menus.
≥Programmes longer than 5 minutes are divided into 5-minute
chapters.
≥These DVD-R can no longer be recorded on or edited.
≥These DVD-R can be played on other DVD players, but this is not
guaranteed.
Play may not be possible due to the player you are using, the
DVD-R, or the condition of the recording. Use this unit to play the
disc if the player is unable.
For your reference
≥It takes about 30 seconds for the unit to complete recording
management information after recording finishes.
≥To record on DVD-R, this unit optimizes the disc for each
recording. Optimizing is carried out when you start recording after
inserting the disc or turning the unit on. Recording may become
impossible after the disc is optimized more than 50 times.
≥The first 30 seconds of a programme may not be recorded if you
make successive timer recordings.
≥The video is recorded in a 4:3 aspect irrespective of the video
signal input. Use the television’s screen modes to change the
screen size for play.
≥Some broadcasts carry signals that allow you to make one copy,
but you cannot record these broadcast with DVD-R. Use
DVD-RAM to record these kinds of broadcast.
≥Play may be impossible in some cases due the condition of the
recording.
≥We recommend using DVD-R manufactured by Panasonic as
they have been tested to be compatible with this unit.
≥You cannot change audio type if a DVD-R is in the unit. Select
the audio type (M1 or M2) before recording by going to “Bilingual
Audio Selection” in the “Sound” menu.
Audio format logos
Dolby Digital (pages 54 and 70)
This unit can play Dolby Digital in stereo
(2 channels). Connect an amplifier with a built-in
Dolby Digital decoder to enjoy surround sound.
DTS Digital Surround (pages 54 and 70)
Connect this unit to equipment that has a DTS
decoder to enjoy DVDs with this mark.
Types of disc for the type of connected
TV
When you use the discs recorded either PAL or NTSC, refer to this
table.
TV type Disc Yes/No
Multisystem TV
NTSC TV
PAL TV
*1If you select “NTSC” in “TV System” (page 61), the picture may
be clearer.
2
*
If your television is not equipped to handle PAL 525/60 signals
the picture will not be shown correctly.
Discs and accessories
≥DVD-RAM
You can also record signals which allow you to make one copy,
onto these discs.
9.4-GB, double-sided, type 4 cartridge:
4.7-GB, single-sided, type 2 cartridge:
4.7-GB, single-sided, non-cartridge:
≥DVD-R
4.7-GB, single-sided, non-cartridge:
≥DVD-RAM/PD Disc cleaner:
≥DVD-RAM/PD Lens cleaner:
PAL Yes
NTSC Yes
PAL No
NTSC Yes*
PAL Yes
2
NTSC Yes*
LM-AD240E
LM-AB120E
(set of 3, LM-AB120E3)
LM-AF120E
(set of 3, LM-AF120E3)
LM-RF120E
LF-K200DCA1
LF-K123LCA1
(PAL60)
1
11

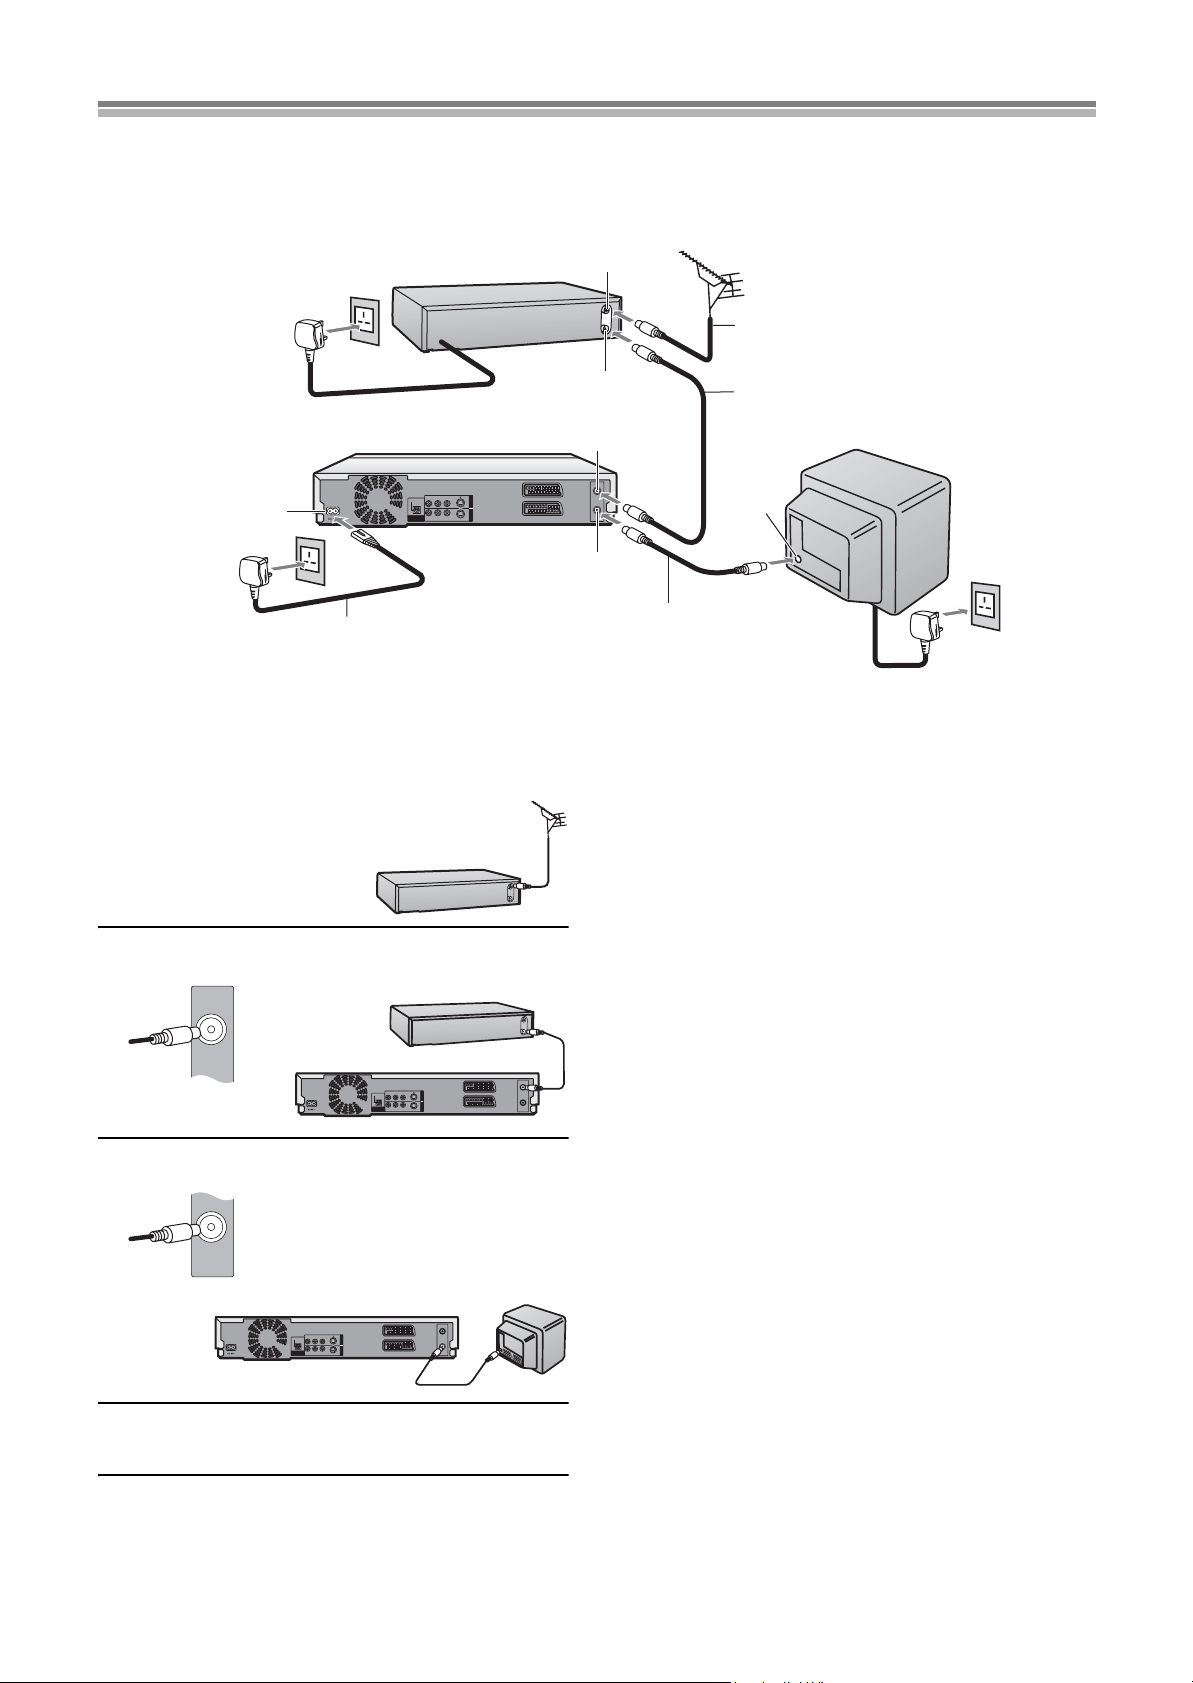
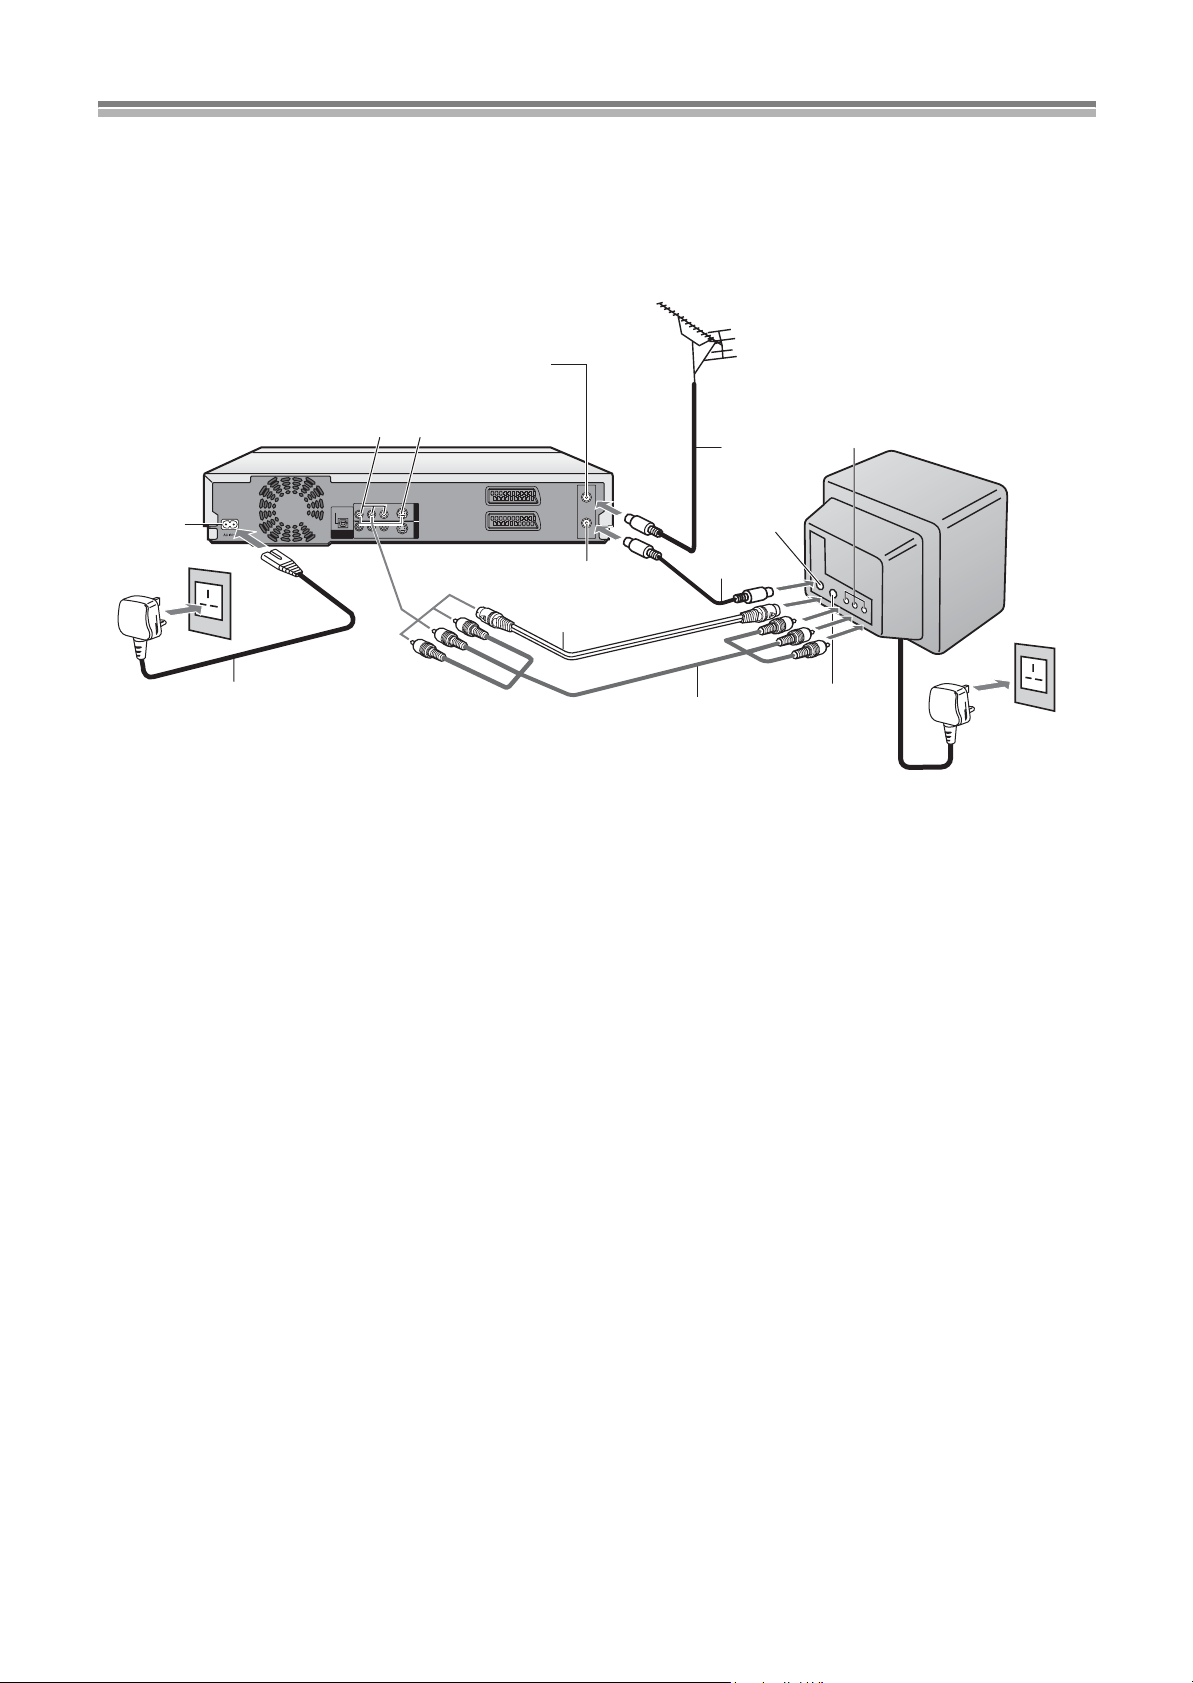
Follow the step-by-step guide below.
RF IN
RF OUT
AV2 (DECODER/EXT) 21-pin Scart socket
Connections (with Scart leads)
RF Input socket
AV1 (TV) 21-pin Scart socket
RF Output socket
Aerial
(not supplied)
TV [with or without Q link function]
1
(not supplied)
AC Input socket
Satellite Receiver (not supplied)
To AC Mains socket
AC Mains lead (supplied)
6
OPTICAL
DIGITAL AUDIO OUT
(PCM/BIT STREAM)
6
21-pin Scart socket (DVD)
R - AUDIO - L VIDEO
AV4 INOUT
S-VIDEO
S-VIDEO
R - AUDIO - L VIDEO
21-pin Scart socket (TV)
1 Connect the aerial to the RF Input sock et of the DVD
Recorder.
This unit
OPTICAL
DIGITAL AUDIO OUT
(PCM/BIT STREAM)
R - AUDIO - L VIDEO
R - AUDIO - L VIDEO
S-VIDEO
AV4 INOUT
S-VIDEO
AV1 (TV)
AV2 (DECODER/EXT)
RF IN
RF OUT
2 Connect the RF lead from the RF Output socket of
the DVD Recorder to the TV aerial input socket.
AV1 (TV)
AV2 (DECODER/EXT)
RF IN
RF OUT
2
RF lead
Aerial Input
socket
(supplied)
AV2 socket
3
Necessary for
TV with Q Link
AV1 socket
To AC Mains socket
6
4
Necessary for Connecting
a Satellite Receiver
Note:
21-pin Scart leads are not supplied.
5
5 Connect the TV scart socket of your Satellite
Receiver to the AV1 scart socket of your TV
(optional). If you are not connecting a Satellite
Receiver, skip this step.
Satellite Receiver
6 Plug the TV, DVD Recorder and Satellite Receiver
into the mains as shown at top of the page.
TV
This unit
DIGITAL AUDIO OUT
(PCM/BIT STREAM)
AV1 (TV)
AV2 (DECODER/EXT)
RF IN
RF OUT
S-VIDEO
R - AUDIO - L VIDEO
OPTICAL
AV4 INOUT
R - AUDIO - L VIDEO
S-VIDEO
TV
3 Connect the AV1 21-pin scart socket to TV scart
socket (optional).
≥This is necessary for Download from TV with Q Link function.
If you use Panasonic TV with RGB output capability and want to
≥
receive RGB signals, connect this unit to the AV1 socket on the TV.
)
AV1 (TV
This unit
DIGITAL AUDIO OUT
(PCM/BIT STREAM)
AV1 (TV)
AV2 (DECODER/EXT)
RF IN
RF OUT
S-VIDEO
R - AUDIO - L VIDEO
OPTICAL
AV4 INOUT
R - AUDIO - L VIDEO
S-VIDEO
TV
4 Connect the AV2 21-pin scart socket to the DVD
Recorder Scart Socket on your Satellite Receiver/
Digital Sat receiver. If you are not connecting a
Satellite Receiver, skip this step. (See pages 15, 56)
This unit
S-VIDEO
AV2(DECODER/DECODEUR/EXT
)
OPTICAL
DIGITAL AUDIO OUT
(PCM/BIT STREAM)
Satellite Receiver
R - AUDIO - L VIDEO
R - AUDIO - L VIDEO
AV1 (TV)
AV4 INOUT
AV2 (DECODER/EXT)
S-VIDEO
Hint
≥Q Link offers a range of convenient functions. For example,
downloading of the tuning positions of all available television
stations into your unit’s memory if you connect the unit to your
television with a fully wired 21-pin Scart cable (not supplied).
Features similar to Q Link have different names and may not
work the same.
- [Q Link] is a registered trademark of Panasonic.
- [DATA LOGIC] is a registered trademark of Metz.
- [Easy Link] is a registered trademark of Philips.
- [Megalogic] is a registered trademark of Grundig.
- [SMARTLINK] is a registered trademark of Sony.
For details, refer to your television’s operating instructions or
consult your dealer.
≥Unlike in most commercially available 21-pin Scart cables, all 21
pins of one plug on a fully wired 21-pin Scart cable are connected
to the matching pins on the other end of the cable.
Reference:
≥If the TV set is equipped with a 21-pin scart socket that features
Y/C signal separation, set the “AV1 Output” to “S-Video”
(see page 61) so that you can play back with high picture quality
and use a fully-wired
21-pin Scart lead (not supplied) to connect
the DVD Recorder to the TV.
RF IN
RF OUT
12
Connections (without Scart leads)
RF IN
RF OUT
If you do not have any scart leads and your TV is not Q Link type, you can connect your DVD Recorder to a TV and Satellite Receiver using
RF leads.
Using this connection method may however be difficult to obtain a clear picture from the Satellite Receiver. For this reason it is not
recommended for inexperienced users.
(See preferred connection on page 12.)
Satellite Receiver (not supplied)
To AC Mains socket
4
RF Input socket
AC Input socket
OPTICAL
DIGITAL AUDIO OUT
(PCM/BIT STREAM)
R - AUDIO - L VIDEO
R - AUDIO - L VIDEO
S-VIDEO
AV1 (TV)
AV4 INOUT
AV2 (DECODER/EXT)
S-VIDEO
RF Output socket
AC Mains lead (supplied)
4
1 Connect the aerial to the aerial input socket of the
Satellite Receiver.
≥If you do not have a Satellite Receiver, connect the aerial to
the RF Input socket of the DVD Recorder and go to step 3.
Satellite Receiver
Aerial Input socket
Aerial Output socket
RF IN
RF OUT
RF lead (supplied)
≥
Must be connected to
watch TV channels.
Note
≥If you have an analogue satellite receiver, select [SKY ONE] or
[SKY NEWS] on the receiver before starting Auto Setup.
After Auto Setup is complete, the satellite position will be shown
as [SAT] in the channel listing to denote programmes from the
satellite receiver.
≥If you have a digital satellite receiver, you can start Auto Setup
with the receiver set to any channel.
We recommend to manually name the [SAT] position after Auto
Setup is complete. (See page 65.)
Aerial
(not supplied)
RF lead
(not supplied)
Aerial Input
socket
3
1
2
TV (not supplied)
To AC Mains socket
4
2 Connect the aerial from Satellite Receiver to the RF
Input socket.
Satellite Receiver
This unit
DIGITAL AUDIO OUT
(PCM/BIT STREAM)
S-VIDEO
R - AUDIO - L VIDEO
OPTICAL
AV4 INOUT
R - AUDIO - L VIDEO
S-VIDEO
AV1 (TV)
AV2 (DECODER/EXT)
RF IN
RF OUT
3 Connect the RF Output socket to the TV aerial
socket.
This unit
DIGITAL AUDIO OUT
(PCM/BIT STREAM)
AV1 (TV)
AV2 (DECODER/EXT)
RF IN
RF OUT
S-VIDEO
R - AUDIO - L VIDEO
OPTICAL
AV4 INOUT
R - AUDIO - L VIDEO
S-VIDEO
TV
4 Plug the TV, DVD Recorder and Satellite Receiver
into the mains as shown at top of the page.
13
Connections (with S-Video cable)
Connections and preparations for a TV with S-Video socket.
The conventional video sockets of DVD Recorder’s output (input) a combination of the luminance signal (Y) and colour signal (C) which are
recorded on the disc. The S (Separate)-Video socket allows separate transmission of signals in order to obtain clearer pictures.
The connection with S-Video Cable can also be used for playback of any disc. The “S” in the “S-Video socket” stands for “SEPARATED Y/C”
not for “S-VHS”.
RF Input socket
AC Input
socket
AC Mains lead (supplied)
Audio/Video
Output socket
R - AUDIO - L VIDEO
OPTICAL
DIGITAL AUDIO OUT
R - AUDIO - L VIDEO
(PCM/BIT STREAM)
S-Video
Output socket
S-VIDEO
AV4 INOUT
S-VIDEO
AV1 (TV)
AV2 (DECODER/EXT)
RF IN
RF OUT
RF Output
socket
S-Video cable
(not supplied)
Aerial
(not supplied)
Aerial Input
socket
RF lead
(supplied)
Audio/Video cables
(supplied)
Audio/video
Input socket
S-Video Input
socket
TV with S-Video
Input socket
(not supplied)
To AC Mains
socket
14

Recording from Set Top Boxes (STB) or other Satellite Receivers (SAT)
ªRecording video signal by “Sky personal Planner” and “External Link 1” Functions
To record programmes from satellite receiver using “Sky Personal Planner” function together with the
“External Link1” function of this DVD Recorder:
≥Make connections as shown.
≥Change the settings in the SETUP menu as follows (page 61).
- “AV2 Input” set to “Video”
- “AV2 Connection” set to “Ext Link 1”
- “AV1 Output” set to “RGB” or “S-Video” or “Video” to suit the AV terminal of your TV.
≥Set up Personal Planner programmes as required.
≥Press [EXT LINK] (40) on the DVD Recorder.
“External Link1” function can only be used with the “Sky Personal Planner” function for timer recording of
video signal from the “VCR Scart” terminal of the Sky Digital Set Top Box.
ªRecording RGB Signals
Most Satellite Receivers are capable of outputting RGB signals for viewing on television through a Scart terminal (called “TV Scart” on a Sky
Digital STB).
In the case of a Sky Digital STB, recording of RGB signals from the “TV Scart” terminals is possible, but the “Personal Planner” function for
timer recording cannot be used in conjunction with the “External Link1” function of this DVD Recorder.
To record programmes by RGB signals:
≥Make connections as shown.
≥Set your Sky Digital STB to output “RGB” signals.
≥Change the settings in the SETUP menu as follows (page 61).
- “AV2 Input” set to “RGB”
- “AV2 Connection” set to “NORMAL”
- “AV1 Output” set to “RGB” or “S-Video” or “Video” to suit the AV terminal of your TV.
≥Set up Personal Planner programmes as required.
≥Follow the steps for setting up timer programming.
After setting Personal Planner programmes as required, Sky Digital STB must be left on (not set to
standby) to ensure continuous output of RGB signals.
TV
AV
AV1
DVD-Recorder
AV2
VCR Scart
STB/SA T
TV
AV
AV1
DVD-Recorder
AV2
It is not possible to use the “External Link 1” function of the DVD Recorder for timer recording of RGB
signals from the Sky Digital STB.
TV Scart
STB/SA T
15
Auto Setup (with Q Link Functions)
If you do not have a Q Link TV, ignore this page and go to page 17.
The Preset Download function can automatically copy the tuning position of all available TV stations into the DVD Recorder’s memory when
you connect the DVD Recorder using a fully-wired
To Set Up this DVD Recorder with a brand-new Q Link TV
Perform the following operation steps exactly as described to ensure that the Preset Download function works correctly.
≥First of all, make sure that the DVD Recorder is switched off.
21-pin Scart lead to a TV equipped with the Q Link function.
START
FINISH
1 Switch the TV on. The TV automatically starts to tune a ll a vailable TV stations and to ad just th e
clock. (This is called Auto Setup function.)
≥When the TV has finished its own auto setup, the DVD Recorder is automatically switched on, and the
downloading of the setup data from the TV to the DVD Recorder starts.
Download
Pos 4
Download in progress, please wait.
RETURN : to abort
RETURN
Indication during downloading
2 Switch [DVD, TV] (15) to “DVD”.
3 When Download has finished, the screen for the Owner ID setting menu appears. Press [1]
(10) and the numeric buttons (4) to enter a 4-digit PIN number.
≥Make sure that you will remember the PIN number (make a note of it).
Owner ID
¢¢¢¢
PIN number
¢¢¢¢¢¢¢¢¢¢¢¢¢¢
Name
SELECT
ENTER
RETURN
Menu for Owner ID setting
House No.
Postcode
RETURN : leave
¢¢¢¢¢¢¢¢¢¢¢¢¢¢
¢¢¢¢¢¢¢¢¢¢¢¢¢¢
4 Press [ENTER] (10) and [4] (10). The cursor moves to “Name”.
5 Press [1] (10).
6 Press [3, 4, 2, 1] (10) to select a letter and then press [ENT ER] (10). Repeat this to enter the
name.
7 Enter “House No.” and “Postcode” in the same way.
8 Press [RETURN] (23) to make the Owner ID setting disappear.
Hint
≥If you use a Panasonic Q Link TV and perform the operation step 1 above, starting the downloading of the setup data will automatically
display the “Download” indication. However, in case of a TV of another make, the “Download” indication may not appear. In this case, select
the AV input on your TV if you want to see the “Download” indication.
Note
≥The explanations in this book refer to Panasonic Q Link TV and DVD Recorder, however they may also apply to other makes of TV and DVD
Recorder with similar functions to Q Link. (See page 12 for details.)
≥If you accidentally switch on the DVD Recorder before the TV, downloading of the setup data from the TV may not be performed correctly. In
this case, follow the steps below.
1) Wait until the Auto Setup is complete on both the TV and the DVD Recorder.
2) Press [FUNCTIONS] (11) to display the FUNCTIONS window on the TV screen and then use [3, 4, 2, 1] (10) to select “SETUP” and
press [ENTER] (10).
3) Use [3, 4, 2, 1] (10) to select “Tuning” and then “Download”.
4) Press [ENTER] (10) and select “Yes”. Downloading of the setup data from the TV to the DVD Recorder starts.
5) When the programme position and the current time appear in the DVD Recorder display, downloading is complete.
16
Auto Setup (with Q Link Functions) (continued)
To Set Up this DVD Recorder with an existing Q Link TV
1 Switch the TV on.
2 Select the AV input on your TV.
3 Switch [DVD, TV] (15) to “DVD”.
4 Press [Í] (1) to switch the DVD Recorder on. Downloading of the setup data starts automatically.
Download
Pos 4
Download in progress, please wait.
RETURN : to abort
RETURN
5 To set up the Owner ID, repeat the steps 3-8 on the previous page.
Owner ID
¢¢¢¢
PIN number
¢¢¢¢¢¢¢¢¢¢¢¢¢¢
Name
¢¢¢¢¢¢¢¢¢¢¢¢¢¢
House No.
¢¢¢¢¢¢¢¢¢¢¢¢¢¢
Postcode
RETURN
RETURN : leave
Auto Setup (without Q Link Functions)
Auto Setup automatically tunes all available stations and sets the DVD Recorder’s clock to the current date and time.
1 Switch the TV on.
2 Select the AV input on your TV.
3 Switch [DVD, TV] (15) to “DVD”.
4 Press [Í] (1) to switch the DVD Recorder on.
≥Auto Setup starts. This takes about 5 minutes.
≥(If connected to your TV using the RF lead only)
Select an unused channel pre-set on your TV and tune it to the RF output channel number shown on the DVD Recorder display (or until
you can clearly see the Auto Setup screen). Store the new video playback channel (refer to the instructions for your TV).
Auto-Setup
Ch 4
Auto-Setup in progress, please wait.
RETURN : to abort
RETURN
5 To set up the Owner ID, repeat the steps 3-8 on the previous page.
Owner ID
¢¢¢¢
PIN number
¢¢¢¢¢¢¢¢¢¢¢¢¢¢
Name
¢¢¢¢¢¢¢¢¢¢¢¢¢¢
House No.
¢¢¢¢¢¢¢¢¢¢¢¢¢¢
Postcode
RETURN
RETURN : leave
When no stations have been set, confirm all connections and restart Auto Setup
See page 66 and Hint below.
To restart Auto Setup
≥You can restart Auto Setup, without using remote controller, by pressing some buttons on the front of the unit. Hold down [W, CH] (18) and
[X, CH] (18) on the main unit simultaneously for about 5 seconds.
17
Auto Setup (without Q Link Functions) (continued)
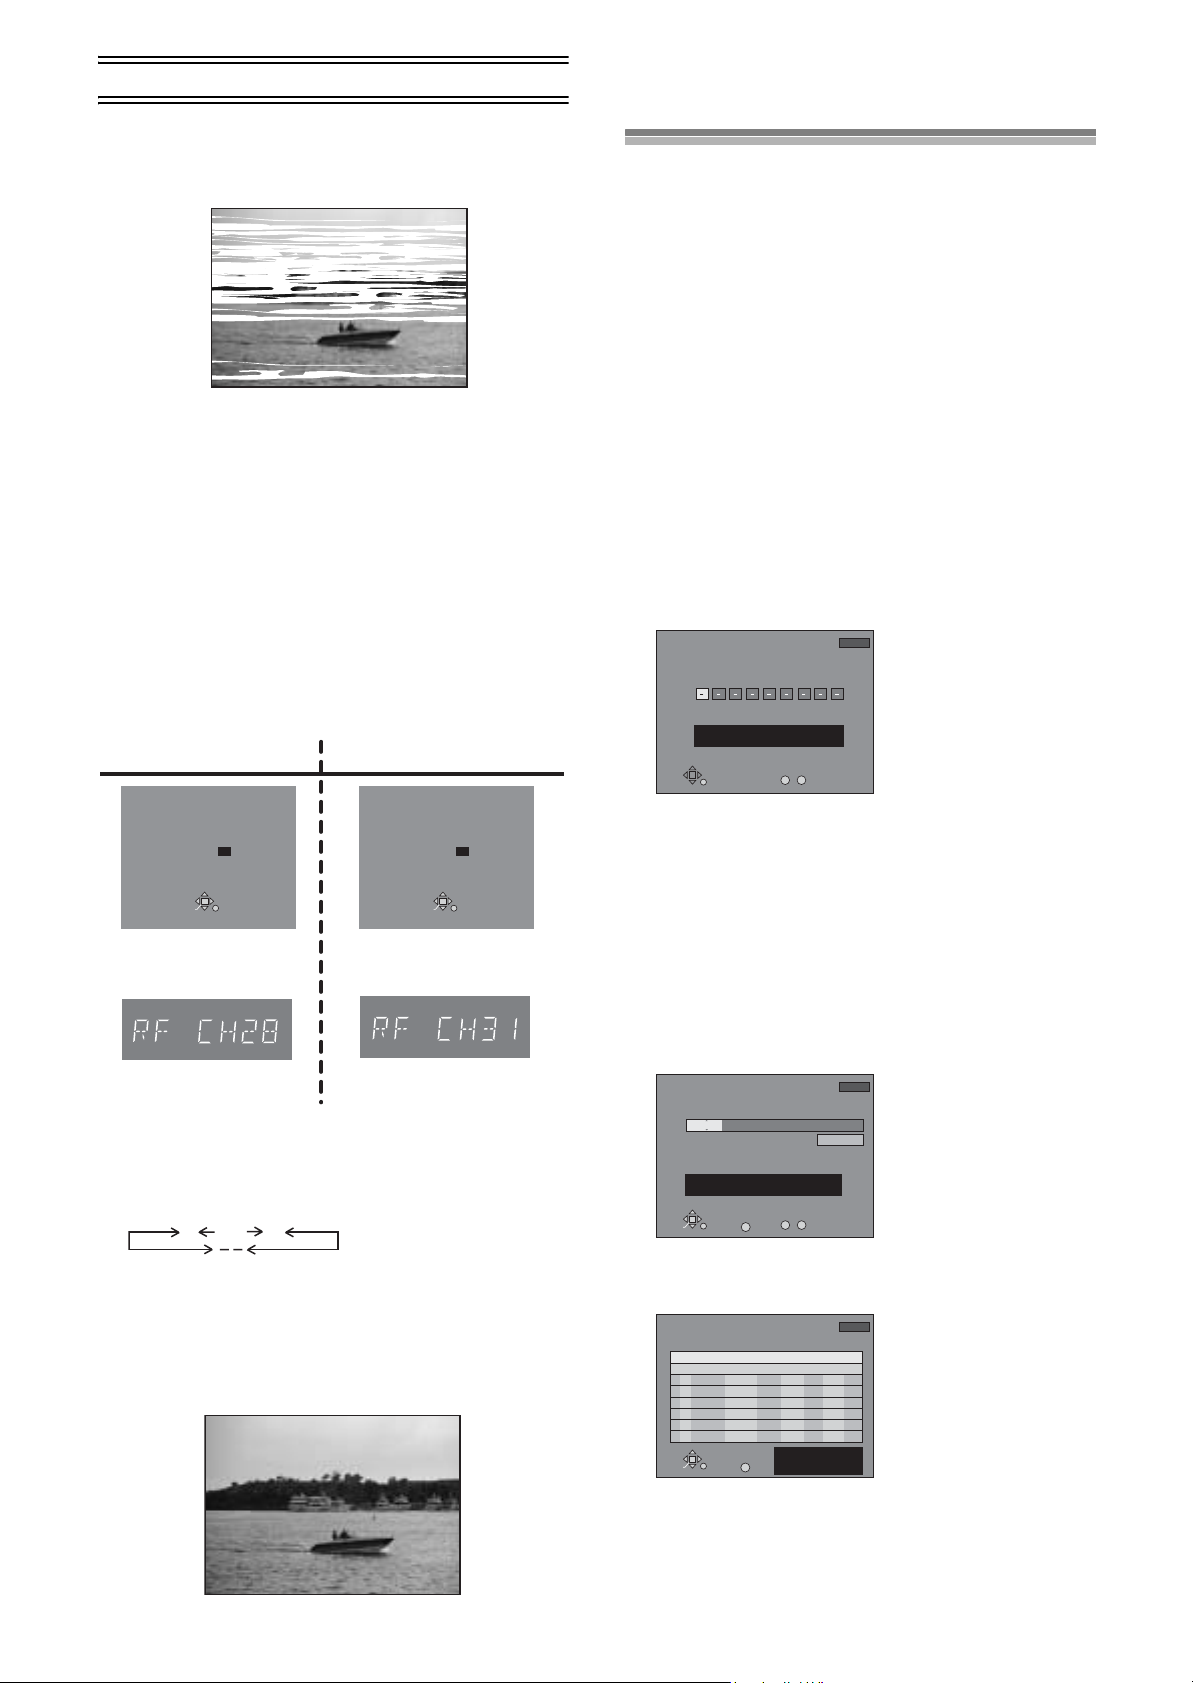
Removing Interference
TV screen
The picture with interference
In some cases, interference (lines or patterning) or a very
poor picture may appear on the TV when the DVD Recorder is
connected. If this happens, follow the steps below to change
the video playback channel (RF output channel) to remove the
interference.
1 Switch [DVD, TV] (15) to “DVD”.
2 Press [FUNCTIONS] (11) for more than 5 seconds.
The RF output channel number is displayed on the
unit display.
3 Press the numeric buttons (4), [3, 4] (10)
[W, X, CH] (18) to select a ch annel number, which
differs by 2 or 3 from the present channel number.
(For example, if the original channel number was
28, enter 31.)
<Before Changing> <After Changing>
RF OUTPUT CHANNEL
DVD
CH : 28
SELECT
ENTER
RETURN
Test pattern indication
Unit display
Indication when the RF output
channel is 28 (example)
≥Set the RF output channel of the DVD Recorder to [ss]
(RF OFF) when the DVD Recorder is connected to the TV via
the 21-pin Scart cable.
Press the numeric (0) button (4) or [W, X, CH] (18) to
display [ss]. Skip the step 4, if using a 21-pin Scart cable.
...
21
(RF OFF)
68
RF OUTPUT CHANNEL
CH : 31
SELECT
ENTER
Test pattern indication
Unit display
Indication after changing the RF
output channel to 31 (example)
4 Retune your TV until you receive the Test pattern
(see above illustration). It may be necessary to
repeat steps 2 and 3 above until you can see the
Test pattern clearly.
5 Press [ENTER] (10) to finish this setting.
DVD
RETURN
or
Video Plus+ Codes for Satellite
Receivers/Cable TV
For the United Kingdom:
This unit is not designed to control (switch on or change channel)
your satellite receiver or Cable TV box, however, it can be taught
to recognise Video Plus+ Codes for Satellite stations. The Satellite
receiver or Cable TV box must be switched on and the correct
station selected. Some receivers have their own timer facility for
this purpose. Please refer to your Satellite Receiver/Cable TV box
instructions for use of such timer facilities.
For your unit to recognise the
station, you must teach your unit which channel or AV input to record
from for the first time. Otherwise when setting a VIDEO Plus+ recording,
ss
] symbol will appear in the channel position indicating that the
the [
unit does not know which channel position to set. Once you have set the
channel/AV input once the unit will remember it whenever you use a
Video Plus+ Code
for the station again.
Preparation
≥Turn on the television.
≥Switch [DVD, TV] (15) to “TV”.
1 Turn on the TV and the unit. Select video playback
channel on the TV.
2 Press [VIDEO Plus+] (2).
VIDEO Plus+
Enter VIDEO Plus+ Number by using 0-9 keys.
RETURN
3 Enter a Video Plus+ Code from a Satellite TV Guide
for a satellite channel, e.g. Sky 1 using the numeric
buttons (4). If you make a mistake, use [2] (10) to
go back.
4 Press [ENTER] (10). [ss] will appear instead of a
channel number/AV input.
5
Use
[3, 4, 2, 1] (10)
that is to be used for recording from the satellite channel.
6
Press [ENTER]
unit will now automatically set the programme
position or AV input correctly when a VIDEO Plus+
recording is set for this satellite station in the future.
TIMER
RECORDING
Name
Date
BBC 1
Press ENTER to store new programme.
SELECT
ENTER
RETURN
CANCEL
7 Use [3] (10) to select the programme that you hav e
just set. Now press [CANCEL] (5) to delete it from
the timer recording list. It is no longer needed.
TIMER
RECORDING
Name
Date
New Timer Programme
Video Plus+ Codes
Remain
0:59 SP
12:53:00 16.7 TUE
No.
0 9
--
for each satellite
to select the channel or AV input
(10)
to memorise the setting. The
Remain
1:58 SP
12:53:00 16.7 TUE
Mode
StopStart
PDC
OFF
2:001:0016/ 7 TUE
SP
Title
No.
0 9
--
Remain
1:58 SP
1:19:00 16.7 TUE
Disc
PDC
Mode
StopStartNo.
space
OFF
SPOK1:221:19BBC1 16/ 7 TUE01
The clear picture
SELECT
ENTER
RETURN
CANCEL
8 Re peat steps 2s7 above until you have set and
deleted dummy timer recordings for each of the
satellite stations that you will make VIDEO Plus+
recordings from.
9 Press [RETURN] (23) when you have finished.
18
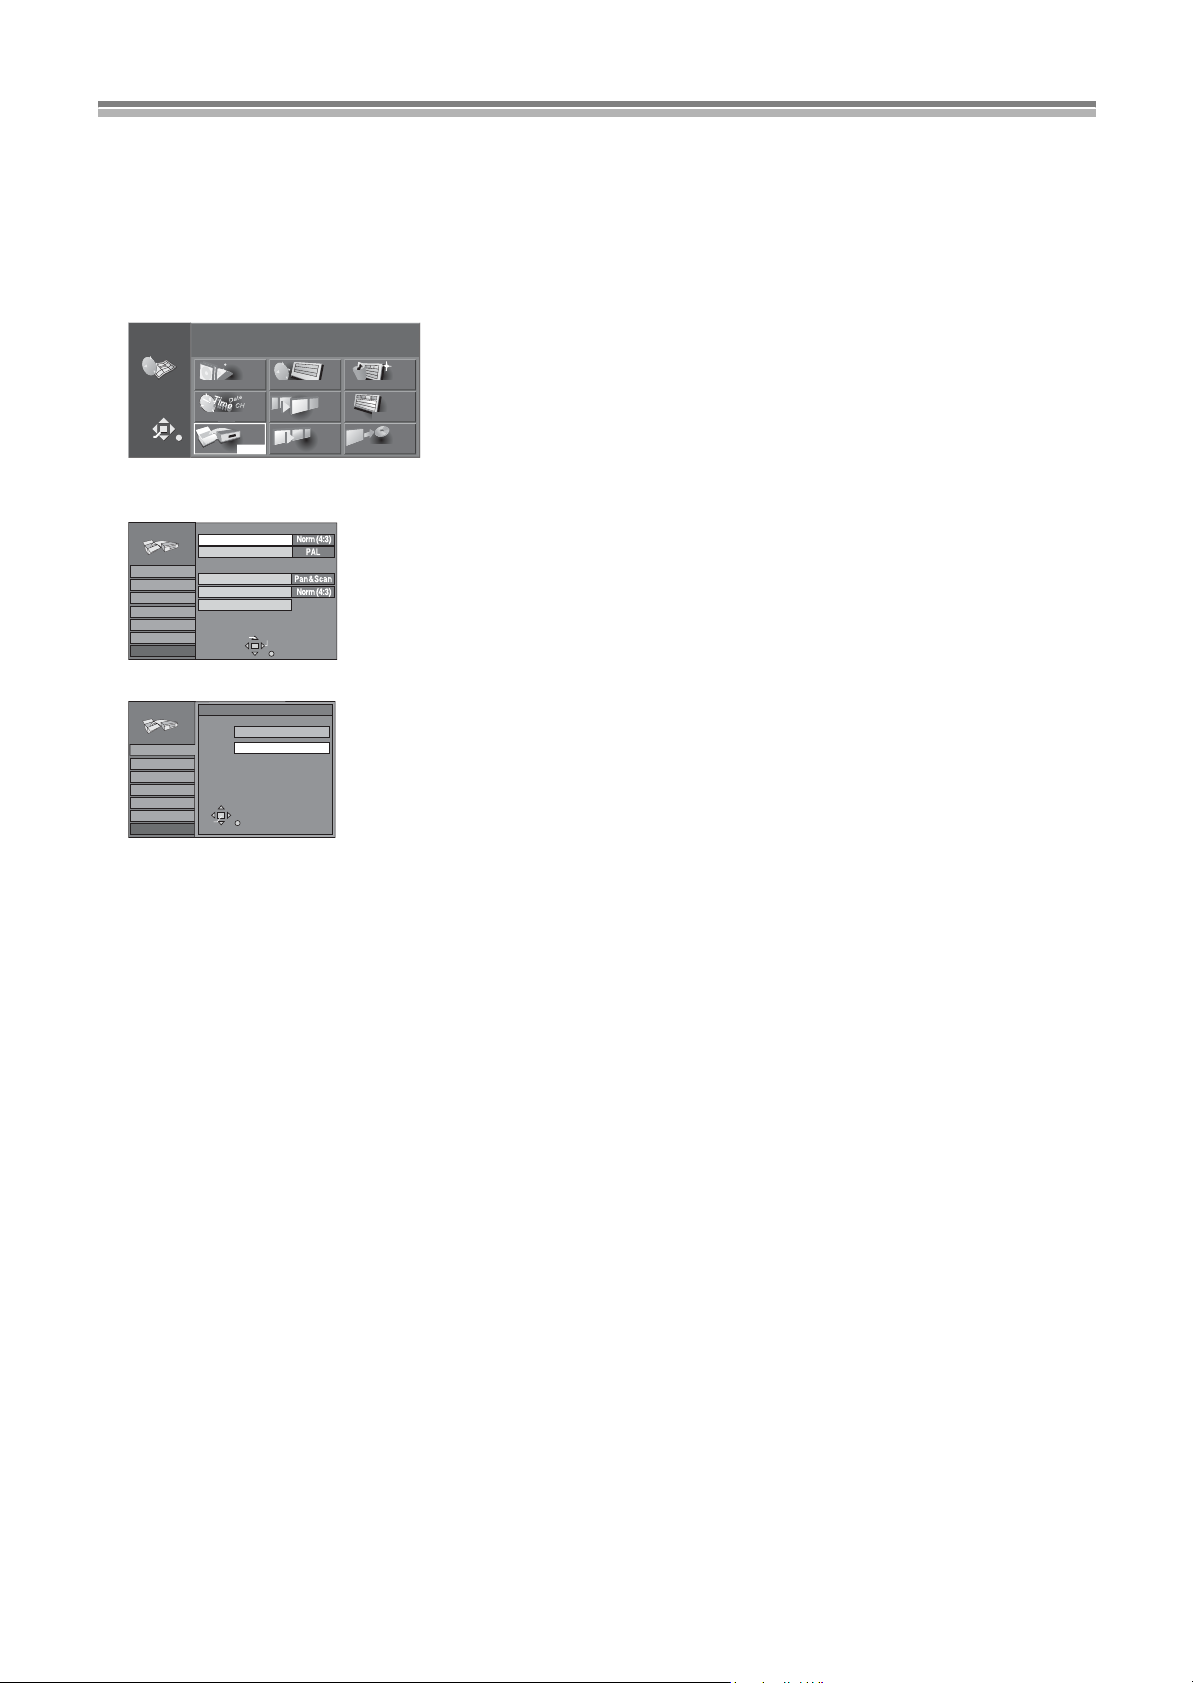
Selecting TV screen type
The aspect ratio is factory set to 4:3 for a regular television. You do not have to change this setting if you have a regular 4:3 aspect television.
Preparation
≥Turn on the television and select the appropriate video input to suit the connections to this unit.
≥Switch [DVD, TV] (15) to “DVD”.
1 Press [DVD, Í] (1) to turn this unit on.
2 Press [FUNCTIONS] (11) to show the FUNCTIONS window.
3 Use [3, 4, 2, 1] (10) to select “SETUP” and press [ENTER] (10).
DVD-RAM
Disc Protection
FUNCTIONS
Cartridge Protection
N
S
DISC INFORMATION
SELECT
ENTER
TIMER RECORDING
RETURN
4 Use [3, 4] (10) to select the “Connection” and press [2] or [1] (10).
5 Use [3, 4] (10) to select “TV Aspect” and press [ENTER] (10).
SETUP
TV Aspect
TV System
Tuning
Settings
Disc
Picture
Sound
Display
Connection
Normal (4:3) TV
Norm (4:3) TV Settings (DVD-Video)
Norm (4:3) TV Settings (DVD-RAM)
AV1/AV2 Settings
6 Use [3, 4] (10) to select the TV aspect and press [ENTER] (10).
SETUP
Tuning
Settings
Disc
Picture
Sound
Display
Connection
≥4:3 (factory setting)
≥16:9
ªTo return to the previous screen
Press [RETURN] (23).
SELECT
ENTER
RETURN
SETUP
Tab
SELECT
TV Aspect
Norm (4:3)
Wide (16:9)
Off
Off
N
S
DIRECT NAVIGA T OR
PLAY
TOP PLAY
RETURN
CREATE PLAY LIST
PLAY LIST
FLEXIBLE REC
For your reference
Apart from “TV Aspect”, other settings also affect how video appears on your television. Check the following if video doesn’t appear correctly
on your television.
≥“Connection”—“Norm (4:3) TV Settings (DVD-RAM)” or “Norm (4:3) TV Settings (DVD-Video)” (page 61).
≥The video setting on the disc. How video appears is often specified by the disc itself.
≥The video settings on your television.
19
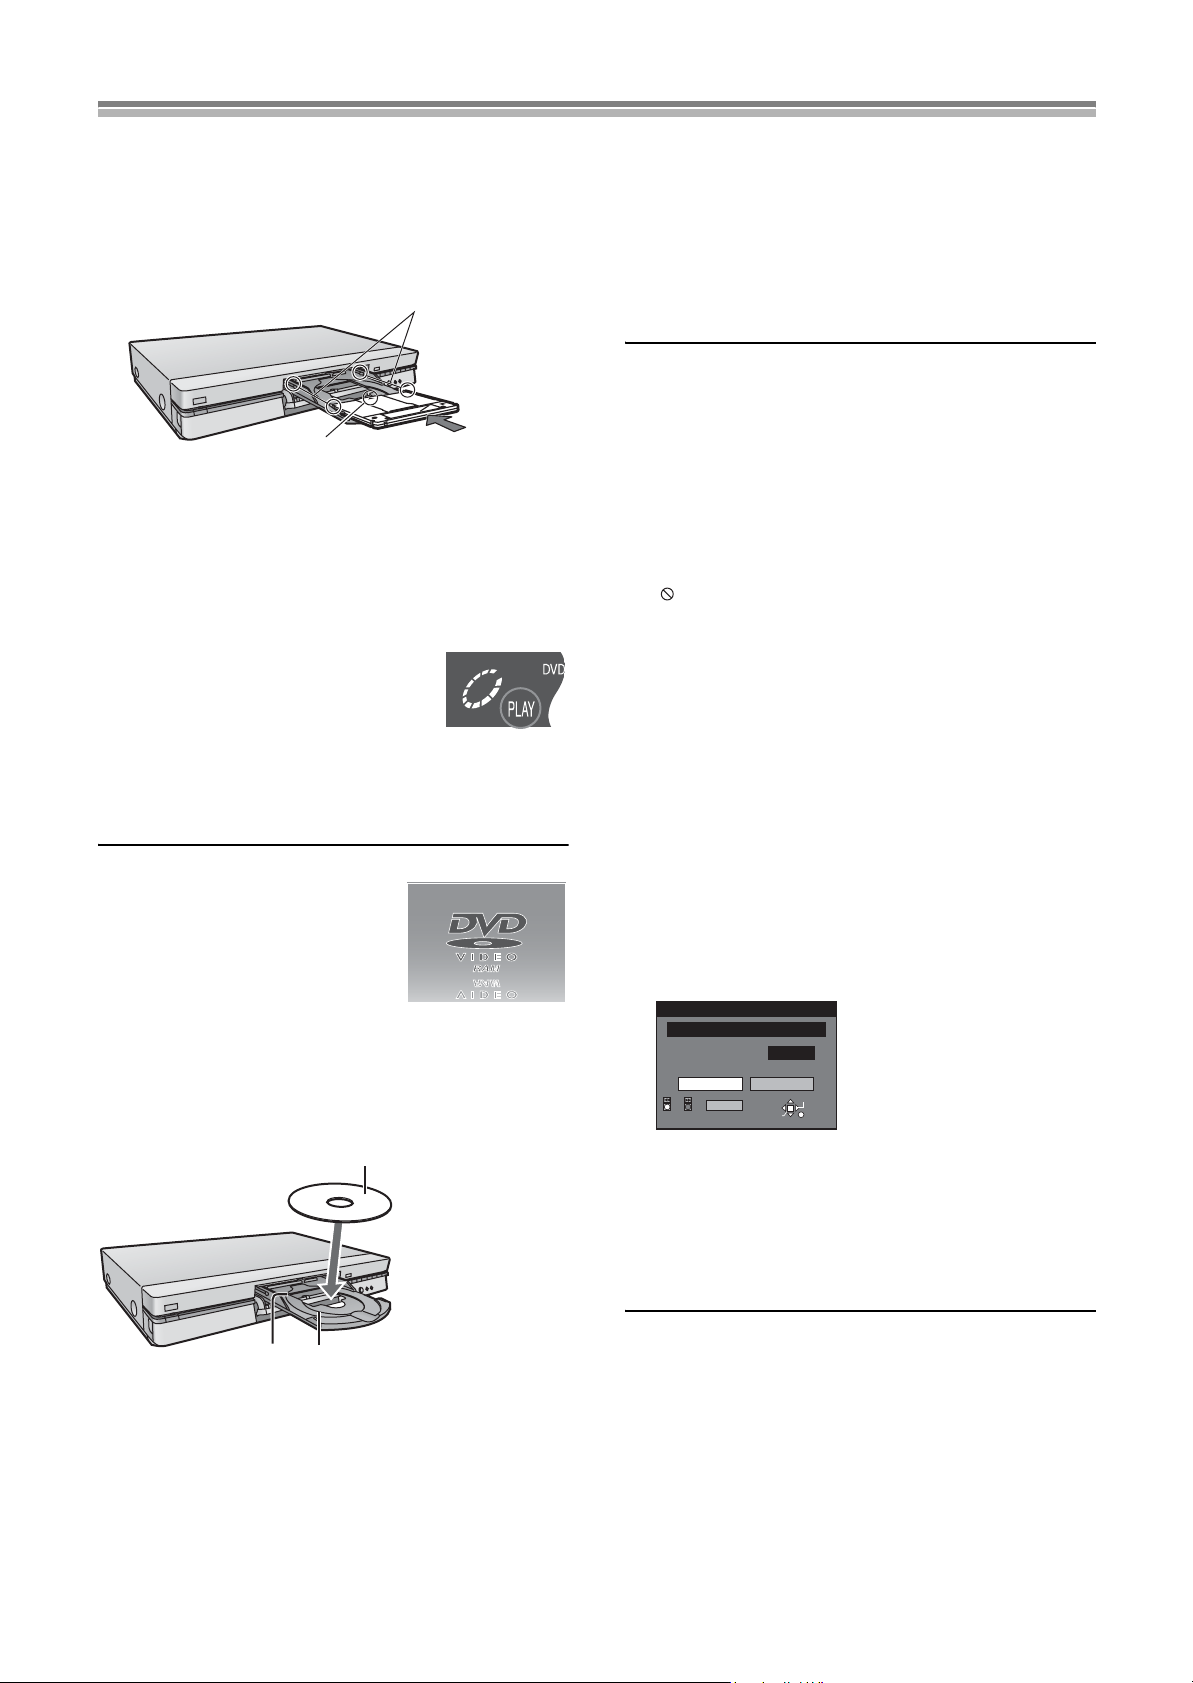
Playing discs
[RAM] [DVD-R] [DVD-V] [CD] [VCD] [MP3]
Preparation
Switch [DVD, TV] (15) to “DVD”.
1 Press [DVD, Í] (1) to turn the unit on.
2 Press [<, OPEN/CLOSE] (39) to open the tray and
insert a disc.
(2)
(1)
e.g.:DVD-RAM
(1) Arrow pointing inwards.
(2) Align correctly.
≥Insert label-up with the arrow facing in. (With double-sided
discs, load so the label for the side you want to play is facing
up.)
≥Insert inside the tray’s guides.
≥Insert one disc only.
3 Press [1] (21).
≥The disc tray closes and play begins.
(The unit takes some time to read the
disc before play starts.)
≥If the Resume function (page 21) is not
active, playback will begin from the most
recently recorded programme.
≥If you insert a DVD-RAM with the write-protect tab set to
“PROTECT” (page 73) and press [<, OPEN/CLOSE] (39),
play starts automatically.
ªTo stop play
Press [∫] (7). (page 21, Starting play
from where you stopped it)
≥A screen similar to the illustrated may
appear when you stop play. Press [∫]
(7) again and you can use this unit’s
tuner to watch television.
This screen is also shown when you are
playing CDs.
ªTo pause play
Press [;] (8).
Press again to restart playing.
ªWith non-cartridge discs
(1)
When a menu screen appears on the television
[DVD-V] [VCD]
Operate menus with the following operations. Actual operations
depend on the disc.
Press the numeric buttons (4) to select an item, or move
[3, 4, 2, 1] (10) to select an item and press [ENTER] (10).
≥You can return to menus after you start play by pressing
[TOP ME NU] (9) or [MENU] (22) (DVD-Video), or [RETURN]
(23) (Video CD).
Note
≥The disc continues to rotate while the menu is displayed even
after you finish playing an item. Press [∫] (7) when you finish to
preserve the unit’s motor and your television screen.
≥Volume may be lower when playing DVD-Video than when
playing other discs or during television broadcasts.
If you turn the volume up on the television or amplifier, ensure
you reduce the volume again before playing other sources or
returning to the television so that a sudden increase in output
does not occur.
For your reference
≥If “ ” appears on the television
The operation is prohibited by the unit or disc.
≥If a disc is loaded, the unit will come on and play will start when
you press [1] (21).
≥If you play a disc that includes parts without video, the unit may
display the video from the disc you were playing immediately
before that disc.
≥[RAM] [DVD-R]
Play starts from the beginning of the most recent recording. If that
programme is extremely short, play starts from the next most
recent recording. Use “TOP PLAY” in the FUNCTIONS window
(page 30) to start play from the oldest programme on the disc
(programme 1).
Erasing a programme that is being
played
[RAM] [DVD-R]
1 D ur i ng play
Press [ERASE] (30).
Erase Programme
Erase
ENTERSELECT
0 : 58 SP
Cancel
ENTER
SELECT
RETURN
Remaining Time
Corresponding PLAY LIST will also be erased.
Erase
≥The menu disappear about 10 seconds later.
2 Use [2] (10) or [:/6] (45) to select “Erase”
and press [ENTER] (10) or [ERASE] (30).
≥A confirmation message will be displayed.
≥Use [1] (10) or [5/9] (45) to select “Cancel” and press
[ENTER] (10) or [ERASE] (30), or press [RETURN] (23) to
cancel.
(2) (3)
(1) Insert label-up. (With double-sided discs, load so the label for
the side you want to play is facing up.)
(2) Guide for 12 cm (5
(3) Guide for 8 cm (3
q) disc
q) disc
Note
≥It is not possible to erase a programme when you are carrying
out simultaneous recording and play (page 29).
≥It is not possible to erase a programme that is in the process of
being recorded.
≥The available recording time on DVD-R does not increase when
you erase programmes.
20

Playing discs (continued)
Quick View (Play t1.3)
[RAM]
During play or Time Slip, you can play faster than the normal play
to save time by Quick View function.
During pla y
Press and hold [1] (21) for about 1 second.
DVD-RAM
PLAY x1.3
L R
≥Press [1] (21) to return to normal play.
≥You cannot use this feature if the “Play k1.3 & Audio during
Search” of “Sound” is “Off” (page 60).
≥This feature can be activated only on DVD-RAM recorded with
Dolby Digital.
≥Simultaneous recording and play with Quick View (Play k1.3) is
possible only during SP, LP and EP recording mode.
≥Quick View (Play k1.3) cannot operate when “editing menu” is
displayed. (pages 44, 46, 48, 49)
≥During Quick View (Play k1.3), the Digital Audio Output will
change to PCM Output.
≥During Quick View (Play k1.3), it may cause the picture to freeze
for a moment when scenes change.
Starting play from where you stopped it
(Resume Function)
[RAM] [DVD-R] [DVD-V] [CD] [VCD] [MP3]
1 D ur i ng play
Press [∫] (7).
≥The unit remembers the position.
2 Press [1] (21).
≥Play starts from where you stopped it.
ªTo cancel the resume function
Press [∫] (7) while the unit remembers the position.
(The position is also cleared when you turn the unit off.)
ªTo start play from a memorized position after turning
the unit off
Press [POSITION MEMORY] (36) during play.
(The message “Position Memorized” appears on the television.)
Now when you press [1] (21) after switching the unit to standby
and back on, play starts from the memorized position.
For your reference
[DVD-R] [DVD-V] [CD] [VCD] [MP3]
≥The position memorized when you press [∫] (7) or
[POSITION MEMORY] (36) is cleared when you open the disc
tray.
[RAM]
≥The position memory is written to the disc and remains intact until
you mark a different position.
You cannot mark positions if the disc is write-protected with DISC
INFORMATION (page 38) or with the write protect tab (page 73).
Release the protection before marking position.
≥If you press [∫] (7) before switching the unit to standby after
pressing [POSITIONMEMORY] (36) to memorize a position,
play will resume from the position you pressed [∫] (7) when you
press [1] (21).
Fast forward and rewind—SEARCH
[RAM] [DVD-R] [DVD-V] [CD] [VCD] [MP3]
During play
Press [6, SLOW/SEARCH] or [5, SLOW/SEARCH]
(20).
[6]: backward
[5]: forward
DVD-RAM
••••
L R
≥If using the [:/6] or [ 5/9] (45) button on the unit,
keep pressing the button for 1 or more seconds.
≥There are 5 search speeds. Each press increases the search
speed.
≥The search speed is maintained when you release the button.
≥Press [1] (21) to return to normal play.
≥You will hear sound at speed one (only forward) when playing
DVD-RAM, DVD-R, DVD-Video and Video CDs. You can turn
this sound off if you want to (page 60, “Sound”—“Play k1.3 &
Audio during Search”).
≥Sound is not heard during chasing play and simultaneous
recording and play.
Slow-motion play
[RAM] [DVD-R] [DVD-V] [VCD]
While paused
Press [6, SLOW/SEARCH] or [5, SLOW/SEARCH]
(20).
[6]: backward (does not work with Video CDs)
[5]: forward
≥If using the [:/6] or [ 5/9] (45) button on the unit,
keep pressing the button for 1 or more seconds.
≥There are 5 slow-motion speeds. Each press increases the slow-
motion speed.
≥The slow-motion speed is maintained when you release the
button.
≥Press [1] (21) to return to normal play.
Frame-by-frame view ing
[RAM] [DVD-R] [DVD-V] [VCD]
Remote control only
While paused
Press [2;, FRAME] or [;1, FRAME] (32) or [2, 1]
(10).
[2;] or [2]: backward (does not work with Video CDs)
[;1] or [1]: forward
≥Each press shows the next or previous frame.
≥Press [1] (21) to return to normal play.
21
Playing discs (continued)
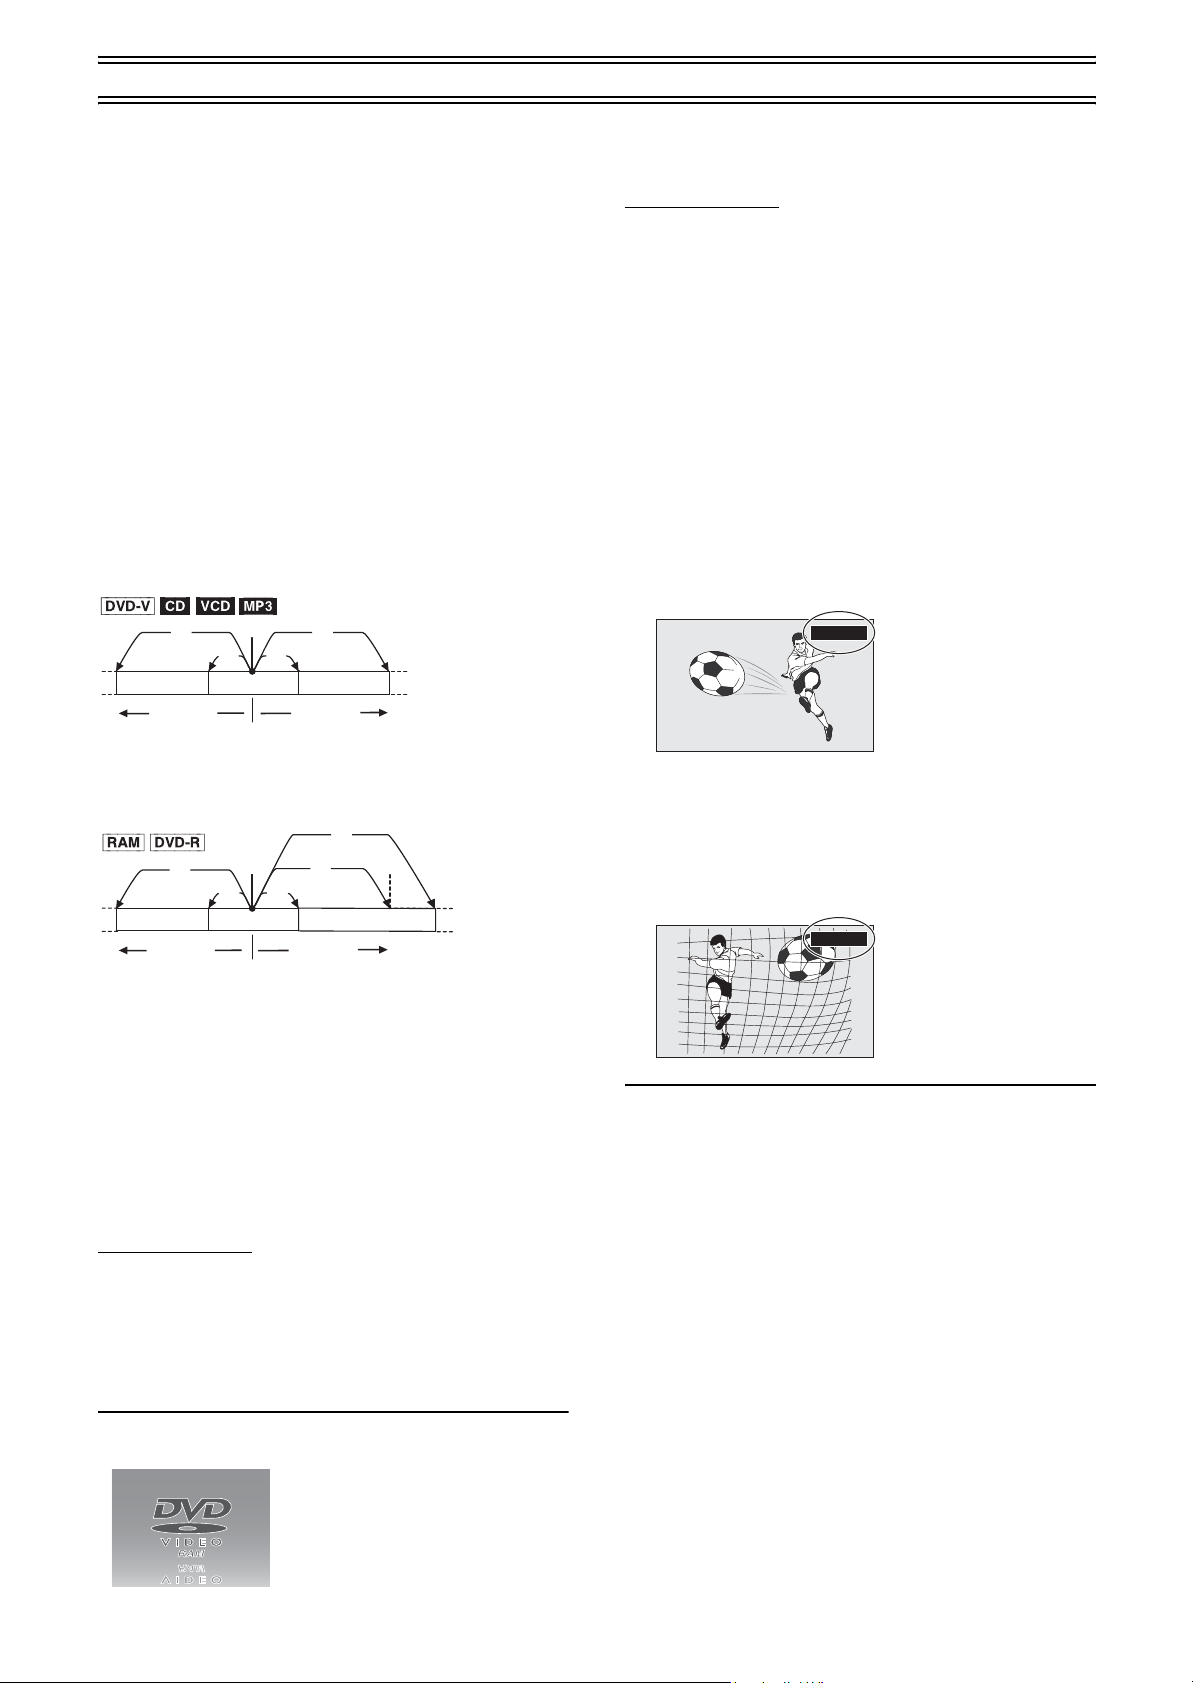
Skipping
[RAM] [DVD-R] [DVD-V] [CD] [VCD] [MP3]
You can skip to the beginning of tracks (page 71) and chapters
(page 71) and restart play from there.
On DVD-RAM and DVD-R, you can skip to the start of a
programme and start play from there.
The section between the point where recording is started and the
point where it is stopped is called a “programme”.
During play or while paused
Press [:, SKIP] or [9, SKIP] (6).
[:]: backward
[9]: forward
Each press increases the number of skips.
For your reference
≥After skipping, the unit returns to the previous state, play or
pause.
≥Press [1] (21) to restart play if it was paused.
≥Pressing [:] or [9] (6) while a DVD menu is being shown
or while the playback control feature on Video CDs (page 71) is
working may take you to a menu screen.
≥You can also mark positions to skip to (page 24).
(2) (2)
(4) (4)
[:]
(1)
(3) (3)
(4)
[9]
Manual Skip
[RAM] [DVD-R]
Remote control only
You can skip commercials easily with this feature.
Preparation
Switch [DVD, TV] (15) to “DVD”.
During play
Press [MANUAL SKIP] (24).
Play restarts from approximately 30 seconds later.
Selecting an amount of time to skip—
Time Slip
[RAM] [DVD-R]
You can set an amount of time and then skip with one press of a
button.
Preparation
Switch [DVD, TV] (15) to “DVD”.
1 D ur i ng play
Press [TIME SLIP] (25).
0 min
(1) Play position
(2) Twice
(3) Once
(4) Chapter/t rack
(5)
(3) (3)
(6)
[:]
(1) Play position
(2) Marker
(3) Twice
(4) Once
(5) Three times
(6) The programme bef ore
(7) Current programme
(8) The programme af ter
(1) (2)
(4) (4)
(7)
[9]
(8)
Starting play from a selected programme,
title, chapter or track
[RAM] [DVD-R] [DVD-V] [CD] [VCD] [MP3]
Remote control only
Preparation
Switch [DVD, TV] (15) to “DVD”.
2 Within 5 seconds
Press [3, 4] (10) to enter the time and press
[ENTER] (10).
≥Play skips the time you entered.
≥Press [3] (10) to increase or [4] (10) to decrease in one-
minute units. Press and hold [3] (10) to increase or [4] (10)
to decrease in 10-minute units.
–5 min
Note
You cannot use this feature while a “DIRECT NAVIGATOR”
(page 41) or “PLAY LIST” (page 45) screen is being displayed.
During pla y
Press the numeric buttons (4) to select the item.
(page 4)
≥This works only when stopped with some discs (the screen saver
is on the television).
22
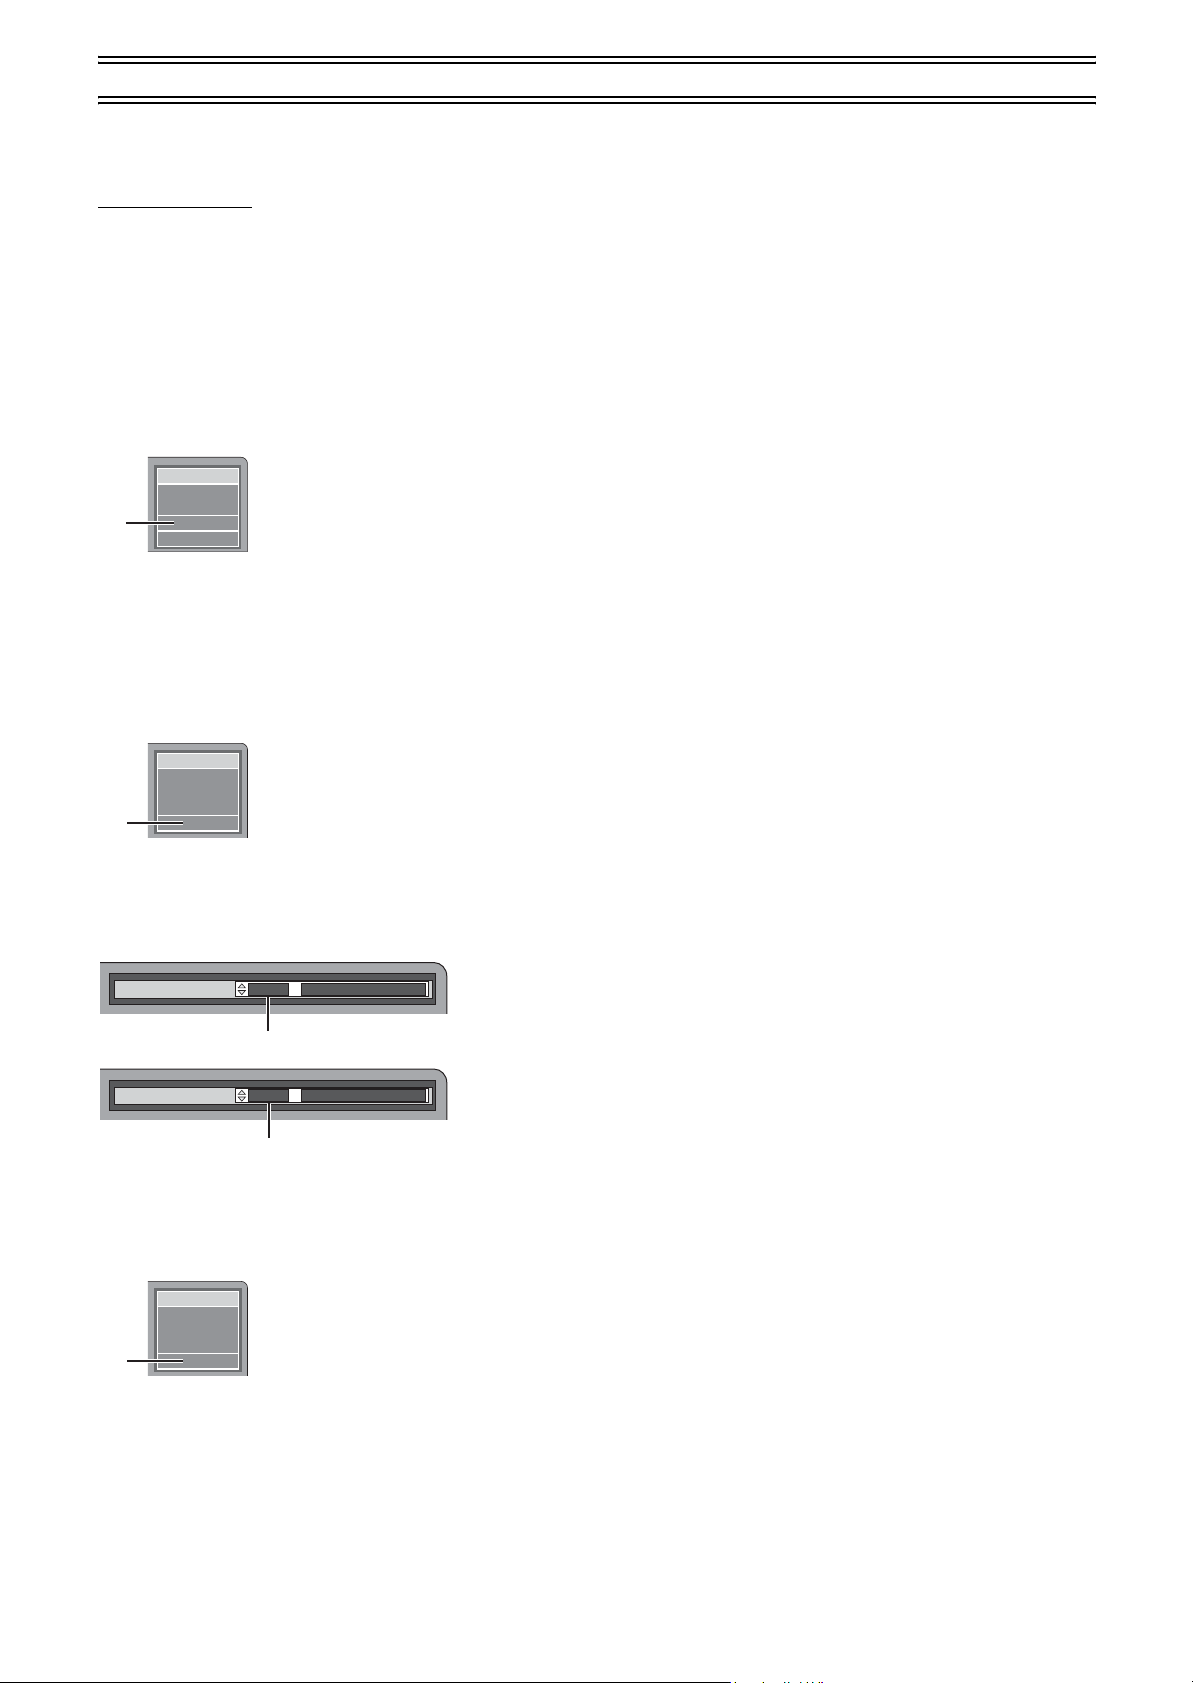
Playing discs (continued)
Changing audio
[RAM] [DVD-V] [VCD]
Remote control only
You can change the audio being received or played with the
following procedure.
Preparation
Switch [DVD, TV] (15) to “DVD”.
During reception or play
Press [AUDIO] (31) to select the audio type.
How the type changes depends on when you press the button.
ªWhile receiving a TV programme with NICAM
Automatic indication of the type of sound system which the
programme being watched (NICAM/MONO) is broadcast.
DVD-RAM
BBC 1
(1)
(1) e.g.: “NICAM” is selected
≥If “NICAM OFF” is selected during manual tuning, “MONO” is
always displayed.
ªWhile playing a television programme recorded on
DVD-RAM
If it is a recording of a stereo broadcast
LR>L>R
^-------------}
NICAM
L R
ªWhen you have connected the unit to other
equipment with an optical digital cable
You cannot change the audio type when you have used only an
optical digital cable for connection in the following cases:
≥While playing stereo or bilingual broadcasts recorded on DVD-
RAM.
≥While playing something recorded from other equipment.
When using DVD-R
You cannot use [AUDIO] (31) or the DISPLAY menu to change
audio type when a DVD-R is in the disc tray.
≥While receiving a bilingual TV broadcast
You can use the SETUP menus to select which audio type is
recorded, either “M1” or “M2”. “M1” is the default setting. (page 60,
“Sound”—“Bilingual Audio Selection”)
≥During play
The audio type selected for recording is played. This is displayed
as “LR”.
DVD-RAM
PLAY
(2)
(2) e.g.: “LR” is selected
L R
ªWhile playing a DVD Video
You can change the audio channel number each time you press
the button. This allows you to change things like the soundtrack
language.
Soundtrack
1 ENG Î Digital 3/2.1ch
(3)
Soundtrack
2 FRA Î Digital 3/2.1ch
(4)
(3) e.g.: English is the selected language
(4) The language is switched to French
ªWhile playing a Video CD
LR>L>R
^-------------}
V-CD
PLAY
(5)
(5) e.g.: “LR” is selected
For your reference
≥You can also use the DISPLAY menu to change the audio type.
≥You can change the audio for the images being played with
simultaneous recording and play and Time Slip.
L R
23

Playing discs (continued)
Marking places to play again—MARKER
[RAM] [DVD-R]
You can mark up to 999 points on a disc to return to later. These
marks are recorded directly onto DVD-RAM, but are cleared when
you removed or finalized DVD-R.
[DVD-V] [CD] [VCD] [MP3]
You can mark up to 5 points on a disc to return to later. All the
markers are cleared when the disc tray is opened.
Preparation
Switch [DVD, TV] (15) to “DVD”.
ªMarking positions directly
During pla y
Press [MARKER] (35).
≥One marker is added.
ªUsing DISPLAY menus to mark positions
Displaying the marker icon
1 D ur i ng play
Press [DISPLAY] (34).
Disc
Play
Picture
Sound
Soundtrack
Subtitle
Audio channel
2 Use [3, 4] (10) to select the Play tab and press [1]
(10).
Disc
Play
Picture
Sound
Repeat Play
Marker
3 Use [3, 4] (10) to select “Marker” and press [1]
(10) to highlight the first asterisk (¢).
[RAM] [DVD-R] [DVD-V] [CD] [VCD] [MP3]
1
1s10
††††††††††
Î Digital 2/0ch
OFF
L R
OFF
Note
[RAM]
≥This feature doesn’t work while using a play list.
≥Markers cannot be added to or removed from discs that are
protected (pages 38, 73).
[RAM] [DVD-R]
≥The markers are ordered by time. This means that the marker
numbers can change when you add and erase markers.
[DVD-V] [CD] [VCD] [MP3]
≥This feature only works if the elapsed playing time of the disc is
shown on the unit’s display.
≥Some subtitles recorded around the marker may fail to appear.
1s10
††††††††††
†††††
Marking positions
1 Use [2, 1] (10) to select an asterisk (¢).
2 Press [ENTER] (10).
≥One marker is added.
When marking positions 11 and above
[RAM] [DVD-R]
1 Use [2, 1] (10) to highlight “1–10”.
2 Use [3, 4] (10) to select “11–20”.
≥Y ou can select the next group of 10 when the current group is
full.
3 Use [1] (10).
≥The first asterisk is highlighted.
4 Press [ENTER] (10) to mark a position.
To play from a marked position
1 Use [2, 1] (10) to select a marker number.
2 Press [ENTER] (10).
≥Play starts from the marked position.
ªTo clear a marker
Use [2, 1] (10) to select a marker number and press [CANCEL]
(5).
≥An asterisk replaces the number and the position is cleared.
ªTo clear the DISPLAY menus
Press [DISPLAY] (34).
24
 Loading...