

Panasonic CQ-VD7500U User Manual
®
YEFM284237 NB0304-0 Printed in Japan
Imprimé au Japon
Impreso en Japón
Panasonic Consumer Electronics
Company, Division of Matsushita
Electric Corporation of America
One Panasonic Way, Secaucus,
New Jersey 07094
http://www.panasonic.com
Panasonic Sales Company.
Division of Matsushita Electric of
Puerto Rico, Inc. (“PSC”)
Ave. 65 de Infanteria, Km. 9.5
San Gabriel Industrial Park, Carolina,
Puerto Rico 00985
http://www.panasonic.com
Panasonic Canada Inc.
5770 Ambler Drive,
Mississauga, Ontario
L4W 2T3
http://www.panasonic.ca
CQ-VD7700U
E
N
T
E
R
PWR NAVI MODE MENU
CHAPTER
ASPECT
P-MODE
TRACK
NAVIGATION
STOP
TOP MENU
DVD / SD MENU
ST/ MONO
CH1 CH2
RANDOM
RETURN
OSD
RET
RAND
AUDIO
ANGLE
REP
SUB
SPACE MUTE
VOL
GRP
DISP
123
456
7A809
PAGE
SCAN
PAUSE PLAY
SUBTITLE
REPEAT
SCROLL
TITLE / CHAPTER
VOL
CAR AV
(CQ-VD7700U)
¡Please read these instructions carefully before using this product and keep this manual for future reference.
¡Prière de lire ces instructions attentivement avant d’utiliser le produit et garder ce manuel pour l’utilisation ultérieure.
¡Lea con atención estas instrucciones antes de utilizar el producto y guarde este manual para poderlo consultar en el futuro.
CQ-VD7700U
CQ-VD7500U
TEXT
In-Dash 7” Widescreen Color LCD Monitor TV/DVD/SD Receiver
Moniteur/télé couleur de tableau de bord à ÉCL de 7 po (grand-
écran)/récepteur/lecteur DVD/SD
Reproductor de DVD con receptor SD y monitor LCD de TV en color de pantalla
ancha de 7 pulgadas para el tablero de instrumentos
CQ-VD7700U/VD7500U
Operating Instructions
Manuel d’instructions
Manual de Instrucciones
CQ-VD7700U
IN-DASH 7" WIDESCREEN COLOR LCD MONITOR TV / DVD / SD RECEIVER
OPEN
VOLUME
MUTE NAVI DISP
MODE
ASP
NAVIGATION
POWER ASPECT
TILT
OPEN / CLOSE
OPEN / CLOSE
TILT
TRACK/
CHANNEL
ENTER
DISC
SD CARD
·
MODE
P
CQ-VD7700U/VD7500U
2
CQ-VD7700U/VD7500U
3
E
N
G
L
I
S
H
F
R
A
N
Ç
A
I
S
Safety Information
Consignes de sécurité
Il est recommandé de noter, dans l’espace prévu ci-dessous, les numéros de modèle et de série inscrits soit à l’arrière soit sous le fond de l’appareil, et de conserver ce manuel comme mémorandum de l’achat afin de permettre
l’identification de l’appareil en cas de vol.
NUMÉRO DE MODÈLE CQ-VD7700U/VD7500U
NUMÉRO DE SÉRIE
DATE DE L’ACHAT
VENDEUR
Find the model number and serial number on either the back or bottom of the unit. Please record them in the
space below and retain this booklet as a permanent record of your purchase to help with identification in case of
theft.
MODEL NUMBER CQ-VD7700U/VD7500U
SERIAL NUMBER
DATE PURCHASED
FROM
CAUTION!
THIS PRODUCT UTILIZES A CLASS ILASER.
USE OF CONTROLS OR ADJUSTMENTS OR PERFORMANCE OF PROCEDURES OTHER THAN THOSE
SPECIFIED HEREIN MAY RESULT IN HAZARDOUS
RADIATION EXPOSURE.
DO NOT OPEN COVERS AND DO NOT REPAIR YOURSELF. REFER SERVICING TO QUALIFIED PERSONNEL.
CAUTION:
• PLEASE FOLLOW THE LAWS AND REGULATIONS
OF YOUR STATE, PROVINCE OR COUNTRY FOR
INSTALLATION OF THE UNIT.
• TO REDUCE THE RISK OF FIRE OR ELECTRIC
SHOCK OR PRODUCT DAMAGE, DO NOT EXPOSE
THIS APPLIANCE TO RAIN, SPLASHING, DRIPPING
OR MOISTURE.
The following applies only in the U.S.A.
Part 15 of the FCC Rules
FCC Warning:
Any unauthorized changes or modifications to this
equipment would void the user's authority to operate
this device.
WARNING
NOTICE:
This product has a fluorescent lamp that contains a small amount of mercury. It also contains lead in some components. Disposal of
these materials may be regulated in your
community due to environmental considerations. For disposal or recycling information
please contact your local authorities, or the
Electronics Industries Alliance:
<http://www.eiae.org.>
• TO REDUCE THE RISK FOR FIRE OR ELECTRIC SHOCK AND ANNOYING INTERFERENCE, USE ONLY THE INCLUDED COMPONENTS.
• This unit operates with a 12 V DC negative
ground auto battery system only. Do not
attempt to use it any other system.
• Do not expose unit to direct sunlight or
excessive heat.
• Keep out the SD-Card and batteries of reach
of children.
If swallowed, seek medical advice immediately.
ATTENTION!
CET APPAREIL EST UN PRODUIT LASER DE LA
CLASSE I.
L’UTILISATION DE COMMANDES OU RÉGLAGES OU
L’EXÉCUTION D’OPÉRATIONS AUTRES QUE CELLES
QUI SONT INDIQUÉES DANS CE DOCUMENT
PEUVENT RÉSULTER EN UNE EXPOSITION À UN
RAYONNEMENT DANGEREUX.
N’OUVREZ PAS LES COUVERCLES ET N’ESSAYEZ
PAS D’EFFECTUER VOUS-MÊME DES RÉPARATIONS.
ADRESSEZ-VOUS À UN PERSONNEL QUALIFIÉ POUR
TOUTE RÉPARATION.
ATTENTION:
•
OBSERVEZ LES LOIS ET RÈGLEMENTS DE VOTRE
PROVINCE OU PAYS POUR L’INSTALLATION DE
L’APPAREIL.
•
AFIN DE LIMITER LES RISQUES D’INCENDIE OU
D’ÉLECTROCUTION OU ENCORE D’ENDOMMAGEMENT DE L’APPAREIL, N’EXPOSEZ PAS CET
APPAREIL À LA PLUIE, AUX ÉCLABOUSSURES
D’EAU OU À L’HUMIDITÉ.
MISE EN GARDE
• AFIN DE PRÉVENIR TOUT RISQUE D’INCENDIE OU D’INTERFÉRENCES, UTILISER
UNIQUEMENT LES COMPOSANTS FOURNIS.
• Cet appareil ne peut fonctionner que sur
une batterie de 12 V c.c. avec négatif à la
masse. Ne tentez pas de l’utiliser avec une
autre source d’alimentation. Cela pourrait
causer de graves dommages.
• N’exposez pas l’unité à la lumière du soleil
directe ou chaleur excessive.
• Gardez les cartes SD et les piles hors de
portée des enfants.
Si elle a été avalée, faites immédiatement
appel à l'intervention d'un médecin.

5
CQ-VD7700U/VD7500U
E
N
G
L
I
S
H
4
CQ-VD7700U/VD7500U
E
S
P
A
Ñ
O
L
Busque el número del modelo y el número de serie ya sea en la parte trasera o en el fondo de la unidad. Sírvase
anotar dichos números en el espacio siguiente, y mantenga este librete como una anotación permanente de su
compra para ayudar en la identificación en el caso de robo.
NÚMERO DEL MODELO CQ-VD7700U/VD7500U
NÚMERO DE SERIE
FECHA DE COMPRA
NOMBRE DE LA TIENDA
When Car Washing
Do not expose the product, including the speakers and discs, to water or excessive moisture. This could cause electrical
shorts, fire, or other damage.
When Parked
Parking in direct sunlight can produce very high temperatures inside your car. Give the interior a chance to cool down
before switching the unit on.
Use the Proper Power Supply
This product is designed to operate with a 12 V DC, negative ground battery system (the normal system in a North
American car.)
Disc Mechanism
Do not insert coins or any small objects. Keep screwdrivers and other metallic objects away from the disc mechanism and
disc.
Protect the Software
When you leave the car, be sure to eject the disc and SD-card from this unit and remove them from the vehicle.
Use Authorized Servicenters
Do not attempt to disassemble or adjust this precision product. Please refer to the Servicenter list included with this product for service assistance.
For Installation
The product should be installed in a horizontal position with the front end up at a convenient angle, but not more than 30˚.
The user should bear in mind that in some areas there may be restrictions on how and where this unit must be installed.
Consult your dealer for further details.
Use This Product Safely
WARNING:
TO AVOID RISK OF SERIOUS INJURY OR POSSIBLE VIOLATION OF LAWS, DO NOT USE WHERE
VISIBLE TO DRIVER FOR ANY PURPOSE OTHER THAN NAVIGATION OR USE WITH REAR VIEW
CAMERA.
When Driving
¡The driver must not operate the color LCD (liquid crystal display) monitor. Operating the color LCD monitor may lead
to carelessness and cause an accident. Stop your car in a safe location when operating the unit.
¡The driver must not watch videos while driving. It may lead to carelessness and cause an accident.
¡Keep the unit at an appropriate sound level. Driving with the sound at a level that prevents you from hearing sounds
outside and around the car may cause an accident.
CAUTION:
Follow local rules and regulations for installing monitor and TV antenna.
Información para su seguridad
PRECAUCIÓN:
ÉSTE UN PRODUCTO LÁSER DE LA CLASEI.
LA UTILIZACIÓN DE CONTROLES, EL HASER
AJUSTES O EL SEGUIR PROCEDIMIENTOS DISTINTOS DE LOS ESPECIFICADOS EN ESTE MANUAL
PODRÍA CAUSAR UNA EXPOSICIÓN PELIGROSA A LA
RADIACIÓN.
NO ABRA LAS CUBIERTAS NI HAGA PERARACIONES
USTED MISMO. SOLICITE LOS TRABAJOS DE SERVICIO AL PERSONAL CUALIFICADO.
PRECAUCIONES:
• RESPETE LAS LEYES Y REGULACIONES DE SU
ESTADO, PROVINCIA O PAÍS PARA LA INSTALACIÓN
DEL APARATO.
• PARA REDUCIR EL PELIGRO DE INCENDIOS Y DE
DESCARGAS ELÉCTRICAS ASÍ COMO DE DAÑOS
DEL PRODUCTO, NO LO EXPONGA A LA LLUVIA, A
SALPICADURAS, CONDENSACIÓN DE AGUA NI
HUMEDAD.
Lo siguiente se aplica solamente a los EE.UU.
Parte 15 de los Reglamentos FCC
Advertencia FCC:
Cualesquier cambios o modificaciones sin autorización a este equipo puede anular la autoridad del
usuario para operar este dispositivo.
ADVERTENCIA
AVISO:
Este producto contiene plomo en algunos
componentes.
La eliminación de estos materiales puede
estar reglamentado en su comunidad debido
a las consideraciones ambientales.
Para informarse acerca de la eliminación o
reciclaje comuníquese con las autoridades
locales, o la Alianza de Industrias
Electrónicas: <http://www.eiae.org.>
•PARA EDUCIR EL RIESGO DE INCENDIOS O
SACUDIDAS ELÉCTRICAS< Y PARA EVITAR
LAS INTERFERENCIAS MOLESTAS, UTILICE
SOLAMENTE LOS COMPONENTES INCLUIDOS.
• Este unidad sólo funcionará con un sistema
de batería de vehículo de 12 V CC con negativo a masa.
• No exponga la unidad a la luz directa del
sol ni a calor excesivo.
• Mantenga las tarjetas SD y las pilas alejadas del alcance de los niños.
Existe el peligro de que se la traguen.
Si se la traga alguien, llévelo inmediatamente al médico.
7
CQ-VD7700U/VD7500U
E
N
G
L
I
S
H
6
CQ-VD7700U/VD7500U
E
N
G
L
I
S
H
ID Code
Prior to operating this unit, it is advisable to assign a 4-digit ID code for security. (Make sure to use four digits for ID code.)
Once the ID code has been set, the unit cannot be operated if the main power supply is disconnected then re-connected. It
is electronically locked so that a thief can not use the stolen unit unless that person knows the code you have set.
The ID code operation must be performed only by the person to whom the unit belongs.
Generally, it is not necessary to enter the ID code each time when using the unit if it has never been disconnected from the
main power supply (car battery). For the ID code setting procedures, see page 57.
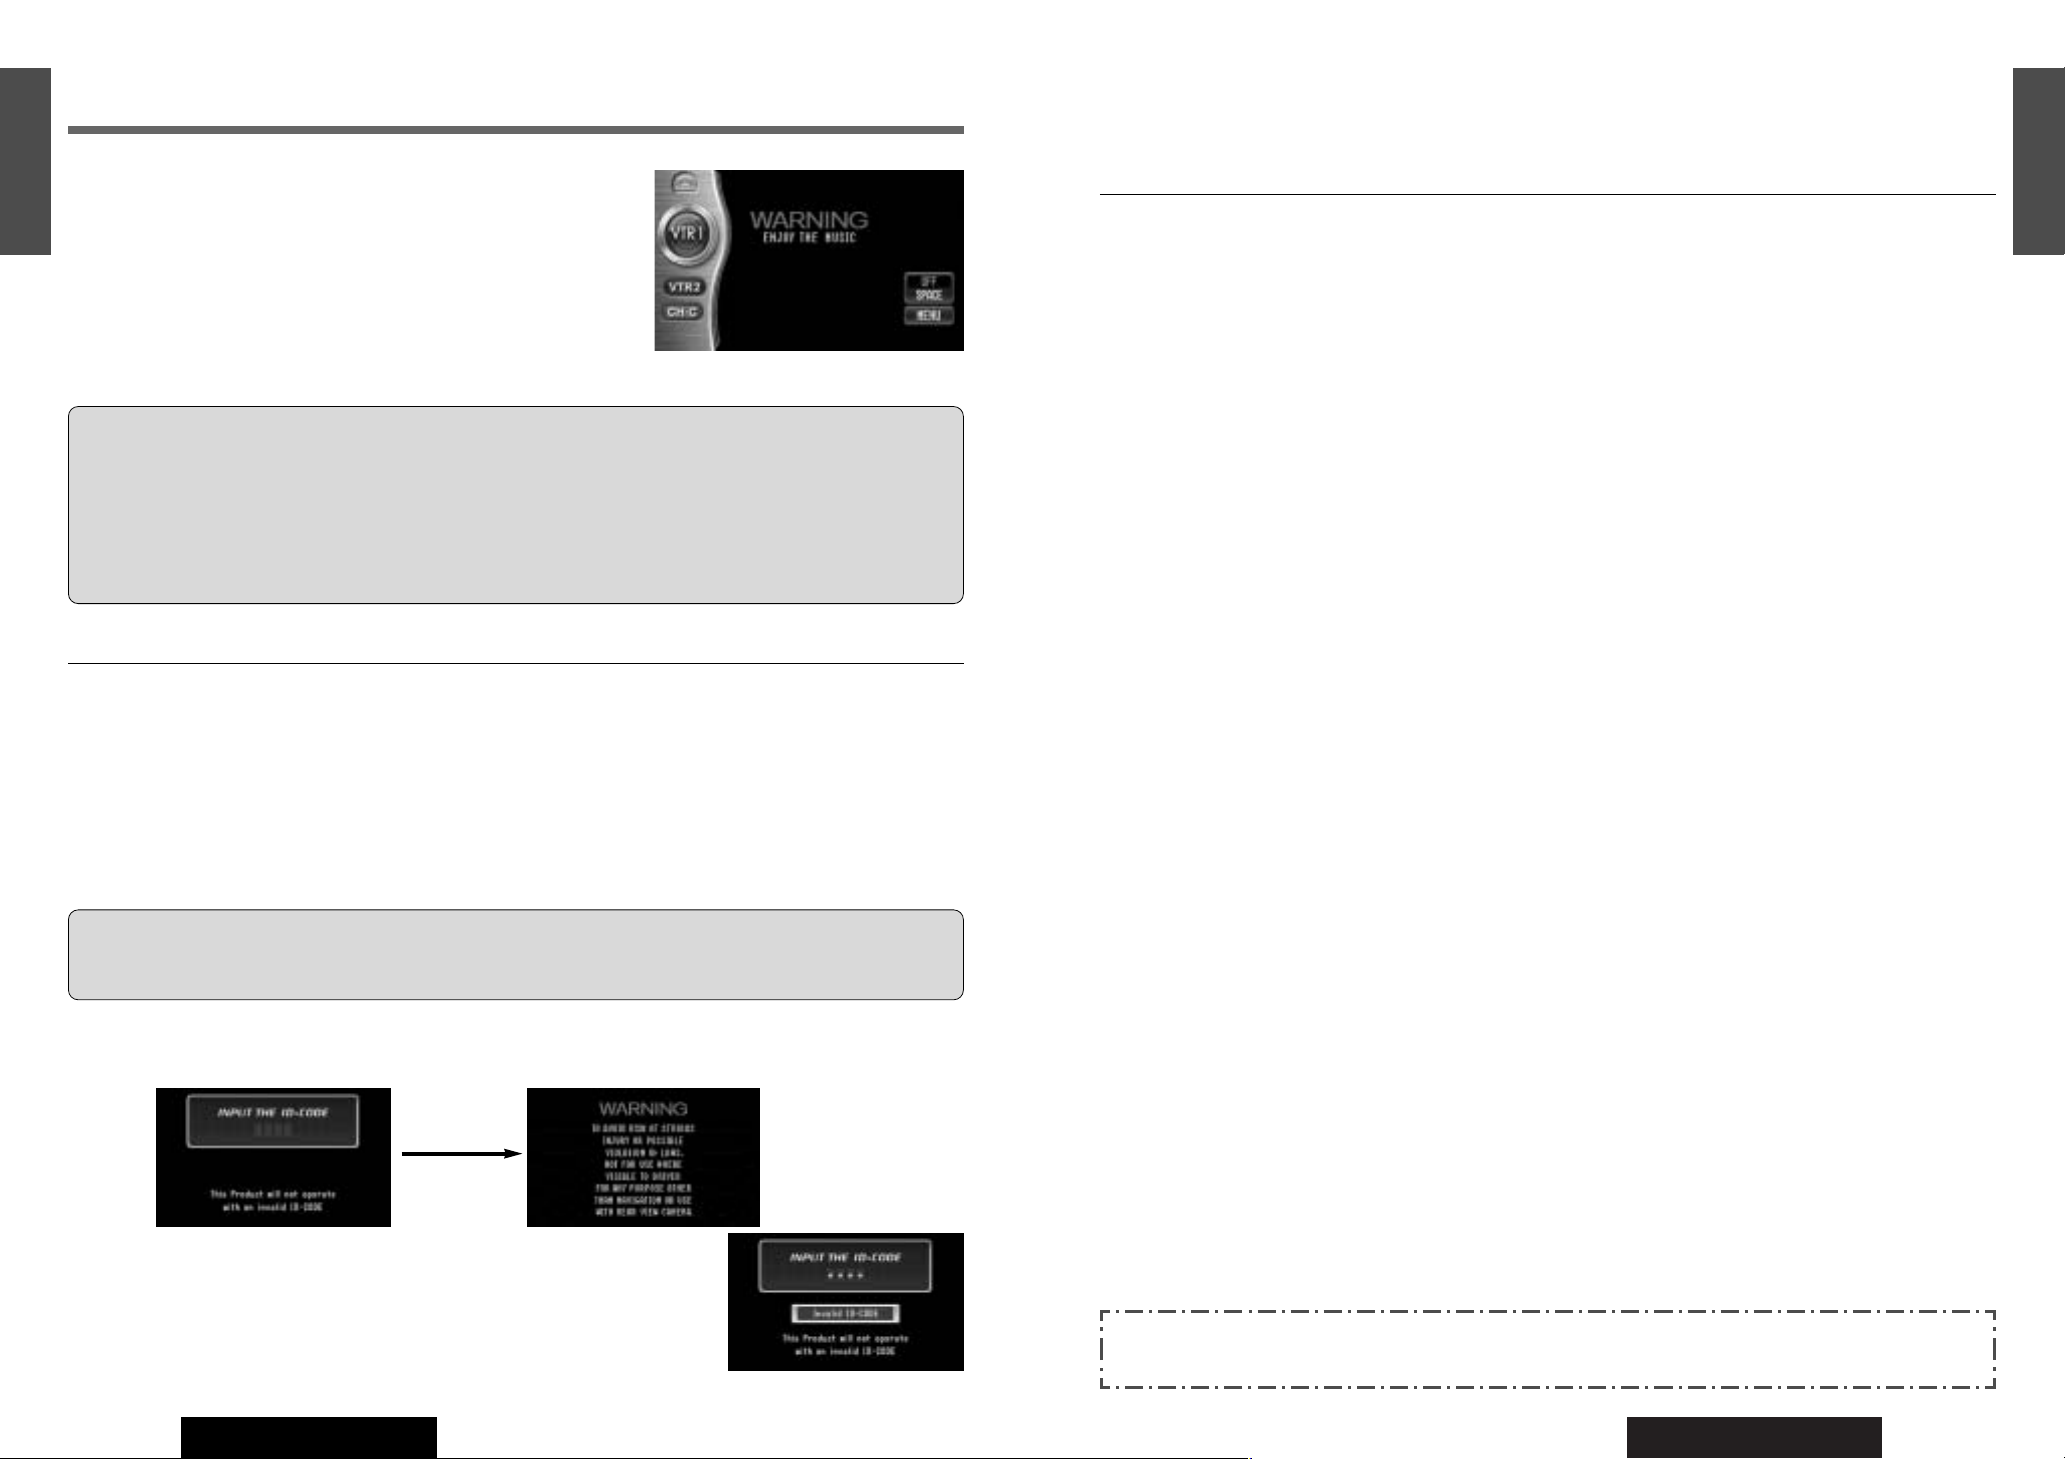
ID Code Input
Enter the ID code after turning on the power and activating the display.
Note: When you fail in entering the ID code, the screen on the right is displayed
and the unit beeps three times. Enter a correct ID code.
If you fail to enter the correct ID code three times consecutively, the power is turned
off. Turn on the power again and enter a correct ID code.
This system is designed so that you cannot see
moving pictures while you are driving.
¡
Park your car in a safe and pull the side brake (parking brake)
lever before watching the monitor.
¡
A rear monitor (option) displays moving pictures while driving.
Note:
Be sure to connect the side brake (parking brake) connection lead. (aInstallation Instructions)
Success
Caution: Record your registered ID code and keep it in a secure location. If you forget it, you will be unable
to use the unit. If you cannot operate the unit because you forgot the ID code, please consult your nearest Panasonic
Servicenter.
Cautions:
¡Picture might not be displayed, or it might take more time than usual to display picture in low temperature.
Also, movement of picture might become labored, or picture quality might deteriorate in low temperature.
[practicable temperature: 32 °F to 104 °F (0 °C to 40 °C)]
¡Do not press the Touch Panel with hard pointed sticks.
¡
In some cases, noise is generated. It depends on the position or direction of a mobile phone and CB transceiver, etc.
Change the position or direction of the mobile phone and CB transceiver, etc. or keep them away from the unit.
Panasonic welcomes you to our ever growing family of electronic product owners. We know that this product
will bring you many hours of enjoyment. Our reputation is built on precise electronic and mechanical engineering, manufactured with carefully selected components and assembled by people who take pride in their work.
Once you discover the quality, reliability, and value we have built into this product, you too will be proud to be
a member of our family.
❏ Features
■ Integration of the monitor, TV tuner, FM/AM radio, DVD Video/Audio player, Video
CD player, CD/MP3 player and SD-card player
¡A CD-R and a CD-RW that hold CD-DA data can be reproduced.
¡A CD-ROM, a CD-R and a CD-RW that hold MP3 data can be reproduced.
¡MP3 ID3Tag is supported.
■ SD-card Player (a page 50)
Equipped with 1 SD-Card Slot. You can play MPEG4 Videos, AAC Audios, JPEG still images and Voice(G.726) files on
the SD-Cards. MP3 audio files on the SD-Card cannot be played. (However, MP3 files that were written with SDJukebox in order to use as an SD audio file are playable.)
■ Built-in Dolby Digital decoder, DTS decoder, Dolby Pro Logic II decoder
(only for CQ-VD7700U)
You can enjoy a powerful 5.1 channel surround system by connecting optional center speaker, power amplifier and
sub-woofer.
■ Built-in DSP (only for CQ-VD7700U) (a page 72)
8 sound field (space) and Parametric equalizer.
■ 7-inch wide LCD (Liquid Crystal Display) display
Delivers images of high quality and superb color reproduction.
■ Optical digital output (Only for CQ-VD7500U)
Equipped with an optical digital output. You can realize the 5.1 channel surround system by connecting an optional
digital surround processor to the output.
■ GUI (Graphic User Interface) with touch panel
GUI displays various indicators with colorful symbols to enhance visibility, enjoyment, and operability.
■ Image capture function
Images can be imported from TV, VTR, DVD or Video CD for a wallpaper.
■ 70 W
High power high-efficiency digital power amplifier (only for CQ-VD7700U)
Digital power amplifier transmits power at approx. 90 % efficiency.
■ ID code
4-digit ID code for increased security.
■ External extension terminal
¡2 video inputs
You can connect a car navigation system, VCR and camcorder with this unit if they have a video output type terminal.
¡One video output (on the hide-away unit side)
You can connect an optional monitor for passengers in the rear seat (private mode).
■ CD changer control function
An optional CD changer (CX-DP880U) can be connected.
Note: It is necessary to incorporate the Dual CD Changer Selector CA-CD55 (option) when connecting 2 CD changers.
This book refers to connections to the Panasonic car navigation system that will come onto the market in the future.
Descriptions regarding the car navigation system are boxed with a dotted line.
Use This Product Safely (continued)
9
CQ-VD7700U/VD7500U
8
CQ-VD7700U/VD7500U
E
N
G
L
I
S
H
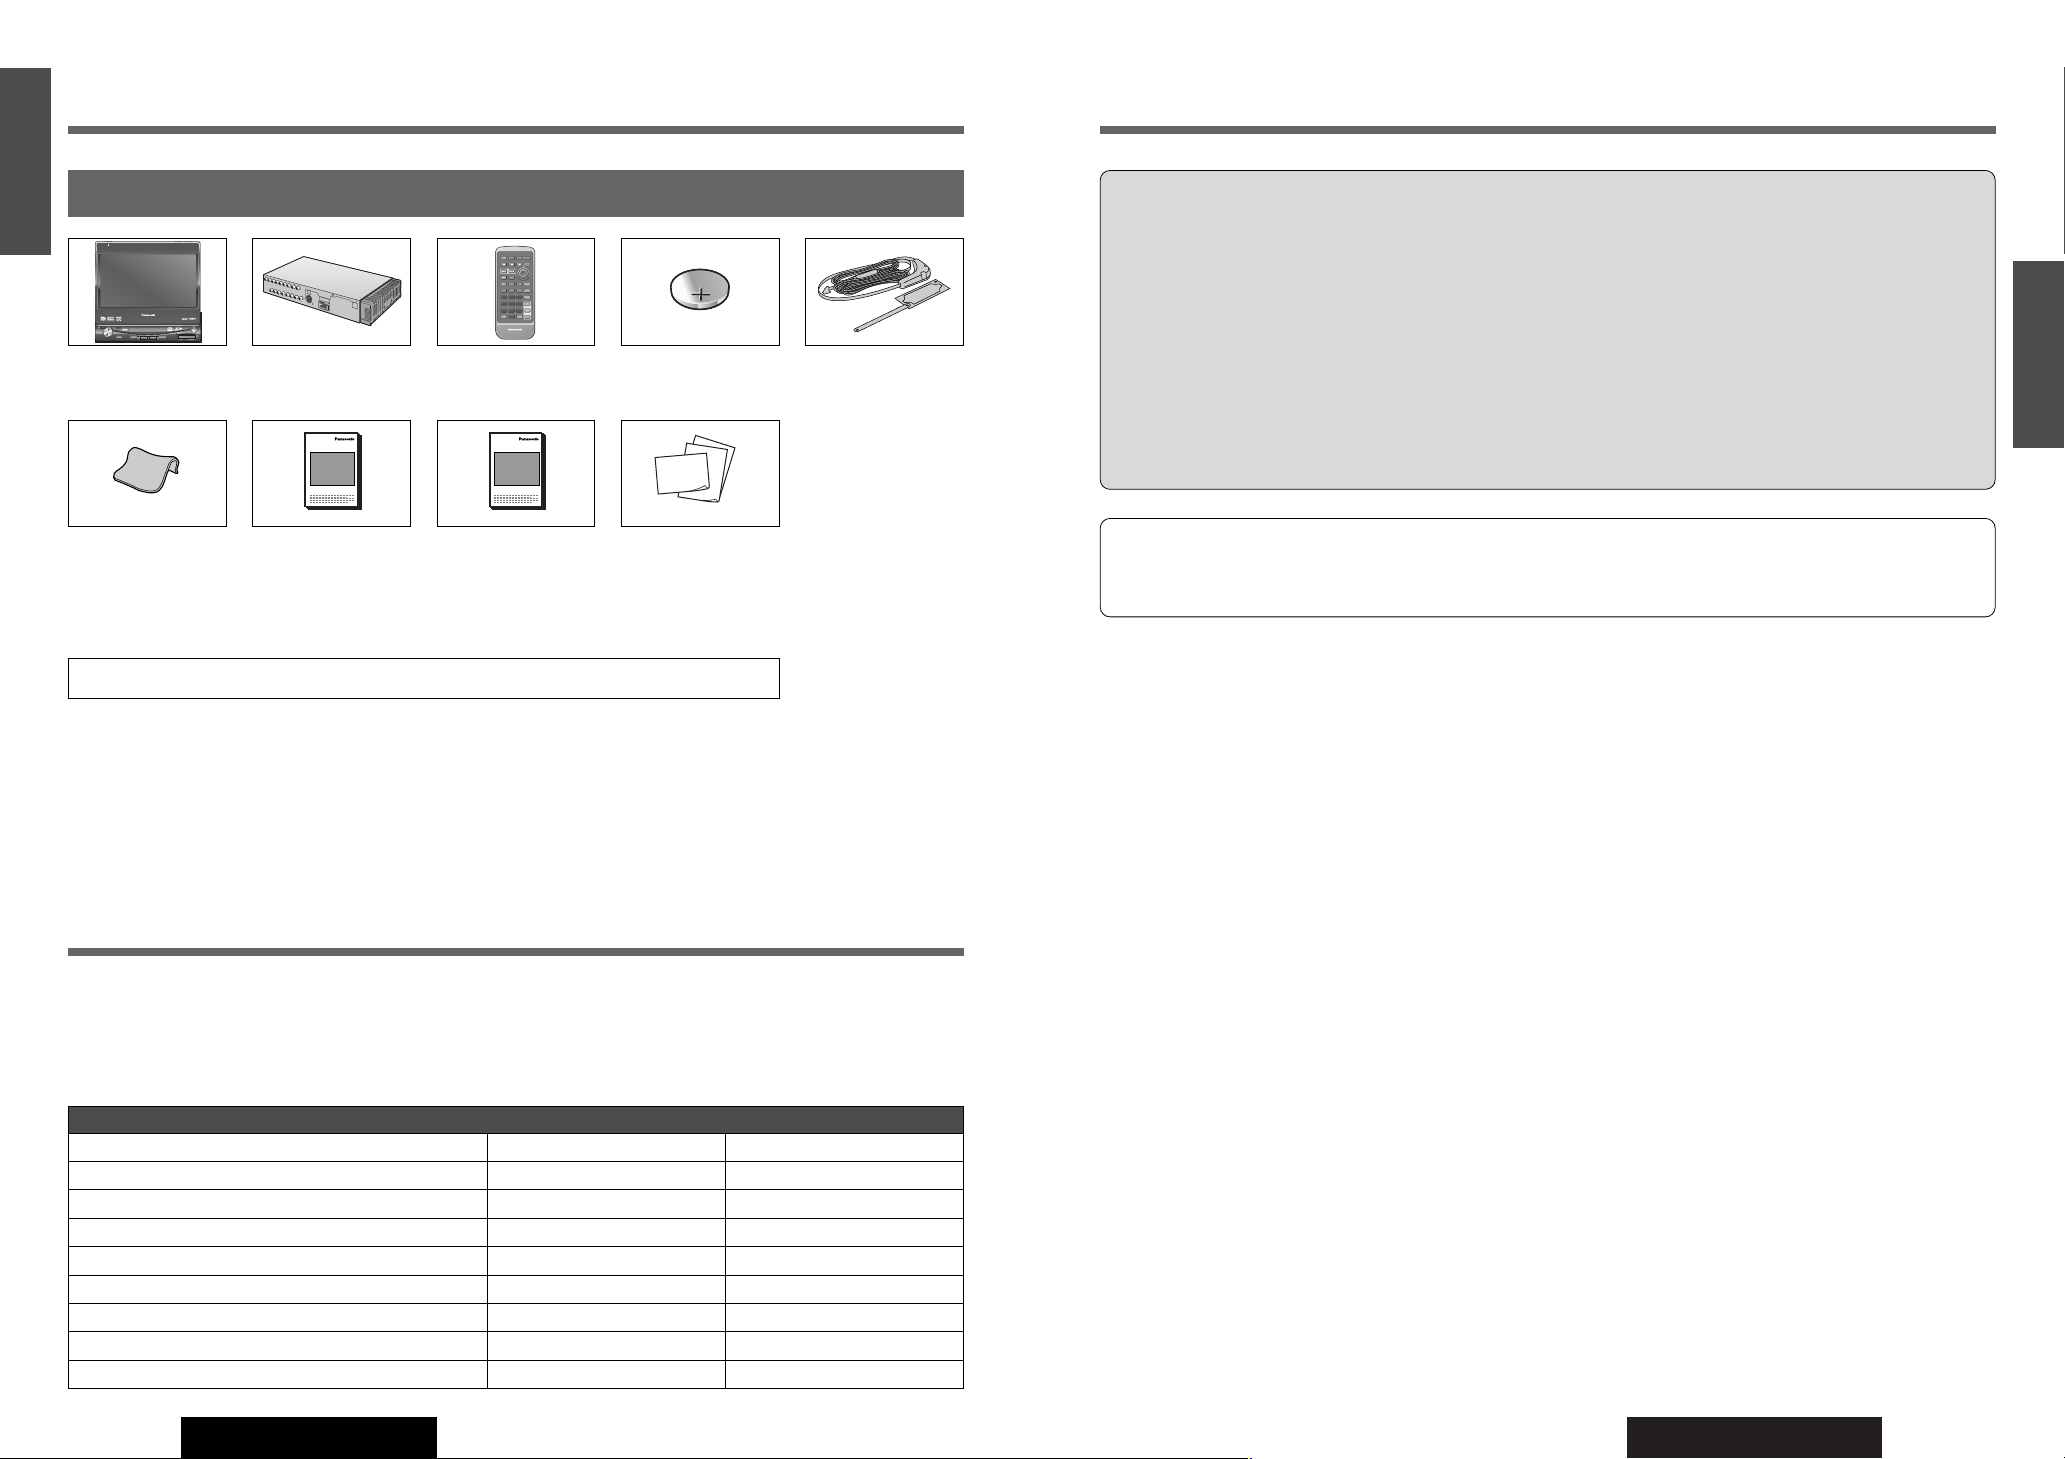
Components
Differences between 2 models
Note: This operating instruction manual is for 2 models CQ-VD7700U and CQ-VD7500U. All illustrations throughout this
manual represent model CQ-VD7700U unless otherwise specified. The following table describes the differences between
the 2 models.
Features
Model CQ-VD7700U CQ-VD7500U
Maximum Power Output 70 W x 4 ch. + 35 W x 1 ch. 50 W x 4 ch.
Power Amplifier Digital Analog
Center Speaker Output Yes (35 W x 1 ch.) No
Subwoofer Output 1 ch. 2 ch. (MONO)
5.1 ch. decoder (Dolby digital/DTS) Yes No
Optical digital Output No Yes
DSP Functions (Space, Parametric EQ.) Yes No
Graphic EQ. and other audio functions No Yes
F
R
A
N
Ç
A
I
S
Lors du nettoyage du véhicule
N’exposez pas l’appareil, incluant les haut-parleurs et le disque, à l’eau ou à une humidité trop grande. Cela risquerait de
causer des courts-circuits, un incendie ou d’autres dommages.
Lorsque la voiture est stationnée
Le stationnement en plein soleil peut produire des températures très élevées à l’intérieur du véhicule. Laissez l’intérieur du
véhicule refroidir avant d’allumer l’appareil.
Utilisez la bonne source d’alimentation
Cet appareil est conçu pour fonctionner sur un système d’alimentation avec batterie de 12 V c.c. à masse négative (système
standard sur les véhicules de construction nord-américaine).
Mécanisme de lecture de disque
N’insérez pas de pièces de monnaie ou tout autre petit objet. Gardez les tournevis et autres objets métalliques à l’écart du
mécanisme de lecture de disque et des disques.
Protégez le logiciel
Au moment de quitter le véhicule, prenez soin d'éjecter le disque et la carte SD de cet appareil et de les conserver sur soi.
Faites appel aux centres de service après-vente agréés
Ne tentez pas de démonter ou d’ajuster cet appareil de précision. Veuillez consulter la liste des centres de service aprèsvente fournie avec cet appareil pour obtenir de l’aide.
Pour l’installation
Cet appareil doit être installé en position horizontale, avec l’extrémité avant inclinée à un angle commode mais ne dépassant pas 30˚.
L’utilisateur doit garder à l’esprit que dans certaines régions il peut y avoir des restrictions spécifiant comment et où
installer cet appareil. Pour plus de détails, contactez votre détaillant.
Utilisez cet appareil de façon sécuritaire
AVERTISSEMENT:
AFIN D’ÉVITER LES RISQUES DE BLESSURE GRAVE OU UNE POSSIBILITÉ D’INFRACTIONS AUX
LOIS, N’UTILISEZ PAS L’APPAREIL DANS LE CHAMP DE VISION DU CONDUCTEUR POUR TOUTE
AUTRE FIN QUE LA NAVIGATION OU POUR L’UTILISATION AVEC UNE CAMÉRA DE VISION
ARRIÈRE.
Au volant:
¡Le conducteur ne doit pas faire fonctionner l’écran couleur à cristaux liquides. Le fonctionnement de l’écran couleur à
cristaux liquides pourrait détourner l’attention du conducteur et entraîner un accident. Lorsque vous faites fonctionner
l’appareil, stationnez votre véhicule dans un endroit sûr.
¡
Le conducteur ne doit pas visionner de vidéos en conduisant. Cela pourrait détourner son attention et entraîner un accident.
¡Maintenez l’appareil à un niveau de son approprié. La conduite avec un niveau de son qui empêche d’entendre les
sons extérieurs et autour du véhicule pourrait entraîner un accident.
PRÉCAUTION:
Respectez les règlements locaux et la réglementation pour installer le moniteur vidéo et l’antenne de télévision.
Note:
¡The number in parenthesis underneath each accessory part name is the part number for maintenance and service.
¡Accessories and their part numbers are subject to modification without prior notice due to improvements.
10. Installation Hardware (screws, cords, etc.) (
a Installation instructions)
1. Display Unit
1
2. Hide-away Unit
1
3. Remote Control
Unit
<YEFX9995145>
1
4. Lithium Battery
(CR2025)
1
5. TV Antenna
<YEAA12692A (R)>
<YEAA12693A (L)>
1 set
6. Wiping Cloth
<YEFX9991793>
1
7. Operating
Instructions
<YEFM284237>
1
8. Installation
Instructions
CQ-VD7700U:
<YEFM293264>
CQ-VD7500U:
<YEFM293265>
1
9. Warranty Card, etc.
1 set
Components
E
N
T
E
R
PWR NAVI MODE MENU
CHAPTER
ASPECT
P-MODE
TRACK
NAVIGATION
STOP
TOP MENU
DVD / SD MENU
ST/ MONO
CH1 CH2
RANDOM
RETURN
OSD
RET
RAND
AUDIO
ANGLE
REP
SUB
SPACE MUTE
VOL
GRP
DISP
123
456
7A809
PAGE
SCAN
PAUSE PLAY
SUBTITLE
REPEAT
SCROLL
TITLE / CHAPTER
VOL
CAR AV
TILT
OPEN / CLOSE
OPEN / CLOSE
TILT
CQ-VD7700U
CQ-VD7700U
OPEN
VOLUME
IN-DASH 7" WIDESCREEN COLOR LCD MONITOR TV / DVD / SD RECEIVER
MUTE NAVI DISP
TRACK/
CHANNEL
ENTER
DISC
SD CARD
·
MODE
P
MODE
ASP
NAVIGATION
POWER ASPECT
XXXXXXXXXXXXXXX
XXXXXXXXXXXXXXXXX
XXXXXXXXXXXXXX
XXXXXXXXXXXXXXXX
OO-OOOOO
XXXXXXXXXXXXXXX
XXXXXXXXXXXXXXXXX
XXXXXXXXXXXXXX
XXXXXXXXXXXXXXXX
OO-OOOOO

17
1
E
N
G
L
I
S
H
CQ-VD7700U/VD7500U
Contents
¢ Safety Information.................................. 2
¢ Use This Product Safely ........................ 5
¢ Features .................................................. 7
¢ Components ........................................... 8
¢ Differences between 2 models.............. 8
¢ Contents................................................ 17
¢ Preparations ......................................... 18
Remote Control, Main Unit
¢ Name of Controls and Functions........ 20
¢ Touch Panel Operation Overview ....... 24
Operation mode, regular mode
¢ Display Mode Changes ........................ 26
¢ Status Bar ............................................. 27
¢ Icons Used in This Manual .................. 27
¢ Indications on the Screen.................... 28
The state of the current output appears, OSD (On
Screen Display) on/off
¢ Discs that can be Played Back............ 29
¢ System Upgrade ................................... 30
¢ General .................................................. 34
Power, source selection (Mode), volume, mute,
display open/close and monitor position adjustment
¢ TV Tuner/VTR (External Devices)........ 36
TV mode, channel setting, direct channel selection,
preset channels, VTR1/VTR2 mode
¢ DVD/Video CD Player ........................... 38
Disc insert/eject, basic operation, chapter/title
selection, useful functions
¢ CD/MP3 Player ...................................... 42
Disc insert/eject, direct folder and file selection,
basic operations, points to remember when recording an MP3 disc
¢ Radio ..................................................... 46
Radio mode, band, tuning, One-touch Selection of
a Station
¢ CD Changer Control............................. 48
CD Changer mode, system expansion, basic
operations
¢ SD-Card Player ..................................... 50
Notes on SD-Card, Playable data, SD-Card inserting, SD mode selection, go to SD Menu, go to SD
Setup Menu, removing the SD-Card
¢ MENU : User Settings .......................... 54
Display unit, beep, guidance, clock, calender, touch
panel, id-code, memory clear
¢ MENU : Display (Screen) Settings ...... 58
Dimmer, picture, LCD dimmer, LCD contrast
¢ MENU : Capture Function.................... 59
Capture, initialize
¢ MENU : Animation Settings................. 60
Animation, color
¢ MENU : Audio Settings ........................ 61
Parametric-EQ, pro logic II, down mix, DR comp, SP
setup, SP level, SP delay, VTR level, graphic-EQ,
bal/fad, sub-woofer, HPF
¢ MENU : DVD Settings........................... 67
Language, display
¢ MENU : Input/output Setting ............... 68
Navi setup, camera setup, VTR skip, video-cont,
rear monitor, BGC
¢ Aspect Ratio ......................................... 71
¢ Sound Settings ..................................... 72
Space, dynamic range compression
¢ About Rear Monitor.............................. 74
Rear monitor set up, private mode
¢ Sub-LCD Display Change .................... 76
¢ Troubleshooting ................................... 78
¢ Maintenance.......................................... 86
¢ Definition of Terms............................... 88
¢ Language Code List ............................. 90
¢ Specifications ....................................... 91
19
3
E
N
G
L
I
S
H
CQ-VD7700U/VD7500U
18
2
E
N
G
L
I
S
H
CQ-VD7700U/VD7500U
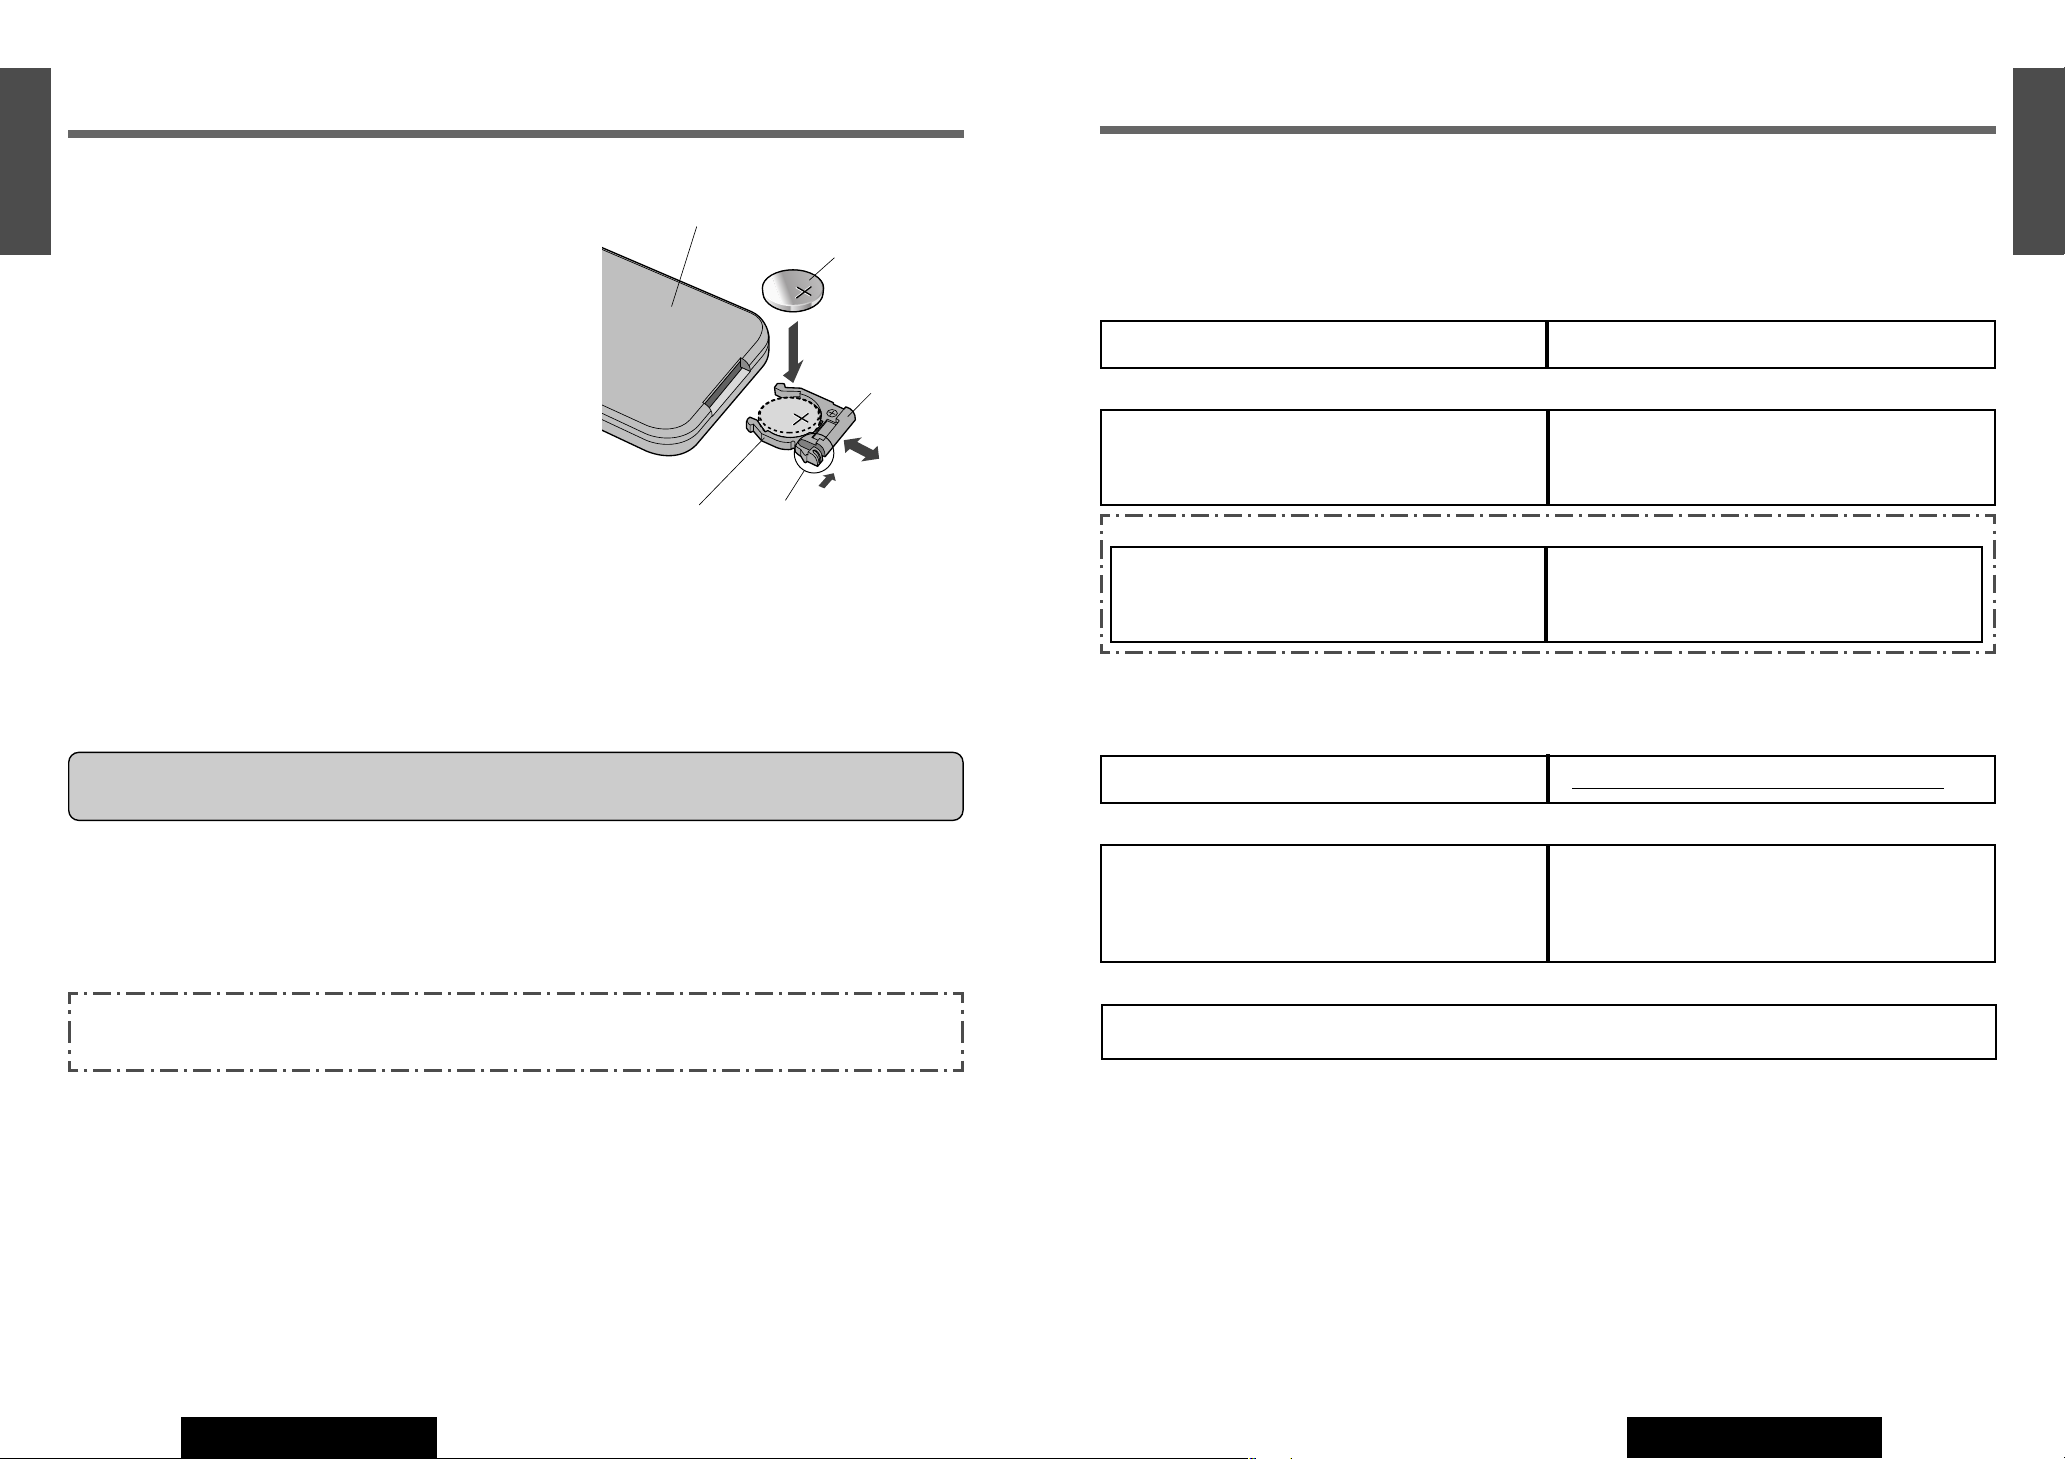
Battery Installation (Inserting/Replacing the Battery)
q Remove the battery holder.
Pull the holder by position B while pushing position A
in the direction indicated by the arrow.
w Install the battery on the battery holder.
Set a new battery properly with its (
+
) side facing up as shown in
the figure.
e Insert the battery holder.
Push the battery holder back into its original position.
Back side
Lithium battery
(CR2025: supplied)
Position B
Position A
Battery holder
Preparations (Remote Control)
Preparations (Main Unit)
You should check and prepare your unit before initial use referring to the following steps:
■
Step 1
Check the connecting external devices for input.
❒ VTR1/VTR2
Connected:
Set the VTR input level, etc. (a page 65, 70)
Unconnected:
Set the VTR Skip. (a page 70)
❒ Rear View Camera
Connected:
Check if the reverse lead is connected. (a installation
Instructions)
Execute the Camera SetUp. (a page 69)
Unconnected:
Set the Rear View Camera to off. (a page 69)
❒ Car Navigation
Connected:
Check the connection terminal. (a Installation
Instructions)
Execute the NAVI SETUP. (a page 68)
Unconnected:
Check if “NAVI INPUT” is set to “RGB”. (a page 68)
■
Step 2
Check the connecting external devices for output.
❒ Rear Monitor
Connected:
Execute the Rear Monitor Set Up. (a page 74)
Unconnected:
❒ Subwoofer and External amplifier
Connected:
Check the connection of external amplifier control lead
and subwoofer output. (a Installation Instructions)
Execute “SP SETUP”. (a page 63: CQ-VD7700U)
Unconnected:
Set “SUB•W” to “NO”. (a page 64)
❒ Other speakers
Check the connected speakers.(a Installation Instructions)
Execute “SP SETUP” and “AUDIO” setting (a page 63, 64: CQ-VD7700U, a page 66: CQ-VD7500U)
■
Step 3
Check the other equipment and settings.
❒ ID code setting (a page 57)
❒ Check the Illumination lead connection. (a Installation Instructions)
❒ Display (Screen) Settings (a page 58)
❒ “DISPLAY UNIT” setting (TILT, OPEN/CLOSE) (a page 54)
❒ Clock Setting (a page 55)
❒ DVD Setting (if necessary)
Language Setting (a page 67)
Display Aspect and DVD Software Mode (a page 68)
Battery Notes
¡Battery life: approx. 6 months (at room temperature)
¡Battery handling:
• Do not disassemble, short-circuit or dispose of batteries in a fire as such action may result in explosion or fire.
• Keep out of the reach of children to prevent risk of choking, swallowing, or other injury.
¡Replace old battery:
Follow the local regulations for disposal.
Caution: Improper use of batteries may cause overheating, an explosion or ignition, resulting in injury or a fire.
Change battery as required - battery leakage may damage the unit.
This book refers to connections to the Panasonic car navigation system that will come onto the market in the future.
Descriptions regarding the car navigation system are boxed with a dotted line.
21
5
E
N
G
L
I
S
H
CQ-VD7700U/VD7500U
20
4
E
N
G
L
I
S
H
CQ-VD7700U/VD7500U
Remote Control (General)
Name of Controls and Functions
Aim the remote control at the remote control sensor of the display unit and operate it (a previous
page)
.
E
N
T
E
R
PWR NAVI MODE MENU
CHAPTER
ASPECT
P-MODE
TRACK
NAVIGATION
STOP
TOP MENU
DVD / SD MENU
ST/ MONO
CH1 CH2
RANDOM
RETURN
OSD
RET
RAND
AUDIO
ANGLE
REP
SUB
SPACE MUTE
VOL
GRP
DISP
123
456
7A809
PAGE
SCAN
PAUSE PLAY
SUBTITLE
REPEAT
SCROLL
TITLE / CHAPTER
VOL
CAR AV
[PWR]
¡Switches the power on/off.
(a page 34)
[RET] (RETURN)
¡Cancel the direct channel selection.
(a page 36)
[SD] (TOP MENU)
¡Show the SD-Card menu.
¡Goes back to the top menu.
(a page 52)
[A] (ASPECT) (P • MODE)
¡Selects the aspect ratio.
(a page 71)
¡Activates/inactivates private mode.
(a page 75)
[0] to [9]
¡Selects a TV channel directly. (a page 36)
¡Scan [5], for the CD/CD changer mode.
(a page 42, 48)
¡Sets the ID code. (a page 57)
[NAVI] (NAVIGATION)
Activates/inactivates the car
navigation. (a page 26)
[MODE]
¡Switches the power on/off. (a page 34)
¡Changes the modes such as sound and pic-
ture. (a page 34)
[MENU]
¡Shows the menu screen. (a page 54)
¡Shows the BGC menu. (a page 70)
[OSD] (CAPTURE)
¡Displays information about each source on
the screen. (a page 28)
¡Saves your favorite part of a playing picture
as a freeze-frame picture. (a page 59)
[DISP]
¡Changes the display. (a page 26, 76)
[}] [{] (VOL)
¡Adjusts the sound volume. (a page 35)
[MUTE]
¡Mutes the sound temporarily. (a page 35)
[SPACE]
¡Setting the sound field.
(Only for CQ-VD7700U) (a page 72)
[}] [{]
¡Searches for TV stations and memorizes them
automatically. (a page 36)
¡Selects a disc. (a page 48)
¡Selects (vertically) or adjusts an operation or
item.
[]] [[]
¡Selects or searches for a channel, frequency,
track or file. (a page 36, 38, 42, 46, 48)
¡Selects (horizontally) or adjusts an operation
or item.
[ENTER]
¡Selects a band. (a page 46)
¡Searches for broadcast stations and memo-
rizes them automatically. (a page 46)
¡Determines an operation or item.
[DVD/SD MENU]
¡Displays the DVD or the SD-Card
menu. (Operations vary according
to the medium.) (a page 40, 52)
ENTER
TILT
CQ-VD7700U
OPEN / CLOSE
DISC
SD CARD
TRACK/
CHANNEL
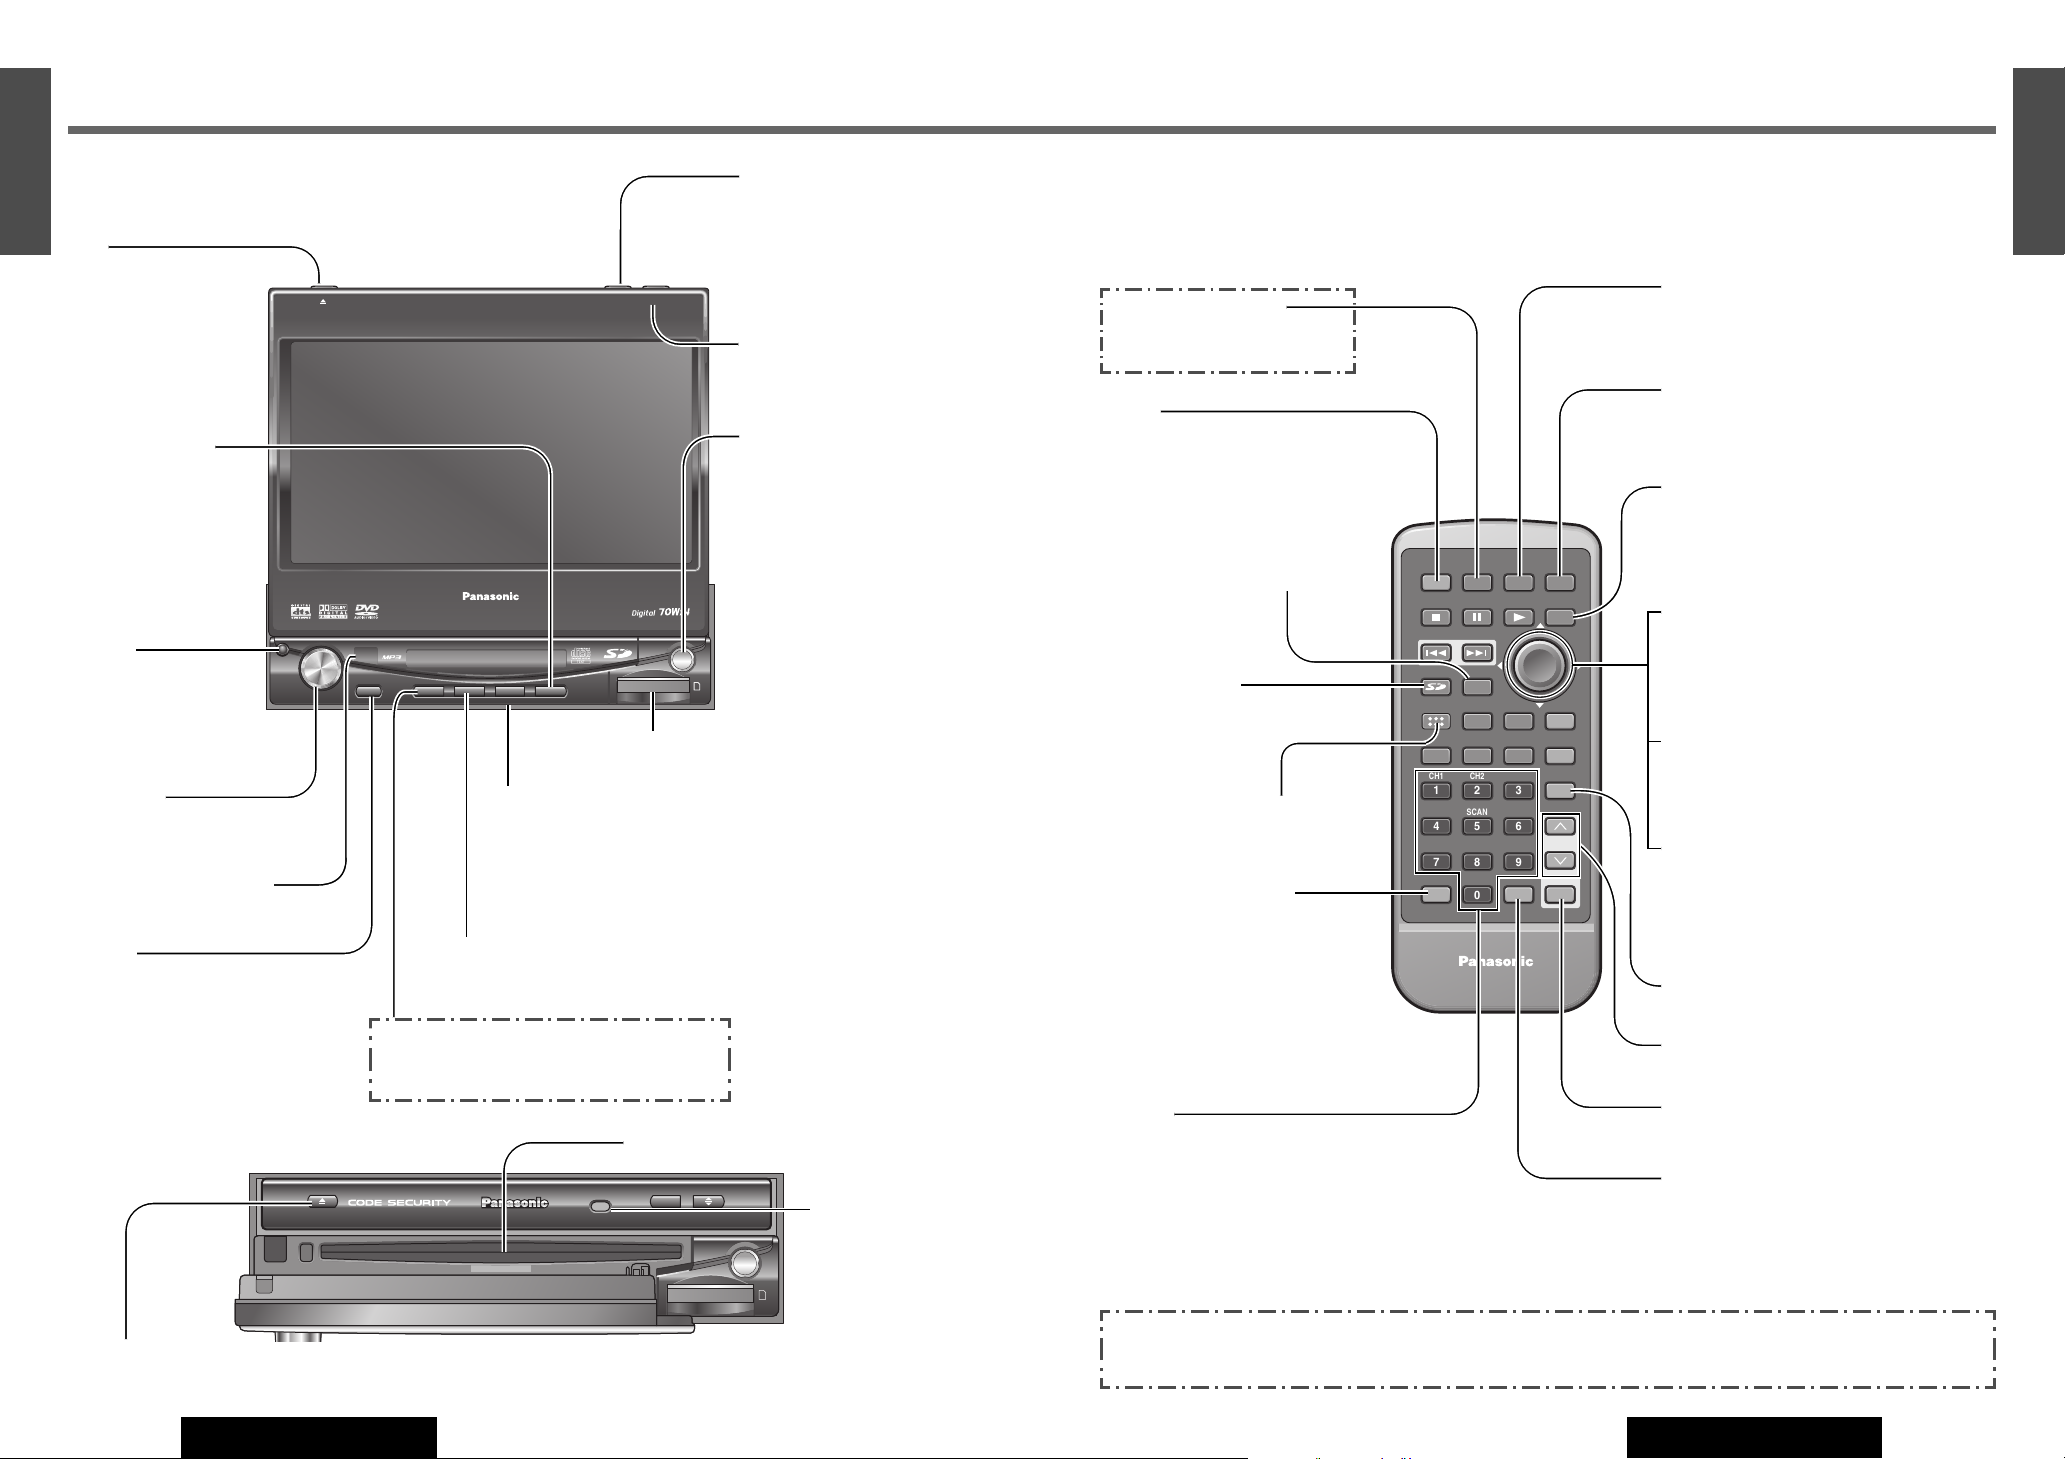
Main Unit
(Front Panel Open)
Disc indicator (EJECT button illumination light) (a page 38, 42)
Caution: A disc is in the slot when this is illuminated in blue.
Disc slot
Dimmer
Sensor
(a page 58)
Main Unit
ENTER
TILT
OPEN
VOLUME
MUTE NAVI DISP
CQ-VD7700U
MODE
OPEN / CLOSE
DISC
POWER ASPECT
P
·
MODE
NAVIGATION
SD CARD
TRACK/
CHANNEL
ASP
IN-DASH 7" WIDESCREEN COLOR LCD MONITOR TV / DVD / SD RECEIVER
OPEN / CLOSE
CQ-VD7700U
TILT
[u]
¡Ejects/reloads a disc.
(a page 38, 42)
Note: You should open
the front panel before
ejecting the disc.
[OPEN/CLOSE]
¡Opens/closes the monitor.
(a page 35)
[TILT]
¡Adjust the monitor position.
(a page 35, 54)
¡Tilts the monitor forward
temporarily. (a page 35, 54)
[}] [{] (DISC)
¡Searches for TV stations and
memorizes them automatically.
(a page 36)
¡Selects a folder or a disc.
(a page 42, 48)
¡Selects (vertically) or adjusts
an operation or item.
[]] [[]
(TRACK/CHANNEL)
¡Selects or searches for a chan-
nel, track, file or frequency.
(a page 36, 38, 42, 46, 48)
¡Selects (horizontally) or
adjusts an operation or item.
[ENTER]
¡Selects a band.
(a page 46)
¡Searches for broadcast sta-
tions and memorizes them
automatically. (a page 46)
¡Determines an operation or
item.
[OPEN]
¡Open the Front Panel.
Note: You should open
the front panel before
ejecting the disc.
[VOLUME]
¡Adjusts the sound volume.
(a page 35)
Remote control sensor
[MUTE]
¡Mutes the sound temporarily.
(a page 35)
[NAVI] (NAVIGATION)
¡Activates/inactivates the car navigation.
(a page 68)
[DISP]
¡Changes sub-LSD display. (a page 76)
[MODE] (POWER)
¡Switches on/off the power.
(a page 34)
¡Changes the modes such as
sound and picture.
(a page 34)
SD-Card Slot
(a page 52)
[ASP] (ASPECT)
(P•MODE)
¡Selects the aspect ratio.
(a page 71)
¡Activates/inactivates
the private mode.
(a page 75)
This book refers to connections to the Panasonic car navigation system that will come onto the market in the future.
Descriptions regarding the car navigation system are boxed with a dotted line.
[ENTER]
¡Changes to direct folder selection
mode. (a page 42)
[}] [{] []] [[]
¡Selects an operation or item.
[]] [[]
¡Selects a track or file. (a page 42, 48)
¡Fast forward/fast reverse (a page 42,
48)
[}] [{]
¡Selects a folder. (a page 42)
¡Selects a disc. (a page 48)
23
7
E
N
G
L
I
S
H
CQ-VD7700U/VD7500U
22
6
E
N
G
L
I
S
H
CQ-VD7700U/VD7500U
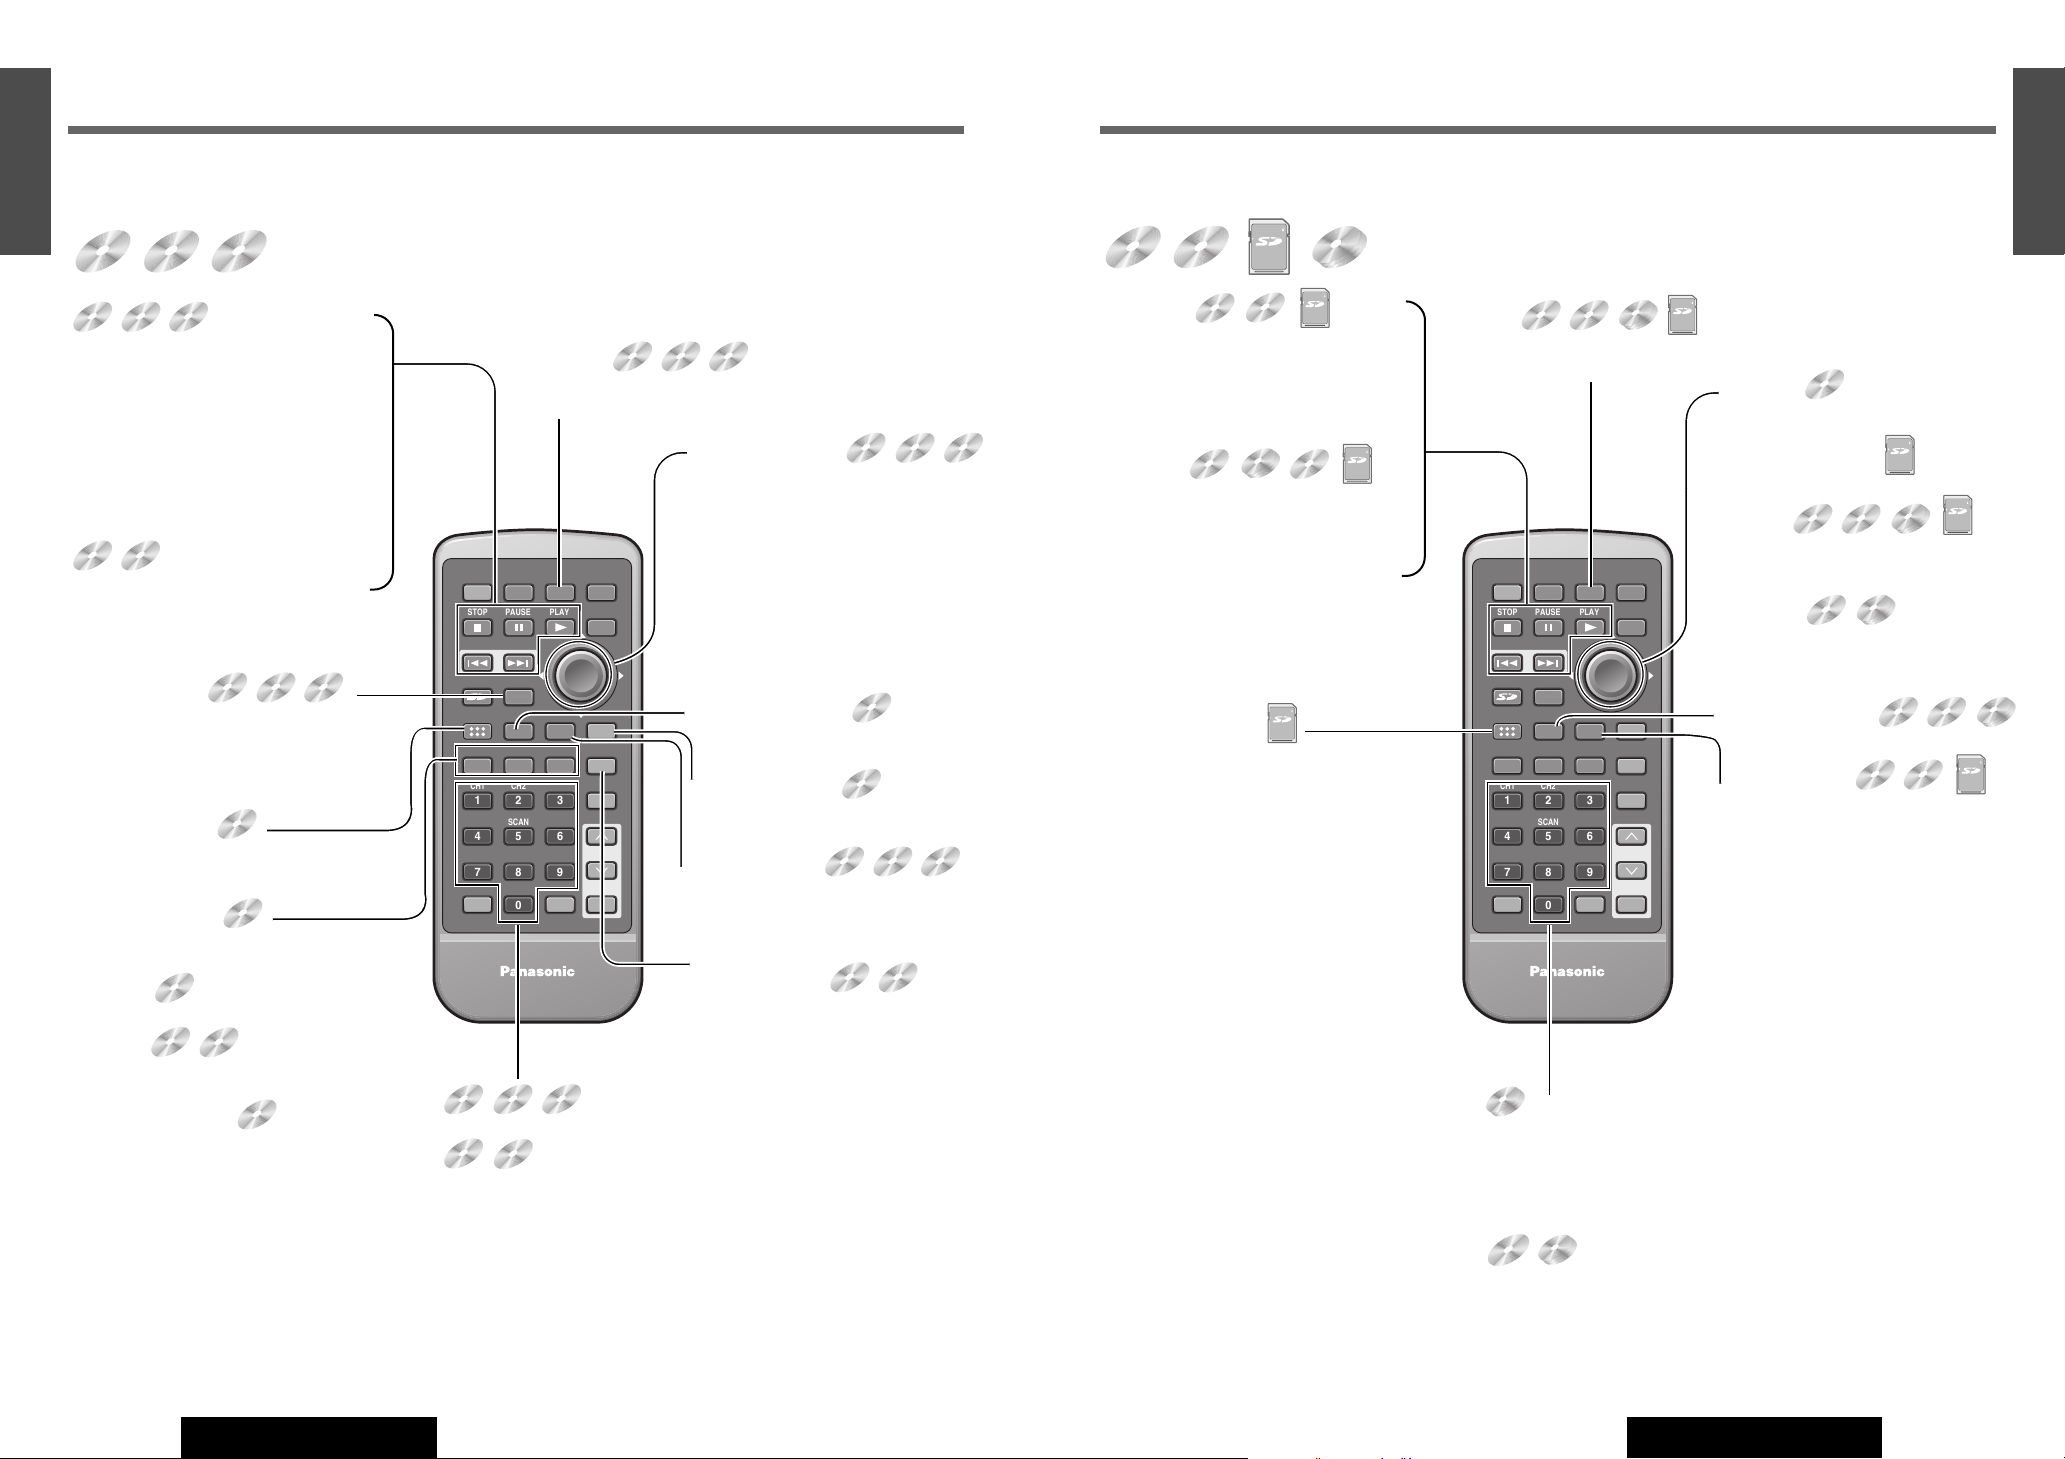
Remote Control Functions for the DVD audio/video, Video CD
E
N
T
E
R
PWR NAVI MODE MENU
CHAPTER
ASPECT
P-MODE
TRACK
NAVIGATION
STOP
TOP MENU
DVD / SD MENU
ST/ MONO
CH1 CH2
RANDOM
RETURN
OSD
RET
RAND
AUDIO
ANGLE
REP
SUB
SPACE MUTE
VOL
GRP
DISP
123
456
7A809
PAGE
SCAN
PAUSE PLAY
SUBTITLE
REPEAT
SCROLL
TITLE / CHAPTER
VOL
CAR AV
Indicates compatible types of Media.
[■] (STOP)
¡Stops playback. (a page 38)
[❚❚] (PAUSE)
¡Pause (a page 38)
[B] (PLAY)
¡Playback (a page 38)
[s] [d]
¡Goes to beginning. (a page 38)
¡Fast forward/fast reverse. (a page 38)
¡Slow playback [d].(a page 38)
[MODE]
¡Changes the modes such as
sound and picture. (a page 34)
[}] [{] []] [[]
¡Selects an operation or item.
[ENTER]
¡Determines an operation or item.
[RAND] (RANDOM)
¡Random play. (a page 38)
[REP] (REPEAT)
¡Repeats a playback. (a page 38)
[PAGE] (SCROLL)
¡Change the page. (a page 38)
[GRP] (TRACK)
(TITLE/CHAPTER)
¡Selects the group/track. (a page 40)
¡Selects the title/chapter. (a page 40)
[0] to [9]
¡Selects an item on the menu. (a page 40)
[0] to [9]
¡Selects a title or chapter. (a page 40)
¡Selects a group/track. (a page 40)
[RET] (RETURN)
¡Returns to the previous display.
(a page 40)
¡Inputs the number again. (a page 40)
¡Displays the video CD's menu.
(a page 40)
[DVD/SD MENU]
¡Displays the DVD menu. (Operations vary
according to the media.) (a page 40)
[SUB] (SUB TITLE)
¡Switching the subtitle language.
(a page 41)
[ANGLE]
¡Switching the angle. (a page 41)
[AUDIO]
¡Switching the audio language. (a
page 41)
[AUDIO] (ST/MONO)
¡Switches between stereo or
monaural sound. (a page 41)
Name of Controls and Functions (continued)
Remote Control Functions for the CD/MP3/SD/CD Changer
E
N
T
E
R
PWR NAVI MODE MENU
CHAPTER
ASPECT
P-MODE
TRACK
NAVIGATION
STOP
TOP MENU
DVD / SD MENU
ST/ MONO
CH1 CH2
RANDOM
RETURN
OSD
RET
RAND
AUDIO
ANGLE
REP
SUB
SPACE MUTE
VOL
GRP
DISP
123
456
7A809
PAGE
SCAN
PAUSE PLAY
SUBTITLE
REPEAT
SCROLL
TITLE / CHAPTER
VOL
CAR AV
Indicates compatible types of Media.
[■] (STOP)
¡Stops playback. (a page 42, 48, 52)
[❚❚] (PAUSE)
¡Pause (a page 42, 48, 52)
[B] (PLAY)
¡Playback (a page 42, 48, 52)
[s] [d]
¡Goes to beginning. (a page 42, 48,
52)
¡Fast forward/fast reverse. (a page 42,
48, 52)
[MODE]
¡Changes modes such as sound
and picture. (a page 34)
[RAND] (RANDOM)
¡Random play. (a page 42, 48)
[REP] (REPEAT)
¡Repeats a playback. (a page 42, 48,
52)
[1] (CH 1)
¡Selects first CD Changer. (a page 48)
[2] (CH 2)
¡Selects second CD Changer. (a page 48)
* When connecting the dual CD changer selector (CA-CD55 option) and two CD
changers.
[5] (SCAN)
¡Scan in the CD/CD Changer mode. (a page 42, 48)
[DVD/SD MENU]
¡Displays the SD-Card menu. (Operations
vary according to the medium.)
(a page 52)
DVD
VIDEO
DVD
VIDEO
AUDIO
DVD
AUDIO
DVD
VIDEO
CD
VIDEO
CD
DVD
DVD
AUDIO
VIDEO
CD
VIDEO
DVD
VIDEO
VIDEO
CD
DVD
DVD
AUDIO
VIDEO
CD
VIDEO
DVD
VIDEO
DVD
VIDEO
DVD
VIDEO
DVD
AUDIO
DVD
VIDEO
VIDEO
CD
DVD
VIDEO
DVD
AUDIO
VIDEO
CD
DVD
VIDEO
DVD
AUDIO
VIDEO
DVD
AUDIO
DVD
VIDEO
DVD
VIDEO
DVD
DVD
AUDIO
AUDIO
AUDIO
DVD
DVD
DVD
AUDIO
VIDEO
VIDEO
CD
CD
LOCK
CD MP3
CD
SD
MP3
CD Changer
LOCK
SD
CD
MP3
CD Changer
LOCK
SD
LOCK
CD MP3
LOCK
SD
CD Changer
CD Changer
CD
CD Changer
SD
MP3
MP3CD
MP3
CD Changer
CD MP3
LOCK
SD
CD Changer
LOCK
SD
CD Changer
MP3CD
LOCK
SD
25
9
E
N
G
L
I
S
H
CQ-VD7700U/VD7500U
24
8
E
N
G
L
I
S
H
CQ-VD7700U/VD7500U
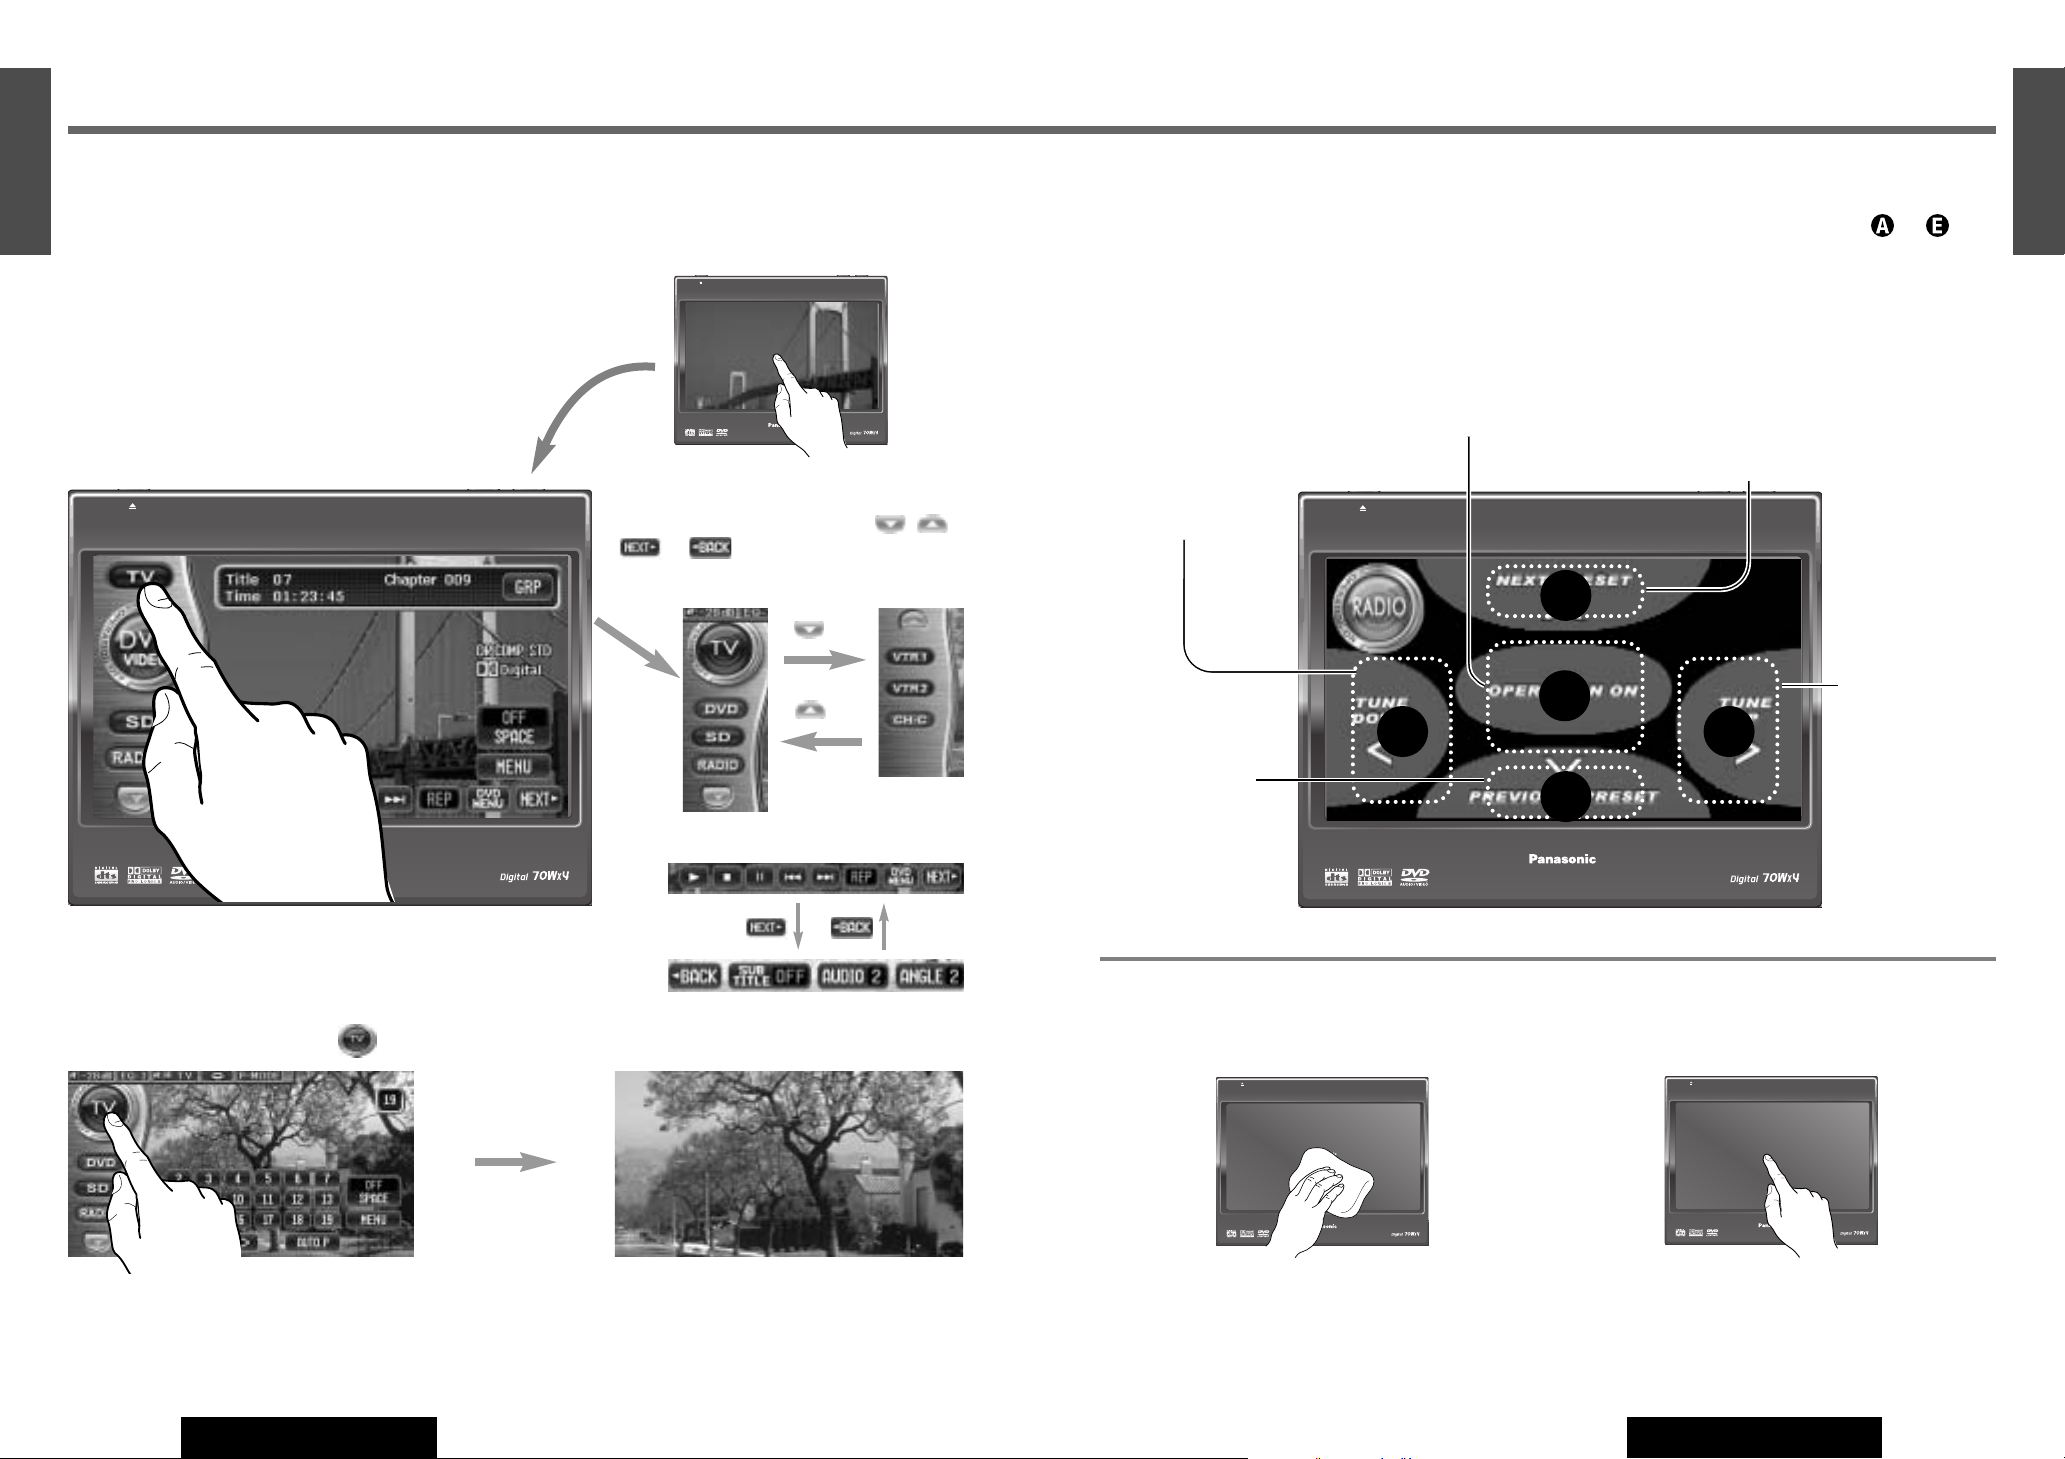
Touch Panel Operation Overview
Operation Mode
While in operation mode, You can operate almost all functions of this unit by touching symbols on
the panel.
TILT
CQ-VD7700U
OPEN / CLOSE
OPEN / CLOSE
CQ-VD7700U
TILT
How to show operation mode
When not in operation mode, Touch the center of touch panel [Area A]
to show operation display (see next page).
Notes:
¡When no operation is performed for 10 seconds during the Video playback, the display returns to the regular mode.
¡In audio mode (CD/MP3/RADIO/CD Changer), the operation mode remains till the [OPERATION OFF] button is pressed.
Return to the regular mode
To return to the regular mode, touch [OPERATION OFF].
Example: TV mode
The Guidance display
appears for 4 seconds
(
a page 26).
Touch a symbol to operate. When there is no
operation symbol to operate, touch , ,
or to show.
Example: Mode Selection:
Example: DVD operation symbols
TILT
CQ-VD7700U
OPEN / CLOSE
OPEN / CLOSE
CQ-VD7700U
TILT
Regular Mode
While in regular mode, You can operate basic functions of this unit by touching areas to on
the panel. Each area has following control functions.
Example: GUIDANCE ON
(a page 55)
Area A
Regular mode:
Shows operation display.
Note: To return the regular mode, press
[OSD] or touch [OPERATION OFF].
Area D
TV/Radio mode:
Next Preset Frequency/Channels
MP3 mode:
Next Folder
CD Changer mode:
Next disc
Area C
TV/Radio mode:
Goes to next frequency or channel.
Seek
DVD/VCD/CD/MP3/C
D Changer mode:
Next Chapter/track/
File
Fast forward
Area B
TV/Radio mode:
Goes to previous frequency or channel.
DVD/VCD/CD/MP3/CD
Changer mode:
Previous Chapter/track/
File
Fast reverse
Area E
TV/Radio mode:
Previous preset
Frequency/Channels.
Seek
MP3 mode:
Previous Folder
CD Changer mode:
Previous Disc
B C
D
E
A
Notes on the Touch Panel
Before operation
¡Clean the surface of the touch panel. (a page 86)
Operation
¡Use only your fingers to operate the touch panel.
¡Do not press the panel forcefully.
¡Do not scratch the panel by fingernails or any hard objects.
¡Do not use a pen or other sharp implements to operate the touch panel.
¡Do not bump the front panel.
a Failure to observe the above may damage or break the glass on the surface of the touch panel.
TILT
CQ-VD7700U
OPEN / CLOSE
OPEN / CLOSE
CQ-VD7700U
TILT
Touch the center of touch panel.
Operations on the touch panel
Touch operation buttons (Symbols) to opearte.
TILT
CQ-VD7700U
OPEN / CLOSE
OPEN / CLOSE
CQ-VD7700U
TILT
TILT
OPEN / CLOSE
OPEN / CLOSE
CQ-VD7700U
CQ-VD7700U
TILT
27
11
E
N
G
L
I
S
H
CQ-VD7700U/VD7500U
26
10
E
N
G
L
I
S
H
CQ-VD7700U/VD7500U
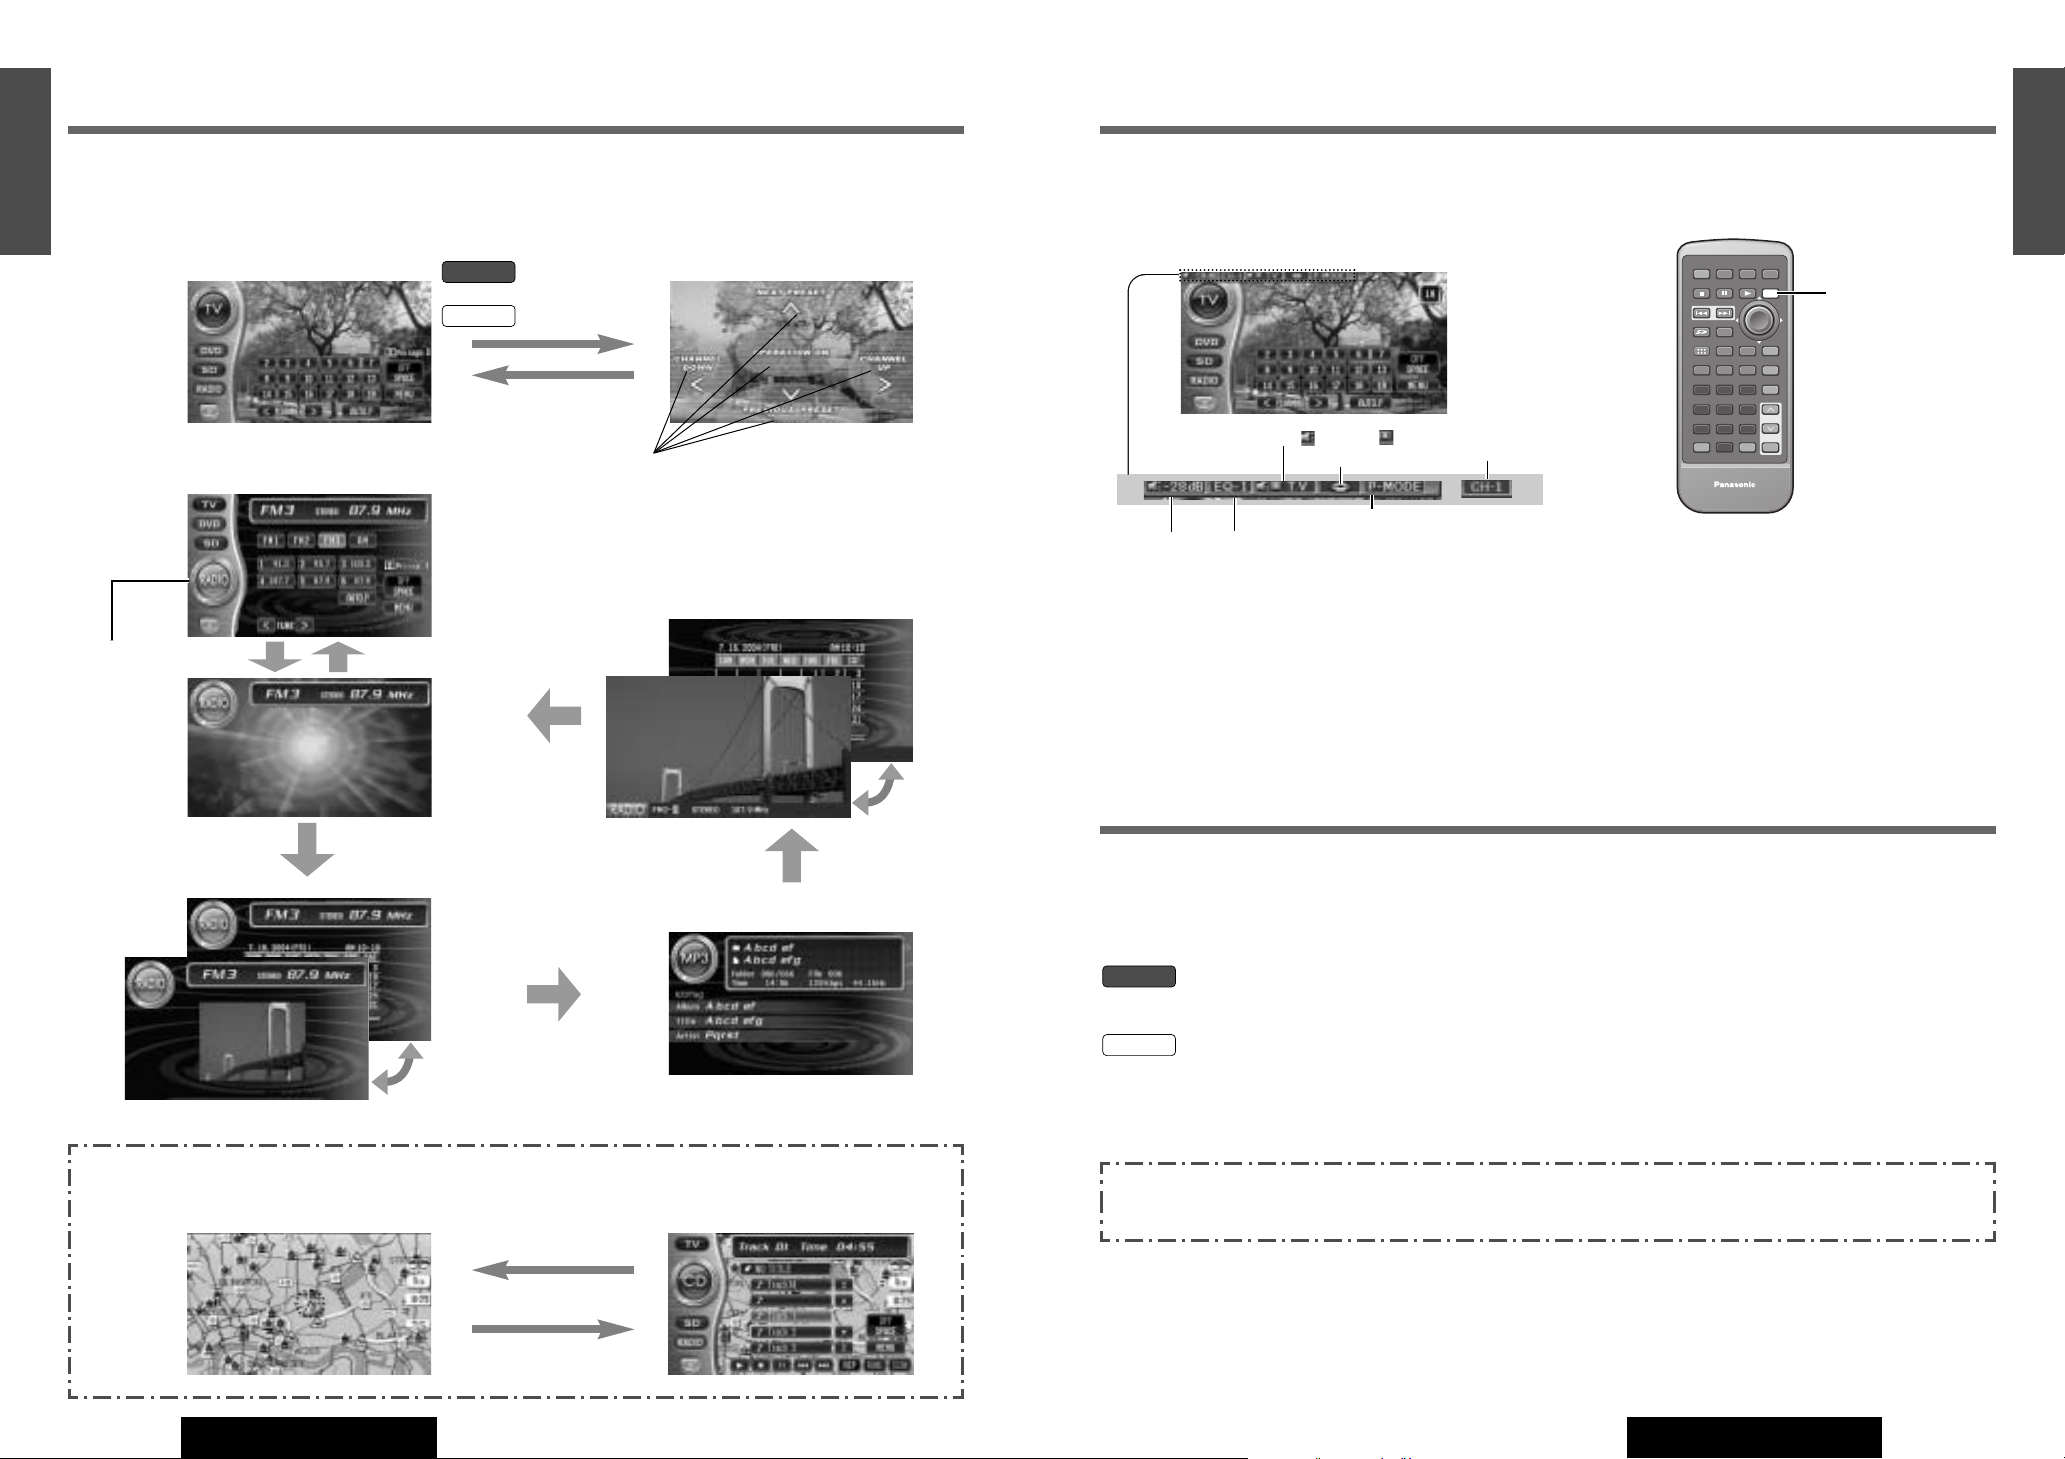
Display Mode Changes Status Bar
This unit has 10 types screens. The following operations allow you to change among screens.
■
TV, DVD Video/Audio, VTR 1/2, SD-Card
Operating mode Regular mode
[OPERATION
OFF]
[OSD]
Area A
[NAVI]
(NAVIGATION)
[NAVI]
(NAVIGATION)
■
CD, MP3, Radio, CD Changer
■
Navigation
Operating mode
Calender Full Screen
[DISP]
[DISP]
[DISP]
[DISP]
[OPERATION OFF]
[OSD]
Area A
Animation
Capture
Full Screen
Calender Window
Navi mode Play mode
ID 3 Tag data (only for MP3)
[OSD]
Capture Window
The status bar provides various information during the playback.
The status bar will inform you of a change in the unit whenever it occurs.
E
N
T
E
R
PWR NAVI MODE MENU
CHAPTER
ASPECT
P-MODE
TRACK
NAVIGATION
STOP
TOP MENU
DVD / SD MENU
ST/ MONO
CH1 CH2
RANDOM
RETURN
OSD
RET
RAND
AUDIO
ANGLE
REP
SUB
SPACE MUTE
VOL
GRP
DISP
123
456
7A809
PAGE
SCAN
PAUSE PLAY
SUBTITLE
REPEAT
SCROLL
TITLE / CHAPTER
VOL
CAR AV
[OSD]
Volume level
(CQ-VD7700U)
Preset Equalizer Number (a page 62, 66)
Current Source ( : Sound : Video)
Disc Indicator
P·MODE indicator (a page 75)
Current selected changer number when two CD
changers are connected. (a page 48)
Icons Used in This Manual
Guidance display
appears for 4 seconds
You can let the guidance display set
to off. (a page 55)
This manual uses some icons to explain touch panel operation as follows:
¡Operation unit
These icons represent the unit used to perform an operation.
: Operations on the touch panel
: Operations on the remote control or the display unit
This book refers to connections to the Panasonic car navigation system that will come onto the market in the future.
Descriptions regarding the car navigation system are boxed with a dotted line.
Panel
Remote
Panel
Remote

29
13
E
N
G
L
I
S
H
CQ-VD7700U/VD7500U
28
12
E
N
G
L
I
S
H
CQ-VD7700U/VD7500U
Indicators on the Screen Discs that can be Played Back
Prohibition
Input is not possible
because a soundtrack, subtitle language or angle number which was not
recorded on the disc
has been selected or
because the user has
attempted to perform
an operation which is
not supported.
Additional Information
Source type, various
settings, etc.
Note: Displaying contents and their positions partly vary with each mode. Refer to the description of each mode for details.
You can switch between OSD-ON and OSD-OFF regarding the mode information when watching a picture.
Example:
DVD Video Mode
(OSD on a see below)
Mode Display/Operating buttons
The current mode and operable touch buttons appear.
Mode Display temporarily hiding
You can hide the mode display temporarily during some
visual related operations such as DVD menu operation.
(During playback)
Touch [Area A]
Touch [OPERA-
TION OFF]
Press [OSD] .
Information of Each
Mode
Playing elapsed time,
title, preset list, etc.
Note:On-Screen Display can be toggled between on and off only in the TV, VTR1/2, DVD video, DVD audio, VCD and SD-
Card modes. (When the captured image is set as a wallpaper in the CD, MP3, RADIO and CD changer, pressing [OSD]
switches captured images.)
The State of the Current Output Appears
OSD (On-Screen Display) On/off
OSD on
OSD off
❒ Region Management Information
This product is designed and manufactured to respond to the Region Management
Information that is recorded on a DVD disc. If the Region number described on the
DVD disc does not correspond to the Region number of this product, this product
cannot play the disc.
The Region number for this product is “1” and “ALL”.
❒ The following discs cannot be played back on this product.
¡DVD-ROM ¡DVD-R ¡DVD-RAM ¡DVD+RW ¡DVD-RW ¡SVCD
¡VSD ¡CVD ¡CD-G ¡CD-ROM (except MP3)
¡CD-RW (except MP3 and CD-DA) ¡CD-R (except MP3 and CD-DA) ¡SACD ¡photo CD
¡CDV ¡Divx Video Discs ¡CD-EXTRA (audio-only playback possible)
¡Discs recorded in PAL format, others
¡DVDs with a region number other than “1” or “ALL”
¡Playing back a photo CD disc with this unit could damage the data that is recorded on the disc.
4:3
1
ALL
12
46
❒ Symbols used on jackets (Examples of such symbols include)
¡Number of subtitle languages
¡Number of audio tracks
¡Number of angles
Screen size (H:V aspect ratio)
The numbers indicate the number of languages, tracks, angles, etc., recorded on the
disc.
¡4:3 standard size
¡Letterbox
¡16:9 wide size
: Play back in letterbox format on a stan-
dard screen (4:3).
: Play back in “Pan & Scan” (a page 88)
format on a standard screen (4:3).
Note: The size of the image that is displayed on the screen
depends on the screen mode (“Aspect Ratio” apage 71),
and on the screen size for the content on the disc.
2
3
(a page 88)
Example:
LB
LB16:9
PS16:9
2
Notes:
¡About CD-Rs, CD-RWs and SD-Card refer to “Notes on CD-Rs/RWs” and “Notes on SD-Card”. (a page 50, 87)
¡Some copy-protected music CDs are not playable.
NTSC
LPCM (CD-DA),
MP3
Disc
DVD audio/
video
Video CD
CD
5” (12 cm)
1
ALL
Mark (logo) Disc size
Video format Region No.
TEXT
Audio format
LPCM, PPCM,
MPEG1, MPEG2,
dts,
Dolby Digital
LPCM, MPEG1
Touch this.
Hide
Appear
Touch this
to appear.
Mode
Display
Panel
Remote
31
15
E
N
G
L
I
S
H
CQ-VD7700U/VD7500U
30
14
E
N
G
L
I
S
H
CQ-VD7700U/VD7500U
ENTER
TILT
OPEN
VOLUME
MUTE NAVI DISP
CQ-VD7700U
MODE
OPEN / CLOSE
DISC
POWER ASPECT
P
·
MODE
NAVIGATION
SD CARD
TRACK/
CHANNEL
ASP
IN-DASH 7 INCH WIDE COLOR LCD TV / DVD / SD RECEIVER
OPEN / CLOSE
CQ-VD7700U
TILT
System Upgrade (CQ-VD7700U)
ENTER
TILT
OPEN
VOLUME
MUTE NAVI DISP
CQ-VD7700U
MODE
OPEN / CLOSE
DISC
POWER ASPECT
P·MODE
NAVIGATION
SD CARD
TRACK/
CHANNEL
ASP
IN-DASH 7 INCH WIDE COLOR LCD TV / DVD / SD RECEIVER
OPEN / CLOSE
CQ-VD7700U
TILT
CQ-VD7700U
Power amplifier
CQ-VD7700U
Recommended system: 5.1-channel Surround System
This unit has a built-in 5-channel amplifier. The procedure for setting up a 5.1-channel surround
system in order to play DVD software in a way that creates a “you are there” feel in a car is
described below.
Front Speakers: CJ-DVD177
Use the left and right front speakers (such as
speakers that are built into the front door).
Center Speaker: EAB-CF2
Install in the middle of the dashboard, near the
monitor.
Surround Speakers: CJ-SS162
Use the left and right rear speakers (such as speakers
that are built into the rear door or the rear deck)
Subwoofer: CJ-SW38
Because the audio imaging is not nearly as dependent
on the position where the subwoofer is installed as it
is with the other speakers, the subwoofer can be
installed anywhere that is convenient. (A separate
power amplifier for the subwoofer is needed.)
¡Details on wiring:
a Installation Instructions
¡Speaker settings:
a page 63-64
¡Details on wiring:
a Installation Instructions
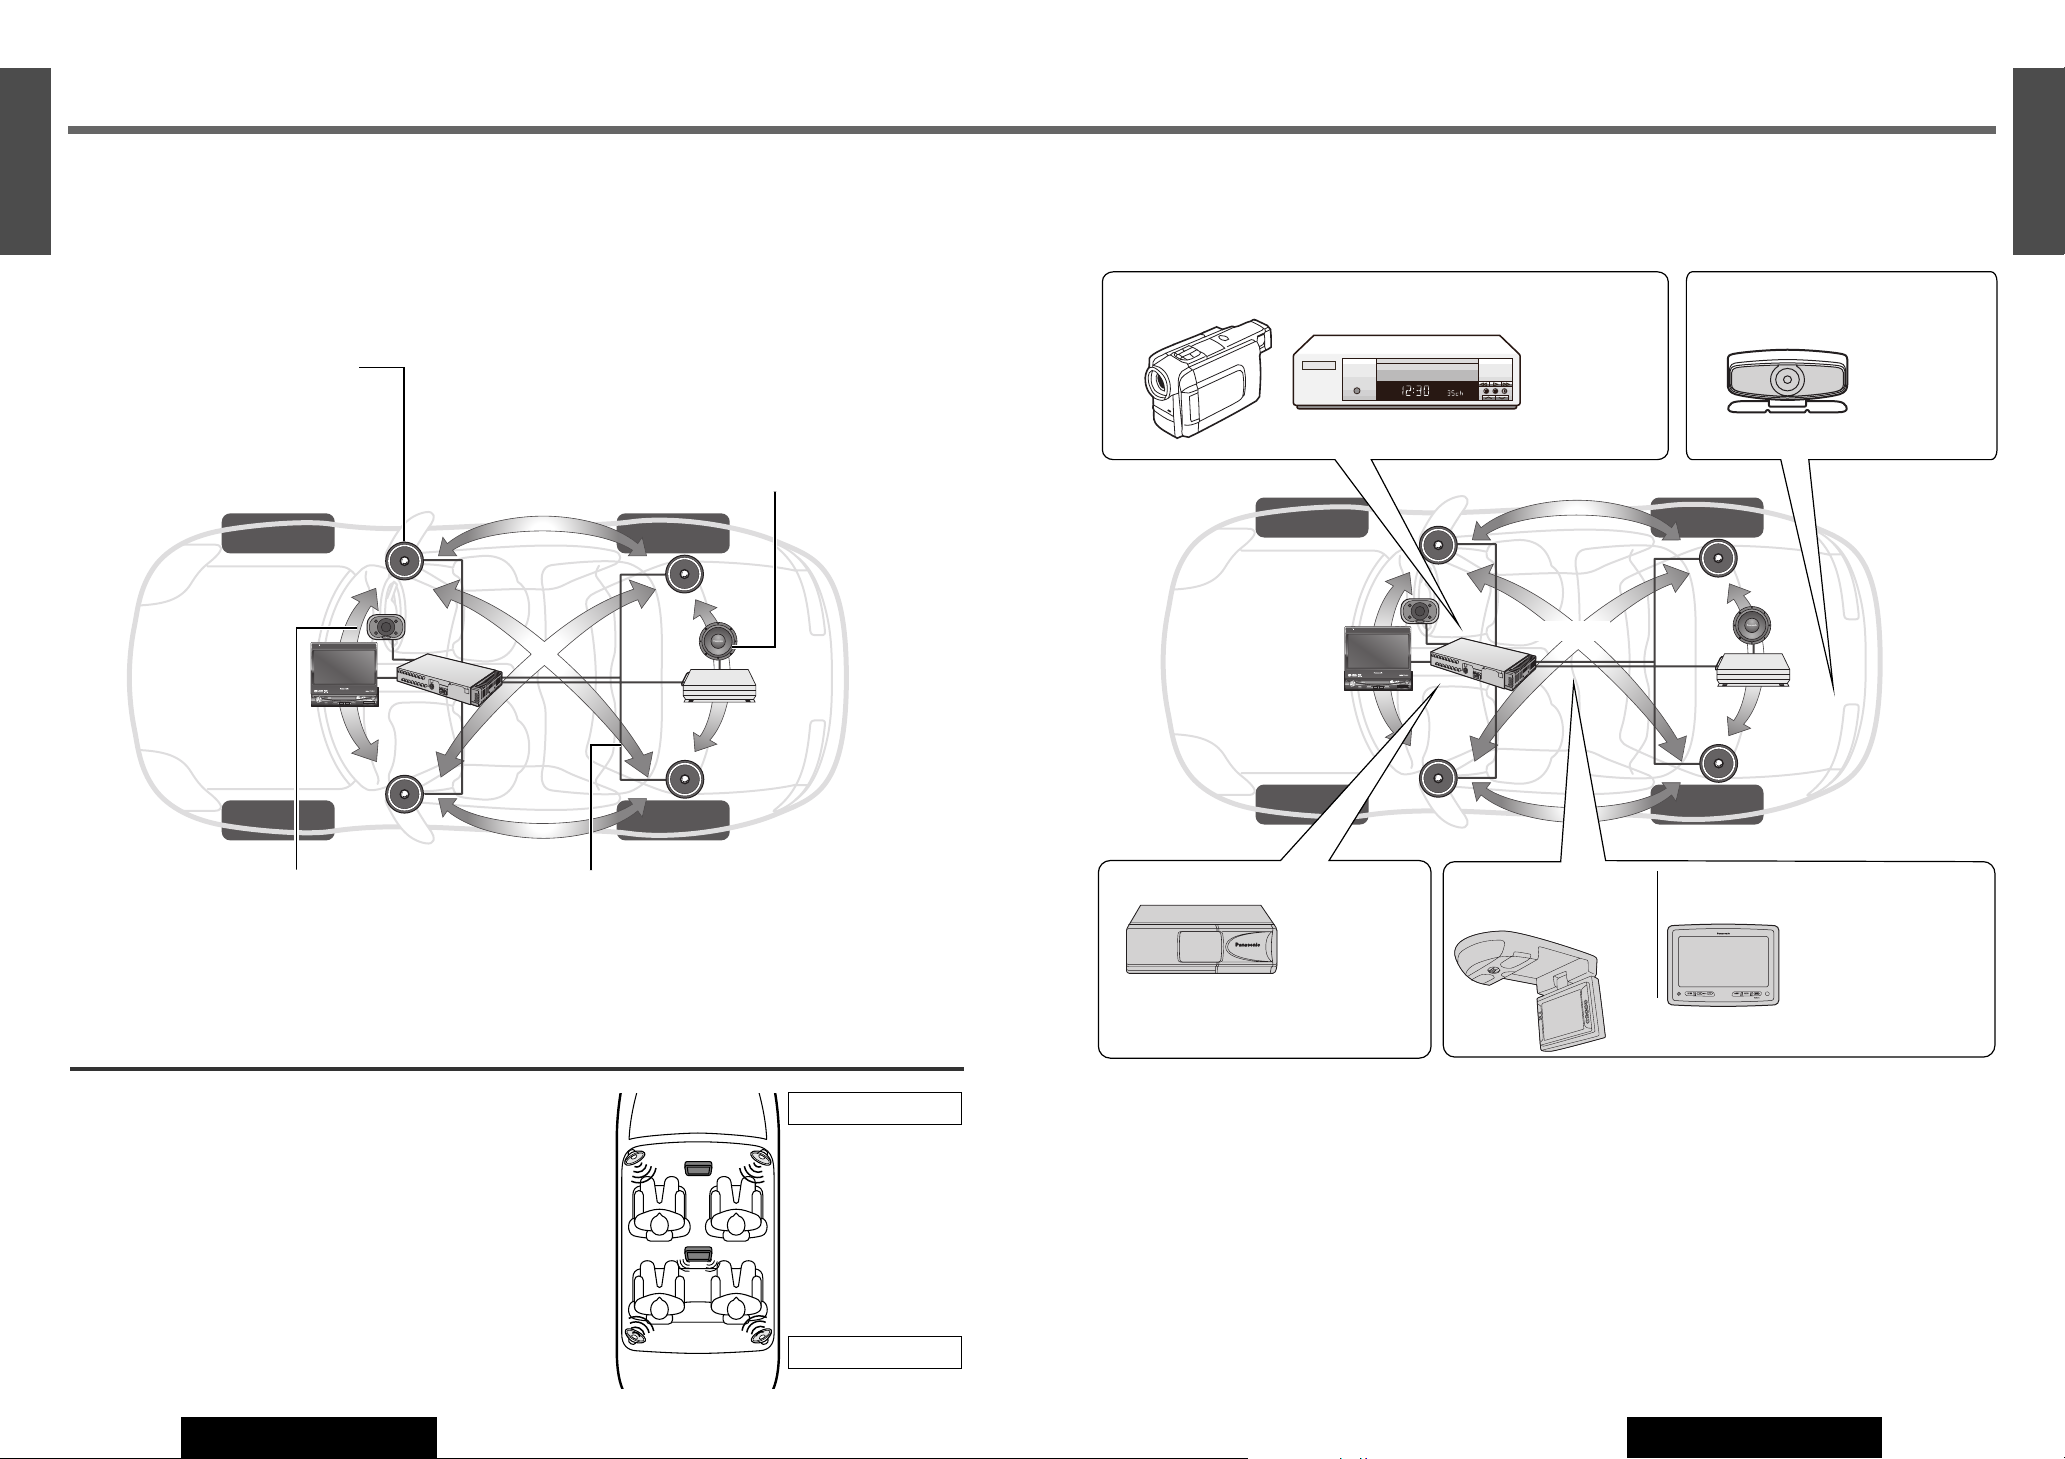
Advanced system
Connecting the devices shown below allows you to enjoy a wonderful world consisting of a
wide variety of pictures and sounds.
About Rear Monitor (a page 74)
You can have different pictures and sound on the
front monitor and rear monitor at the same time.
Private Mode (a page 75)
You can mute the sounds from the rear speakers if
necessary.
(Example: The case of using CY-V7100U with the
headphones)
Camcorder Rear View
Camera
Note: Even if you are using this unit without installing a center speaker, surround speakers, or a subwoofer, it is still nec-
essary to adjust the speaker settings in order to adjust the sound balance. (a page 63)
VCR
Refer to
“Connection with
VCR or
Camcorder”
(a Installation
Instructions).
Refer to
“Connection
with Rear View
Camera”
(a Installation
Instructions).
Rear Monitor
Main Unit Monitor
CD Changer: CX-DP880U
Refer to “CD
Changer
Control”
(a page 48).
OverHead Monitor:
CY-VMX6800U
CY-V7100U
PHONES
Headrest Monitor:
CY-V7100U, etc.
Refer to “Connection with Rear Monitor”
(a Installation Instructions)
Refer to “Connection
with Headrest Monitor”
(a Installation
Instructions)
Note: Two CD Changers can be connected at once by incorporating with CA-CD55
(option).
POWER
BS G-CODE
INTELLIGENT SYSTEM
s
o
a
n
n
i
c
a
P
33
17
E
N
G
L
I
S
H
CQ-VD7700U/VD7500U
32
16
E
N
G
L
I
S
H
CQ-VD7700U/VD7500U
ENTER
TILT
OPEN
VOLUME
MUTE NAVI DISP
CQ-VD7500U
MODE
OPEN / CLOSE
DISC
POWERNAVIGATION
SD CARD
TRACK/
CHANNEL
IN-DASH 7 INCH WIDE COLOR LCD TV / DVD / SD RECEIVER
ASPECT
P
·
MODE
ASP
OPEN / CLOSE
CQ-VD7500U
TILT
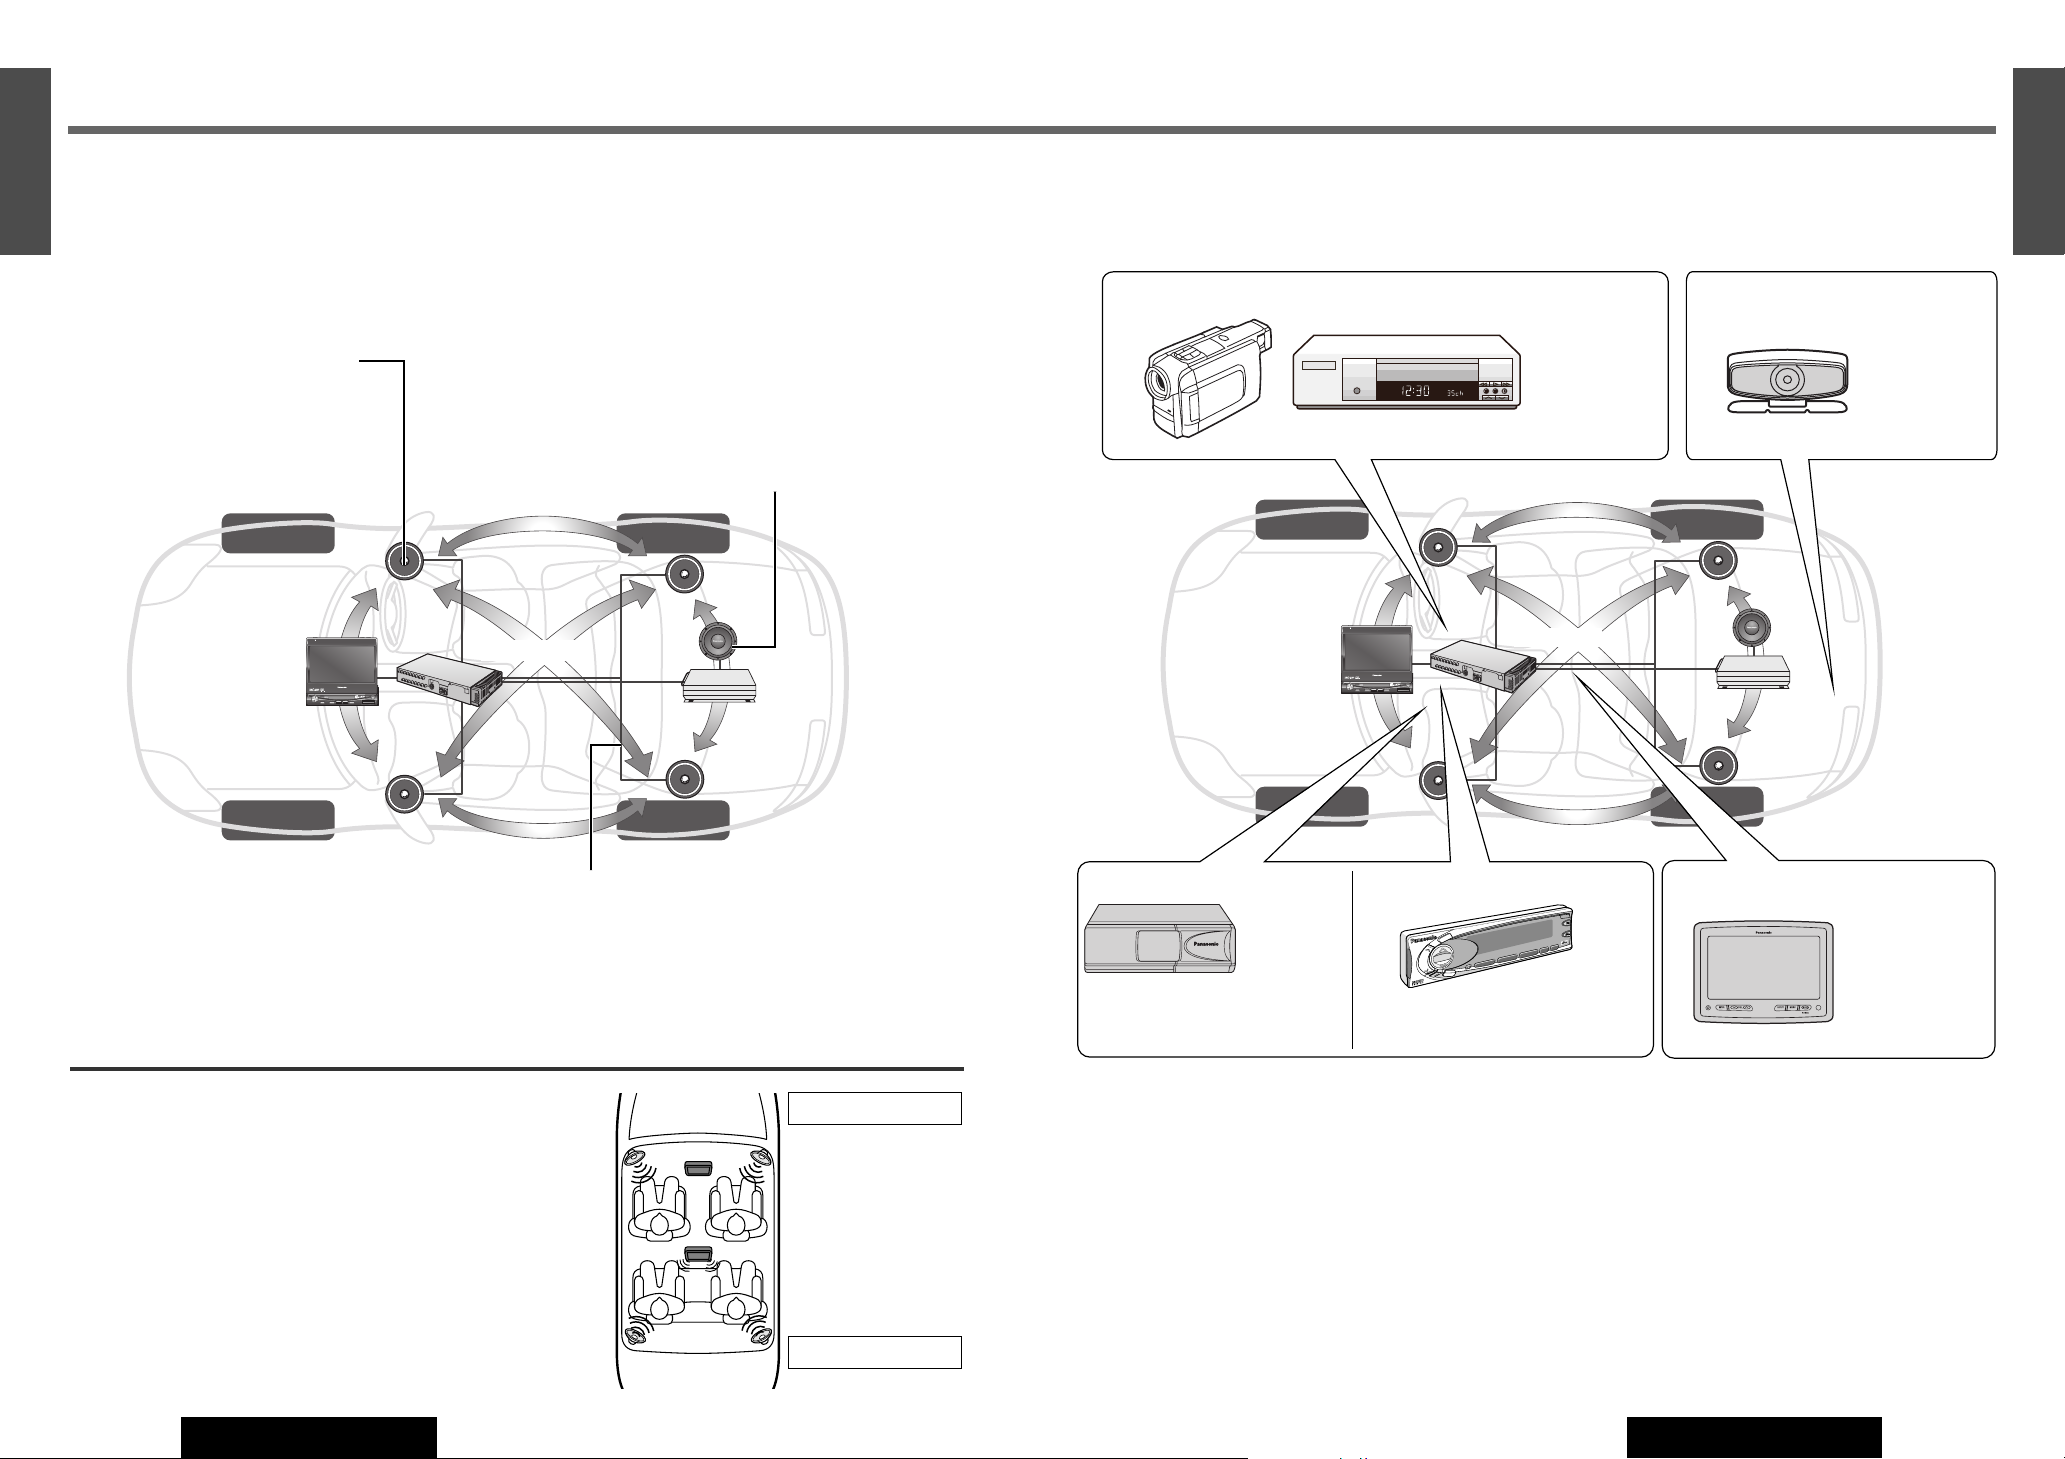
System Upgrade (CQ-VD7500U)
ENTER
TILT
OPEN
VOLUME
MUTE NAVI DISP
CQ-VD7500U
MODE
OPEN / CLOSE
DISC
POWERNAVIGATION
SD CARD
TRACK/
CHANNEL
IN-DASH 7 INCH WIDE COLOR LCD TV / DVD / SD RECEIVER
ASPECT
P
·
MODE
ASP
OPEN / CLOSE
CQ-VD7500U
TILT
CQ-VD7500U
Power amplifier
CQ-VD7500U
Recommended system: 4.1-channel Surround System
This unit has a built-in 4-channel amplifier. The procedure for setting up a 4.1-channel
surround system in order to play DVD software in a way that creates a “you are there” feel in a
car is described below.
Front Speakers: CJ-DVD177
Use the left and right front speakers (such as
speakers that are built into the front door).
Surround Speakers: CJ-SS162
Use the left and right rear speakers (such as speakers
that are built into the rear door or the rear deck)
Subwoofer: CJ-SW38
Because the audio imaging is not nearly as dependent
on the position where the subwoofer is installed as it
is with the other speakers, the subwoofer can be
installed anywhere that is convenient. (A separate
power amplifier for the subwoofer is needed.)
¡Details on wiring:
a Installation Instructions
¡Speaker settings:
a page 66
¡Details on wiring:
a Installation Instructions
Note: When a DVD audio disc is
playing, no digital audio data
comes out on the optical output.
Advanced system
Connecting the devices shown below allows you to enjoy a wonderful world consisting of a
wide variety of pictures and sounds.
About Rear Monitor (a page 74)
You can have different pictures and sound at the
front monitor and rear monitor at the same time.
Private Mode (a page 75)
You can mute the sounds from the rear speakers if
necessary.
(Example: The case of using CY-V7100U with the
headphones)
Camcorder Rear View
Camera
Note: Even if you are using this unit without installing surround speakers or a subwoofer, it is still necessary to adjust the
speaker settings in order to adjust the sound balance.
VCR
Refer to
“Connection with
VCR or
Camcorder”
(a Installation
Instructions).
Refer to
“Connection
with Rear View
Camera”
(a Installation
Instructions).
Rear Monitor
Main Unit Monitor
Headrest Monitor: CY-V7100U,
etc.
Refer to
“Connection with
Headrest Monitor”
(a Installation
Instructions)
CD Changer: CX-DP880U
Note: Two CD Changers can be
connected at once by incorporating
with CA-CD55 (option).
S
O
U
R
C
E
S
E
L
VOL
S
O
U
R
C
E
1
2
3
4
D
R
C
O
M
P
POSI
S
P
C
D
IM
M
U
T
E
A
C
3
0
0
s
u
p
e
r
b
r
i
g
h
t
m
u
l
t
i
-
c
o
l
o
r
d
i
s
p
l
a
y
&
3
0
w
P
o
w
e
r
A
m
p
l
i
f
i
e
r
f
o
r
C
e
n
te
r
S
p
e
a
k
e
r
D
IGIT
A
L
PR
O
LO
G
IC
D
I
G
A
T
A
L
S
U
R
R
O
U
N
D
P
R
O
C
E
S
S
O
R
P
O
S
I
T
I
O
N
D
IM
M
E
R
S
P
AC
E
PWR
Refer to “CD
Changer
Control”
(a page 48).
Digital Surround Processor:
CY-AC300
Refer to “Connection with Digital
Surround Processor” (a Installation
Instructions)
POWER
BS G-CODE
INTELLIGENT SYSTEM
s
o
a
n
n
i
c
a
P
TILT
OPEN / CLOSE
OPEN / CLOSE
TILT
CQ-VD7500U
CQ-VD7500U
TRACK/
IN-DASH 7 INCH WIDE COLOR LCD TV / DVD / SD RECEIVER
CHANNEL
MUTE NAVI DISP
ENTER
DISC
SD CARD
·
MODE
P
MODE
ASP
POWERNAVIGATION
ASPECT
OPEN
VOLUME
TILT
OPEN / CLOSE
OPEN / CLOSE
TILT
CQ-VD7500U
CQ-VD7500U
TRACK/
IN-DASH 7 INCH WIDE COLOR LCD TV / DVD / SD RECEIVER
CHANNEL
MUTE NAVI DISP
ENTER
DISC
SD CARD
·
MODE
P
MODE
ASP
POWERNAVIGATION
ASPECT
OPEN
VOLUME
CY-V7100U
PHONES
 Loading...