

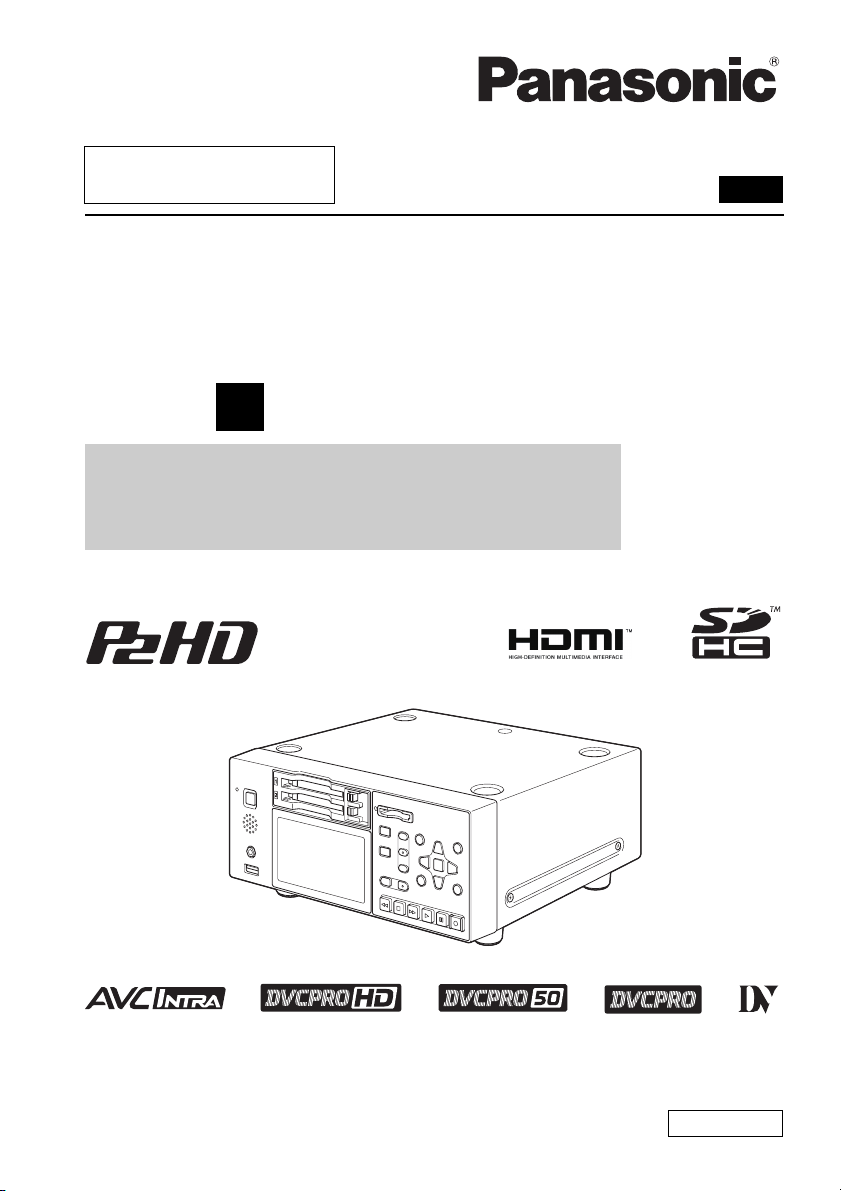
Panasonic AG-HPD24P, AG-HPD24E User Manual
■ This product is eligible for the P2HD 5 Ye ar
Warranty Repair Program. For details,
see page 90 of Vol.2.
Operating Instructions
Memory Card Portable Recorder
Model No.AG-HPD24P
Model No.AG-HPD24E
1
Volume
Note that Operation Instructions Vol.1 describes basic operations
of the Memory Card Portable Recorder.
For instructions on advanced operations of the Memory Card
Portable Recorder, refer to Operating Instructions Vol. 2 (pdf file)
contained in the supplied CD-ROM.
Vol.1
Before operating this product, please read the instructions carefully and save this manual
for future use.
SS0711TO0 -PS
Printed in japan
ENGLISH
VQT3S21
Read this first! (For AG-HPD24P)
CAUTION:
The mains plug of the power supply cord
shall remain readily operable.
The AC receptacle (mains socket outlet)
shall be installed near the equipment and
shall be easily accessible.
To completely disconnect this equipment
from the AC mains, disconnect the mains
plug from the AC receptacle.
CAUTION:
Danger of explosion or fire if battery is
incorrectly replaced or mistreated.
• Do not disassemble the battery or dispose
of it in fire.
• Do not store in temperatures over 60 °C
(140 °F).
WARNING:
This equipment must be grounded.
To ensure safe operation, the three-pin plug
must be inserted only into a standard threepin power outlet which is effectively
grounded through normal household wiring.
Extension cords used with the equipment must
have three cores and be correctly wired to
provide connection to the ground. Wrongly wired
extension cords are a major cause of fatalities.
The fact that the equipment operates
satisfactorily does not imply that the power outlet
is grounded or that the installation is completely
safe. For your safety, if you are in any doubt
about the effective grounding of the power
outlet, please consult a qualified electrician.
WARNING:
• To reduce the risk of fire or electric shock,
do not expose this equipment to rain or
moisture.
• To reduce the risk of fire or electric shock
hazard, keep this equipment away from all
liquids. Use and store only in locations
which are not exposed to the risk of dripping
or splashing liquids, and do not place any
liquid containers on top of the equipment.
WARNING:
Always keep memory cards (optional accessory)
out of the reach of babies and small children.
• Do not expose the battery to excessive
heat such as sunshine, fire or the like.
For Battery Pack
• Use specified charger.
• Replace only with same or specified type.
CAUTION:
In order to maintain adequate ventilation, do
not install or place this unit in a bookcase, builtin cabinet or any other confined space. To
prevent risk of electric shock or fire hazard due
to overheating, ensure that curtains and any
other materials do not obstruct the ventilation.
CAUTION:
To reduce the risk of fire or electric shock
and annoying interference, use the
recommended accessories only.
CAUTION:
This apparatus can be operated at a voltage
in the range of 100 – 240 V AC.
Voltages other than 120 V are not intended
for U.S.A. and Canada.
Operation at a voltage other than 120 V AC
may require the use of a different AC plug.
Please contact either a local or foreign
Panasonic authorized service center for
assistance in selecting an alternate AC plug.
CAUTION:
Excessive sound pressure from earphones
and headphones can cause hearing loss.
indicates safety information.
2
Read this first! (For AG-HPD24P) (continued)
indicates safety information.
FCC NOTICE (USA)
Declaration of Conformity
Model Number: AG-HPD24P
Trade Name: Panasonic
Responsible Party: Panasonic Corporation of North America One Panasonic Way,
Support contact: 1-800-524-1448
This device complies with Part 15 of the FCC Rules.
Operation is subject to the following two conditions:
(1) This device may not cause harmful interference, and (2) this device must accept any
interference received, including interference that may cause undesired operation.
To assure continued compliance, follow the attached installation instructions and do not make
any unauthorized modifications.
CAUTION:
This equipment has been tested and found to comply with the limits for a Class B digital device,
pursuant to Part 15 of the FCC Rules. These limits are designed to provide reasonable protection
against harmful interference in a residential installation. This equipment generates, uses and can
radiate radio frequency energy and, if not installed and used in accordance with the instructions,
may cause harmful interference to radio communications. However, there is no guarantee that
interference will not occur in a particular installation. If this equipment does cause harmful
interference to radio or television reception, which can be determined by turning the equipment off
and on, the user is encouraged to try to correct the interference by one of the following measures:
• Reorient or relocate the receiving antenna.
• Increase the separation between the equipment and receiver.
• Connect the equipment into an outlet on a circuit different from that to which the receiver is
connected.
• Consult the dealer or an experienced radio/TV technician for help.
The user may find the booklet “Something About Interference” available from FCC local regional
offices helpful.
FCC Warning:
To assure continued FCC emission limit compliance, follow the attached installation instructions
and the user must use only shielded interface cables when connecting to host computer or
peripheral devices. Also any unauthorized changes or modifications to this equipment could
void the user’s authority to operate this device.
NOTIFICATION (Canada)
This class B digital apparatus complies with Canadian ICES-003.
Secaucus, NJ 07094
A lithium ion/polymer battery that is recyclable powers the product you have purchased.
Please call 1-800-8-BATTERY for information on how to recycle this battery.
Notice (U.S.A. only):
Disposal may be regulated in your community due to Environmental considerations. For disposal or recycling
information, please visit Panasonic website: http://www.panasonic.com/environmental or call 1-888-769-0149.
Note:
Recorder
The rating plate is on the underside of the recorder.
AC Adaptor
The rating plate is on the underside of the AC Adaptor. Disconnect the AC mains plug from the AC
mains socket when not in use.
3
Read this first! (For AG-HPD24P) (continued)
Brazil Only
Brasil Apenas
■ Manuseio de baterias usadas
BRASIL
Após o uso, as pilhas e /ou baterias poderão ser entregues ao estabelecimento
comercial ou rede de assistência técnica autorizada.
Cobrir os terminais positivo (+) e negativo (-) com uma fita isolante adesiva, antes de depositar
numa caixa destinada para o recolhimento. O contato entre partes metálicas pode causar
vazamentos, gerar calor, romper a blindagem e produzir fogo.
Não desmonte, não remova o invólucro, nem amasse a bateria. O gás liberado pela bateria pode
irritar a garganta, danificar o lacre do invólucro ou o vazamento provocar calor, ruptura da
blindagem e produzir fogo devido ao curto circuito dos terminais.
Não incinere nem aqueça as baterias, elas não podem ficar expostas a temperaturas superiores
a 100 °C (212 °F). O gás liberado pela bateria pode irritar a garganta,danificar o lacre do invólucro
ou o vazamento provocar calor, ruptura da blindagem e produzir fogo devido ao curto circuito dos
terminais provocado internamente.
Evite o contato com o liquido que vazar das baterias. Caso isto ocorra, lave bem a parte afetada
com bastante água. Caso haja irritação, consulte um médico.
■ Para remover a bateria
Bateria Principal de Energia
Pressione o botão para liberar a bateria.
4
Botão de liberação da bateria

Read this first! (For AG-HPD24P) (continued)
IMPORTANT SAFETY INSTRUCTIONS
1) Read these instructions.
2) Keep these instructions.
3) Heed all warnings.
4) Follow all instructions.
5) Do not use this apparatus near water.
6) Clean only with dry cloth.
7) Do not block any ventilation openings. Install in accordance with the manufacturer’s instructions.
8) Do not install near any heat sources such as radiators, heat registers, stoves, or other apparatus
(including amplifiers) that produce heat.
9) Do not defeat the safety purpose of the polarized or grounding-type plug. A polarized plug has two
blades with one wider than the other. A grounding-type plug has two blades and a third grounding
prong. The wide blade or the third prong are provided for your safety. If the provided plug does not
fit into your outlet, consult an electrician for replacement of the obsolete outlet.
10) Protect the power cord from being walked on or pinched particularly at plugs, convenience
receptacles, and the point where they exit from the apparatus.
11) Only use attachments/accessories specified by the manufacturer.
12) Use only with the cart, stand, tripod, bracket, or table specified by the manufacturer, or
sold with the apparatus. When a cart is used, use caution when moving the cart/apparatus
combination to avoid injury from tip-over.
13) Unplug this apparatus during lightning storms or when unused for long periods of time.
14) Refer all servicing to qualified service personnel. Servicing is required when the apparatus has been
damaged in any way, such as power-supply cord or plug is damaged, liquid has been spilled or
objects have fallen into the apparatus, the apparatus has been exposed to rain or moisture, does not
operate normally, or has been dropped.
S3125A
5
Read this first! (For AG-HPD24E)
indicates safety information.
WARNING:
This equipment must be earthed.
To ensure safe operation, the three-pin plug
must be inserted only into a standard threepin power point which is effectively earthed
through normal household wiring.
Extension cords used with the equipment
must have three cores and be correctly
wired to provide connection to the earth.
Wrongly wired extension cords are a major
cause of fatalities.
The fact that the equipment operates
satisfactorily does not imply that the power
point is earthed or that the installation is
completely safe. For your safety, if you are
in any doubt about the effective earthing of
the power point, please consult a qualified
electrician.
WARNING:
• To reduce the risk of fire or electric shock, do
not expose this equipment to rain or moisture.
• To reduce the risk of fire or electric shock
hazard, keep this equipment away from all
liquids. Use and store only in locations
which are not exposed to the risk of dripping
or splashing liquids, and do not place any
liquid containers on top of the equipment.
WARNING:
Always keep memory cards (optional
accessory) out of the reach of babies and
small children.
CAUTION:
To reduce the risk of fire or electric shock
and annoying interference, use the
recommended accessories only.
CAUTION:
Do not remove panel covers by unscrewing
them.
To reduce the risk of electric shock, do not
remove the covers. No user serviceable
parts inside.
Refer servicing to qualified service personnel.
CAUTION:
In order to maintain adequate ventilation, do
not install or place this unit in a bookcase, builtin cabinet or any other confined space. To
prevent risk of electric shock or fire hazard due
to overheating, ensure that curtains and any
other materials do not obstruct the ventilation.
CAUTION:
Danger of explosion or fire if battery is
incorrectly replaced or mistreated.
• Do not disassemble the battery or dispose
of it in fire.
• Do not store in temperatures over 60 °C.
• Do not expose the battery to excessive
heat such as sunshine, fire or the like.
For Battery Pack
• Use specified charger.
• Replace only with same or specified type.
CAUTION:
The mains plug of the power supply cord
shall remain readily operable.
The AC receptacle (mains socket outlet)
shall be installed near the equipment and
shall be easily accessible.
To completely disconnect this equipment
from the AC mains, disconnect the mains
plug from the AC receptacle.
CAUTION:
Excessive sound pressure from earphones
and headphones can cause hearing loss.
The rating plate is on the underside of the Recorder.
EEE Yönetmeliğine Uygundur.
EEE Complies with Directive of Turkey.
6
Read this first! (For AG-HPD24E) (continued)
indicates safety information.
Caution for AC Mains Lead
For battery charger
FOR YOUR SAFETY PLEASE READ THE FOLLOWING TEXT CAREFULLY.
This product is equipped with 2 types of AC mains cable. One is for continental Europe, etc. and the
other one is only for U.K.
Appropriate mains cable must be used in each local area, since the other type of mains cable isnot
suitable.
FOR CONTINENTAL EUROPE, ETC.
Not to be used in the U.K.
FOR U.K. ONLY
This appliance is supplied with a moulded
three pin mains plug for your safety and
convenience.
A 5 amp fuse is fitted in this plug.
Should the fuse need to be replaced please
ensure that the replacement fuse has a rating
of 5 amps and that it is approved by ASTA or
BSI to BS1362.
Check for the ASTA mark or the BSI mark
on the body of the fuse.
If the plug contains a removable fuse cover
you must ensure that it is refitted when the
fuse is replaced.
If you lose the fuse cover the plug must not be
used until a replacement cover is obtained.
A replacement fuse cover can be purchased
from your local Panasonic Dealer.
FOR U.K. ONLY
How to replace the fuse
1. Open the fuse compartment with a screwdriver.
2. Replace the fuse
Fuse
7
Read this first! (For AG-HPD24E) (continued)
indicates safety information.
Caution for AC Mains Lead
For AC adaptor
FOR YOUR SAFETY PLEASE READ THE FOLLOWING TEXT CAREFULLY.
This product is equipped with 2 types of AC mains cable. One is for continental Europe, etc. and the
other one is only for U.K.
Appropriate mains cable must be used in each local area, since the other type of mains cable isnot
suitable.
FOR CONTINENTAL EUROPE, ETC.
Not to be used in the U.K.
FOR U.K. ONLY
This appliance is supplied with a moulded
three pin mains plug for your safety and
convenience.
A 13 amp fuse is fitted in this plug.
Should the fuse need to be replaced please
ensure that the replacement fuse has a rating
of 13 amps and that it is approved by ASTA or
BSI to BS1362.
Check for the ASTA mark or the BSI mark
on the body of the fuse.
If the plug contains a removable fuse cover
you must ensure that it is refitted when the
fuse is replaced.
If you lose the fuse cover the plug must not be
used until a replacement cover is obtained.
A replacement fuse cover can be purchased
from your local Panasonic Dealer.
FOR U.K. ONLY
How to replace the fuse
1. Open the fuse compartment with a screwdriver.
2. Replace the fuse
Fuse
8

Read this first! (For AG-HPD24E) (continued)
EMC NOTICE FOR THE PURCHASER/USER OF THE APPARATUS
1. Applicable standards and operating environment (AJ-HPD24E)
The apparatus is compliant with:
• standards EN55103-1 and EN55103-2 2009, and
• electromagnetic environments E1, E2, E3 and E4
2. Pre-requisite conditions to achieving compliance with the above standards
<1> Peripheral equipment to be connected to the apparatus and special connecting
cables
• The purchaser/user is urged to use only equipment which has been recommended by
us as peripheral equipment to be connected to the apparatus.
• The purchaser/user is urged to use only the connecting cables described below.
<2> For the connecting cables, use shielded cables which suit the intended purpose of
the apparatus.
• Video signal connecting cables
Use double shielded coaxial cables, which are designed for 75-ohm type high-frequency
applications, for SDI (Serial Digital Interface).
Coaxial cables, which are designed for 75-ohm type high-frequency applications, are
recommended for analog video signals.
• Audio signal connecting cables
If your apparatus supports AES/EBU serial digital audio signals, use cables designed
for AES/EBU.
Use shielded cables, which provide quality performance for high-frequency
transmission applications, for analog audio signals.
• Other connecting cables (IEEE1394, USB)
Use shielded cables, which provide quality performance for high-frequency
applications, as connecting cables.
• When connecting to the DVI signal terminal, use a cable with a ferrite core.
• If your apparatus is supplied with ferrite core(s), they must be attached on cable(s)
following instructions in this manual.
3. Performance level
The performance level of the apparatus is equivalent to or better than the performance level
required by these standards.
However, the apparatus may be adversely affected by interference if it is being used in an EMC
environment, such as an area where strong electromagnetic fields are generated (by the
presence of signal transmission towers, cellular phones, etc.). In order to minimize the adverse
effects of the interference on the apparatus in cases like this, it is recommended that the
following steps be taken with the apparatus being affected and with its operating environment:
1. Place the apparatus at a distance from the source of the interference.
2. Change the direction of the apparatus.
3. Change the connection method used for the apparatus.
4. Connect the apparatus to another power outlet where the power is not shared by any
other appliances.
Pursuant to at the directive 2004/108/EC, article 9(2)
Panasonic Testing Centre
Panasonic Service Europe, a division of Panasonic Marketing Europe GmbH
Winsbergring 15, 22525 Hamburg, F.R. Germany
9
Read this first! (For AG-HPD24P/AG-HPD24E)
■ About batteries that you can use with this unit
(Correct as of August 2011)
The battery that can be used with this unit is CGA-D54.
• The unit has a function for distinguishing batteries which can be used safety. The dedicated battery
(CGA-D54) supports this function. The only batteries suitable for use with this unit are genuine
Panasonic products and batteries manufactured by other companies and certified by Panasonic.
(Batteries which do not support this function cannot be used). Panasonic cannot in any way
guarantee the quality, performance or safety of batteries which have been manufactured by other
companies and are not genuine Panasonic products.
It has been found that counterfeit battery packs which look very similar to the genuine product are
made available to purchase in some markets. Some of these battery packs are not adequately
protected with internal protection to meet the requirements of appropriate safety standards. There
is a possibility that these battery packs may lead to fire or explosion. Please be advised that we
are not liable for any accident or failure occurring as a result of use of a counterfeit battery pack.
To ensure that safe products are used we would recommend that a genuine Panasonic battery
pack is used.
EU
To remove the battery
Main Power Battery
Press the battery release button.
Back-up Battery
• For the removal of the battery for disposal at the
end of its service life, please consult your dealer.
3D image viewing
• When viewing 3D images, observe the viewing precautions indicated in the operating
instructions of the monitor. If you continue viewing 3D images in incorrect conditions, it may
cause eyestrain or other adverse effects.
10
Battery release button

• The SDHC logo is a trademark of SD-3C, LLC.
• HDMI, the HDMI logo and High-Definition Multimedia Interface are trademarks or registered
trademarks of HDMI Licensing LLC of the United States and/or other countries.
•Microsoft
United States and/or other countries.
• Apple and Macintosh are registered trademarks of Apple Inc. of the United States and other
countries.
• Microsoft product screen shots reprinted with permission from Microsoft Corporation.
• Names of products, brands, etc., appearing in this manual are trademarks or registered trademarks
of their respective owners.
Illustrations in this manual
• Note that illustrations of the unit and menu screens may differ from those you actually see.
Note concerning screenshots in these instructions
• Screenshots from the AG-HPD24P are used in these operating instructions.
Page references
• In this manual, references to pages are indicated as: (➝ page 00).
Terminology
• The term “SD memory card” is used below as a generic term for both SD and SDHC memory cards.
• A memory card with the “P2” logo (for example the separately sold AJ-P2E064XG) is referred to as a
“P2 card.”
• A recordable media device such as an external hard disk drive connected to a USB port is referred
to as a “storage device.”
• A single continuous video recording is referred to as a “clip.”
• Orange button labels indicate alternate functions enabled by holding the SHIFT button. The operating
instructions refer to the buttons only by label, without mentioning the SHIFT button.
®
and Windows® are registered trademarks or trademarks of Microsoft Corporation® of the
Website URL
• URL:http://pro-av.panasonic.net/
About copyrights
• Copyright laws may prohibit use, except for personal pleasure, of your recorded video and audio
content without permission of the rights holder.
11

Contents
Volume 1
Read this first! (For AG-HPD24P) ........ 2
Read this first! (For AG-HPD24E) ........ 6
Read this first! (For AG-HPD24P/
AG-HPD24E) ...................................... 10
Turning Power On and Off .................. 27
Turning On ............................................ 27
Turning Off ............................................ 27
About Auto Power Off during operation
Setting the Year, Month, Day and
Time ...................................................28
... 28
Usage Precautions............................... 14
Regarding this unit .......................... 14
AC adaptor ........................................... 15
Battery .................................................. 15
Battery characteristics .......................... 15
Remove the battery after use. ............... 16
Before Use ........................................... 16
Always confirm the year, month, day, time and
time zone, and set as necessary
Compatible storage media .................... 16
.......... 16
Supplied Accessories, Optional
Accessories........................................ 17
Supplied Accessories ..................... 17
Optional Accessories .......................... 17
Control Reference Guide..................... 18
Controls ............................................ 18
Slots, etc. ............................................. 21
I/O Connectors ..................................... 22
Preparation ........................................... 24
Charging the battery ....................... 24
Power Preparations ............................. 25
Using a battery ................................. 25
Installation ............................................. 25
Removal ................................................ 25
Using the AC adaptor .......................... 26
Installation ............................................. 26
Removal ................................................ 26
Basic Operation....................................29
About P2 Cards ................................29
Inserting a P2 Card ............................... 29
P2 Card Access Lamp and P2 Card
Status .................................................. 29
About P2 Card Recording Times .......... 30
Removing P2 Cards .............................. 31
Preventing Accidental Deletion ............. 31
Menu Operations ..................................32
LCD Monitor Settings ..........................33
Thumbnail Screen Display ..................34
Displaying the Thumbnail Screen ......... 34
Recording .............................................35
Playback ...............................................35
Playback from the Record/Playback
Screen (Thumbnail Screen Off) .......... 35
Playback from the Thumbnail Screen ... 35
Time Code, User Bits and CTL ...........36
Time Code ............................................. 36
User Bits ................................................ 36
CTL ........................................................ 36
External Connections .......................... 37
USB Device .......................................37
USB HOST ............................................37
3D Signal Recording and Playback ....38
Connections .........................................39
Recording Connection Example ........... 39
Playback Connection Example ............. 40
12
Contents
Selecting the 3D REC/PB Mode .......... 42
Turning Power On and Off .................. 43
Turning On ............................................ 43
Turning Off ............................................ 43
Recording and Playback ..................... 44
Recording ............................................. 44
Playback ............................................... 45
Displaying 3D Thumbnails .................. 46
Displaying the Thumbnail Screen ......... 46
Thumbnail Screen Names and
Functions ............................................ 46
Synchronous Playback ........................48
Connections ......................................... 48
Selecting SYNC PB Mode ................... 48
Playback ............................................... 49
Correctly Synchronizing Playback ........ 49
Playback from the Playback Screen
(Thumbnail Screen Off) ...................... 50
Playback from the Thumbnail Screen ... 51
Setup Menu ...........................................52
Specifications .......................................53
Index ......................................................58
Volume 2
Available Modes
Main Mode
USB Device Mode
3D Recording/Playback Mode (3D REC/
PB)
Synchronous Playback Mode (SYNC PB)
Screen Display
Time Code, User Bits, CTL
Setup Menu
Using a Keyboard
For Long and Trouble-Free Operation
Index
13

Usage Precautions
Regarding this unit
■ Panasonic makes no guarantees for
your recordings
• Please understand that Panasonic makes no
guarantees for your recordings in cases where
video and/or audio were not recorded as you
intended due to problems with this unit, P2
cards, or SD memory cards.
■ Be careful to avoid getting water
inside the unit when using it in rainy
or snowy weather, or near the sea
shore.
• The unit or card may be damaged. (In some
cases, it may become unrepairable.)
■ Do not install this unit in a location
exposed to direct sunlight
• This may deform the cabinet or damage the
LCD screen.
■ Keep the unit away from
elecromagnetic devices (such as TVs
and video game machines).
• Using the unit on or near a TV may result in
distorted video or audio due to
electromagnetic radiation.
• The strong magnetic field produced by
loudspeakers and large monitors can damage
recordings or distort video images.
• Electromagnetic radiation from computers can
distort video and audio.
• If a malfunction is suspected to have occurred
due to the influence of a magnetic device, turn
the unit off and remove the battery or unplug
the AC adaptor. Then re-install the battery or
reconnect the AC adaptor. Finally, turn the unit
back on.
■ Do not use the unit near a radio
transmitter or high-voltage
equipment.
• Recorded video and audio may be disrupted if
used near a radio transmitter or high-voltage
equipment.
■ When using the unit at the sea shore,
be careful to avoid allowing sand or
dust to get inside.
• Sand and dust can damage the unit or card.
(Be especially careful when inserting and
removing cards.)
■ When carrying the unit, be careful not
to drop it.
• The unit can be damaged by strong shocks,
and may malfunction.
■ Keep the unit away from contact with
insecticides or other volatile
materials.
• Insecticides and other volatile materials can
deform the unit and dissolve the finish.
• Do not leave the unit in contact with rubber or
vinyl products for long periods.
■ Secure deletion of data from memory
cards and storage devices prior to
disposal or transfer of the unit.
• The format and delete functions on this unit or
a PC will only change the file management data
and leave data on the memory card or storage
device intact. It is recommended that cards or
storage devices either be physically destroyed
or that commercially sold software be used to
completely delete any data they contain.
Management of data on memory cards and
storage devices is the sole responsibility of the
user.
■ Liquid crystal displays
• The pixels of the LCD monitor are controlled to
obtain high precision with 99.99 % of the
effective pixels. This leaves less than 0.01 % of
pixels that may not light or may remain on all
the time. These phenomena are normal and will
have no effect on the images you shoot.
• There may be some unevenness on the screen
depending on the image displayed.
• Wiping or rubbing the LCD screen with a rough
cloth may damage it.
Usage Precautions: Regarding this unit
14

• A temporary afterimage (burn-in) may occur
when the same image or text is displayed for a
long time, although it can be recovered by
turning power off for several hours.
• LCD response and brightness vary with
operating temperature.
■ Information on software for this product
1. Included with this product is software licensed under the GNU General Public License (GPL) and
GNU Lesser General Public License (LGPL), and users are hereby informed that they have the right
to obtain, change and redistribute the source codes of this software.
Details on GPL and LGPL can be found on the installation CD provided with the unit. Refer to the
folder called “LDOC”.
(Details are given in the original (English-language) text.)
See our website (➝ “Website URL” page 11) to obtain the source code.
The manufacturer asks users to refrain from directing inquiries concerning the source codes they
have obtained and other details to its representatives.
2. Included with this product is software which is licensed under MIT-License.
This information is provided in the LDOC folder (in the original English language text) on the install CD-
ROM supplied with the unit.
• In a high-temperature and high-humidity
location, the LCD panel characteristics may
change and result in uneven image quality.
AC adaptor
Usage Precautions
Use the supplied AC adaptor. Read the Operating Instructions (➝ “Using the AC adaptor” page 26)
before use.
Battery
Use the supplied battery. (CGA-D54 for the AG-HPD24P / CGA-D54s for the AG-HPD24E)
Battery characteristics
This unit uses a rechargeable lithiumion battery that uses its internal chemical reaction to generate
electrical energy. This reaction is easily influenced by the ambient temperature and humidity, and the
battery’s effective operating time is reduced as the temperature rises or falls. In very low temperatures,
the battery may last only 5 minutes.
Protective circuitry functions if you use the battery where it is very hot and you will have to wait before
you can use it again.
Usage Precautions: AC adaptor
15

Remove the battery after use.
Completely remove the battery. (The battery continues to be used even if you have turned the unit off.)
The battery can over discharge if you leave it in the unit and it may become impossible to recharge it.
Before Use
Always confirm the year, month, day, time and time zone, and set as necessary
The clock setting affects management of recorded content and playback control. Before recording,
confirm the correct year, month, day, time and time zone settings. (➝ “Setting the Year, Month, Day and
Time” page 28)
Compatible storage media
The following types of storage media can be used. See the specified pages for details.
•P2 Card (➝ “Handling P2 Card Recording” Vol. 2, page 91)
• SD/SDHC Memory Cards* (➝ “Use of SD/SDHC Memory Cards” Vol. 2, page 92)
* SD/SDHC memory cards cannot be used with this unit for video/audio recording and playback.
Usage Precautions: Before Use
16
Supplied Accessories, Optional Accessories
Supplied Accessories
Battery
For part numbers for
the battery, see
“Optional Accessories”
below.
3D connection label AC adaptor / AC power supply cables
Battery charger / AC power supply cables
AG-HPD24P AG-HPD24E
AG-HPD24P AG-HPD24E
Supplied Accessories, Optional Accessories
(For the U.K.)
(For areas other
than the U.K.)
(For the U.K.)
(For areas other
than the U.K.)
CD-ROM
• After unpacking, dispose of the AC power supply cable caps and packing materials properly.
Optional Accessories
• Battery
CGA-D54 (7.2 V, 5400 mAh: equivalent to accessory battery for the AG-HPD24P)
CGA-D54s (7.2 V, 5400 mAh: equivalent to accessory battery for the AG-HPD24E)
Supplied Accessories, Optional Accessories: Supplied Accessories
17
Control Reference Guide
Controls
5
4
1 6
2
7
8
3
9
10 11 12 14 1513
About button labels:Orange labels indicate alternate functions enabled by simultaneously pressing
SHIFT.
<Example> Press the SHIFT and REMOTE/MODE buttons at the same time to execute the MODE
button function.
1. REMOTE/MODE button
REMOTE button:
Enables remote control of the unit via the
REMOTE connector.
MODE button:
Selects the USB device mode (USB DEVICE),
3D recording/playback mode (3D REC/PB),
or synchronous playback mode (SYNC PB).
USB DEVICE
Enables access to the P2 card in the P2
card slot of this unit as a mass storage
device on a personal computer
connected via USB 2.0.
3D REC/PB
Synchronizes the operation of two units to
record and playback Dual P2 3D clips
(page 38).
SYNC PB
Synchronizes the operation of two units to
play back 3D clips (page 48) on P2 cards
that were recorded using machines that
do not have native support for Dual P2 3D.
2. COUNTER, RESET/TC PRESET button
COUNTER button:
Selects the type of data for the counter
display, in the following sequence.
(➝ “Time Code, User Bits, CTL” Vol. 2, page 47)
Control Reference Guide: Controls
18

RESET/TC PRESET button:
Resets the CTL counter when displayed.
When the counter displays TC or UB, presets
the time code/user bits.
3. AUDIO MON button
Monitor audio volume adjustment:
Press either the + or –, AUDIO MON button to
display the loudspeaker/headphone audio
volume level, and hold the button to adjust.
Wait a short time or press SET or EXIT to
return the display to normal.
Recording audio volume adjustment:
(➝ “Recording Clips” Vol. 2, page 6)
4. USER1-3, 4-6buttons
Users can assign any functions to these
buttons.
(➝ “Setup Menu” Vol. 2, page 50)
5. THUMBNAIL button
Selects whether to show or hide the
thumbnail screen.
(➝ “Thumbnail Screen Display” page 34)
6. SHIFT button
Hold this button while pressing another
button to perform the alternate function of that
button.
Functions of the SHIFT button that are not
indicated by orange button labels:
To select the group of clips from immediately
before the select clip to the clip at the current
cursor position
SHIFT + SET buttons
(➝ “Selecting and Deselecting Clips” Vol. 2,
page 16)
Combine display of selected storage device
partition/folder thumbnails
SHIFT + SET buttons
(➝ “Operations in the EXPLORE screen”
Vol. 2, page 32)
Moving storage device partitions/folders
SHIFT + +/– buttons
(➝ “Displaying thumbnails of clips on storage
devices and viewing video on the monitor”
Vol. 2, page 33)
7. Cursor control buttons
Up/Down/Left/Right cursor buttons:
• Controls cursor movement for thumbnails
and menus.
• During playback, press the Left/Right
cursor buttons to activate SHTL mode to
change playback speed.
(➝ “Playing Back at Variable Speed” Vol. 2,
page 43)
• Press the SET button to pause variable
speed playback.
• While paused, press the Up/Down cursor
buttons to step one frame forward or back.
(➝ “Frame-by-frame playback” Vol. 2, page 8)
• These buttons also adjust recording audio
volume.
(➝ “Recording Clips” Vol. 2, page 6)
TOP/BOTTOM buttons:
Move the cursor to the first (TOP) or last
(BOTTOM) thumbnail.
SET button:
Selects thumbnails or menu items.
◆ NOTE:
• No selection occurs if SET is held too long.
8. MENU, DIAG button
MENU button:
This button displays the menu.
DIAG button:
When the menu is not displayed, pressing
this button displays a diagnostics screen
showing various conditions.
(➝ “Deck Information (DIAG) Icons” Vol. 2, page
45)
9. EXIT, CANCEL button
EXIT button:
Closes the menu, or returns from the storage
explorer to normal display.
Control Reference Guide
Control Reference Guide: Controls
19

CANCEL button:
This button cancels a selection or interrupts
copying.
10.REW, PREV button
REW button:
Fast rewind during playback. Speed is
selectable from the menu setting SETUP -
BASIC - FF.REW MAX.
PREV button:
During playback, cues the previous clip or
clip and text note location.
In 3D REC/PB and SYNC PB modes, cues a
clip when paused.
◆ NOTE:
• Cueing during playback is not available in
3D REC/PB mode.
• Cueing is only available when paused in
SYNC PB mode.
11.STOP button
Stops playback or recording.
12.FF, NEXT button
FF button:
Executes fast forward during playback.
Speed is selectable by the menu setting
SETUP - BASIC - FF.REW MAX.
NEXT button:
During playback, cues the next clip or clip
and text note location.
In 3D REC/PB and SYNC PB modes, cues a
clip when paused.
14.STILL/PAUSE button
Press during playback to pause (STILL) and
display a still image.
Press during recording to toggle recording
standby (PAUSE).
Press to resume recording from standby.
15.REC button
During playback, press this button to check
video and audio in EE mode on the recording/
playback screen (with the thumbnail screen
disabled). Except when stopped, pressing
this button activates EE mode, which remains
active until you press another button. EE
mode monitoring is only available when the
playback video format matches the SETUP -
SYSTEM - FORMAT menu setting.
Press this button and the PLAY button
simultaneously to start recording.
Press this button and the STILL/PAUSE
button simultaneously to activate recording
standby. Remote camera recording can be
enabled from the menu. The SETUP - BASIC
- AUTO REC menu setting enables remote
recording.
(➝ “Setup Menu” Vol. 2, page 50)
◆ NOTE:
• Cueing during playback is not available in
3D REC/PB mode.
• Cueing is only available when paused in
SYNC PB mode.
13.PLAY button
Activates playback.
(➝ “Playback” page 45, ➝ “Playing Back Clips”
Vol. 2, page 43)
Control Reference Guide: Controls
20
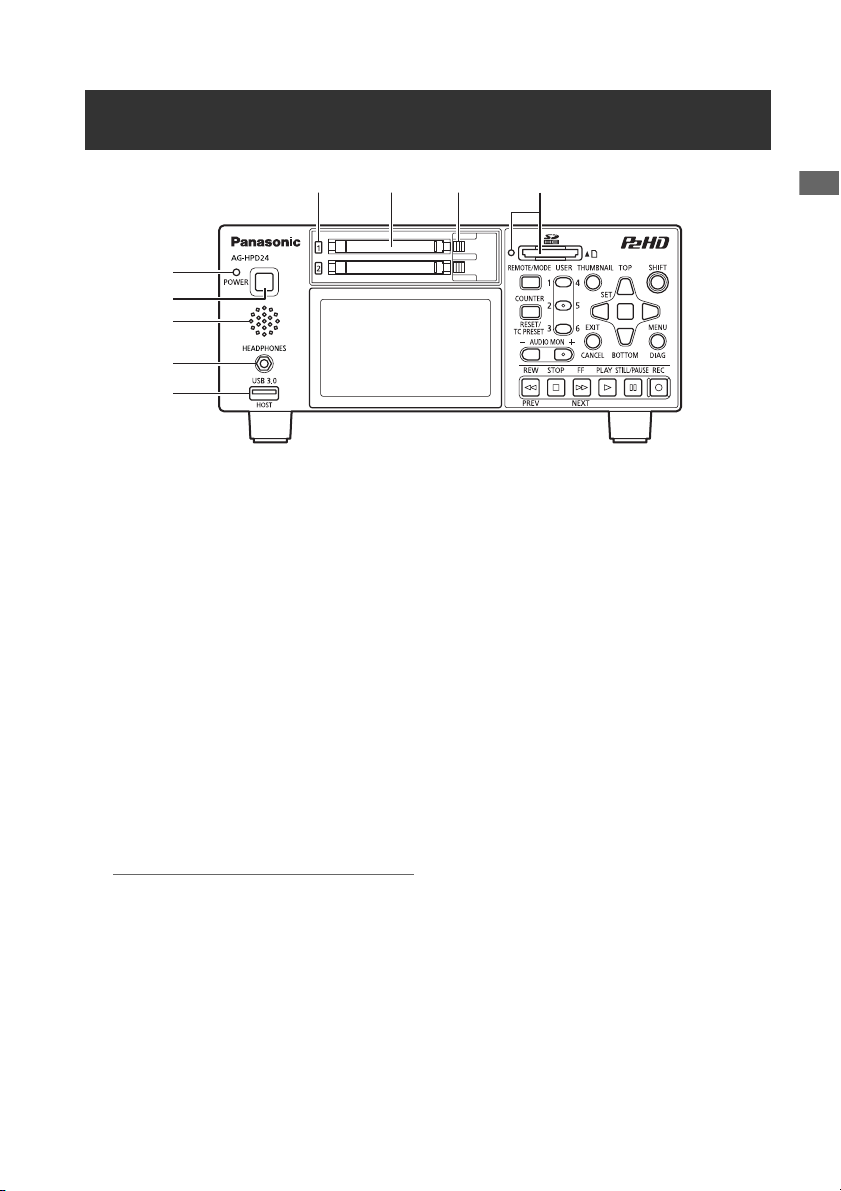
Slots, etc.
6 7 8 9
Control Reference Guide
1
2
3
4
5
1. POWER lamp
(➝ “Turning Power On and Off” page 27)
2. POWER button
Press and hold to turn power on and off.
(➝ “Turning Power On and Off” page 27)
3. Speaker
Outputs monitored audio. Speaker output is
disabled when headphones are connected.
4. Headphone jack
Headphones can be plugged in here.
Outputs monitored audio when headphones
are connected.
5. USB HOST port (USB 3.0 Type A)
(➝ “USB HOST” page 37)
◆ NOTE:
• Use double-shielded cable to connect to
this port.
• Use a USB 3.0 compliant cable to connect
USB 3.0 compatible storage devices.
6. P2 card access lamps
(➝ “P2 Card Access Lamp and P2 Card Status”
page 29)
7. P2 card slots
(➝ “Inserting a P2 Card” page 29)
8. EJECT buttons
(➝ “Inserting a P2 Card” page 29)
9. SD/SDHC memory card slot and access lamp
Insert an SD/SDHC memory card.
Insert the card cut-corner-edge first and
label-side up, until it latches into place.
To remove it, ensure that the green lamp is
off, then release the latch by gently pushing
the card in again.
See the following for details.
(➝ “Use of SD/SDHC Memory Cards” Vol. 2,
page 92)
Control Reference Guide: Slots, etc.
21
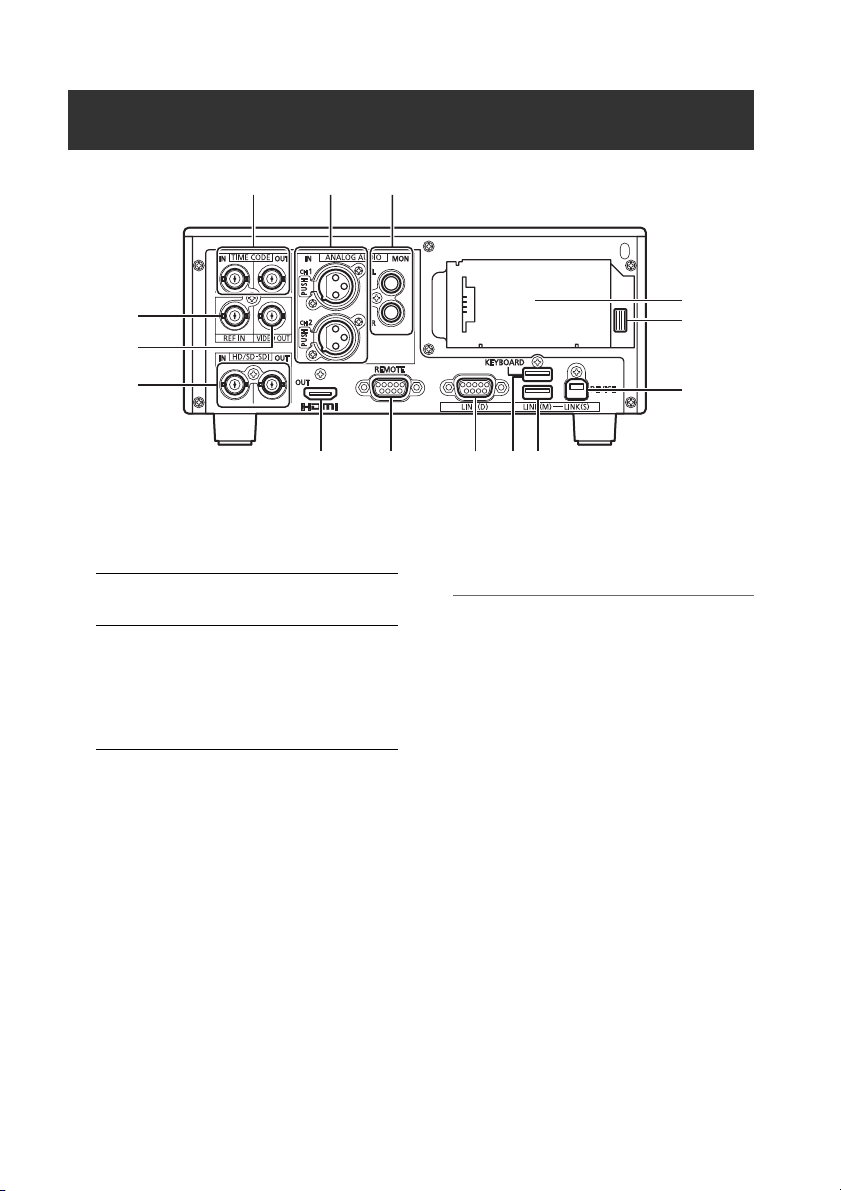
I/O Connectors
1
4
5
6
7 8 9 1110
1. TIME CODE IN/OUT Jacks
TIME
CODE IN:
TIME
CODE
OUT:
Accepts an external time code
for recording onto P2 cards.
Outputs the playback time
code during playback.
Outputs the time code from the
internal time code generator
during recording.
2. ANALOG AUDIO IN jacks
These accept analog audio input.
3. ANALOG AUDIO MON output jacks
The audio signal (CH1 to CH8) selected from
the SETUP - AUDIO - MONITOR CH menu
setting (➝ “Setup Menu” Vol. 2, page 50) is
output here.
4. REF IN jack
Input connectors for HD and SD reference
video signals.
Connect to the VIDEO OUT jack of the slave
device when using 3D REC/PB and SYNC PB
modes.
(➝ “3D Signal Recording and Playback”
2
3
14
13
12
page 38, ➝ “Synchronous Playback” page
)
48
◆ NOTE:
• The HD reference video signals must be
positive and negative polarity tri-level sync
signals. These signals must match the
format of the input signal and SYSTEM
data format.
• The HD reference is only usable with menu
settings SETUP - SYSTEM - FREQUENCY
23.98 Hz, 24 Hz, 59-23, or 60-24.
• SD reference video must include a black
burst signal that complies with SMPTE
170M and ITU 624-4.
• In both 3D REC/PB and SYNC PB modes,
when the menu setting SETUP - SYSTEM -
FREQUENCY is 59.94 or 50 Hz, only a
black burst reference signal can be used.
When the setting is 23.98 or 24 Hz, only the
HD reference can be used.
• Video and audio output signals may be
degraded when no reference video signal
is provided. We recommend using this unit
in systems that provide a reference video
signal for input.
Control Reference Guide: I/O Connectors
22

• When recording 720p with an HD
reference or no reference input, the
recorded phase may be shifted from the
input signal.
• When the SETUP - SYSTEM - FREQUENCY
menu setting is 59-23 or 60-24, the HD
reference signal can only synchronize
playback.
5. VIDEO OUT jack
Provides analog composite video signal
output.
No signal is output when the SETUP -
SYSTEM - FREQUENCY menu setting is
24 Hz or 60-24.
In both 3D REC/PB and SYNC PB modes, the
sync signal output here is exclusively for use
by another AG-HPD24.
➝ “3D Signal Recording and Playback”
(
page 38,
48)
➝ “Synchronous Playback” page
6. HD/SD-SDI IN/OUT jacks
These provide input and output of serial
digital component audio/video signals.
control the unit.
◆ NOTE:
• Use double-shielded cable for
connections.
9. LINK(D) connector
Use this connector to link two units for 3D
REC/PB and SYNC PB modes.
(
➝ “3D Signal Recording and Playback”
page 38,
48)
◆ NOTE:
• Use a double-shielded RS-422A cable not
➝ “Synchronous Playback” page
longer than 1 m long for connection.
10.KEYBOARD port (USB 2.0 Type A)
Connect an external USB keyboard to enter
meta data.
(➝ “Using a Keyboard” Vol. 2, page 80)
11.LINK(M) port (USB 2.0 Type A)
➝ “3D Signal Recording and Playback”
(
page 38,
48)
➝ “Synchronous Playback” page
Control Reference Guide
◆ NOTE:
• Use 5C-FB or equivalent double-shielded
cable for connections.
7. HDMI OUT port
Connects to a monitor or TV using an HDMI
cable. In 3D REC/PB and SYNC PB modes,
3D video can be displayed by connecting a
3D monitor.
(➝ “3D Signal Recording and Playback”
, ➝ “Synchronous Playback” page
page 38
)
48
◆ NOTE:
• This machine does not support VIERA link.
Connecting it to a VIERA link compatible
device with an HDMI cable may cause
VIERA link to malfunction on that device.
8. REMOTE connector
Connect to an external controller to remotely
◆ NOTE:
• Use double-shielded cable for
connections.
12.USB2.0 device/LINK(S) port (Type B)
(
➝ “USB Device” page 37, ➝ “3D Signal
Recording and Playback” page 38,
“Synchronous Playback” page 48)
◆ NOTE:
• Use double-shielded cable for
connections.
➝
13.Battery latch release button
(➝ “Using a battery” page 25)
14.Power supply/battery mounting location
(➝ “Power Preparations” page 25)
Control Reference Guide: I/O Connectors
23

Preparation
Charging the battery
The battery is not charged when the product is
purchased. Use the steps below to fully charge
the battery using the supplied charger. We
recommend keeping one spare battery on hand.
1 Place the battery level on the charger and
slide it in the direction of the arrows on
the charger.
2 Plug the battery charger’s AC power
supply cable into the charger, and then into
a power outlet.
Connect the AC power supply cable in A-B
order.
• The POWER lamp and CHARGE
lamp on the charger light indicating
that charging has started.
• If the CHARGE lamp does not light
when the battery is installed,
reinstall the battery correctly.
B
Insert the
plugs all the
way in.
POWER
CHARGE
A
• The CHARGE lamp on the charger
goes out when charging ends.
3 Slide the battery off the charger.
■ Charging time and battery life
estimates for the supplied battery
Capacity 5400 mAh
Charging time Approx. 330 min.
Continuous playback time Approx. 160 min.
• The above times are estimates for playing back
continuously recorded clips in AVC-Intra 100 to
an E-series P2 card.
• The above values apply at ambient 20 °C
(68 °F) and 60 % relative humidity. Charging
time may be longer under other conditions.
• The battery becomes hot during usage and
charging.
• When the battery temperature becomes
excessively high or low, or it has become
discharged after a long period of inactivity, the
CHARGE lamp may flash two or three times
before automatic charging starts.
• If the CHARGE lamp continues flashing when
the battery is at normal temperature, it may be
defective and you should contact your
supplier.
• Charging time becomes longer for a hot
battery.
• Using the charger or AC adaptor near a radio
may interfere with radio reception. Place the
charger or AC adaptor at least 1 meter away
from a radio.
• The charger may emit noise during charging.
This is not a malfunction.
• No guarantees are given for the operation of
the CGR-D16/CGR-D16s (1600 mAh) battery
pack.
Preparation: Charging the battery
24
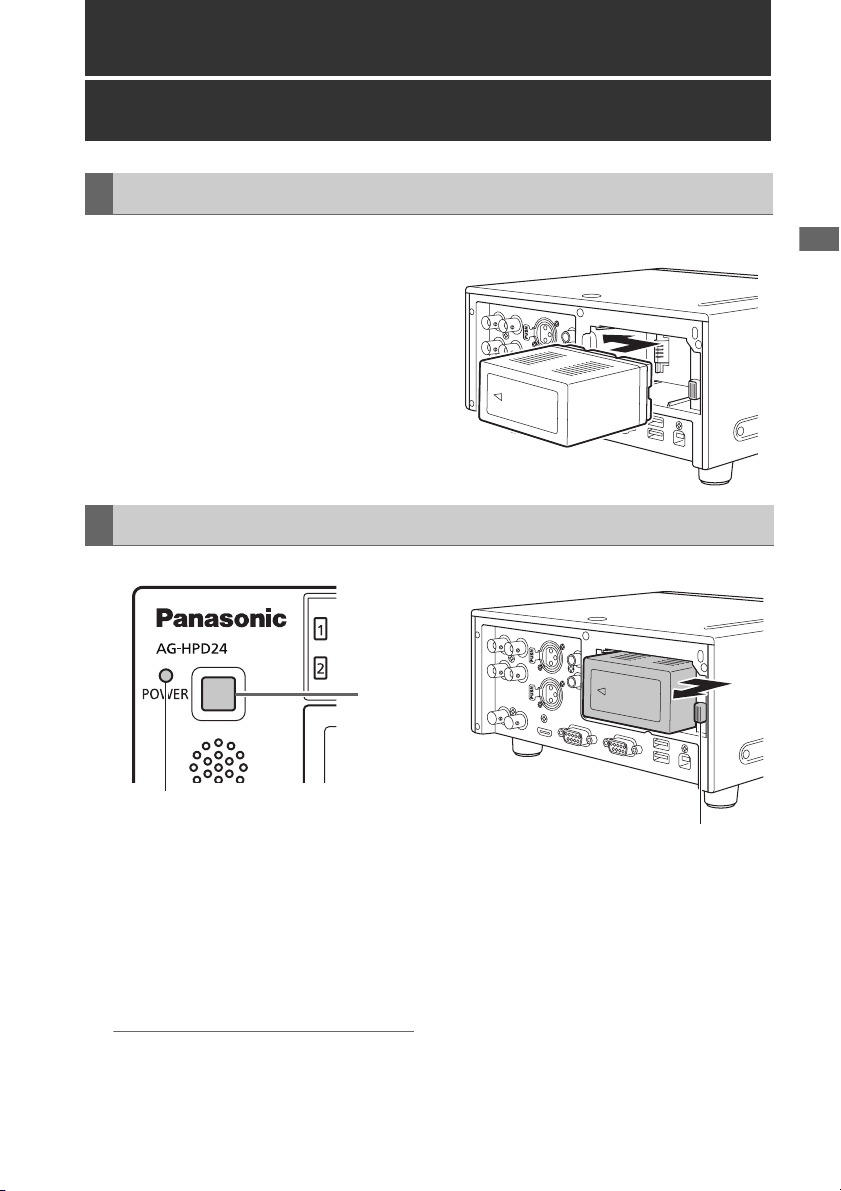
Power Preparations
Installation
Using a battery
1 Slide in the battery until it clicks into place.
Removal
1
POWER lamp
Power Preparations Power Preparations
1 Hold the POWER button for two seconds to
turn the power off, and confirm that the
POWER lamp is off.
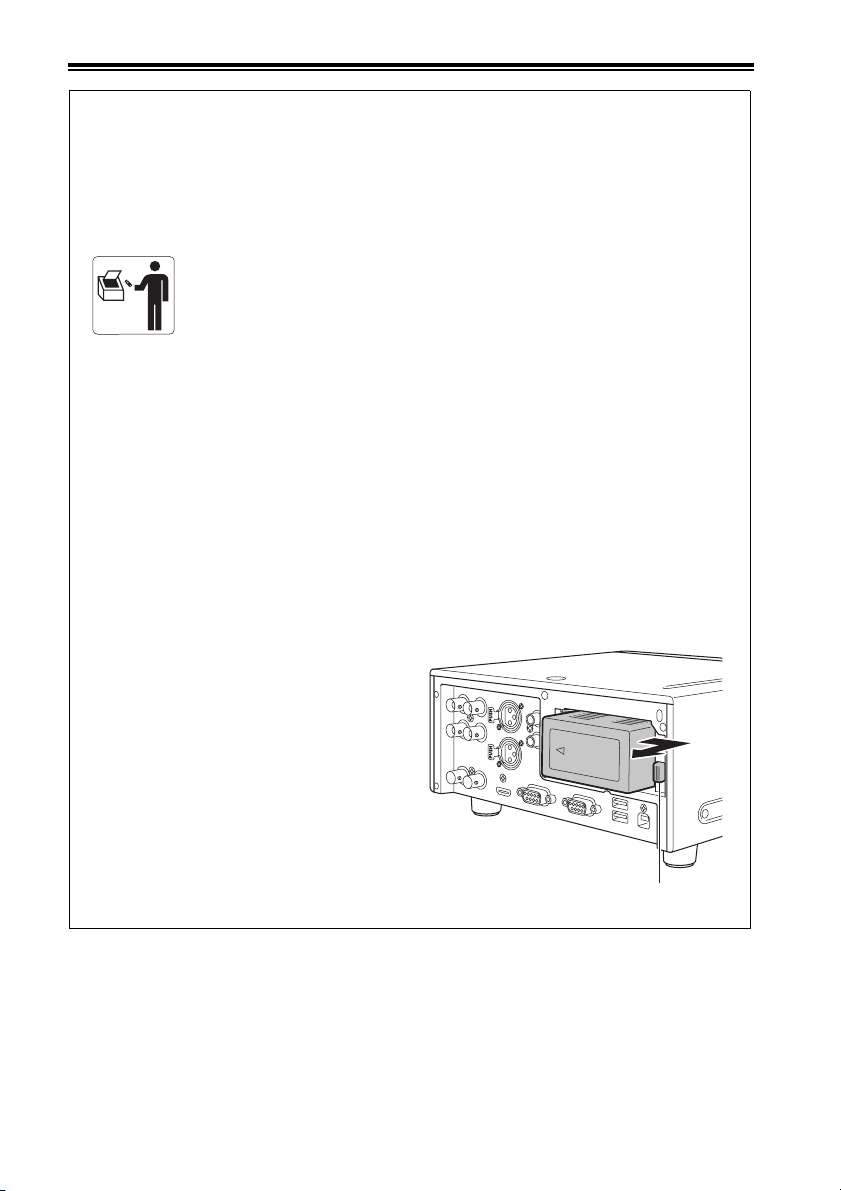
2 Press the battery lock release button to
slide out the battery.
Hold the battery to prevent it from falling out.
◆ NOTE:
• Always be sure that the unit is turned off
before removing the battery.
Battery latch release button
Power Preparations: Using a battery
25

Using the AC adaptor
Installation
1 Plug the AC adaptor’s AC power supply
cable into the adaptor, and then into a
power outlet.
Connect the AC power supply cable in A-B
order.
2 Slide in the DC power supply cable plate
until it clicks into place.
Removal
Insert the
plugs all the
way in.
A
B
3 Unplug the adaptor’s AC power supply
cable from the wall outlet.
POWER lamp
1 Hold the POWER button for two seconds to
turn the power off, and confirm that the
POWER lamp is off.
2 Press the battery lock release button and
slide out the DC power supply cable plate.
◆ NOTE:
• Always be sure that the unit is turned off before
removing the DC cord connector plate.
Power Preparations: Using the AC adaptor
26
◆ NOTE:
• The AC Adaptor is designed to operate on
1
world-wide mains voltages (100 to 240 V)
and frequencies (50/60 Hz). However,
power outlet configurations differ in
different countries. Use a plug that is
designed for the country of operation. If
necessary, contact your supplier to obtain
the appropriate plug adaptor.
• When not using the unit, unplug the
adaptor’s AC power supply cable from the
wall outlet.
• The power lamp on the AC adaptor
normally remains lit for a while after it is
unplugged from the wall outlet.
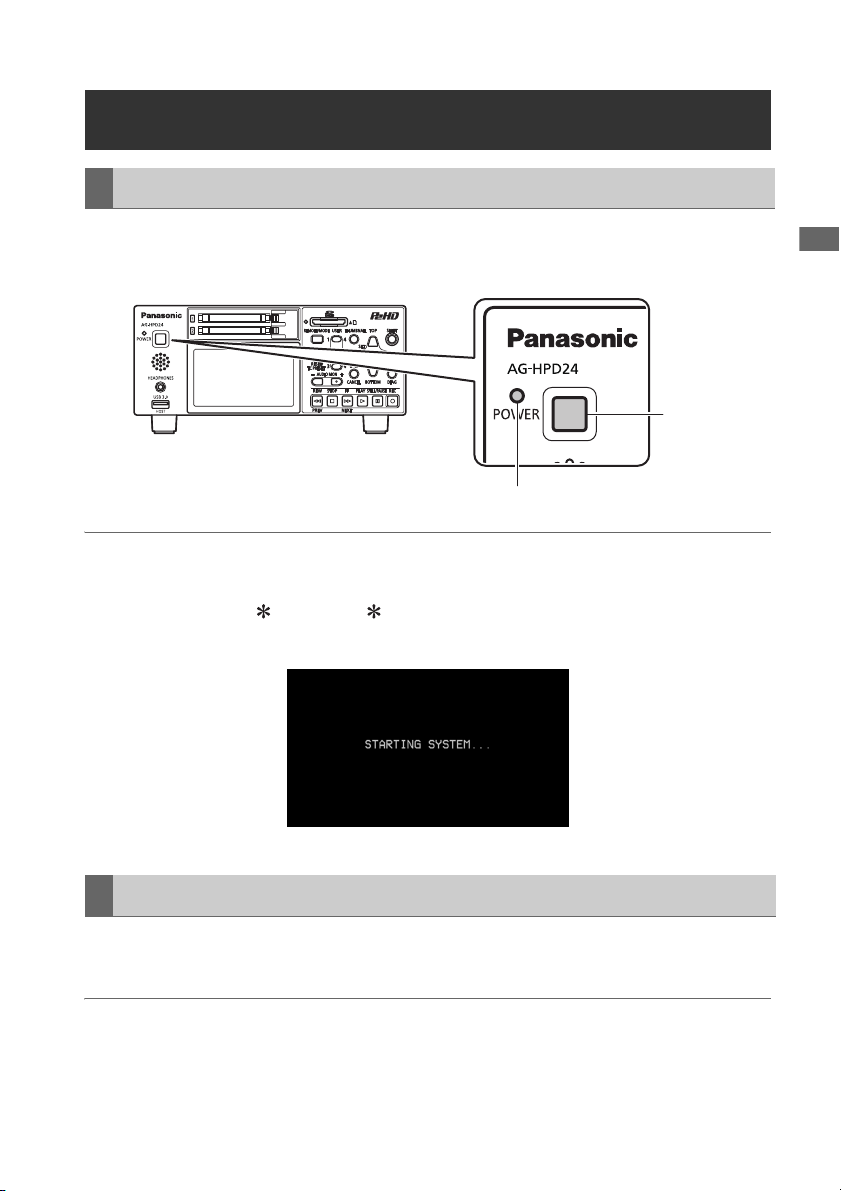
Turning Power On and Off
Turning On
From the power-off state, hold the POWER button for one second to turn the unit on.
When on, the POWER lamp lights green.
POWER
button
POWER lamp
◆ NOTE:
The following messages appear during startup.
• “STARTING SYSTEM...”: blinks during startup.
• “AUTO POWER OFF = min”: where “ ” is the time configured under the menu setting SETUP -
SYSTEM - AUTO POWER OFF. When the menu setting is OFF, AUTO POWER OFF is not displayed.
Power Preparations Power Preparations
Turning Off
From the power-on state, hold the POWER button for two seconds to turn the unit off.
The POWER lamp blinks during shutdown processing, until the unit turns off.
◆ NOTE:
• When a battery fault occurs, turn the power off and replace with a charged battery or switch to the AC
adaptor before turning power back on.
Power Preparations: Turning Power On and Off
27

About Auto Power Off during operation
The Auto Power Off function automatically turns the unit off after a short period if no operation such as
recording, playback, copying or formatting is performed during that time. To resume operation after Auto
Power Off, press the POWER button again.
◆ NOTE:
• The Auto Power Off time can be changed by the SETUP - SYSTEM - AUTO POWER OFF menu setting
(➝ “Setup Menu” Vol. 2, page 50).
Setting the Year, Month, Day and Time
Set the clock before using the unit the first time.
1 Hold the POWER button for one second to
turn the unit on.
2 Press the MENU button to open the menu.
(➝ “Menu Operations” page 32)
3 Use the Up/Down/Left/Right cursor buttons
to select the SETUP - SYSTEM - CLOCK
SET menu item, and press the SET button.
The clock setting screen is displayed. The
default values are the current time settings.
4 Use the Left/Right cursor buttons to select
the digits to be set.
• The AG-HPD24P clock is displayed
in hour:minute, month/day/year, and
time zone sequence.
(The AG-HPD24E clock is displayed
in hour:minute, day/month/year, and
time zone sequence.)
• In time zone, set the difference in
hours from Greenwich Mean Time.
• Hours are displayed in 24-hour
format.
5 Press the Up/Down cursor buttons to set
the year, month, day, time and time zone.
6 Set the calendar and press the SET button.
Pressing the SET button sets the clock to the
set time.
◆ NOTE:
• Since the clock is affected by deviation, it
should be checked before use.
• If you require an exact time setting, check
and reset the time before use.
• The date format on the setting screen can
be changed by the SETUP - THUMBNAIL -
DATE FORMAT menu selection.
• During 3D REC/PB and SYNC PB modes,
the slave unit temporarily synchronizes with
the clock setting on the master unit, and
returns to its original setting upon exiting
these modes.
Power Preparations: Setting the Year, Month, Day and Time
28
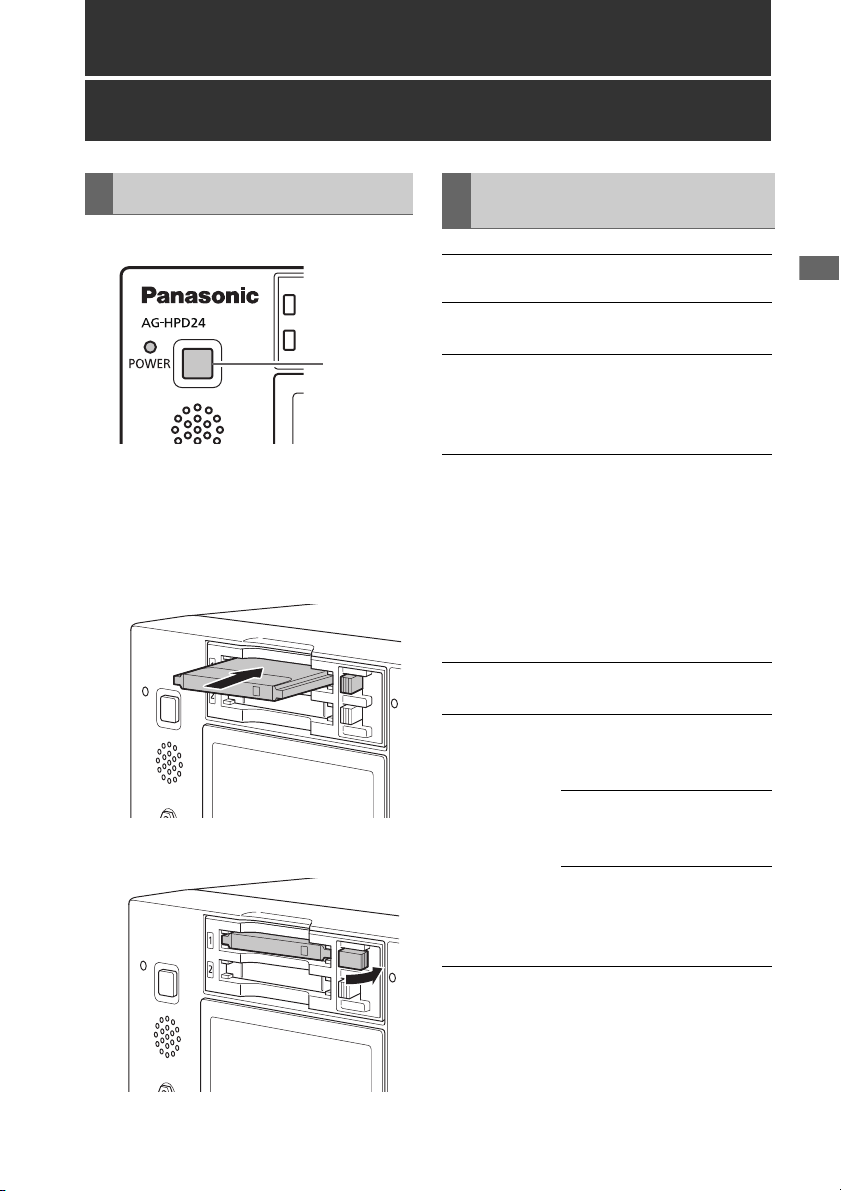
Basic Operation
About P2 Cards
Inserting a P2 Card
ヒ
ビ
1
1 Hold the POWER button for one second to
turn the unit on.
2 Insert a P2 card into a P2 card slot until the
EJECT button pops out.
3 Fold the EJECT button toward the right.
P2 Card Access Lamp and P2 Card Status
P2 Card
Access Lamp
Lights green Writing and reading are
Lights orange Writing and reading are
Flashing
orange
Fast flashing
orange
Flashing green No available space on the P2
P2 Card Status
enabled.
enabled for the current
recording (including LOOP
REC).
Writing or reading is in
progress.
Currently accessing P2 card
using USB device mode.
NOTE:
• Do not turn the unit off or
eject the P2 card when the
lamp is flashing orange,
such as while recording.
P2 card being recognized.
card. Only reading is
possible.
The P2 card contains the
maximum number of clips.
Only reading is possible.
The write-protect switch on
the P2 card is set to
PROTECT. Only reading is
possible.
Basic Operation
Basic Operation: About P2 Cards
29
Extinguished The P2 card is not formatted
properly. Reformat it in this
unit.
The card is incompatible with
this unit. Replace the card.
The P2 card is not inserted.
The P2 card is not accessible
using USB device mode.
About P2 Card Recording Times
• 32 GB, 16 GB and 8 GB P2 cards have
recording times of 1/2, 1/4 and 1/8th of that
provided by a 64 GB P2 card, respectively.
• 3D recording and playback times may be
shorter than those listed above.
■ About P2 cards and SD/SDHC memory
cards
Visit the P2 support desk page at the website
below for the latest information on P2 cards and
SD/SDHC memory cards. (➝ “Website URL”
page 11)
P2 card recording times
■ Recording time on a single 64 GB card
HD Mode
Video format
1080-59.94/
1
50i*
1080-24PN
(Native)
720-59.94P/
1
50P*
720-24PN
(Native)
*1: Includes recording of DVCPRO HD with pull-
down at 30P, 24P and 25P.
SD Mode
Video format
480-59.94i/
576-50i*
Recording format and time
DVCPRO HDAVC-
Intra 100
Approx.
64 min.
Approx.
64 min.
---- Approx.
80 min.
Approx.
64 min.
Approx.
160 min.
Approx.
64 min.
Approx.
160 min.
Recording format and time
DVCPRO 50DVCPRO*2DV*
3
Approx.
128 min.
Approx.
256 min.
AVC-
Intra 50
Approx.
128 min.
Approx.
160 min.
Approx.
128 min.
Approx.
320 min.
2
Approx.
256 min.
Dividing clips over 4 GB in length
With an 8 GB P2 card, continuous recordings
longer than the durations listed below result in
automatic division of the recording into multiple
clips. Despite that, on a P2 device, such
recordings are handled as a single clip for
thumbnail operations (display, delete, repair,
copy, etc.).
Such recordings can be handled as separate
clips in nonlinear editing software or on a PC.
Recording format Recording duration
DVCPRO HD Approx. 5 min.
DVCPRO50 Approx. 10 min.
DVCPRO/DV Approx. 20 min.
AVC-Intra 50 Approx. 10 min.
AVC-Intra 100 Approx. 5 min.
*2: For 2-channel audio recording
3
*
: Includes recording with pull-down at 30P, 24P
and 25P.
◆ NOTE:
• AJ-P2C002SG (2 GB) cards cannot be used.
Basic Operation: About P2 Cards
30
 Loading...