


Firmware Update for TX-NR1007/3007/5007 and PR-SC5507
There are the following methods to update the firmware: via network and via USB storage. Please choose
either one that suits your condition. Before you start, carefully read the update procedure.
To update the firmware, it will take 15 to 25 minutes for TX-NR1007 and 30 to 40 minutes for
TX-NR3007/5007 and PR-SC5507.
■ Update via network
You need a wired Internet connection to update the firmware.
For the update procedure, please refer to “Updating the Firmware via Network” on page 2.
■ Update via USB storage (excluding TX-NR1007)
Please prepare a USB storage device such as a USB flash memory stick. You need at least 32 MB of available
space to update the firmware.
For the update procedure, please refer to “Updating the Firmware via USB” on page 4.
Precautions on the USB storage device:
• The storage media in the USB card reader may not work.
• If the storage device has been partitioned, each section will be treated as an independent device.
• If the USB mass storage device contains a lot of data, the AV receiver/controller may take a while to read it.
• Operation with all USB mass storage devices including the ability to power them is not guaranteed.
• Onkyo accepts no responsibility whatsoever for the loss or damage to data stored on a USB mass storage device when that device is used
with the AV receiver/controller. We recommend that you back up your important music files beforehand.
• If you connect a USB hard disk drive to the USB port, we recommend that you use its AC adapter to power it.
• USB hubs and USB devices with hub functions are not supported. Do not connect your USB mass storage device via a USB hub.
• USB memory devices with security functions are not supported.
Updating the Firmware via Network
TX-NR1007/3007/5007 and PR-SC5507 allow you to
update firmware using Network connection on rear panel.
* In this procedure, on-screen display may vary depending on
the model.
Note:
1. Make sure your AV receiver/controller and TV are
turned on and Ethernet cable is connected to rear
panel of the AV receiver/controller.
2. Never unplug or turn off the AV receiver/controller
during updating process.
3. To update the firmware, it will take 15 to 25 minutes
for TX-NR1007 and 30 to 40 minutes for
TX-NR3007/5007 and PR-SC5507.
4. The AV receiver/controller will retain all your
settings after update is finished.
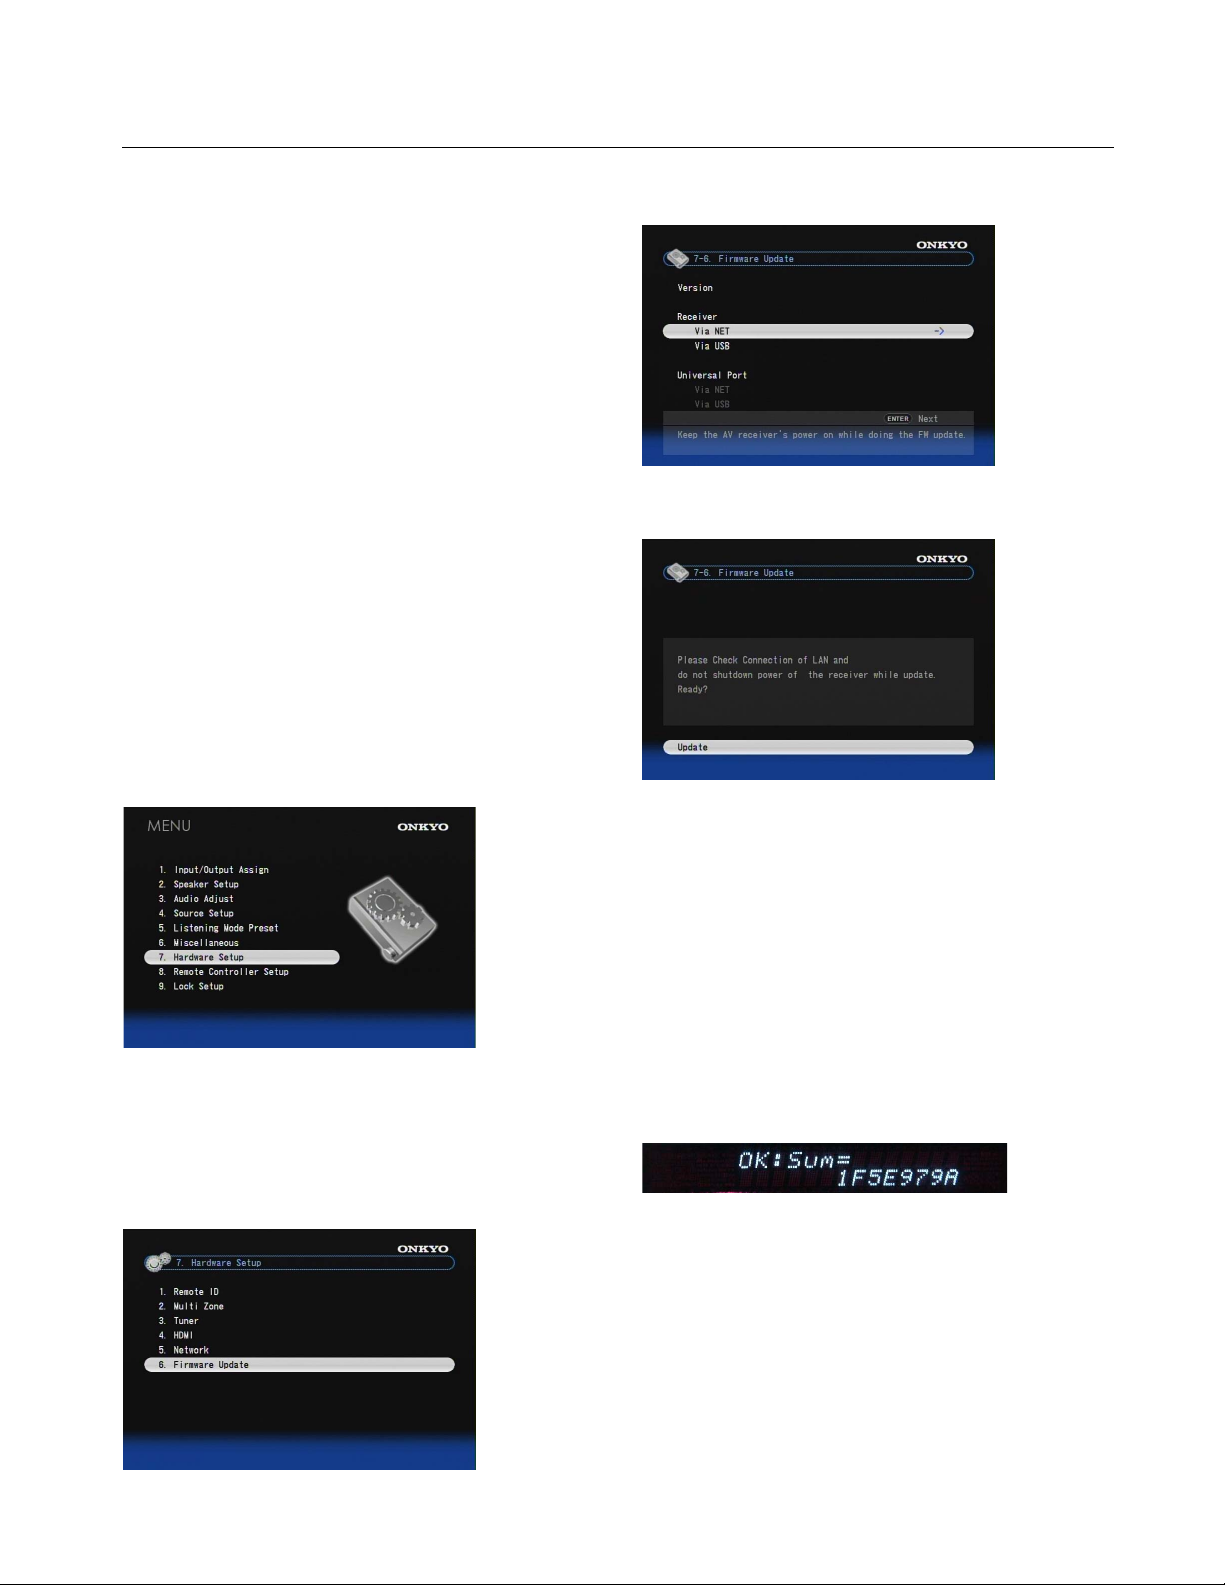
Step1:
Push [RECEIVER] followed by [SETUP] on the
remote controller.
Main menu will be displayed on TV screen.
Procedures thereafter can also be performed on the
AV receiver/controller by using its SETUP, arrow, and
ENTER buttons.
Step4:
Select “Via NET” and push [ENTER].
Step5:
Select “Update” and push [ENTER].
Step2:
Go to “7. Hardware Setup” menu.
Step3:
Go to “7-6. Firmware Update” menu.
Note that the Firmware Update option will be grayed
out for 30 seconds after AV receiver/controller is
turned on.
Please wait.
Updating will begin.
As the updating progresses, the TV screen may
disappear depending on the program updated. In this
case, you can see the update progress on the front
display of the AV receiver/controller. The TV screen
will reappear when you finish the update and turn on
the AV receiver/controller.
Step6:
Message “OK:Sum = ********” appears on the front
display of the AV receiver/controller, indicating that
the update has been completed. (Alpha-numeric
characters on the front display are denoted by
asterisks.)
Step7:
Using the [ON/STANDBY] button on the front panel,
turn off and on the AV receiver/controller.
Do not use the [ON] or [STANDBY] button on the
remote controller.
Congratulations!! Now you have the latest firmware
on your Onkyo AV receiver/controller.
En-2
(Go to the next page for troubleshooting.)

Troubleshooting
Case1:
If “No Update” is displayed on the front display of the
AV receiver/controller as below, the firmware has
already been updated. You do not need to do anything
further.
Case2:
If an error occurs, “Error!! *-**” is displayed on the
front display of the AV receiver/controller. (Alphanumeric characters on the front display are denoted by
asterisks.) The example below is displaying error code
0-10. See the following table and take appropriate
action.
Errors during update via Network
Error Code Description
*-10, *-20
*-11, *-13,
*-21, *-28
Others
Ethernet cable is not detected. Connect the
cable properly. See the instruction manual for
the network connection.
Internet connection error.
Check the following items:
• Make sure IP address, subnet mask, gateway
address, and DNS server are configured
properly.
• Make sure the router is turned on.
• Make sure the AV receiver/controller and the
router are connected with Ethernet cable.
• Make sure the setup configuration of the
router is set properly. See the instruction
manual of the router.
• If your network allows only one client
connection and there is any other device
already connected, the AV receiver/controller
cannot access the network. Consult your
Internet Service Provider (ISP).
• If your modem does not function as a router,
you will need a router. Depending on your
network, you may need to configure the proxy
server if needed. See the document provided
by your ISP. If you still cannot access the
Internet, DNS or proxy server may be
temporarily down. Contact your ISP.
Retry the update procedure from the
beginning. If the error persists, please contact
Onkyo Support (indicated at the end of this
page) and provide the error code.
Case3:
If you do not have a wired connection to the network,
please contact below.
ONKYO CORPORATION
2-1, Nisshin-cho, Neyagawa-shi, OSAKA 572-8540, JAPAN
The Americas
ONKYO U.S.A. CORPORATION
18 Park Way, Upper Saddle River, N.J. 07458, U.S.A.
Tel: +1-800-229-1687, +1-201-785-2600
Fax: +1-201-785-2650
http://www.us.onkyo.com/
Europe
ONKYO EUROPE ELECTRONICS GmbH
Liegnitzerstrasse 6, 82194 Groebenzell, GERMANY
Tel: +49-8142-4401-0 Fax: +49-8142-4401-555
http://www.eu.onkyo.com/
China, Hong Kong
ONKYO CHINA LIMITED
Unit 1&12, 9/F, Ever Gain PlazaTower 1, 88, Container Port Road,
Kwai Chung, N.T., HONG KONG
Tel: 852-2429-3118 Fax: 852-2428-9039
http://www.onkyochina.com/
Asia, Oceania, Middle East, Africa
Please contact an ONKYO distributor referring to Onkyo
SUPPORT site.
<http://www.intl.onkyo.com/suppor t/local_support/index.html>
En-3

Updating the Firmware via USB
TX-NR3007/5007 and PR-SC5507 allow you to
update firmware using a USB storage device.
* In this procedure, on-screen display may vary depending on
the model.
Note:
1. Never unplug or turn off the
AV receiver/controller during updating process.
2. It will take 30 to 40 minutes to update the
firmware.
3. The AV receiver/controller will retain all your
settings after update is finished.
Step1:
Connect a USB storage device to your PC. If there is
any data in the USB storage, remove it.
Step2:
Download the firmware file from the Onkyo web site.
The file name is as follows:
ONKAVR0001_*******.zip
Extract the zip file that you have downloaded. The
following three files are created:
ONKAVR0001_*******.of1
ONKAVR0001_*******.of2
ONKAVR0001_*******.of3
Step7:
Push [RECEIVER] followed by [SETUP] on the
remote controller.
Main menu will be displayed on TV screen.
Procedures thereafter can also be performed on the
AV receiver/controller by using its SETUP, arrow, and
ENTER buttons.
Step8:
Go to “7. Hardware Setup” menu.
Step9:
Go to “7-6. Firmware Update” menu.
Step3:
Copy the extracted files to the USB storage device. Be
careful not to copy the zip file.
Step4:
Remove the USB storage device from your PC and
connect it to the USB port on the
AV receiver/controller. When the
AV receiver/controller has two USB ports, you can use
either one.
Step5:
Make sure your AV receiver/controller and TV are
turned on.
If the AV receiver/controller is in standby mode, push
[ON/STANDBY] to light up the front display.
Step6:
Select the USB input source. “Now Initializing” is
displayed on the front display and then the name of the
USB storage device is displayed. It will take 20 to 30
seconds to recognize the USB storage device.
Step10:
Select “Via USB” and push [ENTER].
En-4

Step11:
Select “Update” and push [ENTER].
Case2:
If an error occurs, “Error!! *-**” is displayed on the
front display of the AV receiver/controller. (Alphanumeric characters on the front display are denoted by
asterisks.) The example below is displaying error code
0-10. See the following table and take appropriate
action.
Errors during update via USB (excluding TX-NR1007)
Updating will begin.
As the updating progresses, the TV screen may
disappear depending on the program updated. In this
case, you can see the update progress on the front
display of the AV receiver/controller. The TV screen
will reappear when you finish the update and turn on
the AV receiver/controller.
Do not turn off the AV receiver/controller and do not
remove the USB storage device during updating process.
Step12:
Message “OK:Sum = ********” appears on the front
display of the AV receiver/controller, indicating that the
update has been completed. (Alpha-numeric characters
on the front display are denoted by asterisks.)
Step13:
Using the [ON/STANDBY] button on the front panel,
turn off the AV receiver/controller and then remove
the USB storage device.
* Do not use the [ON] or [STANDBY] button on the remote con-
troller.
Step14:
Push [ON/STANDBY] to turn on the
AV receiver/controller.
Congratulations!! Now you have the latest firmware
on your Onkyo AV receiver/controller.
Troubleshooting
Case1:
If “No Update” is displayed on the front display of the
AV receiver/controller as below, the firmware has
already been updated. You do not need to do anything
further.
Error Code Description
*-10, *-20
*-14
Others
ONKYO CORPORATION
2-1, Nisshin-cho, Neyagawa-shi, OSAKA 572-8540, JAPAN
The Americas
ONKYO U.S.A. CORPORATION
18 Park Way, Upper Saddle River, N.J. 07458, U.S.A.
Tel: +1-800-229-1687, +1-201-785-2600
Fax: +1-201-785-2650
http://www.us.onkyo.com/
Europe
ONKYO EUROPE ELECTRONICS GmbH
Liegnitzerstrasse 6, 82194 Groebenzell, GERMANY
Tel: +49-8142-4401-0 Fax: +49-8142-4401-555
http://www.eu.onkyo.com/
China, Hong Kong
ONKYO CHINA LIMITED
Unit 1&12, 9/F, Ever Gain PlazaTower 1, 88, Container Port Road,
Kwai Chung, N.T., HONG KONG
Tel: 852-2429-3118 Fax: 852-2428-9039
http://www.onkyochina.com/
Asia, Oceania, Middle East, Africa
Please contact an ONKYO distributor referring to Onkyo
SUPPORT site.
<http://www.intl.onkyo.com/support/local_support/index.html>
USB storage device is not detected. Make
sure the USB flash memory or USB cable is
properly connected to the USB port. If the USB
storage device has its own power supply, use it
to power the USB storage device.
An update file is not found in the root folder of
the USB storage device, or an update file is for
other model. Retry download following
instructions at the support website. If the error
persists, please contact Onkyo Support
(indicated at the end of this page) and provide
the error code.
Retry the update procedure from the
beginning. If the error persists, please contact
Onkyo Support (indicated at the end of this
page) and provide the error code.
En
SN 29400292A
(C) Copyright 2009 ONKYO CORPORATION Japan. All rights reserved.
Y0910-2
* 2 9 4 0 0 2 9 2 A *
 Loading...