

Page 1

Touch & Go™
Technical Guide for
UPEK Sensor Model
67-3090 Rev A
Biometric Fingerprint Scanner
Hardware Installation, Service, and
Software Implementation for
Omnicell 15.0 and higher
Page 2

This guide is CONFIDENTIAL and designed only for Omnicell Technical personnel and/or designated
representatives.
This guide and accompanying software and/or hardware described in it are protected under copyright laws and may
not be copied, wholly or in part, without the express written consent of Omnicell, Inc. The same proprietary and
copyright notices must be attached to any permitted copies as were attached to the original documents.
Omnicell, Inc.
1201 Charleston Road
Mountain View, CA 94043
(650) 251-6100
www.omnicell.com
Omnicell and the Omnicell design mark, OmniBuyer, OmniCenter, OmniRx, OmniSupplier, Pandora, PandoraVIA,
SafetyMed, SafetyStock, and Sure-Med are registered trademarks. Anesthesia TT, Anesthesia Workstation,
Anywhere RN, Executive Advisor, FlexBin, Medication Surveillance, OmniDispenser, OmniLinkRx, OmniScanner,
OmniTrack, Omni TT, Open Touch, OptiFlex, OptiFlex MobileTrack, Point-to-Point Medication Safety, ProServ1,
SecureVault, See & Touch, SinglePointe, TempCheck, Touch & Go, vSuite, and WorkflowRx are trademarks of
Omnicell, Inc. in the United States and internationally. All other trademarks and trade names are the property of their
respective owners.
Copyright 1999-2011 Omnicell, Inc. All rights reserved.
Touch & Go™ Technical Guide for UPEK Sensor Model/67-3090 Rev A © 2011 Omnicell, Inc.
Page 3

Table of Contents
Preface. . . . . . . . . . . . . . . . . . . . . . . . . . . . . . . . . . . . . . . . . . . . . . . . . . . . . . . . . . . . . . . . . . . . . . ii-1
How to Use this Manual . . . . . . . . . . . . . . . . . . . . . . . . . . . . . . . . . . . . . . . . . . . . . . . . . . . . . . . ii-1
Where to Locate Related Information . . . . . . . . . . . . . . . . . . . . . . . . . . . . . . . . . . . . . . . . . . ii-1
Introduction to Touch & Go. . . . . . . . . . . . . . . . . . . . . . . . . . . . . . . . . . . . . . . . . . . . . . . . . . . . 1-1
Hardware Overview . . . . . . . . . . . . . . . . . . . . . . . . . . . . . . . . . . . . . . . . . . . . . . . . . . . . . . . . . . 1-2
Fingerprints . . . . . . . . . . . . . . . . . . . . . . . . . . . . . . . . . . . . . . . . . . . . . . . . . . . . . . . . . . . . . . . . . 1-3
Fingerprint Security . . . . . . . . . . . . . . . . . . . . . . . . . . . . . . . . . . . . . . . . . . . . . . . . . . . . . . . . . . 1-3
User Authentication . . . . . . . . . . . . . . . . . . . . . . . . . . . . . . . . . . . . . . . . . . . . . . . . . . . . . . . . . . 1-4
Single-factor Authentication Mode . . . . . . . . . . . . . . . . . . . . . . . . . . . . . . . . . . . . . . . . . . 1-4
Two-factor with Fingerprint Authentication Mode. . . . . . . . . . . . . . . . . . . . . . . . . . . . . 1-5
Two-factor with Password Authentication Mode . . . . . . . . . . . . . . . . . . . . . . . . . . . . . . 1-5
Fingerprint Enrollment . . . . . . . . . . . . . . . . . . . . . . . . . . . . . . . . . . . . . . . . . . . . . . . . . . . . . . . 1-5
Fingerprint Reports . . . . . . . . . . . . . . . . . . . . . . . . . . . . . . . . . . . . . . . . . . . . . . . . . . . . . . . . . . 1-6
System Requirements/Compatibility . . . . . . . . . . . . . . . . . . . . . . . . . . . . . . . . . . . . . . . . . . . 1-6
User Instructions . . . . . . . . . . . . . . . . . . . . . . . . . . . . . . . . . . . . . . . . . . . . . . . . . . . . . . . . . . . . . 1-7
iii
Installing a Fingerprint Scanner on a 1-, 2-, and 3-Cell . . . . . . . . . . . . . . . . . . . . . . . . . . . 2-1
Install the Fingerprint Scanner . . . . . . . . . . . . . . . . . . . . . . . . . . . . . . . . . . . . . . . . . . . . . . . . 2-1
Installing a Fingerprint Scanner on an OmniRx. . . . . . . . . . . . . . . . . . . . . . . . . . . . . . . . . . 3-1
Remove the Omni Rx Keyboard. . . . . . . . . . . . . . . . . . . . . . . . . . . . . . . . . . . . . . . . . . . . . . . . 3-1
Install the Fingerprint Scanner . . . . . . . . . . . . . . . . . . . . . . . . . . . . . . . . . . . . . . . . . . . . . . . . 3-3
Installing a Fingerprint Scanner on an AWS. . . . . . . . . . . . . . . . . . . . . . . . . . . . . . . . . . . . . 4-1
Remove the AWS Keyboard . . . . . . . . . . . . . . . . . . . . . . . . . . . . . . . . . . . . . . . . . . . . . . . . . . . 4-1
Install the Fingerprint Scanner . . . . . . . . . . . . . . . . . . . . . . . . . . . . . . . . . . . . . . . . . . . . . . . . 4-3
Planning for Touch & Go . . . . . . . . . . . . . . . . . . . . . . . . . . . . . . . . . . . . . . . . . . . . . . . . . . . . . . 5-1
Gather Account Information . . . . . . . . . . . . . . . . . . . . . . . . . . . . . . . . . . . . . . . . . . . . . . . . . . 5-1
Review of Policies and Procedures. . . . . . . . . . . . . . . . . . . . . . . . . . . . . . . . . . . . . . . . . . . . . . 5-1
Review New Features . . . . . . . . . . . . . . . . . . . . . . . . . . . . . . . . . . . . . . . . . . . . . . . . . . . . . . . . . 5-2
© 2011 Omnicell, Inc. Touch & Go™ Technical Guide for UPEK Sensor Model/67-3090 Rev A
Page 4

iv Table of Contents
Develop a Rollout Plan. . . . . . . . . . . . . . . . . . . . . . . . . . . . . . . . . . . . . . . . . . . . . . . . . . . . . . . . 5-2
Go Live . . . . . . . . . . . . . . . . . . . . . . . . . . . . . . . . . . . . . . . . . . . . . . . . . . . . . . . . . . . . . . . . . . . . . . 5-4
Setting Up OmniCenter . . . . . . . . . . . . . . . . . . . . . . . . . . . . . . . . . . . . . . . . . . . . . . . . . . . . . . . 6-1
Setting Up Fingerprint Registrar . . . . . . . . . . . . . . . . . . . . . . . . . . . . . . . . . . . . . . . . . . . . . . . 6-1
Setting Up FP Exempt . . . . . . . . . . . . . . . . . . . . . . . . . . . . . . . . . . . . . . . . . . . . . . . . . . . . . . . . 6-3
User Biometrics . . . . . . . . . . . . . . . . . . . . . . . . . . . . . . . . . . . . . . . . . . . . . . . . . . . . . . . . . . . . . . 6-4
Discuss Fingerprint Options . . . . . . . . . . . . . . . . . . . . . . . . . . . . . . . . . . . . . . . . . . . . . . . . 5-2
Determine Best User Authentication Mode . . . . . . . . . . . . . . . . . . . . . . . . . . . . . . . . . . . 5-3
Configure Settings Based on Best Practices. . . . . . . . . . . . . . . . . . . . . . . . . . . . . . . . . . . . 5-3
Setting Up OmniCenter . . . . . . . . . . . . . . . . . . . . . . . . . . . . . . . . . . . . . . . . . . . . . . . . 5-3
Configure Color Touch Cabinets . . . . . . . . . . . . . . . . . . . . . . . . . . . . . . . . . . . . . . . . 5-3
Demonstrate Use. . . . . . . . . . . . . . . . . . . . . . . . . . . . . . . . . . . . . . . . . . . . . . . . . . . . . . . . . . 5-4
Determine Fingerprint Registrars. . . . . . . . . . . . . . . . . . . . . . . . . . . . . . . . . . . . . . . . . . . . 5-4
Train Users. . . . . . . . . . . . . . . . . . . . . . . . . . . . . . . . . . . . . . . . . . . . . . . . . . . . . . . . . . . . . . . 5-4
Setting Up Global Fingerprint Registrars . . . . . . . . . . . . . . . . . . . . . . . . . . . . . . . . . . . . . 6-2
Modifying the FP Registrar for Individual Users. . . . . . . . . . . . . . . . . . . . . . . . . . . . . . . . . 6-3
Configure Biometric Archiving Setup . . . . . . . . . . . . . . . . . . . . . . . . . . . . . . . . . . . . . . . . 6-6
Setting Up Color Touch Cabinets . . . . . . . . . . . . . . . . . . . . . . . . . . . . . . . . . . . . . . . . . . . . . . . 7-1
Configure Cabinets from OmniCenter. . . . . . . . . . . . . . . . . . . . . . . . . . . . . . . . . . . . . . . . . . 7-2
Configure Cabinets Based on Best Practice . . . . . . . . . . . . . . . . . . . . . . . . . . . . . . . . . . . . . . 7-2
Enable Touch & Go. . . . . . . . . . . . . . . . . . . . . . . . . . . . . . . . . . . . . . . . . . . . . . . . . . . . . . . . 7-2
Shortlist Configurations. . . . . . . . . . . . . . . . . . . . . . . . . . . . . . . . . . . . . . . . . . . . . . . . . . . . 7-2
Inactivity Aging . . . . . . . . . . . . . . . . . . . . . . . . . . . . . . . . . . . . . . . . . . . . . . . . . . . . . . . 7-3
Other Modifications . . . . . . . . . . . . . . . . . . . . . . . . . . . . . . . . . . . . . . . . . . . . . . . . . . . . . . . 7-4
Exempt User Configurations . . . . . . . . . . . . . . . . . . . . . . . . . . . . . . . . . . . . . . . . . . . . 7-4
Fingerprint Help . . . . . . . . . . . . . . . . . . . . . . . . . . . . . . . . . . . . . . . . . . . . . . . . . . . . . . 7-4
Password Entry . . . . . . . . . . . . . . . . . . . . . . . . . . . . . . . . . . . . . . . . . . . . . . . . . . . . . . . 7-5
Other Configurations . . . . . . . . . . . . . . . . . . . . . . . . . . . . . . . . . . . . . . . . . . . . . . . . . . . . . . 7-6
Fingerprint Activity . . . . . . . . . . . . . . . . . . . . . . . . . . . . . . . . . . . . . . . . . . . . . . . . . . . . . . . 7-7
Scanner Maintenance. . . . . . . . . . . . . . . . . . . . . . . . . . . . . . . . . . . . . . . . . . . . . . . . . . . . . . . . . 8-1
Cleaning the Scanner . . . . . . . . . . . . . . . . . . . . . . . . . . . . . . . . . . . . . . . . . . . . . . . . . . . . . . . . . 8-1
Sensor Diagnostics . . . . . . . . . . . . . . . . . . . . . . . . . . . . . . . . . . . . . . . . . . . . . . . . . . . . . . . . . . . 8-1
UPEK Sensor Calibration Utility . . . . . . . . . . . . . . . . . . . . . . . . . . . . . . . . . . . . . . . . . . . . 8-2
Fingerprint Diagnostics . . . . . . . . . . . . . . . . . . . . . . . . . . . . . . . . . . . . . . . . . . . . . . . . . . . . 8-3
Training Customers. . . . . . . . . . . . . . . . . . . . . . . . . . . . . . . . . . . . . . . . . . . . . . . . . . . . . . . . . . . 9-1
User Experience . . . . . . . . . . . . . . . . . . . . . . . . . . . . . . . . . . . . . . . . . . . . . . . . . . . . . . . . . . . . . . 9-1
Proper Finger Placement . . . . . . . . . . . . . . . . . . . . . . . . . . . . . . . . . . . . . . . . . . . . . . . . . . . . . . 9-1
Achieve a Quality Fingerprint Enrollment . . . . . . . . . . . . . . . . . . . . . . . . . . . . . . . . . . . . . . 9-2
Consistent Finger Placement at Log In. . . . . . . . . . . . . . . . . . . . . . . . . . . . . . . . . . . . . . . . . . 9-3
Appropriate Maintenance of the Sensor. . . . . . . . . . . . . . . . . . . . . . . . . . . . . . . . . . . . . . . . . 9-3
Touch & Go™ Technical Guide for UPEK Sensor Model/67-3090 Rev A © 2011 Omnicell, Inc.
Page 5

Table of Contents v
Troubleshooting . . . . . . . . . . . . . . . . . . . . . . . . . . . . . . . . . . . . . . . . . . . . . . . . . . . . . . . . . . . . 10-1
Fingerprint Data Capture . . . . . . . . . . . . . . . . . . . . . . . . . . . . . . . . . . . . . . . . . . . . . . . . . . . . 10-1
Minimizing Failed ID . . . . . . . . . . . . . . . . . . . . . . . . . . . . . . . . . . . . . . . . . . . . . . . . . . . . . . . . 10-2
Sensor is Unresponsive. . . . . . . . . . . . . . . . . . . . . . . . . . . . . . . . . . . . . . . . . . . . . . . . . . . . . . . 10-2
Challenges . . . . . . . . . . . . . . . . . . . . . . . . . . . . . . . . . . . . . . . . . . . . . . . . . . . . . . . . . . . . . . . . . . 10-2
Glossary . . . . . . . . . . . . . . . . . . . . . . . . . . . . . . . . . . . . . . . . . . . . . . . . . . . . . . . . . . . . . . . . . . . GL-1
Index. . . . . . . . . . . . . . . . . . . . . . . . . . . . . . . . . . . . . . . . . . . . . . . . . . . . . . . . . . . . . . . . . . . . . . IN-1
Documentation Feedback . . . . . . . . . . . . . . . . . . . . . . . . . . . . . . . . . . . . . . . . . . . . . . . . . . . FB-1
© 2011 Omnicell, Inc. Touch & Go™ Technical Guide for UPEK Sensor Model/67-3090 Rev A
Page 6

Preface
The purpose of this manual is to help the Omnicell Field Operations Implementation team
successfully plan and install Touch & Go on an Omnicell 15.0 system. Implementation is defined
as the planning, installation, configuration, tailoring, and troubleshooting necessary for a product
or feature to go live.
How to Use this Manual
The manual is designed as a step by step guide that focuses on the tasks needed for software and
hardware implementation.
1. “Introduction to Touch & Go” on page 1-1, provides an overview to Touch & Go and its
software features. Use this chapter to understand the major concepts that influence the
implementation.
2. “Installing a Fingerprint Scanner on a 1-, 2-, and 3-Cell” on page 2-1.
3. “Installing a Fingerprint Scanner on an OmniRx” on page 3-1.
4. “Installing a Fingerprint Scanner on an AWS” on page 4-1.
5. “Planning for Touch & Go” on page 5-1, focuses on the tasks encountered during the planning
phase of implementation. Use this chapter to ensure that known best practices are followed
during implementation.
6. “Setting Up OmniCenter” on page 6-1, provides the steps for software configuration of
OmniCenter for Touch & Go-related features.
7. “Setting Up Color Touch Cabinets” on page 7-1, provides the steps for software configuration
of Color Touch cabinets for Touch & Go-related features.
8. “Scanner Maintenance” on page 8-1, provides the steps for scanner health.
9. “Training Customers” on page 9-1, provides an outline of suggested training topics that
customers learn before the system goes live.
10. “Troubleshooting” on page 10-1,
Reference material along with a glossary and index are also provided.
ii-1
Where to Locate Related Information
Release and product information for both technical documentation and user documentation can
be found on the Omnicell intranet.
User documentation for each release is available through inSite at:
http://insite/products/NewProductsSite/Pages/HomePage.aspx
Technical documentation is available at:
http://hdq-intranet/Documentation/techdoc/wwhelp/wwhimpl/js/html/wwhelp.htm
© 2011 Omnicell, Inc. Touch & Go™ Technical Guide for UPEK Sensor Model/67-3090 Rev A
Page 7

ii-2 Preface
Where to Locate Related Information
Some related documents of particular interest to Touch & Go are:
Document Description Where Located
Omnicell Implementation Guide Provides planning information for the
1,2,3-Cell Color Touch
Installation and Service Guide
Omnicell Product Equipment
Specifications
OmniCenter 15.0 Administrator
Guide
Omnicell Color Touch 15.0User
Guide
Omnicell 15.0 Technical Release
Guide
implementation of the OmniCenter® server and
automated cabinets.
Provide hardware installation, including matrix
drawer design and setup.
Provides an introduction to all Omnicell
hardware products. It can be used by marketing
for quoting to customers in proposals. It can also
be referenced by project managers and field
engineers for implementation and installation
purposes.
Describes the features and functionality of the
Omnicell® OmniCenter Information
Management System. It is designed to be a
detailed resource for the operation of the
OmniCenter.
Provides functional descriptions available to end
users at Color Touch cabinets.
Gain an understanding of the features and
products offered in the release.
PN 67-3004, available in HTML and PDF
formats through TechDoc Central on inSite.
PN 67-2014, available in HTML and PDF
formats through TechDoc Central on inSite.
PN 67-2031, available in HTML and PDF
formats through TechDoc Central on inSite
PN 60-0176, available in HTML and PDF
formats through TechDoc Central on inSite.
PN 60-0xxx, available in HTML and PDF
formats through TechDoc Central on inSite.
PN 67-30xx, available in HTML and PDF
formats through TechDoc Central on inSite.
Table ii-1. Related Documentation
Touch & Go™ Technical Guide for UPEK Sensor Model/67-3090 Rev A © 2011 Omnicell, Inc.
Page 8
1-1
Introduction to Touch & Go
The fingerprint scanner is a biometric, positive-ID system. A biometric system is made up of a
sensor, a computer unit, and an application for which the user’s authentication is necessary. The
sensor captures the biometric characteristic; and the computer unit processes and eventually saves
the biometric data.
The identification of users in a computer system is often done through the use of an ID and
password. IDs and passwords are capable of being forgotten, shared, or stolen. Biometric systems,
such as Omnicell’s biometric fingerprint system, use personal features of the user to check
identity. Biometric systems can be particularly important to hospitals trying to keep medications
and clinical information secure from inappropriate access. Fingerprint recognition is the most
common form of biometric identification.
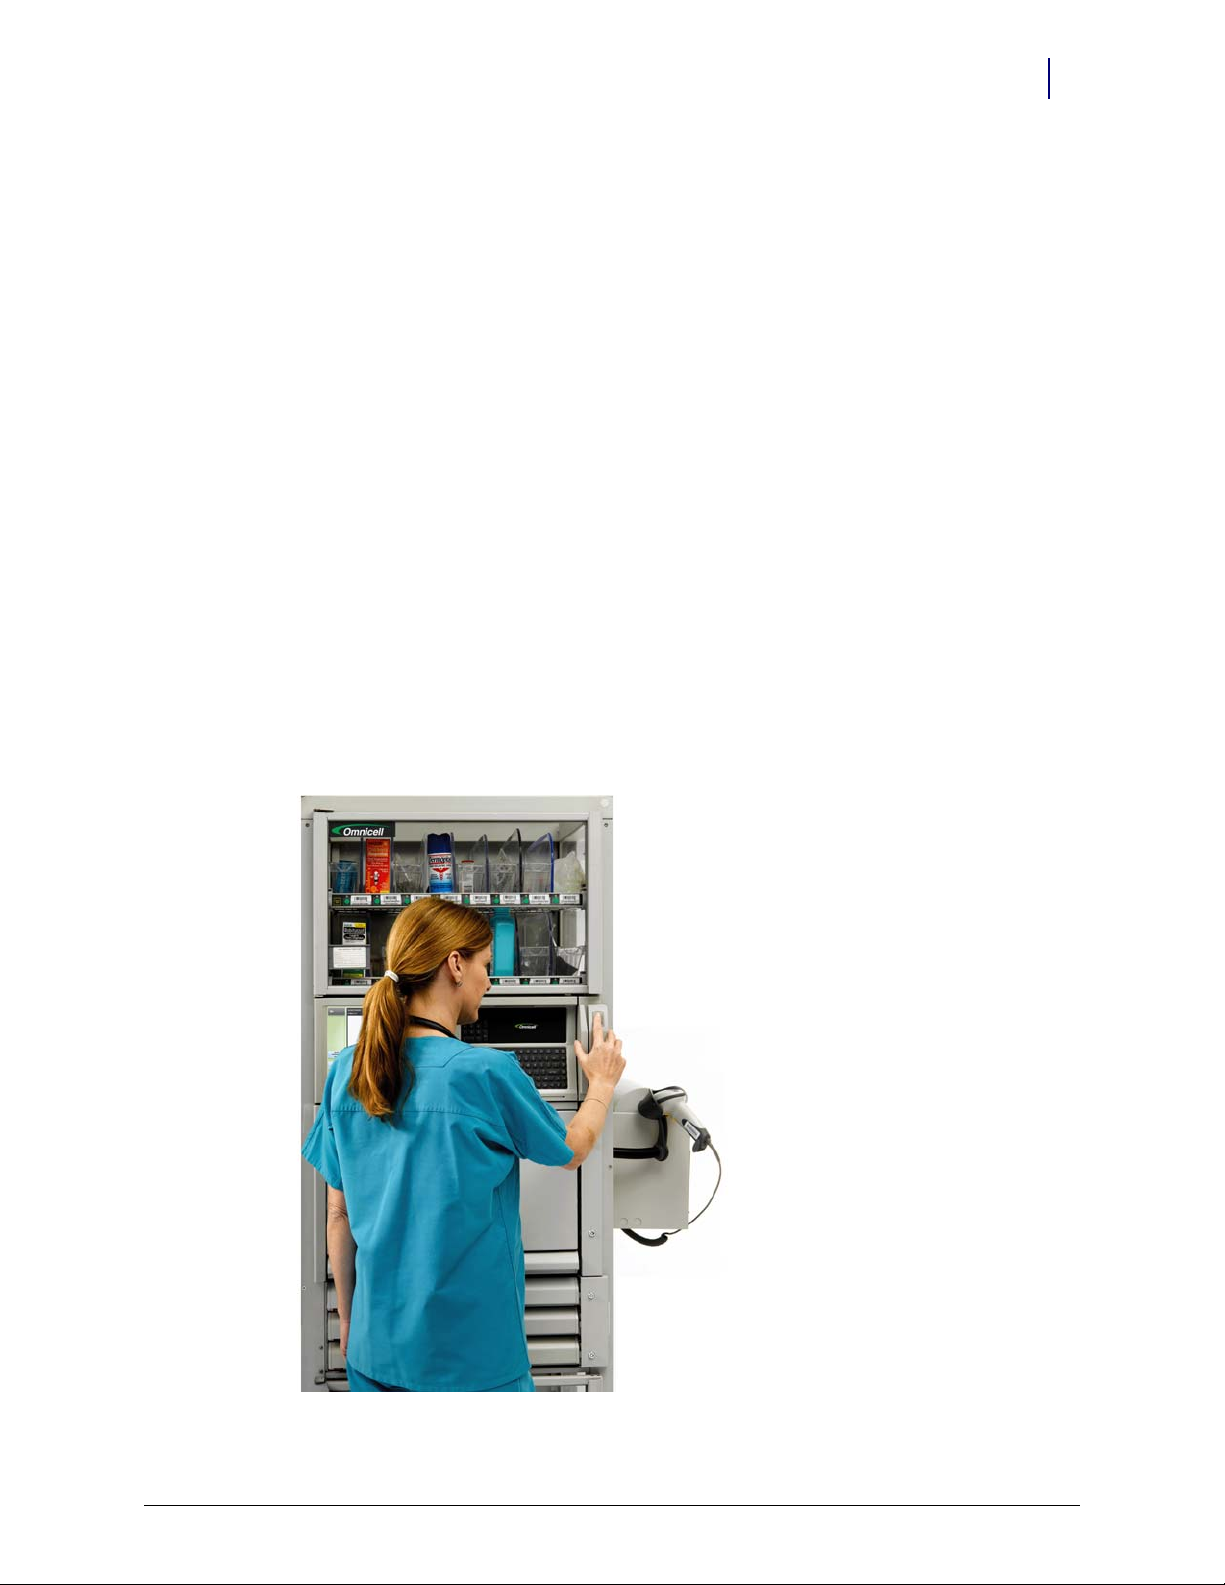
When effectively implemented, Omnicell’s biometric fingerprint system offers high security and
fast access to the Color Touch cabinet. It provides a more secure access because there are no lost or
stolen passwords. Also, no one can replicate or “hack” a fingerprint image. Some state regulations
require positive user identification and fingerprint scanning helps to meet this requirement. It
provides a more rapid access to cabinets because it requires less key strokes than typing a
password. The cabinet uses this hardware for both verification (authentication) and enrollment of
user fingerprints.
Figure 1-1. Touch & Go, One-cell OmniSupplier
© 2011 Omnicell, Inc. Touch & Go™ Technical Guide for UPEK Sensor Model/67-3090 Rev A
Page 9
1-2 Introduction to Touch & Go
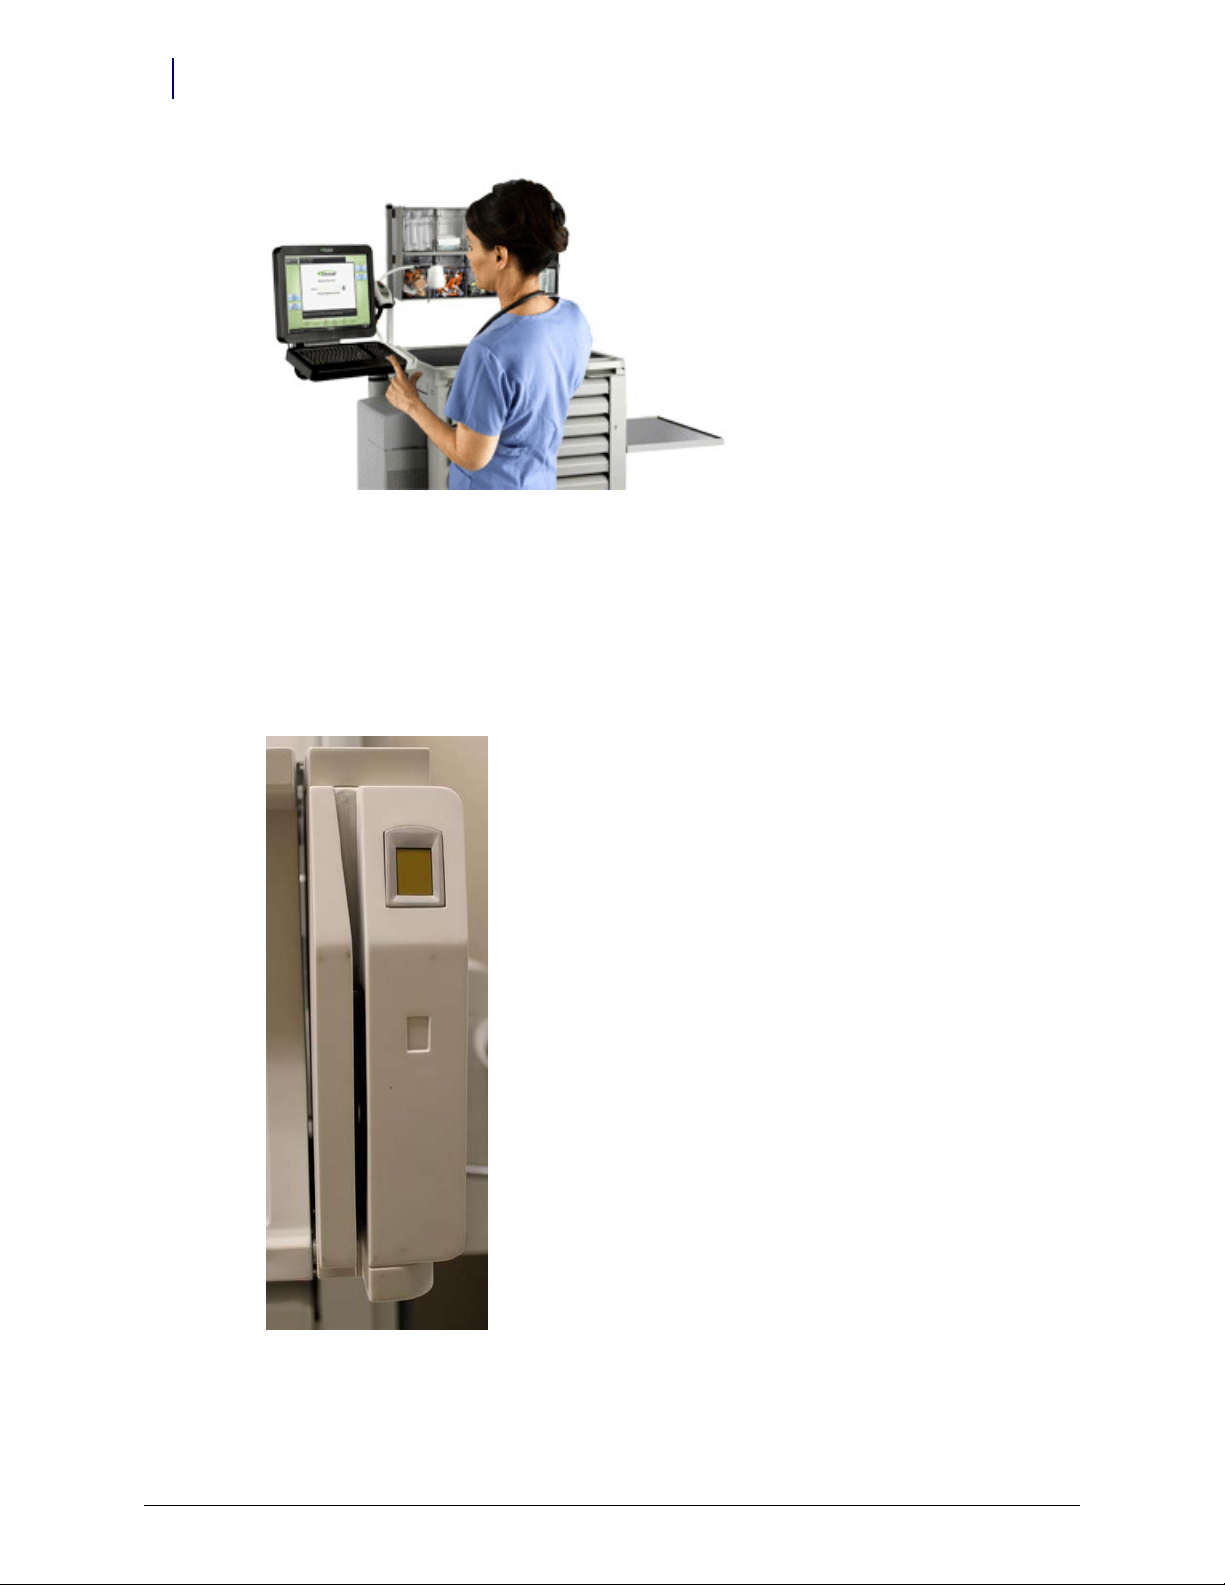
Hardware Overview
Figure 1-2. Touch & Go Anesthesia Workstation
Hardware Overview
Omnicell cabinets that are ordered initially with Touch & Go are shipped with the feature installed
from manufacturing. However, cabinets can be retrofitted for Touch & Go at the customer facility.
The Touch & Go device contains the housing for a card reader, to the left or right of the
fingerprint scanner.
Figure 1-3. Fingerprint Sensor with Card Reader
Touch & Go™ Technical Guide for UPEK Sensor Model/67-3090 Rev A © 2011 Omnicell, Inc.
Page 10

If Touch & Go is ordered with a card reader, the applicable reader mechanism is installed by
manufacturing. If the cabinet has an existing card reader, it is uninstalled and replaced with the
Touch & Go device. See “Retrofitting the Fingerprint Scanner with a Card Reader” on page 3-1.
Note:
Installation and Configuration Guide, PN 67-2006.
Fingerprints
Fingerprints are the result of minute ridges and valleys found on the fingertip of every person.
They are based on the ridges of skin forming a pattern that is unique to each individual. Each
fingerprint has one of three core features: loops, whorls, or arches. It is the core of the fingerprint
that contains the most information.
Many user issues impact the success of any biometric fingerprint system. Cuts, bruises, aging, and
wearing of the skin all impact how well a biometric device scans a fingerprint. A hospital’s
environmental conditions can also impact image quality by causing hands to be dry or excessively
moist. Fingerprint quality varies from finger to finger and a user’s hobbies, such as gardening
woodworking, or rock climbing can all impact the ability to get a good fingerprint scan. Some
users may even be impacted by rare skin diseases or burns which permanently destroy a
fingerprint. These specified users can remain completely exempt from biometric requirements.
Users enroll a reference fingerprint that is used for comparison at the time of login. A good
enrollment is the best predictor of future successful logins.
Introduction to Touch & Go 1-3
Fingerprints
If installing a card reader by itself, without a fingerprint scanner, refer to the Card Reader
Enrolling two fingers takes 1-2 minutes in most cases
Enrollment Rates 95% or higher observed at Beta sites
First time Login Success Rates 95% or higher
User ID + fingerprint login is the most secure
Shortlist login is very secure with a very slight possibility of a false positive ID
Fingerprint Security
Users may have concerns about identity theft or misuse of their fingerprint. Omnicell does not
store or transmit fingerprint images. Fingerprint scanners work by capturing and measuring the
relative position of the different core features (loops, whorls, and arches) of a fingerprint. The
fingerprint is broken down into a complex pattern of unique features called minutiae. The pattern
(not the fingerprint) is stored numerically.
When a fingerprint is scanned, it is processed into an encrypted, secure, numeric code and then
immediately deleted from memory. The VeriFinger fingerprint technology software, built into the
Omnicell software, performs the fingerprint identification processing. The fingerprint minutia
numeric code can only be used by the VeriFinger fingerprint technology software. It cannot be
reverse-engineered to recreate a fingerprint image. The actual image is deleted. The only
information retained is the X-Y location of the minutia points. These minutia points are used for
match comparisons using the VeriFinger software. Omnicell cannot modify the VeriFinger
fingerprint software, because Omnicell does not have access to the underlying VeriFinger source
code.
The fingerprint security configurations of the Touch & Go product provide increased security and
reduces the chance of failed identifications. These configurations allow customers to easily adjust
the security and reliability of the fingerprint identification feature to meet their particular needs.
© 2011 Omnicell, Inc. Touch & Go™ Technical Guide for UPEK Sensor Model/67-3090 Rev A
Page 11
1-4 Introduction to Touch & Go
User Authentication
User Authentication
Omnicell’s biometric fingerprint system provides two functions: Identification and Verification.
The identification function compares and identifies one user out of many possible users. The
verification function makes sure a user is who they claim to be.
Verification, or authentication, is the process of determining the identity of a person and
confirming his or her authenticity. An authentication factor is a piece of information (such as a
password, User ID, or fingerprint) and the process used to verify the identity of a person. In order
for a User ID to qualify as an authentication factor, only the user can know it. The user ID should
be hard to obtain and not be displayed. A user ID may be entered via keyboard entry, magnetic
card, or bar code.
A weak user ID is one which can be easily guessed by another user, and therefore is not considered
a personally identifiable factor for authentication purposes. User names which follow a simple
pattern, such as first name plus the first two letters of the last name, fall into the weak category.
A strong user ID contains information that would be known to the user but not readily known or
available to other users. User names which include the last four digits of the user’s social security
number or random three-digit number assigned by the system would fall into the strong category.
Omnicell has identified three user authentication modes:
Single-factor (Touch & Go) authentication
Two-factor with fingerprint authentication
Two-factor with password authentication
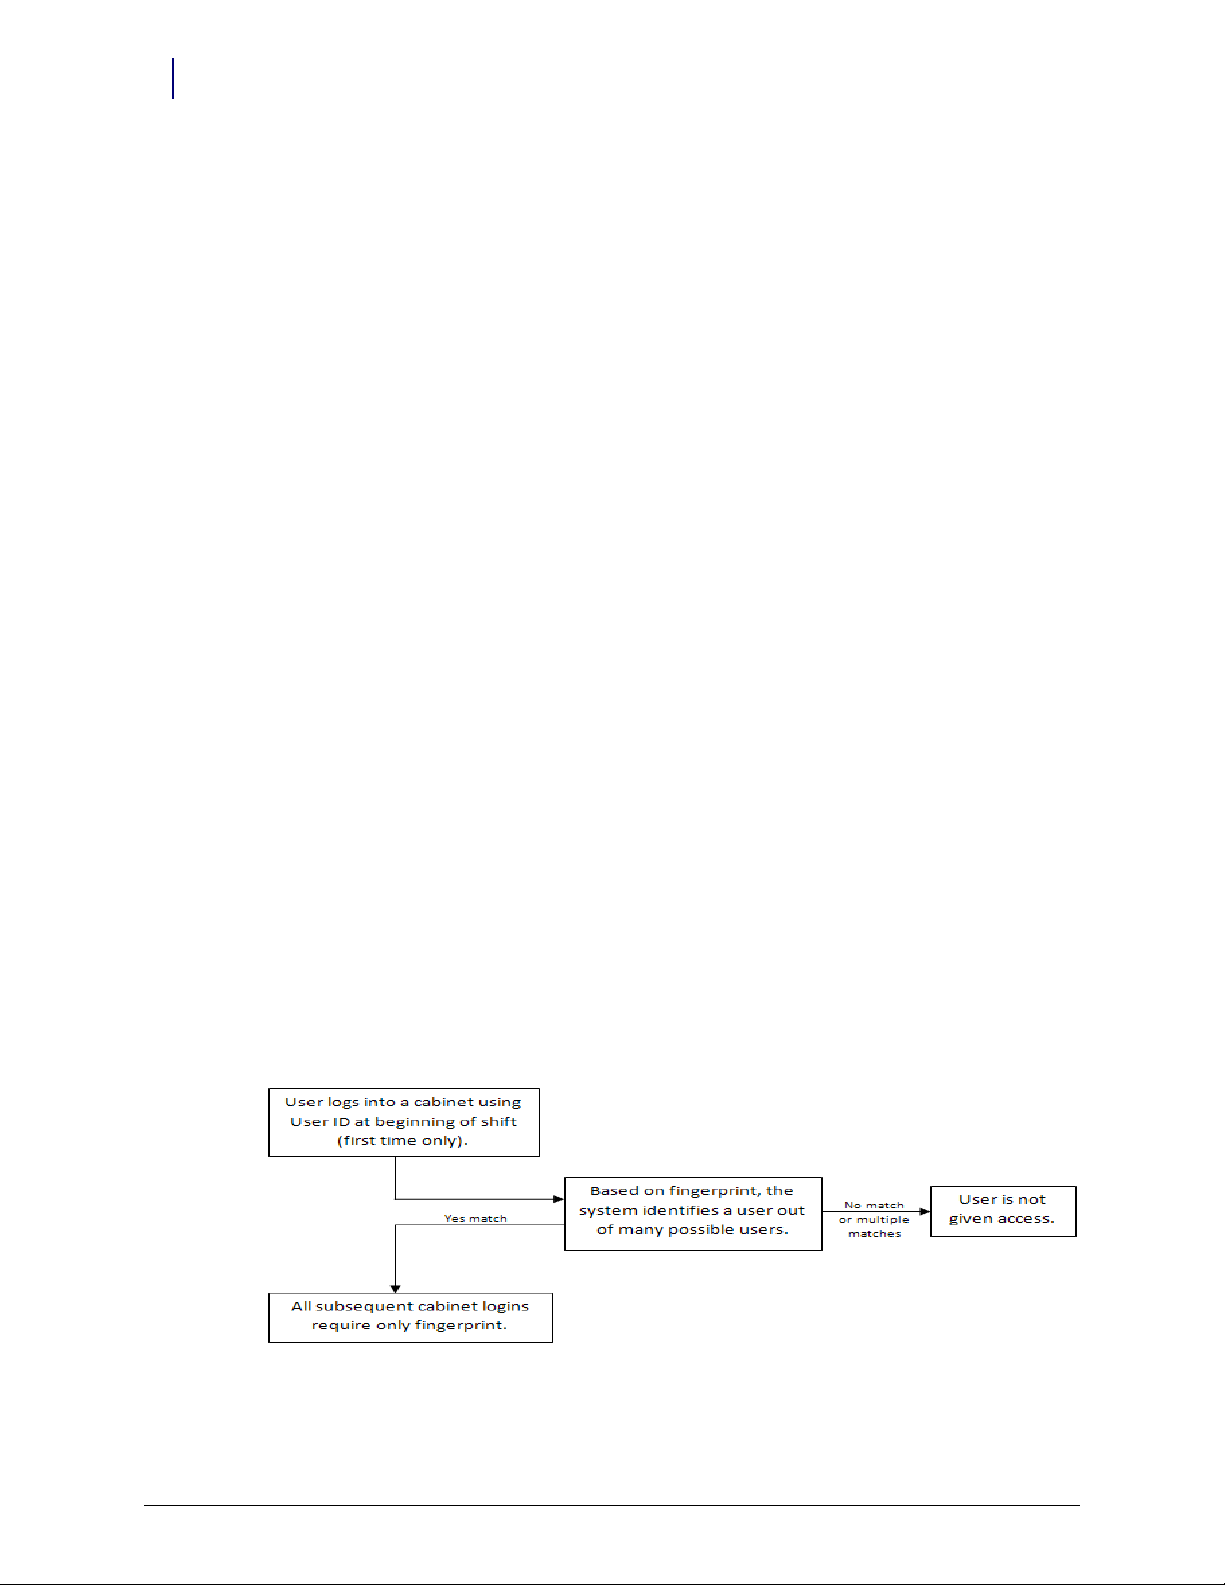
Single-factor Authentication Mode
The single-factor authentication mode is secure and is the most convenient. It requires a
fingerprint only. This mode employs the use of the short list along with the recommended
configuration settings. A short list is a list of fingerprint users within a defined window of activity.
It is a subset of the total users in the database. The length of time that a user remains on a short list
is determined by user activity and configurable OmniCenter settings. After an initial user ID
(with fingerprint or password) is entered on each cabinet that is accessed daily, subsequent login
actions only require a fingerprint scan. (See Figure 1-4.)
If a login fingerprint matches more than one user at or above the minimum quality threshold, the
system warns the user and does not allow access. These users may need to be re-enrolled with a
different finger or made exempt.
Figure 1-4. Single-factor Convenience Authentication
Touch & Go™ Technical Guide for UPEK Sensor Model/67-3090 Rev A © 2011 Omnicell, Inc.
Page 12
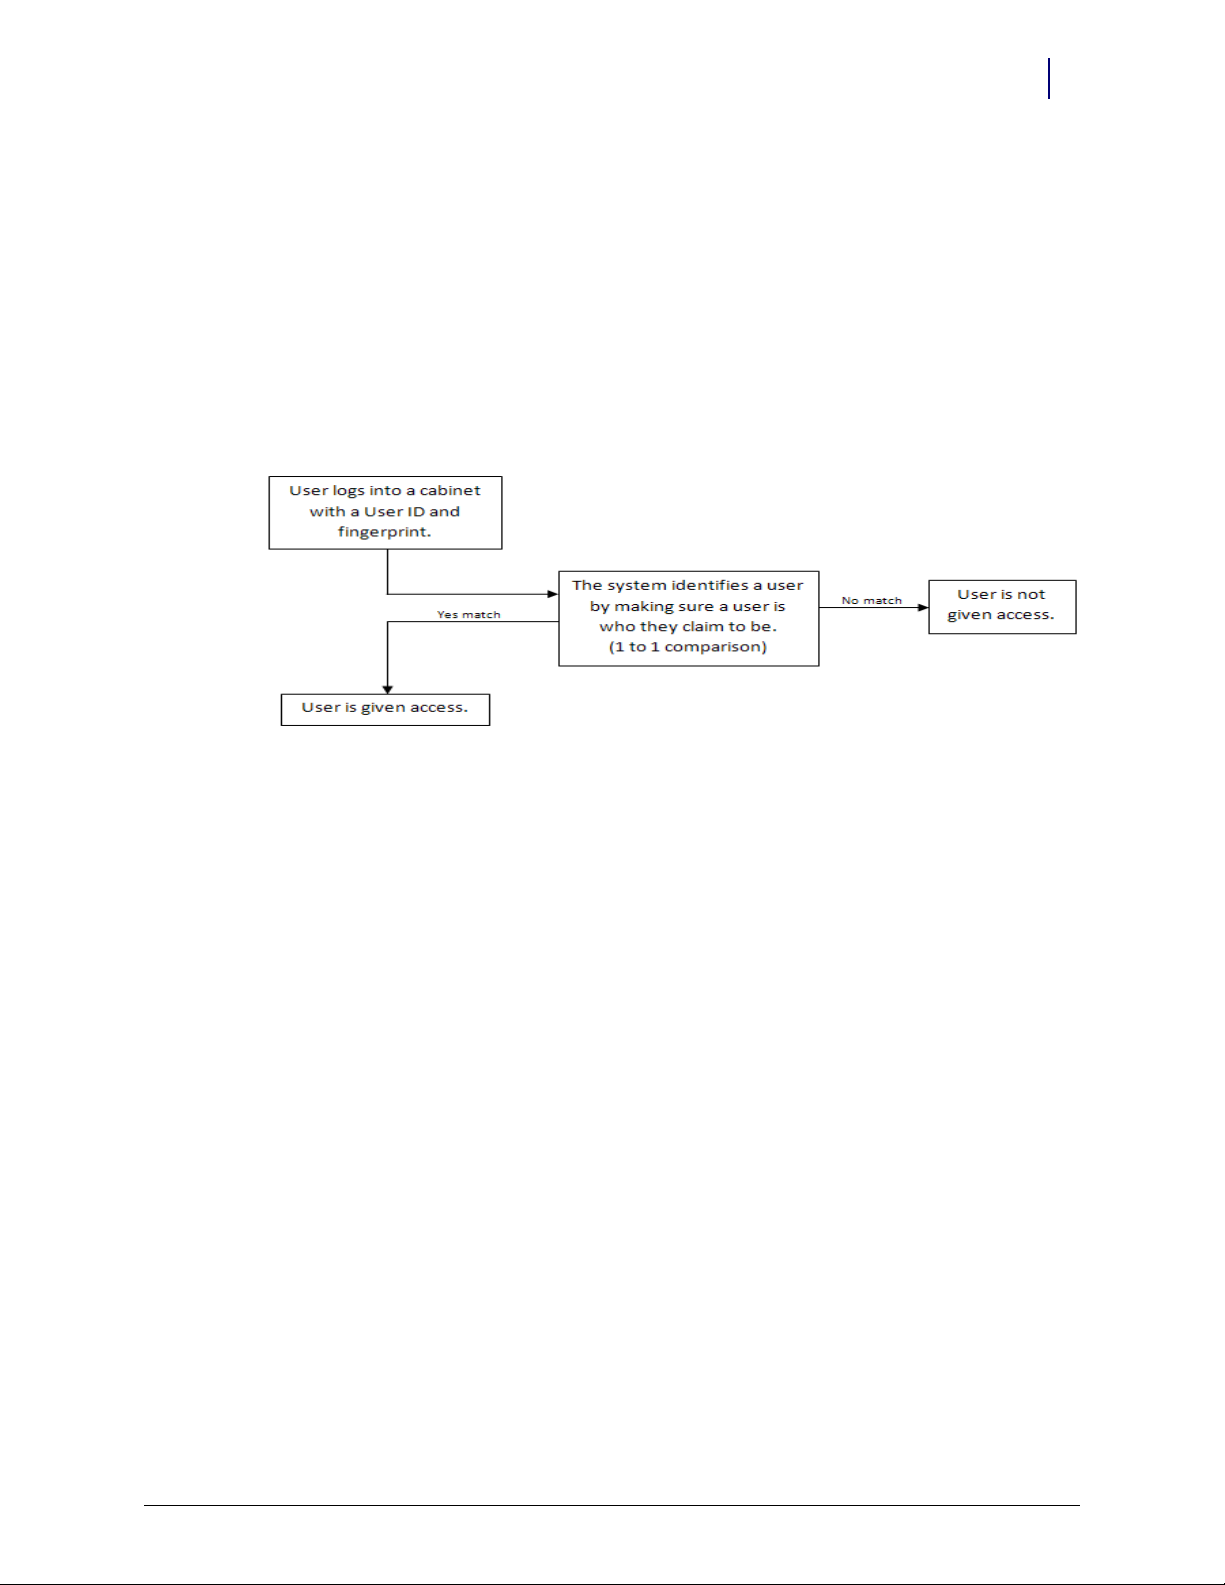
Two-factor with Fingerprint Authentication Mode
The two-factor with fingerprint authentication mode uses two pieces of information to verify
identity. It requires a strong user ID and fingerprint. After the user enters their user ID and their
fingerprint is scanned, the system brings up the user’s stored sample pattern. The system tries to
verify that the fingerprint samples match using a one-to-one comparison. It is the most secure
mode because no one can replicate or “hack” the user’s fingerprint image.
Two-factor with Password Authentication Mode
The two-factor with password authentication mode uses two pieces of information to verify
identity. It requires a strong user ID and password. It is more secure than single-factor.
Introduction to Touch & Go 1-5
Fingerprint Enrollment
Figure 1-5. Two-factor Authentication
Omnicell recommends the implementation of two-factor authentication. Nevertheless, it is the
customer who decides whether to implement single-factor or two-factor authentication. This
decision impacts the system’s overall speed, security, training requirements, and administrative
issues.
Fingerprint Enrollment
Fingerprint enrollment is performed at one Color Touch cabinet. The fingerprint template is sent
to all appropriate cabinets via OmniCenter. User access, witness, and enrollment privileges are
controlled within the individual user record by OmniCenter®. A user’s fingerprint verification can
be used for any login or witness process.
The initial fingerprint enrollment process requires two people—the registrar and the user being
enrolled. The purpose of the registrar is to oversee the enrollment of others. In order to initiate
enrollment, a valid registrar must log in first. Then the user to be enrolled is guided through a
two-part process to assess the scan quality of the finger and to enroll the fingerprint found to
produce quality scans.
Omnicell’s Touch & Go G4 system supports enrollment of a primary and an alternate finger. This
allows the user an option to use either finger to log on. If one finger becomes injured or damaged,
users still have the ability to log on with the other finger.
To further ensure enrollment success, the fingerprint system follows a specific finger order. This
order is consistent for initial enrollment as well as user re-enrollment.
The index fingers, middle fingers, and thumbs are found to be the most successful in terms of
providing the best quality scan. The user to be enrolled can change or modify the guided
workflow based on strong preference or need. Work with the user during initial enrollment to
understand their unique needs.
© 2011 Omnicell, Inc. Touch & Go™ Technical Guide for UPEK Sensor Model/67-3090 Rev A
Page 13

1-6 Introduction to Touch & Go
Fingerprint Reports
For more information about fingerprint enrollment, see Fingerprint Enrollment in the Color Touch
15.0 Administration Guide, PN 60-0209.
Fingerprint Reports
Biometric events contain information that help system administrators manage fingerprint usage.
The information is based on events sent by a G4 cabinet. Two reports provide this information:
User Fingerprint Enrollment Report
The User Fingerprint Enrollment Report provides information about who is enrolled, which
finger is enrolled, when enrollment took place, and which cabinet was used for enrollment,
User Fingerprint Activity Report
The User Fingerprint Activity Report finds out about enrollment and login activity, successes,
and failures.
For more information about the report options, refer to OmniCenter 15.0 Reports Guide,
PN 60-0176.
System Requirements/Compatibility
The UPEK fingerprint scanning device can only be installed on Color Touch G4 cabinets running
Windows® 7. The G3 Fujitsu sensor cannot be moved to a G4 cabinet and the G4 UPEK sensor
cannot be moved to a G3 cabinet.
Important:
Omnicell 15.0 is required at the cabinet.
For full functionality of all Touch & Go features, Windows 2008 is required at the server and
The following are required to implement this feature:
OmniCenter running Microsoft Windows Server 2008 or higher, and Omnicell 15.0 software
or higher.
Color Touch cabinets running Microsoft Windows 7 and Color Touch 15.0 or higher.
Omnicell's G4 (fourth generation) automated medication and supply dispensing solution
A UPEK Touch & Go module installed and enabled on the cabinet.
Specific cabinet types supported are:
OmniRx® Color Touch
OmniSupplier® Color Touch
AWS
The Touch & Go device can be ordered with or without a magnetic card or bar code reader. The
Touch & Go device contains the housing for a card reader on the left or right of the fingerprint
scanner. If ordered with a card reader, the applicable reader mechanism is installed in
manufacturing. Regardless, if the cabinet has an existing card reader, it is uninstalled and replaced
with the Touch & Go device.
Touch & Go™ Technical Guide for UPEK Sensor Model/67-3090 Rev A © 2011 Omnicell, Inc.
Page 14

User Instructions
Complete enrollment instructions along with usage tips are provided in the Color Touch User
Guides:
Color Touch 15.0 User Guide PN 60-0208 Rev A
Introduction to Touch & Go 1-7
User Instructions
© 2011 Omnicell, Inc. Touch & Go™ Technical Guide for UPEK Sensor Model/67-3090 Rev A
Page 15
Installing a Fingerprint Scanner on a 1-, 2-, and 3-Cell
The fingerprint scanner on a 1-, 2-, and 3-cell cabinet is located on the card reader bracket and
should always be installed with the card reader bracket as a single piece.
Install the Fingerprint Scanner
1. Perform a graceful shutdown of the G4 cabinet and unplug the power cord from the back of
the unit.
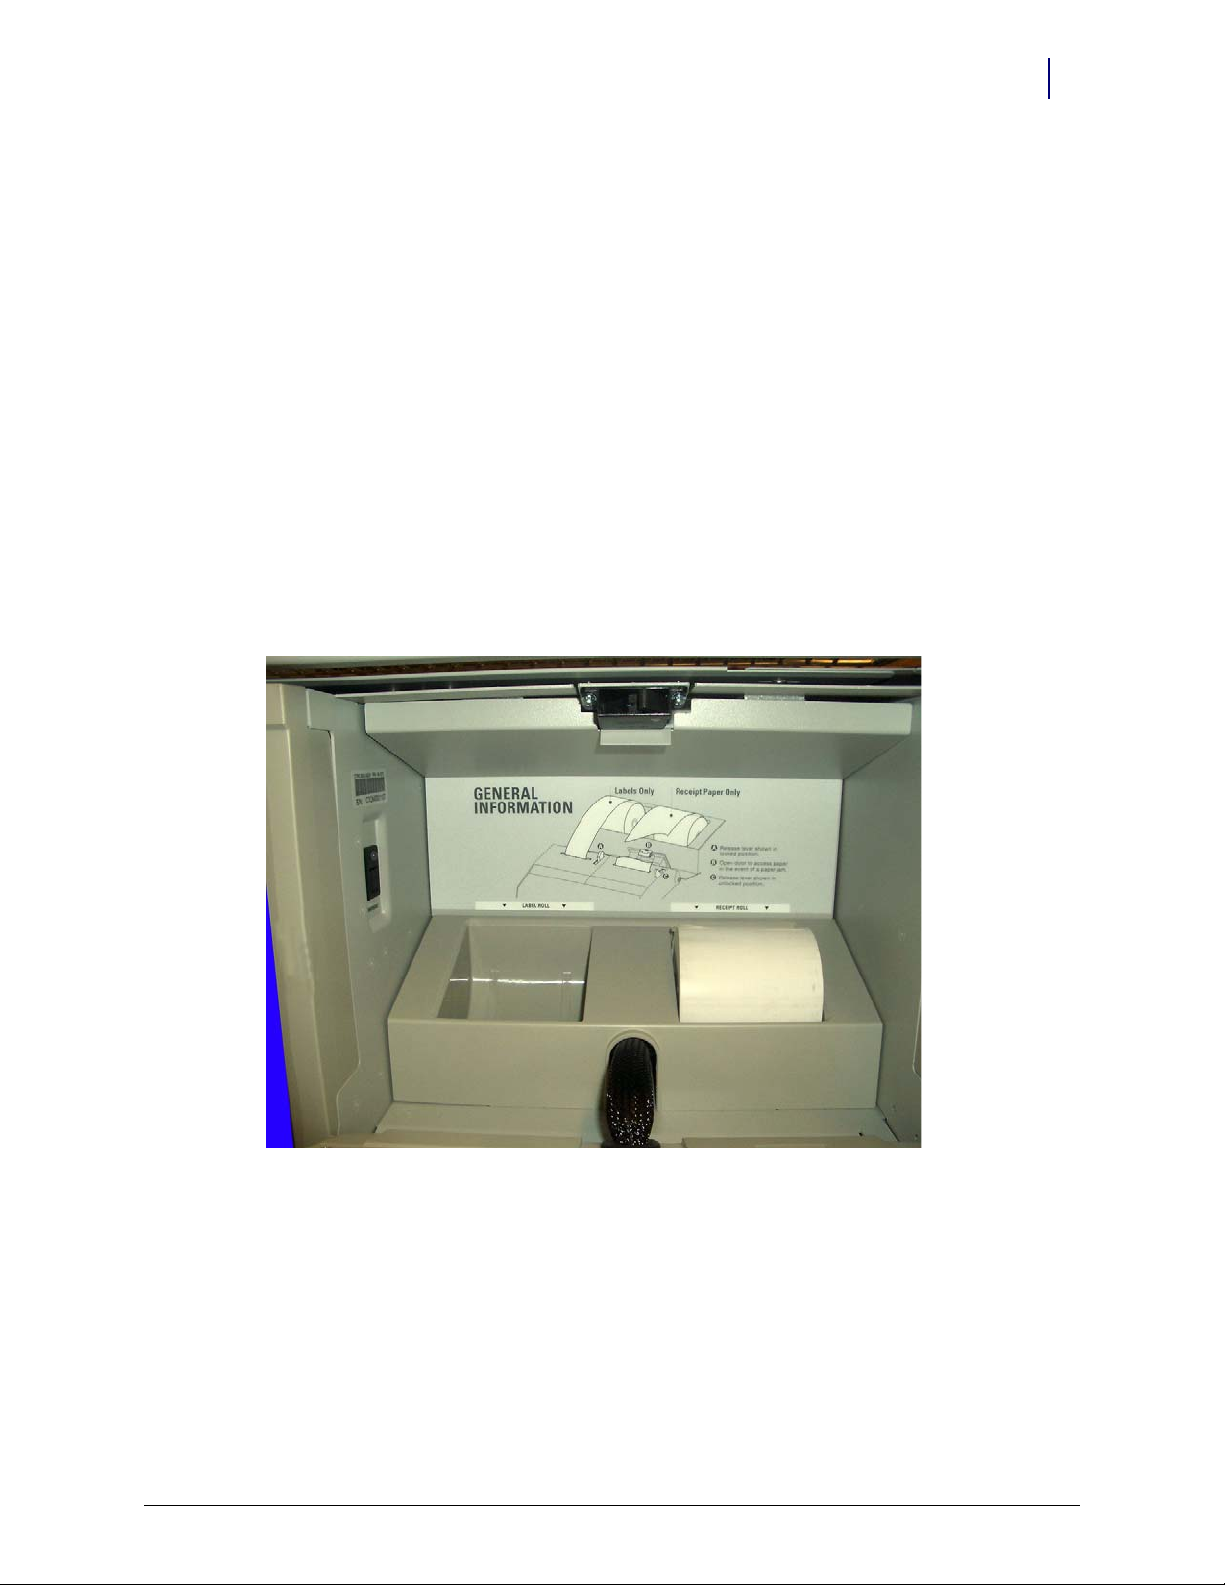
2. Open the printer door.
3. Remove the filter access cover.
2-1
Figure 2-1. Remove the filter access panel
© 2011 Omnicell, Inc. Touch & Go™ Technical Guide for UPEK Sensor Model/67-3090 Rev A
Page 16
2-2 Installing a Fingerprint Scanner on a 1-, 2-, and 3-Cell
Install the Fingerprint Scanner
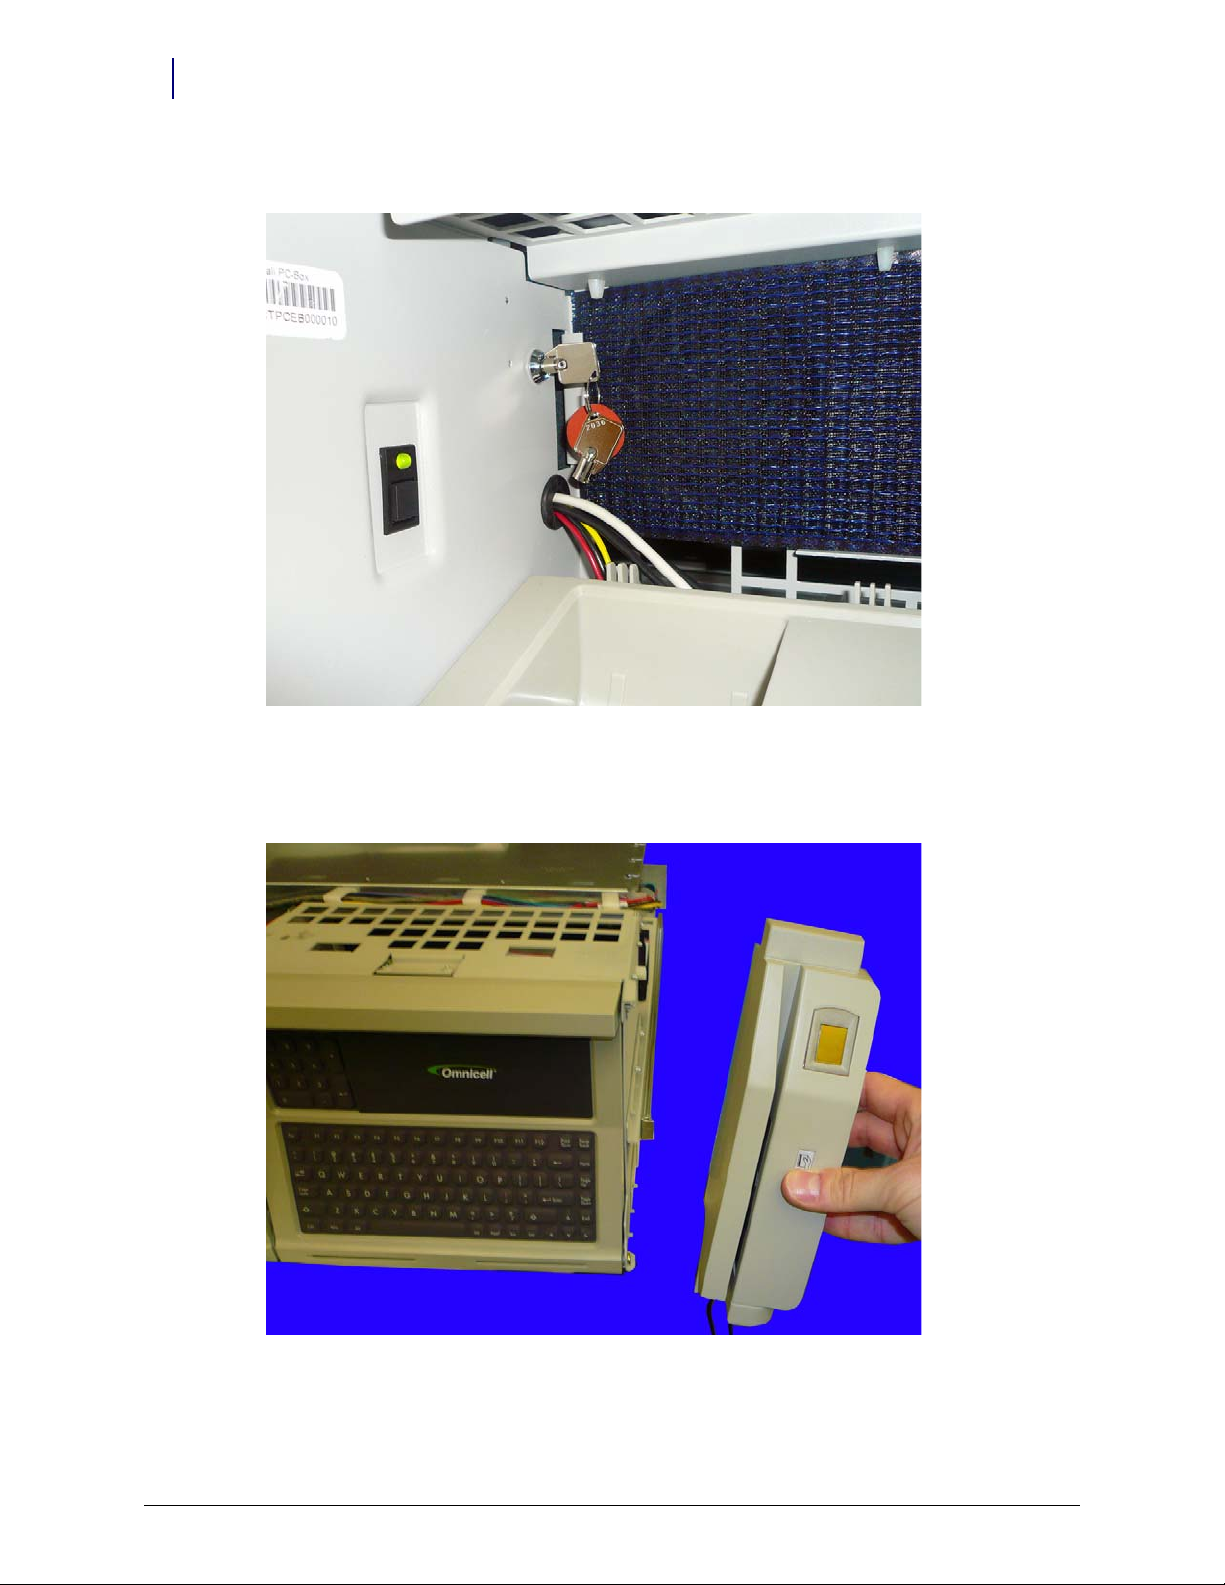
4. Use the # 2378 cam lock key to unlock the E-Box.
Figure 2-2. Unlock the eBox
5. Slide the console out until it locks into place.
6. Place the scanner and card reader bracket in place on the end of the eBox console.
Figure 2-3. Put the card reader and fingerprint scanner in place
Touch & Go™ Technical Guide for UPEK Sensor Model/67-3090 Rev A © 2011 Omnicell, Inc.
Page 17
Installing a Fingerprint Scanner on a 1-, 2-, and 3-Cell 2-3
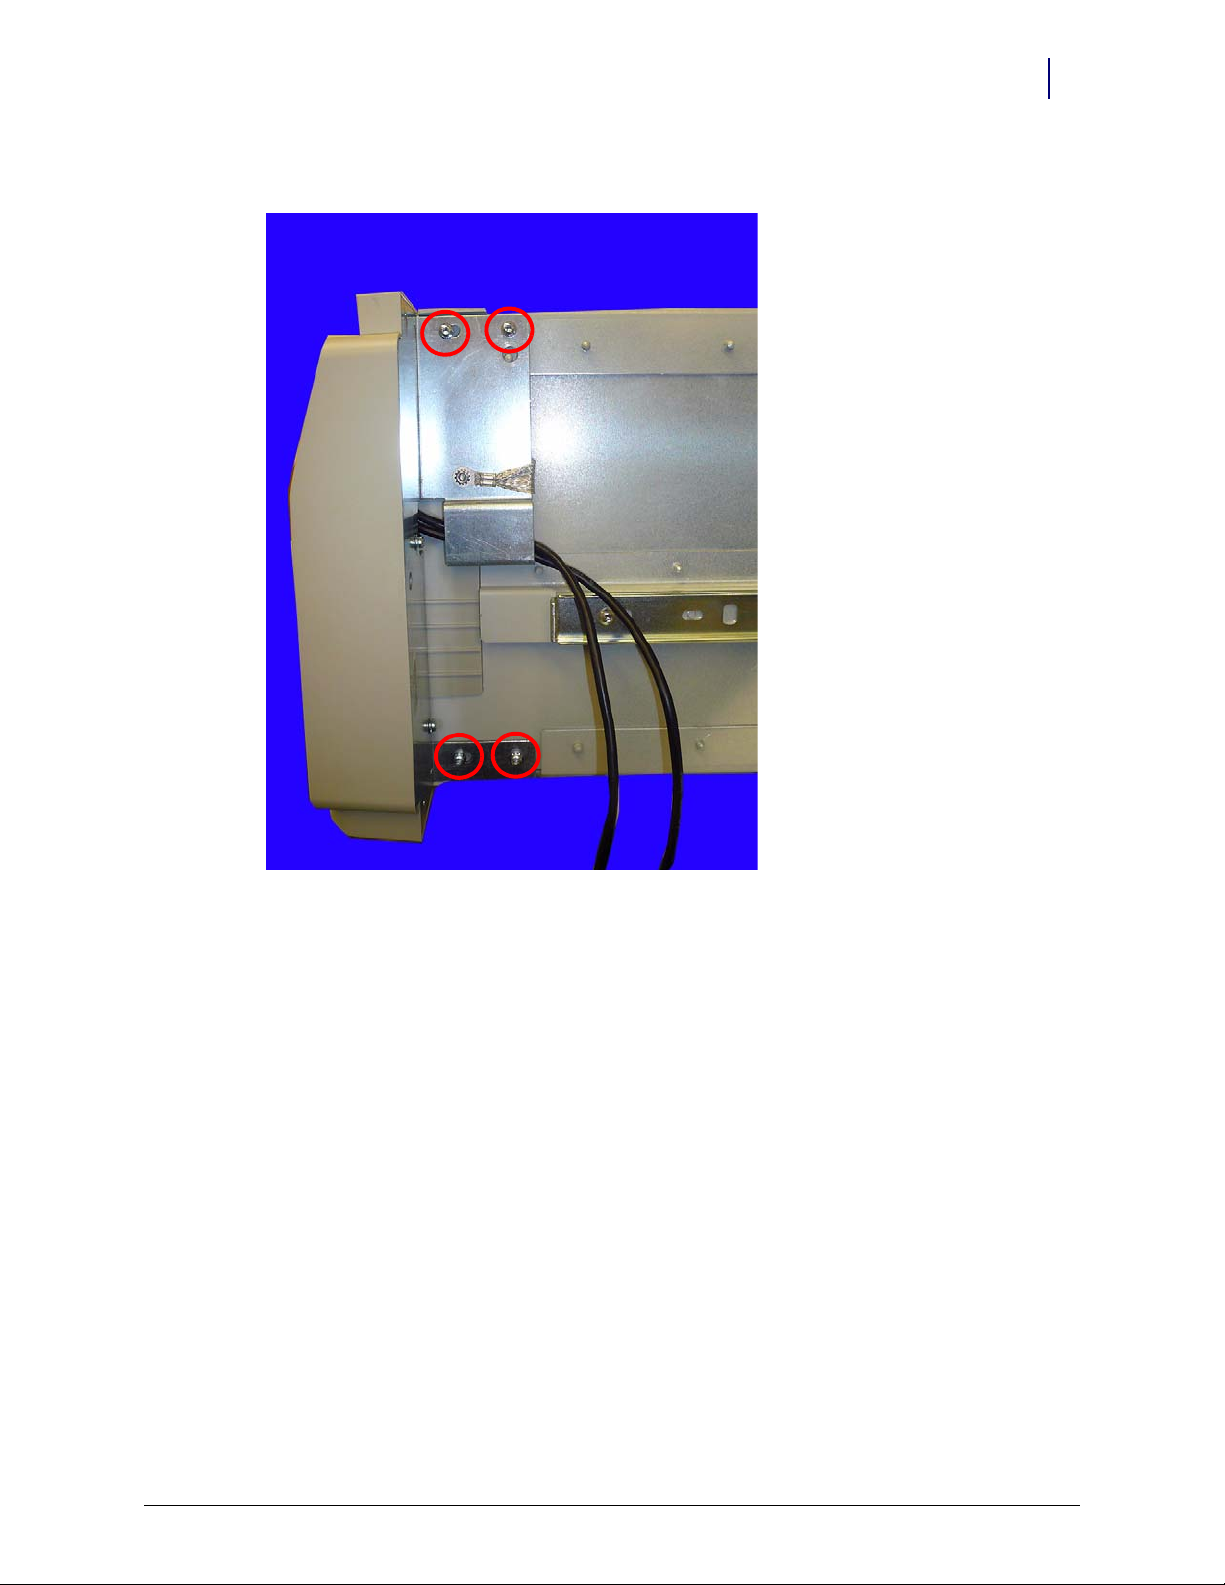
7. Secure the fingerprint scanner bracket with the four screws provided.
Install the Fingerprint Scanner
Figure 2-4. Secure the scanner to the console with the four screws
© 2011 Omnicell, Inc. Touch & Go™ Technical Guide for UPEK Sensor Model/67-3090 Rev A
Page 18
2-4 Installing a Fingerprint Scanner on a 1-, 2-, and 3-Cell
Install the Fingerprint Scanner
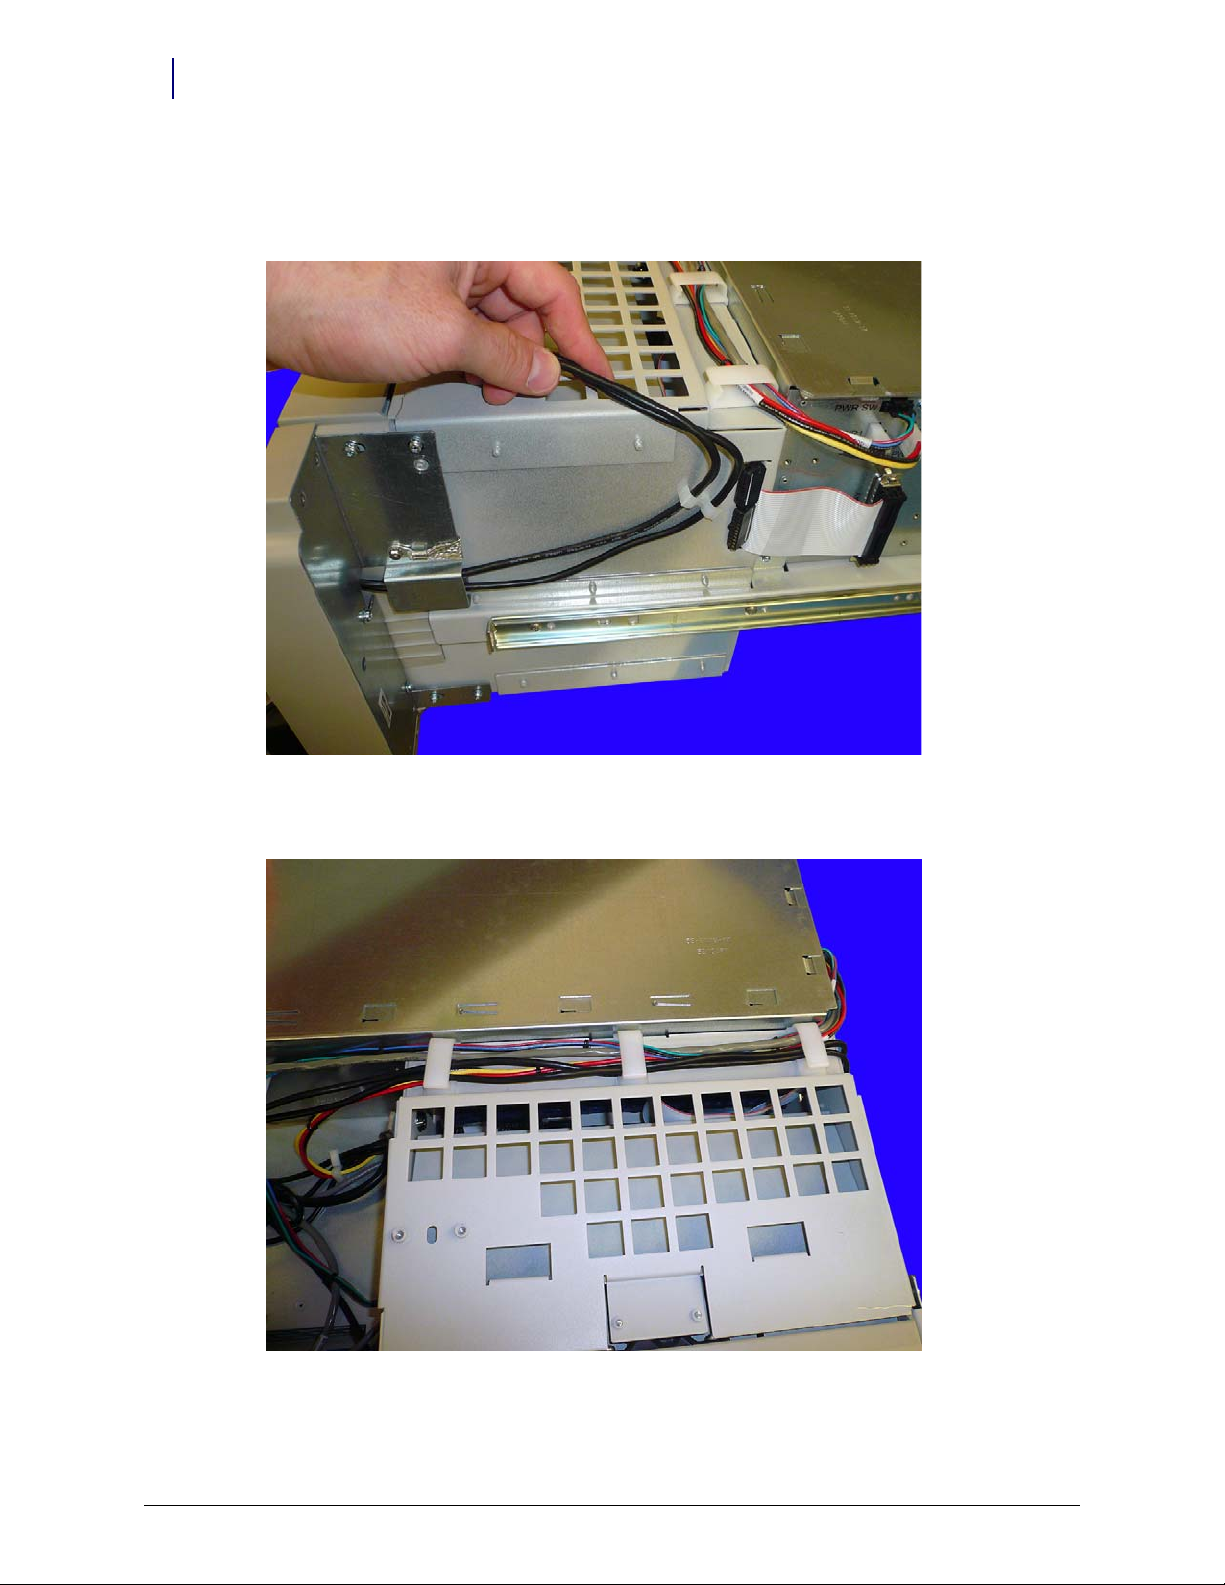
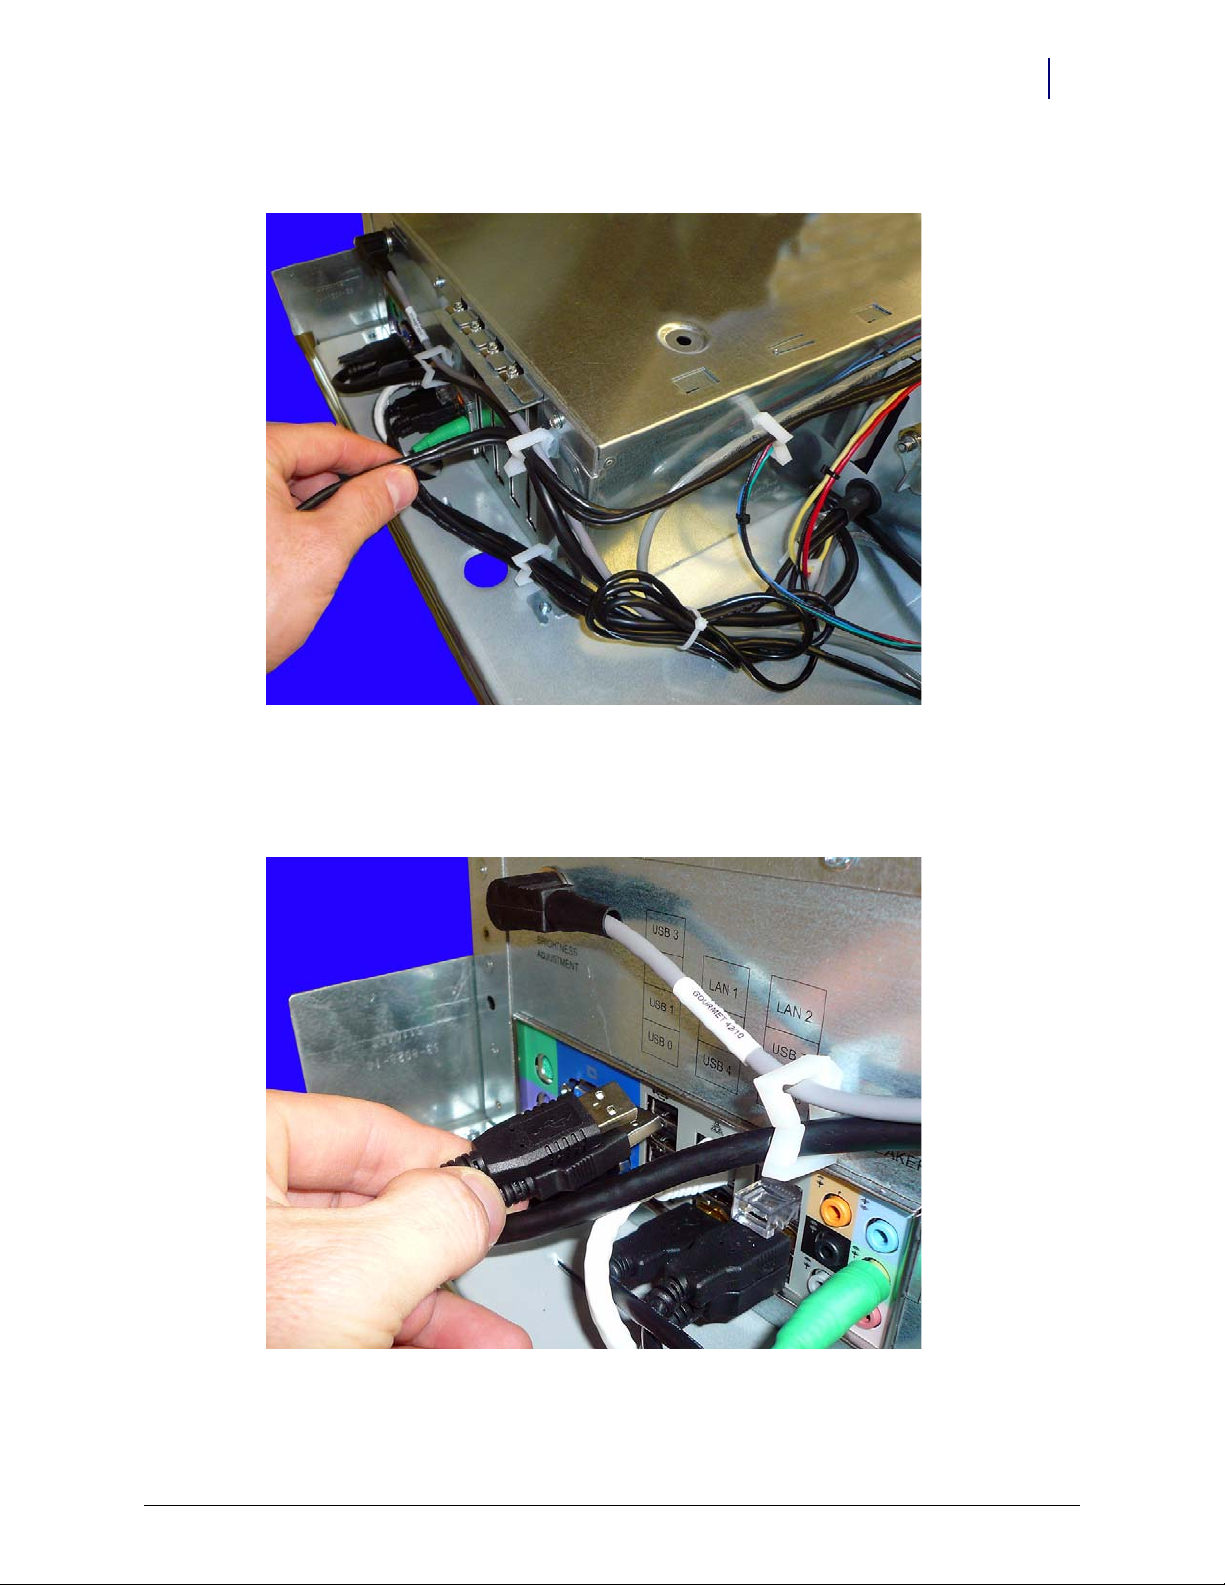
8. If installing a fingerprint scanner and card reader combo, route the two USB cables through
the plastic cable clip provided on the side of the console. If only a scanner or card reader is
being installed, route the single USB cable through the plastic clip provided.
Figure 2-5. Route the cable(s) through the cable clip
9. Route the cable(s) through the clips on the top of the eBox console.
Figure 2-6. Route the cable(s) through the plastic routing clips on top of the console
Touch & Go™ Technical Guide for UPEK Sensor Model/67-3090 Rev A © 2011 Omnicell, Inc.
Page 19
Installing a Fingerprint Scanner on a 1-, 2-, and 3-Cell 2-5
10. Route the cable(s) through the two clips near the USB ports.
Install the Fingerprint Scanner
Figure 2-7. Route the cable(s) tough the two clips near the USB ports
11. Plug the USB cable(s) into the USB ports on the side of the eBox. The fingerprint scanner USB
ca ble should be plugged into USB0 and the card reader USB cable should be plugged into
USB1.
Figure 2-8. Plug the USB cable(s) into the USB ports
12. Push the eBox console back into the cabinet.
© 2011 Omnicell, Inc. Touch & Go™ Technical Guide for UPEK Sensor Model/67-3090 Rev A
Page 20
2-6 Installing a Fingerprint Scanner on a 1-, 2-, and 3-Cell
Install the Fingerprint Scanner
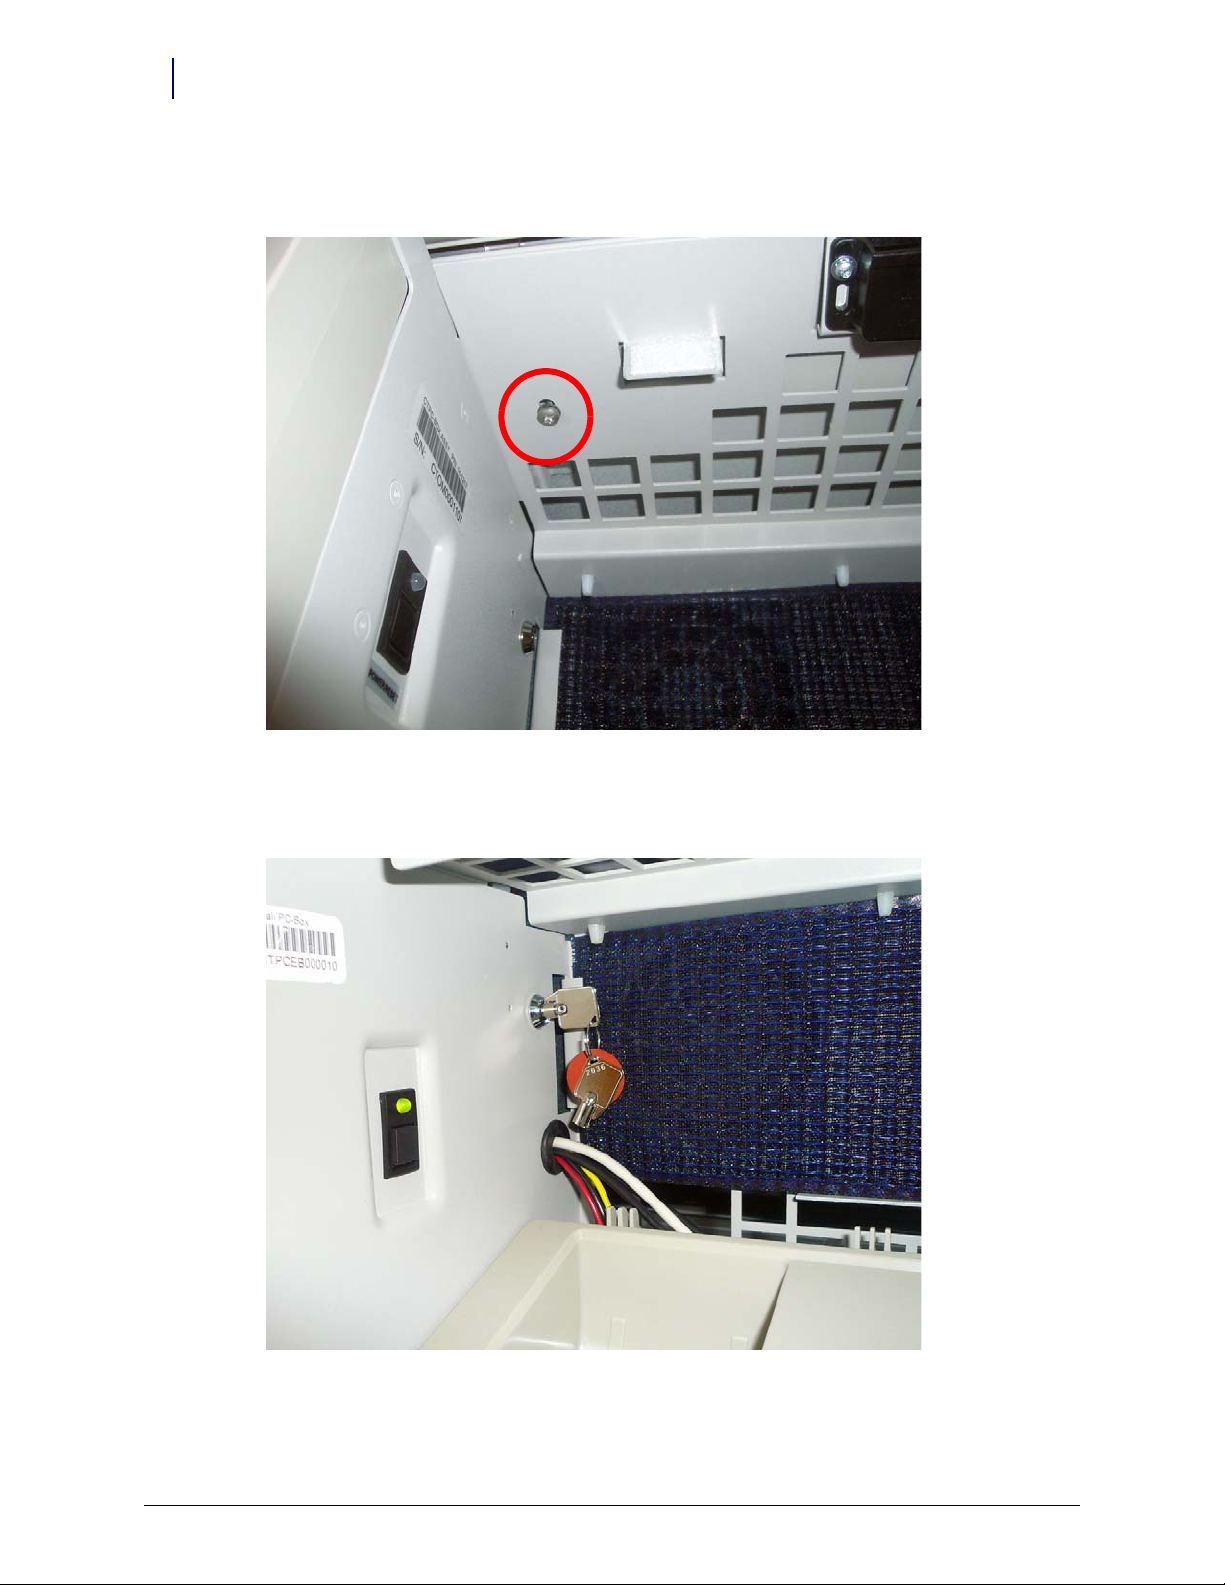
13. LAdd the M4x14 security screw to the top of the printer enclosure, securing it to the console
cover.
Figure 2-9. Add the M4x14 security screw
14. Lock the CT PC console into place using the #2378 key. Turn the key vertical to lock the G4
console into place.
Figure 2-10. Power on the cabinet
15. Replace the filter access panel.
Touch & Go™ Technical Guide for UPEK Sensor Model/67-3090 Rev A © 2011 Omnicell, Inc.
Page 21

Installing a Fingerprint Scanner on a 1-, 2-, and 3-Cell 2-7
16. Power on the cabinet.
17. Close the keyboard door.
18. Power up the G4 console.
19. Test the fingerprint scanner to ensure it is working properly.
Install the Fingerprint Scanner
© 2011 Omnicell, Inc. Touch & Go™ Technical Guide for UPEK Sensor Model/67-3090 Rev A
Page 22

Installing a Fingerprint Scanner on an OmniRx
Remove the Omni Rx Keyboard
1. Perform a graceful shutdown of the OmniRx and unplug the power cord from the rear of the
unit.
2. Remove the two screws on the under side of the OmniRx G4 console that secure the keyboard.
3-1
Figure 3-1. Remove the bottom two keyboard screws
© 2011 Omnicell, Inc. Touch & Go™ Technical Guide for UPEK Sensor Model/67-3090 Rev A
Page 23

3-2 Installing a Fingerprint Scanner on an OmniRx
Remove the Omni Rx Keyboard
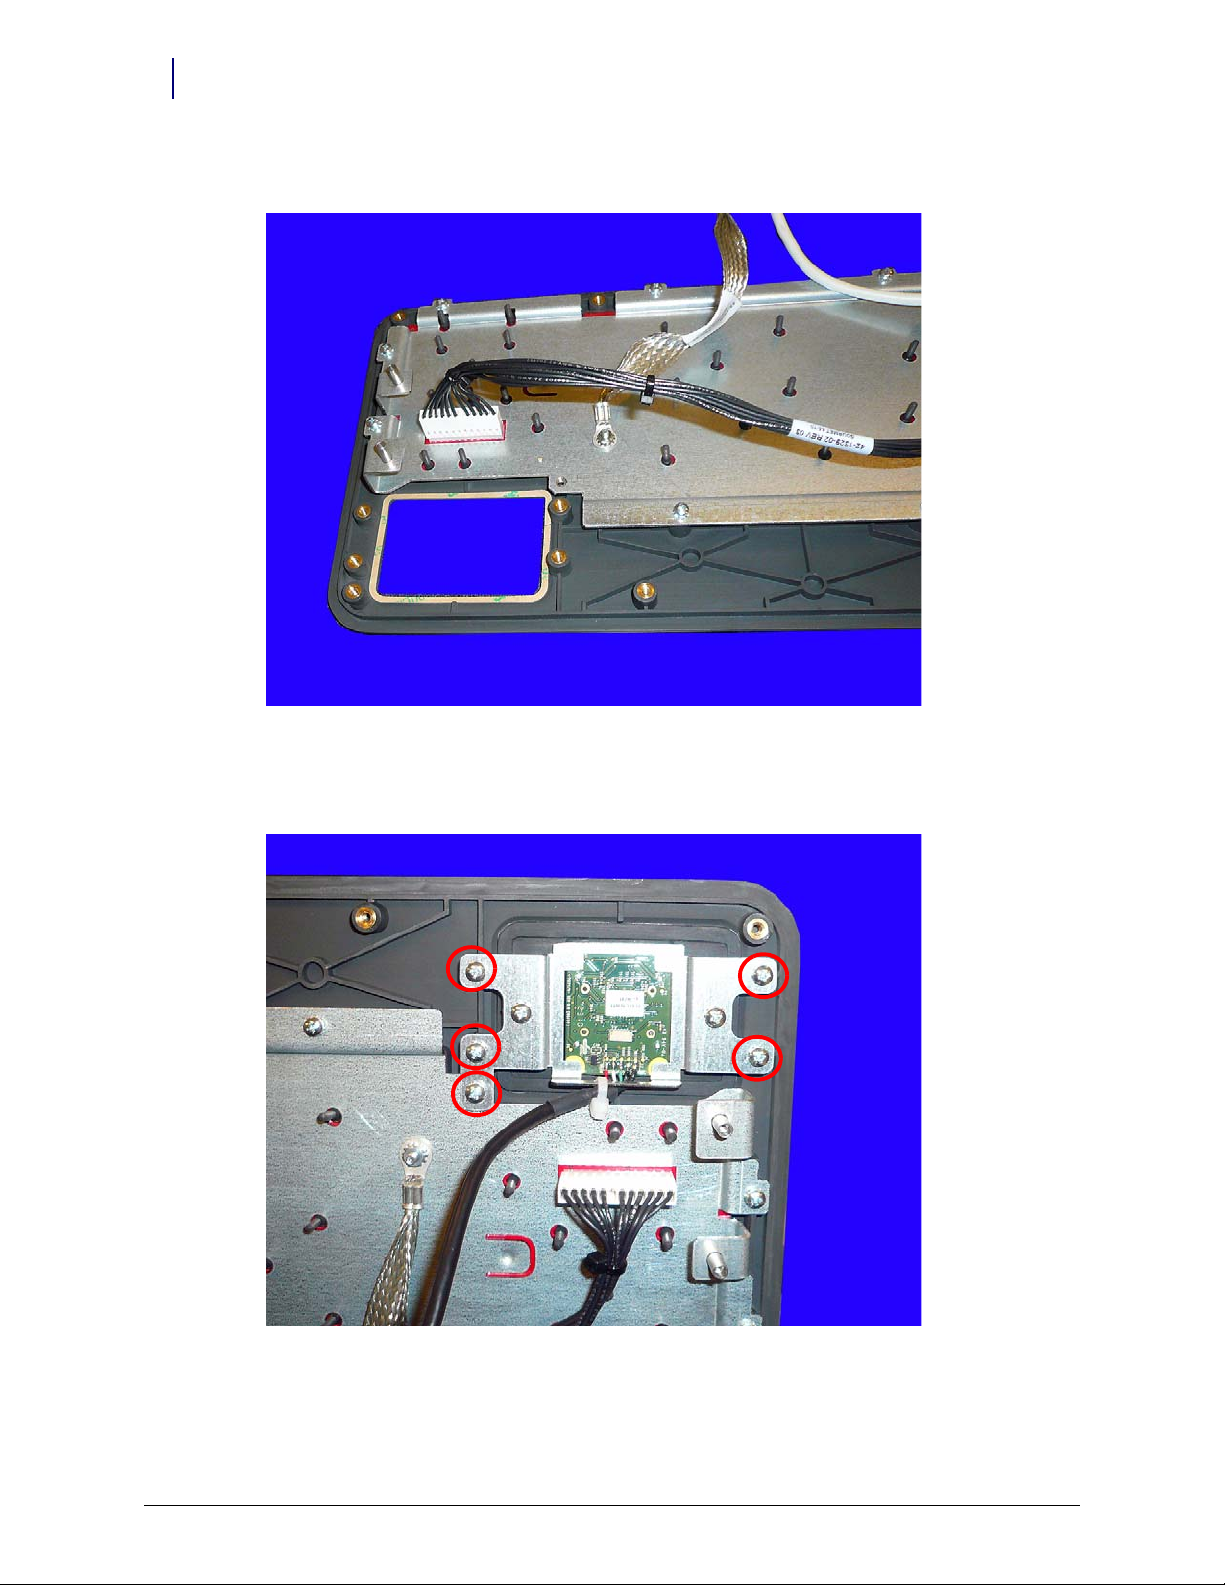
3. Remove the four screws on the keyboard tray that secure the keyboard to the console.
Figure 3-2. Remove the top four screws that secure the keyboard
4. Lift and remove the keyboard from the console. Set the keyboard aside.
Figure 3-3. Lift and remove the keyboard
Touch & Go™ Technical Guide for UPEK Sensor Model/67-3090 Rev A © 2011 Omnicell, Inc.
Page 24

Installing a Fingerprint Scanner on an OmniRx 3-3
5. Remove the nut that secures the keyboard ground cable.
Install the Fingerprint Scanner
Figure 3-4. Remove the keyboard ground cable nut
6. Remove the ground cable.
Install the Fingerprint Scanner
1. If there is a blank plate in place of the scanner location, remove the plate.
© 2011 Omnicell, Inc. Touch & Go™ Technical Guide for UPEK Sensor Model/67-3090 Rev A
Page 25

3-4 Installing a Fingerprint Scanner on an OmniRx
Install the Fingerprint Scanner
2. Ensure that the gasket around the fingerprint scanner is secure.
Figure 3-5. Ensure the gasket is secure
3. Ensure the gasket around the keyboard is secure as well.
Figure 3-6. Ensure the gasket around the keyboard is secure
Touch & Go™ Technical Guide for UPEK Sensor Model/67-3090 Rev A © 2011 Omnicell, Inc.
Page 26
Installing a Fingerprint Scanner on an OmniRx 3-5
Install the Fingerprint Scanner
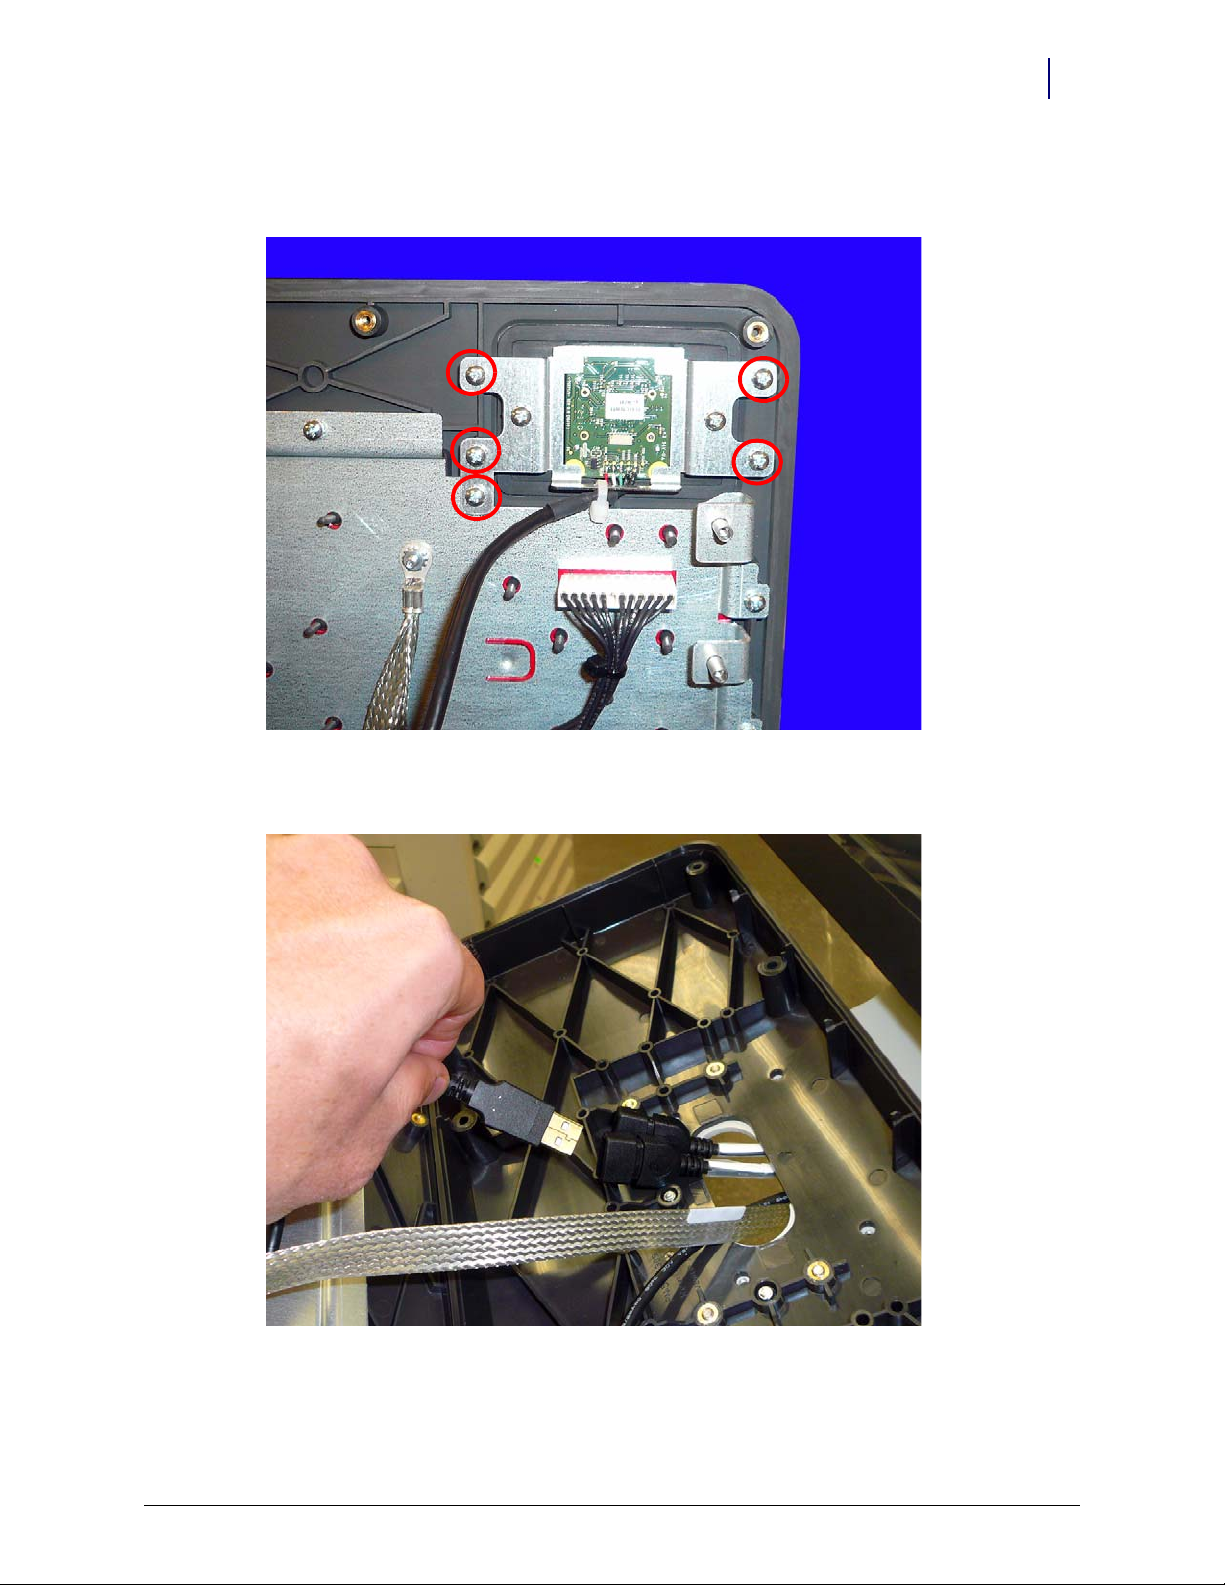
4. Place the fingerprint scanner into place and secure it with the five screws provided. Ensure the
cable is facing toward the data cable.
Figure 3-7. Secure the fingerprint scanner to the keyboard tray
5. Plug the scanner into the USB port on the bottom of the keyboard tray.
Figure 3-8. Connect the USB cable to the extender
6. Reconnect the any cables that have been disconnected during the install of the fingerprint
scanner.
© 2011 Omnicell, Inc. Touch & Go™ Technical Guide for UPEK Sensor Model/67-3090 Rev A
Page 27

3-6 Installing a Fingerprint Scanner on an OmniRx
Install the Fingerprint Scanner
7. Set the keyboard in place.
8. Secure the keyboard with the screws previously removed.
9. Power on the unit and test the fingerprint scanner to ensure that it is working.
Touch & Go™ Technical Guide for UPEK Sensor Model/67-3090 Rev A © 2011 Omnicell, Inc.
Page 28

Installing a Fingerprint Scanner on an AWS
Remove the AWS Keyboard
1. Remove the eight screws thatsecure the keyboard casing on the AWS or AWS G4.
4-1
Figure 4-1. Remove the eight screws that secure the keyboard casing
© 2011 Omnicell, Inc. Touch & Go™ Technical Guide for UPEK Sensor Model/67-3090 Rev A
Page 29
4-2 Installing a Fingerprint Scanner on an AWS
Remove the AWS Keyboard
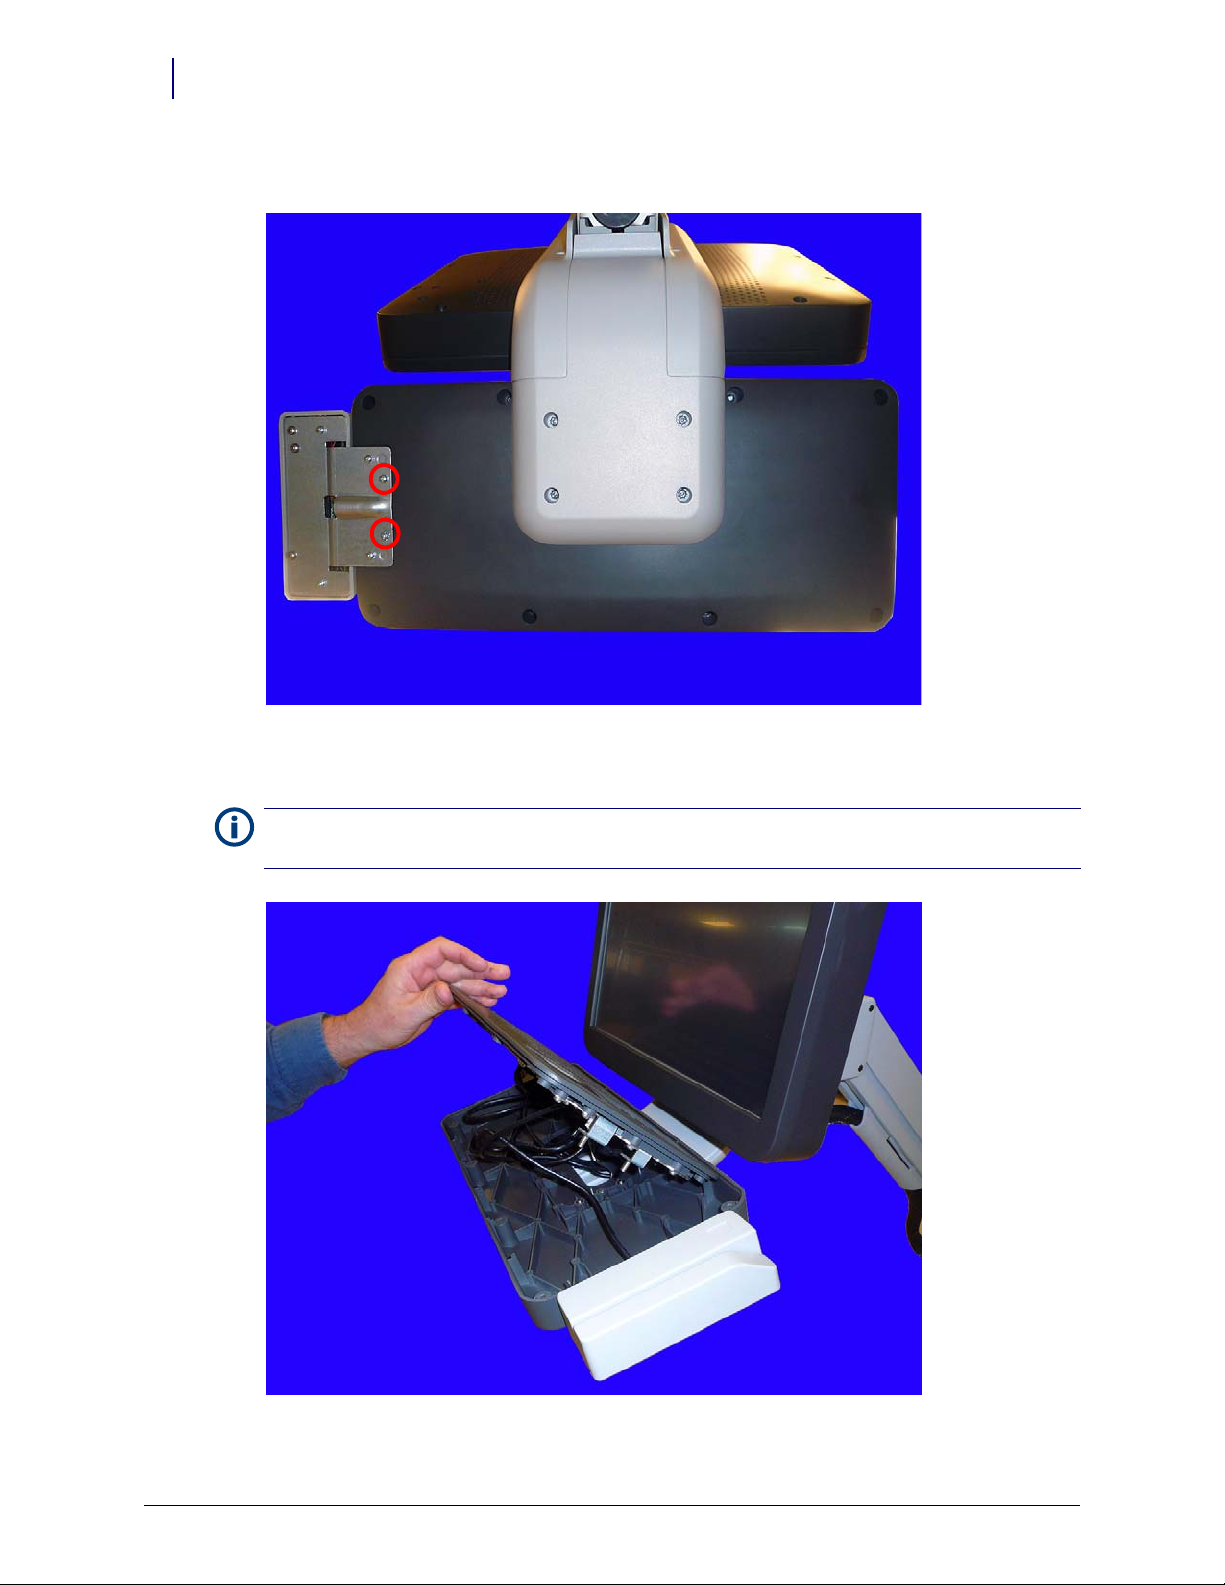
2. If a card reader is present, remove the two innermost screws.
Figure 4-2. Remove the innermost screws on the card reader
3. Lift the keyboard from the keyboard holder.
Note: Do not lift the keyboard too far from its resting place as there are cables attached to the keyboard
which need to be removed before the keyboard can fully be removed.
Figure 4-3. Lift the keyboard from the keyboard enclosure
Touch & Go™ Technical Guide for UPEK Sensor Model/67-3090 Rev A © 2011 Omnicell, Inc.
Page 30

4. Disconnect the keyboard and keypad cables.
Install the Fingerprint Scanner
1. If there is a blank plate in place of the scanner location, remove the plate.
2. Ensure that the gasket around the fingerprint scanner is secure.
Installing a Fingerprint Scanner on an AWS 4-3
Install the Fingerprint Scanner
Figure 4-4. Ensure the gasket is secure
© 2011 Omnicell, Inc. Touch & Go™ Technical Guide for UPEK Sensor Model/67-3090 Rev A
Page 31
4-4 Installing a Fingerprint Scanner on an AWS
Install the Fingerprint Scanner
3. Ensure the gasket around the keyboard is secure as well.
Figure 4-5. Ensure the gasket around the keyboard is secure
4. Place the fingerprint scanner into place and secure it with the five screws provided. Ensure the
cable is facing toward the data cable.
Figure 4-6. Secure the fingerprint scanner to the keyboard tray
Touch & Go™ Technical Guide for UPEK Sensor Model/67-3090 Rev A © 2011 Omnicell, Inc.
Page 32

Installing a Fingerprint Scanner on an AWS 4-5
Install the Fingerprint Scanner
5. Plug the scanner into the USB port on the bottom of the keyboard tray.
Figure 4-7. Connect the USB cable to the extender
6. Reconnect the any cables that have been disconnected during the install of the fingerprint
scanner.
7. Set the keyboard in place.
8. Secure the keyboard with the screws previously removed.
9. Power on the unit and test the fingerprint scanner to ensure that it is working.
© 2011 Omnicell, Inc. Touch & Go™ Technical Guide for UPEK Sensor Model/67-3090 Rev A
Page 33

Planning for Touch & Go
This chapter describes the planning tasks associated with Touch & Go. Complete these tasks
before configuring the OmniCenter or Color Touch cabinets.
“Gather Account Information” on page 5-1
“Review of Policies and Procedures” on page 5-1
“Review New Features” on page 5-2
“Develop a Rollout Plan” on page 5-2
“Discuss Fingerprint Options” on page 5-2
“Determine Best User Authentication Mode” on page 5-3
“Configure Settings Based on Best Practices” on page 5-3
“Demonstrate Use” on page 5-4
“Determine Fingerprint Registrars” on page 5-4
“Train Users” on page 5-4
“Go Live” on page 5-4
5-1
Gather Account Information
Account teams that understand the customer’s current setup are better suited to help migrate the
customer to the new solution. Use the following chart to gather information regarding the current
setup.
Gather Information About Discussion Questions
Faci lit y
Review of Policies and Procedures
Using Touch & Go can change established workflows. Recommend reviewing and updating
existing policies and procedures for:
Logging onto cabinet
Witness for dispensing and wastes
(Additional items, as needed)
Discuss Fingerprint options with the customer System
Administrator. (Refer to Fingerprint Settings Considerations chart
in “Appendix B: Best Practice Forms” .)
Determine best user authentication mode based on customer
feedback.
Determine who will be fingerprint Registrars and what access-Y or S.
Recommend that customer uses or changes to a strong user ID.
Consider masking user ID at log in or not.
© 2011 Omnicell, Inc. Touch & Go™ Technical Guide for UPEK Sensor Model/67-3090 Rev A
Page 34

5-2 Planning for Touch & Go
Review New Features
It is important to document how the new features workflows fold into the existing policies and
procedures. Review the potential new workflow with nursing; change the polices and procedures
as necessary. Address any holes in the proposed process compared to the existing workflow.
Review New Features
Touch & Go was first introduced in Omnicell 9000. Touch & Go has been redesigned for Omnicell
15.0. For customers upgrading from a previous release, Operations should review the feature
changes from the existing release.
Develop a Rollout Plan
Successful implementation is dependent on proper user training.
Plan items include the following:
Discuss Fingerprint options with the customer System Administrator.
Determine best user authentication mode based on customer feedback.
Configure settings based on best practices for type of use.
Setting up OmniCenter
Configure Color Touch cabinets
Demonstrate use based on the decided settings.
Determine fingerprint registrars.
Train us e rs
Discuss Fingerprint Options
Two modes of fingerprint authentication:
identification
The Touch & Go (fingerprint only) has convenient login, but has a non-zero, low fail ID
probability.
verification
A user ID plus fingerprint has practically zero fail ID probability and it is easier to manage.
Touch & Go™ Technical Guide for UPEK Sensor Model/67-3090 Rev A © 2011 Omnicell, Inc.
Page 35

Determine Best User Authentication Mode
The user authentication modes supported by Color Touch cabinets:
User Authentication
Modes
Touch & Go Fingerprint Only
Two Factor w/
Fingerpri nt
Two Factor w/ Password
Authentication
Factors Deta ils
“Shortlist”
Requires login with
User ID at each
cabinet at
beginning of shift
User ID
Fingerpri nt
User ID
Pass word
“Non-shortlist”
User ID should be
hard to obtain and
not be displayed
User ID should be
hard to obtain and
not be displayed
Fingerprint
System
Entry
Speed Security
Faster Secure More strict
Medium Most
Secure
Slower More
Secure
Match
Strictness
at Login
Less strict Periodic re-enrollment
N/A
Planning for Touch & Go 5-3
Develop a Rollout Plan
Administration
Considerations
Failed ID prevention
Periodic re-enrol lment
User ID login at
beginning of shift, each
cabinet
Periodic password
change
Risk of shared or stolen
passwords
Configure Settings Based on Best Practices
Refer to Fingerprint Setup checklist in “Ap pe nd i x B : B e s t Pr ac ti c e Fo rm s” .
Setting Up OmniCenter
Setting up fingerprint registrars
Setting up fingerprint exempt users
A number of configuration options are provided that determine the specific behavior of cabinet
functions. The desired settings for the configuration options should be discussed with the facility
and set as appropriate to the facility needs. These configuration settings enable consistent
fingerprint function across all Color Touch cabinets at a facility.
Specific OmniCenter configurations are covered in “Setting Up OmniCenter” on page 5-1.
Configure Color Touch Cabinets
Enabling the support of the fingerprint scanner hardware ensures this feature is supported. If not
enabled, any fingerprint scanner hardware is ignored.
Specific Color Touch configurations are covered in “Setting Up Color Touch Cabinets” on
page 6-1.
© 2011 Omnicell, Inc. Touch & Go™ Technical Guide for UPEK Sensor Model/67-3090 Rev A
Page 36

5-4 Planning for Touch & Go
Go Live
Demonstrate Use
Getting a good enrollment helps reliability. Set user expectations:
Enrolling two fingers takes 1-2 minutes in most cases.
Enrollment Rates of 95% or higher observed at Beta sites.
First time Login Success Rates is 95% or higher.
Roughly, 5% of users are not able to get consistent fingerprint scans due to excessively dry
fingers. These users should be made Fingerprint Exempt.
Fingerprint conditions can change over time, and users may need to re-enroll to maintain
consistent performance.
Determine Fingerprint Registrars
1. Identify and name customer registrars.
2. Determine mode of access—Fingerprint Registrar or Supervisor
3. Train and certify registrars.
4. Verify registrars have successfully enrolled users.
Train Users
Go Live
Depending on the new policies and procedures, at least one member of nursing should be
designated as a super user that can oversee training and handle problems after implementation is
complete.
New users must understand the new workflow for the features installed on the cabinets.
Success depends on proper configurations, high quality enrollment, and consistent placement.
Specific training recommendations are covered in “Training Customers” on page 8-1.
Final steps for go live are:
1. Notify the users that the system is going live and that Omnicell is on site to answer any
questions.
2. Begin fingerprint enrollment.
Implementation Specialists should be on site to answer questions and to ensure a smooth
transition.
Touch & Go™ Technical Guide for UPEK Sensor Model/67-3090 Rev A © 2011 Omnicell, Inc.
Page 37

Setting Up OmniCenter
This chapter describes the tasks necessary to configure the OmniCenter to support Touch & Go
features. These tasks include:
“Setting Up Fingerprint Registrar” on page 6-1
“Setting Up Global Fingerprint Registrars” on page 6-2
“Modifying the FP Registrar for Individual Users” on page 6-3
“Setting Up FP Exempt” on page 6-3
“User Biometrics” on page 6-4
“Configure Biometric Archiving Setup” on page 6-6
Note:
All screen shots are taken from the Omnicell 15.1 release.
6-1
Setting Up Fingerprint Registrar
Touch & Go implementation at OmniCenter involves the verification and/or modification of user
records for proper assignment of FP Registrar status. Since the default FP Registrar settings are based
on user type, the facility should determine if modifications are necessary, prior to
implementation.
To support this feature, the
privileges for that user. The default settings for a particular
settings can also be modified on the individual user record, provided the logged-in user has the
necessary privileges.
FP Registrar field determines whether the user is authorized to enroll other users.
The
A setting of No indicates that the user cannot enroll other users.
A setting of Yes indicates that the user can enroll other users, but must first log in to the cabinet
biometrically (i.e. by providing a valid fingerprint).
A setting of Supervisor indicates that the user can enroll others, and can log in biometrically or
via keyboard entry.
The default settings for these fields are determined by
Omni User Type FP Registrar
Anesthesia Technician N
Anesthesiologist N
Certified Nurse Assistant N
Head Nurse Y
LPN N
Material Manager Y
Regular Nurse N
Regular Nurse B N
FP Registrar field appears in the Users table indicating the fingerprint login
User Type can be modified globally. The
User Type, as follows:
© 2011 Omnicell, Inc. Touch & Go™ Technical Guide for UPEK Sensor Model/67-3090 Rev A
Page 38

6-2 Setting Up OmniCenter
Setting Up Fingerprint Registrar
Omni User Type FP Registrar
Omnicell Tech S
Out Patient Rehabilitation Specialist N
Pharmacist A S
Pharmacist B N
Pharmacy Technician A N
Pharmacy Technician B N
Respiratory Therapist N
Restock Tech N
Tem p L PN N
Tem po rar y N urse N
Key: N (No); Y (Yes); S (Supervisor)
Setting Up Global Fingerprint Registrars
The default settings for a particular User Type can be modified globally. The FP Registrar field
determines whether the user is authorized to enroll other users. (See Figure 6-1.)
A setting of No indicates that the user cannot enroll other users.
A setting of Yes indicates that the user can enroll other users, but must first log in to the cabinet
biometrically (i.e. by providing a valid fingerprint).
1. Select Administrative tab > Global Modify type > Global Modify User Records option.
2. Select
3. Modify
4. Click Finish.
Omni User Type from the drop down list.
FP Registrar to Y (yes).
Figure 6-1. OmniCenter: Administration tab, Global Modify type, Global Modify User Records—FP Registrar field
Touch & Go™ Technical Guide for UPEK Sensor Model/67-3090 Rev A © 2011 Omnicell, Inc.
Page 39

Modifying the FP Registrar for Individual Users
Modify or verify settings for the desired FP Registrars in the OmniCenter user database. This step
may include downgrading or upgrading FP Registrar status, as needed, for various users.
This field can be altered by any user who has access to the Users table, and who has equal or greater
FP Registrar access rights than the user they are enrolling or modifying. For example, a user with
Supervisor rights can modify all other
1. Select the Database tab, Users table.
2. Select the applicable user record, then click Modify.
3. Change the FP Registrar field to
4. Click Save to record changes.
5. Repeat steps 3-6 for additional users.
FP Registrar types. (See Figure 6-2.)
Yes , No, or Supervisor as needed.
Setting Up OmniCenter 6-3
Setting Up FP Exempt
Figure 6-2. OmniCenter: Database tab, Users table—selected user record, FP Registrar field
Setting Up FP Exempt
Some users are not able to achieve the minimum enrollment quality. Those users should be
flagged as fingerprint-exempt. Determine if any users require FP Exempt status; if so, modify the
applicable User records. This determination must be made by the facility.
To support this feature, the
whether the user is exempt from the fingerprint login requirements. (See Figure 6-3.) An
exemption can be made, for example, if a particular user is physically unable to provide a
fingerprint scan of acceptable quality.
password at the cabinet level.
Note: Exempt users may require a witness at login or when a password is required to access
medications.
© 2011 Omnicell, Inc. Touch & Go™ Technical Guide for UPEK Sensor Model/67-3090 Rev A
FP Exempt field appears in the Users table. The FP Exempt field determines
FP Exempt status is only relevant if fingerprint is required for
Page 40

6-4 Setting Up OmniCenter
User Biometrics
The default setting for this field is unchecked (i.e. set to No) for all User Types. Any user with access to
Users table who is also designated as Supervisor in the FP Registrar field can change the FP Exempt
the
setting for another user.
so. Only users with
users.
1. Select the Database tab, Users table.
2. Select the applicable user record, then click Modify.
3. Select the FP Exempt field to exempt the user from the fingerprint login requirement. De-select
the field to remove the exemption. The field is de-selected (unchecked) by default for all user
types.
4. Click Save to record changes.
FP Exempt users can enroll and use a fingerprint, but are not required to do
FP Registrar status of Yes or Supervisor can serve as a login witness for FP Exempt
Figure 6-3. OmniCenter: Database tab, User table, user record—FP Exempt field
User Biometrics
User Biometrics information is displayed on the Database tab > Users table > selected user > User Biometrics
subtab.
The user biometric data displays each biometric record (template) for an individual user. If the user enrolled
at a G4 cabinet console with the UPEK scanner and VeriFinger software, there is one record per enrolled
fingerprint plus one legacy record for a fingerprint template. A legacy record is a fingerprint template
received from an Omnicell's G3 (third generation) automated medication and supply dispensing solution
(G3 cabinet console) with a Fujitsu scanner and software. The custom upgrade processing creates one user
biometric record containing a legacy fingerprint template for every user record that contains a fingerprint
template.
The following information is displayed:
Finger—finger(s) used for enrollment
Template—fingerprint technology software performing the fingerprint identification
processing (Fujitsu or VeriFinger)
Device Type—fingerprint sensor (Fujitsu or UPEK)
Touch & Go™ Technical Guide for UPEK Sensor Model/67-3090 Rev A © 2011 Omnicell, Inc.
Page 41

Legacy—fingerprint registered using a G3 cabinet console
Quality—fingerprint quality
Enrolled—date/time of fingerprint enrollment
Omni Site+ID—cabinet used to record fingerprint
Setting Up OmniCenter 6-5
User Biometrics
Figure 6-4. OmniCenter: Database tab, User table, user record—User Biometrics subtab
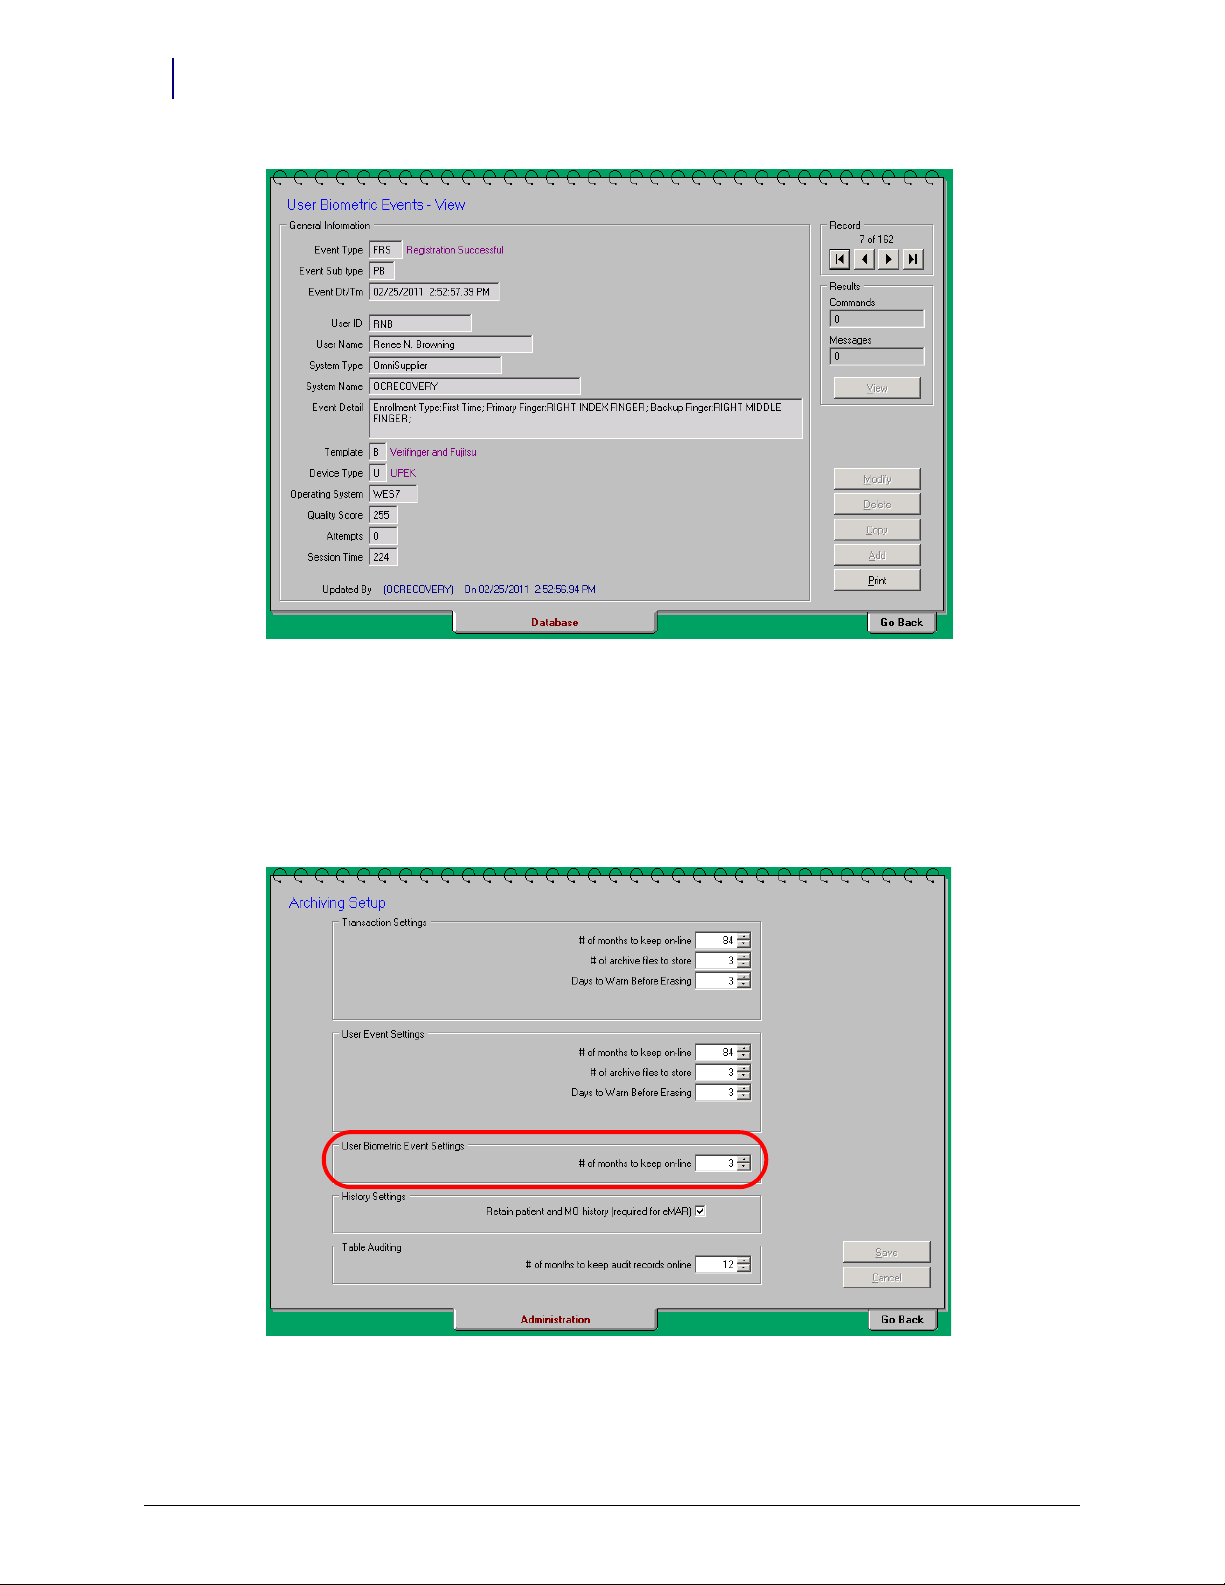
User Biometric Events is viewed from the Database tab, User Biometrics Events table. Selecting an
event displays information. (See Figure 6-5.)
User biometric events are generated at a G4 cabinet console only. Events consist of fingerprint
enrollment events and fingerprint logon events. The event specifies whether or not the activity
was successful and includes certain detail information, if available. These events are not
modifiable.
© 2011 Omnicell, Inc. Touch & Go™ Technical Guide for UPEK Sensor Model/67-3090 Rev A
Page 42
6-6 Setting Up OmniCenter
User Biometrics
Figure 6-5. OmniCenter: Database tab—Users Biometric Events table
Configure Biometric Archiving Setup
The Archiving Setup form is accessed using the OmniCenter console, Administration tab. This
configuration option is for setting the number of months to keep user biometric event data. (See
Figure 6-6.) The default for this setting is 3 months and valid values are from 1 through 84
months.
Figure 6-6. OmniCenter: Administration tab—User Biometric Event Settings
Touch & Go™ Technical Guide for UPEK Sensor Model/67-3090 Rev A © 2011 Omnicell, Inc.
Page 43

7-1
Setting Up Color Touch Cabinets
This chapter describes the tasks necessary to configure the software for Color Touch cabinets. Use
the tasks in this chapter to configure the cabinet specifically by cabinet features or, if you are
familiar with the options already, use the list of all the features in the order presented on the
cabinet.
The tasks in this chapter include:
“Configure Cabinets from OmniCenter” on page 7-2
“Configure Cabinets Based on Best Practice” on page 7-2
“Enable Touch & Go” on page 7-2
“Shortlist Configurations” on page 7-2
“Inactivity Aging” on page 7-3
—
“Other Modifications” on page 7-4
“Exempt User Configurations” on page 7-4
—
“Fingerprint Help” on page 7-4
—
“Password Entry” on page 7-5
—
“Other Configurations” on page 7-6
“Fingerprint Activity” on page 7-7
The Touch & Go fingerprint scanner is used at the Color Touch cabinet for the purposes of
logging in, witnessing transactions, and enrolling or re-enrolling users’ fingerprint scans. A
number of cabinet configuration options are provided that determine the specific behavior of
these functions. The desired settings for the configuration options should be discussed with the
facility and set as appropriate to the facility needs. It is recommended that consistent fingerprint
configuration options are maintained across all Color Touch cabinets at a facility.
© 2011 Omnicell, Inc. Touch & Go™ Technical Guide for UPEK Sensor Model/67-3090 Rev A
Page 44

7-2 Setting Up Color Touch Cabinets
Configure Cabinets from OmniCenter
Configure Cabinets from OmniCenter
There are a number of configurations related to UPEK and Verifinger, but they are hidden at the
cabinet. These configurations are viewable at the server, but these have been tuned by Engineering
and should not be changed.
The following settings are configurable using the OmniCenter only.
1. From the Database tab, open the OmniSuppliers table and select the cabinet to configure.
2. Click the Client Configs subtab and select Fingerprint Scanner category.
3. Set or verify configuration settings as follows.
Color Touch 15.0 software supports both Fujitsu sensors and UPEK sensors. The Fujitsu configurations
Note:
are included for facilities that have a mixed environment using both Fujitsu and UPEK sensors. If Color Touch
15.0 software is running on an XP cabinet with a Fujitsu sensor, the configurations identified for Fujitsu and
VeriFinger also apply.
Configure Cabinets Based on Best Practice
The following configuration settings are based on best practices and are viewable in the Admin
Menus, Omni Config section. These settings can be verified or modified either at the cabinet or at the
OmniCenter.
Enable Touch & Go
The configuration option Fingerprint Scanner Support must be Enabled for each cabinet using Touch & Go
for all features to take effect.
[FINGERPRINT]
Option Name: FINGERPRINTSUPPORT
Option Label: Fingerprint Scanner Support
Description: Enables or disables the support of the fingerprint scanner hardware. If
Valu es : En a bl e; Dis a bl e
Default: Disable
Implementation: Set to Enable for each cabinet using Touch & Go
Shortlist Configurations
A fingerprint scan does not replicate entering the user ID. Users must first enter a user ID via
keyboard entry, at least for initial login. If enabled, the user is then added to the cabinet’s short list
for quick entry and can log in using only a fingerprint, provided that user has a fingerprint
enrolled.
not enabled, any fingerprint scanner hardware will be ignored and there
will be no functional changes with respect to this feature. If enabled, this
feature will be supported. Note: working hardware will be required for
the functionality of this feature.
The entire short list is searched for multiple matches in order to screen for failed identifications.
This search is enabled automatically and cannot be disabled.
Touch & Go™ Technical Guide for UPEK Sensor Model/67-3090 Rev A © 2011 Omnicell, Inc.
Page 45

Setting Up Color Touch Cabinets 7-3
Configure Cabinets Based on Best Practice
If more than one match is found, this indicates a potential failed identification and the login is
denied. Comparisons against the short list stop as soon as a second match is found. During
enrollment when more than one fingerprint match is found against the short list, a warning is
displayed.
When needed, the short list may be reloaded by deleting the short list from memory and restoring
it from the
Startup
When Fingerprint Scanner Support is enabled/disabled
When the value for Fingerprint Short List Max Size is changed
When the value for Fingerprint Inactivity Aging is changed
Users table. A short list reload is triggered at:
These configuration settings can be changed at the cabinet or OmniCenter in order to trigger the
short list reload.
Midnight processing includes a full software reset of the fingerprint device during which
fingerprint support is shut down and then re-initialized. There is no change to the short list
during the reset.
Inactivity Aging
The short list is aged based on a period of inactivity, controlled by the configuration option
Fingerprint Inactivity Aging. A user is cut from the short list if the period of time since a user’s last login is
greater than the value of
short list. Aging takes place once every hour and the system automatically ages users from the
short list as needed.
limit of
Fingerprint Short List Max Size.
[FINGERPRINT]
Fingerprint Inactivity Aging. A setting of 0 (zero) disables the population of the
Fingerprint Inactivity Aging works in conjunction with, and at the same time as, the
Option Name: FINGERPRINTAGING2
Option Label: Fingerprint Inactivity Aging
Description: The maximum period of inactivity, in hours, that a user will be kept on
the short list after initial daily use. Users will be aged off the short list if
they have not had any login activity, via keyboard, card, and/or
fingerprint, within this time. A value of 0 will disable the short list.
When this value is changed the short list will be re-loaded based on the
new value.
Values: 0-720
Default: 96
Implementation: If not using short list, set to 0; If using a short list, set to 10 for each
cabinet using Touch & Go.
© 2011 Omnicell, Inc. Touch & Go™ Technical Guide for UPEK Sensor Model/67-3090 Rev A
Page 46

7-4 Setting Up Color Touch Cabinets
Configure Cabinets Based on Best Practice
Other Modifications
The following configuration settings are based on best practices.
Exempt User Configurations
[FINGERPRINT]
Option Name: FINGERPRINTDAILYTIME
Option Label: Exempt User Daily Use Time
Description: The length of time in hours that a fingerprint exempt user will be able to
Va lu e s : 0 -2 4
Default: 8
Implementation: Set to 10 for each cabinet using Touch & Go.
login without a witness after initial witness log-on. Note: this time will
be fixed, starting from the time of initial witness log-on, and will not be
extended based on subsequent access. This only applies if a user requires
an exempt log-on witness. A value of 0 will indicate such a witness is
required at each log-on.
Option Name: FINGERPRINTEXEMPTWITNESS
Option Label: Fingerprint Exempt Users Require Witness
Description: If enabled, any user designated as exempt from the fingerprint
requirement will require a witness as part of that users initial daily logon. This is ignored if Fingerprint Required for Password is not enabled.
Valu es : En a bl e; Dis a bl e
Default: Disable
Implementation: Verify setting of Disable for each cabinet using Touch & Go.
Fingerprint Help
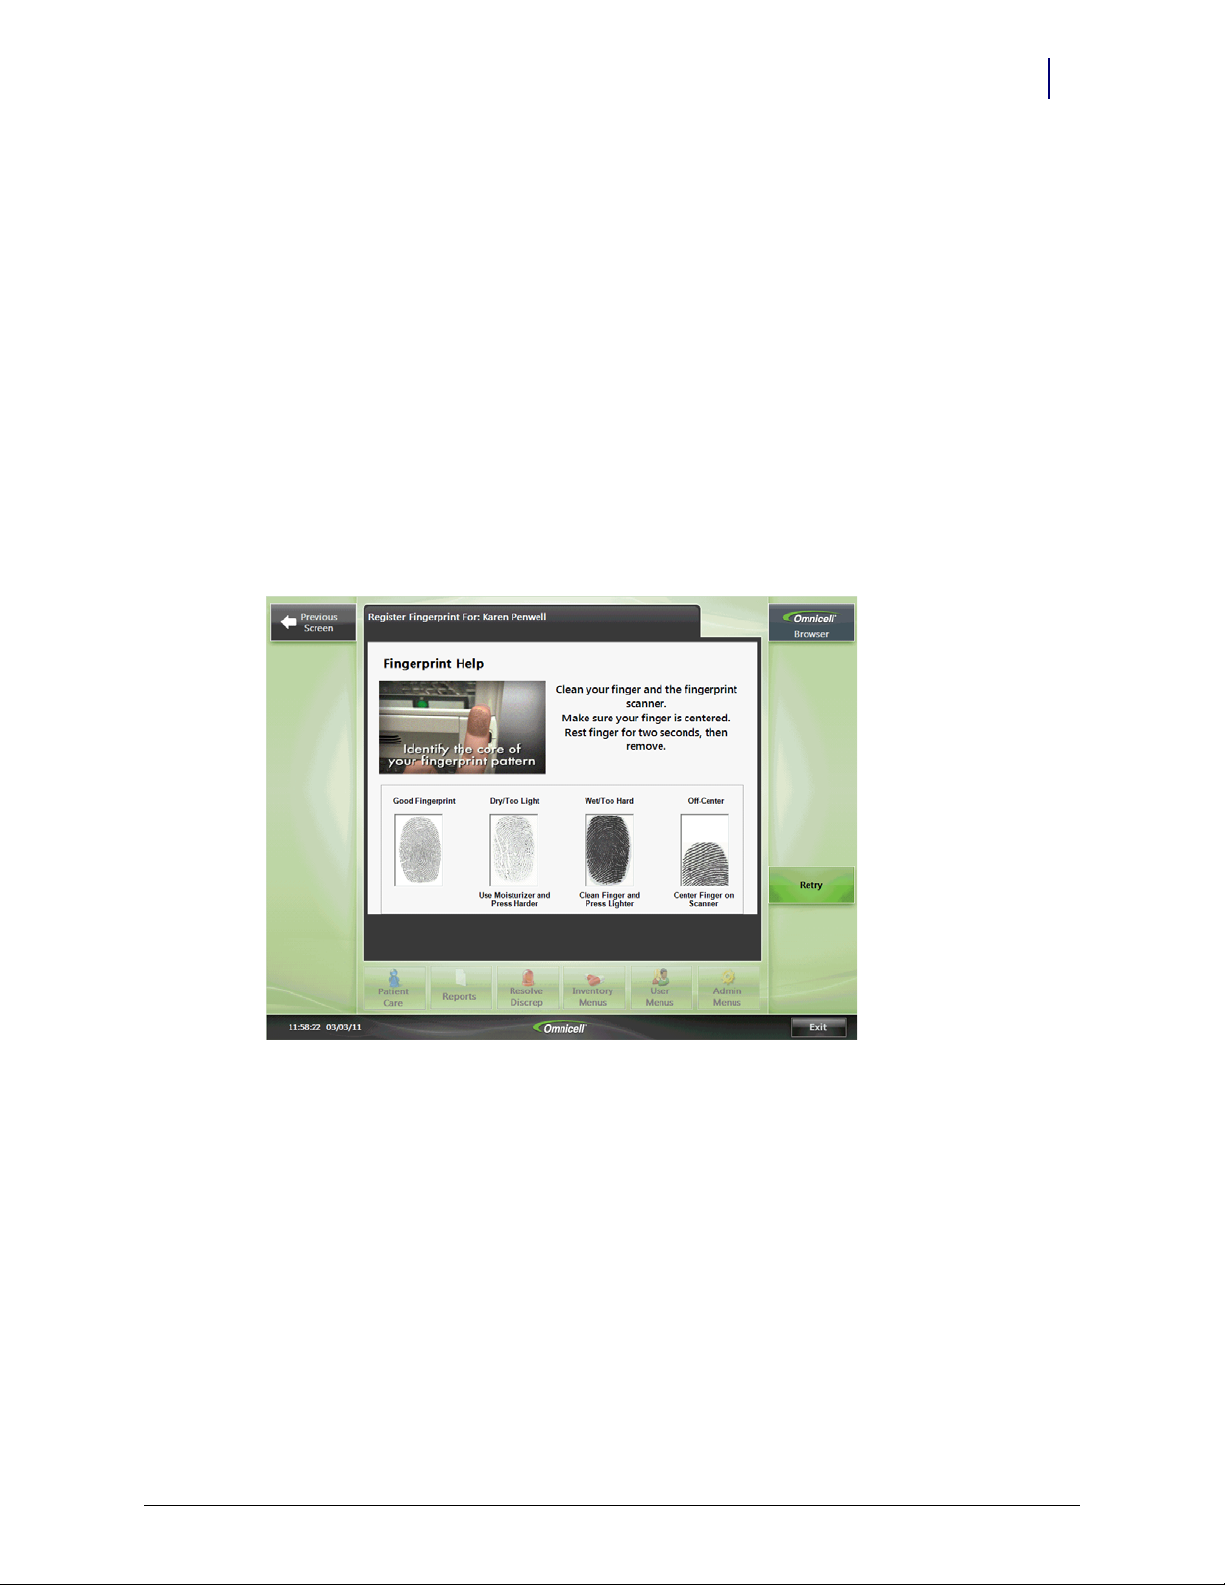
If fingerprint login fails after a configurable number of tries, the Fingerprint Help window (see
Figure 7-1) is displayed. The
Help
configuration option. A setting of 0 (zero) disables the Fingerprint Help window during login
functions.
Note:
The values and defaults of this configuration are different depending on the software version installed.
Fingerprint Help window is controlled by the Fingerprint Login Attempts Before
Touch & Go™ Technical Guide for UPEK Sensor Model/67-3090 Rev A © 2011 Omnicell, Inc.
Page 47
Configure Cabinets Based on Best Practice
[FINGERPRINT]
Option Name: FINGERPRINTTRAININGTHRESHOLD
Option Label: Fingerprint Login Attempts Before Help
Description: Version 15.1.x.x
Number of failed log-on attempts before the user is shown the
fingerprint help screen. The user will automatically be brought to the
fingerprint help screen from log-on if the number of failed fingerprint
log-on attempts reaches this number. Each scan must be within 7
seconds of each other in order to count. 0 disables fingerprint help at
log-on.
Va lu e s : 0 -1 0
Default: 6
Implementation: Set to 5 or 6 for each cabinet using Touch & Go.
Setting Up Color Touch Cabinets 7-5
Figure 7-1. Color Touch: Fingerprint Help
Password Entry
Depending on the cabinet configuration settings for a given User Type, password entry may or
may not be required. If password entry is not required, User ID entry or fingerprint scan (if the
user is on the short list) immediately grants access to the cabinet.
If password entry is required, facilities have the option to require a fingerprint scan by enabling
Fingerprint Required for Password option. The following users can always log in via keyboard entry,
the
regardless of this setting:
FP Exempt: Anyone designated as FP Exempt in the User record has the option to log in via
fingerprint, but is not required to do so. Depending on cabinet configuration settings,
users may be required to have a witness at the initial daily login. Only users with an
value of Y (Yes) or S (Supervisor) are eligible to witness the login of a fingerprint exempt user.
© 2011 Omnicell, Inc. Touch & Go™ Technical Guide for UPEK Sensor Model/67-3090 Rev A
FP Exempt
FP Registrar
Page 48

7-6 Setting Up Color Touch Cabinets
Configure Cabinets Based on Best Practice
FP Registrar—Supervisor: Anyone with an FP Registrar setting of S (Supervisor) has the option to log in
via fingerprint or keyboard entry. However, if
via keyboard, only User Menu is accessible.
Omnitech Users: Anyone with a User Type of Omnitech has the option to login via fingerprint or
keyboard entry. However, if
Patient Care is disabled.
If the
Fingerprint Required for Password configuration option is enabled, a valid fingerprint scan is required
for all witnesses (including FP Registrars) except those designated as
transaction,
FP Exempt users have the option to enter a user ID and password via keyboard entry or
to provide a fingerprint.
Reset or Expired Password When a user’s password expires or is reset, the user is prompted to
enter a new password via keyboard entry or to scan their fingerprint. If the
Password
configuration option is enabled, and a fingerprint was not provided at login (FP Registrar
or Omnitech), the user is prompted for a valid fingerprint scan. Exempt users do not require a
fingerprint scan to change passwords.
Fingerprint Required for Password configuration option is disabled, a fingerprint is not required for
If the
password change for any user.
fingerprint required... is enabled, and the user logs in
fingerprint required... is enabled, and the user logs in via keyboard,
FP Exempt. When witnessing a
Fingerprint Required for
Other Configurations
The following cabinet configuration options are viewable in the Admin Menus, Omni Config section.
These settings can be verified or modified either at the cabinet or at the OmniCenter.
[FINGERPRINT]
Option Name: FINGERPRINTLOGINATTEMPTSTHRESHOLD
Option Label: Short List Attempts Before UserID Prompt
Description: Number of Fingerprint login attempts before text UserID prompt.
Va lu e s : 0 -1 0
Default: 3
Implementation: Confirm value setting of 3 for all cabinets.
Option Name: FINGERPRINTVALIDATION
Option Label: Validate Fingerprint at Enrollment
Description: Enable Fingerprint validation at enrollment time.
Valu es : En a bl e; Dis a bl e
Default: Enable
Touch & Go™ Technical Guide for UPEK Sensor Model/67-3090 Rev A © 2011 Omnicell, Inc.
Page 49

Fingerprint Activity
Fingerprint Activity Availability is enabled automatically and cannot be disabled.
1. Users who are supervisor fingerprint registrars at the OmniCenter can press Fingerprint Activity
to access the Fingerprint Activity window from the User Menu. (See Figure 7-2.)
Setting Up Color Touch Cabinets 7-7
Configure Cabinets Based on Best Practice
Figure 7-2. Color Touch: User Menu—Supervisor
The Fingerprint Activity window displays the contents of the short list, which contains the following
information (see Figure 7-3):
Number of enrolled Touch & Go users
Current setting for Fingerprint Short List Max Size
Current setting for Fingerprint Inactivity Aging
Current short list information
User ID
Each user’s fingerprint enrollment quality
Total number of fingerprint uses for that user that day
Last login activity date/time (keyboard or fingerprint login)
Usage statistics for the specified time period
Total number of fingerprint users
Average sessions per user
Enrollments attempted
Enrollment failed attempts
Logins attempted
Login failed matches
Help text
© 2011 Omnicell, Inc. Touch & Go™ Technical Guide for UPEK Sensor Model/67-3090 Rev A
Page 50

7-8 Setting Up Color Touch Cabinets
Configure Cabinets Based on Best Practice
Figure 7-3. Color Touch: Fingerprint Activity window
Touch & Go™ Technical Guide for UPEK Sensor Model/67-3090 Rev A © 2011 Omnicell, Inc.
Page 51

Scanner Maintenance
Sensor hardware may become damaged over time. Run the sensor check procedure monthly on
each cabinet.
This chapter describes the tasks necessary for scanner maintenance at a Color Touch cabinet. The
tasks in this chapter include:
“Cleaning the Scanner”
“Sensor Diagnostics”
“UPEK Sensor Calibration Utility” on page 8-2
“Fingerprint Diagnostics” on page 8-3
Cleaning the Scanner
It is recommended that the scanner be cleaned regularly, on a daily basis or anytime an oily
residue appears, as residue build-up can affect login performance.
1. Clean the scanner using regular hospital tissue or moist cloth. A clean cotton cloth, tissue, or
moist towelette removes deposits from the sensor surface.
The sensor should be cleaned gently. Scrubbing the sensor too hard may shorten the life of
the sensor.
Abrasive cleaners should not be used to clean the scanner.
Nylon brushes, scouring pads, abrasive cleaning fluids or powders, or steel wool should not
be used to clean the scanner.
Tissues (e.g. Kleenex) that include lotion should not be used as this worsens the dirty
sensor.
No soiled material should be used to clean the sensor. A clean cotton cloth or tissue paper
absorbs the deposits, but a soiled cloth acts as an abrasive.
2. If needed, to clean or prevent contamination, sanitize the scanner using a slightly damp
alcohol wipe.
8-1
Important:
other cleaners should be used.
To avoid damaging the scanner, do not spray or saturate the scanner with alcohol. No
Sensor Diagnostics
Overtime with repeated use, some of the pixels on the sensor may begin to fail. This is natural and
the system can deal with some number of failed pixels. Omnicell has developed a tool that
monitors these failed sensor pixels. When the failures approach the threshold that cause scanning
errors, the sensor can be replaced proactively.
Note: Sensor replacement cycle is expected to be every 2-3 years depending on use.
Check sensor operation three ways:
© 2011 Omnicell, Inc. Touch & Go™ Technical Guide for UPEK Sensor Model/67-3090 Rev A
Page 52

8-2 Scanner Maintenance
Sensor Diagnostics
Color Touch cabinet Logs
Fingerprint Diagnostics
Sensor test and calibration utility
UPEK Sensor Calibration Utility
From the Windows desktop, run the TCEFCRevA6UPEKEIMLiteProductionTest10.exe utility
from the D:\Utilities\UPEK Sensor Test Utility folder. It may take 1-2 minutes for the test to
complete.
A “1” indicates the sensor checks passed, and the unit is operational. (See Figure 8-1.) Any other
value indicates a failure.
Figure 8-1. Sensor Test Utility Results—Passed
If any steps fail, replace the sensor.
The log in Figure 8-2 shows that the tests were successfully run, and no failed features (rows,
columns, pixels) were found.
Figure 8-2. Sensor Test Log—Passed
Touch & Go™ Technical Guide for UPEK Sensor Model/67-3090 Rev A © 2011 Omnicell, Inc.
Page 53
Scanner Maintenance 8-3
Sensor Diagnostics
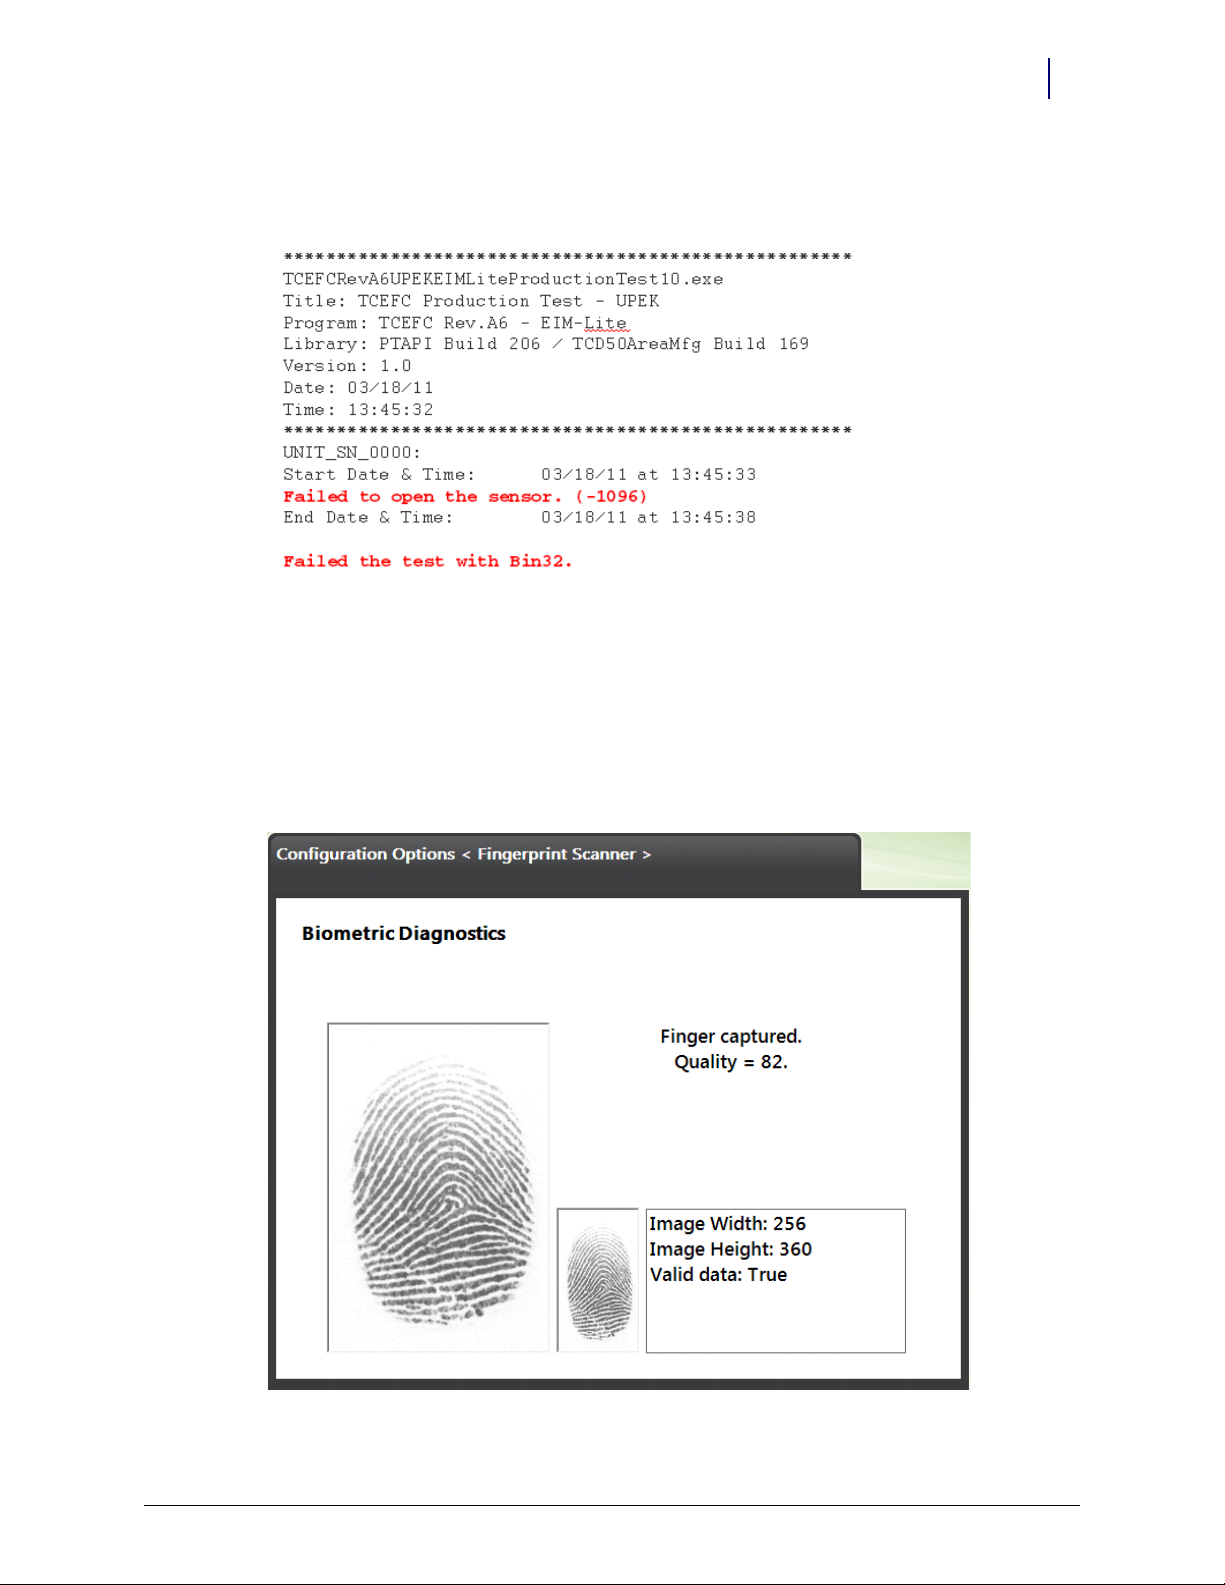
The log in Figure 8-3 shows that the sensor could not be accessed to run any tests. This sensor
should be replaced.
Figure 8-3. Sensor Test Log—Failed
Fingerprint Diagnostics
At the cabinet, run Fingerprint Diagnostics. Sensor operation can be tested through the
Fingerprint Diagnostics screen. (See Figure 8-4.)
Configs > Fingerprint > Fingerprint Diagnostics
If an image appears, the sensor is in working order.
Figure 8-4. Color Touch: Configs, Fingerprint—Fingerprint Diagnostics
© 2011 Omnicell, Inc. Touch & Go™ Technical Guide for UPEK Sensor Model/67-3090 Rev A
Page 54

8-4 Scanner Maintenance
Sensor Diagnostics
Touch & Go™ Technical Guide for UPEK Sensor Model/67-3090 Rev A © 2011 Omnicell, Inc.
Page 55

Training Customers
Provide thorough training to users in order to make the system as easy to use as possible.
User training should focus on:
“User Experience” .
“Proper Finger Placement” on page 9-1.
“Achieve a Quality Fingerprint Enrollment” on page 9-2.
“Consistent Finger Placement at Log In” on page 9-3.
Registrar training should focus on:
“User Experience” .
“Proper Finger Placement” on page 9-1.
“Consistent Finger Placement at Log In” on page 9-3.
“Appropriate Maintenance of the Sensor” on page 9-3.
9-1
User Experience
The G4 fingerprint sensor has a large area sensor providing about 50% more surface area
compared to small-area sensors. The G4 fingerprint sensor is more forgiving of placement issues
and increased accuracy.
After enrolling a user, make sure they can login 2-3 times in a row with their fingerprint.
Proper Finger Placement
Ensure the user understands correct hand and finger placement:
Anchor hand for consistent placement.
Figure 9-1. Color Touch: Anchor Hand (L-one cell; R-table top)
© 2011 Omnicell, Inc. Touch & Go™ Technical Guide for UPEK Sensor Model/67-3090 Rev A
Page 56

9-2 Training Customers
Achieve a Quality Fingerprint Enrollment
Place the finger flat in the sensor.
Align the core feature on the sensor.
Figure 9-2. Color Touch: Finger Placement
Do not roll finger.
Do not poke the sensor like a doorbell.
Do not press too hard.
Do not hold finger on the sensor after a failed scan.
Verify the core finger pattern is the part placed on the scanner.
Achieve a Quality Fingerprint Enrollment
First time fingerprint enrollees should follow the instructions on the screen. The system will guide
them through the enrollment process where they can enroll a primary and alternate finger. The
system will prompt the user to use a specific finger and let them know when they should lift or
place the finger on the sensor.
The system will first prompt the user to try a couple of practice scans on a particular finger. If the
system determines that a finger is suitable for enrollment, the user will be taken to the enrollment
screen.
If the user’s fingerprint quality is not optimal, the system will prompt the user for a different
finger.
Touch & Go™ Technical Guide for UPEK Sensor Model/67-3090 Rev A © 2011 Omnicell, Inc.
Page 57

Consistent Finger Placement at Log In
The Color Touch display provides near real-time visual feedback to the user regarding image
quality and fingerprint placement on the sensor. This is so the user can optimize finger conditions
and placement.
Training Customers 9-3
Consistent Finger Placement at Log In
Figure 9-3. Color Touch: Finger Placement
The fingerprint feedback section appears whenever a scan attempt is detected on the login screen.
Arrows in the window are meant to guide the user to better position their fingers on the sensor.
The fingerprint image on-screen should fill the window. If it does not, users should re-position
their finger on the sensor. Arrows can point up, down, right, or left.
Figure 9-4. Color Touch: Fingerprint Feedback
Appropriate Maintenance of the Sensor
Clean the sensor gently, at least daily, using an alcohol wipe, moist cloth, or moist tissue. Dry the
sensor after cleaning.
If the scanner appears to be damaged or does not seem to be working properly, refer to “Scanner
Maintenance” on page 7-1.
© 2011 Omnicell, Inc. Touch & Go™ Technical Guide for UPEK Sensor Model/67-3090 Rev A
Page 58

10-1
Troubleshooting
During initial enrollment, it is common for users to be more careful and aware of finger
positioning on the scanner. Once accustomed to the scanner, users tend to be more relaxed about
finger placement, and may have difficulty achieving a match with the original scan. If this occurs,
it is recommended that the user(s) be re-enrolled, with finger placement the same as during
normal use. The user may initially have more trouble enrolling but the end result is far more
reliable.
This chapter describes issues that may be helpful when troubleshooting to support Touch & Go
features. These tasks include:
“Fingerprint Data Capture” on page 10-1
“Minimizing Failed ID” on page 10-2
“Sensor is Unresponsive” on page 10-2
“Challenges” on page 10-2
Fingerprint Data Capture
The Color Touch cabinet captures data around all fingerprint processes. This information
provides visibility to the process. The following log information is recorded during the user login
and enrollment process:
Who attempted to enroll
When
With what fingerprint samples
Over how many attempts
Whether they were successful
© 2011 Omnicell, Inc. Touch & Go™ Technical Guide for UPEK Sensor Model/67-3090 Rev A
Page 59

10-2 Troubleshooting
Minimizing Failed ID
Minimizing Failed ID
Note:
Applies to shortlist mode only.
The system has built in failed ID blocking.
If a login fingerprint matches more than one user at or above the minimum quality threshold,
the system will warn the user and not let them gain access.
These users may need to be re-enrolled with a different finger or made exempt.
User events report.
Category: GEN
Multi fingerprint matches
Sensor check.
Dead sensor pixels will contribute false minutiae points to users enrolling at that cabinet.
Sensor is Unresponsive
The sensor can become unresponsive. Latent prints or a gummed up sensor will cause the sensor
to go into a temporary sleep mode.
1. Wipe the sensor with a dry tissue or cloth, and try again.
2. If the sensor is still not responding, reset the sensor.
3. Disable, then Enable at console.
Challenges
User’s fingers may be extremely moist, triggering latent detection.
Omni Config > Fingerprint > Fingerprint Sensor
User does not realize that they are not on the shortlist.
Shortlist becomes full and dumps users.
Dirty sensor or latent print.
Bad sensors leading to failed ID,.
Fingerprints can change over time; periodic re-enrollment is necessary.
Touch & Go™ Technical Guide for UPEK Sensor Model/67-3090 Rev A © 2011 Omnicell, Inc.
Page 60

GL-1
Glossary
Enrollment The process of scanning a fingerprint to create a fingerprint signature for a user.
This signature is stored for later comparison.
Enrollment model The numeric representation of the registered fingerprint used for
verifying a user's identity
False Acceptance An error which occurs when the system wrongly identifies a person as a
different individual.
False Negative See “False Reject” .
False Positive See “False Acceptance” .
False Reject An error which occurs when the system denies access to a properly enrolled
person.
Fingerprint Exempt Certain users may not be able to provide a fingerprint scan. It will be
possible to indicate such users as fingerprint exempt. Special rules will apply to fingerprint
exempt users so they may use the system even when a fingerprint is normally required.
Fingerprint scan See “Scanned print” .
Fingerprint Scanner A USB hardware device that scans a fingerprint. Software can interface
with this device to analyze a user's fingerprint.
Fingerprint Signature Binary data, variable in length, which uniquely identifies a user's
fingerprint.
Identification The process of uniquely identifying a user from a pool of enrolled users.
Image quality The quality of the scanned fingerprint.
Initial Daily Use The first time a user logs onto a unit in a given time period. This would
require a user ID (either typed or via a card reader) and a fingerprint scan.
Match A match occurs when the system associates a newly scanned fingerprint with a
enrolled print.
Password Private user code typed in as part of login or witness actions. For this feature a
fingerprint scan can take the place of a password. The password and fingerprint are not the
same.
Registered print See “Enrollment” .
© 2011 Omnicell, Inc. Touch & Go™ Technical Guide for UPEK Sensor Model/67-3090 Rev A
Page 61

GL-2 Glossary
Scanned fingerprint
Scanned fingerprint See “Scanned print” .
Scanned print The fingerprint sample submitted by a user during an attempt to gain access
to the system.
Short List The list at the Color Touch which stores the fingerprint models of the most recent
users to access the cabinet. After initial daily use the user will be placed on a short list of
fingerprint users eligible for quick login via subsequent daily login. This will be only a subset of the total fingerprint user database.
Subsequent Daily Use For a given time period after initial daily use, the user will be able to
login to the unit with just a fingerprint scan. This time period is configurable.
User Enrollment Process The course by which a user submits a fingerprint to be stored as a
reference (enrollment model) for comparing against login scans.
User Login Process The course by which a user attempts to gain access to the system by
presenting one or more uniquely identifiable characteristics to the system. If the system
recognizes these characteristics, the user is granted access.
User Registration Process See “User Enrollment Process” .
Verification The process of scanning a fingerprint to compare against a stored enrollment
signature in order to verify the identity of a user. A newly scanned fingerprint is compared
against a retrieved enrollment model.
Touch & Go™ Technical Guide for UPEK Sensor Model/67-3090 Rev A © 2011 Omnicell, Inc.
Page 62

Index
IN-1
A
aging for short list 7-3
alignment, finger
anchoring the hand
authentication mode
9-2
9-1
5-3
B
bar code reader 1-6
biometric positive-ID system
1-1
D
data capture errors 10-1
dead sensor
default settings
default settings, user type
10-2
6-1
6-2
E
enrollment
overview
planning for
exempt from biometric requirements
Exempt User Daily Use Time config option
1-1
5-4
1-3
F
fast access 1-1
finger placement
consistent
overview
fingerprint
activity availability
config option
Help window
minutia numeric code
troubleshooting
verification
FP Exempt field
password requirements
setting up
FP Registrar
9-3
9-1
7-7
Exempt Users Require Witness
Inactivity Aging
Login Attempts Before Help
Scanner Support
7-3
7-5
7-2
7-4
1-3
10-1
1-5
7-5
6-3
6-1–6-6, 7-6
7-4
7-4
G
go live 5-4
H
high security 1-1
I
ID blocking 10-2
initial fingerprint enrollment
1-5
K
keyboard entry 7-5
kit/parts required for Touch & Go
OmniRx, TT models, Half-cell
1-1
L
latent prints 10-2
logging in
login attempts
login witness
7-1, 9-1
7-5
6-4
M
magnetic card reader 1-6
maintenance, scanner cleaning
manuals, related documentation
midnight processing
minimizing ID
minutia points
multiple fingerprint matches
7-3
10-2
1-3, 10-2
8-1
ii-1
10-2
O
Omnicell 14.0 Color Touch 5.10 Guide ii-2
Omnicell Technical Release Summary
OmniCenter 15.0 Administrator Guide
Omnitech Users
7-6
ii-2
ii-2
P
password entry 7-5
planning for Touch & Go
5-1–5-4
© 2011 Omnicell, Inc. Touch & Go™ Technical Guide for UPEK Sensor Model/67-3090 Rev A
Page 63

IN-2 Index
R
registering other users
Fingerprint Registrars
FP Registrar field
supervisor
registrars
changing status
identify potiential
purpose
setting up
related documentation
reload, short list
resetting passwords
6-1
1-5
6-2
7-3
6-2
6-1
6-3
5-4
ii-2
7-6
S
sensor check 10-2
short list
Short List Attempts Before UserID Prompt config
sleep mode
Supervisor user type
7-2
option
7-6
10-2
6-1
T
threshold minimum values 10-2
training customers
troubleshooting
5-4, 9-1
10-1–10-2
U
unresponsive sensor 10-2
Usage statistics
user record
enrollment privileges
user access
witness
user type, default settings
7-7
1-5
1-5
1-5
6-1–6-2
V
Validate Fingerprint at Enrollment config option 7-6
verification of user fingerprints
1-1
W
witness transactions 7-1, 7-6
Touch & Go™ Technical Guide for UPEK Sensor Model/67-3090 Rev A © 2011 Omnicell, Inc.
Page 64

Documentation Feedback
This document is designed to provide relevant technical information to those responsible for the
implementation, service, and support of Omnicell products. The Documentation team needs your
input, so we can continue to improve our publications.
Sending Comments to the Technical Documentation Team
Did this document meet your needs? If so, please let us know what we’re doing right. If not, please
provide specific feedback. Email or fax your feedback as follows:
Email: Documentation Requests email group at documentationrequests@omnicell.com (specify the
document title or PN).
Fax: Send this page, along with your feedback, to (650) 251-6266, attention: Documentation.
This document is designed to provide relevant technical information to Omnicell personnel
responsible for the implementation, service, and support of Omnicell Automation Systems.
Feedback Form
Name: Email:
Dept./Title: Phone:
Feed back:
© 2011 Omnicell, Inc. Touch & Go™ Technical Guide for UPEK Sensor Model/67-3090 Rev A
Page 65

 Loading...