

Page 1

OmniTT/AnesthesiaTT
Installation and Service
Guide
67-2024 Rev D
Page 2

This guide is CONFIDENTIAL and designed only for Omnicell Technical personnel and/or designated
representatives.
This guide and accompanying software and/or hardware described in it are protected under copyright laws and may
not be copied, wholly or in part, without the express written consent of Omnicell, Inc. The same proprietary and
copyright notices must be attached to any permitted copies as were attached to the original documents.
Omnicell, Inc.
1201 Charleston Road
Mountain View, CA 94043
(650) 251-6100
www.omnicell.com
Omnicell and the Omnicell design mark, OmniBuyer, OmniCenter, OmniRx, OmniSupplier, SafetyMed, SafetyPak,
SafetyStock, and Sure-Med are registered trademarks. Anesthesia TT, Anesthesia Workstation, Anywhere RN,
Executive Advisor, Flexbin, Medication Surveillance, OmniDispenser, OmniLinkRx, OmniScanner, OmniTrack,
Omni TT, Open Touch, OptiFlex, OptiFlex MobileTrack, Point-to-Point Medication Safety, SecureVault, See & Touch,
SinglePointe, TempCheck, Touch & Go, VSuite, and WorkflowRx are trademarks of Omnicell, Inc. in the United States
and internationally. All other trademarks and trade names are the property of their respective owners
Copyright 2010 Omnicell, Inc. All rights reserved.
OmniTT/AnesthesiaTT Installation and Service Guide/67-2024 Rev D © 2010 Omnicell, Inc.
Page 3

Table of Contents
Electronics Tray . . . . . . . . . . . . . . . . . . . . . . . . . . . . . . . . . . . . . . . . . . . . . . . . . . . . . . . . . . . . . . 1-1
Introduction . . . . . . . . . . . . . . . . . . . . . . . . . . . . . . . . . . . . . . . . . . . . . . . . . . . . . . . . . . . . . . . . . 1-1
Tools List . . . . . . . . . . . . . . . . . . . . . . . . . . . . . . . . . . . . . . . . . . . . . . . . . . . . . . . . . . . . . . . . 1-1
Remove the LCD Screen. . . . . . . . . . . . . . . . . . . . . . . . . . . . . . . . . . . . . . . . . . . . . . . . . . . . . . . 1-1
Remove the LCD Bezel. . . . . . . . . . . . . . . . . . . . . . . . . . . . . . . . . . . . . . . . . . . . . . . . . . . . . 1-1
Remove the LCD Assembly . . . . . . . . . . . . . . . . . . . . . . . . . . . . . . . . . . . . . . . . . . . . . . . . . 1-2
Remove the Speaker . . . . . . . . . . . . . . . . . . . . . . . . . . . . . . . . . . . . . . . . . . . . . . . . . . . . . . . . . . 1-2
Remove the printer . . . . . . . . . . . . . . . . . . . . . . . . . . . . . . . . . . . . . . . . . . . . . . . . . . . . . . . . . . . 1-3
Remove the Printer PC Card. . . . . . . . . . . . . . . . . . . . . . . . . . . . . . . . . . . . . . . . . . . . . . . . 1-6
Remove the Keyboard. . . . . . . . . . . . . . . . . . . . . . . . . . . . . . . . . . . . . . . . . . . . . . . . . . . . . . . . . 1-7
Remove the Elastomer . . . . . . . . . . . . . . . . . . . . . . . . . . . . . . . . . . . . . . . . . . . . . . . . . . . . . 1-8
Replace the Elastomer. . . . . . . . . . . . . . . . . . . . . . . . . . . . . . . . . . . . . . . . . . . . . . . . . . . . . . 1-8
Replace the keyboard . . . . . . . . . . . . . . . . . . . . . . . . . . . . . . . . . . . . . . . . . . . . . . . . . . . . . . 1-8
Remove the Electronics Tray. . . . . . . . . . . . . . . . . . . . . . . . . . . . . . . . . . . . . . . . . . . . . . . . . . . 1-9
Remove the PowerCom2 tray from the OmniRx/TT. . . . . . . . . . . . . . . . . . . . . . . 1-11
Install the PowerCom3 CT PC Tray. . . . . . . . . . . . . . . . . . . . . . . . . . . . . . . . . . . . . . . . . 1-11
Replace the cables . . . . . . . . . . . . . . . . . . . . . . . . . . . . . . . . . . . . . . . . . . . . . . . . . . . . 1-12
iii
Frames and Wireways . . . . . . . . . . . . . . . . . . . . . . . . . . . . . . . . . . . . . . . . . . . . . . . . . . . . . . . . 2-1
Introduction . . . . . . . . . . . . . . . . . . . . . . . . . . . . . . . . . . . . . . . . . . . . . . . . . . . . . . . . . . . . . . . . . 2-1
Tools List . . . . . . . . . . . . . . . . . . . . . . . . . . . . . . . . . . . . . . . . . . . . . . . . . . . . . . . . . . . . . . . . 2-1
Remove the Wireways. . . . . . . . . . . . . . . . . . . . . . . . . . . . . . . . . . . . . . . . . . . . . . . . . . . . . . . . . 2-1
Remove and Replace the Manual Override Cable. . . . . . . . . . . . . . . . . . . . . . . . . . . . . . . . . 2-3
Remove the Manual Override Cable . . . . . . . . . . . . . . . . . . . . . . . . . . . . . . . . . . . . . . . . . 2-3
Replace the manual override cable . . . . . . . . . . . . . . . . . . . . . . . . . . . . . . . . . . . . . . . . . . . 2-6
Drawers . . . . . . . . . . . . . . . . . . . . . . . . . . . . . . . . . . . . . . . . . . . . . . . . . . . . . . . . . . . . . . . . . . . . . 3-1
Introduction . . . . . . . . . . . . . . . . . . . . . . . . . . . . . . . . . . . . . . . . . . . . . . . . . . . . . . . . . . . . . . . . . 3-1
Tools List . . . . . . . . . . . . . . . . . . . . . . . . . . . . . . . . . . . . . . . . . . . . . . . . . . . . . . . . . . . . . . . . 3-1
Matrix Drawers . . . . . . . . . . . . . . . . . . . . . . . . . . . . . . . . . . . . . . . . . . . . . . . . . . . . . . . . . . . . . . 3-2
Configuring Bins in Unlit Matrix Drawers . . . . . . . . . . . . . . . . . . . . . . . . . . . . . . . . . . . . 3-2
Configuring Bins in lit Matrix Drawers. . . . . . . . . . . . . . . . . . . . . . . . . . . . . . . . . . . . . . . 3-3
Labelling Matrix Drawers . . . . . . . . . . . . . . . . . . . . . . . . . . . . . . . . . . . . . . . . . . . . . . . . . . 3-3
Installing a Drawer . . . . . . . . . . . . . . . . . . . . . . . . . . . . . . . . . . . . . . . . . . . . . . . . . . . . . . . . . . . 3-4
Removing a Drawer. . . . . . . . . . . . . . . . . . . . . . . . . . . . . . . . . . . . . . . . . . . . . . . . . . . . . . . . . . . 3-6
Appendix A: Part List . . . . . . . . . . . . . . . . . . . . . . . . . . . . . . . . . . . . . . . . . . . . . . . . . . . . . . . . A-1
Index. . . . . . . . . . . . . . . . . . . . . . . . . . . . . . . . . . . . . . . . . . . . . . . . . . . . . . . . . . . . . . . . . . . . . . IN-1
© 2010 Omnicell, Inc. OmniTT/AnesthesiaTT Installation and Service Guide/67-2024 Rev D
Page 4

iv Table of Contents
Feedback Form. . . . . . . . . . . . . . . . . . . . . . . . . . . . . . . . . . . . . . . . . . . . . . . . . . . . . . . . . . . . . FB-1
OmniTT/AnesthesiaTT Installation and Service Guide/67-2024 Rev D © 2010 Omnicell, Inc.
Page 5
Electronics Tray
Introduction
This section will give detailed instructions on the proper way to replace specific parts within the
CT PC Sled, also known as the electronics tray. To complete any of these procedures, first ensure
that the sled has been unplugged from any power outlet.
Tools List
The following tools are required to install the Electronics Tray:
1-1
T8 Torx Driver
T10 Torx Driver
T15 Torx Driver
9/64” Allen wrench
Removal Procedure
LCD Screen
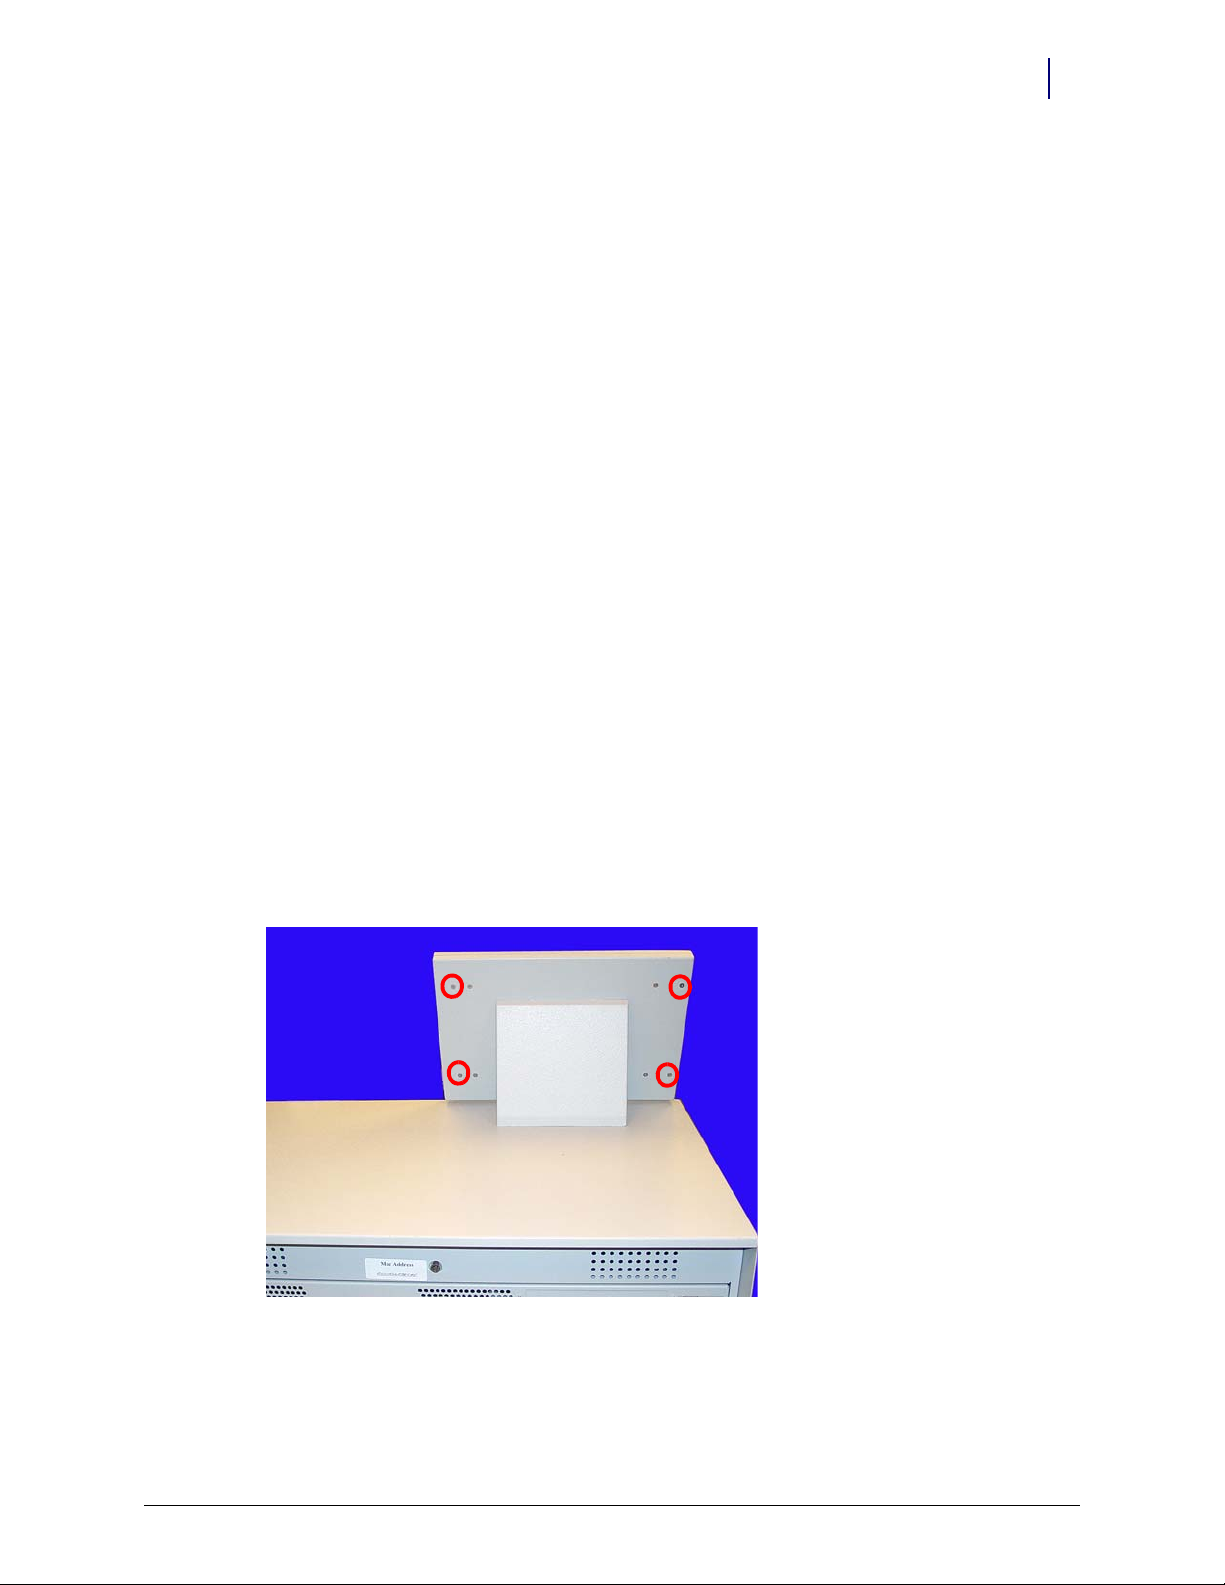
1. Perform a graceful shutdown of the electronics tray.
2. Remove the four outer screws that secure the LCD bezel to the cabinet.
Use a Torx T10 screwdriver.
Figure 1-1. Remove the Four Outer Screws
3. Remove the front bezel.
© 2010 Omnicell, Inc. OmniTT/AnesthesiaTT Installation and Service Guide/67-2024 Rev D
Page 6
1-2 Electronics Tray
Removal Procedure
LCD Assembly
1. Tilt the LCD assembly forward and disconnect the cables from the back of the LCD assembly.
2. Set the lid back down.
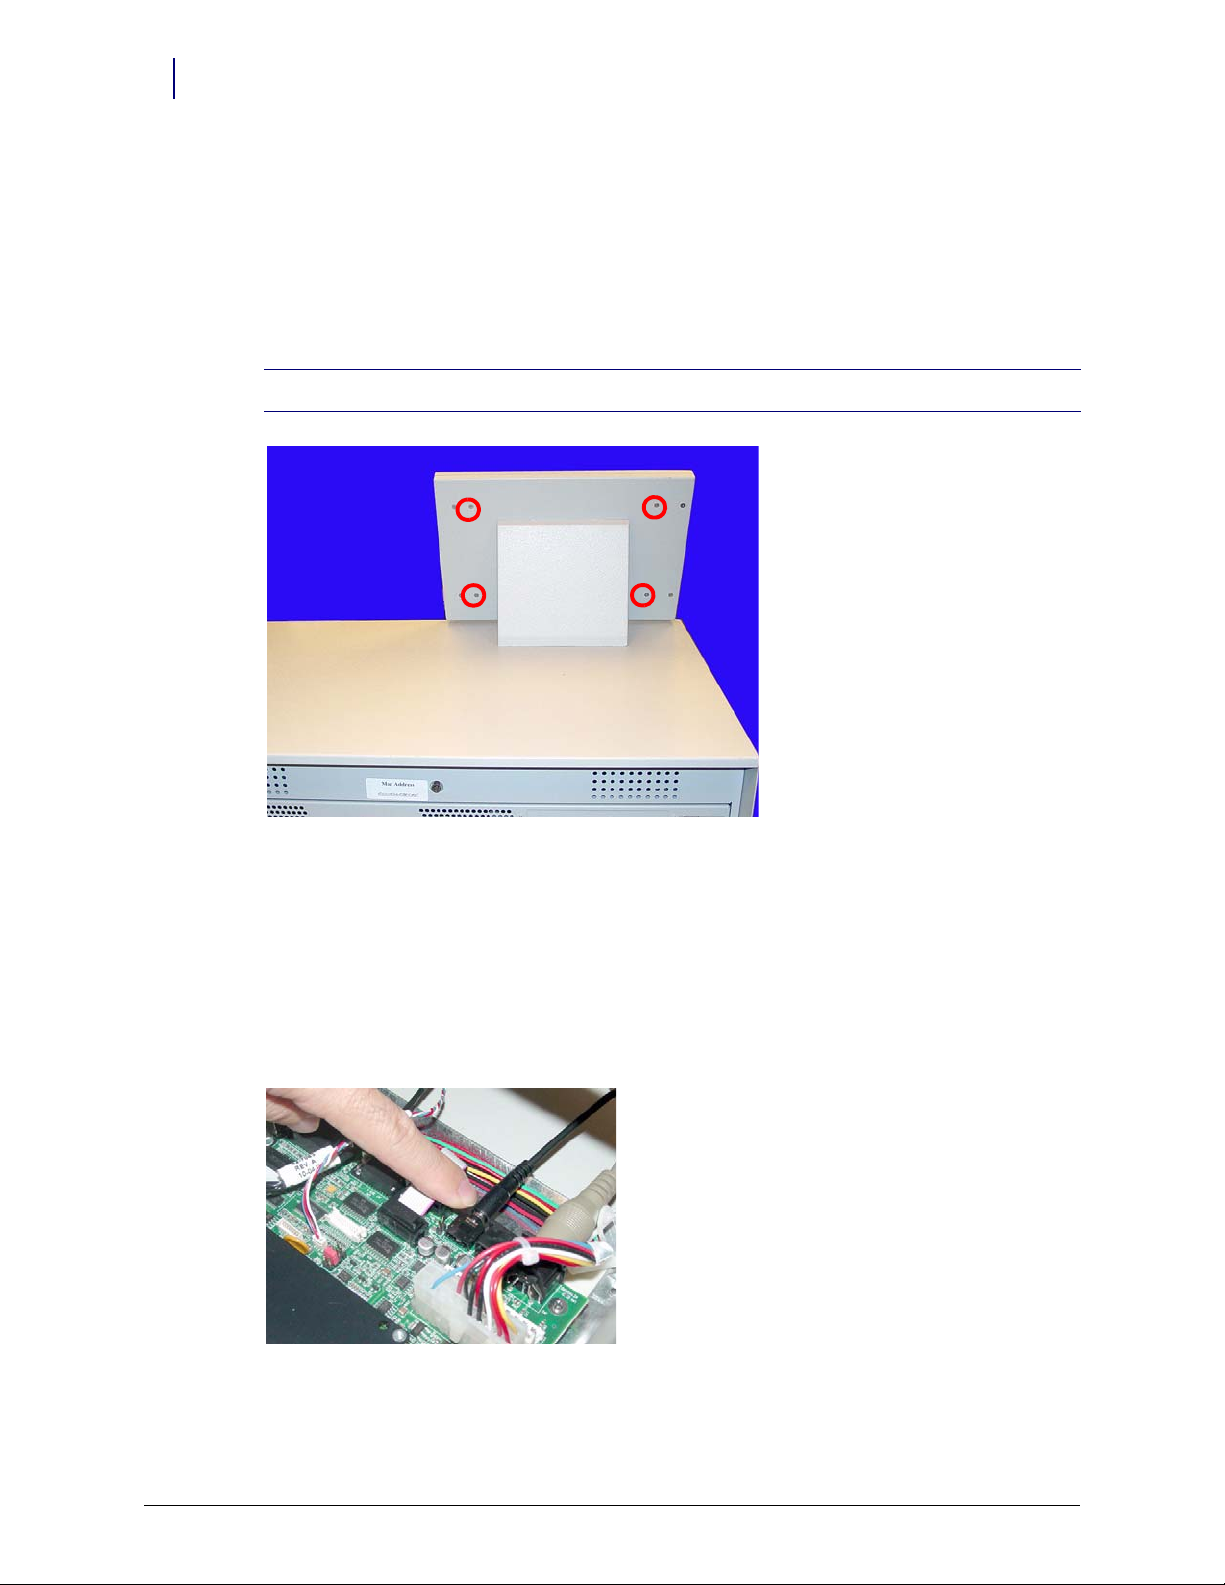
3. Remove the four inner screws at the back of the console lid.
Note: Hold onto the front of the LCD screen while removing the screws so that the assembly does not fall.
a. Disconnect the inverter to power cable.
b. Disconnect the flat panel cable.
Speaker
Figure 1-2. Remove the Four Inner Screws
4. Remove the LCD assembly from the LCD housing.
1. Perform a graceful shutdown of the electronics tray.
2. Open the console top.
3. Remove the speaker from the motherboard.
Figure 1-3. Disconnect the speaker From the motherboard
OmniTT/AnesthesiaTT Installation and Service Guide/67-2024 Rev D © 2010 Omnicell, Inc.
Page 7
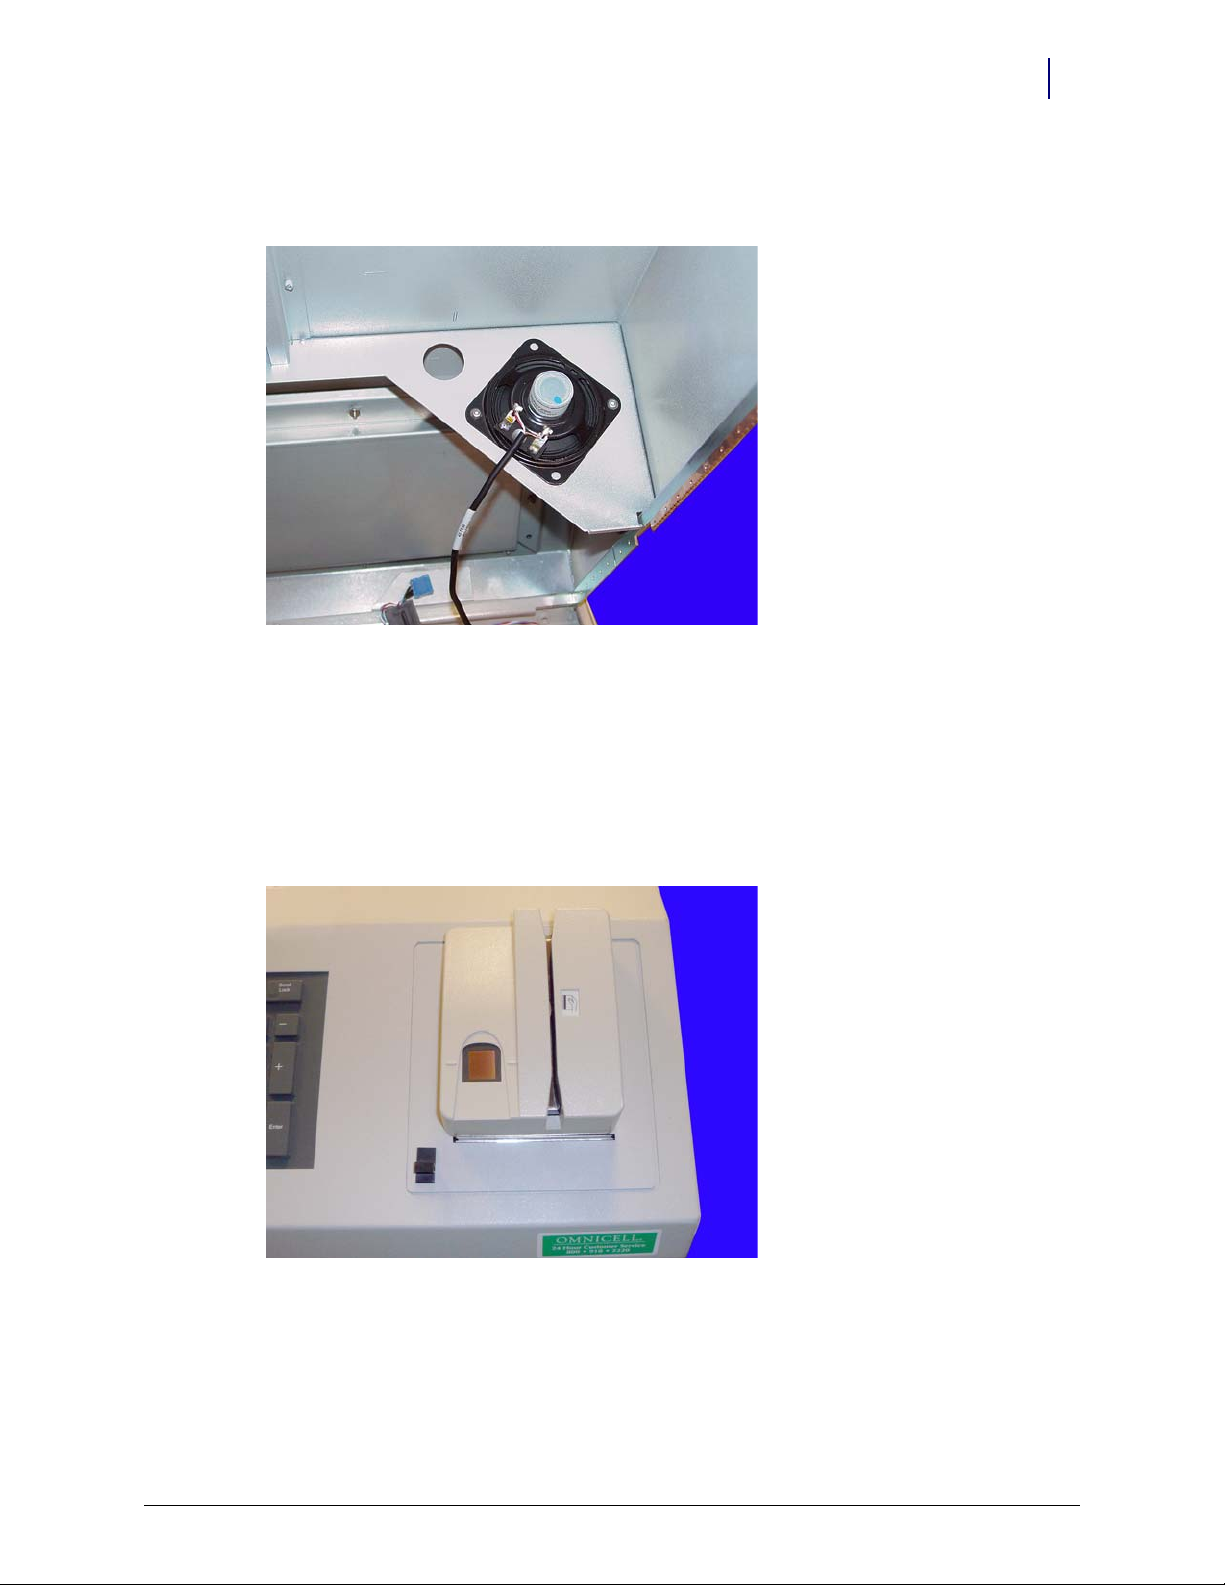
4. Remove the two screws that hold the speaker in place.
Use a Torx T10 screwdriver.
Figure 1-4. Remove the two screws that secure the speaker
Electronics Tray 1-3
Removal Procedure
Printer
5. Disconnect the speaker from the console top.
1. Perform a graceful shutdown of the electronics tray.
2. Open the printer cover by pushing the black release mechanism toward the rear of the
machine and lifting the cover.
Figure 1-5. Open the Printer Cover
© 2010 Omnicell, Inc. OmniTT/AnesthesiaTT Installation and Service Guide/67-2024 Rev D
Page 8
1-4 Electronics Tray
Removal Procedure
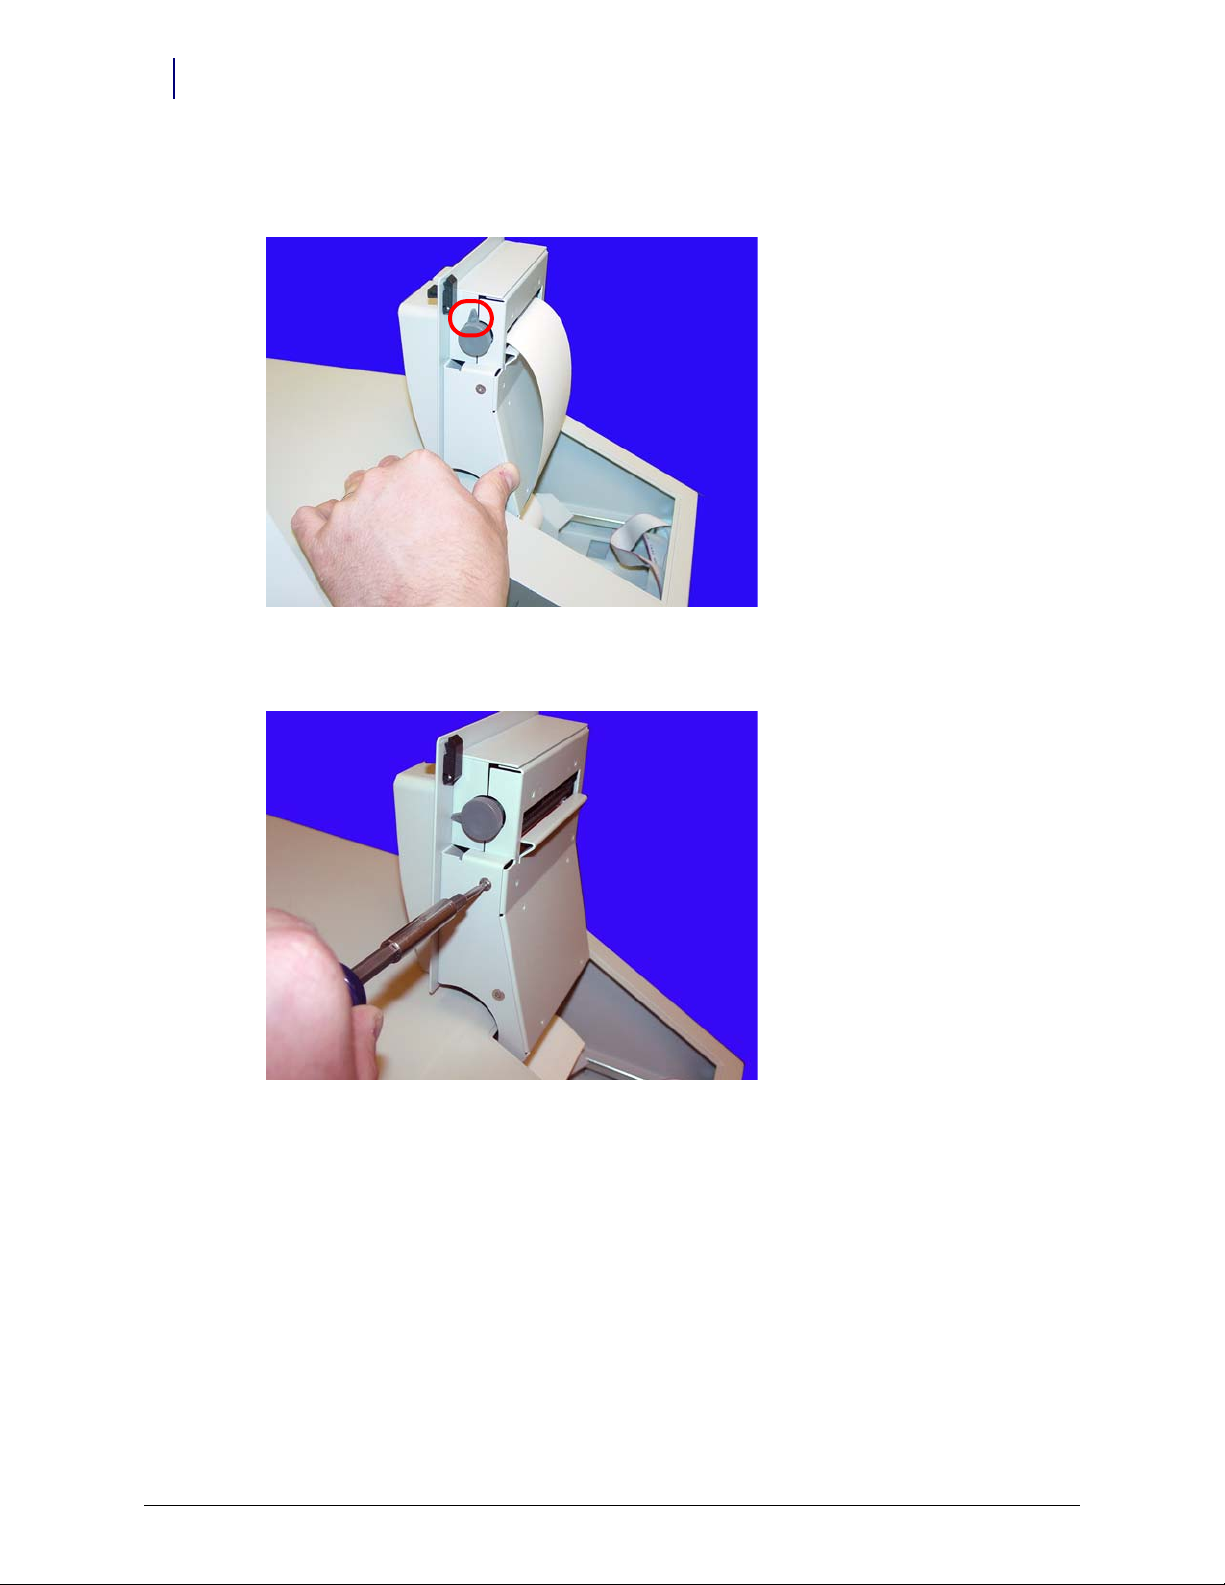
3. Remove the paper from the printer. Push the platen lever to the left to set it to the disengage
Figure 1-6. Turn the Platen Lever to the Left and Remove the Paper
position.
4. Remove the four screws (two on each side) that secure the printer assembly to the cover.
Figure 1-7. Remove the Screws Securing the Printer Assembly
5. Remove the printer assembly.
OmniTT/AnesthesiaTT Installation and Service Guide/67-2024 Rev D © 2010 Omnicell, Inc.
Page 9
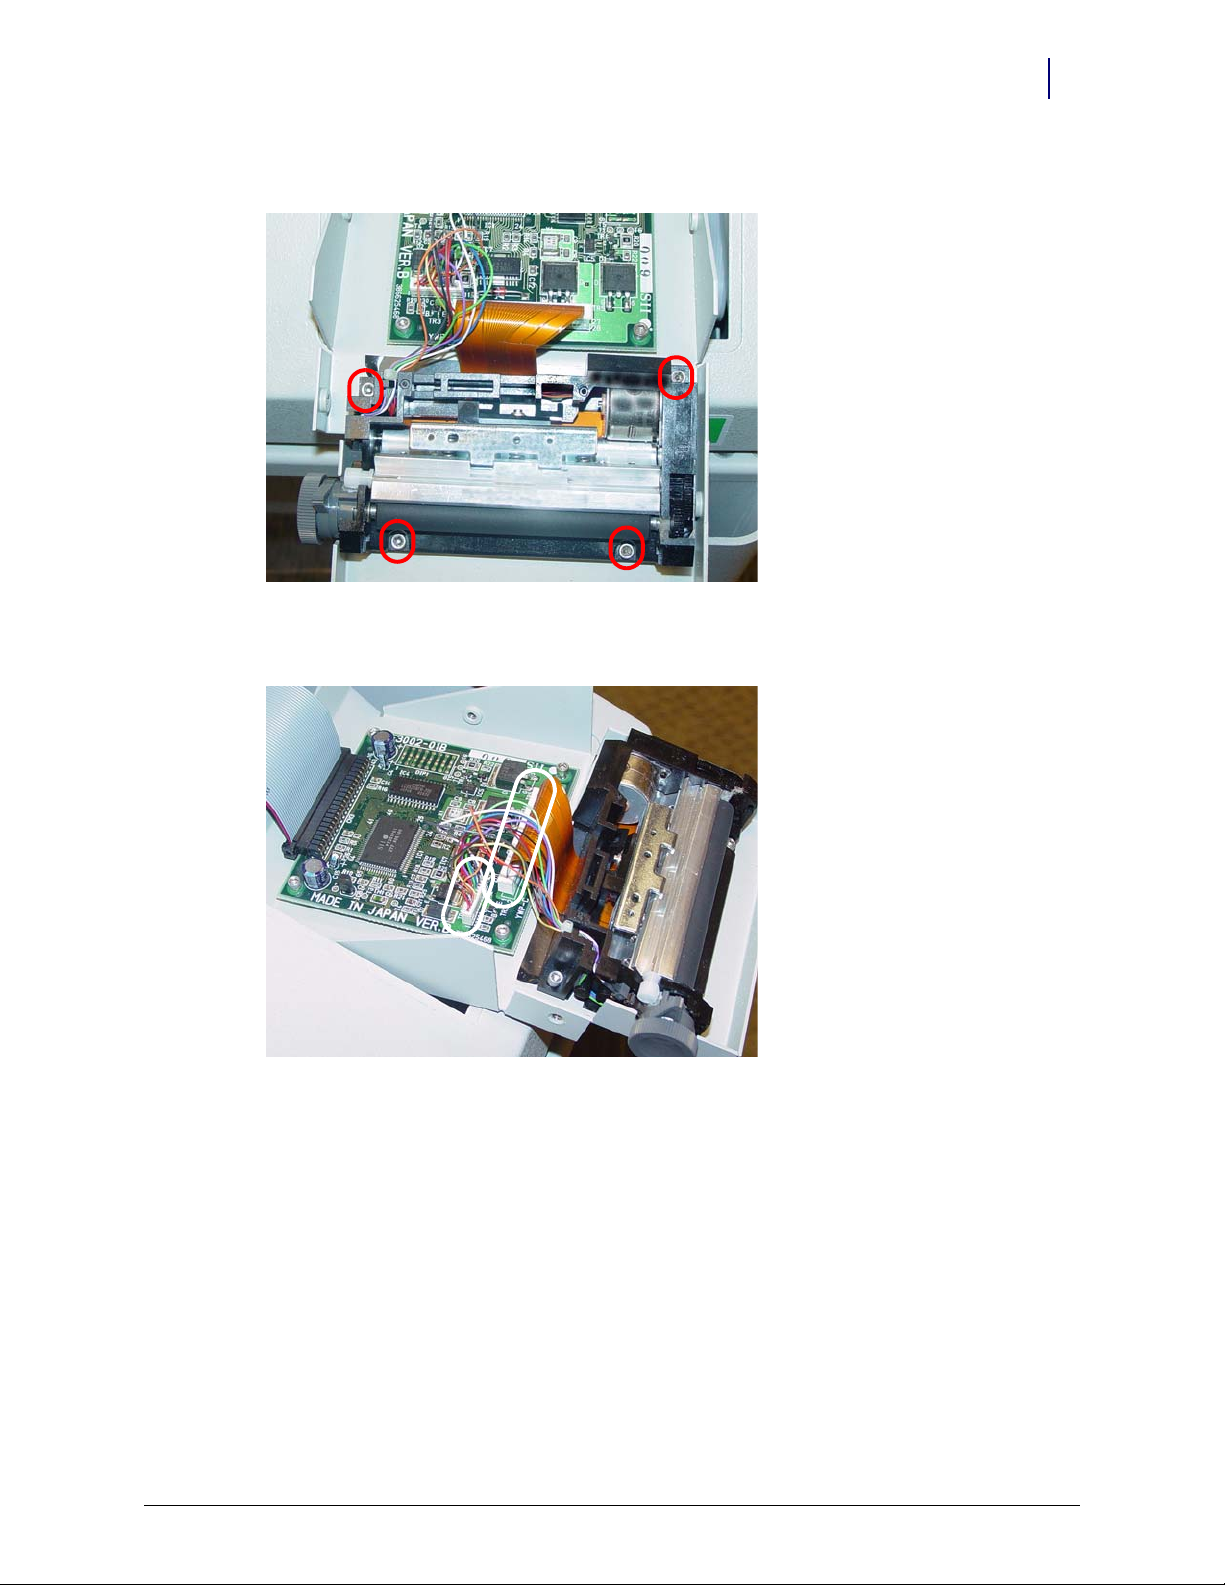
6. Remove the four screws that secure the lower assembly to the frame.
Figure 1-8. Remove the Screws that Secure the Lower Assembly
Electronics Tray 1-5
Removal Procedure
7. Disconnect the printer ribbon cable and the printer data cables from the printer PC board.
Figure 1-9. Remove the Printer Ribbon Cable and the Printer Data Cable
© 2010 Omnicell, Inc. OmniTT/AnesthesiaTT Installation and Service Guide/67-2024 Rev D
Page 10
1-6 Electronics Tray
Removal Procedure
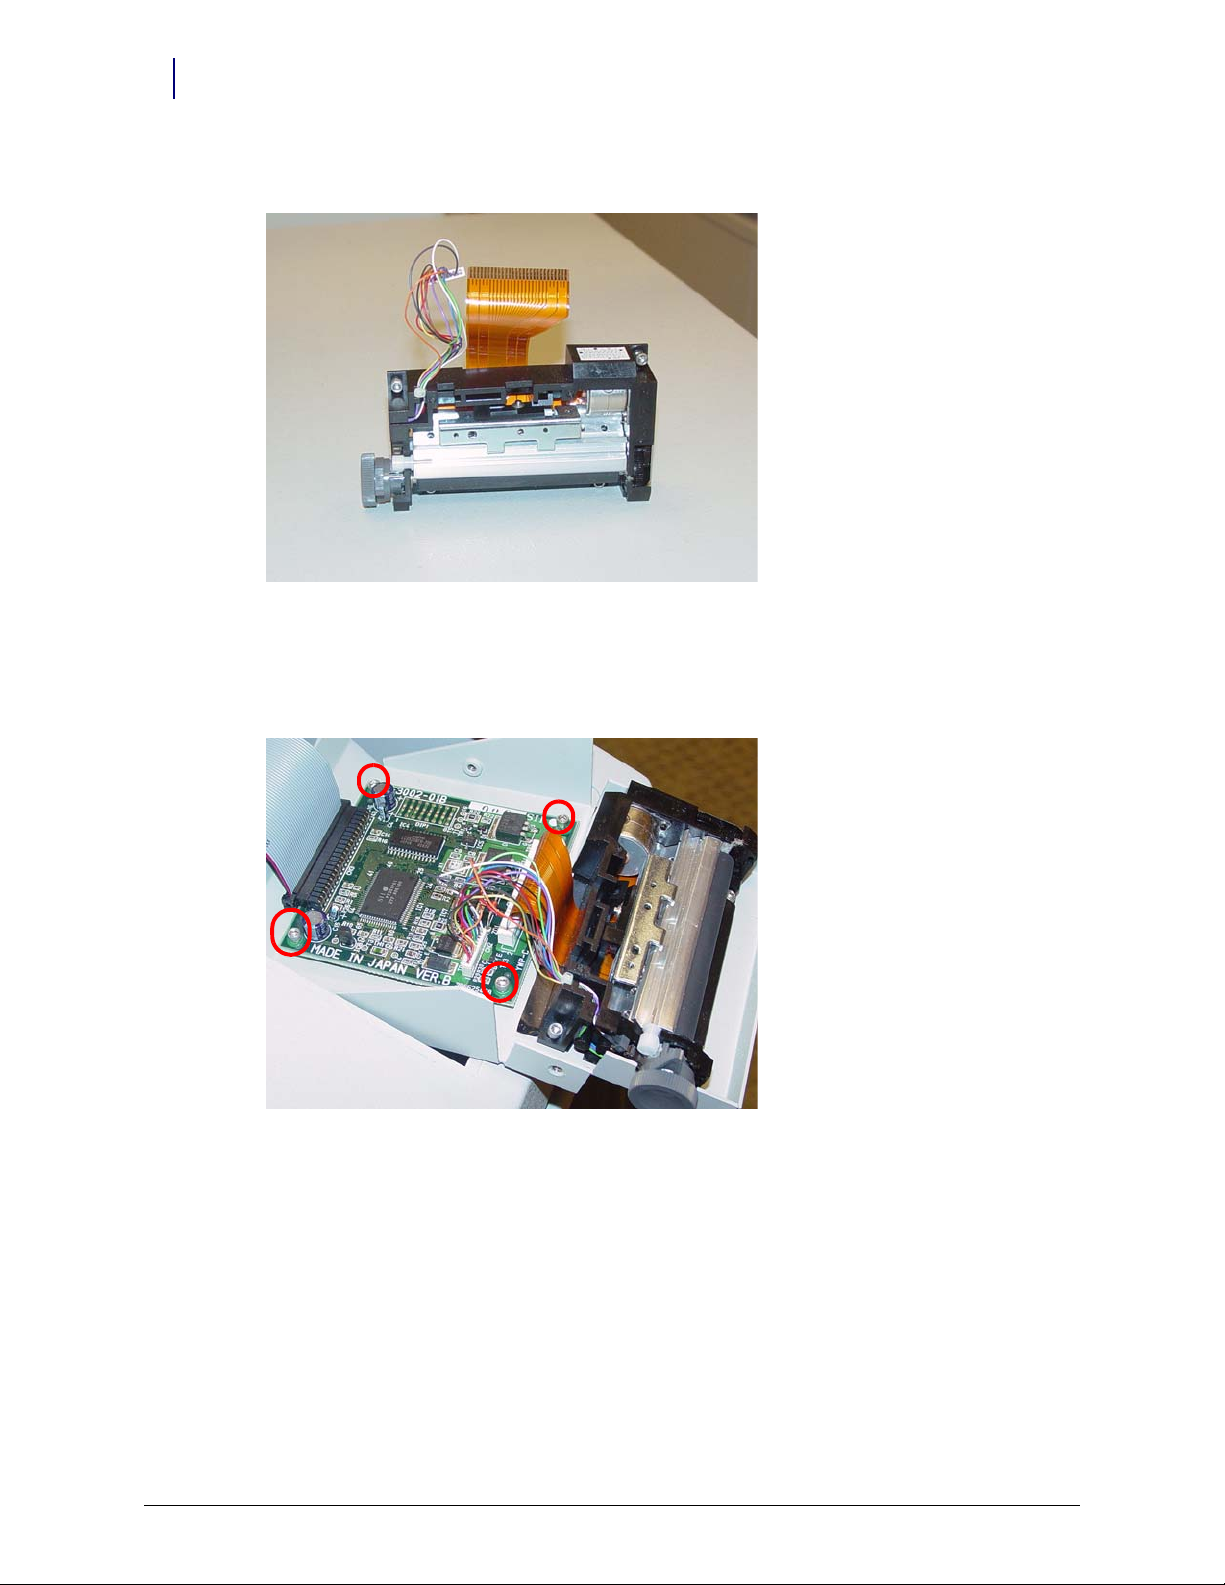
8. Remove the printer.
Figure 1-10. Remove the Printer
Printer PC Card
1. Remove the four screws that secure the PC card to the frame.
Figure 1-11. Remove the Screws that Secure the Printer PC Card
2. Lift the card off the frame slightly, then remove the printer ribbon cable.
OmniTT/AnesthesiaTT Installation and Service Guide/67-2024 Rev D © 2010 Omnicell, Inc.
Page 11
Keyboard
Electronics Tray 1-7
Removal Procedure
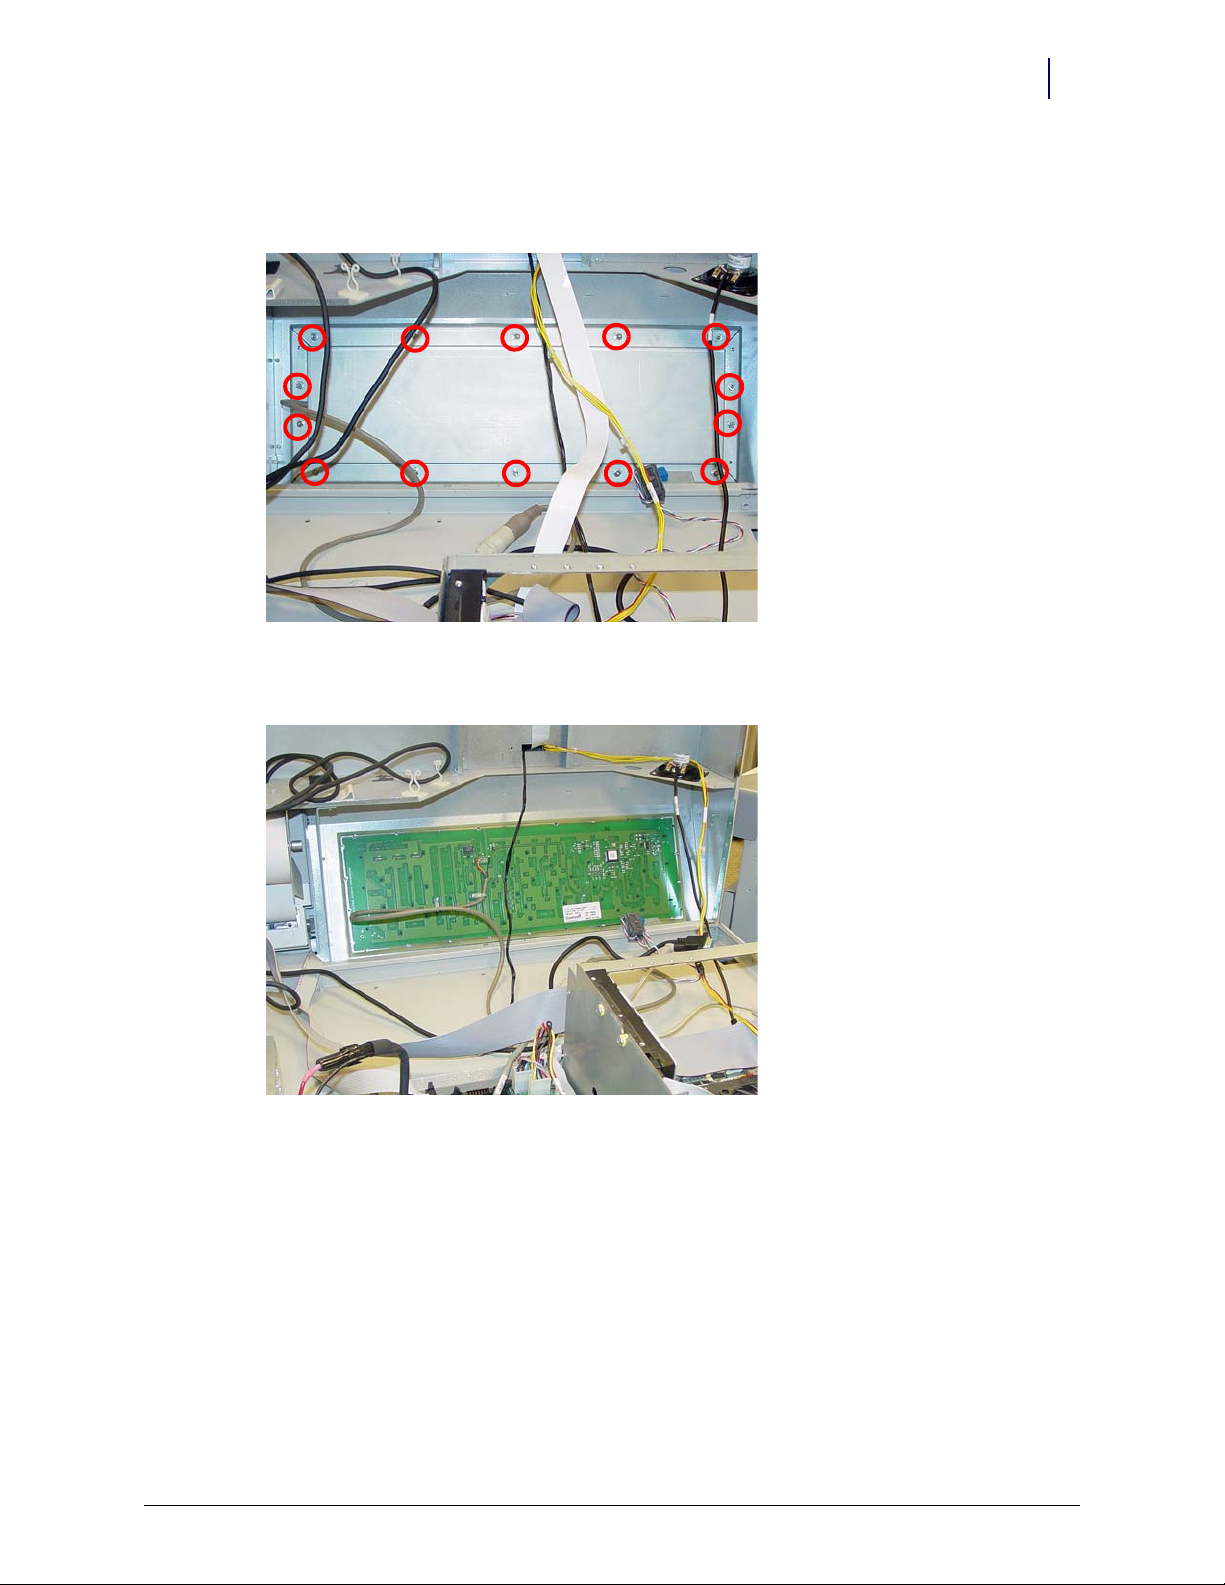
1. Remove the 14 nuts that secure the keyboard cover to the tray.
Figure 1-12. Remove the nuts that secure the keyboard cover to the tray
2. Remove the keyboard cover.
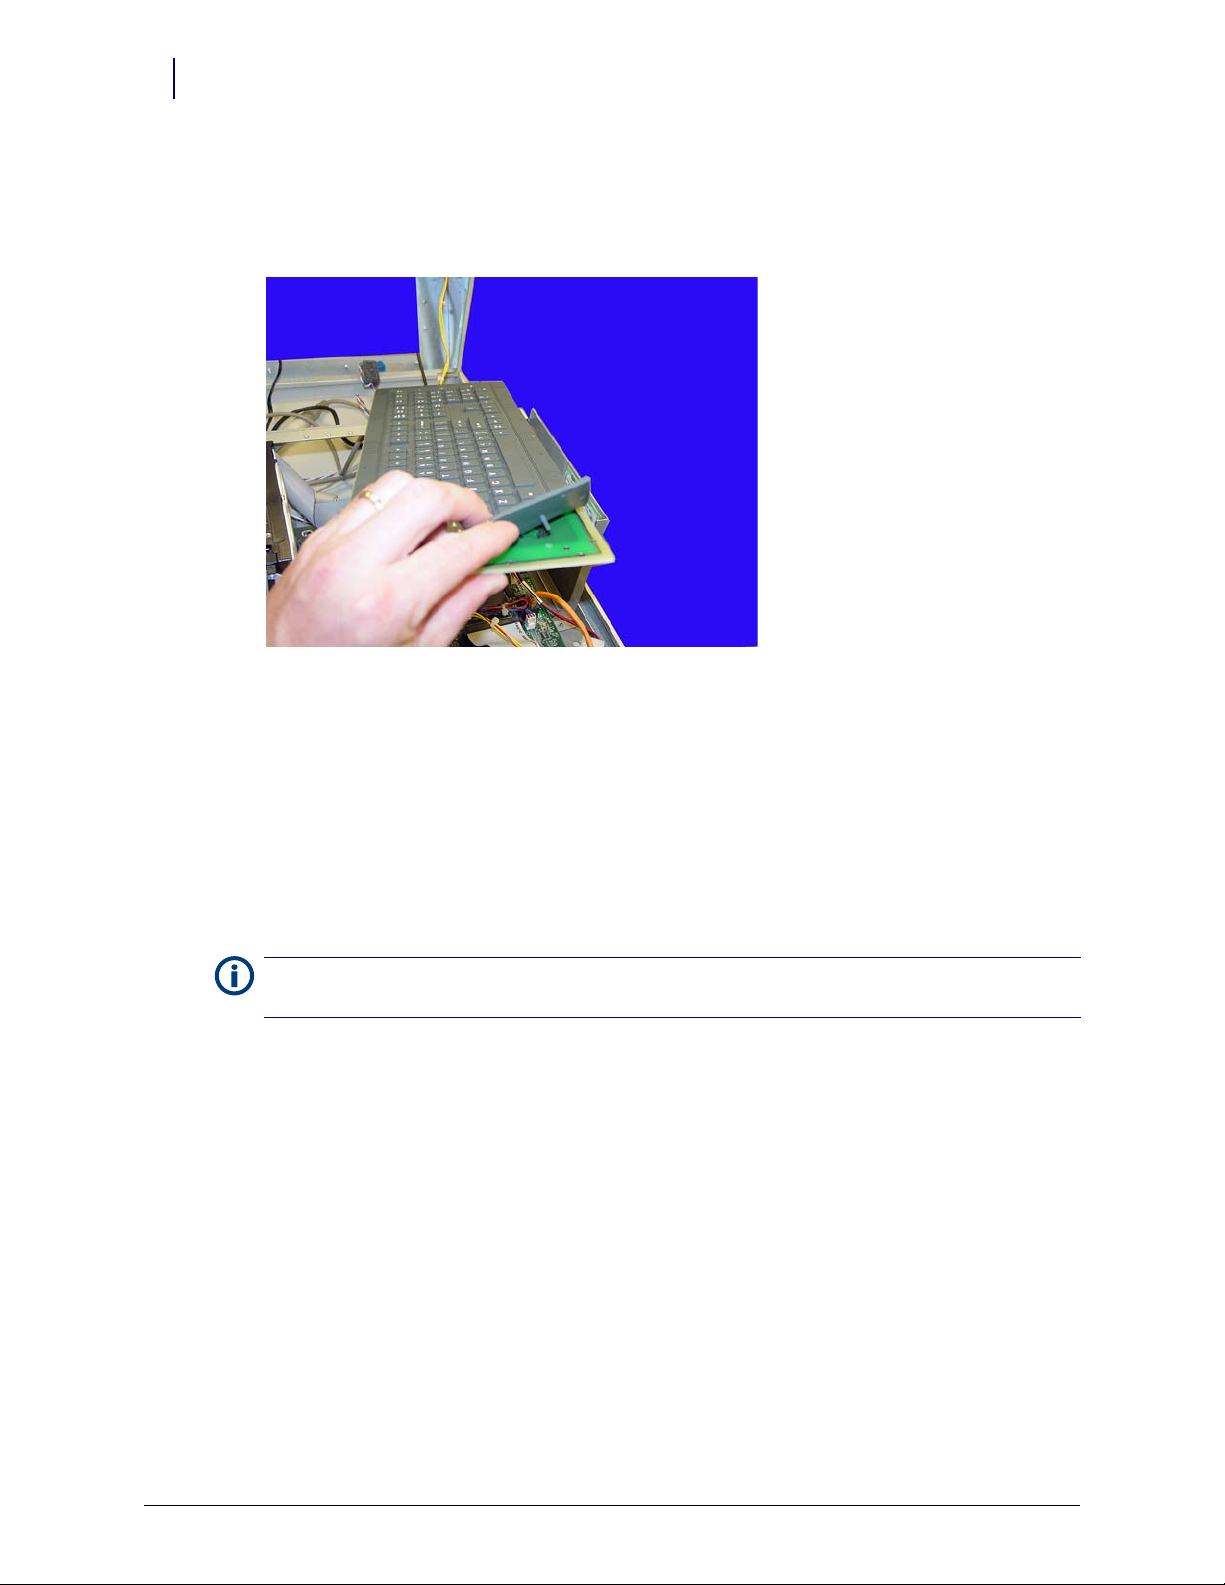
Figure 1-13. Remove the keyboard cover
3. Remove the keyboard from the tray.
© 2010 Omnicell, Inc. OmniTT/AnesthesiaTT Installation and Service Guide/67-2024 Rev D
Page 12
1-8 Electronics Tray
Replacement Procedure
Elastomer
1. Hold the keypad with the elastomer facing up and gently pull the elastomer up and off the
keyboard.
Figure 1-14. Pull the elastomer up and off the keyboard
Replacement Procedure
Elastomer
1. Gently place the new elastomer onto the keyboard and push the rubber tabs through the holes
on the keyboard.
2. Keeping the keypad upright, reach underneath the keyboard and gently pull the tabs until the
elastomer rests snugly on the keyboard.
Note: To prevent ripples in the elastomer, pull the tabs through going left to right, right to left, bottom to top
or top to bottom. Do not pull the tabs through in a random order or in a circular pattern.
3. Remove any bubble or ripples in the elastomer and then place the new keypad and elastomer
back into place on the tray.
Keyboard
1. Replace the keyboard cover.
2. Replace the screws that secure the keyboard cover to the tray.
OmniTT/AnesthesiaTT Installation and Service Guide/67-2024 Rev D © 2010 Omnicell, Inc.
Page 13
Electronics Tray
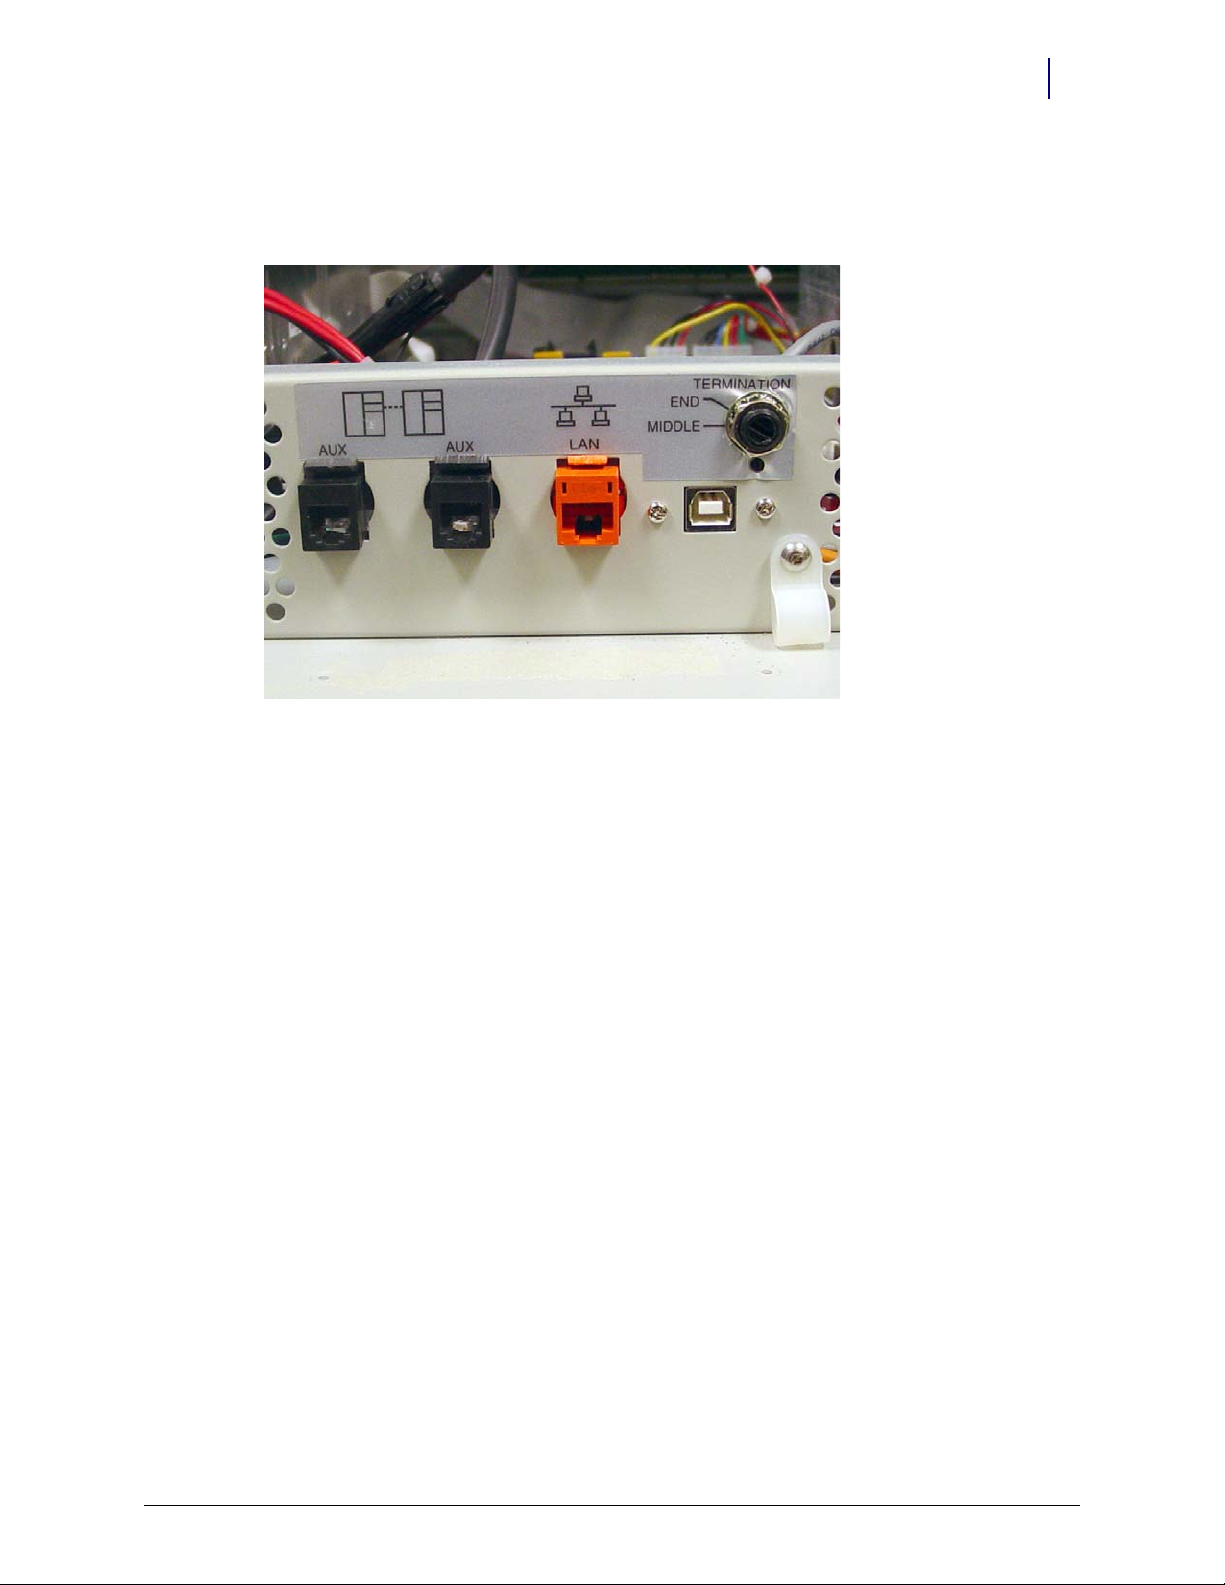
1. Disconnect the LAN cable and the AUX cables from the rear of the TT cabinet.
Electronics Tray 1-9
Electronics Tray
Figure 1-15. Location and labels for LAN and AUX cable connections on CT PC Tray
2. Access the electronics tray.
© 2010 Omnicell, Inc. OmniTT/AnesthesiaTT Installation and Service Guide/67-2024 Rev D
Page 14

1-10 Electronics Tray
Electronics Tray
3. Disconnect the following cables (from tray only):
a. LCD data cable
b. Contrast cable
c. Inverter (backlight) cable
d. Touch screen data cable
e. Keyboard cable
f. Speaker cable
g. Card reader cable (if applicable–not shown)
h. Fan power cable (if applicable)
i. Printer cable (free cable from any clips)
j. Cabinet power/comm cable
Figure 1-16. Location of cables on the CT PC Tray with PowerCom2 Board
OmniTT/AnesthesiaTT Installation and Service Guide/67-2024 Rev D © 2010 Omnicell, Inc.
Page 15

PowerCom2 Tray
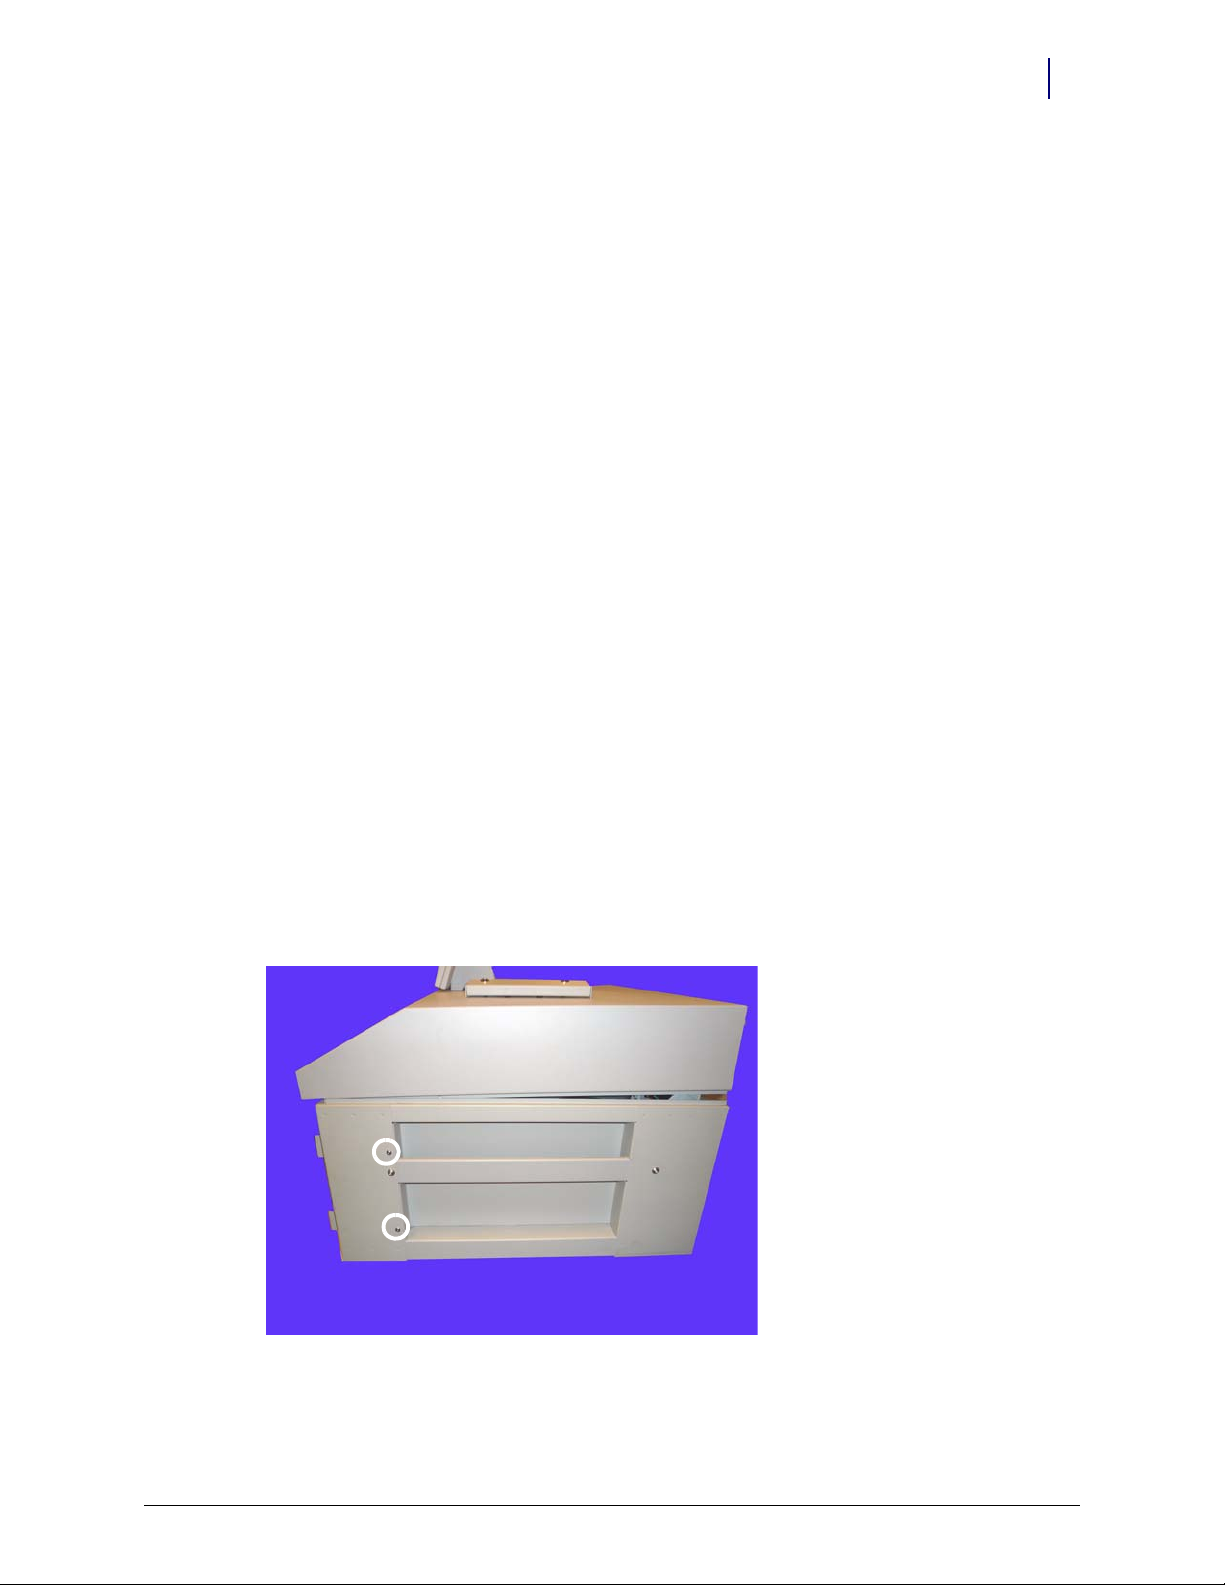
1. Lift the front edge of the tray over the two standoffs and pull the tray forward.
Electronics Tray 1-11
Electronics Tray
Figure 1-17. Lift and remove the CT PC Tray from the Omni TT
2. Lift the rear of the tray and twist slightly until the front tabs clear the frame.
3. Remove the (old) electronics tray.
PowerCom3 CT PC Tray
1. Place the new electronics tray into the cabinet
2. Turn the two 1/4-turn fasteners securing the electronics tray clockwise to lock the tray into
place.
Figure 1-18. Place the CT PC Tray into the Omnicell unit
© 2010 Omnicell, Inc. OmniTT/AnesthesiaTT Installation and Service Guide/67-2024 Rev D
Page 16

1-12 Electronics Tray
Electronics Tray
Cables
1. Connect the wireway cable to the J10 of the PowerCom3 Board
.
Figure 1-19. Connect the Wireway Cable to J10 of the PowerCom3 Board
2. Connect the printer cable to J27 on the motherboard.
Figure 1-20. Connect the Printer Cable to J27 of the Motherboard
Note:
Ensure that the red wire is connected closest to Pin 1.
3. Connect the fan power cable to J17 on the UPS board (if applicable).
OmniTT/AnesthesiaTT Installation and Service Guide/67-2024 Rev D © 2010 Omnicell, Inc.
Page 17

4. Connect the speaker cable to port J45 on the motherboard.
Electronics Tray 1-13
Electronics Tray
Figure 1-21. Connect the Speaker Cable to J45 of the Motherboard
5. Connect the keyboard cable to port J42 on the motherboard.
Figure 1-22. Connect the Keyboard Cable to J42 of the Motherboard
© 2010 Omnicell, Inc. OmniTT/AnesthesiaTT Installation and Service Guide/67-2024 Rev D
Page 18

1-14 Electronics Tray
Electronics Tray
6. Connect the touch screen data cable to J2 on the motherboard:
a. Connect the extension cable provided in the kit to the touch screen data cable (red wire to
red wire).
b. Wrap the joined connectors with electrical tape to ensure that the cables do not become
disconnected.
c. Connect the touch screen data cable extension to J2 on the motherboard.
Figure 1-23. Connect the Touch Screen Data Cable to J2 of the Motherboard
7. Connect the inverter cable (backlight) to J32 on the motherboard.
Figure 1-24. Connect the Backlight Cable to J32 of the Motherboard
OmniTT/AnesthesiaTT Installation and Service Guide/67-2024 Rev D © 2010 Omnicell, Inc.
Page 19

8. Connect the contrast cable to J31 on the motherboard.
Electronics Tray 1-15
Electronics Tray
Figure 1-25. Connect the Contrast Cable to J31 of the Motherboard
9. Connect the LCD data cable to J37 on the motherboard
Figure 1-26. Connect the LCD Data Cable to J37 of the Motherboard
10. If a card reader is present and needs to be reconnected:
a. Connect the card reader serial cable to J47 on the motherboard.
b. Connect the card reader power cable to the back of the card reader serial connector.
c. Insert card reader power cable pins into the disk drive power connector.
d. Align the red-stripe pin to the red cable and the gray-stripe pin to the gray cable in next
spot.
© 2010 Omnicell, Inc. OmniTT/AnesthesiaTT Installation and Service Guide/67-2024 Rev D
Page 20

1-16 Electronics Tray
Standardization Changes
Standardization Changes
To standardize the peripherals that Omnicell products use, the Seiko printer and PS/2 keyboards
are being replaced by APS printers and USB keyboards with a numeric pad. The console is
swapped out in this procedure.
1. Lift and prop-up the lid if it is not already open.
2. Disconnect all console cables.
3. Remove the console.
4. Replace the cable cover bracket with the new, wider one using three screws.
Figure 1-27. Cable cover bracket
5. Place new console into position, then prop it open.
6. Re-connect the cables. Most will go back where the old cables were with a couple of exceptions.
The contrast cable goes into J33 instead of J32.
The USB keyboard cable goes to the USB port (vs. the PS/2 connection).
Move the jumper on JP1 from pins 1-2 to 3-4.
OmniTT/AnesthesiaTT Installation and Service Guide/67-2024 Rev D © 2010 Omnicell, Inc.
Page 21
Frames and Wireways
Introduction
The OmniTT/Anesthesia TT has a metal frame which houses the SPC boards and many of the
cables that connect the components of the system. The frame is not field repairable and must be
replaced if it is damaged. The wireway on the right side of any cabinet in an Omni TT is
removable and the SPC board contained in the wireway is also replaceable.
Tools List
The following tools are required to perform the procedures in this chapter:
Frames and Wireways 2-1
Introduction
Tor x T8 d ri v er
Torx T10 driver
Torx T15 driver
9/64” Allen wrench
Wireway
1. Perform a graceful shutdown of the electronics sled.
2. Remove the manual override cover.
3. Remove all three drawers from the TT cabinet. For help, refer to “Removal Procedure” on
page 3-6.
4. Remove the two screws on the right side of the OmniTT that secure the wireway to the frame
using a Torx T15 screwdriver.
Figure 2-1. Remove the two screws securing the wireway
© 2010 Omnicell, Inc. OmniTT/AnesthesiaTT Installation and Service Guide/67-2024 Rev D
Page 22

2-2 Frames and Wireways
Wireway
5. Remove the screws on either side of the transport handle using a Torx T25 screwdriver.
Figure 2-2. Remove the two screws securing the transport handle
6. Push the transport handle toward the rear of the cabinet then remove it from the frame.
Figure 2-3. Pull the transport handle toward the rear of the cabinet then remove it
OmniTT/AnesthesiaTT Installation and Service Guide/67-2024 Rev D © 2010 Omnicell, Inc.
Page 23

Frames and Wireways 2-3
Manual Override Cable
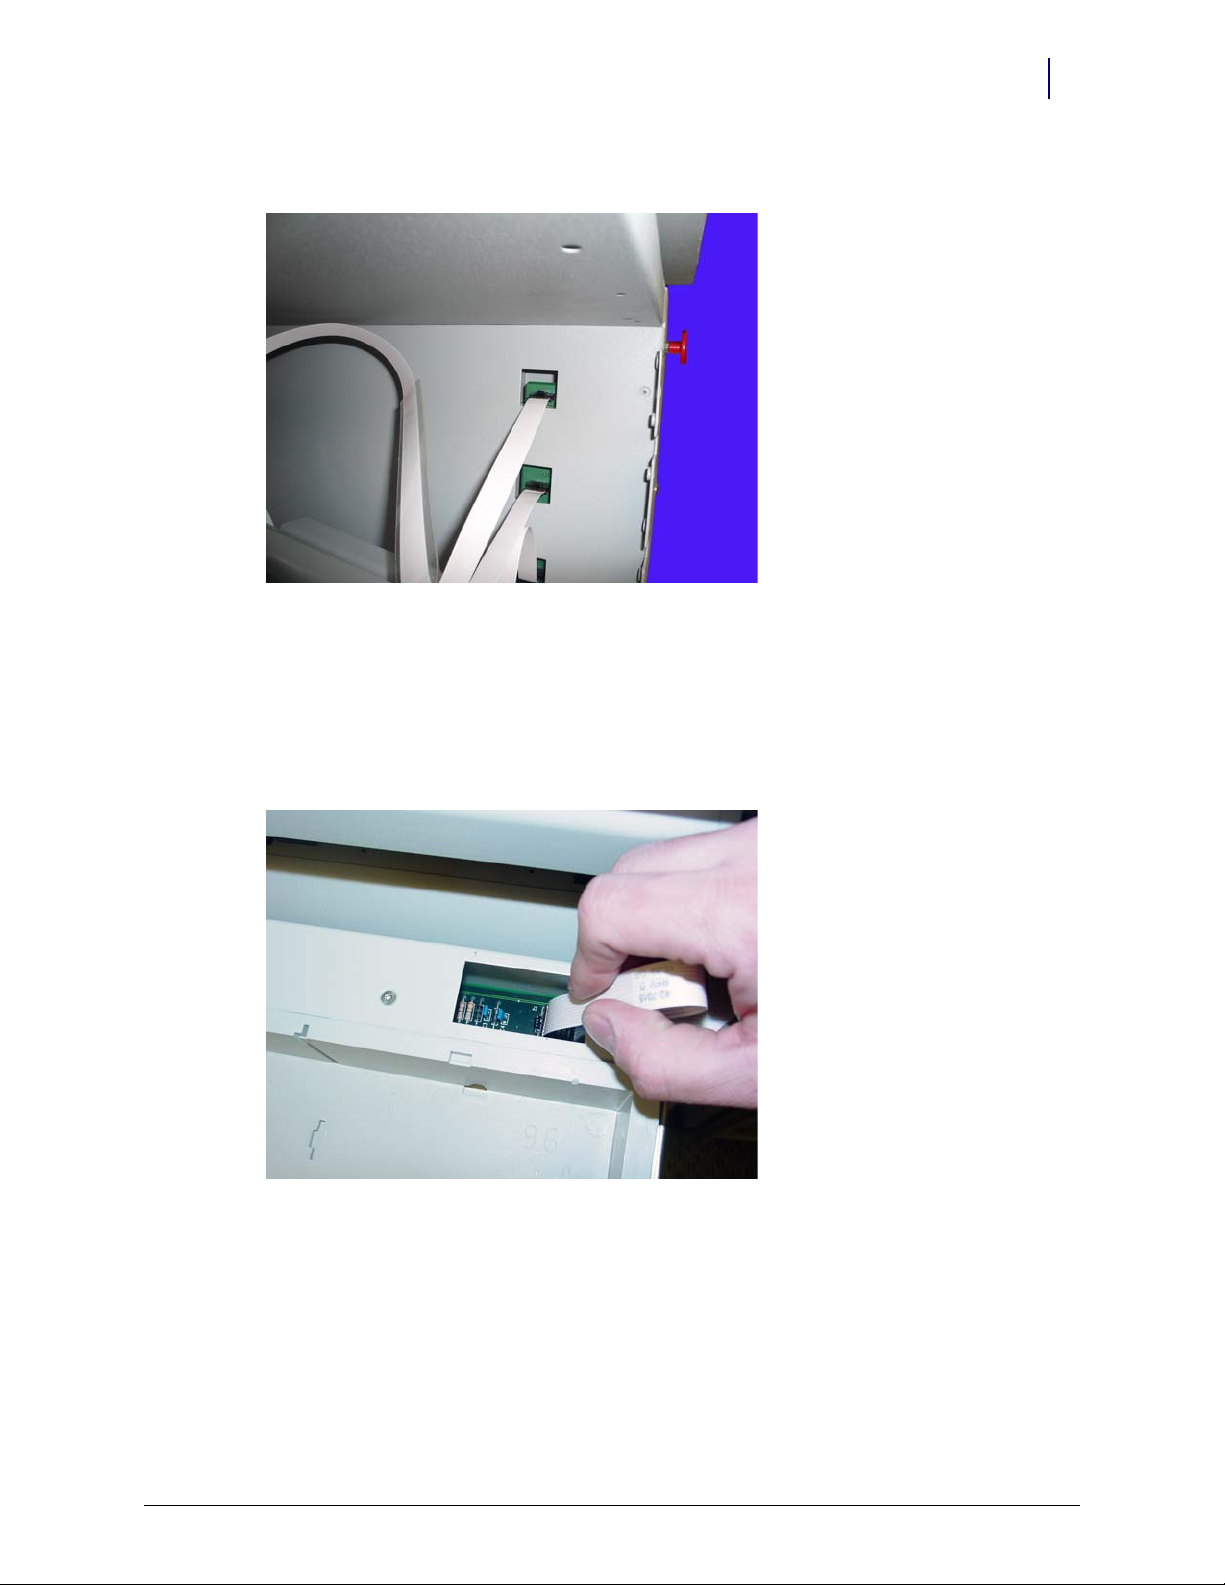
7. Pull the wireway backward toward the rear of the frame and disconnect the ribbon cable
(drawer connect board to IUPS cable assembly).
Figure 2-4. Disconnect the ribbon cable and remove the SPC board
8. Remove the SPC board from the wireway.
Manual Override Cable
Removal
1. Perform a graceful shutdown of the electronics sled.
2. Remove the manual override cover.
3. Remove all three drawers from the TT cabinet. For help, refer to “Removal Procedure” on
page 3-6.
4. Open the printer cover.
5. Push the platen lever to the left to release the paper.
6. Open the lid to the electronics tray.
7. Remove the thermal printer paper and spool.
8. Remove the electronics tray. For help, refer to “Electronics Tray” on page 1-9.
© 2010 Omnicell, Inc. OmniTT/AnesthesiaTT Installation and Service Guide/67-2024 Rev D
Page 24

2-4 Frames and Wireways
Manual Override Cable
9. Remove the four screws that secure the printer support bracket.
Figure 2-5. Remove the four screws that secure the printer support bracket to the frame
10. Remove the bracket.
11. Remove the two screws that secure the manual override cable.
Figure 2-6. Remove the two screws that secure the manual override cable to the frame
OmniTT/AnesthesiaTT Installation and Service Guide/67-2024 Rev D © 2010 Omnicell, Inc.
Page 25

12. Remove the red handle on the front of the manual override cable.
Frames and Wireways 2-5
Manual Override Cable
Figure 2-7. Remove the red handle on the manual override cable
13. Remove the nut that secures the manual override cable to the front of the frame.
Figure 2-8. Remove the nut that secures the manual override cable to the frame.
© 2010 Omnicell, Inc. OmniTT/AnesthesiaTT Installation and Service Guide/67-2024 Rev D
Page 26

2-6 Frames and Wireways
Manual Override Cable
14. Remove the screw that secures the manual override cable to the manual override assembly.
Figure 2-9. Remove the screw that secures the cable to the manual override assembly.
Replacement
15. Loosen the nut that secures the cable to the back of the frame.
Figure 2-10. Loosen the nut that secures the cable to the frame anchor
16. Pull the cable from the anchor on the back of the frame.
17. Pull the cable out from inside the TT cabinet.
1. Feed the cable into the TT cabinet.
2. Replace the screw that secures the manual override cable to the manual override assembly.
3. Place the manual override cable into the frame anchor so that the two screws are on opposite
side of the anchor bracket.
4. Tighten the screws.
5. Feed the front of the manual override cable through the hole on the front of the TT cabinet.
OmniTT/AnesthesiaTT Installation and Service Guide/67-2024 Rev D © 2010 Omnicell, Inc.
Page 27

Frames and Wireways 2-7
Manual Override Cable
6. Replace the nut that secures the cable to the frame.
7. Replace the red handle.
8. Replace the two screws that secure the manual override cable to the inside of the front of the
frame.
9. Replace the printer support bracket.
10. Replace the thermal printer paper and the spool.
11. Replace the electronics sled and reattach all cables that had been removed.
12. Close the lid to the electronics tray.
13. Feed the printer paper through the printer.
14. Power up the TT cabinet.
© 2010 Omnicell, Inc. OmniTT/AnesthesiaTT Installation and Service Guide/67-2024 Rev D
Page 28

Drawers
Introduction
Drawers for the OmniTT and Anesthesia TT offer different levels of control for storing and
tracking medications and pharmacy supplies. Drawers are generally divided into two categories pharmacy drawers and supply drawers. The supply drawers have minimal security and are
designed for convenient and easy access. The pharmacy drawers have more security and are
designed to protect and store low level medications and high level narcotics.
The supply drawer is the lowest security drawer available. It is typically used to store items that are
frequently used and require little security. The drawer is custom configured using individual
dividers and has a 24-line maximum capacity.
The Omnicell Matrix Drawer (OMD) models are matrix drawers without lids that are configured
by using individual dividers. Drawer liners are used to configure matrix drawers to the required
number of bins. The matrix drawers can be lit with guiding light technology (OLMD) or can come
unlit (OMD).
Drawers 3-1
Introduction
Tools List
The lit matrix drawers are configurable up to a maximum of 24 bins and the unlit matrix drawer is
configurable up to a maximum of 96 bins. The drawers are separated into four equal quadrants. In
the unlit drawers, each quadrant can contain a maximum of 24 bins. In the lit matrix drawer, each
quadrant can contain a maximum of six bins.
The Omnicell Sensing Lid (OSL) models have sensing lids. As each lid is lifted, the system senses
and records access to the bin. This guarantees security to those drawers that contain controlled
substances.
The Omnicell Locking Lid (OLL) models are the highest security drawer available. When these
high security drawers are opened, the user can only access the one bin containing the pre-selected
medication. No other bin is unlocked when the user is working in the desired bin. Special censors
provide audible and visual feedback if users attempt unauthorized entry into bins that are not preselected.
The following tools may be required to install a drawer:
Torx T10 screwdriver
Torx T15 screwdriver
© 2010 Omnicell, Inc. OmniTT/AnesthesiaTT Installation and Service Guide/67-2024 Rev D
Page 29

3-2 Drawers
Configuration
Configuration
Unlit Matrix Drawers
Each unlit matrix drawer can contain a maximum of 96 bins - 24 in each quadrant. Customers can
utilize the flexibility of this drawer and custom-configure it to meet specific needs and
requirements for the site. As with other matrix drawers, the dividers are designed to be snapped
off, enabling the bins to be custom-configured to fit site-specific needs.
Figure 3-1. Matrix drawer dividers
Note: Dividers must be placed into the drawer in a specific order with each divider in a specific slot, so
separating the dividers by part number is recommended.
1. Before installing the dividers, ensure that the layout of each drawer has been approved by the
customer.
Note: It is recommended that a drawing be made of each drawer, showing the customer’s preferred
configuration for each quadrant of a given drawer.
2. Break the divider tabs according to the customer design and trim away excess plastic to ensure
a snug fit in the drawer.
3. Add the dividers to the bin liner. The dividers should snap into the bottom of the drawer and
the sides of each bin liner quadrant.
4. Use the gray circular labels provided with the kit to cover any un-used divider slots in the bin
liner.
Lit Matrix Drawers
OmniTT/AnesthesiaTT Installation and Service Guide/67-2024 Rev D © 2010 Omnicell, Inc.
Page 30

Drawers 3-3
Configuration
Each lit matrix drawer can contain a maximum of 24 bins - six in each quadrant. Customers can
utilize the flexibility of this drawer and custom-configure it to meet specific needs and
requirements for the site. As with other matrix drawers, the dividers are designed to be snapped
off, enabling the bins to be custom-configured to fit site-specific needs.
Dividers must be placed into the drawer in a specific order with each divider in a specific slot, so
Note:
separating the dividers by part number is recommended.
Labels
Figure 3-2. Lit matrix drawer
1. Before installing the dividers, ensure that the layout of each drawer has been approved by the
customer.
Note: It is recommended that a drawing be made of each drawer, showing the customer’s preferred
configuration for each quadrant of a given drawer.
2. Break the divider tabs according to the customer design and trim away excess plastic to ensure
a snug fit in the drawer.
3. Add the dividers to the bin liner. The dividers should snap into the bottom of the drawer and
the sides of each bin liner quadrant.
4. Use the gray circular labels provided with the kit to cover any un-used divider slots in the bin
liner.
5. Insert the light pipes into each notch provided in the dividers. The light pipe is installed on the
rear side of the bin divider and snaps into a slot on the bottom of the bin liner.
Note: Be sure to place a light pipe into every notch, even if the position will not be used for guiding light
purposes. The pipes provide support and help keep the dividers in place.
Numerical bin labels are provided with matrix drawers to make bin identification and restock
easier for the customer.
© 2010 Omnicell, Inc. OmniTT/AnesthesiaTT Installation and Service Guide/67-2024 Rev D
Page 31

3-4 Drawers
Installation Procedure
The bottom of the bin liner on any matrix drawer is numbered according to its type (i.e. 1-96, 124, 1-4). These numbers are used to identify bin locations for the drawer. The drawer will be
numbered by using the lowest number in a specific bin. Using the figure below as an example, the
bin in the lower right corner of the drawer would be Bin 7, the bin in the upper left corner would
be Bin 49, and the bin in the upper right corner would be Bin 85.
Figure 3-3. Matrix drawer labelling system
Once a bin has been configured, label the bin divider to correspond with the bin name corner and
affix the label to the top of the right rear divider of that bin.
Installation Procedure
Important: A Pharmacist must be present when servicing drawers where medications are present.
1. Perform a graceful shutdown of the TT cabinet.
2. Unlock the manual override cover.
3. Remove the cover by pushing it to the right and lifting it off.
OmniTT/AnesthesiaTT Installation and Service Guide/67-2024 Rev D © 2010 Omnicell, Inc.
Page 32
4. Connect the drawer cable to the drawer connect board.
Figure 3-4. Connect the drawer cable to the drawer connect board
Drawers 3-5
Installation Procedure
5. Place the rail into the support slot in the back of the frame.
6. Line up the rail with the screw holes on the front of the frame and replace the screws.
7. Connect the drawer controller cable to the drawer controller board at the rear end of the
drawer.
8. Secure the drawer controller cable cover with two screws using a T-10 Torx screwdriver.
Figure 3-5. Connect the drawer controller cable to the controller board
9. Attach the slide to the slide support bracket with three screws and washers using a Torx T15
screwdriver.
10. Install the slide support bracket.
© 2010 Omnicell, Inc. OmniTT/AnesthesiaTT Installation and Service Guide/67-2024 Rev D
Page 33

3-6 Drawers
Removal Procedure
11. Connect a slide to the left side of the carrier using the three screws provided. Tighten the
screws using a Torx T15 screwdriver.
Figure 3-6. Install the new slide support bracket
12. Replace the drawer on the rails. Be sure to place the drawer controller cable between the two
ends of the drawer controller cable clamp.
13. Secure the pharmacy drawer controller cable clamp and the drawer controller cable to the
pharmacy drawer with the two screws provided. Use a Torx T10 screwdriver.
14. Close the drawer and replace the pharmacy manual override cover.
15. Power up the cabinet.
16. Program the drawer at the OmniSupplier in OmniConfigurations.
Removal Procedure
1. Perform a graceful shutdown of the CT PC box.
2. Remove the manual override cover.
Figure 3-7. Remove the manual override cover
OmniTT/AnesthesiaTT Installation and Service Guide/67-2024 Rev D © 2010 Omnicell, Inc.
Page 34

3. Pull the manual override lever and open the desired pharmacy drawer.
Figure 3-8. Pull the manual override lever
Drawers 3-7
Removal Procedure
4. Remove the two screws securing the drawer controller cable cover to the cable clamps using a
Torx T10 screwdriver.
Figure 3-9. Remove the controller cable cover
© 2010 Omnicell, Inc. OmniTT/AnesthesiaTT Installation and Service Guide/67-2024 Rev D
Page 35

3-8 Drawers
Removal Procedure
5. Remove the cable clamp and disconnect the cable.
Figure 3-10. Remove the controller cable
6. Push the release levers on either side of the drawer up or down to release the drawer.
Figure 3-11. Push the release levers to release the drawer
Remove the pharmacy drawer from the module.
OmniTT/AnesthesiaTT Installation and Service Guide/67-2024 Rev D © 2010 Omnicell, Inc.
Page 36

Index
IN-1
C
cables 1-12
CT PC sled 1-1
D
dividers 3-2
drawer labels 3-3
drawers
configuration 3-2
installation 3-4
removal 3-6
tools list 3-1
E
elastomer
removal 1-8
replacement 1-8
electronics tray 1-9
tools list 1-1
F
frame 2-1
O
OLL 3-1
OMD 3-1
OSL 3-1
P
pharmacy drawers 3-1
PowerCom2 tray 1-11
PowerCom3 CT PC tray 1-11
printer PC card 1-6
printer 1-3
S
speaker 1-2
supply drawers 3-1
W
wireway 2-1
removal 2-1
tools list 2-1
K
keyboard
removal 1-7
replacement 1-8
L
LCD assembly 1-2
LCD screen 1-1
lid
locking 3-1
sensing 3-1
M
manual override cable
replacement 2-6
matrix drawers
lit 3-3
unlit 3-2
© 2010 Omnicell, Inc. OmniTT/AnesthesiaTT Installation and Service Guide/67-2024 Rev D
Page 37

Appendix A: Part List
Link back to the procedure that calls out the given part using the cross reference in the Where Used
column.
Part # Part Name Agile Description Where Used
13-1129
13-1142
13-1136
13-1143
13-1150
13-1152
13-1151
13-1153
14-1123 printer assembly MFG,ASSY,PRINTER,OMNIRX
14-1261 LCD assembly MFG ASSY, DISPLAY,ETX-REVC,LVDS,RX-CT
14-7016 lit matrix drawer MODEL,OLMD24,24-LIT,MATRIX,DRAWER
14-7020
14-7021
15-1040 PowerCom2 tray MFG,ASSY,MOTHERBOARD,ETX2 (inactive)
15-7075
15-7076
15-9099 PowerCom 3 tray MFG ASSY, SLED, ELECTRONIC, PC3+
40-3001 (drawer) controller board PCB,ASSY,DRAWER,CONTROLLER
console lid MFG ASSY, LID, ETX, LVDS, RX-CT (old)
MFG ASSY, LID, LVDS, RX-CT, MOBILE CART (old)
MFG ASSY,LID W/O PTR,CE (old)
MFG ASSY, LID W/O PTR, MOBILE CART (old)
MFG ASSY, LID, ETX, LVDS, RX-CT (new)
MFG ASSY, LID, LVDS, RX-CT, MOBILE CART (new)
MFG ASSY,LID W/O APS PTR,CE (new)
MFG ASSY, LID W/O APS PTR, MOBILE CART (new)
keyboard cable (part of ) MFG ASSY, LID, ETX, LVDS, RX-CT
nuts (part of ) MFG ASSY, LID, ETX, LVDS, RX-CT
(console lid) screws (part of ) MFG ASSY, LID, ETX, LVDS, RX-CT
(speaker) screws (part of ) MFG ASSY, LID, ETX, LVDS, RX-CT
platen lever (part of ) MFG,ASSY,PRINTER,OMNIRX
(printer to cover) screws (part of ) MFG,ASSY,PRINTER,OMNIRX
(printer to frame) screws (part of ) MFG,ASSY,PRINTER,OMNIRX
(printer) data cable (part of ) MFG,ASSY,PRINTER,OMNIRX
(printer) PC board (part of ) MFG,ASSY,PRINTER,OMNIRX
(printer PC card) screws (part of ) MFG,ASSY,PRINTER,OMNIRX
contrast cable (part of ) MFG ASSY, DISPLAY,ETX-REVC,LVDS,RX-CT
unlit matrix drawer MODEL,OMD48,4/96-UNLIT,MATRIX,DRAWER
MODEL,OMD4,4-BIN,MATRIX DRAWER,(UNLIT)
dividers KIT,DIVIDER,24-BIN,LIT,MATRIX
KIT,DIVIDER,4/96,BIN,UNLIT,MTR
LCD Assembly
Standardization Changes
Electronics Tray
Keyboard
LCD Assembly
Speaker
Printer
Printer
Manual Override Cable
Printer
Printer
Printer
Printer
Printer PC Card
LCD Assembly
Electronics Tray
Lit Matrix Drawers
Unlit Matrix Drawers
PowerCom2 Tray
Unlit Matrix Drawers
Lit Matrix Drawers
PowerCom3 CT PC Tray
Installation Procedure
A-1
Table A-1. TT Part List
© 2010 Omnicell, Inc. OmniTT/AnesthesiaTT Installation and Service Guide/67-2024 Rev D
Page 38

A-2 Appendix A: Part List
Part # Part Name Agile Description Where Used
40-7031 (wireway) SPC board PCB,ASSY,CARRIER,RX2
42-1110
42-1242
42-1229 power cable CABLE ASSY, LVDS LCD DISPLAY
42-1302-02 [USB keyboard] power cable CABLE,ASSY,USB KEYBOARD,QWERTY TO
42-7029 ribbon cable
42-7030 drawer cable CABLE,ASSY,DRAWER,OMNIRX
42-7037 touch screen data cable CABLE,ASSY,TOUCHPAD DATA, SERIAL,RXCT
42-7085-12
42-7088
42-7087 backlight cable; contrast cable CABLE ASSEMBLY, POTENTIOMETER, OMNIRX
42-7092 inverter cable CABLE ASSY,ETX-REV C TO INVERTER,121PW181,RX
42-7093 card reader cable CABLE ASSY,SERIAL,EXTENSION,MINIMAG,CARD
42-7095 fan power cable CABLE ASSY, 2 FAN, 92MM, 12VDC, OMNIRX
51-2059 transport handle HANDLE,TRANSPORT,HALF-CELL
51-2064 override cable handle KNOB,PULL,MANUAL,OVERRIDE OMNIRX
51-7032 manual override cable CABLE,MANUAL,OVERRIDE,OMNITT
51-7046 printer cover PIVOT,PRINTER,ASSY,OMNIRX
LCD data cable CABLE,ASSY,28",LCD,DATA
CABLE,ASSY,LVDS,LCD DISPLAY
MOTHERBOARD,STD,CTPC
CABLE,ASSY,DRAWER,CONNECT,TO IUPS,OMNIRX
wireway cable
(printer) ribbon cable
printer cable
(cable to frame back) nut (part of) CABLE,MANUAL,OVERRIDE,OMNITT
CABLE ASSY,PRINTER,48"
CABLE ASSEMBLY, PRINTER, 48" FOLDED, OMNIRX
READER,OMNIRX
Wi re wa y
Electronics Tray
LCD Assembly
Standardization Changes
Wi re wa y
Cables
Installation Procedure
Electronics Tray
Printer
Electronics Tray
Standardization Changes
Electronics Tray
Electronics Tray
Electronics Tray
Wi re wa y
Manual Override Cable
Manual Override Cable
Manual Override Cable
Printer
Manual Override Cable
53-1082 keyboard cover BKT,COVER,KEYBD,OMNIRX
53-1105 LCD (front) bezel BEZEL, NEC LVDS LCD DISPLAY
53-2081
53-7289
controller cable cover
printer support bracket
cable cover bracket
COVER,CABLE,OMNIRX [old]
COVER,CABLE,OMNIRX [new]
Keyboard
LCD Screen
Installation Procedure
Removal Procedure
Manual Override Cable
Standardization Changes
53-2092 manual override cover COVER,MANUAL,OVERRIDE,OMNITT
Installation Procedure
Removal Procedure
Wi re wa y
Manual Override Cable
53-7106 cable clamp CABLE,CLAMP,SLIDE,MOUNT,OMNIRX
53-7112 release levers (on drawer) IR blade
53-2091 wireway
drawer connect board
WIREWAY,OMNITT
Installation Procedure
Removal Procedure
Wi re wa y
Installation Procedure
Table A-1. TT Part List
OmniTT/AnesthesiaTT Installation and Service Guide/67-2024 Rev D © 2010 Omnicell, Inc.
Page 39

Appendix A: Part List A-3
Part # Part Name Agile Description Where Used
53-7123 slide support bracket
rail
65-7009
65-7071
71-7008 (printer) PC card PCB ASSY,PRINTER,RIGHT ANGLE SHROUDED CONN
71-1054 elastomer KEYPAD,ELASTOMER,104-KEY,GREY
73-1001 speaker SPEAKER, 2.5", 8 OHM, 2W
80-0802 speaker cable CONN,CABLE ASSY,MOLDED PLUG,3.5, STEREO, SHL'D, PVC, 36”
82-6061 jumper JUMPER,SHUNT,0.1",15AU,RED
88-1005 cabinet power/comm cable CABLE,POWER,SATA,6IN
88-6003 AUX cable CABLE,AUX,RJ12,6,LINE (DATA),25'
88-6014 flat panel cable CABLE,ASSY,REACH,CNTRLR,TO FLAT,PANEL
91-7040
91-7041
91-7044
94-6080 (transport handle) screw SCREW,BHCS,1/4-20,X,1/2,SS
94-6132 (slide) screw
94-6137 (override cable) screw SCREW,BH,TORX,6-32,X,3/16,SS
94-6151 (wireway) screw SCREW,FH,TORX,8-32,X,1/4,SS T15
94-6158 (slide) washer WASHER,FLAT,#8,SS
94-6162 (printer support bracket) screws SCREW,FH,TORX,6-32,X,3/16,100,DEG,C'SINK
bin divider labels LABEL,NUMBERS,1-96,MATRIX,RX
slide SLIDE,OUTER HALF, DRAWER,RX,ACCURIDE C3834-156-1
(rail) screw
(cable cover) screw SCREW,FH,TORX,6-32,X,3/16,100,DEG,C’SINK
BRACKET,SLIDE,MOUNT,MAN. OVERRIDE,ATTACH
LABEL,NUMBERS,1-24 MATRIX,RX
SLIDE,OUTER HALF,SNAP-IN,ACCURIDE C3820-332-20L
SLIDE,INNER HALF,DRAWER,RX, SHORT, ACCURIDE C3834-156-2
SCREW,BH,TORX,8-32,X,3/16,SS
Installation Procedure
Labels
Printer PC Card
Elastomer
Speaker
Electronics Tray
Standardization Changes
Electronics Tray
Electronics Tray
LCD Assembly
Installation Procedure
Wi re wa y
Installation Procedure
Manual Override Cable
Wi re wa y
Installation Procedure
Manual Override Cable
Installation Procedure
Removal Procedure
Standardization Changes
(LCD bezel) screw SCREW,FH,TORX,6-32,X,3/16,100,DEG,C'SINK
94-6167 (cable to frame front) nut NUT,EX,SMALL,HEX,10-32,1/4,X 3/32,SS
94-6182 (cable to assembly) screw SCREW,TRUSS,HD,TORX,6-32,X 1/8,SS
no part # LAN cable LAN cable (external vendor source?)
LCD Screen
Manual Override Cable
Manual Override Cable
Electronics Tray
Table A-1. TT Part List
© 2010 Omnicell, Inc. OmniTT/AnesthesiaTT Installation and Service Guide/67-2024 Rev D
Page 40

Feedback Form
This document is designed to provide relevant technical information to those responsible for the
implementation, service, and support of Omnicell products. The Documentation team needs your
input, so we can continue to improve our publications.
Please send us your feedback:
Did this document meet your needs? If so, please let us know what we’re doing right. If not, please
provide specific feedback. E-mail or fax your feedback as follows:
E-mail: Documentation Requests e-mail group at documentationrequests@omnicell.com (specify the
document title or PN).
Fax: send this page, along with your feedback, to (650) 251-6266, attention: Documentation.
Name: E-mail:
Dept./Title: Phone:
Feed back:
© 2010 Omnicell, Inc. OmniTT/AnesthesiaTT Installation and Service Guide/67-2024 Rev D
Page 41

 Loading...