

Olympus CKX-CCSW Instructions Manual

INSTRUCTIONS
CKX-CCSW
Confluency checker
NOTE:
This instruction manual is for the Olympus confluency checker CKX-CCSW.
To ensure the safety, obtain optimum performance and to familiarize yourself fully with the use of this
software, we recommend that you study this manual thoroughly before using the software, and always
keep this manual at hand when using the software.
Keep this instruction manual in a safe place.
Software for research/education
This software is designed to use in research and or education fields.
Optical Microscope Accessory

Contents
Introduction .......................................................................................................................................................1
Handling Precautions .............................................................................................................................. 2
Cautions in use ...............................................................................................................................................................2
System compatibility .................................................................................................................................................. 2
PC and software ............................................................................................................................................................ 3
1 System diagram ....................................................................................................................................... 4
2 Installation ..................................................................................................................................................... 5
2-1 Installation................................................................................................................................................................ 5
2-2 Activation .................................................................................................................................................................. 8
2-3 Uninstallation ........................................................................................................................................................ 8
3 Basic operations ..................................................................................................................................... 9
3-1 Initial Settings ......................................................................................................................................................... 9
Starting the software ..................................................................................................................................................................9
1
Exiting the software .................................................................................................................................................................. 10
2
Initial settings ................................................................................................................................................................................. 11
3
3-2 Measuring while acquiring the image with DP22/DP27 ..............................................13
Measuring the cell count in the culture vessel while acquiring the image with DP22/DP27
1
Measuring the confluency in the culture vessel while acquiring the image with DP22/DP27
2
3-3 Measuring from the acquired image ............................................................................................ 21
Measuring the cell count from the acquired image....................................................................................21
1
Measuring the confluency from the acquired image .................................................................................24
2
3-4
Measuring while acquiring the image with cameras other than DP22/DP27
Measuring the cell count in the culture vessel while acquiring the image with cameras other than DP22/DP27
1
Measuring the confluency in the culture vessel while acquiring the image with cameras other than DP22/DP27
2
...... 13
... 17
......28
....28
..32
ii
3-5 Measuring the cell count and the confluency at the same time.........................36
3-6 Re-using the measurement settings ............................................................................................ 36
4 Camera connection (when using DP22/DP27) ........................................................37

CKX-CCSW
5 Screen flow ...............................................................................................................................................38
5-1 [Main] screen ...................................................................................................................................................... 38
5-2 Displaying the submenu ..........................................................................................................................39
5-3 Displaying the [Setting] screen ...........................................................................................................39
6 Various settings .....................................................................................................................................40
6-1 [Main] screen ...................................................................................................................................................... 40
Setting the source .....................................................................................................................................................................40
1
6-2 Submenu ............................................................................................................................................................... 41
Setting the area of culture vessel ................................................................................................................................41
1
Setting the objective magnification ...........................................................................................................................41
2
Setting the adapter magnification ...............................................................................................................................42
3
Setting the size of image sensor ................................................................................................................................42
4
Setting the number of images ........................................................................................................................................43
5
6-3 [Setting] screen .................................................................................................................................................43
Setting the file format used for saving results ..................................................................................................44
1
Setting the count color ..........................................................................................................................................................45
2
Setting the confluency color ............................................................................................................................................46
3
Displaying the focus indicator ........................................................................................................................................47
4
Setting the working folder ..................................................................................................................................................48
5
Setting the file name ...............................................................................................................................................................48
6
Setting the language ...............................................................................................................................................................49
7
Setting the DP image format ............................................................................................................................................49
8
Setting the calibration of DP22/DP27 ......................................................................................................................50
9
Displaying About .........................................................................................................................................................................50
10
6-4 [Property] screen ..............................................................................................................................................51
6-5 Saving the settings ....................................................................................................................................... 52
6-6 Loading the settings .................................................................................................................................... 52
iii

7 Effective measurement of cell count/confluency ...................................................53
7-1 Zoom area ............................................................................................................................................................ 53
7-2 Using the cell scale bar effectively .................................................................................................53
Setting the cell scale bar ....................................................................................................................................................54
1
8 Specifications ..........................................................................................................................................55
9 Troubleshooting .................................................................................................................................... 56
iv

CKX-CCSW
Introduction
The confluency checker CKX-CCSW is a product to measure the cell count and the confluency from the image where
the culture cells are acquired with the Olympus microscope digital camera DP22/DP27 or other cameras.
Contents in this instruction manual
This instruction manual covers only the contents concerning the confluency checker CKX-CCSW. For procedures to
use the microscope digital camera DP22/DP27 or other cameras, refer to the instruction manual of the respective
camera.
Trademark
Microsoft, Excel, Internet Explorer and Windows are registered trademarks or trademarks of U.S. Microsoft
Corporation in the United States and other countries.
Intel and Intel Core are trademarks of Intel Corporation in the United States and/or other countries.
Company names and/or product names described in this manual are trademarks or registered trademarks of the
respective companies.
Software license agreement
If you use this product, you shall be deemed to have consented to the terms and conditions in “OLYMPUS ENDUSER LICENSE AGREEMENT”.
"OLYMPUS END-USER LICENSE AGREEMENT" is included in the product. Please read it carefully before using the
product.
1

Handling Precautions
Cautions in use
Image data
1. The recorded image data may be lost (destroyed) in the following cases. Olympus is not liable for the loss
(destruction) of the recorded data.
• When the user or a third party carried out a repair to the product.
• When the system is terminated or the power cord is unplugged while PC is recording or deleting (initializing).
• When the cable is disconnected while acquiring still images or movies.
• When the data have been kept saved in the recording media such as USB memory beyond its data storage
life (approx. from one to several years).
• When the product is damaged.
2. If following phenomena occur even though the camera is working properly, images cannot be restored and the
damages are not compensated.
• The image is abnormal.
• File properties such as file names, file date, etc. are abnormal.
• The image was lost.
} In general, as there is a data storage lifetime in the recording media, such as USB memory, HDD, CD-R, DVD-R, etc.,
the saved files may be lost after several years.
} The image data may be lost (corrupted) unexpectedly, so make frequent backups of the data you acquired.
OLYMPUS shall have no liability for any damage (including compensation for the corrupted image data) from the
use or incapable use of this product.
} Make sure that there is no problem in acquiring the specimen images before acquisition. Even though the problem
may occur by the acquired images, Olympus is not liable for these problems.
Connection to network
If you use this product connected to the network, the product may not work properly due to following problems.
1. Infection to the computer virus through network
2. Malfunction caused by applying OS service pack, security patch, or updating third-party software including runtime
libraries
3. The acquired images are missed or the acquisition process is delayed or stopped due to the overloaded system
which is caused by running the antivirus software, etc.
System compatibility
Restrictions in use
} Please also confirm the restrictions described in the instruction manuals of the digital camera DP22/DP27 or other
cameras you will use.
2
PC and software
Recommended configurations
Common in Desktop PC / Laptop PC / Tablet PC
No. Item Operating Environments
®
1 CPU Intel
2 RAM 4GB
3 HDD 1 GB or more hard disk space for installation
4 Display Desktop PC / Laptop PC:
5 Communication
port
6 OS Microsoft
7 Language English, Japanese, Simplified Chinese
Atom, Intel® Core.i3, Intel® Core.i5, Intel® Core.i7, Intel® Xeon, (CPU with the processing
®
capability of Intel
Resolution 1280 x 1024 (at least 1024 x 768), graphic card available for 32 bit color.
Tablet PC:
10.1 inch 1920 x 1200 (at least 8.3 inch)
USB3.0 port (when using DP22/DP27)
®
Microsoft
Microsoft
®
®
Core i3 or more is recommended.)
Windows® 8.1 Professional (32bit/64bit)
Windows® 8 Professional (32bit/64bit)
Windows® 7 Ultimate/Professional (32bit/64bit) SP1
CKX-CCSW
Even though the above mentioned recommended operating environments are satisfied, it does not necessarily
guarantee the functions of combination use with all PCs commercially available. Refer to Olympus website to check the
PCs whose performances in combination use with this system were confirmed.
PC
1. The PC data may be lost (corrupted) unexpectedly, so make frequent backups of the data you acquired. Olympus
is not liable for any damage due to the use or disability in use of this product, including compensation for lost data.
2. When the free space in the hard disk drive (HDD) is reduced, the data processing speed may be extremely slow or
errors may occur frequently. To prevent this, delete unnecessary data files frequently.
3
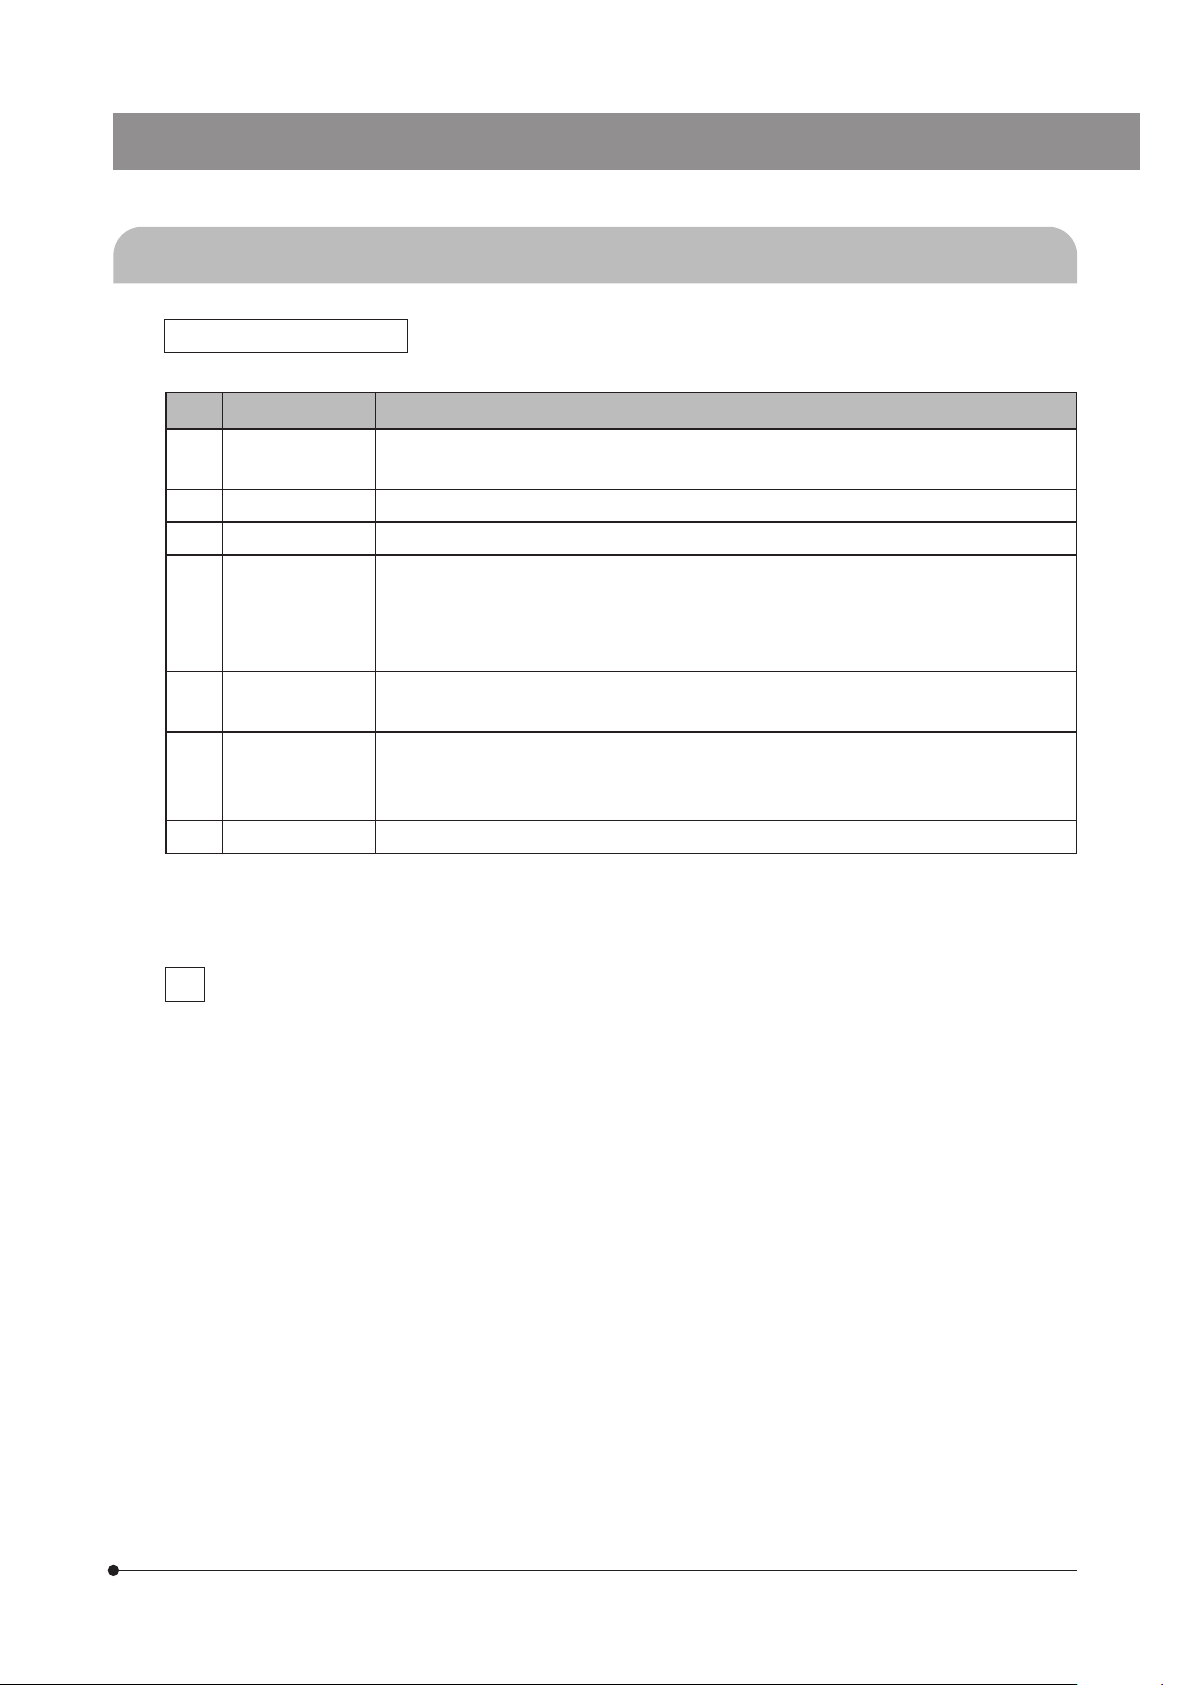
1 System diagram
The system configuration for using this product is shown below.
DP22-CU/DP27-CU
Camera head
Camera
・ DP22-CU *
・ DP27-CU *
(Hereinafter referred to as
DP22/DP27)
Camera adapter
・ U-TV0.5XC
・ U-TV1X
・ U-CMAD
Interface cable **
PC *
(Desktop PC / Laptop PC /
Tablet PC)
This product
CKX-CCSW
(Download from Olympus
web site.)
4
Microscope
・ CKX53 system, etc.
} Consult Olympus for the compatible microscope and camera adapter.
* The camera head may not work properly in combination with some PCs. Refer to Olympus website to check the
PCs whose performances in combination use with this system were confirmed.
** Do not use the interface cable for other use.
CKX-CCSW
2 Installation
Before installing software
1. Close all running applications before installing software.
2. Software cannot be installed unless the user account logging on the Windows is registered as a “Administrator”. If it
is registered as a “User”, change it to a “Administrator”.
(For the change of user account, refer to the Help of Windows.)
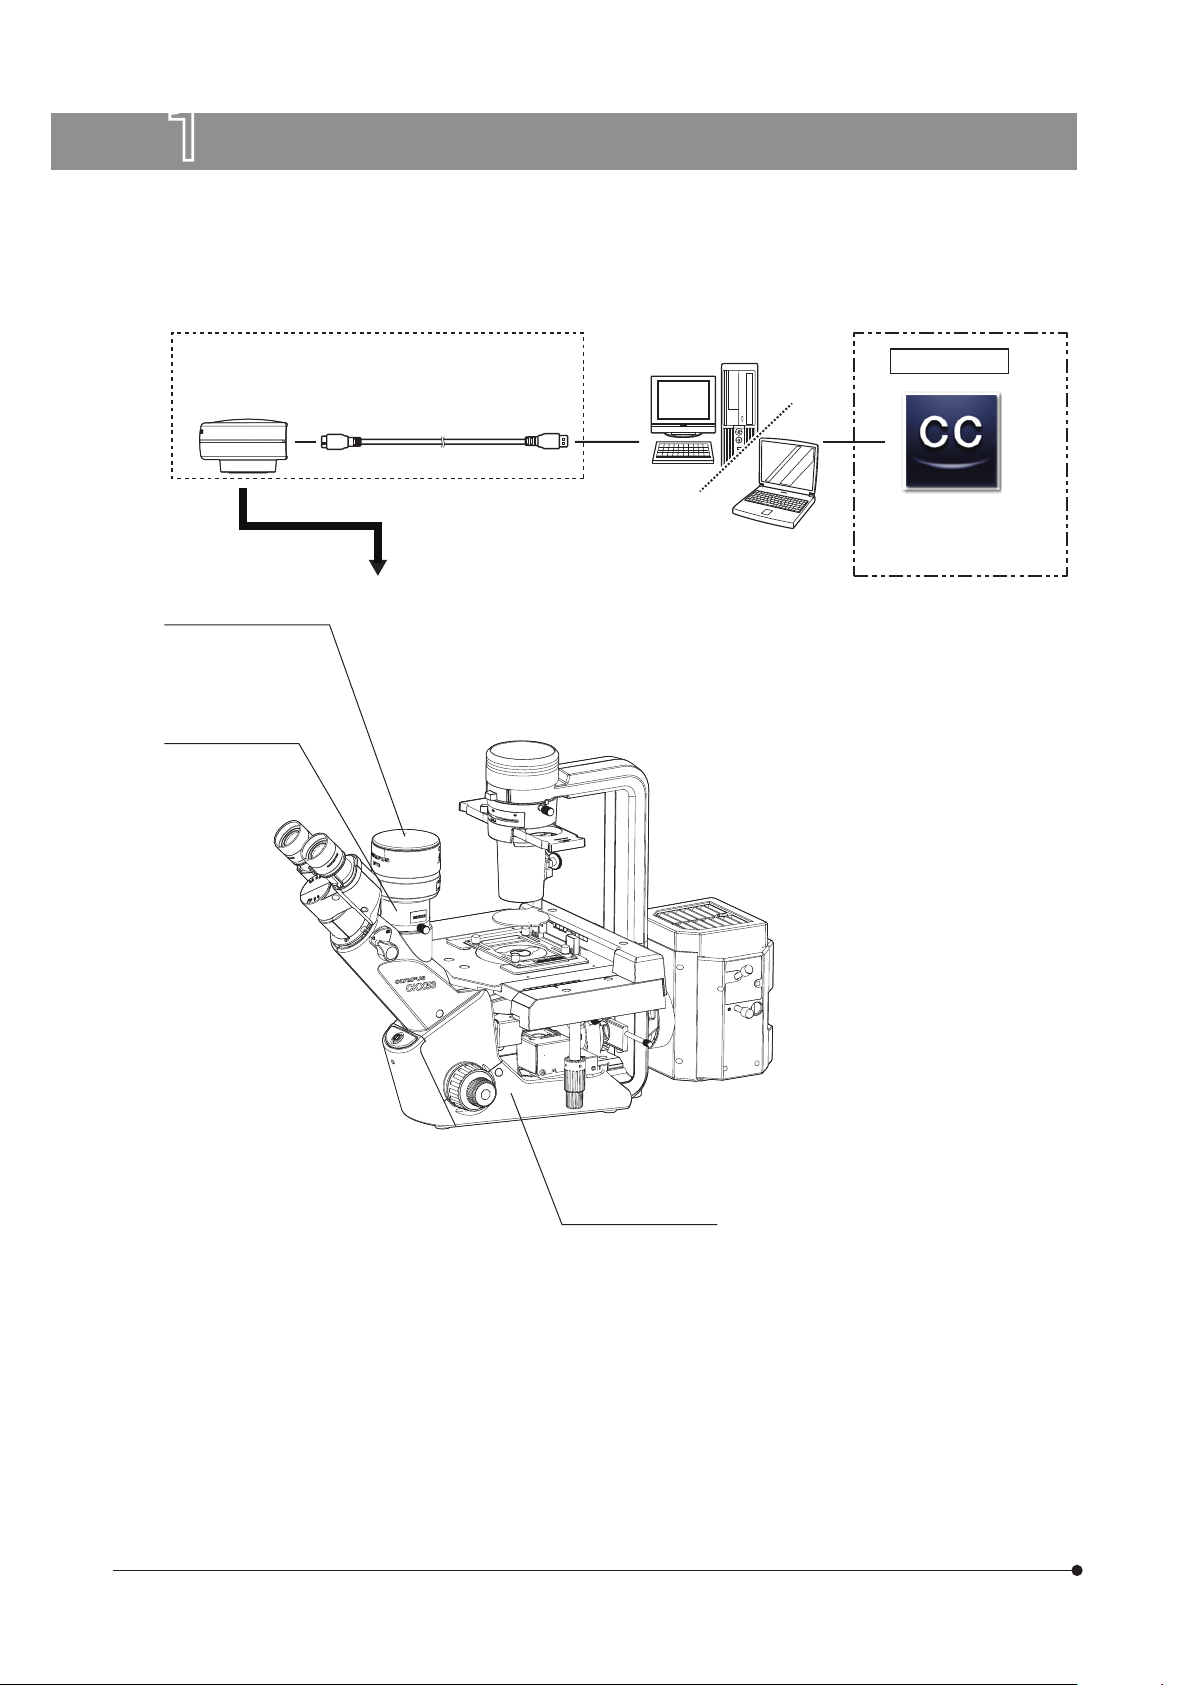
2-1 Installation
The procedures to install this product is described below.
Open (decompress) the file downloaded from the Olympus web site on the desktop screen of PC where this product
1
will be installed.
Click "Setup.exe".
2
Select the language to use.
3
Select the language from followings.
· English
· Chinese (simplified characters)
· Japanese
The procedures described below are for the case when [Japanese] is selected.
Click [Next].
4
Select [Yes, I accept all terms of the License Agreement.] and click [Next].
5
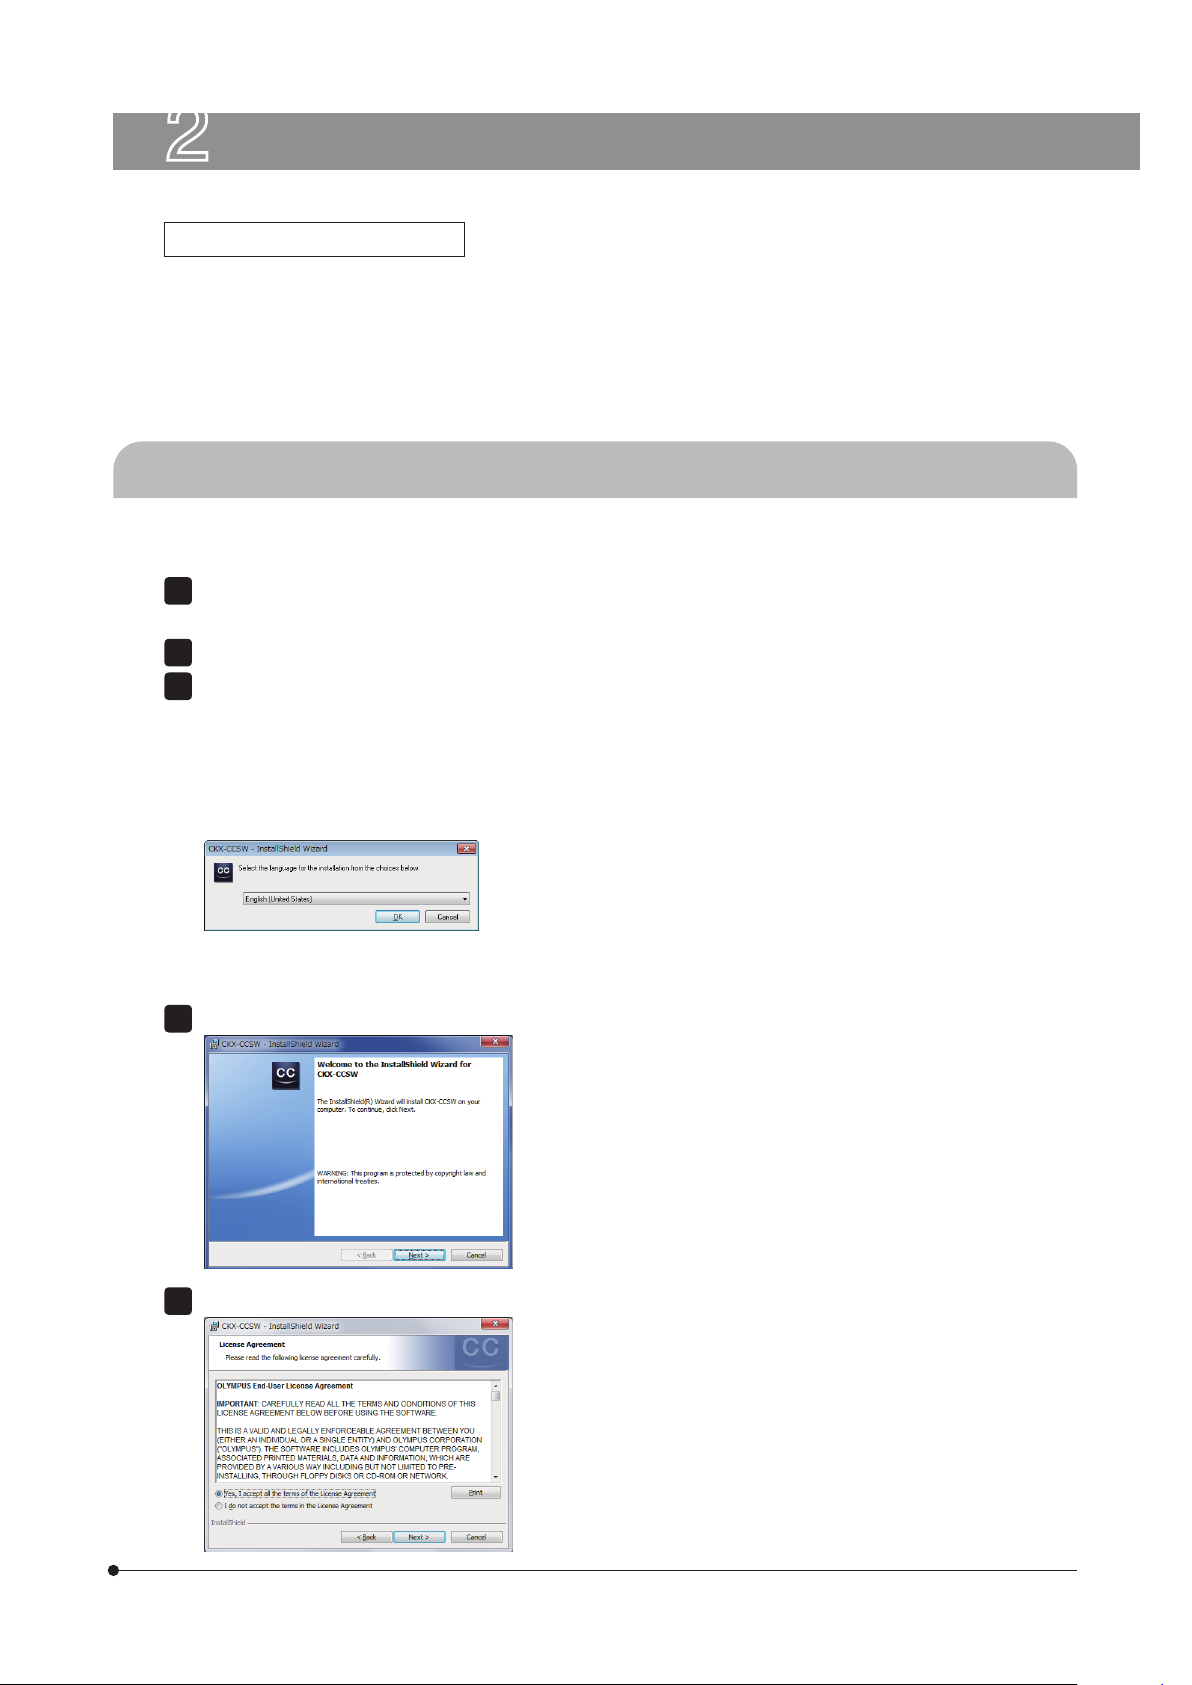
5
Input [User name] and [Company].
6
These fields may have already been filled.
Select the folder to install the software and click [Next].
7
The following folder is specified as the initial setting.
32-bit version C:\Program Files\Olympus\Micro\CKX-CCSW
64-bit version C:\Program Files (x86)\Olympus\Micro\CKX-CCSW
6
Click [Install].
8
The installation starts. During the installation process, if "Would you like to install this device software?] regarding the
installation of the USB driver of DP22/DP27 appears, click [Install].
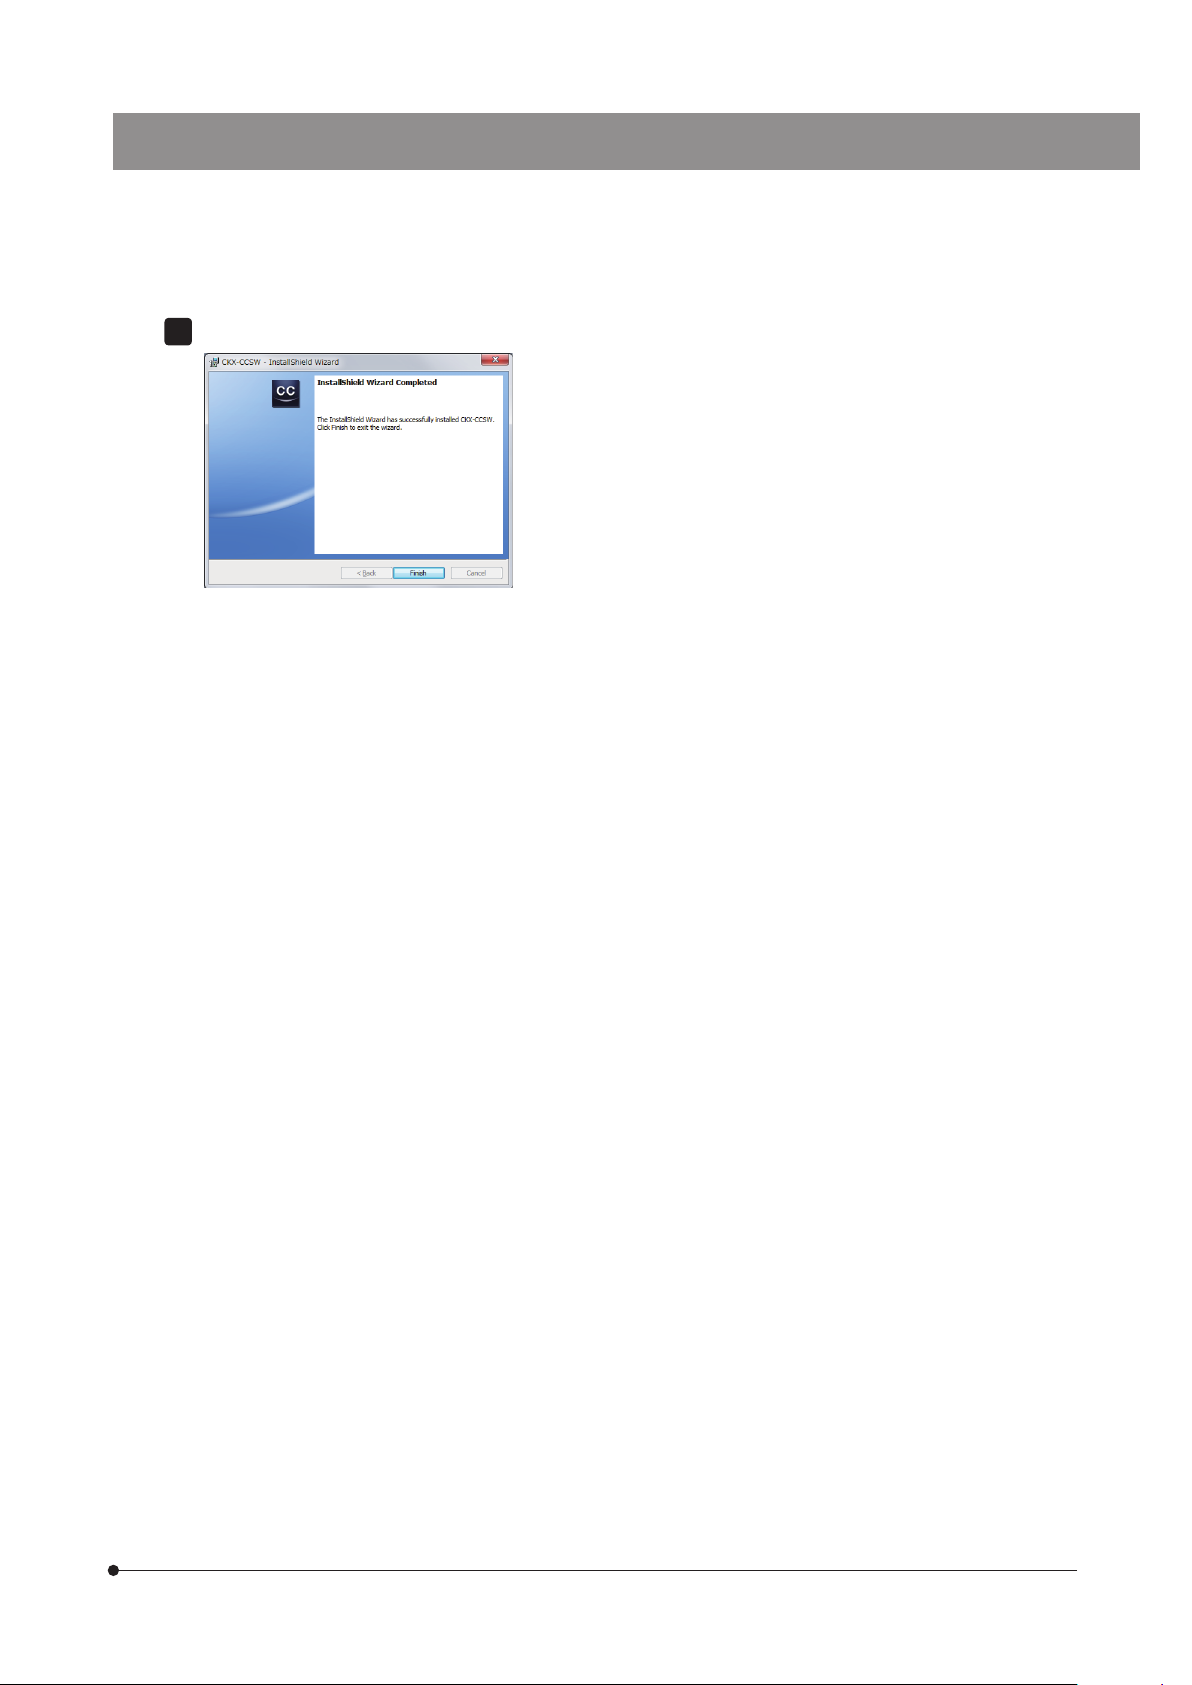
Click [Finish].
9
This is the end of the installation.
CKX-CCSW
7
2-2 Activation
TIP
TIP
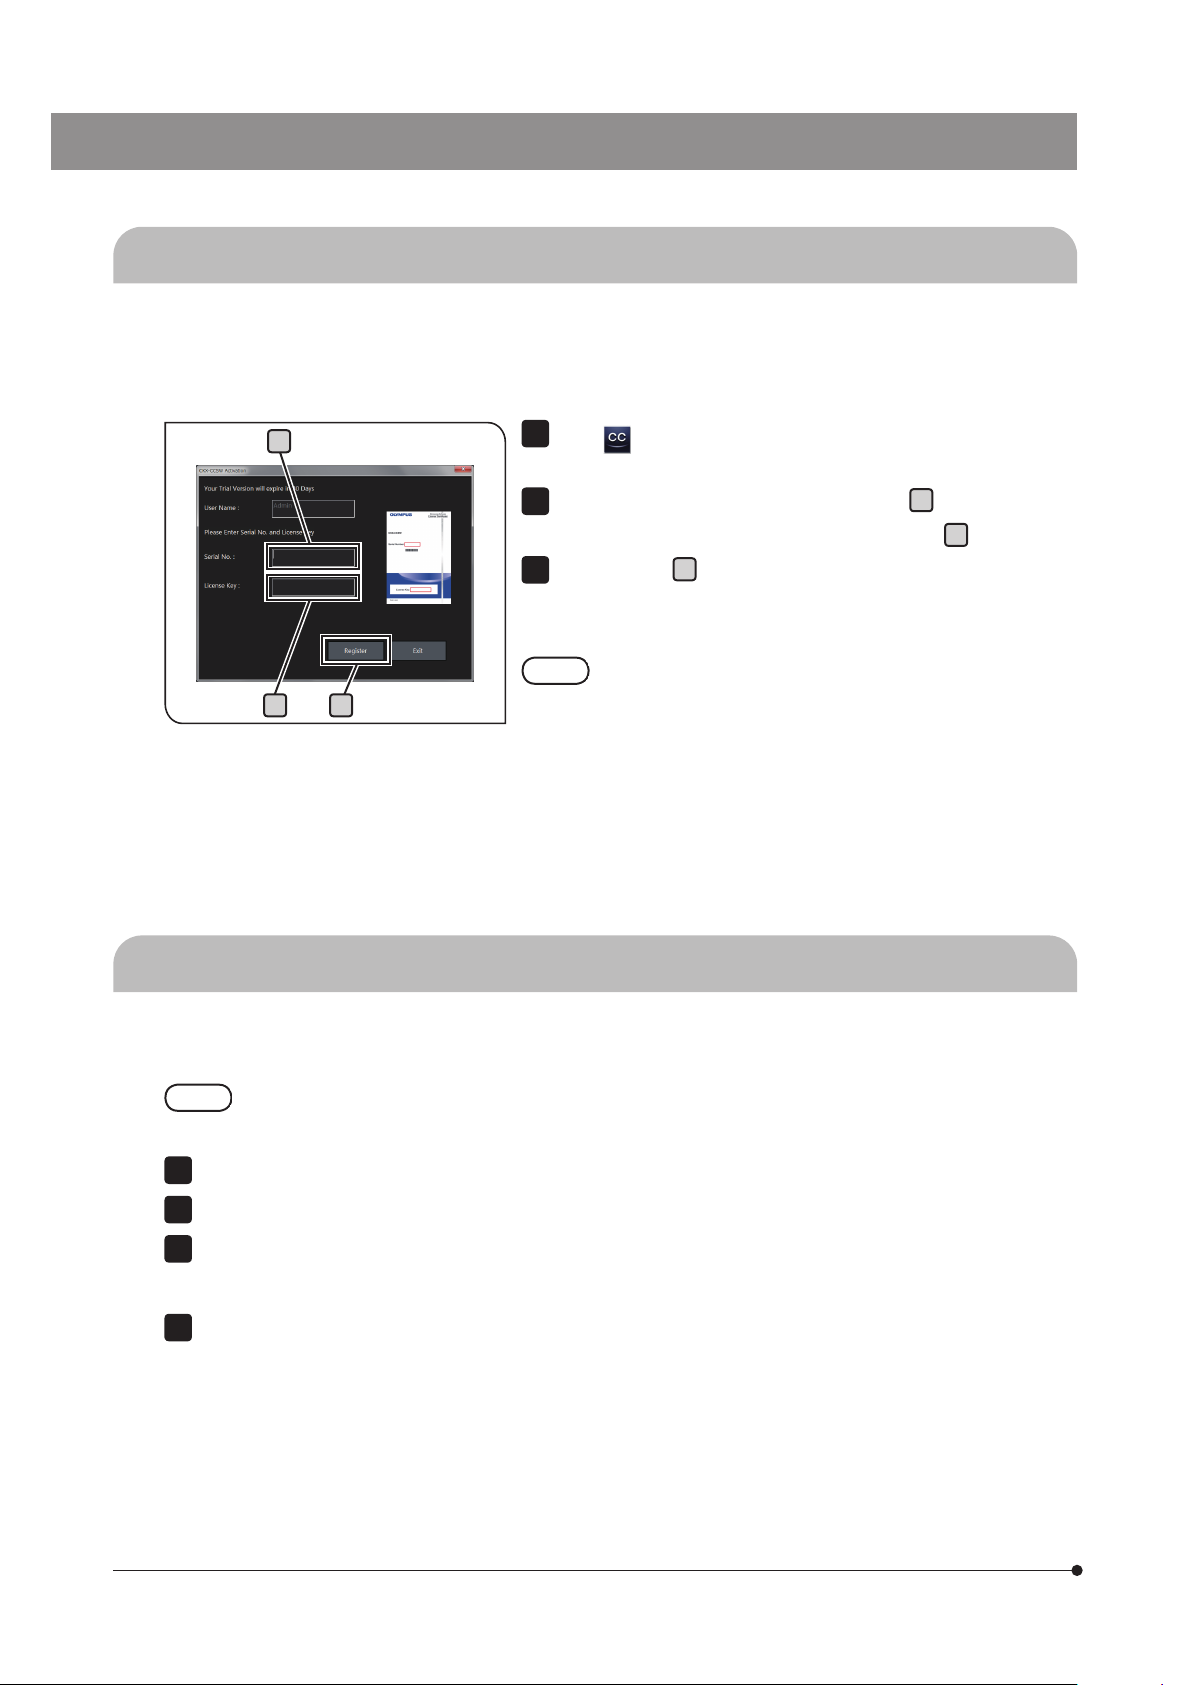
If passing 30 days of more after the date of installation, you must activate this product using the serial code. Without
activation, you will not be able to use this software.
The procedures to activate this product is described below.
Click on the desktop.
a
1
This product starts and the screen to input the license key appears.
Input the serial number in the [Serial No.] field
2
and input the license key in the [License Key] field
Click [Register]
3
Clicking [Finish] will close this screen without activation.
b c
2-3 Uninstallation
The procedures to uninstall this product is described below.
a
,
.
b
c
.
Within 30 days after the date of installation, the above screen
appears when exiting the software.
8
If "Setup.exe" is deleted during installation, use Windows OS functions to uninstall the product.
Click "setup.exe".
1
Click [Next].
2
Select [Delete] and click [Next].
3
The uninstallation starts.
Click [Finish].
4

3 Basic operations
This section describes the basic operating procedures of this product. After initial settings are completed, you can
measure the cell count and the confluency according to the procedures described below.
·
Measure the cell count/confluency in the culture vessel while acquiring the image using the camera (DP22/DP27, etc.).
·
Measure the cell count/confluency in the culture vessel from the acquired images.
3-1 Initial Settings
1
Starting the software
Start this product according to the procedures described below.
· Windows 7
Click
1
on the desktop screen.
CKX-CCSW
Or click in the order of [Start] button - [All programs] - [Olympus] - [CKX-CCSW].
If the error or the warning screen appears after the software starts, click [OK].
· Windows 8/8.1
Display the desktop screen and click
1
Or on the start screen, click [CKX-CCSW.exe] in [All applications].
If the error or the warning screen appears after the software starts, click [OK].
.
9
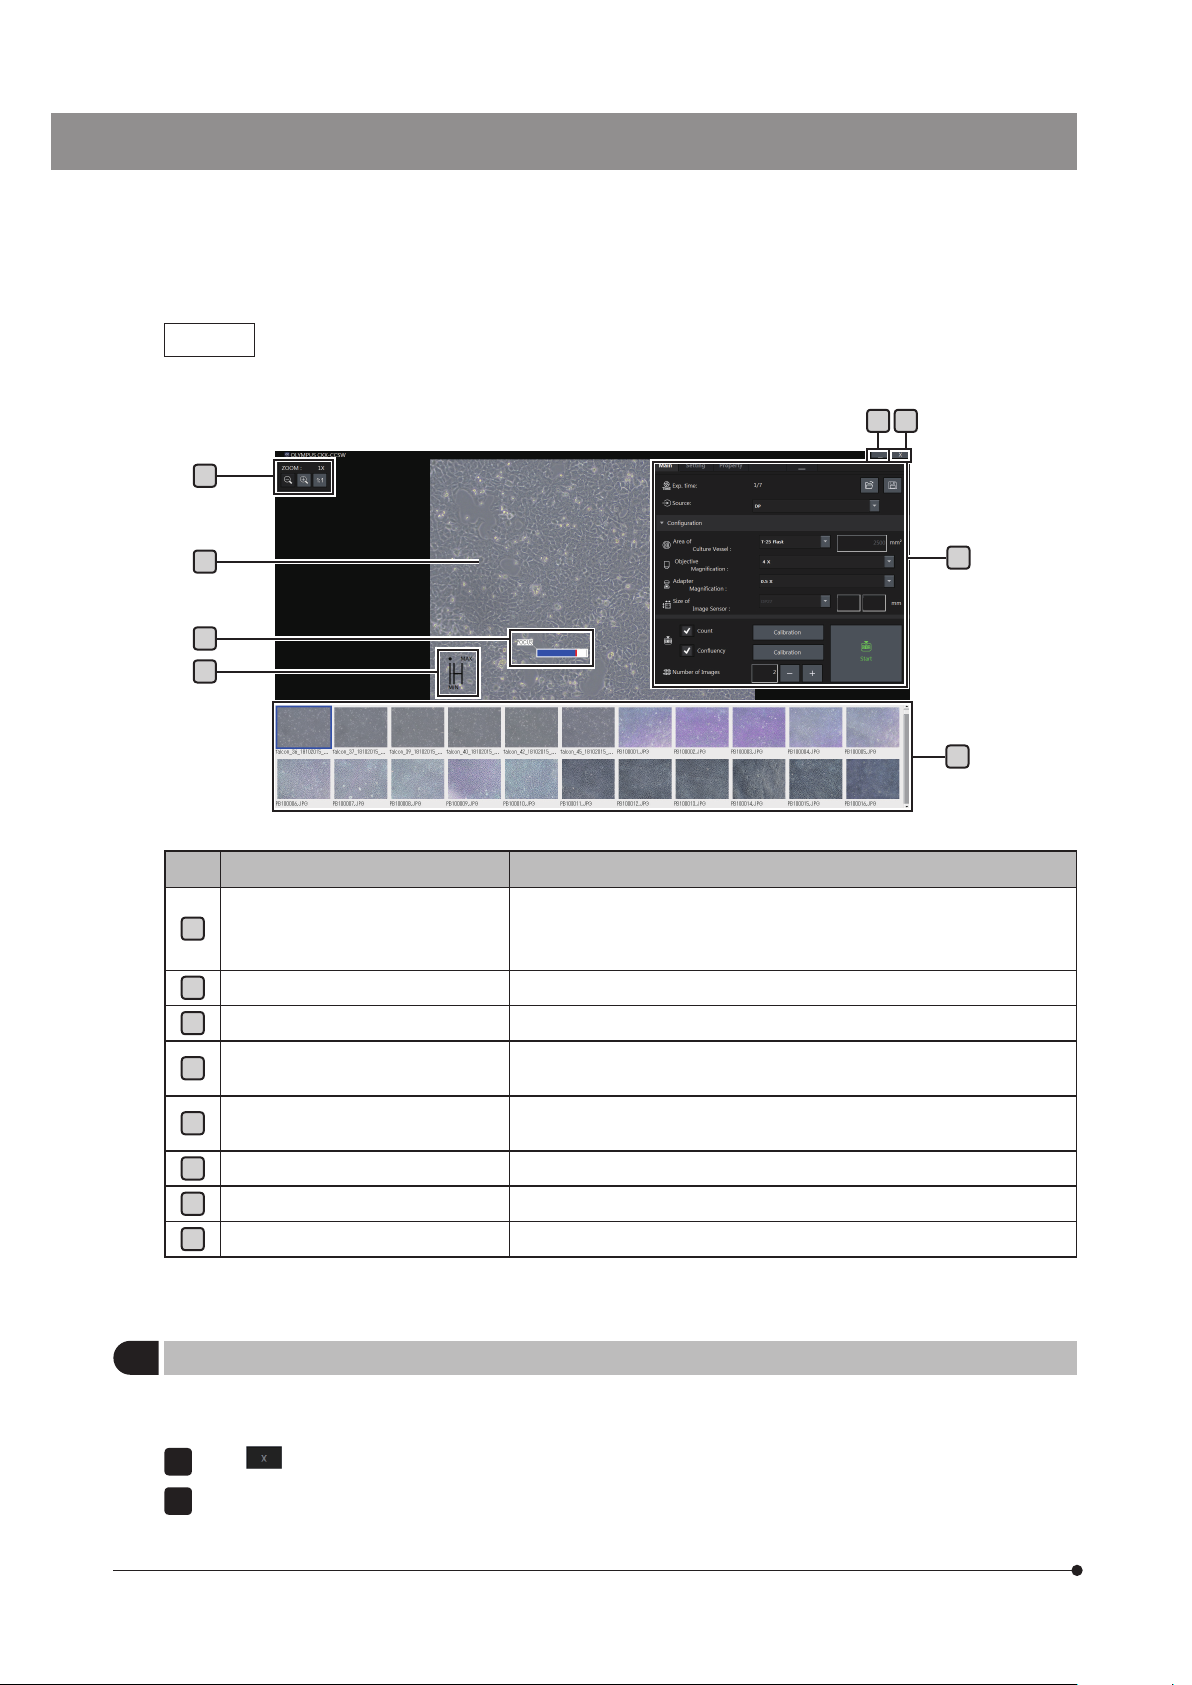
Entire view
When you start this product, the following screen appears first.
b
g
h
c
e
f
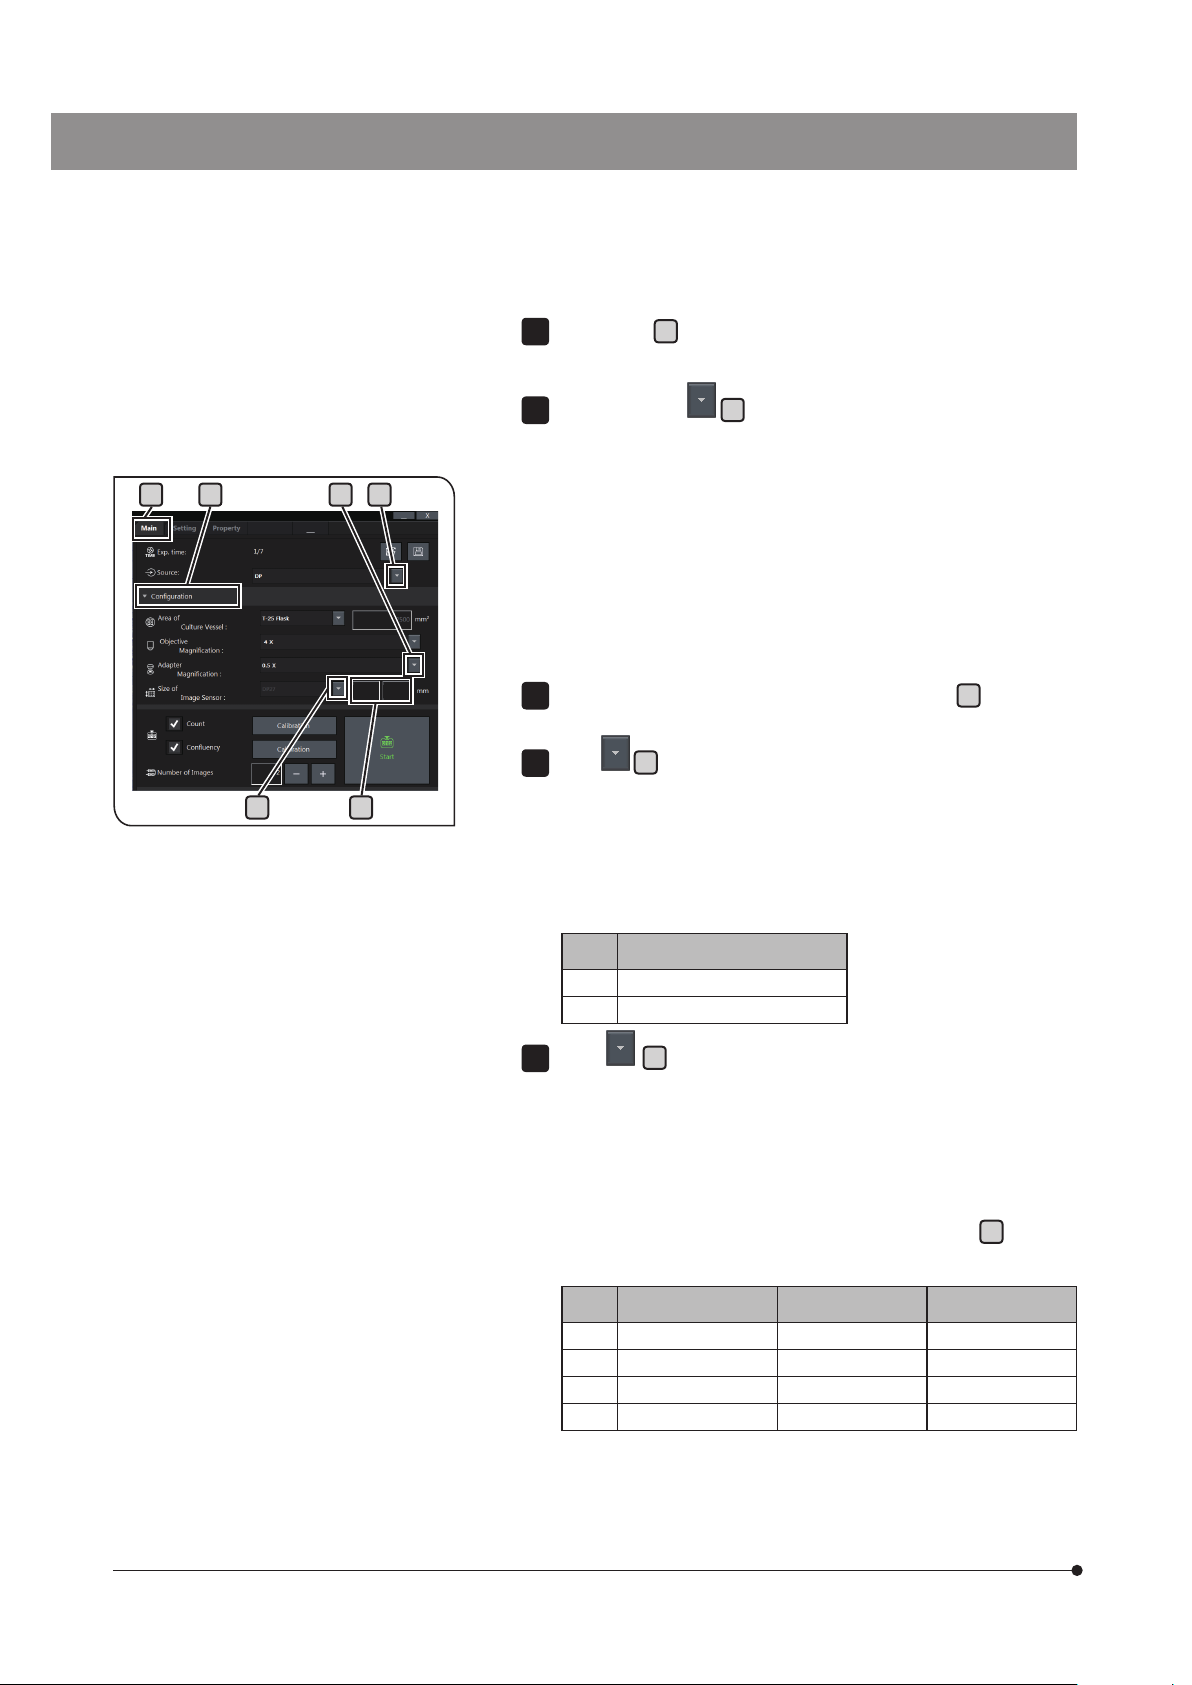
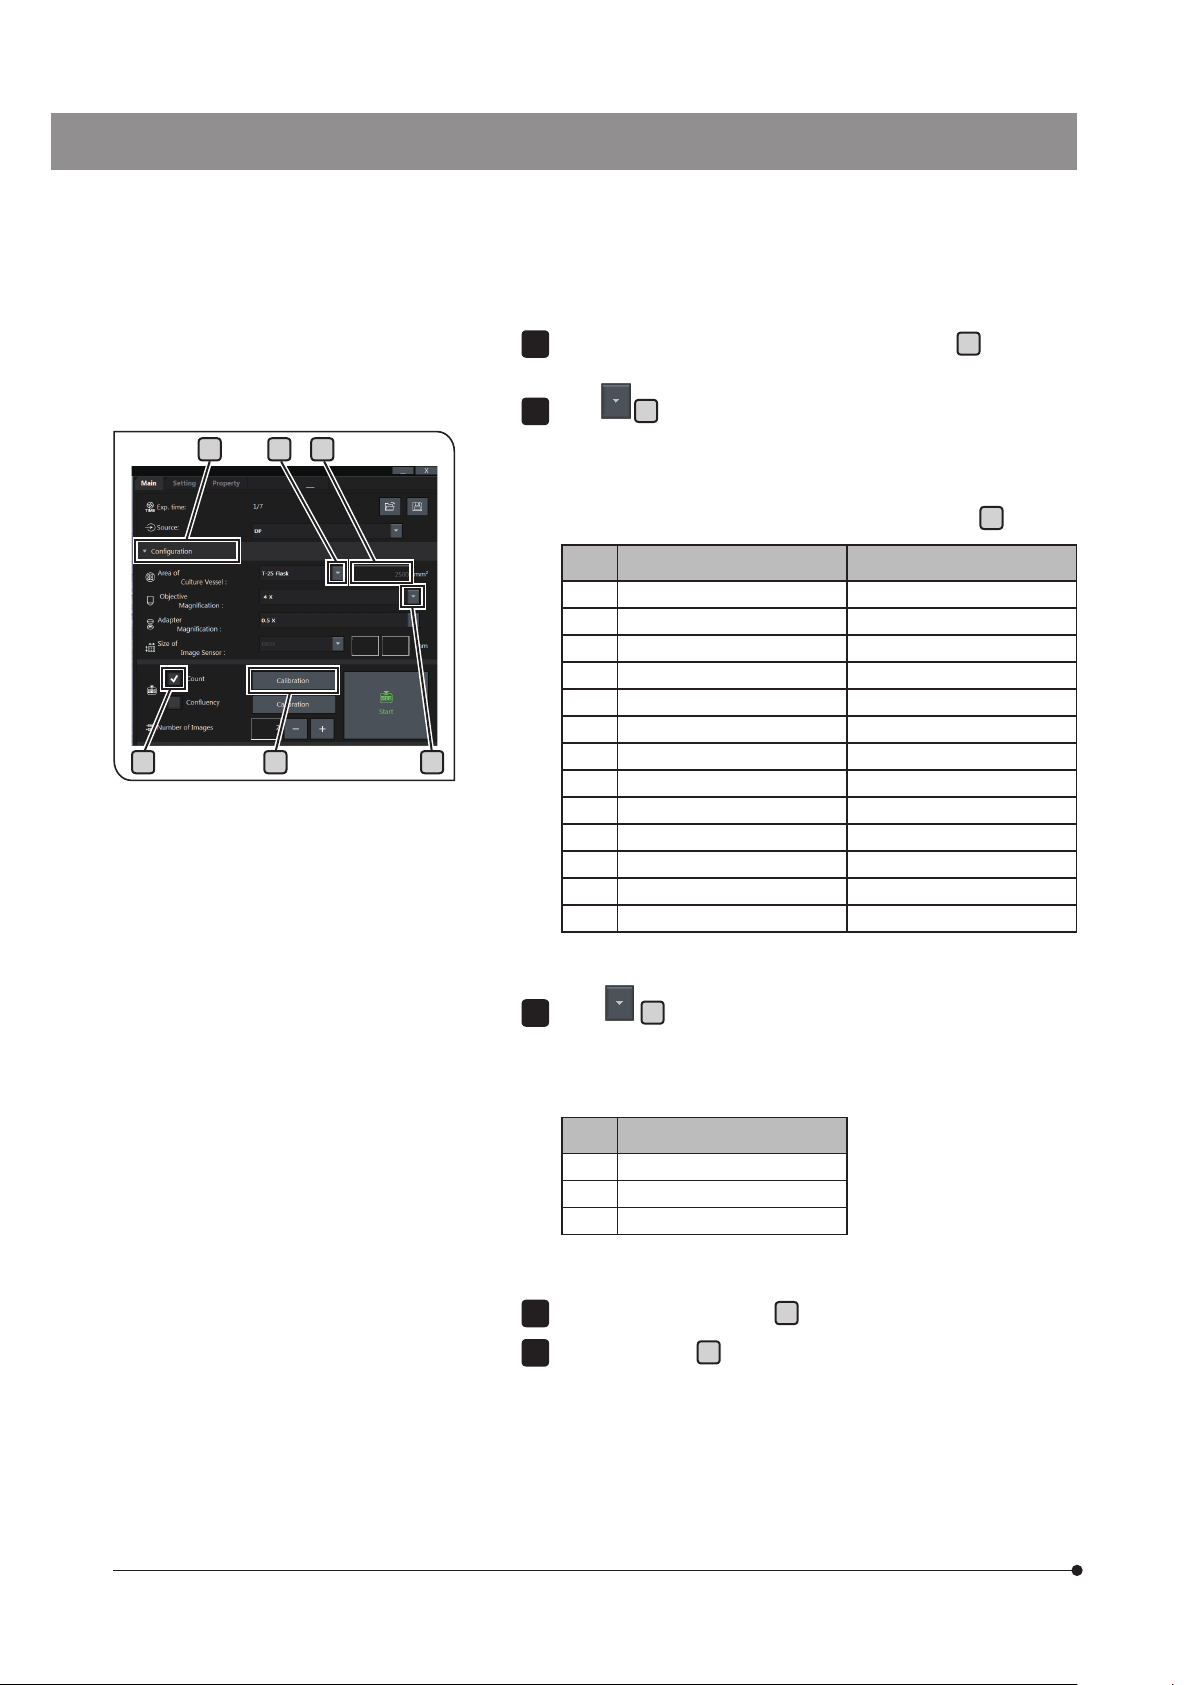
Item Description
Area to perform main operations of this product You can select from three
a
Control area
b
Zoom area Area to zoom in/out the image in the preview area
c
Preview area Area to display the image to be measured
d
Thumbnail area *
e
Focus indicator *
f
Cell scale bar Scale to check whether the cell size is measurable or not
g
Button to minimize Minimizes the screen.
types of screens: [Main] / [Setting] / [Property] by the tab in the upper part
of the area.
Area to display the image in the specified folder by thumbnail and to
select the image to be measured
Displays the contrast level of the live image as a focusing guide when
acquiring with DP22/DP27.
a
d
10
h
Button to close Closes CKX-CCSW
* These fields may not be displayed depending on the camera to be used and software settings.
2
Exiting the software
Exit this product according to the procedures described below.
Click
1
Click [OK].
2
If the software has not been activated, the activation screen appears.
in the title bar.
CKX-CCSW
TIP
3
Initial settings
This section describes the initial setting procedures of this product. This operation is necessary when you start this
product for the first time. After the second time, the product starts in the status reflecting the last settings when exiting the
software.
When you start this product, the message "Unable to display due to no recorded picture. Set the folder containing the
acquired image." may appear, but it is not a malfunction.
(Measuring while acquiring the image with the camera) Confirm that
1
powers of PC and the camera are turned OFF and connect PC to
the camera.
For the connection procedures when using DP22/DP27, see page
37. When using other cameras, refer to the instruction manual of the
respective camera.
b a
(Measuring while acquiring the image with the camera) Confirm that
2
the light path selector of the microscope is set to the camera side.
For procedures to operate the light path selector of the microscope,
c
refer to the instruction manual of the microscope in use.
Start this product according to the procedures described on page 9.
3
The [Main] screen appears in the control area.
a
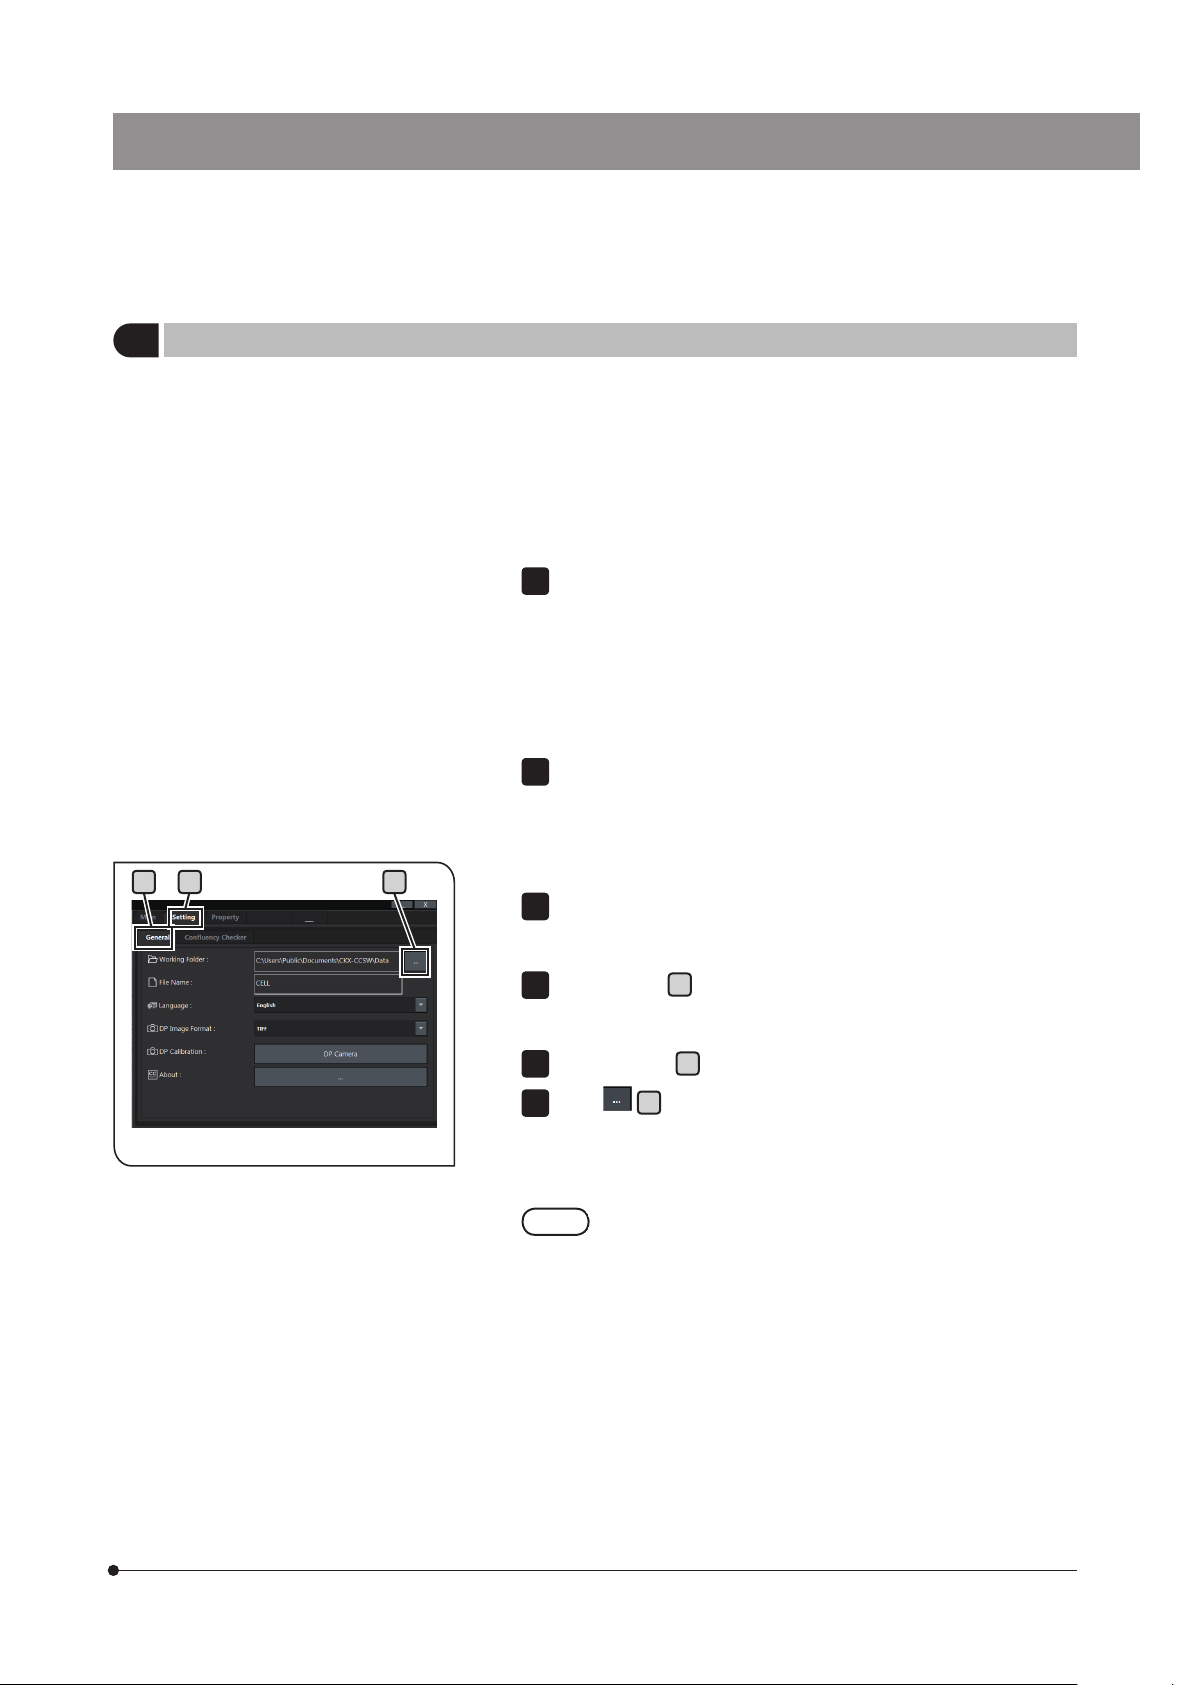
Click [Setting]
4
The [Setting] screen appears.
Click [General]
5
Click
6
The screen to select the folder appears.
Select the folder to use as a working folder and click [Select Folder].
The selected folder is used for saving the image acquired
with this product or for selecting the image to be used for
measurement. Images in the folder are displayed in the
thumbnail area of this product.
(These images are not displayed when measuring while
acquiring the image with DP22/DP27.)
.
.
b
c
.
11
Click [Main]
7
The [Main] screen appears.
.
d
d f e
h i
g
In [Source], click
8
Select the source from followings.
· [DP]: Appears when DP22/DP27 is connected. (Keep this status
when measuring while acquiring the image with DP22/
DP27.)
· [Folder]: Appears when DP22/DP27 is not connected. (Keep
this status when measuring while acquiring the image
with other cameras.)
· [Select Image]: Select this field when measuring from the
If the submenu is not opened, click [Configuration]
9
submenu.
Click
10
the camera adapter connected to the microscope.
Items to be displayed are described below.
No. Magnification
g
in [Adapter Magnification] to display the items, and select
1 X0.5 (Initial setting)
2 X1.0
and select the source.
e
acquired image.
to open the
f
12
h
Click
11
select the size of the image sensor of the camera connected to the
microscope.
If DP22/DP27 is connected, settings are not necessary.
Items to be displayed are described below.
If [Custom] is selected, input the numerical value in the
No. Sensor type [mm] (Horizontal) [mm] (Vertical)
1 DP22 – –
2 DP27 – –
3 4/3 17.3 13.0
4 Custom Direct input Direct input
This is the end of initial settings.
in [Size of Image Sensor] to display the items, and
i
field.
CKX-CCSW
3-2 Measuring while acquiring the image with DP22/DP27
You can measure the cell count and the confluency in the culture vessel while acquiring the image with DP22/DP27.
1
Measuring the cell count in the culture vessel while acquiring the image with DP22/DP27
Start this product according to the procedures described on page 9.
a
1
The [Main] screen appears in the control area.
a
Click
2
Place the culture vessel of the specimen to be measured on the stage
3
of the microscope.
in [Source] and select [DP].
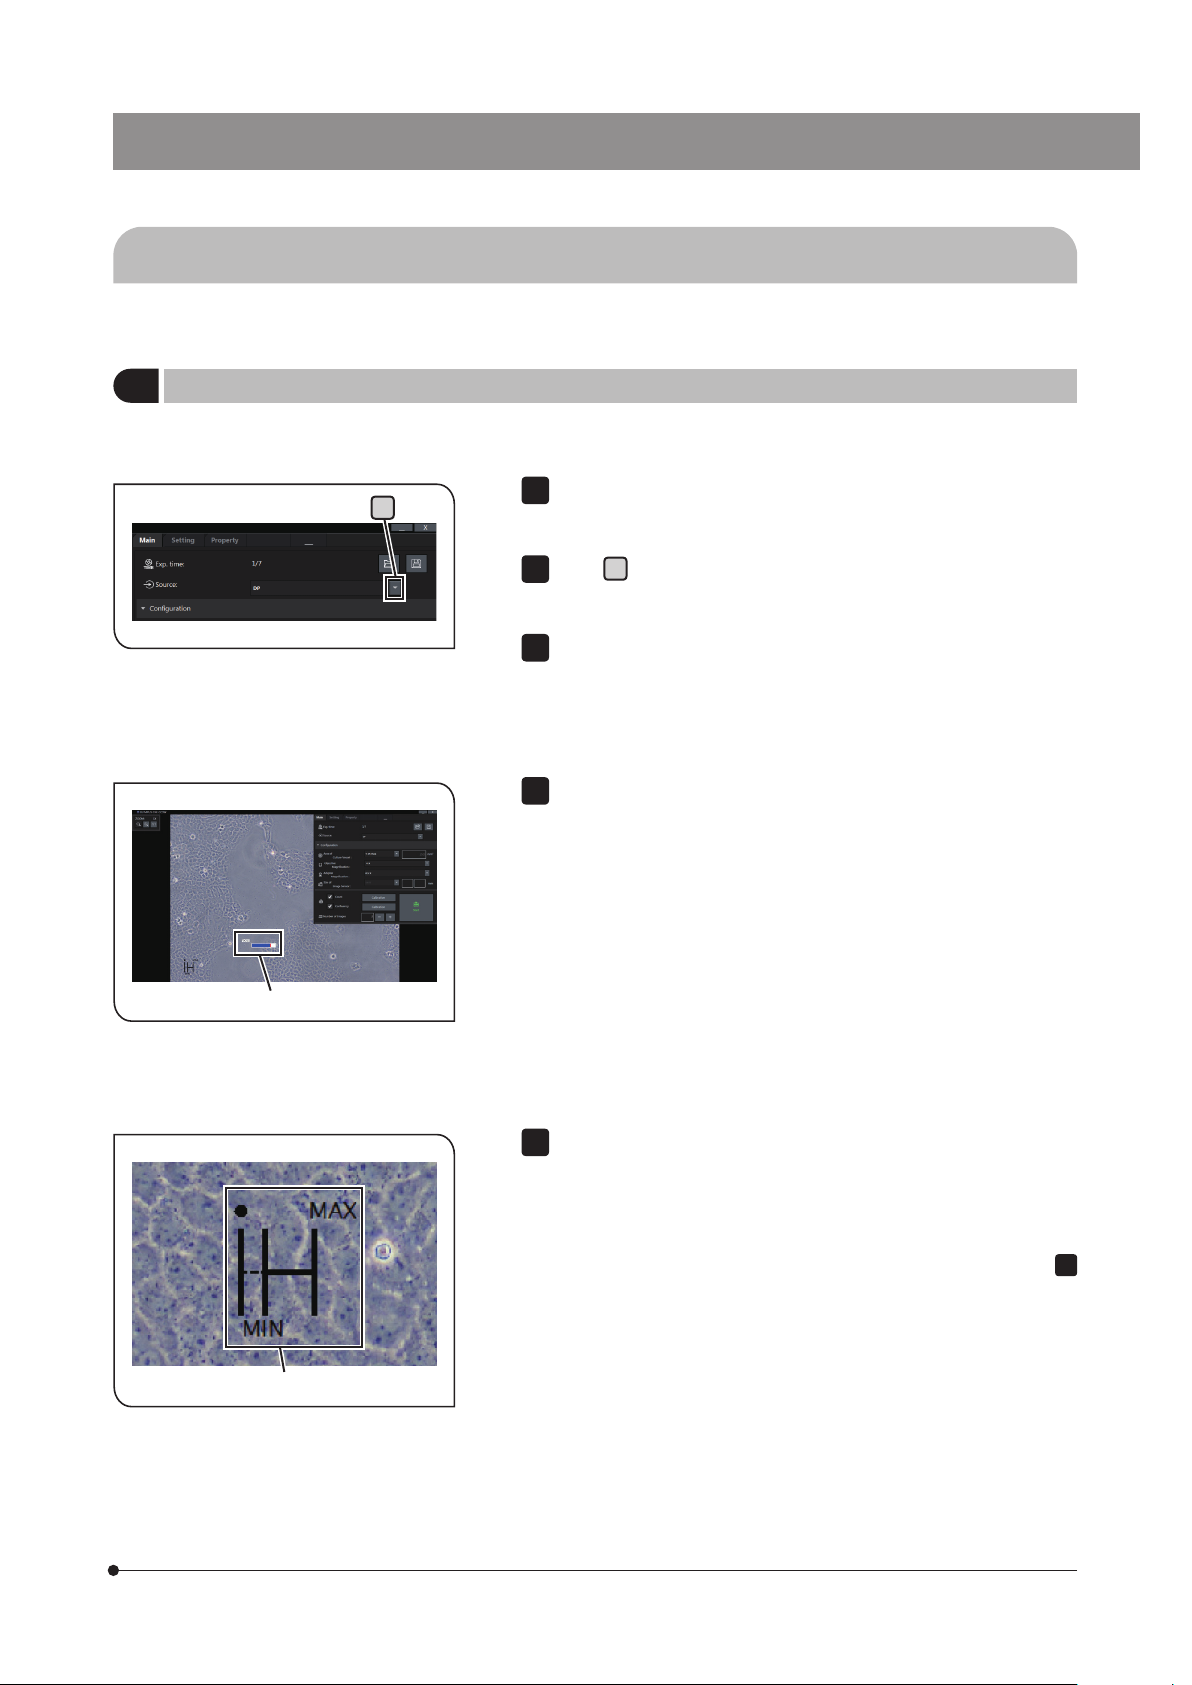
Focus indicator
Cell scale bar
While viewing the live image of the camera displayed in the preview
4
area, rotate the focusing knob of the microscope to bring the cell in
the culture vessel into focus. At this time, the blue bar of the focus
indicator must be 80% or more of the entire length of the focus indicator.
(If the blue bar is not 80% or more of the entire length, refer to the
instruction manual of the microscope and set each units of the
microscope, adjust the brightness, clean lenses, etc. properly.)
While viewing the live image of the camera displayed in the preview
5
area, rotate the nosepiece of the microscope and select the objective
with the magnification where the cell size matches with the size
displayed in the cell scale bar. *
If the cell is defocused due to changing the objective, perform 4
again to bring the cell into focus.
For procedures to confirm the cell size while looking at the cell scale
bar, see page 53.
1
*1 Set the size of one cell to the size
between "MIN" and "MAX" from the left
end of the cell scale bar.
13
b c d
If the submenu is not opened, click [Configuration]
6
submenu.
c
Click
7
the area of the culture vessel to be used.
Items to be displayed are described below.
of [Area of Culture Vessel] to display the items, and select
b
to open the
f e
g
If [Custom] is selected, input the numerical value in the
No. Type of culture vessel [mm2] (Area)
1 35mm Dish 962
2 60mm Dish 2,827
3 100mm Dish 7,854
4 150mm Dish 17,671
5 T-25 Flask (Initial setting) 2,500
6 T-75 Flask 7,500
T-160 Flask 16,000
7
8 6-well 950
9 12-well 380
10 24-well 190
11 48-well 95
12 96-well 32
13 Custom Direct input
Click
8
select the magnification of the objective.
Items to be displayed are described below.
e
in [Objective Magnification] to display the items, and
d
field.
14
No. Magnification
1 X2
2 X4 (Initial setting)
3 X10
Click the [Count] check box
9
Click [Calibration]
10
f
to tick it.
g
. The [Cell Count Setting] screen appears.

CKX-CCSW
TIP
While viewing the cell image displayed in the preview area, adjust the
11
threshold on the [Cell Count Setting] screen so that the point (shown
in red as default) is displayed one by one in the cell.
There are two ways to adjust the threshold: one is to click
i to adjust the slider and the other is to input the numerical value
j
directly.
into
h
or drag
h h
j
ki
When the threshold is determined, click [OK]
Setting] screen is closed.
On the [Main] screen, set the number of images to be measured while
12
acquiring. In [Number of Images], input the numerical value into the
l
field directly or click [+] or [-] in the
The more the number of images is increased, the higher the
measurement accuracy becomes, but it takes longer time. It
is recommended to start from approx. 5 images as a guide
and set the number of images according to the measurement
conditions.
m
field.
. The [Cell Count
k
ml n
13
Click [Start]
n
. The [Measurement Result View] screen appears.
15
 Loading...