

Page 1
Digital Printing Camera
C-211 ZOOM
Quick Start Guide
Thank you for choosing the Olympus C-211 ZOOM Digital Camera.The C-211 ZOOM
combines the flexibility of a digital camera with the convenience of an instant
camera. Because images are stored on SmartMedia cards, you can print as many
copies as you like, whenever you choose.
The C-211 ZOOM is very easy to use.This Quick Star t Guide will have you shooting
and printing images in minutes. But keep in mind that this guide covers only the most
basic operations. For detailed information about the camera’s many advanced
features—movie shooting, advanced playback and shooting techniques, custom
settings, and much more—please refer to the camera’s operating instructions.
Get Ready
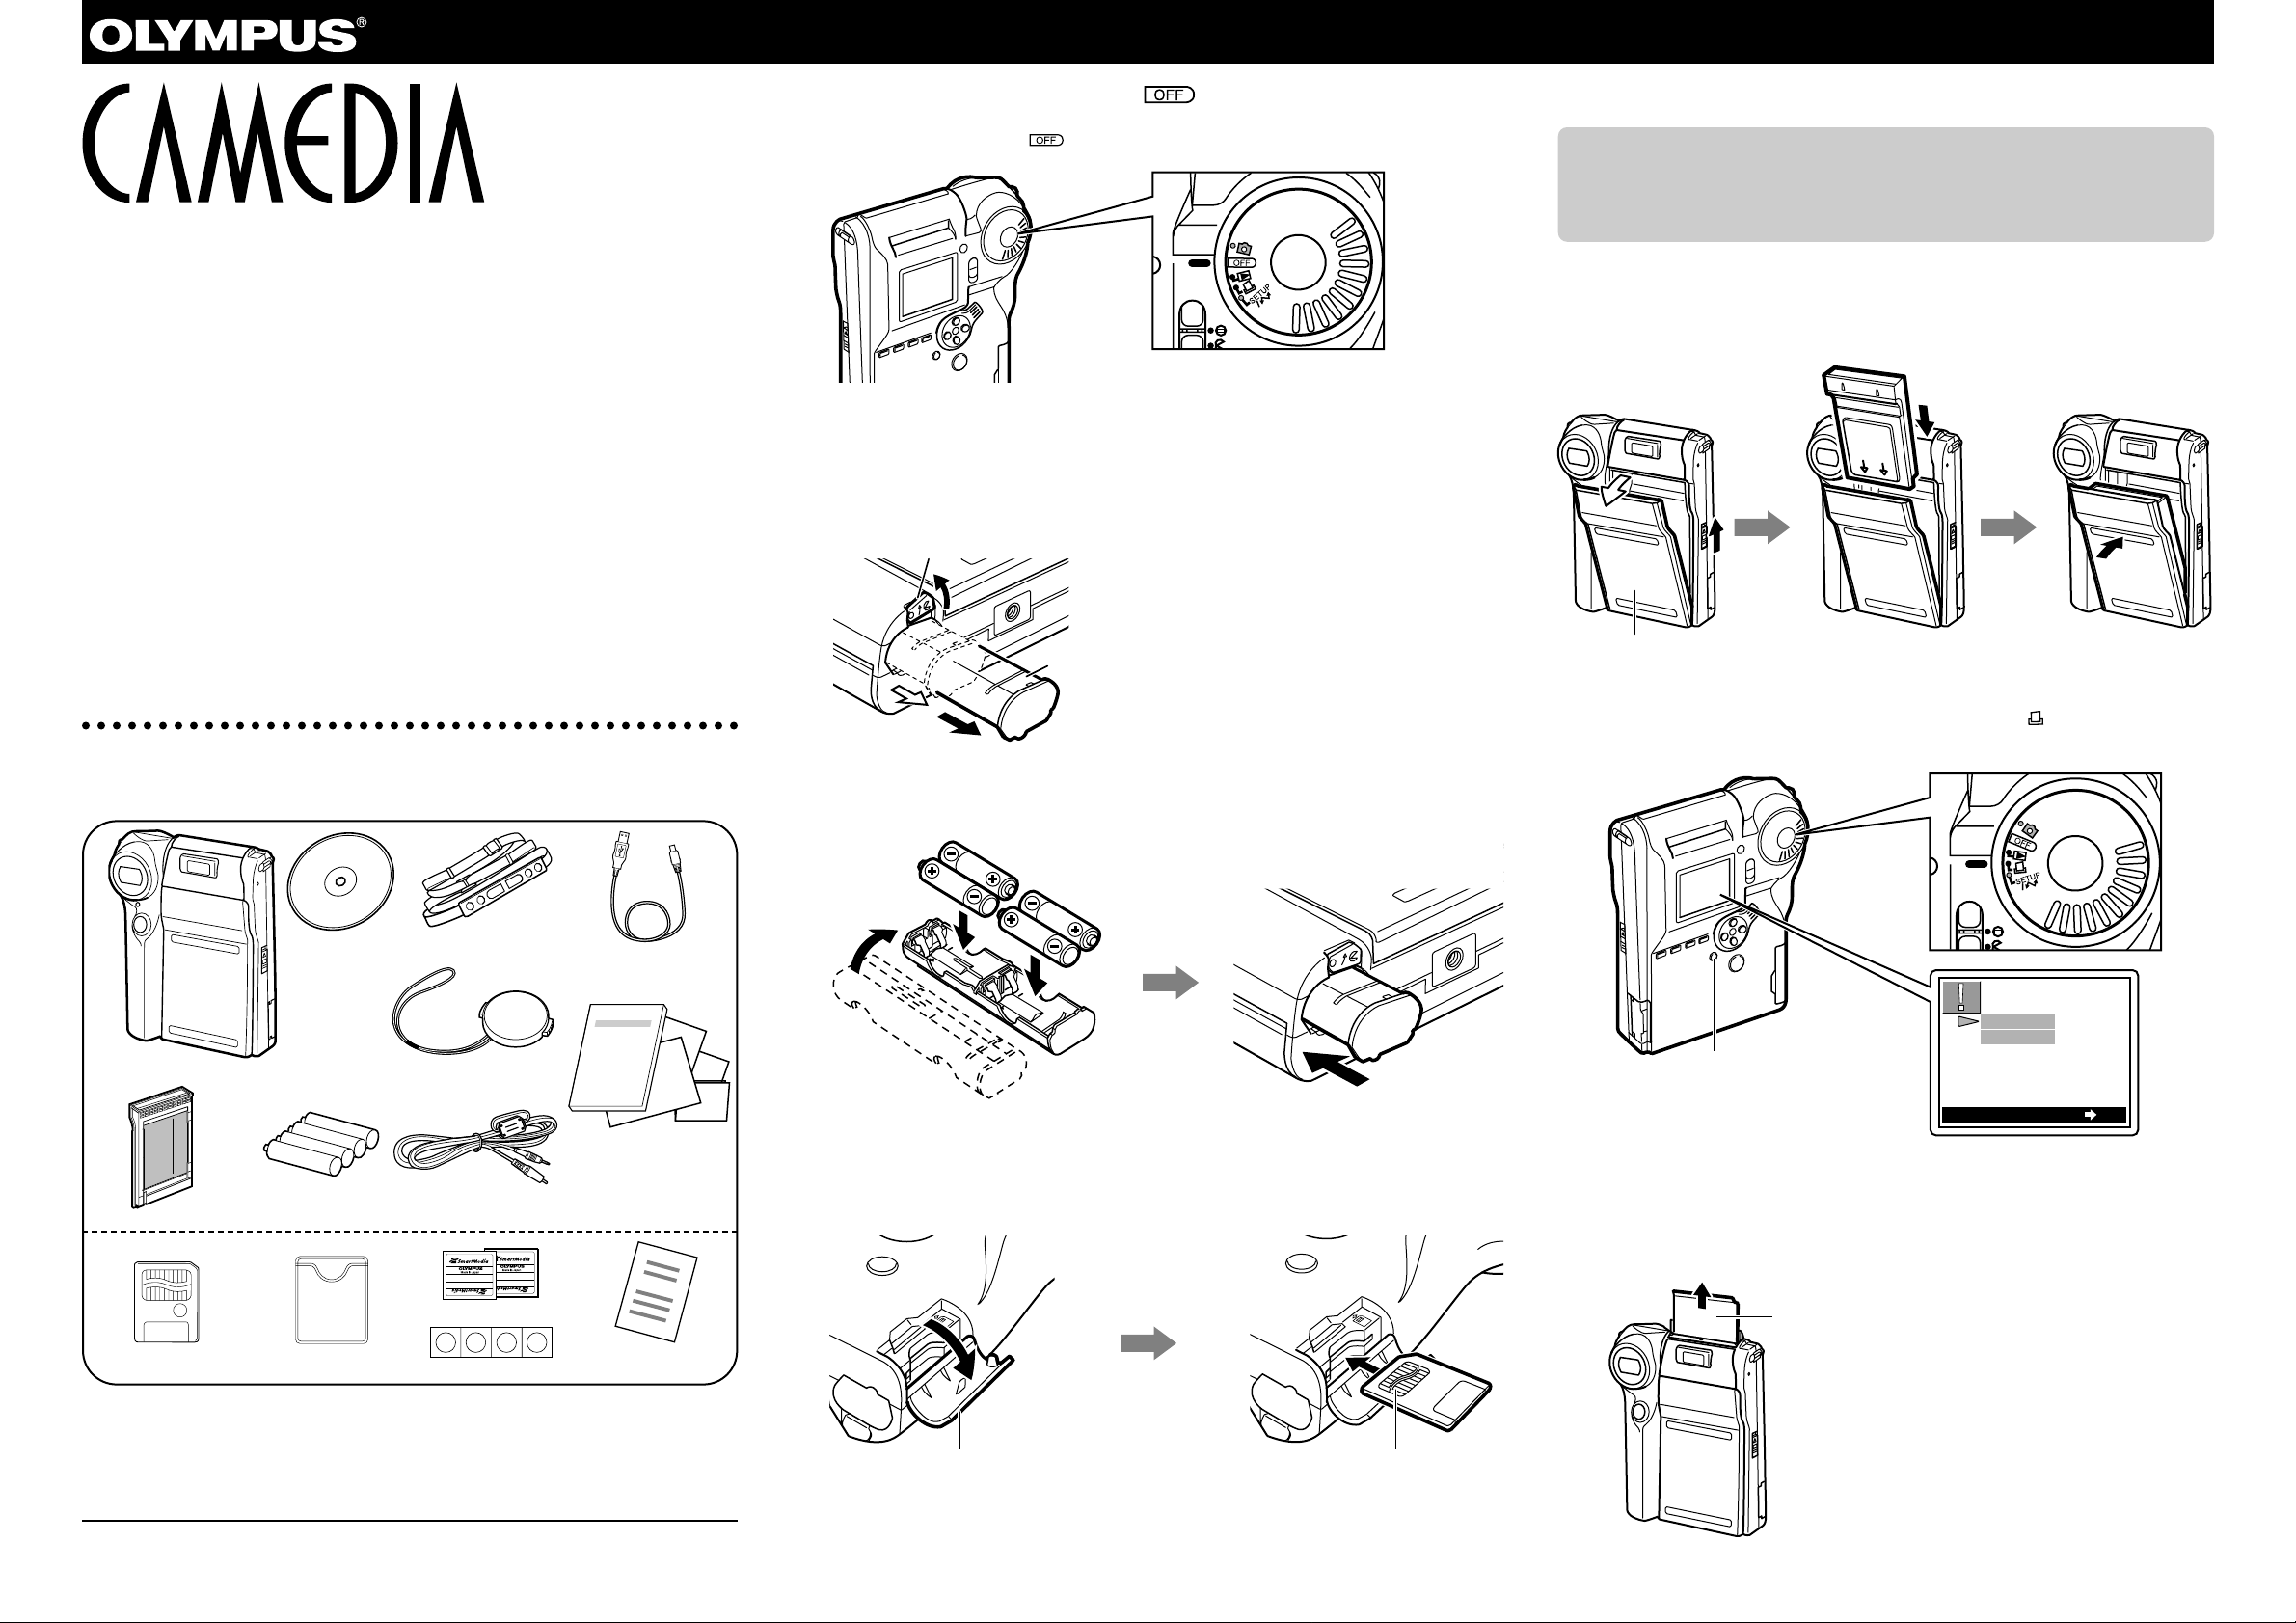
1 Check the package.
Open the camera package and confirm that it contains all of the following items.
If you think something is missing, please contact your dealer. If you have any
questions, please contact customer support (see the reverse side).
2 Be sure that the mode dial is turned to .
If the dial is not already set to , please turn it there now.
3 Load the batteries.
Push the battery-case stopper (on the bottom of the camera) in the direction shown below
to release the battery case, and then take the battery case out of the camera.
Load the batteries into the case as shown below.Then insert the case back into the camera
and push it all the way in, so that it’s locked by the stopper.
4 Load the SmartMedia card.
Open the card compartment cover.Hold the card so that its contact area (the metallic side)
is facing the rear of the camera, and insert it all the way into the slot.Then close the cover.
You must load a SmartMedia card before you can shoot, view, and print pictures.All
pictures that you take are stored into the card.
5 Load the film pack.
If you wish to make Polaroid prints, you need to load a film pack.The camera
package includes one film pack, so you can get started right away. But note that
the film pack is not required for shooting and playing back images—so if you do
not wish to load film at this time, you can skip to the reverse side and start taking
pictures.Then come back and load the film pack when you’re ready to print.
Push the latch upward to open the film compartment cover.Hold the film pack in the
position indicated below, and slide it all the way in along the guides on the inside of
the cover, until the bottom of the pack makes contact with the bottom of the
compartment. Then close the cover, pressing at the center of the cover’s upper label
so that the cover locks into place.
New film packs include a light-blocking cover sheet that must be ejected before you
can print. So now let’s eject the sheet.Turn the mode dial to (PRINT).The
monitor displays the screen illustrated below. Press the OK button to eject the sheet.
The camera begins ejecting the cover sheet.Wait until the sheet stops moving and
you hear the motor go off, and then pull the ejected sheet out of the camera.(Please
do not pull on the sheet while ejection is in progress.)
Camera
Strap
Video cable
Dedicated USB cable
Battery-case stopper
Battery case
Card compartment cover Contact area (the metallic side)
Film compartment cover
OK button
Film cover sheet
Lens cap
Four AA (R6)
alkaline batteries
CD-ROM
(software)
Operating instructions,
warranty agreement,
registration card,
authorized distributors list,
and Quick Start Guide
(this guide)
Static-free case8MB SmartMedia card
Four write-protect seals
Two SmartMedia labels
SmartMedia
instructions
Once you have ejected the cover sheet,
please don’t open the film compartment
again until you have used up all of the
film in the pack.
For questions about Polaroid film:
Contact any of the “Polaroid Service Centers and Offices” listed in the appendix of the camera’s
operating instructions.
VT1456-02
1AG6P1P0866-A
Printed in Japan
Polaroid 500 Film
EJECT THE
FILM COVER
EJECT
CANCEL
ENTER
OK
Page 2
Take Some Pictures
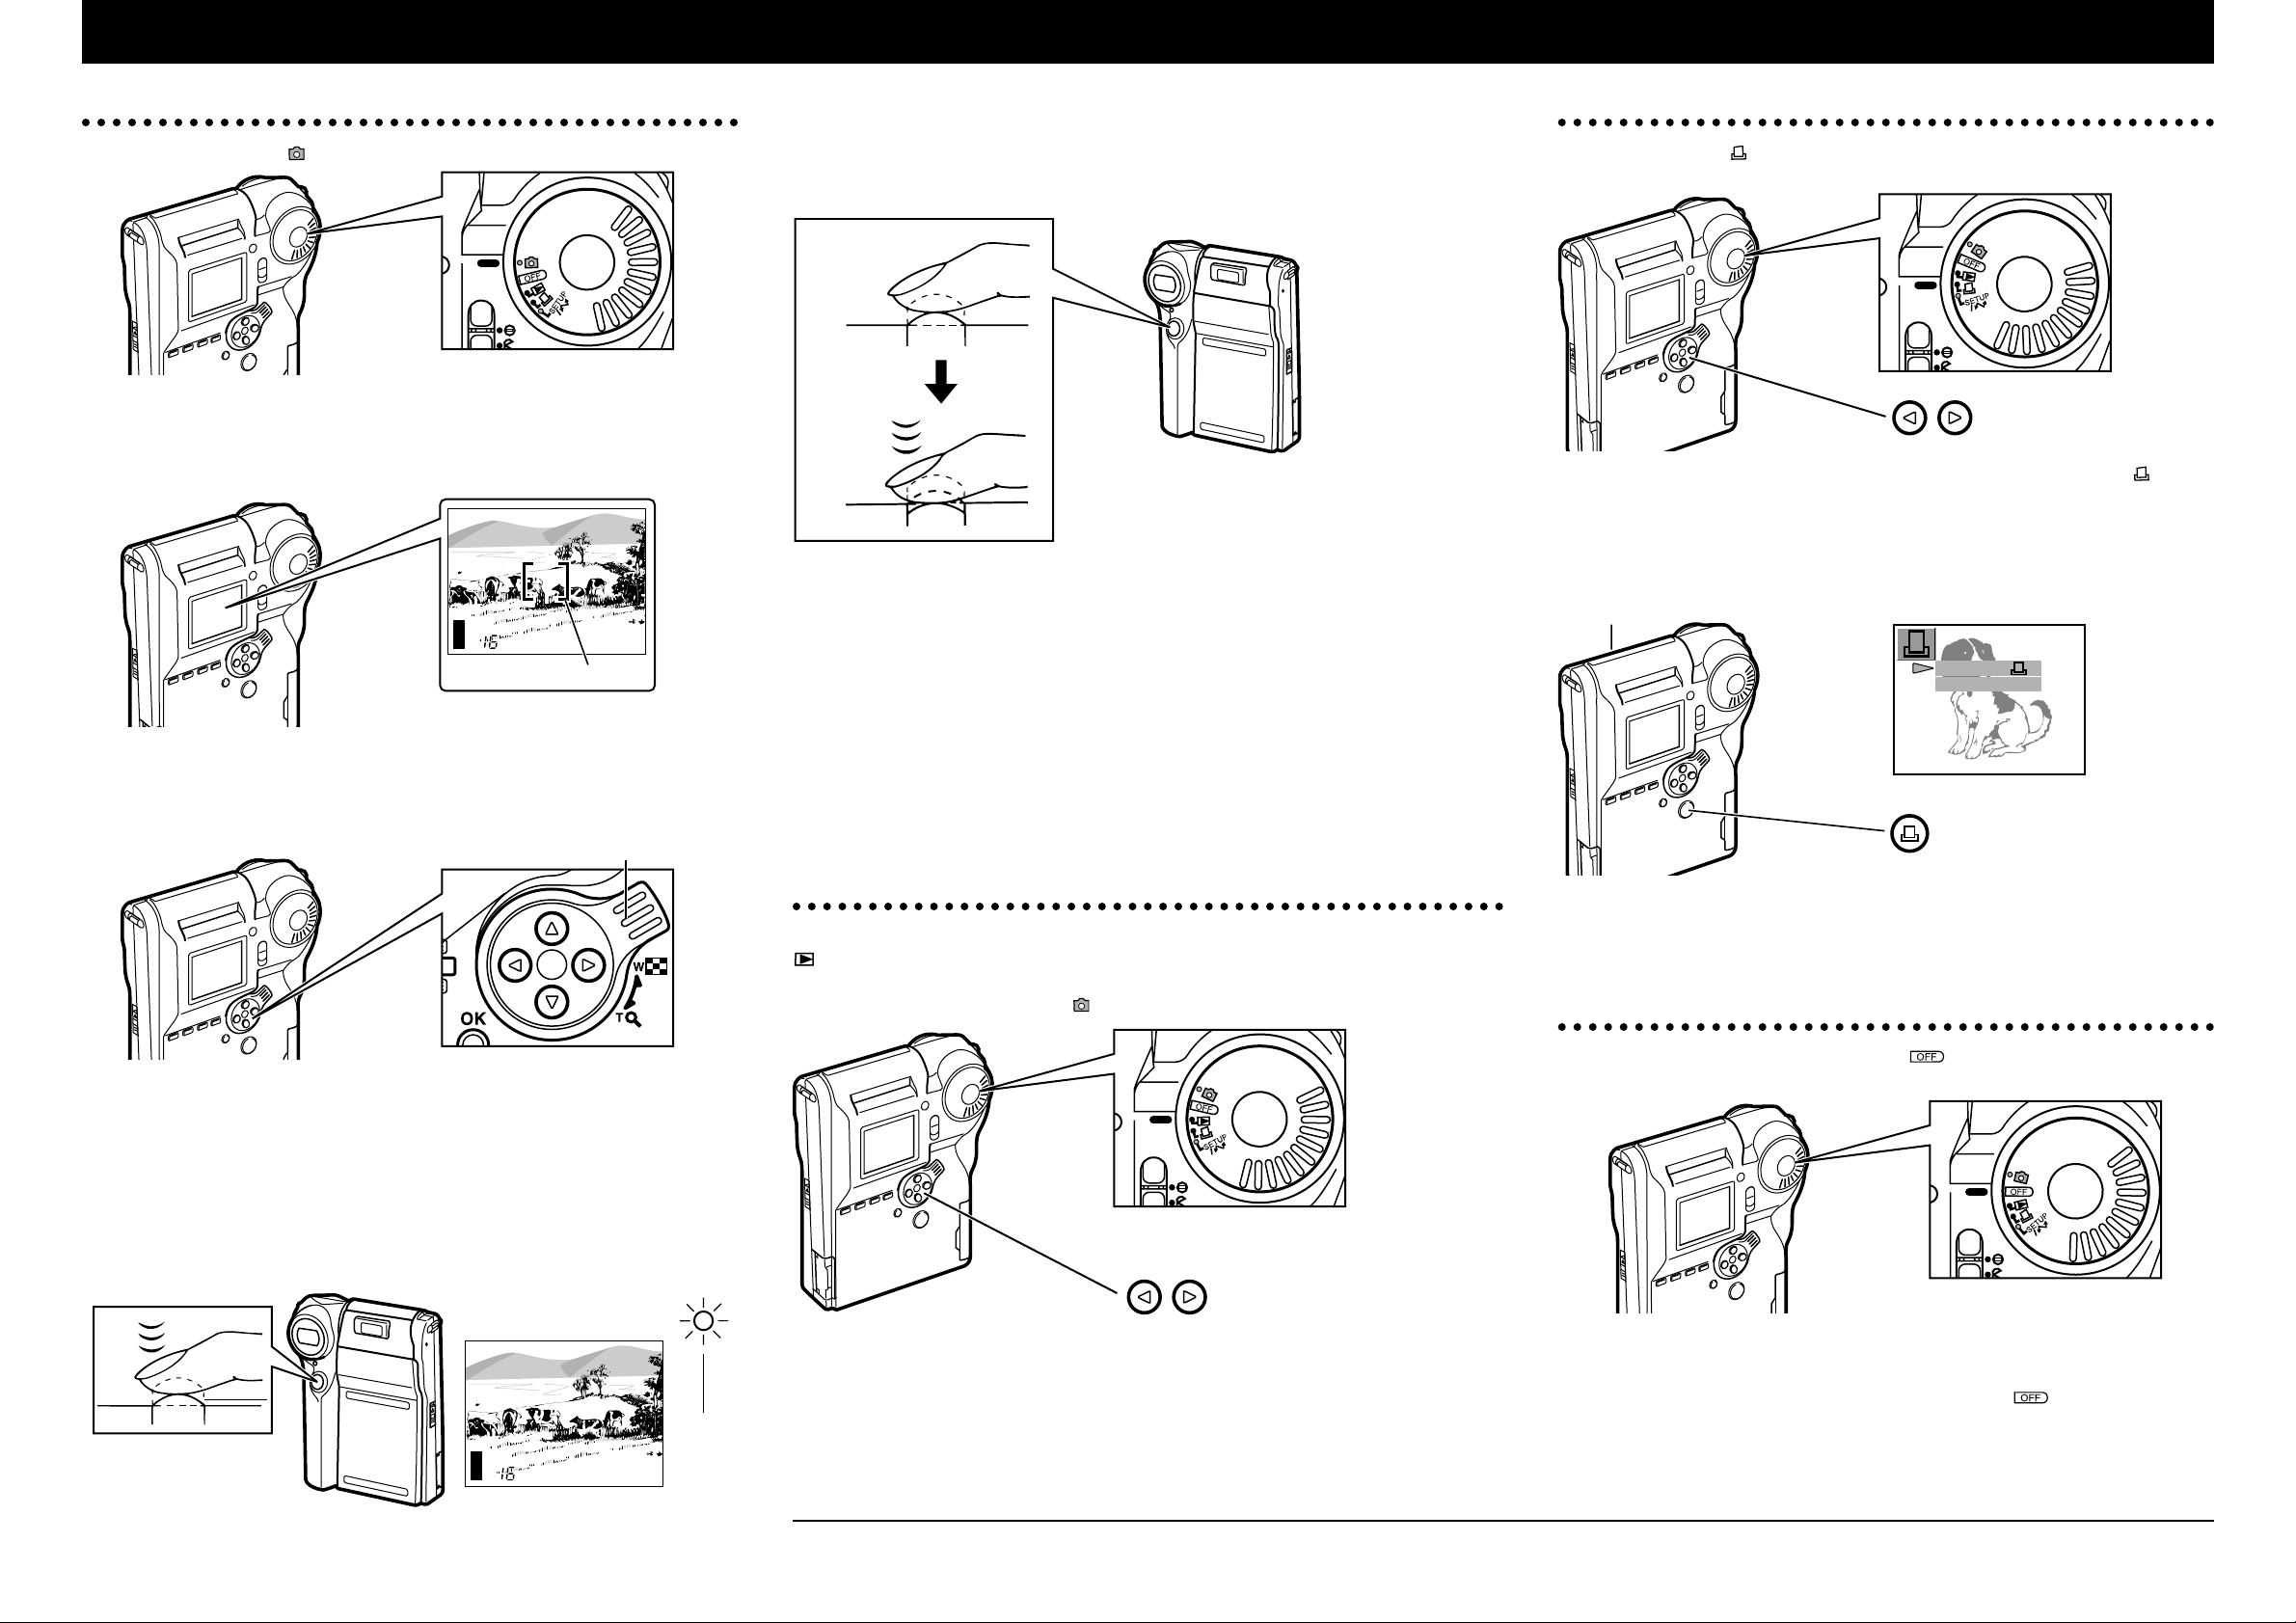
1 Turn the mode dial to (RECORD).
2 Point the camera at the subject you wish to shoot.
Keep your eye on the monitor, and position the camera so that the subject is inside
the autofocus target mark.
3 Try zooming in and out.
* Press the zoom lever to T (telephoto) to zoom in.
* Press the zoom lever to W (wide) to zoom out.
4 Focus the shot. (Half-press)
Hold the camera so that the subject is inside the autofocus target mark, and halfpress the shutter release button (press it down half way and hold it there).The
camera automatically sets the focus and exposure, and the autofocus target mark
disappears.The green lamp comes on solid to indicate that the camera is ready to
shoot.
If the green lamp blinks rather than coming on solid, the picture is not in focus.Take
your finger off the shutter release button for a moment, and then try again.
5 Take the picture. (Full-press)
Press the shutter release button all the way down (go from half-press to full-press) to take
the picture.The camera issues a double-beep to inform you that it has taken the shot.
If natural lighting is insufficient, the camera will automatically fire the flash when taking the
shot.
6 To take more shots...
Repeat steps 4 and 5 above to take more shots. Note however that the camera cannot take
a shot if the green lamp is blinking rapidly. Wait for the lamp to slow down or go off before
shooting again.
The remaining picture count, displayed at the lower left of the monitor, tells you how many
more shots you can fit into the card. If the count falls to 0, you must delete some images or
replace the card before you can shoot again.Of course it is possible to save the images to
your computer before deleting them from the card.For more information, please refer to the
camera’s operating instructions.
View the Recorded Images
After taking some shots, you can play them back on the monitor.Just turn the mode dial to
(PLAY), and the monitor displays the last shot that you took. To display a different
image, just press the right or left arrow on the arrow pad.When you are ready to take more
pictures, turn the mode dial back to .
Make a Polaroid Print
Turn the mode dial to , and then press the right or left arrow on the arrow pad as
necessary to select the image that you wish to print.
Set the camera upright on a stable surface, and press the PRINT button ( ).
When the monitor displays the confirmation screen, press the PRINT button again.
The camera makes the print and begins ejecting the film.Wait until the film stops
moving and you hear the motor go off, and then grasp the front edge of the film and
pull the film completely out of the camera.
Handle the ejected film gently until the image has had time to stabilize (about 5 to 10
minutes). Don’t wave or bend the film during this time.Allow the film to stabilize at its
current temperature—don’t place it in a warm pocket or otherwise heat it up.
Turn the Camera Off
When you are finished, turn the mode dial to to switch off the power.
Note that recorded images are stored in the card itself and are not lost when you
switch off the power or replace the batteries.
To conser ve batteries, please remember to turn the dial to when you have
finished using the camera. Under default conditions the camera will enter sleep state
(and the monitor will go off) if you do not touch any of the buttons for 30 seconds,
and will power-down completely if you do not use it for four hours.If the camera is
sleeping, you can wake it up by touching any of its buttons.
C-211 ZOOM Quick Start Guide
PRINT
CANCEL
[ ]
Autofocus target mark
Zoom lever
Monitor
Shutter release button
Monitor
The print emerges from the print
outlet at the top of the camera.
Monitor
Halfpress
Green lamp
Shutter release button
Full-press
For more information about Olympus digital cameras and related products, visit our website:
http://www.olympus.com
OLYMPUS AMERICA INC.
Two Corporate Center Drive, Melville, NY 11747-3157, U.S.A. Tel.631-844-5000
(Customer support) Tel. 1-888-553-4448
http://www.olympus.com
 Loading...