

Page 1

Digital Printing Camera
C-211 ZOOM
Operating Instructions
•Please read this manual carefully to ensure safe and effective use of
your camera. Keep this manual handy for future reference.
•Spend some time taking test shots and experimenting with the
camera’s various features before taking important photographs.
Page 2

© Copyright 2000. Olympus Optical Co., Ltd.All rights reserved.
Legal and other notices
• The contents of this document are subject to change without prior notice. For the
latest information about this camera and related products, please contact your
nearest Olympus service center.
• Although the contents of this document have been carefully checked to avoid errors,
some may still occur. If you have a question about any point, or you find mistakes or
omissions, please contact us.
• No part of this publication may be reproduced or reprinted except for personal use
without prior written permission from Olympus.
• Olympus makes no representations or warranties regarding any damages, or benefit
expected by using this unit lawfully, or any request from a third person, which are
caused by the inappropriate use of this product.
• Olympus makes no representations or warranties, regarding any damages or any
benefit expected by using this unit lawfully, caused by erasing picture image data.
Trademarks
• IBM is a registered trademark of International Business Machines Corporation.
• Microsoft and Windows are registered trademarks of Microsoft Corporation.
• Macintosh is a trademark of Apple Computer, Inc.
• All other company and product names are registered trademarks of their respective
owners.
2
Page 3

3
IMPORTANT NOTICES
Radio and Televisions Interference
Change or modifications not expressly approved by the manufacturer may void the
user’s authority to operate this equipment.This equipment has been tested and found
to comply with the limits for a Class B digital device, pursuant to Part 15 of the FCC
Rules.These limits are designed to provide reasonable protection against harmful
interference in a residential installation.This equipment generates, uses, and can
radiate radio frequency energy and, if not installed and used in accordance with the
instructions, may cause harmful interference to radio communications.
However, there is no guarantee that interference will not occur in a particular
installation. If this equipment does cause har mful interference to radio or television
reception, which can be determined by turning the equipment off and on, the user is
encouraged to try to correct the interference by one or more of the following measures:
• Reorient or relocate the receiving antenna.
• Increase the distance between the camera and receiver.
• Connect the equipment to an outlet on a circuit different from that to which the
receiver is connected.
Only the included USB cable should be used to connect the camera to a personal
computer.
Declaration of Conformity
Model Number: C-211 ZOOM
Trade Name: OLYMPUS
Responsible party: Olympus America Inc.
Address: 2 Corporate Center Drive, Melville, New Yor k 11747-3157 U.S.A.
Telephone number: 631-844-5000
This device complies with Part 15 of the FCC rules. Operation is subject to the
following two conditions:
(1) This device may not cause harmful interference, and
(2) This device must accept any interference received, including interference that may
cause undesired operation.
This Class B digital apparatus meets all requirements of the Canadian InterferenceCausing Equipment Regulations.
Page 4

Contents
Important Safety Instructions ........................................................................................................8
Features of the C-211 ZOOM .....................................................................................................18
How to Use This Manual.............................................................................................................19
Chapter 1 Getting Started . . . . . . . . . . . . . . . . . . . . . . . . . . . . . . . . . . 21
Checking the Package.................................................................................................................22
Names of Parts............................................................................................................................23
Camera Body.................................................................................................................23
Mode Dial ......................................................................................................................25
Monitor...........................................................................................................................26
Attaching the Strap and the Lens Cap........................................................................................27
Inserting Batteries .......................................................................................................................28
Using an (Optional) AC Adapter..................................................................................................31
Inserting the SmartMedia Card...................................................................................................32
Loading a Film Pack....................................................................................................................34
Setting the Date and Time...........................................................................................................39
Chapter 2 The Basics . . . . . . . . . . . . . . . . . . . . . . . . . . . . . . . . . . . . . . . . . 41
Entering RECORD Mode ............................................................................................................42
Reading the Monitor....................................................................................................................43
Is a SmartMedia Card Loaded?....................................................................................43
Are Batteries Still Good? ...............................................................................................44
Does the Card Have Enough Room for More Pictures? ...............................................45
How to Hold the Camera.............................................................................................................46
Enhancing the Monitor Brightness..............................................................................................47
Taking a Still Image .....................................................................................................................48
Adjust the Focus (Half-press)........................................................................................48
Shoot the Picture (Full-press) .......................................................................................50
Zooming In and Out (Optical Zoom) ...........................................................................................52
Checking Your Completed Stills...................................................................................................53
Tur ning the Camera Off...............................................................................................................54
Printing Stills on Instant Film.......................................................................................................55
For Good-Quality Prints.................................................................................................58
Removing an Empty Film Pack...................................................................................................59
4
Page 5

5
Chapter 3 Viewing, Pr inting, and Protecting
Recorded Images . . . . . . . . . . . . . . . . . . . . . . . . . . . . . . 61
Getting Ready .............................................................................................................................62
Entering PLAY mode.....................................................................................................62
Displaying Images Frame by Frame............................................................................................63
Displaying Multiple Frames.........................................................................................................64
Enlarging an Image ....................................................................................................................66
Enlarging an Image on the Display (Enlarging and Sliding) .......................................66
Printing a Selected Area of an Image (Cropping and Printing) ..................................68
Displaying Images on a TV Screen.............................................................................................70
Protecting Images from Accidental Erasure (Image Protection).................................................72
Erasing a Selected Image (“Erase Frame”).................................................................................74
Chapter 4 Taking Good Pictures . . . . . . . . . . . . . . . . . . . . . . . . . 77
About Focusing............................................................................................................................78
Hard-To-Focus Subjects................................................................................................78
Special Focusing Techniques .....................................................................................................80
Focus Lock (for Off-Center Subjects)............................................................................80
Using Fixed Focus (Quick Focus) .................................................................................81
Taking Shots Close Up (Macro Mode) ........................................................................................83
Using the Flash ...........................................................................................................................84
Flash Modes ..................................................................................................................84
Auto Flash .....................................................................................................................86
Red-Eye Reduction ( ) .............................................................................................86
Flash Off (Flash Override ) ......................................................................................87
Fill-In ( ) ......................................................................................................................87
Slow Sync ( )...................................................................................................88
Red-Eye Reduction + Slow Sync ( ) .........................................................88
Adjusting the Exposure (Exposure Compensation) ....................................................................89
Digital Telephoto Zoom (Enhanced Zoom) ..................................................................................91
Chapter 5 Special Features for
Polaroid Printing . . . . . . . . . . . . . . . . . . . . . . . . . . . . . . . . 93
The Print Menu............................................................................................................................94
Including the Date, Time, or Filename on the Print.....................................................................96
Changing the Caption Type or Position for One Print Only...........................................97
Changing the Default Caption Type...............................................................................99
Printing Multiple Copies ............................................................................................................100
Making a Split Print...................................................................................................................102
Printing a Movie Frame (1-FRAME PRINT) ..............................................................................105
Printing a Movie Index (INDEX PRINT)....................................................................................107
SLOW
SLOW
Page 6

Chapter 6 Advanced Shooting Techniques. . . . . . . . 111
The Shooting Menu...................................................................................................................112
Self-Timer..................................................................................................................................115
Light Metering: ESP or SPOT ...................................................................................................11 7
Sequence Shooting...................................................................................................................119
Recording Mode (Quality vs. Capacity).....................................................................................121
White Balance (Adjusting the Tone)..........................................................................................124
Shooting Movies ........................................................................................................................126
Photographing Text on a White or Black Writing Board (WHITEBOARD/BLACKBOARD).......129
Taking Panoramas.....................................................................................................................131
External Flash ...........................................................................................................................134
Chapter 7 Playback Techniques , Card
Operations, and Digital Printing . . . . . . . . 137
The Playback Menu...................................................................................................................138
Autoplay.....................................................................................................................................140
Playing a Movie.........................................................................................................................141
Displaying an Index Summary of the Movie..............................................................................143
Editing (Tr imming) a Movie (MOVIE EDIT) ...............................................................................145
Creating and Saving a Movie Index (INDEX CREATE).............................................................148
Erasing the Card .......................................................................................................................151
Formatting a Card .....................................................................................................................153
Different Ways to Print ..............................................................................................................155
Selecting Images for DPOF Printing.........................................................................................157
Selecting Images for DPOF Printing...........................................................................157
Selecting Whether to Print a Caption on DPOF Prints ...............................................160
Printing with an Olympus Photo Printer....................................................................................162
Chapter 8 Customizing the Environment. . . . . . . . . . . . 165
The Setup Menu........................................................................................................................166
Adjusting the Monitor Brightness ..............................................................................................169
RECORD-Mode Marker Display................................................................................................170
REC View (Monitor Power Save)...............................................................................................171
Adjusting the Beep Volume .......................................................................................................172
Assigning File Names to Images...............................................................................................173
Viewing File Numbers (INFO Button) ..........................................................................176
Print Adjustment........................................................................................................................177
Setting the Sleep Time .............................................................................................................179
6
Page 7

7
Chapter 9 Processing Images
at Your Computer . . . . . . . . . . . . . . . . . . . . . . . . . . . . . 181
Transferring Image Data to a Computer....................................................................................182
Using a SmartMedia/PC Card Adapter.......................................................................182
Using a SmartMedia/Floppy Adapter ..........................................................................182
Using a USB SmartMedia Reader/Writer ....................................................................183
Cabling the Camera to Your Computer......................................................................................184
Required Hardware .....................................................................................................184
Connecting the Camera to the Computer ...................................................................185
Transferring Images with CAMEDIA Master ..............................................................................187
Other Features of CAMEDIA Master.........................................................................................189
Making Images Brighter ..............................................................................................189
Correcting Blur ............................................................................................................189
Using Templates to Create Composites......................................................................190
Appendix . . . . . . . . . . . . . . . . . . . . . . . . . . . . . . . . . . . . . . . . . . . . . . . . . . . . . . . . . . 191
Frequently Asked Questions.....................................................................................................192
Troubleshooting .........................................................................................................................194
Operating Problems.....................................................................................................194
Poor Image Quality......................................................................................................196
Poor Print Quality........................................................................................................198
Camera Does Not Print ..............................................................................................199
Error Messages.........................................................................................................................200
Configuration Diagram...............................................................................................................202
Accessories...............................................................................................................................203
Specifications ............................................................................................................................204
Polaroid Service Centers and Offices ......................................................................................206
Index .........................................................................................................................................207
Page 8
8
Important Safety Instr uctions
Thank you for purchasing this Olympus digital camera.Before you use your new
camera, read these instructions carefully to enjoy optimum performance and a longer
service life. Keep this manual in a safe place for future reference.
CAUTION: TO REDUCE THE RISK OF ELECTRICAL SHOCK, DO NOT
REMOVE COVER (OR BACK). NO USER-SERVICEABLE PARTS INSIDE.
REFER SERVICING TO QUALIFIED OLYMPUS SERVICE PERSONNEL.
RISK OF ELECTRIC SHOCK
DO NOT OPEN
CAUTION
A lightning flash with an arrowhead, enclosed in a triangle, alerts
you to the presence of uninsulated voltage points inside the
product which could cause a serious electrical shock.
An exclamation point enclosed in a triangle alerts you to important
operating and maintenance instructions in the documentation
provided with the product.
WARNING!
TO AVOID THE RISK OF FIRE OR ELECTRICAL SHOCK, NEVER EXPOSE
THIS PRODUCT TO WATER OR OPERATE IN A HIGH HUMIDITY
ENVIRONMENT.
Page 9

9
1 Read All Instructions — Before you use the product, read all operating instructions.
2 Save These Instructions — Save all safety and operating instructions for future
reference.
3 Heed Warnings — Read carefully and follow all warning labels on the product and
all warnings described in the instructions.
4 Follow Instructions — Follow all instructions provided with this product.
5 Cleaning — Always unplug this product from the wall outlet before cleaning.Use
only a damp cloth for cleaning. Never use any type of liquid or aerosol cleaner, or
any type of organic solvent to clean this product.
6 Attachments — For your safety, and to avoid damaging the product, use only
accessories recommended by Olympus.
7 Water and Moisture — Never use this product around water (near a bathtub,
kitchen sink, laundry tub, wet basement, or swimming pool).
8 Location — To avoid damage to the product and to avoid personal injury, never
place this product on an unstable stand, tripod, bracket, table or cart. Mount only on
a stable tripod, stand, or bracket.Follow the instructions which describe how to
safely mount the product, and use only the mounting devices recommended by the
manufacturer.
9 Power Sources — Connect this product only to the power source described on the
product label. If you are not sure about the type of power supply in your home,
consult your local power company. Refer to your operating instructions for
information on using the product with batteries.
Page 10

10
10 Grounding, Polarization — If this product can be used with an optional AC adapter,
the adapter may be equipped with a polarized alternating current line plug, a plug
with one blade wider than the other.This safety feature allows the plug to fit into the
power outlet only one way. If you cannot inser t the plug into the wall outlet, pull it
out, reverse it, and then insert it again. If the plug still fails to fit, contact an
electrician and have the receptacle replaced.
11 Protecting the Power Cord — The power supply cord should be routed so it will not
be walked on.Never place a heavy object on the power cord and never wrap the
power cord around the leg of a table or chair. Keep the areas around the power
cord connection points, at the power outlet and at the product connection, free of all
obstacles.
12 Lightning — If a lightning stor m occurs while using the optional AC adapter, unplug
the adapter power cord from the wall outlet immediately. To avoid damage from
unexpected power surges, always unplug the AC adapter from the power outlet and
disconnect it from the camera when the camera is not in use.
13 Overloading — Never overload wall outlets, extension cords, power strip, or other
power connection points with too many plugs.
14 Foreign Objects, Spillage — To avoid personal injury from fire or electrical shock
from contact with internal high voltage points, never insert a metal object into the
product. Avoid using the product where there is a danger of spillage.
15 Servicing — Refer all servicing to qualified personnel. Attempting to remove the
covers or disassemble the product could expose you to dangerous high voltage
points.
Page 11

11
16 Damage Requiring Ser vice — While using the optional AC adapter, if you notice
any of the conditions described below, unplug the AC adapter from the wall outlet
and refer servicing to qualified service personnel:
a) If liquid has been spilled, or any object has fallen into the product.
b) If the product has been exposed to water.
c) If the product does not operate normally while following operating instructions.
Adjust only the controls described in the operating instructions as improper
adjustment of other controls could damage the product, requiring extensive
repair work by a qualified technician to restore the product to normal operation.
d) If the product has been dropped or damaged in any way.
e) If the product exhibits a distinct change in performance, this indicates a need
for servicing.
17 Replacement Parts — When replacement parts are required, make sure that the
service center uses only parts recommended by the manufacturer to ensure that
the replacement parts have the same characteristics as the originals. Unauthor ized
substitution of parts could cause a fire, electrical shock, or create other hazards.
18 Safety Check — Upon completion of servicing or repairs, ask the service technician
to perform safety checks to determine that the product is in good working condition.
19 Heat — Never use or store this product near a heat source such as a radiator, heat
register, stove, or any type of equipment or appliance which generates heat,
including stereo amplifiers.
Page 12
12
Handling Batteries
Follow these important guidelines to prevent the batteries from leaking, overheating,
burning, exploding, or causing electrical shock or burns.
DANGER
1 If you use NiMH batteries, use only Olympus NiMH batteries and the recharging
unit recommended for use with these batteries.
2 Never load batteries with their +/– terminals reversed.Never force batteries into the
battery compartment.
3 To prevent causing battery leaks or damaging their terminals, carefully follow all
instructions regarding the use of batteries. Never attempt to disassemble a battery
or modify it in any way, with soldering, etc.
4 Take precautions when carrying or stor ing batteries to prevent them from coming
into contact with any metal objects like jewelry, pins, fasteners, etc.
5 Never heat batteries or incinerate them.
6 Never attempt to connect a battery directly to a power outlet, or to a cigarette
lighter in a vehicle.
7 If battery fluid gets into your eyes, flush your eyes immediately with clear, cold
running water and seek medical attention immediately.
WARNING!
• Keep batteries away from children.
• If a child swallows a battery, seek medical attention immediately.
• Dispose of lithium batteries promptly and safely in compliance with local laws
regarding the disposal of such items.
• To avoid causing a fire or minor burns, always handle lithium batteries carefully.
• Never attempt to charge the lithium battery, disassemble it, heat it above 212°F
(100°C) or incinerate it.
• To ensure good contact, wipe the batter y with a clean, dr y cloth before use.
• To avoid short circuiting the +/– sides of the battery, never handle a lithium battery
with a metal tool, tweezers, etc.
DANGER The DANGER indication alerts you to an imminent hazard that
if not avoided could result in death or serious injury.
WARNING The WARNING indication alerts you to a potential hazard that
if not avoided may result in death or serious injury.
CAUTION The CAUTION indication alerts you to a potential hazard that
if not avoided may result in injury or in proper ty or equipment
damage.
Page 13

13
WARNING
1 Keep batteries dry at all times. Never allow them to come into contact with fresh
water or salt water.
2 To prevent batteries from leaking, overheating, or causing a fire or explosion:
• Use only batteries recommended for use with this product.
• Never heat batteries, incinerate them, or attempt to disassemble them.
• Never mix batteries (old and new batteries, charged and uncharged batteries,
batteries of different manufacture or capacity, etc.).
• Never attempt to charge alkaline or lithium batteries.
• Load batteries carefully as described in the operating instructions. Never reverse
their polarity when loading.
• To prevent a fire or minor burns, inspect batteries carefully before loading. Never
load a battery if you notice that the insulation or protective covering is damaged
in any way or if the battery cover is warped, even if the batteries are new.
3 If NiMH batteries are not charged within the specified time, stop charging them and
do not use them.
4 Before loading, always inspect batteries carefully for leaks, discoloration, warping,
or any other abnormality.
5 Always store batteries out of the reach of small children. If a child accidentally
swallows a battery, seek medical attention immediately.
6 If a battery leaks fluid onto your clothing or skin, remove the clothing and flush the
affected area with clean, running cold water immediately. If the fluid burns your skin,
seek medical attention immediately.
7 Never attempt to modify the battery compartment on the camera, and never insert
anything (other than the recommended battery) into the battery compar tment.
Page 14

14
CAUTION
1 Olympus NiMH batteries are intended for use only with Olympus digital cameras.
Never use these batteries with any other device.
2 Never subject batteries to strong shocks or continuous vibration.
3 Never mix batteries (old and new batteries, charged and uncharged batteries,
batteries of different manufacture or capacity, etc.).
4 Always charge sets of batteries (2 or 4) together.
5 Always charge NiMH batteries before using them for the first time, or if they have
not been used for a long period.
6 While the camera is not in use, always remove the batteries to prevent accidental
leakage which could damage the battery compartment.
7 If a battery leaks, becomes discolored or deformed, or in any other way becomes
abnormal during operation, stop using the camera and consult your dealer or an
authorized Olympus service center. Continued use may result in fire or electric
shock.
8 Never store batteries where they will be exposed to direct sunlight, or subjected to
high temperatures in a hot vehicle, near a heat source, etc.
9 Batteries may become hot during prolonged use.To avoid minor burns, never
remove them immediately after using the camera.
Handling the Camera
WARNING
1 Use caution when taking flash pictures at close range.When you fire the flash, you
must be at least 3 ft. away from the faces of your subjects, especially when taking
pictures of infants and small children. Firing the flash too close to the subject’s eyes
could cause a momentary loss of vision.
2 To avoid damaging your eyes, never aim the camera directly into the sun or any
other extremely bright light source.
3 To avoid causing a fire or explosion, never use the camera near flammable or
explosive gases.
4 Always use and store the camera out of the reach of young children and infants to
prevent the following dangerous situations which could cause serious injury:
• Becoming entangled in the camera strap, causing strangulation.
• Accidentally swallowing a battery or small part.
• Accidentally firing the flash into their own eyes or into the eyes of another child.
5 To avoid the hazards of fire or electrical shock, store the camera in a cool, dry
location where it will not be subjected to high humidity or dust.
Page 15

15
6 To avoid minor burns, never cover the flash with your hand when it is fired. Never
touch the flash unit after continuous use.The flash unit becomes ver y hot during
continuous operation.
7 If the camera is accidentally dropped in water, or if liquid is spilled into the camera,
stop using the camera, allow the camera to dry, and then remove the batteries.
Contact the nearest Olympus authorized service center.
8 Never place anything other than a film pack into the film compartment, and be
careful to keep foreign objects from entering the compartment while the
compartment cover is open. Entr y of foreign matter may result in fire or equipment
damage.
CAUTION
1 During operation of the camera, if you notice any unusual odors, noise, or smoke
around the camera, immediately switch the camera off, disconnect the optional AC
adapter (if it is connected), and allow the camera to sit idle for a few minutes to give
it time to cool.Take the camera outdoors, away from flammable objects, and
carefully remove the batteries to avoid burning your hands. Contact the nearest
Olympus service center immediately.
2 Never attempt to disassemble the camera.The internal circuits contain high voltage
points which could cause serious burns or electrical shock.
3 To avoid dangerous electrical shock, never hold or operate the camera with wet
hands.
4 To avoid damaging the camera or causing a fire, never expose the camera to
excessive heat.
5 When carrying the camera by the strap, be careful to keep camera and strap clear
of obstacles. Snagging the camera or strap on a doorknob, tree branch, or other
such obstacle may result in personal injury or damage to the equipment.
6 Make sure your fingers are clear of the film compartment when closing the
compartment cover.Closing the cover while your finger is in the way can cause
injury.
Page 16

16
Camera Care and Storage
HANDLING
• Never store or use the camera for long periods in locations subject to direct sunlight,
high humidity, extreme variation in temperature, or strong shocks or constant
vibration. Protect the camera at all times from dust and sand.
• Never store the camera near any type of appliance or equipment which generates
high temperatures, low temperatures, high or low humidity, or a strong magnetic field.
Never use the camera in a factory or laboratory where flammable gases are present.
• Never shake the camera or subject it to shock or strong vibration.
• To avoid damaging its precision lens, never leave the camera pointing directly into the
sun.
• Before storing the camera for a long period, remove the batteries. Select a cool, dry
location for storage to prevent condensation or mold from forming inside the camera.
After storage, test the camera by pressing the shutter release button to make sure
that it is operating normally.
• When the camera is mounted on a tripod, adjust the tripod head to reposition the
camera; do not twist the camera.
• Never touch the flash after it has been fired.Avoid using the flash for extended
periods. Allow it to cool occasionally between shots.
• To avoid injury from electrical shock, never attempt to disassemble or modify the
camera in any way.
Selecting Batteries for Your Camera
• This camera can use two CR-V3 lithium battery packs, four AA NiMH batteries, four
AA alkaline batteries, four AA lithium batteries, or four AA NiCd batteries.Use of
Olympus brand batteries is strongly recommended.
• Alkaline battery performance is limited, especially at low temperatures. Using NiMH
batteries is recommended.
• AA manganese batteries cannot be used with this camera.
• Always follow the battery recommendations and loading instructions. Incorrectly
loading the batteries could cause the batteries to leak or overheating.
• When using the camera on battery power at low temperatures, try to keep the camera
and extra batteries as warm as possible.Batteries which run down at low
temperatures may be restored after they are warmed at ambient temperature.
Page 17

17
• Perspiration or oil from your hands on the battery contacts could prevent them from
operating. Before loading batteries, wipe the terminals with a dr y, clean cloth.
• Before going on a long trip, especially before traveling abroad, purchase an ample
supply of extra batteries.The recommended batteries may be difficult to obtain while
traveling.
• Always recharge NiMH or NiCd batteries with a charger recommended for use with
these batteries.
• Before using NiMH or NiCd batteries, always read the instructions provided with
purchase of these batteries.
• To avoid personal injury or damage to the camera, always inspect batteries before
loading. If you notice leaking, damage to the batter y cover or insulation, discoloration,
warping, or any other abnormality, do not use the batteries.
• Recommended temperature ranges for NiMH batteries:
Operation ................................ 32° to 104°F
Charge .................................... 32° to 104°F
Storage.................................... –4° to 86°F
• Using, charging, or storing the batteries outside these ranges could shorten batter y
life or affect battery performance.Always unload the batteries from the camera before
storing the camera and batteries for a long period.
About the Monitor
• The monitor is a consumable item and will eventually wear out. If the monitor image
becomes too dark or begins to flicker, have the camera serviced at an authorized
service center.
• The monitor’s backlight may not perform optimally in cold environments: it may take
extra time to come on, and the color may suddenly change.Tr y to keep the camera
relatively warm even when the surroundings are cold.Performance will return to
normal when the camera warms up.
• When you switch from one picture display to another, you may notice that a few pixels
fail to make the change correctly.You may also notice some variance in the
brightness.These limitations are inherent in the technology and are not considered a
defect.
Page 18

18
Features of the C-211 ZOOM
• With its high-resolution CCD (over 2 million pixels) and high performance lens, the
C-211 ZOOM offers the best picture quality in its class.
• Integrated Polaroid printer lets you make high-quality prints on-the-spot.
• When making Polaroid prints, you can:Select the number of copies, include a date or
time caption, print multiframe images (splits), and crop images directly at the monitor.
• Maximum zoom of 600% (3X optical zoom and 2X digital telephoto zoom).
• Uses readily available, removable SmartMedia cards as the recording medium. Carr y
spare cards and shoot pictures without limit.
• Backlit LCD monitor/viewfinder with special light-entry lid is easy to view both
outdoors and indoors.
• Magnify recorded images 3X on the screen, and crop the enlargement for immediate
printout.
• Easy-to-use Shooting menu lets you select the metering type, white balance, and
more.
• Fast start-up and fast processing—the camera is ready when you are.
• Connects directly to a TV for easy large-screen viewing.
• Shoots not only stills, but also sequences and movies.Also supports panorama
shots.
• DPOF capability lets you preselect images for subsequent printing at a photo lab or
with a DPOF printer.
• Display recorded images either full-frame or in 4-frame or 9-frame indexes.Create
and print indexes of recorded movies.
• Supports connection of an optional telephoto conversion lens (through use of an
optional lens adapter).
Page 19

19
How to Use This Manual
This manual comprises nine chapters and an Appendix. Read the chapter descr iptions
below for a quick preview of what you can find in each chapter.
Chapter 1 Getting Started
This chapter lists all of the items included in the C-211 ZOOM package and identifies
all of the parts on the camera. It also explains how to get the camera ready to go:how
to load batteries, how to insert a SmartMedia card, how to load the film pack, and
more. Read this chapter carefully before starting to use your C-211 ZOOM.
Chapter 2 The Basics
This chapter takes you through an introductory session where you learn how to turn
the power on, shoot some stills, view them, print them, and then turn the power back
off. It also includes basic information about holding the camera, adjusting the monitor
brightness, and so on. Please be sure to read through this entire chapter, with camera
in hand.
Chapter 3 Viewing, Printing, and Protecting Recorded Images
Chapter 3 takes you through the steps required to view your completed stills on the
monitor or on a TV screen.It explains how to display and print images at full size and
in 4-frame and 9-frame indexes, and how to enlarge an image on the monitor or crop
the image for printing. It also explains how to protect images from accidental erasure,
and how to delete selected images from the SmartMedia card. Read through this
chapter after taking your first few shots with this camera.
Chapter 4 Taking Good Pictures
Read this chapter to advance to the next level of picture-taking skill. Here you will learn
essential focusing, flash, and exposure techniques that will help you get good shots in
all situations. All of the features presented here are extremely easy to use—no menus
are required—and will immediately improve your shooting results.
Chapter 5 Special Features for Polaroid Printing
This chapter explains the various features you can use when printing to instant film.
You can print multiple copies, set up a caption (date, time, or filename), create split
prints, and print frames from movies.You control these features using the camera’s
Print menu. Read about the menu first, and then read about each of the pr int features
you’d like to use.
Chapter 6 Advanced Shooting Techniques
This chapter covers the advanced shooting features accessible through the camera’s
Shooting menu. It explains how to shoot movies, sequences, and panoramas, how to
select the metering method, and more. Read about the menu first, and then read about
each of the features that you wish to use.
Page 20

20
Chapter 7 Playback Techniques, Card Operations, and Digital
Printing
This chapter explains how to play still images automatically (“autoplay”), how to view
and work with your recorded movies, and how to erase or for mat a SmartMedia card. It
also explains how to pre-select images for printing by DPOF-compliant printers and
photofinishing services, and it briefly describes methods for printing through your
computer or a dedicated printer.
Chapter 8 Customizing the Environment
The chapter explains how to customize the camera’s working environment: how to set
the date and time; how to adjust the beeper volume, monitor brightness, and print
tonality; how to switch monitor icons on or off;and more.You access these settings
through the camera’s Setup menu.
Chapter 9 Processing Images at Your Computer
This chapter describes the various methods available for transferring images to your
computer, and introduces some of the main features of the CAMEDIA Master software
that came with your camera. Once you have moved the images to your computer, you
can process them using CAMEDIA Master or any other popular graphics application.
Appendix
Do you have any questions, or is something not working the way you think it should?
Check the appendix for answers to frequently asked questions, for troubleshooting
hints, and for advice about what to do when the camera displays an error message.
You can also check the camera’s specifications.
Special Notations
This manual uses the following headings to call attention to different types of
supplementary information.
CAUTION — Calls your attention to a potential source of injury, equipment
problem, or data loss.Please read all CAUTIONs carefully.
HELP — Offers advice about operating features or operational restrictions.
Intended to clear up possible sources of confusion.
NOTE — Offers practical advice or useful additional information.
Page 21

1
Getting Started
This chapter lists the items included in the
C-211 ZOOM package, identifies the camera’s
controls and components, and explains what
you need to do before you can start shooting.
Please read through this chapter before
beginning to use your new camera.
Page 22
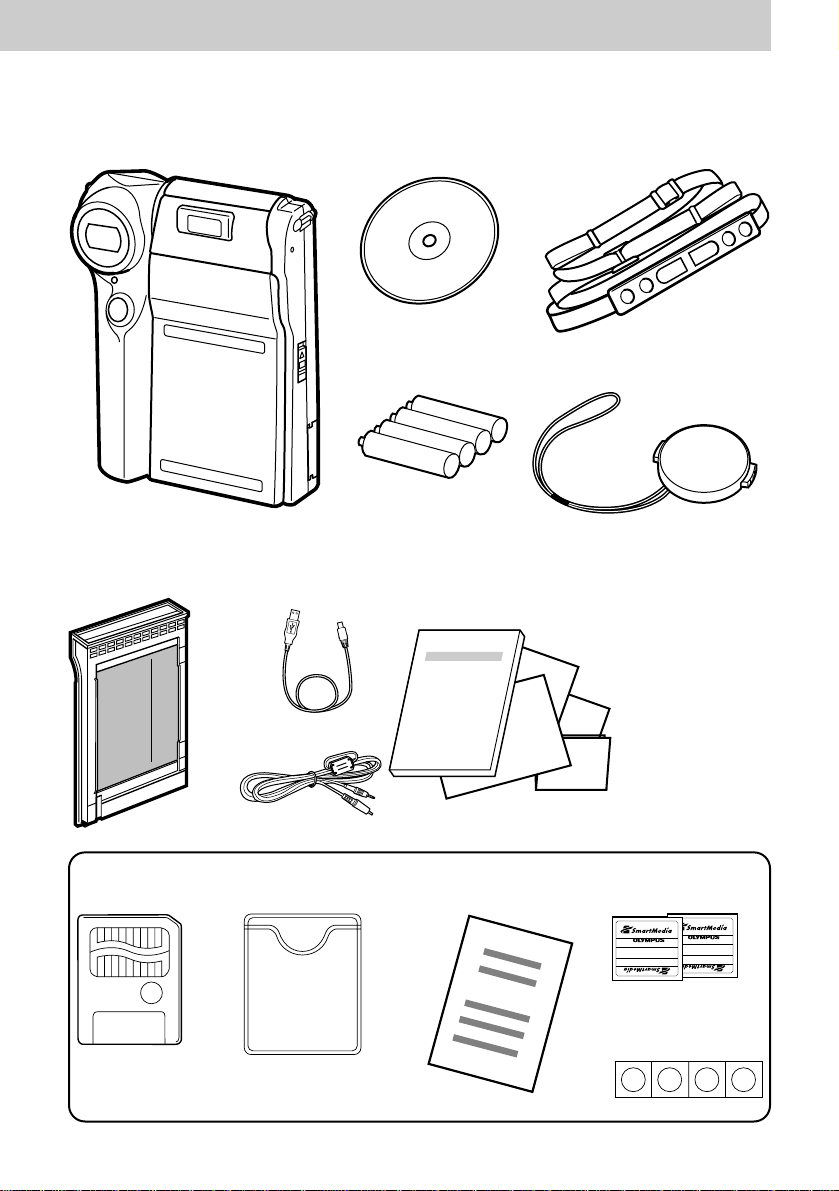
Checking the Package
22
Chapter 1 Getting Started
Camera
Polaroid 500 Film
8MB
SmartMedia card
Four write-protect
seals
Dedicated USB
cable
Static-free
case
SmartMedia
instructions
Two Smar tMedia
labels
Made in Japan
Made in Japan
Operating instructions (this booklet), warranty
agreement, registration card, authorized
distributors list, and Quick Start Guide (English)
Four AA (R6)
alkaline batteries
StrapCD-ROM (software)
Lens cap
Video cable
Page 23
23
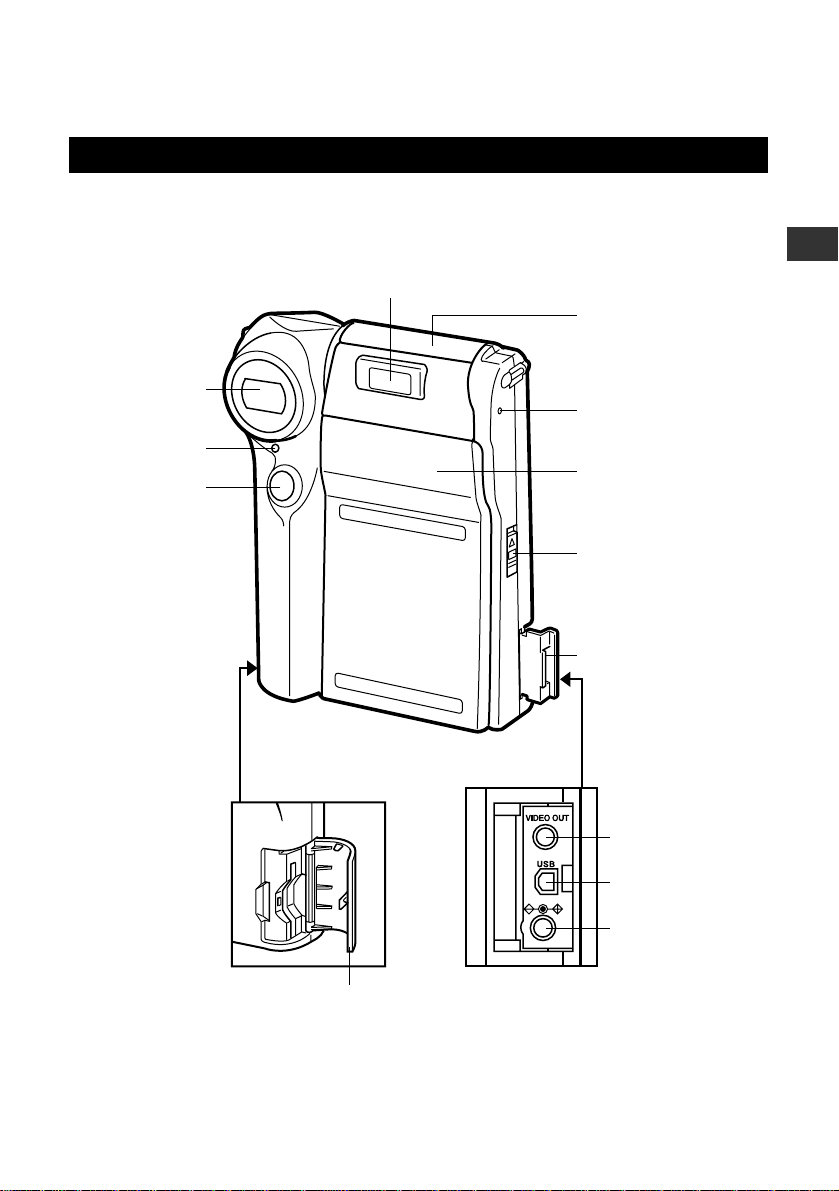
Names of Parts
Camera Body
1
Getting Started
Shutter release
button (p.48)
Built-in flash (pp.51, 84)
Self-timer
lamp (p.115)
Lens
Print outlet (p.37)
(For servicing only)*
Film compartment
cover (p.36)
Card compartment
cover (p.32)
Film compartment
latch (p.36)
Connector cover
Video output jack
(p.70)
USB connector
(p.185)
DC input jack
(p.31)
* The pinhole at the side of the camera is for use by qualified service persons only.
Page 24
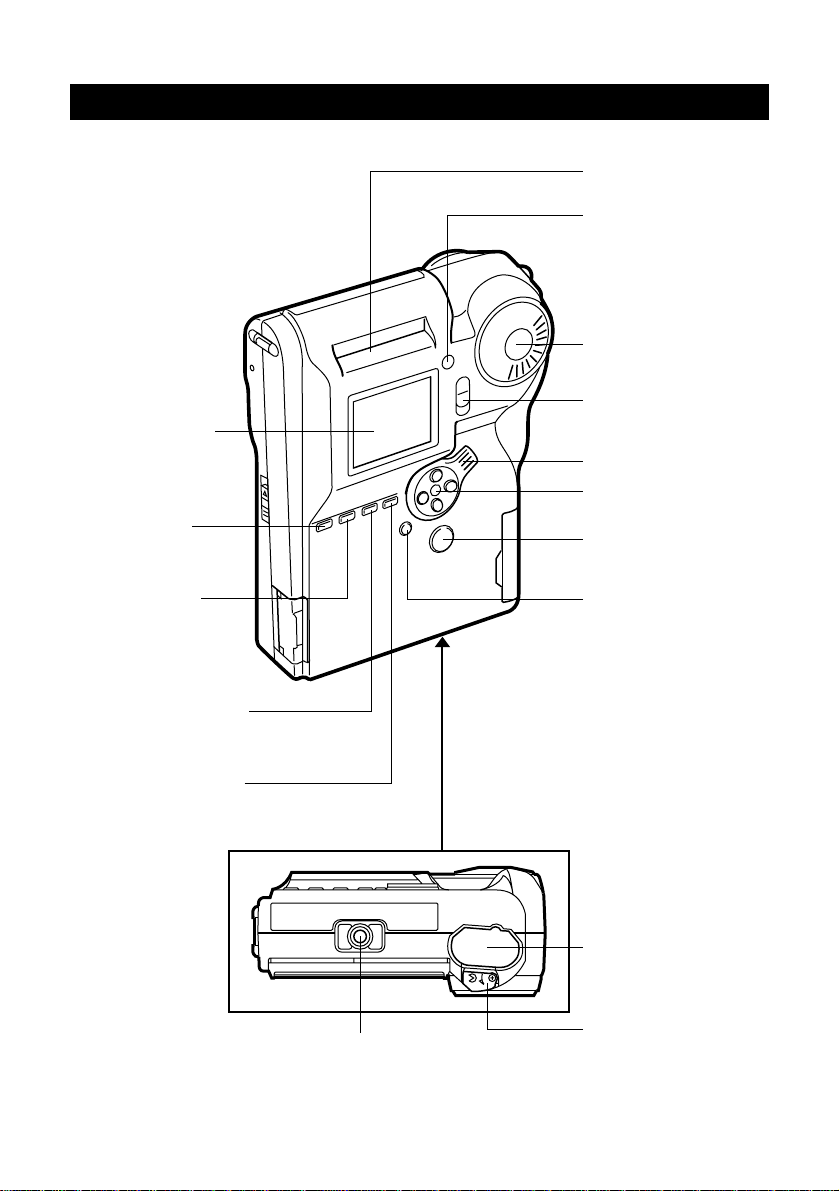
Camera Body (continued)
24
MENU button (p.95)
FLASH MODE button
(p.84) /
ERASE button (p.74)
Monitor (p.26)
DIGITAL TELEPHOTO
button (p.91) /
PROTECT button
(p.72)
FOCUS button
(p.81) /
INFO button (p.176)
Monitor lid (p.47)
Zoom lever (p.52)
Green lamp (p.48) /
Red lamp (p.44)
Mode dial (p.28)
Monitor lid switch
(p.47)
Tripod socket
Arrow pad (p.39)
PRINT button (p.55)
OK button (p.37)
Battery case (p.28)
Battery-case stopper
(p.28)
Page 25
25
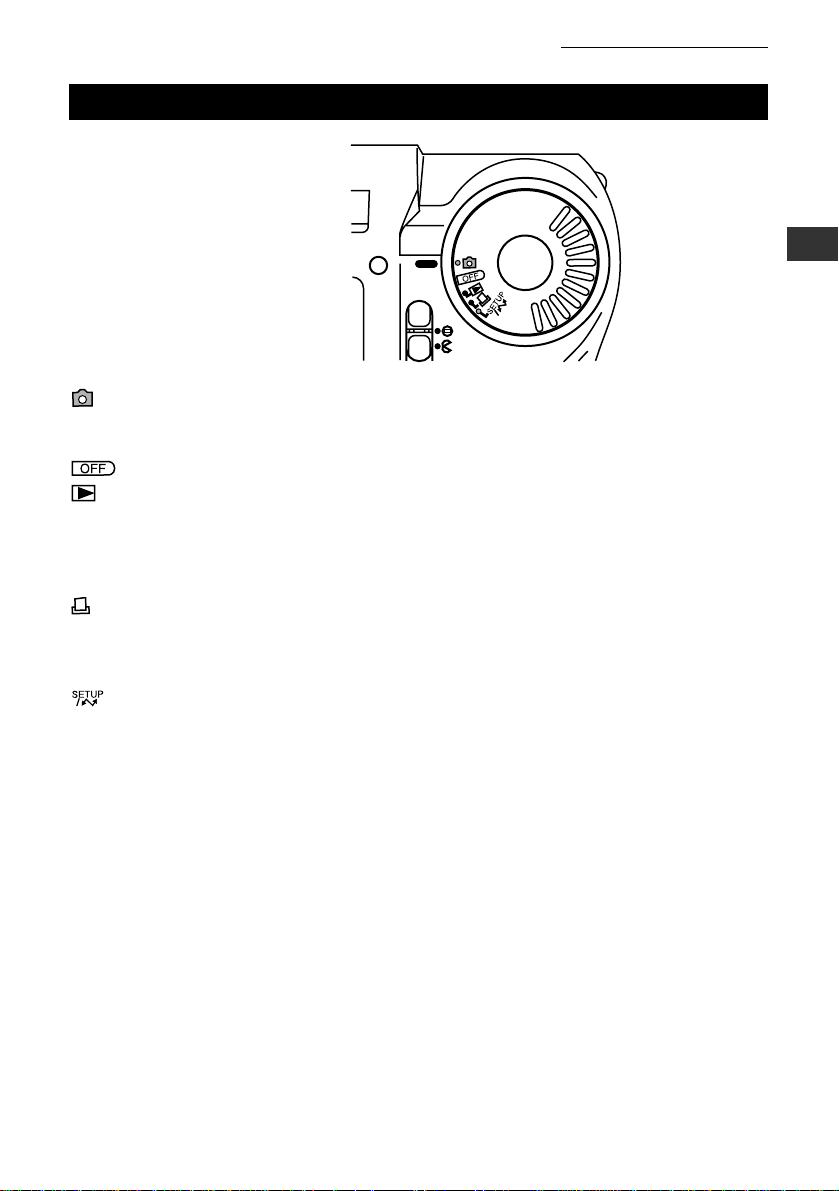
Mode Dial
(RECORD): Use this mode to take still pictures or moving images. See “The
Basics” (p.41), “Taking Good Pictures” (p.77), and “Advanced
Shooting Techniques” (p.111).
: Set the dial to this position to turn off the power.
(PLAY): Use this mode to view stills or movies on the camera’s monitor or
on a TV screen.You also use this mode when selecting images for
DPOF printing. See “Viewing, Printing, and Protecting Recorded
Images” (p.61) and “Playback Techniques, Card Operations, and
Digital Printing” (p.137).
(PRINT): Use this mode to make Polaroid prints.See “The Basics” (p.41),
“Viewing, Printing, and Protecting Recorded Images” (p.61), and
“Playback Techniques, Card Operations, and Digital Printing”
(p.137).
: Use this mode to customize the camera’s operating environment.
You also use this mode when connecting the camera to a
computer.See “Customizing the Environment
”
(p.165), and
“Processing Images at Your Computer” (p.181).
1
Getting Started
Name of Parts (continued)
Page 26
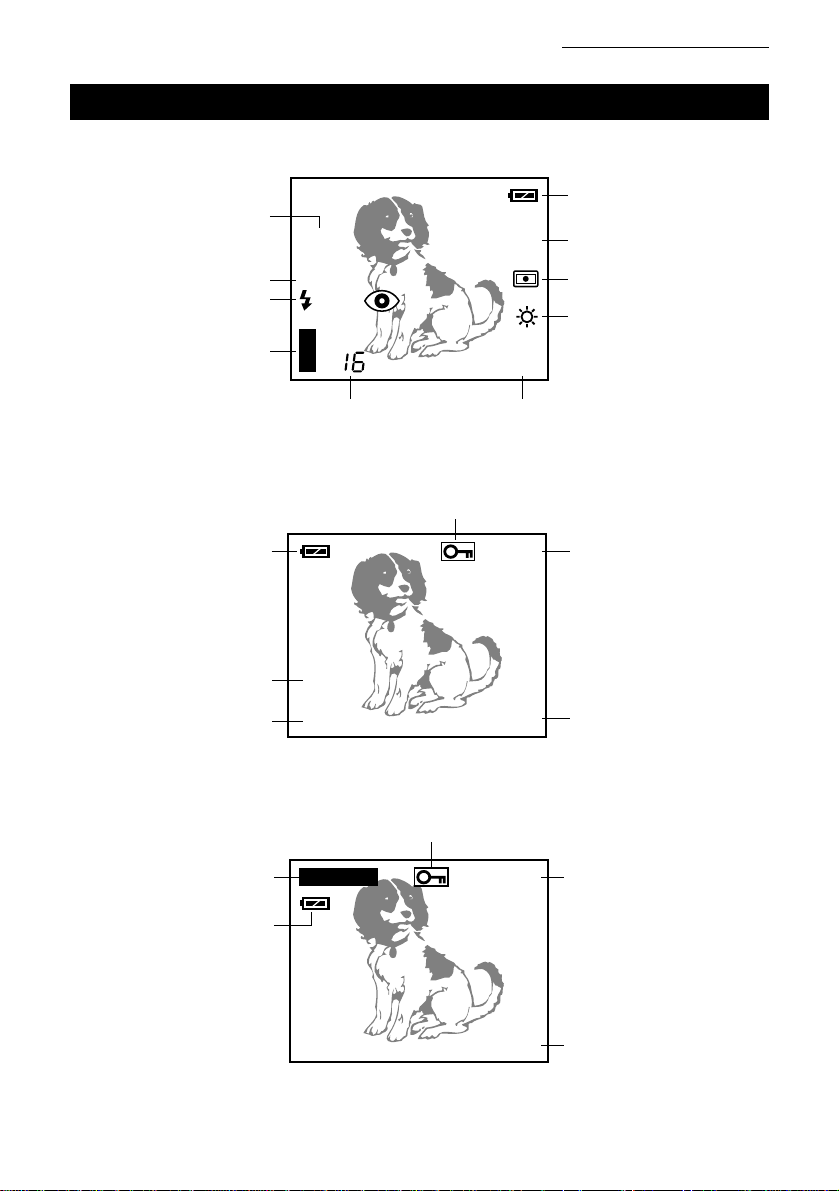
Monitor
RECORD-mode indications (when shooting still images)
PLAY-mode indications (when viewing still images)
PRINT-mode indications
26
HQ
12. 23. ’00
23 : 45 123
HQ
2.0x
2.5m/8ft
SLOW
+
2.0
SHQ
123
10 REMAIN
Protect (p.72)
Recording mode
(p.121)
Frame or file number
(p.176)
Battery check (p.44)
Exposure
compensation (p.89)
Spot metering (p.117)
White balance (p.124)
Recording mode
(p.121)
Frame number (p.176)
Time (p.39)
Digital telephoto (p.91)
Quick focus (p.81) or
macro (p.83)
Flash mode (p.84)
Processing gauge (p.50)
Remaining film count
(p.55)
Remaining picture count (p.45)
Battery check (p.44)
Protect (p.72)
Recording mode (p.121)
Date (p.39)
Battery check (p.44)
Name of Parts (continued)
Page 27
27
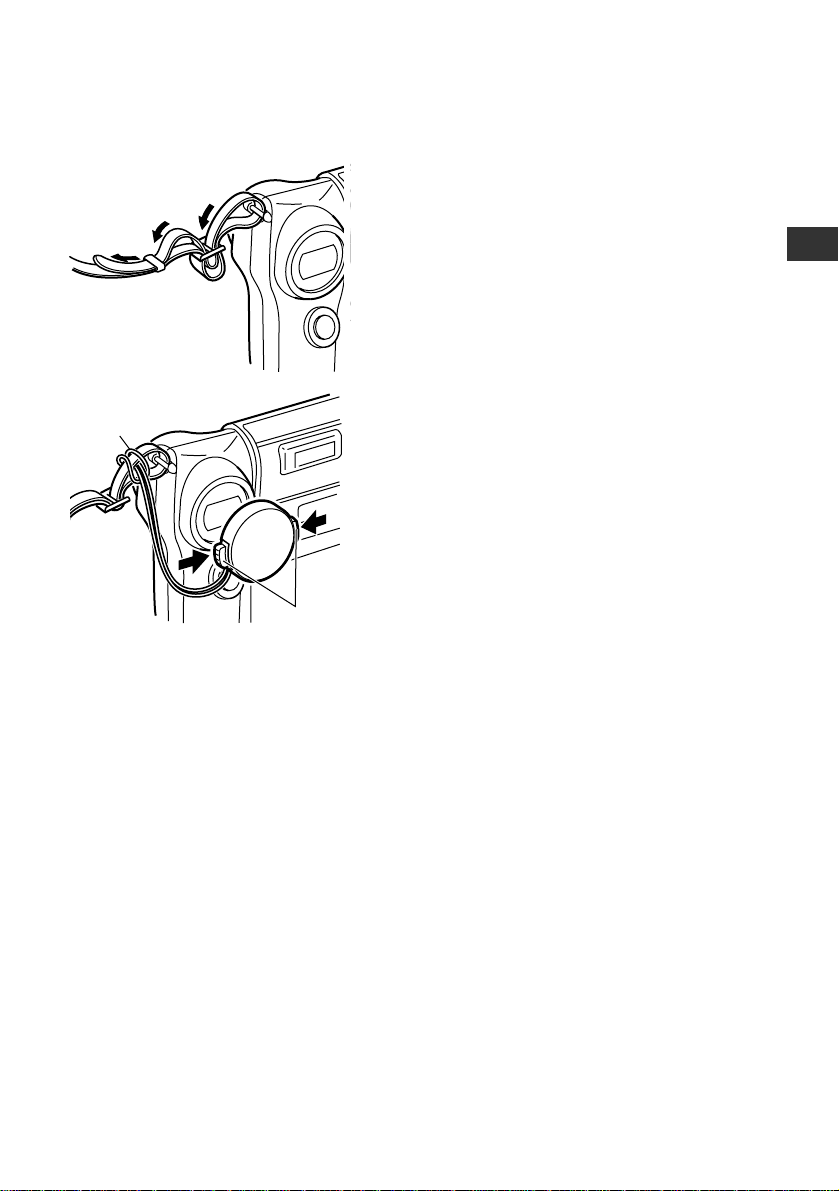
Attaching the Strap and the Lens Cap
1 Attach the strap to the camera.
• Attach the strap as indicated by the arrows
at left.Then pull on it to make sure it’s
secure.
2 Tie the lens-cap string onto the strap, as
shown at left.
3 Attach the lens cap to the lens.
• Press inward on the cap’s latches, fit the cap
over the lens, and then release the latches.
(To remove the cap: Press on the latches
and pull the cap off.)
1
Getting Started
3
2
CAUTION
• Leave the lens cap attached when carrying the camera.
• Be sure to attach the strap correctly, as shown above.The camera may fall from the
strap if the attachment is incorrect. Olympus assumes no responsibility for damage
caused by improper attachment.
Page 28
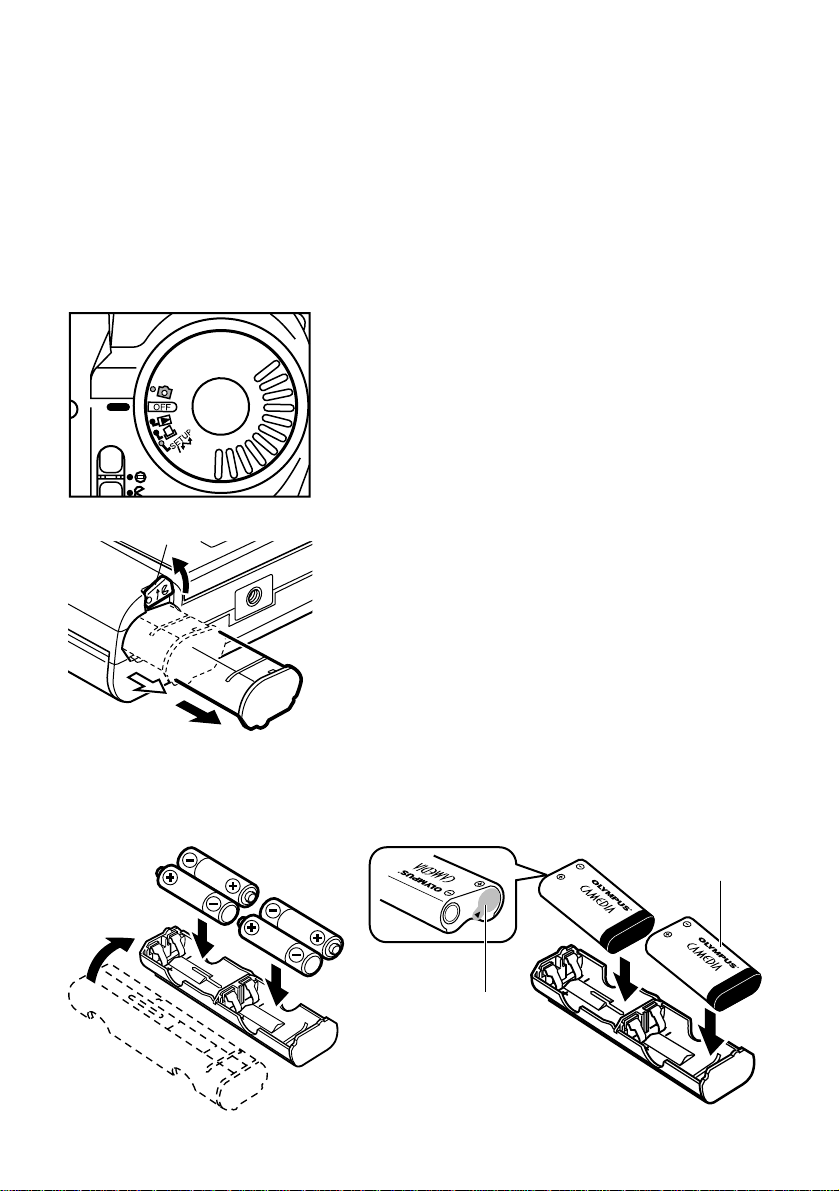
Inserting Batter ies
The camera accepts four AA (R6) batteries (alkaline, NiMH, lithium, or NiCD) or two
CR-V3 lithium battery packs. Four AA (R6) alkaline batteries are included with the
camera.
Do not mix different types of batteries, never use manganese batteries, and always be
sure to insert the batteries in the correct direction. Manganese batteries, mismatched
batteries, or incorrectly inserted batteries may overheat and cause irreparable damage
to the camera.
1 Be sure that the mode dial is set to the
OFF position.
2 Push the stopper in the direction shown in
the diagram.
The battery case pops out.
3 Pull the case out of the camera.
4 Insert the batteries or battery packs into
the case.
Be sure to insert in the correct direction.
Insert battery packs black-band first, with the
CAMEDIA label facing up.
28
2
3
CR-V3
CR-V3
CR-V3 lithium battery packsAA batteries
Some battery packs
come with an insulation
seal covering the battery
terminal. Please remove
this seal before inserting
the pack.
Do not remove
the silver seal.
Page 29
29
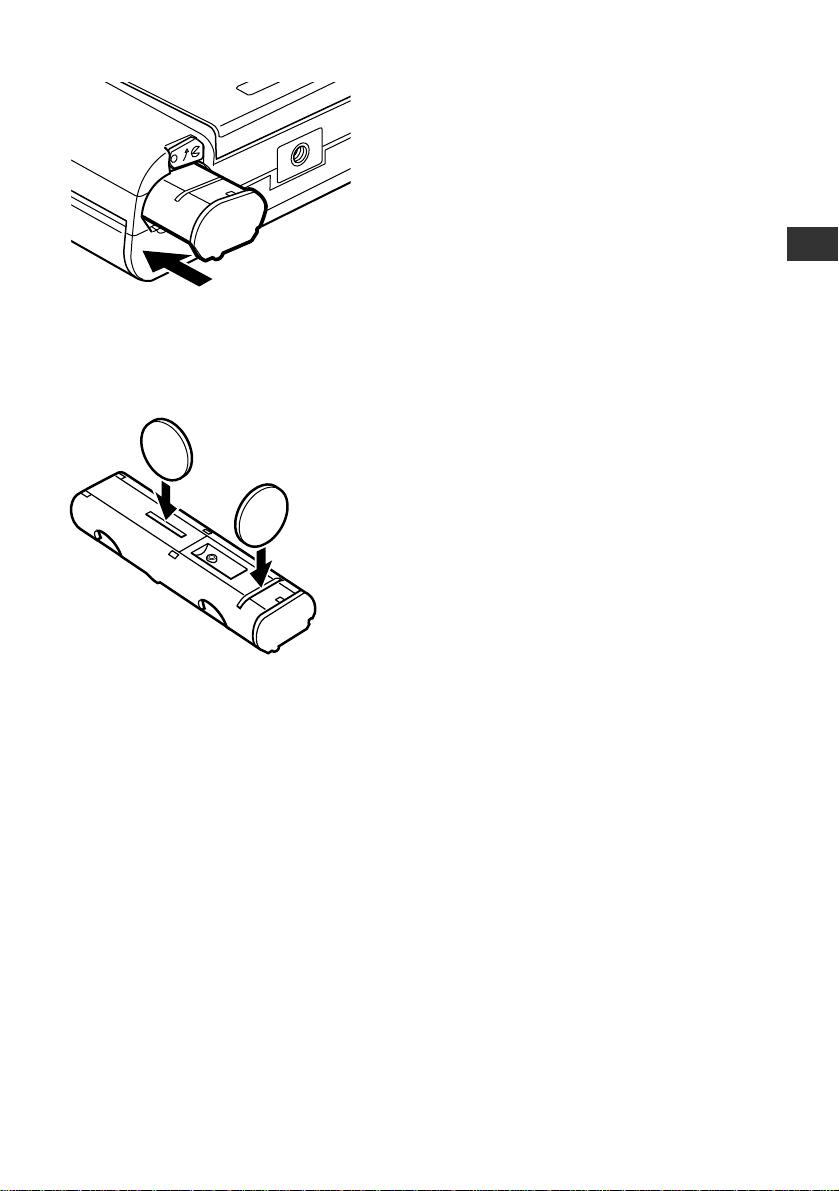
5 Set the case back into the camera.
To remove lithium battery packs...
Push a coin into the slot on the battery pack and pop the battery pack out.
* Please don’t push anything shar p into the
slots.
1
Getting Started
CAUTION
• Make sure that the power is off before loading the batteries.
• Note that CR-V3 battery packs are not rechargeable.
• We recommend that you use CR-V3 battery packs or Olympus-brand NiMH-type AA
batteries. It is best to avoid alkaline batteries, as performance is unreliable (especially
at low temperatures).
• NEVER use manganese batteries.
• Keeps hands away from the inside of the batter y case and battery compartment.
Battery life will be significantly reduced if dirt gets on the contacts inside the case or
compartment.
• If batteries are left out of the camera for about 1 hour with no AC adapter attached,
all settings revert to their factory defaults.
• Refer also to “Handling Batteries” on page 12.
Page 30

WARNING
• Do not use a battery if any part of its outer insulation is peeled off, or if there is a split
along the seam.These batteries may leak, overheat, or explode. Store-bought
batteries may occasionally be defective, with all or part of the seal peeled off. Check
batteries before loading, and do not use them if they appear defective.
Never use batteries that look like this:
Batteries with all or part of the seal (electrical insulation
sheath) peeled off.
Part of the negative electrode is protruding although not
covered by the seal.
The negative electrode (minus terminal) is flat.
(The seal may be covering the outside of the electrode
surface, or the surface may be completely uncovered.In
either case, the battery is defective if the electrode end itself
is flat.)
30
Inserting Batteries (continued)
Page 31

31
1
Getting Started
Using an (Optional) AC Adapter
A separately sold AC adapter allows you to run the camera from an ordinary
household wall outlet (AC120V outlet).
AC wall outlet
AC adapter
DC input jack
CAUTION
• It is normal for the adapter to heat up slightly if left connected for a long period of
time.
WARNING
Incorrect use may result in fire, electric shock, or burn.
• Use only with an AC120V wall outlet.
• Be sure that the adapter is plugged in all the way.
• Never handle the adapter with wet hands.
• If the adapter cord feels hot or emits smoke or a burning odor, unplug the adapter
from the wall outlet immediately and stop using it. If there is anything wrong with the
adapter or camera, please contact your Olympus dealer or an authorized Olympus
service center for assistance.
• Use only the adapter specifically designed for this camera.Use of any other adapter
may damage the camera or power source and may cause other malfunctions.
Olympus is not liable for damages that result from use of other adapters.
• Never pull on the cord to unplug the adapter. Hold the adapter body and pull firmly to
unplug.
• Do not pull, bend, twist, or modify the cord.
• If the cord is nicked or if wires appear severed or in poor contact with the adapter
plug, stop using the adapter and contact your dealer for assistance.
• Be sure that the camera power is OFF before connecting or unplugging the AC
adapter (regardless of whether or not batteries are currently installed).
• Unplug the adapter from the outlet when the camera is not in use.
Page 32

32
Inserting the Smar tMedia Card
Always insert a SmartMedia card before taking pictures.
1 Be sure that the mode dial is set to the
OFF position.
2 Open the card compartment cover.
3 Insert the card as shown in the illustration.
Use Olympus cards or generic 3V (3.3V)
cards only. Never use 5V cards.
If you are using a generic 3V (3.3V) card,
we recommend that you format the card in
the camera before taking pictures. (See
page 153.)
4 Close the cover, so that it clicks into place.
To remove a card: Follow the above procedure,
but pull the card outward at Step 3 (in the
direction opposite the arrow shown in the
illustration).
Contact area (the metallic side)
Page 33

33
CAUTION
• Cutting off power to the SmartMedia card while processing is in progress may
permanently destroy the image data stored in the card.To keep your data safe,
always set the mode dial to OFF and be sure that the monitor and lamp have gone
off before opening the card compartment, removing the batteries, or disconnecting
the AC adapter.
• SmartMedia cards are internally complex devices. Do not subject them to excessive
force or strong impacts.
• Do not touch the contact area (the metallic side) on the card.
1
Getting Started
Page 34

34
Loading a Film Pack
The camera accepts only 10-sheet packs of Polaroid 500 Film (2-7/8"2-1/4" image
size). Please do not tr y to load any other type of film into the camera. The camera
package includes one pack of film, so you can get started right away—just load the film
as described below.
Note that you do not need to load a film pack if you are not planning to print Polaroids.
The camera’s shooting and playback functions operate normally even if there is no film
pack in the camera.
Polaroid 500 Film
When handling the film pack, hold it at the thick
sides only (the area indicated by the arrows at
left). Don’t press on the film cover sheet.
For questions or problems regarding film packs,
please contact Polaroid Corporation. (See listing
on page 206.)
Film cover sheet
WARNING
• Do not tear the film or forcibly separate the layers.The film includes sealed-in alkaline
emulsion that can cause skin irritation if it leaks out—regardless of whether or not the
film has been exposed. If you accidentally tear the film such that emulsion contacts
your skin, wipe skin clean immediately and then flush with water. If emulsion gets into
your mouth or eyes, flush with large quantities of water and consult a physician.
• Keep film packs and prints out of the reach of children.
• Be careful to keep foreign matter from entering the compartment while the
compartment cover is open.
Page 35

35
CAUTION
• Check the expiration date on the film pack’s box, and avoid use of film that has
expired. Film that has passed its expiration date tends to produce red-tinted prints.
• It is recommended that you use all of the film promptly after loading it.
• Keep the film pack out of direct sunlight when taking it from its original box and
moving it into the camera.
• Please read all indications and warnings on the film pack’s box. But please do not tr y
to warm up exposed film by placing it in a warm pocket or heating it with a dryer
(even if the box instructions suggest that you do this).
• Never reuse a film pack after taking it out of the camera, even if there is film
remaining. Olympus assumes no liability for mechanical failure or print problems
caused by reloading of a film pack.
NOTE
• Store finished Polaroid prints away from light in a cool, dry area.
• Polaroid prints stored in darkness at room conditions (below 77˚F and below 50%
relative humidity) should maintain good quality for approximately 25 years, after which
they may noticeably discolor or fade.
1
Getting Started
Page 36

36
1 Be sure that the mode dial is set to the
OFF.
2 Raise the film compartment latch.
• The compartment cover opens.
• The latch is purposely designed to be
somewhat tight so as to prevent accidental
opening of the compartment.
3 Hold the film pack at the thick end, with
the embossed arrows pointing into the
compartment (with the soft cover side
facing into the camera). Slide the pack all
the way in along the metal guides on the
inside of the cover, until the bottom of the
pack makes contact with the bottom of the
compartment.
• If the film pack does not insert easily, do not
try to force it.Take it out, be sure that it is
oriented correctly and that the entry path is
clear of foreign matter, and then try loading
it again.
4 When the film pack is all the way in, close
the compartment cover.
• To lock the cover in place, press inward at
the center of the cover’s upper label.
Page 37

37
1
Getting Started
5 Set the mode dial to PRINT ( ).
• The monitor displays the screen shown at
left (with the EJECT line selected).
• New film packs include a light-blocking cover
sheet.You need to eject this sheet before
you can print.
• If you have not yet loaded a SmartMedia
card (or if the card is loaded incorrectly) the
monitor displays the NO CARD message.
Load a card before proceeding (see
page 32).
6 Press the OK button.
• The camera begins ejecting the cover sheet.
If you have not yet taken any pictures, the
monitor displays the NO PICTURES
message.
• Don’t try to pull the sheet out while ejection
is in progress (while the motor is running
and the sheet is moving).
7 When the motor stops and the cover sheet
stops moving, remove the cover sheet
from the print outlet.
OK
ENTER
EJECT
CANCEL
EJECT THE
FILM COVER
6
Loading a Film Pack (continued)
Monitor
(Eject the film cover screen)
Page 38

Film pack
This camera uses Polaroid 500 Film only.You can purchase film packs at camera
stores and at many other convenient locations.The package appearance is subject to
change without notice.
38
CAUTION
• Do not reopen the film compartment until you have used up all of the film.You can
see how much film is left by switching into PRINT mode and checking the remaining
film count on the monitor (see page 55).
• If for some reason you do open the compartment cover before the pack is empty,
please remove and discard the pack immediately (without trying to print on the
remaining film).
HELP
• If you inadvertently select CANCEL at Step 5 above, the camera will not eject the
cover sheet at this time.In this case, please keep in mind that the first time you print
using the new pack, the pack will eject the cover sheet rather than produce an actual
print.
Loading a Film Pack (continued)
Page 39

39
1
Getting Started
Setting the Date and Time
The camera records the time and date together with each picture that you take.Be sure
that the time and date settings are correct before taking pictures.You can adjust the
settings as follows.
1 Set the mode dial to .
• The Setup menu appears on the monitor.
If you have not yet loaded a SmartMedia
card (or if the card is loaded incorrectly)
the monitor displays the NO CARD
message instead. Load the card correctly
and then try again (see page 32).
2 Press or to move the menu pointer
to , and then press .
• The monitor displays the date-and-time
setup screen.
3 Press or as necessary to select the
pattern you wish to use for the date
display:
MDY (month.day.year)
DMY (day.month.year)
YMD (year.month.day)
• Then press to register the selection.
• The indication moves to the first date value.
1. 1.’00
0:00
CHANGE
[
2/2
]
[
30SEC
]
–M––D––Y–
1. 1. ’00
0: 00
OK
SET
BACK
2 3
Monitor (Setup menu)
Monitor
(Date/time setup screen)
Page 40

40
4 Press or as necessary to adjust the
value.Then press .
• The indication moves to the second date
value.
5 Continue as above, proceeding to set the
second and third date values and then the
hour and minute values.
6 After setting the minute value, press the
OK button.
• The new settings are registered, and the
display returns to the Setup menu.
To quit the date-and-time screen without registering your changes …
Press the MENU button ( ) rather than the OK button.
You’re now ready to take some pictures.Tur n to Chapter 2 for instructions.
If you wish to stop for a while, you can switch off the camera by turning the mode dial
to OFF. (See page 54.)
1. 1. ’00
0 : 00
OK
SET
BACK
4 5
6
CAUTION
• The internal clock may reset or fall behind if batteries go dead or are left out of the
camera. Check that settings are correct before taking important shots.
Setting the Date and Time (continued)
MENU button
Page 41

2
The Basics
The fastest way to learn is by doing.This
chapter takes you through an introductory
session where you learn how to turn the
power on, shoot some stills, view them, print
them, and then turn the power back off.
Please go through these procedures one by
one with camera in hand.
Page 42

Entering RECORD Mode
1 Be sure that you have loaded a
SmartMedia card in the camera. For
instructions, see page 32.
2 Set the mode dial to RECORD ( ).
• The camera enters RECORD mode.
Monitor
• The monitor appears as shown at left.
If you wish to stop for awhile, you can
switch off the camera by turning the mode
dial to OFF. (See page 54.)
If the camera is sleeping...
Under factory settings, the camera automatically enters sleep state and the monitor
goes dark if you do not touch any of the buttons for 30 seconds.You can restore full
power by lightly touching the shutter release button or moving the zoom lever. Note that
you can select a different sleep time as described on page 179.
If you do not touch the camera for about 4 hours after it has entered sleep state, the
camera shuts off all power. (Time to power-off may be somewhat longer if you are
using new batteries.) It is strongly recommended, however, that you switch the camera
off promptly when you are finished using it.
42
Chapter 2 The Basics
HQ
HQ
Battery
check
Remaining picture count
Processing gauge
Recording
mode
CAUTION
• Cutting off power to the SmartMedia card while processing is in progress may
permanently destroy the image data stored in the card.To keep your data safe,
always set the mode dial to OFF and be sure that the monitor and lamp have gone
dark before opening the card compartment, removing the batteries, or disconnecting
the AC adapter.
Page 43

43
Reading the Monitor
Is a SmartMedia Card Loaded?
The camera begins by checking that a StartMedia card is inserted. If you have
forgotten to insert a card, or if there is a problem with the card currently in place, the
monitor displays the NO CARD message.
Monitor
If you see the NO CARD
message...
Card is missing or incorrectly installed.
Tur n the camera off (p.54) and insert a card (or
reinsert the existing card).
If you see some other message...
If some other message appears, proceed as
described in “Error Messages” on page 200.
Monitor (Format screen)
If you see the format screen...
The card you have loaded needs to be
formatted. For information, see “Formatting a
Card” on page 153.
2
The Basics
OK
ENTER
YES
NO
Page 44

Are Batteries Still Good?
When you first enter RECORD mode, the monitor displays a battery check icon.The
icon automatically goes off after a few seconds.
If green :
Batteries are good.
You are ready to take pictures.
.
If blinking red :
Batteries are low and should be replaced.
You can take pictures even without replacing the batteries, but power may be lost at
any time.
If the red lamp is blinking:
Batteries are dead and must be replaced.
If batteries are low, the camera conserves power by switching the monitor off briefly
each time you take a new shot (in RECORD mode).The screen goes dark immediately
after you take the shot, then comes back on a little while later. Note that this does not
mean that the batteries have reached the end of their life.
44
CAUTION
• Keep spare batteries handy when traveling, when shooting in cold environments, and
when attending important events.
• If the camera is unable to take pictures correctly because battery power is low, it will
let you know by sounding a repeating double beep and blinking its red lamp.This may
occur after you have taken a picture (indicating that the picture was not processed
correctly) or when you first switch on the power.If this occurs, please replace the
batteries and begin again.
• The battery life remaining after the icon first appears may vary significantly
according to the type of battery you are using. In particular, the icon may
appear more quickly with NiMH batteries than with lithium battery packs. Under
certain conditions the icon may come up much sooner than you might expect—
although the batteries may continue to last for a considerable period.
Page 45

45
Does the Card Have Enough Room for More Pictures?
When the camera is in RECORD mode, the monitor displays a remaining picture
count.This count tells you how many more pictures you can store into your current
SmartMedia card.
• If the count drops to 0, the monitor displays
the CARD FULL message. At the same
time, the camera beeps and the green lamp
begins blinking. (See page 200.)
• The number of pictures you can store in the
card depends on the card size and the
recording mode that you are using (see
page 121).The count will change if you
change the recording mode.
Approximate storable still images
Approximate maximum movie time (in seconds)*
*Indicates the card’s total remaining movie capacity.The maximum length for a single
movie may be less (see page 128).
2
The Basics
HQ
HQ
Remaining picture count
SQ HQ SHQ
640 480 1600 1200
SQ
SQ-HIGH
HQ SHQ SHQ-TIFF
(SQ high quality)
2MB 020 007 003 01 00
4MB 040 016 007 02 00
8MB 082 032 016 05 01
16MB 165 066 031 11 02
32MB 331 132 064 22 05
64MB 665 266 128 45 11
SmartMedia
size
Recording mode
Resolution
Recording mode
Resolution
SmartMedia size
2MB 4MB 8MB 16MB 32MB 64MB
HQ 320240 5 11 23 48 96 193
Monitor
Reading the Monitor (continued)
HELP
• Since data quantity varies according to the subject you are shooting, the maximum
number of storable stills (and maximum movie recording time) will also vary.For this
reason the displayed counter may occasionally adjust itself by staying unchanged
when you take a new shot (or when you delete an existing shot).
Page 46

How to Hold the Camera
Hold the camera firmly with both hands, one at each side. If shooting a por trait shot,
hold the camera so that the flash is above the lens.
Horizontal (landscape) shot Vertical (portrait) shot
Note that the shot matches the orientation of the monitor, NOT the shape of the
camera. Holding the camera upright produces a hor izontal (landscape) picture.
46
Wrong!
Keep fingers and strap clear of the lens
and the flash.
NOTE
• Be careful of the lens. Don’t allow it to bump into anything, or otherwise subject it to
sharp impacts.
Page 47

47
Enhancing the Monitor Brightness
If using the camera in bright surroundings, you can enhance the brightness of the
monitor by opening the monitor lid.The open lid allows ambient light into the monitor
area, increasing the brightness.
1 Lower the lid switch to open the lid.
• The lid opens.
When it gets dark...
In dark environments the monitor will be harder to see if the lid is left open.When
working in a dark environment, press the lid switch upward to close the lid.
2
The Basics
1
Monitor lid
Page 48

Taking a Still Image
Adjust the Focus
Half-press
1 Position the camera as necessary to
compose the picture, using the monitor as
your viewfinder.
2 Half-press the shutter release button, wait
for the green lamp to come on solid, and
then continue to hold at half-press until
ready to shoot.
• The camera automatically sets the focus
and exposure, and the autofocus target
mark disappears.
• If the green lamp is blinking, the picture is
not in focus.Take your finger off the shutter
release button for a moment, and then try
again.
If your subject is very close to the
camera...
If your subject is less than 31 inches from the
lens, you should use the macro feature to take
the picture (p.83).Although it is possible to take
a close subject without using this feature, the
result may be out of focus or incorrectly
exposed.
48
Monitor
Green lamp
Halfpress
2
Autofocus target
mark
Shutter
release
button
Page 49

49
You’re now ready to take the picture. Keep the shutter release button
half-pressed, and go on to the next page.
2
The Basics
NOTE
• You can check the composition of finished shots by playing the images back on the
monitor, but for detailed checking of the focus and exposure you should display the
images on your TV or copy them to your computer (pp.70, 182).
Page 50

50
Shoot the Picture
Full-press
1 Full-press the shutter release button. (Go
from half-press to full-press.)
Press the button gently. Pressing
forcefully or jerkily may cause the camera
to move, spoiling the picture.
• The camera issues a double beep to
indicate that it has successfully taken the
picture.
• The green lamp starts blinking rapidly, and
the processing gauge appears on the
monitor.These indications mean that
camera is busy writing data into the
SmartMedia card. After a while the green
lamp blinks more slowly, and then goes off.
2 Once the green lamp has slowed down (or
gone off), you can shoot again.
• If you try shooting while the lamp is blinking
rapidly, the camera will not take the shot.
Wait for the blink rate to slow down, and
then try again.
Monitor Processing gauge
Processing gauge
Before
shooting
Camera is writing
to card, but you
can shoot again
anyway.
Camera is very
busy writing to card.
You must wait.
Shutter
release button
Full-press
Page 51

51
2
The Basics
If using the flash...
Under default settings, the camera automatically fires the flash if you are shooting in
low light. If you think the flash will fire, keep the distance between the camera and your
subject within the flash’s working range.The standard range is 8 inches to 13 feet,
although this changes if you use the zoom lever (see page 52).
Taking a Still Image (continued)
CAUTION
• Never open the card compartment cover or cut off the power supply (remove the
batteries or disconnect the AC adapter) while the green lamp is blinking or the
processing gauge is shown on the monitor.These indications mean that the camera
is writing data to the SmartMedia card. Cutting off power at this time may cause loss
of the picture you have just taken, and may also destroy other images stored in the
card.
HELP
• The recorded picture will cover slightly more area than the image that you composed
in the monitor.
• If your subject includes diagonal edges or lines, these may appear somewhat ragged
on the monitor when you compose the shot.This occurs because the resolution of the
monitor is lower than the resolution of the recorded picture.These lines will be
reproduced correctly in the recorded image.
• If you are shooting in bright light, faint vertical stripes may appear in the recorded
image.This is not a malfunction.
• If you switch the beep function off (p.172), the camera will not beep after taking a
picture. In this case you must watch the green lamp.If the lamp blinks, the picture
was taken successfully.
• If you use flash when shooting very close to your subject (at about 8 inches), the right
side of the picture will come out relatively dark.This is a normal characteristic of this
camera’s flash mechanism.
NOTE
• Do not press on the monitor.Strong pressure may crack or otherwise damage the
monitor.
• The processing gauge may remain on the screen for anywhere from 2 to 40 seconds,
depending on the recording mode.
• The time you need to wait before you can take another picture, and also the number
of sequential shots you can take (p.119), will vary according to the recording mode
(p.121).
Page 52

52
Zooming In and Out
(Optical Zoom)
You can zoom in and out using the zoom lever.
Move the zoom lever to W (“Wide angle”)
to zoom out.
Move the zoom lever to T (“Telephoto”) to
zoom in (3X).
Flash working range
The flash’s working range changes when you use optical zoom, as follows.
• Range at full zoom out (lever all the way to W): 8 inches to 13 feet
• Range at full zoom in (lever all the way to T): 8 inches to 8.5 feet
(When shooting at distances from 8 to 31 inches, please use macro mode. See
page 83.)
Monitor
NOTE
• By combining optical zoom with digital zoom (“digital telephoto”), you can get a
maximum zoom enlargement of 6X. See page 91.
Page 53

53
2
The Basics
Checking Your Completed Stills
Now let’s view your completed stills on the monitor.
1 Set the mode dial to PLAY ( ).
• The camera enters PLAY mode. Wait a few
seconds for the monitor to display the last
image that you took.
• If you haven’t taken any pictures at all, the
monitor displays the message NO
PICTURES.
2 Now use the arrow pad buttons to navigate
to the image you want to view.
: Move to the previous image.
: Move to the next image.
: Move back 10 images.
: Move forward 10 images.
3 Turn the mode dial back to RECORD ( ).
• The camera returns to RECORD mode, and
you are ready to take more pictures.
If you wish to turn the camera off instead, turn
the mode dial to OFF. (See the next page.)
2
Page 54

54
Turning the Camera Off
1 Turn the mode dial to OFF.
• The monitor goes dark and the camera’s
power goes off.
NOTE
• If the camera is writing to the card when you turn the dial to OFF, the lamp may
continue blinking for a few moments.
• After confirming that the lamp has gone off, you can safely proceed to replace
batteries or disconnect the AC adapter.
• Switching power off has no effect on images already stored in the card.
Page 55

55
2
The Basics
Printing Stills on Instant Film
Now select one of the stills that you like, and print it out.
1 Set the mode dial to PRINT ( ).
• The camera enters PRINT mode.The
PRINT-mode screen appears, and the
monitor displays the last image that you
took.
• If the camera is unable to print, it displays
an appropriate message (see page 200).
2 Select the still that you want to print.
: Move to the previous image.
: Move to the next image.
: Move back 10 images.
: Move forward 10 images.
3 Press the Print button ( ).
• The monitor displays a confirmation screen.
4 Press the Print button again.
• The camera prints the selected image onto
instant film.The green lamp begins blinking.
After a while the film begins to emerge from
the print outlet.
5 When the film stops moving and the motor
goes off, grasp the leading edge of the
film and pull the film completely out of the
print outlet.
• Allow 30 to 90 seconds for the image to
appear on the film.
HQ
123
10 REMAIN
Monitor (Print-mode screen)
Remaining film count
3 4
2
PRINT
CANCEL
[ ]
Monitor (Confirmation screen)
Green
lamp
Page 56

56
A coiled covering is installed in the print outlet to
block entry of light.The covering unwinds as the
print begins to emerge from the camera, then
winds back into place before the print is fully
ejected. Please avoid handling this material—it
should never be pulled on, bent, or torn.
To ensure uniform printing, avoid touching the
film’s image area until the image has had time to
stabilize (about 5 to 10 minutes).You can safely
hold the film along the edges or on the white
border.
Waving or bending the film before the image has
stabilized may cause streaks or blotches in the
finished print.
The illustrations below show how the camera prints the image displayed on the monitor.
Note that the print shows slightly less area than the image on the monitor.
Monitor
<or>
Print
Light-tight covering
Print
Monitor
Page 57

57
CAUTION
• Avoid printing under direct sunlight.Strong sunlight may impair the print quality.
• Don’t shake or knock the camera while the green lamp is blinking.Sudden camera
movement may degrade the quality of the print.
• Be careful not to block the print outlet, and don’t touch the emerging film until it has
stopped moving and the motor is no longer audible.Interference with the emerging
film may result in film jams, image streaking, film rupture, or leakage of emulsion.
• Don’t open the film compartment cover while printing is in progress. Opening the
cover during printing may result in a film jam or in damage to the camera, and may
cause the camera to display an incorrect remaining film count.
• When making multiple prints: Please don’t start a new print until you have removed
the previous print from the print outlet.
HELP
• In some cases you may notice faint streaks on the printed image.This occurs with
certain types of scenes, and does not indicate a problem with the camera.
• Print coloration may appear to vary somewhat under different lighting environments.
This is characteristic of Polaroid film.
• Yellow spots and edge streaks may occasionally occur on Polaroid prints.For advice
about development problems of this type, please contact the Polaroid Corporation
(see page 206).
• For information about what to do if the camera does not produce or eject a print as
expected, refer to “Camera Does Not Print” on page 199.
• For information about what to do if the FILM JAM message appears, refer to the
“Error Messages” section (p.200).
NOTE
• Print quality is essentially the same regardless of the recording mode you used to
take the picture.
• The camera includes a feature for fine-tuning the print quality. See page 177.
2
The Basics
Printing Stills on Instant Film (continued)
Page 58

58
Printing Stills on Instant Film (continued)
For Good-Quality Prints
Camera orientation
• When making prints, stand the camera upright or lay it lens-side down (monitor-side
up) on a stable, vibration-free surface. Don’t rest the camera with the lens pointing up,
as this may cause the ejected film to warp and may also result in overlapped ejection
and streaking.
Temperature
• Polaroid instant film produces best results when the film temperature is between 55˚F
and 95˚F.
• If the environment is colder than about 50˚F, the film emulsion may harden to the
point where you cannot get good-quality prints.
• The camera will produce prints at any temperature from 45˚F to 104˚F. If the film
temperature is beyond these limits, the camera will refuse to print and the monitor will
display the FILM TOO COLD or FILM TOO WARM message.
• When shooting in cold environments, do not try to warm up the ejected film—for
example, by placing it in a warm pocket or by using a dryer.Rapid temperature
change may adversely affect the quality of the print. (Please avoid doing this even if
you see different advice on the film pack’s box.)
45˚F55˚F95˚F 104˚F
Film Temperature and Printing
Cannot print
Printing is possible, but quality may suffer.
Best
Right
Wrong
Page 59

59
2
The Basics
Removing an Empty Film Pack
When the remaining film count (p.45) falls to 0 and you are ready to remove or replace
the pack, follow the steps below.
1 Turn the mode dial to OFF.
• The monitor goes dark and the camera’s
power goes off.
2 Press and raise the film compartment
latch.
• The compartment cover opens.
3 Remove the film pack.
You can now proceed to load a new film
pack. Refer to “Loading a Film Pack,”
Step 3 (p.36).
4 Close the compartment cover, so that it
locks into place.
WARNING
• Do not tear, cut, or otherwise rupture finished prints or unused film.The film contains
sealed-in emulsion that may leak out and cause alkaline burns.
• The film pack contains its own battery. Do not disassemble, heat, short-circuit, or
attempt to recharge this battery, and do not dispose of the battery in fire, as any of
these actions may cause the battery to explode, leading to possible fire or injury.
• Dispose of the used film pack in accordance with instructions provided on the pack’s
original packing.
Page 60

60
Page 61

3
Viewing, Printing, and
Protecting Recorded Images
This chapter explains how to view images on
the monitor or on a TV, how to display images
full size and in 4-frame and 9-frame indexes,
how to enlarge and crop images, and how to
print the image on the display directly to
Polaroid film.It also explains how to protect
images from accidental erasure, and how to
delete selected images from the SmartMedia
card. Read through this chapter after taking
your first few shots with this camera.
Page 62

Getting Ready
Entering PLAY Mode
1 Set the mode dial to PLAY ( ).
• The camera enters PLAY mode. Wait a few
seconds for the monitor to display the last
image that you took.
• If you haven’t taken any pictures at all, the
monitor displays the message NO
PICTURES.
• If there is a problem with the card, the
monitor will display an appropriate message
(see page 200).
• If batteries are running low, the icon
blinks red on the monitor.
If the camera is sleeping...
Under factory settings, the camera automatically enters sleep state and the monitor
goes dark if you do not touch any of the buttons for 30 seconds while the camera is
running on batteries only. You can restore full power by lightly touching the arrow pad
or moving the zoom lever.Note that you can select a different sleep time as described
on page 179.
If you do not touch the camera for about 4 hours after it has entered sleep state, the
camera shuts off all power. (Time to power-off may be somewhat longer if you are
using new batteries.) It is strongly recommended, however, that you switch the camera
off promptly when you are finished using it.
To turn off the camera...
Tur n the mode dial to OFF. (See page 54.)
62
Chapter 3 Viewing, Printing, and Protecting Recorded Images
CAUTION
• Cutting off power to the SmartMedia card while processing is in progress may
permanently destroy the image data stored in the card.To keep your data safe,
always set the mode dial to OFF and be sure that the monitor and lamp have gone
dark before opening the card compartment, removing the batteries, or disconnecting
the AC adapter.
• Do not press on the monitor.Strong pressure will cause the image to ooze, and may
also crack or otherwise damage the monitor.
HELP
• When you first enter PLAY mode, the monitor may light up briefly and then take up to
2 seconds to display an image.This is not a problem.
Page 63

63
Displaying Images Frame by Frame
The camera can display images one frame at a time (full-size display) or multiple
frames at a time (index display).When you first enter PLAY mode, the monitor displays
images one frame a time.
1 Set the mode dial to PLAY ( ).
• The camera enters PLAY mode, and the
monitor displays the last image that you
took.
• If you haven’t taken any pictures at all, the
monitor displays the NO PICTURES
message.
2 View the image and the accompanying
information.
• The display includes various indications
related to the displayed image, as shown at
left. (Items identified in parentheses appear
only with certain settings or image types.)
The battery-check and recording-mode
indications automatically go off after about 3
seconds, but will come on again when you
switch to a different image.
3 You can now use the arrow pad to move
from image to image.
: Move to the previous still.
: Move to the next still.
: Move back 10 stills.
: Move forward 10 stills.
3
Viewing, Printing, and Protecting Recorded Images
HQ
12. 23. ’00
23 : 45 123
3
(Recording mode)
(Movie)
(Protect)
Battery
check
(Print select mark)
(Date of
shot)
(Time of
shot)
Frame number
Page 64

Displaying Multiple Frames
This feature displays an index of 4 or 9 consecutive images from the card.This is
useful when you want to look through the images stored on the card, or when you want
to search for a particular image.
1 Set the mode dial to PLAY ( ).
• The camera enters PLAY mode, and the
monitor displays the last image that you
took.
2 Push the zoom lever to W ( ).
• Push once 4-frame index.
Push again 9-frame index.
(It takes about 2 seconds for images to
appear.)
3 You can now use the arrow pad to move
back or forth to the next series of images.
: Move back 4 images (if 4-frame index)
or 9 images (if 9-frame index).
: Move ahead 4 or 9 images.
4 You can also use the arrow pad to select a
single image from the displayed index.
: Select the previous frame.
: Select the next frame.
64
3 4
2 5
Page 65

65
5 Push the zoom lever to T ( ).
• The camera returns to full-frame display. The
selected frame appears full size on the
monitor.
• If you wish to return to an index view, push
the zoom lever to W ( ) again, as descr ibed
in Step 2 above.
Printing from an index
You can print a selected image directly from the index. Select the image as described
in Step 4 above, then turn the mode dial to PRINT ( ).Then press the PRINT button
( ) once to display the print confirmation screen, and then again to execute the print.
3
Viewing, Printing, and Protecting Recorded Images
125 126
128127
Four-frame index
120 121 122
123 124 125
126 127 128
Nine-frame index
Selected frame
Selected frame
CAUTION
• When printing, observe the cautions indicated under “Printing Stills on Instant Film”
(p.55).
Page 66

66
Enlarging an Image
Enlarging an Image on the Display
Enlarging and Sliding
1 Set the mode dial to PLAY ( ).
• The camera enters PLAY mode, and the
monitor displays the last image that you
took.
2 Use the arrow pad to select the image that
you want to enlarge.
• You can select images using either full-size
display or index display (p.64).
3 Push the zoom lever to T ( ) one or more
times.
• Each time you push the lever to T, the image
enlarges another step: to 1.5x, 2x, 2.5x, or
3x.
4 Now use the arrow pad to slide (“crop”)
the enlarged image as necessary so that
the desired area appears on the monitor.
5 Push the zoom lever to W ( ).
• Each push reduces the enlargement one
step.
Note that you cannot select a different
image until you return the current image to
its original size.
2 4
3 5
1.5x
Enlargement rate
Page 67

67
Printing
You can make a print of the image area shown on the monitor.Turn the mode dial to
PRINT ( ), then press the PRINT button ( ) once to display the print confirmation
screen, and then again to execute the print.
3
Viewing, Printing, and Protecting Recorded Images
CAUTION
• When printing, observe the cautions indicated under “Printing Stills on Instant Film”
(p.55).
HELP
• If the shot was taken using a low-quality recording mode (p.121), the printed
enlargement may be unclear. It is recommended that you use this print feature only
with images shot in HQ mode or higher.
• This feature is not available if you are viewing a movie frame (if you see the mark
on the monitor).
Page 68

Printing a Selected Area of an Image
Cropping and Printing
A special PRINT-mode feature lets you select a specific part of the image for printing.
The camera enlarges the selected area and prints it out full size.
1 Set the mode dial to PRINT ( ).
• The camera enters PRINT mode, and the
monitor displays the last still image that you
took.
2 Use the arrow pad to select the image that
you want to enlarge. Select in the same
way as in PLAY mode (pp.63, 64).
3 Use the zoom lever to select the amount of
enlargement.
Push the lever to T ( ):
1x 1.5x 2x 2.5x 3x
Push the lever to W ( ):
3x 2.5x 2.0x 1.5x 1x
• The monitor indicates the enlargement rate
and displays the corresponding areaselection box.
4 Use the arrow pad to select the part of the
image that you wish to print.
• The box moves in the corresponding
direction.
68
5
6 7
2 4 5
3
1.5x
10 REMAIN
1.5x
Enlargement rate
Area-selection
box
Page 69

69
5 When you think you are at the right spot,
press the OK button.
• The camera enlarges the selected area so
that it fills the monitor.You can now finely
adjust the range by sliding the image with
the arrow pad. If you like, you can use the
OK button as a toggle to move back and
forth between the enlarged display and the
box display.
6 When you are satisfied with the area you
have selected, press the PRINT button.
• The camera displays a confirmation screen.
7 Press the PRINT button to execute the
print.
• The camera enlarges and prints the
selected part of the image.
3
Viewing, Printing, and Protecting Recorded Images
CAUTION
• Refer to “Printing Stills on Instant Film” (p.55) for precautions you need to keep in
mind when printing to instant film.
HELP
• If the shot was taken using a low-quality recording mode (p.121), the printed
enlargement may be unclear. It is recommended that you use this print feature only
with images shot in HQ mode or higher.
• This feature is not available if you are viewing a movie frame (if you see the mark
on the monitor).
Enlarging an Image (continued)
Page 70

70
Displaying Images on a TV Screen
You can connect the camera to a TV set and view images in large size on the TV
screen. Make the connection using the video cable included with the camera.
1 Be sure the TV is off, and that the camera’s
mode dial is set to OFF.
2 Connect one end of the cable to the video
output connector on the camera. Connect
the other end to the appropriate input
connector on the TV set.
3 Switch on the TV, and set it to display
video input.
For information about how to do this, refer
to the instructions that came with the TV.
4 Set the mode dial to PLAY ( ).
• The camera enters PLAY mode, and the TV
displays the last image that you took.
5 Use the arrow pad to select each image
that you wish to display.
You can also display indexes and movies,
and use any of the other advanced
playback features.
5
2
3
4
Page 71

71
HELP
• The monitor automatically shuts off when you connect the camera to a TV.
• Depending on how your TV is adjusted, the picture may appear somewhat off-center
on the TV screen.This does not indicate a problem with the camera.
• Some TVs may display a black frame around the image. If you print from such a TV
directly to a video printer, a pronounced black frame may also appear on the printout.
• Refer to the instructions that came with your TV or VCR for infor mation about how to
display video images.
• Images displayed on the TV screen can also be saved to videotape.
NOTE
• It is recommend that you use an AC adapter to power the camera when displaying
images on the TV. (The AC adapter for this camera is sold separately.)
3
Viewing, Printing, and Protecting Recorded Images
Page 72

72
Protecting Images from Accidental
Erasure
(Image Protection)
The image-protect feature lets you protect selected images on the SmartMedia card
from accidental erasure. Images that are protected cannot be erased by the camera’s
“Erase Frame”and “Erase Card” functions (see pages 74 and 151). Protection settings
are stored in the card itself, and are not lost when you switch off the camera.
1 Set the mode dial to PLAY ( ).
• The camera enters PLAY mode, and the
monitor displays the last image that you
took.
2 Use the arrow pad to navigate to an image
that you want to protect.
• You can select images using either full-size
display or index display (p.64).
3 Press the PROTECT button ( ) once to
set protection ON.
• When you set protection ON, the protect
mark ( ) appears at the top right of the
image on the monitor.
To cancel protection...
To cancel protection, press the PROTECT button
a second time.
2
3
SHQ
124
Protect mark
Monitor
Page 73

73
CAUTION
• Formatting a card will erase all images on the card, regardless of the protect settings.
HELP
• This feature does not operate if your card has a write-protect seal on it.The writeprotect seal unconditionally protects all images from erasure.
3
Viewing, Printing, and Protecting Recorded Images
Page 74

74
Erasing a Selected Image
(“Erase Frame”)
Erasing images you don’t need increases the space available on the card.
You cannot erase an image if its image protection is set ON, or if the card itself is
protected by a write-protect seal.To erase a protected image, you must first switch the
protection off.To enable erasure from a write-protected card, you must remove the
card’s write-protect seal.(If you remove a write-protect seal, please discard it. Seals
should not be reused.)
1 Set the mode dial to PLAY ( ).
• The camera enters PLAY mode, and the
monitor displays the last image that you
took.
2 Use the arrow pad to navigate to an image
that you want to erase.
• You can select images using either full-size
display or index display (p.64).
3 Press the ERASE button ( ).
• The monitor displays a confirmation screen.
You can cancel by pressing the ERASE
button once again.
4 Press the OK button.
• The camera beeps once and erases the
image.
To erase all unprotected images at
once...
The camera’s “Erase Card” function erases all
unprotected images from the card in a single
operation. See page 151.
2
4
3
ESC
OK
ENTER
YES
NO
Monitor
Page 75

75
3
Viewing, Printing, and Protecting Recorded Images
CAUTION
• Do not open the card compartment cover or cut off the power supply (remove the
batteries or disconnect the AC adapter) while erasure is in progress, as this may
destroy image data stored on the card.
HELP
• It is normal for erasure to take a bit longer if you have selected one or more of the
images on the card for DPOF printing (p.157).
Page 76

76
Page 77

4
Taking Good Pictures
This chapter explains how to focus, how to
use the flash, and how to take advantage of
the various other features designed to
improve your shooting results. Learn about
these features now, so that you will be able to
respond quickly when the opportunity arises.
Before starting this chapter, you should
already be familiar with basic picture-taking
procedures as explained in Chapter 2.
Page 78

About Focusing
Hard-To-Focus Subjects
The camera automatically focuses your shots for you. In most cases you’ll get great
focus simply by centering the subject on the monitor and then half-pressing the shutter
release button.
In certain situations, however, autofocus may not produce optimal results.With subjects
such as shown in diagrams 1 to 3 below, the camera may not be able to focus at all:
the green lamp will blink and the camera will not shoot.In cases such as 4 and 5, it
may also happen that the camera will focus incorrectly:the green light may come on
solid (allowing you to shoot) even though the image is not properly focused. And if you
line up a shot as shown in case 6, the camera will focus on the background rather than
on the subjects.
78
Chapter 4 Taking Good Pictures
1 Very low contrast 4 Close and distant subjects
in same shot
5 Subject moving quickly2 Very bright spot at center
3 Subject has no vertical lines
(relative to image plane’s
long dimension)
6 Subject is off-center (outside
of autofocus target mark)
Autofocus target mark
Page 79

79
One way to handle these situations is to focus on some other object the same distance
as the subject that you want to take, engage the focus lock (see next section), then
turn the camera back to the desired scene and take the shot. Another solution is to fix
the focus at 8 feet (close) or at ∞ (distant) using the “quick focus” feature (p.81).
If you’re shooting a subject with no vertical lines (as in diagram 3), try rotating the
camera 90 degrees, locking the focus, and then rotating the camera back.
4
Taking Good Pictures
Page 80

80
Special Focusing Techniques
Focus Lock (for Off-Center Subjects)
When you use autofocus, the camera automatically focuses on whatever appears
within the autofocus target mark at the center of the monitor.If you wish to
automatically focus on a subject that is off center, use the camera’s focus lock.
1 Set the mode dial to RECORD ( ).
• The camera enters RECORD mode.
2 Hold the camera so that the subject you
want to focus on is inside the autofocus
target mark.
3 Half-press the shutter release button, and
continue holding it. Keep the camera
steady until the green lamp comes on
solid and the autofocus target mark goes
off.
• The subject is now in focus and the
exposure is set.
4 Continue holding the half-press while
repositioning the camera.Then full-press
the button to take the picture.
1
Monitor
Autofocus target mark
The autofocus target
mark goes off.
Half-press
Shutter
release button
Full-press
Page 81

81
4
Taking Good Pictures
Using Fixed Focus
Quick Focus
Use quick focus when you are not able to get the desired results with autofocus.This
feature disables autofocusing and lets you set the focus to either close (8 feet) or distant
(∞).
When you select quick focus, the corresponding focus mark appears on the monitor.
Monitor
FOCUS button
Quick focus mark
Quick focus focusing ranges
2.8ft
4.3ft
5.9ft 13ft
22ft
8ft
Wide angle
(zoomed out) 8ft
∞
Telephoto
(zoomed in) 8ft
∞
(Dotted line means that distance is
beyond the range of the flash.)
Page 82

82
To change the focus type, press the FOCUS button as necessary. Each press switches
you to a different setting, as shown in the table. Note that you can only change the
focus type while the camera is in RECORD mode (while the mode dial is set to ).
For fixed focus, select either close (2.5m/8ft) or distant (∞).
To cancel quick focus operation...
Press the FOCUS button as necessary to change the focus type, or turn off the
camera.
Special Focusing Techniques (continued)
Focus type Mark Operation
Autofocus
(no mark)
2.5m/8ft
Camera focuses automatically.
Macro
(See page 83.)
Close
Fixed focus at 8 feet. Use for close subjects.
Distant
Fixed focus at infinity. Use if subject is far.
Page 83

83
4
Taking Good Pictures
Taking Shots Close Up
(Macro Mode)
Use macro mode for shooting subjects close to the camera.This mode lets you move
in quite close, so that even a small subject will fill the frame.
When using macro, you should maintain a distance of 8 to 31 inches from the subject.
While it is possible to take macro shots from any distance, images taken at less than 8
inches or farther than 31 inches are likely to be out of focus or poorly exposed.
When subject is at minimum distance (8 inches)
For a telephoto shot, push the zoom lever to T.
The monitor is filled by a 3"×2" subject.
For a wide shot, push the zoom lever to W.
The monitor is filled by an 8"×6" subject.
1 Set the mode dial to RECORD ( ).
• The camera enters RECORD mode.
2 Press the FOCUS button once.
• The macro mark appears on the monitor.
• If you press the button twice, you set the
camera to quick focus mode.If you do this
by mistake, press the button again as
necessary to bring up the macro mark.
3 Take the shot.
To cancel macro mode...
You cancel the mode by pressing the FOCUS
button again (to switch to quick focus or
autofocus), or by turning the camera off.
Monitor
1
2
Macro mark
HELP
• Using flash together with macro may result in pronounced shadows.
• If you use flash when shooting very close to your subject (at about 8 inches), the right
side of the picture will come out relatively dark.This is a normal characteristic of this
camera’s flash mechanism.
Page 84

84
Using the Flash
Flash Modes
The C-211 ZOOM offers a choice of five flash modes.Select the mode that best
matches the conditions you are working under.When you first switch the camera on,
the camera automatically sets the mode to auto flash (or to red-eye reduction, if
previously selected).
To change the flash mode, press the FLASH button ( ). The monitor displays a mark
indicating the currently selected mode, as shown in the table.
Monitor
Flash mode button
Flash mode mark
Page 85

85
4
Taking Good Pictures
Flash Mode Mark Usage
Auto flash
(no mark)
Flash fires automatically if available light is low or if the
subject is darker than the background. (p.86)
Red-eye
reduction
Reduces “red eye”problem that may occur with other
flash modes. Flash fires automatically as necessary, just
as with auto flash mode. (p.86)
Off(override)
SLOW
SLOW
Flash does not fire, regardless of ambient light conditions.
(p.87)
Fill-in
Flash always fires, regardless of ambient light conditions.
(p.87)
Slow sync
Good for night scenery. (p.88)
Red-eye
reduction
+ slow sync
Good for shots of people at night. (p.88)
HELP
• The green lamp will blink rapidly if the flash is currently charging.Take your finger off
the shutter release button and wait for the blink rate to slow down (or for the lamp to
go off), indicating that the camera is ready to shoot.
• Use of flash together with the macro feature (p.83) may result in streaking or partial
loss of image. If using flash and macro together, please review the results on the
monitor.
• The flash does not operate when you are shooting movies (p.126), sequences
(p.119), or panoramas (p.131).
• The distance over which the flash is effective changes when you use the zoom
lever (p.52).
Page 86

86
Auto Flash
The flash fires automatically if ambient light is low or if the background is brighter than
the subject.
If your subject is significantly darker than the background (if there is a strong
backlight), hold the camera so that the subject is at the center, inside of the autofocus
target mark.
Red-Eye Reduction
Use of normal flash when shooting a portrait may make the subject’s eyes appear red in
the recorded image. Red-eye reduction mode helps correct this problem. As with auto
flash mode, operation is automatic: the flash will not fire if natural lighting is sufficient.
If you enable this feature and flash is required, the flash unit will fire 10 preliminary
flashes before taking the shot.These pre-flashes cause the subject’s pupils to contract,
so that less light is reflected from the retina—resulting in reduced red-eye.Note that
when you use this feature it takes about 1 second for the camera to shoot the picture,
so be sure to hold the camera steady until the shot is completed.
Red-eye reduction is usually effective but does not work equally well with
everybody. Reduction may also be ineffective if:
• The subject is not looking directly toward the flash unit.
• The subject does not look at the pre-flashes.
• The subject is far from the camera.
Monitor
Red-eye-reduction mark
Monitor
Autofocus target mark
Page 87

87
4
Taking Good Pictures
Flash Off (Flash Override)
This setting turns the flash off.The flash will not fire, regardless of the light conditions.
HELP
• If ambient light is low, the green lamp
may begin to blink rapidly when you halfpress the shutter button.This informs you
that the image may be blurred unless you
use a tripod.
Use this mode when you do not want the flash to fire under any circumstances.This
mode is useful when you are taking pictures in a museum (where flash is not allowed)
or when trying to get certain types of night shots.
Keep in mind that without the flash the camera may need to hold the shutter open for a
relatively long time in order to make the exposure. For this reason, it is recommended
that you use a tripod to keep the camera steady. Shots of moving subjects are likely to
appear blurred, since the shutter may not close fast enough to freeze the image.
Fill-In
Forces the flash to fire on every shot.
This mode forces the flash to fire on every shot, regardless of ambient light conditions.
This is useful when you need to add fill-in light.You might want to use it, for example,
when the overall scene is bright but your subject is in a localized area of shade (such
as under a tree), or when the background is brighter than the subject, or when
shooting indoors under fluorescent lighting. Note that this feature may be relatively
ineffective if you are working in an extremely bright environment.
Monitor
Flash-override
mark
Monitor
Fill-in flash mark
Using the Flash (continued)
Page 88

88
Slow Sync
This mode is useful when shooting night scenes.
When you use slow sync in a dark environment, the flash fires at the start of the
exposure, and the shutter then continues to remain open for an extended interval that
may last as long as 1/2 second. Since the shutter does not close fast enough to freeze
the image, you should use a tripod to hold the camera steady. Moving subjects will be
blurred.
Note that the flash will not fire if there is sufficient ambient light.
HELP
• If ambient light is low, the green lamp may begin to blink rapidly when you half-press
the shutter button.This informs you that the image may be blurred unless you use a
tripod.
Red-Eye Reduction + Slow Sync
This combination mode is useful when taking pictures of people at night.
HELP
• If ambient light is low, the green lamp may
begin to blink rapidly when you half-press the
shutter button.This informs you that the image
may be blurred unless you use a tripod.
This flash mode applies both red-eye reduction and slow sync (see explanations
above).Again, you should use a tripod, and keep in mind that moving subjects will be
blurred.
SLOW
SLOW
Monitor
Mark for “red-eye reduction
+ slow sync” mode
Monitor
Slow-sync mark
Using the Flash (continued)
Page 89

89
4
Taking Good Pictures
Adjusting the Exposure
(Exposure Compensation)
The camera sets the exposure automatically according to the brightness level
throughout the image area.This works fine if your subject is approximately as bright as
the surroundings. But if your subject is much lighter (or darker) than the surroundings,
the subject will come out looking too light (or too dark).
For this reason, the camera includes an exposure compensation feature. Positive
settings increase the exposure (so that the subject gets brighter). Negative settings
reduce the exposure (the subject gets darker).
1 Set the mode dial to RECORD ( ).
• The camera enters RECORD mode.
2 Use the or button to set the
compensation level.
+2.0: If subject is darker than
surroundings
+1.5
+1.0
+0.5
±0: No adjustment.
(Initial setting)
-0.5
-1.0
-1.5
-2.0: If subject is brighter
than surroundings
• The current setting appears on the monitor.
3 Take the shot.
The compensation setting always resets to ±0 when power is
switched on.
+
2.0
Monitor
2
1
Compensation setting
Page 90

HELP
• When you change the setting, the brightness of the view on the monitor will also
change. In some cases you may find that the monitor image becomes difficult to read.
After taking the image, you may want to replay it and check the results.
• Compensation may not always produce the expected results when used with flash.
NOTE
• Exposure compensation cannot fully correct for conditions where surroundings are
extremely brighter or darker than the subject.
90
Adjusting the Exposure (continued)
Page 91

91
4
Taking Good Pictures
Digital Telephoto Zoom
(Enhanced Zoom)
You can use the digital telephoto feature to double the size of the image. Combining
this with optical zoom (p.52) gives you a maximum zoom of 6X. Note that use of digital
telephoto may sometimes reduce the quality of the image.
1 Set the mode dial to RECORD ( ).
• The camera enters RECORD mode.
2 Press the DIGITAL TELEPHOTO button
().
• The view on the monitor doubles in size, and
the digital telephoto mark appears.
3 Take the shot.
• For best results, use a tripod to keep the
camera steady.
To cancel digital telephoto...
Press the DIGITAL TELEPHOTO button a
second time to cancel digital telephoto.Note that
this does not affect the current optical zoom
setting.
2.0x
Monitor
1
2
Digital telephoto
mark
NOTE
• Digital telephoto is disabled if the recording mode is set to SHQ-TIFF (p.121).
Page 92

92
Page 93

5
Special Features for
Polaroid Printing
The C-211 ZOOM offers a variety of special
features that you can use when printing to
Polaroid film.You can print multiple copies, set
up a caption (date, time, or filename), create
split prints, and print frames from movies.You
control these features using the camera’s
PRINT menu.
Page 94

94
Chapter 5 Special Features for Polaroid Printing
The Print Menu
Use the Print menu to set up for printing to instant film.You can select whether to
include a date, time, or filename on the print, and you can set the number of copies to
be printed.You can also use this menu to make a “split” print, and to pr int a frame or
index from a movie.The following table summarizes the settings and operations
available from this menu.
Feature Use to...
See
page...
Caption ( )
Include the date, time, or filename on Polaroid prints. 96
100
102
105
107
Quantity ( )
Set the number of copies to be printed.
Print from movie ( )
Print the displayed movie index.*INDEX PRINT
Print one selected frame from a movie.
Split ( )
Print four or nine selected images on a single Polaroid
print.
1-FRAME PRINT
Factory
setting
OFF
—
—
—
—
* If you wish to store a movie index back onto the card as a still, use the Playback
menu’s Index Create function (p.148).
CAUTION
• Settings will return to their factory values if the batteries go dead or are left out of the
camera (with no AC adapter connected).
Page 95

95
Using the Print menu
This section explains the general procedure for using the Print menu.For details about
the available settings, refer to the explanations provided later in this chapter.
1 Set the mode dial to PRINT ( ).
• The camera enters PRINT mode.
2 Press the MENU button ( ).
• The monitor displays the Print menu.
3 Use or to move the menu pointer to
the appropriate line on the menu.
(In the example in diagram “3” at left, the
“caption” [ ] line has been selected.)
• The selected line is highlighted in green.
4 Press .
• The monitor displays the available settings.
5 Use or to move the pointer to the
desired setting.
(In the example in diagram “5” at left, the
“TIME” caption has been selected. )
• The selected setting is highlighted in green.
6 Press the OK button or the PRINT button
().
• The camera advances to the corresponding
submenu. For information, see the
explanations on the following pages.
To close the Print menu...
Press the MENU button instead of the OK button.
5
Special Features for Polaroid Printing
[
OFF
]
CHANGE
END
OFF
DATE
FILENAME
BACK
TIME
NEXT
2
6
3 4 5
1
3
5
Page 96

96
Including the Date, Time, or Filename
on the Print
This feature lets you select whether to include a date, time, or filename caption directly
on your Polaroid prints. You can use this feature in two different ways.
•You can set the caption for one print only.In this case, the setting applies only to the
next printout of the currently displayed image, and you are also free to set the caption
location.
•You can change the default setting. The new setting will apply by default to all
subsequent prints.
For details about how to use the Print menu, see “Using the Print
menu” on page 95.
OFF:
• Do not include any caption.
DATE:
• Print the date on which the picture was taken.
TIME:
• Print the time at which the picture was taken.
FILENAME:
• Print the image’s filename (the name of the file
on the card).
[
OFF
]
CHANGE
END
Select from menu...
Select to go to the
caption selection screen.
OFF
DATE
FILENAME
TIME
BACK
NEXT
Make the setting...
Page 97

97
5
Special Features for Polaroid Printing
Changing the Caption Type or Position for One Print Only
If you wish to change the caption setting for the next print only, or if you want to print
the caption at a position other than lower right, proceed as follows.
1 Set the mode dial to PRINT ( ).
2 Display the image you wish to print on the
monitor.
3 Open the Print menu and select .
• The caption selection screen appears.
4 Use or to move the pointer to the
desired caption type, and then press the
PRINT button ( ).
• The monitor displays the caption positioning
screen.
5 Use the or button to select the
position for the caption.
• The characters at the selected position are
highlighted in green.
6 Press the PRINT button.
• The camera prints the image, and the Print
menu closes.
3
4 6
1
2–5
OFF
DATE
FILENAME
TIME
BACK
NEXT
Caption selection screen
3
PRINT
CANCEL
[ ]
123
123
123
123
Caption positioning screen
4
Page 98

To cancel the printing...
You can cancel at Step 5 above by pressing (to select CANCEL) and then pressing
the OK button.This will return you to the preceding screen.
98
CAUTION
• Refer to “Printing Stills on Instant Film” (p.55) for precautions you need to keep in
mind when printing to instant film.
Page 99

99
5
Special Features for Polaroid Printing
Changing the Default Caption Type
Use the following procedure to select the default caption type.The caption type you set
here will be used by default for subsequent prints—although you are free to make onetime changes as described on page 97.This default setting is stored in the camera’s
nonvolatile memory and is not lost at power-off.
1 Open the Print menu, select , and then
select the desired caption type.
2 Press the OK button.
• The previous menu screen reappears, and
the new setting is shown in the brackets.
3 Press the OK button again.
• The camera registers the setting, and the
menu disappears.
To cancel the printout...
You can cancel at Step 2 by pressing the MENU
button ( ) rather than the OK button. This will
return you to the preceding screen.
2 3
1
Including the Date, Time, or Filename on the Print (continued)
OFF
DATE
FILENAME
BACK
TIME
NEXT
Caption selection screen
1
[
TIME
]
CHANGE
END
Print menu
2
Page 100

100
Printing Multiple Copies
Use this feature if you want to print out more than one copy of a selected image.
Before opening the Print menu, display the image you wish to print on the monitor.
For details about how to use the Print menu, see “Using the Print
menu” on page 95.
Set the number of copies that you wish to print.
[
OFF
]
END
ENTER
Select from menu...
Select to go to the
quantity setting screen.
BACK PRINT
2
Select the operation...
 Loading...