

Page 1

Cash Register
ECR 3550 T ECR 3550 T
ECR 3550 T euro
ECR 3550 T ECR 3550 T
CLERK GUIDE
GUIDE VENDEUR
KASSIERERANLEITUNG
GUÍA PARA EL EMPLEADO
HANDLEIDING BEDIENDE
GUIA DO EMPREGADO
ENGLISH
FRANÇAISDEUTSCH
ESPAÑOL
NEDERLANDS
PORTUGUÊS
Page 2

PUBLICATION ISSUED BY:
Olivetti Tecnost, S.p.A.
77, Via Jervis - 10015 Ivrea (Italy)
Copyright
©
2002, Olivetti
All rights reserved
Page 3

PREFACE
This Clerk Guide explains how to use the numerous features that the cash register has to offer. This electronic
cash register is designed to help your business function smoothly by providing efficient register operations. Here
are just a few of the cash register’s many valuable features:
• 40 departments and 1000 Price Look-Ups (PLU);
• 9 major department group categories and 99 major PLU group categories;
• PLU-to-PLU linking so that PLUs can automatically register other PLUs when activated;
• possibility of connection to a Personal Computer;
• possibility of connection to a barcode reader;
• keypad programming so that the cash register's standard key functions can be personalized according to the
specific needs;
• with the cash register keypad programmed accordingly, possibility of using Take-out, House, Price Inquiry
and Tray subtotal functions;
• 26 clerk numbers with the possibility of assigning a three-digit security code to individual clerk transactions
to prevent unauthorized access;
• 2-station thermal printer that prints information on 2 separate rolls of paper, providing customer receipts and
a transaction journal;
• 7-line customer sales receipt header personalization plus a 5-line customer sales receipt advertisement string
personalization;
ENGLISH
• cash, check, charge and credit tender media keys;
• possibility of using up to 4 different currency exchange rates;
• swivel pole rear customer 10-character numeric display for transaction viewing;
• front operator alphanumeric display consisting of a 10-character message line on top and a 10-character
transaction line on the bottom;
• automatic tax computations for up to 8 different programmable VAT and Add-on tax rates;
• department-linked entry options that streamline and speed-up operation;
• time and date display, printing on customer receipts and journal records;
• customer receipt and journal record printing in any one of six languages (English, French, German, Spanish,
Dutch and Portuguese);
• possibility of issuing copies of a transaction receipt.
GB-I
Page 4

TABLE OF CONTENTS
GETTING ACQUAINTED WITH YOUR CASH REGISTER ...................................... 1
STANDARD ACCESSORIES ............................................................................................................................. 1
USING THIS MANUAL ....................................................................................................................................... 2
MAINTAINING THE CASH REGISTER .............................................................................................................. 2
THE KEYPAD ............................................................................................................. 3
KEYPAD FUNCTIONS ....................................................................................................................................... 3
OPTIONAL FUNCTIONS THAT CAN BE ASSIGNED TO KEYPAD KEYS ......................................................... 5
THE CONTROL SYSTEM .......................................................................................... 6
THE CONTROL LOCK ....................................................................................................................................... 6
CASH DRAWER WITH REMOVABLE CASH BIN .............................................................................................. 6
OPERATOR AND CUSTOMER DISPLAYS ........................................................................................................ 7
DATE AND TIME DISPLAY ................................................................................................................................. 7
SPECIAL SYMBOL INDICATORS ...................................................................................................................... 7
ERROR CONDITIONS ............................................................................................... 7
ERROR MESSAGES AND CODES ................................................................................................................... 7
THE ERROR ALARM ......................................................................................................................................... 8
CLEARING AN ERROR ..................................................................................................................................... 8
GENERAL CLEARANCE ................................................................................................................................... 8
VOIDING ERRORS ............................................................................................................................................ 9
MEMORY BACK-UP BATTERY SYSTEM ................................................................ 9
PRINTER COMPARTMENT ....................................................................................... 9
PAPER TAPE ..................................................................................................................................................... 9
LOADING THE CUSTOMER RECEIPT ROLL ................................................................................................. 10
LOADING THE JOURNAL ROLL ..................................................................................................................... 11
TRANSACTION EXAMPLES .................................................................................. 13
ENTERING THE REGISTER MODE ................................................................................................................ 13
EXITING THE REGISTER MODE.................................................................................................................... 13
CLEARING ERRORS ....................................................................................................................................... 13
SAMPLE RECEIPT .......................................................................................................................................... 13
REPRINTING A SALES RECEIPT ................................................................................................................... 14
STANDARD TRANSACTIONS .......................................................................................................................... 14
MINUS (-) KEY TRANSACTIONS .................................................................................................................... 19
PLUS (+) KEY TRANSACTIONS ..................................................................................................................... 20
PERCENT DISCOUNT (-%) TRANSACTIONS ................................................................................................ 21
PERCENT PLUS (+%) TRANSACTIONS ........................................................................................................ 24
PLU CODES ..................................................................................................................................................... 26
VOIDS AND REFUNDS ................................................................................................................................... 29
OTHER TRANSACTIONS ................................................................................................................................ 31
TRANSACTIONS USING THE OPTIONAL KEYS ASSIGNED ........................................................................ 34
TRANSACTIONS USING A FOREIGN CURRENCY ............................................................................. 34
CASH REGISTER SPECIFICATIONS AND SAFETY ...................................................................................... 41
GB-II
Page 5
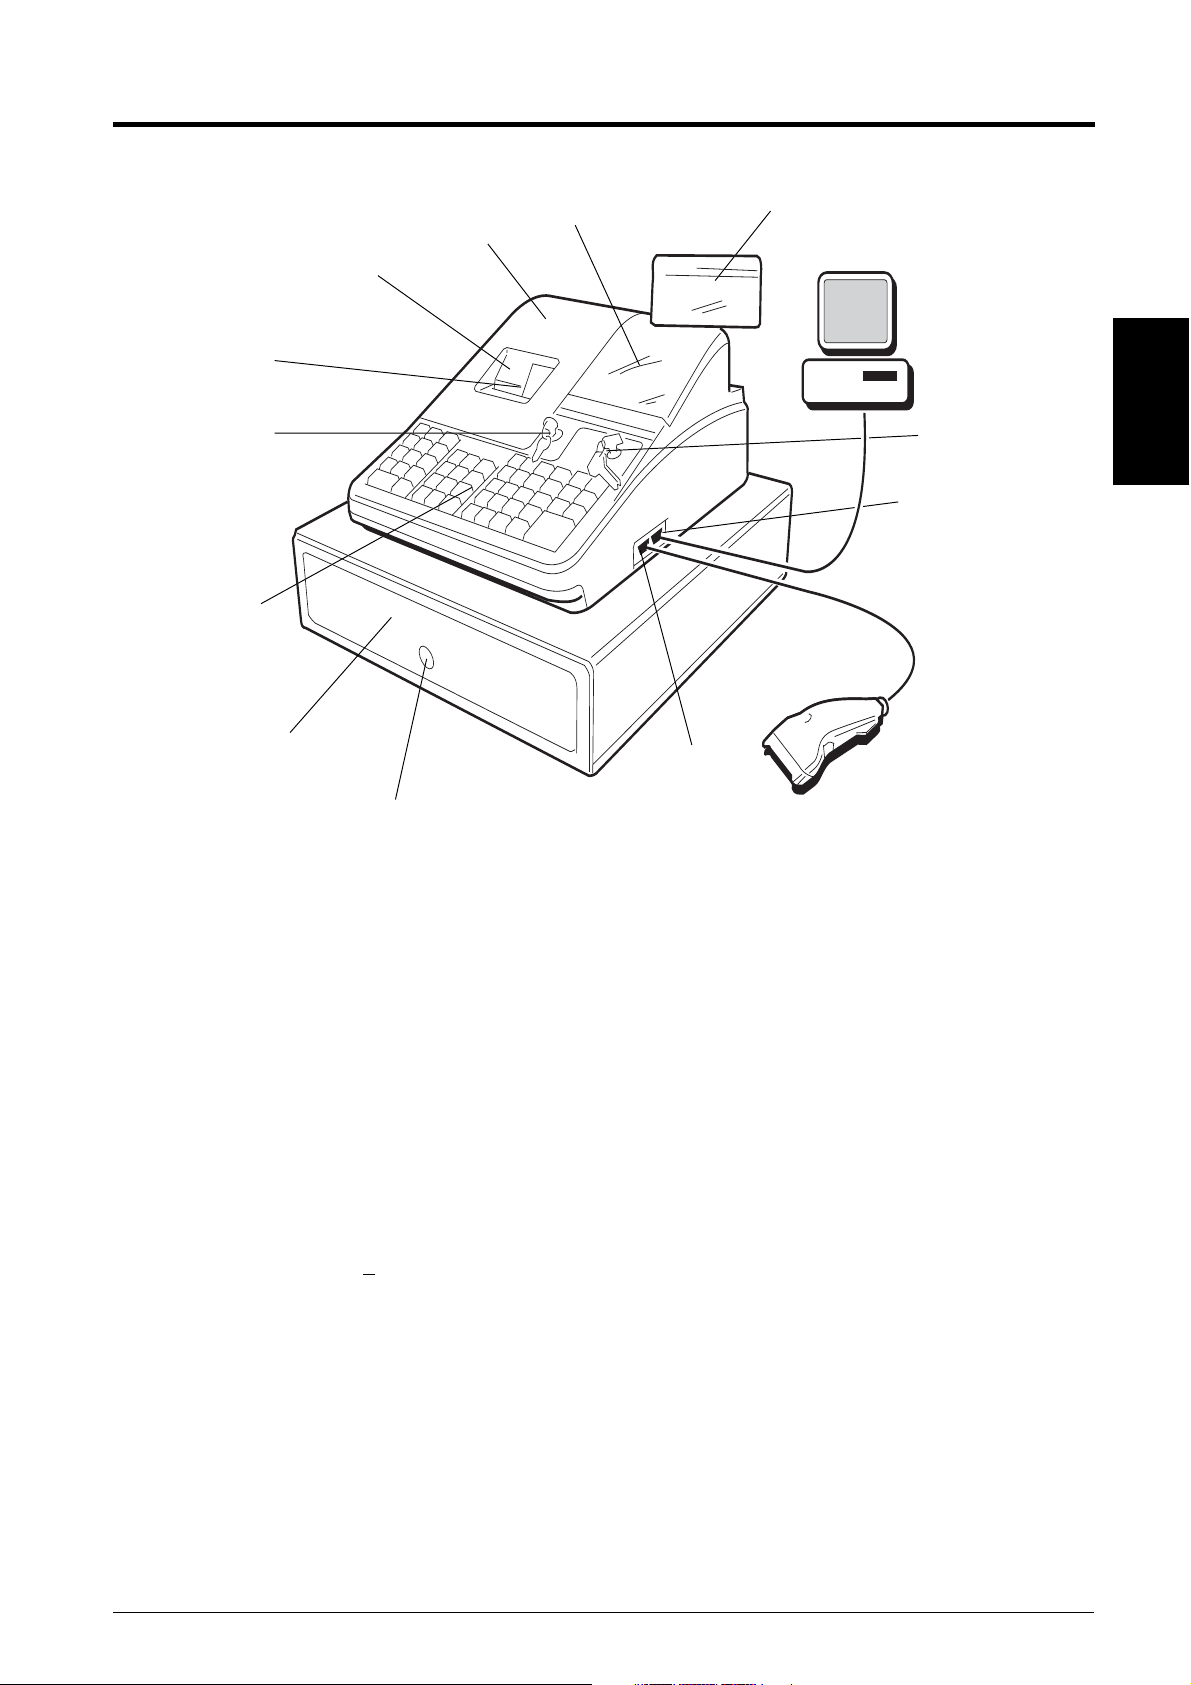
GETTING ACQUAINTED WITH YOUR CASH REGISTER
The figure below shows an overall view of your cash register.
11
10
9
8
7
6
12
4
1
4
2
3
ENGLISH
5
1. Customer Display 8. Printer Compartment Lock
2. Operations Control Lock 9. Journal Roll Display Window
3. Serial interface for connection to a PC 10. Customer Receipt Output Slot
4. Serial interface for connection to a 11. Printer Compartment Cover
barcode reader 12. Operator Display
5. Cash Drawer Lock
6. Cash Drawer
7. Keypad
STANDARD ACCESSORIES
Your cash register comes with the following items:
• One 2-piece black plastic journal winder spindle
• Two rolls of standard 37.5 + 0.5 mm thermal paper, one for customer receipts and the other for journal record
• This Clerk Guide, the System Configuration Guide and the Software Guide
• A set of Program keys (PRG) for accessing the machine programming functions
• A set of Register keys (REG) for accessing the machine cash register functions
• A set of Z keys for accessing the X and Z functions
• A set of keys for locking the cash drawer and printer compartment cover
• A serial interface cable for the connection of the cash register to a Personal Computer.
• Cash register configuration software to be installed on the Personal Computer.
GB-1
Page 6

USING THIS MANUAL
Your cash register Clerk Guide is organized for easy reference. The front portion gives an overall view of the
cash register and provides information on all the features and functions available. Next you will find transaction
examples showing you how to operate the cash register. Transaction examples provide steps for key operations
and include sample receipts. At the back of the manual you will find your cash register's technical specifications
and some safety information. Use the Table of Contents to locate a particular item.
Getting Started
Before you begin to use the cash register, read the sections entitled Keypad Functions, The Control System and
Operator and Customer Displays to become familiar with their operations.
Once the desired program options have been set by your Supervisor, insert the REG control key into the control
lock, turn it to the REG 1 or REG 2 position and you are ready to perform sales transactions. In the REG 2 position
the cash register will not print the customer receipt unless the [ST] key is pressed at the end of the transaction.
MAINTAINING THE CASH REGISTER
Provided below is information on how to maintain your cash register.
NOTE: Before cleaning the cash register, make sure it is powered off and/or unplugged from the wall outlet.
Machine programming data and transaction information for management reports are stored in the cash
register. A back-up battery inside the cash register saves this information when the cash register is
unplugged from the power outlet or the event of a power failure.
1. Keep all liquids away from the cash register so as to avoid spills which could damage the electronic
components.
2. To clean the cash register firstly turn it off and/or unplug it from the wall outlet, then use just a damp cloth.
Do not use corrosive substances such as solvents, alcohol, petrol, or abrasive components.
3. If the cash register is stored in extreme hot or cold temperatures (below 32 degrees or above 104 degrees
Fahrenheit), allow the temperature inside the cash register to reach room temperature before turning it on.
4. DO NOT attempt to pull the paper tape when the cash register is printing or when you are loading paper. Always
use the [R Feed] or [J Feed] key to feed paper. Pulling the paper tape could damage the print mechanism.
GB-2
Page 7

THE KEYPAD
Your cash register is equipped with a 53-key keypad by means of which you can perform all cash register
functions.
The figure below shows the keypad layout.
4
8
9
10
11
12
13
24
23
22
21
20
19
1
18
17
2
3 5 6 7
15
14
16
KEYPAD FUNCTIONS
1. [R Feed] (Receipt Paper Feed) - Advances the receipt paper one line feed; advances the paper continuously
when held down.
ENGLISH
2. [J Feed] (Journal Record Feed) - Advances the journal paper one line feed; advances the paper continuously
when held down.
3. [Dept Shift] (Department Shift) - Allows price entries to departments 21-40. Press this key before entering
applicable department keys 21-40.
4. [0 - 9/00] - Input amounts, indicate how many times a particular item repeats, determine percentage rates or
amounts to add or subtract. Used to enter Clerk identification numbers. The double zero key allows the
quick entry of numbers with two or more zeros.
5. [1-40] (Departments 1 through 40) - Register price entries to departments 1 to 40. To register a price entry
to departments 21 to 40, press the [Dept Shift] key followed by the related department number key.
6. [#/NS] - (NS: No Sale) - Opens the cash drawer without registering any amount such as when changing
cash for a non-sales transaction. Used to register a transaction number to a transaction or to the sale of
individual items.
7. [Price 2] - Registers an alternate price which has been programmed for the same product or department.
8. [Check] - Totals sales paid by check.
GB-3
Page 8

9. [Charge] - Totals sales that are charged.
10. [ST] - Displays and prints on the customer receipt and transaction journal, the subtotal of a sale. It calculates
a subtotal of a transaction consisting of a number of items to be individually discounted or increased by a
determined amount or percentage, and prints this on the customer receipt and transaction journal. Also used to
print a duplicate copy of the sales receipt just issued (the copy is not recorded on the transaction journal).
11. [Credit] - Totals sales that are put on credit, such as a debit card, or on a credit card which is alternative to the
one used for Charge tenders.
12. [Amt Tend/Total] (Amount Tendered/TOTAL) - Totals exact cash transactions and computes change.
13. [.] (Decimal Point) - Used to enter fractional quantities of items being sold. The decimal point is not to be
used when entering a price.
14. [Qty/Time] (Dual function: Multiply and date/time display) - Multiplies [department], [PLU] key entries; also
toggles between the display of the current date and time in the REG mode. Pressing this key during a transaction
displays alphanumeric captions that are longer than the 10-character display capabilities. For example, if the
caption is 18 characters long, the whole caption can be displayed in two steps.
15. [Void/EC] (Dual function: Void and Error Correct) - Deletes the last item entered and corrects a particular entry
after it is processed and printed.
16. [Clerk] - Confirms an entered clerk number.
17. [Return] - Issues refunds or registers the price of returned merchandise.
18. [Clear] - Clears an entry made from the numeric keypad or with the [Qty/Time] key before finalizing
a transaction with a Department or function key. This key is also used to clear error conditions.
19. [PLU] (Price Look Up) - Registers a preset price of an individual item to the appropriate department.
20. [PLU Price] - Temporarily overwrites a price that was assigned to a PLU number.
21. [-] - Subtracts an amount from an item.
22. [+] - Adds an amount to an item.
23. [+%/PO] (Dual function: Percent Plus and Paid Out) - When used as the +% key, adds a percentage to an
item or to the sales total. When used as the PO key, registers any money paid out.
24. [-%/RA] (Dual function: Percent Discount and Received On Account) - When used as the -% key, subtracts
a percentage from an item or from the sales total. When used as the RA key, registers any payment made
to the cash drawer.
GB-4
Page 9

OPTIONAL FUNCTIONS THAT CAN BE ASSIGNED TO KEYPAD KEYS
The cash register offers standard functions that can be invoked by pressing the related key on the cash
register's keypad (refer to the section The Keypad), but the keys that you may not use as frequently as others
can be reprogrammed to invoke other functions that the cash register has to offer. Listed below are the optional
key functions that can be assigned to specific keypad keys.
1. [Non tax] - Used when no tax is to be registered for a department or PLU which is programmed for tax.
2. [Tax1] - Tax change operations; overrides a preset tax rate with the rate defined for Tax 1.
3. [Tax 2] - Tax change operations, overrides a preset tax rate with the rate defined for Tax 2.
4. [000] - Triple zero entry function to quicken the entry of large amounts.
5. [Currency] - Currency conversion key. When the exchange rate of a foreign currency is programmed,
pressing this key after registering the price of an item displays the item price in the programmed foreign
currency. The currency alphanumeric descriptor, if programmed, is displayed on the upper row of the
operator display. Pressing this key a second time returns the display to the local currency.
6. [Price Inq.] - PLU price enquiry functions. Pressing this key before a PLU entry displays the programmed
price of the specific PLU.
7. [Take out] - Registers an alternate tax rate which is applied to restaurant items that are taken out and that
may be subject to a different tax rate with respect to the same item consumed in the restaurant.
8. [House] - Registers a priced item which is offered to the customer free of charge, in other words "on-thehouse".
9. [Tray Subtotal] - In cases when the customer forgets an article, instead of canceling or ending the sales
transaction underway so that the customer can go and collect the forgotten article, the clerk can store the entire
transaction in a "tray" where it can then be recalled successively. The tray subtotal is stored in the cash
register's memory. When the transaction is stored in the tray, the sales transaction of another customer can
be initiated and terminated. Recall the tray subtotal, add items and then end the interrupted sale.
ENGLISH
GB-5
Page 10

THE CONTROL SYSTEM
THE CONTROL LOCK
The control lock is located on the upper right-hand side of the keypad. The REG key must be properly inserted in the
Control Lock in order for you to be able to operate the cash register. The following figure shows the Control Lock and
the different modes that can be used.
Depending on the desired operation, inserting the related key in the Control Lock grants access to the following
positions:
OFF The cash register is turned off and cannot be used.
PRG Used to program the cash register.
REG 1 The cash register can perform the standard sales transactions that are recorded on both the customer
receipt and journal roll. In this mode the preset or programmed header is printed on the customer receipt.
This is also called the Receipt Mode.
REG 2 Same as the REG 1 mode with the only exception that the transaction record is only printed on the
journal roll. The customer receipt is not printed nor issued unless when a receipt reprint is requested by
pressing the [ST] key (copy not recorded on the transaction journal). This is also called the Journal
Mode.
X Prints the X management reports and periodical financial reports.
Z Prints the Z management reports and periodical financial reports, but resets totals (except the grand
total) to zero.
Control Keys
The following sets of keys are provided as well as a set of keys to open the cash drawer and printer compartment:
REG The REGISTER key can be used in the OFF, REG 1, REG 2 and X modes, granting both Clerk and
Supervisor access to cash register functions (as long as the Clerk's specific 3-digit secret code is
entered, if defined).
PRG The PROGRAM key works in all modes (PRG, OFF, REG 1, REG 2, X and Z) and is usually used to
program the cash register and print X and Z management reports.
Z The Z key can be used in the OFF, REG 1, REG 2, X and Z modes granting a higher level access with
respect to the REG key.
CASH DRAWER WITH REMOVABLE CASH BIN
The cash drawer features a cash bin with slots for banknotes and slots for coins. Pressing the [#/NS] key with the
control key in the REG 1 or REG 2 position opens the drawer. If a clerk number and secret code have been set,
pressing this key will open the cash drawer only after the clerk number and code have been specified. This drawer
can be locked for security to prevent accidental opening when moving the cash register by using the printer
compartment key.
A hidden emergency lever underneath the cash register lets you to open the cash drawer even when the machine
is powered off (as long as the cash drawer was not locked with the key).
If desired, the cash bin inside the cash drawer can be completely removed from the cash register. To do so, gently
lift the bin and pull it out.
GB-6
Page 11

OPERATOR AND CUSTOMER DISPLAYS
Your cash register offers two displays that provide easy viewing for both the customer and operator during a
sales transaction. The customer display shows entry amounts and related transaction information through the
use of numbers and special symbols. The operator display shows specific operator messages on the upper 10character line and the same transaction data as shown on the customer display on the lower 10-character line.
Both displays are read from left to right.
DATE AND TIME DISPLAY
Simply pressing the [Qty/Time] key with the cash register in the REG 1 or REG 2 mode toggles between
displaying the current date and time.
SPECIAL SYMBOL INDICATORS
Special symbols appear at the far left-hand side of the displays during cash register operation. These symbols
identify machine conditions and include:
C (Change) Indicates that the displayed amount is the change due to the customer.
S (Subtotal) Indicates that the amount shown is the subtotal of a transaction, including sales tax if applicable.
= (Total) Indicates that the amount shown is the transaction total and that the transaction payment was
finalized by cash, check, charge or credit.
- (Minus) Displays a negative entry. Also displayed if subtotal or cash tendered total is a negative number due
to a return or refund.
Depending on the currency base set, displayed when the reassigned [Currency] key is pressed
to indicate that the amount is displayed in the foreign currency programmed.
ENGLISH
These symbols clear automatically when you start the next entry or press the [Clear] key.
ERROR CONDITIONS
ERROR MESSAGES AND CODES
Error messages and codes appear when an incorrect entry is made or when the cash register is in a state that could
cause an error condition or is, in fact, in an error condition. Error messages are displayed on the upper row of the
operator display while error codes are displayed on the lower row of the operator display and on the customer
display. They include:
ERROR MESSAGE ERROR CODE DESCRIPTION
OPTION RAM E04 Error in the optional RAM.
PRINTER E05 Printer error.
FUNCTION E11 An error is made during operation or when
programming the cash register.
CLERK E12 The Clerk identification sequence is required.
CTRL LOCK E13 The control lock is set to a wrong position.
REPORT REQ E16 A report issue is requested.
GB-7
Page 12

ERROR MESSAGE ERROR CODE DESCRIPTION
PR PAPER 2 E22 Out of customer receipt paper; insert paper.
PR HEAD UP E23 Printhead at customer receipt station up; press the
printhead release lever down.
J PAPER 2 E25 Out of journal paper; insert paper.
J HEAD UP E26 Printhead at journal station up; press the printhead
release lever down.
Press the [Clear] key to clear an error condition.
THE ERROR ALARM
The error alarm warns of an operator error (usually when a wrong key is pressed for a specific type of entry) or of an
error made during cash register programming. The error alarm can also indicate that the Control Lock is in the wrong
position for the current operation. In case of error, the error tone sounds, a specific error code is displayed on the
customer display and on the right-hand side of the lower row of the operator display, the related error message is
displayed on the upper row of the operator display and the keypad locks.
CLEARING AN ERROR
Press the [Clear] key to clear an error. The tone ends, the displays clear and the keypad unlocks, allowing you to
continue with the transaction or restart the program.
If an error condition cannot be cleared, perform a general clearance.
NOTE: The [Clear] key also clears an incorrect entry from the display prior to pressing a registration key. Once an
entry is printed, the [Void/EC] key must be used to correct an error.
GENERAL CLEARANCE
If the cash register does not function, for example when the error signal cannot be stopped by pressing the [Clear]
key, perform a general clearance. There are two ways of performing a general clearance:
1. Turn the Control Key to the OFF position.
2. Unplug the cash register from the power socket.
3. Wait ten seconds and then reconnect the cash register to the power socket to continue.
If the cash register remains in an error condition, proceed with the second general clearance method:
1. Turn the Control Key to the OFF position.
2. With the cash register still plugged to the power outlet open the printer compartment cover and press the Reset
button on the rear left-hand side of this compartment. The Reset button is indicted in the following figure.
GB-8
Page 13

VOIDING ERRORS
Once an entry is printed, the [Clear] key cannot be used to clear an error. Press the [Void/EC] key to correct
an error already registered.
Voiding the Entry Just Completed
Simply press the [Void/EC] key. The entry is reprinted with a "-" symbol followed by the amount and erased
from the transaction.
Voiding an Earlier Entry
To void an earlier entry, register it again and then cancel it using the [Void/EC] key. When a transaction
including the error is completed, proceed with the following steps to void the error.
1. Retype the incorrect information, exactly as originally entered, and press the [Void/EC] key.
2. Enter the correct amount.
3. Total the transaction by pressing the [Amt Tend/Total] key.
MEMORY BACK-UP BATTERY SYSTEM
ENGLISH
During cash register operations, all transaction data for the management reports are stored in the cash register's
memory. This memory also holds all of the cash register's programming data. The memory back-up battery inside
the cash register keeps this information stored in memory when the cash register is unplugged from the power
outlet or when a power failure occurs.
To activate the memory back-up battery system, charge the backup battery by keeping the cash register plugged
into a grounded power outlet for at least 48 hours. The cash register can be used normally during this period of time.
PRINTER COMPARTMENT
The printer compartment is on the upper left-hand side of the cash register. It houses the customer receipt and
journal paper rolls, 2-piece journal winder spindle, thermal printer and the Reset button.
PAPER TAPE
This cash register uses two rolls of standard 37.5 + 0.5 mm paper. One roll is used for the customer receipt
while the other roll is used for the journal record. The cash register signals a receipt or journal out of paper
condition. The paper needs to be changed when a red line appears on the tape.
GB-9
Page 14

LOADING THE CUSTOMER RECEIPT ROLL
Proceed as follows to load a customer receipt roll into the cash register:
1. Make sure that the cash register is plugged into a grounded power outlet and that the Control Key in either
one of the two REG positions.
2. Unlock the printer compartment cover and remove it from the cash register by firmly gripping the back of
the cover and gently lifting the front upward to release its snap features from the case.
3. With a pair of scissors, cut the end of the new paper tape to create a straight, even edge so that the paper
can be properly fed through the print mechanism.
4. Set the customer receipt roll in its predefined slot at the rear left-hand side of the printer compartment so
that the paper feeds out from the bottom of the roll. Then insert the end of the paper into the related paper
feed slot as shown in the following figure.
A
5. Press the [R Feed] key and manually feed the paper into the slot until its catches and advances approximately
six to ten inches above the print mechanism.
NOTE: If the paper does not feed properly, make sure that the paper roll is properly aligned in the slot and that the
end of the paper roll is cut straight. If you need to remove the paper tape so that you can attempt to reload
it again, move the plastic release lever (A) on the right-hand side of the print assy forward and clear the
paper from the slot. Set the lever back to its original position when you are done.
6. Pass the end of the customer receipt through the opening on the compartment cover, then reposition, close and
lock the compartment cover.
GB-10
Page 15

LOADING THE JOURNAL ROLL
Proceed as follows to load a journal roll into the cash register:
1. Make sure that the cash register is plugged into a grounded power outlet and that the Control Key is in either
one of the two REG positions.
2. Unlock and remove the printer compartment cover as explained in Loading the Customer Receipt Roll.
3. If you are replacing the journal roll, lift the 2-piece plastic journal winder spindle from its two supports on the
machine and, if necessary, move the plastic paper release lever (A) located to the right-hand side of the journal
paper insertion slot forward to release the paper which may still be present in the print mechanism. Then slide
the journal paper off the plastic winder.
4. With a pair of scissors, cut the end of the new paper tape to create a straight, even edge so that the paper can
be properly fed through the print mechanism.
5. Set the journal roll in its predefined slot at the rear right-hand side of the printer compartment so that the paper
feeds out from the bottom of the roll. Then insert the end of the paper into the related paper feed slot as shown
in the following figure.
A
6. Press the [J Feed] key and manually feed the paper into the slot until its catches and advances approximately
six to ten inches above the print mechanism.
NOTE: If the paper does not feed properly, make sure that the paper roll is properly aligned in the slot and that the
end of the paper roll is cut straight. If you need to remove the paper tape so that you can attempt to reload
it again, move the plastic release lever (A) on the right-hand side of the print assy forward, and clear the
paper from the slot.
ENGLISH
7. Holding the main body of the 2-piece plastic journal winder with the two wheels to the right-hand side, slide the
end of the paper tape through one of the slots on the plastic journal winder spindle (1) and manually roll the
winder toward the rear of the cash register (2) to take up the slack in the paper tape.
1
2
GB-11
Page 16
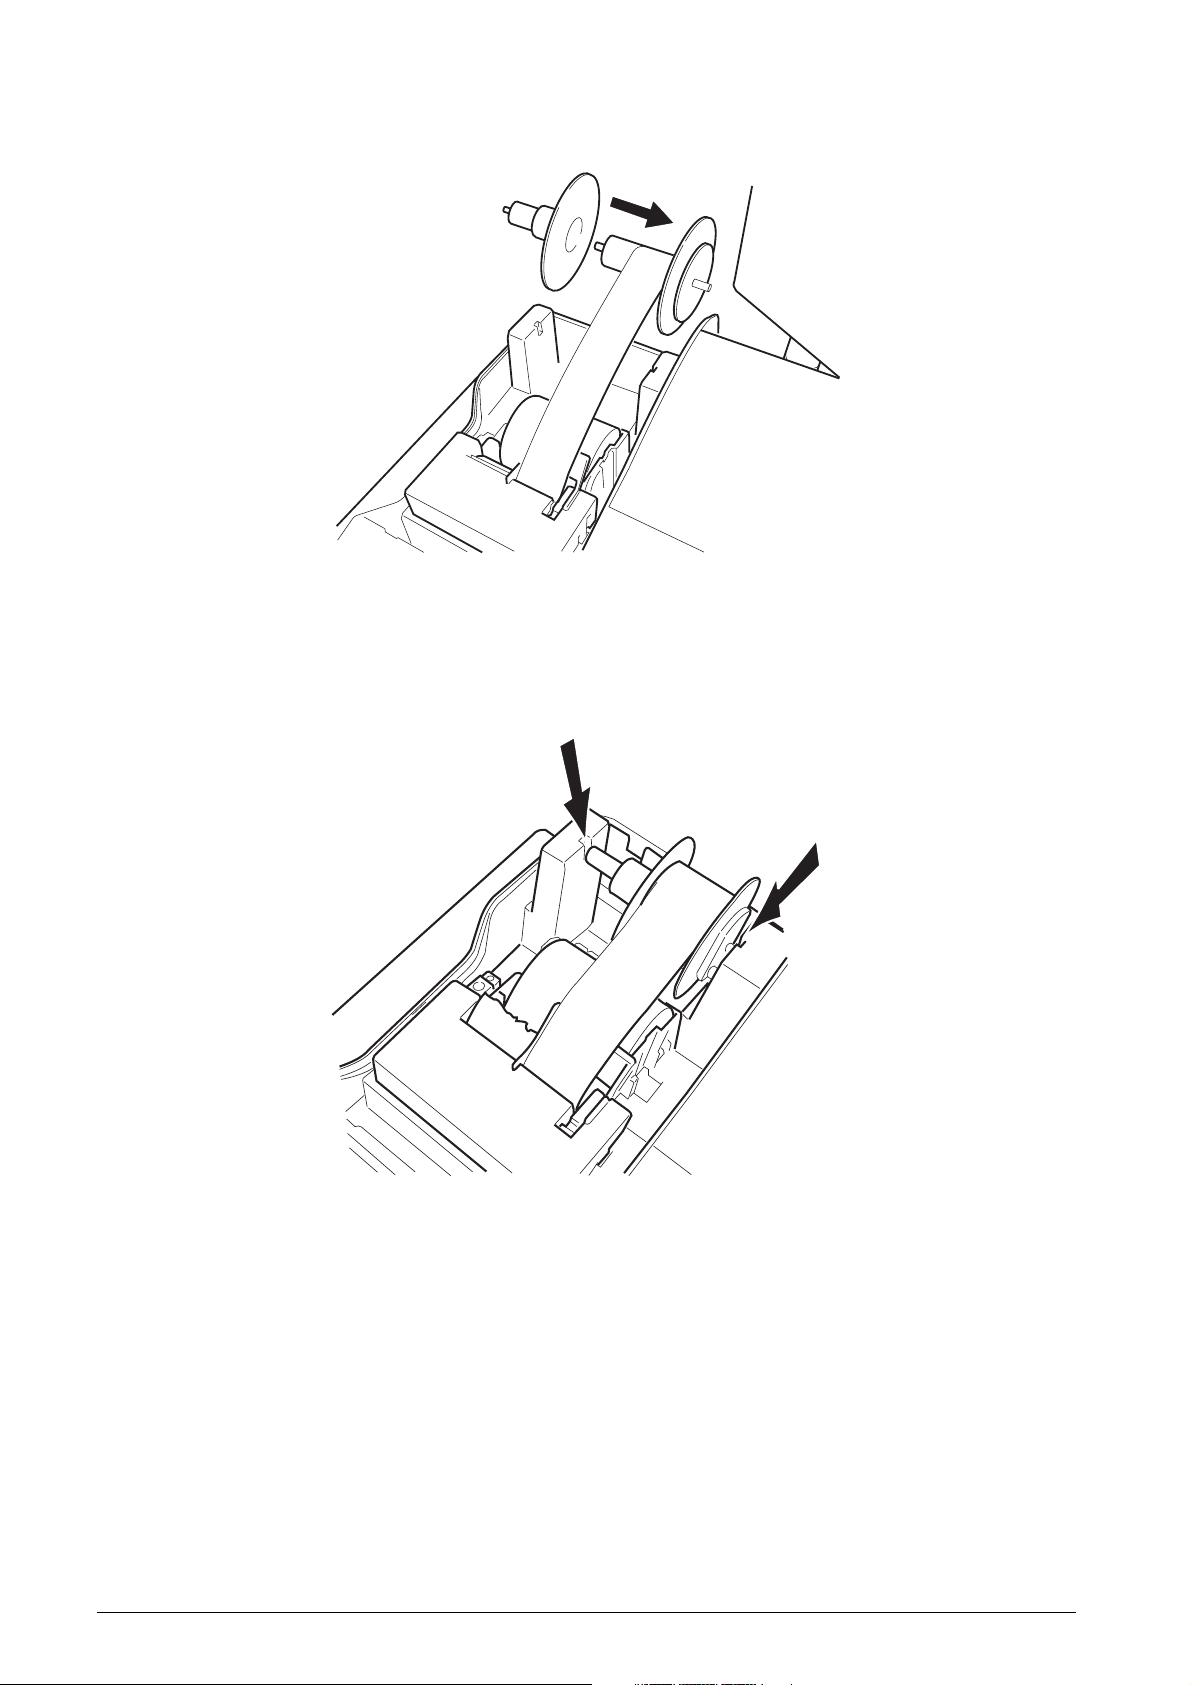
8. Attach the second part (3) of the 2-piece plastic journal winder spindle to the first as shown in the following
figure.
3
9. Place the 2-piece journal winder back onto its two support brackets indicated by the arrows in the following
figure.
10. Reposition, close and lock the compartment cover.
GB-12
Page 17

TRANSACTION EXAMPLES
This section provides examples on how to complete different types of transactions. Sample receipts are included
which reflect some of the programming examples used in the System Configuration Guide.
ENTERING THE REGISTER MODE
The cash register has two register modes which can be used to record ordinary sales transactions. These two
modes are called REG 1 and REG 2, where the only difference between the two is that in the REG 1 mode the
cash register will automatically print the programmed header on all customer receipts and journal records,
while in the REG 2 mode this header is not printed at all. In the REG 2 mode the customer receipts are not
printed unless the [ST] key is pressed at the end of the transaction.
Proceed as follows to enter the REG 1 mode:
1. Insert the control key into the Control Lock and turn it to the REG 1 position.
2. The number "0" is displayed prompting you to enter a Clerk identification sequence. Type a Clerk number
[1 to 26], press the [Clerk] key and the cash register will switch to the REG mode if there is no secret code
programmed. If, instead, the letter "o" is displayed three times in a row you are prompted to enter the secret
code that was previously associated to the Clerk number entered. Type the [3-digit] code and the cash
register will switch to the REG mode.
EXITING THE REGISTER MODE
To exit the register mode at the end of a transaction, simply turn the control key to the OFF position.
CLEARING ERRORS
Detailed instructions on how to clear all kinds of errors which may occur during cash register operations are
explained in the section Error Conditions at the beginning of this manual.
SAMPLE RECEIPT
The following sample receipt shows where general transaction information is printed on a customer receipt.
Machine number
Personalized customer receipt
header on 7 lines
ENGLISH
Clerk
identification
Department
Programmed
PLU read from
barcode reader
with related
number and
price
Department
VAT total
Programmed
advertisment
message
Date
Consecutive receipt number
Item price with department VAT rate
Programmed PLU name, number and
price
Non-taxed item price
Transaction subtotal
Total balance due
Cash tendered
Change due
Item counter
Time
GB-13
Page 18

REPRINTING A SALES RECEIPT
Your cash register allows you to reprint an exact copy of the sales receipt at the end of the current transaction
performed in the REG 1 mode or to print the transaction receipt in the REG 2 mode. The consecutive receipt
number is not increased on the reprinted receipt, and the reprinted receipt is not recorded in the journal record.
This function is particularly useful when working in the REG 2 mode, since it gives you the possibility of issuing
a sales receipt if one is required. Remember that the only difference between the REG 1 mode and the REG 2
mode is that in the REG 2 mode the sales receipt is not printed nor issued.
For this function, the cash register's RAM (Random Access Memory) can store a sales receipt of up to a
maximum of 60 lines. Therefore when a receipt reprint is requested, the cash register will only print up to 60
lines; if this threshold is exceeded, only the total amount will be printed.
Proceed as follows to reprint or print a sales receipt:
1. Perform a sales transaction with a tender in either the REG 1 or REG 2 mode. Refer to the transaction
examples provided further on in this chapter.
2. Press the [ST] key.
STANDARD TRANSACTIONS
Registering a Single Item Sale with Change Tender
Up to nine digits can be used for the amount of the entry.
Example: Register a £1.00 item in Department 1.
Compute change for a £5.00 tender.
Proceed as follows:
1. Type [100] and press the [department 1/21] key.
2. Type the amount tendered [500] and press the
[Amt Tend/Total] key. The transaction is ended
and the change due to the customer is displayed.
Registering a Multiple Item Sale with Exact
Cash Tender
Example: Register a £2.50 item to Department 1, a £.50
item to Department 5 and a £1.65 item to Department 8,
with an exact tender of £4.65.
Proceed as follows:
1. Type [250] and press the [department 1/21] key.
2. Type [50] and press the [department 5/25] key.
3. Type [165] and press the [department 8/28] key.
4. Press the [ST] key for the current balance due.
5. Press the [Amt Tend/Total] key to end the transaction.
Change on a
cash tender
Transaction total
Exact cash tender
GB-14
Page 19

Registering a Sale of Multiple Items at
Same Cost
Up to three digits can be used for the quantity multiplied.
Example: Multiply two items costing £1.50 and register
the sale to Department 1. Compute change for £5.00.
Proceed as follows:
1. Type the number of items [2] and press the [Qty/Time]
key.
2. Type their cost [150] and press the [department
1/21] key.
3. Press the [ST] key for the current balance due.
4. Type the amount tendered [500] and press the [Amt
Tend/Total] key. The transaction is ended and the
change due to the customer is displayed.
Registering a Sale of Individual Items Taken
from a Single Product Package (Split Price
Registration).
Number of items at
same cost multiplied
by unit price
Total cost with
VAT rate
ENGLISH
Item counter
Example: Calculate the cost of 3 items taken from a box
of 12 that costs £10.00. Registrer the sale to department
3 as an exact cash tender.
Proceed as follows:
1. Type the number of items taken from the box [3] and
press the [Qty/Time] key.
2. Type the original number of items that a new box has
[12] and press the [Qty/Time] key.
3. Type the cost of a new box [1000] and press the
[department 3/23] key.
4. Press the [Amt Tend/Total] key for an exact cash
tender. The transaction is ended.
Three items out of a
box of 12
Unit price
Total cost of the
three items
GB-15
Page 20

Registering a Multiple Department Sale with
Payment and Change Tender
Example: Register a £69.00 item to Department 1, a
£5.00 item to Department 4 and a £3.50 item to
Department 7. Compute change for £100.00.
Proceed as follows:
1. Type [6900] and press the [department 1/21] key.
2. Type [500] and press the [department 4/24] key.
3. Type [350] and press the [department 7/27] key.
4. Press the [ST] key for the current balance due.
5. Type the amount tendered [10000] and press the
[Amt Tend/Total] key. The transaction is ended and
the change due to the customer is displayed.
Registering Repeated Entries to the Same
Department
Example: Register the sale of a £20.00 item twice to
Department 3. Subtotal the sale and computer change for
£50.00.
Proceed as follows:
1. Type [2000] and press the [department 3/23] key.
2. Press the [department 3/23] key.
Cash payment
Change tendered
Sale of repeated
entries
Subtotal
3. Press the [ST] key for the current balance due.
4. Type [5000] and press the [Amt Tend/Total] key. The
transaction is ended and the change due to the
customer is displayed.
GB-16
Cash tender with
change
Page 21

Registering a Charge Transaction
Charge transactions are counted and registered to the
charge total in the financial report.
Example: Register a £2.50 item to Department 1 and a
£3.00 item to Department 2 as a charge transaction.
Proceed as follows:
1. Type [250] and press the [department 1/21] key.
2. Type [300] and press the [department 2/22] key.
3. Press the [ST] key for the current balance due.
4. Press the [Charge] key to end the transaction.
Split Cash/Charge Tendering
Example: Register a £10.00 item and a £15.00 item to
Department 2. Split the amount tendered between
£20.00 cash and £5.00 charge.
Proceed as follows:
1. Type [1000] and press the [department 2/22] key.
2. Type [1500] and press the [department 2/22] key.
3. Press the [ST] key for the current balance due.
4. Type the cash tendered [2000] and press the
[Amt Tend/Total] key. The remaining balance due is
displayed.
Amount charged
ENGLISH
Sales total
Cash payment
Charge payment
5. Press the [Charge] key to end the transaction.
Credit Tendering
Example: Register a £70.00 item paid by credit to
Department 21.
Proceed as follows:
1. Type [7000] and press the [dept shift] and
[department 1/21] keys.
2. Press the [Credit] key and the transaction ends
successfully.
Amount paid by
credit
GB-17
Page 22

Check Tendering
Example: Register a £70.00 item paid by check to
Department 21.
Proceed as follows:
1. Type [7000] and press the [Dept Shift] and
[department 1/21] keys.
2. Press the [Check] key and the transaction ends
successfully.
Check Tender with Change
Example: Register a £19.50 item to Department 2, a
£2.50 item to Department 5 and a £5.00 item to
Department 22. Compute the change for a £30.00 check
tender.
Check payment
Proceed as follows:
1. Type [1950] and press the [department 2/22] key.
2. Type [250] and press the [department 5/25] key.
3. Type [500] and press the [Dept Shift] and
[department 2/22] keys.
4. Press the [ST] key for the current balance due.
5. Type the amount paid by check [3000] and press the
[Check] key. The change due to the customer is
displayed and the transaction ends successfully.
Transaction subtotal
Check payment
Change tendered
GB-18
Page 23

Split Check/Cash Tender
Example: Register a £24.00 item to Department 1, a
£36.00 item to Department 3 and a £4.00 item to
Department 4. Split the tender between £60.00 check
and £4.00 cash.
Proceed as follows:
1. Type [2400] and press the [department 1/21] key.
2. Type [3600] and press the [department 3/23] key.
3. Type [400] and press the [department 4/24] key.
4. Press the [ST] key for the current balance due.
5. Type the amount to be tendered by check [6000] and
then press the [Check] key. The remaining balance
due is displayed.
6. Press the [Amt Tend/Total] key when the
corresponding cash is tendered. The transaction ends
successfully.
MINUS (-) KEY TRANSACTIONS
Registering a (-) Reduction (Coupon)
Up to nine digits can be used for the amount of the
transaction.
Example: Register a £.50 reduction (coupon) on a £2.00
item to Department 2. End the transaction with an exact
cash tender.
VAT total
Check payment
Cash payment
Item price
Reduction using manual
entry and minus key
ENGLISH
Proceed as follows:
1. Type [200] followed by the [department 2/22] key.
2. Type the amount to be reduced [50] followed by the
[-] key.
3. End the transaction by pressing the [Amt Tend/Total]
key.
Exact cash tender
GB-19
Page 24

Registering a Multiple (-) Reduction
Example: Register a £.50 reduction on a £2.50 item to
Department 1, a £2.60 item to Department 3, a £.60
reduction on a £4.50 item to Department 21, a £.50
discount to a £3.00 multiple item sale to Department 5
and a £.1.00 reduction to a £5.00 item to Department 22.
Compute change for a £30.00 tender.
Proceed as follows:
1. Type [250] and press the [department 1/21] key.
2. Type the £.50 discount [50] and press the [-] key.
3. Type [260] and press the [department 3/23] key.
4. Type [450] and press the [dept shift] and
[department 1/21] keys.
5. Type the £.60 discount [60] and press the [-] key.
6. Type the number of items of the multiple sale [3], press
the [Qty/Time] key then enter the unit price [300] and
press the [department 5/25] key.
Item price entry
Manual reduction
entry
Multiple item sale
multipled by unit
price
Resulting total
Manual reduction
entry
7. Type [500], press the [dept. shift] key followed by
the [department 2/22] key.
8. Type the £1.00 reduction [100] and press the [-] key.
9. Press the [ST] key for the current balance due.
10. Type the amount tendered [3000] and press the
[Amt Tend/Total] key to display the change due to
the customer and end the transaction.
PLUS (+) KEY TRANSACTIONS
Registering a (+) Add-on
Up to nine digits can be used for the amount of the
transaction.
Example: Register a £.1.00 add-on to a £5.00 item
registered to Department 2. End the transaction with an
exact cash tender.
Proceed as follows:
Total VAT
Cash tendered
Change due
Price entry
Manual add-on
1. Type [500] followed by the [department 2/22] key.
2. Type the amount to be added on [100] followed by the
[+] key.
3. End the transaction by pressing the [Amt Tend/Total]
key.
GB-20
Page 25

Registering a Programmed (+) Add-on
To perform this operation, the [(+)] key must have been
programmed with the add-on value.
Example: Register a programmed £1.00 add-on to a £3.00
item registered to Department 2 and end the transaction
with an exact cash tender.
Proceed as follows:
1. Type [300] and press the [department 1/21] key.
2. Press the [(+)] key.
3. Press the [Amt Tend/Total] key.
PERCENT DISCOUNT (-%) TRANSACTIONS
Discounting the Total Sale
You can call up a programmed discount rate during the
transaction by pressing the [-%/RA] key. If a percent
discount rate is not programmed, type in the discount rate
before pressing the [-%/RA] key. Up to four digits can be
used for the discount percentage (0-99.99%).
Example: Register a programmed 15% discount to an
entire sales transaction. Compute the change tender.
Proceed as follows:
1. Type [250] and press the [department 7/27] key.
Price entry
Programmed add-on
ENGLISH
Transaction subtotal
Programmed discount rate
Discount
Transaction subtotal
2. Type [99] and press the [department 3/23] key.
3. Press the [ST] key for the current balance due.
4. Press the [-%/RA] key to apply the programmed
discount. The amount discounted is displayed.
5. Press the [ST] key for the new balance due.
6. Type the amount tendered [500] and press the
[Amt Tend/Total] key. The change due to the customer
is displayed and the transaction ends successfully.
Cash tendered
Change due
GB-21
Page 26

Discounting the Total Sale by Using a Random
Discount Rate
Example: Register a 9.5% discount to a sales
transaction. Compute the change tender.
Proceed as follows:
1. Type [300] and press the [department 1/21] key.
2. Type [200] and press the [department 2/22] key.
3. Press the [ST] key for the subtotal.
4. Type the discount rate to apply [9.5] and press the
[-%/RA] key. The amount discounted is displayed.
5. Press the [ST] key for the new balance due.
6. Type the amount tendered [500] and press the
[Amt Tend/Total] key. The change due to the customer
is displayed and the transaction ends successfully.
Discounting (-%) Individual Items using the
Programmed Discount Rate
Up to four digits can be used for the discount percentage
(0-99.99).
Example: Register a programmed 15% discount on a
£3.00 item to Department 5, and a £2.50 item to
Department 4. Compute the change tender.
Proceed as follows:
1. Type [300] and press the [department 5/25] key.
2. Press the [-%/RA] key to apply the programmed
discount. The amount discounted is displayed.
3. Type [250] and press the [department 4/24] key.
4. Press the [ST] key for the current balance due.
5. Type the amount tendered [600] and press the [Amt
Tend/Total] key. The change due to the customer is
displayed and the transaction ends successfully.
Transaction subtotal
Manual discount entry
Discount
Transaction total
Programmed discount
rate
Discount
GB-22
Page 27

Discounting Individual Items using Programmed
and Random Discount Rates
Example: Register a £2.50 item to Department 1, apply
the programmed discount to a £3.50 item to Department
25 and apply a discount rate of 3% to a £5.00 item to
Department 2. Compute change tender.
Proceed as follows:
1. Type [250] and press the [department 1/21] key.
2. Type [350] and press the [dept shift] key followed by
the [department 5/25] key.
3. Press the [-%/RA] key to apply the programmed
discount. The amount discounted is displayed.
4. Type [500] and press the [department 2/22] key.
5. Type the discount rate [3] and press the [-%/RA] key.
The amount discounted is displayed.
6. Press the [ST] key for the current balance due.
7. Type the cash tendered [1100] and press the [Amt
Tend/Total] key. The change due to the customer is
displayed and the tranasction ends successfully.
Programmed
discount rate
Random discount
rate
ENGLISH
Discounting (-%) One Item Using the
Programmed Discount Rate
Up to four digits can be used for the discount percentage
(0-99.99%).
Example: Register a programmed 15% discount to a
£.99 cash transaction to Department 7.
Proceed as follows:
1. Type [99] and press the [department 7/27] key.
2. Press the [-%/RA] key to apply the programmed
discount. The amount discounted is displayed.
3. Press the [ST] key for the current balance due.
4. Press the [Amt Tend/Total] key to end the transaction
with an exact cash tender.
Programmed
discount rate
Discount
GB-23
Page 28

PERCENT PLUS (+%) TRANSACTIONS
Applying the Programmed Percent Plus Rate to a
Total Sale
You can call up a programmed percent plus rate during
the transaction by pressing the [+%/PO] key. If a percent
plus rate is not programmed, type in the discount rate
before pressing the [+%/PO] key. Up to four digits can be
used for the percent plus rate (0-99.99%).
Transaction subtotal
Example: Register a programmed 6.5% percent plus
rate to an entire sales transaction. Compute the change
tender.
Proceed as follows:
1. Type [250] and press the [department 7/27] key.
2. Type [99] and press the [department 3/23] key.
3. Press the [ST] key to display the current balance due.
4. Press the [+%/PO] key to apply the programmed addon. The amount added on is displayed.
5. Press the [ST] key again to display the new balance
due.
6. Type the amount tendered [500] and press the [Amt
Tend/Total] key. The change due to the customer is
displayed and the transaction ends successfully.
Applying a Random Percent Plus Rate to
a Total Sale
Programmed percent
plus rate
Amount added on
Example: Register a 20% percent plus rate to a sales
transaction. Compute the change tender.
Proceed as follows:
1. Type [300] and press the [department 1/21] key.
2. Type [250] and press the [department 2/22] key.
3. Press the [ST] key for the current balance due.
4. Type the percent plus rate to apply [20] and press the
[+%/PO] key. The amount added on is displayed.
5. Press the [ST] key for the current balance due.
6. Type the amount tendered [700] and press the
[Amt Tend/Total] key. The change due to the customer
is displayed and the transaction ends successfully.
Transaction subtotal
Random percent plus
rate
Amount added on
GB-24
Page 29

Adding a Percent Plus Rate to Individual Items
Using the Programmed Rate
Up to four digits can be used for the percent plus rate
(0-99.99%).
Example: Register a programmed 6.5% percent plus
rate on a £3.00 item to Department 5, and a £2.50 item
to Department 4. Compute the change tender. Proceed
as follows:
1. Type [300] and press the [department 5/25] key.
2. Press the [+%/PO] key to apply the programmed
percent plus rate. The amount added on is displayed.
Programmed percent
plus rate
Amount added on
3. Type [250] and press the [department 4/24] key.
4. Press the [ST] key for the current balance due.
5. Type the amount tendered [600] and press the
[Amt Tend/Total] key. The change due to the customer
is displayed and the transaction ends successfully.
Applying Programmed and Random Percent
Plus Rates to Individual Items
Example: Register a £2.50 item to Department 1, apply
the programmed percent plus rate to a £3.50 item to
Department 25, and apply a random precent plus rate of
5% to a £5.00 item to Department 2. Compute change
tender.
Proceed as follows:
1. Type [250] and press the [department 1/21] key.
2. Type [350] and press the [dept shift] key followed by
the [department 5/25] key.
3. Press the [+%/PO] key to apply the programmed
percent plus rate. The amount added on is displayed.
ENGLISH
Programmed percent
plus rate
Random percent
plus rate
4. Type [500] and press the [department 2/22] key.
5. Type the random percent plus rate [5] and press the
[+%/PO] key. The amount added on is displayed.
6. Press the [ST] key to display the current balance due.
7. Type the cash tendered [1200] and press the [Amt
Tend/Total] key. The change due to the customer is
displayed and the tranasction ends successfully.
GB-25
Page 30

Adding the Programmed Percent Plus Rate (+%)
to One Item
Up to four digits can be used for the percent plus rate
(0-99.99%).
Example: Register a programmed 6.5% add-on to a
£.50 cash transaction to Department 7.
Proceed as follows:
1. Type [50] and press the [department 7/27] key.
2. Press the [+%/PO] key to apply the programmed
percent plus rate. The amount added on is displayed.
3. Press the [ST] key for the current balance due.
4. Press the [Amt Tend/Total] key to end the transaction
with a correct cash tender.
PLU CODES
Registering a Sales Transaction Using Preset
PLU Codes
Programmed percent
plus rate
Amount added on
In order to be able to use this feature, PLU codes must
have been previously set.
Example: Use preset PLU codes to register an entire
transaction: register PLU 17 and multiply 3 PLU 24.
Compute change for a cash tender.
Proceed as follows:
1. Type [17] followed by the [PLU] key.
2. Type [3] followed by [Qty/Time], then press [24]
followed by the [PLU] key. The amount of the
multiplication is displayed.
3. Press the [ST] key for the current balance due.
4. Type the amount tendered [1000] and press the
[Amt Tend/Total] key. The change due to the customer
is displayed and the transaction is ended successfully.
Programmed
PLU
identifier
Preset PLU
price
Multiple sale
with same
preset PLU
GB-26
Page 31

Overwriting a Preset PLU Price
Example: Overwrite the preset PLU 17 with £2.00.
Compute change for a £5.00 tender.
Proceed as follows:
1. Type the new price [200] and press the [PLU Price]
key. The message PRICE is displayed on the operator
display.
2. Type [17] followed by the [PLU] key to define the PLU
to be overwritten.
3. Press the [ST] key to display the current balance due.
4. Type the cash tendered [500] and press the [Amt Tend/
Total] key. The change due to the customer is displayed
and the transaction ends successfully.
Overwritten
PLU descriptor
Entered PLU
price (manual
price entry)
ENGLISH
Registering a Sales Transaction Reading
Product Label Barcodes with a Barcode Reader
In order to be able to use this feature, the prices related to
product label barcodes must have been previously
assigned to a PLU.
Example: Use the barcode reader to read a price of
£0.45 from a product label barcode. Compute change for
a £5.00 cash tender.
Proceed as follows:
1. Scan the product barcode label with the barcode reader.
The product price previously programmed in the cash
register is automatically registered to the programmed
department.
2. Type the amount tendered [500] and press the
[Amt Tend/Total] key. The change due to the customer
is displayed and the transaction is ended successfully.
Programmed
PLU name with
barcode
number and
associated
price
GB-27
Page 32

Registering a Sales Transaction by Manually
Typing Product Label Barcode Numbers
In order to be able to use this feature, the prices related
to product label barcodes must have been previously
assigned to a PLU.
Example: Register the sale of a product by manually typing
the product barcode label number 4006856200898 on the
numeric keypad. End the transaction with an exact cash
tender.
1. Type the barcode label number [4006856200898] on
the cash register's numeric keypad.
2. Press the [PLU] key. The PLU associated to the
barcode number entered is registered and the product
name (if defined) and associated price is displayed.
3. Press the [Amt Tend/Total] key to end the transaction
with an exact cash tender.
Programmed
PLU name with
barcode
number and
associated
price
PLU-to-PLU Link Registration
A prerequisite to this operation is for linkable PLUs to
have been linked to a specific PLU. If the cash register
was programmed accordingly, by recalling the number of
a linked PLU you can register the sale of the PLU and of
all the linkable PLUs assigned to it. The transaction will
sum the sales price of the PLU and of the ones linked.
Example: Register the sale of PLU 55 named Eat-in Meal
programmed with a service charge of £1.00 and with
linkable PLUs Soft drink, burger and fries linked to it. End
the transaction with an exact cash tender.
1. Type [55] and press the [PLU] key.
2. Press the [Amt tend/Total] key to end the transaction
with an exact cash tender.
Programmed
PLU name with
number and
associated
price
Programmed
linkable PLUs
with name,
number, price
and linked to
PLU 55
GB-28
Page 33

Price 2 Transactions
Price 2 transactions are used when you wish to register a
department single item sale or a PLU sale with the alternate
price (Price 2) assigned to the related department or PLU.
You simply press the [Price 2] key prior to the department
or PLU key.
The cash register can be programmed so that the Price 2
is either temporary or fixed.
Example: Register the sale of PLU 17 with its normal
price of £1.50 and then register the sale of PLU 17 with
its alternate price (Price 2) of £1.00. End the transaction
with an exact cash tender.
Proceed as follows:
1. Type [17] and then press the [PLU] key.
2. Press the assigned [Price 2] key.
3. Type [17] and press the [PLU] key.
4. Press the [Amt Tend/Total] key. The transaction ends
successfully with the alternate price of PLU item 1
registered.
VOIDS AND REFUNDS
Voiding the Previous Entry in the Middle of
a Sale
Example: Void a £2.50 entry erroneously made to
Department 2. Then register a £3.00 item to this same
Department. End the transaction with an exact cash
tender.
Proceed as follows:
PLU17 price 1
PLU17 price 2
ENGLISH
Incorrect item price void
1. Type [250] and press the [department 2/22] key.
2. Press the [Void/EC] key to void the entry made in
the previous step.
The amount voided is displayed and printed.
3. Type [300] and press the [department 2/22] key.
4. Press the [ST] key for the current balance due.
5. Press the [Amt Tend/Total] key to end the transaction
with an exact cash tender.
Correct item price
GB-29
Page 34

Voiding a Previous Entry at the End of a Sale
Example: Register a £1.50 item to Department 1, a
£3.50 item to Department 4, a £5.00 item to Department
3. Then void the £1.50 item erroneously made to
Department 1 and replace it with a £1.00 entry to the
same Department. Compute change for a cash tender.
Proceed as follows:
1. Type [150] and press the [department 1/21] key.
2. Type [350] and press the [department 4/24] key.
3. Type [500] and press the [department 3/23] key.
4. Press the [Clear] key.
5. Type [150], press the [Void/EC] key and then the
[department 1/21] key. The amount voided is displayed
and printed.
6. Type [100] and press the [department 1/21] key.
7. Press the [ST] key for the current balance due.
8. Type the amount tendered [1000] and press the
[Amt Tend/Total] key. The change due to the customer
is displayed and the transaction is ended successfully.
Refunding a Single Item
Example: Refund a £1.00 item in Department 1.
Incorrect price entry
Incorrect item price void
Correct item price entry
Proceed as follows:
1. Press the [Return] key.
2. Type the amount to be refunded [100] and press the
[department 1/21] key. The amount refunded is
displayed.
3. Press the [Amt Tend/Total] key to successfully end
the transaction.
Single item returned
and refunded
Total refunded
GB-30
Page 35

Refunding Multiple Items
Example: Refund a £5.00 item to Department 4 and
three £2.00 items to Department 8.
Proceed as follows:
1. Press the [Return] key.
2. Type [500] and press the [department 4/24] key. The
item's department number and amount refunded are
displayed.
Single item refund
3. Press the [Return] key again.
4. Type the number of items to be refunded [3], press
the [Qty/Time] key, enter their unit price [200] and
then press their department key [department 8/28].
The Department number and the number of items
refunded are displayed.
5. Press the [ST] key for the total amount to be refunded.
6. Press the [Amt Tend/Total] key to successfully end
the transaction.
OTHER TRANSACTIONS
Registering Money Received on Account
Example: Register £100.00 received on account.
Proceed as follows:
1. Type [10000] and then press the [-%/RA] key.
2. Press the [Amt Tend/Tender] key.
Multiple item refund
ENGLISH
Total refund
Amount received
on account
The cash drawer will automatically open to indicate the
end of the transaction. Note that a Charge cannot be
received on account.
Paying Money Out
Example: Pay out £200.00.
Proceed as follows:
1. Type the amount to be paid out [20000] and then press
the [+%/PO] key.
2. Press the [Amt Tend/Total] key.
The cash drawer will automatically open to indicate the
end of the transaction. Note that Paid Out transactions
cannot be performed if the Media-In-Drawer total is a
negative value.
Amount paid out
GB-31
Page 36

Registering an Identification Number
to a Transaction
Up to 13 digits can be used for the identification number.
This entry can be made prior to any operation. The
identification number is not added to the management
report or totals.
Example: Assign the identification number 3456 to a
£1.00 sale to Department 4. Enter an exact cash tender
sale.
Proceed as follows:
1. Type [3456] and press the [#/NS] key.
2. Type [100] and press the [department 4/24] key.
3. Press the [Amt Tend/Total] key for an exact cash
tender sale.
Registering an Identification Number
to an Item Sale
Transaction number
You can also assign identification number of up to 13 digits
to an item sale.
Example: Assign the identification number 78910 to a £2.00
sale to Department 1 and number 111213 to a PLU 17
sale. End the transaction with an exact cash tender.
Proceed as follows:
1. Type [200] and press the [department 1/21] key.
2. Type [78910] and press the [#/NS] key.
3. Type [17] and then press the [PLU] key.
4. Type [111213] and then press the [#/NS] key.
5. Press the [Amt Tend/Total] key for an exact cash
tender sale.
Registering a No Sale
This operation opens the cash drawer and prints a no sale
receipt. The activity is registered to the activity counter in
the financial report.
Item sale identification
number
Proceed as follows:
1. Press the [#/NS] key.
GB-32
Page 37

Registering Negative Entries
For this operation to be performed, a department must
have been programmed with a negative sales status. If
you want to register negative sales value PLUs, also the
related PLU must have been programmed with a negative
status.
Example: Register £3.00 and £5.00 to department 16
programmed with a negative sales status.
1. Type [300] and press the [deptartment 16/36] key.
2. Type [500] and press the [department 16/36] key.
3. Press the [Amt Tend/Total] key to end the transaction.
Registering Returned Merchandise
Returned merchandise can be registered to departments
that have been programmed with a negative status.
Entries to a department
with negative status
ENGLISH
Example: Return a item costing £20.00 and register it to
department 16 programmed with a negative sales status.
1. Press the [Return] key.
2. Type [2000] and press the [department 16/36] key.
3. Press the [Amt tend/Total] key to end the transaction.
Merchandise returned to a
department with negative
status
GB-33
Page 38

TRANSACTIONS USING THE OPTIONAL
KEYS ASSIGNED
This section gives examples of the operations that can be
performed with the optional key functions (listed at the
beginning of this manual) when these are assigned to
specific keys on the keypad.
TRANSACTIONS USING A FOREIGN
CURRENCY
To perform transactions using a foreign currency, the
currency function must be assigned to one of the function
keys on the keypad.
NOTE: As prerequisite to the example currency
conversion transactions in this section, the related
foreign currency exchange rate must be
programmed in the cash register.
In such examples the Euro was programmed as
the foreign currency with an exchange rate of 1
Euro = 0.6221 GBP (with the cash register in the
non-Euro base currency mode (such as GBP) it
divides the price entered or transaction subtotal
by the exchange rate defined).
NOTE: The examples in this section use the first
exchange rate of the four that can be programmed.
If you wish to use any of the other three exchange
rates that may be programmed, press the
exchange rate’s related numeric key [2, 3 or 4]
followed by the assigned [Currency] key.
Registering a Multiple Item Sale with Exact
Cash Tender in Euro
To perform this transaction the Euro exchange rate must
have been programmed.
Example: Register a £10.00 item to Department 1, a
£20.00 item to Department 2, with an exact cash tender
in Euro.
Proceed as follows:
1. Type [1000] and press the [department 1/21] key.
2. Type [2000] and press the [department 2/22] key.
3. Press the [ST] key for the current balance due in Local
currency.
4. Press the assigned [Currency] key to display the
current balance due in Euro.
5. Press the [Amt Tend/Total] key to end the transaction.
Transaction total in
local currency
Exact cash tender
in foreign currency
Cash tender
converted in local
currency
GB-34
Page 39

Registering a Multiple Department Sale with
Payment in Euro and Change Tender in Local
Currency
To perform this transaction the Euro exchange rate must
have been programmed.
Example: Register a £69.00 item to Department 3, a
£5.00 item to Department 2 and a £3.50 item to
Department 4. Compute change for 150.00 Euro.
Proceed as follows:
1. Type [6900] and press the [department 3/23] key.
2. Type [500] and press the [department 2/22] key.
3. Type [350] and press the [department 4/24] key.
4. Press the [ST] key for the current balance due in Local
currency.
5. Press the assigned [Currency] key to display the
current balance due in Euro.
6. Type the amount tendered in Euro [15000] and press
the [Amt Tend/Total] key. The transaction is ended
and the change due to the customer is displayed.
Cash payment
in foreign currency
Change tendered in
local currency
ENGLISH
Split Cash/Charge Tendering in Euro
To perform this transaction the Euro exchange rate must
have been programmed.
Example: Register a £8.00 item and a £12.00 item to
Department 3. Split the amount tendered between
10.00 Euro cash and 22.15 Euro charge.
Proceed as follows:
1. Type [800] and press the [department 3/23] key.
2. Type [1200] and press the [department 3/23] key.
3. Press the [ST] key for the current balance due in Local
currency.
4. Press the assigned [Currency] key to display the
current balance due in Euro.
5. Type the cash tendered in Euro [1000] and press the
[Amt Tend/Total] key. The remaining balance due in
Local currency is displayed.
6. Press the assigned [Currency] key again. The
remaining balance due in Euro is displayed.
7. Press the [Charge] key to end the transaction.
Sales total in local
currency
Cash payment in
foreign currency
Charge payment in
foreign currency
GB-35
Page 40

Check Tender in Euro with Change in Local
Currency
To perform this transaction the Euro exchange rate must
have been programmed.
Example: Register a £19.50 item to Department 4, a
£2.50 item to Department 5 and a £5.00 item to
Department 23. Compute the change in Local currency
for a 50.00 Euro check tender.
Proceed as follows:
1. Type [1950] and press the [department 4/24] key.
2. Type [250] and press the [department 5/25] key.
3. Type [500] and press the [Dept Shift] and [department
3/23] keys.
4. Press the [ST] key for the current balance due in Local
currency.
5. Press the assigned [Currency] key for the current
balance due in Euro.
6. Type the amount tendered by check in Euro [5000]
and press the [Check] key. The change due in local
currency is displayed and the transaction ends
successfully.
Split Check Tender in Local Currency/Cash
Tender in Euro
To perform this transaction the Euro exchange rate must
have been programmed.
Example: Register a £18.00 item to Department 2, a
£24.00 item to Department 3 and a £2.50 item to
Department 4. Split the tender between a £20.00 check
and 39.38 Euro cash.
Sales total in local
currency
Check payment in
foreign currency
Change tendered in
local currency
Proceed as follows:
1. Type [1800] and press the [department 2/22] key.
2. Type [2400] and press the [department 3/23] key.
3. Type [250] and press the [department 4/24] key.
4. Press the [ST] key for the subtotal in local currency.
5. Type the amount to be tendered by check in local [2000]
and then press the [Check] key. The remaining balance
due is displayed in Local currency.
6. Press the assigned [Currency] key to display the
remaining balance due in Euro.
7. Press the [Amt Tend/Total] key when the correspon-
ding cash is tendered in Euro. The transaction ends
successfully.
GB-36
Check payment in
local currency
Cash payment in
foreign currency
Page 41

Take-out Key Transactions
To perform Take-out transactions the Take out function
must be assigned to one of the function keys on the keypad.
Take-out transactions are useful to define a different tax
rate for a product which is taken out with respect to the
same consumed indoors.
Example: Change the tax rate of three products registered
to Departments 1, 2 and 3 programmed with three different
tax rates (3%, 4% and 4.5%, respectively) and that are to
be taken out.
1. Type [2000] and press the [department 1/21] key.
Normal VAT total
2. Type [5000] and press the [department 2/22] key.
3. Type [4000] and press the [department 3/23] key.
4. Press the assigned [Take-out] key.
5. Press the [Amt tend/Total] key to successfully end
the transaction.
ENGLISH
Take-out increased
VAT total
Tax 1, Tax 2 and No Tax Key Operations
The cash register can be programmed so that Tax 1, Tax
2 and No Tax functions are assigned to function keys on
the keypad. With these functions enabled, you can override
the programmed tax status of departments and PLUs with
the Tax 1 rate defined, the Tax 2 rate defined or a No-tax
status by pressing the Tax 1, Tax 2 or No Tax key assigned
to the keypad. You simply press the assigned tax key
prior to the department or PLU key for which you wish to
change the tax status.
GB-37
Page 42

Overwriting a Preset Tax Rate on a Department
Sale with a No-Tax Status
Example: Register a £5.00 item to department 1
programmed with a Tax 1 rate and then register a nontaxable item to the same department. The No-tax key
functions must have been programmed to one of the
function keys on the keypad. End the transaction with an
exact cash tender.
Proceed as follows:
1. Type [500] and press the [department 1/21] key.
2. Press the assigned [No tax] key.
3. Type [200] and press the [department 1/21] key.
4. Press the [Amt Tend/Total] key. The transaction ends
successfully with no tax applied to the item registered
to department 1 programmed with a tax 1 status.
Overwriting a Department's Preset Tax Rate with
Programmed Tax Rate 1
Department
programmed with
VAT rate 1
Same department
with no VAT applied
Example: Register a £4.00 item to Department 3 and
then register a £20,00 item that you want to tax with
programmed tax rate 1 to Department 3 which is
programmed with a T3 tax rate. End the transaction with
an exact cash tender.
Proceed as follows:
1. Type [400] and press the [department 3/23] key.
2. Press the assigned [Tax 1] key.
3. Type [2000] and press the [department 3/23] key.
4. Press the [Amt Tend/Total] key. The transaction ends
successfully with tax 1 rate applied to the item
registered to department 3 programmed with a tax 3
rate.
Department
programmed with
VAT rate 3
Same department
with VAT rate 1
applied
GB-38
Page 43

House Key Transactions
To perform House transactions the House function
must be assigned to one of the function keys on the
keypad.
House transactions are used when you wish to offer a
product free of charge to the customer. You simply
press the assigned House key prior to the department
or PLU registration to offer. The totals of the products
that are offered to the customer are zero.
Example: Register the sale of PLU 55 programmed
for an Eat-in meal and then offer the same meal free
of charge. End the transaction with an exact cash
tender.
Proceed as follows:
1. Type [55] and press the [PLU] key.
2. Press the assigned [House] key.
3. Type [55] and press the [PLU] key.
4. Press the [Amt Tend/Total] key. The transaction
ends successfully with the first meal charged and
the second offered by the establishment.
PLU with associated
linkable PLUs
purchased normally
ENGLISH
Same PLU with linkables
offered by the
establishment
Price Inquiry Functions
For price inquiries the Price Inquiry function must be
assigned to one of the function keys on the keypad.
This feature is very useful when you want to know the
price of a selected PLU or associated to a product
barcode label.
Example: Find out the price registered to PLU 31
and to a product barcode label.
1. Press the assigned [Price Inq.] key.
Transaction total
2. Type the PLU number [31] and then press the
[PLU] key. The price is displayed along with the
name assigned to the PLU.
3. Press the assigned [Price Inq.] key.
4. Scan the product barcode label. The price is
displayed along with the name assigned to the
barcode.
GB-39
Page 44

Tray Subtotal System
To use the Tray Subtotal system the Tray Subtotal function
must be assigned to one of the function keys on the keypad.
The Tray Subtotal system is useful, for example, when a
customer forgets to pick up an item in the store and the
sales transaction is nearly terminated. Instead of waiting
for the customer to search for the forgot item and return to
then terminate the transaction, you can place the
transaction data in the cash register's memory and serve
another customer by starting and completing a brand new
transaction. Once the customer has returned, you can
then recall the transaction data (tray subtotal) from
memory and close the transaction.
Example: Register the sale of a £5.00 item to
Department 2 and a £14.00 item to Department 1. Place
the transaction totals in the tray subtotal, recall the tray
subtotal, register the sale of the forgotten £6.00 item to
department 4 and complete the transaction with a
charge tender.
1. Type [500] and press the [department 2/22] key.
2. Type [1400] and press the [department 1/21] key.
3. Press the assigned [Tray subtotal] key. A customer
receipt is provided indicating that the transaction data
and total are stored in the tray subtotal.
Total of interrupted
transaction
Tray subtotal
4. Press the assigned [Tray subtotal] key to recall the
data from the tray subtotal. The value in the tray
subtotal is printed on the customer receipt.
5. Type [600] and press the [department 4/24] key.
6. Press the [Charge] key to end the transaction.
Transaction resumed
with recalled tray
subtotal
Item added to sales
transaction
Transaction total
GB-40
Page 45

CASH REGISTER SPECIFICATIONS AND SAFETY
Technical Characteristics
Listed below are the technical characteristics of this cash register model.
Type: Electronic cash register with alphanumeric printer and 40 departments, 1000 PLU settings,
26 clerks, 8 tax settings, 99 PLU groups, 9 Department groups and PLU-to-PLU linking
features
Displays: 10-digit green fluorescent numeric client display and 10 digit x 2 rows alphanumeric operator
display.
Capacity: 10-digit input and 10-digit printout
Printer: 2-station thermal printer, 20 characters per line, printing speed of up to 13 lines per second
Paper supply: Two rolls of 37.5 ±0.5 mm wide paper (customer receipt and journal record rolls)
Technology: CMOS RAM
Power cons.
(operating): Refer to the data plate on the back of the machine
Electrical
power supply: Refer to the data plate on the back of the machine
Operating
Temperature: 0 degrees C - 40 degrees C (32-104 degrees F)
ENGLISH
Dimensions: Length: 410 mm
Depth: 430 mm
Height: 270 mm
Weight: 9,0 Kg
Safety Precautions
• The power socket for this cash register must be located near the unit and easily accessible.
• Plug the cash register to a power socket where no other electrical device is connected.
• Do not use this cash register outdoors in the rain or near any liquid.
• Keep the cash register uncovered when turned on to allow the proper cooling of the electronic components.
GB-41
Page 46

Code 506574 V
 Loading...