

Page 1
506528X
Page 2

Olivetti Lexikon, S.p.A.
Divisione Home/Office
77, Via Jervis - 10015 Ivrea (Italy)
Copyright © 2001, by Olivetti
All rights reserved
Page 3
The mark affixed to the product
certifies that the product satisfies the
basic quality requirements.
Your attention is drawn to the following actions that could compromise the
characteristics of the product:
• incorrect electrical supply;
• incorrect installation; incorrect or improper use, or, in any case, not in
accordance with the warnings given in the User Manual supplied with the
product;
• replacement of original components or accessories with others of a type
not approved by the manufacturer , or carried out by unauthorized personnel.
ENGLISH
Page 4

WARNING: THIS EQUIPMENT MUST BE EARTHED .
ATTENTION: CETTE UNITE DOIT ETRE CONNECTEE A LA TERRE.
ACHTUNG: DIESES GERÄT MUSS EINEN ERDUNGSANSCHLUSS
HABEN.
ATENCION: ESTE EQUIPO DEBE ESTAR CONECTADO A UNA TOMA
DI TIERRA.
APP ARA TET MÅ KUN TILK OPLES JORDET STIKKONT A CT .
APP ARA TEN SKALL ANSLUTAS TILL JORDAT NÄTUKKAT.
LAITE ON LITTETTÄVÄ SUKO-RASIAAN.
Lederen med grøn/gul isolation ma kun tilsluttes en klemme maerkrt
eller
.
To disconnect the cash register from the line voltage, unplug its
power cord from the power outlet. The po wer outlet m ust be located
on a wall, near the cash register and easily accessible.
Page 5

Preface
The electronic cash register described in this manual is designed to
help your business function smoothly by providing efficient register
operations and accurate management reports. Startup is quick and easy,
yet there are many options that can be added and revised so that you
can customize your operations for optimum productivity. Here are just a
few of the cash register’s many valuable features:
• 40 departments and 999 Price Look-Up (PLU) settings;
• 26 clerk numbers to monitor the sales of individual employees;
• possibility of assigning a three-digit security code to prevent
unauthorized access to individual clerk transactions (during register
mode only);
• possibility of defining manager passwords to prevent unauthorized
access to the machine's programming mode (PRG), Z mode and X
mode;
• possibility of assigning a name to each clerk for rapid identification;
• 2-station dot-matrix printer that prints information on 2 separate
rolls of paper, providing customer receipts and a transaction journal;
• customer sales receipt header personalization;
• personalization of Local currency, Euro currency, currency convert
and credit captions on the sales receipts and reports;
• possibility of reserving two departments for registering credit
tenders separately;
• Euro exchange rate programming;
• possibility of programming the machine to work with one of two
base currencies, Local or Euro, so that cash register computes in the
currency set and automatically converts the related transaction totals
into the other currency;
• rear customer numeric display for transaction viewing;
• front operator alphanumeric display consisting of a 10-character
message line on top and a 10-character transaction line on the
bottom;
• automatic tax computations for 4 different VAT rates;
• department-linked entry options that streamline and speed-up
operation;
• periodic management and financial reports that provide up-to-date
sales analysis;
• automatic time display after a period of system inactivity;
• automatic time and date printing on receipt and journal records;
• programmable customer receipt and journal record printing in any
one of four languages (English, French, German and Spanish);
• possibility of validating documents at the end of a transaction;
• possibility of issuing copies of a transaction receipt without
increasing the receipt consecutive number and without recording the
copies on the journal record and reports.
ENGLISH
I
Page 6

T able of Contents
GETTING ACQUAINTED WITH YOUR CASH
REGISTER..................................................................... 1
Standard Accessories..................................................... 2
Using this Manual........................................................... 2
Unpacking and Setting Up the Cash Register ................ 3
Maintaining the Cash Register ....................................... 3
THE KEYPAD ................................................................ 4
Keypad Functions........................................................... 5
THE CONTROL SYSTEM ............................................. 6
The Control Lock............................................................ 6
Cash Drawer with Removable Cash Bin ........................ 7
Operator and Customer Displays ................................... 7
Automatic Time Display ................................................. 7
Date Display................................................................... 7
Special Symbol Indicators.............................................. 7
ERROR CONDITIONS .................................................. 8
The Error Alarm ............................................................. 8
Clearing an Error ............................................................ 8
General Clearance ......................................................... 8
Voiding Errors................................................................. 9
MEMORY BACK-UP BATTERY SYSTEM.................... 9
PRINTER COMPARTMENT .......................................... 9
Ribbon Cartridge ............................................................ 9
Installing the Ribbon Cartridge ....................................... 9
Paper Tape....................................................................11
Loading the Customer Receipt Roll ..............................11
Loading the Journal Roll .............................................. 12
QUICK START............................................................. 13
Helpful Hints for a Successfull Start-Up....................... 14
TRAINING MODE ........................................................ 14
Activating the Training Mode ....................................... 15
Exiting the Training Mode ............................................ 15
CASH REGISTER PROGRAMMING .......................... 15
Setting Cash Register Features ................................... 16
Making Changes to Cash Register Programming ........ 16
Entering the Program Mode ......................................... 16
Exiting the Program Mode ........................................... 16
Clearing Errors ............................................................. 16
Clerk Numbers, Secret Codes and Names .................. 17
Machine Numbers ........................................................ 18
Date and Time .............................................................. 18
Receipt Header ............................................................ 19
Percent Discount (-%) .................................................. 20
Percent Plus Rate (+%)................................................ 20
Fraction Rounding ........................................................ 21
II
Page 7

Decimal Point Position ................................................. 21
Value Added Tax (VAT) Rates ...................................... 22
High Digit Lock Out (HDLO) and Tax Status
Assigned to the Minus Key (-) ...................................... 22
Tax Status, High Digit Lock Out, Single/Multiple
Item Sale and Price Linked to a Department ............... 23
Price Look-Ups (PLUs)................................................. 24
Euro Exchange Rates .................................................. 25
Receipt and Report Captions ....................................... 25
Programming System Options ..................................... 28
Dump Reports .............................................................. 31
Overall Programming Dump Report ............................ 32
Manager Passwords ..................................................... 33
Using the Cash Register in a Password Protected
Mode ............................................................................ 34
Z1/Z2 Counter .............................................................. 34
Grand Total ................................................................... 35
Clearing the Cash Register’s Memory.......................... 35
Percent Discount (-%) Transactions............................. 55
Percent Plus (+%) Transactions................................... 60
PLU Codes ................................................................... 64
V oids and Refunds ....................................................... 66
Other Transactions....................................................... 69
MANAGEMENT REPORTS ......................................... 75
X and Z Reports ........................................................... 75
Cash-In-Drawer Report ................................................ 75
Time Report ................................................................. 76
Clerk Report ................................................................. 77
All PLU Report ............................................................. 78
PLU Range Report ....................................................... 79
Department Range Report ........................................... 79
Z1 and X1 Financial Report ......................................... 80
Z2 and X2 Financial Report ......................................... 81
Duplicate Z Report ....................................................... 83
Balancing Formulas ..................................................... 83
ENGLISH
TRANSACTION EXAMPLES ...................................... 36
Entering the Register Mode.......................................... 36
Exiting the Register Mode ............................................ 36
Clearing Errors ............................................................. 37
Sample Receipt............................................................ 37
Reprinting a Sales Receipt........................................... 37
Validation Operations ................................................... 38
Standard Transactions in Local Base Currency ........... 39
Examples of Transactions in Euro Base Currency ....... 49
Minus (-) Key Transactions ........................................... 54
APPENDIX................................................................... 84
Character Code Table .................................................. 84
Caption Table ............................................................... 84
Totalizers and Counters Table ...................................... 88
Cash Register Specifications and Safety ..................... 88
III
Page 8
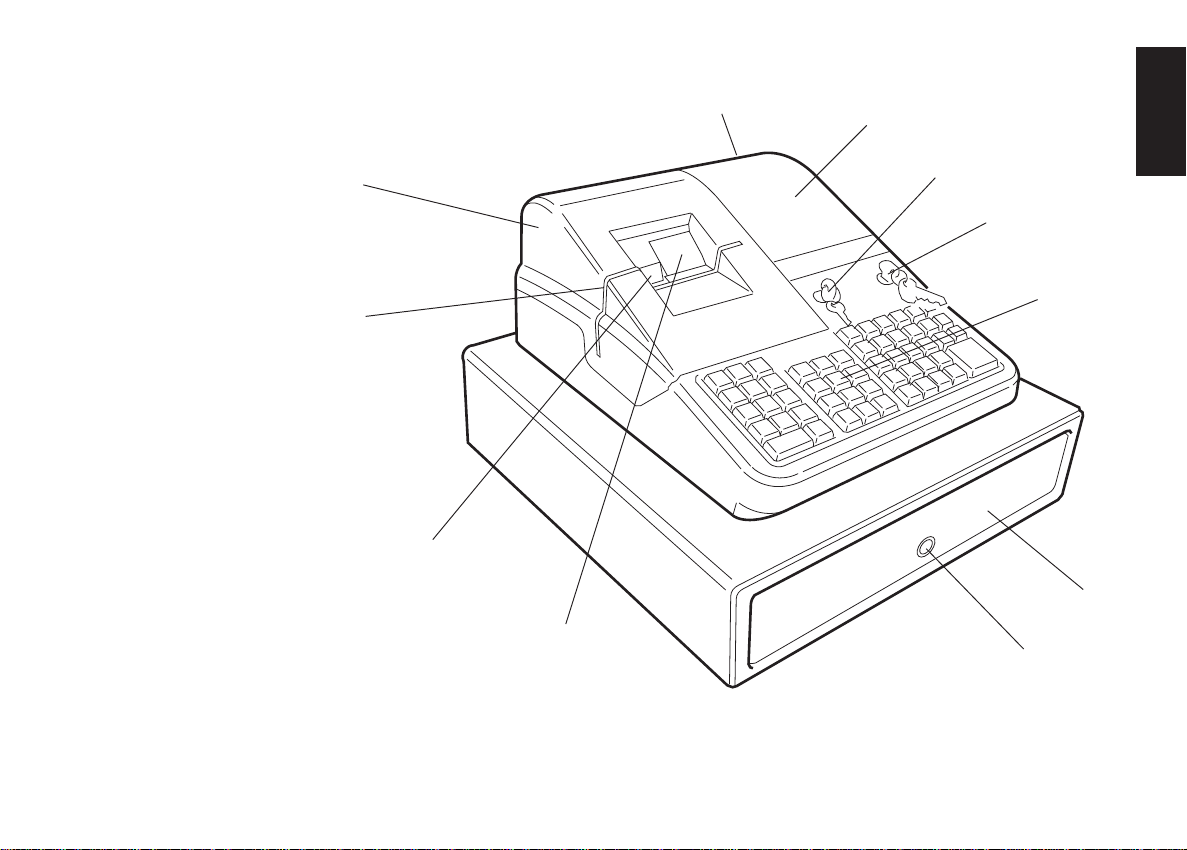
Getting Acquainted with Your Cash Register
The figure below shows an overall view of your cash register.
11
10
9
1
2
ENGLISH
3
4
5
6
1. Customer Display 7. Cash Drawer Lock
2. Operator Display 8. Journal Roll Display Window
3. Printer Compartment Lock 9. Customer Receipt Output Slot
4. Control Lock 10. Document Validation Slot
5. Keypad 11. Printer Compartment Cover
6. Cash Drawer
8
7
1
Page 9

Standard Accessories
Your cash register comes with the following items:
• One black plastic journal winder spindle
• Two rolls of 37.5 + 0.5 mm standard bond paper, one for customer
receipts and the other for journal record
• One inked ribbon cartridge
• This Instructions Manual
• A set of Program keys (PRG) for accessing the machine programming functions
• A set of Register keys (REG) for accessing the machine cash register
functions
• A set of Z keys for accessing the X and Z functions
• A set of keys for locking the cash drawer and printer compartment
cover.
Make sure that the cash register and all of the above items are
included in the shipping carton.
Using this Manual
Your cash register manual is organized for easy reference. The front
portion contains general information on all the features and functions of
the cash register. Instructions for setting the optional programs come
next. Transaction examples for operating the cash register are at the
back of the manual with a Character Code Table to use to program
character strings as an alternative to using the alphanumeric keypad, a
Caption Table indicating the cash register's preprogrammed character
strings in the four languages available, and a Totalizers and Counters
Table. At the back of the manual you will also find your cash register's
techinical specifications and some safety information. Use the Table of
Contents to locate a particular item.
Getting Started
Before you begin to operate or program the cash register, read the
section entitled Unpacking and Setting Up the Cash Register for
information on how to get yourself ready to work. Read also Keypad
Functions, The Control System and Operator and Customer Displays to
become familiar with their operations.
NOTE: Machine programming data and transaction information for
management reports are stored in the memory of the cash
register. A backup battery inside the cash register saves this
information in the event of a power failure or if the cash
register is unplugged from the power outlet.
Programming the Cash Register
Simple step-by-step instructions are included for each program. Also
provided are examples which can be used for practice.
Carrying Out Sales Transactions
Transaction examples provide steps for key operations. Sample
receipts are included.
2
Page 10

Unpacking and Setting Up the Cash Register
NOTE: Please read this section carefully before attempting to program
the cash register or perform sales transactions.
As soon as you receive the cash register, open its shipping carton and
carefully withdraw each component. Make sure that the cash register
and all of its accessories, listed in the section entitled Standard
Accessories, are present in order to setup the cash register by following
these guidelines:
1. Place the cash register on a level, stable, vibration-free and dust-
free surface. Make sure it is near a grounded power outlet.
2. Install the inked ribbon cartridge as explained in the section
Installing the Ribbon Cartridge.
3. Plug the cash register to a grounded power outlet and press the
Reset button located inside the printer compartment, on the rear
left-hand side, to reinitialize the cash register's memory. To remove
and replace the printer compartment cover, refer to the steps 1 and 6
in the section Installing the Ribbon Cartridge.
It is suggested that you plug the cash register to a grounded power
outlet on its own so as to avoid potential electrical interference with
any other electrical equipment which may be plugged to the same
outlet.
4. Load the paper tape as explained in the section Loading the
Customer Receipt and Journal Paper Rolls.
5. Proceed to set the desired program options as explained in the
section Cash Register Programming. Keep the cash register
plugged to the electrical outlet for at least 48 hours so as to
charge the memory back-up battery inside the cash register.
6. Once the desired program options have been set, turn the control
key to the REG 1 or REG 2 position and you are ready to perform
sales transactions. In the REG 2 position the cash register will not
print the customer receipt.
Maintaining the Cash Register
Provided below is information on how to maintain your cash register.
NOTE: Before cleaning the cash register, make sure it is powered off
and/or unplugged from the wall outlet. Machine programming
data and transaction information for management reports are
stored in the cash register. A back-up battery inside the cash
register saves this information when the cash register is
unplugged from the power outlet or the event of a power
failure.
1. Keep all liquids away from the cash register so as to avoid spills
which could damage the electronic components.
2. To clean the cash register firstly turn it off and/or unplug it from the
wall outlet, then use just a damp cloth. Do not use corrosive
substances such as solvents, alcohol, petrol, or abrasive components.
3. If the cash register is stored in extreme hot or cold temperatures
(below 32 degrees or above 104 degrees Fahrenheit), allow the
temperature inside the cash register to reach room temperature
before turning it on.
4. DO NOT attempt to pull the paper tape when the cash register is
printing or when you are loading paper. Always use the [R feed]
key to feed paper. Pulling the paper tape could damage the print
mechanism.
ENGLISH
3
Page 11
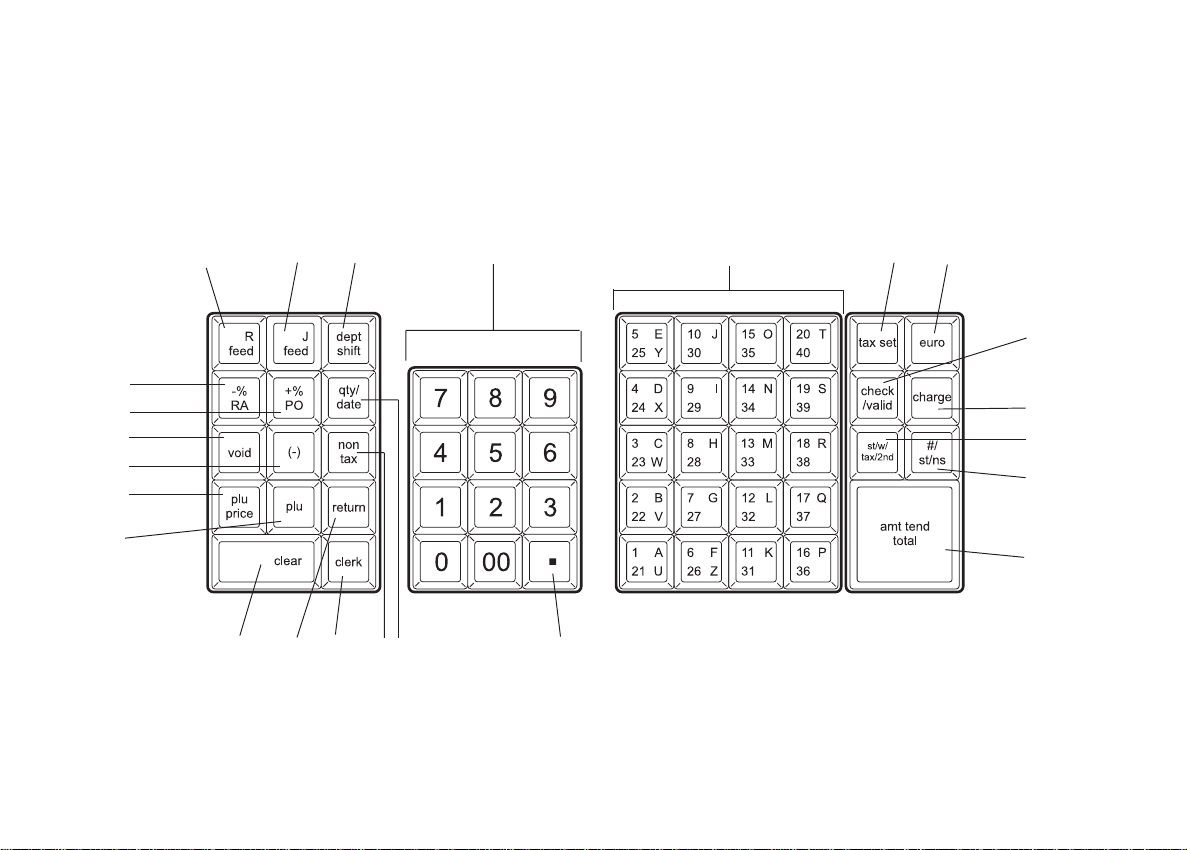
The Keypad
Your cash register is equipped with a 53-key keypad by means of
which you can perform all cash register functions.
The figure below shows the keypad layout.
4
8
9
10
11
12
13
24
23
22
21
20
19
1
18
17
2
3 5 6 7
15
14
16
4
Page 12

Keypad Functions
1. [R feed] (Receipt Paper Feed) - Advances the receipt paper one line
feed; advances the paper continuously when held down.
2. [J feed] (Journal Record Feed) - Advances the journal paper one
line feed; advances the paper continuously when held down.
3. [dept shift] (Department Shift) - Allows price entries for depart-
ments 21-40. Press this key before entering applicable department
keys 21-40.
4. [0 - 9/00] - Input amounts, indicate how many times a particular
item repeats, determine percentage rates to add or subtract, input
department code numbers, handle figures which require a decimal
point. The double zero key allows the quick entry of numbers with
two or more zeros.
5. [1-40 (A-Z)] (Departments 1 through 40, letters A through Z) -
Used to enter single or multiple item sales to a particular department. Department totals are shown in the management report. Also
used to input characters for clerk names, captions, etc.
6. [tax set] - Used to program VAT rates.
7. [euro] - When the cash register is in its default Local base currency,
this key is used to program the Euro exchange rate and to automatically calculate and display the value in Euro of the total amount of a
sale or of a particular amount registered. When the cash register is
programmed to work in the Euro base currency, pressing this key
converts the sales total to the Local currency.
8. [check/valid] - When used as the check key, totals sales paid by
check. Check totals are printed in the management report. Also
stores character code entries during cash register programming.
When used as the valid key, validates a document following a
transaction tender.
9. [charge] - Totals sales that are charged. Charge totals are printed in
the management report.
10. [st/w/tax/2nd] - When used as the st/w/tax key, displays the
subtotal of a sale with sales tax. When used as the 2nd key, prints a
second copy of the transaction receipt.
11. [#/st/ns] (Dual function: ST - Subtotal and NS - No Sale) - As the
No Sale key, opens the cash drawer without registering any amount
such as when changing cash for a non-sales transaction. As the
Subtotal key, calculates a subtotal during a transaction consisting of
a number of items to be individually discounted or increased by a
fixed percentage and prints this on the receipt.
12. [amt tend/total] (Amount Tendered/TOTAL) - Totals exact cash
transactions, computes change and totals check and charge transactions.
13. [.] (Decimal Point) - Used to enter fractional quantities of items
being sold. In all modes, the decimal point is not to be used when
entering a price.
14. [qty/date] (Dual function: Multiply and time display) - Multiplies
[department], [plu] or [-] key entries; also displays the current
date, if set, and is used to print the Cash-In-Drawer Report.
15. [non tax] - Used when no tax is to be registered for a department
which is programmed for tax.
16. [clerk] - Confirms an entered clerk number and three-digit security
code. Also used to print a Clerk Report.
17. [return] - Issues refunds for returned merchandise. Refund totals
are printed in the management report.
18. [clear] - Clears an entry made from the numeric keypad or
with the [qty/date] key before finalizing a transaction with a
Department or function key. This key is also used to clear error
conditions.
19. [plu] (Price Look Up) - Registers a preset price of an individual
item to the appropriate department. Also used to print PLU Reports.
20. [plu price] - Temporarily overwrites a price that was assigned to a
PLU number.
21. [-] - Subtracts an amount from an item or the sales total. Minus key
totals are printed in the management report.
ENGLISH
5
Page 13

22.[void] - Deletes the last item entered and is used for correcting a
particular entry after it is processed and printed. Void totals are
reported in the management report. Also used for cash register
options programming.
23. [+%/PO] (Dual function: Percent Plus and Paid Out) - When used
as the +% key, adds a percentage to an item or to the sales total.
Total percent plus amounts are shown in the management report.
When used as the PO key, registers any money paid out. Paid out
totals appear in the management report. Also used to set a machine
number.
24. [-%/RA] (Dual function: Percent Discount and Received On
Account) - When used as the -% key, subtracts a percentage from an
item or from the sales total. Total discount amounts are shown in
the management report. When used as the RA key, registers any
payment made to the cash drawer. Amounts are added to the
received on account total in the management report.
The Control System
The Control Lock
The control lock is located on the upper right-hand side of the
keypad. The PRG, REG or Z key must be properly inserted in the
Control Lock in order for you to be able to use the different cash
register functions available. The following figure shows the Control
Lock and the different modes that can be used.
6
Depending on the desired operation, insert the related key in the
Control Lock and turn it to the following positions:
PRG Used to program the cash register according to your
specific needs.
OFF The cash register is turned off and cannot be used.
REG 1 The cash register can perform the standard sales transac-
tions that are recorded on both the customer receipt and
journal roll. In this mode the preset or programmed
header is printed on the customer receipt. This is also
called the Receipt Mode.
REG 2 Same as the REG 1 mode with the only exception that the
transaction record is only printed on the journal roll.
The customer receipt is not printed nor issued unless
when a receipt reprint is requested by pressing the
[st/w/tax/2nd] key. This is also called the Journal Mode.
X Prints the X management report, Cash-in-Drawer report,
PLU report, clerk report, cash declaration and periodical
financial reports.
Z Prints the Z management report and resets totals (except
the grand total) to zero. Prints the PLU report, clerk
report, cash declaration and periodical financial reports.
Control Keys
The following sets of keys are provided as well as a set of keys to
open the cash drawer and printer compartment:
REG The REGISTER key can be used in the OFF, REG 1,
REG 2 and X modes, granting both Clerk and Supervisor
access to cash register functions.
PRG The PROGRAM key works in all modes (PRG, OFF,
REG 1, REG 2, X and Z). It is usually used by the
Supervisor to program the cash register and print X and Z
management reports.
Z The Z key can be used in the OFF, REG 1, REG 2, X and
Z modes granting a higher level access with respect to the
REG key.
Page 14

Cash Drawer with Removable Cash Bin
The cash drawer features a cash bin with slots for banknotes and slots
for coins. Pressing the [#/st/ns] with the control key in the REG 1 or
REG 2 position opens the drawer. If a clerk number and secret code
have been set, pressing this key will open the cash drawer only after the
clerk number and code have been specified. This drawer can be locked
for security to prevent accidental opening when moving the cash
register by using the printer compartment key.
A hidden emergency lever underneath the cash register lets you to
open the cash drawer even when the machine is powered off.
If desired, the cash bin inside the cash drawer can be completely
removed from the cash register. To do so, gently lift the bin and pull it
out.
Operator and Customer Displays
Your cash register offers two displays that provide easy viewing for
both the customer and operator during a sales transaction. The customer
display shows entry amounts and related transaction information
through the use of numbers and special symbols. The operator display
shows specific operator messages on the upper 10-character line and
the same transaction data as shown on the customer display on the
lower 10-character line. Both displays are read from left to right.
Automatic Time Display
With the cash register powered on, the current time is automatically
displayed after 30 seconds of cash register inactivity.
Date Display
You can display the date by simply pressing the [qty/date] key with
the cash register in the REG 1 or REG 2 mode. Once the date is
displayed, the time will be automatically redisplayed after 30 seconds
of cash register inactivity.
Special Symbol Indicators
Special symbols appear at the far left-hand side of the displays during
cash register operation. These symbols identify the amount shown, or
warn of an error condition. They include:
C (Change) Indicates that the displayed amount is the change due
to the customer.
E (Error) Indicates when an error is made during operation or
when programming the cash register. An error tone sounds
to alert the operator.
S (Sub-total) Indicates that the amount shown is the subtotal of a
transaction, including sales tax if applicable.
= (Total) Indicates that the amount shown is the transaction total.
- (Minus) Displays a negative entry. Also displays if subtotal or cash
tendered total is a negative number due to a return or
refund.
CA (Cash) Indicates when the total displayed refers to a sales
transaction paid by cash.
Ch (Check) Indicates when the total displayed refers to a sales
transaction paid by check.
Cr (Charge) Indicates when the total displayed refers to a sales
transaction paid by charge.
ENGLISH
7
Page 15

Depending on the currency base set, displayed when the
Euro key is pressed to indicate that the amount is
displayed in the Euro currency or in the local currency.
• Indicates when the cash register is in the training mode.
These symbols clear automatically when you start the next entry or
press the [clear] key.
General Clearance
If the cash register does not function, for example while programming
and the error signal cannot be stopped by pressing the [clear] key,
perform a general clearance. There are two ways of performing a
general clearance, whereby the second method resets all totals and
counters and cancels the programming. Use this method only as
last resort.
Error Conditions
The Error Alarm
The error alarm warns of an operator error (usually when a wrong key
is pressed for a specific type of entry) or of an error made during cash
register programming. The error alarm can also indicate that the
Control Lock is in the wrong position for the current operation. In case
of error, the error tone sounds, the letter E is displayed on the customer
display, the message ERROR is displayed on the operator display and
the keypad locks.
Clearing an Error
Press the [clear] key to clear an error. The tone ends, the displays
clear and the keypad unlocks, allowing you to continue with the
transaction or restart the program.
If an error condition cannot be cleared, perform a general clearance.
Bear in mind, however, that one of the two general clearance
procedures, explained in the next section, will set all counters and
totals to zero and will cancel all programmed functions.
NOTE: The [clear] key also clears an incorrect entry from the display
prior to pressing a registration key. Once an entry is printed,
the [void] key must be used to correct an error.
8
General Clearance without Clearing Totals and the
Programming
1. Turn the Control Key to the OFF position.
2. Unplug the cash register from the power socket.
3. Wait ten seconds and then reconnect the cash register to the power
socket to continue.
If the cash register remains in an error condition, proceed with the
second general clearance method.
General Clearance with the Clearing of Totals and all
Cash Register Programming
NOTE: Be careful that this procedure erases all totals and counters,
and cancels the programming of the cash register.
1. Turn the Control Key to the OFF position.
2. With the cash register still plugged to the power outlet, open the
printer compartment cover and press the Reset button on the rear
left-hand side.
3. Reprogram the cash register upon completion of its initialization
routine.
Page 16
Voiding Errors
Once an entry is printed, the [clear] key cannot be used to clear an
error. Press the [void] key to correct an error already registered.
Voiding the Entry Just Completed
Simply press the [void] key. The entry is reprinted with a "-" symbol
followed by the amount and erased from the transaction.
Voiding an Earlier Entry
To void an earlier entry, register it again and then cancel it using the
[void] key. When a transaction including the error is completed,
proceed with the following steps to void the error.
1. Retype the incorrect information, exactly as originally entered, and
press the [void] key.
2. Enter the correct amount.
3. Total the transaction by pressing the [amt tend/total] key.
Memory Back-up Battery System
During cash register operations, all transaction data for the management reports are stored in the cash register's memory. This memory also
holds all of the cash register's programming data. The memory back-up
battery inside the cash register keeps this information stored in memory
when the cash register is unplugged from the power outlet or when a
power failure occurs.
To activate the memory back-up battery system, charge the backup
battery by keeping the cash register plugged into a grounded power
outlet for at least 48 hours. The cash register can be used normally
during this period of time.
Printer Compartment
The printer compartment is on the upper left-hand side of the cash
register. It houses the customer receipt and journal paper rolls, journal
winder spindle, inked ribbon cartridge, the dot-matrix printer and the
Reset button.
Ribbon Cartridge
This cash register uses a standard inked ribbon cartridge that needs
replacing when faded characters are starting to print. The next section
explains how to install the ribbon cartridge.
Installing the Ribbon Cartridge
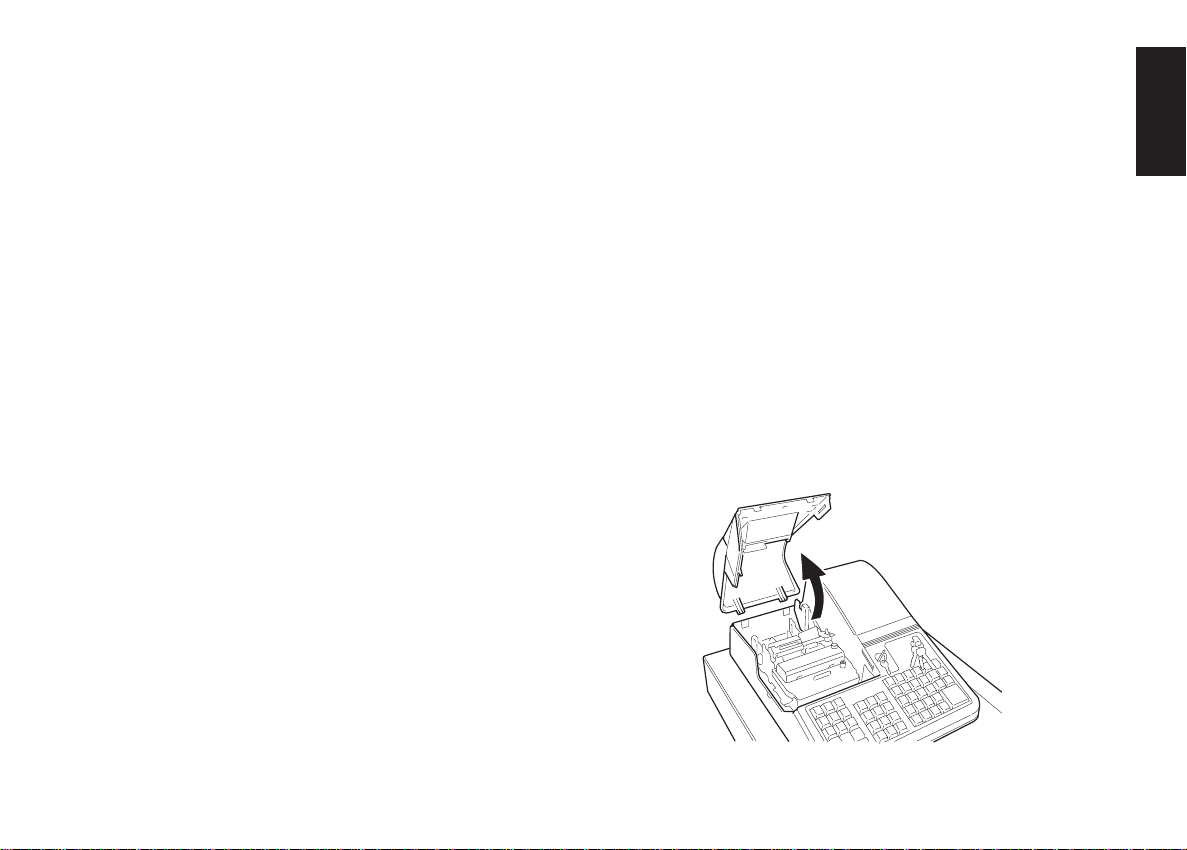
Proceed as follows when you wish to install a new cartridge:
1. Turn the Control Lock to the OFF position, unlock the printer
compartment cover and remove it from the cash register by firmly
gripping the back of the cover and gently lifting the front upwards
to release its snap features from the case.
ENGLISH
9
Page 17
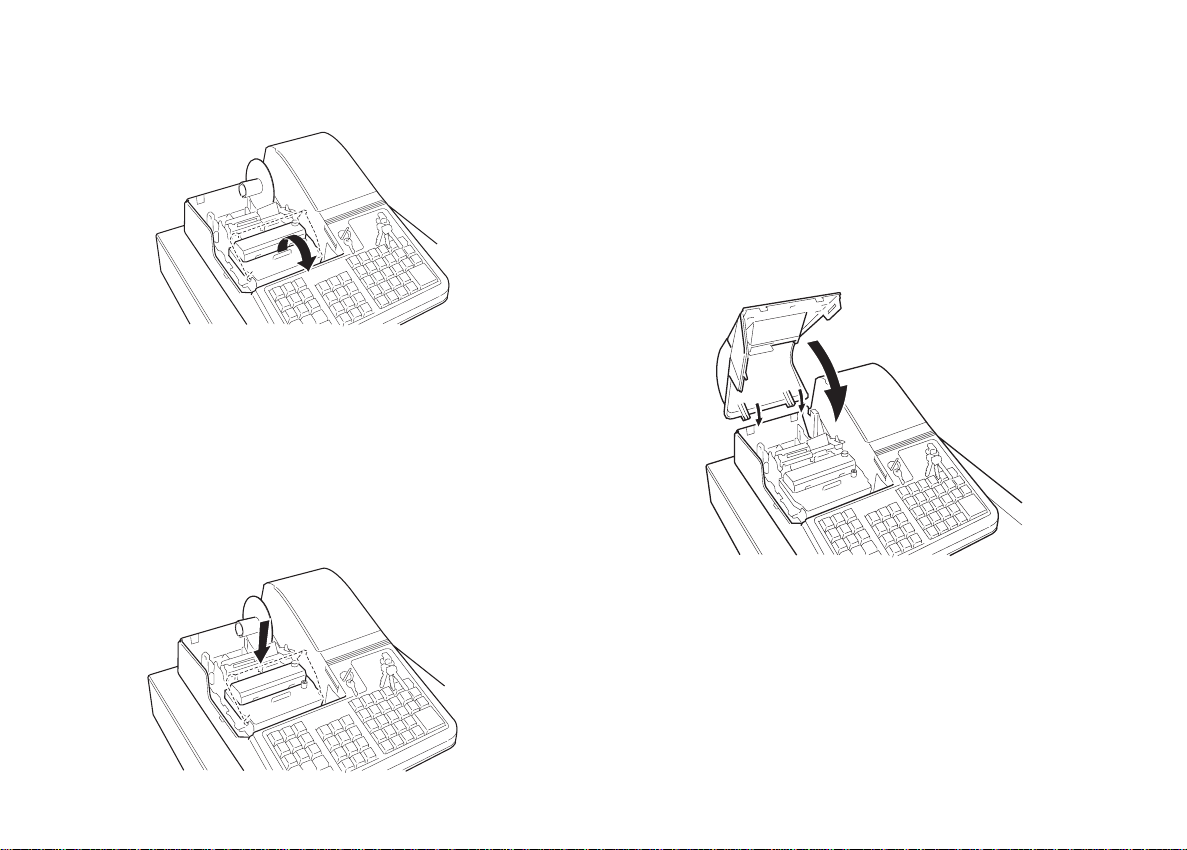
2. Remove the old ink cartridge by pulling the plastic tab on the front
of the cartridge towards you while rotating the cartridge.
3. Extract the inked ribbon cartridge from its sealed package and
slightly turn the ribbon tension knob on the front of the cartridge
clockwise (in the direction of the arrows on the cartridge) to tighten
the ribbon properly.
4. Holding the cartridge by its front plastic tab, place the lower edge of
the cartridge on the printer assembly’s cartridge support base and
then snap the cartridge into place by rotating it forward while
pressing downward. Note that the inked ribbon must slide into its
related slit in front of the print mechanism.
5. Slightly turn the ribbon tension knob on the cartridge clockwise (in
the direction of the arrows on the cartridge) to ensure that the
ribbon is properly taut.
6. Reposition the printer compartment cover by firstly inserting its rear
snap features into the related slots on the case and then gently
tilting the front part of the cover downward so the side and front
snap features slip perfectly into their respective slots. When doing
so, remember to ease the customer receipt through the customer
receipt output slot on the cover so that it can then be fed outside the
machine. Lock the compartment cover once positioned.
10
Page 18
Paper Tape
This cash register uses two rolls of standard 37.5 + 0.5 mm paper.
One roll is is used for the customer receipt while the other roll is used
for the journal record. The paper needs to be changed when a red line
appears on the tape.
Loading the Customer Receipt Roll
Proceed as follows to load a customer receipt roll into the cash
register:
1. Make sure that the cash register is plugged into a grounded power
outlet and that the Control Key is in either one of the two REG
positions.
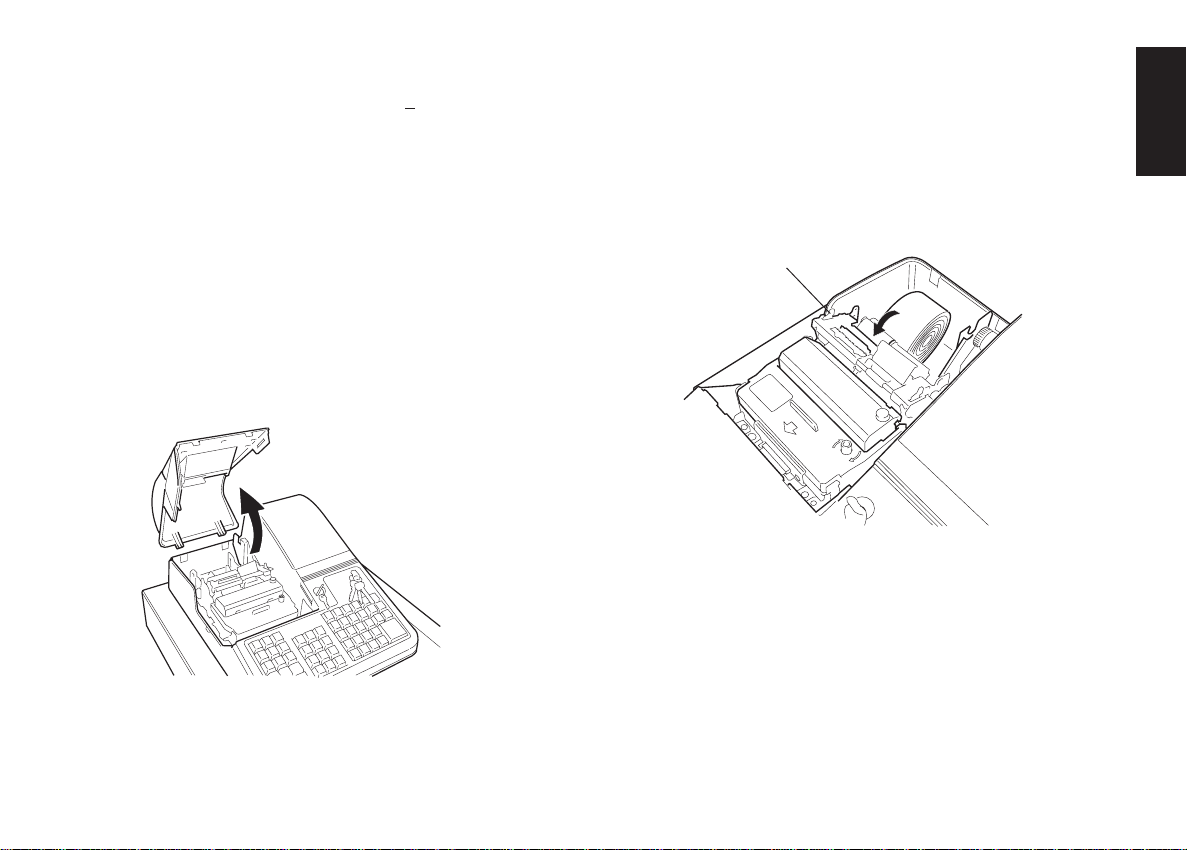
2. Unlock and remove the printer compartment cover as explained in
the section Installing the Ribbon Cartridge.
3. With a pair of scissors, cut the end of the new paper tape to create a
straight, even edge so that the paper can be properly fed through the
print mechanism.
4. Set the customer receipt roll in its predefined slot at the rear lefthand side of the printer compartment so that the paper feeds out
from the bottom of the roll. Then insert the end of the paper into the
related paper feed slot, indicated by an arrow on the metal frame, as
shown in the following figure.
A
5. Press the [R feed] key and manually feed the paper into the slot
until its catches and advances approximately six to ten inches above
the print mechanism.
NOTE: If the paper does not feed properly, make sure that the paper
roll is properly aligned in the slot and that the end of the paper
roll is cut straight. If you need to remove the paper tape so that
you can attempt to reload it again, move the plastic release
lever (A) on the side of the metal frame forward, in the
direction of the arrow on the frame, and clear the paper
from the slot.
ENGLISH
11
Page 19
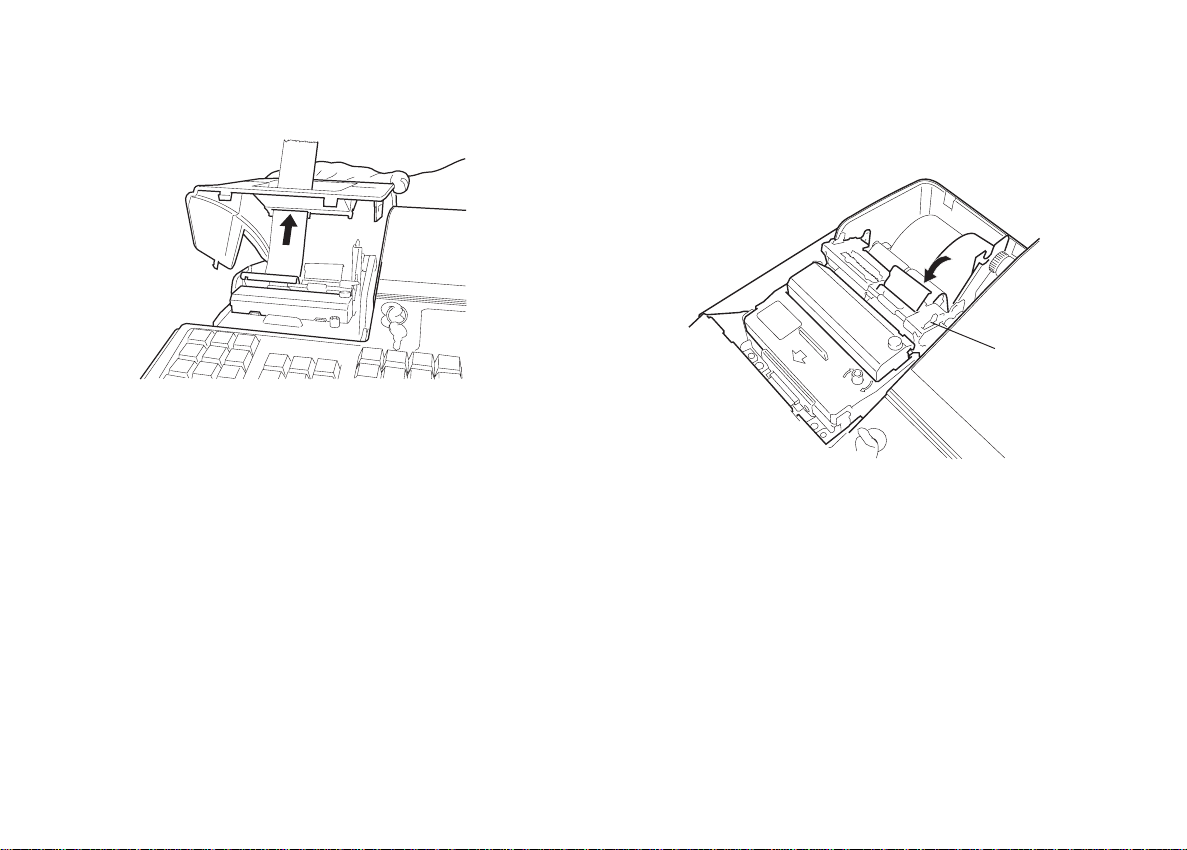
6. Pass the end of the customer receipt through the opening on the
compartment cover, then reposition, close and lock the compartment
cover.
Loading the Journal Roll
Proceed as follows to load a journal roll into the cash register:
1. Make sure that the cash register is plugged into a grounded power
outlet and that the Control Key is in either one of the two REG
positions.
2. Unlock and remove the printer compartment cover as explained in
Installing the Ribbon Cartridge.
3. If you are replacing the journal roll, lift the plastic journal winder
spindle from its support on the machine and, if necessary, move the
plastic paper release lever located to the upper left of the journal
paper insertion slot forward to release the paper which may still be
present in the print mechanism. Then slide the journal paper off the
plastic winder.
4. With a pair of scissors, cut the end of the new paper tape to create a
straight, even edge so that the paper can be properly fed through the
print mechanism.
5. Set the journal roll in its predefined slot at the rear right-hand side
of the printer compartment so that the paper feeds out from the
bottom of the roll. Then insert the end of the paper into the related
paper feed slot, indicated by an arrow on the metal frame, as shown
in the following figure.
A
6. Press the [J feed] key and manually feed the paper into the slot
until its catches and advances approximately six to ten inches above
the print mechanism.
NOTE: If the paper does not feed properly, make sure that the paper
roll is properly aligned in the slot and that the end of the paper
roll is cut straight. If you need to remove the paper tape so that
you can attempt to reload it again, move the plastic release
lever (A) on the side of the metal frame forward, in the
direction of the arrow on the frame, and clear the paper from
the slot.
12
Page 20

7. Holding the plastic journal winder with the two wheels to the righthand side, slide the end of the paper tape through one of the slots on
the plastic journal winder spindle (1) and manually roll the winder
toward the rear of the cash register (2) to take up the slack in the
paper tape.
8. Place the journal winder back onto its support bracket (3), making
sure that the small external gear on the winder meshes perfectly
with the gears of the paper feed mechanism.
2
1
3
9. Reposition, close and lock the compartment cover.
Quick Start
Quick Start is a brief but complete start-up procedure that allows you
to begin using your new cash register as quickly as possible. Carefully
follow the steps listed below:
1. Make sure cash register is plugged into a grounded power outlet.
To activate the memory back-up battery system, charge the
back-up battery by keeping the cash register plugged into a
grounded power outlet for at least 48 hours. The cash register
can be used normally during this period of time. A charged
memory back-up battery will hold all transaction data for management reports and all of the cash register's programming data stored
in memory when the cash register is turned off or when a power
failure occurs.
2. Insert the PRG key into the Control Lock and turn it to the PRG
position.
3. Set the current date in the day/month/year format by typing the
corresponding numeric keys and then pressing [#/st/ns]. Single
digits must be preceded by a zero. For example, to set June 23,
2000, type [230600] and then press the [#/st/ns] key to store your
entry. The newly entered date is printed.
If you wish that the date just entered be printed and displayed
in the month/day/year format, type [40] and then press the
[void] Key.
4. Set the current time using the 24-hour (military) format and then
pressing [qty/date]. Also in this case single digits must be preceded
by a zero. For example, to set 1:05 P.M., type [1305] and then press
the [qty/date] to store your entry. To set 9:15 A.M., type [0915] and
then press [qty/date]. The newly defined time is printed.
If you wish that the time just entered be printed and displayed in the
24-hour format, type [180] and then press the [void] Key.
ENGLISH
13
Page 21

5. Set a machine number by entering a four digit number and then
pressing [+%/PO]. For example, to set machine number 5, type
[0005] and then press [+%/PO]. The newly assigned machine
number is printed.
6. Set the first of up to four possible VAT rates. For example, to set a
VAT1 rate of 16%, type [1] and then press the [tax set] key, type
[16000] (three digits must be entered after the desired decimal
point) and then confirm with the [amt tend/total] key. The VAT
rate followed by T1 is printed.
7. Set the Euro exchange rate for your local currency. For example, to
program an exchange rate of £ 0.62 to the EURO, type [2] followed
by [2] again to define the decimal point positions, type the exchange
rate of [000062] and press the [euro] key. The Euro exchange rate
is printed.
8. Program standard Department 1 as VAT1 to a multiple item price
sale. For example, to assign VAT1, multiple item cash sale and
a price of £3.00 to standard Department 1, type [00001] and
then press [st/w/tax/2nd], type [300] and then press
[department 1/21]. Press the [clear] key to clear the displays.
9. Change, if necessary, the language in which the cash register prints
the customer receipt and journal record. The cash register is
programmed to print the customer receipt and journal record in
English. If you wish to reprogram the cash register to print in
Spanish, French or German:
Type [19] followed by [1] and [void] to print in Spanish, [19]
followed by [2] and [void] to print in French or [19] followed by [3]
and [void] to print in German.
To print in English again, type [19] followed by [0].
10.When programming is complete, exit the program mode by turning
the PRG key to the OFF position.
11.Practice normal sales transactions by switching the cash register
into the Training Mode. This mode is very useful to new users as it
allows them to simulate sales transactions without recording these
trials in the X or Z management reports. More information on this
mode is given in the section entitled Training Mode.
Once you have mastered the Quick Start operations, you will undoubtedly want to expand your use of the machine by studying other sections of
this manual and incorporating new programming into your personalized
cash management system. For example, other valueable functions include
Percent Discount Rate, Percent Plus Rate, Price Look-Ups (PLUs),
receipt caption and information format personalization.
Helpful Hints for a Successfull Start-Up
This cash register has up to 40 departments available. You may
assign the taxable status to any other department by repeating the tax
assignment procedure used for Department 1. For departments 21-40,
press the [dept shift] key before the applicable department key. For
example, to select Department 26 press [dept shift] followed by the
[department 6/26] key.
Training Mode
The optional training mode is designed to help you become better
acquainted with the cash register and offers an ideal place for
beginners to practice transaction examples. Once the training mode is
activated, you cannot operate in the PRG, X or Z modes. The transactions made in the training mode are not summed to machine totals, are
not recorded in the X, Z or journal reports. Receipt numbers are not
counted either: the number of the last transaction receipt issued before
entering the training mode will be printed on each training receipt.
14
Page 22

Activating the Training Mode
Proceed as follows to switch the cash register into the training
mode:
1. Turn the PRG control key to the PRG position.
2. Type [666666] and press the [amt tend/total] key. A dot indicat-
ing the Training Mode On condition is displayed on the left-hand
side of the operator and customer displays.
3. Turn the key to the REG 1 or REG 2 position to perform normal
cash register operations.
Exiting the Training Mode
Proceed as follows to exit the training mode and therefore re-enable
the cash register to record all sales transactions in the X and Z
management reports and in the machine totals.
1. Turn the PRG control key to the PRG position.
2. Type [555555] and press the [amt tend/total] key.
3. Turn the key to the desired operating position.
Cash Register Programming
This cash register can be programmed to tailor its features according
to your specific needs. This programming facility allows you to:
• Define three-digit secret codes for each of the 26 programmable
clerks
• Define clerk names
• Set a machine number
• Set the date and time
• Personalize the customer receipt header
• Set percent discount (-%) rates
• Set percent plus (+%) rates
• Define fraction rounding
• Define decimal point positions
• Define up to four VAT rates
• Define Price Look-Ups (PLUs) for individual items and enter an
item description
• Define tax status and High Digit Lock Out to the minus key
• Define tax status, High Digit Lock Out, Single/Multiple item sale
and relative price to a determined defined department
• Set an exchange rate for the Euro currency
• Personalize the Euro and Local captions, the net converted, Credit-1,
Credit-2 and media-in-drawer captions on the receipts and reports
• Program the different system options available
• Print programming reports
• Define manager passwords for the PRG, X and Z modes.
Set some of or all of the above features, depending on your business
needs. These program settings will reside in the cash register's memory
until you change them or reset the memory by pressing the Reset button
located at the rear left-hand side of the printer compartment.
The cash register's memory can also be cleared by means of specific
programming sequences. Refer to the section Clearing the Cash
Register's Memory.
ENGLISH
15
Page 23

Setting Cash Register Features
All cash register features are programmed by first switching the
cash register to the program (PRG) mode.
This chapter provides simple step-by-step procedures on how to
program the cash register. An example is provided after each procedure.
It is suggested that you first run through all the examples to become
familiar with the cash register's programming facilities, then program
the cash register according to your own specific needs.
NOTE: Program all the desired features at the same time in order to
create a single receipt of all selections. Keep the receipt in a
safe place for future reference.
Exiting the Program Mode
Proceed as follows to exit the program mode once you have finished
programming the cash register:
1. Print a Program Tape by pressing [999999] followed by the
[amt tend/total] key, as explained in the section entitled Overall
Programming Dump Report, for a printed report on how the cash
register is currently programmed.
2. Store the program tape in a safe place for future reference.
3. Turn the PRG key to the REG position if you wish to carry out sales
transactions, or to the OFF position if you wish to exit.
Making Changes to Cash Register Programming
Once the cash register is programmed to satisfy your specific needs,
there is no need to reprogram the entire machine to make single
program changes or corrections. If you wish to make a change (such as
an update to VAT rates, PLUs or Euro exchange rates), be sure you are
in the program mode, re-do the program in question and finalize when
you are ready to exit the programming mode. A new program entry will
automatically overwrite a previous entry for the same program.
Entering the Program Mode
To enter into the program mode simply insert the PRG key into the
Control Lock and turn it to the PRG position.
16
Clearing Errors
To clear an error made during the programming phase, simply press
the [clear] key. The error tone ends, the display clears and the keypad
unlocks.
In case an error condition cannot be cleared, perform one of the two
general clearance methods explained in the section entitled General
Clearance. Remember that the second general clearance sets all
counters and totals to zero, and cancels all features programmed.
Page 24

Clerk Numbers, Secret Codes and Names
Clerk codes are a special security feature to control access to the
register. You can program up to 26 individual clerk numbers linked to
secret entry codes of three digits each. By enabling the Clerk System
Active option as indicated in the Programming System Options section,
the register assigns the default security [000] to all clerks. You can also
assign a name to each of the 26 Clerks, which will be printed on the
customer receipts, on the journal and on all management reports
analysing the transactions of that specific Clerk.
Programming a Secret Code Linked to a Clerk
Number
1. Insert the PRG key into the Control Lock and turn it to the PRG
position.
2. Type [121] and then press the [void] Key to activate the Clerk
system.
3. Type [444444] and press the [amt tend/total] key. The symbol "C"
is displayed on the left-hand of the displays and the message
"CLERK PASS" is displayed on the upper row of the operator
display.
4. Type a number to which the secret code will be linked.
5. Set a three-digit secret code by typing three [numeric keys].
6. Press the [clerk] key.
Repeat the above operations (from step 4 to step 6) to assign a secret
code to the remaining 25 Clerks or use the [clear] key to exit from
Clerk Secret Code programming.
If you wish to change the clerk's secret code and the Clerk system is
already activated, there is no need to perform step 2 above.
Example: Assign secret code 106 to Clerk 1 for the first time.
Type/Press:
[121] + [void] + [444444] + [amt tend/total] + [1] + [106] + [clerk]
Deactivating the Clerk System
Proceed as follows if for any reason you wish to deactivate the Clerk
system, in other words if you no longer want to enter a clerk number
and related secret code to perform sales transactions.
1. Insert the PRG key into the Control Lock and turn it to the PRG
position.
2. Type [120] and then press the [void] key.
Entering a Clerk Number/Secret Code Before Cash
Register Operations
Proceed as follows to enter a defined Clerk number and secret code
before using the cash register in REG 1/REG 2 operating mode.
1. Turn the Control Lock to the REG 1/REG 2 position.
2. Type a Clerk number [1, 2, ... or 26].
3. Type the corresponding three-digit code.
4. Press the [clerk] Key.
The clerk number appears on the left-hand side of the operator and
customer displays and the message "CLERK 1" or the name of the clerk
is displayed on the upper line of the operator display and is printed
under the date on the customer receipt and journal.
Assigning Clerk Names
This cash register feature is useful for rapid identification of the
different clerks which are enabled to use the cash register. You can
program a clerk name or identifier of up to 18 characters long by using
the Character Code Table provided in the Appendix of this manual or
by using the alphanumeric keypad. The assigned Clerk name will be
automatically printed on all receipts, journal records and management
reports carried out with the associated clerk number and displayed on
the upper row of the operator display. However, you can also program
the cash register to not print the assigned Clerk name. Refer to the
section entitled Programming System Options for more information.
17
ENGLISH
Page 25

Proceed as follows to define a clerk name using the Character Code
Table:
1. Turn the PRG key to the PRG position.
2. Type the number of the Clerk whose name is to be defined.
3. Press the [return] key. The letter "P" appears on the left-hand side
of the operator and customer displays while the message "CLERK
NAME" is displayed on the operator display.
4. With reference to the Character Code Table in the Appendix, type
the string of character codes to define the letters of a name and then
press the [check/valid] key. Up to a maximum of 18 digits can be
entered. The name entered will be printed.
Example: Program Christina as the name for Clerk number 1.
Type/Press:
1 + [return] + [43 09 19 10 20 21 10 15 02] + [check/valid]
You can also define a clerk name by using the alphanumeric keypad.
Proceed as follows to do so:
1. Turn the PRG key to the PRG position.
2. Type the number of the Clerk whose name is to be defined.
3. Press the [return] key. The letter "P" appears on the left-hand side
of the operator and customer display while the message "CLERK
NAME" is displayed on the operator display.
4. Type the [dept] key corresponding to the letter wanted. If the
letter wanted is on the bottom half of the [dept] key, press the
[dept shift] key first then the related [dept] key. After entering the
letter string wanted, press the [check/valid] key. The name entered
will be printed.
Example: Program Alex as the name for Clerk number 2.
Type/Press:
2 + [return] + [1/21 12/32 5/25] + [dept shift] + [4/24] + [check/valid]
Machine Numbers
The machine number is a four-digit number used to identify the cash
register. The machine number is printed on all receipts, journal records
and management report.
Proceed as follows to set a machine number:
1. Turn the PRG key to the PRG position.
2. Type the [numeric keys] corresponding to the machine number to
be assigned (up to 4 digits, 0-9999).
3. Press the [+%/PO] key.
Example: Program machine number 5621.
Type/Press:
[5621] + [+%/PO]
Date and Time
Set the date option to print the current date at the top of each receipt,
journal record or management report. The date will print in the day/
month/year format unless otherwise programmed as explained in the
section entitled Programming System Options. You can display the date
by pressing the [qty/date] key when the cash register is in the REG
mode.
Set the time option to print the current time at the bottom of the
receipt in the hour:minutes format. The time is automatically shown on
both customer and operator displays after 30 seconds of cash register
inactivity with the control key in either one of the two REG positions.
The date and time change automatically as long as the cash register is
plugged into the wall outlet or the battery back-up system inside the
cash register remains active.
18
Page 26

Setting the Date
Proceed as follows to set the current date:
1. Turn the PRG key to the PRG position.
2. Type the [numeric keys] representing the current date. Remember
to use the DDMMYY format. Single digit numbers for months and
days must be preceded by a zero (0).
3. Press the [#/st/ns] key to store the date. The date entered is printed.
4. Press the [clear] key to program another feature or exit the program
mode by turning the PRG key to the OFF position.
Example: Set a date of June 23, 2000.
Type/Press:
[230600] + [#/st/ns]
NOTE: If you wish that the date just entered be printed and displayed
in the month/day/year format, type [40] and then press the
[void] Key. More information on how to change the cash
register's basic programming is explained in the section
Programming System Options.
Setting the Time
Proceed as follows to set the correct time in the hour:minutes format:
1. Turn the PRG key to the PRG position.
2. Type the [current time] using the HH:MM format.
NOTE: Time is set according to international, or military time
(24-hour clock format). To correctly enter this time, simply
add 12 to all hours in the PM. For example, to set the time to
9:00 AM, type [0900]; to set the time to 2:15 PM, type [1415].
3. Press the [qty/date] key to store the entered time. The newly
defined time is automatically printed.
4. Press the [clear] key to program another feature or exit program
mode by turning the PRG key to the OFF position.
Example: Set the time at 3:30 PM.
Type/Press:
[1530] + [qty/date]
NOTE: If you wish that the time just entered be printed and displayed
in the 24-hour format, type [180] and then press the [void]
key. More information on how to change the cash register's
basic programming is explained in the section Programming
System Options.
Receipt Header
Your cash register is programmed to print a courtesy header enclosed
in a box delimited by asteriscs, on all customer receipts and reports
when the control lock is in the REG 1, X and Z positions. With the
control lock in the REG 2 and PRG positions, the header will not be
printed.
NOTE: You can change the programmed language in which the cash
register prints the header on the customer receipt and journal
record. Turn to the section Programming System Options,
Machine Condition 19, to see in which languages the cash
register can print the default receipt header.
The receipt header can consist of up to five lines of 18 characters
each. You can change the cash register's default header according to
your own business needs by using the alphanumeric keypad or the
Character Code Table provided in the Appendix, to enter the characters
for your new header.
Personalizing the Receipt Header
Proceed as follows to change the default receipt header:
1. Turn the PRG key to the PRG position.
2. Type [3] followed by the [number] of the line (n = 1....5) you wish
to modify and then press the [return] key. The letter "P" appears on
the left-hand side of the displays and the message "LOGO LINE n"
is displayed on the operator display where n is the number of the
line to change.
19
ENGLISH
Page 27

3. Using the cash register's aphanumeric keypad or the Character Code
Table in the Appendix, type the character code string for the letters
to be entered on this particular line selected. Remember that up to
18 characters can be entered. If you wish to center a writing, you
will need to calculate the empty character spaces before and after
your string and type the appropriate blank space code (00) in the
corresponding places. Use the [void] key as backspace function to
clear an incorrect character entry if necessary.
4. Press the [check/valid] key again to store the newly defined header
line. This new line is automatically printed.
5. Repeat steps 3 and 4 if you wish to program the remaining three
programmable header lines.
Example: Change the fourth line of the default header to *SEE YOU
SOON* with the appropriate spaces before and after to center this new
string and using the Character Code Table provided in the Appendix.
Type/Press:
[3] + [4] + [return] + [76 00 00] + [59 45 45 00] + [65 55 61 00] +
[59 55 55 54] + [00 00 76] + [check/valid]
NOTE: If you wish to use the alphanumeric keypad to type the header
SEE YOU SOON, type [00] for the spaces and then press the
Dept key corresponding to the letter wanted. If the letter
wanted is on the bottom half of the key, firstly press the [dept
shift] key and then the related [dept] key. The asterisk can
only be entered by typing its corresponding code (76) from the
Character Code Table in the Appendix.
Percent Discount (-%)
Setting this option automatically calculates the preset rate each time
the [-%/RA] key is pressed. The percentage rate can be discounted from
an individual item, or from a sales transaction total when the key is
pressed after a subtotal.
Setting a Percent Discount (-%) Rate
Proceed as follows to define a standard discount rate:
1. Turn the PRG key to the PRG position.
2. Type the [numbers] representing the desired percentage rate. Up to
four digits ranging from 0 to 99.99 can be used, and you MUST
enter a total of four digits, two before and two after the desired
decimal place. For example, to enter 10%, type [1000], to enter
6.5% type [0650].
3. Press the [0] key followed by the [-%/RA] key to store the rate.
The programmed rate is printed with the caption "DISCOUNT".
4. Press the [clear] key to program another feature otherwise exit the
program mode by turning the key to the OFF position.
Example: Program a standard 10% discount rate.
Type/Press:
[1000] + [0] + [-%/RA] + [clear]
Percent Plus Rate (+%)
Setting this option automatically calculates the preset add-on rate
each time the [+%/PO] key is pressed. This percentage rate can be
added to an individual item, or to a transaction total when the key is
pressed after a subtotal.
Setting a Percent Plus (+%) Rate
Proceed as follows to define a standard add-on rate:
1. Turn the PRG key to the PRG position.
2. Type the [numbers] representing the desired percentage rate. Up to
four digits ranging from 0 to 99.99 can be used, and you MUST
enter a total of four digits, two before and two after the desired
decimal place. For example, to enter 10%, type [1000], to enter
6.5% type [0650].
3. Press the [0] key followed by the [+%/PO] key to store the rate.
The programmed rate is printed along with the caption "ADD ON".
20
Page 28

4. Press the [clear] key to program another feature otherwise exit the
program mode by turning the PRG key to the OFF position.
Example: Program a standard 3% add-on rate.
Type/Press:
[0300] + [0] + [+%/PO] + [clear]
Fraction Rounding
Fraction rounding is used to round figures with decimals up or down
to the nearest whole numbers and is used for percent tax, percent
discount and percent add-on calculations. The machine is preset with
rounding code "50" where a fraction under one half pence is rounded
down one pence, a fraction above one half pence is rounded up one
pence. Choose from the following three options to select the rounding
as needed:
Rounding Code Fraction Rounding
00 a fraction of a pence is rounded down one pence
50 a fraction under one half pence is rounded
down one pence, a fraction above one half pence
is rounded up one pence
99 a fraction of a pence is rounded up one pence
For the Swiss franc, French franc, Danish krone and Swedish krona
currencies, you can program the machine so that the subtotal and total
of a transaction are automatically rounded accordingly whenever the
[st/w/tax/2nd] or [amt tend/total] key is pressed. For the possible
rounding options available, refer to the section Rounding Option for
Swiss, French, Danish and Swedish Currencies.
Setting the Rounding Code
Proceed as follows to program fraction rounding:
1. Turn the PRG key to the PRG position.
2. Type the [rounding code] and press the [charge] key. The pro-
grammed rounding code is automatically printed along with the
caption "CHARGE".
3. Press the [clear] key to program another feature, otherwise exit the
program mode by turning the PRG to the OFF position.
Example: Program the rounding code so that a fraction of a pence is
rounded down one pence.
Type/Press:
[00] + [charge] + [clear]
Decimal Point Position
The decimal point setting is preset to the x.xx format. This format
can be changed, as needed, to one of the other settings below.
Changing the Decimal Point Position
Proceed as follows to define a new position for the decimal point.
1. Turn the PRG key to the PRG position.
2. Type the status number [0, 1, 2 or 3] to select the desired format as
indicated in the following table:
Status Number Format
0x
1 x.x
2 x.xx
3 x.xxx
ENGLISH
21
Page 29

3. Press the [-%/RA] key to set the new format. The setting made is
automatically printed along with the caption "R-A-".
4. Press the [clear] key to program another feature, otherwise exit the
program mode by turning the PRG to the OFF position.
Example: Program the cash register so that two digits are left after the
decimal point.
Type/Press:
[2] + [-%/RA] + [clear]
Value Added Tax (VAT) Rates
Up to four VAT rates (VAT 1, VAT 2, VAT 3 and VAT 4) can be preset
in the cash register. A maximum 5-digit VAT rate can be programmed
(0-99.999%).
Setting a Fixed VAT Rate
Proceed as follows to program a fixed tax rate:
1. Turn the PRG key to the PRG position.
2. Type the [numbers] which represent the VAT (1 for VAT 1, 2 for
VAT2, 3 for VAT 3 and 4 for VAT 4).
3. Press the [tax set] key. The message "TAX n RATE" appears on the
operator display where n is the number representing the VAT rate.
4. Type the VAT rate. Up to five digits can be used, and you MUST
enter three digits after the desired decimal place. For example, to
enter a 5.5% VAT rate, type [5500]; to enter a 16% VAT rate, type
[16000].
5. Press the [amt tend/total] key. The tax rate entered followed by its
alphanumeric identifier (T1, T2, T3 or T4) is printed.
NOTE: If you make an error, press the [clear] key and start again from
step 3.
6. Press the [clear] key to program another feature, otherwise exit the
program mode by turning the PRG key to the OFF position.
Example: Set a VAT 1 rate of 5.5%, VAT 2 rate of 7%, VAT 3 rate of
15% and a VAT 4 rate of 20%.
Type/Press:
[1] + [tax set] + [5500] + [amt tend/total]
[2] + [tax set] + [7000] + [amt tend/total]
[3] + [tax set] + [15000] + [amt tend/total]
[4] + [tax set] + [20000] + [amt tend/total]
High Digit Lock Out (HDLO) and Tax Status
Assigned to the Minus Key (-)
You can limit the number of digits, i.e. the maximum value of a
minus key operation, from 1 to 6 digits. This makes sure that minus key
amounts do not exceed a maximum amount. You can also assign a VAT
rate or a non tax status to the minus key.
Make your selections for this feature from the following options:
High Digit Lock Out Taxation
0 = No HDLO 00 = Non taxable
1 = 1 digit (0.09) 01 = VAT 1
2 = 2 digits (0.99) 02 = VAT 2
3 = 3 digits (9.99) 03 = VAT 3
4 = 4 digits (99.99) 04 = VAT 4
5 = 5 digits (999.99)
6 = 6 digits (9999.99)
22
Page 30

Programming the High Digit Lock Out and Tax Status
1. Turn the PRG key to the PRG position.
2. Type the HDLO code [0-6].
3. Type the tax status code [00-04].
4. Press the [-] key. A minus sign appears on the displays and the
caption "COUPON" is printed on the receipt along with the
programmed tax status.
5. Press the [clear] key to program another feature, otherwise exit the
program mode by turning the PRG key to the OFF position.
Example: Allocate a maximum of 5 digits and VAT 2 to the minus key.
Type/Press:
[5] + [02] + [-]
Tax Status, High Digit Lock Out, Single/Multiple
Item Sale and Price Linked to a Department
You can assign the following to individual departments:
• A department status, consisting of:
- Department definition, meaning a Standard department where
ordinary items are sold or a Negative department where
negative sales transactions are recorded.
- Single item cash sale or multiple item sale capability whereby
the department will ring up each item entered as a single item
sale with exact change tender or as a multiple item sale.
- A High Digit Lock Out code whereby you prohibit item entries
for a certain number of digits and above.
- A taxable or non-taxable status.
• The price which will ring up automatically every time the appropriate department key has been pressed. You can also skip this option,
in which case the price has to be entered manually before pressing
the department key.
• A maximum 12-character description of the item associated to the
specific department key.
The 5-digit department status can be programmed using the following
options:
Dept. Def. Single/Multiple Item High Digit Lock Out Tax Status
Cash Sale
0 = Standard 0 = Normal 0 = No HDLO 00 = Non tax.
Dept. 1 = Single item cash 1 = 1 digit (0.09) 01 = VAT 1
1 = Negative 2 = 2 digits (0.99) 02 = VAT 2
Dept. 3 = 3 digits (9.99) 03 = VAT 3
4 = 4 digits (99.99) 04 = VAT 4
5 = 5 digits (999.99)
6 = 6 digits (9999.99)
ENGLISH
23
Page 31

Linking an HDLO, Tax Status, Single/Multiple Item Cash
Sale, Item Price and Description to a Department
1. Turn the PRG key to the PRG position.
2. Type the [department definition], [single/multiple item cash
sale], [HDLO] and [tax status] options by referring to the previous
table.
3. Press the [st/w/tax/2nd] key to confirm your entry. The message
"DEPT PRICE" appears on the operator display and the codes of the
options programmed will be printed along with the caption
"SUBTTL".
4. Type a [price] to assign to a specific item and then press the
relative [department] key. The message "DEP n NAME" appears
on the operator display and the amount entered is printed along with
the caption "DEPT n", where the n in both cases represents the
department number.
5. With reference to the Character Code Table in the Appendix or by
using the alphanumeric keypad, define the department descriptor
(max 12 chars, spaces included).
6. Store the item descriptor entered by pressing the [check/valid] key.
7. Press the [clear] key to program another feature, otherwise exit the
program mode by turning the PRG key to the OFF position.
Example: Assign a five digit HDLO, VAT 1, multiple item sale, a price
of £2.50 to an item in Standard Department 1 named Groceries defined
using the Character Code Table.
Type/Press:
[0] + [0] + [5] + [01] + [st/w/tax/2nd] + [250] + [department 1/21] +
[47 58 55 43 45 58 49 45 59] + [check/valid]
NOTE: If you wish to rename the Groceries department back to
DEPT 1, repeate the procedure and enter the character code
string [44 45 56 60 00 31] (or type the related characters on
the alphanumeric keypad).
Price Look-Ups (PLUs)
Price Look-Ups simplify cash register operations by automatically
registering an individual item's price (up to 999 can be registered),
maximum 12-character description (spaces included), department
number, tax status and rate (if applicable). To look up individual item
prices, simply type the item's corresponding PLU number and press the
[plu] key.
Creating Price Look-Ups
Proceed as follows to create a price look-up:
1. Turn the PRG key to the PRG position.
2. Press the [qty/date] key. The message "PLU PRICE" appears on the
operator display and the number 001 is displayed on the left-hand
side of the displays to indicate the first PLU number.
If you wish to change the PLU number from 001 to another number
such as 30, type [030] and then press the [plu] key.
3. Type the [unit price] that you wish to assign to that PLU.
4. Press the appropriate [department] key to assign the PLU to a
Department from 1 to 20. Use the [dept shift] key for departments
from 21-40. The message "PLU NAME" is displayed while the PLU
number, item price and department number are printed.
5. With reference to the Character Code Table in the Appendix or by
using the alphanumeric keypad, define a maximum 12-character
description to the PLU item. For example, the item Coffee will have
the [43 55 46 46 45 45] character code string if the Character Code
Table is used.
6. Press the [check/valid] key to store the PLU item description which
is printed. The cash register automatically switches to the next PLU
item number.
24
Page 32

7. Press the [qty/date] key to program another feature, otherwise exit
the program mode.
Example: Create PLU 1 with a unit price of £2.69 assigned to Department 3 and name this item Coffee by using the Character Code Table
and then create PLU 320 with a unit price of £5.00 assigned to Department 33 and name this item Books by using the alphanumeric keypad.
Type/Press:
[qty/date] + [269] + [department 3/23] + [43 55 46 46 45 45] +
[check/valid] + [320] + [plu] + [500] + [dept shift] + [dept 13/33] +
[dept 2/22 dept 15/35 dept 15/35 dept 11/31 dept 19/39] +
[check/valid] + [qty/date]
3. Type the [decimal point position] of the converted amount (0-3
digits after the decimal point).
4. Type the [exchange rate] using up to six digits without specifying
any decimal point.
5. Press the [euro] key to store the exchange rate. The rate entered is
automatically printed along with the caption "EURO".
Example: Program an exchange rate of £ 0.62 to the Euro.
Type/Press:
[2] + [2] + [000062] + [euro]
ENGLISH
Euro Exchange Rates
You can program the Euro exchange rate so that the cash register can
automatically calculate the transaction from your local currency into the
Euro currency and vice versa depending on the cash register's base
currency (Local or Euro). The cash register is programmed by default so
that your local currency is the base currency. If you wish to change the
base currency to Euro, refer to the "Programming System Options"
section in this manual, Machine Condition 31.
Programming the Euro Exchange Rate
Euro exchange rate programming consists of firstly defining the
position of the decimal point of the Euro exchange rate (0-8 digits after
the decimal point), the position for the decimal point of the changed
amount which is also printed on the sales receipt (0-3 digits after the
decimal point), and then the actual current exchange rate (up to 6
digits). To provide you with the Euro currency value, the cash register
divides the local currency value by the exchange rate defined.
Proceed as follows to program or update the exchange rate of your
local currency into Euro:
1. Turn the PRG key to the PRG position.
2. Type the [decimal point position] of the exchange rate (0-8 digits
after the decimal point).
Receipt and Report Captions
This cash register model also gives you the possibility of personalizing the different captions printed on the customer receipt, journal roll
and on financial and management reports.
The currency convert caption printed on the customer receipt or
journal record can be changed, when working in the EURO base
currency mode, from the default LOCAL caption to, for example, your
actual local currency descriptor (such as UK pounds) or, when working
in the local base currency mode from the default EURO caption to any
other descriptor you wish. You can also change the covert total net sales
caption on the financial and management reports to any other descriptor
as required.
Likewise, you can personalize the captions for credit card payments
made. The machine's default Credit 1 and Credit 2 captions identify
total sales amounds charged to, lets say, two different types of credit
cards, These captions can be changed, for example, to identify the
respective cards.
Furthermore, this cash register model also lets you personalize the
captions identifying the totals of the different types of payments that
were tendered to the cash register and accounted for in the financial
and management reports. The Media-In-Drawer caption programming
feature allows you to convert default captions such as Cash EURO or
Charge EURO into any other descriptor you wish.
25
Page 33

Personalizing EURO and Local Captions
By default the cash register prints one of two programmable convert
captions to indicate a converted sales transaction total on the receipt
and journal report; if the cash register is programmed with a Local base
currency, the convert caption printed is "EURO" while if it is programmed with a Euro base currency, the convert caption printed is
"LOCAL". If an exchange rate has been defined, the amounts indicated
in both cases are the sales totals converted into the respective currency.
If an exchange rate has not been defined, by default the cash register
assumes a 1:1 conversion rate.
If you wish to avoid printing the Local or Euro converted sales total
and just print the transaction total of the base currency, program the
cash register to do so as indicated in the section entitled Programming
System Options, Machine Condition 30.
If you have programmed the cash register for a Euro base currency,
proceed as follows to change the LOCAL caption printed:
1. Turn the PRG key to the PRG position.
2. Type [41] and then press the [return] key. The caption "LOCAL"
appears on the operator display.
3. With reference to the Character Code Table in the Appendix or by
using the alphanumeric keypad, define the new caption (max 10
characters, spaces included). Remember that you can use the [void]
key as backspace function if an error is made during caption entry.
4. Press the [check/valid] key to confirm the new caption which is
automatically printed.
Example: Change the caption LOCAL to UK POUNDS by using the
alphanumeric keypad.
Type/Press:
[41] + [return] + [dept shift] [dept. 1/21] + [dept. 11/31] + [00] +
[dept. 16/36] + [dept. 15/35] + [dept shift ] + [dept. 1/21] +
[dept. 14/34] + [dept. 4/24] + [dept. 19/39] + [check/valid]
You can proceed in the same way to change the EURO convert
caption printed when the Local base currency is programmed. In this
case the only difference is that you need to type [42] in step 2 and the
caption "EURO" appears on the operator display; you can then program
whatever caption you wish as long as it is up to 10 characters long.
Personalizing the Net Converted Caption
The machine's default net converted caption "CNV.NET" indicating
the net sales total exchanged into a programmed currency (either your
local currency or EURO, depending on the machine's programmed base
currency) at the currency exchange rate defined and that is printed on
the financial and management reports, can be personalized accordingly.
If the cash register is in its default base currency mode and you wish
to personalize the CNV.NET caption of the financial and management
report to identify the converted EURO value, proceed as follows:
1. Turn the PRG key to the PRG position.
2. Type [43] and then press the [return] key. The caption
"CONV.NET" appears on the operator display.
3. With reference to the Character Code Table in the Appendix or by
using the alphanumeric keypad, define the new caption (max. 10
characters, spaced included). Remember that you can use the [void]
key as backspace function if an error is made during caption entry.
4. Press the [check/valid] key to confirm the new caption which is
automatically printed.
Example: Change the caption CNV.NET to EURO NET by using the
alphanumeric keypad.
Type/Press:
[43] + [return] + [dept. 5/25] + [dept. shift] + [dept. 1/21] +
[dept. 18/38] + [dept. 15/35] + [00] + [dept. 14/34] + [dept. 5/25] +
[dept. 20/40] + [check/valid]
26
Page 34

Personalizing the Credit 1, Credit 2 Captions
With reference to the Programming System Options section in this
manual, you can set Machine Condition 16 so that the cash register
reserves department 19 or 20, or both, for the registration of credits
deriving from sales transactions. By means of this function, you can
assign Credit 1 to the transactions paid with one type of credit card and
Credit 2 to those paid with another. In this way you can sort the sales
that have been paid with two different credit cards. The related Credit 1
(referring to the credits registered in Department 20) and Credit 2
(referring to the credits registered in Department 19) captions can be
personalized according to your needs or according to the related credit
card. Proceed as follows to do so:
1. Turn the PRG key to the PRG position.
2. Type [51] for Credit 1 caption programming or [52] for Credit 2
caption programming and then press the [return] key.
The message "CRED n NAME" is displayed where n can be either
1 or 2 depending on the credit caption to the programmed.
3. Define a [new caption] of up to 12 characters, spaces included, by
using either the Character Code Table found in the Appendix or by
typing it directly on the alphanumeric keypad. Remember that you
can use the [void] key as backspace function during caption entry.
4. Press the [check/valid] key.
Personalizing the Media-In-Drawer Caption
The total net amounts for the different means of payment (cash,
check, charge, credit cards) tendered in EURO currency when the
machine is in the local base currency mode, or in local currency when
the machine is in the EURO base currency mode, are indicated
individually in the financial reports thus helping you to sort between
the different means payments that have been made in the specific
currency. These amounts are identified by captions that you can
personalize according to your needs.
The personalizing the media-in drawer caption function is particularly
useful when receiving different forms of payment in local currency
when the machine is in the EURO base currency mode. For example, if
you received a charge payment in UK £, you can change the charge
Euro caption accordingly being careful to not exceed the max. limit of
12 characters, spaces included.
To personalize the media in drawer captions, proceed as follows:
1. Turn the PRG key to the PRG position.
2. Type [4n], where n represents the media caption to be changed:
4 = CASH EURO
5 = CHECK EURO
6 = CHARGE EUR
7 = CREDIT1 EU
8 = CREDIT2 EU
For example, type [46] if you wish to change the CHARGE EUR
position.
3. Press the [return] key. The caption currently set for the choice
made is displayed.
4. With reference to the Character Code Table in the Appendix or by
using the alphanumeric keypad, define the new caption of up to a
maximum of 12 characters, spaces included. Remember that you
can use the [void] key as backspace function to correct any error
made during caption entry.
5. Press the [check/valid] key to confirm the new caption which is
automatically printed.
27
ENGLISH
Page 35

Programming System Options
Your cash register's system options programming feature includes 35
options for the operation of the cash register, receipt printing and
management report printing. Each of the functions described in this
section is already set upon delivery of the cash register to meet the most
frequent requirements. The cash register's factory default settings,
which you can reprogram at any time, are indicated in bold print in the
table below.
Machine Settings
Condition
1 0 = Grand Total will not reset after Z financial report
1 = Grand Total will reset after Z financial report
2 0 = Subtotal will print when the "#/ST/NS" key is pressed
1 = Subtotal will not print when the "#/ST/NS" key is pressed
3 0 = Amount tender is not compulsory
1 = Amount tender is compulsory
4 0 = Date set in the "month - day - year" format
1 = Date set in the "day - month - year" format
5 0 = Z1 and Z2 counter will not reset after a Z report
1 = Z1 and Z2 counter will reset after a Z report
6 0 = VAT amount is printed on the receipt
1 = VAT amount is not printed on the receipt
7 0 = Zero skip on financial report
1 = Non-skip on financial report
8 0 = Date will print
1 = Date will not print
9 0 = Time will print
1 = Time will not print
28
Machine Settings
Condition
10 0 = Consecutive receipt number will print
1 = Consecutive receipt number will not print
11 0 = Clerk name will print
1 = Clerk name will not print
12 0 = Clerk system inactive
1 = Clerk system active
13 0 = Reserved
1 = Reserved
2 = VAT calculation
14 0 = Z1/Z2 counter will print
1 = Z1/Z2 counter will not print
15 0 = VAT amount will be printed after tender amount
(sales receipt)
1 = VAT amount will be printed before total amount
(sales receipt)
16 0 = Normal Key Layout
1 = Dept20 used as Credit 1
2 = Dept19 used as Credit 2
3 = Dept20 used as Credit 1 and Dept19 as Credit 2
17 Reserved
18 0 = Time set to 24 hour format
1 = Time set to 12 hour format
19 0 = Language selection - English
1 = Language selection - Spanish
2 = Language selection - French
3 = Language selection - German
Page 36

Machine Settings
Condition
20 0 = Not mandatory to input clerk number at each transaction
1 = Clerk number must be entered at each transaction
21 Reserved
22 Reserved
23 0 = Addition and subtraction
1 = No addition nor subtraction +% result to the department
24 0 = VAT amounts are separately printed on receipt
1 = Only total VAT amount is printed on receipt
25 0 = Duplicate Z report active
1 = Duplicate Z report inactive
26 0 = Consecutive receipt number will reset after Z1 report
1 = Consecutive receipt number will not reset after Z1 report
27 0 = 0 price registration allowed
1 = 0 price registration not allowed
28 0 = Euro convert function allowed
1 = Euro convert function not allowed
29 0 = VAT rate not printed on financial report in VAT mode
1 = VAT rate printed on financial report in VAT mode
+% result to the department
Machine Settings
Condition
32 0 = Receipt copies will be issued
1 = Receipt copies will not be issued
ENGLISH
33 0 = Validation printing in format 1 (refer to section Validation
Operations)
1 = Validation printing in format 2 (refer to section Validation
Operations)
2 = Validation printing in format 3 (refer to section Validation
Operations)
3 = Validation printing disabled
34 0 = Validation printing repeated as many times as required
1-9 = Definition of the number of time validation printing is to
be performed
35 0 = No rounding
1 = Swiss rounding
2 = French rounding
3 = Danish rounding
4 = Swedish rounding
NOTE: Machine conditions 17, 21 and 22 are not available.
30 0 = Prints converted total at convert tender
1 = Prints converted total at every tender
31 0 = Local base currency
1 = Euro base currency
29
Page 37

Changing the Cash Register's Standard Settings
Proceed as follows if you wish to change any of the standard machine
settings indicated in the previous table:
1. Turn the PRG key to the PRG position.
2. Type the [number] of the machine condition (1-35 as indicated in
the table) that you wish to alter. Machine conditions 17, 21 and 22
are reserved and cannot be changed.
3. Type the [number] of the required setting.
4. Press the [void] key. The message "VOID/CORR" is printed with
setting you have just made.
5. Press the [clear] key to program another feature, otherwise exit the
program mode by turning the PRG key to OFF.
Example: Program the cash register so that the customer receipts and
journal record are printed in German instead of in English.
Type/Press:
[19] + [3] + [void]
Rounding Option for Swiss, French, Danish and
Swedish Currencies
For the Swiss franc, French franc, Danish krone and Swedish krona
currencies, you can program the machine to so that the amount of a
transaction is automatically rounded accordingly whenever the
[st/w/tax/2nd] or a [tender] key is pressed. The rounded result will be
displayed on the operator and client displays, printed on the customer
receipt and journal report. The total adjustments are indicated on the
financial reports.
Setting the Rounding Option
With reference to the section Programming System Options, by
setting Machine Condition 35 to the related value (1, 2, 3 or 4), you can
program the machine to round off the subtotal or tender values of the
related currency as follows:
• Swiss franc rounding (Machine condition 35, setting 1)
0.00 – 0.02 = amount rounded to 0.00
0.03 – 0.07 = amount rounded to 0.05
0.08 – 0.09 = amount rounded to 0.10
• French franc amount rounding (Machine condition 35, setting 2)
0.00 – 0.03 = amount rounded to 0.00
0.04 – 0.07 = amount rounded to 0.05
0.08 – 0.09 = amount rounded to 0.10
• Danish krone rounding (Machine condition 35, setting 3)
0.00 – 0.12 = amount rounded to 0.00
0.13 – 0.37 = amount rounded to 0.25
0.38 – 0.62 = amount rounded to 0.50
0.63 – 0.87 = amount rounded to 0.75
0.88 – 1.12 = amount rounded to 1.00
• Swedish krona rounding (Machine condition 35, setting 4)
0.00 – 0.24 = amount rounded to 0.00
0.25 – 0.74 = amount rounded to 0.50
0.75 – 1.24 = amount rounded to 1.00
For example by programming machine condition 35 to setting 2,
if the total of a transaction in French francs is FRF 135.31, the amount
FRF 135.30 will be displayed when the [st/w/tax/2nd] key is pressed
and accounted for when a tender key is pressed.
30
Provided on the next page is an example receipt showing the programmed rounding.
Page 38
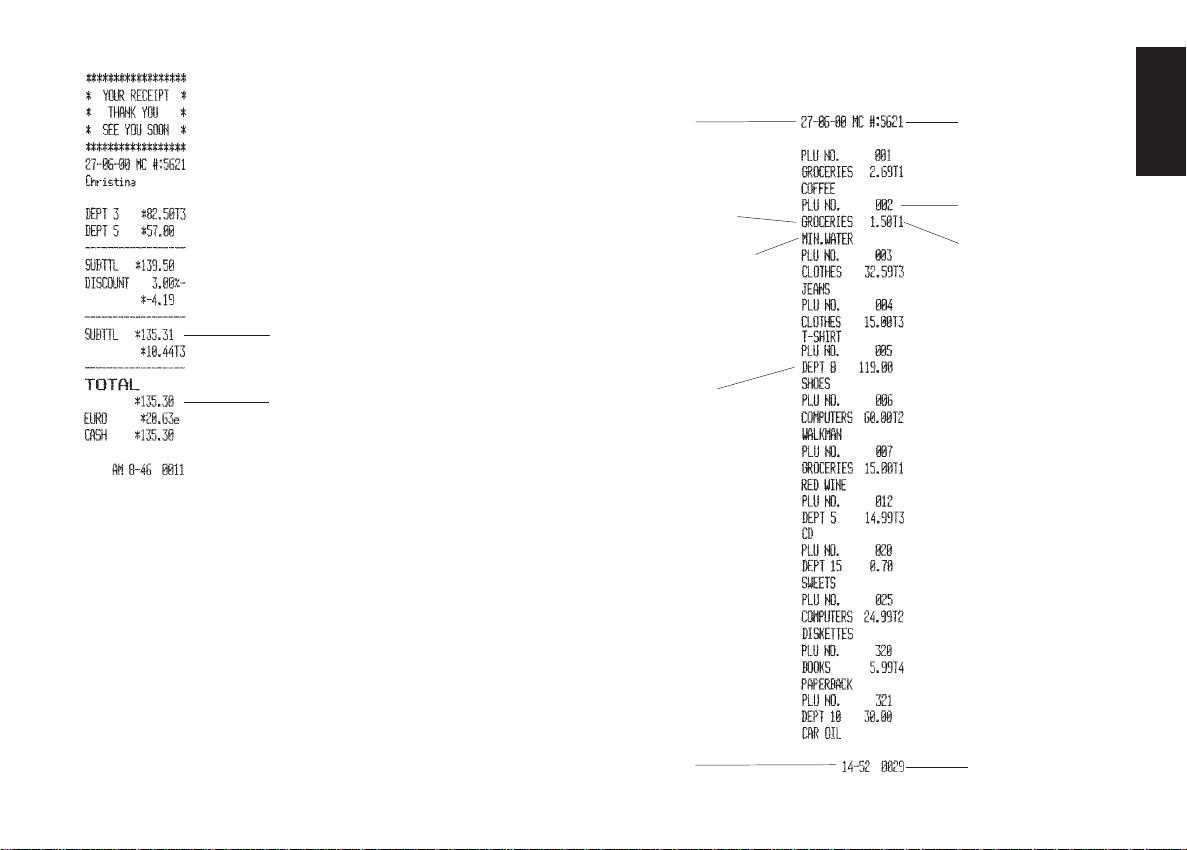
Shown below is an example PLU dump report.
T ransaction subtotal
T ransaction rounded off
total in Local currency
Dump Reports
Printing an All PLU Dump Report
If a large number of PLUs are created (bear in mind that up to 999
PLUs can be programmed), a separate receipt can be printed indicating
all the PLUs programmed. Their number, associated price, VAT rate (if
applicable), item descriptor and associated department are reported on
this receipt, which should be kept in a safe place for future reference.
Proceed as follows to print a PLU report:
1. Turn the PRG key to the PRG position.
2. Press the [plu] key to print the list.
3. Turn the PRG key to the OFF position to exit the program mode.
Date
Allocated
department
Item identifier
Allocated
department
without
identifier
Time
Machine number
PLU number
Item price and
associated V A T
Consecutive
receipt number
ENGLISH
31
Page 39

Printing a PLU Range Dump Report
Proceed as follows to print a PLU range dump report:
1. Turn the PRG key to the PRG position.
2. Define a [start plu number] from 001 to 999.
3. Define an [end plu number] from 001 to 999.
4. Press the [plu] key.
5. Turn the PRG key to the OFF position to exit the program mode.
NOTE: You can interrupt the PLU range dump report printing at any
time by pressing the [J feed] key.
Example: Print a PLU range dump report from PLU number 002 to
PLU number 020.
Type/Press:
[002] + [020] + [plu]
Printing a Department Range Dump Report
Proceed as follows to print a department range dump report:
1. Turn the PRG key to the PRG position.
2. Press [88].
3. Define a [start department number] from 01 to 40.
4. Define an [end department number] from 01 to 40.
5. Press the [amt tend/total] key.
6. Turn the PRG key to the OFF position to exit the program mode.
Example: Print a department range dump report from Department
number 01 to Department number 08.
Type/Press:
[8] + [8] + [01] + [08] + [amt tend/total]
Overall Programming Dump Report
After programming your cash register to best suit the needs of your
business, you can print a tape record providing information on how the
cash register is programmed.
Printing the Programming Dump Report
Proceed as follows to print the program tape:
1. Turn the PRG key to the PRG position.
2. Type [999999] and press the [amt tend/total] key.
3. Turn the PRG key to the OFF position to exit the program mode.
On the next page you will find an example of the cash register's
overall programming dump report.
32
Page 40
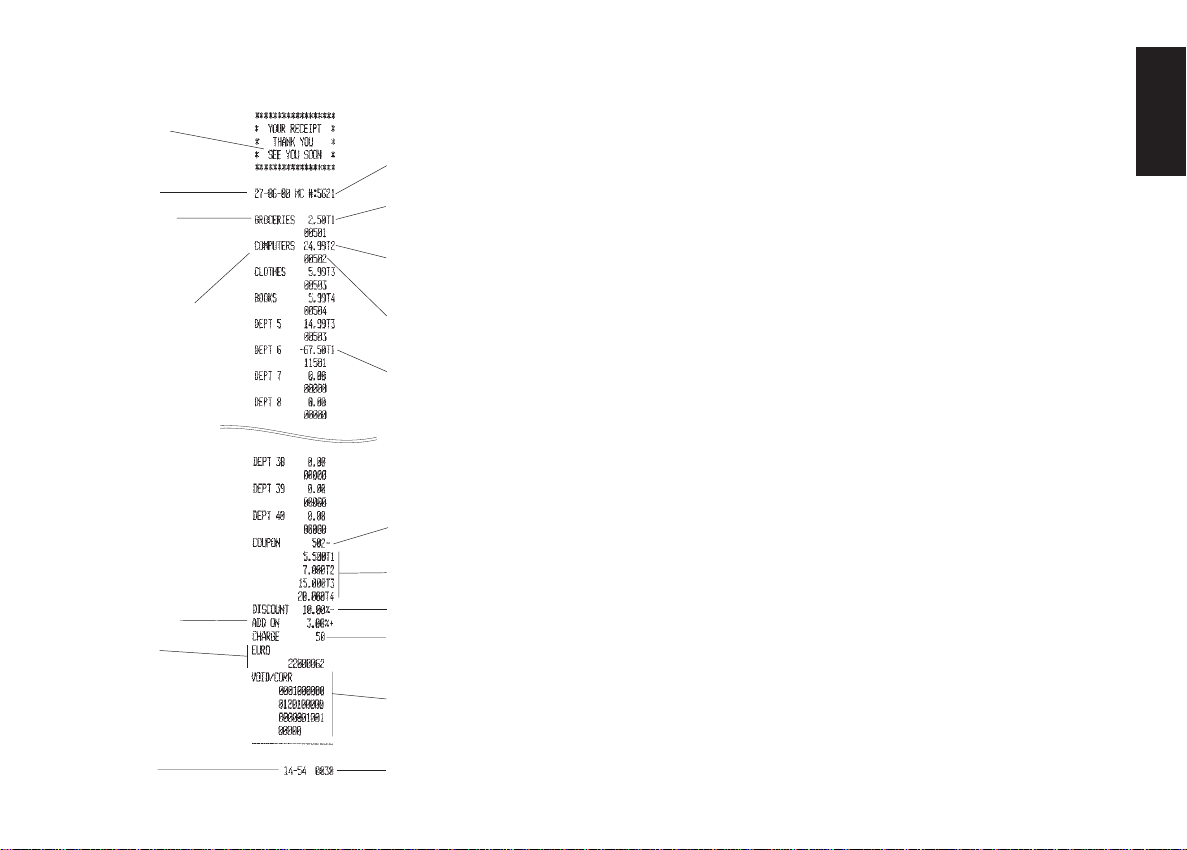
Shown below is an example printout of how your cash register can be
programmed.
Personalized
line on
receipt
header
Date
Name
assigned to
DEPT 1
Name
assigned to
DEPT 2
Percent
plus rate
Euro
exchange rate
Time
Machine number
Price linked to
DEPT 1 with
VAT rate
Price linked to
DEPT 2 with
VAT rate
Department 2
status
Department
programmed for
negative sales
transactions
HDLO,
minus key
VAT rate 1, 2,
3 and 4
Discount rate
Fraction
rounding
System options
programming
condition
Consecutive
receipt number
Manager Passwords
You can define two individual manager passwords to prevent
unauthorized access to the machine's programming mode (PRG), Z
mode and X mode. One manager password grants access to the PRG
and Z modes, while another grants access to the X mode.
Defining a PRG and Z Mode Manager Password
Proceed as follows to define a manager password that grants access to
the PRG and Z modes:
1. Turn the PRG key to the PRG position.
2. Type [111111] and press the [amt tend/total] key. The message
"PRG/Z PASS" appears on the operator display.
3. Type your 4-digit manager password and then press the [non tax]
key. Remember that only digits are accepted and the password is not
printed.
NOTE: If you define a manager password of 0000, the password
security protection feature will not work.
Example: Define manager password 9876 for the PRG and Z modes.
Type/Press:
[111111] + [amt tend/total] + [9876] + [non tax]
Defining an X Mode Manager Password
Proceed as follows to define a manager password that grants access to
the X mode:
1. Turn the PRG key to the PRG position.
2. Type [222222] and press the [amt tend/total] key. The message "X
PASS" appears on the operator display.
3. Type your 4-digit manager password and then press the [non tax]
key. Remember that only digits are accepted and the password is not
printed.
ENGLISH
33
Page 41

NOTE: If you define a manager password of 0000, the password
security protection feature will not work.
Example: Define manager password 7654 for the X mode.
Type/Press:
[222222] + [amt tend/total] + [7654] + [non tax]
Using the Cash Register in a Password Protected
Mode
If a manager password was defined to protect unauthorized access to
the PRG, Z and X machine modes, proceed as follows to enter the
specific passwords so that you can work normally in these modes:
1. Turn the PRG key to the PRG, X or Z position.
2. Type the specific 4-digit password that grants you access to the
required mode.
3. Press the [check/valid] key.
NOTE: If you attempt to use a protected machine mode without typing
the correct password, the cash register emits an error signal
and the message "SEC CODE" appears on the operator
display.
If a PRG and Z manager password is entered and a Z report is taken,
the password security system is automatically reactivated upon
completion of this operation. The security system is automatically
reactivated also when the Control Lock is turned to any position other
than "Z" and "PRG".
If an X manager password is entered and an X report is taken, also in
this case the password security system is automatically reactivated upon
completion of the operation. The security system is automatically
reactivated also when the Control Lock is turned to any position other
than "X".
Z1/Z2 Counter
The Z1/Z2 comprehensive financial reports allow you to keep track of
transaction totals for whatever period of time you require, such as daily,
monthly, quarterly, etc. An important feature of these kind of reports is
that once taken, ALL TRANSACTION TOTALS ARE RESET TO
ZERO except for the Grand Total unless otherwise programmed in the
system options programming mode. The Z1 financial report is mainly
used as an end-of-day report as it provides daily totals while the Z2
financial report provides periodical totals.
The cash register is configured with a programmable counter that
indicates how many times a Z1/Z2 report was taken. If you wish to
change the counter data to best suit your requirements, proceed as
indicated in the following sections.
Programming the Z1 Counter
To program the Z1 financial report counter, proceed as follows:
1. Turn the PRG key to the PRG position.
2. Press [1] to personalize the Z1 counter and then type the new
4-digit [Z1 counter number]. The digits entered will not printed.
3. Press the [return] key to store the new counter number defined.
Programming the Z2 Counter
To program the Z2 financial report counter, proceed as follows:
1. Turn the PRG key to the PRG position.
2. Press [2] to personalize the Z2 counter and then type the new 4-
digit [Z2 counter number]. The digits entered will not printed.
3. Press the [return] key to store the new counter number defined.
34
Page 42

Grand Total
The Grand Total value is held in the cash register ’s memory and is
updated each time a sales transaction is performed.
This value can be changed to best suit your business needs.
Proceed as follows to change the Grand Total data stored in memory:
1. Turn the PRG key to the PRG position.
2. Type [777777] and press the [amt tend/total] key. The message
“GT PRESET” is displayed.
3. Type the new max. 12-digit Grand Total value and then press the
[non tax] key. The digits entered will not printed.
Clearing the Cash Register’s Memory
The cash register’s memory holds all of the cash register’s programming data in addition to all the transaction data for the management
and financial reports that are constantly updated during machine
operation. This memory is divided into different areas that store
different types of data. The cash register’s memory initialization
procedure allows you to reset the memory so as to clear its contents in
the case of the management and financial report areas, or to restore the
machine’s factory default settings in the case of the cash register
programming data area. For information on the cash register’s default
configuration, refer to the values printed in bold in the section Programming System Options.
The following memory areas can be cleared:
• The entire memory (all areas)
• The cash register’s programming data area
• The cash register’s management and financial report data area
• The cash register’s PLU (Price Look-Up) data area.
Clearing the Entire Cash Register Memory
Proceed as follows to clear all the areas of cash register memory:
1. Turn the PRG to the PRG position.
2. Type [960199] and then press the [amt tend/total] key. The
message “ALL MEMORY INITIAL” is prined on the journal record
only.
Clearing the Programming Data Memory Area
Proceed as follows to clear the memory area containing all the data
that was programmed in the PRG mode, meaning with the control lock
in the PRG position:
1. Turn the PRG to the PRG position.
2. Type [960110] and then press the [amt tend/total] key. The
message “PROGRAMME INITIAL” is prined on the journal record
only.
In the case of the cash register’s system options that you tailored to
your needs, remember that this procedure resets their settings to the
factory default configuration. Refer to the section Programming System
Options for the related default settings.
ENGLISH
35
Page 43

Clearing the Management and Financial Report Data
Memory Area
Proceed as follows to clear the cash register’s memory area containing all the data that is used in the management and financial reports,
such as individual department sales, gross and net sales, tax collected,
media sales, drawer totals and more. This memory initialization
procedure also resets the Z1 and Z2 counters and the non-resettable
Grand Total amount.
1. Turn the PRG to the PRG position.
2. Type [960120] and then press the [amt tend/total] key. The
message “REPORT INITIAL” is prined on the journal record only.
Clearing the PLU Data Memory Area
Proceed as follows to clear the cash register’s memory area holding
all the PLU amounts defined for the different products you sell:
1. Turn the PRG to the PRG position.
2. Type [960130] and then press the [amt tend/total] key. The
message “PLU INITIAL” is prined on the journal record only.
Transaction Examples
This section provides examples on how to complete different types of
transactions. Sample receipts are included which reflect some of the
programming examples used in the chapter entitled Cash Register
Programming.
Entering the Register Mode
The cash register has two register modes which can be used to record
ordinary sales transactions. These two modes are called REG 1 and
REG 2, where the only difference between the two is that in the REG 1
mode the cash register will automatically print the programmed header
on all customer receipts and journal records, while in the REG 2 mode
this header is not printed at all.
Proceed as follows to enter the register mode, assuming that you wish
to have the cash register print the programmed header:
1. Insert the control key into the Control Lock and turn it to the REG 1
position.
2. If the Clerk System option was set to active as explained in the
section entitled Clerk Numbers, Secret Codes and Names, enter the
related Clerk number assigned and its associated three-digit secret
code. If the Clerk System option was set to active and a secret code
was not programmed, type any Clerk number [1-26] and then press
the [clerk] key.
Exiting the Register Mode
To exit the register mode at the end of a transaction, simply turn the
control key to the OFF position.
36
Page 44

Clearing Errors
Detailed instructions on how to clear all kinds of errors which may
occur during cash register operations are explained in the section Error
Conditions at the beginning of this manual.
Sample Receipt
The following sample receipt shows where general transaction
information is printed on a customer receipt.
Customer receipt header on 5 lines
with max. 18 char acters per line
Date
Clerk
identification
Departments
V A T totals
Cash
tendered
Time
Consecutive receipt number
Machine number
Item price with
department VA T rate
Item price in nontaxable department
T otal balance due
T otal balance due in
converted currency
Change due
Change due in
converted currency
Reprinting a Sales Receipt
By default your cash register is programmed to allow you to reprint
an exact copy of the sales receipt at the end of the current transaction
performed in either the REG 1 and REG 2 modes. The consecutive
receipt number is not increased on the reprinted receipt, and the
reprinted receipt is not recorded in the journal record nor in the
management and financial reports.
This function is particularly useful when working in the REG 2 mode,
since it gives you the possibility of issuing a sales receipt if one is
required. Remember that the only difference between the REG 1 mode
and the REG 2 mode is that in the REG 2 mode the sales receipt is not
printed nor issued.
For this function, the cash register's RAM (Random Access Memory)
can store a sales receipt of up to a maximum of 60 lines. Therefore
when a receipt reprint is requested, the cash register will only print up
to 60 lines; if this threshold is exceeded, only the total amount will be
printed.
Proceed as follows to reprint a sales receipt:
1. Perform a sales transaction with a tender in either the REG 1 or
REG 2 mode. Refer to the transaction examples provided further on
in this chapter.
2. Press the [st/w/tax/2nd] key to reprint the sales receipt.
ENGLISH
37
Page 45

Validation Operations
In addition to the number of valuable functions that are offered by
your cash register, this model also allows you to validate the tender of a
sales transaction on the specific slip that you enter into the validation
slot on the printer compartment cover.
Validation consists of printing a transaction summary on a slip and is
typically used to validate checks, gift certificates, paid out slips and
guest checks. For example, it can be used to mark a bill as being paid.
With reference to the section Programming System Options, Machine
Condition 33, you can select the validation print format to best suit your
requirements. By default (machine condition 33, setting 0) your
machine is programmed to print the validation string in the following
format:
The following validation print formats can be selected:
1. By choosing setting number 1:
Date
Machine
number
T ender
Receipt
number
Amount of
tender
2. By choosing setting number 2:
Date Time
Receipt
number
T ender
Amount of
tender
To select another validation print format, proceed as follows:
1. Turn the PRG control key to the PRG position.
2. Type the machine condition number [33] followed by the related
setting number [0 (default setting), 1, 2 or 3] and then press the
[void] key.
3. Turn the PRG control key to the OFF position.
38
Date
Clerk
number
Receipt
number
T ender
Amount of
tender
3. Choosing setting number 3 disables the validation printing function.
Refer to the section Validating a Document for the related information.
Page 46

Standard Transactions in Local Base Currency
Registering a Single Item Sale with Change Tender
Up to seven digits can be used for the amount of the entry.
Example: Register a £1.00 item in Department 1 (programmed at a
5.5% fixed VAT rate). Compute change for a £5.00 tender.
Proceed as follows:
1. Type [100] and press the [department 1/21] key.
2. Type the amount tendered [500] and press the [amt tend/total] key.
The transaction is ended and the change due to the customer is
displayed.
Change on a
cash tender
Change in conve rted
currency (Euro)
Registering a Multiple Item Sale with Exact Cash
Tender in Local Currency
Example: Register a £2.50 item to Department 1, a £.50 item to Department 5 and a £1.65 item to Department 8, with an exact tender of £4.65.
Proceed as follows:
1. Type [250] and press the [department 1/21] key.
2. Type [50] and press the [department 5/25] key.
3. Type [165] and press the [department 8/28] key.
4. Press the [st/w/tax/2nd] key to display the current balance due.
5. Press the [amt tend/total] key to end the transaction.
T ransaction total in
local and conve rted
currency
Exact cash tender in
local currency
ENGLISH
39
Page 47

Registering a Multiple Item Sale with Exact Cash
Tender in Euro
Example: Register a £10.00 item to Department 1, a £20.00 item to
Department 2, with an exact tender of 48.39e.
Proceed as follows:
1. Type [1000] and press the [department 1/21] key.
2. Type [2000] and press the [department 2/22] key.
3. Press the [st/w/tax/2nd] key to display the current balance due in
Local currency .
4. Press the [euro] key to display the current balance due in Euro.
5. Press the [amt tend/total] key to end the transaction.
T ransaction total in
local and converted
currency
Exact cash tender in
converted currency
(Euro)
Registering a Sale of Multiple Items at Same Cost
Up to three digits can be used for the quantity multiplied.
Example: Multiply two items costing £1.50 and register the sale to
Department 1. Compute change for £5.00.
Proceed as follows:
1. Type the number of items [2] and press the [qty/date] key.
2. Type their cost [150] and press the [department 1/21] key.
3. Press the [st/w/tax/2nd] key to display the current balance due.
4. Type the amount tendered [500] and press the [amt tend/total] key.
The transaction is ended and the change due to the customer is
displayed.
Number of items at
same cost multiplied
by unit price
T otal cost with
VAT rate
40
Page 48
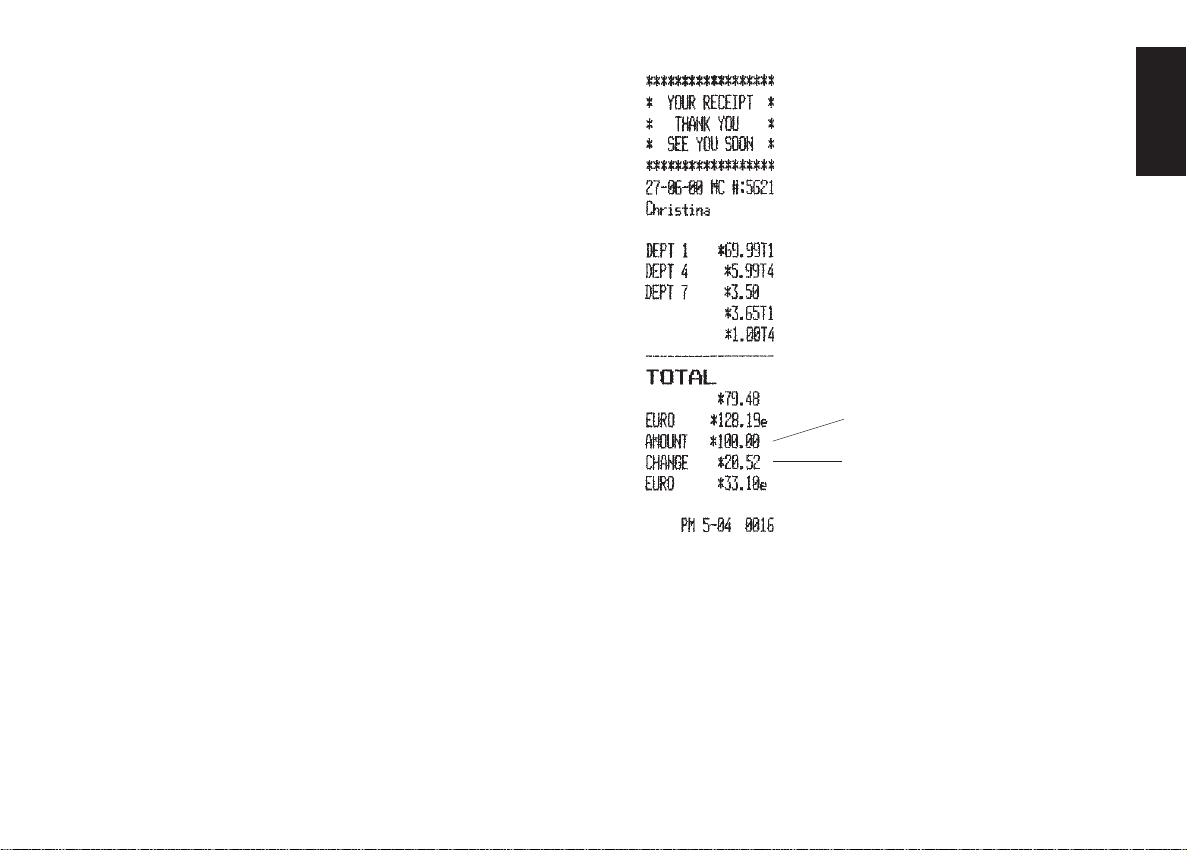
Registering a Multiple Department Sale with Payment
and Change Tender
Example: Register a £69.99 item to Department 1, a £5.99 item to
Department 4 and a £3.50 item to Department 7. Compute change for
£100.00.
Proceed as follows:
1. Type [6999] and press the [department 1/21] key.
2. Type [599] and press the [department 4/24] key.
3. Type [350] and press the [department 7/27] key.
4. Press the [st/w/tax/2nd] key to display the current balance due.
5. Type the amount tendered [10000] and press the [amt tend/total]
key. The transaction is ended and the change due to the customer is
displayed.
ENGLISH
Cash payment
Change tendered
41
Page 49
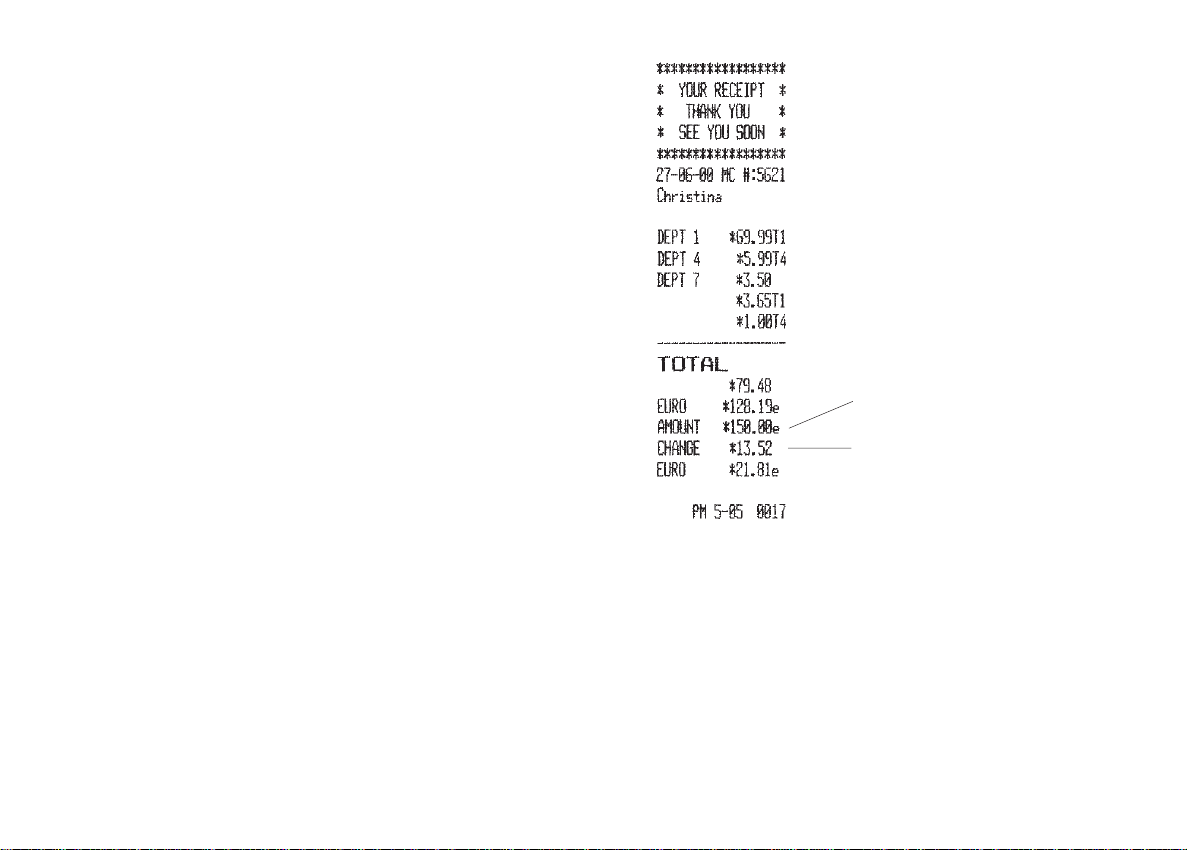
Registering a Multiple Department Sale with Payment
in Euro and Change Tender in Local Currency
Example: Register a £69.99 item to Department 1, a £5.99 item to
Department 4 and a £3.50 item to Department 7. Compute change for
150.00e.
Proceed as follows:
1. Type [6999] and press the [department 1/21] key.
2. Type [599] and press the [department 4/24] key.
3. Type [350] and press the [department 7/27] key.
4. Press the [st/w/tax/2nd] key to display the current balance due in
Local currency .
5. Press the [euro] key to display the current balance due in Euro.
6. Type the amount tendered in Euro [15000] and press the
[amt tend/total] key. The transaction is ended and the change due
to the customer is displayed.
Cash payment
in Euro
Change tendered in
local currency
42
Page 50
Registering a Charge Transaction
Charge transactions are counted and registered to the charge total in
the financial report.
Example: Register a £2.50 item to Department 1 and a £3.00 item to
Department 2 as a charge transaction. Use the [#/st/ns] key to print the
sub total on the sales receipt.
Proceed as follows:
1. Type [250] and press the [department 1/21] key.
2. Type [300] and press the [department 2/22] key.
3. Press the [#/st/ns] key to print the current balance due.
4. Press the [charge] key to end the transaction.
Split Cash/Charge Tendering in Local Currency
Example: Register a £10.00 item and a £15.00 item to Department 2.
Split the amount tendered between £20.00 cash and £5.00 charge in
Local currency .
Proceed as follows:
1. Type [1000] and press the [department 2/22] key.
2. Type [1500] and press the [department 2/22] key.
3. Press the [st/w/tax/2nd] key to display the current balance due in
Local currency .
4. Type the cash tendered [2000] and press the [amt tend/total] key.
The remaining balance due (5.00) is displayed.
5. Press the [charge] key to end the transaction.
ENGLISH
Amount charged
Sales total in local and
converted currency
Cash payment
Charge payment
43
Page 51
Split Cash/Charge Tendering in Euro
Example: Register a £8.00 item and a £12.00 item to Department 3.
Split the amount tendered between 10.00e cash and 22.26e charge.
Proceed as follows:
1. Type [800] and press the [department 3/23] key.
2. Type [1200] and press the [department 3/23] key.
3. Press the [st/w/tax/2nd] key to display the current balance due in
Local currency .
4. Press the [euro] key to display the current balance due in Euro.
5. Type the cash tendered in euro [1000] and press the
[amt tend/total] key. The remaining balance due in Local currency
is displayed.
6. Press the [euro] key again. The remaining balance due in Euro
(22.26) is displayed.
7. Press the [charge] key to end the transaction.
Sales total in local and
converted currency
Cash payment in Euro
Charge payment in Euro
44
Page 52
Check Tendering
Example: Register a £70.00 item paid by check to Department 24.
Proceed as follows:
1. Type [7000] and press the [dept shift] and [department 4/24] keys.
2. Press the [check/valid] key and the transaction ends successfully.
Check payment
Check Tender with Change in Local Currency
Example: Register a £19.50 item to Department 4, a £2.50 item to
Department 5 and a £5.00 item to Department 24. Compute the change
in Local currency for a £30.00 check tender.
Proceed as follows:
1. Type [1950] and press the [department 4/24] key.
2. Type [250] and press the [department 5/25] key.
3. Type [500] and press the [dept shift] and [department 4/24] keys.
4. Press the [#/st/ns] key to print the current balance due.
5. Type the amount paid by check [3000] and press the [check/valid]
key. The change due to the customer is displayed and the transaction
ends successfully.
The transaction receipt is shown on the next page.
ENGLISH
45
Page 53
T ransaction subtotal
Check payment
Change tendered
Check Tender in Euro with Change in Local Currency
Example: Register a £19.50 item to Department 4, a £2.50 item to
Department 5 and a £5.00 item to Department 24. Compute the change
in Local currency for a 40.00e check tender.
Proceed as follows:
1. Type [1950] and press the [department 4/24] key.
2. Type [250] and press the [department 5/25] key.
3. Type [500] and press the [dept shift] and [department 4/24] keys.
4. Press the [#/st/ns] key to print the current balance due in Local
currency.
5. Press the [euro] key to display the current balance due in Euro.
6. Type the amount tendered by check in Euro [5000] and press the
[check/valid] key. The change due in local currency is displayed
and the transaction ends successfully.
46
Page 54
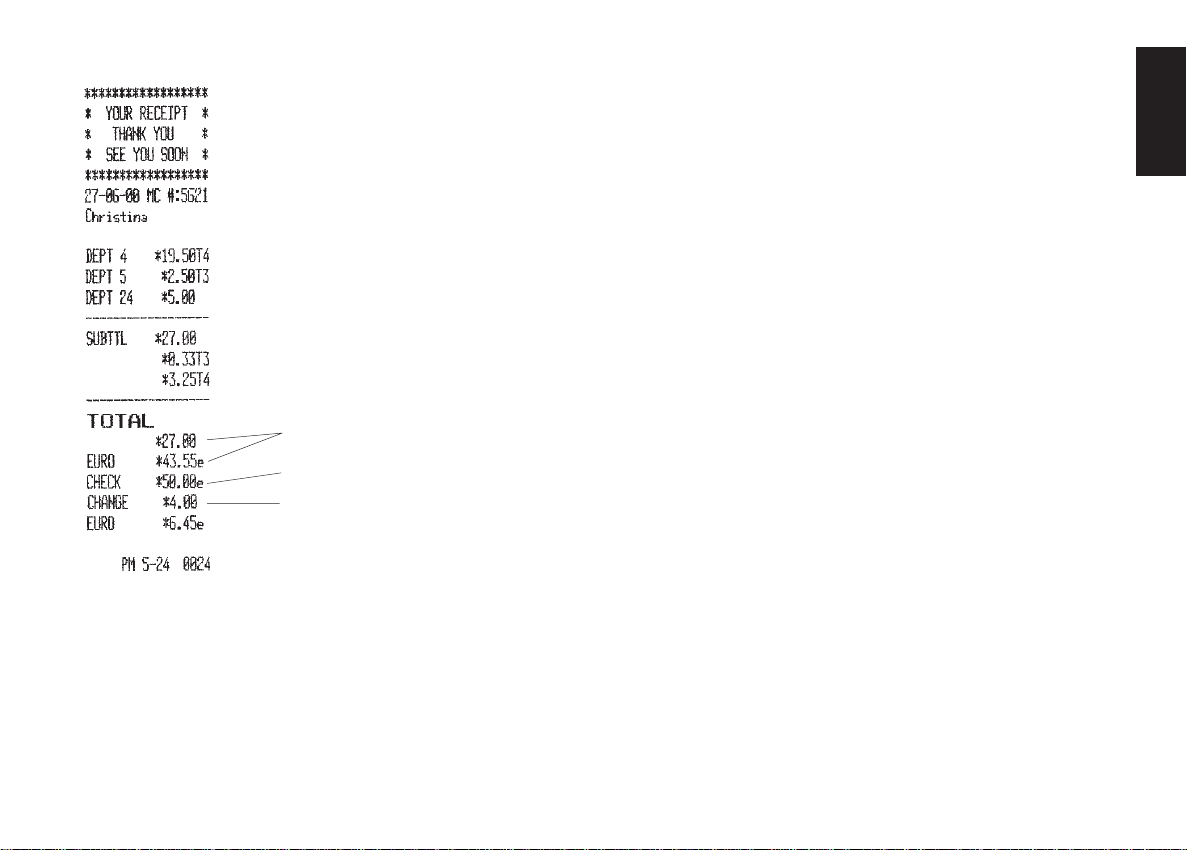
Sales total in local and
converted currency
Check payment in Euro
Change tendered in
local currency
Split Check/Cash Tender in Local Currency
Example: Register a £24.00 item to Department 1, a £36.00 item to
Department 3 and a £4.00 item to Department 4. Split the tender
between £60.00 check and £4.00 cash.
Proceed as follows:
1. Type [2400] and press the [department 1/21] key.
2. Type [3600] and press the [department 3/23] key.
3. Type [400] and press the [department 4/24] key.
4. Press the [st/w/tax/2nd] key to display the current balance due.
5. Type the amount to be tendered by check [6000] and then press the
[check/valid] key. The remaining balance due is displayed.
6. Press the [amt tend/total] key when the corresponding cash is
tendered. The transaction ends successfully.
The transaction receipt is shown on the next page.
ENGLISH
47
Page 55
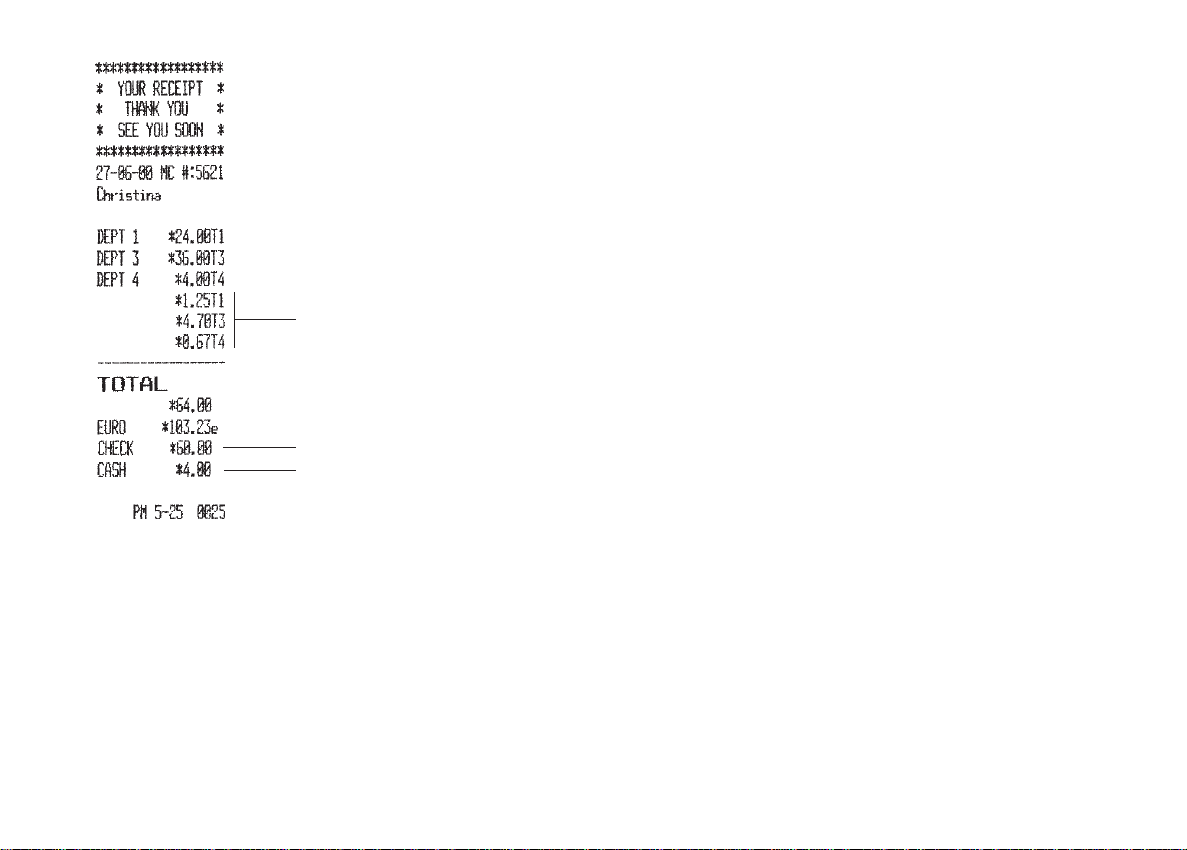
V A T totals
Check payment
Cash payment
Split Check Tender in Local Currency/Cash Tender
in Euro
Example: Register a £18.00 item to Department 2, a £24.00 item to
Department 3 and a £2.50 item to Department 4. Split the tender
between a £20.00 check and 39.52e cash.
Proceed as follows:
1. Type [1800] and press the [department 2/22] key.
2. Type [2400] and press the [department 3/23] key.
3. Type [250] and press the [department 4/24] key.
4. Press the [st/w/tax/2nd] key to display the subtotal in local
currency.
5. Type the amount to be tendered by check in local [2000] and then
press the [check/valid] key. The remaining balance due is displayed
in Local currency.
6. Press the [euro] key to display the remaining balance due in Euro.
7. Press the [amt tend/total] key when the corresponding cash is
tendered in euro. The transaction ends successfully.
48
Page 56
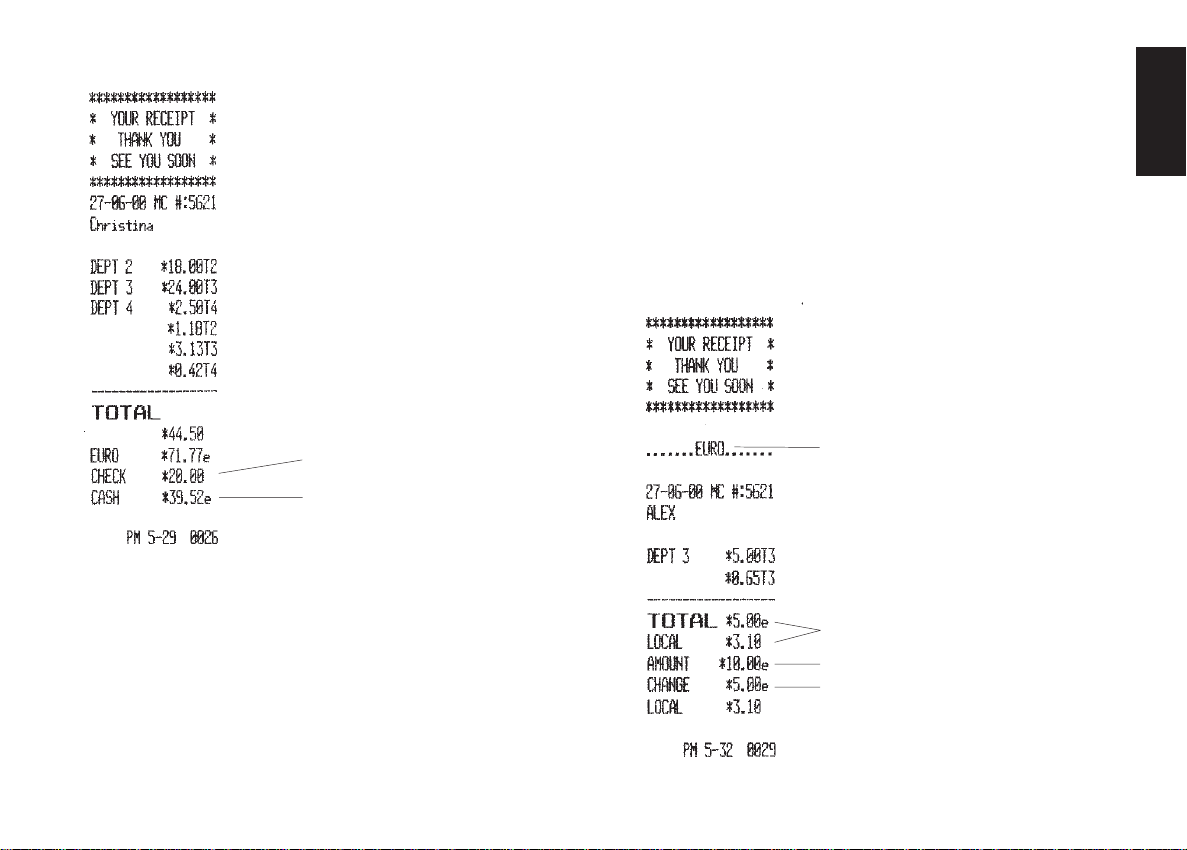
Check pa yment in
local currency
Cash payment in Euro
Examples of Transactions in Euro Base Currency
This section provides a few transaction examples performed with a
Euro base currency. By default the machine is programmed with a
Local base currency. In order to program the machine for a Euro base
currency, set Machine Condition 31 to the value 1 as indicated in the
section entitled "Changing the Cash Register's Standard Settings".
When the base currency is set to Local, the converted amount is in
Euro while when the base currency is set to Euro, the converted amount
is in Local.
Registering a Single Item Sale with Change Tender
Up to seven digits can be used for the amount of the entry.
Example: Register a 5.00e item in Department 3 (programmed at a
15% fixed VAT rate). Compute change for a 10.00e tender.
Proceed as follows:
1. Type [500] and press the [department 3/23] key.
2. Type the amount tendered [1000] and press the [amt tend/total]
key. The transaction is ended and the change due to the customer is
displayed.
Euro caption indicating
machine is programmed
in Euro base currency
Sales total in Euro and in
converted local currency
Cash payment in Euro
Change tendered in Euro
ENGLISH
49
Page 57
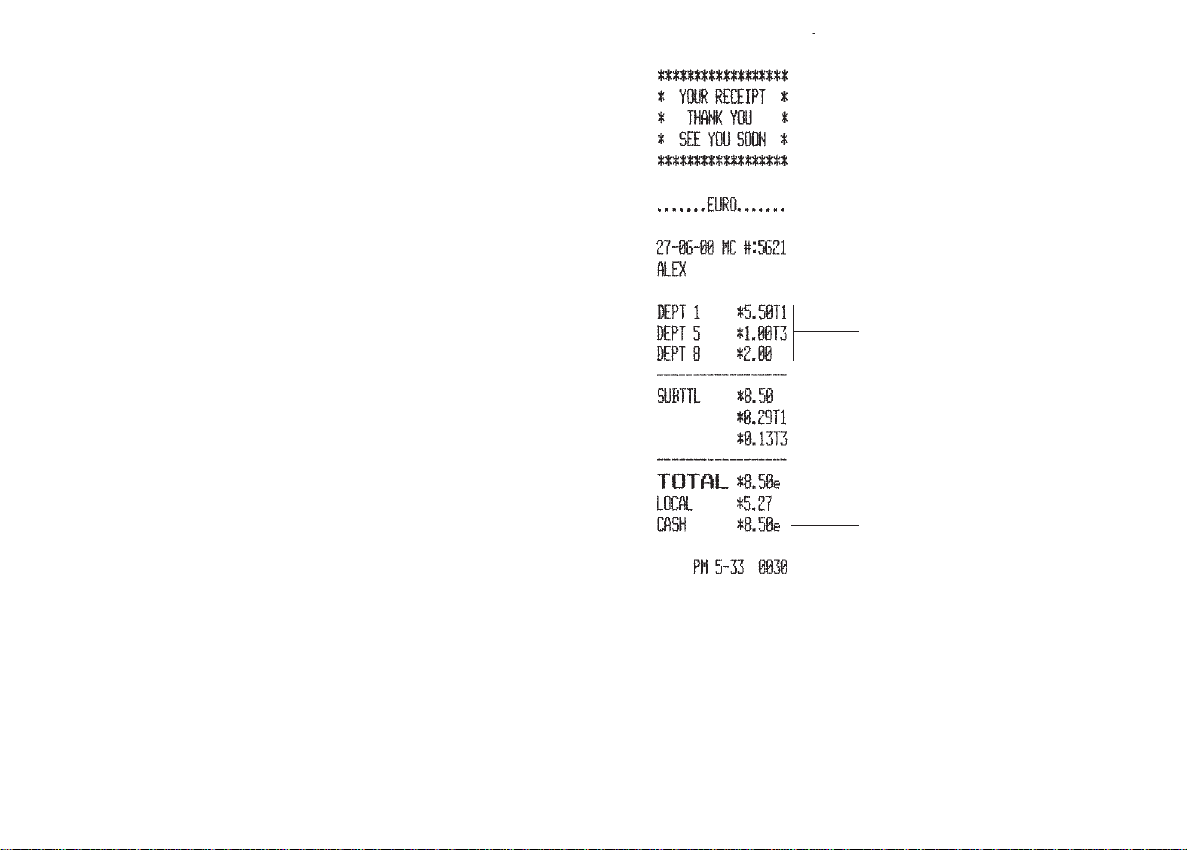
Registering a Multiple Item Sale with Exact Cash
Tender
Example: Register a 5.50e item to Department 1, a 1.00e item to
Department 5 and a 2.00e item to Department 8, print the subtotal and
accept an exact tender of 8.50e.
Proceed as follows:
1. Type [550] and press the [department 1/21] key.
2. Type [100] and press the [department 5/25] key.
3. Type [200] and press the [department 8/28] key.
4. Press the [#/st/ns] key to display and print the current balance due.
5. Press the [amt tend/total] key to end the transaction.
Department sales
Exact cash
payment in Euro
50
Page 58

Registering a Multiple Department Sale with Payment
in Local Currency and Change Tender in Euro
Example: Register a 70.00e item to Department 1 (programmed at a
5.5% VAT rate), a 6.00e item to Department 4 (programmed at a 20%
VAT rate) and a 4.00e item to Department 7 (programmed without
VAT). Compute change for a £100.00 tender.
Proceed as follows:
1. Type [7000] and press the [department 1/21] key.
2. Type [600] and press the [department 4/24] key.
3. Type [400] and press the [department 7/27] key.
4. Press the [st/w/tax/2nd] key to display the current balance due in
Euro.
5. Press the [euro] key to display the current balance due in Local
currency.
6. Type the amount tendered in Local [10000] and press the
[amt tend/total] key. The transaction is ended and the change in
Euro due to the customer is displayed.
Sales total in Euro and in
converted local currency
Cash payment in
local currency
Change tendered
in Euro
ENGLISH
51
Page 59

Check Tender in Local Currency with Change in Euro
Example: Register a 19.50e item to Department 4, a 2.50e item to
Department 5 and a 5.00e item to Department 24. Compute the change
in Local currency for a £20.00 check tender.
Proceed as follows:
1. Type [1950] and press the [department 4/24] key.
2. Type [250] and press the [department 5/25] key.
3. Type [500] and press the [dept shift] and [department 4/24] keys.
4. Press the [#/st/ns] key to print the current balance due in Euro.
5. Press the [euro] key to display the current balance due in Local
currency.
6. Type the amount tendered by check in Local currency [2000] and
press the [check/valid] key. The change due in Euro currency is
displayed and the transaction ends successfully.
Check pa yment in
local currency
Change tendered
in Euro
52
Page 60

Split Tender with Cash in Local Currency/Check in
Euro with Change
Example: Register a 10.00e item to Department 1 and a 25.00e item to
Department 2. Display the subtotal, accept a split tender consisting of
£15.00 cash in Local currency and a 40.00e check in Euro, then tender
change in Euro.
Proceed as follows:
1. Type [1000] and press the [department 1/21] key.
2. Type [2500] and press the [department 2/22] key.
3 Press the [st/w/tax/2nd] key to display the amount due in Euro.
4. Press the [euro] key to display the current balance due in Local
currency.
5. Type the amount tendered by cash in Local currency [1500] and
press the [amt tend/total] key. The current balance due in Euro is
displayed.
6. Type [4000] and press the [check/valid] key. The change in Euro is
displayed and the transaction ends successfully.
Cash payment in
local currency
Check payment
in Euro
Change tendered
in Euro
ENGLISH
53
Page 61

Minus (-) Key Transactions
Registering a (-) Reduction (Coupon)
Up to seven digits can be used for the amount of the transaction.
Example: Register a £.10 reduction (coupon) on a £2.00 item to
Department 2.
Proceed as follows:
1. Type [200] followed by the [department 2/22] key.
2. Type the amount to be reduced [10] followed by the [-] key.
3. End the transaction by pressing the [amt tend/total] key.
Item price
Reduction using manual
entry and minus key
Exact cash tender
Registering a Multiple (-) Reduction
Example: Register a £.12 reduction on a £2.50 item to Department 1, a
£2.60 item to Department 3, a £.60 reduction on a £4.50 item to
Department 21, a £.10 discount to a £3.00 multiple item sale to
Department 5 and a £.1.00 reduction to a £5.00 item to Department 22.
Compute change for a £30.00 tender.
Proceed as follows:
1. Type [250] and press the [department 1/21] key.
2. Type the £.12 discount [12] and press the [-] key.
3. Type [260] and press the [department 3/23] key.
4. Type [450] and press the [dept shift] and [department 1/21] keys.
5. Type the £.60 discount [60] and press the [-] key.
6. Type the number of items of the multiple sale [3], press the
[qty/date] key then enter the unit price [300] and press the
[department 5/25] key.
7. Type the number of items of the multiple sale to be discounted by
pressing the [3] key followed by [qty/date] key and then type the
£.10 discount [10] followed by the [-] key.
8. Type [500], press the [dept. shift] key followed by the
[department 2/22] key.
9. Type the £1.00 reduction [100] and press the [-] key.
10.Press the [st/w/tax/2nd] key to display the current balance due.
11.Type the amount tendered [3000] and press the
[amt tend/total] key to display the change due to the customer and
end the transaction.
54
Page 62
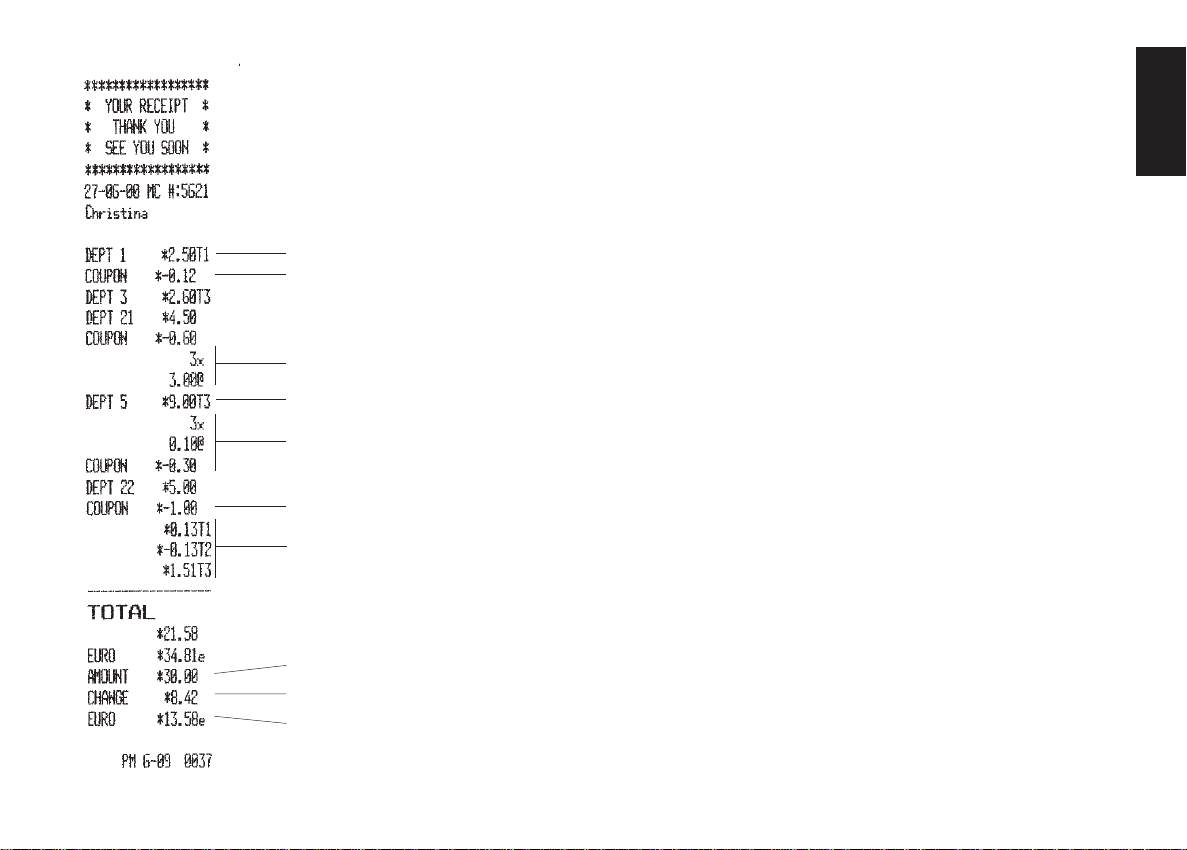
Item price entry
Manual reduction entry
Multiple item sale
multipled by unit price
Resulting total
Multiple item reduction
Manual reduction entry
Calculated VA T rates
Percent Discount (-%) Transactions
Discounting the Total Sale
You can call up a programmed discount rate during the transaction by
pressing the [-%/RA] key. If a percent discount rate is not programmed,
type in the discount rate before pressing the [-%/RA] key. Up to four
digits can be used for the discount percentage (0-99.99%). You MUST
enter two digits after the decimal position.
Example: Register a programmed 10% discount to an entire sales
transaction. Compute the change tender.
Proceed as follows:
1. Type [250] and press the [department 7/27] key.
2. Type [99] and press the [department 3/23] key.
3. Press the [#/st/ns] key to display and print the current balance due.
4. Press the [-%/RA] key to apply the programmed discount. The
amount discounted is displayed.
5. Press the [st/w/tax/2nd] key to display the new balance due.
6. Type the amount tendered [500] and press the [amt tend/total] key.
The change due to the customer is displayed and the transaction
ends successfully.
The transaction receipt is shown on the next page.
ENGLISH
Cash tendered
Change due
Change converted
into Euro
55
Page 63

T ransaction subtotal
Programmed discount rate
Discount
T ransaction total
Cash tendered
Change due
Change converted
into Euro
Discounting the Total Sale by Using a Random
Discount Rate
Example: Register a 20% discount to a sales transaction. Compute the
change tender.
Proceed as follows:
1. Type [259] and press the [department 1/21] key.
2. Type [125] and press the [department 2/22] key.
3. Press the [#/st/ns] key to print the subtotal.
4. Type the discount rate to apply [20] and press the [-%/RA] key.
The amount discounted is displayed.
5. Press the [st/w/tax/2nd] key to display the new balance due.
6. Type the amount tendered [500] and press the [amt tend/total] key.
The change due to the customer is displayed and the transaction
ends successfully.
56
Page 64
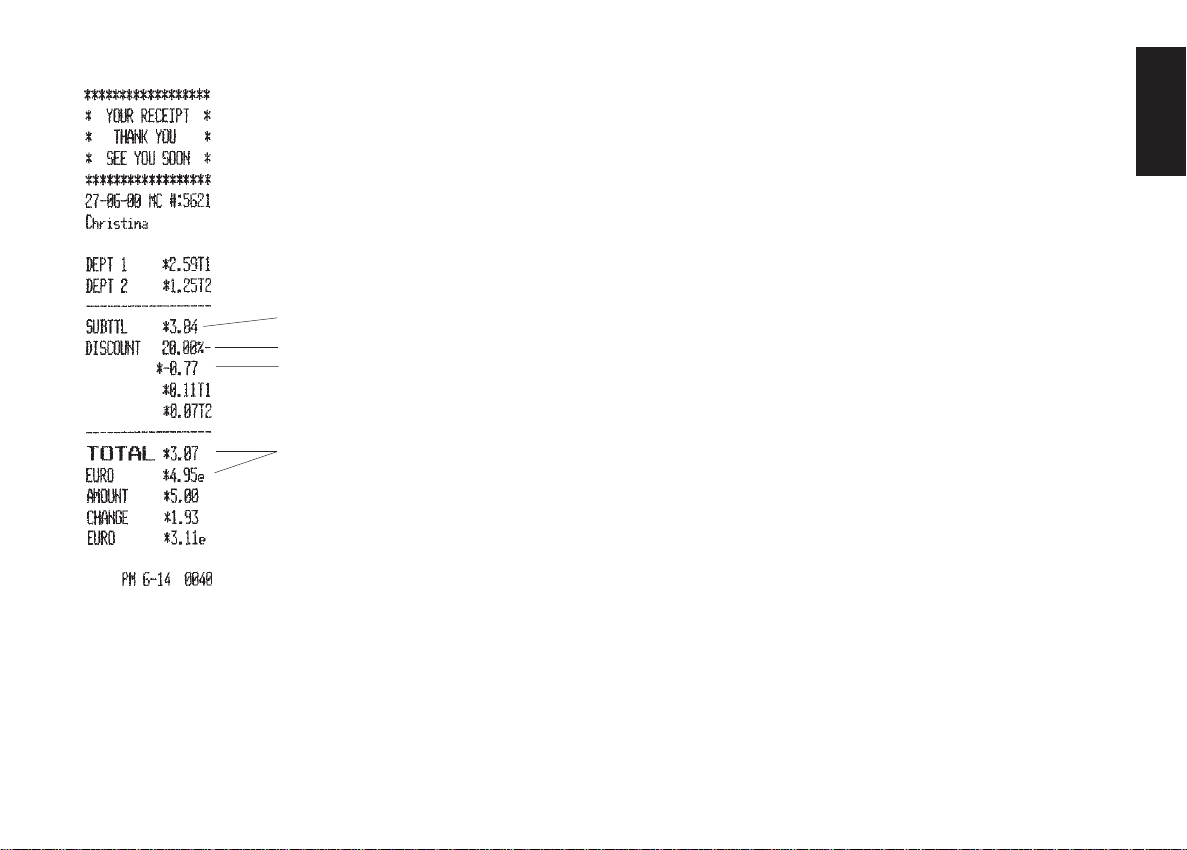
T ransaction subtotal
Manual discount entry
Discount
T ransaction total in local
currency and in Euro
Discounting (-%) Individual Items using the
Programmed Discount Rate
Up to four digits can be used for the discount percentage (0-99.99).
You MUST enter two digits after the decimal position.
Example: Register a programmed 10% discount on a £3.00 item to
Department 5, and a £2.50 item to Department 4. Compute the change
tender.
Proceed as follows:
1. Type [300] and press the [department 5/25] key.
2. Press the [-%/RA] key to apply the programmed discount. The
amount discounted is displayed.
3. Type [250] and press the [department 4/24] key.
4. Press the [st/w/tax/2nd] key to display the current balance due.
5. Type the amount tendered [600] and press the [amt tend/total] key.
The change due to the customer is displayed and the transaction
ends successfully.
The transaction receipt is shown on the next page.
ENGLISH
57
Page 65
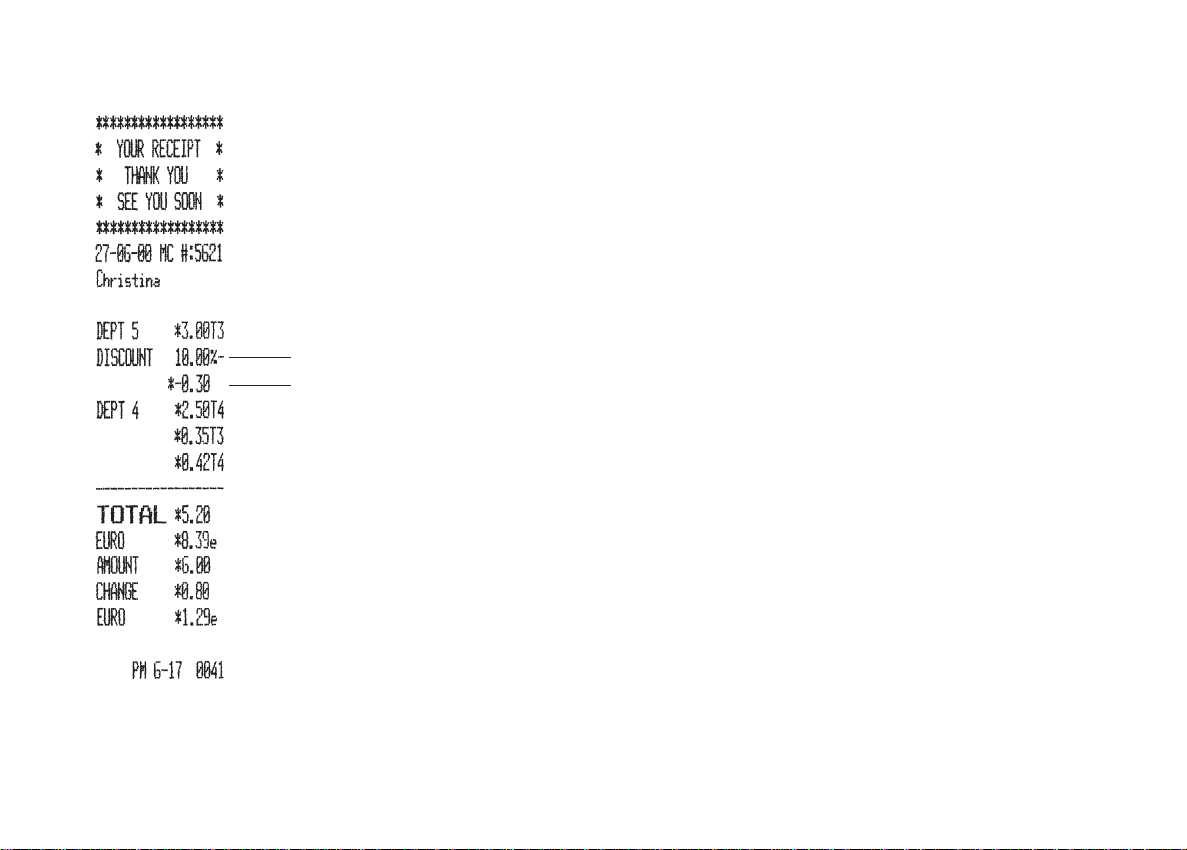
Programmed discount rate
Discount
Discounting Individual Items using Programmed and
Random Discount Rates
Example: Register a £2.50 item to Department 1, apply the programmed discount to a £3.50 item to Department 25 and apply a
discount rate of 3% to a £5.00 item to Department 2. Compute change
tender.
Proceed as follows:
1. Type [250] and press the [department 1/21] key.
2. Type [350] and press the [dept shift] key followed by the
[department 5/25] key.
3. Press the [-%/RA] key to apply the programmed discount. The
amount discounted is displayed.
4. Type [500] and press the [department 2/22] key.
5. Type the discount rate [3] and press the [-%/RA] key. The amount
discounted is displayed.
6. Press the [st/w/tax/2nd] key to display the current balance due.
7. Type the cash tendered [1100] and press the [amt tend/total] key.
The change due to the customer is displayed and the tranasction
ends successfully.
58
Page 66
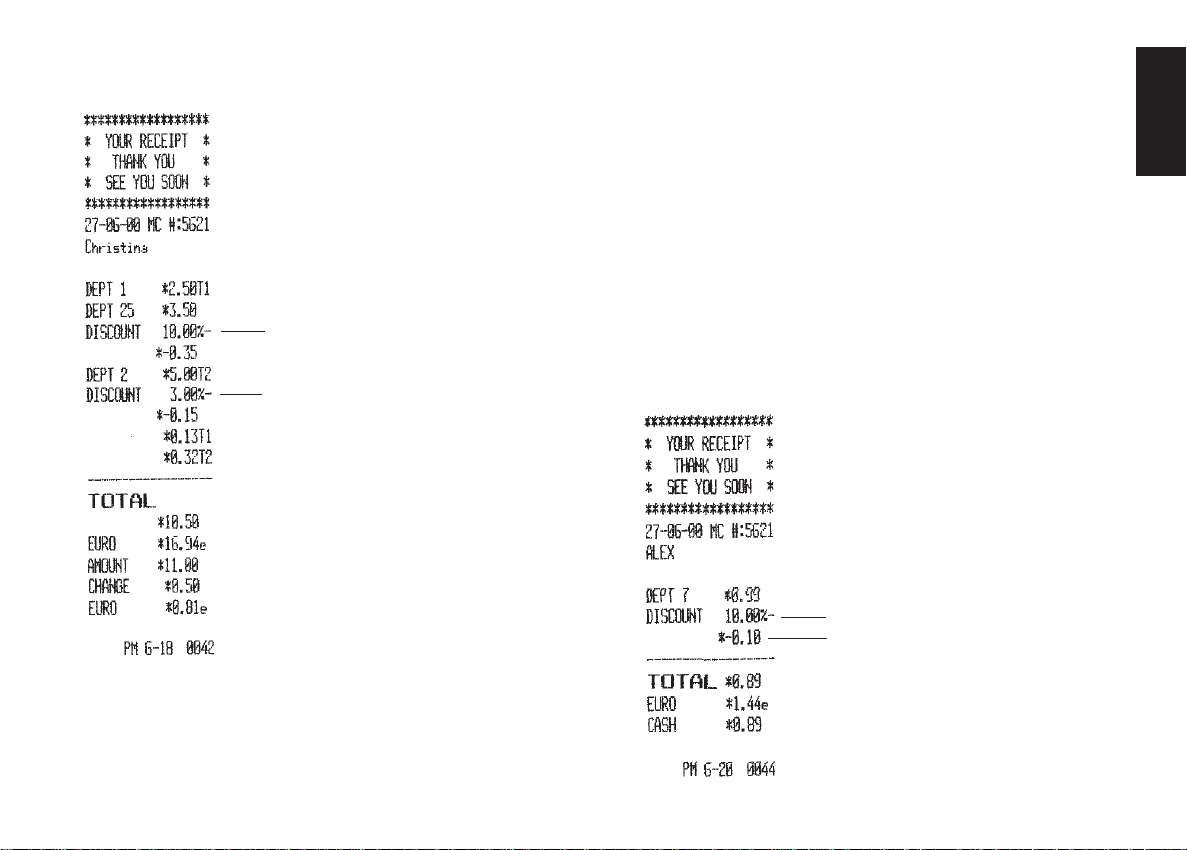
Programmed discount rate
Random discount rate
Discounting (-%) One Item Using the Programmed
Discount Rate
Up to four digits can be used for the discount percentage (0-99.99%).
You MUST enter two digits after the decimal position.
Example: Register a programmed 10% discount to a £.99 cash
transaction to Department 7.
Proceed as follows:
1. Type [99] and press the [department 7/27] key.
2. Press the [-%/RA] key to apply the programmed discount. The
amount discounted is displayed.
3. Press the [st/w/tax/2nd] key to display the current balance due.
4. Press the [amt tend/total] key to end the transaction with a correct
cash tender.
Programmed discount rate
Discount
ENGLISH
59
Page 67
Percent Plus (+%) Transactions
Applying the Programmed Percent Plus Rate to a
Total Sale
You can call up a programmed percent plus rate during the transaction by pressing the [+%/PO] key. If a percent plus rate is not programmed, type in the discount rate before pressing the [+%/PO] key.
Up to four digits can be used for the percent plus rate (0-99.99%). You
MUST enter two digits after the decimal position.
Example: Register a programmed 3% percent plus rate to an entire
sales transaction. Compute the change tender.
Proceed as follows:
1. Type [250] and press the [department 7/27] key.
2. Type [99] and press the [department 3/23] key.
3. Press the [st/w/tax/2nd] key to display the current balance due.
4. Press the [+%/PO] key to apply the programmed add-on. The
amount added on is displayed.
5. Press the [st/w/tax/2nd] key again to display the new balance due.
6. Type the amount tendered [500] and press the [amt tend/total] key.
The change due to the customer is displayed and the transaction
ends successfully.
T ransaction subtotal
Programmed percent plus rate
Amount added on
60
Page 68
Applying a Random Percent Plus Rate to a Total Sale
Example: Register a 20% percent plus rate to a sales transaction.
Compute the change tender.
Proceed as follows:
1. Type [259] and press the [department 1/21] key.
2. Type [125] and press the [department 2/22] key.
3. Press the [#/st/ns] key to print the current balance due.
4. Type the percent plus rate to apply [20] and press the [+%/PO] key.
The amount added on is displayed.
5. Press the [st/w/tax/2nd] key to display the new balance due.
6. Type the amount tendered [500] and press the [amt tend/total] key.
The change due to the customer is displayed and the transaction
ends successfully.
ENGLISH
T ransaction subtotal
Random percent plus rate
Amount added on
61
Page 69
Adding a Percent Plus Rate to Individual Items Using
the Programmed Rate
Up to four digits can be used for the percent plus rate (0-99.99%).
You MUST enter two digits after the decimal position.
Example: Register a programmed 3% percent plus rate on a £3.00 item
to Department 5, and a £2.50 item to Department 4. Compute the
change tender. Proceed as follows:
1. Type [300] and press the [department 5/25] key.
2. Press the [+%/PO] key to apply the programmed percent plus rate.
The amount added on is displayed.
3. Type [250] and press the [department 4/24] key.
4. Press the [st/w/tax/2nd] key to display the current balance due.
5. Type the amount tendered [600] and press the [amt tend/total] key.
The change due to the customer is displayed and the transaction
ends successfully.
Programmed percent
plus rate
Amount added on
62
Page 70
Applying Programmed and Random Percent Plus
Rates to Individual Items
Example: Register a £2.50 item to Department 1, apply the programmed percent plus rate to a £3.50 item to Department 25, and apply
a random precent plus rate of 5% to a £5.00 item to Department 2.
Compute change tender.
Proceed as follows:
1. Type [250] and press the [department 1/21] key.
2. Type [350] and press the [dept shift] key followed by the
[department 5/25] key.
3. Press the [+%/PO] key to apply the programmed percent plus rate.
The amount added on is displayed.
4. Type [500] and press the [department 2/22] key.
5. Type the random percent plus rate [5] and press the [+%/PO] key.
The amount added on is displayed.
6. Press the [st/w/tax/2nd] key to display the current balance due.
7. Type the cash tendered [1200] and press the [amt tend/total] key.
The change due to the customer is displayed and the tranasction
ends successfully.
Programmed percent
plus rate
Random percent
plus rate
ENGLISH
63
Page 71

Adding the Programmed Percent Plus Rate (+%) to
One Item
Up to four digits can be used for the percent plus rate (0-99.99%).
You MUST enter two digits after the decimal position.
Example: Register a programmed 3% add-on to a £.99 cash transaction
to Department 7.
Proceed as follows:
1. Type [99] and press the [department 7/27] key.
2. Press the [+%/PO] key to apply the programmed percent plus rate.
The amount added on is displayed.
3. Press the [st/w/tax/2nd] key to display the current balance due.
4. Press the [amt tend/total] key to end the transaction with a correct
cash tender.
PLU Codes
Registering a Sales Transaction Using Preset PLU
Codes
In order to be able to use this feature, PLU codes must have been
previously set. Turn to the section entitled Setting PLU Codes for
information on how to define a PLU to an individual item.
Example: Use preset PLU codes to register an entire transaction:
register PLU 1 (preset for Coffee) and multiply 3 PLU 2 (preset for
Mineral Water). Compute change for a cash tender.
Proceed as follows:
1. Type [1] followed by the [plu] key.
2. Type [3] followed by [qty/date], then press [2] followed by the
[plu] key. The amount of the multiplication is displayed.
3. Press the [st/w/tax/2nd] key to display the current balance due.
4. Type the amount tendered [1000] and press the [amt tend/total]
key. The change due to the customer is displayed and the transaction
is ended successfully.
64
Page 72
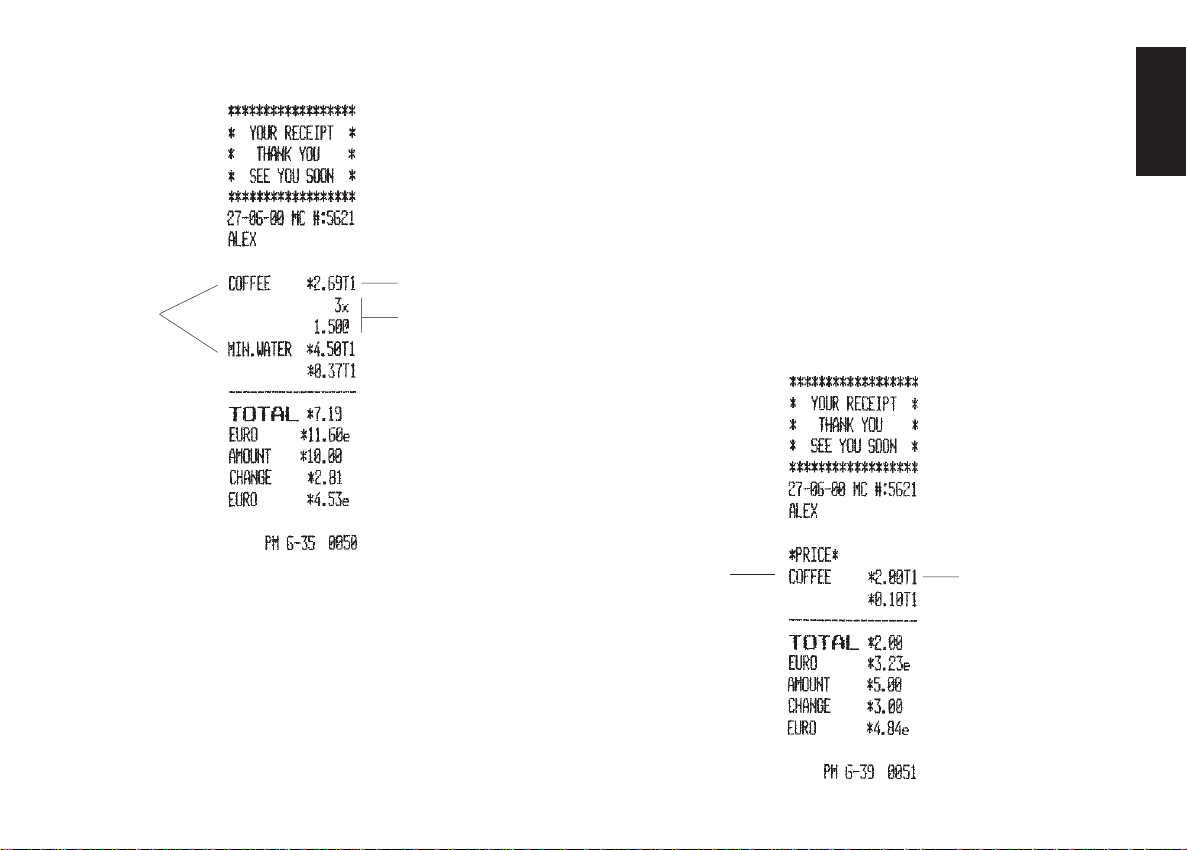
Programmed
PLU identifier
Preset PLU price
Multiple sale with
same preset PLU
Overwriting a Preset PLU Price
Example: Overwrite the preset PLU 1 with £2.00. Compute change for
a £5.00 tender.
Proceed as follows:
1. Type the new price [200] and press the [plu price] key. The
message PRICE is displayed on the operator display.
2. Type [1] followed by the [plu] key to define the PLU to be
overwritten.
3. Press the [st/w/tax/2nd] key to display the current balance due.
4. Type the cash tendered [500] and press the [amt tend/total] key.
The change due to the customer is displayed and the transaction
ends successfully.
ENGLISH
Overwritten
PLU descriptor
Entered PLU
price (manual
price entry)
65
Page 73
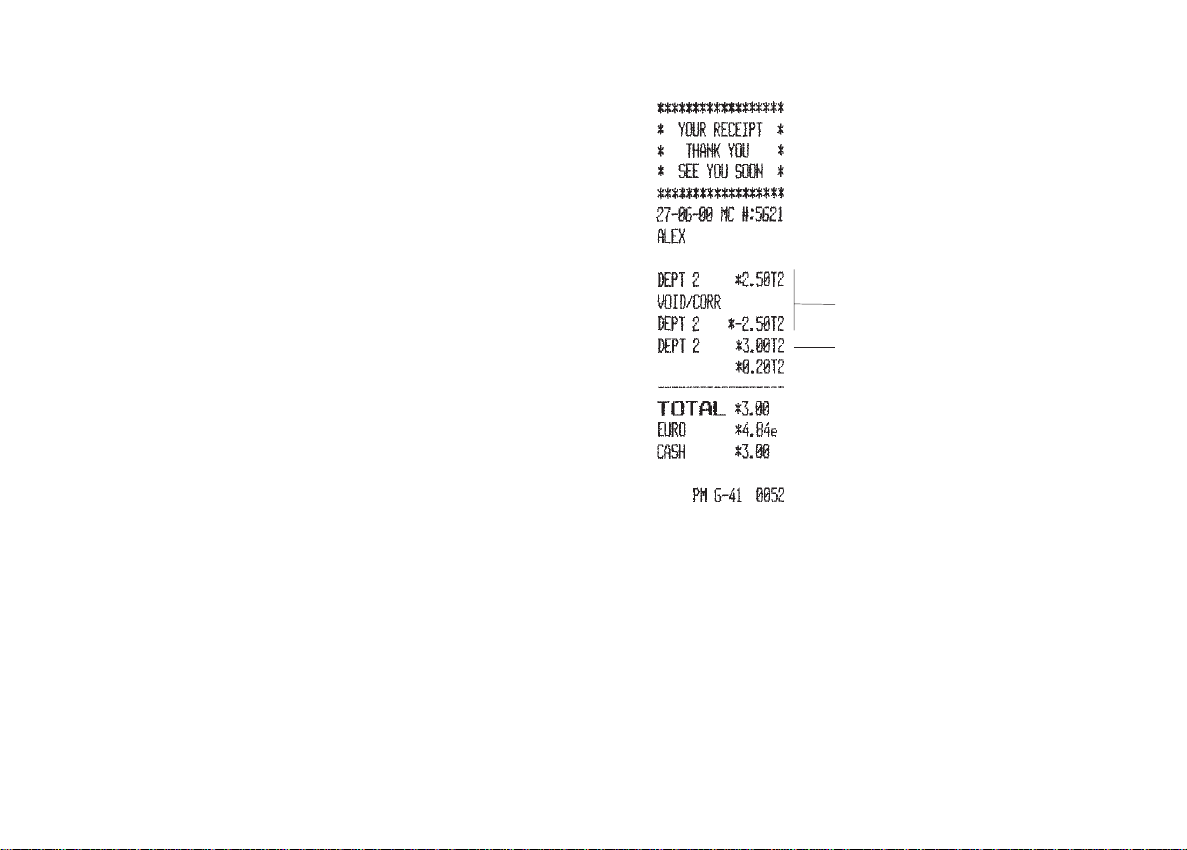
Voids and Refunds
Voiding the Previous Entry in the Middle of a Sale
Example: Void a £2.50 entry erroneously made to Department 2. Then
register a £3.00 item to this same Department. End the transaction with
an exact change tender.
Proceed as follows:
1. Type [250] and press the [department 2/22] key.
2. Press the [void] key to void the entry made in the previous step.
The amount voided is displayed and printed.
3. Type [300] and press the [department 2/22] key.
4. Press the [st/w/tax/2nd] key to display the current balance due.
5. Press the [amt tend/total] key to end the transaction with an exact
change tender.
Incorrect item price void
Correct item price
66
Page 74

Voiding a Previous Entry at the End of a Sale
Example: Register a £1.50 item to Department 1, a £2.59 item to
Department 4, a £5.99 item to Department 3. Then void the £1.50 item
erroneously made to Department 1 and replace it with a £1.00 entry to
the same Department. Compute change for a cash tender.
Proceed as follows:
1. Type [150] and press the [department 1/21] key.
2. Type [259] and press the [department 4/24] key.
3. Type [599] and press the [department 3/23] key.
4. Type [150], press the [void] key and then the [department 1/21]
key. The amount voided is displayed and printed.
5. Type [100] and press the [department 1/21] key.
6. Press the [st/w/tax/2nd] key to display the current balance due.
7. Type the amount tendered [1000] and press the [amt tend/total]
key. The change due to the customer is displayed and the transaction
is ended successfully.
ENGLISH
Incorrect price entry
Incorrect item price void
Correct item price entry
67
Page 75

Refunding a Single Item
Example: Refund a £1.00 item in Department 1.
Proceed as follows:
1. Press the [return] key. The message REFUND is displayed on the
operator display.
2. Type the amount to be refunded [100] and press the
[department 1/21] key. The amount refunded is displayed.
3. Press the [amt tend/total] key to successfully end the transaction.
Single item returned
and refunded
T otal refunded in local
currency and in Euro
Refunding Multiple Items
Example: Refund a £4.99 item to Department 4 and three £2.00 items
to Department 8.
Proceed as follows:
1. Press the [return] key. The message REFUND is displayed on the
operator display.
2. Type [499] and press the [department 4/24] ke y. The item's
department number and amount refunded are displayed.
3. Press the [return] key again.
4. Type the number of items to be refunded [3], press the [qty/date]
key, enter their unit price [200] and then press their department key
[department 8/28]. The Department number and the number of
items refunded are displayed.
5. Press the [st/w/tax/2nd] key to display the total amount to be
refunded.
6. Press the [amt tend/total] key to successfully end the transaction.
68
Page 76

Single item refund
Multiple item refund
Other Transactions
Registering Money Received on Account
Example: Register £10.00 received on account.
Proceed as follows:
1. Type [1000] and then press the [-%/RA] key.
The cash drawer will automatically open to indicate the end of the
transaction.
ENGLISH
T otal refund
Amount received
on account
69
Page 77

Paying Money Out
Example: Pay out £2.50.
Proceed as follows:
1. Type the amount to be paid out [250] and then press the [+%/PO]
key.
The cash drawer will automatically open to indicate the end of the
transaction.
Amount paid out
Overwriting a Preset VAT Rate on a Department Sale
The [non tax] key overwrites a preset VAT rate linked to a depart-
ment.
Example: Register a £1.15 item to Department 1, with a preset 5.5%
VAT rate, then register a non-taxable £2.50 item to the same Department. Compute the change for a £5.00 cash tender.
Proceed as follows:
1. Type [115] and press the [department 1/21] key.
2. Press the [non tax] key.
3. Type [250] and press the [department 1/21] key.
4. Press the [st/w/tax/2nd] key to display the current balance due.
5. Type [500] and press the [amt tend/total] key. The change due to
the customer is displayed and the transaction ends successfully.
Department programmed
with VA T rate 1
Same department
with no V AT applied
70
Page 78

Overwriting the VAT Calculation at the End of a Sale
The [non tax] key can also be used to overwrite the final VAT
calculation at the end of a sale.
Example: Register a £2.00 item to Department 1 with a preset 5.5%
VAT rate, then register a £2.50 item to Department 2 with a preset 7%
VAT rate. Over-ride the VAT calculation and compute the change for a
£5.00 cash tender.
Proceed as follows:
1. Type [200] and press the [department 1/21] key.
2. Type [250] and press the [department 2/22] key.
3. Press the [non tax] key.
4. Press the [st/w/tax/2nd] key to display the current balance due.
5. Type [500] and press the [amt tend/total] key. The change due to
the customer is displayed and the transaction ends successfully.
ENGLISH
Departments with
VAT status
No VA T calculation
71
Page 79

Credit Tenders
With reference to the Programming System Options section in this
manual, you can set Machine Condition 16 so that the cash register
reserves departments 19, 20, or both, for the registration of credits
deriving from a sales transaction. In this way you can sort the sales that
have been paid with two different credit cards.
Prerequisite to the example shown below is having appropriately
setting the Machine Condition indicated above as explained in the
section entitled Changing the Cash Register's Standard Settings.
Example: Register a £5.00 item to Department 4 and a £1.00 item to
Department 5. Assign the resulting credit to Department 20.
Proceed as follows:
1. Type [500] and press the [department 4/24] key.
2. Type [100] and press the [department 5/25] key.
3. Press the [department 20/40] key. The cash register registers the
transaction to Department 20 and the transaction ends successfully.
Sales total in local
currency and in Euro
T otal credit assigned
72
Page 80
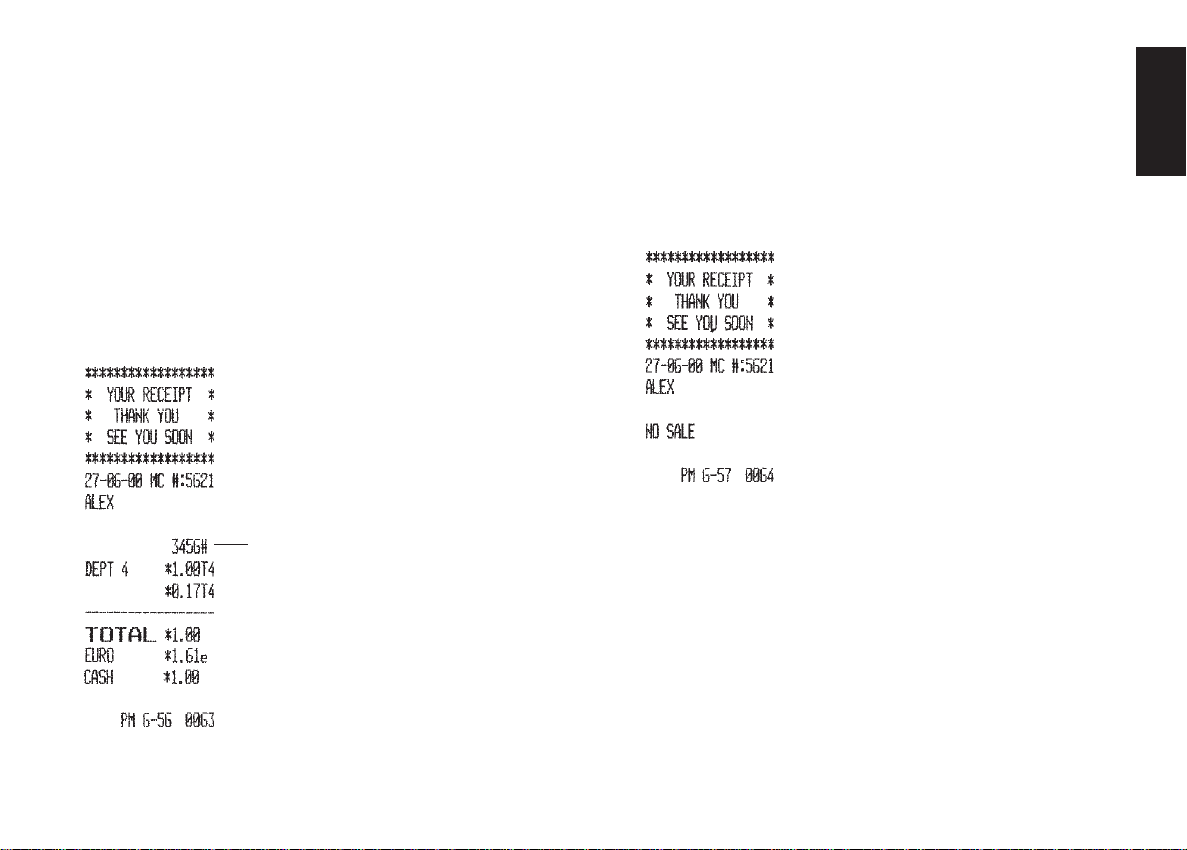
Registering an Identification Number to a Transaction
Up to 7 digits can be used for the identification number. This entry
can be made prior to any operation. The identification number is not
added to the management report or totals.
Example: Assign the identification number 3456 to a £1.00 sale to
Department 4. Enter an exact cash tender sale.
Proceed as follows:
1. Type [3456] and press the [#/st/ns] key.
2. Type [100] and press the [department 4/24] key.
3. Press the [amt tend/total] key for an exact cash tender sale.
T ransaction number
Registering a No Sale
This operation opens the cash drawer and prints a no sale receipt.
The activity is registered to the activity counter in the financial report.
Proceed as follows:
1. Press the [#/st/ns] key.
ENGLISH
73
Page 81
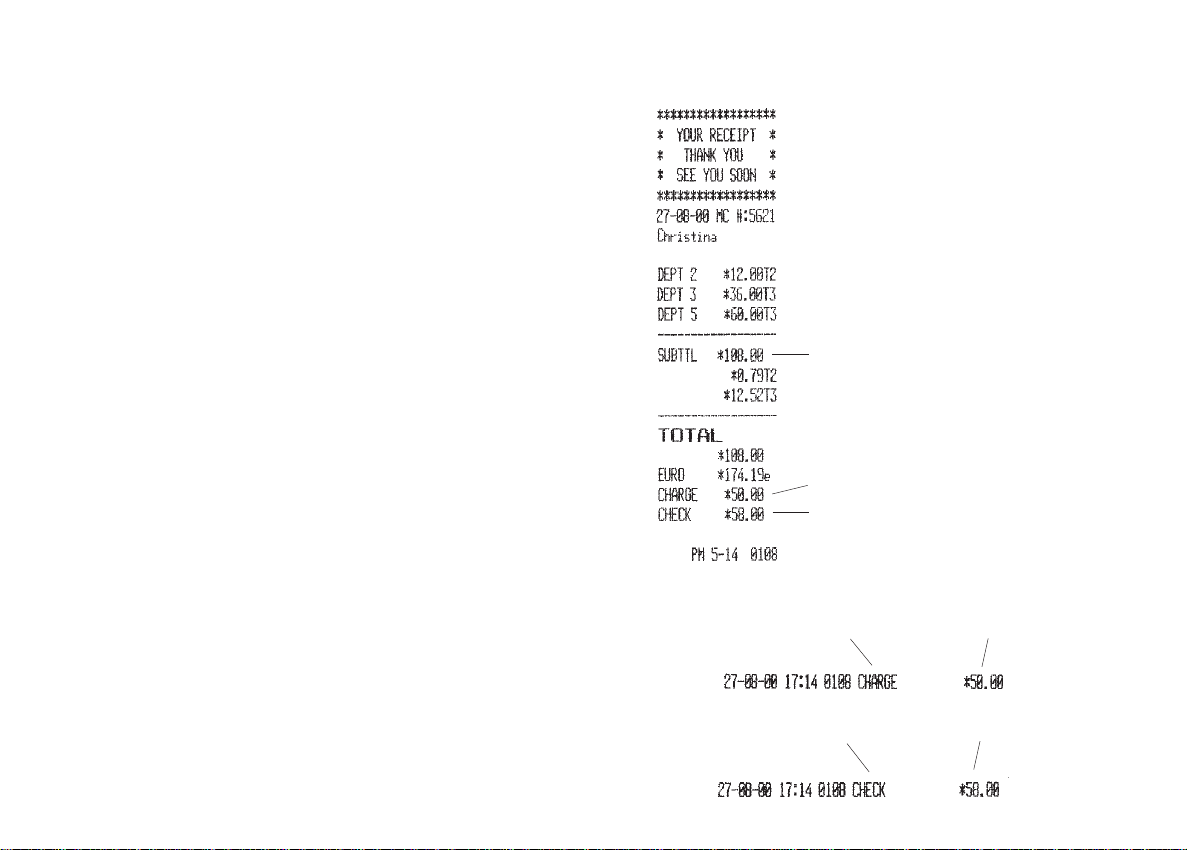
Validating a Document
This operation is used to print a transaction summary (validation) on
a form or slip, such as a credit card slip, a check or other, at the end of
a sales transaction. It is typically used to validate checks, gift certificates, paid out slips, and guest checks. By default, the machine’s
validation printing format provides the date and time at which the
transaction was performed, the related receipt number, the form of
payment and the related amount(s) tendered.
Example: Register the sale of a £ 12.00 item to Department 2, a
£36.00 item to Department 3 and a £60.00 item to Department 5.
Subtotal the transaction and split the amount tendered between £50.00
charge and the remaining balance due by check. At the end of the
transaction, validate two documents, one with the amount charged and
the other with the amount paid by check.
1. Type [1200] and press the [department 2/22] key, type [3600] and
press the [department 3/23] key and then type [6000] and press the
[department 5/25] key.
2. Press the [#/st/ns] key to subtotal the transaction. The subtotal is
printed on the customer receipt and journal roll.
3. Type the amount to be charged [5000] and press the [charge] key.
The remaining balance due is displayed. Press the [check/valid]
key to end the transaction.
4. Insert the document for charge tender validation into the document
validation slot on the printer compartment cover and press the
[charge] key.
5. Press the [check/valid] key to print the validation string on the
document. Remove the document from the slot.
6. Insert the document for check tender validation into the document
validation slot on the printer compartment cover and press the
[check/valid] key.
7. Press the [check/valid] key again to print the validation string on
the document. Remove the document from the slot.
Validation strings:
T ransaction subtotal
Charge tender
Check tender
Charge
tender
Check
tender
Amount
charged
Amount paid
by check
74
Page 82
Management Reports
Transaction data is maintained in the memory of the cash register as
long as the cash register was plugged to the electrical outlet for at least
48 hours. See the section Memory Back-up Battery System. This data
can be printed as a report for management review. The Management
Report can be printed with the Control Lock in either the X or Z
position.
A Z2 Report is also called a period-to-date financial report which
also clears the transaction totals from memory once issued.
This report is usually taken at the end of the month, for example, if a
monthly sales report is desired to check the activities of each single
department.
An X2 Report gives the same period-to-date financial report as a Z2
Report but does not reset the totals to zero. This report can be taken at
any time.
ENGLISH
X and Z Reports
Turning the PRG, REG or Z key to the X position prints the
accumulated transaction information and RETAINS ALL TOTALS IN
MEMORY. Use this report mode to print periodic reading of the
transactions performed. X reports include the Cash-In-Drawer, PLU
Report, Time Report, Clerk Report and X1 and X2 Financial Reports.
X1 and X2 Financial Reports are provided in this chapter.
Turning the PRG or Z key to the Z position prints the same
information as the X reports. The only difference between the
two types of report is, however, that after a Z report printout ALL
TRANSACTION TOTALS ARE RESET TO ZERO, except for
the grand total unless otherwise programmed in the system options
programming mode.
An X1 Report can be printed at any time of the day. This report gives
you all the sales transaction totals made before the report is issued.
The Grand Total value at the bottom of this report shows the total sales
up to the previous day, if a Z1 report was previously taken (this GT
does not, however, include the current day’s totals).
A Z1 Report gives the same information as an X1 Report but then
resets the transaction totals to zero once printed. It is usually taken at
the end of the day so that all the transaction totals are cleared to start
from zero the following day. After a Z1 Report, the transaction totals
are transferred to the Grand Total (GT) value of the X1 Report. Only
when a Z1 Report is taken are the transaction totals transferred to the
Z2 or X2 reports.
Cash-In-Drawer Report
The cash-in-drawer report tells you how much cash is in the cash
drawer without resetting the related total.
Proceed as follows to print a cash-in-drawer report:
1. Turn the control key to the X position.
2. Type the manager password if it has been defined.
3. Press the [qty/date] key.
T otal cash in draw er
in local currency
Acronym for
Cash In Drawer
75
Page 83
Time Report
The time report provides the net total sales performed by the cash
register on an hourly basis.
Proceed as follows to print the time report:
1. Turn the control key to the X or Z position (remember that a Z
time report printout will reset the totals to zero).
2. Type the manager password if it has been defined.
3. Type [11] and press the [amt tend/total] key.
Time
X report
identifier
76
Activity
counter
Time of receipt
printout
Net sales total
at 4:00 PM
Net sales total
at 5:00 PM
Receipt number
Page 84

Clerk Report
The Clerk Report lists the number of transactions and sales totals for
each Clerk. At the end of the receipt you are given the sales total of all
clerks. Proceed as follows to print a Clerk Report:
1. Turn the control key to the X or Z position (remember that a Z
Clerk Report resets all totals).
2. Type the manager password if it has been defined.
3. Press the [clerk] key.
Clerk name or
identification
Activity
counter
X report identifier
Sales total of
clerk Christina
Sales total of clerk 3
Sales total of
all clerks
ENGLISH
77
Page 85
All PLU Report
The All PLU Report lists all transaction information pertaining to the
use of the PLU codes by all the Clerks on a particular cash register.
This report provides the number of times a particular PLU is used and
the totals for that number. Proceed as follows to print a PLU Report.
1. Turn the control key to the X or Z position (remember that a Z
PLU Report resets all PLU totals to zero).
2. Type the manager password if it has been defined.
3. Press the [plu] key.
Programmed
PLU identifier
X report identifier
Number of items sold
for PLU min water
PLU min water
sales total
All PLUs
sales total
78
Page 86
PLU Range Report
The PLU Range Report lists the transaction information pertaining to
a defined range of PLUs. It provides the same information as an All
PLU Report, the only difference being that you can define the start PLU
and end PLU numbers.
Proceed as follows to print an example PLU Report from PLU 001 to
PLU 004.
1. Turn the control key to the X position.
2. Type the manager password if it has been defined.
3. Type [001] to define the start PLU and then type [004] to define the
end PLU.
4. Press the [plu] key.
Department Range Report
The Department Range Report lists the transaction information
pertaining to a defined range of departments. It provides the total sales
transactions performed by the departments within the defined range.
Proceed as follows to print an example Department Range Report
starting with Department 01 and ending with Department 06.
1. Turn the control key to the X position.
2. Type the manager password if it has been defined.
3. Type [01] to define the start department followed by [06] to define
the end department.
4. Press the [amt tend/total] key.
Start department
ENGLISH
End department
Department range
sales totals
79
Page 87

Z1 and X1 Financial Report
The Z1 and X1 financial report gives the totals of all the transactions
performed by the cash register. The only difference between a Z1 and
X1 report is that the Z1 report resets all totals to zero, and therefore
can be used as an end-of-day report.
Proceed as follows to print a Z1 or X1 financial report:
1. Turn the control key to the Z or X position (bearing in mind that a Z
printout resets all totals to zero).
2. Enter the manager password if it has been defined.
3. Press the [amt tend/total] key.
A sample Z1 financial report printout is provided in the next section.
Sample Z1 or X1 Financial Report
Shown on the next page is an example Z1 financial report. Printing a
Z1 report resets all totals to zero.
Date
Z1 report ident.
Machine number
Z1 counter
Department 1
Activity counter
Department 1
sales total
80
Sales total of all
departments
T otal amount VAT 1,
2, 3 and 4
Coupon discount total
Page 88
Refund counter
Void counter
Cash sales counter
Check sales counter
Charge sales counter
Credit-1 sales counter
Received on
account counter
Paid out counter
No sale counter
Time
T otal programmed discount
T otal programmed percent plus
Net sales total in base currency
T ender rounding total
Conversion currency
net sales total
Refund total
Void total
Gross sales total
Cash sales total
Check sales total
Charge sales total
Credit 1 sales total
Received on account total
Paid out total
Euro cash total
Euro check total
Euro charge total
Cash in drawer total
Check-in-drawer total
Charge-in-drawer total
Credit 1-in-drawer total
Grand total
Consecutive receipt number
Z2 and X2 Financial Report
A Z2 or X2 period-to-date financial report provides the transaction
totals for all 40 departments available, along with the relative VAT
totals. Both reports are the same, the only difference being that a Z2
report resets all totals to zero. Can be taken as monthly sales reports
to view end-of-month sales totals for each department.
Proceed as follows to print a Z2 or X2 financial report.
1. Turn the control key to the Z or X position (remember that a Z
financial report printout resets all totals to zero).
2. Type the manager password if it has been defined.
3. Type [99] and press the [amt tend/total] key.
An example Z2 financial report is provided on the next page.
ENGLISH
81
Page 89
Date
Z2 report ident.
Machine number
Z2 counter
Department 1
Activity counter
Department 1
sales total
Sales total of all
departments
T otal amount VAT 1,
2, 3 and 4
Coupon discount total
Refund counter
Void counter
Cash sales counter
Check sales counter
Charge sales counter
Credit-1 sales counter
Received on
account counter
Paid out counter
No sale counter
Time
T otal programmed discount
T otal programmed percent plus
Net sales total in base currency
T ender rounding total
Conversion currency
net sales total
Refund total
Void total
Gross sales total
Cash sales total
Check sales total
Charge sales total
Credit 1 sales total
Received on account total
Paid out total
Euro cash total
Euro check total
Euro charge total
Cash in drawer total
Check-in-drawer total
Charge-in-drawer total
Credit 1-in-drawer total
Grand total
Consecutive receipt number
82
Page 90

Duplicate Z Report
In case the paper runs out or a paper jam occurs during the printing of
a Z report, you can print the entire report again from the beginning by
following this procedure:
1. Turn the control key to the Z position.
2. Type the manager password if it has been defined.
3. Press [#/st/ns] followed by the [amt tend/total] key.
Balancing Formulas
The following examples show how totals are calculated for the
management reports:
System Balance
(+) Department 1
(+) Department 2
(+) Department 3
: :
(+) Department 39
(+) Department 40
(=) Department Total
System option 23=0
(+) Department Total
(-) Minus Total
(-) Sales -% Total
(+) Sales +% Total
(+) Adjustment Total
(=) Net Sales
Media Balance
System option 23=1
(+) Department Total
(-) Minus Total
(-) -% Total
(+) +% Total
(+) Adjustment Total
(=) Net Sales
(+) Net sales
(+) Minus Total
(+) -% Total
(+) Return Total
(+) Void Total
(-) Adjustment Total
(=) Gross Sales
(+) Net Sales
(+) Previous Grand Total
(=) Ending Grand Total
(+) Net Sales
(-) Check
(-) Charge
(-) Credit 1
(-) Credit 2
(+) Received on Account
(-) Paid Out
(-) Payment Out
(=) Cash in Drawer
ENGLISH
83
Page 91

Appendix
Character Code Table
The Character Code Table shown on the next page indicates all the
codes representing the characters which your cash register is capable
of printing. You need to use this table when programming Clerk, item,
department names, currency descriptors or the header on the customer
receipt or the different captions that can be personalized. Each
character code consists of two numbers.
To use this table, first look for the character wanted and then
identify its corresponding code by reading the number on the first
number column to the left-hand side, identified by 1, and then the
second number in the first number row on the top of the table,
identified by 2.
For example, the letter R has a character code of 58, the number 5
has a character code of 35 while the Dollar sign has a character code
of 72.
Shown below is your cash register's Character Code Table.
.
ü
I
DW : Select double width characters.
Caption Table
The Caption Table shown on the next pages indicates the information
that is printed on the customer receipt and journal record, in the
different languages available.
84
Page 92

ENGLISH
# DESCRIPTOR DIGITS NOTE
1 COUPON _____ 10 Sales Receipt
2 DISCOUNT _____ 10 Sales Receipt
3 ADD_ON _____ 10 Sales Receipt
4 CHARGE _____ 10 Sales Rece ipt
5 VOID/CORR _ _ 10 Sal es Receipt
6 SUBTTL _____ 10 Sales Receipt (SUBTOTAL)
7 CHANGE _____ 10 Sales Receipt
8 CASH ________ 10 Sales Receipt
9 *PRICE* _____ 10 Sales Receipt
10 AMOUNT _____ 10 Sales Receipt
11 CHECK _____ 10 Sales Receipt
12 T1 2 Sales Receipt / TAX Symbol
13 T2 2 Sales Receipt / TAX Symbol
14 T3 2 Sales Receipt / TAX Symbol
15 T4 2 Sales Receipt / TAX Symbol
16 REFUND _____ 18 Sales Receipt
17 TOTAL 10 Sales Receipt
18 PAID_OUT ___ 10 Receipt
19 RECD_ACCT _ 10 Receipt
20 NO_SALE ____ 10 Receipt
21 COUPON 10 Program Print
22 DISCOUNT ___ 10 Program Print
23 ADD_ON _____ 10 Program Print
24 CHARGE _____ 10 Program Print
25 R-A- _________ 10 Program Print
26 P-O- _________ 10 Program Print
# DESCRIPTOR DIGITS NOTE
27 VOI D /COR R _ 10 Program Print
28 SUBTTL _____ 10 Program Print
29 PLU_NO. ____ 10 Program Print
30 T 1 2 Progr am Print / TAX Sy m bol
31 T2 2 Program Print / TAX Symbol
32 T3 2 Program Pr int / TAX S y m bol
33 T4 2 Program Pr int / TAX S y m bol
34 COUPON _____ 10 Financial Report
35 DISCOUNT ____ 10 Financial Report
36 ADD_ON _____ 10 Financial Report
37 CHARGE _____ 10 Financial Report
38 VOID/CORR _ 10 Financial Report
39 RECD_ACCT _ 10 Financial Report
40 PAID_OUT ___ 10 Financial Report
41 NO_SALE ____ 10 Financial Report
42 CHECK ______ 10 Financial Report
43 DEPTTL ______ 10 Financial Report
44 REFUND ______ 10 Financial Report
45 TAX_1 ________ 10 Financial Report
46 TAX_2 ________ 10 Financial Report
47 TAX_3 _________ 10 Financial Report
48 TAX_4 _________ 10 Financial Report
49 NET ____ 10 Financial Report
50 GROSS 10 Financial Report
51 G T ____ 8 Financial Report (GRAND TOTAL)
52 C - I - D 10 Financial Report
53 CASH ______ 10 Financial Report
54 T1 2 Financial Report / TAX Symbol
ENGLISH
85
Page 93

# DESCRIPTOR DIGITS NOTE
55 T2 2 Financial Report / TAX Symbol
56 T3 2 Financial Report / TAX Symbol
57 T4 2 Financial Report / TAX Symbol
58 T X 2 Financial Report / TAX Symbol
59 TOTAL 10 PLU Report
60 PLU _____ 10 PLU Report
61 TOTAL 10 Clerk Re por t
62 CLERK ______ 10 Clerk Report
63 C - I - D ___ 10 Cash in drawer Report
64 NET ______ 10 Monthy Repo rt
65 GROSS 10 Monthy Report
66 T 1 __ ______ 10 Monthy Report
67 T 2 _________ 10 Monthy Repo r t
68 T 3 _ ________ 10 Monthy Report
69 T 4 __ _______ 10 Monthy Report
70 MC_#: 5 Machine Number
71 ****************** 18 Store Header 1st line (Programmable)
* YOUR RECEIPT *
72
* THANK YOU *
73
18 Store Header 2 nd line (Progr ammable)
18 Store Header 3 r d line (Programmable)
74 ****************** 18 Store Header 4th line (Programmable)
75 DEPT ______ 10 Department, all receipt (Programmable)
76 CLERK _______ 18 Clerk Name (Programmable)
77 TIME ______ _ 10 Time Report (Programmable)
78 CREDIT-1 _____ __ 12 Cre dit - 1 Capt ion (Pro gr ammable )
79 CREDIT-2 _____ __ 12 Cre dit - 2 Capt ion (Pro gr ammable )
80 PLU_No ______ 9 PLU Caption (Prog rammable)
* "-" Indicates blank space
# SPANISH FRENCH GERMAN
1 CUPON ______ COUPON______ MINUS_______
2 DESCUENTO _ REMISE______ RABATT______
3 INCREMENTO MAJORATION AUFSCHLAG_
4 CARGO _______ C-CREDIT__ KREDIT______
5 ANUL/CORRC CORRECTION STORNO______
6 SUBTOTAL__ SOUS-TOTAL ZWSUMME______
7 CAMBIO____ RENDU______ RUCKGELD__
8 METALICO__ ESPECES____ BAR_________
9 "PRECIO"___ PRIX________ PREIS________
10 CANTIDAD__ MONTANT____ BETRAG______
11 CHEQUE ____ CHEQUE_____ SCHECK______
12 T1 T1 S1
13 T2 T2 S2
14 T3 T3 S3
15 T4 T4 S4
16 REEMBOLSO RETOUR RUCKZAHLUNG
17 TOTAL TOTAL GESAMT______
18 SALIDAS_____ SORTIE______ AUSZAHLUNG
19 CUENTA______ ENTREE______ EINZAHLUNG
20 NO_VENTA NON-VENTE_ NULL_BON__
21 CUPON_______ COUPON______ MINUS_______
22 DESCUENTO_ REMISE______ RABATT______
23 INCREMENTO MAJORATION AUFSCHLAG_
24 CARGO_______ C-CREDIT___ KREDIT______
25 CUENTA______ ENTREE______ EINZAHLUNG
26 SALIDAS_____ SORTIE______ AUSZAHLUNG
27 ANUL/CORRC CORRECTION STORNO______
28 SUBTOTAL___ SOUS-TOTAL ZWSUMME__
86
Page 94

# SPANISH FRENCH GERMAN
29 PLU_NO______ PLU-NO______ PLU-NR______
30 T1 T1 S1
31 T2 T2 S2
32 T3 T3 S3
33 T4 T4 S4
34 TL-CUPON__ TL-COUPON _ MINUS_______
35 DESCUENTO_ TL-REMISE_ RABATT______
36 TL-INCREM_ TL_MAJOR__ AUFSCHLAG_
37 CARGO______ TL-C-DRED_ KREDIT______
38 ANUL/CORRC TL-CORREC_ STORNO______
39 CUENTA______ TL-ENTREE_ EINZAHLUNG
40 SALIDAS_____ TL-SORTIE_ AUSZAHLUNG
41 NO_VENTA___ TL-NON-VTE NULL-BON__
42 CHEQUE______ TL-CHEQUE_ SCHECK______
43 TOTAL_DPTO TL-DEPART_ WG _TOTAL__
44 REEMBOLSO_ TL-RETOUR_ RUCKZAHLUNG__
45 T 1__________ TL-TVA1 T 1__________
46 T 2__________ TL-TVA2 T 2__________
47 T 3__________ TL-TVA3 T 3__________
48 T 4__________ TL-TVA4 T 4__________
49 N E T O__ TL-NET______ N E T T O
50 B R U T O TL-BRUT BRUTTO______
51 GRAN_TOTAL__ G T_________ G T__________
52 METAL_CAJA NET-TIROIR G - I - S
53 METALICO__ TOT-ESPECE BARGELD___
54 T1 T1 S1
55 T2 T2 S2
56 T3 T3 S3
# SPANISH FRENCH GERMAN
57 T4 T4 S 4
58 TX TX TX
59 TOTAL TL-PLU_____ GESAMT_____
60 P L U___ P L U_____ P L U_____
61 T O T A L TL-VENDEUR GESAMT_____
62 DEPENDIEN_ VENDEUR_ KASSIERER ____
63 METAL_CAJA NET-TIROIR G - I - S
64 N E T O_____ TL-NET_ N E T T O
65 B R U T O TL- BRUT_____ BRUTTO_____
66 T 1_____ TL-TVA1_____ T 1_____
67 T 2_____ TL-TVA2_____ T 2_____
68 T 3_____ TL-TVA3_____ T 3_____
69 T 4_____ TL-TVA4_____ T 4______
70 MC# CR-NO MC#
71 ********* ***** **** ********* ***** **** ******************
72 ****SU RECIDO***** **VOUS REMERCIE*** **IHRE RECHNUNG***
73 *****GRACIAS****** DE VOTRE CONFIANCE ***VIELEN DANK****
74 ****************** ****************** ******************
75 DPTO_____ DEPT_____ WARENGRP_____
76 DEPENDIENTE_____ VENDEUR_____ KASSIERER _____
77 HORA_____ HEURE_____ ZEIT_____
78 CRED-1_____ CART-CRED_1 KRED-1
79 CRED-2_____ CART-CRED_2 KRED-2
80 P L U_No _____ ARTICLE____ _ ARTIKEL ___ __
* "-" Indicates blank space
ENGLISH
87
Page 95

Totalizers and Counters Table
The table below indicates the Z1/X1 and Z2/X2 totalizers and
counters for the different cash register features.
Z 1 / X 1 Z 2 / X 2
TOTALIZERS COUNTERS TOTALIZERS COUNTERS
Depart ment 1-40 10 (digits) X 40 4 ( dig it s) X 40 10 (di git s ) X 40 4 (digits ) X 40
Clerk 1- 26 10 X 26 4 X 2 6 - -
TAX amount 10 X 4 - 10 X 4 Minus 10 X 1 - 10 X 1 -
-% 10 X 1 - 10 X 1 +% 10 X 1 - 10 X 1 Return 10 X 1 4 X 1 10 X 1 4 X 1
Void 10 X 1 4 X 1 10 X 1 4 X 1
Received account 10 X 1 4 X 1 10 X 1 4 X 1
Paid out 10 X 1 4 X 1 10 X 1 4 X 1
Cash 10 X 1 4 X 1 10 X 1 4 X 1
Charge 10 X 1 4 X 1 10 X 1 4 X 1
Check 10 X 1 4 X 1 10 X 1 4 X 1
Cash in drawe r 10 X 1 - 10 X 1 NO sale - 4 X 1 - 4 X 1
Grand Total 12 X 1 - - Net sales 10 X 1 - 10 X 1 Convert net sales 10 X 1 - 10 X 1 Gross sales 10 X 1 - 10 X 1 PLU 10 X 99 9 4 X 999 - Z1 Counte r - 4 X 1 - Z2 Counte r - - - 4 X 1
Time sales 4 X 24 4 X 24 - -
Cash Register Specifications and Safety
Technical Characteristics
Listed below are the technical characteristics of this cash register
model.
Type: Electronic cash register with alphanumeric printer
and 40 departments and 999 PLU settings
Displays: 10-digit green fluorescent numeric client display and
10 digit x 2 rows alphanumeric operator display.
Symbols for error, change, subtotal, minus, total,
cash, check, charge, Euro currency shown.
Capacity: 7-digit input and 10-digit printout
Printer: 2-station shuttle dot-matrix, 18 characters per line
Inked ribbon: Nylon fabric ribbon cartridge
Paper supply: Two rolls of 37.5 ±0.5 mm wide paper (customer
receipt and journal record rolls)
Technology: CMOS RAM
Power cons.
(operating): Refer to the data plate on the back of the machine
Electrical
power supply: Refer to the data plate on the back of the machine
Operating
Temperature: 0 degrees C - 40 degrees C (32-104 degrees F)
Dimensions: Length: 410 mm
Depth: 440 mm
Height: 270 mm
Weight: 12 Kg
88
Page 96

Safety Precautions
• The power socket for this cash register must be located near the
unit and easily accessible.
• Plug the cash register to a power socket where no other electrical
device is connected.
• Do not use this cash register outdoors in the rain or near any liquid.
• Keep the cash register uncovered when turned on to allow the
proper cooling of the electronic components.
ENGLISH
89
 Loading...