

Page 1

User Guide
Manual del Usuario
Page 2
Nokia 2135 User Guide
Nota: La traducción en español de este manual inicia en la Página 65.
1
Page 3

© 2007 Nokia. All rights reserved.
Nokia, Navi and Nokia Connecting People are trademarks or registered
trademarks of Nokia Corporation. Nokia tune is a sound mark of Nokia
Corporation. Other product and company names mentioned herein may be
trademarks or tradenames of their respective owners.
US Patent No 5818437 and other pending patents. T9 text input software
Copyright (C) 1997-2007. Tegic Communications, Inc. All rights reserved.
Includes RSA BSAFE cryptographic or security protocol software
from RSA Security.
The information contained in this user guide was written for the Nokia 2135
product. Nokia operates a policy of ongoing development. Nokia reserves the
right to make changes and improvements to any of the products described
in this document without prior notice.
TO THE MAXIMUM EXTENT PERMITTED BY APPLICABLE LAW, UNDER NO
CIRCUMSTANCES SHALL NOKIA OR ANY OF ITS LICENSORS BE RESPONSIBLE
FOR ANY LOSS OF DATA OR INCOME OR ANY SPECIAL, INCIDENTAL,
CONSEQUENTIAL OR INDIRECT DAMAGES HOWSOEVER CAUSED.
THE CONTENTS OF THIS DOCUMENT ARE PROVIDED "AS IS". EXCEPT AS
REQUIR ED BY APPL ICABLE LA W, NO W ARRA NTIE S OF A NY KIND , EI THER
EXPRESS OR IMPLIED, INCLUDING, BUT NOT LIMITED TO, THE IMPLIED
WARRANTIES OF MERCHANTABILITY AND FITNESS FOR A PARTICULAR
PURPOSE, ARE MADE IN RELATION TO THE ACCURACY, RELIABILITY OR
CONTENTS OF THIS DOCUMENT. NOKIA RESERVES THE RIGHT TO REVISE
THIS DOCUMENT OR WITHDRAW IT AT ANY TIME WITHOUT PRIOR NOTICE.
The availability of p articular products and application s and services for these
products may vary by region. Please check with your Nokia dealer for details,
and availability of language options.
2
Page 4

Export controls
This device may contain commodities, technology, or software subject to
export laws and regulations from the US and other countries. Diversion
contrary to law is prohibited.
FCC/INDUSTRY CANADA NOTICE
Your device may cause TV or radio interference (for example, when using a
telephone in close proximity to receiving equipment). The FCC or Industry
Canada can require you to stop using your telephone if such interference
cannot be eliminated. If you require assistance, contact your local service
facility. This device complies with part 15 of the FCC rules. Operation is
subject to the following two conditions: (1) This device may not cause
harmful interference, and (2) this device must accept any interference
received, including interference that may cause undesired operation. Any
changes or modifications not expressly approved by Nokia could void the
user’s authority to operate this equipment.
9204912/Issue 1
3
Page 5

Contents
SAFETY........................................................................................ 6
General information .................................................................. 9
Access codes................................................................................................................ 9
Nokia support on the web....................................................................................... 9
1. Get started ........................................................................ 10
Install and remove battery ................................................................................... 10
Charge the battery.................................................................................................. 12
Switch your phone on or off................................................................................ 13
Normal operating position ................................................................................... 13
2. Your phone........................................................................ 14
Keys and parts.......................................................................................................... 14
Standby mode and shortcuts............................................................................... 15
Keyguard.................................................................................................................... 16
3. Call functions ................................................................... 17
Make and answer a call ........................................................................................ 17
Conference Calling ................................................................................................. 17
Loudspeaker.............................................................................................................. 18
4. Write text.......................................................................... 18
Traditional text input............................................................................................. 19
Predictive text input............................................................................................... 19
4
Page 6

5. Menu functions ................................................................ 20
Contacts..................................................................................................................... 20
Messages ................................................................................................................... 21
Call log....................................................................................................................... 28
Profiles ....................................................................................................................... 29
Settings...................................................................................................................... 30
Gallery ........................................................................................................................ 37
Games......................................................................................................................... 37
Organizer................................................................................................................... 38
Voice recorder.......................................................................................................... 42
Downloads................................................................................................................. 43
6. Enhancements................................................................... 44
7. Reference information ..................................................... 46
Battery and charger information........................................................................ 46
Nokia battery authentication.............................................................................. 49
Care and maintenance............................................................. 51
Additional safety information ................................................ 53
Index ......................................................................................... 63
5
Page 7

SAFETY
Read these simple guidelines. Not following them may be dangerous
or illegal. Read the complete user guide for further information.
SWITCH ON SAFELY
Do not switch the device on when wireless phone use is
prohibited or when it may cause interference or danger.
ROAD SAFETY COMES FIRST
Obey all local laws. Always keep your hands free
to operate the vehicle while driving. Your first
consideration while driving should be road safety.
INTERFERENCE
All wireless devices may be susceptible to interference,
which could affect performance.
SWITCH OFF IN RESTRICTED AREAS
Follow any restrictions. Switch the device off in aircraft,
near medical equipment, fuel, chemicals, or
blasting areas.
QUALIFIED SERVICE
Only qualified personnel may install or repair
this product.
6
Page 8

ENHANCEMENTS AND BATTERIES
Use only approved enhancements and batteries.
Do not connect incompatible products.
WATER-RESISTANCE
Your device is not water-resistant. Keep it dry.
■
About your device
The wireless device (RH-108) described in this guide is approved
for use on on CDMA 800 and 1900 MHz, and CDMA 2000 1x RTT
network. Contact your service provider for more information
about networks.
When using the features in this phone, obey all laws and
respect local customs, privacy and legitimate rights of others,
including copyrights.
Copyright protection may prevent some images, music, and other
content from being copied, modified, or transferred.
Warning: To use any features in this device, other than
the alarm clock, the device must be switched on. Do not
switch the device on when wireless device use may cause
interference or danger.
Remember to make back-up copies or keep a written record of all
important information stored in your device.
When connecting to any other device, read its user guide for detailed
safety instructions. Do not connect incompatible products.
7
Page 9

■ Network services
To use the phone you must have service from a wireless service
provider. Many of the features require special network features.
These features are not available on all networks; other networks may
require that you make specific arrangements with your service
provider before you can use the network services. Your service
provider can give you instructions and explain what charges will
apply. Some networks may have limitations that affect how you
can use network services. For instance, some networks may not
support all language-dependent characters and services.
Your service provider may have requested that certain features be
disabled or not activated in your device. If so, these features will not
appear on your device menu. Your device may also have a special
configuration such as changes in menu names, menu order, and
icons. Contact your service provider for more information.
■
Shared memory
The following features in this device may share memory:
Downloaded ringtones and wallpapers.
Use of one or more of these features may reduce the memory
available for the remaining features sharing memory. Your device
may display a me ssage that the memory is full wh en you try to use a
sh ared memo ry fe atur e. I n t his cas e, de let e s ome of th e in fo rma tio n
or entries stored in the shared memory features before continuing.
8
Page 10

General information
■ Access codes
The security and lock code controls access to features are
supplied with the phone.
The phone lock feature protects your phone from
unauthorized outgoing calls or unauthorized access to
information stored in the phone.
When the phone lock is on, the only outgoing calls that can
be made are to the emergency number programmed into your
phone (for example, 911 or other official emergency number).
Select Menu > Settings > Security settings to set how your
phone uses the access codes and security settings.
■ Nokia support on the web
Check www.nokiausa.com/support or your local Nokia web
site for the latest version of this guide, additional information,
downloads, and services related to your Nokia product.
9
Page 11
1. Get started
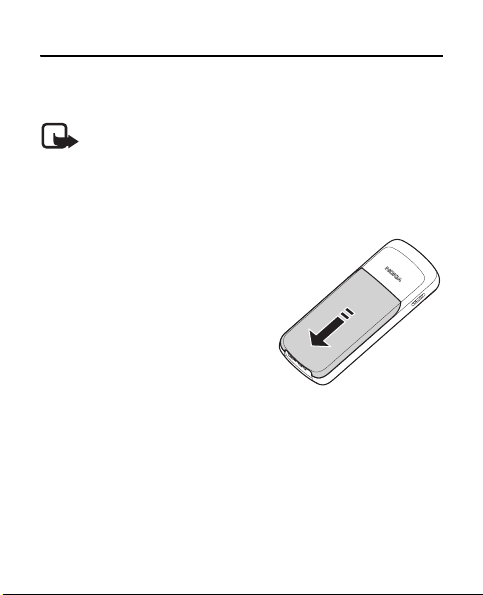
■ Install and remove battery
Note: Always switch off the power and disconnect
the charger and any other device before removing
the covers. Avoid touching electronic components
while changing the covers. Always store and use
the device with the covers attached.
1. To remove the cover, with
the back of the phone facing
you. Press and slide the back
cover toward the bottom of
the phone.
10
Page 12

2. To insert the battery,
position the battery so
the gold-colored contacts
match up with those on the
phone, and insert the battery
into the battery slot.
3. Push down on the other end
of the battery to snap the
battery into place.
4. Align the back cover with
the back of the phone, and
slide it toward the top of the
phone until you hear a click
to lock it into place.
5. To remove the battery,
remove cover (see step 1)
and insert your finger into
the finger grip, to lift the
battery from its compartment.
11
Page 13

■ Charge the battery
Warning: Use only batteries, chargers, and
enhancements approved by Nokia for use with
this particular model. The use of any other types
may invalidate any approval or warranty, and
may be dangerous.
This device is intended for use with a BL-5B battery and
AC-3 or AC-4 charger. For availability of approved
enhancements, please check with your dealer.
When you disconnect the power cord of any enhancement,
grasp and pull the plug, not the cord.
1. Connect the charger to a
wall socket.
2. Insert the charger output
plug into the round jack at
the bottom of the phone.
If the battery is completely
discharged, it may take a few
minutes before the charging indicator appears
on the display or before any calls can be made.
12
Page 14

■ Switch your phone on or off
To switch your phone on or off,
press and hold the power/
end key on the keypad for at
least three seconds.
Warning: Do no t sw i tc h t he
phone on when wireless phone use is prohibited or
when it may cause interference or danger.
■ Normal operating position
Your device has an internal antenna. Hold the phone as
you would any other telephone with the antenna pointed
up and over your shoulder.
Your device may have internal and
external antennas. As with any other radio
transmitting device, avoid touching the
antenna unnecessarily while the antenna is
transmitting or receiving. Contact with such
an antenna affects the communication quality and may
cause the device to operate at a higher power level than
otherwise needed and may reduce the battery life.
13
Page 15

2. Your phone
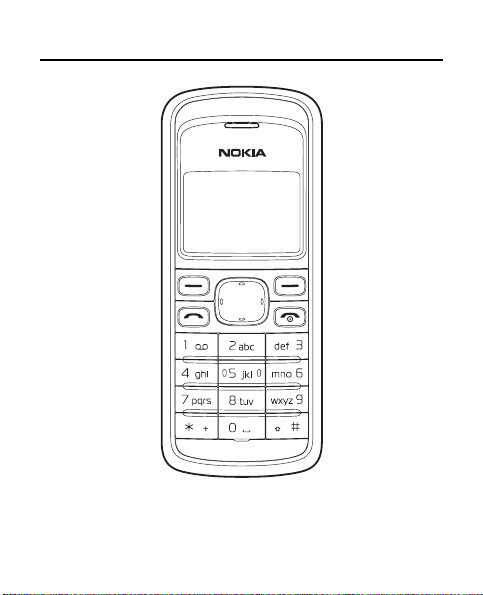
■ Keys and parts
1. Earpiece
2. Right selection key
3. Power/End key
4. Keypad
5. Microphone
6. Charger port
7. Headset port
8. Call key
9. Left selection key
10.Navi™ key (referred to as
scroll key)
11.Display screen
14
Page 16
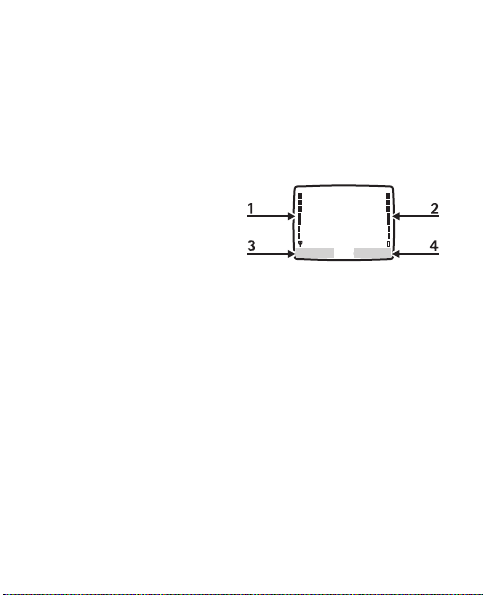
■ Standby mode and shortcuts
Depending on your wireless service provider and the model
number of your device, some or all of the following selection
keys may appear in the standby mode.
At the start screen, your phone is idle and standing by
for activity.
1. Signal strength —
A higher bar
indicates a stronger
network signal.
2. Battery level — A higher
bar indicates more power in the battery.
3. Menu—Press the left selection key to enter the
main menu.
4. Contacts—Press the right selection key to enter
contacts list.
In the standby mode, the four-way scroll key may vary with
your network services. please refer to your service operator
for detailde information.
15
Page 17

■ Keyguard
The keyguard locks the keypad to prevent keys from being
pressed and calls from being made accidentally.
To lock the keypad, select Menu, and press * within
2 seconds.
To unlock the keypad, select Menu, and press * within
2 seconds.
If the keypad is locked, it is unlocked automatically when you
receive a call. After the call, the lock automatically
reactivates. When the keyguard is on, calls may be possible to
the official emergency number programmed into your phone.
In the standby mode, select Menu > Settings > Phone
settings > Automatic keyguard > On to set the keypad to
lock automatically after a preset time delay. Select Off to
deactivate the feature.
16
Page 18

3. Call functions
■ Make and answer a call
To make a call, enter the phone number, including the
country code and area code if necessary and press the call
key to call the number. Scroll right to increase or left to
decrease the volume of the earpiece or headset during the
phone call.
To answer an incoming call, press the call key. To end a call,
or reject an incoming call without answering, press the
end key.
■ Conference Calling
Conference calling is a network service that allows you to
take part in a conference call with another two participants.
To make a call to a new participant, select Options > New
call. Enter the number you want, and press the call key. When
the new call is answered, press the call key to connect the
calls. To end the conference call, select Options > End all
calls, or press the end key.
17
Page 19
■ Loudspeaker
You can use your phone as a loudspeaker during a call.
Warning: Do not hold the device near your ear
when the loudspeaker is in use because the volume
may be extremely loud.
To activate the loudspeaker during a call, select Loudsp..
To deactivate the loudspeaker during a call select Handset.
The loudspeaker is deactivated automatically when a
call (or a call attempt) ends or when certain enhancements
are connected.
4. Write text
You can enter text using traditional or predictive
text input. To change the text input method, and
to switch between upper and lower case, press the # key.
18
Page 20

■ Traditional text input
Press a number key, 1 to 9, repeatedly until the desired
character appears. To add a space, press 0. To add a
number, press and hold the desired number key. To get a
list of special characters, press *.
■ Predictive text input
Predictive text input is based on a built-in dictionary when
writing in English. To turn it on:
Select Menu > Messages > Text messages > Create
message > Options > Prediction on; to turn it off, select
Prediction off.
When using predictive text input, press each key once for
a single letter. If * is displayed first, you need to press the
key to write another letter.
If the displayed word is the one you want, press 0, and
start writing the next word.
If your word is not displayed, press * repeatedly to view
other word options.
19
Page 21

If ? is displayed after the word, the word is not in the
dictionary. To add the word to the dictionary, select Spell,
or select Options > Edit word, to enter the word
(using traditional text input), and select Save.
To get a list of special characters, press and hold *.
5. Menu functions
The phone functions are grouped into menus. Not all menu
functions or option items are described here.
In the standby mode, select Menu and scroll to the desired
menu item and press Select to enter a submenu. Press Exit
or Back to exit the current level of menu. Press the end key
to return to the standby mode directly.
■ Contacts
The contacts list can hold up to 400 contacts with multiple
numbers and text notes for each contact. The amount of
numbers and text entries that you can save may vary,
depending on length and the total number of entries in
the contacts list.
20
Page 22

To search for a contact, select Contacts > Search, enter
the first character of the contact name, and highlight the
contact you wish to view. Select Details > Options and
the action you want to apply to the contact.
Settings
Settings allows you to determine how your phone numbers
are viewed, and the memory status of contacts in your phone.
1. Select Contacts> Settings.
2. To select how names and numbers are viewed in the
contacts list, select Scrolling view.
3. To view the amount of used and remaining memory in
the phone contacts, select Memory status.
■ Messages
The message services can only be used when they
are supported by your network or service provider.
Message settings
To edit your message sending settings, select Menu >
Messages > Text messages > Message settings >
Sending options and one of the following:
21
Page 23

Message priority—to select the priority of the message as
Normal or Urgent.
Delivery note—a note is sent to you confirming delivery of
the message. Select On or Off.
Send callback number —to send a callback number, enter
the number you wish to be called back with. To not send a
callback number select Off.
For other settings, select Menu > Messages > Text
messages > Message settings > Other settings, and the
setting you wish to change:
Message font size—you can change the font size for message
reading and writing. Select or Small font or Large font.
Message overwriting—when the message memory is full,
your phone cannot receive any new messages. You can set
your phone to automatically overwrite old messages when
new ones arrive. To choose which messages can be replaced,
select Sent items only, Inbox only, or S. items & Inbox or,
to deactivate this feature, select Off.
Save to Sent items as sending—you can determine whether
messages should be saved automatically to the Sent items
folder when sent. Select Always save, Always prompt or Off
22
Page 24

Queue msgs. when digital unavailable—you can store in
Outbox messages to be sent later when digital service is
available. Select On, On prompt, or Off.
Voice messages
Voice mail is a network service that must be activated by
your service provider. If you subscribe to voice mail, your
wireless provider will supply a a voice mailbox number
that must be saved to your phone. For more details about
voice messages, contact your service provider.
To listen to your voce messages recorded in the voice mail
box, select Menu > Messages > Voice messages > Listen
to voice messages.
To access voice mail using speed dial, press and hold key 1.
Create message
1. Select Menu > Messages > Text messages >
Create message.
2. Compose a message using the keypad.
3. To send the message, in the message editor screen,
select Send to.
23
Page 25

4. To send to one recipient, select Send to number. Enter
the recipient’s phone number; or select Search to retrieve
a number from your contacts. Select Send.
5. To send to many recipients, select Send to many.
Select Options > Add number to enter the recipient’s
phone number; or select Search to retrieve a number
from your contacts list. Select Send.
6. To send by e-mail, select Send to e-mail . Enter the
recipient’s e-mail address ; or select Search to retrieve
a number from your contacts list. Select Send.
Note: Your device may indicate that your message
was sent to the message center number programmed
into your device. Your device may not indicate
whether the message is received at the intended
destination. For more details about messaging
services, contact your service provider.
Your device supports text messages beyond the limit for a
single message. Longer messages are sent as two or more
messages. Your service provider may charge accordingly.
Characters with accents or other marks, and characters from
some language options, take up more space, and limit the
number of characters that can be sent in a single message.
24
Page 26

Picture messages
Picture messages is a network service. If your wireless
service provider supports this feature, your phone comes
with five preloaded pictures. Pictures can be attached to a
text message and sent to compatible phones.
Note: The appearance of a message may vary
depending on the receiving device.
Copyright protections may prevent some
pictures from being copied, modified, transferred,
or forwarded.
To send a picture message, do the following:
1. Select Menu > Messages > Text messages >
Create message.
2. Write a message (or enter nothing if you choose to just
send a picture), and select Options.
3. Select Insert picture.
4. Scroll down through the pictures, and select View.
5. Select Insert to insert the picture into your message;
otherwise select Back, scroll to another picture, and
select View again.
25
Page 27

6. To send the picture message, select Send to > Send to
number, Send to many, or Send to e-mail .
7. Enter the phone number for your recipient, or select
Search to retrieve a number from the contacts list.
8. Select Send.
Picture images can only be received in text messages.
Read and reply
When you receive a message, a notification message is
displayed, and the icon appears.
1. Select Show to read the message or Exit to dismiss
the notification.
Scroll to view the whole message, if necessary.
When unopened messages are in your inbox, is shown
in the standby display mode as a reminder.
2. Select Reply > Empty screen, Original text, Template,
or other preset reply.
3. Enter your reply, and select Send.
Inbox, Sent items, and Drafts folders
All incoming messages are automatically stored in the inbox.
26
Page 28

Messages that are unsent and messages that failed to be
sent are automatically stored in the Outbox folder.
To save sent messages automatically to the Sent items
folder, select Menu > Messages > Text messages >
Message settings > Other settings > Save to Sent items
as sending and then select Always save or Always prompt
or Off to deactivate this feature.
You can store draft messages in the Drafts folder to edit and
send later. In the message editor screen, select Options >
Save message >Drafts.
Delete messages
If your message memory is full and you have more messages
waiting at the network, blinks in the standby mode.
You can: read and delete messages from some of your folders.
To delete a single message, select Menu >Messages >
Text messages, choose the message and select Options >
Delete and OK to delete the message, or Back to exit.
To delete all messages in a folder, select Menu > Messages >
Text messages > Delete messages and one of the following:
27
Page 29

• All—choose Inbox, Outbox, Sent items, Drafts, or Archive
as the desired folder from which you want to delete all
messages. Select Done, and confirm the deletion by
pressing Yes at the confirmation note.
• All read—choose Inbox, Outbox, Sent items, Drafts, or
Archive as the desired folder from which you want to
delete all read messages. Select Done, and confirm the
deletion by pressing Yes at the confirmation note.
• All unread—delete any messages that have not been
read in the Inbox folder, and confirm the deletion by
pressing OK at the confirmation note.
■ Call log
The Call log stores information about the last
20 missed, received, or dialed calls. It also adds
the total duration of all calls. When the number of calls
exceeds the maximum, the most recent call replaces the
oldest. The network must support these functions, and
the phone must be switched on and inside the network
service area.
28
Page 30

Select Menu> Call log > Missed calls, Received calls, or
Dialed numbers to view the date and time of the call, edit,
view, or call the registered phone number; save it to contacts;
or delete it from the phone memory. You can also send a
text message.
You can delete any missed, dialed, or received calls from
phone memory. Select Menu > Call log > Delete recent
call lists > All, Missed, Received, or Dialed.
Select Menu > Call log > Call timers to view the approximate
duration of the last call, all received calls, all dialed calls,
life timer or all calls.
To reset the timers, select Menu > Call log > Call timers >
Clear timers, enter your security code, and select OK.
Note: The actual time invoiced for calls by your
service provider may vary, depending on network
features, rounding off for billing, and so forth.
■ Profiles
Profiles defines for example, how your phone
reacts when you receive a call or message, and
how your keypad sounds when you press a key.
29
Page 31

Ringing options, keypad tones, and other settings for each
of the available profiles can be left at their default setting
or personalized to suit your needs. Available profiles are:
Normal, Silent, Meeting, Outdoor, and Pager.
To activate or customize a profile or set a timed expiration
for a profile, select Menu > Profiles, choose a profile and
select Activate, Customize, or Timed. You can also press
the end key and select to activate a profile (or Switch off!
to switch off the phone).
■ Settings
In this menu, you can adjust various phone
settings. To reset menu settings to their default values,
select Menu > Settings > Restore factory settings.
You will be prompted to enter your security code before
you can proceed.
Call settings
Select Menu > Settings > Call settings and from the
following options:
Location info sharing —allows the sharing of your network
location so that your position may be known. If activated
it can be set to on at all times, or only when are made.
30
Page 32

Anykey answer—to answer an incoming call by briefly
pressing any key except the end key or right selection.
Automatic redial—to set your phone to redial a number
after an unsuccessful call attempt.
1-touch dialing—to select whether number keys (2-9) can
be used for one-touch dialing (calling a number by pressing
and holding a key).
Calling card—to save up to four calling card numbers in
your phone to use for long distance calls.
International prefix—to make calls using the + sign as the
international prefix. The phone replaces the + sign in a
saved phone number when creating a call.
Call summary—to display the time spent on a call when
you hang up.
Phone settings
Select Menu > Settings > Phone settings and from the
following options:
Phone language—to select the language for the display text.
Automatic keyguard—to set the keypad to lock automatically
after a preset time delay.
31
Page 33

Touch tones—to set the tone duration when you press the
keys on your phone keypad.
Welcome note—to write a welcome note that briefly appears
whenever you switch your phone on.
Banner —the default banner for your phone depends on your
network service. To change your banner, select Customize,
enter the text you want displayed, and select OK.
Help text activation—to display brief descriptions for
most menu items.
Time and date settings
Select Menu >Settings > Time and date settings and from
the available options:
Clock—to hide or show the clock, set the time, change the
time zone and format.
Date—to hide or show the date, set the date, change the
date format and date separator.
Auto-update of time & date —to have the time and date
updated automatically, select On. To update the time and
date only after your confirmation, select Confirm first.
To switch off the automatic update feature select Off.
32
Page 34

Display settings
Select Menu > Settings > Display settings and from the
following options:
Wallpaper—to set a background image that is displayed
when the phone is in the standby mode.
Color schemes—to personalize the colors used on the
phone display.
Display brightness—to adjust the display brightness by
pressing the left and right scroll keys.
Backl. time-out—to control the backlight time-out of
your phone display.
Tone settings
All tone settings can only apply to the currently
selected profile.
Select Menu > Settings > Tone settings and from the
available options:
Incoming call alert—to set the alert type for incoming calls.
Ringing tone—to set the tone for incoming calls.
33
Page 35

Ringing volume—set the volume level for the ringing and
message alert tones, by adjusting the Ringing volume to the
volume of your preference. If you have your Ringing option
set to Ascending, and the Ringing volume set to level 2 or
above, your phone rings with the volume ascending from
level 1 to the level for incoming calls. If you select the highest
ringing tone level, the ringing tone reaches its highest level
after a few seconds.
Vibrating alert—to set the phone to vibrate when you
receive a call or a text message.
Message alert tone—to set the tone to sound when you
receive a text message.
Keypad tones—to select the volume level of the keypad tones.
Warning tones—to control warning and confirmation tones.
Alert for—to select that the phone gives an audible alert
only when a member of a selected caller group is calling.
Enhancement settings
To view compatible enhancements the phone can be
connected to, select Menu > Settings > Enhancement
settings > Charger, Hearing aid or Text phone.
34
Page 36

Security settings
To set the security settings for your phone, the following
options are available:
Select Menu > Settings > Security settings > Call restrictions
or Access codes.
Network
The Network menu allows you to customize the way your
phone chooses a network in which to operate while you
are within or outside of your primary or home system.
Your phone is set to search for the most effective network.
If your phone cannot find a preferred network, it selects a
network automatically based on the option you choose in
the Network menu.
Select Menu > Settings > Network > Roaming options,
Roam call ringing tone or Service change tones.
The menu options you see in your phone are based on your
service provider’s network. The network determines which
options actually appear in the phone menu. Check with
your service provider for more information.
35
Page 37

Network services
Displays available network services and their settings.
For the network service availability, please contact your
service provider.
Select Menu > Settings > Network services, and one of the
following options:
Network feature setting —to activate network services
in the phone by using feature codes received from your
service provider.
Own number selection —to activate network services in
the phone by using a number you have selected.
Restore factory settings
You can restore the original factory default settings without
affecting personal data such as contacts, language selection,
or calendar notes.
1. Select Menu > Settings > Restore factory settings.
2. Enter your security code and select OK.
36
Page 38

■ Gallery
You can use Gallery to manage your image
and audio files.
Images
Images can be used to personalize your phone. To display a
list of available images, select Menu > Gallery > Images >
Open. You can scroll through the images, select an image
and Options to Set as wallpap., Delete or view the Details
of the selected image file.
Tones
Tones can be used to personalize your phone. To display a
list of available tones, select Menu > Gallery > Ton es. Select
a tone > Options and one of the following: Open —to listen
to the tone, Delete — to remove it, Set as ring tone, Set as
msg tone or Details to view the details of the tone.
■ Games
Some menus listed are network services.
Contact your service provider for more information.
In the standby mode, select Menu > Games > Select game
to display and play a game on your phone.
37
Page 39

To adjust common game settings, select Menu > Games >
Settings. You can set the Game sounds, Game lights, or
Shakes for a game.
■ Organizer
Your phone contains features to help organize
your everyday life, including an alarm clock, calendar,
calculator, countdown timer, stopwatch and voice recorder.
Alarm clock
The alarm clock is based on the phone clock. It sounds an
alert any time you specify.
The alarm will still sound even when the device is switched off.
To activate an alarm, select Menu > Organizer > Alarm
clock. Enter the time for the alarm in hh:mm format, and
select OK. Select am or pm if 12-hour clock format is on.
Alarm on appears briefly in the display, and appears in
the standby mode.
When the alarm sounds, your phone beeps, vibrates (if vibrate
alert is on in the currently active profile), and lights up.
When the alarm sounds, select Stop to shut the alarm off
or Snooze.
38
Page 40

To turn off an alarm, select Menu > Organizer > Alarm
clock > Off.
Calendar
The calendar keeps track of reminders, calls you need to
make, meetings, memos, and birthdays. It can also sound
an alarm for these events.
The monthly view provides an overview of the selected
month and weeks. It also allows you to access a specific
date. Any dates that appear in bold font contain calendar
notes such as a meeting or reminder.
To open the calendar, scroll right or select Menu >
Organizer > Calendar. To go to a date, select Options in the
calendar view and Go to date, enter the date, and select OK.
To note a specific date from the monthly view (with the go to
date highlighted), select Options > Make a note, Meeting,
Call, Birthday, Memo, or Reminder. Your phone asks for
further information depending on which note you select.
39
Page 41

Calculator
The calculator adds, subtracts, multiplies, divides,
calculates the square and the square root, changes the
sign (positive or negative) of the number entered, and
converts currency values.
Note: This calculator has a limited accuracy and is
designed for simple calculations.
1. Select Menu > Organizer > Calculator.
2. Enter the first number in the calculation.
Press # for a decimal point if necessary.
Press * to cycle through the add (+), subtract (-),
multiply (*), and divide (/) characters. Pause briefly
to select the displayed character.
3. Enter the second number in your calculation,
press Options > Equals to get the result.
To perform a square or square root calculation, select
Options > Square or Square root. Select Options >
Change sign, or scroll up or down to change the sign
(positive or negative) of your result.
40
Page 42

Countdown timer
You can enter a specified time up to 99 hours, 59 minutes.
The timer starts to count down. When the timer reaches zero,
an alarm sounds.
The countdown timer only works when the phone is on.
When you turn off your phone, the timer is no longer active.
To set the countdown timer, select Menu > Organizer >
Countdown timer. Enter the time, and select OK. Enter a
note for the timer, and select OK (in hh:mm).
Appears in the standby mode when the countdown
timer is set.
When the time runs out, your phone sounds an alarm,
displays a timer note, and flashes its lights.
Select Menu > Organizer > Countdown timer > Change
time to change the time and Stop timer to stop the timer
before the alarm sounds.
Stopwatch
Your phone has a stopwatch that can be used to track time.
The stopwatch displays time in hours, minutes, seconds,
and fractions of a second in hh:mm:ss.ss format.
41
Page 43

Using the stopwatch, or allowing it to run in the background
when using other features, increases the demand on battery
power and reduces the battery life.
To use the split time or lap time functions for activities where
you need to time yourself, select Menu > Organizer >
Stopwatch > Split timing or Lap timing > Start.
If you press the end key and return to the standby mode,
the clock continues to run in the background, Appears
in the upper left corner of the screen.
To return to the stopwatch screen, select Menu >
Organizer > Stopwatch > Continue. To stop it, select Stop.
■ Voice recorder
This feature allows you to record speech or
sound with your phone and listen to them later. The total
available time is 90 seconds if no recordings have been stored.
The maximum length of a recording depends on how much
memory remains available.
To record speech or sound, select Menu > Organizer >
Voice recorder > Record. Select Stop when you finish
recording. Enter a title for the recording, and select OK.
The recording is saved to the Recordings list.
42
Page 44

After you have saved a recording to the recordings list,
you can select Options > Playback, Delete, Edit title, or
Add alarm.
■ Downloads
The BREW application feature requires network
support and may not be available, or appear differently on
your phone depending on your network service provider.
For further information, please contact your service provider.
Mobile shop—to download applications to your mobile
phone. There are two options for finding an online
application: Catalog—allows you to browse by category,
and Search—to find applications using keywords.
Settings—provides management and system
information tools.
Help—get information about how to purchase and restore
applications, how to subscribe and cancel subscription of
applications, and information on charges.
43
Page 45

6. Enhancements
Check the model number of any
charger before use with this device.
This device is intended for use when
supplied with power from Nokia
AC-3 or AC-4 charger.
Warning: Use only batteries, chargers, and
enhancements approved by Nokia for use with
this particular model. The use of any other types
may invalidate any approval or warranty, and may
be dangerous.
Practical rules about accessories and enhancements
• Keep all accessories and enhancements out of the
reach of small children.
• When you disconnect the power cord of any accessory
or enhancement, grasp and pull the plug, not the cord.
• Check regularly that enhancements installed in a vehicle
are mounted and are operating properly.
• Installation of any complex car enhancements must be
made by qualified personnel only.
44
Page 46

Power
• Standard 890 mAh Li-Ion battery (BL-5B)
• Compact Charger (AC-3)
• Travel Charger (AC-4)
• Car Power Adapter (DC-4)
Audio
• Headset (HS-9)
Warning: When using the headset your ability to
hear outside sounds may be affected. Do not use
the headset where it can endanger your safety.
45
Page 47

7. Reference information
This section provides information about your phone batteries,
enhancements, chargers, safety guidelines and technical
information. Be aware that the information in this
section is subject to change as batteries, chargers,
and enhancements change.
■ Battery and charger information
Your device is powered by a rechargeable battery. The battery
intended for use with this device is the BL-5B battery. This
device is intended for use when supplied with power from
the following chargers: AC-3 or AC-4. The battery can be
charged and discharged hundreds of times, but it will
eventually wear out. When the talk and standby times are
noticeably shorter than normal, replace the battery. Use only
Nokia approved batteries, and recharge your battery only
with Nokia approved chargers designated for this device.
Use of an unapproved battery or charger may present a
risk of fire, explosion, leakage or other hazard.
46
Page 48

If a battery is being used for the first time or if the battery has
not been used for a prolonged period, it may be necessary
to connect the charger, then disconnect and reconnect it
to begin charging the battery. If the battery is completely
discharged, it may take several minutes before the charging
indicator appears on the display or before any calls can
be made.
Always switch the device off and disconnect the charger
before removing the battery.
Unplug the charger from the electrical plug and the device
when not in use. Do not leave a fully charged battery
connected to a charger, since overcharging may shorten
its lifetime. If left unused, a fully charged battery will lose
its charge over time.
Use the battery only for its intended purpose. Never use
any charger or battery that is damaged.
Always try to keep the battery between 59°F and 77°F
(15°C and 25°C). Extreme temperatures reduce the capacity
and lifetime of the battery. A device with a hot or cold battery
may not work temporarily. Battery performance is particularly
limited in temperatures well below freezing.
47
Page 49

Do not short-circuit the battery. Accidental short-circuiting
can occur when a metallic object such as a coin, clip, or pen
causes direct connection of the positive (+) and negative
(-) terminals of the battery. (These look like metal strips on
the battery.) This might happen, for example, when you carry
a spare battery in your pocket or purse. Short-circuiting the
terminals may damage the battery or the connecting object.
Do not dispose of batteries in a fire as they may explode.
Batteries may also explode if damaged. Dispose of batteries
according to local regulations. Please recycle when possible.
Do not dispose as household waste.
Do not dismantle, cut, open, crush, bend, deform, puncture
or shred cells or batteries. In the event of a battery leak, do
not allow the liquid to come in contact with the skin or eyes.
In the event of such a leak, flush your skin or eyes immediately
with water, and seek medical help.
Do not modify, remanufacture, attempt to insert foreign
objects into the battery, or immerse or expose it to water
or other liquids.
48
Page 50

Improper battery use may result in a fire, explosion or other
hazard. If the device or battery is dropped, especially on a
hard surface, and you believe the battery has been damaged,
take it to a service center for inspection before continuing
to use it.
Use the battery only for its intended purpose. Never use
any charger or battery that is damaged. Keep your battery
out of the reach of small children.
■ Nokia battery authentication
Always use original Nokia batteries for your safety. To check
that you are getting an original Nokia battery, purchase it
from an authorized Nokia dealer and inspect the hologram
label using the following steps:
Successful completion of the steps is not a total assurance
of the authenticity of the battery. If you have any reason
to believe that your battery is not an authentic original
Nokia battery, you should refrain from using it and take it
to the nearest authorized Nokia service point or dealer for
assistance. Your authorized Nokia service point or dealer
will inspect the battery for authenticity. If authenticity
cannot be verified, return the battery to the place of purchase.
49
Page 51

1. When you look at the hologram
on the label, you should see the
Nokia connecting hands symbol
from one angle and the Nokia
Original Enhancements logo
when looking from another angle.
2. When you angle the hologram
left, right, down, and up, you
should see 1,2,3 and 4 dots on
each side respectively.
What if your battery is not authentic?
If you cannot confirm that your
Nokia battery with the hologram on
the label is an authentic Nokia battery, please do not use
the battery. Take it to the nearest authorized Nokia service
point or dealer for assistance. The use of a battery that is
not approved by the manufacturer may be dangerous and
may result in poor performance and damage to your device
and its enhancements. It may also invalidate any approval
or warranty applying to the device.
To find out more about original Nokia batteries, visit
www.nokia.com/battery
50
.
Page 52

Care and maintenance
Your device is a product of superior design and craftsmanship and
should be treated with care. The following suggestions will help
you protect your warranty coverage.
• Keep the device dry. Precipitation, humidity, and all types of
liquids or moisture can contain minerals that will corrode
electronic circuits. If your device does get wet, remove the
battery, and allow the device to dry completely before replacing it.
• Do not use or store the device in dusty, dirty areas. Its moving
parts and electronic components can be damaged.
• Do not store the device in hot areas. High temperatures can
shorten the life of electronic devices, damage batteries, and
warp or melt certain plastics.
• Do not store the device in cold areas. When the device returns
to its normal temperature, moisture can form inside the device
and damage electronic circuit boards.
• Do not attempt to open the device other than as instructed in
this guide.
• Do not drop, knock, or shake the device. Rough handling can
break internal circuit boards and fine mechanics.
51
Page 53

• Do not use harsh chemicals, cleaning solvents, or strong
detergents to clean the device.
• Do not paint the device. Paint can clog the moving parts and
prevent proper operation.
• Use only the supplied or an approved replacement antenna.
Unauthorized antennas, modifications, or attachments could
damage the device and may violate regulations governing
radio devices.
• Use chargers indoors.
• Always create a backup of data you want to keep, such as
contacts and calendar notes.
• To reset the device from time to time for optimum
performance, power off the device and remove the battery.
These suggestions apply equally to your device, battery, charger,
or any enhancement. If any device is not working properly, take it
to the nearest authorized service facility for service.
Note: Before sending your device to a service facility,
create a backup of data you want to keep such as
contacts and calendar notes.
52
Page 54

Additional safety information
■ Small children
Your device and its enhancements may contain small parts.
Keep them out of the reach of small children.
Operating environment
■
This device meets RF exposure guidelines when used either in the
normal use position against the ear or when positioned at least
2.2 centimeters (7/8 inches) away from the body. When a carry case,
belt clip, or holder is used for body-worn operation, it should not
contain metal and should position the device the above-stated
distance from your body.
To transmit data files or messages, this device requires a quality
connection to the network. In some cases, transmission of data
files or messages may be delayed until such a connection is
available. Ensure the above separation distance instructions are
followed until the transmission is completed.
Parts of the device are magnetic. Metallic materials may be attracted
to the device. Do not place credit cards or other magnetic storage
media near the device, because information stored on them may
be erased.
53
Page 55

■ Medical devices
Operation of any radio transmitting equipment, including wireless
phones, may interfere with the functionality of inadequately
protected medical devices. Consult a physician or the manufacturer
of the medical device to determine if they are adequately shielded
from external RF energy or if you have any questions. Switch off
your devic e in heal th car e facili ties whe n any r egulati ons po sted in
these areas instruct you to do so. Hospitals or health care facilities
may be using equipment that could be sensitive to external RF energy.
Implanted medical devices
Manufacturers of medical devices recommend that a minimum
separation of 15.3 centimeters (6 inches) should be maintained
between a wireless device and an implanted medical device, such
as a pacemaker or implanted cardioverter defibrillator to avoid
potential interference with the medical device. Persons who have
such devices should:
• Always keep the wireless device more than 15.3 centimeters
(6 inches) from the medical device when the wireless device is
turned on.
• Not carry the wireless device in a breast pocket.
• Hold the wireless device to the ear opposite the medical
device to minimize the potential for interference.
• Turn the wireless device off immediately if there is any reason
to suspect that interference is taking place.
54
Page 56

• Read and follow the directions from the manufacturer of their
implanted medical device.
If you have any questions about using your wireless device with
an implanted medical device, consult your health care provider.
Hearing aids
Some digital wireless devices may interfere with some hearing
aids. If interference occurs, consult your service provider.
■
Vehicles
RF signals may affect improperly installed or inadequately shielded
electronic systems in motor vehicles such as electronic fuel
injection systems, electronic antiskid (antilock) braking systems,
electronic speed control systems, and air bag systems. For more
information, check with the manufacturer, or its representative,
of your vehicle or any equipment that has been added.
Only qualified personnel should service the device or install the
device in a vehicle. Faulty installation or service may be dangerous
and may invalidate any warranty that may apply to the device.
Check regularly that all wireless device equipment in your vehicle is
mounted and operating properly. Do not store or carry flammable
liquids, gases, or explosive materials in the same compartment as
the device, its parts, or enhancements. For vehicles equipped with
an air bag, remember that air bags inflate with great force. Do not
place objects, including installed or portable wireless equipment
55
Page 57

in the area over the air bag or in the air bag deployment area.
If in-vehicle wireless equipment is improperly installed and the
air bag inflates, serious injury could result.
Using your device while flying in aircraft is prohibited. Switch off
your device before boarding an aircraft. The use of wireless
teledevices in an aircraft may be dangerous to the operation of the
aircraft, disrupt the wireless telephone network, and may be illegal.
■
Potentially explosive environments
Switch off your device when in any area with a potentially explosive
atmosphere, and obey all signs and instructions. Potentially explosive
atmospheres include areas where you would normally be advised
to turn off your vehicle engine. Sparks in such areas could cause
an explosion or fire resulting in bodily injury or even death. Switch
off the device at refueling points such as near gas pumps at service
stations. Observe restrictions on the use of radio equipment in
fuel depots, storage, and distribution areas; chemical plants; or
where blasting operations are in progress. Areas with a potentially
explosive atmosphere are often, but not always, clearly marked.
They include below deck on boats, chemical transfer or storage
facilities, and areas where the air contains chemicals or particles
such as grain, dust, or metal powders. You should check with the
manufacturers of vehicles using liquefied petroleum gas (such as
propane or butane) to determine if this device can be safely used
in their vicinity.
56
Page 58

■ Emergency calls
Important: This device operates using radio signals, wireless
networks, landline networks, and user-programmed
functions. If your device supports voice calls over the
Internet (Internet calls), activate both the Internet calls
and the cellular phone. The device will attempt to make
emergency calls over both the cellular networks and
through your Internet call provider if both are activated.
Connections in all conditions cannot be guaranteed.
You should never rely solely on any wireless device for
essential communications like medical emergencies.
To make an emergency call:
1. If the device is not on, switch it on. Check for adequate signal
strength. Depending on your device, you may also need to
complete the following:
• Insert a SIM card if your device uses one.
• Remove certain cell restrictions you have activated in
your device.
• Change your profile from offline or flight profile mode to
an active profile.
2. Press the end key as many times as needed to clear the display
and ready the device for calls.
57
Page 59

3. Enter the official emergency number for your present location.
Emergency numbers vary by location.
4. Press the call key.
If certain features are in use, you may first need to turn those
features off before you can make an emergency call. If the device
is in the offline or flight profile mode, you may need to unlock the
device and change to the calling profile before you can make an
emergency call. Consult this guide or your service provider for
more information.
When making an emergency call, give all the necessary information
as accurately as possible. Your wireless device may be the only
means of communication at the scene of an accident. Do not end
the call until given permission to do so.
■
Certification information (SAR)
The wireless device described in this guide (RH-108) is approved
for use on the CDMA 800 and 1900 networks. This mobile device
meets guidelines for exposure to radio waves.
Your mobile devi ce is a radio transmitter and receiver. It is designed
not to exceed the limits for exposure to radio waves recommended
by international guidelines. These guidelines were developed by
the independent scientific organization ICNIRP and include
safety margins designed to assure the protection of all persons,
regardless of age and health.
58
Page 60

The exposure guidelines for mobile devices employ a unit of
measurement known as the Specific Absorption Rate or SAR. The
SAR limit stated in the ICNIRP guidelines is 2.0 watts/kilogram (W/kg)
averaged over 10 grams of tissue. Tests for SAR are conducted
using standard operating positions with the device transmitting
at its highest certified power level in all tested frequency bands.
The actual SAR level of an operating device can be below the
maximum value because the device is designed to use only the
power required to reach the network. That amount changes
depending on a number of factors such as how close you are to a
network base station. The highest SAR value under the ICNIRP
guidelines for use of the device at the ear is 0.75 W/kg.
Use of device accessories and enhancements may result in different
SAR values. SAR values may vary depending on national reporting
and testing requirements and the network band. Additional SAR
information may be provided under product information at
www.nokiausa.com
Your mobile device is also designed to meet the requirements for
exposure to radio waves established by the Federal Communications
Commission (USA) and Industry Canada. These requirements set a
SAR limit of 1.6 W/kg averaged over one gram of tissue. The highest
SAR value reported under this standard during product certification
for use at the ear is 1.28 W/kg and when properly worn on the
body is 0.64 W/kg.
.
59
Page 61

Information about this device model can be found at
http://www.fcc.gov/oet/fccid
authorization system using FCC ID: QMNRH-108.
by searching the equipment
Hearing aid compatibility
Your mobile device model complies with FCC rules governing
hearing aid compatibility. These rules require an M3 microphone
or higher value. The M-value, shown on the device box, refers to
lower radio frequency (RF) emissions. A higher M-value generally
indicates that a device model has a lower RF emissions level, which
may improve the likelihood that the device will operate with certain
hearing aids. Some hearing aids are more immune than others to
interference. Please consult your hearing health professional to
determine the M-rating of your hearing aid and whether your hearing
aid will work with this device. More information on accessibility
can be found at www.nokiaaccessibility.com
60
.
Page 62

■ Technical information
Feature Specification
Dimensions Width 42.6 mm
Weight 78 g with BL-5B Li-ion battery
Wireless networks CDMA 2000 1x RTT
Volume 73cc
PCS Frequency range (Tx) 1851.25 to 1908.75 MHz
PCS Frequency range (Rx) 1931.25 to 1988.75 MHz
Cell Frequency range (Tx) 824.70 to 848.31 MHz
Cell Frequency range (Rx) 869.70 to 893.31 MHz
Length 103.85 mm
Depth 16.57 mm
■ Battery information
This section provides information a bout battery charging times with
the Compact Charger (AC-3), the travel charger (AC-4), and talk and
standby tim es. Be aware that the info rmation in this section is subject
to change. For more information, contact your service provider.
61
Page 63

Important: Battery talk and standby times are estimates
only and depend on signal strength, network conditions,
features used, battery age and condition, temperatures to
which battery is exposed, use in digital mode, and many
ot her fact ors. The amoun t of time a device is use d for cal ls
will affect its standby time. Likewise, the amount of time
that device is turned on and in the standby mode will affect
its talk time.
Charging times
The following charging times are approximate:
Charger options AC-3 AC-4
BL-5B 890 mAh Li-Ion battery Up to 3.5 hours Up to 3 hours
Talk and standby times
Operation times are estimates only and depend on signal strength,
phone use, network conditions, features used, battery age and
condition (including charging habits), temperatures to which the
battery is exposed, and many other factors.
Function Digital
Talk time Up to 3 hours 30 mins
Standby time Up to 10 days
62
Page 64

Index
A
access codes 9
activate profile
alarm
B
batteries and chargers 46
battery
charging
charging times
talk times
C
calculator 40
calendar
calls
ending
making
care and maintenance
charger
connecting
information
times
30
38
12
62
62
39
17
17
51
12
46
62
20
contacts
countdown timer
D
default settings 36
dialed calls
28
E
enhancements 44
G
game 38
I
image files 37
K
keyguard
lock and unlock
L
loudspeaker 18
41
16
63
Page 65

M
message 21
messages
delete
27
picture messages
voice messages
missed call
23
28
N
network 35
O
organize 38
P
phone settings 31
picture message
25
R
received call 28
recording
42
restore factory settings
35
roaming
64
25
36
S
safety 53
saftey
hearing aids
pacemaker
share memory
start screen
stopwatch
55
54
8
15
41
T
talk and standby times 62
technical information
tone files
37
turn phone on and off
61
13
V
voice
messages
23
recording
42
Page 66

Manual del Usuario de Nokia 2135
65
Page 67

© 2007 Nokia. Todos los derechos reservados.
Nokia, Navi y Nokia Connecting People son marcas comerciales o marcas
registradas de Nokia Corporation. Nokia tune es una marca de sonido
registrada de Nokia Corporation. Otros nombres de productos y compañías
aquí mencionados pueden ser marcas registradas o marcas comerciales de
sus respectivos propietarios.
Número de patente de EE.UU. 5818437 y otras patentes pendientes.
Software de ingreso de texto T9. Copyright © 1997-2007.
Tegic Communications, Inc. Todos los derechos reservados.
Se incluye el software de protocolo de seguridad o criptográfico
RSA BSAFE de RSA Security.
La información contenida en este manual del usuario fue escrita para el
producto Nokia 2135. Nokia opera bajo un sistema de desarrollo continuo.
Nokia se reserva el derecho de hacer cambios y mejoras en cualquier
producto descrito en este manual sin previo aviso.
EN LA EXTENSIÓN MÁXIMA PERMITIDA POR LA LEGI SLACIÓN VIGENTE, BAJO
NINGUNA CIRCUNSTANCIA NOKIA O SUS CEDENTES DE LICENCIAS SERÁN
RESPONSABLES POR CUALQUIER PÉRDIDA DE DATOS, O GANANCIAS, O
POR CUALQUIER OTRO DAÑO ESPECIAL, INCIDENTAL, CONSECUENTE O
INDIRECTO QUE PUEDE DERIVAR DE DICHAS PÉRDIDAS.
EL CON TEN IDO DE E STE DOCU MEN TO E STÁ PRO VIS TO " TAL CUA L". A MEN OS
QUE LO SEA REQUERIDO POR LA LEGISLACIÓN APLICABLE, NO SE EMITE
NINGUNA OTRA GARANTÍA, DE NINGÚN TIPO, SEA EXPRESA O IMPLÍCITA,
INCLUYENDO, PERO SIN LIMITARSE A GAR ANTÍAS IMPLÍCITAS DE MERCADEO
Y de CAPACIDAD PARA UN PROPÓSITO PARTICULAR, EN CUANTO A LA
PRECISIÓN Y FIABILIDAD O CONTENIDO DE ESTE DOCUMENTO. NOKIA SE
RESERVA EL DERECHO DE REVISAR ESTE DOCUMENTO O DESCONTINUAR
SU USO EN CUALQUIER MOMENTO SIN PREVIO AVISO.
66
Page 68

La disponibilidad de productos y servicios específicos, y de las aplicaciones
para dichos productos, pueden variar de una región a otra. Comuníquese
con su distribuidor Nokia para obtener información acerca de los detalles
de los productos, su disponibilidad y opciones de idiomas.
Control de exportaciones
Este dispositivo podría contener bienes, tecnología o software sujetos a
leyes y regulaciones de los Estados Unidos y otros países. Se prohíbe su
desvío contraviniendo las leyes.
AVISO DE LA FCC/INDUSTRIA CANADIENSE
Su dispositivo puede causar interferencias radioeléctricas y televisivas (por
ejemplo, cuando se utilice el dispositivo muy próximo a equipos receptores
electrónicos). La FCC/Industria Canadiense puede exigirle que deje de usar
su teléfono si tales interferencias no se pueden eliminar. Si necesita ayuda,
comuníquese con su centro de servicio local. Este dispositivo es compatible
con la sección 15 de los reglamentos de la FCC. El funcionamiento de este
dispositivo está sujeto a las siguientes condiciones: (1) este dispositivo no
debe causar interferencia perjudicial, y (2) este dispositivo debe aceptar
cualquier interferencia recibida, incluso interferencia que pueda causar un
funcionamiento no deseado. Cualquier cambio o modificación que no haya
sido expresamente aprobado por Nokia puede anular la autoridad del
usuario para operar este equipo.
9204912/Número 1
67
Page 69

Contenido
SEGURIDAD .............................................................................. 70
Información general ................................................................ 74
Códigos de acceso................................................................................................... 74
Asistencia técnica Nokia en la Web .................................................................. 74
1. Inicio..................................................................................... 75
Retirar e instalar la batería.................................................................................. 75
Cargar la batería...................................................................................................... 77
Encender y apagar el teléfono............................................................................. 78
Posición normal de operación ............................................................................. 78
2. Su teléfono .......................................................................... 79
Teclas y partes.......................................................................................................... 79
Modo standby y accesos directos....................................................................... 80
Bloqueo de teclas.................................................................................................... 81
3. Funciones de llamada.......................................................... 82
Realizar y contestar una llamada....................................................................... 82
Llamadas de multiconferencia............................................................................ 82
Altavoz ....................................................................................................................... 83
4. Escribir texto........................................................................ 83
Ingreso de texto tradicional................................................................................. 84
Ingreso de texto predictivo .................................................................................. 84
68
Page 70

5. Funciones de menú ............................................................. 85
Contactos .................................................................................................................. 86
Mensajes.................................................................................................................... 87
Registro...................................................................................................................... 95
Perfiles........................................................................................................................ 96
Configuraciones....................................................................................................... 97
Galería...................................................................................................................... 104
Juegos....................................................................................................................... 105
Organizador ............................................................................................................ 106
Grabador de voz .................................................................................................... 110
Descargas ................................................................................................................ 111
6. Accesorios ......................................................................... 112
7. Información de referencia ............................................... 114
Información sobre las baterías y cargadores ................................................ 114
Normas de autenticación de baterías Nokia................................................. 117
Cuidado y mantenimiento .................................................... 120
Información adicional de seguridad .................................... 122
Índice .......................................................................................134
69
Page 71

SEGURIDAD
Lea estas sencillas normas. El incumplimiento de ellas puede ser
peligroso o ilegal. Lea el manual del usuario completo para
obtener el máximo de información.
ENCIENDA EL TELÉFONO EN FORMA SEGURA
No encienda el dispositivo donde el uso de
teléfonos móviles esté prohibido o pueda causar
interferencia o peligro.
LA SEGURIDAD VIAL ANTE TODO
Obedezca todas las leyes locales. Mantenga siempre
las manos libres para maniobrar el vehículo mientras
conduce. Su prioridad cuando conduce debe ser la
seguridad vial.
INTERFERENCIAS
Todos los dispositivos móviles pueden ser
susceptibles a interferencias que pueden afectar a su
rendimiento.
APAGUE EL TELÉFONO EN ÁREAS RESTRINGIDAS
Respete todas las restricciones existentes. Apague el
dispositivo en aviones, cuando se encuentre cerca de
equipo médico, combustibles, elementos químicos o
áreas donde se realicen explosiones.
70
Page 72

SERVICIO TÉCNICO CALIFICADO
Sólo personal de servicio técnico calificado puede
instalar o reparar este producto.
ACCESORIOS Y BATERÍAS
Utilice sólo baterías y accesorios aprobados. No conecte
productos incompatibles.
RESISTENCIA AL AGUA
Su teléfono no es resistente al agua. Manténgalo seco.
■
Acerca de su dispositivo
El dispositivo móvil (RH-108) desc rito en este manual está aprobado
para su uso en las redes CDMA 800 y 1900 MHz, y en las redes
CDMA 2000 1x RTT. Comuníquese con su proveedor de servicios
para obtener más información.
Cuando use las funciones de este t eléfono, obedezca todas las leyes
y respete la privacidad y todos los derechos legítimos de los demás,
incluyendo la protección de los derechos de propiedad intelectual.
La protección de los derechos de propiedad intelectual puede
impedir la copia, modificación, transferencia o desvío de imágenes,
música (incluyendo tonos de timbre) y otros contenidos.
71
Page 73

Advertencia: Para usar cualquier función de este dispositivo,
excepto la alarma, es necesario que el teléfono esté
encendido. No encienda el dispositivo móvil cuando su
uso pueda causar interferencia o situación de peligro.
Acuérdese de hacer copias de seguridad o llevar un registro
por escrito de toda la información importante que guarda en
su dispositivo.
Antes de conectar el teléfono con otro dispositivo, lea el manual
del usuario para informarse de las instrucciones detalladas de
seguridad. No conecte productos incompatibles.
■
Servicios de red
Para usar el teléfono debe estar suscrito con un proveedor de
servicios móviles. Muchas de las funciones de este dispositivo
dependen de funciones de red especiales. Estas funciones no
están disponibles en todas las redes; puede que tenga que hacer
arreglos específicos con su proveedor de servicios antes de
utilizar los servicios de red. Su proveedor de servicios podrá darle
instrucciones adicionales acerca de su utilización y cualquier
información de los cargos aplicables. Algunas redes pueden tener
limitaciones que afecten el uso de los servicios de red. Por ejemplo,
puede que algunas redes no admitan todos los servicios y
caracteres que dependen del idioma.
72
Page 74

Su proveedor de servicios puede haber pedido que ciertas funciones
de su dispositivo sean inhabilitadas o no activadas. De ser así, éstas
no aparecerán en el menú. Es posible que su dispositivo también
tenga una configuración especial, como cambios en nombres de
menús, orden del menú e iconos. Comuníquese con su proveedor
de servicios para obtener información.
■
Memoria compartida
Las siguientes funciones de este dispositivo pueden
compartir memoria:
Tonos de timbre e imágenes de fondo descargados.
El uso de una o más de estas funciones puede reducir la memoria
disponible para las demás funciones que compartan la memoria.
Es posible que su dispositivo muestre un mensaje para avisar que
la memoria está llena cuando se esté intentando usar una función
de memoria compartida. En este caso, antes de continuar, elimine
alguna información o entradas almacenadas en las funciones de
memoria compartida.
73
Page 75

Información general
■ Códigos de acceso
Los códigos de seguridad y bloqueo que controlan el acceso
a las funciones se entregan con el teléfono.
La función de bloqueo protege su teléfono contra el uso
no autorizado de las llamadas salientes o del acceso no
autorizado a la información guardada en el teléfono.
Con el teléfono bloqueado, las únicas llamadas que se
pueden realizar son al número de emergencia programado
en el teléfono (por ejemplo, 911 u otro número de
emergencia oficial).
Seleccione Menú > Configurac. > Conf. seguridad para
configurar la manera en que su teléfono usa los códigos
de acceso y las configuraciones de seguridad.
■ Asistencia técnica Nokia en la Web
Consulte www.nokiausa.com/support o al sitio web
Nokia local para obtener la versión más reciente del
manual del usuario, así como información adicional,
descargas y demás servicios relacionados a su producto.
74
Page 76

1. Inicio
■ Retirar e instalar la batería
Nota: Siempre apague el dispositivo y desconecte
el cargador y todos los otros dispositivos antes de
retirar las cubiertas. Evite tocar los componentes
electrónicos mientras cambia las cubiertas.
Siempre guarde y use el dispositivo con las
cubiertas instaladas.
1. Para retirar la cubierta, con
la parte posterior del
teléfono hacia usted.
Presione y deslice la
cubierta posterior hacia la
base del teléfono.
75
Page 77

2. Para insertar la batería,
colóquela de manera que los
contactos dorados estén
alineados con los del
teléfono e inserte la batería
en la ranura
correspondiente.
3. Presione en el otro extremo
de la batería para colocarla
en su lugar.
4. Alinee la cubierta posterior
con la parte posterior del
teléfono y deslícela hacia la
parte superior del teléfono
hasta que escuche un sonido y encaje en su sitio.
5. Para extraer la batería,
retire la cubierta (consulte el
paso 1) y con el dedo en la
ranura levante la batería de
su compartimiento.
76
Page 78

■ Cargar la batería
Advertencia: Utilice sólo baterías, cargadores y
accesorios aprobados por Nokia para este modelo
particular de teléfono. El uso de otros tipos de
accesorios puede anular toda aprobación o
garantía aplicables y podría resultar peligroso.
Este dispositivo está diseñado para su uso con una batería
BL-5B y cargador AC-3 o AC-4. Comuníquese con su
distribuidor para obtener información acerca de la
disponibilidad de accesorios aprobados.
Cuando desconecte el cable de alimentación de cualquier
accesorio, sujételo y tire del enchufe, no del cable.
1. Conecte el cargador a un
tomacorriente de pared.
2. Conecte el cable del
cargador al conector
redondo ubicado en la
base del teléfono.
Si la batería está
completamente descargada, es posible que pasen varios
minutos antes de que el indicador de carga aparezca en la
pantalla o antes de poder hacer alguna llamada.
77
Page 79

■ Encender y apagar el teléfono
Para encender o apagar el teléfono,
mantenga pulsada la tecla
Encender/Apagar/Finalizar en el
teclado durante al menos 3 segundos.
Advertencia: No encienda el
dispositivo donde el uso de
teléfonos móviles esté prohibido o pueda causar
interferencia o peligro.
■ Posición normal de operación
Su dispositivo tiene una antena interior. Sujete el teléfono
como de costumbre, con la antena orientada hacia arriba
sobre su hombro.
Es posible que el dispositivo tenga una antena
interna y una externa. Al igual que al usar
dispositivos de transmisión por radio, no
toque ninguna antena sin necesidad mientras
el dispositivo esté transmitiendo o recibiendo.
El contacto con la antena afecta la calidad
de la comunicación y puede hacer que el dispositivo funcione
con una potencia más alta de la necesaria, y reducir la vida
útil de la batería.
78
Page 80

2. Su teléfono
■ Teclas y partes
1. Audífono
2. Tecla de
selección derecha
3. Tecla Encender/
Apagar/Finalizar
4. Teclado
5. Micrófono
6. Cargador para cargador
7. Puerto para auricular
8. Tecla Llamar
9. Tecla de
selección izquierda
10. Tecla Navi™ (de aquí
en adelante tecla de desplazamiento)
11. Pantalla
79
Page 81

■ Modo standby y accesos directos
Dependiendo de su proveedor de servicios móviles y del
número de modelo de su dispositivo, algunas o todas las
siguientes teclas de selección pueden aparecer en el
modo standby.
La pantalla de inicio indica que el teléfono está inactivo y
en espera de actividad.
1. Intensidad de la señal:
una barra más alta
indica una señal de red
más potente.
2. Nivel de la batería: una
barra más alta indica más carga en la batería.
3. Menú: pulse la tecla de selección izquierda para
acceder al menú principal.
4. Contact.: pulse la tecla de selección derecha para
acceder a la lista de contactos.
En el modo standby, es posible que la tecla de desplazamiento
de cuatro sentidos varíe con los servicios de red. Consulte a
su operador de servicios para recibir información detallada.
80
Page 82

■ Bloqueo de teclas
El bloqueo de teclas bloquea el teclado para evitar la
pulsación de teclas y realizar llamadas accidentales.
Para bloquear el teclado, seleccione Menú y pulse la
tecla * en 2 segundos.
Para desbloquear el teclado, seleccione Menú y pulse la
tecla * antes de 2 segundos.
Si el teclado está bloqueado, éste se desbloquea de manera
automática al recibir una llamada. Después de la llamada, el
bloqueo se vuelve a activar de manera automática. Cuando el
bloqueo de teclas está activado, es posible realizar llamadas
al número de emergencia programado en su teléfono.
En el modo standby, seleccione Menú > Configurac. >
Configuraciones de teléfono > Bloqueo automático >
Activada para que el teclado se bloquee de manera
automática después de un tiempo de espera predeterminado.
Para desactivar esta función, seleccione Desactivada.
81
Page 83

3. Funciones de llamada
■ Realizar y contestar una llamada
Para realizar una llamada, ingrese el número de teléfono,
incluyendo el código de país y de área, si es necesario, y
pulse la tecla Llamar para llamar al número. Para subir el
volumen del auricular o del audífono durante la llamada,
desplácese hacia la derecha; si desea bajar el volumen,
desplácese hacia la izquierda.
Para contestar una llamada entrante, pulse la tecla Llamar.
Para finalizar una llamada o rechazar una llamada
entrante antes de contestar, pulse la tecla Finalizar.
■ Llamadas de multiconferencia
Las llamadas de multiconferencia es un servicio de red que
le permite participar en una multiconferencia con dos
participantes más. Para realizar una llamada a un nuevo
participante, seleccione Opciones > Llamada nueva. Ingrese
el número que desea y pulse la tecla Llamar. Cuando se ha
contestado la nueva llamada, pulse la tecla Llamar para
conectar las llamadas. Para finalizar la llamada de
multiconferencia, seleccione Opciones > Finalizar llam. o
pulse la tecla Finalizar.
82
Page 84

■ Altavoz
Puede usar el teléfono como altavoz durante una llamada.
Advertencia: Cuando esté usando el altavoz, no
sostenga el dispositivo cerca del oído, ya que el
volumen puede resultar demasiado alto.
Para activar el altavoz durante una llamada, seleccione
Altavoz. Para desactivar el altavoz durante una llamada,
seleccione Teléfono.
El altavoz se desactiva de manera automática cuando
finaliza una llamada (o un intento de llamada) o cuando
se conectan ciertos accesorios.
4. Escribir texto
Puede escribir con el ingreso de texto tradicional
o predictivo . Para cambiar el método de ingreso
de texto y alternar entre mayúscula y minúscula, pulse la
tecla #.
83
Page 85

■ Ingreso de texto tradicional
Pulse una tecla numérica de la 1 a la 9 varias veces, hasta
que aparezca el carácter deseado. Para agregar un espacio,
pulse 0. Para agregar un
número, mantenga pulsada la tecla del número deseado.
Para acceder a una lista de caracteres especiales, pulse la
tecla *.
■ Ingreso de texto predictivo
El ingreso de texto predictivo se basa en un diccionario
incorporado cuando escribe en Español. Para activarlo:
Seleccione Menú > Mensajes > Mensaje de texto > Crear
mensaje > Opciones > Predicción ac…; para desactivarlo,
seleccione Predicción de….
Cuando utilice el ingreso de texto predictivo, pulse cada
tecla una sola vez para cada letra. Si primero aparece *,
deberá pulsar la tecla para escribir otra letra.
Si la palabra que aparece es la que desea escribir, pulse 0 y
comience a escribir la siguiente palabra.
Si la palabra que busca no aparece, pulse la tecla * varias
veces para ver otras opciones.
84
Page 86

Si aparece el signo ? después de la palabra, significa que la
palabra no está en el diccionario. Para agregar la palabra
al diccionario, seleccione Deletr. o seleccione Opciones >
Editar palabra para ingresar la palabra (con el ingreso de
texto tradicional) y seleccione Guardar.
Para acceder a una lista de caracteres especiales, mantenga
pulsada la tecla *.
5. Funciones de menú
Las funciones de menú están agrupadas en menús.
No todas las funciones de menú o elementos de opciones
se describen aquí.
En el modo standby, seleccione Menú y desplácese al
elemento de menú que desea y pulse Selec. para ingresar a
un submenú. Pulse Salir o Atrás para salir del nivel actual
del menú. Pulse la tecla Finalizar para volver directamente
al modo standby.
85
Page 87

■ Contactos
La lista de contactos puede guardar hasta 400 nombres con
diferentes números y notas de texto para cada contacto.
La cantidad de números e ingresos de texto que puede
guardar podría variar, dependiendo de la longitud y de la
cantidad total de ingresos en la lista de contactos.
Para buscar un contacto, seleccione Contact. > Buscar,
ingrese el primer carácter para el nombre del contacto y
destaque el contacto que desea ver. Seleccione Detalles >
Opciones y la acción que desea aplicar al contacto.
Configuraciones
Las configuraciones le permiten determinar la visualización
para los números telefónicos y el estado de la memoria de
los contactos en el teléfono.
1. Seleccione Contact.> Configurac..
2. Para seleccionar la manera en que los nombres y
números aparecen en la lista de contactos, seleccione
Vista de desplazamiento.
3. Para ver la cantidad de memoria en uso y disponible en los
contactos del teléfono, seleccione Estado de la memoria.
86
Page 88

■ Mensajes
Los servicios de mensajes se pueden usar
sólo cuando la red o el proveedor de servicios
los admite.
Configuraciones de mensaje
Para editar las configuraciones de envío de mensajes,
seleccione Menú > Mensajes > Mensajes de texto >
Configuraciones de mensajes > Opciones envío y alguna
de las siguientes opciones:
Prioridad mens.: para seleccionar la prioridad del mensaje
como Normal o Urgente.
Aviso de envío: para recibir una nota confirmando el
envío del mensaje. Seleccione Activado o Desactivado.
Enviar N° devolución: para enviar un número de devolución
de llamada, ingrese el número al que desea le devuelvan la
llamada. Si no desea enviar un número de devolución de
llamada, seleccione Desactivado.
Para otras configuraciones, seleccione Menú > Mensajes >
Mensajes de texto > Configuraciones de mensaje >
Otras config. y las configuraciones que desea cambiar:
87
Page 89

Tamaño de letra del mensaje: puede cambiar el tamaño
de la letra para leer y escribir mensajes. Seleccione Letra
pequeña o Letra grande.
Sobrescribir mensaje: cuando la memoria para mensajes
está llena, el teléfono no puede recibir mensajes nuevos.
Usted puede configurar el teléfono para que
automáticamente sobrescriba los mensajes antiguos
cuando reciba nuevos mensajes. Para elegir los mensajes
que se pueden reemplazar, seleccione Sólo Elem. env.,
Sólo Buzón ent. o El. en Buz. ent. ; para desactivar esta
función, seleccione Desactivado.
Guard. en Elem. env. al enviar: puede determinar si lo
mensajes se guardarán automáticamente en la carpeta
Elementos enviados cuando se envían. Seleccione Guard.
siempre, Siempre indicar o Desactivado
Mens. en cola si dig. no dispon.: puede guardar en el Buzón
de salida los mensajes que puede enviar en otro momento
cuando el servicio digital esté disponible. Seleccione Activar,
Con confirma. o Desactivar
88
Page 90

Mensajes de voz
El buzón de voz es un servicio de red que debe activar el
proveedor de servicios de red. Si está suscrito al buzón de
voz, el proveedor celular le asignará un número de buzón
de voz que debe guardar en el teléfono. Para obtener
información acerca de los mensajes de voz, consulte al
proveedor de servicios de red.
Para escuchar los mensajes de voz grabados en el buzón,
seleccione Menú > Mensajes > Mensajes de voz >
Escuchar mensajes voz.
Para acceder al buzón de voz usando la marcación rápida,
mantenga pulsada la tecla 1.
Crear mensajes
1. Seleccione Menú > Mensajes > Mensajes de texto >
Crear mensaje.
2. Redacte un mensaje con el teclado.
3. Para enviar el mensaje, en la pantalla del editor de
mensajes, seleccione Enviar a.
89
Page 91

4. Para enviar el mensaje a un destinatario, seleccione
Enviar a núm.. Ingrese el número telefónico del
destinatario, o bien seleccione Buscar para recuperar
un número de sus contactos. Seleccione Enviar.
5. Para enviar el mensaje a varios destinatarios, seleccione
Copias múltiples. Seleccione Opciones > Agregar núm.
para ingresar el número telefónico del destinatario o
seleccione Buscar para recuperar un número de sus
contactos. Seleccione Enviar.
6. Para enviar el mensaje mediante e-mail, seleccione
Enviar a e-mail. Ingrese la dirección de e-mail del
destinatario o seleccione Buscar para obtener el
número desde la lista de contactos. Seleccione Enviar.
Nota: Su dispositivo puede indicar que se ha enviado
su mensaje al número del centro de mensajes
programado en el dispositivo. Sin embargo, no
significa que el destinatario lo haya recibido. Para
obtener información acerca de los servicios de
mensajes, consulte a su proveedor de servicios de red.
Su dispositivo admite mensajes de texto que exceden el límite
para un único mensaje. Mensajes largos son enviados como
una serie de dos o más mensajes. Es posible que su proveedor
90
Page 92

de servicios le cobre los cargos correspondientes. Los
caracteres que llevan tilde u otros signos, y los caracteres
especiales de algunos idiomas, ocupan más espacio, lo que
limita el número de caracteres que se pueden enviar en un
único mensaje.
Mensajes con imagen
Los mensajes con imagen corresponden a un servicio de red.
Si su proveedor celular admite esta función, el teléfono
puede incluir cinco imágenes previamente cargadas. Las
imágenes se pueden adjuntar en un mensaje de texto y
enviar a teléfonos compatibles.
Nota: La apariencia de un mensaje podrá variar
dependiendo del dispositivo receptor.
La protección de los derechos de propiedad
intelectual puede impedir la copia, modificación,
transferencia o desvío de imágenes.
Para enviar un mensaje con imagen, haga lo siguiente:
1. Seleccione Menú > Mensajes > Mensajes de texto >
Crear mensaje.
2. Escriba un mensaje (o déjelo en blanco si sólo desea
enviar una imagen) y seleccione Opciones.
91
Page 93

3. Seleccione Insertar imagen.
4. Desplácese hacia abajo por las imágenes y seleccione Ver.
5. Seleccione Insertar para insertar la imagen en el
mensaje; de lo contrario, seleccione Atrás, desplácese
a otra imagen y vuelva a seleccionar Ver.
6. Para enviar el mensaje con imagen, seleccione Enviar a >
Enviar a núm., Copias múltiples o Enviar a e-mail .
7. Ingrese el número telefónico del destinatario o
bien seleccione Buscar para recuperar un número de
sus contactos.
8. Seleccione Enviar.
Las imágenes sólo se reciben en mensajes de texto.
Leer y responder
Cuando reciba un mensaje, una notificación y el icono
aparecen en la pantalla .
1. Seleccione Mostrar para leer el mensaje o Salir para
ignorar la notificación.
Si es necesario, desplácese para ver todo el mensaje.
92
Page 94

Cuando tiene mensajes sin leer en el buzón de
entrada, en la pantalla de modo standby aparece
como un recordatorio.
2. Seleccione Responder > Pantalla vacía, Texto original,
Plantilla o alguna otra respuesta previamente establecida.
3. Ingrese la respuesta y seleccione Enviar.
Carpetas Buzón de entrada, Elementos
enviados y Borradores
Todos los mensajes entrantes se almacenan automáticamente
en el buzón de entrada.
Los mensajes no enviados y los que no se logró su envío se
almacenan automáticamente en la carpeta Buzón de salida.
Para guardar automáticamente los mensajes no enviados
en la carpeta Elementos enviados, seleccione Menú >
Mensajes > Mensajes de texto > Configuraciones de
mensajes > Otras config. > Guardar en Elem. env. al
enviar y seleccione Guard. siempre o Siempre indicar o
Desactivado para desactivar esta función.
93
Page 95

Usted puede guardar borradores de mensajes en la carpeta
Borradores para editarlos y enviarlos en otro momento.
En la pantalla del editor de mensajes, seleccione
Opciones >Guardar mens. >Borradores.
Eliminar mensajes
Si la memoria para mensajes está llena y tiene más mensajes
esperando en la red, destella en la pantalla del modo
standby. Usted puede: leer y eliminar mensajes de algunas
de las carpetas.
Para eliminar un solo mensaje, seleccione Menú >
Mensajes > Mensaje de texto, elija el mensaje y
seleccione Opciones > Eliminar y OK para eliminar el
mensaje o Atrás para salir.
Para eliminar todos los mensajes de una carpeta,
seleccione Menú > Mensajes > Mensajes de texto >
Eliminar mensajes y alguna de las siguientes opciones:
• Todos: elija Buzón de entr., Buzón de s., Elem. env.,
Borradores o Archivo como la carpeta deseada desde la
cual desea eliminar todos los mensajes. Seleccione
Listo y confirme la eliminación pulsando OK en la nota
de confirmación.
94
Page 96

• Todos los leídos: elija Buzón de ent., Buzón de s., Elem.
env., Borradores o Archivo como la carpeta desde la
que eliminará todos los mensajes leídos. Seleccione
Listo y confirme la eliminación al pulsar Sí en la nota
de confirmación.
• Todos no leídos: elimine cualquier mensaje que no ha
leído en la carpeta Buzón de entrada y confirme la
eliminación al pulsar OK en la nota de confirmación.
■ Registro
El Registro guarda información sobre las últimas
20 llamadas perdidas, recibidas o marcadas.
También suma la duración total de todas las llamadas.
Cuando la cantidad de llamadas excede el máximo, la
llamada más reciente reemplaza la más antigua. La red
debe admitir dichas funciones y el teléfono debe estar
encendido y dentro del área de cobertura de la red.
Seleccione Menú > Registro > Llamadas perdidas, Llamadas
recibidas o Números marcados para ver la fecha y hora de
la llamada; editar, ver o llamar al número telefónico
registrado, guardarlo en los contactos o eliminarlo de la
memoria del teléfono. Usted también puede enviar un
mensaje de texto.
95
Page 97

Puede eliminar cualquiera de las llamadas perdidas,
recibidas o números marcados de la memoria del teléfono.
Seleccione Menú > Registro > Eliminar listas de llamadas
recientes > Todas, Perdidas, Recibidas o Marcados.
Seleccione Menú > Registro > Duración de las llamadas
para ver la duración aproximada de la última llamada,
todas las llamadas recibidas, todas las llamadas marcadas,
el cronómetro general o todas las llamadas.
Para poner el cronómetro en cero, seleccione Menú >
Registro > Duración de las llamadas > Cronómetros a
cero, ingrese el código de seguridad y seleccione OK.
Nota: El tiempo real facturado por su proveedor
para las llamadas y servicios puede variar según las
funciones de red, el redondeo de la facturación, etc.
■ Perfiles
Los Perfiles definen, por ejemplo, la manera en
que el teléfono recibe las llamadas o los mensajes,
y los sonidos del teclado al pulsar una tecla. Las opciones de
timbre, los tonos del teclado y otras configuraciones para
cada uno de los perfiles disponibles, pueden permanecer con
su configuración predeterminada o puede personalizarlos
96
Page 98

para que se ajusten a sus necesidades. Los perfiles
disponibles son: Normal, Silencio, Reunión, Exterior y Pager.
Para activar o personalizar un perfil o programar una
hora de expiración para un perfil, seleccione Menú >
Perfiles, elija un perfil y seleccione Activar, Personalizar o
Programado. También puede pulsar la tecla Finalizar y
seleccionar para activar un perfil (o ¡Apagar! para apagar
el teléfono).
■ Configuraciones
En este menú, puede ajustar diversas
configuraciones del teléfono. Para restaurar las
configuraciones a sus valores predeterminados, seleccione
Menú > Configurac. > Restaurar configuraciones de
fábrica. Antes de continuar, se le solicitará que ingrese su
código de seguridad.
Configuraciones de llamadas
Seleccione Menú > Configurac. > Configuraciones de
llamadas y alguna de las siguientes opciones:
97
Page 99

Compartir in fo. de ubicación : permite compartir su ubicación
de red para dar a conocer su posición. Si la función está
activada, puede configurarla de manera que esté activa en
todo momento o sólo cuando se realicen llamadas.
Cualquier tecla contesta: para contestar una llamada
entrante al pulsar brevemente cualquier tecla excepto la
tecla Finalizar o la tecla de selección derecha.
Remarcado automático: para que el teléfono vuelva a
marcar un número después de que no se logró el intento.
Marcación rápida: para seleccionar si las teclas numéricas
(2 a la 9) se pueden utilizar para la marcación rápida
(llamar a un número al mantener pulsada una tecla).
Tarjeta de llamada: para guardar hasta cuatro números de
tarjeta de llamada en el teléfono que se utilizarán para
llamadas de larga distancia.
Prefijo internacional: para realizar llamadas con el signo +
como prefijo internacional. Cuando realiza una llamada, el
teléfono reemplaza el signo + en un número telefónico
guardado.
Resumen llamada: para ver el tiempo transcurrido en una
llamada cuando cuelga.
98
Page 100

Configuraciones de teléfono
Seleccione Menú > Configuraciones > Configuraciones
de teléfono y alguna de las siguientes opciones:
Idioma del teléfono: para seleccionar el idioma del texto
en pantalla.
Bloqueo automático: para configurar el teclado para que
se bloquee automáticamente después de un lapso de
tiempo determinado.
Tonos DTMF: para configurar la duración del tono cuando
pulsa las teclas del teléfono.
Saludo inicial: para escribir un saludo inicial que aparece
brevemente cada vez que se enciende el teléfono.
Título : el título predeterminado del teléfono se basa en el
servicio de red. Para cambiar el título, seleccione Personalizar
, ingrese el texto que desea ver en pantalla y seleccione OK.
Activación texto de ayuda: para ver descripciones breves
para la mayoría de los elementos del menú.
Configuraciones de hora y fecha
Seleccione Menú >Configurac. > Configuraciones de hora
y fecha y alguna de las opciones disponibles:
99
 Loading...