


Manual
Nero Express

Copyright and Trademark Information
This document, like the software described therein, is provided as a license and may only be used or reproduced in accordance with the licensing agreement. The contents of this document, as well as the associated software, is subject to change without prior notice. Nero AG rejects any responsibility for the correctness of the contents of this document and rejects any claims that transcend the clauses of the guarantee agreement.
This document and all of its contents are protected by copyright and are the property of Nero AG. All rights reserved. In addition, this document contains material that is protected by internationally valid copyright. This document may not be reproduced, transmitted, or transcribed in whole or in part without the express written permission of Nero AG.
Please keep in mind that existing graphics, pictures, videos, music titles or other materials that you may wish to insert or transcribe into projects may be protected by copyright. The unauthorized use of this type of material in your projects may violate the rights of the owner of the copyright. Make sure that you obtain all necessary authorizations from the owner of the copyright.
Unless you own the copyright, have permission from the copyright owner or your actions fall under the "fair use" provisions of copyright law, you may be violating national or international copyright laws. The transcribing, re-formation, modification or publication of copyright-protected material may lead to claims for damages and the enforcement of other legal measures against you. If you are unsure of your rights, you should contact your legal advisor.
Some Nero Multimedia Suite applications require technologies developed by third-party manufacturers, some of which are contained in the Nero Multimedia Suite as demo versions. These applications can be activated online free of charge or by sending an activation fax to have unlimited use of the version. Nero will only transmit the data necessary for activation of the technology licensed from third parties. For unlimited use of Nero Multimedia Suite, it is therefore necessary to have an Internet connection or a fax machine.
Copyright © 2006-2010 Nero AG and its licensors. All rights reserved.
Nero, Nero BackItUp, Nero BackItUp & Burn, Nero Burning ROM, Nero Digital, Nero DMA Manager, Nero Essentials, Nero Express, Nero ImageDrive, Nero LiquidTV, Nero MediaHome, Nero MediaHub, Nero MediaStreaming, Nero Move it, Nero Music2Go, Nero PhotoDesigner, Nero PhotoSnap, Nero Recode, Nero RescueAgent, Nero Simply Enjoy, Nero SmartDetect, Nero SmoothPlay, Nero StartSmart, Nero Surround, Nero Vision, Nero Vision Xtra, Burn-At-Once, InCD, LayerMagic, Liquid Media, the SecurDisc logo, and UltraBuffer are common law trademarks or registered trademarks of Nero AG.
Gracenote® is either a registered trademark or a trademark of Gracenote, Inc. in the United States and/or other countries. The Gracenote logo and logotype, and the "Powered by Gracenote" logo are trademarks of Gracenote.
Adobe, Acrobat, Acrobat Reader and Premiere are trademarks or registered trademarks of Adobe Systems, Incorporated. AMD Athlon, AMD Opteron, AMD Sempron, AMD Turion, ATI Catalyst and ATI Radeon are trademarks or registered trademarks of Advanced Micro Devices, Inc. ATSC is a trademark of the Advanced Television Committee. ICQ is a registered trademark of AOL, LLC. Apple, iPhoto, iPod, iTunes, iPhone, FireWire, and Mac are trademarks or registered trademarks of Apple, Inc. ARM is a registered trademark of ARM, Ltd. AudibleReady is a registered trademark of Audible, Inc. BenQ is a trademark of the BenQ Corporation. Bluray Disc is a trademark of Blu-ray Disc Association. Check Point and Check Point Endpoint Security are trademarks or registered trademarks of Check Point Software Technologies Ltd. CyberLink is a registered trademark of CyberLink Corp. DLNA is a registered trademark of Digital Living Network Alliance. DivX and DivX Certified are registered trademarks of DivX, Inc. Dolby, Pro Logic and the double-D symbol are trademarks or registered trademarks of Dolby Laboratories, Inc. DTS and DTS Digital Surround are registered trademarks of DTS, Inc. DVB is a registered trademark of the DVB Project. Freescale is a trademark of Freescale Semiconductor, Inc. Google and YouTube are trademarks of Google, Inc. WinTV is a registered trademark of Hauppauge Computer Works, Inc. Intel, Intel XScale, Pentium and Core are trademarks or registered trademarks of Intel Corporation. Linux is a registered trademark of Linus Torvalds. Memorex is a registered trademark of Memorex Products, Inc. ActiveX, ActiveSync, DirectX, DirectShow, Internet Explorer, Microsoft, HDI, MSN, Outlook, Windows, Windows Mobile, Windows NT, Windows Server, Windows Vista, Windows Media, Xbox, Xbox 360, the Windows Vista start button and the Windows logo are trademarks or registered trademarks of Microsoft Corporation. My Space is a trademark of MySpace, Inc. NVIDIA, GeForce and ForceWare are trademarks or registered trademarks of NVIDIA Corporation. Nokia is a registered trademark of Nokia Corporation. CompactFlash is a registered trademark of SanDisk Corporation. Sony, Memory Stick, PlayStation, PLAYSTATION and PSP are trademarks or registered trademarks of Sony Corporation. HDV is a trademark of Sony Corporation and Victor Company of Japan, Limited (JVC). UPnP is a registered trademark of the UPnP Implementers Corporation. Labelflash is a registered trademark of Yamaha Corporation.
The trademarks mentioned here are named for information purposes only. All trade names and trademarks are the property of their respective owners.
Nero AG, Im Stoeckmaedle 13, D-76307 Karlsbad, Germany
Nero Express |
2 |

|
|
Table of contents |
Table of contents |
|
|
1 |
Start Successfully |
5 |
1.1 |
About the Manual |
5 |
1.2 |
About Nero Express |
5 |
1.3 |
Versions of Nero Express |
5 |
1.4 |
Working with the Application |
6 |
2 |
Starting the Program |
8 |
3 |
Start Screen |
9 |
3.1 |
Extended Area (Start Screen) |
10 |
4 |
Compilation Screen |
12 |
5 |
Data Disc |
14 |
5.1 |
Compiling Data Disc |
14 |
5.2 |
Compiling SecurDisc disc |
16 |
5.3 |
Saving Data Track |
18 |
6 |
Music |
20 |
6.1 |
Compiling Audio CDs |
20 |
6.1.1 |
Customizing Properties of The Audio File |
22 |
6.2 |
Compiling Jukebox Disc |
26 |
6.3 |
Automatic Music Recognition |
26 |
6.3.1 |
Identifying Audio Files |
27 |
6.4 |
Copy Audio CDs to Hard Drive |
28 |
6.4.1 |
Copy Audio CDs to Hard Drive |
31 |
7 |
Video |
36 |
7.1 |
Compiling DVD-Videos |
36 |
7.2 |
Compiling AVCHD Video Disc |
37 |
7.3 |
Compiling Blu-ray Video Disc |
38 |
8 |
Loading a Disc Image or Saved Project |
41 |
9 |
LightScribe |
42 |
9.1 |
Printing LightScribe Labels (Without Compilation) |
42 |
9.2 |
LightScribe Print Properties Window |
44 |
9.3 |
Printing LightScribe Labels (Within The Project) |
45 |
10 |
Labelflash |
47 |
10.1 |
Burn Label Screen |
47 |
10.2 |
Printing Labelflash Labels and DiskT@2 |
48 |
Nero Express |
3 |

Table of contents
11 |
Burn Compilation |
51 |
11.1 |
Choice of Burner |
51 |
11.2 |
Starting the Burn Process |
52 |
11.3 |
Creating an Image File |
52 |
11.4 |
Final Burn Settings Screen |
54 |
11.4.1 |
Extended Area (Burn Settings) |
55 |
12 |
Copying a Disc |
57 |
12.1 |
Methods of Copying |
57 |
12.1.1 |
On-the-fly Copying |
57 |
12.1.2 |
Copy Over Image |
57 |
12.2 |
Copying a Disc |
57 |
12.3 |
Copy Settings |
59 |
13 |
Erase Rewritable Disc Window |
62 |
14 |
Final Screen |
64 |
15 |
Configuration Options |
65 |
15.1 |
Compilation Settings |
66 |
15.2 |
Cache Settings |
66 |
15.3 |
Expert Features |
67 |
15.4 |
Ultrabuffer Settings |
68 |
15.5 |
LightScribe Settings |
68 |
16 |
Technical Information |
70 |
16.1 |
System Requirements |
70 |
16.2 |
Formats Supported |
70 |
16.2.1 |
Disc Types |
70 |
16.2.2 |
Disc Formats |
70 |
16.2.3 |
Audio Formats and Codecs |
71 |
16.2.4 |
Video Formats and Codecs |
71 |
16.2.5 |
Image Formats |
72 |
16.2.6 |
Formats for Playlists |
72 |
17 |
Glossary |
73 |
18 |
Index |
76 |
19 |
Contact |
78 |
Nero Express |
4 |

Start Successfully
1 Start Successfully
1.1About the Manual
This manual is intended for all users who want to learn how to use Nero Express. It is process-based and explains how to achieve a specific objective on a step-by-step basis.
To make best use of this documentation, please note the following conventions:
|
Indicates warnings, preconditions or instructions that have to be pre- |
|
cisely followed. |
|
|
|
Indicates additional information or advice. |
|
|
1. Start … |
The number at the beginning of a line indicates a prompt for action. |
|
Carry out these actions in the order specified. |
|
|
|
Indicates an intermediate result. |
|
|
|
Indicates a result. |
|
|
OK |
Indicates text passages or buttons that appear in the program inter- |
|
face. They are shown in boldface. |
|
|
(see…) |
Indicates references to other chapters. They are executed as links and |
|
are shown in red and underlined. |
|
|
[…] |
Indicates keyboard shortcuts for entering commands. |
|
|
1.2About Nero Express
Nero Express provides all the performance and efficiency of Nero Burning ROM with a simplified user interface. Whether you are a beginner or an expert, Nero Express guides you quickly and easily through your desired burning tasks. The default settings are selected to automatically produce the best possible results. Using the program is remarkably easy: simply select the project to be burned, add the files, and start burning.
Using Nero Express you can save audio files from an Audio CD to the hard drive. In the process, the files are encoded, i.e. converted into a format that the computer can read. The Audio CD can be automatically identified with Gracenote. So called metadata such as title, genre, and track title are accessed by the Gracenote Media Database and associated to the tracks. That way you have audio files that are accurately and fully named after the encoding process.
Music recognition technology and related data are provided by Gracenote®. Gracenote is the industry standard in music recognition technology and related content delivery. For more information, please visit www.gracenote.com.
Nero Express |
5 |

Start Successfully
1.3Versions of Nero Express
Nero Express is available in versions with different features. In addition to the full Nero Express version, there are other versions with restricted features.
Nero Express Essentials does not offer the following features:
Creating labels with LightScribe (not included in the standard functions)
Creating labels with Labelflash (not included in the standard functions)
Burning SecurDisc discs (not included in the standard functions)
Simultaneous burning with multiple burners
Cross fade with previous track
Music title recognition with Gracenote
Support of Album art with Gracenote
Gracenote Plug-in
You will need the Gracenote Plug-in to identify single audio files and to display Album art.
You can obtain the plug-in at www.nero.com. The plug-in is already included in the full version.
In addition, the encoding and decoding formats in Nero Express Essentials are restricted. The mp3PRO Plug-in is included as a trial version.
mp3PRO Plug-in
You will need the mp3PRO Plug-in for unlimited MP3 and mp3PRO encoding/decoding.
You can obtain the plug-in at www.nero.com. The plug-in is already included in the full version.
1.4Working with the Application
Basically, the user interface of Nero Express consists of the selection of a compilation type in the start screen. A compilation comprises the content of the disc. You then complete the task by navigating through the different steps where a separate window is displayed for each individual step. This generally requires four steps:
Choose compilation type
Select what you would like to do by moving the cursor over the menu item and clicking one of the tasks displayed. This manual contains a chapter for each task that describes all of the steps required for its completion.
Completing a task
Depending on the task you will have to go through various steps until you reach the end. Each individual step consists of a new screen.
Nero Express |
6 |

Start Successfully
Burning a compilation
Burning marks the end of the procedure. To burn, set the burn parameters and click the Burn button. Depending on the type of the task you are working on and the recorder connected to the system, a number of different entries are available for selection.
Options after burning
After burning is complete, you can decide what to do next: select the option to continue working with Nero Express or exit the program.
Nero Express |
7 |

Starting the Program
2 Starting the Program
To start Nero Express via Nero StartSmart, proceed as follows:
1.Click the Nero StartSmart icon.
The Nero StartSmart window is opened.
2.Click the  button.
The list of Nero applications is displayed.
Nero StartSmart window
3.Select the Nero Express entry in the selection list.
The Nero Express window is opened.
You have started Nero Express via Nero StartSmart.
Nero Express |
8 |
Start Screen
3 Start Screen
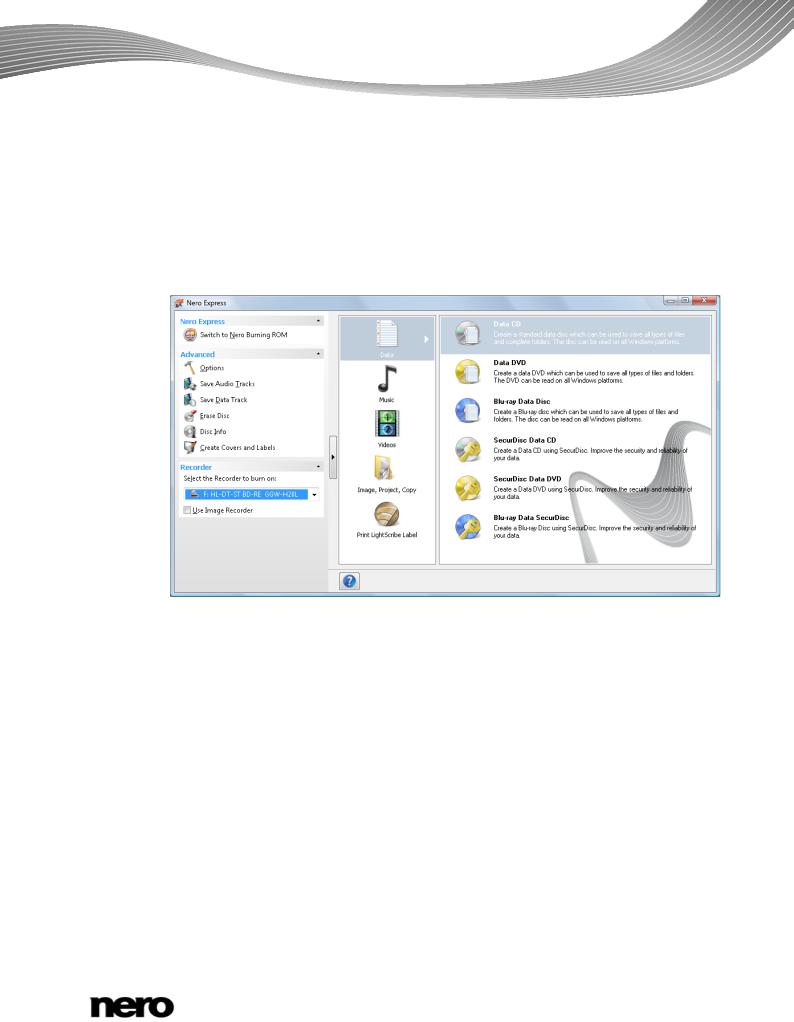
The main screen in Nero Express is the starting point for all actions. Click here on the relevant menu icons to go to the desired screen where you can compile and work on your project. The selection is categorized into two areas: several formats or options are available for the single compilation methods.
Click the  button in the left margin of the window to display an extended area with additional options and features.
|
Start Screen |
The following compilation methods are available: |
|
|
|
Data |
Allows you to compile and burn all types of files and folders. |
|
|
Music |
Allows you to compile and burn audio files as Audio CD for example. |
|
|
Videos |
Allows you to compile and burn video files as DVD-Video for example. |
|
|
Image, Project, |
Allows you to copy a source disc and to load an image file or a saved |
Copy |
project. |
|
|
Print LightScribe |
Displays the Disc Label screen. |
Label |
This is where you can create or load a label in order to print on the |
|
label side of special CDs/DVDs in the recorder. |
|
A LightScribe recorder must be selected to enable the option. |
|
|
Nero Express |
9 |

Start Screen
The actual entries that are available and the actual disc types (e.g. DVD) to which can be written depend on the selected recorder.
You can find more information on Blu-ray support at www.nero.com/link.php?topic_id=416.
See also
Loading a Disc Image or Saved Project → 41
LightScribe → 42
Data Disc → 14
Music → 20
Video → 36
3.1Extended Area (Start Screen)
You can access the additional options and features in the extended area of the start screen by clicking on the  button in the left margin of the window. The extended area is available in all Nero Express screens.
The following menu icons are available:
Switch to Nero |
Closes Nero Express and opens the start screen of Nero Burning |
Burning ROM |
ROM. Nero Burning ROM is able to open Nero Express compilation |
|
files and Nero Express is able to open Nero Burning ROM compila- |
|
tion files. |
|
This option is only available in the extended area of the start screen. |
|
If you decide to create a project with Nero Express, the option Saves |
|
the active project is displayed in all of the other windows at this |
|
point. |
|
|
Saves the active |
Opens the Save As window to save your compilation. The file links |
project |
and settings to be burned are saved. |
|
|
Options |
Opens the Options window to customize Nero Express to suit your |
|
requirements. |
|
|
Save Audio Tracks |
Opens the Copy Audio CDs to Hard Drive to copy audio files from |
|
CD to the hard drive. |
|
|
Save Data Track |
Opens the Select Track window in which you can save the track of a |
|
data disc as an image file. |
|
|
Erase Disc |
Opens the Erase Rewritable Disc window to erase data from a re- |
|
writable disc. |
|
|
Nero Express |
10 |
|
Start Screen |
|
|
Disc Info |
Opens the Disc Info window to display information about the in- |
|
serted disc. The total capacity and available capacity are displayed, |
|
in addition to the tracks and sessions. |
|
|
Create Covers and |
Opens Nero CoverDesigner. Nero CoverDesigner is used to create |
Labels |
and print labels and booklets for burned discs. |
|
Please see the separate Nero CoverDesigner user manual for full |
|
instructions on how to make professional looking covers and labels. |
|
|
SecurDisc Settings |
Defines the settings for burning a SecurDisc disc. |
|
|
Burn Label |
Opens the Burn Label window, in which you can create or load a |
|
label in order to print a label and/or print directly on the data side of |
|
special discs in the recorder. |
|
Available with a Labelflash recorder only. The recorder must be se- |
|
lected to enable the option. |
|
|
Recorder |
Defines the recorder that you want to use for burning and/or the Nero |
|
Image Recorder. |
|
|
See also
Configuration Options → 65
Copy Audio CDs to Hard Drive → 31
Erase Rewritable Disc Window → 62
Nero Express |
11 |

Compilation Screen
4 Compilation Screen
You can access the Nero Express compilation screens by selecting the compilation type you want in the start screen. You can add data to your projects in the compilation screens and customize the directory structure on the disc to suit your requirements. The capacity bar near the bottom of the window indicates how much space is being used by the data on the disc. Essentially, all compilation screens have the same structure.
Compilation screen
The following setting options are available in the compilation screen:
Button |
Opens the Add files and folders window. |
Add |
|
|
|
Button |
Removes the selected file. |
Delete |
|
|
|
Button |
Plays a selected audio or video file. |
Playback |
|
|
|
Button |
Returns to the start screen. |
Back |
|
|
|
Button |
Switches to the Final Burn Settings screen. |
Next |
|
|
|
Button |
Opens the Audio Track Properties window for Audio CDs. |
Properties |
Available for Audio CDs only. |
|
|
Nero Express |
12 |

|
Compilation Screen |
|
|
Check box |
Enables a filter that brings the volume of the audio files to be |
Normalize all audio |
burned into line with one another. This is recommended particular- |
files |
ly if the files originate from different sources. |
|
Available for Audio CDs only. |
|
|
Check box |
Establishes that the audio files merge into one another without a |
No pause between |
pause. If the check box is cleared, a pause of two seconds is in- |
tracks |
serted between the files. |
|
We strongly recommend using the disc-at-once burn mode. Oth- |
|
erwise the zero pause length may not be supported by all record- |
|
ers and/or a very short clicking noise may be heard between |
|
tracks. |
|
Available for Audio CDs only. |
|
|
Selection list |
Allows you to expand or shrink the capacity bar according to the |
DVD9 (8152MB) / |
type of DVD you are going to burn. Choose the DVD9 (8152 MB) |
DVD5 (4483MB) |
option for a double layer DVD (DVD DL) and DVD5 (4483 MB) for |
|
a single layer DVD. |
|
Available for all DVD compilations. |
|
|
Selection list |
Allows you to expand or shrink the capacity bar according to the |
BD DL (47732MB) / |
type of Blu-ray Disc you are going to burn. Choose the BD DL |
BD (23866MB) |
(47732MB) option for a double layer Blu-ray Disc (BD DL) and BD |
|
(23866MB) for a single layer Blu-ray Disc. |
|
Available for all Blu-ray Disc compilations except BD-Video. |
|
|
You can find more information on Blu-ray support at www.nero.com/link.php?topic_id=416.
See also
Compilation Settings → 66
Nero Express |
13 |

Data Disc
5 Data Disc
5.1Compiling Data Disc
With Nero Express you can compile and burn all types of files and folders. If a Blu-ray recorder is installed on your computer you can burn data CDs, data DVDs and data Blu-ray Discs. If you have a CD recorder you can only burn data CDs. The procedure for all data compilation methods is identical.
A data disc is particularly useful for storing files on a disc and for burning backups. To create a data disc, proceed as follows:
1.Click the Data menu icon in the Nero Express start screen.
The data disc options are displayed.
2.Click the option you require: Data CD, Data DVD, or Data Blu-ray Disc.
The Disc Content compilation screen for data discs is displayed.
Disc Content compilation screen
3.Click the Add button.
The Add files and folders window is opened.
4.Select the files that you want to add to the compilation and click the Add button.
5.Repeat the previous step for all files that you want to add.
6.Click the Close button.
The files are added to the compilation and displayed in the compilation screen.
7.Click the Next button.
You have successfully compiled a data disc and can now burn this compilation.
Nero Express |
14 |

Data Disc
5.2Compiling SecurDisc disc
SecurDisc is a technology developed by Nero and HLDS with which you can create discs with special protection properties. SecurDisc refers to both a software technology and a special hardware technology.
Discs that are created with Nero Express and the SecurDisc compilation type include data integrity and reconstructability. Additional SecurDisc features include the possibility to protect the data on your SecurDisc disc against unauthorized access using a password, to digitally sign the disc, and to configure the data redundancy. In combination with a SecurDisc supported drive (e.g. from HLDS/LG) PDF files can receive additional copy protection when burned to a DVD.
To be able to view or access the content of a SecurDisc disc you will need a special application named SecurDisc Viewer, which can be downloaded free of charge at www.securdisc.net. The SecurDisc Viewer is also burned automatically to the SecurDisc disc. Discs can also be read from any drive with InCD or InCD Reader, both available at www.nero.com.
More information on SecurDisc technology can be found at www.securdisc.net.
This function is only available in the full version. You can always upgrade your
Essentials version at www.nero.com to get the full version with all the functions.
To compile a SecurDisc disc, proceed as follows:
1.Click the Data menu icon in the Nero Express start screen.
The data disc options are displayed.
2.Click the SecurDisc option you require.
The Disc Content compilation screen for SecurDisc discs is displayed.
SecurDisc DVD compilation
Nero Express |
15 |

Data Disc
3.Click the Add button.
The Add files and folders window is opened.
4.Select the files that you want to add to the compilation and click the Add button.
5.Repeat the previous step for all files that you want to add.
6.Click the Close button.
The files are added to the compilation and displayed in the compilation screen.
7.If you want to enable the password protection for all files:
1.Select the Password protection check box in the extended area of the compilation screen.
A lock symbol shows that all data is protected.
8.If you want to sign the disc with a digital signature:
1.Select the Digital signature check box in the extended area of the compilation screen.
The SecurDisc – Digital Signature window is opened.
2.If you have already created a digital key, click the Browse button and select the key.
3.If you want to create a digital key, click the Start button.
The SecurDisc – Create Digital Key window is opened.
4.Read the instructions and click the Next button.
The SecurDisc Key Creation Process window is opened.
Nero Express |
16 |

Data Disc
5.Move your mouse at random until the creation process is complete.
You can monitor the status of the creation process using the progress bar. The Next button is enabled as soon as the process is complete.
6.Click the Next button.
The SecurDisc – Key Creation Completed window is opened.
7.Enter a file name for the key you have created and click the Finish button.
The SecurDisc – Digital Signature window is opened again and the selected key appears in the drop-down menu.
8.Click the OK button.
The corresponding window is opened to inform you that the disc is being digitally signed with the selected key.
9.Click the OK button.
You can pass on the relevant public key to recipients to enable them to verify the signature.
SecurDisc capable drive and DVD to copy-protect PDF
With a SecurDisc supported drive (e.g. from HLDS/LG) you can copy-protect PDF files when you are compiling a SecurDisc DVD. Make sure you have selected the SecurDisc drive in the recorder drop-down menu.
To copy-protect all PDF files on the SecurDisc DVD, select the Copy protection check box. For permitting duplication of the data after entering a password, select the Use password to disable copy protection check box and enter the desired password in the window that is opened.
9.If you want to enhance the burning speed by limiting the data redundancy or to configure the data redundancy:
1.Select the Intended Data Reliability check box in the extended area of the screen..
The drop-down menu is enabled.
2.Select the desired reliability level.
If the Intended Data Reliability check box is cleared, the disc will be filled completely with copies of the chosen data and checksums. A display panel in the compilation screen indicates the current redundancy level.
10.Click the Next button.
If you enabled the Password protection feature, the SecurDisc – Protect Data window is opened.
Nero Express |
17 |

Data Disc
SecurDisc – Protect Data window
11. Enter the desired password in the Password input area and then click the OK button.
When appropriate, a wizard offers suggestions in an additional Tips dialog box when entering and selecting the password. The wizard estimates the security level, i.e. the quality of the password, during entry.
You have compiled a SecurDisc disc with settings according to your requirements and can now burn the disc.
5.3Saving Data Track
With Nero Express you can save a data disc as an image file. The image file can later be burned to a recordable disc. The result is a copy of the original data disc.
To save the data disc as an image file, proceed as follows:
1.Insert the data disc in a drive.
2.Click the Save Data Tracks button in the extended area of the start screen.
The Select Track window is opened. The tracklist shows you the sessions and data tracks that are found on the disc. Due to the technical reasons, only the first data track of the first session can be saved.
Nero Express |
18 |

Data Disc
Select Track
3.Select the first data track.
4.Click the Save Track button.
The Save As window is opened.
5.Select a file name and a storage location.
6.Select the desired output format (ISO or NRG) for the image file in the Save As drop-down menu.
7.Click the Start button.
The Progress window is opened and displays the progress made while saving. When the save process is complete, the window is closed automatically.
You have successfully created an image file starting from a data disc. Now you can burn the image file to a disc.
Nero Express |
19 |

Music
6 Music
6.1Compiling Audio CDs
Some of the functions mentioned here are restricted or not available in the Essentials version. You can always upgrade your Essentials version at www.nero.com to get the full version with all the functions.
With Nero Express you can create an Audio CD that contains music files. It can be played in all standard CD players. To compile an Audio CD, source files with different audio formats are automatically converted into Audio CD format before being burned.
Some CD players cannot play CD-RWs. Use CD-R discs to burn Audio CDs.
The encoding and decoding formats in the Essentials version are limited. You can always upgrade your Essentials version at www.nero.com to get the full version with all the functions.
mp3PRO Plug-in
You will need the mp3PRO Plug-in for unlimited MP3 and mp3PRO encoding/decoding.
You can obtain the plug-in at www.nero.com. The plug-in is already included in the full version.
To create an Audio CD, proceed as follows:
1.Click the Music menu icon in the Nero Express start screen.
The compilation methods for music are displayed.
2.Click the Audio CD button.
The My Audio CD compilation screen for Audio CDs is displayed.
Nero Express |
20 |

Music
My Audio CD compilation screen
3.Click the Add button.
The Add files and folders window is opened.
4.Select the audio files that you want to add to the compilation and click the Add button.
5.Repeat the previous step for all audio files that you want to add.
6.Click the Close button.
The audio files are added to the compilation and displayed in the compilation screen.
7. Customize the properties of the audio files to suit your requirements.
Nero Express |
21 |

Music
8.Click the Next button.
You have successfully compiled an Audio CD and can now burn this compilation.
See also
Compilation Screen → 12
Copy Audio CDs to Hard Drive → 31
6.1.1Customizing Properties of The Audio File
You can display and/or make changes to the audio file properties on the Track Properties,
Indexes, Limits, Splits and Filters tabs of the Audio Track Properties window. To open the window, select an audio file in the compilation screen My Audio CD for Audio CDs and click the Properties button.
6.1.1.1 Track Properties Tab
On the Track Properties tab you will find basic information on the selected file in the Source information area. To open the window, mark an audio file in the compilation screen for Audio CDs and click the Edit > Properties menu.
Track properties
The following input areas are available in the Properties area:
Input field
Title (CD Text)
Defines a title which is saved as CD Text. CD players that support CD Text show the title name entered here.
Only Latin characters can be displayed as CD Text. CD Text can only be written in disc-at-once mode.
Nero Express |
22 |

|
Music |
|
|
Input field |
Defines the artist which is saved as CD Text. CD players that sup- |
Artist (CD Text) |
port CD Text show the artist's name entered here. |
|
Only Latin characters can be displayed as CD Text. CD Text can |
|
only be written in disc-at-once mode. |
|
|
Input field |
Defines the length of the pause in seconds or frames between the |
Pause |
selected audio file and the next one. |
|
|
Input field |
Identifies the CD title using a 12-character digital code. The ISRC is |
International Stan- |
entered in the subcode and included silently. |
dard Recording |
If you do not know the ISRC, you should leave this input field blank. |
Code (ISRC) |
|
|
|
Check box |
Sets the copy protection bit for the corresponding track on the Audio |
Protection |
CD. As most CD recording applications simply ignore this bit, copy |
|
protection cannot be ensured. A warning message will be opened in |
|
Nero Express while copying an Audio CD with copy protected tracks. |
|
|
Check box |
Defines a crossfade between this and the previous audio file. You |
Cross fade with |
can specify the length of the crossfade in seconds or in sectors. |
previous track |
|
|
|
6.1.1.2 Indexes, Limits, Split Tab
On the Indexes, Limits, Split tab you can set and delete indexes and split audio files to create two or more shorter ones. The tab consists of the Oscilloscope and Positions areas.
Indexes, Limits, Split Tab
Nero Express |
23 |

Music
Audio files are displayed graphically in the Oscilloscope area. The following configuration options are available in the Positions area:
Selection lists |
Shows the positions for the beginning and end of the audio file on |
Start/End |
the CD. |
|
|
Button |
Sets a new index position at the selected position. For the CD player |
New Index |
this is the position from which a new song starts, and the player can |
|
also jump to it directly. However, not all CD players support this fea- |
|
ture. |
|
|
Button |
Opens the Set Track End dialog box. |
Edit |
You can enter the exact position of a split. |
|
|
Button |
Deletes a selected index. |
Delete |
|
|
|
Button |
Splits the audio file at the marked position. |
Split |
|
|
|
Button |
Plays the audio file from the marked position. |
Play |
During playback, the Stop playing button is displayed. |
|
|
Button |
Stops playback of the audio file. |
Stop playing |
If playback is stopped, the Play button is displayed again. |
|
|
Button |
Splits the audio file at the set index positions. |
Split at Index Posi- |
|
tions |
|
|
|
Button |
Enlarges the graphical representation of the audio file. |
Zoom In |
|
|
|
Button |
Reduces the graphical representation of the audio file. |
Zoom Out |
|
|
|
Button |
Displays a graphical representation of the entire audio file. |
Full View |
|
|
|
6.1.1.3 Filters Tab
The Filters tab includes filters that improve or change the quality of the music. The so-called non-destructive procedure is used for processing, i.e. the actual recording is not changed, but flags are simply set that can be canceled at any time. No additional audio data is created. The audio files on hard drive are not modified during this procedure.
Nero Express |
24 |
 Loading...