


 Loading...
Quickstart
Ahead Software AG
Table of Contents
1 |
Getting Started |
3 |
|
|
1.1 |
Introduction .......................................................................................... |
3 |
|
1.2 |
How This Manual is Organized ............................................................ |
3 |
|
1.2.1 Notes for the User............................................................................. |
4 |
|
2 |
About Cover Designer |
5 |
|
|
2.1 |
Introduction .......................................................................................... |
5 |
|
2.2 |
Program Structure................................................................................ |
5 |
|
2.2.1 |
Cover Elements ................................................................................ |
6 |
|
2.2.2 Buttons on the Toolbar...................................................................... |
6 |
|
3 |
Auxiliary Aids |
7 |
|
|
3.1 |
Ruler .................................................................................................... |
7 |
|
3.2 |
Guidelines ............................................................................................ |
7 |
|
3.3 |
Grid ...................................................................................................... |
8 |
4 |
Settings |
9 |
|
|
4.1 |
Default Settings.................................................................................... |
9 |
|
4.2 |
Program Settings ................................................................................. |
9 |
|
4.2.1 |
Paper Stocks Selection................................................................... |
10 |
|
4.2.2 |
Printer Calibration ........................................................................... |
11 |
5 |
Create Cover |
12 |
|
|
5.1 |
Introduction ........................................................................................ |
12 |
|
5.2 |
Select Cover and CD Type ................................................................ |
12 |
|
5.3 |
Booklet Design................................................................................... |
14 |
|
5.3.1 |
Booklet (Front) ................................................................................ |
14 |
|
5.3.2 |
Booklet (Rear)................................................................................. |
17 |
|
5.4 |
Add Document Data........................................................................... |
20 |
|
5.5 |
Create Inlay........................................................................................ |
22 |
|
5.6 |
Label Design ...................................................................................... |
25 |
6 |
Document Templates |
29 |
|
|
6.1 |
Create template ................................................................................. |
29 |
|
6.2 |
Load or Modify Document Template.................................................. |
33 |
7 |
Image Editing |
35 |
|
|
7.1 |
Introduction ........................................................................................ |
35 |
|
7.2 |
Using Effects...................................................................................... |
35 |
|
7.3 |
Fitting to the Frame Size.................................................................... |
39 |
8 |
Text Block Editing |
41 |
|
|
|
|
Quickstart Cover Designer |
Getting Started • i |
|
|
8.1 |
Introduction ........................................................................................ |
41 |
|
|
8.2 |
'Properties' Window ........................................................................... |
42 |
|
|
8.2.1 |
|
'Textbox Tab'................................................................................... |
42 |
|
8.2.2 |
|
'Pen' Tab ......................................................................................... |
43 |
|
8.2.3 |
|
'Brush' Tab ...................................................................................... |
44 |
|
8.2.4 |
|
'Image' Tab ..................................................................................... |
45 |
9 |
Editing Artistic Text |
47 |
||
|
9.1 |
Introduction ........................................................................................ |
47 |
|
|
9.2 |
'Properties' Window ........................................................................... |
48 |
|
|
9.2.1 |
|
'Pen' Tab ......................................................................................... |
48 |
|
9.2.2 |
|
'Brush' Tab ...................................................................................... |
49 |
|
9.2.3 |
|
'Text' Tab ........................................................................................ |
50 |
|
9.2.4 |
|
'Font' Tab ........................................................................................ |
51 |
10 |
Document Datas |
52 |
||
|
10.1 |
|
Introduction ...................................................................................... |
52 |
|
10.2 Adding Files and Tracks .................................................................. |
52 |
||
|
10.3 Files, Folders and Tracks................................................................. |
55 |
||
|
10.3.1 Naming Files and Folders ............................................................. |
55 |
||
|
10.3.2 Deleting Files and Folders ............................................................ |
56 |
||
|
10.3.3 |
Naming Tracks.............................................................................. |
56 |
|
|
10.3.4 |
Deleting Tracks ............................................................................. |
57 |
|
11 |
Adding Fields |
58 |
||
|
11.1 |
|
Introduction ...................................................................................... |
58 |
|
11.2 |
|
Adding a Field .................................................................................. |
59 |
12 |
Index |
|
60 |
|
|
|
|
Quickstart Cover Designer |
Getting Started • ii |
|

1 Getting Started
1.1 Introduction
These instructions will show you how to quickly create and design your own CD cover. The program is very comprehensive and powerful, so we will only present the most important features. We will omit some parts of the program or will only touch on them briefly.
You will find detailed information about Cover Designer in the online help which you can access at any time by pressing the F1 key.
You can also look up current information about Cover Designer on the Internet at www.nero.com.
1.2 How This Manual is Organized
This manual contains practical examples for creating various cover elements as well as program reference material.
The individual chapters present the following information:
Chapter 1 gives you an overview of the manual's structure and familiarizes you with the symbols that are used.
Chapter 2 introduces Cover Designer and its cover elements and provides a brief description of the program's structure.
Chapter 3 shows you where you can define the appearance of the various cover elements by modifying the default and program settings. It also describes how you select paper stocks and calibrate the printer.
Chapter 4 presents various aids that help you create and align objects, for example guidelines.
Chapter 5 guides you step by step through the process of creating a CD cover. By following the instructions, you can modify the design of each cover element and compare your results with the illustrations. You will be surprised how easy it is to achieve the results you want.
Chapter 6 shows you how to give a uniform appearance to your CD covers by creating and loading document templates and modifying them again as needed.
Chapter 7 introduces you to the world of graphics design. You can choose among a seemingly endless range of effects. To round off the topic, we give you examples and information for adapting the image size to the document.
|
|
|
Quickstart Cover Designer |
Getting Started • 3 |
|

Chapter 8 presents editing features for text blocks and gives a detailed description of the corresponding 'Textbox', 'Pen', 'Brush' and 'Image' tabs.
Chapter 9 presents artistic text design features and provides a detailed description of the corresponding 'Pen', 'Brush', 'Text' and 'Font' tabs. The 'Bent' function is emphasized, which allows you to fit artistic text to the curvature of the CD.
Chapter 10 shows you how to add, name or delete files, folders and tracks for you document data.
Chapter 11 lets you quickly find the information you want using the index created here.
1.2.1 Notes for the User
The following symbols are used in this manual:
This symbol means 'warning' or 'caution'.
It identifies very important information. Failure to comply with the information leads to undesirable program behavior.
This symbol stands for 'useful tip' or 'nice to know'. It indicates important or informative items.
|
|
|
Quickstart Cover Designer |
Getting Started • 4 |
|

2 About Cover Designer
2.1 Introduction
The Cover Designer was specially created to allow the design and production of CD covers via a userfriendly interface. It is included in some of Ahead software’s products and can be initiated by clicking on the respective icon.
One of the advantages of integrating the Cover Designer into some of Ahead’s products is the ability to automatically create playlists and/or filename lists, thus saving you the annoyance of having to manually type them in. In addition, playlists from external sources (such as FreeDB) can queried/used.
When a document is created, the CD type and the number of disks included is defined. All corresponding cover elements appear at the lower frame of the screen. You can activate them by clicking on the appropriate tab. If all cover elements have been processed, the cover is finished and can be printed.
A variety of functions is available to the user: Create new graphics
Import graphics using a scanner Add existing graphics
Define graphics as background images Edit graphics
Deform graphics using special effects Add text
Format text Add fields
2.2 Program Structure
The structure of Cover Designer conforms to standard Windows conventions: a menu bar, various icon bars and a status bar. The workspace of Cover Designer displays the cover element selected, which you can format using text and/or image elements. The most important aid to use when designing cover elements is the toolbar at the lower frame of the screen.
|
|
|
Quickstart Cover Designer |
About Cover Designer • 5 |
|

2.2.1 Cover Elements
A CD cover includes the following elements:
Booklet (front): front side of the title insert
Booklet (Rear): back side of the title insert
Inlay: back side of the CD as inlay in the CD case
Disk: designation of a sticker (label) in the shape of a CD
2.2.2 Buttons on the Toolbar
The table below provides you with a quick overview of the most important buttons in Cover Designer.
The buttons on the toolbar have the following functions:
Selection tool to mark objects
Line tool to draw lines
Rectangle tool to draw rectangles and squares
Oval tool to draw ellipses and circles
Text box tool to insert a text box. Double click to open a window for text entry (block of text)
Artistic text tool to insert artistic text
Track list tool to insert a track list for audio CDs
Directory tool to insert a directory for data CDs
Image tool to insert saved images
Field tool to insert fields, such as title, artist, number of tracks, playing time.
|
|
|
Quickstart Cover Designer |
About Cover Designer • 6 |
|
3 Auxiliary Aids
3.1 Ruler
The ruler, which appears at the left upper side of the application window, makes it easier to set the size and position of objects.
The ruler is displayed by default. If it is not displayed, you can make it visible using the 'Ruler' item on the 'View' menu.
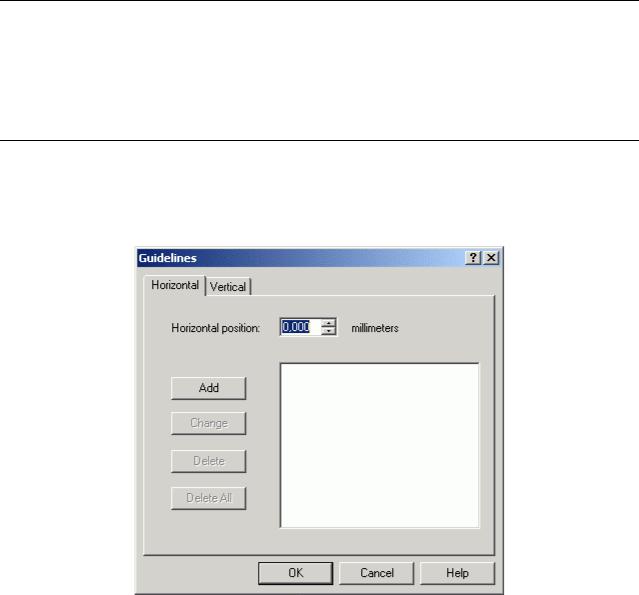
3.2 Guidelines
Guidelines are lines that help you align objects. They can be either horizontal or vertical.
1. Select 'Guidelines' from the 'View' menu.
2.Enter the desired (horizontal or vertical) position and click on the 'Add' button.
3.Repeat the entry for each additional reference line.
|
|
|
Quickstart Cover Designer |
Auxiliary Aids • 7 |
|
4.Click on the 'OK' button to close the window. The reference lines you have created are identified by a dotted red line.
If 'Snap to guidelines' is active, objects are automatically aligned to the guidelines when they are moved or drawn near the lines.
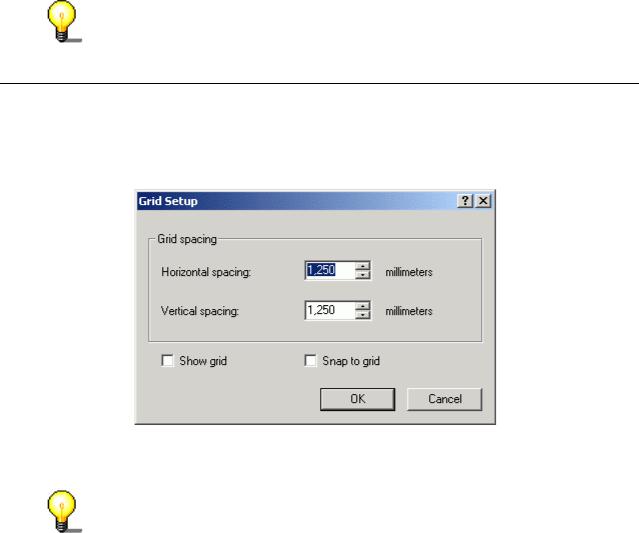
3.3 Grid
In a way similar to guidelines, the grid helps you align objects. The grid is a row of dots with uniform horizontal and vertical spacing.
1. Select the 'Set grid' command on the 'View' menu.
2.Enter the horizontal and vertical grid spacing you want.
3.Click on the 'OK' button to close the window. The grid is then displayed.
If 'Snap to grid' is active, objects are automatically aligned to the grid when they are moved or drawn near the lines.
|
|
|
Quickstart Cover Designer |
Auxiliary Aids • 8 |
|

4 Settings
4.1 Default Settings
Default settings define the appearance of various elements of Cover Designer. Use 'Default settings' on the 'File' menu to display and modify default settings.
Pen:
Defines the width and color of the pen.
Brush:
Defines the style and the selection of foreground and background colors.
Font:
Defines the font, style, size and display type.
Field:
Defines various field functions, such as alignment and number format.
Directory:
Defines the appearance of the directory tool.
Tracks:
Defines the appearance of the track tool.
4.2 Program Settings
Program settings define the appearance of various Cover Design elements.
Use the 'Preferences' command on the 'File' menu to display and modify program settings.
General:
Defines the display of messages and font.
Folders:
Defines the directories for documents, templates and import files.
Locale:
Defines language and units of measure.
Paper stocks:
Defines the paper stocks for Cover Designer elements.
Print:
Defines the print area, starts the calibration process and adjusts the settings.
|
|
|
Quickstart Cover Designer |
Settings • 9 |
|

Undo:
Defines options for the undo command.
4.2.1 Paper Stocks Selection
Cover Designer lets you to choose between pre-defined or user-defined paper stocks. In this manual, we will describe how to work with pre-defined paper stocks.
1.Select 'Paper Stocks' on the 'File' menu. Click on 'Predefined stocks' in the 'Paper Stocks' window that then appears.
A list of available paper stocks is displayed. In the center of the window, you see the number of paper stocks separated into pre-defined and user-defined. The 'Add Stock', 'Import' and 'Export' buttons are inactive if you have selected pre-defined paper stocks.
2.Click on the type of label that you want to use. Use the scroll bar if you do not see the label you want. The selected form appears in the preview window.
3.Click on the 'OK' button to specify the selected type of label for printing in Cover Designer.
|
|
|
Quickstart Cover Designer |
Settings • 10 |
|
You must pre-define any user-designed paper stocks before you can use them.
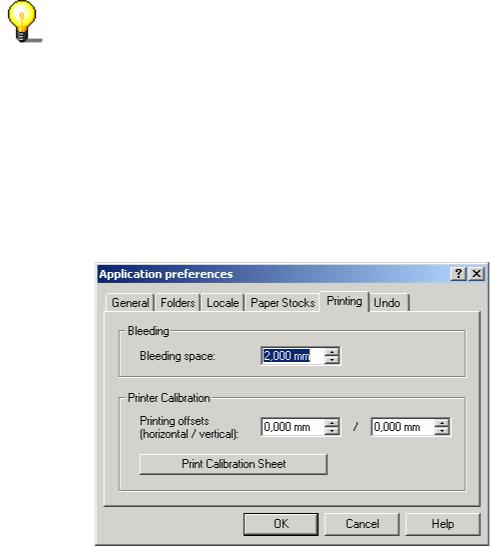
4.2.2 Printer Calibration
Because printers are mechanical devices that are subject to minimal variations while printing, we recommend the you calibrate the printer once after you have chosen the label type and selected the printer.
1.Prior to calibration, select the desired label type and the printer.
2.Select the 'Preferences' command on the 'File' menu and click on the 'Printing' tab.
3.Click on the 'Print Calibration Sheet' button.
4.Take the paper out of the printer. Fold the paper horizontally and vertically in the middle.
The dotted line indicates the current calibration setting.
5.Unfold the paper again and compare where the horizontal and vertical fold lines meet the intersection of the axes.
The intersection point indicates printer deviation in millimeters relative to the center of the page.
6.If there is a difference between the fold lines and the current setting, enter the actual horizontal and vertical values on the 'Printing' tab and then print another calibration sheet.
7.Fold that paper again horizontally and vertically in the middle. The fold lines should now coincide with the dotted lines. If this is the case, you have successfully competed printer calibration. (If not, repeat the appropriate steps to perform the calibration.)
8.Click on the 'OK' button to close the tab and end calibration.
|
|
|
Quickstart Cover Designer |
Settings • 11 |
|
5 Create Cover
5.1 Introduction
In this chapter, you will learn how you create a cover step by step using an example, from selection of a cover and CD type through design of the various cover elements, booklet (front), the booklet (Rear), inlay and label. Cover Designer lets you very easily create professional customized covers.
5.2 Select Cover and CD Type
The first step is to select a cover and CD type, because different cover elements are available depending on the selection you make.
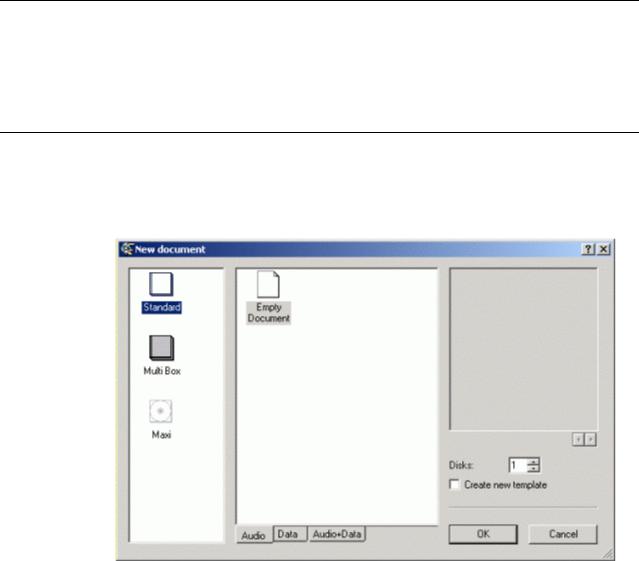
Start Cover Designer. The 'New Document' window appears in the foreground.
Three cover types with different elements are available:
Standard: Cover for a CD with booklet (front), booklet (Rear), inlay and label
Multi Box: Cover for a least two CDs (double CD) with booklet (Front), booklet (Rear), inlay (Front), inlay (Rear) and labels
|
|
|
Quickstart Cover Designer |
Create Cover • 12 |
|

Maxi: Cover for a maxi CD with inlay and label The CD type is selectable as a tab. The choices are: Audio: the CD contains only music
Data: the CD contains only data Audio+Data: the CD contains music and data
The document templates that are available for the CD type appear in the center of the window.
Define the number of disks in the 'Disks' field. Either enter the value or use the arrow keys.
If the 'Create new template' check box is checked, a new reusable template is created instead of a new document (refer to the 'Document Templates' chapter).
To make the first selection, proceed as follows:
1.On the 'New Document' window, click on the 'Default' icon to select the cover type.
2.Click on the 'Audio' tab to create a cover for a music CD.
3.Click on the 'OK' button.
The following window is displayed.
The window consists of:
The non-shaded portion which can be edited and is the size of a CD cover
Four tabs for the different CD cover elements at the lower frame,
for example booklet (Front), booklet (Rear), inlay and disk 1 (label for a CD)
The toolbar at the left frame of the window containing tools for creating and manipulating the cover elements
|
|
|
Quickstart Cover Designer |
Create Cover • 13 |
|
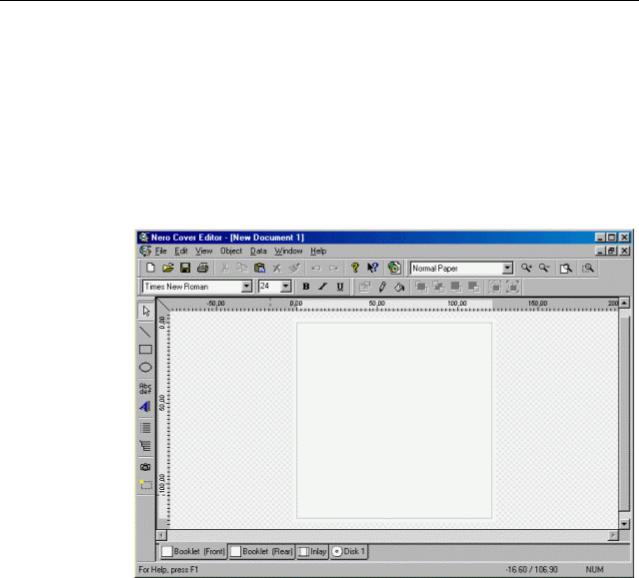
The menu bar with the associated functions
The icon bar for quick access to functions using buttons
The formatting bar for easy object formatting
5.3 Booklet Design
A booklet is the title insert of a CD. Booklet (Front) means the front side of this title and booklet (Rear) means the back side. Both can consist of images as well as text.
5.3.1 Booklet (Front)
The following section describes how to create a booklet (Front) containing an image.
1.Click on the 'Booklet (Front)' tab to bring up the template for the front side of a booklet.
2.On the toolbar, click on the  button to load a saved image. The corresponding window opens.
|
|
|
Quickstart Cover Designer |
Create Cover • 14 |
|
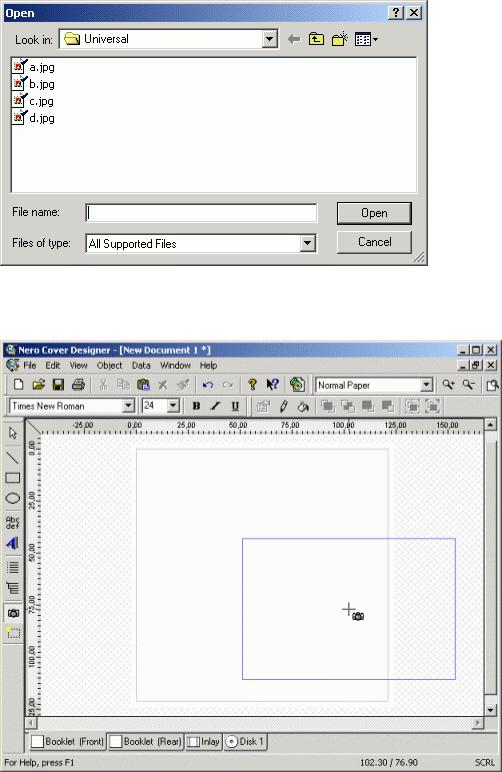
3.If necessary, change the directory and file type. Select a file and click on the 'Open' button.
A moveable alignment frame appears.
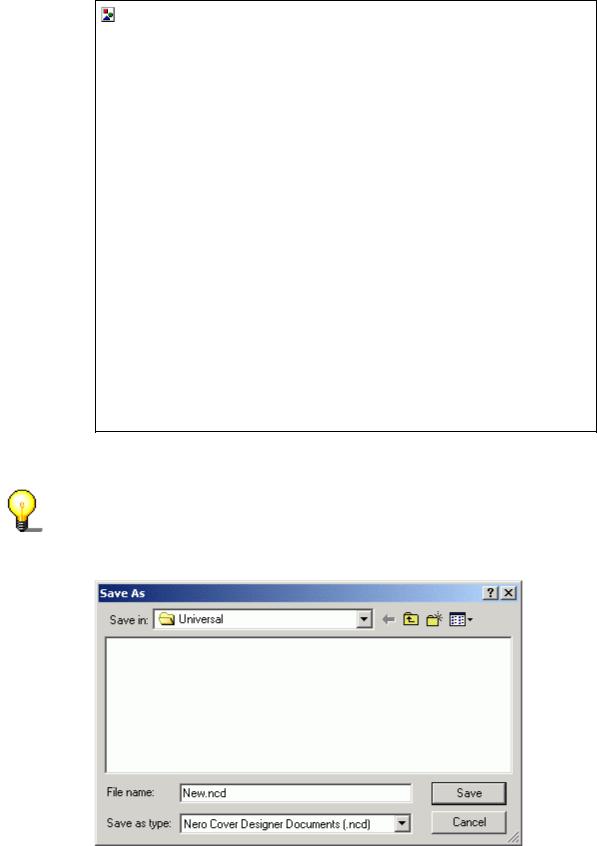
4. Position the frame with the mouse and click once. The image will be inserted.
|
|
|
Quickstart Cover Designer |
Create Cover • 15 |
|
You can easily edit the selected image by right clicking. Refer to the 'Image Editing' chapter.
If a scanner is installed, you can scan in an image. Use the 'TWAIN' and 'Acquire Image' commands on the 'File' menu.
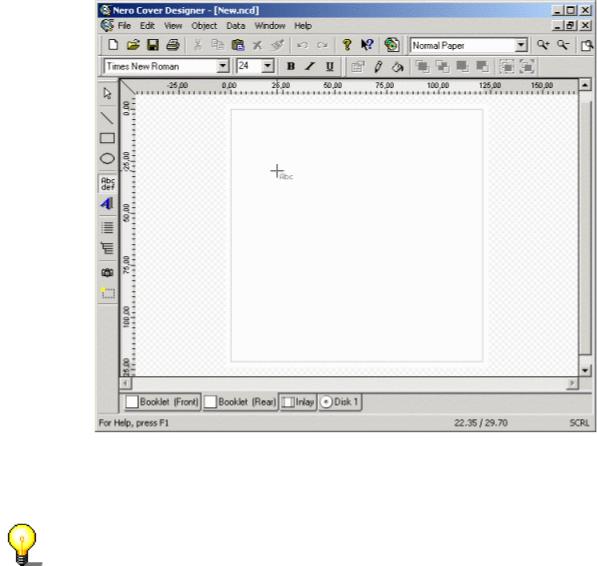
5. On the icon bar, click on the 'Save' button and enter a file name.
All additional cover elements for this cover are then saved in this file.
|
|
|
Quickstart Cover Designer |
Create Cover • 16 |
|
5.3.2 Booklet (Rear)
The following section describes how to create a booklet (Rear) with text.
1.Click on the 'Booklet (Rear)' tab to bring up the template for the back side of a booklet.
2.On the toolbar, click on the  button to insert a text box. The mouse cursor changes to cross hairs.
3.Position the cross hairs at the place you want the text to begin, hold down the left mouse button and drag the frame to the approximate size of the anticipated text block. Release the mouse button. The text box has now been inserted.
You can change the size of the text box at any time by dragging the handles.
|
|
|
Quickstart Cover Designer |
Create Cover • 17 |
|
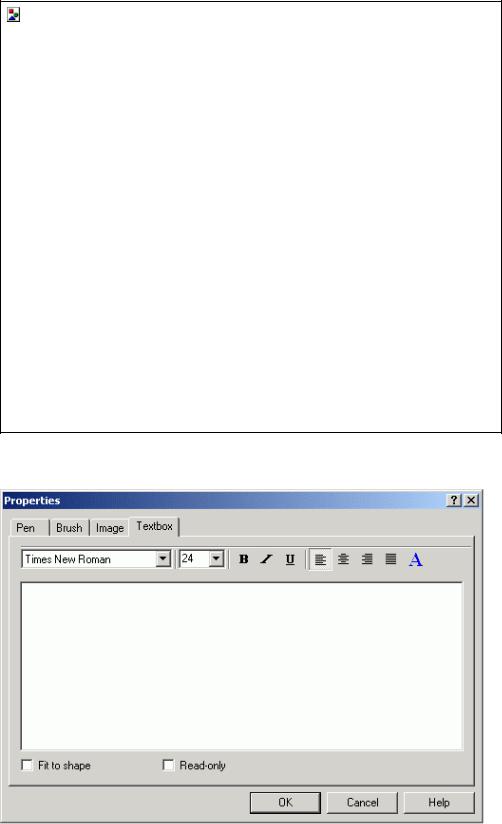
4.Double click on the selected text box to enter your text.
The 'Properties' window appears with the 'Textbox' tab in the foreground.
5.Write your text, for example 'I am creating my first booklet'. Select the text and change the font size from 24 to 26 point.
6.Click on 'A' at the upper frame of the window to select another font color. Choose a color, for example blue.
|
|
|
Quickstart Cover Designer |
Create Cover • 18 |
|
Loading...