


Manual
Nero BackItUp

Copyright and Trademark Information
This document, like the software described therein, is provided as a license and may only be used or reproduced in accordance with the licensing agreement. The contents of this document, as well as the associated software, is subject to change without prior notice. Nero AG rejects any responsibility for the correctness of the contents of this document and rejects any claims that transcend the clauses of the guarantee agreement.
This document and all of its contents are protected by copyright and are the property of Nero AG. All rights reserved. In addition, this document contains material that is protected by internationally valid copyright. This document may not be reproduced, transmitted, or transcribed in whole or in part without the express written permission of Nero AG.
Please keep in mind that existing graphics, pictures, videos, music titles or other materials that you may wish to insert or transcribe into projects may be protected by copyright. The unauthorized use of this type of material in your projects may violate the rights of the owner of the copyright. Make sure that you obtain all necessary authorizations from the owner of the copyright.
Unless you own the copyright, have permission from the copyright owner or your actions fall under the "fair use" provisions of copyright law, you may be violating national or international copyright laws. The transcribing, duplication, modification or publication of copyright-protected material may lead to claims for damages and the enforcement of other legal measures against you. If you are unsure of your rights, you should contact your legal advisor.
Nero BackItUp requires technologies developed by third party manufacturers, some of which are contained in Nero BackItUp as demo versions. These applications can be activated online free of charge or by sending an activation fax to have unlimited use of the version. Nero will only transmit the data necessary for activation of the technology licensed from third parties. For unlimited use of Nero BackItUp, it is therefore necessary to have an Internet connection or a fax machine.
Copyright © 2010 Nero AG and its licensors. All rights reserved.
Nero, Nero BackItUp, Nero BackItUp & Burn, Nero Burning ROM, Nero Digital, Nero DMA Manager, Nero Essentials, Nero Express, Nero ImageDrive, Nero LiquidTV, Nero MediaHome, Nero MediaHub, Nero MediaStreaming, Nero Move it, Nero Music2Go, Nero PhotoDesigner, Nero PhotoSnap, Nero Recode, Nero RescueAgent, Nero Simply Enjoy, Nero SmartDetect, Nero SmoothPlay, Nero StartSmart, Nero Surround, Nero Vision, Nero Vision Xtra, Burn-At-Once, InCD, LayerMagic, Liquid Media, the SecurDisc logo, and UltraBuffer are common law trademarks or registered trademarks of Nero AG.
Adobe, Acrobat, Acrobat Reader and Premiere are trademarks or registered trademarks of Adobe Systems, Incorporated. AMD Athlon, AMD Opteron, AMD Sempron, AMD Turion, ATI Catalyst and ATI Radeon are trademarks or registered trademarks of Advanced Micro Devices, Inc. ATSC is a trademark of the Advanced Television Committee. ICQ is a registered trademark of AOL, LLC. Apple, Apple TV, iTunes, iTunes Store, iPad, iPod, iPod touch, iPhone, iPhoto, FireWire, and Mac are trademarks or registered trademarks of Apple, Inc. ARM is a registered trademark of ARM, Ltd. AudibleReady is a registered trademark of Audible, Inc. BenQ is a trademark of the BenQ Corporation. Blu-ray Disc is a trademark of Blu-ray Disc Association. CyberLink is a registered trademark of CyberLink Corp. DLNA is a registered trademark of Digital Living Network Alliance. DivX and DivX Certified are registered trademarks of DivX, Inc. Dolby, Pro Logic and the double-D symbol are trademarks or registered trademarks of Dolby Laboratories, Inc. DTS and DTS Digital Surround are registered trademarks of DTS, Inc. DVB is a registered trademark of the DVB Project. Freescale is a trademark of Freescale Semiconductor, Inc. Google and YouTube are trademarks of Google, Inc. WinTV is a registered trademark of Hauppauge Computer Works, Inc. Intel, Intel XScale, Pentium and Core are trademarks or registered trademarks of Intel Corporation. Linux is a registered trademark of Linus Torvalds. Memorex is a registered trademark of Memorex Products, Inc. ActiveX, ActiveSync, DirectX, DirectShow, Internet Explorer, Microsoft, HDI, MSN, Outlook, Windows, Windows Mobile, Windows NT, Windows Server, Windows Vista, Windows Media, Xbox, Xbox 360, Silverlight, the Silverlight logo, Windows Vista start button, and the Windows logo are trademarks or registered trademarks of Microsoft Corporation. My Space is a trademark of MySpace, Inc. NVIDIA, GeForce and ForceWare are trademarks or registered trademarks of NVIDIA Corporation. Nokia is a registered trademark of Nokia Corporation. CompactFlash is a registered trademark of SanDisk Corporation. Sony, Memory Stick, PlayStation, PLAYSTATION and PSP are trademarks or registered trademarks of Sony Corporation. HDV is a trademark of Sony Corporation and Victor Company of Japan, Limited (JVC). UPnP is a registered trademark of the UPnP Implementers Corporation. Labelflash is a registered trademark of Yamaha Corporation.
The trademarks mentioned here are named for information purposes only. All trade names and trademarks are the property of their respective owners.
Nero AG, Im Stoeckmaedle 18, D-76307 Karlsbad, Germany
Nero BackItUp |
2 |

|
|
Inhaltsverzeichnis |
Table of contents |
|
|
1 |
Start Successfully |
5 |
1.1 |
About the Manual |
5 |
1.2 |
About Nero BackItUp |
5 |
1.3 |
Versions of Nero BackItUp |
6 |
1.4 |
Working With Nero BackItUp |
6 |
1.5 |
Easy Setup Wizard |
6 |
1.6 |
Starting the Program |
8 |
2 |
User Interface |
10 |
2.1 |
Job Screen |
12 |
3 |
Backup With Nero BackItUp |
13 |
4 |
Autobackup |
14 |
4.1 |
Storing on Hard Drive With Autobackup |
14 |
4.2 |
Storing Online With Autobackup |
19 |
5 |
Backing Up Files |
22 |
6 |
Backing Up Drives |
25 |
7 |
Backup Settings Screen |
27 |
7.1 |
About Backup Types |
29 |
7.2 |
About the Time Schedule |
31 |
8 |
Verifying a Backup |
33 |
9 |
Restore With Nero BackItUp |
35 |
9.1 |
Restore File Backup |
35 |
9.2 |
Restore Drive Backup |
37 |
10 |
Backup and Restore Expert Options Overview |
39 |
10.1 |
E-mail Notification |
40 |
10.2 |
Miscellaneous |
41 |
11 |
Syncing With Nero BackItUp |
43 |
11.1 |
Syncing Folders |
43 |
11.2 |
About Sync Types |
45 |
12 |
Tools |
46 |
12.1 |
Creating Bootable Nero BackItUp ImageTool |
46 |
12.2 |
Creating Standalone Nero BackItUp SyncTool |
47 |
12.3 |
Erase Rewritable Disc Window |
48 |
|
Nero BackItUp |
3 |

Inhaltsverzeichnis
13 |
Nero BackItUp Options Overview |
50 |
13.1 |
Setting Up FTP Server Connection |
50 |
13.2 |
Remote Proxy |
52 |
13.3 |
Setting Up E-Mail Account |
53 |
13.4 |
Creating Filter |
54 |
14 |
Nero BackItUp ImageTool |
58 |
14.1 |
Starting Nero BackItUp ImageTool |
58 |
14.2 |
User Interface |
59 |
14.2.1 |
Extended Area |
60 |
14.3 |
Drive Backup |
61 |
14.3.1 |
Burning a Backup to Disc |
61 |
14.3.2 |
Saving the Backup to a Hard Drive or FTP Server |
62 |
14.4 |
Restore |
63 |
14.4.1 |
Restoring a Drive Backup |
63 |
14.4.2 |
Extract Files From Backup |
64 |
14.5 |
Options Window |
65 |
14.6 |
Exiting Nero BackItUp ImageTool |
66 |
15 |
Nero BackItUp SyncTool |
67 |
16 |
Technical Information |
68 |
16.1 |
System Requirements |
68 |
17 |
Glossary |
69 |
18 |
Index |
70 |
19 |
Contact |
72 |
Nero BackItUp |
4 |
Start Successfully
1 Start Successfully
1.1About the Manual
This manual is intended for all users who want to learn how to use Nero BackItUp. It is process-based and explains how to achieve a specific objective on a step-by-step basis.
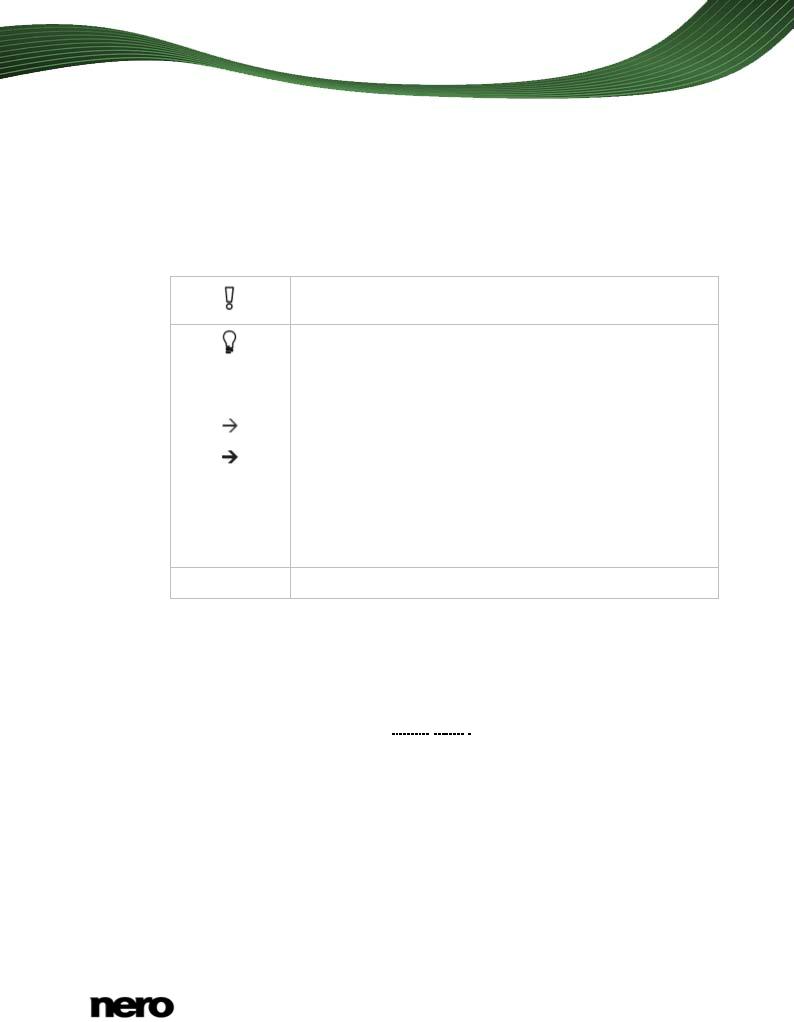
To make best use of this documentation, please note the following conventions:
Indicates warnings, preconditions or instructions that have to be precisely followed.
|
Indicates additional information or advice. |
|
|
|
|
1. Start … |
The number at the beginning of a line indicates a prompt for action. |
|
Carry out these actions in the order specified. |
||
|
||
|
|
|
|
Indicates an intermediate result. |
|
|
|
|
|
Indicates a result. |
|
|
|
|
OK |
Indicates text passages or buttons that appear in the program |
|
interface. They are shown in boldface. |
||
|
||
|
|
|
(see…) |
Indicates references to other chapters. They are executed as links and |
|
are shown in red and underlined. |
||
|
[…]Indicates keyboard shortcuts for entering commands.
1.2About Nero BackItUp
Nero BackItUp is a program for backing up and restoring data. Nero BackItUp saves files (file backup), as well as programs and operating systems (drive backup).
Open files can be backed up with the shadow copy feature, while you continue to work on
the file. You can burn the backup to a disc, save it to a hard drive or removable medium, or use an online storage. With Nero BackItUp you can verify at any time that the backed up data is complete and correct.
Use Nero BackItUp to schedule backups, e.g. for regular data backup that are executed automatically. You can also use Nero BackItUp to set up the Autobackup feature, which automatically backs up monitored folders.
Nero BackItUp ImageTool is another tool for backing up files and drives. The Nero BackItUp ImageTool is included on the bootable disc that you can create with Nero BackItUp. With the Nero BackItUp ImageTool, you can back up and restore drives. This particularly lends itself to backing up on otherwise active drives, since such drives are inactive when booting the Nero BackItUp ImageTool.
Nero BackItUp |
5 |
Start Successfully
Nero BackItUp SyncTool is a tool for syncing folders. It is created with Nero BackItUp and stored either on hard disk drive, removable medium or optical disc. Nero BackItUp SyncTool can be started from this medium on any computer; Nero BackItUp doesn't have to be installed to start Nero BackItUp SyncTool.
1.3Versions of Nero BackItUp
Nero BackItUp is available in three different versions: Nero BackItUp, Nero BackItUp Essentials and Nero BackItUp Autobackup Essentials. Nero BackItUp offers the full range of features.
Nero BackItUp Essential does not offer the following features:
Backup and restore expert options
Multiple targets for backups
Advanced encryption
Archive splitting
Extract files from drive backup
Create file filter
Backup with Nero BackItUp ImageTool
Features that are not available in Nero BackItUp Essentials are indicated by the icon. The icon offers you upgrade possibilities, and gives information about it.
In addition, the desktop icon may be missing. However, the application can always be started through the start menu of your computer as well.
Nero BackItUp Autobackup Essentials offers only Autobackup features.
1.4Working With Nero BackItUp
With Nero BackItUp you can backup, restore and sync. Just click the desired menu to choose a task and start it. You then complete the task by navigating through the different steps where a separate screen is displayed for each individual step.
1.5Easy Setup Wizard
By starting Nero BackItUp for the first time, the Easy Setup wizard will be opened automatically. It will guide you to turn on Autobackup. You can set up Autobackup to automatically back up files and folders to a local or external hard drive. Nero BackItUp regularly backs up all folders on all hard drives in a defined sequence. You can also choose individual folders and define your own time schedule at any time within the application.
Autobackup formats the external or internal hard drive with the NTFS file system if it is formatted with another file system. In this case, all data on this drive will be lost.
Nero BackItUp |
6 |

Start Successfully
Use only hard drive with more than 4GB
If you want to use an external hard drive which is not formatted with the NTFS file system, make sure that its space has more than 4 GB.
Formatting with the NTFS file system and thus using the Autobackup feature is not possible for some external hard drives (e.g. flash drive or USB stick) with a space less than 4 GB due to technical hard ware restrictions, and may cause serious problems on the existing file system.
Proceed as follows:
1.Connect the external hard drive you want to use as target. (We recommend it to be empty and to be formatted with the NTFS file system.)
2.Double-click the  Nero BackItUp icon.
If you are going to start Nero BackItUp for the first time, the Easy Setup wizard is opened automatically.
The Easy Setup wizard displays possible targets. The best target is automatically preselected.
Easy Setup Wizard
Nero BackItUp |
7 |
Start Successfully
3. Select the desired target.
If you want to turn on Autobackup later, select the Skip setup Autobackup option button.
4.Click the  button.
The first full backup is carried out saving all folders to the chosen hard drive.
The Easy Setup wizard is closed and Nero BackItUp is opened.
You have set up Autobackup carrying out a first full backup. Autobackup will carry out the backup updates automatically due to the specified settings.
To be fully saved we recommend making a complete drive backup now using Nero BackItUp to backup also your programs and your operating system. We also recommend to create a disc including Nero BackItUp ImageTool, your disaster recovery tool that you can use in case of a system crash or other damage to reboot and restore your operating system.
1.6Starting the Program
To start Nero BackItUp, proceed as follows:
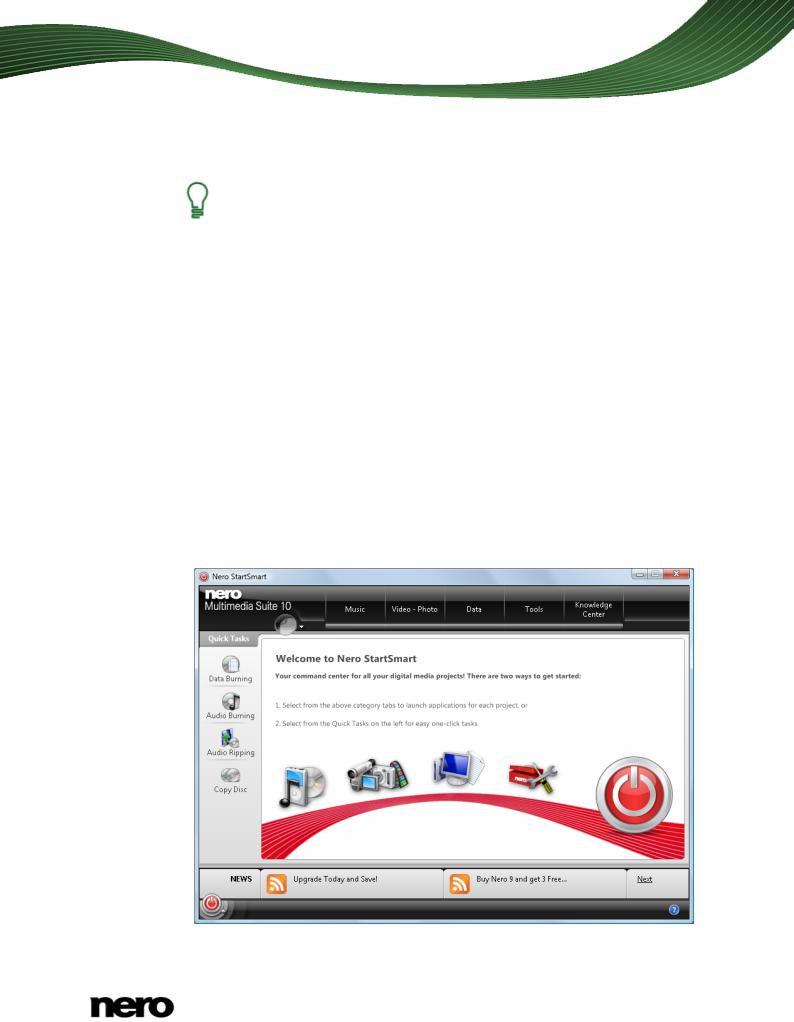
1.If you use the Nero Multimedia Suite and have Nero StartSmart available:
1.Click the Nero StartSmart desktop icon.
The Nero StartSmart window is opened.
Nero StartSmart window
Nero BackItUp |
8 |

Start Successfully
2.Click the  button.
The list of Nero applications is displayed.
3.Select the Nero BackItUp entry in the selection list.
The Nero BackItUp window is opened.
2.If you use Nero BackItUp & Burn.
1.Click the Nero BackItUp  desktop icon.
The Nero BackItUp window is opened.
You have started Nero BackItUp.
Nero BackItUp can also be opened through the start menu or by clicking the EXE file in the Nero BackItUp application folder (by default C:\Program Files\Nero\Nero BackItUp & Burn\Nero BackItUp).
You can also start Nero BackItUp tasks from the context menu of the Nero
BackItUp Agent (indicated by the |
icon). The Nero BackItUp Agent is available |
on your computer's taskbar. Under Windows 7 you have to open the queue by clicking the triangle.
Nero BackItUp |
9 |
User Interface
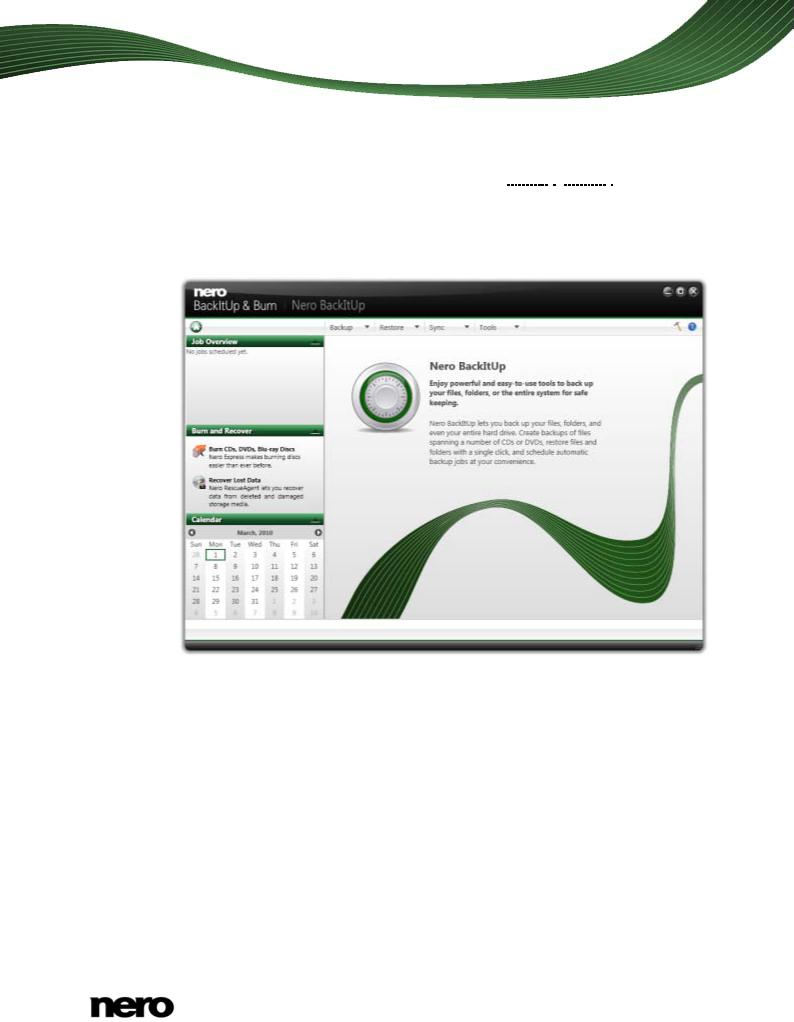
2 User Interface
The Nero BackItUp user interface is the starting point for backups, restores, syncs, and any other task that you can carry out with Nero BackItUp.
You can start the task via the drop-down menus on the top side of the window. There is also the possibility to open the options and the help. In the left margin of the window you always have an area which gives you information about the steps and tasks you are fulfilling.
Start screen
The following menus are available on the top side of the window:
Backup |
Provides backup facilities such as backing up files, backing up drives, |
|
setting up Autobackup, or verifying backups. You can also open the |
||
|
Job list screen for backup jobs here. |
|
|
|
|
Restore |
Provides restore facilities such as restoring file and drive backups. |
|
|
|
|
Sync |
Provides sync facilities such as creating a new sync job. You can also |
|
open the Job list screen for sync jobs here. |
||
|
||
|
|
|
|
Provides the options to create a bootable disc including the Nero |
|
Tools |
BackItUp ImageTool and to create the standalone tool Nero BackItUp |
|
SyncTool. You can also erase a rewritable disc and display disc |
||
|
||
|
information. |
|
|
|
Nero BackItUp |
10 |
User Interface
The following icons are available on the top side of the window:
Displays the start screen.
Opens the Options window.
Displays help options. You can also enter a new serial number if necessary.
The following areas are available on the left side of the window:
|
Shows jobs that have been carried out recently, the currently carried |
|
Job Overview |
out job, and the next jobs that are planned. You can open the Job list |
|
screen by clicking on a job. |
||
|
||
|
Only available in the start screen and the Job list screen. |
|
|
|
|
|
Provides an overview of the necessary steps to complete the current |
|
Overview |
task. |
|
|
Not available in the start screen and the Job list screen. |
|
|
|
|
Information |
Shows cumulated information related to the current task. |
|
Not available in the start screen and the Job list screen. |
||
|
||
|
|
|
Burn & Recover |
- Starts Nero Express. |
|
- Starts Nero RescueAgent. |
||
|
||
|
|
|
Calendar |
Shows planed and finished backup jobs in a calendar view. You can |
|
open the calendar and the job list by clicking on a day. |
||
|
||
|
|
Nero BackItUp |
11 |
User Interface
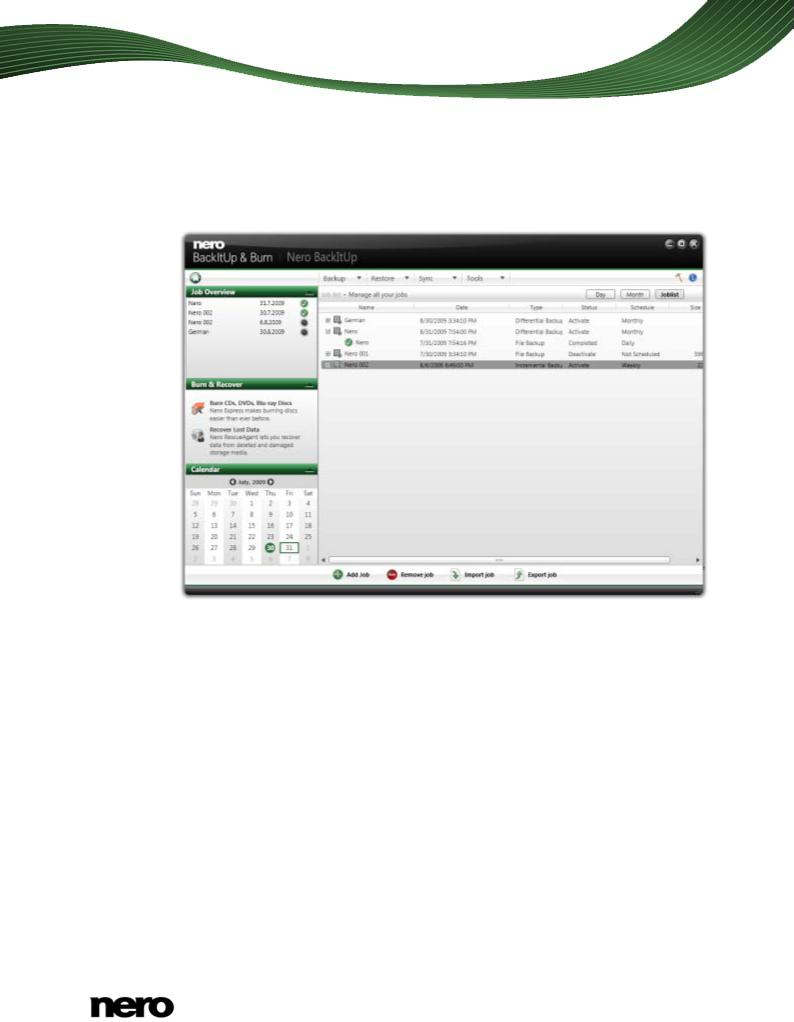
2.1Job Screen
The Job list screen shows planned and carried out jobs. If you selected Sync > Job view, only sync jobs are displayed. If you selected Backup > Job view, only backup jobs are displayed. Click the + icon preceding the job to display the respective backups.
Job list
You can modify jobs by opening the context menu with the right mouse button and select the appropriate entry. The following entries are available:
Run now
Copy
Modify
Deactivate
Export
Reschedule
Delete
From a displayed backup you can start the restore process by opening the context menu and selecting the appropriate entry.
If you select the backup and display the context menu with the right mouse button, then possibilities are available such as Restore, Search and Restore or Delete.
Nero BackItUp |
12 |

Backup With Nero BackItUp
3 Backup With Nero BackItUp
With Nero BackItUp you can back up data. Click the Backup menu to start the desired backup task.
The following backup tasks are available:
Autobackup
With Nero BackItUp, you can set up and configure Autobackup, the automatic backup feature. Once it has been set up, Autobackup is available on your computer's system tray and backs up specified folders in the background.
Setting up Autobackup is particularly useful when you want to carry out regular backups for the same files. The advantages are, e.g. that all the settings for the backup have already been configured and that there is no risk of forgetting a backup date or of not carrying out a backup as scheduled (as long as the computer is on).
File backup
If you choose a file backup, the individual files and folders that you select are backed up. If you want to back up the same files again later, a backup update makes it easier and saves resources and other things.
A file backup is useful to protect against data loss that can occur due to hardware damage or force majeure (fire, etc.). As a result, we recommend frequent backups so that you can restore data that is as current as possible in case of loss.
Drive backup
If you choose drive backup, entire drives (hard drives and/or partitions) are backed up, including the programs and the operating system. You can select the drives to be backed up.
In contrast to file backups, drive backups restore programs and operating systems when restoring. So, a drive backup is useful to set up the whole operating system plus programs in case of hardware damage.
Verification
Nero BackItUp can be used to verify an existing backup. Nero BackItUp verifies whether or not the backup can be used for a successful restore process. During this process, data integrity is checked, and the backed up data is compared to the source data. If you carry out the verification right after the backup and have not modified any data in the meantime, you can use the feature to verify whether or not all data was backed up successfully (data verification).
See also
Autobackup → 14
Backing Up Files → 22
Backing Up Drives → 25
Verifying a Backup → 33
Restore With Nero BackItUp → 35
Nero BackItUp |
13 |

Backing Up Files
4 Autobackup
With Nero BackItUp, you can set up and configure the automatic Autobackup. Once it has been set up, Autobackup is available on your computer's notification area and backs up the folders that you specify in the background.
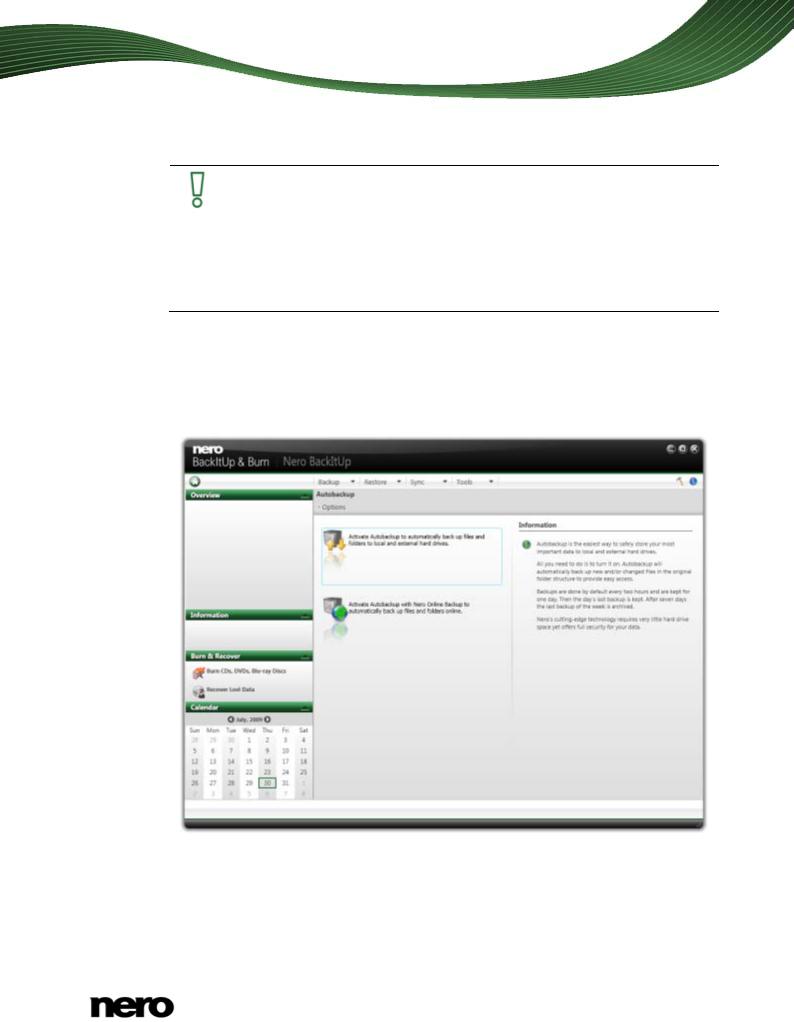
You can choose between two Autobackup options:
Activate Autobackup to automatically back up files and folders to local and external hard drives
Activate Autobackup with Nero Online Backup to automatically back up files and folders online.
The one Autobackup option stores the backup on a hard drive whereas the other Autobackup option uses the Internet service Nero Online Backup to store the backup online.
When using Autobackup to store on a hard drive, you can define a backup schedule. The Autobackup that stores online does so automatically every time a change in the monitored folders takes place.
Autobackup formats the external or internal hard drive with the NTFS file system if it is formatted with another file system. In this case, all data on this drive will be lost.
Nero Online Backup offers you an online data storage (which is subject to charge). We recommend a broadband Internet connection (e.g. DSL-1000 or faster) for uploading the files to be backed up. The costs for the Internet connection and the costs for using the Internet service Nero Online Backup are the user's responsibility.
4.1Storing on Hard Drive With Autobackup
With Nero BackItUp you can set up and configure Autobackup to automatically back up files and folders to a local or external hard drive. We recommend the drive to be empty. Once it has been set up, Autobackup is available in the Windows notification area. Autobackup regularly backs up all folders on all hard drives in a defined sequence. You can also choose individual folders and define your own time schedule.
Setting up Autobackup is particularly useful when you want to carry out regular backups. The advantages are, e.g. that all the settings for the backup have already been configured and that there is no risk of forgetting a backup date or of not carrying out a backup as scheduled (as long as the computer is on).
Autobackup formats the external or internal hard drive with the NTFS file system if it is formatted with another file system. In this case, all data on this drive will be lost.
Nero BackItUp |
14 |
Backing Up Files
Use only hard drive with more than 4GB
If you want to use an external hard drive which is not formatted with the NTFS file system, make sure that its space has more than 4 GB.
Formatting with the NTFS file system and thus using the Autobackup feature is not possible for some external hard drives (e.g. flash drive or USB stick) with a space less than 4 GB due to technical hard ware restrictions, and may cause serious problems on the existing file system.
To set up Autobackup or change the settings, proceed as follows:
1.Connect the external hard drive you want to use as target. (We recommend it to be empty.)
2.Click the Backup > Autobackup menu.
The Autobackup - Options screen is displayed.
Autobackup - Options
3.Select the appropriate Autobackup entry.
If Nero BackItUp does not detect an external empty hard drive, a window is opened which asks you how to proceed. To choose the target by yourself, click the No, select another target button.
Nero BackItUp |
15 |
Backing Up Files
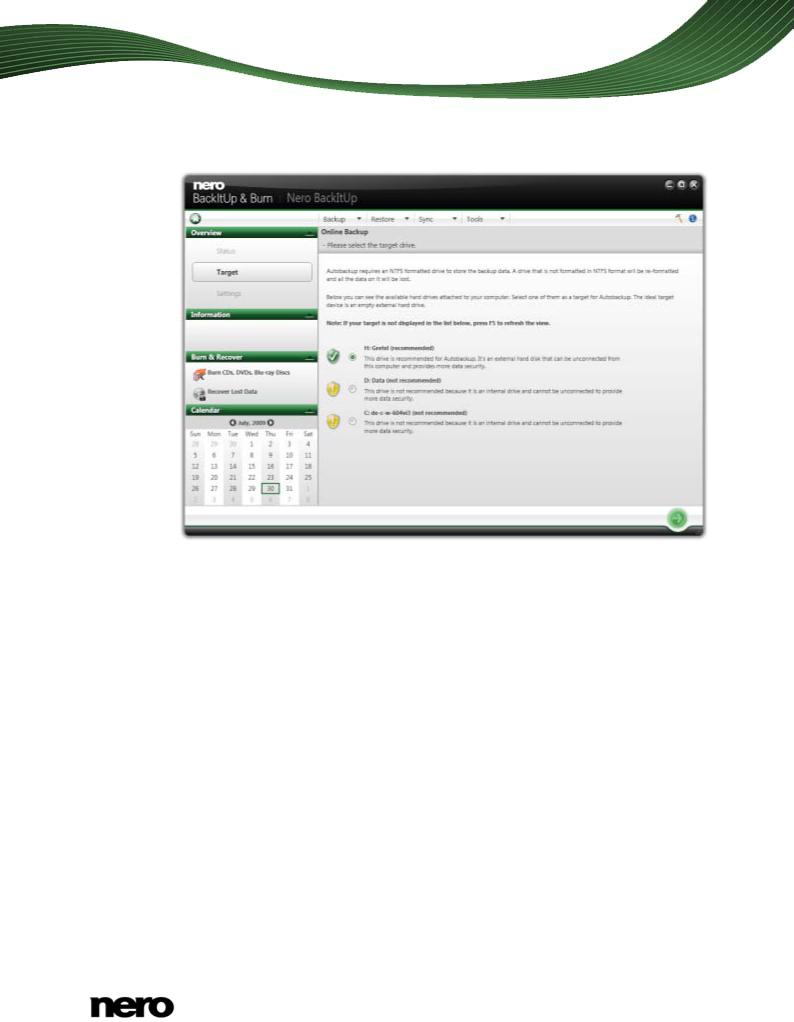
The Autobackup - Select the target drive screen is displayed.
Autobackup - Please select the target device
4.Select the desired target and click the  button.
The drive is formatted with the NTFS system. A progress window is opened and displays the progress made while formatting.
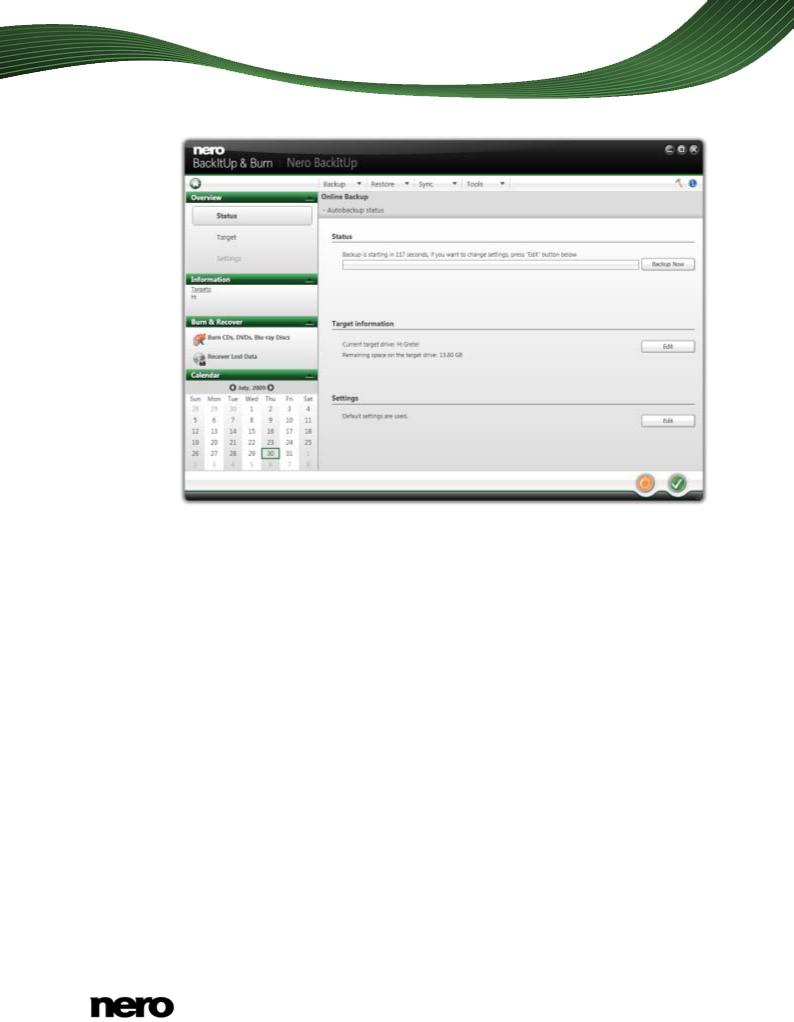
The Autobackup - Autobackup status screen is displayed.
Nero BackItUp |
16 |
Backing Up Files
Autobackup - Autobackup status
5.If you want to change the default settings regarding time schedule and folders to be backed up:
1.Click the Edit button in the Settings area.
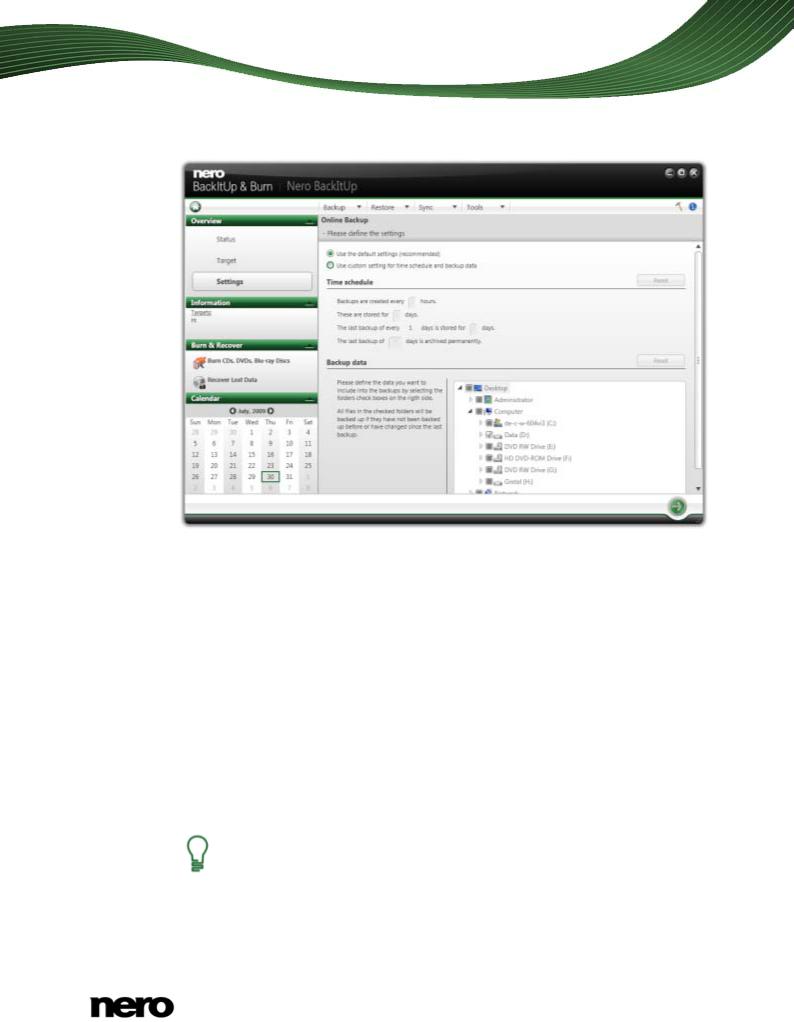
The Autobackup - Define the settings screen is displayed.
Nero BackItUp |
17 |
Backing Up Files
2.Select the Use custom setting for time schedule and backup data option button.
3.Enter the desired values in the Time schedule area. You can always set the values back to the default settings by clicking the Reset button.
4.Select the check boxes in the Backup data area for the folders you want to backup.
5.Click the  button.
The Autobackup - Autobackup status screen is displayed again.
6.If you want to manually start the first backup now, click the Backup Now button in the
Status area.
The first full backup for the folders that you have specified is carried out. You can monitor the progress with the progress bar in the Status area.
7.Click the  button.
The final screen is displayed. Autobackup has been set up and carries out the backup updates automatically due to the specified settings.
Turn off Autobackup
If you want to turn off Autobackup, just click the  button in the Autobackup status screen.
Nero BackItUp |
18 |

Backing Up Files
4.2Storing Online With Autobackup
With Nero BackItUp you can set up and configure Autobackup to automatically back up files and folders online, using the Internet service Nero Online Backup as a backup location. Once it has been set up, Autobackup is available in the Windows notification area and backs up the folders that you specify in the background in the defined sequence.
Setting up Autobackup is particularly useful when you want to carry out regular backups for the same files and want to have a computer independent access to your data.
In order for Autobackup to be able to carry out the automatic backup process according to your preferences, configure which file types should be automatically backed up in which folders and define the backup target.
Nero Online Backup offers you an online data storage (which is subject to charge). We recommend a broadband Internet connection (e.g. DSL-1000 or faster) for uploading the files to be backed up. The costs for the Internet connection and the costs for using the Internet service Nero Online Backup are the user's responsibility.
The update backup method is used for automatic backups made through
Autobackup. In this process, the data from the previous backup is overwritten with the modified data. This means that there are no backup versions, i.e. accessing older backup versions is not possible.
Files that are deleted from a monitored folder are kept in the backup. If you want to delete these files from the backup as well, then use the delete feature, which can be accessed in the Autobackup status screen.
To set up Autobackup or change the settings, proceed as follows:
1.Click the Backup > Autobackup menu.
The Autobackup - Options screen is displayed.
Nero BackItUp |
19 |

Backing Up Files
Autobackup - Options
2.Select the appropriate Autobackup entry.
The Source information screen is displayed.
Online Autobackup - Source information
Nero BackItUp |
20 |
Backing Up Files
3.Specify which file type you want to backup:
1.Click the  button in front of the file type you want to configure.
2.Select the check box in front of the file type you want to include in the backup.
3.Clear the check box in front of the file type you want to exclude from the backup.
4.Select the Add file type check box at the end of the file type list and enter the file type ending you want to add to the backup.
4.Specify which folders you want to monitor with Autobackup:
1.Select the check box in front of the folder you want to include in the backup.
2.Clear the check box in front of the folder you want to exclude from the backup.
3.Select the Additional Folders check box and click the  button to add your own folders to the monitoring list.
5.Click the  button.
If you have not yet subscribed to the Nero Online Backup service or if Autobackup is turned off, the Nero Online Backup - Create an account or enter existing account data screen is displayed. You can enter your account information here.
6.If you have not yet subscribed to the Nero Online Backup service, select the appropriate option button.
7.Click the  button.
The Nero Online Backup - Create new account screen is displayed.
8.Choose a backup storage and subscription duration.
9.Choose a password for your account.
10.Enter an e-mail address.
11.Please read the terms and conditions agreement carefully by clicking the Terms &
Conditions link. If you agree to the terms of the agreement, select the I have read the Terms & Conditions check box. A subscription is not possible without this agreement.
12.Click the  button.
The Autobackup - Autobackup status screen is displayed. You can view your backup status and your subscription information here and also delete files and folders from your storage at Nero Online Backup.
13.Click the  button.
The first full backup for the folders that you have specified is carried out. You can monitor the progress with the status information in the taskbar. The final screen is displayed. Autobackup has been set up and carries out the backup updates automatically due to the specified settings.
Turn off Autobackup
If you want to turn off Autobackup, just click the  button in the Autobackup status screen.
Nero BackItUp |
21 |
Backing Up Files
5 Backing Up Files
With Nero BackItUp you can carry out file backups. This means that individual files can be backed up and then restored at a later point in time. In comparison to drive backups, it is not possible to restore operating systems or programs with this option.
The first step is selecting files and folders to back up.
The next step is to select a target where to save the backup. You can save the backup on your hard drive or removable data media, burn them to a disc or use an online storage.
At last you can make settings according to your preferences. To backup files, proceed as follows:
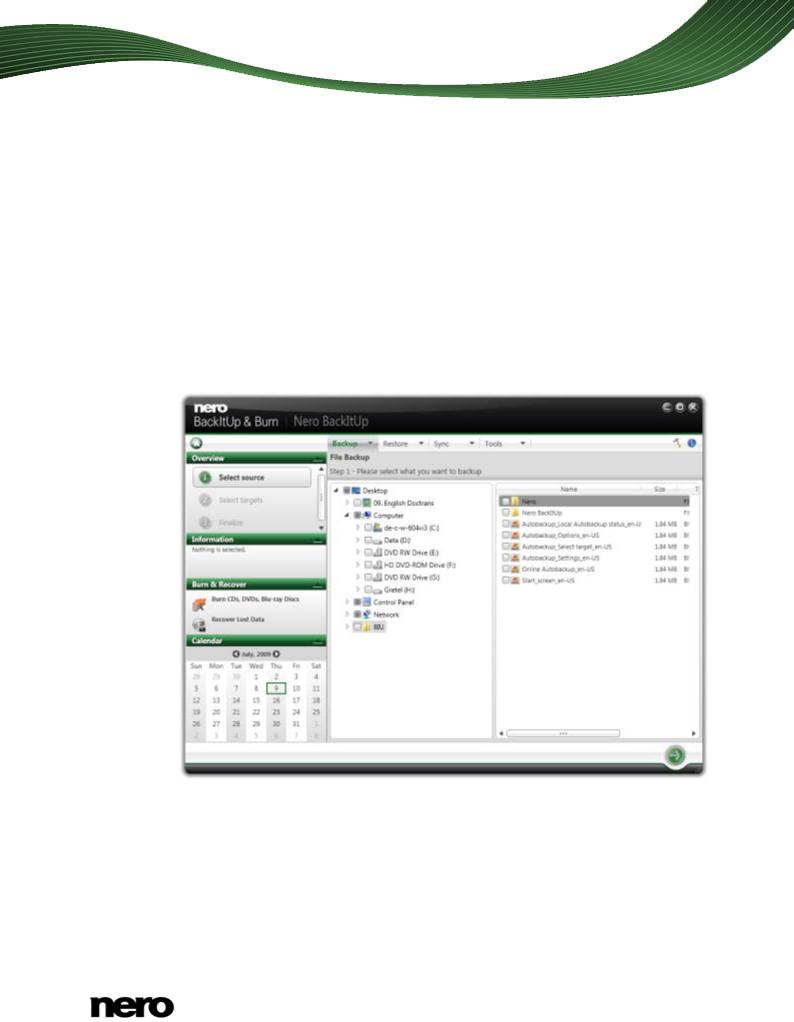
1.Click the Backup > File Backup menu.
The File Backup - Select what you want to backup screen is displayed.
File Backup - Please select what you want to backup
2.Select the check box preceding the folder or the file that you want to add to the backup. Select a folder in the left to show the contained files in the right.
The selected files are added to the backup.
3.Click the  button.
The File Backup - Please select targets screen is displayed.
Nero BackItUp |
22 |
 Loading...