

Page 1

Page 2

Table of Contents
1. Disclaimer ................................................................................................................. 1
2. Foreword ................................................................................................................... 2
3. Welcome to MASCHINE+ ............................................................................................ 3
3.1. MASCHINE Documentation ................................................................................. 3
3.2. What's New in MASCHINE+ 1.3.0 ......................................................................... 4
3.3. What's New in MASCHINE 1.2.15 ......................................................................... 4
3.4. Document Conventions ....................................................................................... 6
3.5. Important Names and Concepts ........................................................................... 6
3.6. Standalone vs. Controller Mode ............................................................................ 8
4. Connecting MASCHINE+ ........................................................................................... 10
4.1. Setup Examples ................................................................................................ 10
4.1.1. Connecting Active Monitor Speakers .......................................................... 10
4.1.2. Connecting Headphones ........................................................................... 11
4.1.3. Connecting Line Level Equipment .............................................................. 12
4.1.4. Connecting a Dynamic Microphone ............................................................ 12
4.2. Connecting to Wi-Fi ........................................................................................... 14
4.2.1. Disconnecting from Wi-Fi .......................................................................... 14
4.2.2. Using Airplane Mode ................................................................................. 14
4.3. Syncing MASCHINE+ using Ableton Link ............................................................. 14
4.3.1. Connecting to Ableton Link ........................................................................ 15
4.3.2. Joining and Leaving a Link Session ............................................................ 15
4.4. Integrating MASCHINE+ into a MIDI Setup .......................................................... 16
4.4.1. Connecting External MIDI Equipment ......................................................... 16
4.4.2. Sync to External MIDI Clock ....................................................................... 16
4.4.3. Send MIDI Clock ....................................................................................... 17
4.5. Connecting a Pedal ........................................................................................... 17
4.6. Connecting MASCHINE+ to a Computer .............................................................. 18
4.7. Using MASCHINE+ as a MIDI Device ................................................................... 18
4.8. Using Two or More Devices with MASCHINE ....................................................... 18
2
5. MASCHINE+ Overview ............................................................................................... 20
5.1. Top Panel Overview ........................................................................................... 20
5.1.1. Control Section ........................................................................................ 21
5.1.2. Edit Section .............................................................................................. 22
5.1.3. Performance Section ................................................................................ 23
5.1.4. Group Section .......................................................................................... 25
5.1.5. Transport Section ..................................................................................... 25
5.1.6. Pad Section ............................................................................................. 26
5.2. Side Panel Overview .......................................................................................... 29
5.3. Rear Panel Overview .......................................................................................... 30
6. Common Operations ................................................................................................. 32
6.1. Using the 4-Directional Push Encoder ................................................................. 32
6.2. Modes and Mode Pinning .................................................................................. 32
6.3. Undoing and Redoing Actions ............................................................................ 34
6.4. Focusing on a Group or a Sound ......................................................................... 34
6.5. Switching Between the Master, Group, and Sound Level ....................................... 35
Page 3

6.6. Navigating Channel Properties, Plug-ins, and Parameter Pages ............................. 35
6.7. Navigating Song View ........................................................................................ 36
6.7.1. Following the Playback Position ................................................................. 37
6.7.2. Scrubbing Through Your Song ................................................................... 37
6.8. Performing with Scenes and Sections ................................................................. 37
6.8.1. Jumping between Scenes and Sections ..................................................... 38
6.9. Adjusting Volume, Swing, and Tempo ................................................................. 39
6.10. Mute and Solo ................................................................................................ 40
6.11. Using the Smart Strip ...................................................................................... 41
6.11.1. Pitch Mode ............................................................................................ 42
6.11.2. Modulation Mode ................................................................................... 42
6.11.3. Notes Mode ........................................................................................... 42
6.12. Entering Text .................................................................................................. 43
7. Working with MASCHINE+ ......................................................................................... 44
7.1. Using the Library ............................................................................................... 44
7.1.1. Downloading Content to Your Library ......................................................... 44
7.1.2. Updating Installed Products ...................................................................... 44
7.1.3. Viewing Products Installed in Your Library .................................................. 44
7.2. Using the File Menu ........................................................................................... 45
7.2.1. Working with Storage Devices ................................................................... 46
7.2.2. Transferring Files to the SD Card ................................................................ 47
7.2.3. Opening Files from Your SD Card ............................................................... 48
7.2.4. Saving a Project ....................................................................................... 48
7.2.5. Saving a Group ......................................................................................... 49
7.2.6. Saving a Sound ........................................................................................ 49
7.2.7. Exporting Audio ........................................................................................ 50
7.3. Settings Overview ............................................................................................. 52
7.3.1. General Settings ....................................................................................... 53
7.3.2. Audio Settings .......................................................................................... 56
7.3.3. MIDI Settings ........................................................................................... 57
7.3.4. System Settings ....................................................................................... 59
7.3.5. Library Settings ........................................................................................ 60
7.3.6. Hardware Settings .................................................................................... 61
7.3.7. Network Settings ...................................................................................... 62
7.3.8. About Settings ......................................................................................... 63
3
8. Using the Browser ..................................................................................................... 65
8.1. Browsing the Library ......................................................................................... 65
8.2. Loading Files from the Browser .......................................................................... 66
8.2.1. Selecting a Product Category, a Product, a Bank, and a Sub-Bank ................. 66
8.3. Accessing User Content .................................................................................... 68
8.4. Filtering Favorites ............................................................................................. 69
8.4.1. Adding an Item to the Favorites List ........................................................... 69
8.4.2. Removing an Item from the Favorites List .................................................. 70
8.5. Using Quick Browse .......................................................................................... 70
8.6. Additional Browsing Tools .................................................................................. 71
8.6.1. Loading the Selected Files Automatically .................................................... 71
8.6.2. Auditioning Instrument Presets ................................................................. 72
8.6.3. Auditioning Samples ................................................................................. 72
8.6.4. Loading Groups with Patterns ................................................................... 73
8.6.5. Loading Groups with Routing .................................................................... 73
Page 4

9. Managing Sounds, Groups, and Your Project .............................................................. 74
9.1. Overview of the Sounds, Groups, and Master ....................................................... 74
9.1.1. The Sound, Group, and Master Channels .................................................... 74
9.1.2. Similarities and Differences in Handling Sounds and Groups ........................ 75
9.1.3. Selecting Multiple Sounds or Groups .......................................................... 75
9.2. Managing Sounds ............................................................................................. 78
9.2.1. Loading Sounds ....................................................................................... 78
9.2.2. Pre-listening to Sounds ............................................................................. 78
9.2.3. Renaming Sound Slots .............................................................................. 78
9.2.4. Changing the Color of a Sound .................................................................. 79
9.2.5. Saving Sound ........................................................................................... 79
9.2.6. Copying and Pasting Sounds ..................................................................... 79
9.2.7. Moving Sounds ........................................................................................ 80
9.2.8. Resetting Sound Slots .............................................................................. 80
9.3. Managing Groups ............................................................................................. 80
9.3.1. Creating Groups ....................................................................................... 80
9.3.2. Loading Groups ........................................................................................ 81
9.3.3. Renaming Groups ..................................................................................... 81
9.3.4. Changing the Color of Group ..................................................................... 82
9.3.5. Saving Groups .......................................................................................... 82
9.3.6. Copying and Pasting Groups ..................................................................... 82
9.3.7. Moving Groups ......................................................................................... 83
9.3.8. Deleting Groups ........................................................................................ 83
4
10. Working with Plug-ins ............................................................................................. 84
10.1. Plug-in Overview ............................................................................................. 84
10.1.1. Plug-in Basics ........................................................................................ 84
10.1.2. Loading, Removing, and Replacing a Plug-in ............................................. 85
10.1.3. First Plug-in Slot of Sounds: Choosing the Sound’s Role ............................. 87
10.1.4. Browser Plug-in Slot Selection ................................................................. 87
10.2. Adjusting the Plug-in Parameters ..................................................................... 89
10.3. Bypassing Plug-in Slots ................................................................................... 89
10.4. Using Side-Chain ............................................................................................. 90
10.5. Moving Plug-ins .............................................................................................. 90
10.6. Sampler Plug-in ............................................................................................... 90
10.6.1. Page 1: Voice Settings / Engine ................................................................ 91
10.6.2. Page 2: Pitch / Envelope .......................................................................... 92
10.6.3. Page 3: FX / Filter ................................................................................... 93
10.6.4. Page 4: Modulation ................................................................................. 94
10.6.5. Page 5: LFO ........................................................................................... 95
10.6.6. Page 6: Velocity / Modwheel .................................................................... 96
10.7. Audio Plug-in .................................................................................................. 97
10.7.1. Loading a Loop into the Audio Plug-in ..................................................... 100
10.7.2. Using Loop Mode ................................................................................. 101
10.7.3. Using Gate Mode .................................................................................. 101
10.8. Drumsynths .................................................................................................. 102
10.8.1. Using Drumsynths ................................................................................ 102
10.8.2. Engines: Many Different Drums per Drumsynth ....................................... 102
10.8.3. Common Parameter Organization .......................................................... 103
10.8.4. Shared Parameters ............................................................................... 103
10.8.5. Various Velocity Responses .................................................................. 104
10.8.6. Pitch Range, Tuning, and MIDI Notes ...................................................... 104
10.9. Bass Synth ................................................................................................... 104
Page 5

10.9.1. Using Bass Synth ................................................................................. 105
10.9.2. Bass Synth Parameters ......................................................................... 105
10.10. Poly Synth .................................................................................................. 106
10.10.1. Using Poly Synth ................................................................................ 107
10.10.2. Poly Synth Parameters ........................................................................ 107
10.11. Using Native Instruments Plug-ins ................................................................ 116
10.11.1. Using the VST/AU Plug-in Parameters .................................................. 117
10.11.2. Using Native Instruments Plug-in Presets ............................................. 117
10.11.3. Multiple-Output Plug-ins and Multitimbral Plug-ins ................................ 118
11. Recording Patterns ............................................................................................... 119
11.1. Setting Recording Options ............................................................................. 119
11.1.1. Setting the Tempo ................................................................................ 120
11.1.2. Setting the Step Grid ............................................................................. 120
11.1.3. Adjusting the Pattern Length ................................................................. 121
11.2. Playing and Programming Beats ..................................................................... 121
11.2.1. Loading a Drum Kit ............................................................................... 121
11.2.2. Recording Beats in Real-time ................................................................. 123
11.2.3. Sequencing Beats with Step Mode ......................................................... 125
11.2.4. Adding Swing ....................................................................................... 126
11.2.5. Applying Groove ................................................................................... 127
11.2.6. Applying Choke .................................................................................... 127
11.3. Creating Melodies and Harmonies .................................................................. 128
11.3.1. Loading an Instrument .......................................................................... 128
11.3.2. Recording Melodies and Harmonies in Real-time ..................................... 129
11.3.3. Step Sequencing Melodies and Harmonies ............................................. 129
11.3.4. Selecting Scales and Chords ................................................................. 129
11.3.5. Scale and Chord Parameters ................................................................. 131
11.3.6. Creating Arpeggios ............................................................................... 138
11.3.7. Playing Notes with Smart Strips ............................................................. 141
11.4. Recording Modulation ................................................................................... 142
11.4.1. Recording Modulation in Step Mode ....................................................... 143
11.4.2. Which Parameters Are Modulatable? ...................................................... 143
11.5. Using Lock Snapshots ................................................................................... 144
11.5.1. Creating a Lock Snapshot ...................................................................... 144
11.5.2. Using Extended Lock ............................................................................ 144
11.5.3. Updating a Lock Snapshot ..................................................................... 144
11.5.4. Recalling a Lock Snapshot .................................................................... 145
11.5.5. Morphing Between Lock Snapshots ....................................................... 145
11.5.6. Deleting a Lock Snapshot ...................................................................... 146
5
12. Working with Patterns and Clips ............................................................................ 147
12.1. Navigating between Patterns and Clips ........................................................... 148
12.2. Working with Patterns ................................................................................... 148
12.2.1. Deleting Events or Notes ....................................................................... 148
12.2.2. Quick Edit in Step Mode ........................................................................ 149
12.2.3. Deleting Groups and Sounds ................................................................. 150
12.2.4. Quantizing Your Pattern ........................................................................ 151
12.2.5. Doubling a Pattern ................................................................................ 151
12.2.6. Clearing a Pattern ................................................................................. 152
12.2.7. Deleting a Pattern ................................................................................. 152
12.2.8. Duplicating a Pattern ............................................................................ 152
12.2.9. Transposing a Pattern ........................................................................... 152
Page 6

12.2.10. Cutting, Copying, and Pasting Events/Notes ......................................... 152
12.2.11. Adding Variation to Patterns ................................................................ 153
12.2.12. Duplicating a Sound ............................................................................ 155
12.2.13. Duplicating a Group ............................................................................ 156
12.3. Working with Clips ......................................................................................... 156
12.3.1. Creating a Clip ...................................................................................... 156
12.3.2. Deleting a Clip ...................................................................................... 157
12.3.3. Doubling a Clip ..................................................................................... 157
12.3.4. Duplicating a Clip .................................................................................. 157
12.3.5. Clearing a Clip ...................................................................................... 157
12.3.6. Adjusting the Length of a Clip ................................................................ 158
12.3.7. Adjusting the Start of a Clip ................................................................... 158
12.3.8. Repositioning a Clip .............................................................................. 158
12.3.9. Inserting Scenes to an Arrangement as Clips .......................................... 159
13. Audio Routing, Remote Control, and Macro Controls ............................................... 160
13.1. Using MIDI Control ........................................................................................ 160
13.1.1. Sending MIDI from Sounds .................................................................... 161
13.1.2. Triggering Sounds via MIDI Notes .......................................................... 162
13.1.3. MIDI Change ........................................................................................ 164
13.2. Audio Routing ............................................................................................... 165
13.2.1. Sending External Audio to Sounds .......................................................... 166
13.2.2. Conguring the Main Output of Sounds and Groups ................................ 167
13.2.3. Setting Up Auxiliary Outputs for Sounds and Groups ............................... 169
13.2.4. Conguring the Master and Cue Outputs ................................................ 170
13.2.5. Mono Audio Inputs ............................................................................... 171
13.3. Creating Custom Sets of Parameters with the Macro Controls .......................... 171
13.3.1. Macro Control Overview ........................................................................ 172
6
14. Controlling Your Mix .............................................................................................. 173
14.1. Navigating Your Channels in Mix Mode ........................................................... 173
14.2. Adjusting the Level and Pan in Mix Mode ......................................................... 174
14.3. Mute and Solo in Mix Mode ............................................................................ 175
14.4. Plug-in Icons in Mix Mode .............................................................................. 175
15. Using Effects ........................................................................................................ 176
15.1. Effects List ................................................................................................... 176
15.2. Applying Effects at the Sound, Group, or Master Level ...................................... 177
15.2.1. Adding an Effect ................................................................................... 177
15.2.2. Other Operations on Effects ................................................................... 178
15.2.3. Using the Side-Chain Input .................................................................... 179
15.3. Applying Effects to External Audio .................................................................. 181
15.3.1. Step 1: Congure MASCHINE+ Audio Inputs ........................................... 181
15.3.2. Step 2: Set up a Sound to Receive the External Input ............................... 181
15.3.3. Step 3: Load an Effect to Process an Input .............................................. 182
15.4. Creating a Send Effect ................................................................................... 183
15.4.1. Step 1: Set Up a Sound or Group as Send Effect ...................................... 183
15.4.2. Step 2: Route Audio to the Send Effect ................................................... 185
15.5. Creating Multi-Effects .................................................................................... 186
16. Using Performance Effects .................................................................................... 188
16.1. List of Perform Effects ................................................................................... 188
16.2. Using a Performance Effect ........................................................................... 188
Page 7

16.3. Automating a Performance Effect ................................................................... 189
17. Arranging Your Project .......................................................................................... 190
17.1. Arranger Basics ............................................................................................ 190
17.1.1. Switching Between Ideas View and Song View ........................................ 190
17.1.2. Navigating Song View ........................................................................... 190
17.1.3. Following the Playback Position ............................................................. 191
17.1.4. Performing with Scenes and Sections .................................................... 191
17.2. Using Ideas View ........................................................................................... 192
17.2.1. Using Scene Mode ................................................................................ 192
17.2.2. Creating a New Scene ........................................................................... 193
17.2.3. Assigning and Removing Patterns .......................................................... 193
17.2.4. Removing a Pattern in Ideas View .......................................................... 194
17.2.5. Selecting a Scene ................................................................................. 194
17.2.6. Deleting a Scene ................................................................................... 194
17.2.7. Duplicating a Scene .............................................................................. 195
17.2.8. Selecting a Scene Bank ......................................................................... 195
17.2.9. Creating and Deleting Scene Banks ........................................................ 195
17.2.10. Making a Scene Unique ....................................................................... 195
17.2.11. Appending a Scene to the Arrangement ................................................ 196
17.2.12. Changing the Color of a Scene ............................................................. 196
17.3. Using Song View ........................................................................................... 196
17.3.1. Creating Sections ................................................................................. 197
17.3.2. Assigning a Scene to a Section .............................................................. 197
17.3.3. Selecting a Section ............................................................................... 197
17.3.4. Creating and Deleting Section Banks ...................................................... 198
17.3.5. Selecting a Section Bank ....................................................................... 198
17.3.6. Moving a Section .................................................................................. 198
17.3.7. Adjusting the Length of a Section ........................................................... 199
17.3.8. Duplicating a Sections .......................................................................... 199
17.3.9. Removing a Section .............................................................................. 200
17.3.10. Enabling Auto Length .......................................................................... 200
17.4. The Arrange Grid ........................................................................................... 201
17.5. Quick Grid ..................................................................................................... 201
7
18. Sampling and Sample Mapping ............................................................................. 203
18.1. Opening the Sample Editor ............................................................................. 203
18.2. Recording Audio Overview ............................................................................. 203
18.2.1. Opening the Record Page ...................................................................... 203
18.2.2. Selecting the Source to Record .............................................................. 204
18.2.3. Choosing a Recording Mode .................................................................. 204
18.2.4. Monitoring the Input Signal .................................................................... 206
18.2.5. Arming, Starting, and Stopping the Recording ......................................... 206
18.2.6. Using the Footswitch for Recording Audio .............................................. 208
18.2.7. Checking Your Recording ...................................................................... 208
18.3. Editing a Sample ........................................................................................... 209
18.3.1. Using the Edit Page ............................................................................... 209
18.3.2. Audio Editing ........................................................................................ 211
18.4. Slicing a Sample Overview ............................................................................. 213
18.4.1. Slicing a Sample ................................................................................... 213
18.4.2. Opening the Slice Page ......................................................................... 214
18.4.3. Adjusting the Slicing Settings ................................................................ 214
18.4.4. Live Slicing ........................................................................................... 216
Page 8

18.4.5. Delete All Slices .................................................................................... 216
18.4.6. Manually Adjusting Slices ...................................................................... 216
18.4.7. Applying the Slicing .............................................................................. 218
18.4.8. Exporting Single Slices .......................................................................... 219
18.5. Mapping Samples to Zones ............................................................................ 220
18.5.1. Opening the Zone Page ......................................................................... 220
18.5.2. Editing Zones ....................................................................................... 220
18.5.3. Adding Samples to the Sample Map ....................................................... 223
19. Support ................................................................................................................ 225
19.1. How to Get Support ....................................................................................... 225
19.2. User Forum .................................................................................................. 225
20. Glossary ............................................................................................................... 226
8
Page 9

DISCLA IM E R 1
1. Disclaimer
The information in this document is subject to change without notice and does not represent a
commitment on the part of Native Instruments GmbH. The software described by this document
is subject to a License Agreement and may not be copied to other media. No part of this
publication may be copied, reproduced, or otherwise transmitted or recorded, for any purpose,
without prior written permission by Native Instruments GmbH, hereinafter referred to as Native
Instruments.
“Native Instruments”, “NI” and associated logos are (registered) trademarks of Native Instruments
GmbH.
Mac, macOS, GarageBand, Logic, and iTunes are registered trademarks of Apple Inc., registered in
the U.S. and other countries.
Windows and DirectSound are registered trademarks of Microsoft Corporation in the United States
and/or other countries.
Ableton Live™ and LINK™ are trademarks of Ableton AG.
ASIO and VST are a trademark and software of Steinberg Media Technologies GmbH.
All other trademarks are the property of their respective owners and use of them does not imply
any afliation with or endorsement by them.
Document authored by David Gover, Nico Sidi
Software version: 1.3.0 (07/2021)
Special thanks to the Beta Test Team, who were invaluable not just in tracking down bugs, but in
making this a better product.
Page 10

FOREWO RD 2
2. Foreword
We are thrilled that you are about to start your journey with MASCHINE+.
Several teams have worked relentlessly to bring this product to life. Our hardware team has
worked near miracles to t all the necessary components into the MASCHINE MK3 form factor,
keeping the portable size and iconic workflow intact while still providing an even more premium
touch. Our software teams have built a whole new operating system, capable of running the
MASCHINE application, several engines and plugins, as well as an embedded version of the Native
Access experience. The end result is an immersive experience with fewer distractions that enables
you to focus on making music without having to hook up a computer.
We hope that MASCHINE+ will provide you the perfect environment to help you get in the zone and
make even more music.
The MASCHINE team
Page 11

WELCOM E T O MASCHIN E+ 3
3. Welcome to MASCHINE+
Thank you for purchasing MASCHINE+!
MASCHINE+ is a standalone groovebox and sampler for production and performance, combining
an iconic workflow with premium instruments and effects.
Standalone means more focus, more freedom, and more music-making opportunities, and is ideal
for making music live, as well as in the studio. Plug in, power up, and get creating straight away in
the embedded production environment – from rst ideas to nished tracks. You can dial in effects
to tweak your sounds, or sample audio and make it your own with an intuitive interface. If you
want to bring your ideas into a DAW, copy them over, and use the MASCHINE software on your
computer and control it with the MASCHINE+ in Controller mode to pick up where you left off.
With MASCHINE+ you can tap in freely with the pads or use Note Repeat to jam along.
Alternatively, build your beats using the step sequencer just like classic drum machines. Patterns
can be intuitively combined with Clips that enable you to rearrange freely on the timeline to form
larger ideas with transitions and vocals. You can try out several different versions of a song
without ever having to stop the music. You can also sample your material, slice loops, and
rearrange them easily.
However, MASCHINE+ is a lot more than an ordinary groovebox or sampler: it comes with an
inspiring 8-gigabyte library, and a sophisticated, yet intuitive tag-based Browser to give you instant
access to the sounds you are looking for. Additionally, MASCHINE+ SELECTION provides pro-level
instruments, effects, and expansions to cover all of your sonic needs.
What’s more, MASCHINE+ provides lots of options for manipulating your sounds via internal
effects and other sound-shaping possibilities. You can also control external MIDI hardware and
3rd-party software with MASCHINE+ while customizing the functions of the pads, knobs, and
buttons according to your needs utilizing the included Controller Editor application. We hope you
enjoy this fantastic instrument as much as we do. Now let’s get going!
—The MASCHINE+ team at Native Instruments.
3.1. MASCHINE Documentation
Native Instruments provides various learning assets for MASCHINE. The main documents should
be read in the following order:
1. MASCHINE+ Quickstart: This animated online guide is a practical tutorial to help you learn the
basics of MASCHINE+ and is useful if you're new to MASCHINE or a beginner. The guide is
available from the Native Instruments website: MASCHINE+ Quickstart.
2. MASCHINE+ Manual (this document): This reference manual provides a comprehensive
description of all MASCHINE+ features. This manual is useful when using MASCHINE+ in
Standalone mode.
3. MASCHINE Software Manual: This provides a comprehensive description of all MASCHINE
software features. This manual is useful when using MASCHINE+ in Controller mode, and is
available from the Native Instruments website: MASCHINE Manual.
Other Online Resources: If you are experiencing problems related to your Native Instruments
product that the supplied documentation does not cover, there are several ways of getting help:
• Support on the Native Instruments website. For more informational, see Support
Page 12

WELCOM E T O MASCHIN E+ 4
Please check the Native Instruments website regularly for up-to-date and localized
versions of these documents.
3.2. What's New in MASCHINE+ 1.3.0
The following features and enhancements have been added to MASCHINE+:
• Poly Synth: Based on the Native Instruments Pro-53 plug-in, Poly Synth delivers the colorful
character of a classic dual-oscillator synth built for full hands-on control with MASCHINE+. It
provides warm vintage tones, organic bass, and shimmering pads with the 80s golden-era
style. Assign modulation, switch routings, blend sounds, patch, and play for polysynth magic.
For more information, see Poly Synth.
• MIDI Change: The MIDI change feature is now available on MASCHINE+. This enables Scenes,
Section, Lock to be triggered using external MIDI messages. For more information, see MIDI
Change and the updated sections in MIDI Settings.
• Extended Arpeggiator mode: MASCHINE+ now includes the Advanced and Range Arpeggiator
modes. The Advanced mode includes Retrigger, Repeat, Offset, and Inversion, allowing you to
explore alternative versions of the same arpeggiator sequence. The Range mode enables you
to set the minimum and maximum range of notes used for an arpeggiator sequence. For more
information, see Creating Arpeggios.
• Presets for Instruments and FX can be saved: Plug-in presets can now be saved from
the PLUG-IN page. Navigate to the plug-in you wish to save. When you hold down the SHIFT
button, the SAVE option appears on Button 4. Pressing this will bring up the text input dialog
where you can enter the name for the preset. Your presets are saved to either the Native
Instruments/Maschine 2/Plug-ins/ or the Native Instruments/User Content/ folders on the SD
card.
• Plug-in products can now be updated over the air: Plug-ins such as REAKTOR, KONTAKT,
FM8, etc, can now be updated directly from MASCHINE+ in standalone. Follow the usual
update process, by pressing Setting, and navigating to the Library tab. For more information
on the Library, see Using the Library and Library Settings.
3.3. What's New in MASCHINE 1.2.15
The following features and enhancements have been added to MASCHINE+:
• Loading Samples from External USB Disk Drives: It is now possible to use external disk drives
to browse and load Projects, Groups, and Sounds (samples) in the Browser when the USER
toggle is activated. For more information on accessing user content, see Accessing User
Content. For information on working with external storage devices, see Working with Storage
Devices.
• Saving Projects with samples: If you now save a Project with samples, the Project and
samples will be saved on your SD card. If you only save the Project, the samples will continue
to reside on the external drive, which requires the drive with the samples to be accessible by
MASCHINE+ the next time the project is opened. For more information, see Saving a Project.
Page 13

WELCOM E T O MASCHIN E+ 5
• Integration with Native Instruments keyboard controllers: MASCHINE+ now supports
KOMPLETE KONTROL S-Series MK2, A-Series, and M32 keyboards. They can be connected and
powered via USB and used in MIDI mode, as is the case for all class-compliant MIDI devices.
Full integration with KOMPLETE KONTROL keyboards is the same feature as with current
computer setups. Only one keyboard instance at a time is ofcially supported. For more
information, refer to your controller's manual, which is available from the Native Instruments
website.
• Integration with MASCHINE JAM: MASCHINE+ now provides basic integration with
MASCHINE JAM controllers. This enables you to select Groups and Sounds, use the sliders to
control Perform effects, access the Ideas view, and use the matrix to sequence Patterns. For
more information on the integration, download the MASCHINE JAM Integration Cheat Sheet,
available here: Download Cheat Sheet.
• Navigating Clips via 4-D Encoder: The 4-D encoder can be used to interact and arrange Clips
in Song mode. It is possible to navigate between Groups, select, move, and resize Clips using
the 4-D encoder. For more information, see Working with Clips.
• Improved navigation between Pattern view and Clip view: It is now possible to easily switch
between Pattern view and Clip view. For more information, see Navigating between Patterns
and Clips.
• Improved naming for Clip and Pattern duplication: To aid ease of use and speed up workflow,
the names of Clips and Patterns are now automatically appended with a number when
duplicated. This helps distinguish between different Patterns and Clips while in the creative
flow. You can still use custom names for your Pattern and Clips, which will also be numerically
appended whenever duplicated.
• File deletion: Files selected in the Browser can now be deleted using the ERASE button.
• System update notifications: MASCHINE+ will now provide notications when a System
Update is available. You will be prompted, and a graphic ‘tick’ will be displayed on the SYSTEM
tab in SETTINGSas a reminder until the System is updated.
Page 14

WELCOM E T O MASCHIN E+ 6
3.4. Document Conventions
In this document the following formatting is used to highlight useful information:
Italics Indicates paths to locations on your hard disk or other storage devices
Bold Highlights important names, concepts, software interface elements, and
hardware controls.
[Brackets] References keys on a computer’s keyboard.
Single item instructions are represented by a bullet icon.
Results in procedures are represented by an arrow icon.
The following three icons represent different types of information:
The light bulb icon indicates a useful tip, suggestion, or interesting fact.
The information icon highlights important information that is essential for the given
context.
The warning icon alerts you of serious issues and potential risks that require your full
attention.
3.5. Important Names and Concepts
We will start with a list (in alphabetical order) of the most important concepts and names.
Arranger
The Arranger is the area located in Song view and enables you to combine Sections (references to
Scenes) and arrange Clips on the timeline into a song.
Browser
The Browser is the front end for accessing all the elements of your MASCHINE Projects: Projects,
Groups, Sounds, instruments and effect presets, and Samples. Each of these can be stored and
tagged to provides easy access. The factory library has already been completely tagged, including
the factory libraries of any Native Instruments products. To learn more about the Browser, see
Using the Browser.
Clip
Clips exist in the Song view and are one-off unique sound bites that can be used in addition to
Patterns. They are similar to Patterns, however, they are much more flexible and have the
advantage of being able to be freely positioned on the timeline. They can be part of a section, but
can also exist outside a section or span across multiple Sections. Clips are great for adding
transitions or audio to your song. To learn more about the Clips, see Working with Patterns and
Clips.
Page 15

WELCOM E T O MASCHIN E+ 7
Effect
MASCHINE comes with many different effects in the form of Internal Plug-ins. You may also use
some Native Instruments VST/AU effect plug-ins. Each Sound, each Group, and the Master can
hold any number of effects that can be applied as insert effects. The flexible routing system also
allows you to create send effects, multi-effects, and side-chains. For more details on using effects
in MASCHINE, refer to chapter Using Effects. You can nd an exhaustive description of all internal
effects included in MASCHINE Software Manual available from the Native Instruments website.
Event
Events are the individual drum hits or notes that make up a Pattern. In the Pattern Editor, events
are visually represented by rectangles in the Event area. Depending on the current view in the
Pattern Editor, you can see events for all Sounds slots (Group view) or for the selected Sound slot
only (Keyboard view). Events are described in more detail in chapter Recording Patterns.
Group
A Group contains 16 Sound slots. In addition to the Effect Plug-ins applied to each individual
Sound, a Group can have its own insert effect. These affect all the Sounds in the Group. A Group
can also contain any number of Patterns (grouped into banks of 16 Patterns each). Refer to
chapter Managing Sounds, Groups, and Your Project for more information on Groups.
Ideas View
The Ideas view allows you to experiment with your musical ideas without being tied to a timeline
or arrangement. You can create Patterns for each Group and combine them into a Scene. Scenes
can then be added to Sections in the Song view to create a larger musical structure. For more
information, see Switching Between Ideas View and Song View and Using Ideas View.
Master
This is where all audio signals from each of the Groups and Sounds come together and get mixed.
The Master channel can also host any number of insert effects of its own, these effects are
applied to all Groups and the Sounds within them. More information on the Master can be found in
chapter Managing Sounds, Groups, and Your Project.
Pattern
A Pattern is a sequence that plays Sounds from a Group. It belongs to that Group and will be
saved together with the Group. In every Scene you can choose for each Group which of its
Patterns has to be played. More information on Patterns can be found in the chapter Working with
Patterns and Clips.
Plug-in
Each Sound, each Group, and the Master can hold any number of Plug-ins. Plug-ins can be
instruments or effects, and they can be internal (included with MASCHINE), from other specic
Native Instruments products (instruments or effects). Instrument and Effect Plug-ins can be
loaded in the rst Plug-in slot of Sounds. The other Plug-in slots of Sounds, as well as the Plug-in
slots of Groups and of the Master can hold Effect Plug-ins only. At each level (Sound, Group, and
Master), Plug-ins process the audio in series, according to the order in which they are stacked up.
Refer to chapter Working with Plug-ins.
Page 16

WELCOM E T O MASCHIN E+ 8
Project
A Project contains all data needed for a song: Groups with their Patterns, all Scenes and all
settings, modulation, effects, routings, Sounds, and Samples. It’s like a snapshot of the entire state
of MASCHINE.
Scene
A Scene is a combination of Patterns for each Group. They can be used to combine Patterns in
order to create musical ideas. Scenes are created in the Ideas view and then added to Sections in
the Song view to create an arrangement. For more information, see Arranging Your Project and
Using Scene Mode.
Section
A Section is a reference to a specic Scene on the Timeline of the Song view. They are used to
arrange the Scenes into a larger musical structure. The benet of using Sections is that any
changes made to a Scene are replicated in each Section where the Scene is referenced therefore
making the process of changing parts of a song quick and easy. For more information, see
Arranging Your Project and Using Song View.
Song view
Song view will enable you to combine Sections (references to Scenes) and arrange them into a
song in the Arranger. For more information, see Using Song View.
Sound
Sounds are the building blocks of all sound content in MASCHINE. A Sound is made up of any
number of Plug-ins. Each Sound of the selected Group is mapped to one of the 16 pads on the
hardware controller, so you can play the Sounds by pressing the pads. Refer to chapter Managing
Sounds, Groups, and Your Project for more information on Sounds.
Please refer to the Glossary for more denitions, see Glossary.
3.6. Standalone vs. Controller Mode
MASCHINE+ can be used in two main modes: Standalone Mode and Controller Mode.
• In Standalone mode: MASCHINE+ functions alone as an embedded production environment,
that does not need to be connected to a computer. When MASCHINE+ is in Standalone mode
the power button is lit green.
• In Controller mode: MASCHINE+ can be used as a controller for the MASCHINE software
running on a computer, or as a MIDI controller that can be congured using the Controller
Editor software. When MASCHINE+ is in Controller mode the power button is lit orange.
Using Standalone Mode
MASCHINE+ starts in Standalone mode, however, if you are in Controller mode you can still return
to Standalone mode.
To access Standalone mode:
1. Press SETTINGS.
2. Use the 4-D encoder to select System.
Page 17

WELCOM E T O MASCHIN E+ 9
3. Press Button 4 (STANDALONE).
→ MASCHINE+ restarts in Standalone mode.
Using Controller Mode
To start MASCHINE+ in Controller mode:
1. Make sure the USB-B Port on your MASCHINE+ is connected to your computer.
2. On your computer, open the MASCHINE software.
3. If MASCHINE+ is powered off and connected to the computer only with USB, press FILE (the
power button) to switch it on.
4. If MASCHINE+ is powered off, connected to the computer with USB, and connected to the
power adapter, press SHIFT + FILE (the power button) to switch it on.
→ MASCHINE+ is now in Controller mode and the power button is lit orange. You can now control
the MASCHINE software using your MASCHINE+.
Use of the power adapter is optional in Controller mode. However, be aware that if the
power adapter is connected to MASCHINE+ you are additionally required to hold
SHIFT then press FILE (the power button) to power up in Controller mode.
Switching from Standalone to Controller Mode
To switch from Standalone mode to Controller mode:
1. Press SETTINGS.
2. Using the 4-D encoder, select System.
3. Press Button 4 (CONTROLLER).
→ If the current project has been modied you will be prompted to save it. After pressing SAVE or
DISCARD, MASCHINE+ will proceed to shut down and enter into Controller mode. Pressing
CANCEL will allow you to continue using Standalone mode.
For maximum compatibility, before you connect MASCHINE+ to your computer, make
sure that you have downloaded and installed the latest version of the MASCHINE
software MASCHINE+ to your computer, and you are also using the latest system
update on MASCHINE+. You can download MASCHINE software using NATIVE
ACCESS, and update MASCHINE+ by pressing SETTINGS and selecting System. For
more information on Native Access, visit the Native Instruments website: Native
Access. For more information on updating your MASCHINE+, see System Settings.
Page 18

CONNEC TI N G MASCHIN E+ 10
4. Connecting MASCHINE+
As well as being a groovebox and a sampler for creating custom kits, MASCHINE+ can be used as
the centerpiece of your studio to record vocals, guitars, and drums. You can connect MIDI or USB
hardware synths and sequence them to capture the results or sculpt external audio using effects
and modulation. You can control, mix, and manipulate the rest of your setup with line, and mic
inputs to bring everything together.
This chapter contains a quick walk-through of the basic hardware setups and the necessary
connections.
4.1. Setup Examples
In this section, you will learn how to connect MASCHINE+ in various setup scenarios. Although it's
not possible to cover all imaginable setups here, the examples are general enough to apply the
information to most situations.
4.1.1. Connecting Active Monitor Speakers
This example shows an all-in-one production system set up in which your active monitor speakers
are directly plugged into the main outputs of your MASCHINE+.
MASCHINE+ setup with active monitors.
To use active speakers (self-powered speakers with a built-in amplier) with MASCHINE+:
1. Turn the LINE OUT VOLUME knob on the rear panel to the left-end stop to set the output
volume to a minimum.
2. Connect the LINE OUT L/R sockets on the rear panel of MASCHINE+to your active speakers
using balanced cables with 1/4" TRS jack plugs. First, connect the L output channel with the
left speaker, then the R output channel with the right speaker.
Page 19

CONNEC TI N G MASCHIN E+ 11
3. Once you have connected the speakers to the device, set the volume knob on your active
speakers to 0 dB and turn them on.
4. Start the playback of a MASCHINE Project.
5. Gradually turn the LINE OUT VOLUME knob on the rear panel of MASCHINE+ until you reach an
appropriate listening level.
If you have a main mixer connected to your monitors, and various devices plugged
into your main mixer, you can simply add MASCHINE+ to your setup by connecting its
audio outputs to any stereo line input on your main mixer.
4.1.2. Connecting Headphones
This example shows a setup for “on-the-road” beat making or performance including MASCHINE+,
and a pair of headphones
MASCHINE+ setup with headphones.
To use headphones with MASCHINE+:
1. Turn the PHONES VOLUME knob on the rear panel of MASCHINE+ to the left-end stop to set
the headphones volume to a minimum.
2. Plug the 1/4" TRS jack of your headphones into the PHONES socket nearby.
3. Start the playback of a MASCHINE Project.
4. Gradually turn the PHONES VOLUME knob on MASCHINE+ until you reach a comfortable
listening level.
The headphones output of your MASCHINE+ is an additional stereo output, distinct
from the main output pair, and perfectly tailored for the Cue channel of MASCHINE+.
However, if you want to monitor the main outputs in your headphones, please select
+Phones in the Outputs section of the Hardware page in the SETTINGS. For more
information, see Hardware Settings.
Page 20

CONNEC TI N G MASCHIN E+ 12
4.1.3. Connecting Line Level Equipment
This example shows a setup with both a pair of active speakers (see Connecting Active Monitor
Speakers) and a pair of headphones (see Connecting Headphones) with an extra line-level input
device, for example, a synthesizer.
MASCHINE setup with a line-level device (here a synthesizer) as input.
To use the MASCHINE+ in a setup with typical line level equipment:
1. Turn the LINE OUT VOLUME and PHONES VOLUME knobs on the rear panel of your
MASCHINE+ to the left-end stop to set the output and headphones volumes to a minimum.
2. Plug a pair of 1/4" TRS jacks from the outputs of your device into the LINE IN 1 and 2 sockets
on the rear panel of the MASCHINE+ (use a single jack plugged into the LINE IN 1 socket if you
are using a mono device).
3. Adjust the output signal of your connected device by using its relevant volume/gain control.
Check that your input signal does not clip.
4. Turn the LINE OUT VOLUME and PHONES VOLUME knobs back to their usual levels.
In order to use the LINE IN 1 and 2 sockets on your MASCHINE+, make sure that no
microphone is connected to the MIC IN socket nearby! Indeed, plugging a microphone
into the MIC IN socket bypasses the LINE IN 1 and 2 sockets.
4.1.4. Connecting a Dynamic Microphone
This example shows a setup with both a pair of active speakers (see Connecting Active Monitor
Speakers) and a pair of headphones (see Connecting Headphones) with a dynamic microphone,
for example, when recording vocals.
Page 21

MASCHINE+ setup with a dynamic microphone.
CONNEC TI N G MASCHIN E+ 13
Make sure the LINE OUT VOLUME, PHONES VOLUME, and MIC IN GAIN knobs are
turned down before connecting a microphone to MASCHINE+. Microphones placed
near speakers can cause a loud squealing tone (a phenomenon called the “Larsen
effect” or “audio feedback loop”) and can seriously damage your hearing and your
equipment. The greater the distance between a microphone and the speakers, the
less chance there is of this effect occurring.
You cannot plug a condenser microphone directly into MASCHINE+. It will require a
preamp.
To use the MASCHINE+ in a recording setup with a dynamic microphone:
1. Turn the LINE OUT VOLUME, PHONES VOLUME , and MIC IN GAIN knobs on the rear panel
fully to the left to set the output volume, headphones volume, and microphone input level to a
minimum.
2. Plug the 1/4" TRS jack of your dynamic microphone into the MIC IN socket on the rear panel of
your MASCHINE+.
3. Turn the LINE OUT VOLUME and PHONES VOLUME knobs back to their usual levels.
4. While singing/playing an instrument into the microphone, adjust the input signal level by
gradually turning the MIC IN GAIN knob to the right while checking that the signal is not
clipping.
When a microphone is plugged in the MIC IN socket, the LINE IN 1 and 2 sockets are
bypassed. Hence, if you want to record the audio from a line-level device, make sure
that no microphone is connected to the MIC IN socket!
Page 22

CONNEC TI N G MASCHIN E+ 14
4.2. Connecting to Wi-Fi
Connecting MASCHINE+ to a network enables you to download content to your Library from your
Native Instruments account using your Native ID, connect to other devices using Ableton Link, and
perform system updates.
To connect MASCHINE+ to a Wi-Fi network:
1. Press SETTINGS.
2. Using the 4-D encoder, select Network.
3. Turn the 4-D encoder or Knob 8 to select the name of the network you want to connect. If the
name of the network you want to connect is not visible, press Button 7 (REFRESH).
4. Press Button 8 (CONNECT).
5. Select each letter of the password by pushing and turning the 4-D encoder, press it to enter a
letter.
6. Press ENTER to conrm your password.
→ MASCHINE+ is now connected to the selected network.
4.2.1. Disconnecting from Wi-Fi
It is possible to disconnect MASCHINE+ from the Wi-Fi network from the Settings page.
To disconnect MASCHINE+ from a Wi-Fi network:
1. Press SETTINGS.
2. Use the 4-D encoder to select Network.
3. Press Button 8 (DISCONNECT).
→ MASCHINE+ is now disconnected from the network
4.2.2. Using Airplane Mode
Airplane mode suspends the device's network signal transmission, effectively disabling the
network service. As the name suggests, this mode is for use in environments where you are not
allowed to use Wi-Fi.
To enable or disable Airplane mode:
1. Press SETTINGS.
2. Use the 4-D encoder to select Network.
3. Turn Knob 1 (Enabled) to enable/disable Airplane mode.
→ Wi-Fi network service is suspended when Enabled is set to On.
4.3. Syncing MASCHINE+ using Ableton Link
Ableton Link is a protocol that synchronizes beat, phase, and tempo of Link-enabled applications
on the same computer, or over a shared network. This means you can conveniently keep
applications synchronized across different devices or join a group jam with others with minimal
setup. Connecting applications via Link provides you with the ability to synchronize them to a
shared timeline and change the tempo globally from each of the connected applications.
Page 23

CONNEC TI N G MASCHIN E+ 15
Using Ableton Link to synchronize with external equipment
4.3.1. Connecting to Ableton Link
Applications that support Ableton Link can join a Link session when connected to the same
network. To enable Link within MASCHINE+, simply make sure it is connected to the same local
network as the other applications you want to link to. This can either be a local network or an adhoc (computer-to-computer) connection.
For more general information on setting up and using Link, please refer to the Link FAQs article
located on the Ableton website:
https://help.ableton.com/hc/en-us/articles/209776125-Link-FAQs.
Instead of using Wi-Fi, you can also connect MASCHINE+ to a network using a USB
ethernet adapter.
4.3.2. Joining and Leaving a Link Session
It is possible to join a Link session at any time by simply enabling Link in the MIDI Settings page.
For more information, see MIDI Settings.
When another Link-enabled application is connected, a moving bar on the MIDI settings page is
displayed even though the MASCHINE+ transport is not running. This bar represents the global
phase of Link that all participating applications lock into.
After clicking the Play button, playback will resume on the downbeat once the moving bar is lled.
The rst participant to join the session sets the initial tempo, from then on any participant in the
session can change the tempo in their respective application. If multiple participants change the
tempo at the same time, the last tempo change will take effect.
To start or join a Link session, proceed as follows:
1. Press SETTINGS.
2. Use the 4-D encoder to select MIDI.
3. Turn Knob 4 (Link) to set ENABLE to On.
→ The Link session is activated. Other devices on the same network can also join the same
session if they have Link enable.
When Link is active, it is not possible to set MASCHINE+ to receive MIDI Clock. Link
will take priority. Sending MIDI Clock from MASCHINE+ is still possible.
Page 24

CONNEC TI N G MASCHIN E+ 16
4.4. Integrating MASCHINE+ into a MIDI Setup
You can quickly integrate MASCHINE+ into a MIDI setup.
You can use MIDI in various ways. Notably:
• You can synchronize a MIDI Clock signal between MASCHINE+ and other MIDI devices:Sync to
External MIDI Clock and Send MIDI Clock.
• If you connect a MIDI keyboard to the MIDI IN, you can directly play the focused Sound with it
without having to set anything up.
• You can let particular Sounds and Groups react to incoming MIDI data and send MIDI data to
the desired port. More on these in section Using MIDI Control.
4.4.1. Connecting External MIDI Equipment
MASCHINE+ has dedicated MIDI sockets that allow you to directly connect other MIDI devices
using a MIDI cable with a 5-pin DIN MIDI jack to integrate it into your MIDI setup.
The MIDI sockets on the rear panel of MASCHINE+
To connect your external MIDI equipment:
1. Connect the device receiving MIDI signals to the MIDI OUT socket on the rear panel using a 5-
pin DIN MIDI jack.
2. Connect the device sending MIDI signals to the MIDI IN socket on the rear panel using a 5-pin
DIN MIDI jack.
→ The MIDI equipment is connected.
Depending on your use case, additional conguration is required:
• You need to activate the corresponding MIDI inputs and outputs of your MASCHINE+ in the
MIDI page which is accessible by pressing SETTINGS. For information on MIDI settings, see
MIDI Settings.
• If MASCHINE+ is being used in Controller mode and the MASCHINE software is running as a
plug-in in a host, the MIDI conguration is managed by the host.
4.4.2. Sync to External MIDI Clock
If MASCHINE+ is running as a stand-alone application, it can be controlled externally via MIDI
Clock by any device that is capable of sending MIDI Clock. This could be hardware such as a drum
machine, another groovebox, or even another sequencer.
To congure MASCHINE+ to receive MIDI Clock from an external device:
1. Press SETTINGS.
2. Select the MIDI page.
Page 25

CONNEC TI N G MASCHIN E+ 17
3. Turn Knob 1 to select Receive from the menu.
→ MASCHINE+ can now receive MIDI Clock from an external device
When Receive is selected, the PLAY button is deactivated.
4.4.3. Send MIDI Clock
If MASCHINE+ is running in Standalone mode it can send a MIDI Clock signal to any device that is
capable of receiving MIDI Clock. This could be hardware such as a drum machine, another
groovebox, or even another software sequencer.
To congure MASCHINE+ to receive MIDI Clock from an external device:
1. Press SETTINGS.
2. Use the 4-D encoder to select MIDI.
3. In the MIDI Sync section select Send Clock from the menu.
→ MASCHINE+ will send a MIDI Clock signal to any connected device that is capable of receiving
MIDI Clock.
You can adjust the MIDI Clock offset in the MIDI page of the SETTINGS panel. See
MIDI Settings for more information.
If you want MASCHINE+ to send other MIDI messages than MIDI Clock, in particular,
if you want to control other MIDI-capable devices via the notes played in MASCHINE+,
please refer to section
4.5. Connecting a Pedal
MASCHINE+ provides a pedal input in the form of a 1/4-inch socket on the rear panel.
The PEDAL socket on the rear panel.
The PEDAL socket allows you to use a pedal footswitch to control the transport. A single
footswitch with two pedals can be used to control the transport in the following way:
• Pedal 1: Starts/stop the playback.
• Pedal 2: Engage/disengages recording.
The PEDAL socket can also be congured to send Continuous MIDI CC messages in
the Preferences of the Controller Editor software. For more information read the
Controller Editor manual.
Page 26

CONNEC TI N G MASCHIN E+ 18
4.6. Connecting MASCHINE+ to a Computer
Connecting MASCHINE+ to your computer using USB enables you to do the following:
• Control the MASCHINE software using Controller mode. For more information, see Standalone
vs. Controller Mode.
• Control external MIDI equipment using the Controller Editor software, see Using MASCHINE+
as a MIDI Device.
• Transfer les from your SD memory card in Storage mode. For more information, see
Transferring Files to the SD Card.
To connect MASCHINE+ to your computer:
1. Attach the ‘device end’ of the included USB cable to the USB B socket on the rear panel of
MASCHINE+.
2. Attach the 'computer end' of the USB cable to an available USB 2.0 (or later) port on your
computer.
MASCHINE+ will not work with your computer when it is connected to a USB 1.1 port.
A USB 2.0 (or later) port is required.
4.7. Using MASCHINE+ as a MIDI Device
In addition to using MASCHINE+ as a standalone device, or as a controller for the MASCHINE
software, you can also use it as a powerful and highly versatile MIDI controller to pilot any other
MIDI-capable software application running on the computer it is connected to via USB. This is
made possible by the Controller Editor software, an application that allows you to precisely dene
all MIDI assignments for your MASCHINE controller. The Controller Editor is installed during the
MASCHINE software installation procedure. For more information on this, please refer to the
Controller Editor Manual available as a PDF le via the Help menu of Controller Editor.
4.8. Using Two or More Devices with MASCHINE
In controller mode MASCHINE+ can be used to control the MASCHINE software. However, if two
or more MASCHINE devices are connected to your computer, only one device can be used to
control the MASCHINE software at a time.
If you have more than one instance of the MASCHINE software running on your
computer, you can control each instance with a different controller. Also, a device not
connected to any MASCHINE software instance can be used in MIDI mode (i.e. as a
MIDI controller) at the same time as the other controller(s). See the Controller Editor
Manual for more information on MIDI mode.
You can choose which device you want to use with the MASCHINE software. This can be done
both from your hardware and in the software.
For more information, on the MASCHINE software, release refer to the MASCHINE
Software Manual available from the Native Instruments website.
Page 27

CONNEC TI N G MASCHIN E+ 19
You can select the desired device from the Controller menu in MASCHINE:
Click the Controller menu in the MASCHINE software and select the device you want to use.
Hardware
On the hardware device you want to use with the MASCHINE software, do the following:
• MASCHINE+: Press SHIFT + PLUG-IN, turn the 4-D encoder to select the desired instance and
press the 4-D encoder or Button 4 to load it.
• MASCHINE MK3 controller: Press SHIFT + PLUG-IN, turn the 4-D encoder to select the desired
instance and press the 4-D encoder or Button 4 to load it.
• MASCHINE STUDIO controller: Press SHIFT + PLUG-IN, turn the jog wheel to select the desired
instance and press the jog wheel or Button 8 to load it.
• MASCHINE (MK1 & MK2) controller: Press SHIFT + STEP, turn Knob 8 (or press Button 5/6) to
select the desired instance, and press Button 8 to load it.
• MASCHINE MIKRO (MK1 & MK2) controller: Press SHIFT + F2, turn the Control encoder to
select the desired instance and press the Control encoder to load it.
• MASCHINE JAM controller: Press SHIFT + H (INSTANCE), turn the Control encoder to select
the desired instance and press the Control encoder to load it.
• KOMPLETE KONTROL Keyboard MK1: Press INSTANCE and turn the Control encoder to select
the desired instance, and press the Control encoder to load it.
• KOMPLETE KONTROL Keyboard MK2: Press INSTANCE and turn the 4-D encoder to select the
desired instance, and press the 4-D encoder to load it.
For more information on Controller mode, see Standalone vs. Controller Mode.
Page 28

MASCHI NE + O VERVIEW 20
5. MASCHINE+ Overview
This section describes the areas and control elements on your MASCHINE+.
5.1. Top Panel Overview
The top panel includes the following sections:
Overview of the top panel and its main sections
1. Control section: Use this multi-purpose section to access to all parameters of the currently
selected mode. On the left, dedicated buttons provide access to the Browser, the Arranger, the
Mixer, Settings, and the Sample Editor. For more information, see Control Section.
2. Edit section: This section holds the 4-D encoder, a multifunctional element to be used in
various contexts. Used in combination with the 4-D encoder, the three Quick Edit buttons
nearby allow you to easily adjust the volume, tempo, and swing of your Sounds, Groups, and
Project. In Step mode, they let you quickly adjust the velocity, position, and tune of the selected
events(s). For more information, see Edit Section.
3. Performance section: This section provides you with various tools shaped for live
performance. The NOTE REPEAT button provides you access to the Note Repeat / Arp feature.
The LOCK button allows you to store and recall snapshots during your set. Underneath, the
Smart Strip and its four function buttons make up a highly versatile and intuitive tool for
enriching your performance. For more information, see Performance Section.
4. Group section: The dedicated Group buttons allow you to instantly access each of your
Groups. For more information, see Group Section.
Page 29

MASCHI NE + O VERVIEW 21
5. Transport section: Start, stop and restart playback, activate record, and tap the tempo, simply
by pressing the dedicated buttons. Use SHIFT to access the secondary functions. For more
information, see Group Section.
6. Pad section: Access the various modes using the column of mode buttons on the left side of
this section. Use the 16 pads to play your Sounds. Above the pads, the Pad Input Mode buttons
let you choose how the pads will behave: e.g., they can trigger all Sounds in your Group,
different notes of a single Sound, specic chords of a single Sound, or create and edit events in
the step sequencer. Besides playing the Sounds, the pads provide you access to many editing
and selection commands depending on the selected mode. For more information, see Pad
Section.
5.1.1. Control Section
The Control section provides access to all parameters of the selected mode. It also contains
dedicated buttons to access, for example, the Browser, the Arranger, the Mixer, the Sample Editor,
and Settings.
The Control section
1. CHANNEL button: Press CHANNEL to switch to Control mode (the default mode on your device
and directly display the Channel properties of the selected Sound/Group or the Master. This
provides instant access to all Channel properties’ parameters via the eight Buttons and eight
Knobs above and under the displays. Press SHIFT + CHANNEL (MIDI) to switch your device to
MIDI mode. This mode will enable you to use MASCHINE as a MIDI controller. For more
information, refer to the Controller Editor Manual.
2. PLUG-IN button: Press PLUG-IN to switch to Control mode (the default mode on your device)
and directly display the Plug-in(s) loaded in the selected Sound/Group or the Master. This
provides instant access to all Plug-ins’ parameters via the eight Buttons and eight Knobs above
and under the displays. Press SHIFT + PLUG-IN (Instance) to enter Instance mode. In this
mode you can select which instance of the MASCHINE plug-in you want to control from your
MASCHINE+ if you have more than one instance open in your host.
3. IDEAS button: Press IDEAS at any time to get an overview of your Project. In the Ideas view
you can view your Scenes and Patterns, in the Song view, you can edit your Sections, Scenes,
Patterns, and Clips to create the perfect arrangement. Press IDEAS, then SHIFT and Button 1
or 2 to switch between Ideas view and Song view.
4. MIXER button: Press MIXER at any time to access an overview of your mix. Use the Mix view
to, for example, quickly edit the level and panning of each Sound and Group. For more
information, see Controlling Your Mix.
Page 30

MASCHI NE + O VERVIEW 22
5. BROWSER button: Press the BROWSER button to access the Browser. Press SHIFT +
BROWSER (+Plug-In) to access the Plug-in menu and load a Plug-in (Internal, Native
Instruments, and External, as well as Instrument and Effect) in the selected Plug-in slot. For
more information, see Using the Browser.
6. SAMPLING button: Press the SAMPLING button to access the Sample Editor. Here you can
record and edit samples. For more information, see Recording Samples.
7. Page buttons: Press the Page buttons to switch between pages. For a clear and simple layout
of the displays, parameters are grouped into different pages.
8. POWER / FILE button: Press the power button to switch on MASCHINE+ . Press and hold the
power button to shutdown. The button is green in standalone mode, and orange when used in
Controller mode, and flashes red when the device is in standby. The button also provides
access to your les and audio export options and you can press SHIFT + FILE (Save), to
quickly save a Project on the fly. For more information on the File menu, see ???.
9. SETTINGS button: Press the SETTINGS button to adjust the preferences of your MASCHINE+
and access MIDI, hardware, network, and mode settings. Here you can also perform system
updates and access your library of content from your Native Instruments account. For more
information, see Settings Overview.
10.AUTO button: Press and hold while turning any of the eight Knobs (or any combination) under
the displays to record modulation for the corresponding parameter(s). Press SHIFT + AUTO to
pin/unpin the Auto mode. For more information on Auto mode, see Recording Modulation.
11.MACRO button: The MACRO button provides instant access to the properties of the channel’s
Macro Controls). This shortcut can greatly facilitate both reactivity and improvisation when
performing live. Press SHIFT + MACRO (Set) to dene new Macros in a quick and easy way,
directly from your device. For more information, see Creating Custom Sets of Parameters with
the Macro Controls.
12.Buttons 1–8: The eight Buttons above the displays dynamically adapt their function to the
selected mode, allowing direct access to the most important functions. The action they
perform is shown below each Button in the displays.
13.Displays: The displays are laid out to provide you with all the essential information. Press
SETTINGS (9) and select Hardware to adjust the brightness.
14.Knobs 1–8: Each Knob dynamically controls the parameter shown in the display above it.
5.1.2. Edit Section
The Edit section holds the 4-D encoder, a multifunctional element to be used in various contexts.
Used in combination with the 4-D encoder, the three Quick Edit buttons nearby allow you to easily
adjust the volume, tempo, and swing of the Sounds, the Groups, and the Project.
Page 31
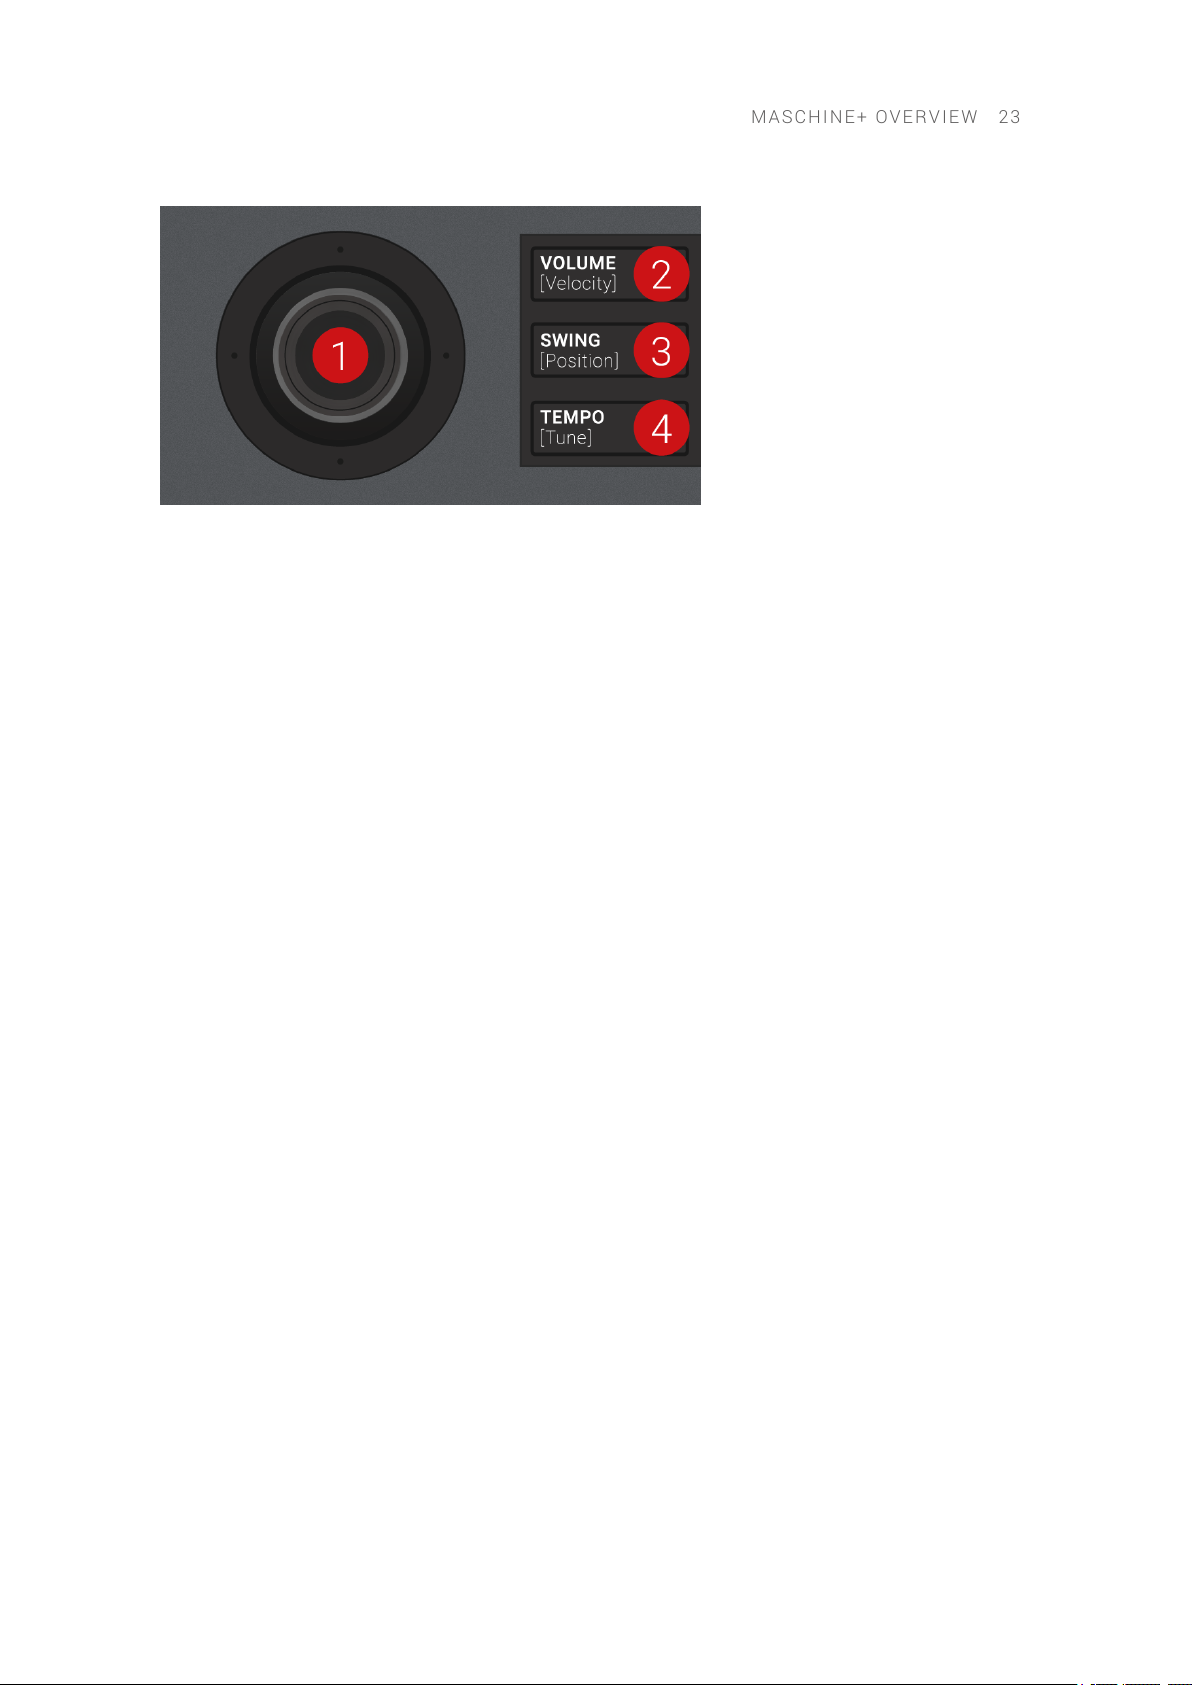
MASCHI NE + O VERVIEW 23
The Edit section
1. 4-D encoder : The 4-Directional Push encoder combines the functionalities of a conventional
joystick, of a button, and of an endless rotary encoder. Hence, it can be moved in the four
directions: up, down, left, and right, as well as being pushed and rotated. These aspects make it
into a highly versatile control element that can be used for navigation, for adjusting values of
parameters, and for controlling instruments. Depending on the context, the four LEDs around
the encoder indicate you the directions in which you can move the joystick. As well as being
used in combination with the Quick Edit buttons (VOLUME, SWING, and TEMPO), press SHIFT
and turn the 4-D Encoder to scroll through your Song.
2. VOLUME button: Enables quick adjustment of the volume via the 4-D encoder. When VOLUME
is active (lit), hold a pad or a Group button and turn the 4-D encoder to change the volume level
for that individual Sound or Group. Press the lit button to deactivate it and switch the encoder
back to its default behavior. In Step mode, the Volume button enables you to adjust the velocity
of the selected events. For more information, see Adjusting Volume, Swing, and Tempo.
3. SWING button: Enables quick adjustment of the swing via the 4-D encoder. When SWING is
active (lit), hold a pad or a Group button and turn the 4-D encoder to change the swing amount
for that individual Sound or Group. Press the lit button to deactivate it and switch the encoder
back to its default behavior. In Step mode, the Swing button enables you to adjust the position
of the selected events. For more information, see Adjusting Volume, Swing, and Tempo.
4. TEMPO button: Enables quick adjustment of the tempo via the 4-D encoder. When TEMPO is
active (lit) turn the 4-D encoder to change the tempo. Press the lit button to deactivate it and
switch the encoder back to its default behavior. In Step mode, the Tempo button enables you to
adjust the tuning of the selected Group, or Sound. For more information, see Adjusting
Volume, Swing, and Tempo.
5.1.3. Performance Section
The Performance section provides you with various tools shaped for live performance.
Page 32

MASCHI NE + O VERVIEW 24
The Performance section
1. NOTE REPEAT button: Note Repeat is a convenient way to play and record beats and melodies.
When your pads are in Group mode, the Note Repeat engine plays the selected Sound
automatically at a given rate. While holding the NOTE REPEAT button, hold the pad you want to
play: notes will be repeatedly triggered at the rate selected in the right display. With Buttons 5–
8 you can select different rates while playing. You can change the rate value for the selected
Button by turning Knob 3. When your pads are in Keyboard or Chord mode, NOTE REPEAT
provides you instead access to the flexible and versatile Arp engine, an arpeggiator that
effectively lets you play your Sounds in note sequences. The arpeggios are created according
to both the pads you hold and the scale and chords you have congured. As a shortcut, when
your pads are in Group mode press SHIFT + NOTE REPEAT (Arp) to directly switch your pads
in Keyboard mode and activate the Arp engine. The Note Repeat / Arp mode can be pinned:
Press NOTE REPEAT + Button 1 to pin/unpin the mode. For more information, see Using Note
Repeat.
2. LOCK button: Press LOCK at any time to create a snapshot of all modulable parameters in your
Project. Subsequently, change any of these parameters during your performance or studio
session, then press the dim-lit LOCK button again to recall the snapshot with the original
parameter values. Press SHIFT + LOCK (Ext Lock) to access Extended Lock mode and store/
recall up to 64 snapshots using your pads, update and organize them into banks, and congure
morphing transitions between them. Lock is a powerful tool for extensive modulations, but also
very useful to compare mixes, or to switch up snapshots during a live performance. For more
information, see Using Lock Snapshots.
3. Smart Strip : The Smart Strip puts control of several parameters at your ngertips: Depending
on the Strip Mode button selected above the Smart Strip, use it to apply pitch bend or
modulation to the Sound(s) played on the pads, apply and tweak Perform FX in real-time, or
play Sounds by strumming on the strip, even with two ngers. Above the Smart Strip, a LED bar
indicates the current value or note set on the strip. When no Strip Mode button is active, the
Smart Strip LEDs display the playhead position for the selected Pattern or Clip in Ideas view, or
the playhead position in the arrangement in Song view.
4. PITCH Enable this button and use the Smart Strip to send MIDI Pitchbend data to the selected
Sound. While doing this, press REC in the Transport section to record your actions as MIDI
automation into your Pattern.
5. MOD Enable this button and use the Smart Strip to send MIDI Modulation data to the selected
Sound. While doing this, press REC in the Transport section to record your actions as MIDI
automation into your Pattern.
Page 33

MASCHI NE + O VERVIEW 25
6. PERFORM Enable this button and use the Smart Strip to control the Perform FX (if any) for the
selected Group. Press SHIFT + PERFORM (FX Select) to quickly select and load a Perform FX
for that Group while enabling its control from the Smart Strip. For more information, see Using
Performance Effects.
7. NOTES Enable this button and use the Smart Strip to play whatever is currently loaded on the
pads: Sounds, notes, or chords, depending on the current Pad Input mode. If you hold certain
pads, only these pads are triggered by the strip, otherwise, all pads can be triggered along the
strip. For example, with pads in Keyboard mode, you can touch the strip for single notes, slide
your nger for progressive note strums, use two ngers for instant jumps between notes, but
that’s not all: You can use the Smart Strip in combination with the Note Repeat, Arp, and Chord
engines for endless creative possibilities. For more information, see Playing Notes with Smart
Strips.
5.1.4. Group Section
The eight dedicated Group buttons , labeled A to H, provide instant access to the Groups.
The Group buttons
Press any Group button to select the Group you want to work in. Once a Group is selected its
button lights up in the assigned color and its Sounds are available on the pads: whether one
Sound on each pad (pads in Group mode) or different notes for one particular Sound (pads in
Keyboard mode). The other colored Group buttons are dim-lit to indicate they can be selected.
Press the dim white button to create a new Group in that slot. Buttons remain uncolored and unlit
for the other empty Group slots.
If you want to use more than eight Groups in your Project, hold SHIFT and press the Group
buttons to select and access other banks of Groups.
These buttons are also used to solo and mute Groups on the fly when SOLO or MUTE buttons are
held; this is great for jamming out your Project and performing live.
If the VOLUME, TEMPO , or SWING button is active in the Edit section above (see Edit Section),
hold a Group button and turn the 4-D encoder to change the volume, tune or swing for that
individual Group.
5.1.5. Transport Section
The Transport section holds various transport tools as well as the SHIFT button used in various
contexts.
Page 34

MASCHI NE + O VERVIEW 26
The Transport section
1. PLAY button: Press PLAY to activate playback. Press PLAY a second time to stop playback.
2. REC button: When playback is on, press REC to begin recording. Or when playback is off, press
SHIFT + REC to begin recording with the Count-in. Press REC a second time to stop recording.
Hold the REC button to access Pattern Preset mode, this allows you to select the desired
Pattern Length before recording new Patterns.
3. STOP button: Press STOP to stop playback.
4. RESTART button: Press the RESTART button at any time to restart from the beginning of the
current loop range. Used together with SHIFT, the RESTART button enables you to easily
adjust the Loop in many ways: Press SHIFT + RESTART to enable/disable looping. Hold SHIFT
+ RESTART and turn the 4-D encoder to move the entire Loop along the Timeline, or “push &
turn” the encoder to adjust only the endpoint of the Loop. While you hold SHIFT + RESTART,
the displays provide another useful set of looping controls.
5. ERASE button: During playback, hold ERASE and hold any number of pads or Group buttons to
erase the events for the corresponding Sounds or Groups on the fly as the playback goes on.
Use the shortcut ERASE + EVENTS + pad to quickly erase all events triggered by that pad in
your Pattern. If you have automated a parameter, hold ERASE and turn the corresponding Knob
under the displays to erase the automation of this parameter. Press SHIFT + ERASE + any pad
or Group button to completely remove the Sound or Group in that slot.
6. TAP button: Repeatedly tap the TAP button to set the desired tempo. Press SHIFT + TAP to
quickly enable/disable the metronome.
7. FOLLOW button: If you activate FOLLOW, time-related displays (like the Pattern Editor) will
show the next part as the playhead goes beyond the current part so that you always see where
the playhead is. Press SHIFT + FOLLOW to open Grid mode and adjust the grids to dene how
various MASCHINE objects can be moved or resized: Perform grid (for transitions between
Sections), Arrange grid (for Pattern length and Section length), Step grid (for events), and
Nudge grid (for events as well).
8. SHIFT button: While the most important features are accessible through dedicated buttons,
many shortcuts are available by holding the SHIFT button and pressing pads 1–16 or several
other buttons. You can also use the SHIFT button to change parameters in ner increments
when entering values with the Knobs, or use it to bypass, remove, and move Plug-ins from
within the Plug-in List.
5.1.6. Pad Section
The Pad section includes numerous features. Use the 16 pads to play your Sounds. Above the
pads, the Pad Input Mode buttons let you choose how the pads will react to your hits, for example,
you can trigger all Sounds in your Group, play different notes of a single Sound, specic chords of
that Sound, or create and edit events in the step sequencer.
Besides playing Sounds, the pads provide access to many editing and selection commands
depending on the mode selected from the column of Mode buttons left of the pads.
Page 35

MASCHI NE + O VERVIEW 27
Additionally, when you hold SHIFT the pads provide you with useful shortcuts and commands for
your everyday work with MASCHINE+.
The Pad section
Mode Buttons and the Pads
The Mode buttons (1) to (8) are located in the column left of the pads. They switch the pads and
your device to a series of modes dedicated to specic workflows:
All the Mode buttons left of the pads can be pinned: Simply press the desired button +
Button 1 (above the left display) to pin/unpin the corresponding mode. See Modes
and Mode Pinning for more information.
1. MUTE button: Enters Mute mode. In this mode, you can instantly mute Sounds and/or Groups
by pressing the corresponding pads and/or Group buttons. This is good for getting on top of
your production when you have many sounds playing and especially useful for performing live.
Muted Sounds/Groups are represented by half-lit pads, while audible Sounds/Groups are
represented by fully lit pads.
2. SOLO button: Enters Solo mode. In this mode, you can instantly solo any Sound or Group
(equals muting all other Sounds/Groups) by pressing its pad or Group button. This is useful
when you want to tweak a Sound or for performing live. The pad of the soloed Sound or Group
is fully lit, while all other pads (representing the muted Sounds/Groups) are dimmed.
Page 36

MASCHI NE + O VERVIEW 28
3. SELECT button: Enters Select mode. This mode allows you to select a Sound without hearing it,
or select specic events of a particular Sound, which is useful for limiting quantization, nudging
notes, and other operations specic to the selected events. Press SHIFT + SELECT + pad to
quickly select all events triggered by that pad in your Pattern, or notes at that pitch when in
Keyboard mode. Press ERASE + SELECT + pad to quickly erase all events triggered by that pad
in your Pattern or notes at that pitch when in Keyboard mode.
4. DUPLICATE button: Enters Duplicate mode. Use Duplicate mode to swiftly create another
instance of any Sound, Pattern, Group, or Scene. This can be useful for creating variations or
trying out something new while preserving the current state of your work. Press SHIFT
+DUPLICATE to quickly double the current Pattern.
5. VARIATION button: Enters Variation mode. This lets you introduce “happy accidents” in your
Patterns. The Variation mode provides you with two features: Humanize adds natural rhythmic
fluctuations to programmed sequences, while Random provides randomly generated
variations of your beats and melodies based on adjustable settings. Press SHIFT + VARIATION
to enter Navigate mode. In Navigate mode you can use the pads and the displays to zoom in
and out or scroll through Patterns and Scenes. Furthermore, the Buttons above the displays
provide quick access to Channel properties and Plug-in parameters.
6. EVENTS button: Enters Events mode. Here you can select particular events in your Pattern or
Clips and modify their position, pitch (key), velocity, and length. Press EVENTS + pad to quickly
select all events triggered by that pad.
7. PATTERN button: Enters Pattern mode. Pattern mode allows you to manage all Patterns in the
selected Group: create new empty Patterns or duplicates of existing ones, switch between
different Patterns, etc. Dimmed pads represent existing Patterns, the fully lit pad represents the
selected Pattern. Press SHIFT + PATTERN to access Clip mode. For more information, see
Recording Patterns and Working with Patterns and Clips.
8. SCENE button: Enters Scene mode (in Ideas view) or Section mode (in Song view). Use Scene
mode to access your Scenes and Section mode to arrange your song.
9. Pad 1–16 : The sixteen velocity-sensitive pads can be used to play and select your Sounds.
Their behavior can be congured by the Pad Input Mode buttons (10) to (14) described below.
The pads also have many functions depending on the mode that is currently selected.
10.PAD MODE button: Press PAD MODE to switch the pads to Group mode (the default mode). In
Group mode each pad represents one Sound of the Group. Group mode is typically used for
drum kits. You can adjust various parameters of the mode via the displays and the surrounding
Buttons and Knobs. The right display shows you the Sound triggered by each pad. You can use
Buttons 5 to 8 to adjust the Base Key, which sets the key (pitch) triggered for each Sound in the
Group, and Knobs 1 to 4 under the left display to set the Choke and Link group settings. Please
refer to the MASCHINE Manual for more information on these features. By pressing PAD MODE
again, you can hide its parameters from the displays and return to your previous workflow
while keeping Group mode enabled on your pads; as a reminder, the PAD MODE button will stay
lit as long as your pads are in Group mode. Press SHIFT + PAD MODE to switch your pads to
Group mode without switching the displays to the mode parameters.
11.KEYBOARD button: Press KEYBOARD to switch the pads to Keyboard mode. In Keyboard
mode the pads represent 16 pitches of the chromatic scale for the selected Sound, ascending
from the selected Root Note; this way you can play the selected Sound like a melodic
instrument. The right display shows you the pitch triggered by each pad. You can use
Buttons 5 to 8 to adjust the Root Note (triggered by pad 1), and Knobs 1 to 4 to congure the
Scale engine and limit the available pitches to a particular scale. By pressing KEYBOARD again,
you can hide its parameters from the displays and return to your previous workflow while
keeping Keyboard mode enabled on your pads; as a reminder, the KEYBOARD button will stay
lit as long as your pads are in Keyboard mode. Press SHIFT + KEYBOARD to switch your pads
to Keyboard mode without switching the displays to the mode parameters.
Page 37

MASCHI NE + O VERVIEW 29
12.CHORDS button: Press CHORDS to switch the pads to Chords mode. The Chords mode is
similar to the Keyboard mode (see the KEYBOARD button (11) above) with the difference that
each pad triggers a whole chord instead of a single note. You can use Knob 3 and 4 to
congure the chord you want to play. By pressing CHORDS again, you can hide its parameters
from the displays and return to your previous workflow while keeping Chords mode enabled on
your pads; as a reminder, the CHORDS button will stay lit as long as your pads are in Chords
mode. Press SHIFT + CHORDS to switch your pads to Chords mode without switching the
displays to the mode parameters.
13.STEP button: Press STEP to switch the pads to Step mode. Step mode turns your MASCHINE+
into a full-featured step sequencer. In this mode, each pad represents one step of the selected
Step Grid resolution. During playback, a running light through the pads represents the current
position of the step sequencer. Pressing the pads creates notes on the corresponding steps
(causing them to light up) or it removes them. By pressing STEP again, you can hide its
parameters from the displays and return to your previous workflow while keeping Step mode
enabled on your pads; as a reminder, the STEP button will stay lit as long as your pads are in
Step mode. Press SHIFT + STEP to switch your pads to Step mode without switching the
displays to the mode parameters.
14.FIXED VEL button: Press FIXED VEL to enable/disable the Fixed Velocity option. By default, the
pads are sensitive to velocity: The harder you hit them, the louder the sound will be. With Fixed
Velocity enabled, your pads play at the same volume no matter how hard you hit them. For
example, this can be very handy when you are triggering slices of a loop from your pads and
want to have all slices at the same volume. Fixed Velocity is available in all four pad input
modes: Group, Keyboard, Chords, and Step. Press SHIFT + FIXED VEL to activate/deactivate
the 16 Velocities option. In this mode, your pads play the same note (pitch) of the focused
Sound but with 16 different velocity values. This can be useful to play or program complex
drum lls. The right display indicates the velocity values for each pad. The pitch of the played
note is dened by the Base Key. The 16 Velocities option is only available in Group mode, for
instance, when PAD MODE is enabled.
5.2. Side Panel Overview
The left side panel of MASCHINE+ contains the SD memory card slot.
Left side panel view
1. Kensington Lock slot: Use this to sure your MASCHINE+ with a Kensington Lock.
2. SD Memory Card slot: Here you can insert an SD memory card to save les such as Projects
and samples. In System Storage mode, these les can be transferred to your computer.
Page 38

MASCHI NE + O VERVIEW 30
Do not remove the SD memory card while saving or loading les as this could result in
data loss or corruption of your SD card. Always eject the card from MASCHINE+. For
more information, see Using the File Menu.
When using Storage mode to transfer les between MASCHINE+ and your computer,
always eject the SD card drive from your computer before you disconnect Storage
mode. Failure to do so could result in data loss and corruption of your SD card. For
more information on Storage mode, and transferring les between your computer and
MASCHINE+, see Transferring Files to the SD Card.
5.3. Rear Panel Overview
The rear panel of MASCHINE+ holds the various hardware knobs, and sockets of the integrated
audio interface, power supply, and USB sockets.
The rear panel
1. PHONES VOLUME knob: Adjusts the level of the PHONES output (2).
2. PHONES socket: Stereo output socket for plugging in headphones with a 1/4" TRS jack. In your
music software, this stereo output appears as a pair of mono outputs labeled 3: Headphone
Left and 4: Headphone Right. Turn the PHONES VOLUME knob (1) to adjust their output level.
3. LINE OUT VOLUME knob: Adjusts the level of the LINE OUT 1 and 2 outputs (4).
4. LINE OUT L and R sockets: These 1/4" TRS sockets are the main outputs of the audio
interface. In your music software, they will appear as 1: Main Left and 2: Main Right. Turn the
LINE OUT VOLUME knob (3) to adjust their output level.
5. MIC IN GAIN knob: Adjusts the level of the MIC IN input (6). Use this knob to raise the
microphone signal until it reaches a level high enough for your music application without
clipping. If the microphone signal sounds distorted, slowly turn this knob down until the
artifacts have disappeared.
6. MIC IN socket: Balanced input socket for plugging in dynamic microphones with a 1/4" TRS
jack. When a microphone is plugged into the socket, the LINE IN 1 and 2 sockets (7) are
deactivated.
7. LINE IN 1 and 2 sockets: Pair of balanced 1/4" TRS input sockets accepting any line-level
signal (for example,., a synthesizer or mixer output). In your music software they will appear as
1: Input Left and 2: Input Right. If a microphone is plugged in the MIC IN socket (6), the LINE
IN 1 and 2 sockets are deactivated.
Page 39

MASCHI NE + O VERVIEW 31
8. MIDI IN and OUT sockets: The MIDI input (IN) and output (OUT) sockets let you integrate
MASCHINE+ into your MIDI setup. For example, you can connect a MIDI keyboard to the MIDI
IN socket and play melodic Sounds via the keyboard. Connect your favorite hardware synth to
the MIDI OUT socket and trigger its sounds from within your MASCHINE Project. You can
synchronize MASCHINE with other tempo-related instruments by sending or receiving a MIDI
Clock signal. Please refer to the Manual to discover all details on the various MIDI possibilities
and how to set them up.
9. PEDAL socket: Allows you to use a footswitch to control the transport in MASCHINE. Note that
this is a stereo socket, allowing you to plug in a double footswitch and control the PLAY and
the REC buttons in MASCHINE. The PEDAL socket can also be congured to accept
continuous pedals (“expression pedals”). For more details, please refer to the MASCHINE
Manual available from the Help menu.
10.USB B socket: Connects MASCHINE+ to your computer via USB 2.0.
11.Power Supply socket: Connect the included power supply to the socket, then turn it to the right
to lock it into place. Turn it to the right, and pull it out of the socket to remove it. It is not
necessary to use the power supply when MASCHINE+ is connected to a computer via USB and
in Controller mode. For more information on Controller mode, see Standalone vs. Controller
Mode.
Always use the power supply that was included with your MASCHINE+. Using
another type of power supply could result in performance issues.
12.USB A sockets: Connect peripheral devices such as USB-enabled keyboards, external audio
devices, and external drives.
Page 40

COMMON O P E R ATIONS 32
6. Common Operations
This section introduces a few very common operations in MASCHINE+ you will encounter in
numerous situations.
6.1. Using the 4-Directional Push Encoder
The 4-Directional Push Encoder (referred to as the 4-D encoder) combines the functionalities of a
conventional joystick, of a button, and of a continuous encoder. These aspects make it into a
multi-functional control element that can be used for navigation, for adjusting values of
parameters and controlling instruments. Hence, it can be moved to the four directions: up, down,
left, and right, as well as being pushed and rotated.
The 4-D encoder situated to the left of the VOLUME, SWING , and TEMPO buttons
Depending on the menu or context, the available actions differ:
• The displays are navigated by moving the 4-D encoder in a direction indicated by the
surrounding LEDs.
• Entries in a list are browsed by turning the 4-D encoder.
• The value of a highlighted parameter is adjusted by turning the 4-D encoder.
• A selection is conrmed by pushing the 4-D encoder.
6.2. Modes and Mode Pinning
MASCHINE+ has many different modes of operation.
In addition to the default Control mode (in which the pads trigger your Sounds), there are many
other modes for accomplishing various tasks. These modes are enabled by specic buttons, for
example, SCENE, CHORDS, BROWSER, etc.
For some of these modes, you need to hold the button to keep the mode active. For example,
when you press the SOLO button, the displays will show Solo-specic control options; when you
release the button, it MASCHINE+ switches back to the previous mode.
The buttons that are required to be held are in the middle column (left of the pads) along with the
NOTE REPEAT and AUTO button:
Page 41

COMMON O P E R ATIONS 33
By default, each of these buttons needs to be held in order to use the corresponding mode
Pinning Modes
You can also pin (lock) modes on MASCHINE+, so they do not switch back when releasing a mode
button:
1. Press and hold a mode button, for example, PATTERN.
2. Press Button 1 above the left display.
→ On the left screen, the PATTERN label under Button 1 gets highlighted. You can release the
PATTERN button: MASCHINE+ will remain in Pattern mode until you press PATTERN again.
Once a mode has been pinned MASCHINE+ will automatically pin the mode next time
it is pressed.
You can unpin the active mode by pressing Button 1 again.
Here is a list of all buttons that you can pin by simultaneously pressing Button 1:
• All buttons in the column at the left of the pads (SCENE, PATTERN, …, SOLO, MUTE).
Page 42

COMMON O P E R ATIONS 34
• NOTE REPEAT (Arp) button: Both Note Repeat mode (for pads in Group mode) and Arp mode
(for pads in Keyboard or Chords mode) can be pinned.
• FOLLOW (Grid) and VARIATION buttons: These buttons respectively switch to Grid and
Navigate mode when pressed with SHIFT simultaneously. These modes are already pinned by
default. You can unpin them and pin them again as usual by pressing Button 1.
• AUTO button: Instead of using Button 1, press SHIFT + AUTO to pin the AUTO mode. Moreover,
when you leave this mode it is automatically unpinned, it will be temporary again next time you
press AUTO.
6.3. Undoing and Redoing Actions
Undoing and re-doing your last actions can be a useful way to cancel operations you have
performed or to compare two versions before and after a change. You can undo most of the
actions you have made since loading or creating your Project.
Step Undo/Redo is the classic undo/redo. It cancels or re-executes each action you have made,
step by step.
On your MASCHINE+:
▶ To undo the last action, press SHIFT + Pad 3 (Step Undo).
▶ To redo the last action, press SHIFT + Pad 4 (Step Redo).
6.4. Focusing on a Group or a Sound
To display the content and parameters of a particular Sound or Group, you rst need to put it in
focus.
Setting the focus on a Sound or Group is slightly different than selecting it: The focus denes what
will be displayed, whereas the selection denes what will be affected by your edits.
Focusing on a Group
1. If necessary, press SHIFT + the desired Group button A–H to switch to the Group bank
containing the desired Group.
2. Press the desired Group button A–H.
→ The corresponding Group is now in focus.
Once the Group is focused you can use Button 1–3 above the left display to quickly
switch between the Master, the focused Group, and the last focused Sound in that
Group See section Switching Between the Master, Group, and Sound Level for more
information.
Setting the Focus on a Sound
1. If you want to set the focus on a Sound located in another Group, rst set the focus on its
Group as described above.
2. Press SELECT + the pad of the desired Sound (or simply press its pad if pads are in Pad Mode).
→ The corresponding Sound is now in focus.
Page 43

COMMON O P E R ATIONS 35
Once the Sound is focused you can use Button 1–3 above the left display to quickly
switch between the Master, the containing Group, and the focused Sound. See
section Switching Between the Master, Group, and Sound Level for more
information.
You can also select multiple Sounds at once to apply changes to all of them. See
section Selecting Multiple Sounds or Groups for more information.
6.5. Switching Between the Master, Group, and Sound Level
At any time you can quickly switch the Control view between the parameters of the Master, the
focused Group, or the focused Sound.
1. Press the CHANNEL or PLUG-IN button to enter Control mode.
2. Press Button 1 (MASTER), Button 2 (GROUP), or Button 3 (SOUND) above the left display to
show the Plug-in parameters and Channel properties of the Master, the focused Group, or the
focused Sound, respectively.
→ The selected tab lights up. The name of your Project, the focused Group, or the focused Sound
appears on the left display (under the MASTER, GROUP, and SOUND tabs), and the displays
show the Plug-in parameters and Channel properties of the Master, the focused Group, or the
focused Sound, respectively.
6.6. Navigating Channel Properties, Plug-ins, and Parameter
Pages
This section describes how to display/edit any Plug-in parameters or Channel properties located in
a Sound, Group, or Master.
Navigating Channel Properties, Plug-ins, and Parameter Pages
To navigate Channel Properties, Plug-ins, and Parameter Pages:
1. Set the focus on the desired Sound, Group, or the Master (see section Focusing on a Group or
a Sound).
2. Press the CHANNEL button to display the Channel properties or the PLUG-IN button to display
the Plug-in slots of the selected Sound, Group, or the Master.
3. Press Button 1 (MASTER), Button 2 (GROUP), or Button 3 (SOUND) to display the Plug-ins and
Channel properties of the Master, the focused Group, or the focused Sound.
4. Use the 4-D encoder or press Button 5/6 to navigate the Channel properties or Plug-ins (the
name of the selected Channel properties or Plug-in appears between the left and right arrows
under Button 5 and 6). The parameters of the selected Channel properties or Plug-in are shown
on the displays.
5. Use the Page buttons (underneath the BROWSER and SAMPLER buttons) to navigate through
the Parameter pages of the selected Channel properties or Plug-in. Moreover, if there is another
page available to the left or to the right of the current page, the corresponding Page button will
be half-lit.
Page 44

COMMON O P E R ATIONS 36
6. Use Knobs 1–8 under the displays to adjust the value of the parameters available on the
selected page. For continuous parameters, hold SHIFT while turning the Knobs to adjust the
values in ner increments.
The displays showing the Audio page from the Group’s OUTPUT properties.
Using the Navigate Mode
Alternatively, you can also navigate Channel properties and Plug-ins along with their Parameter
pages via the Navigate mode:
1. Press SHIFT + VARIATION to enter Navigate mode (or pin it by pressing NAVIGATE + Button
1).
2. Hold SHIFT + VARIATION, then Button 2 (PAGE NAV) to enter Page Navigation mode.
3. Press the CHANNEL button to display the Channel properties or the PLUG-IN button to display
the Plug-in slots of the selected Sound, Group, or the Master.
4. Press Button 5/6 to navigate the Channel properties or Plug-ins. The name of the selected
Channel properties or Plug-in appears between the left and right arrows under Button 5 and 6.
Furthermore, this Plug-in or set of Channel properties is highlighted on the left display.
5. Press the dimmed pads to select the desired Parameter pages. The names of the available
Parameter pages are shown on the right display along with the corresponding pads.
6. Upon your selection, the corresponding pad turns fully lit and the page name is highlighted on
the right display.
7. If there are more than 16 Parameter pages, press Button 7/8 to switch to the previous/next 16
pages.
8. Release the VARIATION button to get back to Control mode (or press VARIATION) a second
time if you pinned the Navigate mode).
→ The selected Parameter page now appears on the displays. Use Knobs 1–8 under the displays
to adjust the parameters.
6.7. Navigating Song View
You can control the position and zoom factor in the Song view using the following controls:
▶ Press SHIFT + IDEAS (Song), then button 2 (SONG) to enter Song mode.
▶ Turn Knob 5 (Arranger Zoom) to zoom in or out of the Arranger.
▶ Turn Knob 6 (Arranger Scroll) to scroll through the Arranger.
Page 45

COMMON O P E R ATIONS 37
6.7.1. Following the Playback Position
If the Song view doesn’t display the entire Loop Range currently selected, at some point the play
head will go beyond the portion of your Project currently displayed and you might lose track of the
playback position. To prevent this, you can force the Song view to follow the playhead.
To follow the playhead position during playback:
▶ Press FOLLOW button in the Transport section.
→ The FOLLOW button lights up. The Arranger will now switch to the next portion of your Project
(with the same zoom factor) as soon as the playhead reaches the end of the portion currently
displayed. This way, you always see the portion of the Project that is being played.
The Follow function is automatically deactivated as soon as you manually scroll to
another portion of the Arranger or of the Pattern Editor.
The Follow function affects the displays in Song mode, Pattern mode, Step mode, and Note
Repeat mode. Additionally, in Step mode the Follow function affects the pads: When Follow is
activated and the playhead has gone across all 16 steps shown by the pads, the pads
automatically switch to the next 16 steps of the Pattern, if any.
6.7.2. Scrubbing Through Your Song
Scrubbing is a convenient way to quickly navigate to a certain position in your song using the 4-D
encoder. The intervals at which you can scrub through a song are relative to Arrange Grid setting.
To scrub through your Song:
1. Press IDEAS (Song) then SHIFT + Button 2 to select Song mode.
2. Press SHIFT and turn the 4-D Encoder to scroll through your song at intervals relative to the
Arrange Grid value.
3. Press SHIFT, then press and turn the 4-D Encoder to scroll through your song in smaller
intervals relative to the Arrange Grid setting.
To set the Arrange Grid value, press SHIFT + FOLLOW (Grid) and press a pad relative
to the value you want to use.
6.8. Performing with Scenes and Sections
MASCHINE+ provides you with settings to ne-tune the timing of the jump between the Scenes
and Sections:
• The Perform Grid lets you quantize the Scene transitions: You can choose the point at which
the playback will leave the current Scene (Ideas view) or Section (Song view). For example, you
might not want a newly selected loop to re off immediately, you might want it to wait until the
next bar line. The available quantization values are: one bar, one-half note, one-quarter note,
one-eighth note, one-sixteenth note, the whole Scene/Section, and Off. If you choose Off, the
Scene/Section change will be performed immediately after you select the next loop.
Page 46

COMMON O P E R ATIONS 38
• The Retrigger setting lets you decide where the next loop will start:
• If Retrigger is activated, the next Section (Ideas view) or Section (Song view) that is
selected will be forced to play from the start. This is useful if you always want your Scenes
or Sections to play from the beginning regardless of what’s happening elsewhere in the
music.
• If Retrigger is deacrivated (default setting), the next Scene or Section that is selected will
play from the same offset to the beginning: for example, leaving the current Section on beat
3 will cause the new Section to start playing on its beat 3. This ensures that the global
groove of your track is not interrupted.
6.8.1. Jumping between Scenes and Sections
In Ideas view the Perform Grid and the Retrigger control the setting for the jump between Scenes
and in Song view it sets the grid for the jump between Sections.
To set the Perform Grid and the Retrigger settings:
1. Press SHIFT + IDEAS then press Button 1 or 2 to select Ideas view or Song View.
2. Press SHIFT + FOLLOW (Grid) to enter Grid mode (or pin it by pressing SHIFT + FOLLOW (Grid)
then Button 1).
3. Press Button 2 to select PERFORM.
4. Press a pad to select the desired value, for example, pad 9 (for 1/4, a quarter note).
→ The next time you select a new Scene/Section or loop range, the switch will happen on the next
quarter note.
Adjusting the Scene Retrigger Setting
To adjust the Scene Retrigger setting:
1. Press SHIFT + IDEAS (Song) then press Button 1 to select Ideas view.
2. Press SCENE (Section) to enter Scene mode (or pin it by pressing SCENE + Button 1).
3. At the bottom left corner of the left display, you see the current RETRIGGER value (Off by
default).
4. Turn Knob 1 to select On.
→ The next time you select a new Scene or loop range, it will start from the beginning.
Adjusting the Section Retrigger Setting
To adjust the Section Retrigger setting:
1. Press SHIFT + IDEAS (Song) then press Button 2 to select Song view.
2. Press SCENE to enter Section mode (or pin it by pressing SCENE + Button 1).
3. Press the Right Page button to access page 2.
4. At the bottom left corner of the left display you see the current RETRIGGER value (Off
bydefault).
5. Turn Knob 1 to select On.
→ The next time you select a new Section or loop range, it will start from the beginning.
Page 47

COMMON O P E R ATIONS 39
6.9. Adjusting Volume, Swing, and Tempo
At any time you can quickly adjust volume levels, swing, and the overall tempo of your Project
using the Quick Edit buttons.
Adjusting Volume
▶ Press the VOLUME button near the 4-D encoder.
→ The VOLUME button lights up. You can now adjust the volume for your overall Project, for each
Group, and for each Sound individually using the 4-D encoder as follows:
• To adjust the overall volume, turn the 4-D encoder. Hold SHIFT to adjust the value in ner
increments.
• To adjust the volume of a particular Group, hold its Group button (A–H) and turn the 4-D
encoder. Hold SHIFT to adjust the value in ner increments.
• To adjust the volume of an individual Sound, press and hold its pad and turn the 4-D encoder.
Hold SHIFT to adjust the value in ner increments.
As you adjust the volume, the left display shortly indicates its current value.
It is recommended you try this while your Pattern is playing, you will immediately hear
the effect of your changes.
Adjusting Swing
You can also adjust the overall swing of your Project. The Swing feature shifts some of the played
notes, hereby adding some “groove” to your Pattern. The procedure is similar to the one described
above for the volume:
1. Press the SWING button near the 4-D encoder. The SWING button lights up. If the VOLUME
button was still on, it turns off.
2. Turn the 4-D encoder to adjust the swing for your overall Project.
→ As you adjust the swing, the left display shortly indicates its current value.
You can also adjust the individual Swing values for Sounds and Groups by holding the
desired Group button or pad as described above for the volume.
Adjusting Tempo/Tune
▶ Press the TEMPO button.
→ The TEMPO button lights up. You can now adjust the tempo of your Project as well as the tune
for each Group and for each Sound individually using the 4-D encoder:
• To adjust the tempo, turn the 4-D encoder. Hold SHIFT to adjust the value in ner increments.
• To adjust the tune of a particular Group, press and hold its Group button (A–H) and turn the 4D encoder. Hold SHIFT to adjust the value in ner increments.
• To adjust the tune of an individual Sound, press and hold its pad and turn the 4-D encoder. Hold
SHIFT to adjust the value in ner increments.
As you adjust the tempo or the tune, the left display shortly indicates its current value.
Page 48

COMMON O P E R ATIONS 40
It is recommended you try this while your Pattern is playing, you will immediately hear
the effect of your changes.
▶ When you are done with your volume, swing, and tempo changes, press the lit VOLUME,
SWING, or TEMPO button to deactivate it.
6.10. Mute and Solo
Muting allows you to bypass a Sound or a Group, whereas Soloing is pretty much the opposite:It
mutes all other Sounds or Groups so that only the soloed Sound or Group is played.
The combination of muting and soloing is a useful means both to play live and to test different
sequences together.
In a live set you can mute and solo Groups and Sounds at the same time. Since soloing a Sound
mutes all Sounds except one, the MUTE button can then be used to “release” Sounds that have
been muted. You can use this technique to create a breakdown: solo a given Sound such as a kick
drum, then build the track up again by bringing the muted Sounds back in one at a time with the
MUTE button.
To enter solo mode:
The Solo mode
1. Press and hold SOLO to enter Solo mode. You can also press SOLO + Button 1 to pin this mode
and make it permanent.
2. Solo Sounds by pressing their pads, and solo Groups of the current Group bank by pressing
their Group buttons. Press Button 3 and 4 to switch to the previous/next Group bank.
To enter mute mode:
The Mute mode
1. Press and hold MUTE to enter Mute mode. You can also press MUTE + Button 1 to pin this
mode and make it permanent.
Page 49

COMMON O P E R ATIONS 41
2. Mute Sounds by pressing their pads, and mute Groups of the current Group bank by pressing
their Group buttons. Press Button 3 and 4 to switch to the previous/next Group bank,
respectively.
In both Solo and Mute modes you will note the following:
• On your controller, the unmuted pads and Group buttons are fully lit, while the muted ones are
dim-lit (and the empty ones are off).
• On the displays, the unmuted Sounds and Groups are highlighted while the muted ones are not
(and the empty ones are… empty).
In both modes the displays provide a few more functions:
▶ Press ALL ON (Button 5) to activate all Sounds in the selected Group.
▶ Press NONE (Button 6) to deactivate all Sounds in the selected Group.
▶ Hold Button 8 (AUDIO) to see on the pads which Sounds have audio mute enabled (see above):
Sounds with audio mute enabled have fully lit pads, while Sounds with only event mute have
dim-lit pads. This is also indicated on the right display (Sounds with audio mute are
highlighted). While holding Button 8 (AUDIO), press any pad to switch the audio mute for this
Sound on or off.
Enabling/disabling audio mute for a Sound does not mute/unmute it! It only sets this
Sound to get both its events and its audio muted when you will mute it via the usual
way (pressing MUTE + its pad).
Since soloing a Sound mutes all Sounds except one, the MUTE button can then be
used to “release” Sounds that have been muted. You can use this technique to create
a breakdown: Solo a given Sound such as a kick drum, then build the track up again
by bringing the muted Sounds back in one at a time while holding the MUTE button.
6.11. Using the Smart Strip
The Smart Strip puts control of several parameters at your ngertips: You can use the Smart Strip
to apply pitch bend or modulation to the sound you are playing on the pads, tweak Perform FX in
real-time, or play Sounds by strumming on the Smart Strip.
Smart Strip with PITCH mode enabled.
When the Smart Strip modes are not in use the LEDs show the playhead position within a pattern
or song.
• In Ideas view, the Smart Strip LEDs indicate the playhead position within the selected pattern
during playback and recording.
Page 50

COMMON O P E R ATIONS 42
• In Song view, the Smart Strip LEDs indicate the playhead position within the song.
This feature provides great visual feedback to aid your timing when recording or switching up
patterns during a live set.
This feature is not available when the Smart Strip modes (Pitch, Mod, Perform, and
Notes) are in use.
6.11.1. Pitch Mode
In Pitch mode, sliding your nger on the Smart Strip “bends” the pitch of the notes you play on the
pads, i.e., it detunes the sound by a certain amount. If you have used the pitch bend wheel on a
synthesizer or standard MIDI keyboard before, you are probably familiar with this effect.
In Pitch mode, the scale on the Smart Strip is centered, as indicated by a white LED in the middle
of the Smart Strip. Sliding your nger to the left will flatten the pitch. Sliding your nger to the right
will sharpen the pitch. The amount of pitch bend applied to the Sound is indicated by the LED dots
above the Smart Strip. Once you lift your nger off the Smart Strip, the pitch of the sound will
return to standard tuning.
▶ To enable Pitch mode, press the PITCH button.
6.11.2. Modulation Mode
In Modulation mode, sliding your nger on the Smart Strip modulates the sound of the notes you
play on the pads. The Smart Strip always controls the parameter that is assigned to the standard
MIDI CC #1. This MIDI Continuous Controller is reserved for the modulation wheel. If you have
used the modulation wheel on a synthesizer or standard MIDI keyboard before, you are probably
familiar with the effect.
In Modulation mode, the scale starts at the left side of the Smart Strip, as indicated by a white
LED. Sliding your nger to the right will apply an increasing amount of modulation, as indicated by
the LED dots above the Smart Strip. When you lift your nger off the Smart Strip, the modulation
value will remain at the position where the strip was last touched; the LED dots above remain lit to
indicate this position.
▶ To enable Modulation mode, press the MOD button.
6.11.3. Notes Mode
In Notes mode, sliding your nger on the Smart Strip plays the pads you hold one after the other.
Sliding your nger on the Smart Strip while no pad is held will play all Sounds mapped to the pad
matrix in Pad Mode or Keyboard mode. If you slide your nger from left to right, the pads will be
played in an ascending manner. If you slide your nger from right to left, the pads will be played in
a descending manner. This applies regardless of which pads (if any) are held.
To play notes using the Smart Strip:
1. Load a Group (in Pad mode) or Sound (in Keyboard/Chords mode) so they are mapped to the
pads.
2. Press the NOTES button to enable Notes mode.
3. Press and hold the pads you want to play.
4. Slide your nger on the Smart Strip to “strum” the sounds mapped to the pads.
Page 51

COMMON O P E R ATIONS 43
6.12. Entering Text
At certain times when using MASCHINE+ you will need to enter text in order to, for example, name
les, projects, or enter passwords. In such situations the following text entry dialog will appear:
Save Project As text entry dialog
To enter text into the dialog, use a combination of the following:
▶ Turn the 4-D encoder to select characters on the same line.
▶ Push the 4-D encoder up or down to jump to another line of characters.
▶ Press the 4-D encoder to enter the selected character.
▶ Press Button 5 (SPACE) to enter a space.
▶ Press Button 6 (BACKSPACE) to clear a character or the whole text entry eld.
▶ Press Button 7 (CANCEL) to exit without making any changes.
▶ Press Button 8 (ENTER) to enter text.
Page 52

WORKIN G W I TH MASCH IN E + 44
7. Working with MASCHINE+
This chapter holds useful information for your every-day work with MASCHINE+.
7.1. Using the Library
The Library enables you to download and install products, view installed products, and check your
Native Instruments account for updates of products you own.
7.1.1. Downloading Content to Your Library
The Library enables you to download and install all of your plug-ins and content from your Native
Instruments account using your Native ID.
To download and install content to your Library:
1. Press SETTINGS.
2. Use the 4-D encoder to select Library.
3. Turn Knob 1 to select Available.
→ A list of available products from your account are listed on the right-hand display.
4. Turn Knob 8 to select a product.
5. Press Button 8 (INSTALL ) to install the product.
→ You can pause or resume the installation at any time by pressing Button 8. If you want to
cancel the installation press Button 7. After installation, the product is available from the
Browser.
7.1.2. Updating Installed Products
The Library enables you to view any available updates for the products you have already installed.
To view a list of updates available for the products installed on your MASCHINE+:
1. Press SETTINGS.
2. Use the 4-D encoder to select Library.
3. Turn Knob 1 to select Updates.
→ All available updates are listed on the right-hand display.
4. Turn the 4-D encoder or Knob 6 to scroll through the list of product updates.
5. Press Button 8 (UPDATE) to install the update for the selected product.
→ The update is installed and now available from the Browser.
7.1.3. Viewing Products Installed in Your Library
The Library provides a list of all products installed on your MASCHINE+.
To view a list of products downloaded and installed on your MASCHINE+:
1. Press SETTINGS.
2. Use the 4-D encoder to select Library.
Page 53

WORKIN G W I TH MASCH IN E + 45
3. Turn Knob 1 to select Installed.
→ All installed products are listed on the right-hand display.
4. Turn the 4-D encoder or Knob 6 to scroll through the list of installed products.
Products installed in your Library are available from the Browser.
If the SD memory card has been removed and then reinserted into the slot, or if the
content on the card has been changed, it is advisable to perform a rescan of your
content by pressing Button 4 (RESCAN).
7.2. Using the File Menu
MASCHINE+ provides a dedicated mode that enables you to manage your Project les. This
includes creating new Project les, saving Project les, and also saving copies of les as you work
through iterations of your projects. You can also view a list of the most recent projects that have
been worked on, and of course load existing Projects. Additionally, you can also use this mode to
export audio les. eject and format storage devices.
To access File mode:
▶ Press the FILE button.
→ The File menu is displayed.
The available File menu options are as follows:
Option Description
NEW Creates a new Project le. If you already have a project open, you will be
prompted to save or discard it, after which, a new Project will be created.
SAVE AS Enables you to save the current Project under an alternative name.
SAVE COPY Quickly enables you to save a copy of the current Project with a numerical
iteration added to the le name.
EXPORT
AUDIO
STORAGE Enables you to format and eject storage devices such as SD cards and
RECENT Provides a list of recent Projects for quick and easy access.
LOAD Loads the selected le. Turn the 4-D encoder or Knob 8 to select a Project le
Enables you to congure options to export your ideas or songs as audio
les. For more information on exporting audio, see Exporting Audio.
external drives connected to your MASCHINE+. For more information on
how to format, and eject storage devices, see Formatting a Storage Device
and Ejecting a Storage Device.
and press the 4-D encoder or Button 8 to load it.
Always eject storage devices before removing them from MASCHINE+. Removing
storage devices without rst ejecting them could result in data loss or le corruption.
For information on transferring les from the SD card in your MASCHINE+ to a
computer via USB, see Transferring Files to the SD Card.
Page 54

WORKIN G W I TH MASCH IN E + 46
7.2.1. Working with Storage Devices
The Storage menu enables you to format and eject external storage devices connected to your
MASCHINE+.
Here are a few points to note when working with external storage devices:
• In addition to SD Cards, MASCHINE+ supports storage devices such as USB flash drives, and
external disk drives using USB2 with a power rating up to 2.5W (5V@500mA).
• MASCHINE+ uses the exFAT le system, but can also read drives formatted with the FAT le
system.
• For the best results, it is recommended that external storage devices are formatted in exFAT
using the onboard MASCHINE+ Format utility, as formatting storage devices on some other
operating systems may result in them appearing on MASCHINE+ with partitions. For more
information on formatting external storage devices, see Formatting a Storage Device.
• Additionally, using exFAT is benecial as it enables easy le transfer between different
operating systems, for instance, if you have samples stored on Windows or macOS you can
easily transfer them to an external storage device formatted with exFAT or FAT and access
them on MASCHINE+.
• Files on external storage devices connected to MASCHINE+ are accessible from the Browser
when the USER toggle is activated. For more information loading user content, see Accessing
User Content.
• Always eject external storage devices when removing them from MASCHINE+. For more
information on ejecting storage devices, see Ejecting a Storage Device.
Failure to eject a storage device before removing it from MASCHINE+ could
damage your storage device and cause data loss.
• Samples accessed from external storage devices can be saved to your SD card using the SAVE
AS option in the File menu. For more information, see Saving a Project.
Formatting a Storage Device
MASCHINE+ can accept several types of storage devices including SD cards, USB flash drives, and
external USB hard drives. You can use any of these types of storage devices as long as they are
formatted in a way that MASCHINE+ can read and write to them.
MASCHINE+ uses exFAT le system but can also read FAT. For the optimal experience, we
recommend formatting your storage devices using the onboard formatting utility.
To format a storage device:
1. Press FILE (Save) to enter File mode.
2. Press Button 6 (STORAGE).
3. Use the 4-D encoder to select the storage device you want to format.
4. Press Button 7 (FORMAT) to format the selected device.
→ MASCHINE+ will conrm that you want to format the storage device.
5. Press Button 8 (OK) to conrm you want to format the device.
→ The storage device is formatted and now ready for use.
Page 55

WORKIN G W I TH MASCH IN E + 47
Using Format will erase all data on the selected storage device. If required, back-up all
data before you format the device.
Ejecting a Storage Device
It is not always easy to tell whether your MASCHINE+ is still accessing or writing les to storage
devices. Therefore pulling a memory card out of its reader or removing an external drive out of the
USB port could cause corrupted les, unreadable media or both. Ejecting your storage device
safely decreases these chances. You can safely remove storage devices using built-in utilities
designed for disconnecting hardware.
To safely eject a storage device:
1. Press FILE (Save) to enter File mode.
2. Press Button 6 (STORAGE).
3. Use the 4-D encoder to select the storage device you want to eject.
4. Press Button 8 (EJECT) to eject the selected device.
→ You can now safely remove the storage device you selected from MASCHINE+.
7.2.2. Transferring Files to the SD Card
Storage mode enables you to exchange les between the SD memory card in your MASCHINE+
and a computer.
To exchange les you must rst connect your MASCHINE+ to a computer using a USB cable, then
activate Storage mode. The SD card within your MASCHINE+ then appears as a drive on your
computer. For more information, see Connecting MASCHINE+ to a Computer.
You can exchange the following les types:
• Projects: This enables you to exchange Project les between MASCHINE+ and the MASCHINE
software. For example, you could start a project on MASCHINE+ and then nish it using the
MASCHINE software on your computer with MASCHINE+ in Controller mode, or vice versa.
• Samples: This enables you to exchange samples between your computer and MASCHINE+ .
Note that MASCHINE+ only accepts the following audio le formats: .aif and .wav.
Accessing Storage Mode and Transferring Files
To access Storage mode and transfer les:
1. Press SETTINGS.
2. Use the 4-D encoder to select System.
3. Press Button 3 (STORAGE).
→ The SD card of your MASCHINE+ is now available as a drive on your computer and you can
now transfer les.
4. Add Projects to the following directory on the SD card: Native Instruments\Maschine 2\Projects.
5. Add samples to the following directory on the SD card: Native Instruments\Maschine 2\Samples.
→ The les are transferred to the SD card in MASCHINE+. When you have nished transferring
les, eject the SD card drive from your computer.
Page 56

WORKIN G W I TH MASCH IN E + 48
Accessing Storage mode stops the Transport, deactivates access to all other modes,
and pauses any les downloading in the Library while in use. You can continue using
your MASCHINE+ after you have disconnected from Storage mode.
Disconnecting from Storage Mode
To disconnect from Storage mode:
1. On your computer, eject the MASCHINE+ SD card drive.
2. On MASCHINE+, press SETTINGS.
3. Press Button 8 (DISCONNECT).
→ The SD card in MASCHINE+ is now disconnected from your computer.
7.2.3. Opening Files from Your SD Card
You can open your user content saved directly from the File menu. This includes Projects, Groups,
and Sounds.
To open your les from the SD card on MASCHINE+.
1. Press BROWSER.
2. Press Button 4 (USER)
3. Press Button 1 or 2 to select the le type you want to load.
4. Turn Knob 2 to Select Maschine.
5. Turn Knob 8 to select the name of the project you want to load.
6. Press Button 8 LOAD.
→ The selected le is loaded from the SD card.
If les from your SD card do not automatically appear in the Browser, press SHIFT +
Button 1 (RESCAN) to scan for new content.
7.2.4. Saving a Project
Sometimes it is useful to have the ability to save all Samples used in your Project outside of the
MASCHINE Library. This is particularly useful if you want to take a Project to another studio or if
you want to back up a production with all the related les. This is an effective way to transfer
Projects and Samples between and MASCHINE software and MASCHINE+.
To save a Project on MASCHINE+:
1. Press FILE (Save).
2. Press Button 3 SAVE AS.
3. Turn Knob 1 to select Project.
4. Turn Knob 3 if you want to save the Project with or without its samples.
5. Turn Knob 4 if you want to delete (not save) unused samples from within the Project.
6. Press Button 8 SAVE AS.
Page 57

WORKIN G W I TH MASCH IN E + 49
7. Press ENTER to save the Project and its samples.
→ The Project is saved to the SD card.
Projects are saved to the following directory on your SD card: \Native Instruments
\Maschine 2\Projects.
You can also save a single Group or Sound. For more information, see Saving a
Group, and Saving a Sound.
7.2.5. Saving a Group
Sometimes it is useful to have the ability to save a Group outside of the MASCHINE Library. If you
want to take a Group to another studio or if you want to backup or share a custom drum kit with all
the related les, this comes in handy. This procedure is also useful if you want to transfer Groups
between MASCHINE+ and MASCHINE software.
To save a Group on MASCHINE+:
1. Press FILE (Save).
2. Press Button 3 SAVE AS.
3. Turn Knob 1 to select Group.
4. Turn Knob 2 to select the name of the group you want to save, or simply press the Group
button.
5. Press Button 8 SAVE AS.
6. Enter a name for your Group.
7. Press ENTER to save the Group.
→ The Group is now saved to the SD card.
Groups are saved to the following directory on your SD card: \Native Instruments
\Maschine 2\Groups.
You can also save your whole Project, see Saving a Project.
7.2.6. Saving a Sound
Using the File menu you can save individual Sounds directly to the SD card. This procedure is also
useful if you want to transfer Sounds between MASCHINE+ and MASCHINE software.
To save a Sound on MASCHINE+ :
1. Press FILE (Save).
2. Press Button 3 SAVE AS.
3. Turn Knob 1 to select Sound.
Page 58

WORKIN G W I TH MASCH IN E + 50
4. Turn Knob 2 to select the name of the Sound you want to save, or simply press the
corresponding pad.
→ The corresponding pad of the selected Sound will light-up brightly.
5. Press Button 8 SAVE AS.
6. Enter a name for your Sound.
7. Press ENTER to save the Sound.
→ The Sound is now saved to the SD card.
Sounds are saved to the following directory on your SD card: \Native Instruments
\Maschine 2\Sounds.
You can also save your whole Group including all of its Sounds, see Saving a Group.
7.2.7. Exporting Audio
Use Export Audio to export your complete arrangement as audio from the Song view, or render
individual Scenes or Sections as audio les in from the Ideas view.
Export Audio is available from the File page.
• In Ideas view, it is used to export individual Scenes, or all Scenes at once.
• In Song view, it is used to export your complete arrangement or individual Sections of the
arrangement depending on the Loop range.
The exact length of the exported audio le depends on the Loop Optimize setting (see description
below). Export Audio also contains options that allow you to select the source you want to export
such as the Master, Groups, or Sounds.
To export Ideas or a Song as audio:
1. Enter Ideas or Song mode by pressing IDEAS, then SHIFT.
→ This will determine if you are able to export ideas or your whole song.
2. Set the Loop Range to the region that you want to export.
3. Press FILE, then Button 5 EXPORT AUDIO.
4. If necessary, adjust the available export options (see description below) using Knobs 1 to 8.
5. Press Button 8 Export to start the export process, or Button 7 Cancel to exit the page without
exporting.
Page 59

WORKIN G W I TH MASCH IN E + 51
Element Description
SOURCE Select what you want to export. The content of the Output list under the menu
depends on your selection in the menu:
Master: Select this to export the Master output signal (including all Groups
and Sounds and their effects) to one audio le.
Group: Select this to export the output signals of specic Groups to individual
audio les.
Sound: Select this to export the output signals of specic Sounds to individual
audio les.
SCENES/
RANGE
Set the range for the audio you want to export. The options here will differ
depending on whether MASCHINE is in Ideas view or Song view.
In Ideas view the following Scene options are available:
All: Select this option to export all Scenes as audio.
Selected: Select this option to export the selected Scene as audio.
In Song view the following Range options are available:
All: Select this option to export all Sections in the arrangement as audio.
Loop: Select this option to export the selected Section of the arrangement as
audio.
SAMPLE
RATE
Select from ve different sample rates for the exported audio le(s): 44100 Hz
(this is the sample rate of the audio CD format), 48000 Hz, 88200 Hz, 96000
Hz, and 192000 Hz.
TYPE Select the required audio format : uncompressed WAV or AIFF.
BIT DEPTH Select from three different bit depths (or bit resolutions) for the exported
audio le(s):
16 Bit is the bit depth of the audio CD format.
24 Bit is well suited for mastering.
32 Bit float is the bit depth used internally the audio processing engine.
Choose this setting if you plan to further process the exported audio using
other high-end digital audio devices or applications that support this bit depth.
This setting will allow greater headroom, however, note that the exported les
will be signicantly larger.
Page 60

WORKIN G W I TH MASCH IN E + 52
Element Description
LOOP
OPTIMIZE
NORMALIZE Select this option to normalize your audio as it is exported. This means the
SPLITBYSE
CTION
Optimize the audio le for use as a loop:
Switch on Loop Optimize to keep the exact Loop Range when exporting audio.
Any effect tail will be rendered into the beginning of the audio le. Additionally,
the le metadata will include the tempo (in BPM) and length (in bars). Turn
this feature off to prolong the audio le when exporting audio, for example, to
keep the tail of a reverb. The end of the exported audio will always correspond
to a bar division.
exported audio will be brought to the highest possible level without clipping (0
dBFS).
Select this option to export audio within the loop braces. If the loop spans
multiple Sections, individual audio les for each Section within the selected
area will be created. Please note, if you only select one Section and export,
you will not gain any advantage by using this feature.
Names of the Exported Audio Files
The exported audio les are named according to the following rules:
• If Master Output is selected in the Output menu the audio le will be named as follows:
[Project name] - [BPM].wav/aiff.
• If Group Outputs is selected in the Output menu the audio les will be named as follows:
[Project name] - [Group order number] [Group index (letter + number)] [Group name] [BPM].wav/aiff.The Group order number is a two-digit number indicating the “order of
appearance” of the Group in the Group List. This ensures that an alphabetical listing of the
exported les will reflect the structure of your Project.
• If Sound Outputs is selected in the Output menu the audio les will be named as follows:
[Project name] - [Sound name] - [BPM].wav/aiff.
In addition, if the name of the le about to be exported is already used in the
destination folder, a hyphen followed by an index number is added to the name (e.g.,
“ - 1,” “ - 2,” “ - 3,”) to avoid any le being overwritten.
7.3. Settings Overview
The Settings page lets you specify various preferences to customize your MASCHINE+. Using the
4-D encoder, you can access different categories presented as "tiles" to set preferences for the
MASCHINE+, such as recording options, audio card conguration, network access, and MIDI.
Using the Settings page you can also update the operating system of your MASCHINE+, access
your library to download, install, and update your plug-ins, and switch between Stand-alone and
Controller modes.
To select open the Settings panel and select options:
1. Press SETTINGS to open the Settings panel.
2. Move the 4-D encoder in any direction to select a category, or use Buttons 5 and 6.
Page 61

WORKIN G W I TH MASCH IN E + 53
The Setting page with General settings selected
The Settings page contains the following categories:
• General: Contains all of the global settings for MASCHINE+. This includes settings for the
Metronome, Count-in, Quantize, Project reload, Scene/Section, and Colors. For more
information, see General Settings.
• Audio: Contains settings related to your audio interface. This can be used to congure the
internal or external audio interface for MASCHINE+. For more information, see Audio Settings.
• MIDI: Allows you to set up the MIDI input and output ports for MASCHINE+. This page also
includes MIDI Sync, Clock Offset, and Ableton Link. For more information, see MIDI Settings.
• Hardware: Enables you to customize how the pads react to your playing, adjust the brightness
of the displays, and set the sensitivity of the knobs. For more information, see Hardware
Settings.
• Library: Provides an overview of the plug-ins installed on your device and enables you to use
your Native ID to download, install, and update new plug-ins. For more information, see Library
Settings.
• Network: Provides an overview of available Wi-Fi networks. Here you see which network you
are connected to and choose to connect, disconnect, or enable Airplane mode. For more
information, see Network Settings.
• System: Allows you to update the operating system of your MASCHINE+, switch to Storage
mode or Controller mode, and reset your device. For more information, see System Settings.
• About: Provides an overview of the System version and rmware installed on your MASCHINE
+. You can also use this page to view a list of MASCHINE+ credits and select whether you want
to enable or disable usage data tracking. For more information, see About Settings.
7.3.1. General Settings
General contains all of the global settings for MASCHINE+. This includes settings for the
Metronome, Count-in, Quantize, Project reload, Scene/Section, and Colors.
To display the General page:
1. Press SETTINGS.
2. Use the 4-D encoder to select General.
3. Use the Page buttons to select a page.
4. Use the Knobs 1–8 to change settings.
The General page provides the following options:
General Settings (Page 1)
Page 62

WORKIN G W I TH MASCH IN E + 54
Setting Description
Metronome
ENABLED Activates/deactivates the metronome. A metronome is a device used by
musicians that marks time at a selected rate by giving a regular tick in
beats per minute.
LEVEL Adjusts the volume level of the metronome.
TIME Selects the time interval between each tick of the metronome. By default
the metronome indicates quarter notes (1/4).
AUTO-ON Automatically turns on the metronome when you start recording a Pattern.
When you start recording a Pattern, the metronome is automatically
enabled. When you exit recording the metronome returns to its state before
the recording (this can be on or off). The Auto-on option does not affect the
Count-in: Even if Auto-on is deactivated, the metronome turns on when you
press SHIFT + REC to start the Count-in.
Count-In
LENGTH Sets the duration of the Count-in, for instance, how long the metronome
will sound before the recording actually starts.
Time Signature
NUMERATOR Sets the number of beats in a measure. For example, in 4/4, there are 4
beats per measure.
DENOMINATOR Sets which type of note receives one beat. If the denominator is a 4, a
quarter note counts as one beat; if the denominator is an 8, an eighth note
counts as one beat; if the denominator is a 16, a 16th note counts as one
beat, and so on...
General Settings (Page 2)
Setting Description
Project
RELOAD Automatically reloads the last Project on startup.
Quantize
Page 63

WORKIN G W I TH MASCH IN E + 55
Setting Description
MODE Automatically quantize your input as you record.
Select one of the following Input Quantization modes:
None: Input Quantization is deactivated. Events you play or record on the
Pads are not quantized.
Record: Input Quantization is applied only when you record the Pads.
Play/Rec: Input Quantization is applied both when you play on the pads and
when you record them. In Play/Rec mode, quantization while playing is
slightly different from the quantization applied while recording: When
recording, all events are quantized to the closest step, possibly ahead of the
event. When playing, events occurring in the rst half of the steps are left
untouched (since you cannot bring them forward in the timeline) whereas
events occurring in the second half of the steps are quantized to the next
step.
Scene/
Section
DUPLICATE Selects how the Duplicate function will operate when duplicating Scenes.
Scene Only: Only the Scene is duplicated. The result is a new unlinked Scene
with the same Patterns referenced.
Scene and Patterns: The Scene itself and additionally all Patterns are
duplicated. The new Scene and Patterns are now completely independent
from the originals.
LINK WHEN
DUPL
Creates a linked copy of a Section when using the Duplicate function. By
default this feature is deactivated.
When enabled, the Duplicate function will create a linked copy of a Section. A
linked copy will automatically be updated when any instance of a linked
Section is edited. This way, you don’t need to keep track of which Section is
the “original.”
Pattern
LENGTH Sets the default length of a Pattern.
GROW Sets the default of Auto-growing Patterns on or off. Auto-Growing Patterns
enables you to record patterns of an undened length. This means you can
quickly capture an idea without having to set a pattern length in advance.
Simply begin recording and the length of the pattern will grow until you stop
recording. When you have nished recording, any silence at the end of the
pattern will automatically be trimmed to the nearest Bar (quantization can be
adjusted via Grid settings).
General Settings (Page 3)
Page 64

WORKIN G W I TH MASCH IN E + 56
Setting Description
Colors
SCENE Selects the default color for your Scenes. In the menu, you can select the
desired color from the 16-color palette or White (default setting). The color
selected as default is highlighted in the menu. If you select Auto, each Scene will
have a different default color.
GROUP Selects the default color for your Groups. In the menu, you can choose the
desired color from the 16-color palette. The color selected as default is
highlighted in the menu. If you select Auto (default setting) each Group will have
a different default color.
SOUND Selects the default color for your Sounds. In the menu, you can choose the
desired color from the 16-color palette. The color selected as default is
highlighted in the menu. If you select Auto each Sound will have a different
default color. If you select Use Group (default setting) Sounds will by default
mirror the color of the Group to which they belong.
LOAD
COLORS
Enables you to load Color settings with your MASCHINE les (Projects, Groups,
Sounds, etc.). If you turn off Load with Colors (On by default), saved colors will
not be used next time you load les. The default colors set in this Colors page
will be used instead.
7.3.2. Audio Settings
The Audio page contains settings related to your audio interface. This can be used to congure the
internal or an external audio interface for MASCHINE+. The right-hand display provides an
overview of the current status of your audio inputs and output, including measurement of the total
latency.
To display the Audio page:
1. Press SETTINGS.
2. Use the 4-D encoder to select Audio.
3. Use the Page buttons to select a page.
4. Use the Knobs 1–8 to change settings.
Audio Settings page 1 provides the following options:
Setting Description
Interface
DEVICE Selects available the internal, or external audio devices when they are connected
to the USB A ports.
The following external devices from Native Instruments are supported:
• KOMPLETE AUDIO 1
• KOMPLETE AUDIO 2
• KOMPLETE AUDIO 6 (MK2)
For more information on these products please refer to the Native Instruments
website: https://www.native-instruments.com/en/catalog/komplete/audio-
interfaces/
Page 65

WORKIN G W I TH MASCH IN E + 57
Audio Settings pages 2 to 6 provide the following options:
Setting Description
Input
Routing
1–8 Allows you to select which inputs on your audio interface should be used for
the four stereo inputs of MASCHINE+. Select the inputs of your audio
interface on the right column by clicking the elds: you will be presented with
all of the available Inputs across several pages. The choices made here will,
for example, determine which inputs can be used when sampling external
sources.
Output
Routing
1–16 Represents a list of the 16 stereo outputs from MASCHINE+ across several
pages: you can assign them to the outputs of your audio interface. Output
routing ports are spread across pages 3–8 of the Audio settings.
7.3.3. MIDI Settings
The MIDI settings page allows you to set up the MIDI input and output ports for MASCHINE+. This
page also includes MIDI Sync, MIDI Change, Clock Offset, and Ableton Link settings.
To display the MIDI page:
1. Press SETTINGS.
2. Use the 4-D encoder to select MIDI.
3. Use the Knobs 1–8 to change the settings.
Page 1 of the MIDI settings contains the following settings:
Setting Description
MIDI Sync
MODE Selects the MIDI Sync mode preference:
• Off: No MIDI sync mode is selected.
• Send Clock: Sends a MIDI Clock signal to any device that is capable of
receiving MIDI Clock. This could be hardware such as a synthesizer, drum
machine, or even another software sequencer.
• Receive Clock: Receives external MIDI Clock signals and can then be
controlled by any device capable of sending MIDI Clock. This could be
hardware such as a drum machine, another groove box or sequencer, or
another software sequencer. Note that the Receive Clock option is not
available when Link is active.
CLOCK
OFFSET
MIDI Input
Compensates for delay that may occur during MIDI data transmission.
Delayed MIDI Clock data will cause external devices to respond too late, thus
making your track sound out of sync. By adjusting the Clock Offset value, you
can set an amount of latency to be compensated (in milliseconds).
MASCHINE+ will then send MIDI Clock events ahead of time as dened. Clock
Offset is not available when MIDI Sync Mode is set to Off.
Page 66

WORKIN G W I TH MASCH IN E + 58
Setting Description
DEFAULT Enables you to play your Sound(s) via MIDI notes, for example, from a MIDI
keyboard. By default and without any conguration, incoming MIDI notes on
any MIDI port and any MIDI channel, or via USB, will trigger the pitch of the
focused Sound. In addition, you can select that a Sound receives no MIDI
input and dene the default setting for MIDI input by selecting the Default
MIDI Input Mode preference. Select one of the following MIDI input mode
options:
• Focus: MIDI input from any connected controller can trigger the focused
(selected) Sound.
•
None: Selected Sounds will not receive MIDI data.
Link
ENABLED Enables the Ableton Link protocol by default. Applications that support
Ableton Link can join a Link session when connected to the same network. For
more information on Ableton Link, see Syncing MASCHINE+ using Ableton
Link.
Input
Devices
SELECT Displays a list of all available MIDI inputs of your MASCHINE+. Use STATUS to
activate/deactivate each input.
STATUS Displays the current status of the MIDI input device selected in SELECT. Here
you can activate/deactivate the selected MIDI input.
Output
Devices
SELECT Displays a list of all available MIDI outputs of your MASCHINE+. Use STATUS
to activate/deactivate each input.
STATUS Displays the current status of the MIDI output device selected in SELECT.
Here you can activate/deactivate the selected MIDI output.
Page 2 of the MIDI Settings contains the following:
MIDI
Change
Page 67

WORKIN G W I TH MASCH IN E + 59
TYPE Selects the type of MIDI Change item you want to trigger using Notes or
Program Change MIDI messages from an external MIDI device.
Scene: Selects Scenes as the item to be triggered via MIDI note or Program
Changes messages.
Section: Selects Sections as the item to be triggered via MIDI note or Program
Changes messages.
Lock: Selects Lock snapshots as the item to be triggered via MIDI note or
Program Changes messages.
For more information on MIDI Change, see MIDI Change.
TRIGGER Selects the type of trigger you want to use to change Scenes, Sections, or Lock
snapshots from an external MIDI device.
None: Removes any selection as the trigger for MIDI Change messages,
effectively turning the feature off.
Note: Selects MIDI Note messages as the trigger for MIDI Changes.
Program Change: Selects Program Changes Note messages as the trigger for
MIDI Changes.
SOURCE Selects the external input device used to trigger MIDI Change. The name of
your external device will appear here. Note that the external MIDI device must
rst be selected and activated in the Input Devices section on page one of the
MIDI settings. For more information, see the SELECT and STATUS entries in
the table above.
CHANNEL Selects the MIDI channel number MASCHINE+ will receive MIDI notes or
Program Change messages. Your external MIDI device sending the messages
must be set to the same MIDI channel for MASCHINE+ to receive these
messages.
7.3.4. System Settings
The System settings enable you to update the MASCHINE+operating system, switch to Storage
mode to exchange data between the SD card in MASCHINE+ and your computer, or enter
Controller mode to use MASCHINE+ as a controller for the MASCHINE software running on a
computer.
Using the SHIFT you can also nd National options to reset your MASCHINE+, and manually scan
for system updates.
To display the System settings page:
1. Press SETTINGS.
2. Use the 4-D encoder to select System.
3. Use the Buttons 1–8 to change settings.
Page 68

WORKIN G W I TH MASCH IN E + 60
4. Press SHIFT to see additional settings.
The Device page provides the following settings:
Setting Description
STORAGE Allows you to access the SD card within your MASCHINE+ when connected
via USB. In this mode, you can transfer content between MASCHINE+ and
your computer. For more information on Storage mode, see Using
MASCHINE+ in Controller Mode.
CONTROLLER Activates Controller mode. In Controller mode MASCHINE+ can be used as a
controller for the MASCHINE software, where all processing is performed by
the connected computer. It is possible to start exchange Project les and
samples between MASCHINE+ and your computer using Storage mode. This
means you could effectively, for example, start a Project on MASCHINE+ and
then nish later on your computer using the MASCHINE software.
To use Controller mode, your MASCHINE+ must be connected via USB to a
computer that is running the latest MASCHINE software. For more
information on Controller mode, see Stand-Alone and Controller Mode.
UPDATE Enables you to update the MASCHINE+ operating system whenever a new
version is available. When connected to Wi-Fi, MASCHINE+ automatically
checks for updates when the System page is accessed. Press Button 8 to
install system updates when they become available.
MASCHINE software and MASCHINE+ are constantly being
developed. To receive new features and improvements, it is
recommended that you install the latest updates.
Here are the additional settings that are available when pressing SHIFT:
Setting Description
RESET Enables you to reset your MASCHINE+ to its default settings.
Pressing RESET will erase all of your settings and preferences. This
action cannot be undone.
SCAN Enables you to manually scan for system updates.
7.3.5. Library Settings
The Library page provides an overview of the plug-ins installed on your device and enables you to
use your Native ID to download, install, and update plug-ins from your Native Instruments account.
To display the Library settings page.
1. Press SETTINGS.
2. Use the 4-D encoder to select Library.
Page 69

WORKIN G W I TH MASCH IN E + 61
3. Use the Buttons and Knobs 1–8 to change settings.
The Library page provides the following settings:
Setting Description
Products
SHOW Shows a list of products installed or available to install:
Installed: Displays all products installed.
Available: Displays a list of products available to install.
• Turn Knob 6 or the 4-D encoder to select a product.
• Press Button 8 to install, pause, or resume the installation of the selected
product.
•
Press Button 4 (RESCAN) at anytime to update the list of available products.
Rescan also checks the directories on your SD card for any new content that
may have been added while transferring les in Storage mode, for example,
new Projects, or samples. Once the SD card has been scanned these les are
available from the User section in Browser. For more information, see Loading
Files from the Browser and Transferring Files to the SD Card.
To update the MASCHINE+ operating system, see System Settings.
7.3.6. Hardware Settings
Enables you to customize how the pads react to your playing, adjust the brightness of the
displays, and set the sensitivity of the knobs.
To display the Hardware page:
1. Press SETTINGS.
2. Use the 4-D encoder to select Hardware.
3. Use the Knobs 1–8 to change settings.
The Hardware page provides the following settings:
Setting Description
Pads
SENSITIVITY Adjusts how sensitive the pads respond to your touch. This sets the
minimum threshold at which a “hit” is registered.
SCALING Determines how your playing is translated into velocity values: starting
from Soft 3 (a soft touch is enough to get a big velocity value) through
Linear to Hard 3 (you really have to hit the pad hard to get a big velocity
value).
LEDs
BRIGHTNESS Adjusts the brightness of the pads and buttons.
Page 70

WORKIN G W I TH MASCH IN E + 62
Setting Description
Touchstrip
SHOW POSITION Shows the playhead position within a Pattern or song:
• Off: The Touchstrip never displays the playhead position.
• Rec. Only: The Touchstrip displays the playhead position only when
you are recording.
• On: The Touchstrip displays the playhead position during playback
and recording.
Display
BRIGHTNESS Adjusts the brightness of both displays.
Outputs
MAIN Routes the Line Out L/R to the Phones output. This allows you to listen
to the same audio output channel via the line output and headphone
output simultaneously, for example, use this if you want to listen to the
main out via speakers and listen to the main out via headphones.
Touch-Sensitive
Knobs
AUTO-WRITE Activates / deactivates the Touch Auto-write option. Touch Auto-write
can be very useful if you want to re-record modulation for a parameter at
a constant value. With Touch Auto-write enabled, you only need to keep a
nger on a parameter Knob (1–8): The current modulation value is
recorded as long as you touch the Knob, automatically replacing any old
modulation events at the position in the Pattern.
7.3.7. Network Settings
The Network settings page contains options related to connecting MASCHINE+ to a Wi-Fi
network. Before you make a connection, available Wi-Fi networks are listed on the right-hand
display. Connecting to a network enables you to download plug-ins to your library from your Native
Instruments account (see, Library Settings), update the system, and connect to an Ableton Link
session (see, MIDI Settings) so you can sync to external devices.
To display the Network settings page:
1. Press SETTINGS.
2. Use the 4-D encoder to select Network.
3. Use the Buttons and Knobs 1–8 to change settings.
The Network page provides the following settings:
Buttons
Setting Description
CONNECT Connects to the selected network. Use the 4-D encoder to select a network,
then press Button 8 (CONNECT) to log-on to that network. You will need the
network credentials to log-on.
REFRESH Refreshes the list of available Wi-Fi networks. Press Button 5 (REFRESH) to
update the list.
Page 71

WORKIN G W I TH MASCH IN E + 63
Setting Description
DISCONNECT Disconnects from the current Wi-Fi connection. Press Button 8
(DISCONNECT) to disconnect.
Knobs
Setting Description
Airplane
Mode
Enabled Activates or deactivates Airplane mode. When activated, this mode
suspends Wi-Fi network signal transmission from MASCHINE+, effectively
disabling the network service. As the name suggests, this mode is for use in
environments where you are not allowed to use Wi-Fi.
For more information on connecting to Wi-Fi networks, and Ableton Link, see
Connecting to Wi-Fi and Syncing MASCHINE+ using Ableton Link.
7.3.8. About Settings
The About page provides an overview of the System version, MASCHINE version, and rmware
installed on your MASCHINE+. You can also use this page to view a list of MASCHINE+ credits and
select whether you want to disable usage data tracking.
To display the About page:
1. Press SETTINGS.
2. Use the 4-D encoder to select About.
3. Use the Knobs 1 to 8 to change settings.
The About page provides the following settings:
Buttons
Setting Description
CREDITS Press Button 8 to see a list of MASCHINE+ credits. In no particular order, this list
includes everyone that has contributed to the development, and sound design of
MASCHINE+. Use Knob 8 to scroll through the list.
Knobs
Setting Description
Usage
Data
Page 72

WORKIN G W I TH MASCH IN E + 64
Setting Description
TRACK Turn Knob 1 to activate or deactivate Usage Data Tracking.
Usage Data Tracking technology enables MASCHINE+ to automatically track
anonymous usage data that you can choose to share with us. All users should
keep Data Tracking activated as it provides a valuable tool for understanding the
performance of Native Instruments products when they are used in real life
situations. The data sent to Native Instruments is 100% anonymous and will not
affect performance.
For more detailed information about Usage Data Tracking, please refer to the
following Knowledge Base article on the Native Instruments website: https://
support.native-instruments.com/hc/en-us/articles/209545029.
Page 73

USING TH E B ROWSER 65
8. Using the Browser
The Browser provides access to all MASCHINE les: Projects, Groups, Sounds, presets for
Instrument and Effect Plug-ins, Loops, and One-shots. Using the MASCHINE software, each of
these can be stored, tagged, and categorized in a way that provides you with easy access to all of
them. MASCHINE’s factory library is already completely tagged, as well as the factory libraries of
all Native Instruments products installed on your MASCHINE+.
Once MASCHINE+ is up and running, your rst stop is the Browser. You can access the extensive
Library using the BROWSER button and navigate it using the 4D-encoder, the eight touch-sensitive
knobs, and buttons above the displays.
The sections within this chapter cover the generic use of the Browser when using MASCHINE+.
For detailed information on using the Browser with the MASCHINE software in Controller mode,
please read the MASCHINE Software Manual.
When using MASCHINE+ in Controller mode, the Browser will respect the following
settings made in the MASCHINE Software such as; Prehear (audition), Preload, and
the loading of Patterns with Groups. Please refer to the MASCHINE Software to
congure these settings.
8.1. Browsing the Library
To access the Browser:
▶ Press BROWSER to enter or leave the Browser.
The Browser on MASCHINE+ .
On the displays, the Browser is organized as follows:
• The left display enables you to narrow your search by selecting the le type, the content type
(factory or user les), as well as a product category, a product, a bank, and a sub-bank.
• The right display allows you to further rene your search by selecting the desired Type (and
possibly Character) tags. It also shows you the corresponding result list. Turn the 4-D encoder
or Knob 8 to select any entry from the list, and press the 4-D encoder or Button 8 (LOAD) to
load it.
The above workflows are described in detail in the following sections. In addition, you will nd
most of the browsing aids available in the MASCHINE software also available here on MASCHINE
+ , as described in section Additional Browsing Tools.
Page 74

USING TH E B ROWSER 66
Browsing Your Library Using the 4-D Encoder
Each parameter (visible at the bottom of the displays) can be adjusted by the knob directly
underneath. This is also true in Browse mode.
Browse mode additionally provides an alternate, unied method for adjusting any eld appearing
at the bottom of the displays: using the 4-D encoder.
1. Move the 4-D encoder left/right to select a eld. The selected eld is indicated by thin brackets:
2. Turn the 4-D encoder to change the value in the selected eld.
3. Move the 4-D encoder right to select the Results list.
4. Turn the 4-D encoder to select an item from the Results list.
5. Press the 4-D encoder to load your selection from the Results list.
8.2. Loading Files from the Browser
To load a le using MASCHINE+:
1. Press BROWSER to display the Browser.
2. Press Button 1 or 2 to select a le type, from left to right: Projects, Groups, Sounds, Instrument
and Effect Plug-ins presets, Loops and One-Shots.
3. Turn Knob 8 to select and items from the results list.
4. Press Button 8 to load the selected le.
→ The selected le is loaded.
With the Browser still open, you can continue to load the next or previous le.
To load the next or previous le:
▶ Press Button 5 or 6 to load the next or previous le.
→ The next/previous le is loaded.
Press SHIFT and turn the Knob 8 to quickly scroll through the results list by ten items
at a time.
8.2.1. Selecting a Product Category, a Product, a Bank, and a Sub-Bank
To lter your selection in Browse mode:
1. Turn Knob 1–4 under the left display to select a product category (if any), a particular product,
a bank of that product (if any), and a sub-bank in that bank (if any), respectively. Turn a Knob
fully left to remove any particular selection at this level (i.e. to select all items at this level).
2. Alternatively, move the 4-D encoder left or right to select a eld and then turn it to adjust the
value.
Page 75

USING TH E B ROWSER 67
Selecting a product category, a product, a bank, and a sub-bank
Additionally, the left display shows you the name and icon of all products corresponding to the
selected product category (Knob 1). The selected product (Knob 2) is highlighted.
If there are more than six products available, a scroll bar appears on the right of the left display.
The display automatically scrolls to show the selected product. You can also use the Page buttons
to just see the other products available:
1. Press the Page buttons to scroll the products on the left display without changing the
selection.
2. Alternatively, move the 4-D encoder up or down to scroll through the products in the left display
without changing the selection.
List and Tag Overlays in the Browser
When browsing your Library, the touch-sensitive Knobs 1 to 8 provide you with handy browsing
aids.
List Overlays for Product Category, Bank, and Sub-Bank
As you select a product category, bank, or sub-bank via Knobs 1 to 3 (under the left display), the
corresponding list overlay appears above. In each list, the selected item is highlighted.
Page 76
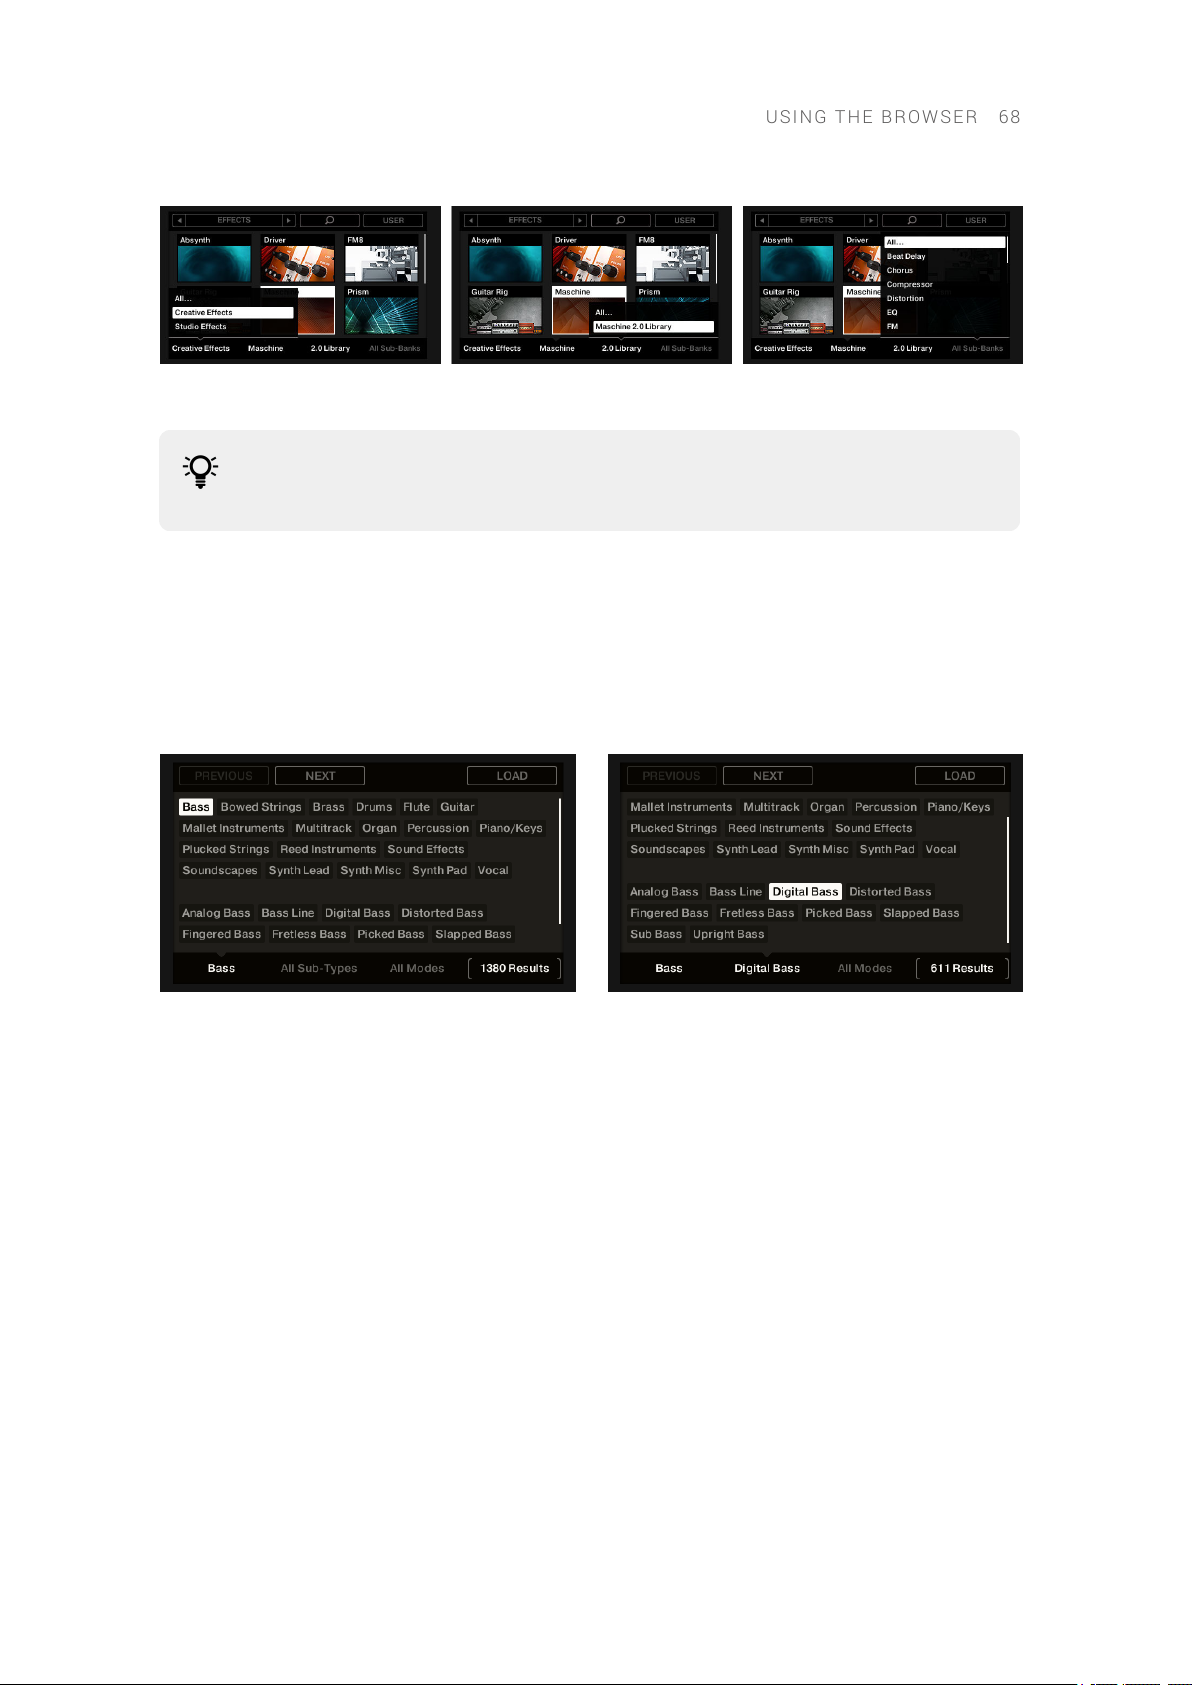
USING TH E B ROWSER 68
The left display, when browsing Effects: Selecting the Creative Effects category via Knob 1, the 2.0 Library bank via Knob 3 (in the
middle), and all sub-banks via Knob 4 (on the right).
These lists include an All… entry at the top allowing you to deselect any selected item.
Turn the corresponding Knob at full left to select this entry.
Tag Overlays for Type, Sub-Type, and Mode
As you select a Type, Sub-Type(s), and/or Mode via Knobs 5 to 7 under the right display, a tag
cloud appears above. It shows all tags for which items have been found in the Library. In this
cloud, the selected tag is highlighted.
The Type and Sub-Type tags share the same tag cloud, while the Mode tag has its own cloud.
The highlighted tag indicates which one is currently displayed.
The right display, here when browsing Instruments: Selecting the Bass Type via Knob 5 (left picture) and the Digital Bass Sub-Type
via Knob 6 (on the right).
8.3. Accessing User Content
The Browser enables you to lter and load content from your SD Card and external storage
devices.
Your sample les (loops or one-shots) can typically be found under the product tile reflecting the
name of the external drive they are stored on. All of your other les can be found under the
Maschine product tile.
To access User content:
1. Press BROWSER.
2. Press Button 4 (USER).
→ Access to User content is available when Button 4 is lit and USER label is highlighted.
Otherwise, you are viewing factory content.
3. Press Button 1 or 2 to select a le type (PROJECTS, GROUPS, SOUNDS, INSTRUMENTS,
EFFECTS, LOOPS, or ONE-SHOTS).
4. If you are loading LOOPS or ONE-SHOTS (samples), turn Knob 2 to select the name of your SD
card or external storage device.
Page 77

USING TH E B ROWSER 69
5. Select the le you want to load by turning the 4-D encoder. If you are loading samples, you can
activate or deactivate audition by pressing SHIFT + Button 8 (PREHEAR).
6. Press Button 8 (LOAD) or press the 4-D encoder to load the selected le.
Samples (loops and one-shots) contained on external storage devices are only
available when selecting the LOOPS and ONE-SHOTS le types. When these le types
are selected you can then choose the storage device containing your samples using
Knob 2. For information using storage devices, see Working with Storage Devices.
If new content from your SD card or external drives does not automatically appear in
the Browser, press SHIFT + Button 1 (RESCAN) to scan for new content.
To learn more about transferring user content, for example, Projects, or samples, see Transferring
Files to the SD Card and Opening Files from Your SD Card.
8.4. Filtering Favorites
Favorites in the Browser enable you to quickly view and browse your most frequently used items.
This includes Projects, Groups, Sounds, Instrument presets, Effect presets, and Samples (Loops
and One-shots). Any of these items can be assigned as a Favorite.
Favorites serve as an additional lter in the Browser. When activated, the results list will only show
items that have been assigned as a Favorite and also match all other selected lters, including the
search query entered into the search eld. Favorites are available for both the Factory content and
User content.
To lter by Favorites:
1. Press Browser.
2. Press Button 1 or 2 to select a le type (PROJECTS, GROUPS, SOUNDS, INSTRUMENTS,
EFFECTS, LOOPS, or ONE-SHOTS).
3. Press Button 7.
→ The Results list on the right will now show only the les you have marked as favorites. Press
Button 7 again to deselect the Favorites lter.
8.4.1. Adding an Item to the Favorites List
Items can be added to the Favorites list from the Browser search results.
To add an item to the Favorites list:
1. Press BROWSER.
2. Press Button 1 or 2 to select a le type (PROJECTS, GROUPS, SOUNDS, INSTRUMENTS,
EFFECTS, LOOPS, or ONE-SHOTS).
3. Press Button 4 (USER) if the content you want to add is in your User folder.
4. Turn Knob 8 to select a le in the search results list.
5. Press SHIFT and Button 7 (SET★) to add the selected item to the Favorites list.
→ The item is added to the Favorites list as indicated by the highlighted icon next to its name.
Page 78

USING TH E B ROWSER 70
To view your Favorite items for the selected le type, press Button 7 (★).
8.4.2. Removing an Item from the Favorites List
Items can be removed from the Favorites list.
To remove an item to the Favorites list:
1. Press BROWSER.
2. To see all Favourites, press Button 7 (★) to active the Favorites lter.
3. Turn Knob 8 to select an entry in the Results list.
4. Press SHIFT and press Button 7 (SET★) to remove the corresponding item from the Favorites
list.
→ The item is removed from the Favorites list, and the Favorites icon next to its name is removed.
8.5. Using Quick Browse
Quick Browse is a feature that allows you to quickly recall a search query you performed to nd a
given le. Let’s say you have loaded a kick Sample after browsing the Library, then loaded a snare
Sample to another Sound slot. You now realize you are not satised with that kick Sample, but you
heard a nice kick Sample just before you chose the current one. Normally you would now have to
try to remember the name or the tags you used to nd it or browse all kick Samples (given that the
MASCHINE Library already has several hundreds of kick Samples, this may take a considerable
amount of time). With Quick Browse you can restore the query with just one click.
Quick Browse from Control Mode
You can easily access Quick Browse for Samples and Plug-in presets directly from Control mode:
1. Press PLUG-IN to enter Control mode and access your Plug-ins.
2. Navigate to the channel (Master, Group, or Sound) hosting the Plug-in for which you want to
recall the search query.
3. In this channel, select the desired Plug-in (for a Sample, select the Sampler Plug-in in which it is
loaded).
Page 79

USING TH E B ROWSER 71
4. Press Button 8.
→ Button 8 is illuminated, and the result list that was used to nd this le directly appears in the
right part of the right display:
5. Turn the 4-D encoder to select the desired Plug-in preset or Sample from the list, and press the
4-D encoder to load it.
→ The selected le replaces the previous le in your Project.
Quick Browse from the Browse Mode
You can also access Quick Browse from the Browser. This notably allows you to perform Quick
Browse on Sounds and Groups as well:
1. Press PLUG-IN to enter Control mode.
2. If you want to trigger Quick Browse for a Group or a Sound, set the focus to this Group or
Sound.
3. If you want to trigger Quick Browse for a Sample or a Plug-in preset, additionally select the
desired Plug-in (for a Sample, select the Sampler Plug-in in which it is loaded).
Once you have focused/selected the desired le, switch to Browse mode to continue:
1. Press BROWSER to enter the Browser.
2. Press Button 1 and 2 to select the le type corresponding to the le you have focused/selected
above.
3. Press Button 3 (showing a magnifying glass) to trigger the Quick Browse function. The
Browser automatically recalls the search query used when you loaded that le.
4. Turn the 4-D encoder or Knob 8 to select the desired Plug-in preset or Sample from the list, and
press the 4-D encoder or Button 8 (LOAD) to load it.
The selected le replaces the previous le in your Project.
8.6. Additional Browsing Tools
MASCHINE+ provides various useful tools that will help you quickly nd and check the les you
need. Some of the tools are available only for specic le types. The next sections describe each
of these tools.
8.6.1. Loading the Selected Files Automatically
When Autoload is enabled, any item that you select in the Result list of the Browser is
automatically loaded into the focused Group or Sound slot or into the selected Plug-in slot,
replacing any content currently in that location. This allows you to listen to this item in context
with the rest of your Project while it is playing.
Page 80

USING TH E B ROWSER 72
To autoload content in Browse mode:
▶ Press Buttons 5 (PREV) and 6 (NEXT) above the right display to directly load the next or the
previous le from the result list.
Autoload is not available when browsing Projects.
Autoload is not available when browsing Samples with Prehear enabled — see section
Auditioning Samples. When Prehear is enabled, Button 5 and 6 select the previous/
next Sample in the result list without loading it automatically.
8.6.2. Auditioning Instrument Presets
The Prehear function enables you to audition Instrument presets before you load them.
When browsing Instrument presets:
▶ Press SHIFT + Button 8 (PREHEAR) to enable/disable the Prehear function.
When Prehear is enabled:
• The Instrument preset selected in the result list can be heard.
• Turn the 4-D encoder or Knob 8 to select the previous or next Instrument preset in the result
list. Upon selection this Instrument preset is played back and the previous Instrument preset
stops playing.
• Button 5 (PREV) and 6 (NEXT) allow you to audition the previous or next preset in the results
list.
• In Pad Mode, pressing the highlighted pad allows you to also audition the Instrument preset
again.
• To load the Instrument preset, press the 4-D encoder or Button 8 (LOAD).
When you deactivate Prehear, the playback of any Instrument preset still being pre-listened is
stopped.
The Prehear signal is sent to the Cue bus of MASCHINE+ .
8.6.3. Auditioning Samples
The Prehear function enables you to audition samples before you load them.
When browsing Samples:
▶ Press SHIFT + Button 8 (PREHEAR) to activate/deactivate the Prehear function.
When Prehear is activated:
• The Sample selected in the result list can be triggered from the pad of the focused Sound or
from any pad without being loaded into that Sound.
• Pressing any other pad triggers its Sound without changing the focus. To set the focus to
another Sound you have to press SELECT + its pad or to deactivate Prehear.
Page 81

USING TH E B ROWSER 73
• Turn the 4-D encoder or Knob 8 to select the previous or next Sample in the result list. Upon
selection, this Sample is played back and the previous Sample stops playing.
• Button 5 (PREV) and 6 (NEXT) do not automatically load the Sample they select as they usually
do (see section Loading the Selected Files Automatically), but instead, they play it back as
well.
• To load the Sample, press the 4-D encoder or Button 8 (LOAD).
When you deactivate Prehear, the playback of any Sample still being pre-listened is stopped.
8.6.4. Loading Groups with Patterns
Every Group from the factory library includes a set of Patterns that illustrate possible uses of that
Group. Similarly, when you save a Group of your own to the Library for later use, all Patterns you
have created for that Group will be saved with the Group.
When browsing Groups, you can choose to load each Group with or without its Patterns. This is
done by selecting + PATTERNS:
• + PATTERNS button activated: Groups will be loaded together with their Patterns. This allows
you to use the Patterns you have saved with the Groups. Upon loading, all Patterns of the
focused Group will be replaced.
• + PATTERNS button deactivated: Groups will be loaded without their Patterns. This enables
you to load another set of Sounds while keeping your current Patterns. Notably, this can be
very useful to try another drum kit with your current Patterns.
+PATTERNS is only available when browsing Groups.
When browsing Groups:
▶ Press SHIFT + Button 4 (+ PATTERNS) to include or exclude Patterns when Groups are loaded.
→ When the option is enabled (Button 4 lit and + PATTERNS label highlighted), Groups are loaded
together with their Patterns.
8.6.5. Loading Groups with Routing
When the le type Groups is selected, the +ROUTING button. When the +ROUTING button is
enabled the audio and MIDI routings stored in the Group are also loaded, potentially overwriting
previous routings in the selected Group. When the +ROUTING button is off, any audio and MIDI
routings saved in the Group will not be loaded, thus preserving any existing routings in the active
Group.
▶ Press SHIFT + Button 3 (+ ROUTING) to include or exclude audio and MIDI routing when
Groups are loaded.
→ When the option is enabled (Button 3 lit and + ROUTING label highlighted), Groups are loaded
together with their audio and MIDI routing.
Page 82

MANAGI NG S O UNDS, G RO U P S , AND Y OU R P ROJECT 74
9. Managing Sounds, Groups, and Your
Project
This chapter explains in detail how to handle the various objects that structure any MASCHINE
Project: Sounds, Groups, and the Master.
9.1. Overview of the Sounds, Groups, and Master
In a MASCHINE Project, objects are organized into three hierarchic levels, from the lowest to the
highest:
• Sounds are played by the pads. When they are loaded into Sound slots:
• Each Sound of the selected Group is by default mapped to one of the 16 pads, so you can
play all Sounds of a Group by pressing the pads.
• Each Sounds are made up of any number of Plug-ins that process the audio in series.
• Sounds are the only objects that can accept Instrument Plug-ins and these go in the
Sounds’ rst Plug-in slot. The type of the Plug-in (Instrument or Effect) loaded in this rst
Plug-in slot will dene the Sound’s role (audio source or bussing point). For more
information on Plug-ins and how they dene the Sound’s role, see Working with Plug-ins.
• Groups can contain up to 16 Sounds each with all their own parameters, and when in use:
• The 16 pads can play each of the Sounds within a selected Group.
• Groups are selected using the Group Buttons A to H, and they are visible on the right display
when Song mode is selected.
• A Project can have any number of Groups, which are further organized in banks of eight
Groups each.
• Each Group can have any number of insert effects, which will globally apply to all Sounds
contained in that Group, as well as any number of Patterns organized in banks of 16
Patterns each. For more information on Patterns, see Recording Patterns.
• The Master is the place where all signals from the Groups are being mixed together. Just like
the Groups and Sounds, the Master can host any number of insert effect
9.1.1. The Sound, Group, and Master Channels
From a routing point of view, each Sound, each Group, and the Master represents a distinct
channel in MASCHINE+. The channels of the 16 Sounds in a Group are mixed together and sent to
the Group channel, where their sum will be processed by the Group’s Plug-ins if any are in use.
Similarly, the channels of all Groups in your Project are mixed together and sent to the Master
channel, where their sum will be processed by the Master’s Plug-ins if any are in use. The resulting
signal is sent to the outputs.
Each channel provides a various set of Channel properties that adjust the input, output, groove,
and macro control settings for that particular Sound, Group, or for the Master, independently of the
plug-ins it contains. Please refer to chapter and section Applying Groove for more details on these.
When the software is in Mix view, Sounds, Groups, and the Master are represented by channel
strips in the Mixer. This view provides you with an intuitive control on both the audio and MIDI
routings of any Sound, Group, and the Master. Please refer to section Controlling Your Mix for
more information.
Page 83

MANAGI NG S O UNDS, G RO U P S , AND Y OU R P ROJECT 75
The Mixer displaying the channel strips for Sounds in a Group
9.1.2. Similarities and Differences in Handling Sounds and Groups
Sounds and Groups are handled in very similar ways — see section Managing Sounds and
Managing Groups below for all details. Here is a list of the main differences between both:
• In each Group you always have a fixed number of Sound slots, namely 16. Some of these
Sound slots might be empty, and you can have gaps in your slots (i.e. some empty Sound slots
between other slots containing Sounds), depending on how you prefer to play your Sounds
from your pads. You cannot create Sound slots, but instead, you can load/unload Sounds to/
from the 16 existing Sound slots in each Group.
• In your Project, you can have any number of Groups. You can create, ll up, and delete Groups
as you see t. If you delete a Group, all following Groups are shifted up in the Group List to ll
the gap. If you use more than eight Groups, another Group bank is automatically created.
9.1.3. Selecting Multiple Sounds or Groups
In MASCHINE you can select multiple Sounds or multiple Groups at once. This notably allows
you to change a parameter value for all selected Sounds/Groups at a time.
To achieve this, MASCHINE+ distinguishes the “focus” from the “selection”:
• The focus determines what is displayed. For example, by selecting a Sound you are putting the
focus on that Sound, and all the parameters (Channel properties, Plug-ins, etc.) for the selected
item are displayed. For the focus, the following rule applies:At each level (Sound and Group)
there is always one object, and only one, in focus. The focused object is highlighted.
• The selection, determines what will be affected by your actions (for example, adjusting a
parameter). For example, the focused Sound (for instance, the one you selected) is implicitly
selected, nothing special here: This just means that the Sound whose parameters are currently
displayed will be indeed affected by the changes you do on these parameters. But you can
select additional objects on top of the focused object, thereby extending your selection.
Selected objects are highlighted in the displays.
More precisely, if a Group or a Sound is currently focused, you can additionally select other Groups
or Sounds, respectively. These will be also affected by your edits on the focused Group or Sound.
You cannot select Sounds and Groups simultaneously.
Each Group remembers its own Sound selection and focus.
When setting the focus to a new Sound or Group, the following rules apply:
Page 84

MANAGI NG S O UNDS, G RO U P S , AND Y OU R P ROJECT 76
• If you set the focus to a Sound or Group which is not selected, both the focus and the selection
are moved to this new Sound or Group.
• If you set the focus to a Sound or Group which is already included in the current selection, the
focus is moved to this new Sound or Group but the selection is preserved. This notably allows
you to check the parameters of any selected Sound or Group while keeping the ability to
modify parameters for the entire selection.
What Is Affected by the Multiple Selection, and How?
When multiple Sounds or multiple Groups are selected, any change in the following settings of the
focused Sound/Group will be mirrored in the other selected Sounds/Groups, respectively:
• Channel properties: Parameter adjustments apply to all selected Sounds/Groups for any
parameter in any set of Channel properties. See chapter Audio Routing, Remote Control, and
Macro Controls for more information on the Channel properties.
• Plug-ins: Parameter adjustments apply to all selected Sounds/Groups that have the same
Plug-in loaded in the same Plug-in slot. See chapter Working with Plug-ins for more
information on Plug-ins.
• Pad view: Base key, Choke group, and Link group settings apply to all selected Sounds.
• You can move multiple Sound slots or multiple Groups at once. See section Moving Sounds
and Moving Groups for more information.
• You can reset multiple Sound slots and delete multiple Groups at once. See section Resetting
Sound Slots and Deleting Groups for more information.
The adjustments made in the Assignment area are never mirrored in any other
selected Sound/Group.
Furthermore, the exact influence on the equivalent parameter in the affected Sounds/Groups
depends on the type of parameter:
• Continuous parameters (knob): the values in all selected Sounds/Groups are incremented/
decremented by the same amount as the value in the focused Sound/Group. Values are
clipped when they reach their range limit.
• Discrete parameter (button or selector): the values in all selected Sounds/Groups are set to the
value of the focused Sound/Group.
Selecting Multiple Sounds/Groups
To select multiple Sounds or Groups via the Select mode:
▶ Press and hold SELECT to enter Select mode. You can also press SELECT + Button 1 to pin this
mode and make it permanent.
→ You are ready to select more than one Sound or Group.
Page 85

MANAGI NG S O UNDS, G RO U P S , AND Y OU R P ROJECT 77
Selecting Sounds and Groups via the Select mode
You have the following selection tools at your disposal:
Selection Tool Description
Pads Press any pad to set the focus to that particular Sound slot. The pad lights
up to indicate that the Sound slot is focused (and selected). Unlit pads
indicate unselected, empty Sound slots, and half-lit pads indicate
unselected Sounds. The selection behavior depends on the state of the
MULTI option (Button 8, see below).
Group buttons
A–H
Button 3/4
(PREV/NEXT)
Button 5 (ALL) Selects all Sounds in the current Group without changing the focus.
Button 6
(NONE)
Button 8
(MULTI)
Press any Group button to set the focus to that particular Group in the
current Group bank. The button lights up to indicate that the Group is
focused (and selected). Unlit Group buttons cannot be pressed (they don’t
correspond to any existing Group), and half-lit Group buttons indicate
unselected Groups. The selection behavior depends on the state of the
MULTI option (Button 8, see below).
Selects the previous/next Group bank.
Deselects all Sounds in the current Group except the focused Sound.
Activated/deactivates the multiple selection mode. Toggling this option
does nothing to the current focus nor selection but changes the behavior
of the selection process, see below.
The MULTI option (Button 8) switches between single and multiple selections:
• When MULTI is deactivated (Button 8 off):
• Pressing the Group button/pad of an unselected Group/Sound sets the focus to that
Group/Sound and clears the current Group/Sound selection (only the focused Group/Sound
is then selected). The Group button/pad lights up.
• Pressing the Group button/pad of a selected Group/Sound only sets the focus to that
Group/Sound without changing the current Group/Sound selection. The Group button/pad
stays fully lit.
• When MULTI is activated (Button 8 on):
• Pressing the Group button/pad of an unselected Group/Sound adds it to the current Group/
Sound selection without changing the current focus. The Group button/pad lights up.
• Pressing the Group button/pad of a selected Group/Sound unselects it unless it is the
focused Group/Sound. The Group button turns half-lit; the pad turns half-lit (if it contains a
Sound) or off (if it is empty).
Page 86

MANAGI NG S O UNDS, G RO U P S , AND Y OU R P ROJECT 78
9.2. Managing Sounds
This section describes the global editing functions available for Sounds.
9.2.1. Loading Sounds
You can load a ready-made Sound from the Browser or from your operating system. The Sound
can be included in the MASCHINE Library or any EXPANSION PACK but it can also be a Sound you
have created yourself and saved for later use.
Loading Sounds
You can load Sounds directly from the Browser:
• You can browse your MASCHINE Library for the desired Sound. For more information on how
to do this, please refer to section Loading Files from the Browser.
• Alternatively, you can recall the search query that was used to nd the Sound currently loaded
in the focused Sound slot. See section Using Quick Browse for more information.
9.2.2. Pre-listening to Sounds
Pre-listening to Sounds
Pre-listening to Sounds actually is the default behavior: In Control mode, when you press a pad
you both trigger its Sound and bring it into focus at once. Hence, you don’t need to enable
anything, pre-listening to Sounds in the focused Group is working out of the box.
Setting the Focus on Sounds without Triggering Them
You can also set the focus on any Sound in the current Group without triggering it. This comes in
handy if you are in a live situation and don’t want to trigger every single Sound you select. To do
this, use the Select mode:
▶ Press SELECT + the pad containing the desired Sound.
→ The Sound is focused without being triggered.
9.2.3. Renaming Sound Slots
By default, Sound slots are named Sound 1–16. If you load a Sound, a Plug-in preset, or a Sample
(for example, from the Browser) into the Sound slot, the Sound slot takes the Sound’s, preset’s, or
Sample’s name.
You can also rename Sound slots manually.
To rename a Sound slot:
1. Press PAD MODE.
2. Press the pad of the Sound you want to rename.
3. Press SHIFT + Button 5 (RENAME).
4. Turn and press the 4-D Encoder to provide a new name.
5. Press Button 8 (ENTER) to conrm the new name.
→ The Sound is now renamed.
Page 87

MANAGI NG S O UNDS, G RO U P S , AND Y OU R P ROJECT 79
9.2.4. Changing the Color of a Sound
You can change the color of each individual Sound.
To change the color of a Sound:
1. Press PAD MODE.
2. Press the Pad of the Sound you want to change.
3. Press the right Page button to select page 2.
4. Turn Knob 2 to select a color from the Palette. You can also choose to set the Sound back to
the default color corresponding to its position in the list by selecting Default from the Color
Palette.
→ The pads reflect the Sound colors you have selected.
By default, Sounds inherit the color of their Group. But you can choose another
default color for Sounds in Hardware Settings.
Once you have set a custom color for a Sound as described above, the Sound will
retain its color when you move it, and the color will be stored with the Sound when
you save the Sound for later use. Note that you can select the same color as the one
used by default: In that case, the color (even unchanged) will be considered a custom
color and will follow the Sound as you move it.
9.2.5. Saving Sound
You can save your Sounds as individual les (extension “.mxsnd”) using the File menu. For more
information on the File menu, and saving Sounds, see Saving a Sound and Transferring Files to
the SD Card.
9.2.6. Copying and Pasting Sounds
You can copy and paste Sounds across pads and Groups in your Project.
To copy a Sound from one pad to another:
1. Press and hold DUPLICATE.
2. If you want to duplicate a Sound including its Pattern content, enable the +EVENTS option
(Button 5).
3. Press the pad of the Sound you want to copy. The pad of the Sound starts blinking.
4. Press the pad of the target Sound slot (this can also be in another Group, in this case, rst
press the desired Group button).
→ All parameters of the Sound will be copied (including the Pattern content for that Sound if you
have enabled the +EVENTS option). The copied Sound will replace any Sound previously loaded
in the target slot.
You will notice that once you have pasted the Sound, the target pad starts blinking itself, indicating
that it is ready to be pasted again to additional Sound slots: Therefore, to duplicate a Sound more
than once, once you have pressed the source pad you just have to press all the desired target pads
in a row.
Page 88

MANAGI NG S O UNDS, G RO U P S , AND Y OU R P ROJECT 80
Instead of holding DUPLICATE, you can also pin the Duplicate mode by pressing
DUPLICATE + Button 1. You can then release DUPLICATE: Your MASCHINE+ will stay
in Duplicate mode until you press DUPLICATE again. See section Modes and Mode
Pinning for more information.
9.2.7. Moving Sounds
You can reorder Sounds in your Project. It can be helpful to organize your Sounds more
conveniently. Notably, this enables you to move your Sounds from one Pad to another, and create
a Group that is easier to play from the pads.
To copy a Sound from one pad to another:
1. Press PAD MODE to enter Pad mode.
2. Press the pad of the Sound you want to move.
3. Press SHIFT + Button 7 or 8 (MOVE) to move the Sound.
→ The Sound is now moved.
9.2.8. Resetting Sound Slots
Resetting a Sound slot will remove the Sound it contains and put all its settings (Channel
properties, name, color…) back to their default values.
Resetting a Sound Slot
▶ To reset a Sound slot, hold SHIFT + ERASE and then press the pad related to the Sound you
want to reset.
→ The Sound is removed from the pad, and the pad is turned off.
9.3. Managing Groups
This section describes the global editing functions available for a Group.
9.3.1. Creating Groups
Creating a Group will add a new empty Group at the end of the Group List. You can then ll this
Group with the Sounds of your choice.
Existing Groups are indicated by the lit Group buttons A to H:
• The focused Group is indicated by the fully lit Group button.
• The other Groups of your Project are indicated by half-lit Group buttons, each Group button
showing the color of the corresponding Group.
• In the last Group bank, the last half-lit Group button is white: It doesn’t correspond to any
existing Group but instead allows you to create another Group in your Project.
To create a new Group:
1. Hold SHIFT and press the last lit Group button to select the last Group bank.
2. Release SHIFT.
Page 89

MANAGI NG S O UNDS, G RO U P S , AND Y OU R P ROJECT 81
3. Press the dimmed white Group button after all other lit Group buttons.
→ A new empty Group is created after the existing Groups with the default name and color.
If the last Group bank already contains eight Groups, pressing SHIFT + the last lit
Group button at the rst step will directly create a new empty Group in a new Group
bank.
Automatic Group Bank Management
In MASCHINE+ Group banks are managed automatically, so that you don’t have to create or delete
them manually. Groups are always adjacent to the Group List: you cannot have any gap in the
Group List, or in any Group bank. When you create a new Group, the following happens:
• As long as the last Group bank contains less than eight Groups, the new Group is created in
that bank.
• If the last bank already contains eight Groups, a new Group bank is automatically created after
the existing bank(s) and the new Group is created in that new bank.
9.3.2. Loading Groups
You can load a ready-made Group from the Browser. The Group can be included in the MASCHINE
Library or any EXPANSION PACK.
Loading Groups
You can use the Browser to load Groups:
• You can browse your MASCHINE Library for the desired Group. For more information on how
to do this, please refer to section Browsing the Library.
• Alternatively, you can recall the search query that was used to nd the Group currently loaded
in the focused Sound slot. See section Using Quick Browse for more information.
You can also load a Group you have created yourself.
To open a Group from your SD card on MASCHINE+:
1. Press BROWSER. Press SHIFT + Button 1 (SCAN) to scan for new content.
2. Press Button 4 (USER) Press Button 2 or 3 to select GROUPS.
3. Turn Knob 2 to Select Maschine.
4. Turn Knob 8 to select the name of the Group you want to load.
5. Press Button 8 LOAD. The Group is now loaded from the SD card.
Be aware, that loading a Group will replace the selected Group and all of its Sounds.
9.3.3. Renaming Groups
By default, new Groups are named Group Ax–Hx, “x” indicating the bank number (Group A1–H1,
Group A2–H2, etc.). However, you can also rename Groups slots manually.
To rename a Group:
1. Press PAD MODE.
2. Press the Group button you want to rename.
Page 90

MANAGI NG S O UNDS, G RO U P S , AND Y OU R P ROJECT 82
3. Press SHIFT + Button 2 (RENAME).
4. Turn and press the 4-D Encoder to provide a new name.
5. Press Button 8 (ENTER) to conrm the new name.
→ The Group is now renamed.
9.3.4. Changing the Color of Group
You can change the color of each individual Group.
To change the color of a Group:
1. Press PAD MODE.
2. Press the Group button you want to change.
3. Press the right Page button to select page 2.
4. Turn Knob 1 to select a color from the Palette. You can also choose to set the Group back to
the default color corresponding to its position in the list by selecting Default from the Color
Palette.
→ The Group buttons reflect the color you have selected.
By default, each Group has a different color. But you can choose a common default
color for Groups in General Settings.
Once you have set a custom color for a Group as described above, the Group will
retain its color when you move it in the Group List, and the color will be stored with
the Group when you save the Group for later use. Note that you can select the same
color as the one used by default: In that case, the color (even unchanged) will be
considered a custom color and will follow the Group as you move it.
9.3.5. Saving Groups
Sometimes it is useful to have the ability to save a Group with its Samples outside of the
MASCHINE Library. For information on how to save a Group using the File menu, see Saving a
Group and Transferring Files to the SD Card.
9.3.6. Copying and Pasting Groups
You can copy and paste Groups in your Project.
Duplicating Groups
In Control mode, do the following to copy a Group from one Group button to another:
1. Press PLUG-IN.
2. Press and hold DUPLICATE.
3. If you want to duplicate a Group including its Patterns, enable the +EVENT option (Button 5).
4. Press the Group button of the Group you want to copy. The Group button starts blinking.
Page 91

MANAGI NG S O UNDS, G RO U P S , AND Y OU R P ROJECT 83
5. Press the Group button of your target Group (this can also be in another Group bank, in this
case, rst press Button 3/4 to select the Group bank). If you want to paste the Group without
affecting the existing Groups, press the dim white Group button after the last colored Group
button to create the new Group and automatically paste the copied Group there.
→ All parameters of the Group (all included Sounds, Group effects, Group’s Channel properties)
will be copied (including its Patterns in the Arranger if you have enabled the +EVENT option).
The copied Group will replace the Group previously at that position in the Group List.
You will notice that once you have pasted the Group, the target Group button starts blinking itself,
indicating that it is ready to be pasted again: Therefore, to duplicate a Group more than once, once
you have pressed the source Group button you just have to press all the desired target Group
buttons in a row.
9.3.7. Moving Groups
You can reorder Groups by moving them. For convenience, it can be helpful to organize your
Groups.
To move a Group:
1. Press PAD MODE to enter Pad Mode.
2. Press the Group you want to move.
3. Press SHIFT + Button 3 or 4 (MOVE) to move the Group.
→ The Group is now moved.
9.3.8. Deleting Groups
Deleting a Group will remove it from the Group List.
It is not possible to have a Project without any Groups; attempting to delete the last
remaining Group in a Project will simply reset the Group to the default values.
Deleting a Group
In Control mode, do the following to delete a Group:
▶ To delete a Group, hold SHIFT + ERASE and press the Group button of the Group you want to
delete.
→ The Group is removed. All following Groups are shifted left to ll the gap.
Page 92

WORKIN G W I T H PLUG- IN S 84
10. Working with Plug-ins
Plug-ins are the building blocks of all sound in MASCHINE+. They can be used at all three levels of
the MASCHINE+ audio routing system: in Sounds, in Groups, and in the Master.
This chapter includes the following Plug-in topics:
• An overview of Plug-ins and how to handle them. For more information, see Plug-in Overview.
• An extensive description of an essential Internal Instrument Plug-in in charge of playing back
all sample content in MASCHINE: the Sampler. For more information, see Sampler Plug-in.
• An overview of the Audio plug-in, that enables you to playback Samples (drums, percussion,
basslines, guitar riffs, etc.) in sync with the tempo of your Project. For more information, see
Audio Plug-in.
• An overview of the DrumSynth, and Basssynth plug-ins that were specically designed for
MASCHINE. For more information see Drumsynths and Bass Synth.
• Specic information on Native Instruments Plug-ins. For more information, see Using Native
Instruments Plug-ins.
10.1. Plug-in Overview
This section describes general Plug-ins topics such as: where you can nd them, how you can
adjust their settings, and how you can manage them.
10.1.1. Plug-in Basics
In the Plug-in view, the content and settings of the focused Sound/Group or the Master are
displayed.
Sounds, Groups, and the Master can each hold any number of Plug-ins. These are listed left to
right:
The Plug-in view
In the Plug-in List, the processing order is always from top to bottom.
In addition to Plug-ins, each Sound, each Group, and the Master also provide a set of
global settings called Channel properties. These are described in section Applying
Groove and in chapter Audio Routing, Remote Control, and Macro Controls.
Page 93

WORKIN G W I T H PLUG- IN S 85
Different Types of Plug-ins
There are two types of Plug-ins:
Instrument Plug-ins Effect Plug-ins
Internal Plug-ins Audio, Sampler, Drumsynth, Bass
Synth
Native Instruments
Plug-ins
• Instruments: These Plug-ins generate sound. Instrument Plug-ins can only be loaded in the
rst Plug-in slot of Sounds. The following Plug-ins are available:
• Audio: The Audio Plug-in allows audio loops to play back in time with the tempo of your
Project. Adding audio with the Loops tag from the Browser to the Sound slot will
automatically load the Audio Plug-in in the rst Plug-in slot of the Sound. See Audio Plug-in.
• Sampler: The Sampler Plug-in allows the selected Sound to play back Samples. Adding a
Sample to the Sound slot will automatically load the Sampler in the rst Plug-in slot of the
Sound. See Sampler Plug-in.
• Drumsynths: These Plug-ins are mini-synths specialized in generating drum sounds. See
Drumsynths.
• Bass Synth: This Plug-in is a monophonic synthesizer specialized in generating bass
sounds. See Bass Synth.
• Native Instruments: You can use all Native Instruments MASCHINE+ SELECTION
instruments installed on your MASCHINE+ as VST/AU plug-ins (for example, MASSIVE, and
FM8, etc.). Products from Native Instruments are tightly integrated into MASCHINE+.
• Effects: These Plug-ins modify the audio coming from the previous Plug-in slot (or from the
incoming audio if the Effect is loaded in the rst Plug-in slot of a Sound). Effect Plug-ins can be
loaded in any Plug-in slot. The following Plug-ins are available:
• Internal Effects: These are the Effect Plug-ins included with MASCHINE. To read every
detail about each of the MASCHINE internal effects, and how to use them, please refer to
chapter Audio Routing, Remote Control, and Macro Controls and Effect Reference.
• Native Instruments: You can use the Native Instruments MASCHINE+ SELECTION effects
installed on your MASCHINE+ as VST/AU plug-ins. Products from Native Instruments are
tightly integrated with MASCHINE+.
VST/AU instrument plug-ins from
Native Instruments included in the
MASCHINE+ SELECTION
MASCHINE internal effects
VST/AU effect plug-ins from
Native Instruments included in
the MASCHINE+ SELECTION
What to Load, and Where
The type of Plug-in that you can load depends on the selected level (Sound, Group, or Master) and
slot:
• Instrument Plug-ins (both internal and external) can only be loaded in the rst Plug-in slot of
Sounds.
• Effect Plug-ins (both internal and external) can be loaded in all Plug-in slots at all levels (Sound,
Group, Master).
10.1.2. Loading, Removing, and Replacing a Plug-in
The procedure to load a Plug-in with its default settings is common to all levels (Sound, Group, and
Master) and all Plug-in types:
To load, remove, or replace a Plug-in:
Page 94

WORKIN G W I T H PLUG- IN S 86
1. Press the PLUG-IN button to enter Control mode and display the Plug-in slots of the selected
Sound, Group, or the Master.
2. Select the Sound, Group, or the Master where the Plug-in is located (see section Focusing on a
Group or a Sound).
3. Move the 4-D encoder to the right to navigate to the desired Plug-in. The name of the selected
Plug-in appears on the right display in the eld between the arrows under Button 5 and 6. If
there are no Plug-ins in the channel this will read EMPTY.
→ You are now ready to load, insert, remove, or replace a Plug-in as described in the following
paragraphs.
Loading a Plug-in in Place
To load a Plug-in into the selected Plug-in slot:
1. Press SHIFT + BROWSER (Plug-in) to open the Plug-in Browser and browse the available Plug-
ins.
2. On the left display, turn Knob 1 to select the TYPE from Instrument or Effect. The right display
shows the list of available instruments or effect Plug-ins.
3. Turn the 4-D encoder or Knob 8 to browse the Plug-ins corresponding to your TYPE (and
possibly VENDOR) selection.
4. When you have found the Plug-in you want to use, press the 4-D encoder or Button 8 (LOAD) to
load it. You can also use Buttons 5 and 6 to step through the list and load each effect directly.
If the selected Plug-in slot was not empty, the previous Plug-in will be replaced with
the new Plug-in.
Instead of using the Plug-in Browser, you can also use the common Browser to load a
particular preset for a Plug-in. For more information, see section Browsing the
Library.
Inserting a Plug-in
To insert a Plug-in directly after the selected Plug-in slot, do the following:
1. Press SHIFT + Button 3 (INSERT). This automatically opens the Browser and locks the File
Type to EFFECT (Button 1 and 2, normally used in the Browser to select the desired File Type,
are here deactivated).
2. Choose and load the desired Plug-in preset via the usual workflow in the Browser (see section
Focusing on a Group or a Sound).
3. Press the 4-D encoder or Button 8 (LOAD).
→ MASCHINE+ automatically switches back to Control mode and the new Plug-in is loaded in the
next Plug-in slot. All following Plug-ins are shifted one slot downwards to make room for the
new Plug-in.
Removing a Plug-in
To remove a Plug-in from its slot:
Page 95
WORKIN G W I T H PLUG- IN S 87
▶ Press SHIFT + Button 8 (REMOVE).
→ The Plug-in is unloaded from the slot. All following Plug-ins are shifted one slot upwards to ll
the gap.
Alternatively, you can press SHIFT + BROWSE, turn the 4-D encoder (or Knob 8) to
select (none) at the top of the list in the right display, and press the 4-D encoder or
Button 8 (LOAD).
Replacing a Plug-in
To replace a Plug-in:
▶ Select its slot and load a new Plug-in.
You can also recall the search query that was used to nd the Plug-in preset currently
loaded in the Plug-in slot (see section Using Quick Browse for more information).
10.1.3. First Plug-in Slot of Sounds: Choosing the Sound’s Role
The Plug-in loaded in the rst Plug-in slot of a Sound will determine the general role of this Sound:
• If the rst Plug-in slot holds an Instrument Plug-in (Sampler, Drumsynth, Native Instruments,
see Plug-in Overview), the Sound will generate its own audio.
• If the rst Plug-in slot holds an Effect Plug-in, the Sound will be available as a bussing point for
other signals (from within MASCHINE+, and possibly from the outside world). This notably
allows you to build up send effects or to apply effects to external audio. See section Step 1: Set
Up a Sound or Group as Send Effect for more information.
You can also sample directly to a Sound slot. This will automatically load a Sampler in
its rst Plug-in slot. Read chapter Effect Reference for more details on this.
10.1.4. Browser Plug-in Slot Selection
Select a plug-in slot directly from the Browser using the SHIFT button. The SHIFT button provides
temporary access to the Plug-in mode allowing you to select a plug-in slot from the Plug-in List.
This can be accomplished from the Browser when loading content into all three levels of the
MASCHINE audio routing system: in Sounds, in Groups, and in the Master.
To change the focus of the plug-in slot from the Browser:
1. Press the BROWSE button.
2. Press SHIFT, then press Button 5 or 6 to select a plug-in slot.
→ The focus slot can be selected from the Browser.
Loading, Removing, and Replacing a Plug-in
The procedure to load a Plug-in with its default settings is common to all levels (Sound, Group, and
Master) and all Plug-in types:
Page 96

WORKIN G W I T H PLUG- IN S 88
To load, remove, or replace a Plug-in:
1. Press the PLUG-IN button to enter Control mode and display the Plug-in slots of the selected
Sound, Group, or the Master.
2. Select the Sound, Group, or the Master where the Plug-in is located (see section Focusing on a
Group or a Sound).
3. Move the 4-D encoder to the right to navigate to the desired Plug-in. The name of the selected
Plug-in appears on the right display in the eld between the arrows under Button 5 and 6. If
there are no Plug-ins in the channel this will read EMPTY.
→ You are now ready to load, insert, remove, or replace a Plug-in as described in the following
paragraphs.
Loading a Plug-in in Place
To load a Plug-in into the selected Plug-in slot:
1. Press SHIFT + BROWSER (Plug-in) to open the Plug-in Browser and browse the available Plug-
ins.
2. On the left display, turn Knob 1 to select the TYPE from Instrument or Effect. The right display
shows the list of available instruments or effect Plug-ins.
3. Turn the 4-D encoder or Knob 8 to browse the Plug-ins corresponding to your TYPE (and
possibly VENDOR) selection.
4. When you have found the Plug-in you want to use, press the 4-D encoder or Button 8 (LOAD) to
load it. You can also use Buttons 5 and 6 to step through the list and load each effect directly.
If the selected Plug-in slot was not empty, the previous Plug-in will be replaced with
the new Plug-in.
Instead of using the Plug-in Browser, you can also use the common Browser to load a
particular preset for a Plug-in. For more information, see section Browsing the
Library.
Inserting a Plug-in
To insert a Plug-in directly after the selected Plug-in slot, do the following:
1. Press SHIFT + Button 3 (INSERT). This automatically opens the Browser and locks the File
Type to EFFECT (Button 1 and 2, normally used in the Browser to select the desired File Type,
are here deactivated).
2. Choose and load the desired Plug-in preset via the usual workflow in the Browser (see section
Focusing on a Group or a Sound).
3. Press the 4-D encoder or Button 8 (LOAD).
→ MASCHINE+ automatically switches back to Control mode and the new Plug-in is loaded in the
next Plug-in slot. All following Plug-ins are shifted one slot downwards to make room for the
new Plug-in.
Removing a Plug-in
To remove a Plug-in from its slot:
Page 97

WORKIN G W I T H PLUG- IN S 89
▶ Press SHIFT + Button 8 (REMOVE).
→ The Plug-in is unloaded from the slot. All following Plug-ins are shifted one slot upwards to ll
the gap.
Alternatively, you can press SHIFT + BROWSE, turn the 4-D encoder (or Knob 8) to
select (none) at the top of the list in the right display, and press the 4-D encoder or
Button 8 (LOAD).
Replacing a Plug-in
To replace a Plug-in:
▶ Select its slot and load a new Plug-in.
You can also recall the search query that was used to nd the Plug-in preset currently
loaded in the Plug-in slot (see section Using Quick Browse for more information).
10.2. Adjusting the Plug-in Parameters
The procedure for adjusting the Plug-in parameters is common to all types of Plug-ins and all sets
of Channel properties. It is described in section Navigating Channel Properties, Plug-ins, and
Parameter Pages.
10.3. Bypassing Plug-in Slots
You can bypass (mute) any Plug-in slot. When a Plug-in slot is bypassed, the Plug-in it contains is
temporarily removed from the signal flow and does not process the audio passing through the
slot. Instead, the incoming audio is directly sent to the next Plug-in slot for further processing (or
to the channel’s output if you bypass its last Plug-in slot).
Bypassing Plug-in slots can be very useful in various situations, for example:
• Bypassing and re-enabling an effect during a live performance.
• Comparing the sound with and without an effect.
• Troubleshooting complex effect chains and routings.
Bypassing a Plug-in Slot
1. Press the PLUG-IN button to enter Control mode and display Plug-in slots.
2. If you want to bypass a Plug-in of the Master, press Button 1 to select the MASTER tab.
3. If you want to bypass a Plug-in of a Group, press Button 2 to select the GROUP tab and press
the Group button A–H corresponding to the desired Group. If necessary, rst press SHIFT + the
desired Group button A–H to switch to the Group bank containing that Group.
4. If you want to bypass a Plug-in of a Sound, press Button 3 to select the SOUND tab, select its
parent Group as described in the previous step, and press SELECT + the pad of that Sound (or
simply hit its pad if pads are in Pad Mode).
5. Press Button 5/6 to select the desired Plug-in slot. The name of the selected Plug-in appears in
the eld between the left and right arrows under Button 5 and 6. If there are no Plug-ins in the
channel this will read EMPTY.
Page 98

WORKIN G W I T H PLUG- IN S 90
6. Press SHIFT + Button 7 (BYPASS) above the right display to bypass the selected Plug-in slot.
→ The Plug-in is bypassed and does not affect the sound anymore. In the left display, the Plug-in
icon and name are grayed out. When you hold SHIFT, Button 7 is fully lit and the BYPASS label
on the right display is highlighted to indicate that this Plug-in slot is now bypassed:
Use the same method to unmute the effect:
▶ To unmute the effect, press SHIFT + the lit Button 7 (BYPASS).
In most cases, the rst Plug-in slot contains an Instrument Plug-in (for example, a
Sampler). Be careful: bypassing the slot will mute the whole Sound.
10.4. Using Side-Chain
Some Plug-ins provide side-chaining. This allows you to control their influence on the audio via
another audio signal sent to their secondary, side-chain input. This extra routing feature is
described in detail in section Using the Side-Chain Input.
10.5. Moving Plug-ins
MASCHINE+ allows you to move Plug-ins across the Plug-in List and across Sounds and Groups.
Moving a Plug-in
On your MASCHINE+ in Plug-in mode, you can move a Plug-in to another slot of the same Sound,
Group, or the Master. To do this:
1. Press PLUG-IN.
2. Select the desired Plug-in using the 4-D encoder.
3. Press SHIFT + Button 5/6 to move this Plug-in to the previous/next slot.
→ The Plug-in takes its new place between the existing Plug-ins while keeping the exact same
settings. All other Plug-ins sitting between its old and new location are shifted one slot
upwards/downwards to ll the gap.
10.6. Sampler Plug-in
The Sampler Plug-in allows you to playback any Sample in MASCHINE+, including all Groups,
Sounds, and Samples of the factory library. The Sampler comes with an extensive set of
parameters that offer various ways to further shape each of your Sounds. You can tune, change
basic dynamics, and apply effects as well as different modulation options.
Page 99

WORKIN G W I T H PLUG- IN S 91
Many of these parameters can be modulated and automated! For more information,
see section Recording Modulation.
This section describes the specic parameters found in the Sampler. For a general description of
the features and characteristics of Plug-ins (including the Sampler), please refer to section Plug-in
Overview.
Here the Sampler parameters are shown as they appear in the Plug-in view. The parameters are
organized into 6 pages:
• Page 1: Voice Settings / Engine: Page 1: Voice Settings / Engine.
• Page 2: Pitch / Envelope: Page 2: Pitch / Envelope.
• Page 3: FX / Filter: Page 3: FX / Filter
• Page 4: Modulation: Page 4: Modulation
• Page 5: LFO: Page 5: LFO.
• Page 6: Velocity / Modwheel: Page 6: Velocity / Modwheel
Pages can be selected for display and parameter editing using the Page buttons.
10.6.1. Page 1: Voice Settings / Engine
Sampler parameters – page 1 of 6: VOICE SETTINGS and ENGINE
Parameter Description
VOICE
SETTINGS
Polyphony Here you can dene a voice limit for the Sound, that is the maximum number
of voices (notes) the Sampler can play simultaneously. Once this polyphony
has been reached, triggering any additional note will kill the “oldest” note still
playing (i.e. the note that was triggered rst). The available values are 1, 2, 4, 8
(default), 16, 32, and 64. You can also set this to Legato — in that case the
polyphony is set to 1 and the Sampler performs a continuous pitch transition
between consecutive notes.
Glide If Legato is selected for the Polyphony parameter, this enables you to adjust
the duration of the transition between consecutive notes.
Pitchbend Here you can adjust how the Sound reacts on incoming MIDI Pitchbend
messages from an external MIDI controller or your host application. For more
information on how to setup your Sounds to receive MIDI, refer to section
Triggering Sounds via MIDI Notes.
Page 100

WORKIN G W I T H PLUG- IN S 92
Parameter Description
ENGINE
Mode This allows you to select between different models for the sampling engine.
Besides the default Standard setting, the other options MP60 and S1200
emulate the sound of two legendary Samplers that are often used in Hip-Hop
and similar genres of music. The latter comes in various flavors offering
different ltering: S1200 (no ltering), S1200 L (for Low, i.e. low-pass ltering),
S1200 LM (for Low-Mid, i.e. low-mid-pass ltering), S1200 HM (for High-Mid,
i.e. mid-high-pass ltering), and S1200 High (for High, i.e. high-pass ltering).
10.6.2. Page 2: Pitch / Envelope
Sampler parameters – page 2 of 6: PITCH / GATE and AMPLITUDE ENVELOPE
Parameter Description
PITCH / GATE
Tune Denes the basic pitch of your Sample: turn the knob to the right for a higher
pitch and to the left for a lower pitch.
Start Determines the start point of the Sample. This parameter can also be
modulated by the Velocity control, see Page 5: LFO.
Reverse Plays the Sample backwards when activated.
Type Selects from three different types of amplitude envelopes. See below for
more information.
AMPLITUDE ENVELOPE
The AMPLITUDE ENVELOPE section allows you to tailor your Sample in terms of its loudness over
time.
The Type selector allows you to choose from three different types of amplitude envelopes.
Depending on the selected type, the available parameters in the AMPLITUDE ENVELOPE section
will differ (see table below):
• One-shot: This is typical vintage drum machine behavior, where the sample is played in its
entirety from beginning to end with no envelope.
• AHD: AHD mode deactivates the Sustain and Release controls of the ADSR envelope, and
replaces them with the Hold parameter. AHD mode is ideal for “re and forget” behavior, when
you would like to have the sound trigger for a certain amount of time regardless of how long
you hold the pad down.
• ADSR: Typically, the ADSR envelope is used for longer, sustained Samples that require complex
dynamic control.
 Loading...