

Page 1
Getting Started
Page 2

The information in this document is subject to change without notice and does not represent a commitment on the part of Native Instruments GmbH. The software described by
this document is subject to a License Agreement and may not be copied to other media.
No part of this publication may be copied, reproduced or otherwise transmitted or recorded, for any purpose, without prior written permission by Native Instruments GmbH, hereinafter referred to as Native Instruments.
“Native Instruments”, “NI” and associated logos are (registered) trademarks of Native Instruments GmbH.
Mac, Mac OS, GarageBand, Logic, iTunes and iPod are registered trademarks of Apple
Inc., registered in the U.S. and other countries.
Windows, Windows Vista and DirectSound are registered trademarks of Microsoft Corporation in the United States and/or other countries.
All other trade marks are the property of their respective owners and use of them does not
imply any affiliation with or endorsement by them.
Document authored by: David Gover
Document version: 1.0 (08/2011)
Special thanks to the Beta Test Team, who were invaluable not just in tracking down bugs,
but in making this a better product.
Disclaimer
Page 3
Germany
Native Instruments GmbH
Schlesische Str. 29-30
D-10997 Berlin
Germany
www.native-instruments.de
USA
Native Instruments North America, Inc.
6725 Sunset Boulevard
5th Floor
Los Angeles, CA 90028
USA
www.native-instruments.com
Contact
© Native Instruments GmbH, 2011. All rights reserved.
Page 4

Table of Contents
Table of Contents
1 Welcome to MASCHINE MIKRO! ..................................................................................
1.1 The MASCHINE MIKRO Documentation ........................................................................................ 9
1.1.1 Manual Conventions .................................................................................................. 9
1.1.2 Where To Start? ......................................................................................................... 10
1.1.3 In This Document ....................................................................................................... 11
2 Overview ...................................................................................................................
2.1 MASCHINE MIKRO Hardware ....................................................................................................... 14
2.2 MASCHINE Software .................................................................................................................... 22
2.1.1 CONTROL Section ....................................................................................................... 15
2.1.2 TRANSPORT Section ................................................................................................... 18
2.1.3 PADS Section ............................................................................................................. 20
2.2.1 The Header ................................................................................................................ 23
2.2.2 The Browser ............................................................................................................... 25
2.2.3 Arranger .................................................................................................................... 26
2.2.4 Control Area ............................................................................................................... 27
2.2.5 Pattern Editor ............................................................................................................ 28
3 Overview of a MASCHINE Project ...............................................................................
3.1 The Structure of a MASCHINE Project .......................................................................................... 30
3.2 Navigating the MASCHINE MIKRO Controller Display .................................................................. 36
3.3 Controller Modes and Mode Locking ........................................................................................... 37
3.4 Navigation and Shortcuts ........................................................................................................... 38
3.1.1 Sound Content ........................................................................................................... 31
3.1.2 Arrangement .............................................................................................................. 33
3.4.1 Control Mode ............................................................................................................. 38
3.4.2 Controlling the Software View from the Hardware ..................................................... 38
3.4.3 Property Page and Module Shortcuts ......................................................................... 41
8
13
30
MASCHINE MIKRO - Getting Started - 4
Page 5

Table of Contents
3.4.4 Sampling Shortcuts ................................................................................................... 44
4 Creating a Pattern .....................................................................................................
4.1 Finding Samples in the Browser ................................................................................................. 47
4.2 Selecting Sounds and Creating a Group ..................................................................................... 50
4.3 Creating Patterns ....................................................................................................................... 51
4.4 Creating Patterns in Keyboard Mode ........................................................................................... 57
4.5 Creating Patterns with Plug-in Instruments ............................................................................... 59
4.6 Mute & Solo ................................................................................................................................ 66
4.3.1 Adjusting Quantization using the Grid ....................................................................... 52
4.3.2 Adjusting Pattern Length ........................................................................................... 52
4.3.3 Recording a Pattern with the Controller ..................................................................... 54
4.3.4 Step Sequencer .......................................................................................................... 55
4.3.5 Note Repeat ............................................................................................................... 56
4.3.6 Recording a Pattern with the Software ...................................................................... 57
4.5.1 Module Slots .............................................................................................................. 59
4.5.2 Defining Sources for Module Slots ............................................................................. 60
4.5.3 Loading an Instrument Plug-in .................................................................................. 60
4.5.4 Opening and Closing Plug-in Windows ...................................................................... 64
4.6.1 Hardware ................................................................................................................... 66
4.6.2 Software .................................................................................................................... 67
5 Using Effects & Routing .............................................................................................
5.1 Available Internal Effects ........................................................................................................... 69
5.1.1 Dynamics ................................................................................................................... 69
5.1.2 Filtering ..................................................................................................................... 69
5.1.3 Modulation ................................................................................................................ 70
5.1.4 Spatial and Reverb .................................................................................................... 70
5.1.5 Delay ......................................................................................................................... 70
5.1.6 Distortion ................................................................................................................... 71
47
69
MASCHINE MIKRO - Getting Started - 5
Page 6

5.2 Applying Effects to a Sound ........................................................................................................71
5.3 Applying Effects to a Group ........................................................................................................ 74
5.4 Applying Effects to the Master .................................................................................................... 77
5.5 Bypassing Effects .......................................................................................................................80
5.6 Automating Effects and Sampler Parameters ............................................................................. 80
6 The Input Module and Advanced Routing ....................................................................
6.1 Applying an Effect to an external audio source ........................................................................... 82
6.2 Setting up a Send Effect .............................................................................................................85
6.3 Routing Tips ............................................................................................................................... 89
7 Creating a Song using Scenes ....................................................................................
7.1 Creating a Clip in the Arranger ................................................................................................... 91
7.2 Inserting and Deleting Scenes .................................................................................................... 93
7.3 Using the Loop Mode .................................................................................................................. 94
8 Sampling ..................................................................................................................
8.1 How to Sample ............................................................................................................................95
8.2 Editing a Sample ........................................................................................................................ 98
8.3 Slicing a Sample ........................................................................................................................ 100
8.4 Mapping Samples .......................................................................................................................103
9 Managing Projects ....................................................................................................
9.1 Saving Sounds, Groups, Patterns ............................................................................................... 107
9.2 Saving and Recalling Module Presets ......................................................................................... 109
9.3 Exporting Audio .......................................................................................................................... 111
9.1.1 Saving a Sound ......................................................................................................... 107
9.1.2 Saving a Group .......................................................................................................... 108
9.1.3 Saving a Pattern ........................................................................................................ 108
9.2.1 Saving Module Presets .............................................................................................. 109
9.2.2 Recalling Module Presets .......................................................................................... 109
10 Tips for Playing Live ..................................................................................................
Table of Contents
82
91
95
107
114
MASCHINE MIKRO - Getting Started - 6
Page 7

10.1 Focus on the Hardware ............................................................................................................... 114
10.2 Check your CPU Power Before Playing ......................................................................................... 114
10.3 Name your Groups and Sounds ................................................................................................... 114
10.4 Use Mute & Solo and Scenes and Patterns with the Lock function ............................................. 114
10.5 Use Note Repeat ......................................................................................................................... 115
10.6 Set up your own Multi-effect Groups ........................................................................................... 115
10.7 Use a Limiter on your Master ...................................................................................................... 115
11 Glossary ...................................................................................................................
Table of Contents
116
MASCHINE MIKRO - Getting Started - 7
Page 8

Welcome to MASCHINE MIKRO!
1 Welcome to MASCHINE MIKRO!
Thank you for buying MASCHINE!
MASCHINE is essentially the synergy of the MASCHINE MIKRO controller hardware and
the MASCHINE software combining the advantages of both worlds for making music, live
as well as in the studio. The intuitive, hands-on qualities of a dedicated Instrument, the
MASCHINE MIKRO controller, with the advanced editing features and the versatility of the
MASCHINE software turn it into the creative center of your musical productions.
You can create tight rhythms, harmonies and melodies — the highly enjoyable instrument
combines a pattern-based sequencer, professional sampler, multi-effect unit and VST/AU
plug-in host. Everything is intuitively controllable via the fully integrated hardware — once
you touch the tactile controller the fun and intuitive workflow takes over, allowing you to
stay focused on your music.
Since you can integrate it in any DAW that supports VST, Audio Units or the RTAS format
with multiple instances, you can profit from its abilities in almost any software setup or
use it as a stand-alone application. You can sample your own material, slice loops and rearrange them easily turning your ideas into full productions.
However, MASCHINE is a lot more than an ordinary Groovebox or Sampler: It comes with a
6 Gigabyte Library programmed and created by well known artists and a sophisticated, yet
easy to use tag-based Browser to give you instant access to the sounds you are looking for.
But it doesn't stop there! You can create your own sounds and samples or use MASCHINE
EXPANSION packs, available from Native Instruments website to further enhance your library of sounds.
You can also control your external MIDI Hardware and Software with the MASCHINE MIKRO controller and customize the functions of the pads, knobs and buttons to your needs,
utilizing the Controller Editor Application.
We hope you enjoy the MASCHINE playground as much as we do. Now let’s get going!
MASCHINE MIKRO - Getting Started - 8
Page 9

Welcome to MASCHINE MIKRO!
The MASCHINE MIKRO Documentation
1.1 The MASCHINE MIKRO Documentation
1.1.1 Manual Conventions
This section introduces you to the signage and text highlighting used in this manual. This
manual uses particular formatting to point out special facts and to warn you of potential
issues. The icons introducing these notes let you see what kind of information is to be expected:
Whenever this exclamation mark icon appears, you should read the corresponding note carefully and follow the instructions and hints given there if applicable.
This light bulb icon indicates that a note contains useful extra information. This information
may often help you to solve a task more efficiently, but does not necessarily apply to the setup or operating system you are using; however, it's always worth a look.
Furthermore, the following formatting is used:
▪ Text appearing in (drop-down) menus (such as Open…, Save as… etc.) and paths to
locations on your hard drive or other storage devices is printed in italics.
▪ Text appearing elsewhere (labels of buttons, controls, text next to checkboxes etc.) is
printed in blue. Whenever you see this formatting applied, you will find the same text
appearing somewhere on the screen.
▪ Text appearing on labels of the MASCHINE controller is printed in orange. Whenever
you see this formatting applied, you will find the same text on the controller.
▪ Important names and concepts are printed in bold.
▪ References to keys on your computer's keyboard you'll find put in square brackets
(e.g., "Press [Shift] + [Return]").
► Single instructions are introduced by this play button type arrow.
→ Results of actions are introduced by this smaller arrow.
Naming Convention
Throughout the documentation we will refer to MASCHINE MIKRO as the hardware controller
and MASCHINE software as the software installed on your computer.
The term 'effects' will often be abbreviated as 'FX' when referring to elements in the MASCHINE software and hardware. These terms have the same meaning.
MASCHINE MIKRO - Getting Started - 9
Page 10

Welcome to MASCHINE MIKRO!
The MASCHINE MIKRO Documentation
1.1.2 Where To Start?
MASCHINE MIKRO provides you with many information sources. The main sources are
meant to be read in the following sequence:
1. MASCHINE Setup Guide
2. MASCHINE MIKRO Getting Started Guide (this document) and online video tutorials
3. MASCHINE MIKRO Reference Manual
4. MASCHINE MIKRO Hardware Control Reference
Hereafter is a quick description of each of these documentation sources.
The Setup Guide is available in printed form in the product box. The whole documentation
set is also available in PDF format and located within the MASCHINE MIKRO installation
folder on your hard drive. You can also access these documents from the application’s Help
menu.
Your First Stop: the Setup Guide
A printed Setup Guide is included in the product box. It will guide you through the software and hardware installation of MASCHINE MIKRO, from the very beginning to the first
sound coming through your speakers. This should be your first stop in learning MASCHINE.
First read the Setup Guide. Then proceed with this MASCHINE MIKRO Getting Started
Guide to get more familiar with MASCHINE MIKRO.
MASCHINE MIKRO Getting Started Guide
After reading the Setup Guide and following its instructions, your MASCHINE MIKRO
should be up and running. The next step is to read this MASCHINE MIKRO Getting Started Guide. The MASCHINE MIKRO Getting Started Guide first gives you an overview of MASCHINE MIKRO and a practical approach to creating a project.
MASCHINE MIKRO Reference Manual
The MASCHINE MIKRO Reference Manual provides you with a detailed reference of your
MASCHINE software along with extra information (solving common issues, specifications,
etc.).
MASCHINE MIKRO Hardware Control Reference
The MASCHINE MIKRO Hardware Control Reference provides an overview of a MASCHINE
project, the quick access options performed using the MASCHINE MIKRO hardware controller, and lots of keyboard shortcuts.
MASCHINE MIKRO - Getting Started - 10
Page 11

Welcome to MASCHINE MIKRO!
The MASCHINE MIKRO Documentation
Video Tutorials
The Native Instruments website provides you with a lot of video tutorials that give you a
hands-on approach to many sides of the MASCHINE workflow. To see them, point your favorite browser to following URL: www.native-instruments.com/maschinemikromedia.
Controller Editor Reference Manual
Besides using your MASCHINE MIKRO hardware controller together with its dedicated
MASCHINE software, you can also use it as a powerful and highly versatile MIDI controller
to pilot any other MIDI-capable application or device. This is made possible by the Controller Editor software, a little application that allows you to precisely define all MIDI assignments for your MASCHINE MIKRO controller. The Controller Editor should have been
installed during the MASCHINE MIKRO installation procedure. For more info on this,
please refer to the Controller Editor Reference Manual available as a PDF file in the Documentation subfolder of the Controller Editor installation folder on your hard disk.
1.1.3 In This Document
What you are reading now is the MASCHINE MIKRO Getting Started Guide Manual. This
manual is structured as follows:
The first part is this introduction.
▪ Chapter 2 quickly introduces you to the MASCHINE MIKRO hardware and software.
▪ Chapter 3 provides an overview of a MASCHINE project and a description of how
sound content and arrangement elements are linked.
▪ Chapter 4 is the first tutorial, and focused on creating a Pattern — the basic starting
point for a MASCHINE project. You will discover how to use both MASCHINE MIKRO
hardware and MASCHINE software to layout a Pattern with some drums, a bass line
and a melody. This practical example will simplify the learning process and get you
quickly started making beats!
▪ Chapter 5 provides an overview of effects and routing and also contains the second tu-
torial focused on adding effects to the Pattern you created in chapter 4.
▪ Chapter 6 describes the Input Module and more advanced routing options.
▪ Chapter 7 shows you how to arrange your patterns and develop them into a song using
the arranger.
MASCHINE MIKRO - Getting Started - 11
Page 12

Welcome to MASCHINE MIKRO!
The MASCHINE MIKRO Documentation
▪ Chapter 8 describes how to use your soundcard and MASCHINE software to sample in-
ternal and external audio.
▪ Chapter 9 provides an overview of how to efficiently manage MASCHINE Projects, by
saving different elements independently so you can easily use and find them in other
Projects.
▪ Chapter 10 provides some hands-on tips for producing music with MASCHINE MIKRO
as well as for performing live.
MASCHINE MIKRO - Getting Started - 12
Page 13

2 Overview
This mini-chapter will quickly introduce you to the main areas and concepts of MASCHINE, both on your MASCHINE MIKRO hardware controller and in the MASCHINE software. By now you should have read the printed Setup Guide included in the product box
and will have setup MASCHINE MIKRO by making the necessary connections and configuring the software.
Take the time to read these few pages, as they will familiarize you with MASCHINE MIKRO's
workflow and provide an insight to the power of its design.
First of all lets have a quick look at the MASCHINE MIKRO hardware.
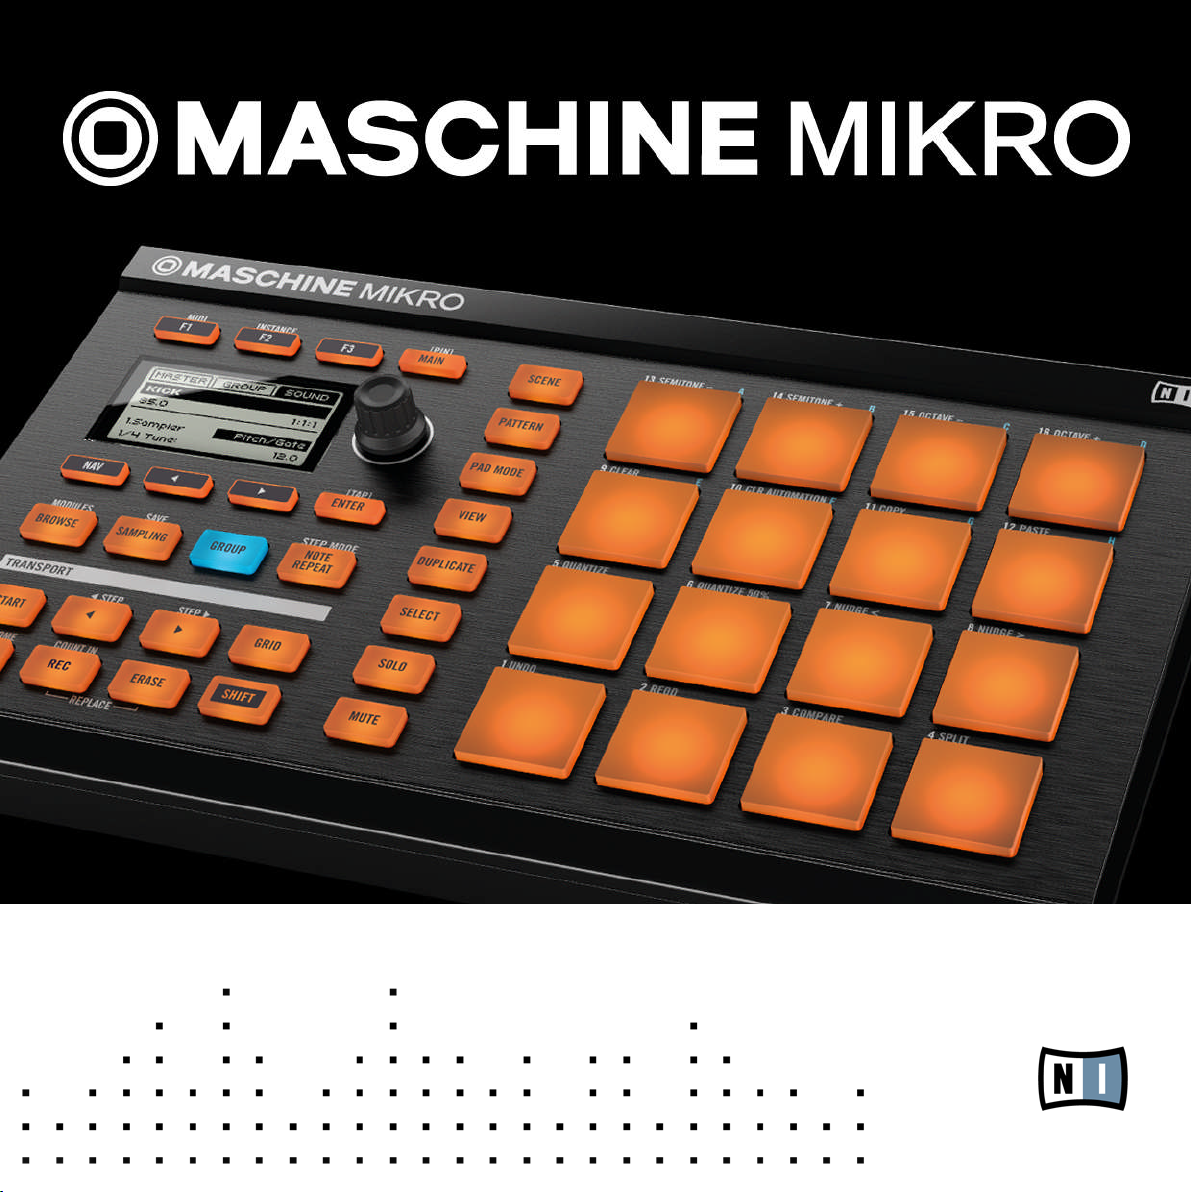
Overview
MASCHINE MIKRO - Getting Started - 13
Page 14
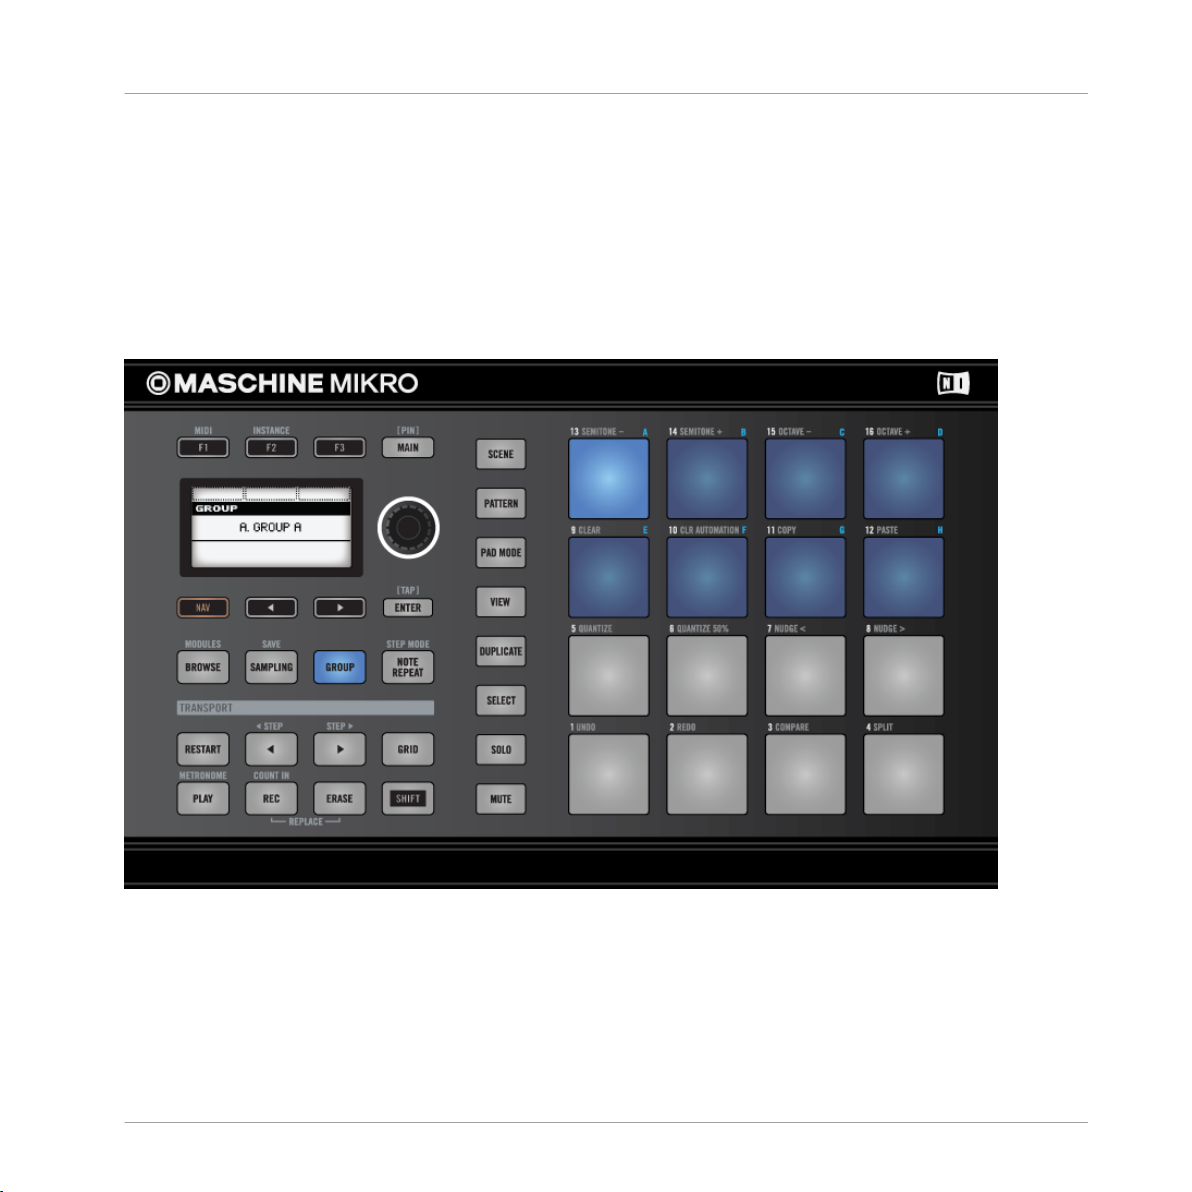
2.1 MASCHINE MIKRO Hardware
Overview
MASCHINE MIKRO Hardware
MASCHINE MIKRO hardware controller overview
(1) CONTROL section: provides instant access to all Sound, Group and Master parameters
via the MAIN button and the Control knob. There are also dedicated buttons to access the
Browser, Groups and Sampling. For more information on this section please view ↑2.1.1,
CONTROL Section.
(2) TRANSPORT section: Start, stop and restart playback, activate record and skip bars
while playing, simply by pressing the dedicated buttons in the transport area of the MASCHINE MIKRO controller. For more information on this section please view ↑2.1.2,
TRANSPORT Section
MASCHINE MIKRO - Getting Started - 14
Page 15
MASCHINE MIKRO Hardware
(3) PADS section: Access the various modes of MASCHINE MIKRO using the mode buttons
on the left-hand side of this section. By pressing any of the 16 pads you will hear the corresponding Sound if one has been assigned. For more information on this section please
view ↑2.1.3, PADS Section.
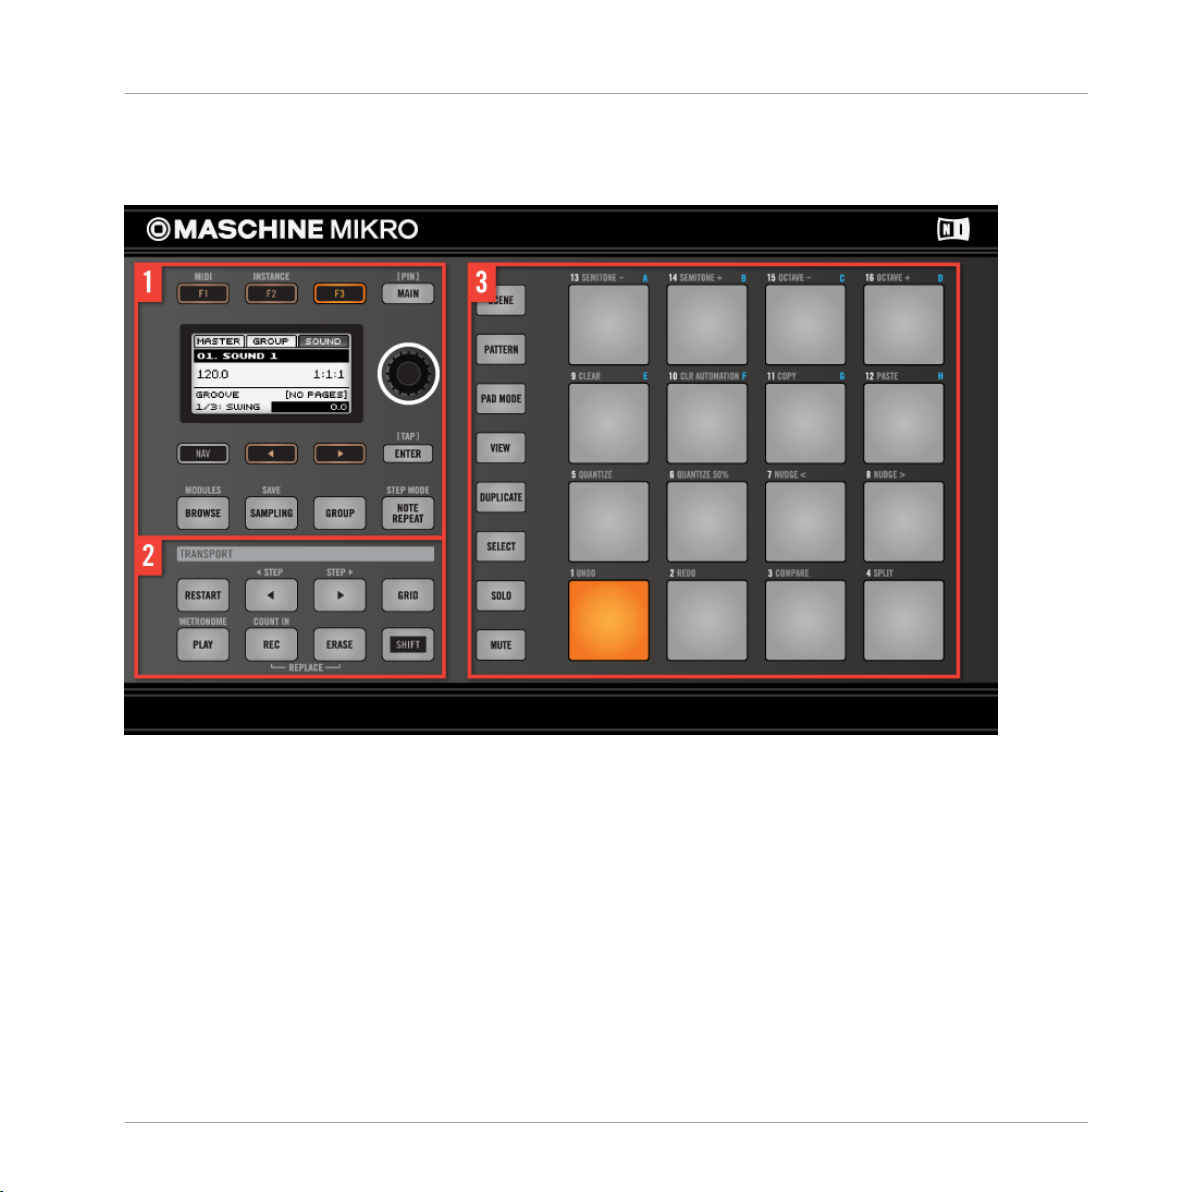
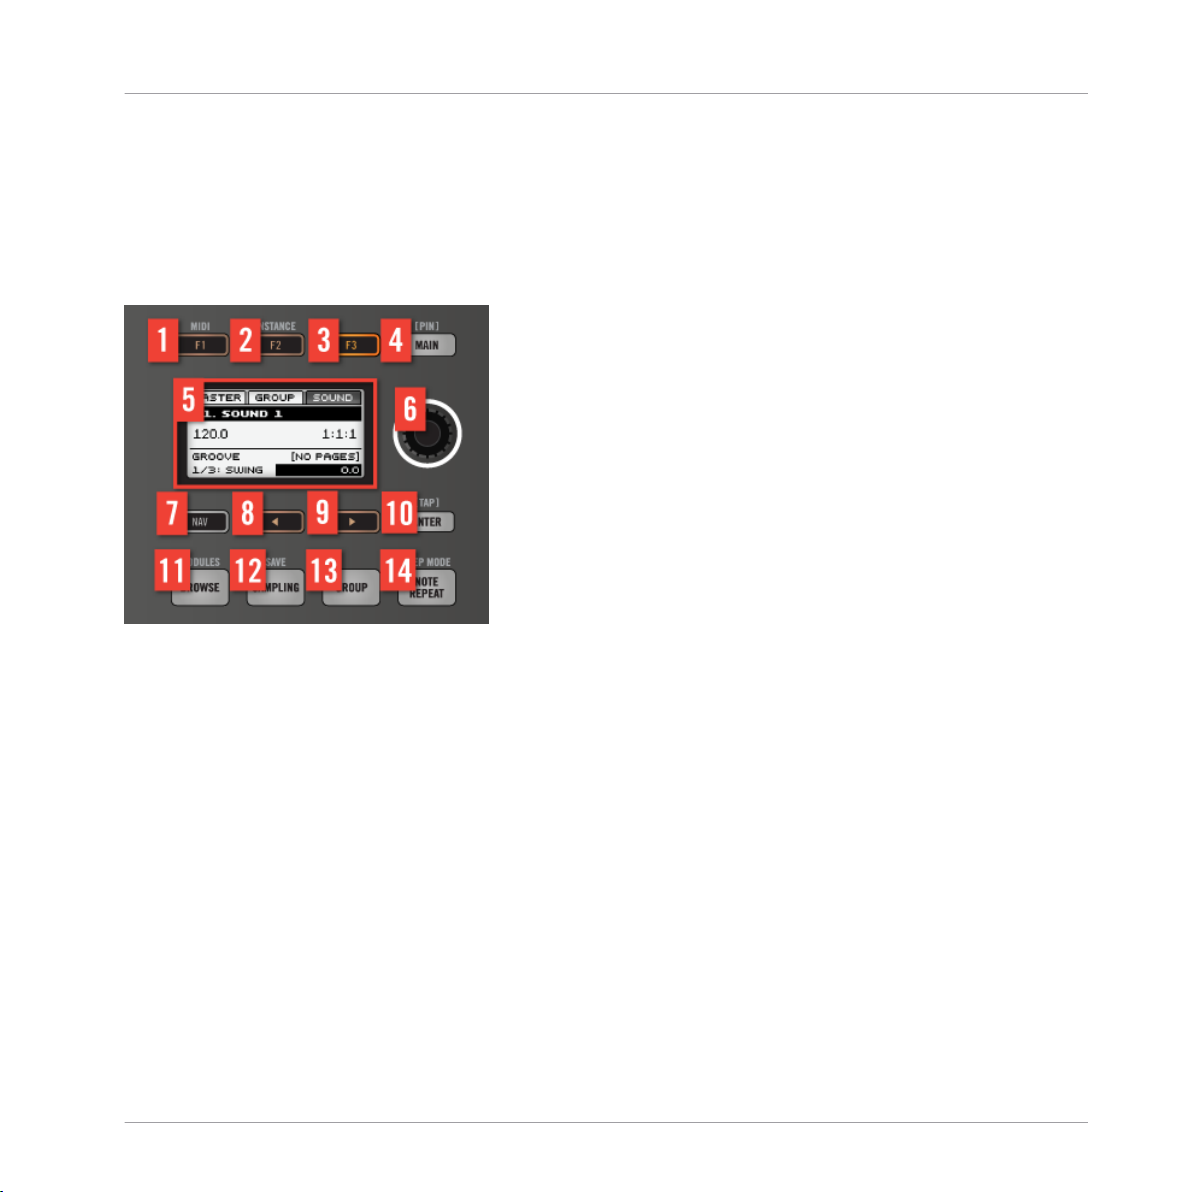
2.1.1 CONTROL Section
Overview
Control section overview
(1-3) F1, F2 and F3 buttons: The three buttons above the LCD display dynamically adapt
their function to the currently active environment, allowing direct access to the most important sub-sections and functions. The action they will perform is shown below each button in the display. Using the SHIFT button you can also use F1 to access MIDI mode and F2
to access Instance mode:
▪ MIDI mode: In this mode you can use MASCHINE MIKRO as a MIDI controller. Press
SHIFT + F1 to access MIDI mode.
▪ Instance mode: In this mode you can select another instance of MASCHINE if you
have more than one open in your Digital Audio Workstation (DAW). Press SHIFT + F2
to access Instance mode. Use the Control knob to select an instance.
(4) MAIN button: Press the MAIN button to toggle between Control mode and Main mode.
▪ Control mode is the default MASCHINE MIKRO page and may be used to access the
Sound, Group and Master levels of the MASCHINE project.
MASCHINE MIKRO - Getting Started - 15
Page 16

MASCHINE MIKRO Hardware
▪ Main mode is used to change Volume, Swing and Tempo parameters. Press the MAIN
button plus: F1 for main Volume, F2 for global Swing, and F3 Tempo to control the
tempo of your project. Use the Control knob to change a parameter value.
When a pad or the GROUP button is held Tempo will be replaced by the Tune setting allowing
you to tune individual Sounds or Groups on the fly by rotating the Control knob.
(5) Display: Part of the hardware interface is occupied by the multi-functional control area,
which forms the core of MASCHINE's mouse-free workflow. The crystal-clear LCD display
will provide you with all essential information — no need to glance at the computer
screen.
(6) Control knob: Turn the Control knob to dynamically change the value of the parameter
shown in the display. Press the SHIFT button to change a value in finer increments. In
combination with the NAV button, Left and Right Arrow buttons (below the Display) you
can also use the Control knob to navigate the display area.
(7) NAV button: Press NAV + Left or Right Arrow buttons to quickly scroll fields on the display.
▪ If you press and hold the NAV button in Control mode you can change the mode of the
pads to operate as shortcuts to specific modules or parameter pages. See ↑3.4, Navi-
gation and Shortcuts for more details.
(8) Arrow Left button: Use this button to navigate left in the display. Use with the NAV button to quickly navigate to the previous page.
(9) Arrow Right button: Use this button to navigate right in the display. Use with the NAV
button to quickly navigate to the next page.
(10) ENTER (TAP): Press the ENTER button to confirm a specific value or to load from the
Browser. Press SHIFT and repeatedly tap the ENTER button to set the required tempo for
your project.
(11) BROWSE button: MASCHINE comes with over 6GB of sample content, organized in an
infinitely expandable library. The browser is fully integrated into the hardware-based workflow of MASCHINE, so finding the right Sound in MASCHINE is easier and faster than
anything you've experienced before. Anytime you press the BROWSE button, the characteristics of the currently selected Sound are used to filter the Library (i.e., Drums/Snare/Analog) so that you can immediately step through and audition alternatives. This feature is
known as Quick Browse.
Overview
MASCHINE MIKRO - Getting Started - 16
Page 17
MASCHINE MIKRO Hardware
(12) SAMPLING (SAVE) button: MASCHINE comes with fully integrated sampling functionality. Record external audio from a turntable, instrument or MP3 player or resample the
MASCHINE output to create tightly cut loops. Press the SAMPLING button to access this
Sample mode.
(13) GROUP button: Pressing the GROUP button will toggle the function of pads 9-16 from
Sound pads to Group pads to allow you to select the Group you want to work in. Dimmed
blue pads show which Groups contain Sounds, while fully lit blue pads show the selected
Group — the name of this Group will show in the display.
Overview
Press the GROUP button to toggle Group pads
The Group pads can also used to solo and mute Groups on the fly when the SOLO or MUTE
mode buttons are pressed. In the MASCHINE software each Group is represented by a
Group Slot A to H. In a MASCHINE Project you may have up to 8 Groups each containing
16 Sounds.
MASCHINE MIKRO - Getting Started - 17
Page 18
MASCHINE MIKRO Hardware
(14) NOTE REPEAT button: Note Repeat is a really handy way to program beats — it plays
the selected Sound automatically at a given quantization. While holding the NOTE REPEAT
button, press the pad you want to record: notes will now repeatedly triggered at the selected rate shown in the display. With buttons F1, F2 and F3, you can select different quantization settings while playing. You can select new quantization values for each of these
buttons by turning the Control knob. By pressing SHIFT + NOTE REPEAT you can enter
STEP mode.
For more information on Step mode please refer to ↑4.3.4, Step Sequencer.
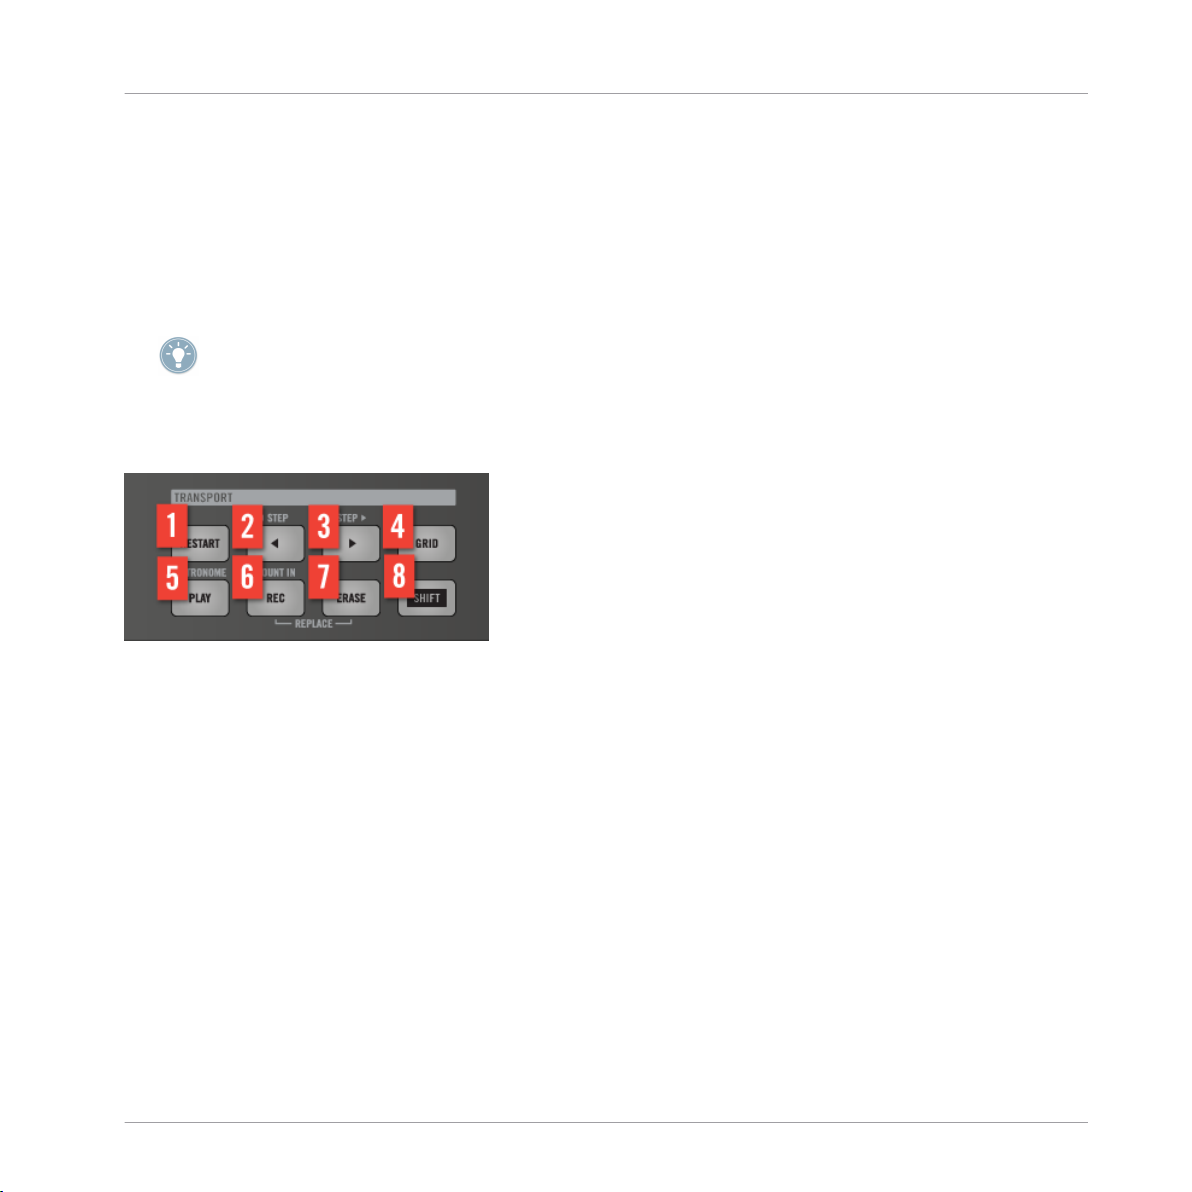
2.1.2 TRANSPORT Section
Overview
TRANSPORT section overview
Start, stop and restart playback, activate record and skip bars while playing, simply by
pressing the dedicated buttons in the transport area of the MASCHINE MIKRO controller.
Use the SHIFT button to invoke secondary commands such as the Metronome, Count in
and Step forward and backward in smaller increments.
(1) RESTART button: Press the RESTART button to restart the track at anytime. Playback
will begin at bar 1 of the project.
(2) Step Backwards button: Skip back through the arrangement one bar at a time. Press the
SHIFT button and STEP to skip backwards through the arrangement in finer increments.
(3) Step Forwards button:
(4) GRID button: Select grid sizes for quantization when recording single events, for changing pattern lengths or switching scenes. Turn the grid off completely for a direct groove
without quantization.
MASCHINE MIKRO - Getting Started - 18
Page 19

MASCHINE MIKRO Hardware
(5) PLAY button: Press the PLAY button to activate playback. Press PLAY a second time to
stop playback. Press SHIFT and PLAY to turn the Metronome on. Press SHIFT and PLAY a
second time to turn the Metronome off.
(6) REC button: Press PLAY and REC at the same time to begin recording. Press PLAY and
REC a second time to stop recording.
(7) ERASE button: When creating music, erasing needs to be as quick and simple as recording, so there is a dedicated button for this! Hold ERASE during playback and press any
number of pads to erase the events of the currently activated pattern on the fly. Press the
button of a Group to erase all its events at once. If you turn any knobs while holding
ERASE, it will clear the automation of the associated parameter.
(8) SHIFT button: While the most important features are accessible through dedicated buttons, many shortcuts are available by holding the SHIFT button and pressing pads 1-16 or
several other buttons. You can also use the SHIFT button to change parameters in fine increments when entering values with the Control knob.
All MASCHINE MIKRO hardware shortcuts are explained in the Hardware Control Reference.
Overview
MASCHINE MIKRO - Getting Started - 19
Page 20
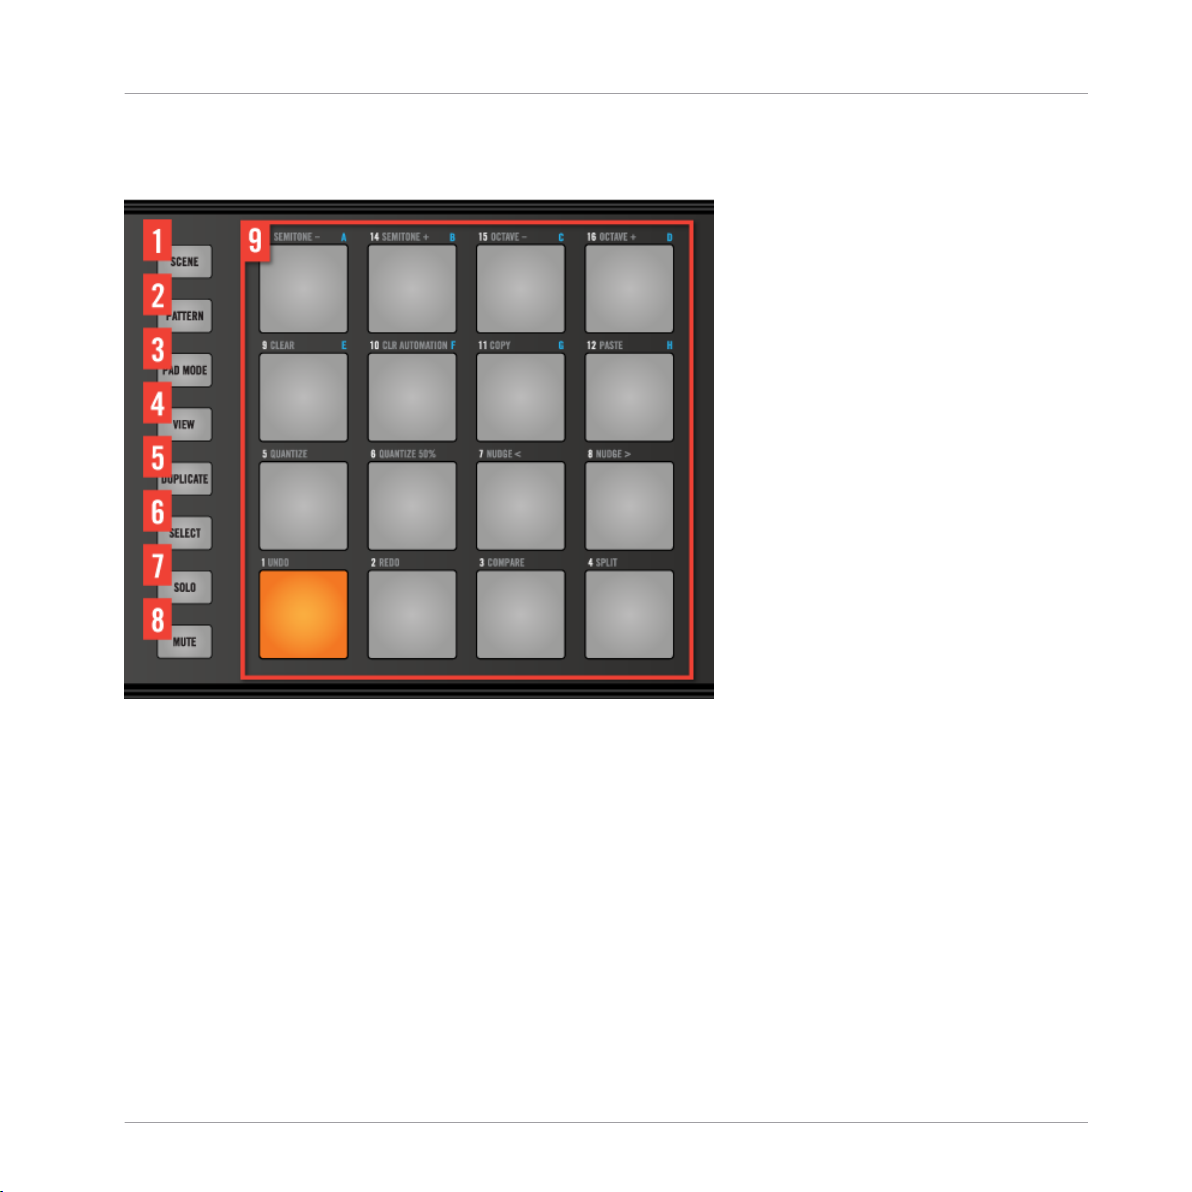
2.1.3 PADS Section
Overview
MASCHINE MIKRO Hardware
PADS section overview
(1) SCENE button: Create Scenes to work out the structure of your track. During playback,
you can switch to other Scenes for quick on-the-fly arrangement. Dimmed pads show
which scenes contain clip, while fully lit pads show the currently selected Scene.
(2) PATTERN: Working with Patterns allows you to create different beats with the same set
of Sounds. Switch between different patterns or create a new one during playback. Dimmed pads show which Patterns contain Events, fully lit pads show the selected Pattern.
(3) PAD MODE: MASCHINE is designed to record drum sounds, but the pads can easily be
used to play melodies or even chords! Besides the standard layout mapping, there are two
options to map a single Sound to all 16 pads. In Keyboard mode, the pads represent 16
chromatic steps, ascending from the selected root note — this way you can play the se-
MASCHINE MIKRO - Getting Started - 20
Page 21

MASCHINE MIKRO Hardware
lected Sound like an instrument. You can also use F2 to transpose down or F3 to transpose
up an octave at a time. In 16 Velocities mode, the pads represent 16 levels from the softest to the full velocity — this is especially useful for building up dynamic grooves.
(4) VIEW: When working on large projects, it is sometimes necessary to look at the computer screen. With MASCHINE there is no need to use the mouse and search for scroll bars or
magnifying glasses! Just use the pads and the knobs to zoom in and out or scroll through
Patterns and Scenes.
(5) DUPLICATE: Use the Duplicate button to swiftly create another instance of any Sound,
Pattern, Group or Scene. This can be useful for creating variations or trying out something
new while preserving the current state of your work.
(6) SELECT: Select a Sound without having to play it, or select the notes playing a particular Sound, which is useful for limiting quantization, nudging notes and other operations
specific to the selected events.
(7) SOLO: Instantly solo any Sound or Group (equals muting all other Sounds/Groups) useful to tweak the sound or for performing live. Sounds and Groups that are not muted
are represented by their corresponding button or pad being dimmed. The LCD screen show
the names of all the Groups and Sounds as well as their current status.
(8) MUTE: Instantly mute Sounds or Groups — good for getting on top of your production
when you have many sounds playing and especially useful for performing live. Muted
Sounds and Groups are represented by the corresponding buttons' lights turning off. The
LCD screen show the names of all the Groups and Sounds as well as their current status.
(9) Pads 1-16: Hitting the ultra responsive pads will play (and record, if REC is on) the corresponding Sound. When a Sound is selected you can instantly edit it's parameters. Press
and hold a pad to toggle to Main mode and change the value for TUNE by turning the Control knob. Press F1 to change VOLUME and F2 to change SWING for the sound on each pad.
Overview
For a detailed explanation of each feature please refer to the Reference Manual.
MASCHINE MIKRO - Getting Started - 21
Page 22
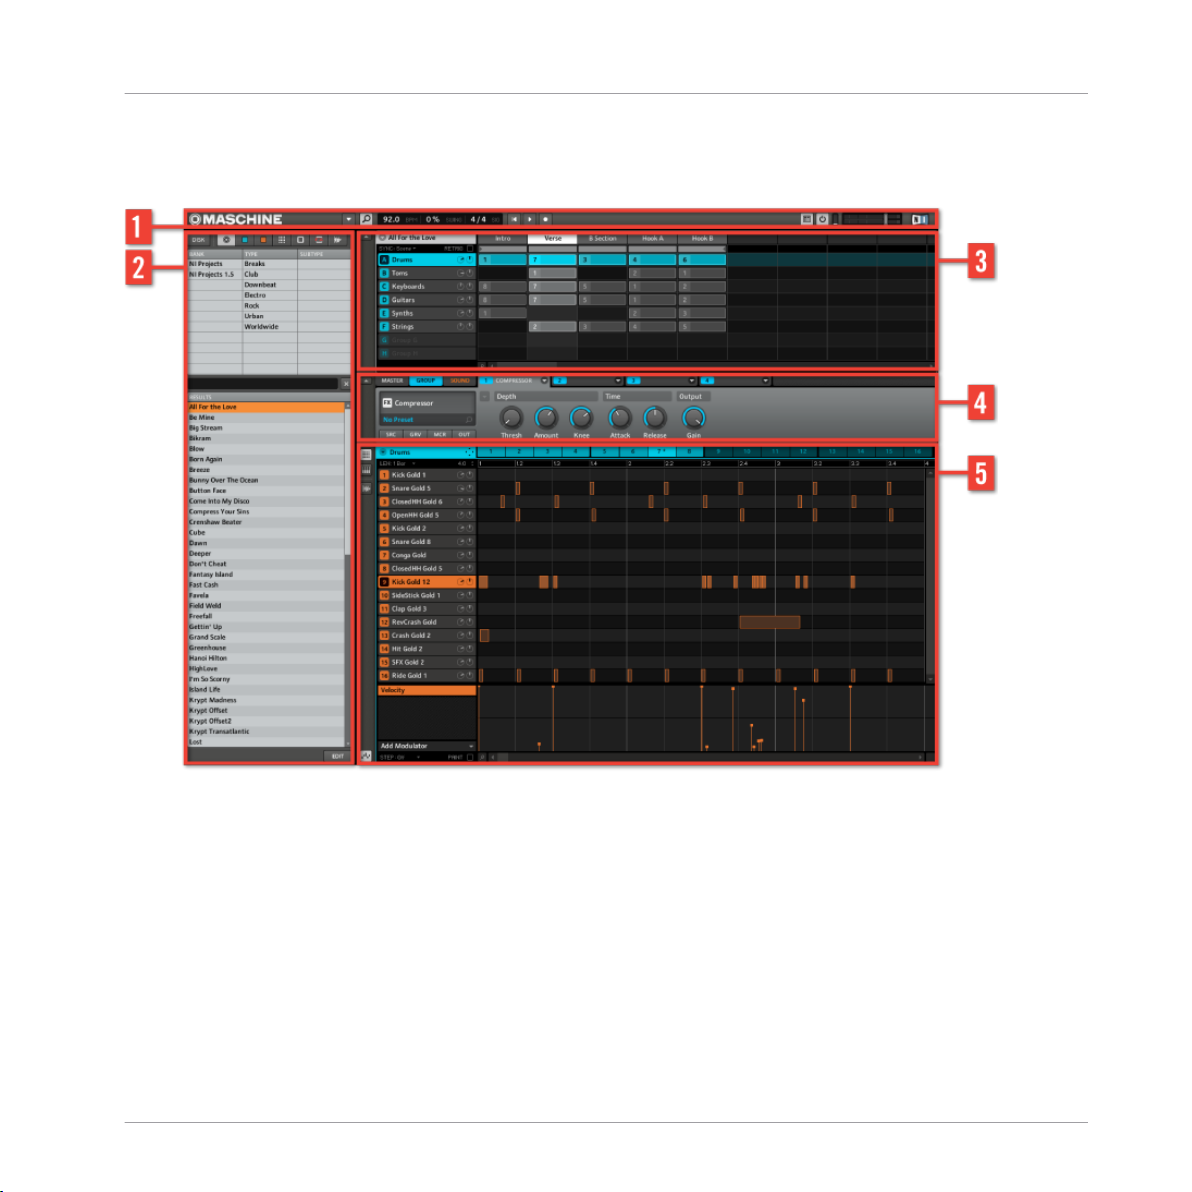
2.2 MASCHINE Software
Overview
MASCHINE Software
The MASCHINE Software
(1) Header: The Header contains the main controls for the MASCHINE software including
the Display Area, Transport controls and the main volume output levels. You can also use
this area to toggle the Browser, connect to MASCHINE controller and monitor your computers CPU usage.
(2) Browser: The Browser is your tool for managing, finding, tagging and categorizing
Projects, Groups, Patterns, Sounds, Samples, FX and Plug-in presets. Using the search facility you can quickly find things and audition sounds.
(3) Arranger: Use this area to drag and drop up to 64 Scenes in order to build your track
and make arrangements.
MASCHINE MIKRO - Getting Started - 22
Page 23
MASCHINE Software
(4) Control Area: The Control Area allows you control parameters and settings for each of
the four modules at each project level (Sound, Group and Master). This area can hold settings for Samples, Sounds, Plug-ins, internal FX, MIDI and Routing.
(5) Pattern Editor: The Pattern Editor features both step programming and real-time recording and is the basis for each Scene. Up to 8 groups of 64 patterns can be created here
and then arranged into Scenes in the Arranger. The Pattern Editor also supports automation for Sounds, Samples, FX, Plug-ins and mixer parameters.
2.2.1 The Header
The Header
(1) Menu button: Click the Menu button to access the software menus. This button is particularly useful in Full-screen mode and when MASCHINE is used as a DAW plug-in.
(2) Browser button: Use the Browser button to toggle the Browser. The Browser is your tool
for managing, finding, tagging and categorizing Projects, Groups, Patterns, Sounds, Plugin and FX presets. From the Browser you can to directly search your computer or an external drive to add new samples. You may also audition sounds directly from the Browser and
apply new tags.
(3) Display Area: The Display area provides visual feedback regarding Tempo, Global Swing
and Time signature.
(4) Transport controls: The Transport control contains buttons like a conventional tape recorder or CD player, such as Play, Restart, Record and Stop.
(5) Connect button: Use the Connect button to connect an instance of MASCHINE to the
hardware controller.
(6) Audio Engine button: Click the Audio Engine button to completely bypass the sound
processing of MASCHINE.
Overview
MASCHINE MIKRO - Getting Started - 23
Page 24
MASCHINE Software
(7) CPU Meter: The CPU Meter represents the current load on your computer's processor
and is constantly measured; it should not go above 70% to avoid clicks and interruptions.
You can save CPU power by sampling the audio output of MASCHINE if necessary using
export.
Please refer to the Reference Manual for more information on exporting audio from MASCHINE.
(8) Volume control: Shows the amplitude of the MASCHINE audio output and features an
integrated Volume fader that controls the output level.
(9) NI Logo: The NI logo and MASCHINE logo opens the About Screen which displays the
version number and edition of your MASCHINE software.
Overview
MASCHINE MIKRO - Getting Started - 24
Page 25
2.2.2 The Browser
Overview
MASCHINE Software
The Browser
(1) Disk button: Use the Disk button to access your computer hard drives.
(2) File Type Selector: This contains 7 icons each representing the different files types of
MASCHINE. From the left to right the file types are Project, Group, Sound, Pattern, Instrument, FX, and Sample. By clicking one of them it causes only the files of the selected type
to be displayed in the Search Result List.
MASCHINE MIKRO - Getting Started - 25
Page 26
MASCHINE Software
(3) Tag Filter: The Tag Filter allows you to search for file types based on tags that have
been applied to them. You can quickly find files based on the Bank, Type and Subtype
categories.
(4) Text Search Field: Use the Text Search Field to quickly find files based on their name or
tagged attribute. Select the type of file you are looking for from the File Type Selector and
enter the name or category of a file into the Text Search Field to perform a search. Results
are displayed in the Search Result List below.
(5) Search Result List: The Search Result List displays all files that match your query.
(6) Tag Editor: The Tag Editor allows you to edit Tags applied to files and add Tags to new
files from the three available categories.
(7) Audition controls: This allows you to listen to Samples, Sounds, which can be listened
to in context with the rest of your Project while it is playing.
2.2.3 Arranger
Overview
The Arranger
(1) Play mode controls: This area contains the controls for Scene Sync which allow you to
quantize Scene transitions and retrigger them.
(2) Arranger Timeline: This area displays the current position within the track and allows
you to set the loop range.
(3) Group Slots: The Group Slots each contain 16 Sound Slots, each of which can hold one
Sound.
MASCHINE MIKRO - Getting Started - 26
Page 27
MASCHINE Software
(4) Clip Area: Each Clip represents a Pattern from a given Group. A combination of several
Clips stacked vertically is called a Scene. A Scene can be moved freely by dragging and
dropping it into place, or you can use more conventional Copy, Paste and delete functions.
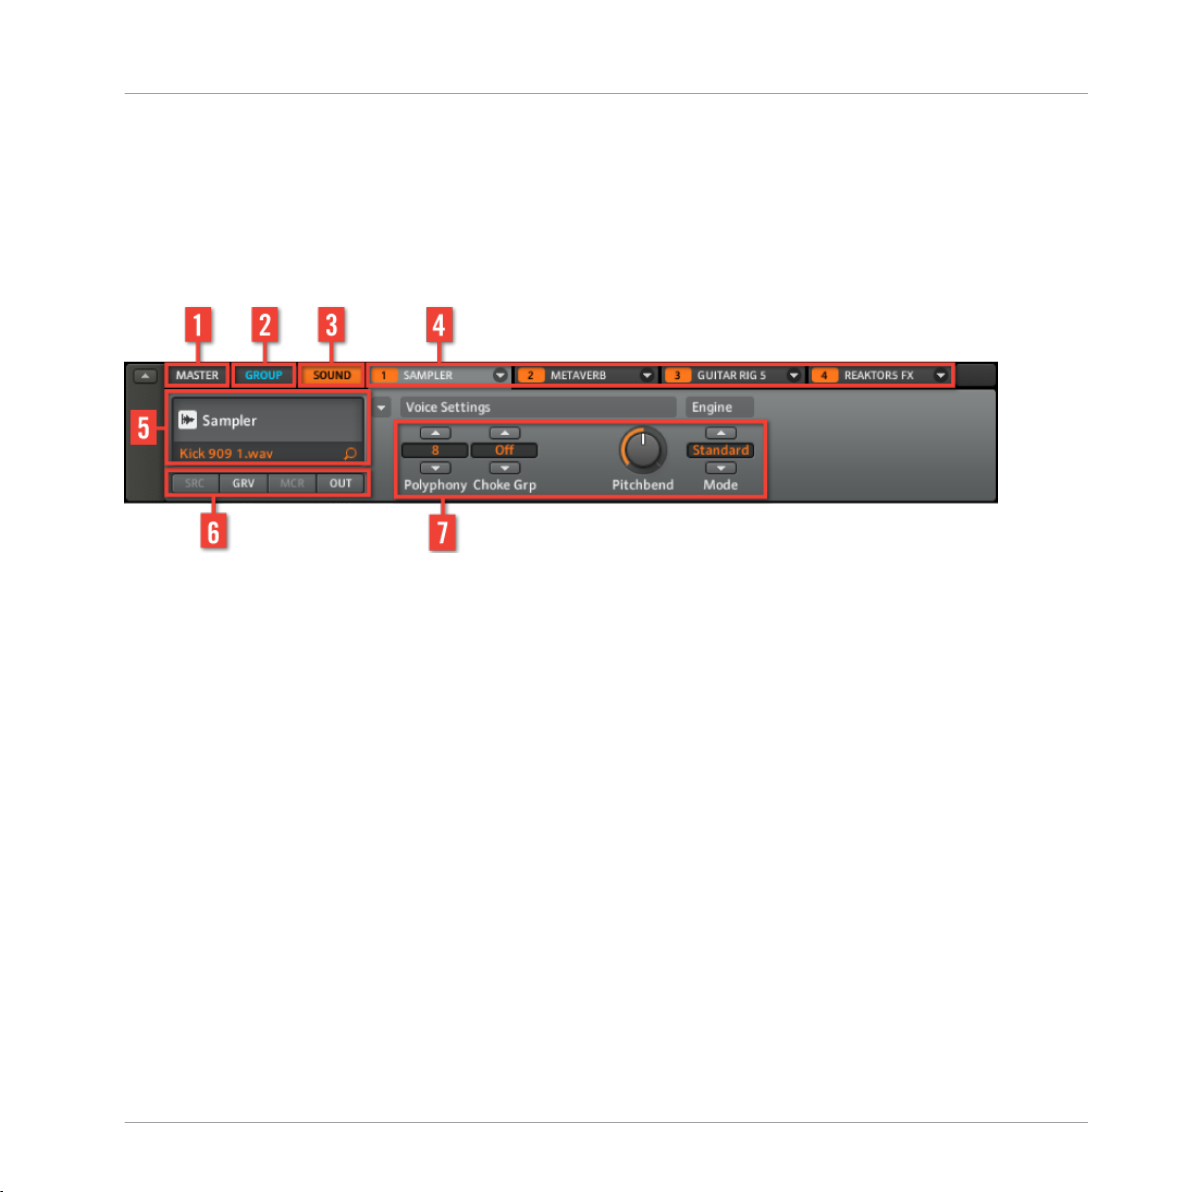
2.2.4 Control Area
The Control Area
(1) Master tab: Controls sound at the main outputs of MASCHINE (including all Groups).
(2) Group tab: Use the Group tab to gain access to the Group page which contains the
Group Modules and Group Property Pages. Controls on the Group tab affect the sound of
the currently selected Group A-H (including all Sound Slots).
(3) Sound tab: Use the Sound tab to gain access to the Sound page which contains the
Sound Modules and Sound Property Pages. Controls on the Sound Page affect the sound
of the currently selected Sound Slot (1-16).
(4) Module tabs 1-4: There are four modules on each project level; Sound, Group and Master. They can contain instruments and FX and are the building blocks for your project. Use
modules to change sound parameters, setup FX sends and route audio. These will be explained in more detail in chapter ↑4.5.1, Module Slots.
(5) Quick Browse Area: The Quick Browse area can be used to recall a file in the Browser
and the search query you performed to find to the given file. If you rollover the Quick
Browse Area with your mouse when using a VST/AU plug-in the edit icon appears. Click
this to open the plug-in in a separate window.
(6) Property Page buttons: Use the Property Pages to control the Source, Groove, Macro and
Output properties. These are available at each level of the Project.
Overview
MASCHINE MIKRO - Getting Started - 27
Page 28
MASCHINE Software
(7) Parameter Pages: Displays parameters based on the selected Tab and Property Page.
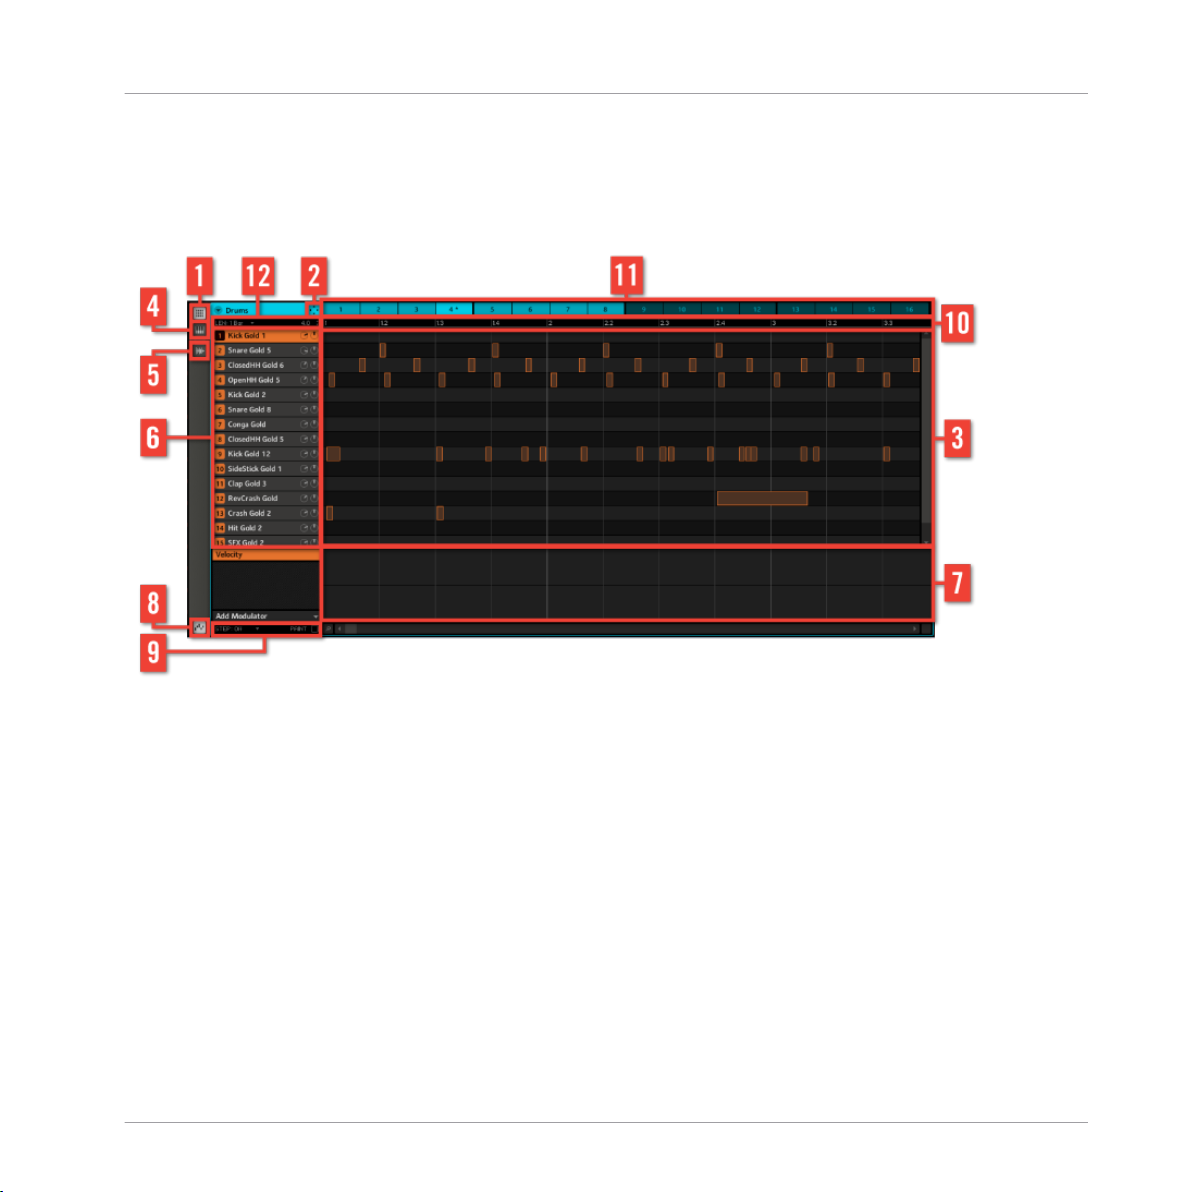
2.2.5 Pattern Editor
Overview
The Pattern Editor
(1) Pattern Editor view switch: Use this button to select the Pattern Editor view.
(2) Dragger Icon: The Dragger Icon allows you to conveniently drag and drop audio or MIDI
patterns to your desktop or host software.
(3) Pattern Editor: Here you can see rectangular blocks known as Events from the selected
Pattern Slot. In Pattern Editor view these represent each part of your drum pattern. In Piano Roll/Keyboard view they represent musical notes. The Events can be edited using your
mouse; they can be dragged to a new position, elongated, shortened or deleted. Use the
Edit Control (9) to change the steps in which Events can be moved.
(4) Piano Roll / Keyboard view switch: Use this button to select the Piano Roll/Keyboard
view.
(5) Sampling view switch: Use this button to select the Sampling view.
MASCHINE MIKRO - Getting Started - 28
Page 29

MASCHINE Software
(6) Sound Slots: Sounds Slots 1-16 of a selected Group are listed here. Click a Sound Slot
to bring it into focus.
(7) Automation Lane: The Automation Lane provides a visual overview of the each parameters automation.
(8) Automation View Switch: The Automation View Switch allows you to toggle the Automation Lane view on or off.
(9) Edit Controls: The Edit Controls allow you to change the Grid of the Steps, select a new
value from the drop-down Grid menu.
(10) Pattern Timeline: The timeline at the top of the Arrange area displays musical time
units, including bars and beats.
(11) Pattern Slots: Each Group has 4 Pattern Banks which can contain up to 64 Patterns
known as Pattern Slots. Each slot can contain many Events to make up a single Pattern.
This can be a drum pattern or musical phrase. When a Pattern Slot is selected it is referenced by the selected Scene, this is known as a Clip. The Clip will take the name of the
Pattern number although it is possible to give the Clip a unique name. Create different
Clips from Pattern Slots to form an arrangement.
(12) Pattern Length controls: The Pattern Length controls allow you to change the length of
the pattern, select a new value from the drop-down Pattern Length menu.
Overview
For a detailed explanation of each section please refer to the Reference Manual.
MASCHINE MIKRO - Getting Started - 29
Page 30
Overview of a MASCHINE Project
The Structure of a MASCHINE Project
3 Overview of a MASCHINE Project
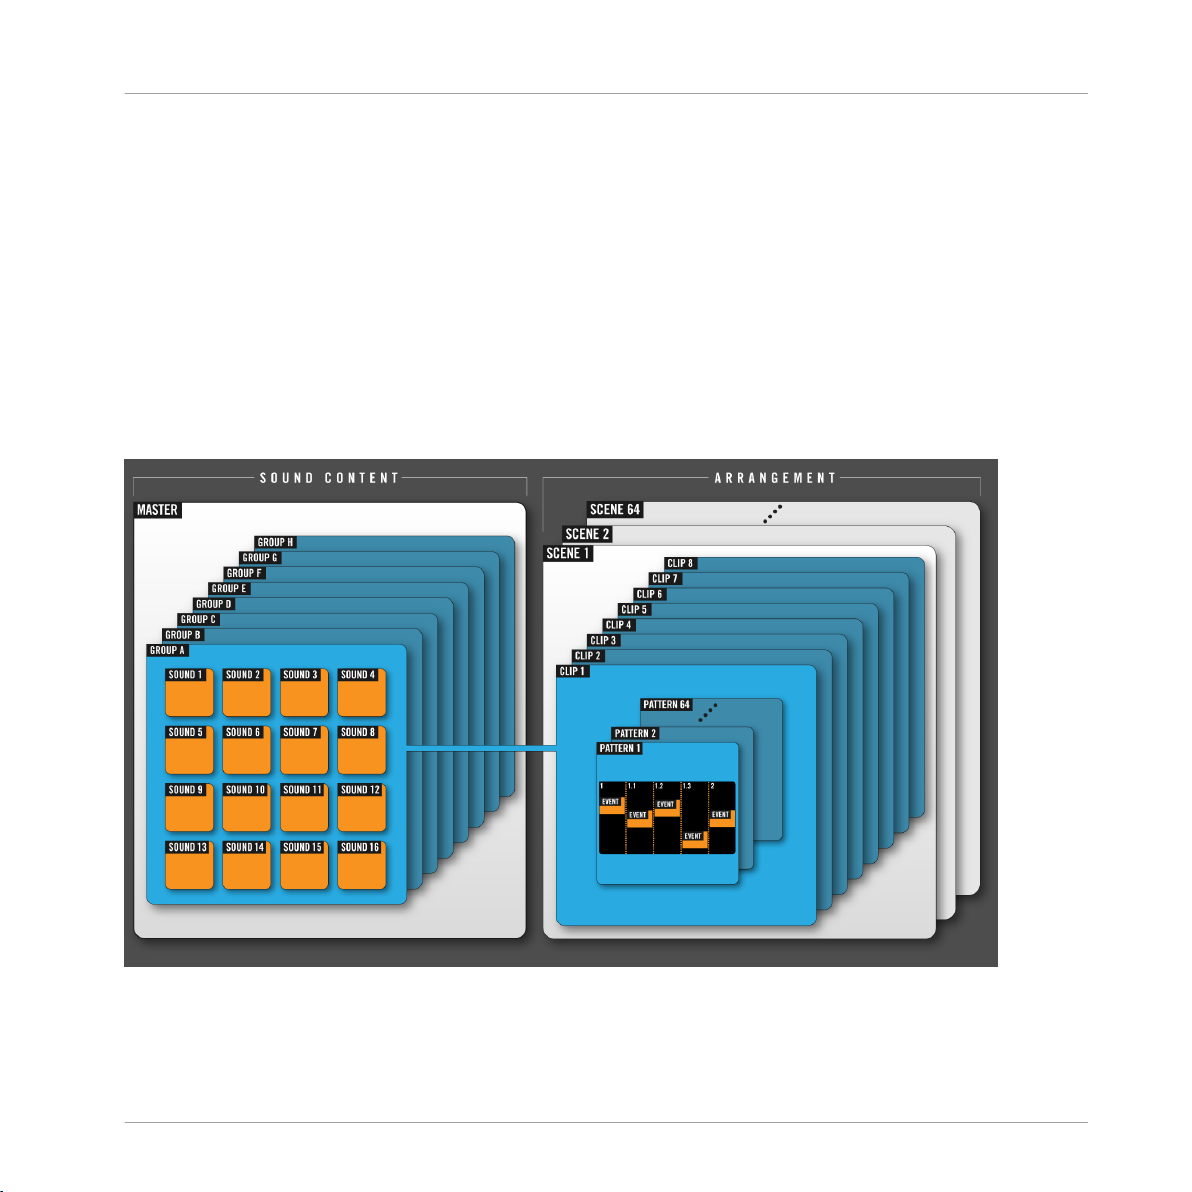
This chapter will familiarize you with the core concepts and terms of MASCHINE and explain the structure of a MASCHINE project.
3.1 The Structure of a MASCHINE Project
MASCHINE's file format is called a MASCHINE Project, and it has the file extension
".mprj."
A MASCHINE Project contains all the information stored with a MASCHINE-produced
piece of music. In the following diagram we can see the different aspects of a MASCHINE
Project.
Overview of a MASCHINE Project.
▪ The Project references all the sound content, the instruments, sounds and samples,
and all the effects you apply to them.
MASCHINE MIKRO - Getting Started - 30
Page 31

Overview of a MASCHINE Project
The Structure of a MASCHINE Project
▪ The Project also contains the arrangement of your Song, how patterns are built from
events which trigger Sounds, and how they are arranged into a song structure using
Scenes and Pattern Clips.
So basically there are two aspects to a MASCHINE Project: the sound content and the ar-
rangement. The following section will explain these aspects in detail.
3.1.1 Sound Content
The sound content aspect of a MASCHINE Project.
The sound content aspect of a MASCHINE Project includes all the audio material — the
instruments and effects contained in your Project file, and how these are structured:
▪ A MASCHINE Project file (1) offers 8 Groups (A-H) (2), which again hold 16 Sound
Slots (1-16) (3) each. Each Sound Slot can be filled with audio material.
MASCHINE MIKRO - Getting Started - 31
Page 32

Overview of a MASCHINE Project
The Structure of a MASCHINE Project
▪ You can influence the sound on these three levels: the Project (or Master) level, the
Group level, and the Sound level. The relevant controls are situated in the Parameter
area (4), which is your one-stop mixer, routing, effects, and plug-in section. The Parameter area has three tabbed pages: MASTER, GROUP, and SOUND.
◦
The controls on the MASTER page affect the sound at the main outputs of MASCHINE.
◦
The controls on the GROUP page affect the sound of the selected Group (A-H).
◦
The controls on the SOUND page affect the sound of the selected Sound Slot (1-16).
MASCHINE has a top-to-bottom structure: an effect on the SOUND level will only affect
the selected Sound Slot, while an effect on the Master will affect all Groups and all Sound
Slots in your Project.
MASCHINE MIKRO - Getting Started - 32
Page 33

3.1.2 Arrangement
Overview of a MASCHINE Project
The Structure of a MASCHINE Project
The arrangement aspect of a MASCHINE Project.
The arrangement aspect of a MASCHINE Project is about building patterns from audio material, and further about putting those patterns into a loop or a song structure. The basic
workflow in building a MASCHINE Song is as follows:
▪ You load or sample audio into a Sound Slot (1).
▪ You record instances of your Sounds by playing the pads. A recorded instance of a
Sound is called an Event (2).
▪ Several Events add up to a Pattern (3).
▪ All of this takes place in the Pattern Editor (4).
▪ In the upper half of the software's user interface you have the Arranger area (5).
MASCHINE MIKRO - Getting Started - 33
Page 34

Overview of a MASCHINE Project
The Structure of a MASCHINE Project
▪ Here you combine your Patterns — represented by Pattern Clips (7) — into Scenes
(6).
▪ Several Scenes add up to a Song (...or a Beat, or an Arrangement, or whatever you
want to call it).
An awful lot of terminology here, but it sounds more complicated than it is, you'll see.
For Completeness...
Now that you know about the core concepts, let’s have a quick look at three other important areas of the user interface.
MASCHINE MIKRO - Getting Started - 34
Page 35

Overview of a MASCHINE Project
The Structure of a MASCHINE Project
The Header and the Browser area.
(1) The Header: Contains global settings such as the main Volume output, Tempo, Swing
and viewing modes are also set here.
(2) The Browser: Here you manage your audio content and effect presets. For more detailed information on the MASCHINE Browser, please refer to the MASCHINE Reference
Manual.
MASCHINE MIKRO - Getting Started - 35
Page 36

Overview of a MASCHINE Project
Navigating the MASCHINE MIKRO Controller Display
(3) The Modules: MASCHINE contains four Module Slots on each of the three MASCHINE
Project levels Sound, Group, and Master. Apart from hosting Samplers, internal MASCHINE effects, they host VST and AU plug-ins too. These will be explained in more detail
in chapter ↑4.5.1, Module Slots.
3.2 Navigating the MASCHINE MIKRO Controller Display
The buttons above the display on your MASCHINE MIKRO controller have functions relating to what is on the display. The Control knob aids navigation and allows you to change
the selected property, page, parameter or value.
The Function buttons and Control knob on the MASCHINE MIKRO controller.
For better reference, we applied a special formatting here: throughout the document these
elements are capitalized and numbered, so these buttons are written F1, F2 and F3, while
the knob is simply referred to as the Control knob. E.g., whenever you see an instruction
such as "Press Button F3 to open the SOUND page," you'll know it's the third button from
the left above the display.
▪ In Control mode use the Left and Right Arrow buttons (below the display) to switch
fields.
▪ Use the NAV button plus the Left and Right Arrow buttons to quickly scroll to the next
or previous page.
▪ Rotate the Control knob to change the selected property, page, parameter or value.
MASCHINE MIKRO - Getting Started - 36
Page 37

Overview of a MASCHINE Project
Controller Modes and Mode Locking
3.3 Controller Modes and Mode Locking
In the middle of the controller, left of the pads, there is a vertical row of buttons.
The controller mode buttons on the MASCHINE MIKRO controller.
These buttons represent different MASCHINE controller modes, e.g., when pressing the
PAD MODE button, the displays will show pad-specific control options. When released, the
controller switches back to standard controller mode.
You can also lock controller modes, so the controller doesn't switch back when releasing a
mode button:
1. Press and hold a controller mode button (e.g., VIEW MODE).
2. Press the MAIN button.
MASCHINE MIKRO - Getting Started - 37
Page 38

Overview of a MASCHINE Project
Navigation and Shortcuts
→ The controller will remain in View mode until you press the MAIN button again.
Once a mode has been pinned MASCHINE MIKRO will automatically pin the mode next time
it is pressed.
For more detailed information on controller modes, please refer to the Reference Manual.
3.4 Navigation and Shortcuts
To help navigate the pages and fields in the MASCHINE MIKRO display there are many
shortcuts that have been enabled. These will speed up the process of working with MASCHINE MIKRO and help you focus on what's important — making music! The following
sections describe some of these navigation features.
Please remember to refer to this section when following the tutorial in Chapter 4.
3.4.1 Control Mode
Control mode is the default page on MASCHINE MIKRO. Normally you will access Control
mode by pressing the MAIN button once. When pressed repeatedly, the MAIN button will
toggle between Control mode and Main mode.
The Control mode display.
All steps in this Getting Started Guide will instruct you to press the MAIN button to access
Control mode. Please bear in mind you may need to press the MAIN button twice to access
Control mode especially if you are in another mode.
3.4.2 Controlling the Software View from the Hardware
Scene View
Use Scene view to navigate the Arrangement area of the MASCHINE software.
Press the VIEW button to enter View mode.
MASCHINE MIKRO - Getting Started - 38
Page 39

Overview of a MASCHINE Project
Navigation and Shortcuts
Press F1 to select SCENE and use the pads in the table below to navigate the Scene view.
Shortcuts for Scene view on the MASCHINE MIKRO controller.
Shortcut Control Element
Hide/view Browser area Press pad 13
Hide/view Arranger area Press pad 14
Hide/view Parameter area Press pad 15
Hide/view Modulation Lane Press pad 16
Scroll Arranger left Press pad 1
Scroll Arranger right Press pad 3
Zoom in Press pad 6
Zoom out Press pad 2
MASCHINE MIKRO - Getting Started - 39
Page 40

Overview of a MASCHINE Project
Navigation and Shortcuts
Pattern View
Use Pattern view to navigate the Pattern Editor area of the MASCHINE software.
Press the VIEW button to enter View mode.
Press F2 to select PATTERN and use the pads in the table below to navigate the Pattern
Editor view.
Shortcuts for Pattern Editor view on the MASCHINE MIKRO controller.
Shortcut Control Element
Hide/view Browser area Press pad 13
Hide/view Arranger area Press pad 14
Hide/view Parameter area Press pad 15
MASCHINE MIKRO - Getting Started - 40
Page 41

Overview of a MASCHINE Project
Navigation and Shortcuts
Shortcut Control Element
Hide/view Modulation Lane Press pad 16
Scroll Pattern left Press pad 1
Scroll Pattern right Press pad 3
Zoom in Press pad 6
Zoom out Press pad 2
Scroll Pattern up Press pad 8
Scroll Pattern down Press pad 4
3.4.3 Property Page and Module Shortcuts
Property Page Shortcuts
Use the Property pages to control the Source, Groove, Macro and Output properties. These
are available at each level of the Project.
To jump to a Property page use the following method:
1. Press the MAIN button to access Control mode.
2. Press F1 for Master, F2 for Group, or F3 for Sound to access a level of sound content.
3. Press the NAV button and the press F2 for Setup.
4. Use the buttons and pads in the table below to make a shortcut.
MASCHINE MIKRO - Getting Started - 41
Page 42

Overview of a MASCHINE Project
Navigation and Shortcuts
Property page shortcuts on the MASCHINE MIKRO controller.
Shortcut Control Element
SOURCE property page Press NAV + pad 13
GROOVE property page Press NAV + pad 14
MACRO property page Press NAV + pad 15
OUT property page Press NAV + pad 16
MAIN parameters Press NAV + pad 16, then press pad 1
AUX 1 parameters Press NAV + pad 16, then press pad 2
AUX 2 parameters Press NAV + pad 16, then press pad 3
AUX MODE parameters Press NAV + pad 16 ,then press pad 4
MASCHINE MIKRO - Getting Started - 42
Page 43

Overview of a MASCHINE Project
Navigation and Shortcuts
Module Slot Shortcuts
The Module slots are used to edit and select a sound source, and add effects.
1. Press the MAIN button to access Control mode.
2. Press F1 for MASTER, F2 for GROUP, or F3 for SOUND to access a level of sound con-
tent.
3. Hold the NAV button then press F3.
4. Use the buttons and pads in the table below to make a shortcut.
Module shortcuts on the MASCHINE MIKRO controller.
Shortcut Control Element
MODULE 1 Press NAV + pad 13
MODULE 2 Press NAV + pad 14
MASCHINE MIKRO - Getting Started - 43
Page 44

Overview of a MASCHINE Project
Navigation and Shortcuts
Shortcut Control Element
MODULE 3 Press NAV + pad 15
MODULE 4 Press NAV + pad 16
SAMPLER VOICE parameters Press NAV + pad 13-16 to select a module, then press pad 1
SAMPLER ENGINE parameters Press NAV + pad 13-16 to select a module, then press pad 2
SAMPLER PITCH / GATE parameters Press NAV + pad 13-16 to select a module, then press pad 3
SAMPLER AMP ENV parameters Press NAV + pad 13-16 to select a module, then press pad 4
SAMPLER FX parameters Press NAV + pad 13-16 to select a module, then press pad 5
SAMPLER FILTER parameters Press NAV + pad 13-16 to select a module, then press pad 6
SAMPLER MOD ENV parameters Press NAV + pad 13-16 to select a module, then press pad 7
SAMPLER MOD DEST parameters Press NAV + pad 13-16 to select a module, then press pad 8
3.4.4 Sampling Shortcuts
Use the Sampling pages to access the sample record and edit functions.
1. Press the SAMPLING button to enter Sampling mode.
2. Hold the NAV button and press one of the pads in the table below to make a shortcut.
MASCHINE MIKRO - Getting Started - 44
Page 45

Overview of a MASCHINE Project
Navigation and Shortcuts
Sampling mode shortcuts on the MASCHINE MIKRO controller.
Function Control Element
RECORD Press NAV + pad 13
EDIT Press NAV + pad 14.
EDIT: TRIM Press NAV + pad 14, then press pad 1
EDIT: LOOP Press NAV + pad 14, then press pad 2
EDIT: ENVELOPE Press NAV + pad 14, then press pad 3
SLICE Press NAV + pad 15
MAP Press NAV + pad 16
MAP: ROOT NOTE Press NAV + pad 16, then press pad 1
MASCHINE MIKRO - Getting Started - 45
Page 46

Function Control Element
MAP: VELOCITY Press NAV + pad 16, then press pad 2
MAP: TUNE Press NAV + pad 16, then press pad 3
Overview of a MASCHINE Project
Navigation and Shortcuts
MASCHINE MIKRO - Getting Started - 46
Page 47

Creating a Pattern
Finding Samples in the Browser
4 Creating a Pattern
The following tutorials are workflow-oriented and start with the simplest tasks and progressively lead you to more complex operation, helping you familiarize yourself with MASCHINE.
In order to get you started let’s lay out a basic Pattern with some drums, a bass line and a
melody. After reading this, you should have a basic understanding of how to create Sounds
and Groups.
4.1 Finding Samples in the Browser
The Browser is your tool for finding, tagging and categorizing Projects, Groups, Patterns,
Instruments, FX and Samples.
If you want to know more about the Browser's capabilities, please read the Browser chapter in the Reference Manual.
Hardware
1. On the MASCHINE MIKRO controller, press the BROWSE button. In the display, you
will now be presented with a selection of choices.
2. Press F1 to select FILTER.
3. Press the Left Arrow button to select the Category field, then turn the Control knob to
select FILETYPE. This indicates the type of files that will be displayed.
4. Use the Right Arrow button to select the Attribute filter. Turn the Control knob to se-
lect SAMPLE.
MASCHINE MIKRO - Getting Started - 47
Page 48

Creating a Pattern
Finding Samples in the Browser
5. Now press NAV + Right Arrow to jump to the next category. You will see, the Category
field in the display turns to BANK. This indicates the Bank of files that will be displayed. In the Category field Turn the Control knob to select DRUMS.
6. Press NAV + Right Arrow to switch to the next category turn the Control knob to select
KICK.
7. Finally, Press NAV + Right Arrow and turn the Control knob until the Attribute filter
turns to SUB.
8. Now press F2 and turn the Control knob to browse through the result list and see all
the bass drums that have been filtered to this category. Press ENTER to load a selected bass drum into your Sound Slot.
MASCHINE MIKRO - Getting Started - 48
Page 49
Creating a Pattern
Finding Samples in the Browser
Software
1. Click the Browser button in the top row to show the Browser within the MASCHINE
window (the button becomes highlighted):
2. We will start by finding a bass drum for our Pattern: In the top row of the Browser,
click the Sample icon on the far right to get a list of all the available samples in the
library. Now activate Pre-listen by clicking the Audition button (with the loudspeaker
symbol on it) underneath the list:
3. You can listen to the Samples by clicking on their names.
MASCHINE MIKRO - Getting Started - 49
Page 50

Creating a Pattern
Selecting Sounds and Creating a Group
4. Since we want to find a bass drum first, type “kick” into the empty field above the
list of Samples. As soon as you start typing, you will see the list below being updated
to display Samples matching your query.
5. Now you can listen to the available bass drums by clicking on their names in the list
and choose one you like.
Searching Samples by their names is not the only way to access the MASCHINE Library:
you can also use the Browser’s Tag Filter to narrow down your search using Tags.
4.2
Selecting Sounds and Creating a Group
Now that you know how to find a Sample, we will create a Group which contains up to 16
Sounds and up to 64 Patterns associated with it.
MASCHINE MIKRO - Getting Started - 50
Page 51

Creating a Pattern
Creating Patterns
Hardware
On the MASCHINE MIKRO controller, you were just browsing through the Samples using
the Control knob. When you find a bass drum that matches your taste load it by pressing
ENTER on your MASCHINE MIKRO controller. It will be loaded into the focused Sound
Slot and playable by pressing the respective pad.
Software
1.
In the Pattern Editor, select Sound 1 by clicking on it:
2. In the Browser, double-click on the Sample you want to use or, alternatively, you can
drag and drop the Sample (in this case the bass drum) onto the Sound Slot. After you
have loaded a Sample into Sound Slot 1, you will recognize that pad 1 on your hardware is brightly lit. This indicates that there is a sample assigned to pad 1, so if you
hit the pad, the bass drum sample will play.
3. In the same way you have just selected your bass drum, try to find some other drum
sounds that make a good match: e.g. a clap, a snare drum, a hi-hat and maybe a
cymbal, and put together your drum kit by assigning each sample to a Sound Slot one
by one.
If you do not like the Sample's name that is being displayed in a Sound Slot, you can always
rename it by double-clicking on the Sound Slot and typing a new name.
4.3 Creating Patterns
Now that you have assembled a nice drum kit, let's record a Pattern with it.
MASCHINE MIKRO - Getting Started - 51
Page 52

Creating a Pattern
Creating Patterns
4.3.1 Adjusting Quantization using the Grid
The Step Grid property affects all Pattern editing actions, including quantization (note
snap). The default setting is 1/16th, however you may use another one or disable the Step
Grid completely.
Hardware
1. To change the Step Grid's quantization settings, press and hold the GRID button.
2. Press F3 to access the Step Grid's quantization settings.
3. Turn the Control knob to select a value.
Software
The area to the right of the Sound Slots is called Pattern Editor. To change the Grid of the
Steps, select a new value from the drop-down Grid menu.
The Grid menu.
4.3.2
Adjusting Pattern Length
Now that you have adjusted the Pattern Grid, let's adjust the Pattern Length as well.
Hardware
1. To change the Pattern length, press the GRID button on the MASCHINE MIKRO con-
troller.
MASCHINE MIKRO - Getting Started - 52
Page 53

Creating a Pattern
Creating Patterns
2. Press F2 to access the Pattern Length parameter.
3. Turn the Control knob to select a value.
Software
Adjusting the Pattern length.
The Pattern length is represented by the highlighted area of the Pattern. To change the
Pattern length, click in the Pattern Length bar at the position you want your Pattern to
end, or alternatively, drag the end point. The Pattern length will resize to the mouse click
position, quantized to the Pattern Grid value. To change the step width that the Pattern
length can be resized in, select another resolution from the drop down Pattern Grid menu:
MASCHINE MIKRO - Getting Started - 53
Page 54

Creating a Pattern
Creating Patterns
The Pattern Grid menu.
4.3.3 Recording a Pattern with the Controller
Now that you have chosen the Grid, let’s get going with the Pattern, starting with some
drums!
Recording live
First, lets record some beats with the pads: press the PLAY button, then the REC (Record)
button to enable Record mode. Now tap the pads you want to record and listen to what
happens. The Metronome will help you to keep the time when recording in real-time. To
activate the Metronome, hold down SHIFT and press PLAY. To deactivate the Metronome,
hold SHIFT and press PLAY again. If you want to quantize your recording afterwards, hold
the MASCHINE controller’s SHIFT button and press pad 5 (Quantize). Your pattern will be
quantized according to the selected Grid.
MASCHINE MIKRO - Getting Started - 54
Page 55

Creating a Pattern
Creating Patterns
Recording a Pattern: press PLAY & REC and then play some pads!
4.3.4 Step Sequencer
If you are familiar with classic drum machines, you may want to program your Pattern using the Step Sequencer:
1. Hit the pad with the Sound you want to sequence.
2. Press SHIFT + NOTE REPEAT button to enter Step mode. Each pad now represents one
step of a 16-step sequence: you can activate it by pressing the pad once, lighting it
up. If you hit it again, the step is gone. This way it’s quick and easy to create a drum
pattern.
3. Press the PLAY button. Now you will hear the sequence and see a light chasing
through the pads, starting from pad 1, going up all four rows from left to right and
ending at pad 16. You may continue to activate or deactivate pads to build your sequence during playback.
4. To switch to another Sound, use buttons F1 and F2, located above the display or al-
ternatively, press the SELECT button and press the pad with the Sound you want to
sequence.
There is an Undo function available that you can access from the MASCHINE controller:
hold the SHIFT button and press pad 1 to undo any pattern edits.
Only the first 16 steps will be represented in the Step Sequencer, so if you want to program
longer Patterns, you will have to switch to the next 16 steps by using the Right Arrow button.
MASCHINE MIKRO - Getting Started - 55
Page 56

Only the first 16 steps will be represented in the Step Sequencer, so if you want to program
longer Patterns, you will have to switch to the next 16 steps by using the Right Arrow button.
Creating a Pattern
Creating Patterns
A typical 4/4 kick in Step mode.
4.3.5 Note Repeat
Note Repeat is a really handy way to program beats — it plays the selected Sound automatically at a given quantization. While holding the NOTE REPEAT button, press the pad
you want to record: notes will now repeatedly triggered at the selected rate shown on the
MASCHINE MIKRO - Getting Started - 56
Page 57

Creating a Pattern
Creating Patterns
right display. With buttons F1, F2 and F3, you can select different quantization settings
while playing. You may alter the quantization values of these buttons by turning the Control knob.
4.3.6 Recording a Pattern with the Software
► In the MASCHINE Software, set a step by double-clicking into the Grid to the right of
the respective Sound.
► To clear the step, right-click (on Mac OS X: [Ctrl]+click) it. You may also drag it to the
right or left, or stretch it by dragging its right border.
There is an Undo function available that you can access from the MASCHINE Software's Edit
menu or by pressing [Ctrl]/[Cmd]+[Z] on your computer keyboard.
4.4 Creating Patterns in Keyboard Mode
Now lets add a melody and bass line to our drums. With MASCHINE you may choose an
internal tonal Sample in the way you chose a drum Sample as described in ↑4.2, Selecting
Sounds and Creating a Group or, alternatively, you may use a VST/AU plug-in instrument
as your sound source as described in ↑4.5, Creating Patterns with Plug-in Instruments.
If you prefer to play your melodies with a USB keyboard, please connect it to your computer. You can use any USB keyboard selected in the Audio and MIDI Settings window. The
connected keyboard will always play the selected Sound.
For details on making Audio and MIDI settings please refer to the printed Setup Guide.
Hardware
1. Select your Sound by pressing the pad it is assigned to.
MASCHINE MIKRO - Getting Started - 57
Page 58

Creating a Pattern
Creating Patterns in Keyboard Mode
2. Now press and hold the PAD MODE button. On the display, you can choose the desired
Pad mode. Press the F1 button above the display to select Keyboard mode; then release the PAD MODE button (you will notice that the button stays lit).
3. If you hit the pads now, you will hear that they all play the same Sound, but with a
different pitch. The pitch scale is divided in halftones, starting with pad 1 as the lowest note going up to pad 16 as the highest note.
4. Press the PLAY button, then the RECORD button, and start to record your melody!
In Keyboard mode use the F2 button to transpose the pads down an octave or F3 button to
transpose up an octave.
Software
1. In order to select the Sound you want to record a melody with, click on its name.
MASCHINE MIKRO - Getting Started - 58
Page 59

Creating a Pattern
Creating Patterns with Plug-in Instruments
2. Now click the Piano Roll/Keyboard Icon: the Grid that showed all Sounds of the Group
in one row now only shows the Sound you selected: by adding steps, you can choose
their pitch in halftones depending on where you put them, the lowest note being the
lowest row in the Piano Roll/Keyboard Editor.
4.5 Creating Patterns with Plug-in Instruments
In addition to using the internal sounds of MASCHINE you may also use 32-bit and 64-bit
VST/AU plug-ins from Native Instruments and third party manufacturers.
4.5.1 Module Slots
Module Slot 1 containing Native Instruments KONTAKT.
MASCHINE MIKRO - Getting Started - 59
Page 60

Creating a Pattern
Creating Patterns with Plug-in Instruments
MASCHINE contains four Module Slots on each of the three MASCHINE Project levels
Sound, Group, and Master. Apart from hosting Samplers and MASCHINE effects, Module
Slots can host instrument and effect type plug-ins in the following combination:
▪ Module Slot 1 can host either an effect or an instrument plug-in.
▪ Module Slots 2, 3, and 4 can host effect plug-ins only.
See the following section for further explanation.
4.5.2 Defining Sources for Module Slots
There are four Source options available from a Module Slot 1's drop-down menu: Sampler,
Input, MIDI Out, and Plug-ins:
▪ Sampler: allows the selected Slot to play back Samples. This is the most common
Source type, as adding a Sample to the Sound Slot will automatically set the Module
Source to Sampler.
▪ Input: this allows the selected Sound Slot to be available as a bussing point for exter-
nal Inputs.
▪ MIDI Out: allows you to use a Sound to send MIDI notes to your host application or
your external MIDI equipment.
▪ Plug-ins: allows the use of VST/AU plug-ins from Native Instruments and third-party
manufacturers.
If you use the MIDI Out Module in Slot 1, Slots 2-4 will not be effective.
4.5.3 Loading an Instrument Plug-in
To load a plug-in instrument we must be at the Sound level, where there are four Module
Slots available. Module Slot 1 can host either source Modules or effect Modules. Module
Slots 2, 3 and 4 can host effect Modules only (of course you can put an effect Module
behind a source Module and add them in series) but more on using effects in the next
chapter. For now, lets load an instrument plug-in to a Sound Slot:
Hardware
1. Press the MAIN button to enter the Control mode.
2. Press F3 to select the Sound tab, then press the pad you want to load the instrument
to.
MASCHINE MIKRO - Getting Started - 60
Page 61

Creating a Pattern
Creating Patterns with Plug-in Instruments
3. Press and hold the NAV button. Then press F3 to select MODULES.
4. Continue to hold the NAV button and press pad 13 to select Module Slot 1.
5. Press SHIFT + BROWSE to select a sound source.
6. Use the Left Arrow button to move to the Category field and turn the Control knob un-
til the Category field in the display turns to TYPE.
7. Use the Right Arrow button to select the Attribute filter and turn the Control knob to
select PLUG-IN.
8. Hold the NAV button and press the Right Arrow. This shortcut will display the next at-
tribute. Turn the Control knob until the Category field in the display turns to INSTRU-
MENT.
MASCHINE MIKRO - Getting Started - 61
Page 62

Creating a Pattern
Creating Patterns with Plug-in Instruments
9. Press the F2 to view the filtered list of available Plug-in instruments and turn the
Control knob to browse the available plug-ins.
10. When you have found the plug-in you want to use, press ENTER to load it.
11. Press the MAIN button to switch back to Control mode. Now you can try out the in-
strument plug-in by playing the pad it was assigned to.
To play the instrument plug-in chromatically using the pads on the MASCHINE MIKRO hardware; hold the PAD MODE button and then press F1.
For information on changing and assigning plug-in parameters please read the MASCHINE
Reference Manual.
Software
1.
Click on the SOUND tab to switch to the Sound level.
2. Click on the Sound Slot you want to load an instrument to.
MASCHINE MIKRO - Getting Started - 62
Page 63

Creating a Pattern
Creating Patterns with Plug-in Instruments
3. Click on the first Module Slot (only Module Slot 1 can host instrument plug-ins) and
click the drop-down arrow at the right end of it.
4. Select Plug-ins from the menu to get a list of all available instrument plug-ins.
MASCHINE MIKRO - Getting Started - 63
Page 64

Creating a Pattern
Creating Patterns with Plug-in Instruments
5. As an example: let’s choose the Native Instruments KONTAKT plug-in. After selecting
it with the mouse, KONTAKT will be loaded, and its parameters will be displayed on
the parameter area of the Module tab: Now you can try out the instrument plug-in by
pressing the pad.
6. Choose different Parameter Pages via the Page menu by clicking the triangle on the
top left side of the parameter area.
7. If you find a good sound setting, save it as a preset as described in section ↑9.2, Sav-
ing and Recalling Module Presets.
To play the instrument plug-in chromatically using the pads on the MASCHINE hardware;
press and hold SHIFT then press the PAD MODE button to quickly toggle to Keyboard mode.
For information on changing and assigning plug-in parameters please read the MASCHINE
Reference Manual.
4.5.4 Opening and Closing Plug-in Windows
You can open floating windows for all plug-ins of a MASCHINE project. MASCHINE will
always show the open floating windows of the selected Sound, Group or the Master at a
time.
MASCHINE MIKRO - Getting Started - 64
Page 65

Creating Patterns with Plug-in Instruments
MASCHINE with GUITAR RIG and MASSIVE plug-in user interfaces opened.
You can open or close floating windows for plug-ins as described in the following.
Creating a Pattern
Software
When a plug-in has been assigned to a Module Slot, the plug-in icon will appear in the
Quick Browse area.
An edit icon appears when the mouse curser is placed over the REAKTOR logo
To open a floating window for the plug-in:
1.
Place your mouse cursor over the plug-in icon; an
EDIT
button appears.
MASCHINE MIKRO - Getting Started - 65
Page 66

Creating a Pattern
2.
Click the EDIT button to open the plug-in in a separate floating window. A second click
on the EDIT button will close the plug-in window.
This feature is currently not available from the MASCHINE MIKRO controller, please use the
MASCHINE software instead.
4.6 Mute & Solo
Muting is used to bypass the audio signal of either a Sound or a Group, whereas Soloing is
pretty much the opposite: it mutes all other Sounds and Groups, so that you can listen to
the selected Sound or Group alone. The combination of both is a useful means to play live
and to test different sequences together.
4.6.1 Hardware
Solo a Sound
Press the SOLO button and then press the pad with the sound you want to solo. The pad
containing the soloed sound will become fully lit and the other pads containing sounds will
be dimmed. Press the pad again to release it from Solo.
Mute & Solo
Mute a Sound
Press the MUTE button and then press the pads with the sounds you want to mute. Pads
containing muted sounds will be dimmed and the other pads containing sounds will remain fully lit. Press the pads with muted sounds to unmute them.
Solo a Group
Press the SOLO button and then press the GROUP button. Pads that contain Groups will
light blue. Press the pad with the Group you want to solo, this will stay fully lit and the
other pads will be dimmed. Press the Group pad again to release it from Solo.
Mute a Group
Press the MUTE button and then press the GROUP button. Press the Group pads you want
to mute. Muted Groups will be dimmed and the other Groups will remain fully lit. Press
the muted Group pads to unmute them.
MASCHINE MIKRO - Getting Started - 66
Page 67

Creating a Pattern
4.6.2 Software
Solo
► To solo a Sound, right-click (on Mac OS X: [Ctrl]+click) on the pad icon in the Pattern
Editor:
► To unsolo it, right-click (on Mac: [Ctrl]+click) on the pad icon again.
► To solo a Group, right-click (on Mac: [Ctrl]+click) on the Group icon in the Arranger:
Mute & Solo
► To unsolo it, right-click (on Mac: [Ctrl]+click) on the Group icon again.
Mute
► To mute a Sound, click on the pad icon in the Pattern Editor:
► To unmute the Sound, click on the pad icon again.
MASCHINE MIKRO - Getting Started - 67
Page 68
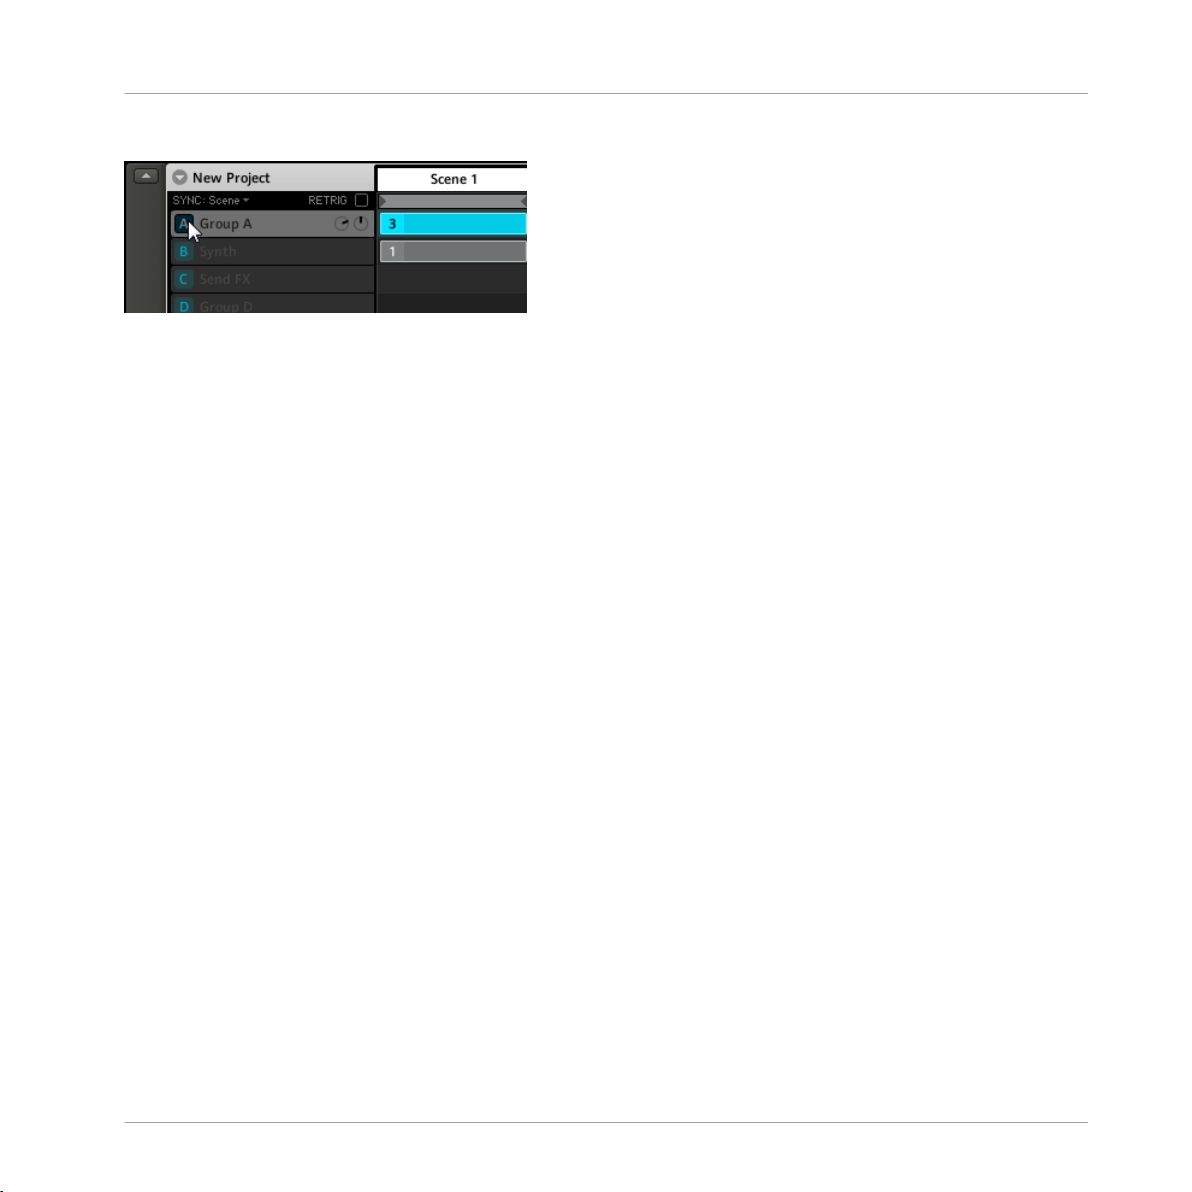
Creating a Pattern
► To mute a Group, click on the Group icon in the Arranger:
► To unmute the Sound, click on the Group icon again.
In the next chapter, you will learn how to add effects and get to know the powerful routing
system of MASCHINE.
Mute & Solo
MASCHINE MIKRO - Getting Started - 68
Page 69

Using Effects & Routing
Available Internal Effects
5 Using Effects & Routing
Now that we have created the Pattern, let’s spice it up with some effects. MASCHINE provides a healthy selection of effects (FX) that can be applied on Sounds, Groups and the
Master, all as Insert effects. In addition, you may also use 32-bit and 64-bit plug-in effects from Native Instruments and third party manufacturers. By using the Routing dialogue in Audio and MIDI Settings, effects can also be applied to external Inputs and set
up as Send effects.
For information on the Routing dialogue in Audio and MIDI Settings please refer to the printed Setup Guide.
5.1 Available Internal Effects
The internal MASCHINE effects cover a wide range of sonic possibilities; for an in-depth
description of all effects and their parameters, read the Effects chapter in the Reference
Manual.
MASCHINE effects are really designed to be modulated via the MASCHINE software. This
is described in section ↑5.6, Automating Effects and Sampler Parameters.
5.1.1 Dynamics
▪ Compressor: Classic compression effect to control the dynamic information of an au-
dio signal.
▪ Gate: The Gate cuts parts of the input signal which fall below the input threshold.
This can be used to rhythmically chop the signal and make it sound more “punchy.”
▪ Limiter: The Limiter ensures that the signal level stays below 0 dB, thus preventing
digital clipping. It is recommended to place the Limiter in the Master effects slot. The
Limiter can also increase the overall perceived volume by reducing the threshold.
Note that the Limiter introduces a small latency.
▪ Maximizer: The Maximizer reduces the dynamics within the sound, making the overall
sound louder.
5.1.2 Filtering
▪ EQ: Use the EQ to boost or cut selective frequencies of the audio signal.
MASCHINE MIKRO - Getting Started - 69
Page 70

Using Effects & Routing
Available Internal Effects
▪ Filter: This Filter has selectable characteristics that can be modulated via an LFO or
envelope follower.
5.1.3 Modulation
▪ Chorus: The Chorus is useful to “thicken” signals and enhance the stereo content. It
is most effective on melodic sounds.
▪ Flanger: This is a standard Flanger with LFO and envelope-follower modulators.
▪ FM: FM modulates the frequency of the audio signal based on FM synthesis. High fre-
quency settings are useful for adding a subtle “gritty” texture to the input signal.
▪ Freq Shifter: The Frequency Shifter allows for shifting selected frequencies of the au-
dio signal.
▪ Phaser: Standard Phaser with LFO and envelope-follower modulators.
5.1.4 Spatial and Reverb
▪ Ice: Ice includes a bank of self-oscillating filters for interesting and colorful effects.
▪ Metaverb: Like the Reverb, the Metaverb adds spacial room information. However, in
contrast to the Reverb it has a much more “synthetic” sound, which is particularly
suited to melodic content.
▪ Reflex: At moderate settings the Reflex can be useful to emulate small, “tight” rooms.
At more extreme settings, it can produce interesting artificial, metallic textures.
▪ Reverb: The Reverb adds room information to the signal, making it sound more spa-
cious and natural. It is particularly suited to drum sounds.
5.1.5 Delay
▪ Beat Delay: This delay is specifically designed for creating delays that are synced to
the tempo.
▪ Grain Delay: By chopping the input into small grains, the Grain Delay is useful for cre-
ating ambient textures. Increase Size, Space and Density to quickly transform any
sound into an evolving ambient texture.
▪ Grain Stretch: The Grain Stretch effect uses granular synthesis to manipulate the
speed and pitch of the incoming signal. Increase Time, Loop and Pitch to quickly
'stretch' or 'warp' any sound.
▪ Resochord: The Resochord is a bank of 6 comb filters, each of which is individually
tuned according to a particular chord. The Resochord will print its own harmonic content on to any input material.
MASCHINE MIKRO - Getting Started - 70
Page 71

Using Effects & Routing
Available Internal Effects
5.1.6 Distortion
▪ Distortion: Combining overdrive, feedback and modulation, the Distortion produces a
heavy distortion/fuzz effect.
▪ Lofi: The Lofi effect reduces the Bitrate and Sample Rate of the audio signal for an
interesting “vintage” effect at subtle settings, and heavy digital distortion at extreme
settings.
▪ Saturator: The Saturator combines compression and saturation to increase the overall
loudness and add additional harmonics. The Contour control determines how closely
it responds to the input volume.
5.2 Applying Effects to a Sound
There are four Module Slots available at the Sound level. Using each Module Slot, you can
apply up to four MASCHINE effects and VST/AU plug-in effects directly to each Sound
Slot.
Module 1 is often used to contain a Sampler or live Input so choose one of the free Modules
(2-4) to insert an effect.
If you plug one of the internal MASCHINE effects or a plug-in effect to Module Slot 1 of a
Sound, you will find this effect as a bussing point in the Output menu of other Sound Slot's
Main control section (in the Control Area). You can also route MIDI events to the effects in
Module Slot 1.
Hardware
1. Press the MAIN button to enter the Control mode.
2. Press F3 to select the Sound tab, then press the pad where you want to load the ef-
fect.
3. Press the NAV button and then press F3 to select MODULES.
MASCHINE MIKRO - Getting Started - 71
Page 72

Using Effects & Routing
Applying Effects to a Sound
4. Continue to hold the NAV button and press pad 14 to select Module Slot 2.
5. Press SHIFT + BROWSE to select an effect. Then press F1 to select FILTER.
6. Use the Left Arrow button to move to the Category field and turn the Control knob un-
til the Category field in the display turns to TYPE.
7. Use the Right Arrow button to select the Attribute filter and then turn the Control
knob to select INTERNAL for MASCHINE FX or PLUG-IN for VST/AU plug-in FX.
8. Use NAV + Right Arrow button to turn the Category filter to SUBTYPE and turn the
Control knob to select FX.
9. Press the F2 button to view the filtered list and turn the Control knob to browse the
available MASCHINE FX or VST /AU Plug-in FX.
MASCHINE MIKRO - Getting Started - 72
Page 73

10. When you have found the FX you want to use, press ENTER to load it.
Switch back to Control mode using the MAIN button. Now you can edit the effect parameters
using the Control knob.
Software
1.
Click on the SOUND tab to select the Sound you want to apply an effect to. The actual
Sound that you assign the effect to is always the one in focus; in the example underneath it’s Noise FrostShock.
Using Effects & Routing
Applying Effects to a Sound
MASCHINE MIKRO - Getting Started - 73
Page 74

Using Effects & Routing
Applying Effects to a Group
2. Select one of the Modules (in this case we select Module 2) and click the arrow to the
right to get a list of all available effects:
3.
As an example, let’s choose the Reverb effect. After selecting it with the mouse, you
will find the parameters displayed in the Control area of Module 2:
4.
Now you can try out some of the parameters: turn the Size knob for a bigger Reverb or
adjust the Stereo Width by using the Stereo knob.
If you have VST/AU effect plug-ins installed you may also load them from the effects menu
by selecting Plug-ins from the list.
5.3 Applying Effects to a Group
You can apply four effects directly to each Group. The effects will then be applied to all
the Sounds in the Group.
MASCHINE MIKRO - Getting Started - 74
Page 75

Using Effects & Routing
Applying Effects to a Group
Hardware
1. Press the MAIN button to enter the Control mode.
2. Press F2 to select the GROUP tab, then press the Group pad where you want to load
the effect.
3. Press the NAV button and then press F3 to select MODULES.
4. Continue to hold the NAV button and press pad 13 to select Module Slot 1.
5. Press SHIFT + BROWSE to select an effect. Then press F1 to select FILTER.
6. Use the Left Arrow button to move to the Category field and turn the Control knob un-
til the Category field in the display turns to TYPE.
7. Use the Right Arrow button to select the Attribute filter and then turn the Control
knob to select INTERNAL for MASCHINE FX or PLUG-IN for VST/AU plug-in FX.
8. Press NAV + Right Arrow to switch the Category filter to SUBTYPE. Turn the Control
knob to select FX.
MASCHINE MIKRO - Getting Started - 75
Page 76

Using Effects & Routing
Applying Effects to a Group
9. Press the F2 to view the filtered list of available FX and turn the Control knob to
browse the available MASCHINE FX or VST /AU Plug-in FX.
10. When you have found the FX you want to use, press ENTER to load it.
11. Press the MAIN button to edit the FX using the Control knob.
Switch back to Control mode using the MAIN button. Now you can edit the effect parameters
using the Control knob.
Software
1.
Click on the GROUP tab to switch to the Group level:
MASCHINE MIKRO - Getting Started - 76
Page 77

Using Effects & Routing
Applying Effects to the Master
2. In the same way that effects applied to the Sound in focus, they get applied to the
Group in focus, so make sure to have your Group in focus in the Arranger:
3. Since our Group is mainly for drums, let’s apply some compression by adding the
Compressor to Module 1:
4. Play around with the parameters of the Compressor to get used to it!
If you have VST/AU effect plug-ins installed you may also load them from the effects menu
by selecting Plug-ins from the list.
5.4 Applying Effects to the Master
You can apply four effects to the Master so that all your Sounds and all your Groups together are being sent into the effect.
Hardware
1. Press the MAIN button to enter the Control mode.
MASCHINE MIKRO - Getting Started - 77
Page 78

Using Effects & Routing
Applying Effects to the Master
2. Press F1 to select the MASTER tab, then press the pad where you want to load the
effect.
3. Press the NAV button and then press F3 to select MODULES.
4. Continue to hold the NAV button and press pad 13 to select Module Slot 1.
5. Press SHIFT + BROWSE to select an effect. Then press F1 to select FILTER.
6. Use the Left Arrow button to move to the Category field and turn the Control knob un-
til the Category field in the display turns to TYPE.
7. Use the Right Arrow button to select the Attribute filter and then turn the Control
knob to select INTERNAL for MASCHINE FX or PLUG-IN for VST/AU plug-in FX.
8. Press NAV + Right Arrow. Turn the Control knob to select FX.
9. Press F2 to view the filtered list of available FX and turn the Control knob to browse
the available MASCHINE FX or VST/AU Plug-in FX. When you have found the FX you
want to use, press ENTER to load it.
MASCHINE MIKRO - Getting Started - 78
Page 79

Using Effects & Routing
Applying Effects to the Master
10. Press the MAIN button to edit the FX using the Control knob.
Switch back to Control mode using the MAIN button. Now you can edit the effect parameters
using the Control knob.
Software
Select the MASTER tab and then click the Arrow on the right of the Module to select an effect for the Master.
Since we want to fine-tune the frequencies of the Song, let's choose the EQ.
The list of available effects for the Master.
► Use the mouse to turn the knobs on the EQ Module. By using the Page Selector, you
can access the other parameter page(s), if any:
MASCHINE MIKRO - Getting Started - 79
Page 80

Using Effects & Routing
Bypassing Effects
The Page Selector in the Software.
5.5 Bypassing Effects
Bypassing effects might come in handy whenever you want to return to a dry, unaltered
signal: such as after applying so much Reverb that you can’t hear the dry signal anymore
or to get rid of the Feedback while using the Delay for example.
This feature is currently not available from the MASCHINE MIKRO controller, please use the
MASCHINE software instead.
Software
1.
Select the Tab where you want to bypass the effect (either SOUND, GROUP or MASTER) by
clicking on it.
2. Make sure you have the right Sound (click on it on the left of the Grid) or Group (click
on it on the left of the Arranger) in focus. For the Master, select the MASTER tab.
3. Now click on the label (orange if it is a Sound, blue if it is a Group, white if it is the
Master) on the left side of the effect Modules to bypass the desired effect. Click the
label again to hear the effect signal.
5.6 Automating Effects and Sampler Parameters
One of the really cool features of MASCHINE is the ability to automate parameters from
the effect Modules and the Sampler Modules on the software in a very easy way.
MASCHINE MIKRO - Getting Started - 80
Page 81

Using Effects & Routing
Automating Effects and Sampler Parameters
This feature is currently not available from the MASCHINE MIKRO controller, please use the
MASCHINE software instead.
Software
If you take a closer look at the knobs on the parameter pages you will notice they have an
outer ring.
► You can record Automation by moving that ring with a left click on it and then dragging
it up and down.
► To remove the Automation, simply right-click (on Mac: [Ctrl]+click) on that outer ring.
► To edit the Automation, drag the automation points in the Automation Lane.
MASCHINE MIKRO - Getting Started - 81
Page 82

The Input Module and Advanced Routing
Applying an Effect to an external audio source
6 The Input Module and Advanced Routing
The Routing features allow for a flexible way to handle routings within MASCHINE and together with external instruments. Since the Routing capabilities are quite powerful, we will
focus on two common usage scenarios: routing external audio into the effects and setting
up Send effects.
For more in-depth information, please read the Routing chapter of the Reference Manual.
6.1 Applying an Effect to an external audio source
Please make sure that you have connected an external audio signal source to your soundcard and that the inputs of the soundcard are activated. Open Audio and Midi Settings
from the File menu.
Now activate the desired inputs by clicking on the fields on the right and selecting the desired physical input of your soundcard; then click OK:
The Inputs of the soundcard in the Audio and MIDI Settings dialog.
MASCHINE MIKRO - Getting Started - 82
Page 83

The Input Module and Advanced Routing
Applying an Effect to an external audio source
→ Audio signals coming from external sources are now be routed to MASCHINE’s modules
where effects can be added. You can also use the audio signals for sampling.
For detailed information on sampling external audio please refer to the Reference Manual.
Hardware
1. First choose an empty Group by selecting it with one of the GROUP buttons.
2. Select an empty Sound Slot by selecting one of the pads, let’s say pad 1.
3. Press SHIFT + BROWSE: Then press F1 to select FILTER.
4. Use the Left Arrow button to move to the Category field and turn the Control knob un-
til the Category field in the display turns to TYPE.
5. Use the Right Arrow button to select the Attribute filter and then turn the Control
knob to select INTERNAL.
6. Hold the NAV button and press the Right Arrow. Turn the Control knob until the Cate-
gory field in the display turns to INSTRUMENT.
MASCHINE MIKRO - Getting Started - 83
Page 84

The Input Module and Advanced Routing
Applying an Effect to an external audio source
7. Press F2 to select LIST. By using the Control knob you can select (NONE), SAMPLER,
INPUT and MIDI OUT. Select INPUT and press ENTER to confirm your selection.
8. Switch back to Control mode by pressing the MAIN button.
9. Select the INPUT parameter and turn the Control knob and select an external source
10. To add an effect to the input press NAV + pad 14 to select Module 2.
11. Press SHIFT + BROWSE: By turning the Control knob you will see a list of available
effects.
12. Choose an effect and load it using ENTER. Now the external audio will be processed
by the effect.
Software
1. Choose an empty Group by selecting it in the Arranger, then choose one of the Sound
Slots by clicking on it.
2.
Select the SOUND tab and then click on Module 1.
3.
On the right of the Module 1 tab, you will find an Arrow. Click on it and you will be presented with several options in the dropdown menu: Sampler, Input and MIDI Out. Select Input.
MASCHINE MIKRO - Getting Started - 84
Page 85

The Input Module and Advanced Routing
Setting up a Send Effect
4. You will now see two parameters: one knob for the Level of the external input and a
button that lets you select a Source. Select Ext In 1 as the Source.
5.
Click on the Module 2 next to the INPUT Module and select an effect using the effect
menu from the upper right corner of the Module 2 tab.
→ Now the external audio will be processed by the effect!
6.2 Setting up a Send Effect
Sometimes you may want to have a classic Send effect, for example a classic reverb which
can be shared by multiple sound sources. This is how to set it up.
Hardware
1. Lets send the Snare of the 909 Kit to a Reverb Send effect. Load the 909 Kit into
Group A by double-clicking it in the Browser and create a basic Pattern.
2. Now select an empty Group with an empty Sound Slot, let’s say Sound 1. Select it by
pressing its pad.
3. Press SHIFT + BROWSE: Then press F1 to select FILTER.
4. Use the Left Arrow button to move to the Category field and turn the Control knob un-
til the Category field in the display turns to TYPE.
MASCHINE MIKRO - Getting Started - 85
Page 86

The Input Module and Advanced Routing
Setting up a Send Effect
5. Use the Right Nav button to select the Attribute filter and then turn the Control knob
to select INTERNAL.
6. Press and hold the NAV button and press the Right Arrow. Turn the Control knob until
the Category field in the display turns to INSTRUMENT.
7. Press F2 to select LIST. By using the Control knob you can select (NONE), SAMPLER,
INPUT and MIDI OUT. Select INPUT and press ENTER to confirm your selection.
8.
9. Then press NAV + pad 14 to select MODULE 2.
10. Turn the Control knob to select REVERB. Press ENTER to load the effect.
11. Press the BROWSE button to deselect the Browser. Press the GROUP button and select
Group A to go back to the 909 Kit Group and select the Snare sound by pressing pad
2.
MASCHINE MIKRO - Getting Started - 86
Page 87

The Input Module and Advanced Routing
Setting up a Send Effect
12. Press NAV + F2 to select SETUP, then press pad 16 to select OUT.
13. Press NAV + pad 2 to select AUX1, then press the Right Arrow key to navigate to the
Aux 1 output field. Turn the Control knob to select B: INPUT from the list. As you can
hear, the Snare is already being sent to the effect; by turning the Aux 1 Level, you
can adjust the amount of signal that gets sent into the Reverb.
14. Press NAV + Arrow Right to select the AUX1 LEVEL parameter and turn the Control
knob to adjust the level of Reverb.
MASCHINE MIKRO - Getting Started - 87
Page 88

The Input Module and Advanced Routing
Setting up a Send Effect
Software
1. Select the first Sound Slot of an empty Group. Load the Reverb into the Sound Slot’s
effects tab.
2.
On the Source tab (
SRC
), select Input and leave the Source at Internal:
MASCHINE MIKRO - Getting Started - 88
Page 89

The Input Module and Advanced Routing
3.
Now select the 909 Kit Group again and click the Output tab (OUT) of the Sound Snare
909 1:
Routing Tips
4.
You can see the two Aux Sends,
B: Input 1 to send the
Snare 909 1
Aux 1
and
Aux 2
. In the dropdown menu of
Sound to the Reverb in Sound 1:
Aux 1
, select
→ As you can hear, the Snare is already being sent to the effect; by turning the Aux 1
Level, you can adjust the amount of signal that gets sent into the Reverb.
6.3
Routing Tips
▪ For a better overview, rename the Sound you use as a Send effect after the effects
name.
▪ You can build your own multi-effects this way: up to three effects per Sound with 16
Sounds per Group allow up to 48 different effects in one Group!
MASCHINE MIKRO - Getting Started - 89
Page 90

The Input Module and Advanced Routing
Please be aware using too many effects may cause a high load on your computers CPU, as a
result the amount of effects you should use is dependant on the processing power of your
computer.
▪ Since you can save Patterns together with your Group, you can also prerecord automa-
tion for your effects, for example filter sweeps or complex effects clusters with multi-
ple effects that you can use on your material.
The Routing in MASCHINE is a really powerful tool with a vast amount of possibilities. You
can set up your own effects Chains, route Sounds through several other Sounds or out of
your soundcard through a Hardware effect and then back into MASCHINE. For more information on Routing read the Routing chapter of the Reference Manual.
Routing Tips
MASCHINE MIKRO - Getting Started - 90
Page 91

Creating a Song using Scenes
Creating a Clip in the Arranger
7 Creating a Song using Scenes
Creating a Song on MASCHINE is easy and straightforward. The basic concept is this:
Groups and their Patterns are combined in Clips, a Clip being a representation of a Group
with a specific Pattern. The Patterns are automatically named by their Pattern number,
but Clips may be renamed at anytime. A Song is divided into up to 64 Scenes; the Scenes
are parts of the Song containing different Groups and their Pattern content.
7.1 Creating a Clip in the Arranger
Each clip placed in the Arranger references one of the Patterns created in the Pattern Editor. Therefore, when the content or length of a Pattern is edited, all referencing clips in
the Arranger will automatically get updated.
Hardware
1. Switch to Scene mode by pressing the SCENE button. The pads will light to show
available Scenes. Hit pad 1 to select Scene 1. The pad of the selected Scene will
light brightly and its name will become visible in the display.
2. Enter Pattern mode by pressing PATTERN button.
3. Choose your Pattern by selecting it with the pads. The pads will light to show availa-
ble Patterns. The selected Pattern will automatically be inserted into the selected
Scene.
► To remove a Clip, press F3.
► By pressing F1, you can double the Pattern length with the same content.
► By pressing F2, you duplicate the selected Pattern.
MASCHINE MIKRO - Getting Started - 91
Page 92

Creating a Song using Scenes
Creating a Clip in the Arranger
Software
1.
Select the Scene you want to edit by clicking on the Scene 1 Label in the Arranger
Area.
2. Select the Pattern you want to use in the Scene by clicking on it in the Pattern Editor:
3. A Clip, representing the selected Pattern, will be automatically inserted into the fo-
cused Scene Column in the Arranger.
► To delete a Clip, right-click (on Mac OS X: [Ctrl]+click) it.
MASCHINE MIKRO - Getting Started - 92
Page 93

Creating a Song using Scenes
Inserting and Deleting Scenes
7.2 Inserting and Deleting Scenes
Hardware
1. Enter Scene mode by pressing the SCENE button.
2. Using F2 (Duplicate) you can now copy the selected Scene to the following Scene.
► To delete a Scene; Press the pad with the Scene you want to delete and then press F3.
If there are already Scenes behind the one being copied, they will get shifted upwards one
Scene number; respectively, if you delete a Scene, the following Scene will be shifted backward accordingly.
Software
1. Select the Scene you want to edit by clicking on it.
2. Now right-click (on Mac OS X: [Ctrl]+click) and you will be presented with a drop-
down menu allowing you to Cut, Copy or Paste the Scene’s content or to Clear, Remove or
Duplicate the Scene.
3. To rearrange Scenes, use the [Left] and [Right] arrows on your computer keyboard
while holding [Ctrl] depressed.
MASCHINE MIKRO - Getting Started - 93
Page 94

Creating a Song using Scenes
Using the Loop Mode
7.3 Using the Loop Mode
A single selected Scene is always looping automatically. The Loop mode allows you to select several consecutive Scenes and play them one after the other in a Loop. This is useful
to check if the Scenes go well together and/or if the arrangement works.
Hardware
1. Enter Scene mode by pressing the SCENE button.
2. The loop range can be defined by selecting a start Scene and an end Scene. First,
select the starting Scene by pressing the corresponding pad. Then, while holding the
first pad, press the pad corresponding to the end Scene.
Software
Scene 1
In
lighted. Release the Mouse button in
quence.
click in the Arranger Timeline and drag to the right. The active Loop will be high-
Scene 2
. Now you will hear
Scene 1
and
Scene 2
in se-
A Loop containing the first two Scenes.
By toggling between Scenes you can find out if two Scenes are a good match, if you have to
add another one or edit it. Since the Scenes always loop, there is no break that could disturb
your inspiration. On the Hardware, press Scene together with Button 1 to lock it and use the
pads to change between Scenes; on the Software, click in the Scene row on the Scene you
want to select.
MASCHINE MIKRO - Getting Started - 94
Page 95

8 Sampling
MASCHINE allows you to record internal or external audio signals using your soundcard.
This is a useful feature if you want to record your own Samples or rearrange Loops that you
have created yourself using MASCHINE.
For information on routing audio please refer to ↑6, The Input Module and Advanced Rout-
ing. You will also find detailed information in the Reference Manual.
This chapter is a short introduction to Sampling, for detailed information please refer to the
Reference Manual.
8.1 How to Sample
Hardware
1. Choose an empty Sound Slot in Group B to record into by selecting it with its pad.
2. Now hit the SAMPLING button to enter the Sampling mode:
Sampling
How to Sample
3. You can select the Source by using Control knob: it is either set to External (EXTERN)
for audio signals connected to your audio interface, or Internal (INTERN) for audio sig-
nals from MASCHINE itself (either from another Group, Sound or from the Master
Output).
4. In this case we want to record the 909 Kit which is loaded on Group A with a pattern,
so use the Control knob to select INTERN.
5. Press the GROUP button + pad 14 to select Group B. Then select an empty pad. The
sample will be recorded to this pad.
There are two different ways to start a recording:
▪ You can set a certain Threshold value, and the input signal level exceeding this
Threshold will start the recording.
MASCHINE MIKRO - Getting Started - 95
Page 96

▪ You can synchronize the recording function to the sequencer by selecting the Sync
option, so that recording starts as soon as you start the sequencer.
1. Press NAV + Arrow Right button twice to select MODE category. Since we want to re-
cord a drum loop, select SYNC by turning the Control knob.
2. Press NAV + Arrow Right, to define a length of 1 bar by turning the Control knob.
3. Now press the F1 button (START) and, since the recording is going to be triggered by
the sequencer, press PLAY.
Software
1. First choose an empty Sound Slot to record into by clicking on its name.
2. Now click the SAMPLING button right underneath the PIANO ROLL/KEYBOARD but-
ton:
Sampling
How to Sample
3.
In the RECORD tab, select your Source. You can record Samples internally (check the
Int radio button) from another Group, Sound or the Master Output or from one of the
External Inputs (check the radio button labeled Ext). In this case we will record from
the Group called 808 Kit.
4.
In the next Panel of the RECORD tab, you can select a way to start the recording: either
by setting a Threshold value (adjustable with the mouse by dragging) or in Sync with
the Project Tempo. Since we want to record a drum loop from the 808 Kit, we select
Sync.
MASCHINE MIKRO - Getting Started - 96
Page 97

5.
Click on the Sync radio button and enter a length of 1 bar using the mouse and drag-
ging:
6.
Now click the START button and, since the recording is going to be triggered by the se-
quencer, click the Play button too.
→ After the recording stops, you will see the Waveform of your Sample:
Sampling
How to Sample
Under the bigger Waveform representing the recorded Sample, you can see a small icon
for each Sample that got recorded into this Sound Slot: this is called the Recording History. You can drag the Samples to other Sound Slots to use them separately.
For external Samples coming from an instrument that is not synced to MASCHINE by way of
MIDI Clock, it is more useful to record it manually or in Threshold mode.
MASCHINE MIKRO - Getting Started - 97
Page 98

Editing a Sample
8.2 Editing a Sample
Hardware
To edit the recorded Sample.
1. Press NAV + pad 14 to select EDIT. You will see a waveform representing the recorded
Sample.
2. Press NAV + pad 1 to select the START parameter. Press the Right Arrow button to
select the TRIM parameter. Turn the Control knob to trim the start point of the Sam-
ple.
3. Press NAV + Right Arrow to select the END parameter of the Sample. Turn the Control
knob to trim the end point of the Sample.
Sampling
4. Press NAV + pad 2 to access Loop mode. Press the Right Arrow button to select the
Loop mode parameter and turn the Control knob to switch Loop mode ON.
5. Adjust the Start and End point of the Loop on the second page using knobs 2 and 3.
Software
1. Click the Sampling button to open the Sampling Area.
2.
Select the EDIT tab by clicking on it.
MASCHINE MIKRO - Getting Started - 98
Page 99

Editing a Sample
3. Adjusting the Start and End point is done by either dragging the small grey icons la-
beled S (for Start) and E (for End) using the mouse, or by entering the Start and End
points in their respective fields.
Sampling
4.
Enable Loop by clicking on the LOOP button.
5. The Loop Area is now highlighted: you can change the Loop Area by moving the han-
dles in the front and in the end of the Sample.
MASCHINE MIKRO - Getting Started - 99
Page 100

Slicing a Sample
6. If you want to have a bigger view of what’s happening, put the mouse cursor over the
timeline located above the waveform: the cursor turns into a small magnifying glass.
Click and hold the mouse button, then drag your mouse vertically to zoom in/out and
horizontally to scroll through the waveform.
Sampling
8.3 Slicing a Sample
Slicing a Sample is useful if you want to rearrange Loops or make them play correctly at
another tempo. Let’s slice the drum loop we have just recorded!
Hardware
1. Press NAV + pad 15 to enter SLICE mode.
MASCHINE MIKRO - Getting Started - 100
 Loading...