

Page 1

MANUAL
Page 2

The information in this document is subject to change without notice and does not represent a
commitment on the part of Native Instruments GmbH. The software described by this document is subject to a License Agreement and may not be copied to other media. No part of this
publication may be copied, reproduced or otherwise transmitted or recorded, for any purpose,
without prior written permission by Native Instruments GmbH, hereinafter referred to as Native
Instruments.
“Native Instruments”, “NI” and associated logos are (registered) trademarks of Native Instruments GmbH.
Mac, Mac OS, GarageBand, Logic, iTunes and iPod are registered trademarks of Apple Inc.,
registered in the U.S. and other countries.
Windows, Windows Vista and DirectSound are registered trademarks of Microsoft Corporation
in the United States and/or other countries.
All other trademarks are the property of their respective owners and use of them does not imply
any affiliation with or endorsement by them.
Document authored by: David Gover, Nicolas Sidi, Gustav Santo Tomas
Software version: 2.5 (10/2016)
Disclaimer
Hardware version: MASCHINE JAM
Special thanks to the Beta Test Team, who were invaluable not just in tracking down bugs, but
in making this a better product.
Page 3

NATIVE INSTRUMENTS GmbH
Schlesische Str. 29-30
D-10997 Berlin
Germany
www.native-instruments.de
NATIVE INSTRUMENTS North America, Inc.
6725 Sunset Boulevard
5th Floor
Los Angeles, CA 90028
USA
www.native-instruments.com
NATIVE INSTRUMENTS K.K.
YO Building 3F
Jingumae 6-7-15, Shibuya-ku,
Tokyo 150-0001
Japan
www.native-instruments.co.jp
Contact
NATIVE INSTRUMENTS UK Limited
18 Phipp Street
London EC2A 4NU
UK
www.native-instruments.co.uk
© NATIVE INSTRUMENTS GmbH, 2016. All rights reserved.
Page 4

Table of Contents
Table of Contents
1 Welcome to MASCHINE! ............................................................................................
1.1 Where to Start? ........................................................................................................................... 21
1.2 Manual Conventions ................................................................................................................... 23
2 Basic Concepts .........................................................................................................
2.1 Names and Concepts You Should Know ...................................................................................... 25
2.2 Adjusting the MASCHINE User Interface ..................................................................................... 27
2.3 Common Operations ................................................................................................................... 31
2.4 Native Kontrol Standard ............................................................................................................. 42
2.5 Stand-Alone and Plug-in Mode ................................................................................................... 45
2.6 Preferences .................................................................................................................................48
2.2.1 Adjusting the Size of the Interface ............................................................................. 28
2.2.2 Showing/Hiding the Browser ...................................................................................... 29
2.2.3 Switching between Arrange View and Mix View ......................................................... 29
2.2.4 Minimizing the Mixer ................................................................................................. 30
2.2.5 Showing/Hiding the Control Lane .............................................................................. 30
2.3.1 Setting the Focus on a Group or a Sound ................................................................... 31
2.3.2 Switching Between the Master, Group, and Sound Level ........................................... 35
2.3.3 Navigating Channel Properties, Plug-ins, and Parameter Pages in the Control Area . 35
2.3.4 Undo/Redo ................................................................................................................. 39
2.3.5 Pinning a Mode on Your Controller ............................................................................. 41
2.3.6 Using Two or More Hardware Controllers ................................................................... 41
2.4.1 Installing KONTAKT Instruments with NKS Support .................................................... 43
2.4.2 Loading NKS and Third-party Plug-ins from the Plug-in Menu .................................. 44
2.5.1 Differences between Stand-Alone and Plug-in Mode ................................................. 46
2.5.2 Switching Instances .................................................................................................. 47
20
25
MASCHINE 2 - Manual - 4
Page 5

Table of Contents
2.6.1 Preferences – General Page ....................................................................................... 50
2.6.1.1 Usage Data Tracking .................................................................................53
2.6.2 Preferences – Audio Page .......................................................................................... 55
2.6.3 Preferences – MIDI Page ............................................................................................ 57
2.6.4 Preferences – Default Page ....................................................................................... 60
2.6.5 Preferences – Library Page ........................................................................................ 63
2.6.6 Preferences – Plug-ins Page ..................................................................................... 71
2.6.7 Preferences – Hardware Page .................................................................................... 76
2.6.8 Controller Menu in the Hardware Page of the Preferences Panel ............................... 77
2.6.9 Preferences – Colors Page ......................................................................................... 79
3 Browser ....................................................................................................................
3.1 Browser Basics ........................................................................................................................... 82
3.2 Searching and Loading Files from the Library ............................................................................ 84
3.3 Additional Browsing Tools .......................................................................................................... 107
3.1.1 The MASCHINE Library ............................................................................................... 82
3.1.2 Browsing the Library vs. Browsing Your Hard Disks ................................................... 83
3.2.1 Overview of the LIBRARY Pane ................................................................................... 84
3.2.2 Selecting or Loading a Product and Selecting a Bank from the Browser .................... 87
3.2.3 Selecting a Product Category, a Product, a Bank, and a Sub-Bank ........................... 92
3.2.4 Selecting a File Type .................................................................................................. 97
3.2.5 Choosing Between Factory and User Content ............................................................. 97
3.2.6 Selecting Type and Mode Tags ................................................................................... 98
3.2.7 Performing a Text Search ........................................................................................... 102
3.2.8 Loading a File from the Result List ............................................................................ 103
3.3.1 Loading the Selected Files Automatically .................................................................. 108
3.3.2 Pre-Listening to Your Samples .................................................................................. 109
82
MASCHINE 2 - Manual - 5
Page 6

Table of Contents
3.4 Using Favorites in the Browser ................................................................................................... 111
3.5 Editing the Files’ Tags and Properties ........................................................................................ 115
3.6 Loading and Importing Files from Your File System .................................................................... 121
3.7 Locating Missing Samples .......................................................................................................... 131
3.8 Using Quick Browse .................................................................................................................... 132
3.3.3 Loading Groups with their Patterns ........................................................................... 109
3.3.4 Displaying File Information ........................................................................................ 110
3.5.1 Attribute Editor Basics .............................................................................................. 115
3.5.2 The BANK Page .......................................................................................................... 117
3.5.3 The TYPES and MODES Pages .................................................................................... 118
3.5.4 The PROPERTIES Page ............................................................................................... 120
3.6.1 Overview of the FILES Pane ........................................................................................ 121
3.6.2 Using Favorites .......................................................................................................... 123
3.6.3 Using the Location Bar .............................................................................................. 124
3.6.4 Navigating to Recent Locations ................................................................................. 125
3.6.5 Using the Result List ................................................................................................. 126
3.6.6 Importing Files to the MASCHINE Library ................................................................... 129
4 Managing Sounds, Groups, and Your Project ...............................................................
135
4.1 Overview of the Sounds, Groups, and Master .............................................................................. 135
4.2 Managing Sounds .......................................................................................................................142
4.1.1 The Sound, Group, and Master Channels ................................................................... 136
4.1.2 Similarities and Differences in Handling Sounds and Groups ................................... 138
4.1.3 Selecting Multiple Sounds or Groups ......................................................................... 139
4.2.1 Loading Sounds ......................................................................................................... 144
4.2.2 Pre-listening to Sounds ............................................................................................. 145
4.2.3 Renaming Sound Slots .............................................................................................. 145
MASCHINE 2 - Manual - 6
Page 7

Table of Contents
4.3 Managing Groups ....................................................................................................................... 155
4.4 Exporting MASCHINE Objects and Audio ..................................................................................... 166
4.5 Importing Third-Party File Formats ............................................................................................. 177
4.2.4 Changing the Sound’s Color ...................................................................................... 146
4.2.5 Saving Sounds ........................................................................................................... 148
4.2.6 Copying and Pasting Sounds ..................................................................................... 150
4.2.7 Moving Sounds .......................................................................................................... 153
4.2.8 Resetting Sound Slots ............................................................................................... 154
4.3.1 Creating Groups ........................................................................................................ 156
4.3.2 Loading Groups ......................................................................................................... 157
4.3.3 Renaming Groups ...................................................................................................... 158
4.3.4 Changing the Group’s Color ....................................................................................... 158
4.3.5 Saving Groups ........................................................................................................... 160
4.3.6 Copying and Pasting Groups ..................................................................................... 162
4.3.7 Moving Groups ........................................................................................................... 164
4.3.8 Deleting Groups ......................................................................................................... 165
4.4.1 Saving a Group with its Samples ............................................................................... 166
4.4.2 Saving a Project with its Samples ............................................................................. 168
4.4.3 Exporting Audio ......................................................................................................... 170
4.5.1 Loading REX Files into Sound Slots ........................................................................... 177
4.5.2 Importing MPC Programs to Groups ........................................................................... 178
5 Working with Plug-ins ...............................................................................................
182
5.1 Plug-in Overview ........................................................................................................................ 182
5.1.1 Plug-in Basics ........................................................................................................... 182
5.1.2 First Plug-in Slot of Sounds: Choosing the Sound’s Role ........................................... 186
5.1.3 Loading, Removing, and Replacing a Plug-in ............................................................ 186
MASCHINE 2 - Manual - 7
Page 8

Table of Contents
5.2 The Sampler Plug-in ................................................................................................................... 200
5.3 Using Native Instruments and External Plug-ins ........................................................................ 211
5.1.4 Adjusting the Plug-in Parameters ............................................................................. 192
5.1.5 Bypassing Plug-in Slots ............................................................................................ 193
5.1.6 Using Side-Chain ...................................................................................................... 194
5.1.7 Moving Plug-ins ........................................................................................................ 194
5.1.8 Alternative: the Plug-in Strip ..................................................................................... 195
5.1.9 Saving and Recalling Plug-in Presets ....................................................................... 195
5.1.9.1 Saving Plug-in Presets ..............................................................................196
5.1.9.2 Recalling Plug-in Presets ..........................................................................198
5.1.9.3 Removing a Default Plug-in Preset ............................................................199
5.2.1 Page 1: Voice Settings / Engine ................................................................................. 201
5.2.2 Page 2: Pitch / Envelope ............................................................................................ 202
5.2.3 Page 3: FX / Filter ...................................................................................................... 205
5.2.4 Page 4: Modulation .................................................................................................... 206
5.2.5 Page 5: LFO ............................................................................................................... 208
5.2.6 Page 6: Velocity / Modwheel ...................................................................................... 210
5.3.1 Opening/Closing Plug-in Windows ............................................................................. 211
5.3.2 Using the VST/AU Plug-in Parameters ....................................................................... 214
5.3.3 Setting Up Your Own Parameter Pages ...................................................................... 215
5.3.4 Using VST/AU Plug-in Presets .................................................................................... 220
5.3.5 Multiple-Output Plug-ins and Multitimbral Plug-ins ................................................. 222
6 Working with Patterns ...............................................................................................
223
6.1 Pattern Basics ............................................................................................................................ 223
6.1.1 Pattern Editor Overview ............................................................................................. 224
6.1.2 Navigating the Event Area ......................................................................................... 226
MASCHINE 2 - Manual - 8
Page 9

Table of Contents
6.2 Recording Patterns with the Step Sequencer .............................................................................. 237
6.3 Editing Events ............................................................................................................................ 238
6.4 Recording and Editing Modulation ............................................................................................. 251
6.5 Creating MIDI Tracks from Scratch in MASCHINE ....................................................................... 261
6.6 Managing Patterns ..................................................................................................................... 263
6.1.3 Following the Playback Position in the Pattern .......................................................... 228
6.1.4 Jumping to Another Playback Position in the Pattern ................................................. 229
6.1.5 Group View and Keyboard View .................................................................................. 230
6.1.6 Adjusting the Pattern Grid and the Pattern Length .................................................... 232
6.1.7 Adjusting the Step Grid and the Nudge Grid .............................................................. 234
6.2.1 Step Mode Basics ...................................................................................................... 237
6.3.1 Editing Events with the Mouse: an Overview ............................................................. 238
6.3.2 Creating Events/Notes ............................................................................................... 242
6.3.3 Selecting Events/Notes .............................................................................................. 243
6.3.4 Editing Selected Events/Notes ................................................................................... 244
6.3.5 Deleting Events/Notes ............................................................................................... 246
6.3.6 Cut, Copy, and Paste Events/Notes ............................................................................ 247
6.3.7 Quantizing Events/Notes ........................................................................................... 249
6.3.8 Quantization While Playing ........................................................................................ 251
6.4.1 Which Parameters Are Modulatable? ......................................................................... 253
6.4.2 Recording Modulation ................................................................................................ 254
6.4.3 Creating and Editing Modulation in the Control Lane ................................................ 255
6.6.1 The Pattern Manager and Pattern Mode .................................................................... 263
6.6.2 Selecting Patterns and Pattern Banks ....................................................................... 265
6.6.3 Creating Patterns ...................................................................................................... 266
6.6.4 Deleting Patterns ....................................................................................................... 268
MASCHINE 2 - Manual - 9
Page 10

Table of Contents
6.7 Importing/Exporting Audio and MIDI to/from Patterns ................................................................ 276
6.6.5 Creating and Deleting Pattern Banks ........................................................................ 269
6.6.6 Naming Patterns ....................................................................................................... 270
6.6.7 Changing the Pattern’s Color .................................................................................... 272
6.6.8 Duplicating, Copying, and Pasting Patterns .............................................................. 273
6.6.9 Moving Patterns ........................................................................................................ 275
6.7.1 Exporting Audio from Patterns ................................................................................... 276
6.7.2 Exporting MIDI from Patterns ..................................................................................... 278
6.7.3 Importing MIDI to Patterns ........................................................................................ 280
7 Audio Routing, Remote Control, and Macro Controls ....................................................
7.1 Audio Routing in MASCHINE ....................................................................................................... 290
7.2 Using MIDI Control and Host Automation .................................................................................... 315
7.3 Creating Custom Sets of Parameters with the Macro Controls ................................................... 335
7.1.1 Sending External Audio to Sounds ............................................................................. 291
7.1.2 Configuring the Main Output of Sounds and Groups ................................................. 296
7.1.3 Setting Up Auxiliary Outputs for Sounds and Groups ................................................. 301
7.1.4 Configuring the Master and Cue Outputs of MASCHINE ............................................. 304
7.1.5 Mono Audio Inputs ..................................................................................................... 310
7.1.5.1 Configuring External Inputs for Sounds in Mix View ..................................311
7.2.1 Triggering Sounds via MIDI Notes .............................................................................. 316
7.2.2 Triggering Scenes via MIDI ........................................................................................ 321
7.2.3 Controlling Parameters via MIDI and Host Automation .............................................. 322
7.2.4 Selecting VST/AU Plug-in Presets via MIDI Program Change ..................................... 330
7.2.5 Sending MIDI from Sounds ........................................................................................ 331
7.3.1 Macro Control Overview ............................................................................................. 336
7.3.2 Assigning Macro Controls .......................................................................................... 337
289
MASCHINE 2 - Manual - 10
Page 11

Table of Contents
8 Controlling Your Mix ..................................................................................................
8.1 Mix View Basics .......................................................................................................................... 343
8.2 The Mixer .................................................................................................................................... 346
8.3 The Plug-in Chain .......................................................................................................................359
8.4 The Plug-in Strip ........................................................................................................................ 360
8.1.1 Switching between Arrange View and Mix View ......................................................... 343
8.1.2 Mix View Elements ..................................................................................................... 344
8.2.1 Displaying Groups vs. Displaying Sounds .................................................................. 347
8.2.2 Adjusting the Mixer Layout ........................................................................................ 349
8.2.3 Selecting Channel Strips ........................................................................................... 350
8.2.4 Managing Your Channels in the Mixer ....................................................................... 351
8.2.5 Adjusting Settings in the Channel Strips ................................................................... 353
8.2.6 Using the Cue Bus ..................................................................................................... 357
8.4.1 The Plug-in Header .................................................................................................... 362
8.4.2 Panels for Drumsynths and Internal Effects .............................................................. 364
8.4.3 Panel for the Sampler ................................................................................................ 365
8.4.4 Custom Panels for Native Instruments Plug-ins ........................................................ 368
8.4.5 Undocking a Plug-in Panel (Native Instruments and External Plug-ins Only) ............ 372
9 Using the Drumsynths ................................................................................................
343
375
9.1 Drumsynths – General Handling ................................................................................................. 376
9.2 The Kicks .................................................................................................................................... 380
9.1.1 Engines: Many Different Drums per Drumsynth ......................................................... 376
9.1.2 Common Parameter Organization .............................................................................. 376
9.1.3 Shared Parameters .................................................................................................... 379
9.1.4 Various Velocity Responses ....................................................................................... 379
9.1.5 Pitch Range, Tuning, and MIDI Notes ........................................................................ 379
MASCHINE 2 - Manual - 11
Page 12

Table of Contents
9.3 The Snares ..................................................................................................................................399
9.4 The Hi-hats .................................................................................................................................420
9.2.1 Kick – Sub ................................................................................................................. 382
9.2.2 Kick – Tronic .............................................................................................................. 384
9.2.3 Kick – Dusty .............................................................................................................. 387
9.2.4 Kick – Grit ................................................................................................................. 388
9.2.5 Kick – Rasper ............................................................................................................ 391
9.2.6 Kick – Snappy ............................................................................................................ 392
9.2.7 Kick – Bold ................................................................................................................ 394
9.2.8 Kick – Maple .............................................................................................................. 396
9.2.9 Kick – Push ............................................................................................................... 397
9.3.1 Snare – Volt ............................................................................................................... 401
9.3.2 Snare – Bit ................................................................................................................ 403
9.3.3 Snare – Pow .............................................................................................................. 405
9.3.4 Snare – Sharp ........................................................................................................... 406
9.3.5 Snare – Airy ............................................................................................................... 408
9.3.6 Snare – Vintage ......................................................................................................... 410
9.3.7 Snare – Chrome ......................................................................................................... 412
9.3.8 Snare – Iron ............................................................................................................... 414
9.3.9 Snare – Clap ............................................................................................................. 416
9.3.10 Snare – Breaker ......................................................................................................... 418
9.4.1 Hi-hat – Silver ........................................................................................................... 421
9.4.2 Hi-hat – Circuit ......................................................................................................... 423
9.4.3 Hi-hat – Memory ........................................................................................................ 425
9.4.4 Hi-hat – Hybrid ......................................................................................................... 427
9.4.5 Creating a Pattern with Closed and Open Hi-hats ..................................................... 429
MASCHINE 2 - Manual - 12
Page 13

9.5 The Toms .................................................................................................................................... 430
9.6 The Percussions ..........................................................................................................................441
9.7 The Cymbals ............................................................................................................................... 452
9.5.1 Tom – Tronic .............................................................................................................. 432
9.5.2 Tom – Fractal ............................................................................................................ 434
9.5.3 Tom – Floor ................................................................................................................ 438
9.5.4 Tom – High ................................................................................................................ 440
9.6.1 Percussion – Fractal .................................................................................................. 443
9.6.2 Percussion – Kettle .................................................................................................... 446
9.6.3 Percussion – Shaker .................................................................................................. 448
9.7.1 Cymbal – Crash ......................................................................................................... 454
9.7.2 Cymbal – Ride ........................................................................................................... 456
10 Using Effects .............................................................................................................
10.1 Applying Effects to a Sound, a Group or the Master .................................................................... 459
10.2 Applying Effects to External Audio .............................................................................................. 470
10.3 Creating a Send Effect ............................................................................................................... 473
10.4 Creating Multi-Effects ................................................................................................................ 477
10.1.1 Adding an Effect ........................................................................................................ 459
10.1.2 Other Operations on Effects ....................................................................................... 466
10.1.3 Using the Side-Chain Input ....................................................................................... 467
10.2.1 Step 1: Configure MASCHINE Audio Inputs ................................................................ 470
10.2.2 Step 2: Set Up a Sound to Receive the External Input ................................................ 472
10.2.3 Step 3: Load an Effect to Process an Input ................................................................ 472
10.3.1 Step 1: Set Up a Sound or Group as Send Effect ........................................................ 474
10.3.2 Step 2: Route Audio to the Send Effect ...................................................................... 476
10.3.3 A Few Notes on Send Effects ...................................................................................... 476
Table of Contents
459
MASCHINE 2 - Manual - 13
Page 14

Table of Contents
11 Effect Reference ........................................................................................................
11.1 Dynamics ....................................................................................................................................481
11.2 Filtering Effects .......................................................................................................................... 495
11.3 Modulation Effects ..................................................................................................................... 502
11.4 Spatial and Reverb Effects ......................................................................................................... 509
11.1.1 Compressor ............................................................................................................... 481
11.1.2 Gate ........................................................................................................................... 484
11.1.3 Transient Master ....................................................................................................... 487
11.1.4 Limiter ....................................................................................................................... 489
11.1.5 Maximizer .................................................................................................................. 492
11.2.1 EQ .............................................................................................................................. 495
11.2.2 Filter .......................................................................................................................... 497
11.2.3 Cabinet ...................................................................................................................... 501
11.3.1 Chorus ....................................................................................................................... 502
11.3.2 Flanger ...................................................................................................................... 503
11.3.3 FM ............................................................................................................................. 505
11.3.4 Freq Shifter ................................................................................................................ 506
11.3.5 Phaser ....................................................................................................................... 507
11.4.1 Ice ............................................................................................................................. 509
11.4.2 Metaverb ................................................................................................................... 510
11.4.3 Reflex ........................................................................................................................ 512
11.4.4 Reverb (Legacy) ......................................................................................................... 513
11.4.5 Reverb ....................................................................................................................... 515
11.4.5.1 Reverb Room .............................................................................................515
11.4.5.2 Reverb Hall ................................................................................................518
11.4.5.3 Plate Reverb ..............................................................................................520
480
MASCHINE 2 - Manual - 14
Page 15

11.5 Delays .........................................................................................................................................521
11.6 Distortion Effects ........................................................................................................................ 529
11.7 Perform FX .................................................................................................................................. 536
11.5.1 Beat Delay ................................................................................................................. 521
11.5.2 Grain Delay ................................................................................................................ 524
11.5.3 Grain Stretch ............................................................................................................. 526
11.5.4 Resochord .................................................................................................................. 527
11.6.1 Distortion ................................................................................................................... 529
11.6.2 Lofi ............................................................................................................................ 530
11.6.3 Saturator ................................................................................................................... 531
11.6.4 Analog Distortion ....................................................................................................... 535
12 Creating a Song Using Scenes ...................................................................................
12.1 Arranger Basics .......................................................................................................................... 557
12.2 Managing Scenes ....................................................................................................................... 568
12.1.1 Arranger Overview ..................................................................................................... 559
12.1.2 Navigating the Arranger ............................................................................................ 561
12.1.3 Following the Playback Position in Your Project ......................................................... 564
12.1.4 Jumping to Another Playback Position in Your Project ............................................... 565
12.1.5 Creating and Removing Clips .................................................................................... 566
12.2.1 Scene Management Overview .................................................................................... 568
12.2.2 Selecting Scenes and Scene Banks ........................................................................... 570
12.2.3 Creating Scenes ........................................................................................................ 572
12.2.4 Deleting Scenes ......................................................................................................... 574
12.2.5 Creating and Deleting Scene Banks .......................................................................... 578
12.2.6 Naming Scenes .......................................................................................................... 581
12.2.7 Changing the Scene’s Color ....................................................................................... 583
Table of Contents
557
MASCHINE 2 - Manual - 15
Page 16

Table of Contents
12.3 Managing Scenes ....................................................................................................................... 592
12.4 Playing with Scenes ....................................................................................................................600
12.5 Triggering Scenes via MIDI (MASCHINE Plug-in Only) ................................................................. 606
12.6 The Arrange Grid .........................................................................................................................607
12.2.8 Moving Scenes ........................................................................................................... 584
12.2.9 Clearing Scenes ......................................................................................................... 586
12.2.10 Duplicating, Copying, and Pasting Scenes ................................................................ 586
12.2.11 Adjustable Scene Length ........................................................................................... 587
12.2.11.1 Adjusting the Length of a Scene Using the Software .................................588
12.2.12 Enabling Scene Auto Length ...................................................................................... 590
12.2.13 Looping ...................................................................................................................... 590
12.2.13.1 Setting the Loop Range in the Software .....................................................591
12.3.1 Scene Linking Basics ................................................................................................. 593
12.3.2 Setting Scene Options in the Preferences .................................................................. 594
12.3.3 Duplicating Scenes .................................................................................................... 597
12.3.4 Link when Duplicating Scenes ................................................................................... 599
12.3.5 Making Scenes Unique .............................................................................................. 600
12.4.1 Selecting a Loop Range ............................................................................................. 601
12.4.2 Jumping to Other Scenes ........................................................................................... 604
13 Sampling and Sample Mapping ..................................................................................
609
13.1 Opening the Sample Editor ......................................................................................................... 609
13.2 Recording a Sample ................................................................................................................... 610
13.2.1 Opening the Record Page .......................................................................................... 610
13.2.2 Selecting the Source and the Recording Mode ........................................................... 611
13.2.3 Arming, Starting, and Stopping the Recording .......................................................... 614
13.2.4 Checking Your Recordings ......................................................................................... 615
MASCHINE 2 - Manual - 16
Page 17

Table of Contents
13.3 Editing a Sample ........................................................................................................................ 619
13.4 Slicing a Sample ........................................................................................................................ 626
13.5 Mapping Samples to Zones ........................................................................................................ 644
13.2.5 Location and Name of Your Recorded Samples .......................................................... 618
13.3.1 Using the Edit Page ................................................................................................... 619
13.3.2 Audio Editing Functions ............................................................................................. 623
13.4.1 Opening the Slice Page .............................................................................................. 627
13.4.2 Adjusting the Slicing Settings ................................................................................... 628
13.4.3 Manually Adjusting Your Slices (OBSOLETE?) ............................................................ 630
13.4.4 Applying the Slicing ................................................................................................... 633
13.4.5 From 2.4.6 ................................................................................................................ 637
13.4.5.1 Live Slicing ................................................................................................637
13.4.5.2 Delete All Slices .........................................................................................639
13.4.6 Sample Slicer Mono Option ........................................................................................ 642
13.4.6.1 Activating the Sample Slicer Mono Option in the Software ........................642
13.4.7 Auto-Snap ................................................................................................................. 643
13.5.1 Opening the Zone Page .............................................................................................. 644
13.5.2 Zone Page Overview ................................................................................................... 645
13.5.3 Selecting and Managing Zones in the Zone List ........................................................ 646
13.5.4 Selecting and Editing Zones in the Map View ............................................................ 651
13.5.5 Editing Zones in the Sample View ............................................................................. 655
13.5.6 Adjusting the Zone Settings ...................................................................................... 657
13.5.7 Adding Samples to the Sample Map .......................................................................... 662
14 KOMPLETE KONTROL Integration .................................................................................
664
14.1 Switching the Keyboard Focus to/from a MASCHINE Instance ..................................................... 664
14.2 Controlling the Transport in MASCHINE ...................................................................................... 671
MASCHINE 2 - Manual - 17
Page 18

14.3 Navigating and Controlling Your Sounds within a Group ............................................................ 676
14.4 Browsing Your MASCHINE Library ............................................................................................... 683
14.5 Using the Perform Features ........................................................................................................ 688
14.6 Using the Touch Strips ............................................................................................................... 694
14.7 Recording Modulation from Your Keyboard ................................................................................. 700
14.8 Adjusting the Settings for Your Keyboard in the MASCHINE Preferences ..................................... 704
14.9 Arp Hold Mode ............................................................................................................................ 706
14.10 Support for KOMPLETE KONTROL S88 ......................................................................................... 707
15 Troubleshooting – Getting Help ..................................................................................
15.1 Troubleshooting .......................................................................................................................... 708
15.2 Getting Help ............................................................................................................................... 710
15.1.1 The MASCHINE Software Won’t Start .......................................................................... 708
15.1.2 Latency Issues ........................................................................................................... 708
15.1.3 The MASCHINE Software Crashes .............................................................................. 709
15.1.4 Updates ..................................................................................................................... 709
15.2.1 Knowledge Base ........................................................................................................ 710
15.2.2 Technical Support ...................................................................................................... 710
15.2.3 Registration Support ................................................................................................. 711
15.2.4 User Forum ................................................................................................................ 711
16 Appendix: Tips for Playing Live ..................................................................................
Table of Contents
708
712
16.1 Preparations ............................................................................................................................... 712
16.1.1 Focus on the Hardware .............................................................................................. 712
16.1.2 Customize the Pads of the Hardware ......................................................................... 712
16.1.3 Check Your CPU Power Before Playing ....................................................................... 712
16.1.4 Name and Color Your Groups, Patterns, Sounds and Scenes ..................................... 712
16.1.5 Consider Using a Limiter on Your Master ................................................................... 713
MASCHINE 2 - Manual - 18
Page 19

Table of Contents
16.2 Basic Techniques ....................................................................................................................... 713
16.3 Special Tricks ............................................................................................................................. 714
16.1.6 Improvise ................................................................................................................... 713
16.2.1 Use Mute and Solo ..................................................................................................... 713
16.2.2 Use Scene Mode and Tweak the Loop Range .............................................................. 713
16.2.3 Create Variations of Your Drum Patterns in the Step Sequencer ................................ 714
16.2.4 Use Note Repeat ........................................................................................................ 714
16.2.5 Set Up Your Own Multi-effect Groups and Automate Them ........................................ 714
16.3.1 Changing Pattern Length for Variation ...................................................................... 714
16.3.2 Using Loops to Cycle Through Samples ..................................................................... 715
16.3.3 Using Loops to Cycle Through Samples ..................................................................... 715
16.3.4 Load Long Audio Files and Play with the Start Point .................................................. 715
17 Glossary ...................................................................................................................
Index ........................................................................................................................
716
728
MASCHINE 2 - Manual - 19
Page 20

Welcome to MASCHINE!
1 Welcome to MASCHINE!
Thank you for buying MASCHINE!
MASCHINE is a groove production studio that implements the familiar working style of classical groove boxes along with the advantages of a computer based system. MASCHINE is ideal
for making music live, as well as in the studio. It’s the hands-on aspect of a dedicated instrument, the MASCHINE hardware controller, united with the advanced editing features of the
MASCHINE software.
Creating beats is often not very intuitive with a computer, but using the MASCHINE hardware
controller to do it makes it easy and fun. You can tap in freely with the pads or use Note Repeat to jam along. Alternatively, build your beats using the step sequencer just as in classic
drum machines.
Patterns can be intuitively combined and rearranged on the fly to form larger ideas. You can try
out several different versions of a song without ever having to stop the music.
Since you can integrate it into any sequencer that supports VST, AU, or AAX plug-ins, you can
reap the benefits in almost any software setup, or use it as a stand-alone application. You can
sample your own material, slice loops and rearrange them easily.
However, MASCHINE is a lot more than an ordinary groovebox or sampler: it comes with an
inspiring 7-gigabyte library, and a sophisticated, yet easy to use tag-based Browser to give you
instant access to the sounds you are looking for.
What’s more, MASCHINE provides lots of options for manipulating your sounds via internal effects and other sound-shaping possibilities. You can also control external MIDI hardware and
3rd-party software with the MASCHINE hardware controller, while customizing the functions of
the pads, knobs and buttons according to your needs utilizing the included Controller Editor
application. We hope you enjoy this fantastic instrument as much as we do. Now let’s get going!
—The MASCHINE team at Native Instruments.
MASCHINE 2 - Manual - 20
Page 21
Welcome to MASCHINE!
Where to Start?
1.1 Where to Start?
MASCHINE provides you with many information sources. The main documents are meant to be
read in the following sequence:
1. MASCHINE Setup Guide
2. MASCHINE Getting Started and online video tutorials
3. MASCHINE Manual (this document)
The whole documentation set is available in PDF format and located within the MASCHINE installation folder on your hard disk. You can also access these documents
from the Help menu in the Application Menu Bar or from the Help submenu in the MASCHINE menu.
Please check the Service Center or the Native Instruments website regularly for up-todate and localized versions of these documents. You can start the Service Center by selecting Launch Service Center from the Help menu in the Application Menu Bar or from
the Help submenu in the MASCHINE menu.
Additional documentation sources provide you with details on more specific topics:
▪ MASCHINE Hardware Control Reference
▪ Controller Editor Manual
Hereafter is a quick description of each of these documentation sources.
Your First Stop: the Setup Guide
The Setup Guide will guide you through the software and hardware installation of MASCHINE,
from the very beginning to the first sound coming through your speakers.
First read the Setup Guide. Then proceed with this MASCHINE Getting Started to get more familiar with MASCHINE.
MASCHINE 2 - Manual - 21
Page 22

Welcome to MASCHINE!
Where to Start?
MASCHINE Getting Started
After reading the Setup Guide and following its instructions, your MASCHINE should be up
and running. The next step is to read the MASCHINE Getting Started. This gives you a practical approach to MASCHINE via a set of tutorials covering easy and more advanced tasks in order to help you familiarize yourself with MASCHINE.
Video Tutorials
The Native Instruments website provides you with a lot of video tutorials that give you a handson approach to many sides of the MASCHINE workflow. To see them, point your favorite browser to following URL: http://native-instruments.com/maschinemedia.
MASCHINE Manual
This MASCHINE Manual provides you with a comprehensive description of all MASCHINE software and hardware features.
MASCHINE Hardware Control Reference
The MASCHINE Hardware Control Reference provides an overview of a MASCHINE Project, the
quick access options performed using the MASCHINE hardware controller, and lots of keyboard shortcuts.
Controller Editor Manual
Besides using your MASCHINE hardware controller together with its dedicated MASCHINE
software, you can also use it as a powerful and highly versatile MIDI controller to pilot any other MIDI-capable application or device. This is made possible by the Controller Editor software,
a little application that allows you to precisely define all MIDI assignments for your MASCHINE
controller. The Controller Editor should have been installed during the MASCHINE installation
procedure. For more information on this, please refer to the Controller Editor Manual available
as a PDF file in the Documentation subfolder of the Controller Editor installation folder on your
hard disk.
Other Online Resources
If you are experiencing problems related to your Native Instruments product that the supplied
documentation does not cover, there are several ways of getting help:
MASCHINE 2 - Manual - 22
Page 23
Welcome to MASCHINE!
Manual Conventions
▪ Knowledge Base
▪ User Forum
▪ Technical Support
▪ Registration Support
You will find more information on these in chapter ↑15, Troubleshooting – Getting Help.
1.2 Manual Conventions
This section introduces you to the signage and text highlighting used in this manual. This manual uses particular formatting to point out special facts and to warn you of potential issues.
The icons introducing these notes let you see what kind of information is to be expected:
This document uses particular formatting to point out special facts and to warn you of potential issues. The icons introducing the following notes let you see what kind of information can
be expected:
The speech bubble icon indicates a useful tip that may often help you to solve a task
more efficiently.
The exclamation mark icon highlights important information that is essential for the given context.
The red cross icon warns you of serious issues and potential risks that require your full
attention.
Furthermore, the following formatting is used:
▪ Text appearing in (drop-down) menus (such as Open…, Save as… etc.) in the software and
paths to locations on your hard disk or other storage devices is printed in italics.
▪ Text appearing elsewhere (labels of buttons, controls, text next to checkboxes etc.) in the
software is printed in blue. Whenever you see this formatting applied, you will find the
same text appearing somewhere on the screen.
MASCHINE 2 - Manual - 23
Page 24

Welcome to MASCHINE!
Manual Conventions
▪ Text appearing on the displays of the controller is printed in light grey. Whenever you see
this formatting applied, you will find the same text on a controller display.
▪ Text appearing on labels of the hardware controller is printed in orange. Whenever you see
this formatting applied, you will find the same text on the controller.
▪ Important names and concepts are printed in bold.
▪ References to keys on your computer’s keyboard you’ll find put in square brackets (e.g.,
“Press [Shift] + [Enter]”).
Single instructions are introduced by this play button type arrow.
►
Results of actions are introduced by this smaller arrow.
→
Naming Convention
Throughout the documentation we will refer to MASCHINE controller (or just controller) as the
hardware controller and MASCHINE software as the software installed on your computer.
The term “effect” will sometimes be abbreviated as “FX” when referring to elements in the MASCHINE software and hardware. These terms have the same meaning.
MASCHINE 2 - Manual - 24
Page 25
Basic Concepts
Names and Concepts You Should Know
2 Basic Concepts
This chapter will reintroduce you to MASCHINE’s main elements and terminology and explain
how they relate to one another. You will also learn how to set up your audio interface and how
to connect MIDI devices.
Before reading this chapter it is strongly recommended that you read the MASCHINE
Getting Started first.
2.1 Names and Concepts You Should Know
We will start with a list defining the most important concepts and names.
Browser
The Browser is the front end for accessing all the elements of your MASCHINE Projects:
Projects, Groups, Sounds, instruments and effect presets, and Samples. Each of these can be
stored and tagged in a way that allows you easy access to all of them. MASCHINE’s factory
library is already completely tagged, as well as factory libraries of any Native Instruments products installed on your computer. You can also import your own files to the Library and tag them
as well. To learn more about the Browser, please read chapter ↑3, Browser.
Project
A Project contains all data needed for a song: Groups with their Patterns, all Scenes and all
settings, modulation, effects, routings, Sounds and Samples. It’s like a snapshot of the entire
state of MASCHINE. Please read the MASCHINE Getting Started for a complete overview of
the MASCHINE Project structure.
MASCHINE 2 - Manual - 25
Page 26

Basic Concepts
Names and Concepts You Should Know
Sound
Sounds are the building blocks of all sound content in MASCHINE. A Sound is made up of any
number of Plug-ins. Each Sound of the selected Group is mapped to one of the 16 pads on the
hardware controller, so you can play the Sounds by pressing the pads. Refer to chapter ↑4,
Managing Sounds, Groups, and Your Project for more information on Sounds.
Group
A Group contains 16 Sound slots. In addition to the Effect Plug-ins applied to each individual
Sound, a Group can have its own insert effect. These affect all the Sounds in the Group. A
Group can also contain any number of Patterns (grouped into banks of 16 Patterns each). Refer to chapter ↑4, Managing Sounds, Groups, and Your Project for more information on Groups.
Master
This is where all audio signals from each of the Groups and Sounds come together and get
mixed. The Master channel can also host any number of insert effects of its own, these effects
are applied to all Groups and the Sounds within them. More information on the Master can be
found in chapter ↑4, Managing Sounds, Groups, and Your Project.
Pattern
A Pattern is a sequence that plays Sounds from a Group. It belongs to that Group and will be
saved together with the Group. In every Scene you can choose for each Group which of its Patterns has to be played. More information on Patterns can be found in chapter ↑6, Working with
Patterns.
Scene
A Scene is a combination of Clips for your different Groups. Each Clip references a specific
Pattern of a Group. In a Scene you can create one Clip for each Group. Scenes are located in
the Arranger. They can be used to build up a finished arrangement or to trigger different parts
of a song during a live performance. Refer to chapter ↑12, Creating a Song Using Scenes for
more information on Scenes.
MASCHINE 2 - Manual - 26
Page 27
Basic Concepts
Adjusting the MASCHINE User Interface
Event
Events are the individual drum hits or notes that make up a Pattern. In the Pattern Editor,
events are visually represented by rectangles in the Event area. Depending on the current view
in the Pattern Editor, you can see events for all Sounds slots (Group view) or for the selected
Sound slot only (Keyboard view). Events are described in more detail in chapter ↑6, Working
with Patterns.
Plug-in
Each Sound, each Group, and the Master can hold any number of Plug-ins. Plug-ins can be
instruments or effects, and they can be internal (included with MASCHINE), from other Native
Instruments products (instruments or effects), or external (third-party VST/AU plug-ins). Instrument and Effect Plug-ins can be loaded in the first Plug-in slot of Sounds. The other Plug-in
slots of Sounds, as well as the Plug-in slots of Groups and of the Master can hold Effect Plugins only. At each level (Sound, Group, and Master), Plug-ins process the audio in series, according to the order in which they are stacked up. Refer to chapter ↑5, Working with Plug-ins.
Effect
MASCHINE comes with many different effects in the form of Internal Plug-ins. You may also
use Native Instruments or third-party VST/AU effect plug-ins. Each Sound, each Group, and
the Master can hold any number of effects that will be applied as insert effects. The flexible
routing system also allows you to create send effects, multi-effects, and side-chains. For more
details on using effects in MASCHINE, refer to chapter ↑10, Using Effects. You will find an
exhaustive description of all internal effects included in MASCHINE in chapter ↑11, Effect
Reference.
Please refer to chapter ↑17, Glossary at the end of this Manual for more definitions!
2.2 Adjusting the MASCHINE User Interface
The MASCHINE software user interface is very flexible. You can choose what to display and
what not, allowing you to focus on your workflow. This section shows you how to adjust the MASCHINE GUI to suit your needs.
MASCHINE 2 - Manual - 27
Page 28
Basic Concepts
Adjusting the MASCHINE User Interface
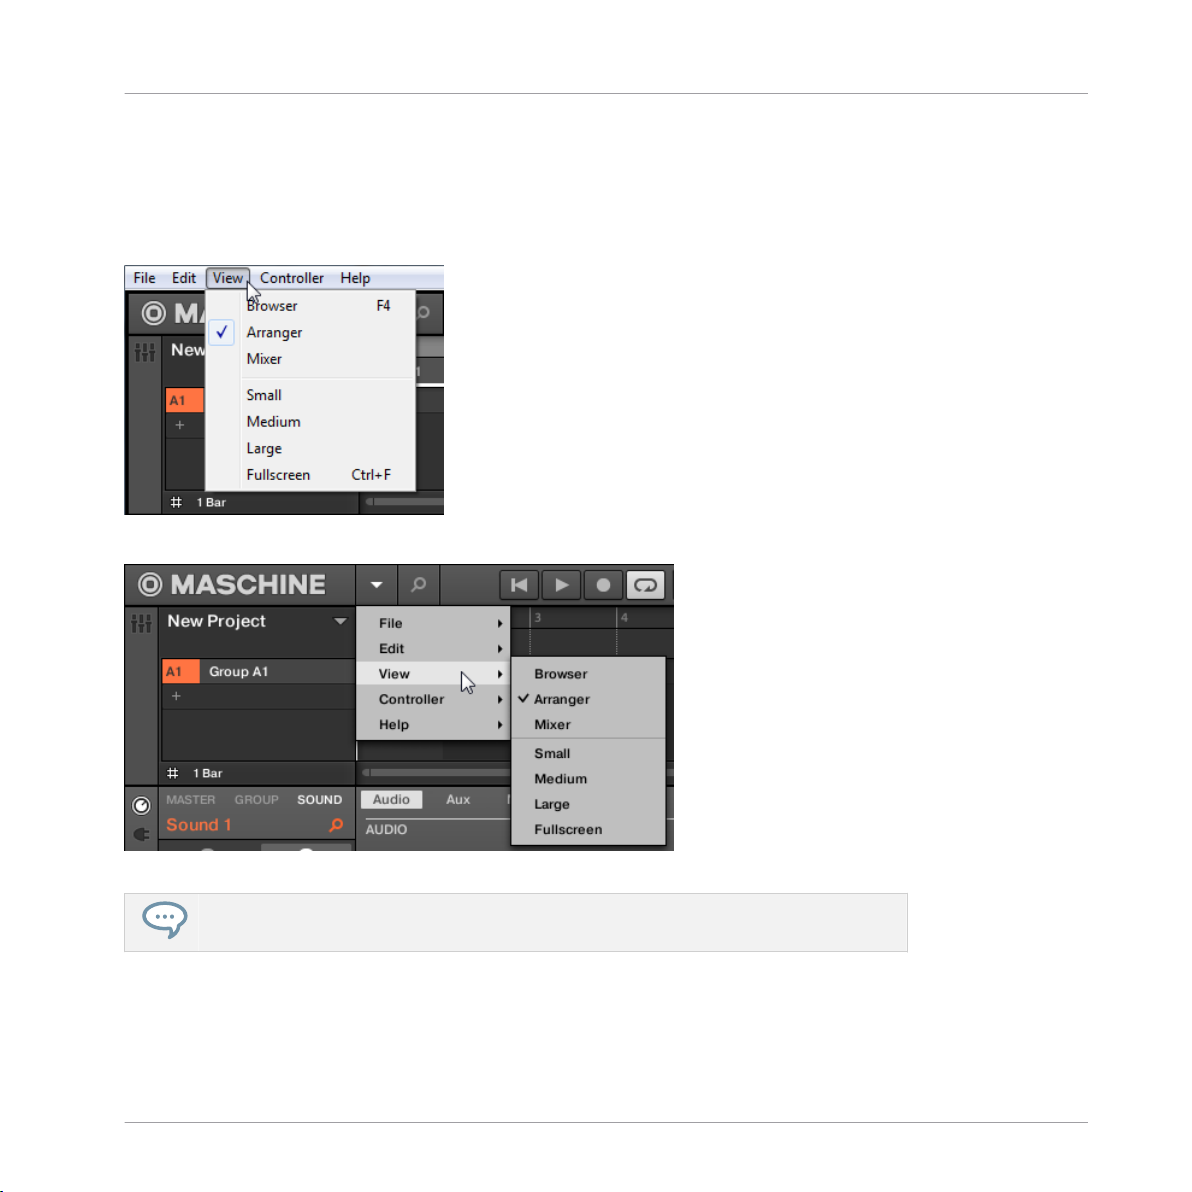
2.2.1 Adjusting the Size of the Interface
From the View menu in the Application Menu Bar and from the View submenu in the MASCHINE menu you can select one of four different sizes to display MASCHINE’s software GUI:
The View menu in the Application Menu Bar (Windows depicted).
The View submenu in the MASCHINE menu.
Full screen view is also available from your computer keyboard via [Ctrl]+[F] (Mac OS X:
[Cmd]+[F]).
MASCHINE 2 - Manual - 28
Page 29
Adjusting the MASCHINE User Interface
2.2.2 Showing/Hiding the Browser
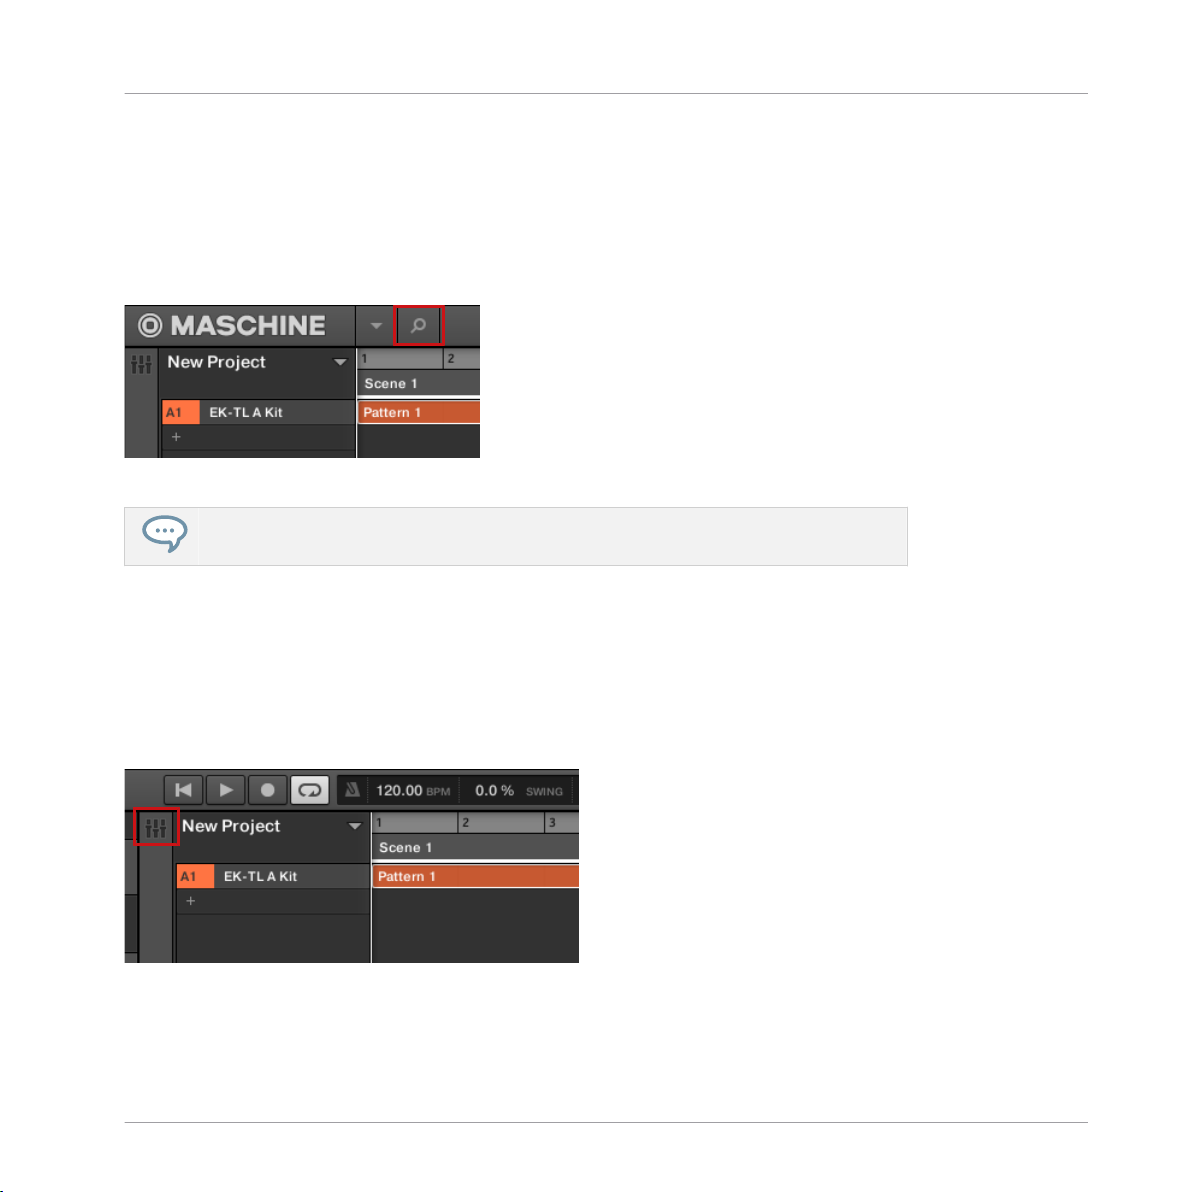
Click the Browser button (with the magnifier symbol) in the Header to show and hide the
►
Browser. You can also select Browser from the View menu in the Application Menu Bar or
from the View submenu in the MASCHINE menu.
The Browser button in the Header.
You can also show/hide the Browser from your computer keyboard via the [F4] function
key.
Basic Concepts
2.2.3 Switching between Arrange View and Mix View
Click the Mix View button at the top left of the Arranger to switch between the Arrange
►
view and the Mix view. You can also select Arranger or Mixer from the View menu in the
Application Menu Bar or from the View submenu in the MASCHINE menu.
The Mix View button.
MASCHINE 2 - Manual - 29
Page 30

Basic Concepts
Adjusting the MASCHINE User Interface
You can also switch between Arrange view and Mix view from your computer keyboard
via the [Tab] key.
2.2.4 Minimizing the Mixer
When MASCHINE is in Mix view, you can minimize/maximize the Mixer in the top part of the
MASCHINE window:
Click the arrow button at the bottom left of the Mixer to show and hide the channel de-
►
tails in the Mixer.
Minimizing/maximizing the Mixer.
2.2.5 Showing/Hiding the Control Lane
When MASCHINE is in Arrange view, you can show/hide the Control Lane under the Pattern
Editor:
Click the arrow button on the bottom left of the Pattern Editor to show and hide the Con-
►
trol Lane.
MASCHINE 2 - Manual - 30
Page 31

Basic Concepts
Common Operations
Click the arrow button at the bottom left of the Pattern Editor to show/hide the Control Lane.
2.3 Common Operations
This sections introduces a few very common operations in MASCHINE you will encounter in
numerous situations.
2.3.1 Setting the Focus on a Group or a Sound
To display the content and parameters of a particular Sound or Group, you first need to put it
in focus.
Setting the focus on a Sound or Group is slightly different than selecting it: The focus defines
what will be displayed, whereas the selection defines what will be affected by your edits. Note
that a focused Sound/Group is always selected. The distinction is of importance because you
can select multiple Sounds or Groups to apply your edits to all of them at once! See section
↑4.1.3, Selecting Multiple Sounds or Groups for more on this.
MASCHINE 2 - Manual - 31
Page 32

We show here how to put Sounds and Groups in focus when the MASCHINE software is
in Arrange view (default view). For instructions on putting Sounds and Groups in focus
in Mix view, please refer to chapter ↑8.2.3, Selecting Channel Strips.
Setting the Focus on a Group
To put a Group in focus, click this Group in the Group List of the Arranger:
►
The focused Group is highlighted. The Pattern Editor displays the Sounds and Patterns of
→
that Group.
Basic Concepts
Common Operations
MASCHINE 2 - Manual - 32
Page 33

Basic Concepts
Common Operations
The focused Group is highlighted and the Pattern Editor show its content.
If the desired Group does not appear in the Group List, use the scroll bar at the right
end of the Arranger or turn your mouse wheel while hovering the Arranger to display any
hidden Groups. You can also extend the Arranger by dragging its lower right corner vertically with the mouse.
You can also select multiple Groups at once to apply changes to all of them. See section
↑4.1.3, Selecting Multiple Sounds or Groups for more information.
Setting the Focus on a Sound
To put a Sound in focus:
MASCHINE 2 - Manual - 33
Page 34

Basic Concepts
Common Operations
1. Set the focus to the Group containing the desired Sound by clicking it in the Group List
on the left of the Arranger (see above).
The focused Group is highlighted. The Pattern Editor displays the Sounds and Patterns of
that Group.
2. Click the desired Sound slot in the Sound List of the Pattern Editor:
The focused Sound slot is highlighted.
→
The focused Sound slot is highlighted.
MASCHINE 2 - Manual - 34
Page 35

Basic Concepts
Common Operations
If the desired Sound does not appear in the Sound List, use the scroll bar at the right
end of the Pattern Editor or turn your mouse wheel while hovering the Pattern Editor to
display any hidden Sounds.
You can also select multiple Sounds at once to apply changes to all of them. See section ↑4.1.3, Selecting Multiple Sounds or Groups for more information.
2.3.2 Switching Between the Master, Group, and Sound Level
At any time you can quickly switch the Control area between the parameters of the Master, the
focused Group, and the focused Sound.
Click the desired tab to switch the display of the Control area.
Click the MASTER, GROUP or SOUND tab in the top left corner of the Control area to
►
display the Plug-in parameters or Channel properties of the Master, the focused Group or
the focused Sound, respectively.
The selected tab lights up. The name of your Project, the focused Group or the focused
→
Sound appears under the MASTER, GROUP, and SOUND tabs (the Muddy Matt Sound in
the picture above), and the rest of the Control area displays the Plug-in parameters and
Channel properties of the Master, the focused Group or the focused Sound, respectively.
2.3.3 Navigating Channel Properties, Plug-ins, and Parameter Pages in the Control Area
We describe here how to display/edit any Plug-in parameters or Channel properties located in
any Sound, Group or the Master.
To select a particular Plug-in or a particular set of Channel properties, you first need to display
the parameters of the Master, the desired Group or the desired Sound.
MASCHINE 2 - Manual - 35
Page 36

Basic Concepts
Common Operations
1. To display the parameters of a particular Group or Sound, put it in focus by clicking it in
the Group List or Sound List, respectively (see section ↑2.3.1, Setting the Focus on a
Group or a Sound above).
2. In the top left corner of the Control area, click the MASTER, GROUP or SOUND tab to
display the parameters of the Master, the focused Group or the focused Sound, respectively.
The Control area now displays the Plug-in parameters and Channel properties of the de-
→
sired Sound, desired Group or the Master.
Selecting Channel Properties
1. At the far left of the Control area, click the Channel icon (showing a little knob) to display
the Channel properties:
The button lights up. The Channel Property selector appears in the left part of the Control
area, showing a square of four buttons representing the various sets of Channel properties
available for the selected Sound, Group or the Master:
2. Click the desired button (Input, Output, Groove, or Macro) in the Channel Property selector to select that set of Channel properties.
The selected button is highlighted and the parameters of the selected Channel properties
→
appear in the Parameter area (the right and biggest part of the Control area).
MASCHINE 2 - Manual - 36
Page 37

Selecting a Plug-in
1. At the far left of the Control area, click the little Plug-in icon to display the Plug-ins:
The icon lights up. The Plug-in List appears in the left part of the Control area, showing a
stack of all Plug-ins loaded in the selected Sound, Group or the Master:
2. Click the desired Plug-in slot in the Plug-in List to select that Plug-in.
The parameters of the selected Plug-in appear in the Parameter area (the right and big-
→
gest part of the Control area).
Basic Concepts
Common Operations
If the Plug-in List only shows a “+” sign, it means that there are no Plug-ins loaded in
this Sound, Group or the Master. Clicking the “+” sign allows you to load a new Plug-in:
see section ↑5.1.3, Loading, Removing, and Replacing a Plug-in for more on this.
Navigating Parameter Pages
In some situations, the selected Plug-in or Channel properties provide more parameters than
the display(s) of your controller and the Parameter area in the software can show at once. Examples of this are the parameters for the Groups’ or Sounds’ Output properties and those for
the Sampler Plug-in. In these cases, the parameters are divided into several Parameter pages
that you can easily navigate with the hardware and software.
In the software the names of the available pages are displayed at the top of the Parameter
area. The name of the page currently displayed is highlighted.
Click the desired page name at the top of the Parameter area to show the corresponding
►
Parameter page.
MASCHINE 2 - Manual - 37
Page 38

Basic Concepts
Common Operations
The Parameter pages of the Sound’s Output properties: Audio (currently displayed), Aux, and MIDI.
If all page names cannot be displayed at once at the top of the Parameter area, two small arrows are displayed on the left to click through the pages:
Click the left or right arrow to access additional pages.
►
Adjusting the Parameters
In the Parameter area, each parameter includes a control element and a label. Following types
of control elements are available:
MASCHINE 2 - Manual - 38
Page 39

Element Action
Knob: Click the knob and drag your mouse vertically to change
the parameter value. Hold [Shift] on your computer keyboard and
drag your mouse to adjust the value in finer increments.
Button: Click the button to switch its state. When the button is
enabled, it shows a small colored LED.
Selector: Click the displayed value to open the drop-down list,
and click another value in the list to select it.
Basic Concepts
Common Operations
2.3.4 Undo/Redo
Undoing and re-doing your last actions can be useful to cancel operations you have performed
or to compare two versions before and after a change. You can undo nearly everything you did
after loading or creating your Project.
Note: If you save your Project, you will no longer be able to undo or redo any actions
performed before saving!
MASCHINE 2.0 provides two different undo/redo features, each of them being suited for specific situations:
▪ Step Undo allows you to cancel your last single action.
▪ Take Undo allows you to cancel your last group of actions.
MASCHINE 2 - Manual - 39
Page 40

Basic Concepts
Common Operations
Step Undo
Step Undo/Redo is the classic undo/redo found in most applications. It cancels or re-executes
each single action you have performed.
In the software use the following keyboard shortcuts for the Step Undo and Step Redo functions:
To cancel your last action (Step Undo), press [Ctrl]+[Shift]+[Z] ([Cmd]+ [Shift]+ [Z] on
►
Mac OS X). To re-execute your last action (Step Redo), press [Ctrl]+ [Shift]+ [Y] ([Cmd]+
[Shift]+ [Y] on Mac OS X). You can also select Undo Step and Redo Step from the Edit
menu in the Application Menu Bar or from the Edit submenu in the MASCHINE menu.
The commands in the Edit menu additionally shows which action will be undone/redone!
Take Undo
Suppose you have just recorded a 16th-note hi-hat beat over four bars, but then decide to cancel it. Normally you would have to cancel the 64 notes one at a time, repeatedly calling the
undo function 64 times in a row. This is what Take Undo has been made for!
Take Undo/Redo is an extended undo/redo available while recording that allows you to cancel
or re-execute a whole group of actions at once.
Take Undo/Redo is the default undo/redo in MASCHINE. In the software use the common keyboard shortcuts for the Undo and Redo functions:
To cancel your last group of actions, press [Ctrl]+[Z] ([Cmd]+[Z] on Mac OS X). To re-exe-
►
cute your last group of actions, press [Ctrl]+[Y] ([Cmd]+[Y] on Mac OS X). You can also
select Undo and Redo from the Edit menu in the Application Menu Bar or from the Edit
submenu in the MASCHINE menu.
The commands in the Edit menu additionally shows which action will be undone/redone!
Take Undo is available in following situations:
▪ Recording in Control mode
MASCHINE 2 - Manual - 40
Page 41

Basic Concepts
Common Operations
▪ Recording in Step mode
▪ Recording modulation
Outside of these three situations, Take Undo has the same effect as Step Undo (see
above).
2.3.5 Pinning a Mode on Your Controller
Besides the default Control mode, your controller has various other modes of operation, which
you can enter by pressing their dedicated buttons. Depending on their purpose and workflow,
these controller modes are of two types:
▪ Temporary modes only stay active as long as you hold down their button on the controller.
When you release the button, your controller returns to Control mode. This is for example
the case with the MUTE button.
▪ Permanent modes stay active even if you release their button. To deactivate them, you must
press their button a second time. This is for example the case with the BROWSE button.
But in some situations you might want to release the mode button of a temporary mode without leaving that mode, e.g., to free your hand and tweak other controls more easily. For this
purpose, MASCHINE lets you pin (or “lock”) temporary modes so that they behave like permanent modes.
2.3.6 Using Two or More Hardware Controllers
If two or more MASCHINE controllers of different types (MASCHINE STUDIO, MASCHINE
MK2, MASCHINE MIKRO MK2, MASCHINE, and MASCHINE MIKRO) are connected to your
computer, only one controller can be used to control the MASCHINE software at a time.
If you have more than one instance of the MASCHINE software running on your computer, you can control each instance with a different controller. See Controlling Various Instances with Different Controllers for more information.
A controller not connected to any MASCHINE software instance can be used in MIDI
mode (i.e. as a MIDI controller) at the same time as the other controller(s). See the Controller Editor Manual for more information on MIDI mode.
MASCHINE 2 - Manual - 41
Page 42

Basic Concepts
Native Kontrol Standard
You can choose which controller you want to use with the MASCHINE software. This can be
done both from your controller and in the software.
You can select the desired controller from the Controller menu in the Application Menu Bar or
from the Controller submenu in the MASCHINE menu:
Click the Controller menu (left) or the Controller submenu in the MASCHINE menu (right) and select the controller you want
to use (Windows depicted).
Hardware
On the controller you want to use with the MASCHINE software, do the following:
▪ MASCHINE STUDIO controller: Press SHIFT + PLUG-IN, turn the jog wheel to select the
desired instance, and press the jog wheel or Button 8 to load it.
▪ MASCHINE (MK2) controller: Press SHIFT + STEP, turn Knob 5 (or press Button 5/6) to
select the desired instance, and press Button 8 to load it.
▪ MASCHINE MIKRO (MK2) controller: Press SHIFT + F2, turn the Control encoder to select
the desired instance, and press the Control encoder to load it.
2.4 Native Kontrol Standard
Native Kontrol Standard (NKS) is a software instrument format that allows third-party developers to integrate with MASCHINE and KOMPLETE KONTROL hardware and software at the
same deep level as KOMPLETE Instruments.
MASCHINE 2 - Manual - 42
Page 43

Basic Concepts
Native Kontrol Standard
The Native Kontrol Standard includes:
▪ Seamless integration into the MASCHINE and KOMPLETE KONTROL Browser for a unified
browsing experience.
▪ Full parameter mapping for instant hands-on control.
▪ Support of KOMPLETE KONTROL S-SERIES features such as the Light Guide.
This means that instruments supporting NKS can be found in the MASCHINE Browser next to
your KOMPLETE Instruments. All of their presets are fully tagged, so you can use filters to
search for sounds from all of your NKS and KOMPLETE Instruments. When you load a preset
from an NKS instrument, all of its parameters are mapped to the controls on your MASCHINE
hardware in a meaningful way, just like any preset from your KOMPLETE Instruments.
NKS instruments are automatically added to your Library when you start MASCHINE for the
first time after installing the instrument (except KONTAKT instruments with NKS support, see
below).
The folders containing the preset files for NKS support can be managed in the Factory
pane on the Library page of the Preferences.
2.4.1 Installing KONTAKT Instruments with NKS Support
Third-party developers of KONTAKT instruments provide you with a folder that contains all instrument files, including presets and samples. Instead of running an installer, this folder needs
to be stored on the hard drive and added to the KONTAKT Browser by using KONTAKT's Add
Library function.
As a MASCHINE user, you can add KONTAKT instruments with NKS support to your MASCHINE Library by dragging the folder onto the MASCHINE Browser. If you are using KONTAKT, the instrument is automatically added to your KONTAKT Browser, too.
MASCHINE 2 - Manual - 43
Page 44

To add a KONTAKT instrument with NKS support to your MASCHINE Library, drag the
►
instrument folder onto the MASCHINE Browser.
Basic Concepts
Native Kontrol Standard
The KONTAKT instrument is now available in the Library pane of the MASCHINE Brows-
→
er.
The MASCHINE Library and the KONTAKT Browser reference the instrument files contained in the folder. Do not delete or move the folder afterwards, otherwise MASCHINE
and KONTAKT will not be able to access the instrument files.
2.4.2 Loading NKS and Third-party Plug-ins from the Plug-in Menu
The plug-in menu has been updated to display NKS and third-party plug-ins in submenus sorted by vendor in alphabetical order, both within the software and hardware.
The plug-in menu lists installed plug-ins in the following format:
MASCHINE 2 - Manual - 44
Page 45

Stand-Alone and Plug-in Mode
Instrument Plug-ins Effect Plug-ins
Internal Plug-ins Sampler, Drumsynths MASCHINE internal effects
Basic Concepts
Native Instruments
Plug- ins
VST/AU instrument plug-ins from
Native Instruments’ range of
products
NKS and Thirdparty Plug-ins
Plug-in menu displaying NKS and third-party plug-ins
NKS and Third-party VST/AU
instrument plug-ins
VST/AU effect plug-ins from Native
Instruments’ range of products
Third-party VST/AU effect plug-ins
For more information on using Plug-ins and accessing the plug-in menu please refer to chapter
6 “Working with Plug-ins” in the MASCHINE manual.
2.5 Stand-Alone and Plug-in Mode
You can run the MASCHINE software as a stand-alone application or integrate it into your favorite Digital Audio Workstation (or DAW, in short) by loading it as a plug-in. The MASCHINE
software is available in the VST, Audio Unit, and AAX plug-in formats. For further information
on plug-in compatibility and for a detailed description of how to use plug-ins in your host,
MASCHINE 2 - Manual - 45
Page 46

Basic Concepts
Stand-Alone and Plug-in Mode
please refer to the documentation included with your host software. If you did not install the
plug-ins when installing the MASCHINE software, please refer to the Setup Guide available
from the documentation folder in the MASCHINE software installation folder.
2.5.1 Differences between Stand-Alone and Plug-in Mode
Transport Functions
The most noticeable difference between the stand-alone and plug-in mode of MASCHINE relates to the interaction with MASCHINE’s sequencer. Indeed, when MASCHINE is used as a
plug-in within a host sequencer software (e.g., Cubase or Pro Tools), MASCHINE’s sequencer
is exclusively controlled by the host application: you cannot, e.g., manually start, stop or restart the playback in MASCHINE, nor modify the tempo or the time signature of your Project
within the MASCHINE plug-in itself — these are synchonized to your host’s own transport
functions and tempo settings. As a direct consequence, when MASCHINE is used as a plug-in
the Restart and Play buttons as well as the Tempo and Time Signature fields are grayed out
and inactive in the MASCHINE Header. Obviously you cannot control MASCHINE’s playback
and tempo settings from your MASCHINE controller either.
However from your controller you can directly control the transport functions of your host
application instead. See section Controlling your Host’s Transport Functions in Plug-in
Mode for more information.
Audio and MIDI Handling
When MASCHINE is used in stand-alone mode, it directly communicates with your audio and
MIDI interface. You can select which physical audio/MIDI ports have to be used on your interface, and configure crucial audio settings like the sample rate. All this is done via the Audio
and MIDI Settings panel (for more information on this, please refer to Integrating MASCHINE
into Your MIDI Setup).
On the contrary, When MASCHINE is used as a plug-in within a host application, the communication with your audio and MIDI interfaces is managed by the host — the MASCHINE plugin only communicates with the host. Native Instruments’ Online Knowledge Base provides
how-tos that will help you route the MASCHINE plug-in to multiple tracks/outputs in the major
hosts:
MASCHINE 2 - Manual - 46
Page 47

Basic Concepts
Stand-Alone and Plug-in Mode
▪ How to route MASCHINE to multiple outputs in Ableton Live:
http://www.native-instruments.com/knowledge/questions/1705
▪ How to route MASCHINE to multiple outputs in Cubase:
http://www.native-instruments.com/knowledge/questions/1707
▪ How to route MASCHINE to multiple outputs in Pro Tools:
http://www.native-instruments.com/knowledge/questions/1709
▪ How to route MASCHINE to multiple outputs in Logic Pro:
http://www.native-instruments.com/knowledge/questions/1711
For all details on the audio and MIDI configuration of your host application, please refer
to its documentation.
Multiple Plug-in Instances
When you are using MASCHINE as a plug-in within a host application, you can open multiple
MASCHINE instances. Actually, you can load as many instances of MASCHINE as your computer and your host application can handle CPU-wise. In contrast to the stand-alone application, they are always synced to the host. In plug-in mode you can also send MIDI Program
Change messages from your host to switch between MASCHINE’s Scenes or between patches
of other plug-ins loaded into MASCHINE, or record automation for MASCHINE parameters. To
learn more about these, have a look at chapter ↑12.5, Triggering Scenes via MIDI (MASCHINE
Plug-in Only) and ↑7.2, Using MIDI Control and Host Automation.
2.5.2 Switching Instances
When two or more instances of the MASCHINE software are running (e.g., as plug-ins on different tracks of your DAW), you must choose which instance you want to control from your
hardware controller. You can do this both from your controller and in the software.
To select your controller from a particular MASCHINE instance, click the Connect button
►
in the MASCHINE Header of that instance.
Click the Connect button to connect the controller to that instance.
MASCHINE 2 - Manual - 47
Page 48

2.6 Preferences
The Preferences panel lets you specify various settings for MASCHINE.
To open the Preferences panel, click Preferences… in the Maschine menu (Mac OS X) or
►
File menu (Windows) of the Application Menu Bar, or in the File submenu of the MA-
SCHINE menu:
Basic Concepts
Preferences
Preferences… in the File menu of the Application Menu Bar (Windows depicted), and in the File submenu of the MASCHINE menu.
MASCHINE 2 - Manual - 48
Page 49

MS_SW_2.5_Access_Preferences_1
Basic Concepts
Preferences
MS_SW_2.5_Access_Preferences_2
The following pages are available in the Preferences panel:
▪ General: see ↑2.6.1, Preferences – General Page.
▪ Default: see ↑2.6.4, Preferences – Default Page.
▪ Library: see ↑2.6.5, Preferences – Library Page.
▪ Plug-ins: see ↑2.6.6, Preferences – Plug-ins Page.
MASCHINE 2 - Manual - 49
Page 50

▪ Hardware: see ↑2.6.7, Preferences – Hardware Page.
▪ Colors: see ↑2.6.9, Preferences – Colors Page.
2.6.1 Preferences – General Page
The General page holds a few global settings.
To display the General page click the General tab on the left of the Preferences panel.
►
Basic Concepts
Preferences
The Preferences – General page.
MASCHINE 2 - Manual - 50
Page 51

Setting Description
Startup
Reload Last Project If this option is checked, the last Project you worked on will
automatically load the next time you start MASCHINE.
Recording Audio
Prefer Project Folder If this checkbox is marked, the Samples you record will be put
in a subdirectory of the folder where your Project is saved. If
not, your recordings will be saved in the generic Recordings
folder in your standard user directory (see section ↑2.6.4,
Preferences – Default Page).
MIDI
Sync Offset Slave Depending on variables such as the speed of your CPU, your
audio interface, your MIDI interface and the Latency value you
selected in the Audio and MIDI Settings panel (see 2.6), you
may experience a lack of synchronization between MASCHINE
and the external MIDI Master. To compensate, you can adjust
this Sync Offset Slave value in milliseconds. An easy way to do
that is to play a 4/4 kick drum pattern or a metronome sound on
both MASCHINE and the external MIDI Master and mix them
together moving the slider until they are played at exactly the
same time. As soon as you can hear a flanger-like effect, you
know you are close to the correct Sync Offset Slave value. Keep
on adjusting the Sync Offset Slave control until you can neither
hear the flanging effect nor two separate signals.
Basic Concepts
Preferences
MASCHINE 2 - Manual - 51
Page 52

Setting Description
Default MIDI Input Mode MASCHINE lets you play your Sound(s) via MIDI notes, for
example, from a MIDI keyboard. By default and without any
configuration, incoming MIDI notes on any MIDI port and any
MIDI channel will trigger the pitch of the focused Sound. In
addition, you can select that a Sound receives no MIDI input,
and also define the default setting for MIDI input by selecting
the Default MIDI input Mode preference. The following default
MIDI input mode options are:
Focus: MIDI input from any connected controller can be used to
trigger the focused (selected) Sound slot.
None: The selected Sound will not receive MIDI data.
Basic Concepts
Preferences
Metronome
Enabled Check this box to activate the metronome. You can also enable
the metronome by clicking the Metronome button in the
MASCHINE Header — see section Using the Metronome.
Auto-Enable when
Recording
Auto-Enable option automatically turns on the metronome when
you start recording a Pattern. When you start recording a Pattern
(typically by pressing REC on your controller), the metronome is
automatically enabled. When you exit recording (e.g., by
pressing the lit REC button) the metronome returns to its state
before the recording (this can be on or off).
The Auto-Enable option can be activated/deactivated both in the
software and from your controller.
The Auto-Enable option does not affect the Count-in: Even if
Auto-Enable is disabled, the metronome turns on when you
press SHIFT + REC to start the Count-in. For more information
on the Count-in, please refer to section 7.2.4 “Recording with
Count-in” in the MASCHINE 2.0 Manual.
Volume
Adjusts the volume of the metronome.
MASCHINE 2 - Manual - 52
Page 53

Setting Description
Signature Selects the time interval between each tick of the metronome.
By default the metronome indicates the beats (the quarter
notes, 1/4). Here you can select another note value for the ticks.
Count-in Length Adjusts the duration of the Count-in, i.e. how long the
metronome will sound before the recording actually starts.
Input
Quantize The Input Quantization settings previously available have been
renamed to include the new Input Quantization mode — now
Input Quantization can be set to following modes:
None: Input Quantization is disabled. Events you play or record
on the pads are not quantized.
Record: Input Quantization is applied only when you record the
pads.
Play/Rec: Input Quantization is applied both when you play on
the pads and when you record them.
In Play/Rec mode the quantization applied while playing is
slightly different from the quantization applied while recording:
When recording, all events are quantized to the closest step —
possibly ahead of the event. When playing, on the other hand,
events occurring in the first half of the steps are left untouched
(since you cannot bring them forward in the timeline!) whereas
events occurring in the second half of the steps are quantized to
the next step
Basic Concepts
Preferences
2.6.1.1 Usage Data Tracking
Usage Data Tracking technology enables MASCHINE to automatically track anonymous usage
data that you can choose to share with us.
MASCHINE 2 - Manual - 53
Page 54

Basic Concepts
Usage Data Tracking can be enabled or disabled in the General page of the Preferences in the
MASCHINE software. However, we encourage all users to keep Data Tracking enabled as it provides a valuable tool for understanding the performance of Native Instruments applications
when they are used in real life situations. The data sent to Native Instruments is one hundred
percent anonymous and will not affect performance.
For more detailed information about Usage Data Tracking, please refer to the following Knowledge Base article on the Native Instruments website:
https://support.native-instruments.com/hc/en-us/articles/209545029
To enable or disable Usage Tracking:
1. Open the General page of the Preferences by clicking Preferences… in the Maschine
menu (Mac OS X) or File menu (Windows) of the Application Menu Bar, or in the File submenu of the MASCHINE menu.
2. Click the Allow usage data tracking checkbox to enable or disable user data tracking.
Preferences
Usage Data Tracking in the MASCHINE Preferences.
MASCHINE 2 - Manual - 54
Page 55

Basic Concepts
2.6.2 Preferences – Audio Page
The Audio page holds settings related to your audio interface.
The Routing section allows you to configure the connections between the virtual inputs/outputs
of MASCHINE and the physical inputs/outputs of your audio interface.
To display the Audio page click the Audio tab on the left of the Preferences panel.
►
Preferences
Preferences – Audio page.
MASCHINE 2 - Manual - 55
Page 56

Setting Description
Interface
Driver Select your audio driver here.
Device This allows you to choose from the available devices if you have
connected more than one audio interface.
Status This shows you whether your audio interface is currently
running.
Sample Rate This displays the selected sample rate of your audio interface.
Please restart MASCHINE after changing the sample rate.
ASIO Config (Windows only) Click Open Panel to access specific controls related to your
Soundcard. Please consult the documentation that came with
your Soundcard for more information.
Latency Mac OS X: This slider allows you to adjust the latency of your
audio interface in samples. Lower values result in a more
immediate playing response but are heavier on both the CPU
and the audio driver, and may result in audible clicks and pops.
Larger values are easier on the CPU, but introduce a larger
latency (i.e., there may be a very small delay between when you
hit a pad and when you actually hear it). You should therefore
experiment with this setting so that it is as low as possible
without overloading your CPU or introducing any audio artifacts.
Basic Concepts
Preferences
Routing
Windows: When using an ASIO driver, the Audio and MIDI
Settings panel shows an ASIO Config button instead of the
Latency slider. Click this button to open the settings window of
the selected ASIO driver.
MASCHINE 2 - Manual - 56
Page 57

Basic Concepts
Setting Description
Inputs By clicking Inputs, you can define which inputs on your audio
interface should be used for the four stereo inputs of
MASCHINE. Select the inputs of your audio interface on the
right column by clicking the fields: you will be presented with a
drop-down menu with all the available Inputs. The choices
made here will determine which inputs can be used when
sampling external sources, for example.
Outputs By clicking Outputs, you will be presented with a list of the 16
stereo outputs from MASCHINE: In the right column, you can
assign them to the outputs of your audio interface. Click the
fields in the right column to select the desired outputs via a
drop-down menu.
2.6.3 Preferences – MIDI Page
The MIDI page allows you to set up the MIDI input and output ports that you want to use with
MASCHINE.
Preferences
To display the MIDI page click the MIDI tab on the left of the Preferences panel.
►
MASCHINE 2 - Manual - 57
Page 58

Basic Concepts
Preferences
The Preferences – MIDI page.
MASCHINE 2 - Manual - 58
Page 59

Setting Description
Sync
Mode Off: No MIDI sync mode is selected.
Master (Send Clock): If MASCHINE is running as a stand-alone
application, it can also send a MIDI Clock signal to any device that
is capable of receiving MIDI Clock. This could be hardware such as
a drum machine, another groovebox, or even another software
sequencer.
Slave (Receive Clock): If MASCHINE is running as a stand-alone
application, it can be controlled externally via MIDI Clock by any
device that is capable of sending MIDI Clock. This could be
hardware such as a drum machine, another groovebox or sequencer,
or even another software sequencer.
Basic Concepts
Preferences
Clock Offset (appears
when Mode is set to
Slave)
Use the Clock Offset control to compensate delay that may occur
during MIDI data transmission. Delayed MIDI Clock data will cause
external devices to respond too late, thus making your track sound
out of sync.
By adjusting the Clock Offset value you can set an amount of
latency to be compensated (in milliseconds). MASCHINE will then
send MIDI Clock events ahead of time as defined.
Devices
Inputs Clicking Inputs displays a list of all the available MIDI inputs of
your system. You can activate/deactivate each input by clicking the
fields in the Status column, which displays the current status of the
corresponding port.
Outputs Clicking Outputs displays a list of all the available MIDI outputs of
your system. You can activate/deactivate each output by clicking
the fields in the Status column, which displays the current status of
the corresponding port.
MASCHINE 2 - Manual - 59
Page 60

Basic Concepts
If you want MASCHINE to send other MIDI messages than MIDI Clock, in particular if
you want to control other MIDI-capable devices via the notes played in MASCHINE,
please refer to section ↑7.2.5, Sending MIDI from Sounds.
2.6.4 Preferences – Default Page
The Default page allows you to define a few default settings that will be used for every new
Project.
To display the Default page click the Default tab on the left of the Preferences panel.
►
Preferences
MASCHINE 2 - Manual - 60
Page 61

Basic Concepts
Preferences
The Preferences – Default page.
Setting
Sounds
Default MIDI Input Mode
Metronome Settings
Description
MASCHINE 2 - Manual - 61
Page 62

Setting Description
Basic Concepts
Preferences
Down Beat Sample and Up
Beat Sample
Here you can select audio files to be used as up and down beat
of the metronome, respectively. The fields display the locations
of the audio files selected for use. Click the fields to select
other files. Click the little crosses on the right of the fields to
remove the custom audio files and use the default metronome
sounds instead.
Pattern Length
Bars Here you can define the default length of new Patterns. The
length is measured in bars:beats:16ths. To adjust the value,
click the desired number (bars, beats or 16ths) and drag your
mouse vertically. See ↑6.1.6, Adjusting the Pattern Grid and the
Pattern Length for more information on the Pattern Length.
Template Project
MASCHINE 2 - Manual - 62
Page 63

Setting Description
Standalone Here you can select a Project to load automatically when you
start a new Project in MASCHINE used as a stand-alone
application. The field displays the location of the Template
Project selected for use. Click the folder icon to select another
Template Project. Any Project file can be used as a template,
this can be from the MASCHINE Library or you could create a
file, for example with your preferred instruments and effects
already loaded into the Plug-in slots. If you have already set a
Template Project, click the cross icon to unset it and start new
Projects from scratch instead.
Plug-in Here you can select a Project to load automatically when
MASCHINE is used as a plug-in within a Digital Audio
Workstation. The field displays the location of the Template
Project selected for use. Click the folder icon to select another
Template Project. Any Project file can be used as a template,
this can be from the MASCHINE Library or you can create a file,
for example with your preferred instruments and effects loaded
into the Plug-in slots. If you have already set a Template
Project, click the cross icon to unset it and start new Projects
from scratch instead.
Basic Concepts
Preferences
2.6.5 Preferences – Library Page
The Library page allows you to edit the locations of all MASCHINE library files (both factory
and user) that appear in the LIBRARY pane of the Browser.
The LIBRARY pane of the Browser is described in section ↑3.2, Searching and Loading
Files from the Library.
To display the Library page click the Library tab on the left of the Preferences panel.
►
At the top of the page, the Factory and User buttons allow you to switch between the Factory
pane and the User pane.
MASCHINE 2 - Manual - 63
Page 64

Factory Pane
To display the Factory pane, click the Factory button at the top of the Library page.
►
Basic Concepts
Preferences
The Preferences panel – the Library page’s Factory pane.
The Factory pane shows all factory libraries available. These includes the MASCHINE Factory
Library, libraries imported from other NI products, as well as installed MASCHINE EXPANSIONS.
These libraries will appear in the Factory view of the Browser’s Library pane.
MASCHINE 2 - Manual - 64
Page 65

Element Description
Location column Shows the path of each library. If you have moved any library to
another location on your computer, click the folder icon on the left of
that library and select its new path.
Product column Shows the name of each product. These names cannot be edited.
Rescan button If you have made any change to a library (e.g., changed its location),
select it in the list and click the Rescan button to rescan that library.
User Pane
To display the User pane, click the User button at the top of the Library page.
►
Basic Concepts
Preferences
MASCHINE 2 - Manual - 65
Page 66

Basic Concepts
Preferences
The Preferences panel – the Library page’s User pane.
The User pane shows all user libraries currently used. These include MASCHINE’s standard
user directory as well as any other user directory you might have defined. These libraries will
appear in the User view of the Browser’s Library pane.
MASCHINE 2 - Manual - 66
Page 67

Element Description
Location column Shows the path of each library. If you have moved any library to
another location on your computer, click the folder icon on the left of
that library and select its new path.
Alias column Shows the alias stored for each library. Click an alias to edit it.
Defining aliases for your user folders is not mandatory, but it can be
of great help when working on different computers (see description
below). After adding a location (see Add below), click the field in the
new row and in the Alias column to set the alias for that new
location. The alias of the default user folder, Standard User
Directory, cannot be edited — this is the location where all your user
files will be stored by default.
Add button Click Add to manually add directories to the user library. See below
for more details.
Remove button Click Remove to remove the selected user library. Files will only be
removed from the MASCHINE Browser, not from your hard disk.
Rescan button If you have made any change to a library (e.g., added/removed files),
select it in the list and click the Rescan button to rescan that library.
Basic Concepts
Preferences
Scan user content for
changes at start-up
Click this checkbox to allow MASCHINE to scan for changes to the
User content directory during start-up.
checkbox.
You can resize the Preferences panel at your convenience using the usual method on
your operating system. You can also resize each column by clicking and dragging the
limit between both column headers.
User Content Folder Included in MASCHINE’s User Paths
Products from Native Instruments will store user-generated content in a centralized User Content folder. In MASCHINE this User Content folder is automatically added to the list of user
directories in the User pane of the Library page in the Preferences panel, and as a consequence its files are available in the MASCHINE Browser.
MASCHINE 2 - Manual - 67
Page 68

Basic Concepts
The User Content folder can neither be renamed nor removed from the list. You can modify its
path in the Location column.
Standard User Directory Cannot Be Removed
The Standard User Directory can neither be renamed nor removed from the list in the User
pane of the Library page in the Preferences panel. You can modify its path in the Location column.
Cancelling Library Rescan
In the Library page of the Preferences panel, the Rescan button allows you to rescan the selected library (or all your libraries if none is selected) so that the MASCHINE Browser mirrors
any changes you have made to the files. Clicking this Rescan button triggers the scan and an
Updating Database dialog shows you the progress of the scan.
The Updating Database dialog includes a CANCEL button allowing you to interrupt the scanning process without harming the database permanently:
Preferences
The Updating Database dialog now includes a Cancel button.
MASCHINE 2 - Manual - 68
Page 69

Basic Concepts
1. Click CANCEL in the Updating Database dialog to interrupt the scan.
A Cancel Rescan dialog opens up asking you to confirm that you want to cancel the scan:
The dialog warns you that cancelling the scan may lead to inconsistencies or missing
items in your MASCHINE Library.
2. If you still want to cancel the scan, click CANCEL RESCAN at the bottom right, and the
scan will be cancelled.
3. If you prefer instead not to cancel the scan, click CONTINUE or press [Esc] on your computer keyboard, and the scan will go on.
If you cancelled the scan, any inconsistencies or missing items in your MASCHINE Library will
be solved by rescanning the same path(s) again (via the Rescan button mentioned above).
Preferences
In opposition to the rescan process described here, you cannot cancel the import of files
into the MASCHINE Library (via the FILES pane of the Browser or via the Library page of
the Preferences panel) nor the process of applying changes to the file tags and properties (via the Attribute Editor in the Browser).
Using Aliases
The aliases available in the Alias column act as references to the paths shown in the Location
column. When you save a Project, the saved data includes both the path and the alias for each
file used in the Project. This will allow you to use a Project on different computers even if the
files used in the Project (e.g., Samples) are stored in different locations on each computer:
Simply define the same alias for these locations on each computer, and MASCHINE will replace the path saved on the first computer with the path set to the same alias on the second
computer in order to retrieve the files on this second computer, therefore avoiding the possibility of missing Samples.
MASCHINE 2 - Manual - 69
Page 70

Basic Concepts
Adding Folders to the User Library
In the User pane of the Library page, you can add other folders to the user content of your MASCHINE Library. To do this:
1. Click Add at the bottom of the pane.
A folder selection dialog opens up.
2. In the dialog, navigate to the desired folder on your computer and click OK (Choose on
Mac OS X).
All MASCHINE-compatible files found in the selected folder are added to your user con-
→
tent in MASCHINE.
Furthermore, the imported files will have their attributes (product/bank/sub-bank, Type/SubType/Mode tags, as well as properties) set as follows:
▪ For all file types, any attributes already in the files will be retained.
▪ For Samples, if the product/bank/sub-bank attributes are empty, they will be set to the
folders in which the Samples are located:
◦ The product will be set to the name of the folder you have selected.
Preferences
◦ If Samples reside in a subfolder of this folder, the subfolder name will be used as
bank.
◦ If Samples reside in a subfolder of this subfolder, the name of the lower subfolder will
be used as sub-bank.
By adding a folder to the user content of your MASCHINE Library, you make their files available in the Browser’s LIBRARY pane for quick searching and loading! For more information on
how to use the LIBRARY pane of the Browser, please refer to section ↑3.2, Searching and
Loading Files from the Library.
Paths to folders added via the IMPORT button in the Browser’s FILES pane will also
show up here. The only difference between adding folders via the Add button in Prefer-
ences panel, described here, and via the IMPORT button in the FILES pane of the
Browser is that the latter allows you to directly tag the files as they are imported. See
section ↑3.6.5, Using the Result List for more information on how to import folders via
the FILES pane.
MASCHINE 2 - Manual - 70
Page 71

Basic Concepts
Please note that the selected folder cannot contain, or be contained within, a folder already
listed in the User or Factory pane. If MASCHINE detects such a folder as you press OK
(Choose on Mac OS X) in the folder selection dialog, a Duplicate Location message appears:
Click OK to return to the folder selection dialog and select another folder on your computer.
Removing Folders from the User Library
You can also remove any user folder from your Library — except the default user
2.6.6 Preferences – Plug-ins Page
The Plug-ins page allows you to manage the Native Instruments and External Plug-ins you want
to use in MASCHINE.
To display the Plug-ins page click the Plug-ins tab on the left of the Preferences panel.
►
At the top of the page, the Manager and Locations buttons allow you to switch between the
Manager pane and the Locations pane.
Manager Pane
Preferences
To display the Manager pane, click the Manager button at the top of the Plug-ins page.
►
In the
Manager pane of the Plug-ins page, you can enable/disable VST/AU plug-ins, rescan
their directories, and set default presets for your Native Instruments and External Plug-ins.
When a Native Instruments or External Plug-in is disabled, it will not be available for loading
(from the various Plug-in menus in the software and from the Plug-in Browser on your controller). If, for example, you do not use certain VST plug-ins in MASCHINE, it could be useful to
disable them so that they do not overload the list of available Plug-ins.
For more information on Native Instruments Plug-ins, External Plug-ins, and other Plugins in MASCHINE, please refer to chapter ↑5, Working with Plug-ins.
MASCHINE 2 - Manual - 71
Page 72

Basic Concepts
Preferences
The Preferences panel – the Plug-ins page’s Manager pane.
MASCHINE 2 - Manual - 72
Page 73

Element Description
Plug-in column Lists all available VST/AU plug-ins from the directories specified in
the Locations pane (see below). This includes all enabled or disabled
32-bit VST/AU plug-ins, when MASCHINE is running in 32-bit mode
or otherwise all enabled or disabled VST/AU 64-bit plug-ins, when
MASCHINE is running in 64-bit mode.
On the left of each plug-in in the list, a checkbox allows you to
enable/disable this plug-in in MASCHINE. When a plug-in is disabled,
it will not be available for loading in MASCHINE.
Default Config column For each plug-in you can set a default preset that will be loaded with
this plug-in when you load it. Click the folder icon on the left to
choose a default plug-in preset. You can also save a preset as default
for the Plug-in via the Save As Default… entry in the Plug-in menu. If
no default is set here, the parameters of this plug-in will be automapped when loading it into a plug-in slot.
To remove a default plug-in preset, click the little cross on the right.
Rescan button If you have changed the content of any directory specified in the
Locations pane (see below), you should rescan your plug-in
directories in order to keep the list of available external plug-ins up to
date. Clicking Rescan will check the integrity of your plug-ins and
allow you to automatically detect plug-ins that were added or
removed, or deselect any plug-ins that are not working correctly for
any reason. Note that the scan will ignore the plug-ins that are
disabled in the list above.
Basic Concepts
Preferences
Always Use Latest
Version of NI Plug-Ins
checkbox
The option to Always Use Latest Version of NI Plug-Ins selects
whether or not your Library content is always loaded with the latest
version of the associated plug-in. If this option is disabled, your
Library content is loaded with the lowest required version of the
associated plug-in found on the computer.
MASCHINE 2 - Manual - 73
Page 74

Basic Concepts
Manager Pane: Use NI Audio Units Checkbox (Mac OS X Only)
On Mac OS X, the Manager pane contains an additional Use NI Audio Units checkbox. Check
this box to include the Audio Units (AU) versions of your Native Instruments plug-ins in the
software’s Plug-in menus and in the controller’s Plug-in Browser:
▪ If this checkbox is disabled (default setting), the AU versions of your Native Instruments
plug-ins are still listed in the list above but they are disabled (checkbox unchecked): These
Plug-ins won’t appear in the Native Instruments submenu of the Plug-in menus (software)
or in the Plug-in Browser (controller). Additionally, the remaining entries for Native Instruments Plug-ins (all of them VST) won’t display the (VST) mention next to their name.
▪ If you enable the Use NI Audio Units checkbox, all Native Instruments’ AU plug-ins are en-
abled in the list above and are available for loading in MASCHINE. In order to distinguish
them from the VST versions, Plug-in entries in the Native Instruments submenu of the
Plug-in menus and in the Plug-in Browser will display either (VST) or (AU) after their name.
You can also enable or disable Native Instruments’ AU plug-ins individually in the list via the
checkboxes described above — as soon as you enable one of them, the Use NI Audio Units
checkbox is automatically activated.
The Use NI Audio Units checkbox relates only to AU plug-ins from Native Instruments.
AU plug-ins from third-party manufacturers are not affected by this setting.
Preferences
When the Use NI Audio Units checkbox is disabled or the AU version of a Native Instruments plug-in is disabled, you can still load Projects that use AU plug-ins.
Location Pane
To display the Location pane, click the Location button at the top of the Plug-ins page.
►
In the Locations section of the Plug-ins page, you can manage the various plug-in directories
you want to use in MASCHINE.
MASCHINE 2 - Manual - 74
Page 75

Basic Concepts
Preferences
The Preferences panel – the Plug-ins page’s Locations pane.
The Locations pane also contains the following controls:
Element
Description
Plug-in column Lists all plug-in directories used in MASCHINE. Click the folder icon
on the left of an entry to change the path of that plug-in directory.
Add button Click Add to add plug-in directories.
MASCHINE 2 - Manual - 75
Page 76

Basic Concepts
Element Description
Remove button Click Remove to remove the selected directory.
Rescan button If you have changed the content of a directory (such as installed or
removed plug-ins), you should rescan your plug-in directories in order
to keep the list of available plug-ins up to date. Clicking Rescan will
check the integrity of your plug-ins and allow you to automatically
detect plug-ins that are added or removed, or disable any plug-ins
that are not working correctly for any reason.
2.6.7 Preferences – Hardware Page
The Hardware page enables you to customize how the pads react to your playing and to adjust
the brightness of the displays.
To display the Hardware page click the Hardware tab on the left of the Preferences panel.
►
Preferences
MASCHINE 2 - Manual - 76
Page 77

Basic Concepts
Preferences
The Preferences panel – Hardware page.
2.6.8 Controller Menu in the Hardware Page of the Preferences Panel
In previous MASCHINE versions you could have only one device focused on a particular MASCHINE instance, and the Hardware page of the Preferences panel showed the settings for
that particular controller. With the integration of the KOMPLETE KONTROL S-SERIES key-
MASCHINE 2 - Manual - 77
Page 78

Basic Concepts
boards in MASCHINE 2.2, you can have two devices simultaneously focused on a MASCHINE
instance: a controller from the MASCHINE family and a KOMPLETE KONTROL S-SERIES keyboard.
For this reason, the Hardware page of the Preferences panel provides you with a new Controller
menu at the top allowing you to select the device of which you want to see and modify the settings:
Preferences
The Controller menu allows you to display the settings for the desired device.
This menu can hold up to two entries, depending on the device(s) focused on that MASCHINE
instance:
▪ No device focused on that instance: The Controller menu is empty and all settings in the
Hardware page are grayed out and inactive. To modify the settings of a device from that
MASCHINE instance, the device must be connected to your computer and focused on that
instance.
▪ One device (MASCHINE or KOMPLETE KONTROL S-SERIES) focused on that instance:
The Controller menu holds only one entry for that device. This entry is always selected and
you can adjust the settings for that device.
▪ Two devices (one controller from the MASCHINE family and one KOMPLETE KONTROL S-
SERIES keyboard) focused on that instance: The Controller menu holds an entry for each
focused device and you can choose which settings you want to edit.
MASCHINE 2 - Manual - 78
Page 79

When two devices are focused on the MASCHINE instance, click the Controller menu at
►
the top of the Hardware page in the Preferences panel and select the particular device of
which you want to edit the settings.
Upon your selection all settings underneath are updated accordingly.
→
2.6.9 Preferences – Colors Page
The Colors page enables you to choose default colors for your Scenes, Groups, and Sounds.
To display the Colors page click the Colors tab on the left of the Preferences panel.
►
Basic Concepts
Preferences
MASCHINE 2 - Manual - 79
Page 80

Basic Concepts
Preferences
The Preferences panel – Colors page.
MASCHINE 2 - Manual - 80
Page 81

Setting Description
Scene Default Selects a default color for your Scenes. In the menu you can
choose the desired color from the 16-color palette or White
(default setting). The color selected as default is highlighted in
the menu. If you select Auto each Scene will have a different
default color.
Group Default Selects a default color for your Groups. In the menu you can
choose the desired color from the 16-color palette. The color
selected as default is highlighted in the menu. If you select
Auto (default setting) each Group will have a different default
color.
Sound Default Selects a default color for your Sounds. In the menu you can
choose the desired color from the 16-color palette. The color
selected as default is highlighted in the menu. If you select
Auto each Sound will have a different default color. If you select
Use Group Color (default setting) Sounds will by default mirror
the color of the Group they belong to.
Basic Concepts
Preferences
Load with Colors Color settings are saved with your MASCHINE files (Projects,
Groups, Sounds, etc.). If you uncheck Load with Colors
(checked by default), the saved colors won’t be used next time
you load the files — the loaded files will use the default colors
set in this Colors page instead.
Please note that the settings in this Colors page define default colors: These colors will
only be used when creating a new Project, resetting a Group/Sound, or when Load with
Colors is unchecked (see above). To change the color of particular objects (Sounds,
Groups, Patterns, Scenes) in your Project, use the Color submenu in the object’s context
menu in the software. See ↑4.2.4, Changing the Sound’s Color, ↑4.3.4, Changing the
Group’s Color, ↑6.6.7, Changing the Pattern’s Color, and ↑12.2.7, Changing the Scene’s
Color for more information, respectively.
As long as an object (Scene, Sound, Group or Pattern) has the default color, this color is
not attached to the object but instead to its “position” in the respective list: In particular, if you move the object to another position the default color will not follow the object
— the object will instead take the default color of its new position.
MASCHINE 2 - Manual - 81
Page 82

3 Browser
The Browser is the place where you can organize and categorize all of your Projects, Groups,
Sounds, Plug-in presets, and Samples. This is done by tagging them, which means categorizing them by using keywords. Given that the MASCHINE software has some advantages over the
hardware in this case, such as a very big screen and a QWERTY-keyboard, we will start with the
software first.
3.1 Browser Basics
This section describes some general concepts about the Browser.
3.1.1 The MASCHINE Library
To organize, find, keep track of, and provide you thousands of files at any time ready for loading, MASCHINE makes use of a Library. The MASCHINE Library not only contains the factory
content included with MASCHINE, but also any other factory content (e.g., from MASCHINE
EXPANSIONS or other Native Instruments products) as well as your own user content.
Browser
Browser Basics
To help you find the right file quickly and efficiently, the Library implements various techniques that go far beyond the classic folder structure of your operating system. For example,
each file included in the Library can be described according to following aspects:
▪ The file type: Project, Group, Sound, etc.
▪ The content type of the file, i.e. whether it originates from a product’s factory library or if it
was created by a user.
▪ The product which the files comes from — this can include, e.g., a hierarchical structure
with a product category, a particular product, and possibly a bank and sub-bank of this
product.
▪ A variable amount of tags used to describe various characteristics of the file, for example,
the type of effect, the sonic character, the context in which it is used — in a word, anything that might help you find the file.
MASCHINE 2 - Manual - 82
Page 83

Note that the Library is the only other way to display and access your files: You could
also navigate to the same files in your file system. The (substantial) difference lies in
the fact that the Library organizes your files in a musically relevant way.
Which Files are Included in the MASCHINE Library?
The files included in the MASCHINE Library are all MASCHINE-relevant files found in the folders whose paths are listed in the Library page of the Preferences panel. For more information
on how to manage these library folders, please refer to ↑2.6.4, Preferences – Default Page.
3.1.2 Browsing the Library vs. Browsing Your Hard Disks
The Browser is your interface to the MASCHINE Library. It provides all necessary tools to
search for the files you require — and suggest other files you might not have thought of. Beside this, the Browser also allows you to navigate your file system in a classic way. Both are
described in the next section.
The Browser provides two operation modes, each of them providing its own tools:
▪ The LIBRARY pane allows you to browse the MASCHINE Library. This is the preferred way
to search for files meeting particular musical requirements. This pane also allows you to
tag your own files to your liking.
Browser
Browser Basics
▪ The FILES pane allows you to browse your hard disks by using the hierarchical folder struc-
ture of your operating system. For example you can use it to navigate files that have not
been imported into the MASCHINE Library — and you can import them from there!
In contrast to the software, the Browser on your controller can only load files that have
already been added to the Library. You cannot directly access specific directories on
your hard disks with the Browser using the controller. This is why you should always import all your files to the Library and tag them using the software beforehand.
Switching Between LIBRARY and FILES Pane
To show the LIBRARY pane or the FILES pane of the Browser, click the corresponding
►
tab at the top of the Browser.
MASCHINE 2 - Manual - 83
Page 84

Searching and Loading Files from the Library
Click the desired tab to show the corresponding pane of the Browser.
The LIBRARY pane is described in section ↑3.2, Searching and Loading Files from the Library,
and the FILES tab is described in section ↑3.6, Loading and Importing Files from Your File
System.
3.2 Searching and Loading Files from the Library
The Browser’s LIBRARY pane allows you to search for any file in the MASCHINE Library.
To display the LIBRARY pane, click the LIBRARY tab in the top left corner of the Brows-
►
er.
Browser
3.2.1 Overview of the LIBRARY Pane
The LIBRARY pane contains following elements:
MASCHINE 2 - Manual - 84
Page 85

1 2 3
4
5
6
7
8
9
Browser
Searching and Loading Files from the Library
The elements of the LIBRARY pane.
(1) LIBRARY tab: Click the LIBRARY tab to open the LIBRARY pane described here.
(2) File Type selector: This contains six icons, each representing the different files types of MASCHINE. From the left to right the file types are Project, Group, Sound, Instrument preset, Effect preset, and Sample. By clicking one of them it causes only the files of the selected type to
be displayed in the Result list (8). See section ↑3.2.4, Selecting a File Type.
MASCHINE 2 - Manual - 85
Page 86

Searching and Loading Files from the Library
(3) Content selector: Click the NI icon (on the left) to select factory content or the User icon (on
the right) to select user content instead. Only the files of the content selected here will be displayed in the Result list (8). See section ↑3.2.5, Choosing Between Factory and User Content.
(4) Product selector: Click to open a drop-down menu where you can select a particular product, product category, and sometimes the bank and sub-bank of the selected product. Again,
only the files matching your selection will be displayed in the Result list (8). See section
↑3.2.3, Selecting a Product Category, a Product, a Bank, and a Sub-Bank.
(5) TYPES filter: allows you to search for files based on Type and Sub-Type tags that have been
applied to them. See section ↑3.2.6, Selecting Type and Mode Tags.
(6) MODES filter (Instrument/Effect presets only): allows you to search for files based on Mode
tags that have been applied to them. See section↑3.2.6, Selecting Type and Mode Tags.
(7) Search field: Enter any character string into the Search field to limit the search results to
the files containing this string. See section ↑3.2.7, Performing a Text Search.
(8) Result list: The Result list displays all files that match your query, as specified via the various tools above. See section ↑3.2.8, Loading a File from the Result List.
(9) Control bar: At the bottom of the Browser, the Control bar provides a few useful tools when
browsing the MASCHINE Library, some of them depending on your selection in the File Type
selector (2):
Browser
▪ For all file types except Project, click the Autoload button at the far left of the Control bar to
automatically load the selected file in order to hear it in context with the rest of your
Project while it is playing. See section ↑3.3.1, Loading the Selected Files Automatically.
▪ For Samples, enable the Prehear button and adjust the volume fader next to it in order to
pre-listen to the selected Samples directly from the Browser in order to make a quick selection. See section ↑3.3.2, Pre-Listening to Your Samples.
▪ For Groups, enable the Load Patterns checkbox to load the Group’s Patterns together with
the Group. See section ↑3.3.3, Loading Groups with their Patterns.
▪ For all files, click the Information button (showing a little “i”) near the EDIT button to dis-
play more information on the selected file(s). See section ↑3.3.4, Displaying File Informa-
tion.
MASCHINE 2 - Manual - 86
Page 87

Searching and Loading Files from the Library
▪ For all files, click the EDIT button at the far right of the bar to open the Attribute Editor and
modify the tags and properties assigned to the selected file(s). See section ↑3.5, Editing
the Files’ Tags and Properties.
Overview of the Search Workflow in the LIBRARY Pane
When searching for files via the LIBRARY pane, you can progressively refine your search by following this typical top-to-bottom workflow.
The first two steps are mandatory:
1. Choose a file type in the File Type selector (2).
2. Select between factory content and user content in the Content selector (3).
The next steps are optional. They can be useful to further refine your search and limit the
number of search results to a reasonable amount:
1. Choose a product category or a product in the Product selector (4). If you have selected a
product you can further choose a particular bank and sub-bank of this product, if any.
2. Select tags in the TYPES filter (5) — and the MODES filter (6) for Instrument and Effect
presets — describing what you are looking for.
Browser
At any time in the procedure described above, you can use the Search field (7) to quickly perform a text search among the entries in the Result list (8).
The above steps are described in detail in the following sections.
3.2.2 Selecting or Loading a Product and Selecting a Bank from the Browser
The Product selector allows you to limit your search to a certain product category, a particular
product, or a specific bank of the product. You can also load a product along with its default
preset file directly from the Product selector (see below).
By default there is no particular selection in the Product selector; it reads All Instruments:
MASCHINE 2 - Manual - 87
Page 88

Searching and Loading Files from the Library
The closed Product selector header.
Selecting a Product Category
Click on the Product selector header to open it.
►
The Product selector opens up, showing you all products available in your MASCHINE Li-
→
brary.
Browser
MASCHINE 2 - Manual - 88
Page 89

1
2
3
Searching and Loading Files from the Library
The opened Product selector.
(1) Product selector header: The header shows the selected product—if there is no selection it
shows a generic label (All Instruments). Click on the header to close the Product selector.
Browser
(2) Category/Vendor selector: Allows you to sort the Product list by Category or by Vendor.
(3) Product list: Shows all products that are available in your MASCHINE Library.
If Category is selected in the Category/Vendor selector, the Product list is sorted by the following categories:
▪ Drums & Percussion
▪ Sampled Instruments
▪ Synthesizers
▪ Other
If Vendor is selected in the Category / Vendor selector, the Product list is sorted by the names
of the manufacturers.
To select a product and show only the preset files associated with it, click on the product
►
in the list.
MASCHINE 2 - Manual - 89
Page 90

Searching and Loading Files from the Library
Upon your selection, the Product selector automatically closes, the product name and
→
icon appear in the header, and the tag filter and results list below will be filtered accordingly.
Products are shown in the Product selector only if the Library contains files for them. If
a particular product does not show up, make sure that you have installed the latest updates using Service Center.
Resetting the Product Selection
To reset the selection made in the Product selector, click the little cross at the right of
►
the product name:
Browser
The product selection is cancelled. The Product selector displays the generic label All In-
→
struments. The tag filter and the results list under the Product selector now include files
for all products.
Selecting a Bank
When you select specific products in the Product list (see description above), an additional
Bank menu appears under the closed Product selector:
MASCHINE 2 - Manual - 90
Page 91

Searching and Loading Files from the Library
The Bank menu showing All Banks for POLYPLEX
The Bank menu allows you to select a particular bank of files for the selected product (POLYPLEX in the picture above).
Banks can be additional Libraries (for example MASSIVE Expansions), different versions of the
original Factory Library (for example FM7 Legacy and FM8 Factory Library), or any other content categorization specific to a particular product (for example different sets of drum sounds
for POLYPLEX, as shown above).
To select a particular bank for the selected product, click the Bank menu under the prod-
►
uct icon and choose a bank from the available entries.
Browser
Upon your selection the Bank menu closes and displays the selected bank. The tag filter
→
and results list underneath further narrow their content accordingly.
MASCHINE 2 - Manual - 91
Page 92

Searching and Loading Files from the Library
As with the product selection, you can remove the selected bank by clicking the little
►
cross next to the bank name in the closed menu.
Loading a Product from the Product Selector
If you wish to not only filter the results list by selecting a product, but also load the product
along with its default preset file, you can do so directly from the Product selector.
To load a product with its default preset file, place the mouse over the product entry in
►
the Product selector and click on the arrow symbol that appears in the upper right corner
of the product entry.
The product and the first preset from the results list for this product are loaded, and the
→
result list only displays preset files only associated with this product.
Browser
3.2.3 Selecting a Product Category, a Product, a Bank, and a Sub-Bank
The Product selector allows you to limit your search to a certain product category, a particular
product, a specific bank of the product, or even a sub-bank in this bank.
By default there is no particular selection in the Product selector: It reads All Projects, All
Groups, All Sounds, All Instruments, All Effects or All Samples according to the type of file
selected in the File Type selector above (see section Selecting a File Type):
The closed Product selector without any Instrument selected.
Selecting a Product or a Product Category
Click the Product selector to open it.
►
MASCHINE 2 - Manual - 92
Page 93

The Product selector opens up and shows you the following:
1
2
3
4
→
Browser
Searching and Loading Files from the Library
The opened Product selector (for Instrument presets).
(1) Product selector header: The header shows the product or the selected product category —
if there is no selection it shows a generic label (All Instruments in the picture above) corresponding to the type of file selected in the File Type selector above. Click the header to close
the Product selector.
MASCHINE 2 - Manual - 93
Page 94

Searching and Loading Files from the Library
(2) Product Category filter: Shows the categories of the products that have files available in the
MASCHINE Library. Click a category of a product to select/deselect it. Selecting a category
limits the number of products shown in the Product list below (3). Only one category can be
selected at a time. You can also select a category and close the Product selector by clicking its
header (1) again: The header (1) will display the category that you have just selected, and the
TYPES filter (and MODES filter, if present) along with the Result list will be filtered by that
category.
(3) Product list: Shows the products for which files are available in the MASCHINE Library.
Click the desired product in the list. Upon your selection the Product selector automatically
closes, the product name and icon appear in the header, and the tag filter and Result list below will be filtered accordingly.
The closed Product selector with an Instrument selected.
Product categories and products are shown in the Product selector only if the MASCHINE Library contains files for them. For example, if a Native Instruments effect from
the KOMPLETE family is installed on your computer but you haven’t saved any user presets for it in MASCHINE yet, its product icon will not be available in the Product selector when the user content is selected in the Content selector. Similarly, if you haven’t
updated a particular Native Instruments effect/instrument, the icon for that product
might not be available in the Product selector when the factory content is selected in
the Content selector — to prevent this, make sure that all your Native Instruments products are up to date.
Browser
Resetting the Product Selection
To reset the selection made in the Product selector, click the little cross at the right of
►
the product name:
MASCHINE 2 - Manual - 94
Page 95

Searching and Loading Files from the Library
The product selection is cancelled. The Product selector displays the generic label corre-
→
sponding to the selected file type (Project, Group, Sound, Instrument preset, Effect preset or Sample). The tag filter and the Result list under the Product selector now include
files for all products.
Selecting a Bank and a Sub-Bank
When you select specific products in the Product list (see description above), an additional
Bank menu appears under the closed Product selector:
The Bank menu showing All Banks for REAKTOR Effects.
This Bank menu allows you to select a particular bank of files for the selected product (MASCHINE in the picture above).
To select a particular bank for the selected product, click the Bank menu under the prod-
►
uct icon and choose a bank from the available entries.
Browser
Upon your selection the Bank menu closes and displays the selected bank. The tag filter
→
and Result list underneath further narrow their content accordingly.
Banks can be, e.g., additional libraries (e.g., MASSIVE EXPANSIONS), different versions
of the original Factory Library (e.g., FM7 Legacy and FM8 Factory Library), or any other
content categorization specific to a particular product.
MASCHINE 2 - Manual - 95
Page 96

Searching and Loading Files from the Library
Similarly, some banks are split into several sub-banks. In that case a Sub-Bank menu appears
under the Bank menu and allows you to select a particular sub-bank. For example, in the picture below the Grain Delay sub-bank of the Maschine 2.0 Library bank is selected for the MASCHINE Effect presets:
The Grain Delay sub-bank in the Maschine 2.0 Library bank.
As with the product above, you can remove the selected bank and sub-bank by clicking the little cross at the right of the bank or sub-bank name in the closed menu.
Products and Banks for User Content
When you save your own MASCHINE files, they are automatically assigned to products, banks,
and sub-banks as follows:
▪ When you save Projects, Groups or Sounds, they are automatically set to the Maschine
product.
Browser
▪ When you save Instrument or Effect presets:
◦ Presets for Internal Plug-ins: The product is set to Maschine, while the bank is set to
the particular Internal Plug-in for which the preset has been saved (e.g., Sampler,
Kick, Flanger, etc.).
◦ Presets for Native Instruments Plug-ins: The product is set to the particular Native In-
struments effect or instrument. The bank and sub-bank will vary with each Native Instruments product.
◦ Presets for External Plug-ins: The product is set to the manufacturer of the VST/AU
plug-in, and the bank is set to the particular VST/AU plug-in for which the preset has
been saved. The sub-bank is left empty. In addition, the preset is assigned to the Ex-
ternal Plug-ins product category.
MASCHINE 2 - Manual - 96
Page 97

1
2
3
4
5
6
Searching and Loading Files from the Library
3.2.4 Selecting a File Type
The File Type selector shows six icons representing the different file types of MASCHINE:
The File Type selector.
(1) Project: (.mxprj)
(2) Groups: (.mxgrp)
(3) Sounds: (.mxsnd)
(4) Instrument Plug-in presets: (.mxinst)
Browser
(5) Effect Plug-in presets: (.mxfx)
(6) Samples: (.wav, .aiff)
Click the desired icon in the File Type selector to display only the files of that type in the
►
Result list.
The selected icon is highlighted and the files are filtered accordingly.
→
3.2.5 Choosing Between Factory and User Content
The Content selector shows two icons representing the factory content on the left, and the user
content on the right:
The Content selector.
MASCHINE 2 - Manual - 97
Page 98

Searching and Loading Files from the Library
Click the NI icon to search the factory content, or click the User icon to search the user
►
content.
3.2.6 Selecting Type and Mode Tags
The tag filter that appears under the Product selector allows you to search for files according to
particular characteristics, effect type, sonic character, etc.
Browser
TYPES and MODES filters for the Massive Threat bank of the MASSIVE Plug-in.
Click the desired tags in the tag filter to select them and limit the search to the files
►
marked with them. Click the selected tags again to deselect them and broaden the
search.
Tags for Projects, Groups, Sounds, and Samples: 3 Type Levels
For Projects, Groups, Sounds, and Samples, tags are structured into three hierarchical levels
globally called Types. You can select them via the TYPES filter:
▪ At first the TYPES filter displays the available top-level tags only.
▪ As soon as you select a tag at the top level, the second level appears underneath with sub-
tags of the selected tag.
MASCHINE 2 - Manual - 98
Page 99

Searching and Loading Files from the Library
▪ The hierarchical structure means that the sets of sub-tags are specific to each tag of the
level above.
Example: Imagine that you are looking for a shaker Sample from the MASCHINE factory library:
▪ You have already selected the Maschine product in the Product selector, and the Maschine
2.0 Library bank of this product (for more information on this, see section Selecting a
Product Category, a Product, a Bank, and a Sub-Bank). For now the TYPES filter shows only top-level tags:
▪ In order to find a shaker, you first select the Drums Type from the TYPES filter.
Upon your selection the second level of tags appears underneath:
Browser
In this second level, you select the Shaker Sub-Type.
Now the third level appears with Sub-Types like Acoustic, Analog, etc.
MASCHINE 2 - Manual - 99
Page 100

Searching and Loading Files from the Library
By selecting any of these tags, say, Acoustic, you will narrow your search to this particular
Sub-Type of shakers:
▪ Now imagine that you have loaded an acoustic shaker Sample and want to find a Sample
for another drum instrument, e.g., a tom: You leave the Drums tag selected at the top level
of the TYPES filter and directly go to the second level, where you select Tom instead of
Shaker. As you select Tom, the whole set of Sub-Types underneath (third level) will be re-
placed with the Sub-Types of the Tom tag. However, insofar as possible your previous selection will be retained: In our example, both the Shaker and Tom tags have an Acoustic
tag below them; since you had selected the Acoustic tag below the Shaker tag, the Acous-
tic tag below the Tom tag will be automatically selected as well.
Browser
This allows you to quickly find various Samples (even for different instruments) with similar
characteristics — here, an acoustic sound.
Tags for Instrument and Effect Presets: 2 Type Levels and 1 Mode Level
For Instrument and Effect presets, tags can be of two kinds: Type or Mode. You can select
them via the TYPES and MODES filter, respectively:
▪ The TYPES filter works as described above for all other file types, except that only two hier-
archical levels are available. See above for a detailed description.
▪ The MODES filter provides an additional level that is independent from the Type levels:
MASCHINE 2 - Manual - 100
 Loading...