

Page 1
®
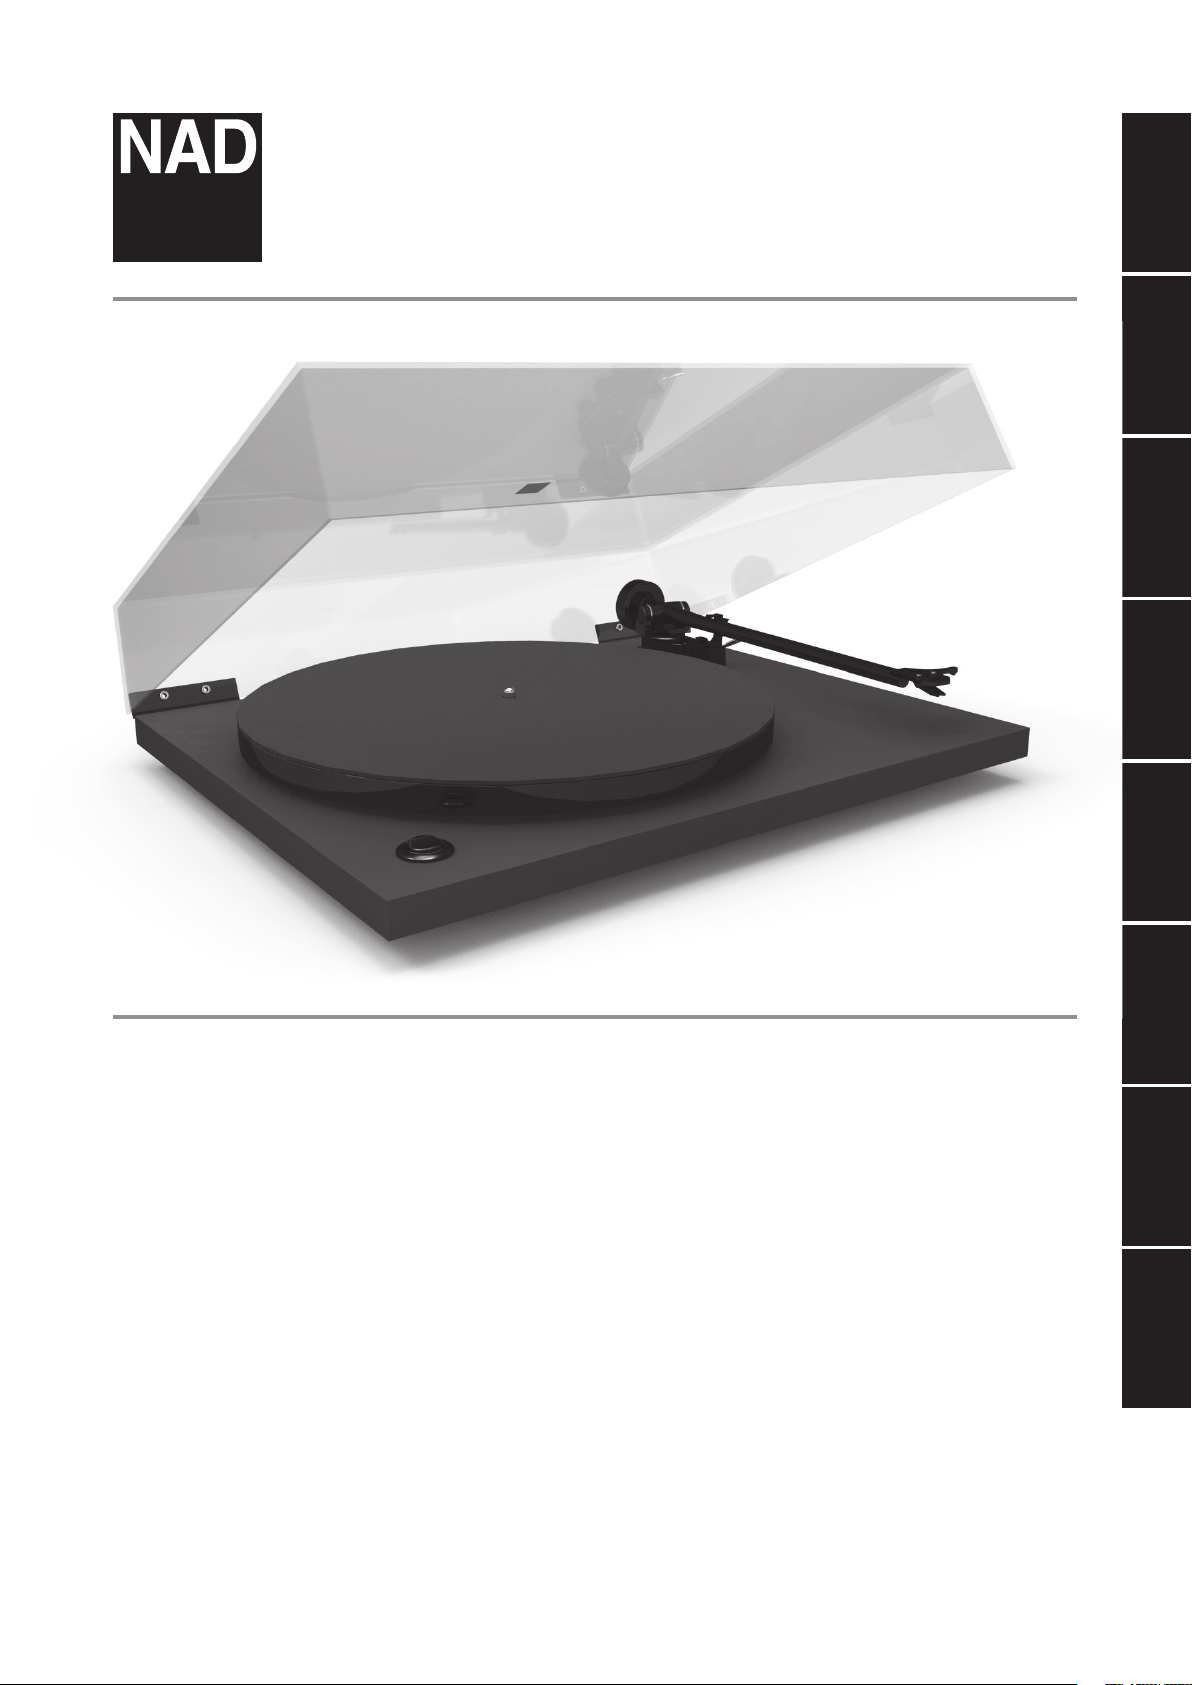
C 556
Turntable
ENGLISHPORTUGUÊS FRANÇAISESPAÑOLITALIANODEUTSCHNEDERLANDSSVENSKAРУССКИЙ
Owner’s Manual
Manuel d’Installation
Manual del Usuario
Manual do Proprietário
Manuale delle Istruzioni
Bedienungsanleitung
Gebruikershandleiding
Bruksanvisning
Page 2
IMPORTANT SAFETY INSTRUCTIONS
IMPORTANT
DO NOT make any connection to the larger terminal which is marked
with the letter ‘E’ or by the safety earth symbol or colored GREEN or GREEN
AND YELLOW. The wires in the mains lead on this product are colored in
accordance with the following code:
BLUE - NEUTRAL
BROWN - LIVE
As these colors may not correspond with the colored markings identifying
the terminals in your plug, proceed as follows:
• The BLUE wire must be connected to the terminal marked with the
letter ‘N’ or colored BLACK.
• The BROWN wire must be connected to the terminal marked with the
letter ‘L’ or colored RED
• When replacing the fuse, only a correctly rated and approved type
should be used, and be sure to re-t the fuse cover.
IF IN DOUBT CONSULT A COMPETENT ELECTRICIAN.
This product is manufactured to comply with the radio
interference requirements of EEC DIRECTIVE 2004/108/EC.
ENGLISHFRANÇAISESPAÑOLITALIANODEUTSCHNEDERLANDSSVENSKAРУССКИЙ
ENGLISH PORTUGUÊSFRANÇAIS ESPAÑOL ITALIANO DEUTSCH NEDERLANDS SVENSKA РУССКИЙ
PRECAUTIONS
Read the Operating Instructions carefully and completely before operating the unit. Be
sure to keep the Operating Instructions for future reference. All warnings and cautions
in the Operating Instructions and on the unit should be strictly followed, as well as the
safety suggestions below.
INSTALLATION
1 Water and Moisture - Do not use this unit near water, such as near a bathtub,
washbowl, swimming pool, or the like.
2 Heat - Do not use this unit near sources of heat, including heating vents,
stoves, or other appliances that generate heat. It also should not be placed in
temperatures less than 5°C (41°F) or greater than 35°C (95°F).
3 Mounting surface - Place the unit on a at, even surface.
4 Ventilation - The unit should be situated with adequate space around it so that
proper ventilation is assured. Allow 10 cm (4 inches) clearance from the rear and
the top of the unit, and 5 cm (2 inches) from each side. Do not place on a bed, rug,
or similar surface that may block the ventilation openings. Do not install the unit
in a bookcase cabinet, or airtight rack where ventilation may be impeded.
5 Objects and liquid entry - Take care that objects or liquids do not get inside the
unit through the ventilation openings.
6 Carts and stands - When placed or mounted on a stand or cart, the
unit should be moved with care. Quick stops, excessive force, and
uneven surfaces may cause the unit and cart to overturn or fall.
7 Wall or ceiling mounting - The unit should not be mounted on a wall or ceiling,
unless specied in the Operating Instructions.
WARNING!
TO REDUCE THE RISK OF FIRE OR ELECTRONIC SHOCK, DO NOT EXPOSE THIS
APPLIANCE TO RAIN OR MOISTURE
This product is manufactured to comply with the radio interference
requirements of EEC DIRECTIVE 89/68/EEC and 73/23/EEC
ELECTRIC POWER
1 Power Sources - Connect this unit only to power sources specied in the
Operating Instructions, and as marked on the unit.
2 Polarization - As a safety feature, some units are equipped with polarized AC
power plugs which can only be inserted one way into a power outlet. If it is
dicult or impossible to insert the AC power plug into an outlet, turn the plug
over and try again. If it still does not easily insert into the outlet, please call a
qualied service technician to service or replace the outlet. Avoid defeating the
safety feature of the polarized plug, do not force it into a power outlet.
3 AC power cord - When disconnecting the AC power cord, pull it out by the AC
power plug. Do not pull the cord itself. Never handle the AC power plug with wet
hands, as this could result in re or shock. Power cords should be routed to avoid
being severely bent, pinched, or walked upon. Pay particular attention to the cord
from the unit to the power socket. Avoid overloading AC outlets and extension
cords beyond their capacity, as this could result in re or shock.
4 Extension cord - To help prevent electric shock, do not use a polarized AC power
plug with an extension cord, receptacle, or other outlet unless the polarized plug
can be completely inserted to prevent exposure of the blades of the plug.
5 When not in use - The primary method of isolating the turntable from the mains
supply is to disconnect the mains plug. Ensure that the mains plug remains
accessible at all times. Unplug the AC power cord from the AC outlet if the unit
will not be used for several months or more.
EXPLANATION OF GRAPHICAL SYMBOLS
The lightning ash with arrowhead symbol, within an equilateral
2
triangle, is intended to alert the user to the presence of uninsulated
“dangerous voltage” within the product’s enclosure that may be of
sucient magnitude to constitute a risk of electric shock to persons.
The exclamation point within an equilateral triangle is intended to alert
the user to the presence of important operating and maintenance
(servicing) instructions in the literature accompanying the appliance.
CAUTION
Modications or adjustments to this product, which are not expressly approved by the
manufacturer, may void the user’s right or authority to operate this product.
MAINTENANCE
Clean the unit only as recommended in the Operating Instructions.
DAMAGE REQUIRING SERVICE
Have the unit serviced by a qualied service technician if
• The AC power plug has been damaged.
• Foreign objects or liquid have got inside the unit.
• The unit has been exposed to rain or water.
• The unit does not seem to operate normally.
• The unit exhibits a marked change in performance.
• The unit has been dropped, or the cabinet has been damaged
DO NOT ATTEMPT TO SERVICE THE UNIT YOURSELF.
NOTES ON ENVIRONMENTAL PROTECTION
At the end of its useful life, this product must not be disposed of with
regular household waste but must be returned to a collection point for
the recycling of electrical and electronic equipment. The symbol on the
product, user’s manual and packaging, point this out.
The materials can be reused in accordance with their markings.
Through re-use, recycling of raw materials or other forms of recycling of old products,
you are making an important contribution to the protection of our environment. Your
local administrative oce can advise you of the responsible waste disposal point.
INFORMATION ABOUT COLLECTION AND DISPOSAL OF WASTE BATTERIES
(DIRECTIVE 2006/66/EC OF THE EUROPEAN PARLIAMENT AND THE COUNCIL
OF EUROPEAN UNION) (FOR EUROPEAN CUSTOMERS ONLY)
Batteries bearing any of these symbols indicate that they
should be treated as “separate collection” and not as
municipal waste. It is encouraged that necessary measures
are implemented to maximize the separate collection of
waste batteries and to minimize the disposal of batteries
as mixed municipal waste.
End-users are exhorted not to dispose waste batteries
as unsorted municipal waste. In order to achieve a high
level of recycling waste batteries, discard waste batteries
separately and properly through an accessible collection
point in your vicinity. For more information about collection and recycling of waste
batteries, please contact your local municipality, your waste disposal service or the
point of sale where you purchased the items.
By ensuring compliance and conformance to proper disposal of waste batteries,
potential hazardous eects on human health is prevented and the negative impact of
batteries and waste batteries on the environment is minimized, thus contributing to
the protection, preservation and quality improvement of the environment.
OWNER’S RECORD
For your convenience, record the model number and serial number in the space provided
below. Please refer to them when you contact your dealer in case of diculty.
Model No. : ......................................
Serial No. : ......................................
Page 3
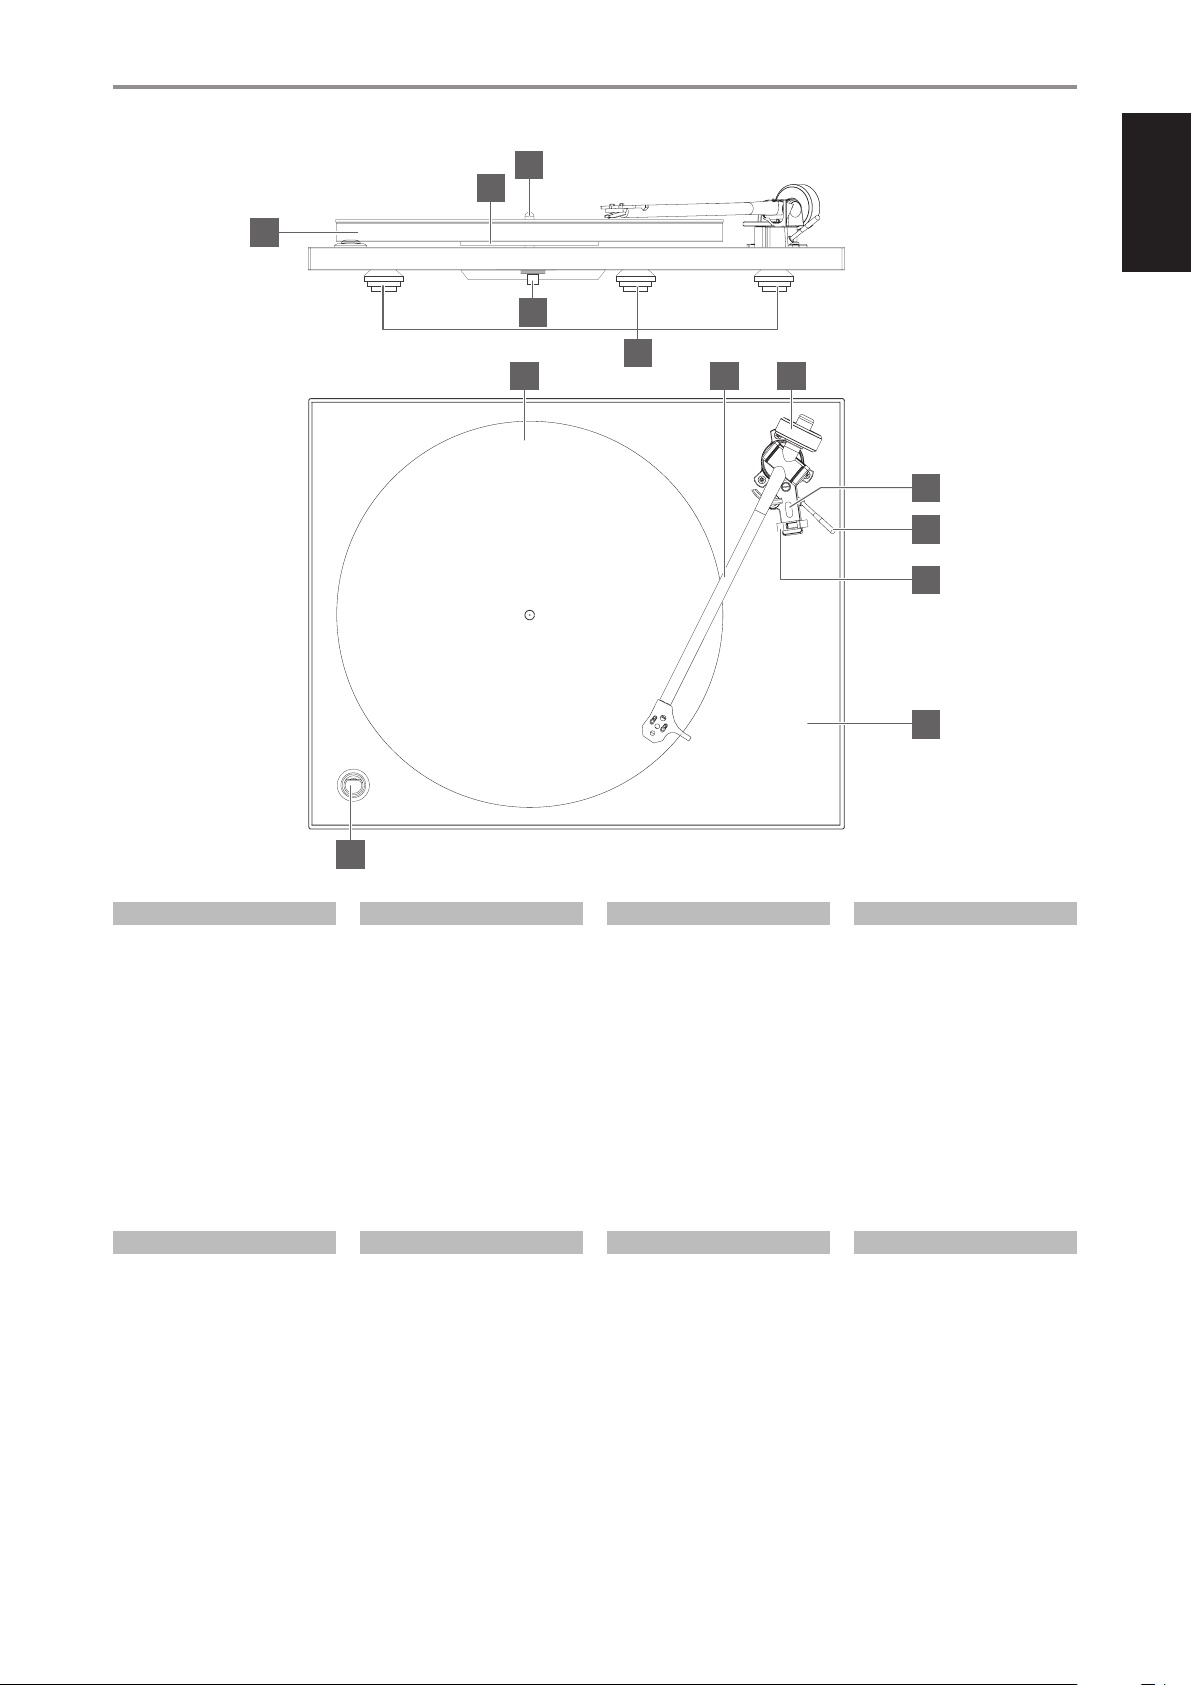
IDENTIFICATION OF CONTROLS
3
2
1
4
5
6 7 8
9
10
11
12
ENGLISHPORTUGUÊS FRANÇAISESPAÑOLITALIANODEUTSCHNEDERLANDSSVENSKAРУССКИЙ
ENGLISH
1 Platter
2 Sub platter
3 Spindle
4 Bearing
5 Anti-vibration feet
6 Mat
7 Tonearm
8 Counterweight
9 Bias adjustment
10 Lift/lower mechanism
11 Arm clip
12 Plinth
13 On/o switch
ITALIANO
1 Piastra
2 Sottopiastra
3 Mandrino
4 Supporto
5 Piedino antivibrazioni
6 Tappetino
7 Braccio del rivelatore acustico
8 Contrappeso
9 Regolazionedell’impulso
diinclinazione
10 Meccanismo disollevamento /
abbassamento
11 Fermaglio braccio
12 Piedistallo
13 Interruttore acceso/spento
13
FRANÇAIS
1 Plateau
2 Plateau interne
3 Axe
4 Palier
5 Pieds antivibratoires
6 Couvre-plateau
7 Bras
8 Contrepoids
9 Réglage del’antiskating
10 Lève-bras
11 Agrafe de bras
12 Support
13 Interrupteur Marche/Arrêt (On/O )
DEUTSCH
1 Plattenteller
2 Unterteller
3 Spindel
4 Lager
5 Antivibrationsfuß
6 Matte
7 Tonarm
8 Gegengewicht
9 Anti-Skating-Einsteller
10 Tonarmlift
11 Tonarmclip
12 Sockel
13 Ein-/Ausschalter
ESPAÑOL
1 Plato
2 Subplato
3 Eje
4 Cojinete
5 Patas contra la vibración
6 Esterilla
7 Brazo
8 Contrapeso
9 Ajuste delantideslizamiento
10 Mecanismo desubida/bajada
11 Clip del brazo
12 Plinto
13 Interruptor de encendido/
apagado (On/O )
NEDERLANDS
1 Draaitafel
2 Subchassis
3 As
4 Lager
5 Dempers
6 Mat
7 Toonarm
8 Contragewicht
9 Antiskating
10 Omhoog- /omlaagmechanise
11 Armklem
12 Kast
13 Aan/uit-schakelaar
PORTUGUÊS
1 Prato
2 Sub-prato
3 Eixo
4 Suporte
5 Pés anti-vibração
6 Tapete
7 Braço do gira-discos
8 Contrapeso
9 Dispositivo anti-resvalo
10 Mecanismo de levantamento /
descida
11 Gancho do braço
12 Mesa fono-reprodutora
13 Interruptor de Ligar / Desligar
SVENSKA
1 Skivtallrik
2 Undertallrik
3 Spindel
4 Lager
5 Anti-vibrations fötter
6 Skivmatta
7 Tonarm
8 Motvikt
9 Justering avsidokraft
10 Tonarmslyft
11 Lås för tonarmen
12 Plinth
13 Huvudströmbrytaren
3
Page 4
ENGLISH PORTUGUÊSFRANÇAIS ESPAÑOL ITALIANO DEUTSCH NEDERLANDS SVENSKA РУССКИЙ
USING THE C 556
This turntable has been engineered to give extremely good musical
reproduction. Inherent in the design are several features that improve
sound quality and focus the manufacturing costs where they are most
needed.
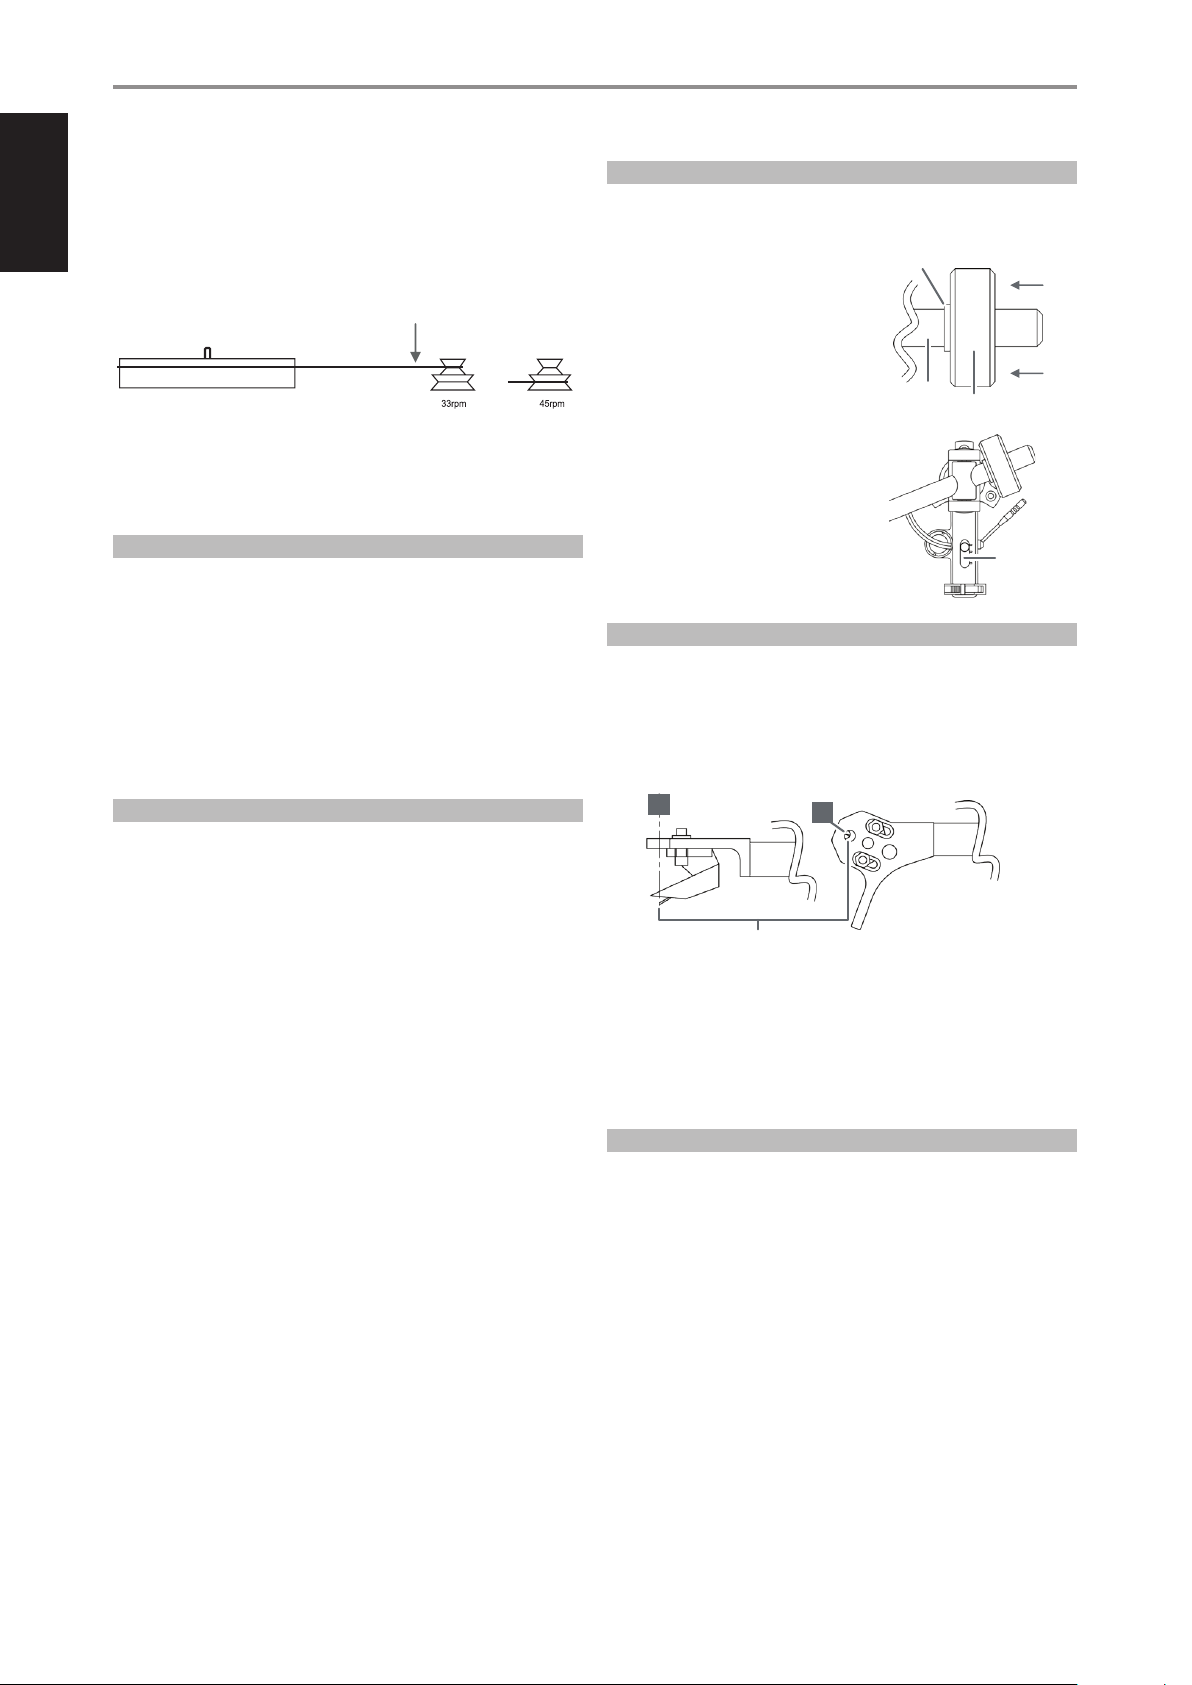
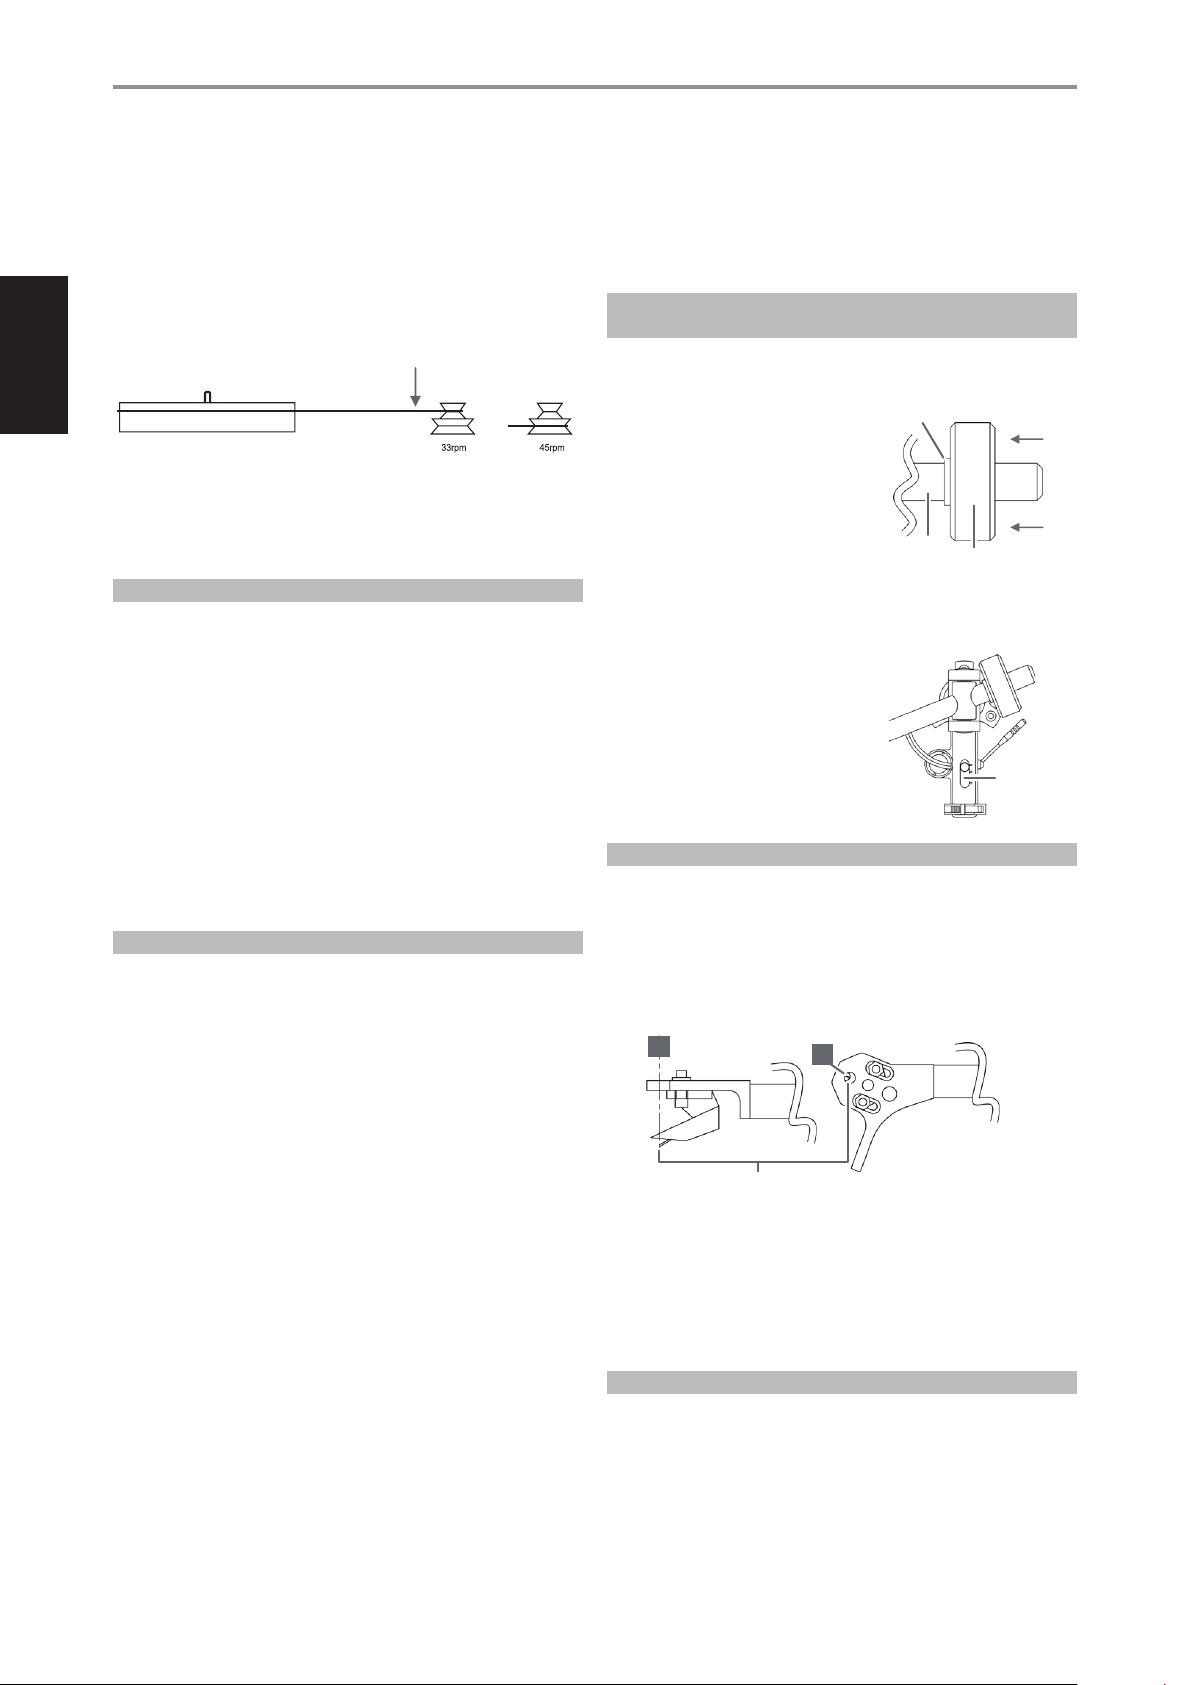
Example: Speed change is achieved by manually moving the drive belt
from one pulley to another as shown below.
QUICKSTART FOR FACTORY FITTED CARTRIDGE
The C 556 is designed to be setup and used seamlessly. Setup the factory
tted cartridge by the following setup instruction.
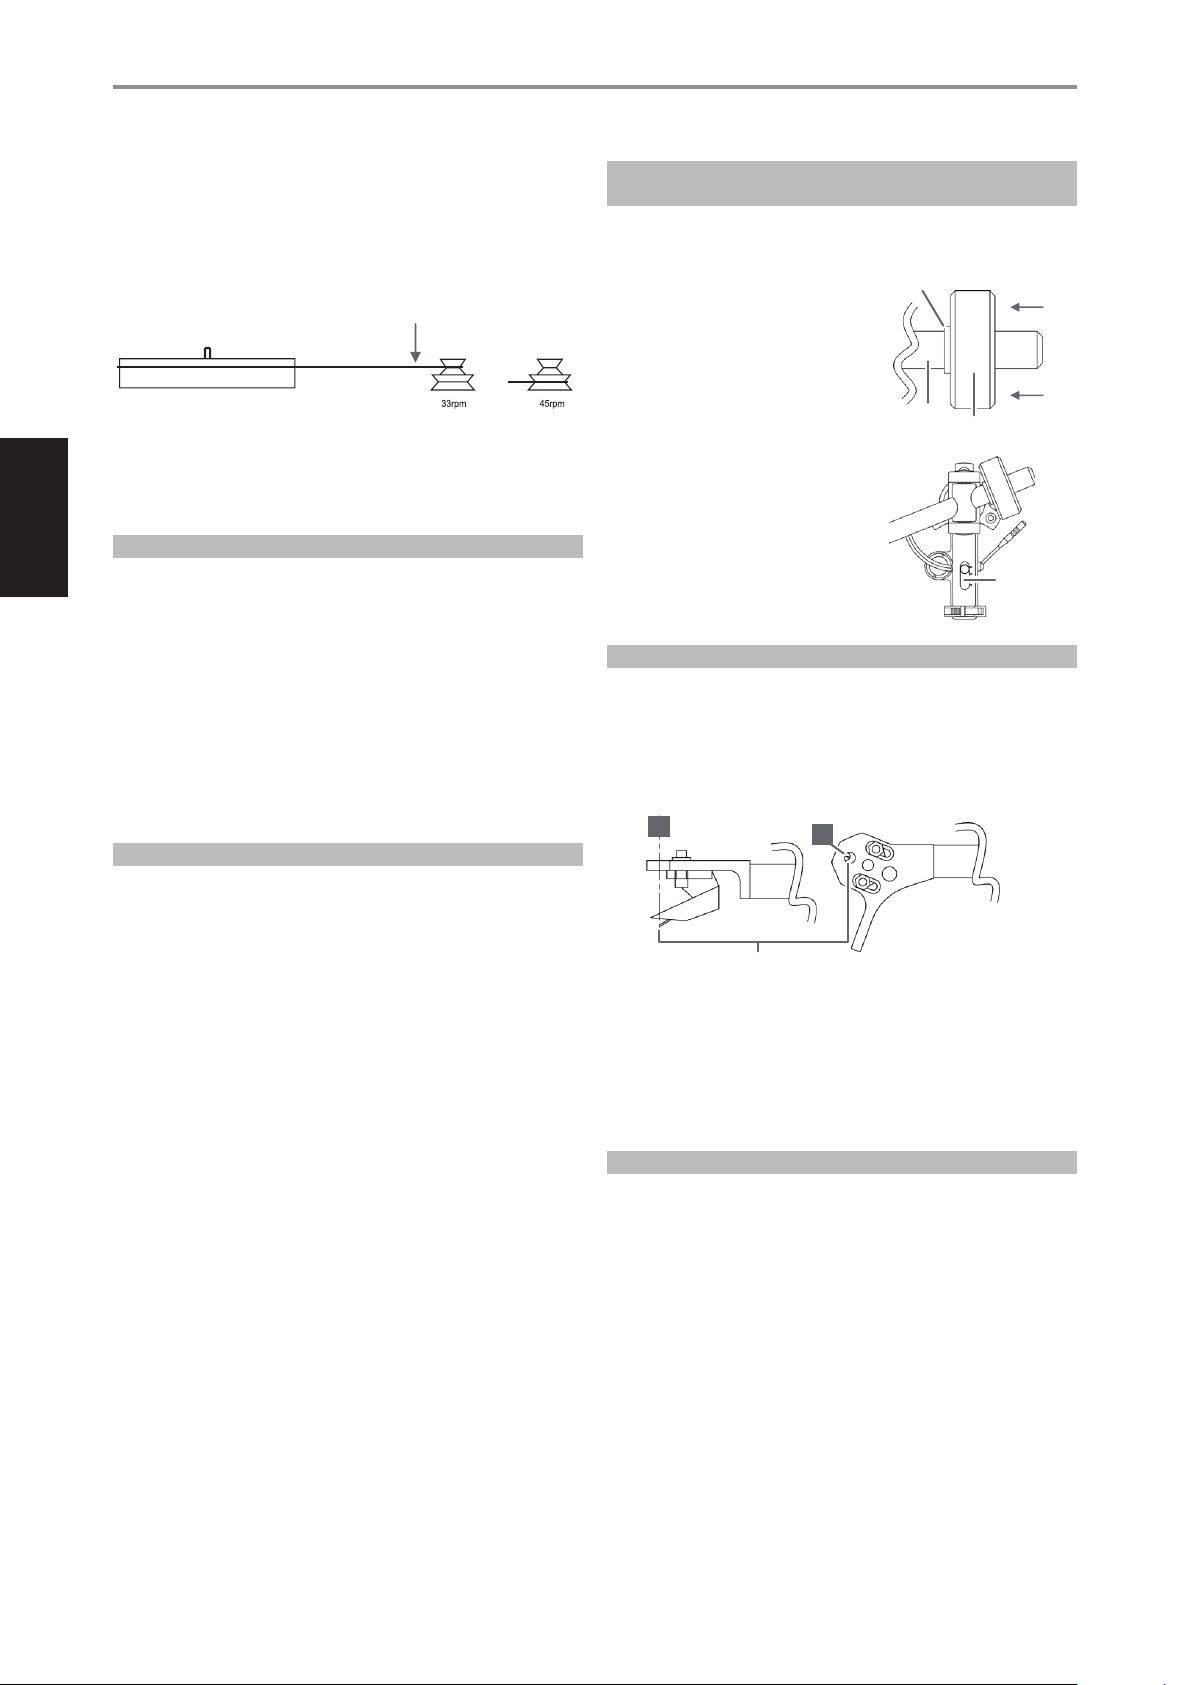
1 Push the counterweight as close as
possible to the stop point in order to
attain the correct tracking weight. This
will automatically set the tonearm to
within the recommended tracking
range for the factory tted stylus (1.5g
– 2.0g).
Stop point
Tonearm
Counterweight
The cost saving from the use of manual speed change allows a very
expensive low vibration motor with an accuracy exceeding that of
conventional designs to be employed.
NOTES ON INSTALLATION
1 Try to mount the turntable on a rigid, level surface. A light shelf screwed
to the wall or in an alcove would be ideal. Avoid mounting on hollow or
heavy cabinets, or anything mounted on a wooden oor.
2 DO NOT lift the centre hub from its bearing. The bearing is factory
assembled with a lm of thick lubricant. Disturbance of this can cause
serious problems with speed variation and wear.
3 The tonearm is automatically earthed (or ground) through the arm
cable screening. No other earthing should be necessary.
4 Save the packing, in case the turntable has to be transported in the
future.
TIPS AND SUGGESTIONS
1 Try to keep the lid closed while playing records. This will prevent dust
falling onto the records and make cleaning unnecessary. There may also
be a sound improvement.
2 Try to leave the turntable running during a record playing session.
Switch ON before the start, and only switch OFF after the last record has
nished. Changing records while the platter revolves is easier than it
sounds!
3 When the record reaches the end of one side, remember to lift the
stylus o the surface of the record using the lift/lower mechanism.
4 When switching on the turntable, especially at 45rpm, it is
recommended to give the platter a quick spin clockwise as the “ON”
switch is pressed. This relieves strain on the motor and belt.
5 No maintenance should be necessary. If the turntable is working well,
leave it alone. Some settling of the anti-vibration feet may cause the
turntable to lean backwards slightly after a few months, but this is
nothing to worry about.
6 Don’t use a record cleaner that works as the record plays, or any
cleaners that use water or uids. Don’t touch the playing surface of
records. Visible dust on the record surface is simply brushed aside by
the stylus, and any that collects there can easily be blown away.
7 Don’t use any polishes on the turntable or lid. To clean or dust, wipe
gently with a soft cotton duster (slightly damp, only if necessary).
2 Set the Bias adjustment slider to the
same number as the tracking weight.
For example, 1.5g tracking weight =
1.5g on the Bias slider.
Bias slider
ADVANCED SET-UP
A tracking pressure gauge is required to correctly apply the required down
force when changing the factory tted cartridge with a new or dierent
cartridge. The down force must correspond to the upper limit of the
cartridge maker’s recommended range.
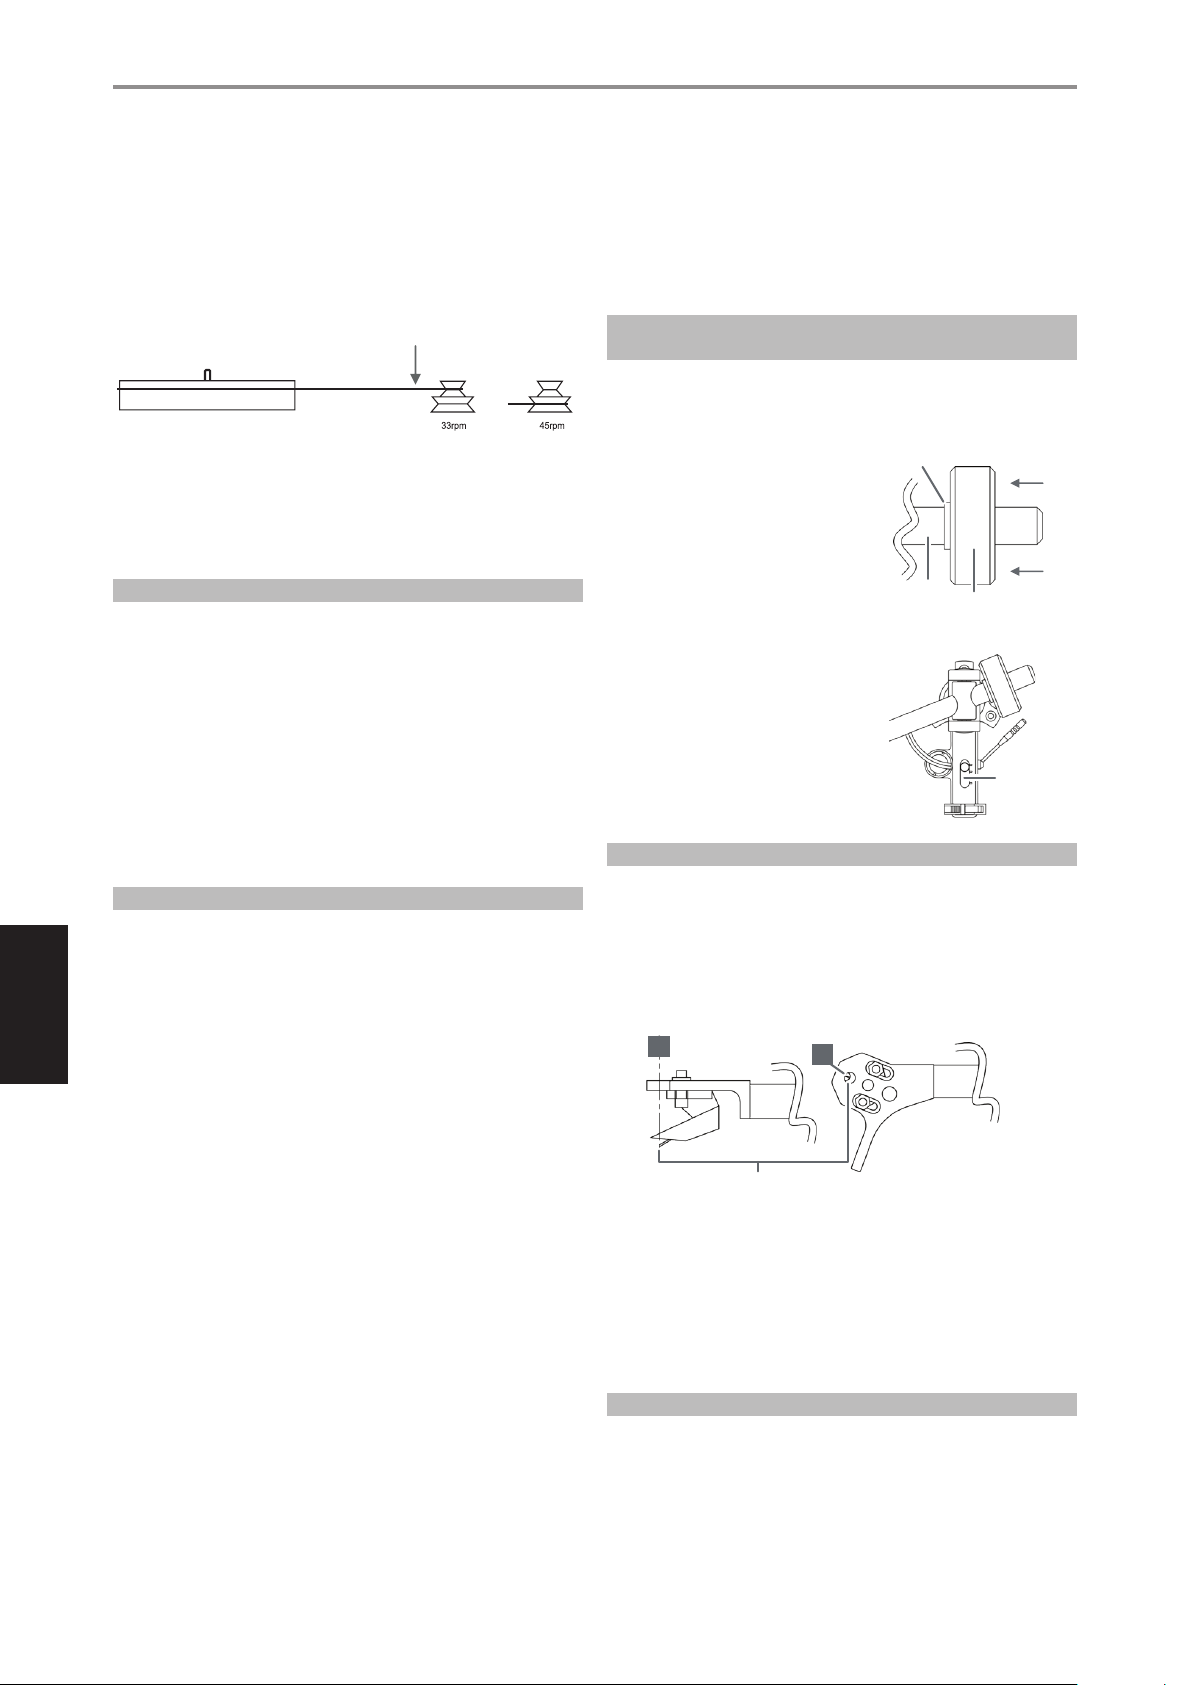
1 Align the new cartridge correctly as shown.
A
Stylus tip
2 Adjust the cartridge position in the head-shell so that the stylus tip is
vertically aligned with the front of the hole marked A.
3 Ensure the cartridge is sitting square in the head-shell before fully
tightening. Do not over tighten!
4 Set the Bias adjustment slider to the same number as the tracking
weight.
A
CONNECTING THE C 556
Use the external phono leads to connect the C 556 to an amplier. Use an
external Phono Preamplier (like one of NAD’s Phono Preamplier series) if
your amplier has no integrated phono stage.
ENJOY THE MUSIC!
4
Page 5

SPECIFICATIONS
GENERAL
TURNTABLE
Drive system Belt drive
Motor High torque synchronous motor
Speed 33.3 and 45.1 rpm
Suspension system 3 energy absorbent synthetic rubber feet
TONEARM
Operation Manual
Length 289 mm total length; 244 mm pivot to
stylus
Eective mass 9 g
Overhang 19.1 mm
Cable capacitance 150-400 pF
CARTRIDGE SPECIFICATION: ORTOFON OM5E
TRANSDUCER CHARACTERISTICS
Frequency response ±2 dB (20 Hz – 20 kHz)
Channel balance 2 dB at 1 kHz
Channel separation 22 dB at 1 kHz, 15 dB at 15 kHz
Output voltage 4 mV at 1 kHz, 5cm/sec.
Tracking force range 1.5 - 2.0 g (15-20 mN)
Tracking force recommended 1.75 g (17.5 mN)
Vertical tracking angle 20 degrees
Stylus radius Elliptical 0.00072 x 0.0003 inch; 18µ x 8µ
Stylus type r/R 8/18µ
ELECTRICAL CHARACTERISTICS
Recommended load resistance 47 kohms
Recommended load capacitance 200 – 600 pF
Internal inductance 450 mH
Internal impedance, DC resistance 750 ohms
MECHANICAL CHARACTERISTICS
Cartridge weight 5 g
Tracking weight 1.5 - 2.0 g (15-20 mN)
Replacement stylus unit Stylus 5E
PHYSICAL SPECIFICATIONS
Unit Dimension (W x H x D) with dust
cover down
Net Weight 4 kg (8.8 lbs)
Shipping Weight 7 kg (15.4 lbs)
Specications are subject to change without notice.
For updated documentation and features, please log onto
www.NADelectronics.com for the latest information about the C 556.
447 x 115 x 360 mm
17 / x 4 / x 14 / inches
ENGLISHPORTUGUÊS FRANÇAISESPAÑOLITALIANODEUTSCHNEDERLANDSSVENSKAРУССКИЙ
5
Page 6
ENGLISH PORTUGUÊSFRANÇAIS ESPAÑOL ITALIANO DEUTSCH NEDERLANDS SVENSKA РУССКИЙ
UTILISATION DU C 556
Cette platine tourne-disques a été conçue et fabriquée pour une
reproduction musicale d’excellente qualité. Dès la phase de conception,
les fonctionnalités ont été centrées sur une amélioration de la qualité
sonore de manière à consacrer les coûts de la fabrication aux points les plus
importants.
Exemple: Le changement de vitesse se fait en déplaçant la courroie
d’entraînement d’une poulie à une autre, comme le montre le schéma
ci-dessous.
7 N’utilisez aucun produit pour nettoyer la platine ou son couvercle.
Pour éliminer la poussière, essuyez doucement avec un chion doux
(légèrement humecté si c’est vraiment nécessaire).
IL NE VOUS RESTE PLUS QU’À PROFITER DE LA MUSIQUE !
DÉMARRAGE RAPIDE POUR LA CELLULE DE LECTURE
INSTALLÉE EN USINE
Le C 556 est conçu pour être installé et utilisé en toute simplicité. Réglez la
cellule de lecture installée en usine en suivant les instructions de réglage.
L’économie réalisée grâce à ce changement de vitesse manuel a permis
d’incorporer un moteur très onéreux, dont le niveau vibratoire est
extrêmement bas et la précision bien supérieure aux modèles traditionnels.
NOTES CONCERNANT L’INSTALLATION
1 Dans la mesure du possible, posez la platine tourne-disques sur une
surface plane et rigide. Une étagère légère vissée au mur ou dans
une alcôve sont des solutions idéales. Évitez de poser la platine sur un
meuble creux ou lourd, ou sur n’importe quel meuble posé sur un sol
en bois.
2 NE SOULEVEZ PAS le moyeu central de son palier. Le palier a été
assemblé chez le fabricant avec une couche de lubriant épais. Si vous
dérangez cet assemblage, cela peut entraîner de graves problèmes
d’usure et d’oscillations de vitesse.
3 Le bras de lecture est automatiquement relié à la terre (ou à la masse)
via le blindage du câble du bras. Aucune autre mise à la terre ne devrait
être nécessaire.
4 Conservez les emballages, pour le cas où vous auriez besoin de
transporter la platine tourne-disques à nouveau.
CONSEILS ET SUGGESTIONS
1 Dans la mesure du possible, le couvercle doit rester fermé pendant
la lecture des disques. Cette précaution empêche la poussière de se
déposer sur les disques et rend leur nettoyage inutile. Elle permet aussi
d’améliorer la reproduction du son.
2 Dans la mesure du possible, laissez tourner le plateau en permanence
pendant une séance d’écoute de disques. Mettez l’appareil en marche
avant de commencer et ne l’éteignez pas avant la n du dernier disque.
Changer un disque alors que le plateau tourne, ce n’est pas aussi facile
que l’on puisse le penser !
3 Lorsque vous avez ni d’écouter une face d’un disque, n’oubliez pas de
relever la pointe de la surface du disque en vous servant du lève-bras.
4 Lorsque vous mettez la platine tourne-disques en marche, surtout à
45 tr/mn, il est recommandé de lancer manuellement le plateau dans
le sens des aiguilles d’une montre au moment où vous appuyez sur le
bouton «MARCHE». En procédant ainsi, vous diminuerez les contraintes
sur le moteur et la courroie.
5 Aucune maintenance n’est normalement nécessaire. Si la platine
tourne-disques fonctionne correctement, ne touchez à rien. Après
quelques mois, il se pourrait que les pieds antivibratoires se tassent un
peu, faisant pencher la platine légèrement en arrière, mais cela ne doit
susciter aucune inquiétude.
6 N’utilisez pas d’appareil qui nettoie les disques pendant la lecture, ni
de dispositif de nettoyage qui fonctionne avec de l’eau ou un liquide
quelconque. Ne touchez pas la surface de lecture des disques. Toute
poussière visible à la surface du disque est simplement balayée par la
pointe; en cas d’accumulation de poussières au niveau de la pointe, il
sut de la dégager en souant dessus.
1 Poussez le contrepoids aussi près que
possible du point d’arrêt an d’obtenir
la force d’appui exacte. Cela règlera
automatiquement le bras dans la plage
de force d’appui recommandée pour la
pointe de lecture installée en usine
(1,5 – 2,0 g).
2 Réglez la glissière de compensation de
la force centripète au même nombre
que le contrepoids. Par exemple,
force d’appui de 1,5 g = 1,5 g sur la
glissière de compensation de la force
centripète.
Stop point
Tonearm
Counterweight
Bias slider
RÉGLAGE AVANCÉ
Une jauge de force d’appui est nécessaire pour appliquer la force
d’appui nécessaire lorsque la cellule installée en usine est remplacée
par une nouvelle cellule ou une cellule diérente. La force d’appui doit
correspondre à la limite supérieure de la plage recommandée par le
fabricant de la cellule.
1 Alignez correctement la nouvelle cellule comme montré.
A
Stylus tip
2 Ajustez la position de la cellule dans le support de tête an que la
pointe de lecture soit verticalement alignée avec l’avant du trou A.
3 Assurez-vous que la cellule est posée à l’équerre dans le support de tête
avant de serrer. Évitez de trop serrer !
4 Réglez la glissière de compensation de la force centripète au même
nombre que le contrepoids.
A
RACCORDEMENT DU C 556
Utilisez les câbles phono externes pour raccorder le C 556 à un
amplicateur. Si votre amplicateur n’est pas doté d’un étage phono
intégré, utilisez un préampli phono externe (comme un des modèles de la
gamme de préamplicateurs phono de NAD).
6
Page 7

CARACTERISTIQUES
GÉNÉRAL
TOURNE-DISQUE
Entraînement Courroie
Moteur Moteur synchrone à couple élevé
Vitesses 33,3 et 45,1 tr/mn
Suspension
BRAS
Utilisation Manuelle
Longueur
Masse eective 9 g
Avance 19,1 mm
Capacitance du câble 150 à 400 pF
CARACTÉRISTIQUES DE LA CELLULE: ORTOFON OM5E
TRANSDUCTEUR
Réponse en fréquence ±2 dB (20 Hz à 20 kHz)
Équilibre entre canaux 2 dB à 1 kHz
Séparation des voies 22 dB à 1 kHz, 15 dB à 15 kHz
Tension de sortie 4 mV à 1 kHz, à 5 cm/s
Angle vertical 20 degrés
Taille de la pointe
Type de pointe r/R 8/18µ
3 pieds absorbeurs d’énergie en
caoutchouc synthétique
289 mm longueur totale;
244mm entre l’axe et la pointe
Elliptique 0.00072 x 0.0003 pouce;
18µ x 8µ
ÉLECTRIQUES
Résistance de charge 47 kilohms
Capacitance de charge 200 à 600 pF
Inductance interne 450 mH
Résistance interne, DC 750 ohms
MÉCANIQUES
Poids de la cellule 5 g
Axes de xation 1,5 à 2,0 g (15-20 mN)
Replacement stylus unit Stylus 5E
CARACTÉRISTIQUES PHYSIQUES
Dimensions de l’unité (L x H x P),
couvercle fermé
Poids net 4 kg (8,8 lbs)
Poids emballé 7 kg (15,4 lbs)
Les caractéristiques techniques sont sujettes à modications sans préavis.
Pour la documentation et les caractéristiques actualisées, consulter le
site web www.nadelectronics.com pour les toutes dernières informations
concernant le C 556.
447 x 115 x 360 mm
17 / x 4 / x 14 / pouces
ENGLISHPORTUGUÊS FRANÇAISESPAÑOLITALIANODEUTSCHNEDERLANDSSVENSKAРУССКИЙ
7
Page 8
ENGLISH PORTUGUÊSFRANÇAIS ESPAÑOL ITALIANO DEUTSCH NEDERLANDS SVENSKA РУССКИЙ
UTILIZACIÓN DEL C 556
Este tocadiscos se ha concebido para proporcionar una reproducción
musical extremadamente buena. Forman parte del diseño varias
prestaciones que mejoran la calidad del sonido y que concentran los costes
de fabricación donde más se precisan.
INICIO RÁPIDO PARA CÁPSULA FONOCAPTORA
INSTALADA EN FÁBRICA
El C 556 está diseñado para una conguración y uso muy sencillos.
Congure la cápsula instalada en fábrica según las siguientes instrucciones.
Ejemplo: El cambio de velocidad se consigue moviendo manualmente la
correa de accionamiento desde una polea a otra como se muestra abajo.
El ahorro de coste al utilizar el cambio manual de velocidad permite
emplear un motor muy caro de baja vibración con una precisión que
supera la de los diseños convencionales.
NOTA SOBRE LA INSTALACION
1 Trate de montar el tocadiscos sobre una supercie rígida y nivelada.
Una ligera balda atornillada a la pared o en un nicho resultaría ideal.
Evite instalarlo en armarios huecos o pesados o en algo que vaya
montado sobre un suelo de madera.
2 NUNCA levante el cubo central de su cojinete. Este se monta en fábrica
con una película de lubricante espeso. La interferencia con esto puede
originar serios problemas de variación de la velocidad y de desgaste.
3 El brazo va conectado automáticamente a masa (o a tierra) a través del
apantallado del cable del brazo. Ninguna otra puesta a tierra debería ser
necesaria.
4 Guarde el embalaje en caso de que el tocadiscos tenga que ser
transportado en el futuro.
CONSEJOS Y SUGERENCIAS
1 Trate de mantener la tapa cerrada mientras reproduzca discos. Así
evitará que polvo caiga sobre los discos y hará innecesaria su limpieza.
Además tal vez se mejore el sonido.
2 Trate de de dejar el tocadiscos funcionando durante una sesión de
reproducción de discos. Conéctelo antes de empezar y desconéctelo
sólo cuando haya nalizado el último disco.
3 Cuando el sco llega al nal de una cara, no olvide levantar la aguja de
la supercie del disco usando su mecanismo de subida/bajada.
4 Cuando se conecta el tocadiscos, especialmente a 45 rpm, se
recomienda dar al plato una rápida vuelta en igual sentido que las
agujas del reloj al tiempo que se aprieta el interruptor de conexión “ON”.
De este modo se alivia el esfuerzo sobre el motor y la correa.
5 No debería precisarse mantenimiento. Si el tocadiscos está funcionando
bien, no lo toque. Al asentarse un poco las patas contra la vibración
puede hacer que el tocadiscos se incline hacia atrás después del
algunos meses, pero esto no deberá resultarle preocupante.
6 No utilice un producto de limpieza de discos que limpie mientras
se toca el disco, no otros productos de limpieza que empleen agua
o líquidos. Evite tocar la supercie de reproducción de los discos. El
polvo visible sobre la supercie del disco lo elimina la aguja y lo que se
acumule en ella se elimina fácilmente soplándolo.
7 No utilice ceras sobre el tocadiscos ni sobre la tapa. Para limpiarlos o
quitarles el polvo, basta pasar con cuidado un suave paño de algodón
(ligeramente humedecido, solamente si fuere necesario).
1 Empuje el contrapeso tan cercano
como sea posible al punto de
detención para obtener el peso de
seguimiento apropiado. Esto pondrá
automáticamente el brazo dentro del
peso de seguimiento recomendado
para la aguja incluida (1,5 a 2,0 g).
2 Ponga el ajuste antideslizamiento
en el mismo número del peso de
seguimiento. Por ejemplo, 1,5 g de
peso de seguimiento = 1,5 g en el
ajuste antideslizamiento.
Stop point
Tonearm
Counterweight
Bias slider
INSTALACIÓN AVANZADA
Se necesita una balanza de aguja (stylus pressure gauge) para aplicar
correctamente la fuerza requerida cuando se cambia la cápsula de fábrica
por una nueva o diferente. La fuerza hacia abajo debe corresponder al
límite superior del peso recomendado por el fabricante de la cápsula.
1 Alinee la cápsula nueva correctamente.
A
Stylus tip
2 Ajuste la posición de la cápsula en el portacápsula para que la punta de la
aguja quede alineada verticalmente con el frente del oricio marcado A.
3 Asegúrese de que la cápsula esté perfectamente alineada en el
portacápsula antes de ajustarla totalmente. No la ajuste en exceso.
4 Ponga el ajuste antideslizamiento en el mismo número del peso de
seguimiento.
A
CONEXIÓN DEL C 556
Use los conectores RCA externos para conectar el C 556 a un amplicador.
Use un preamplicador de fono externo (como un modelo de la serie
Phono Preamplier de NAD) si su amplicador no tiene una sección de
fono integrada.
¡DISFRUTE DE LA MÚSICA!
8
Page 9

ESPECIFICACIONES
GENERAL
TOCADISCOS
Sistema de accionamiento Accionamiento por correa
Motor Motor síncrono de alto par
Velocidad 33,3 y 45,1 rpm
Sistema de suspensión 3 apoyos de caucho sintético absorbentes
de energía
BRAZO
Operación Manual
Longitud total 289 mm-244mm desde el pivote a la
aguja
Masa efectiva de la punta 9 g
Colgante 19,1 mm
Capacitancia de cable 150-400 pF
ESPECIFICACIÓN DE LA CÁPSULA FONOCAPTORA :
ORTOFON OM5E
CARACTERÍSTICAS DE TRANSDUC TORES
Respuesta de frecuencia ±2 dB (20 Hz - 20 kHz)
Balance de canal 2 dB a 1 kHz
Separación de los canales 22 dB a 1 kHz, 15 dB a 15 kHz
Tensión de salida 4 mV a 1 kHz, 5cm/s
Angulo vertical de seguimiento de pista 20 grados
Radio de la aguja Elíptico 0,00072 x 0,0003 pulgada;
18µ x 8µ
Tipo de aguja r/R 8/18µ
CARACTERÍSTICAS ELÉC TRICAS
Resistencia de carga 47 kohms
Capacitancia de carga 200-600 pF
Inductancia interna 450 mH
Resistencia interna 750 ohms
CARACTERÍSTICAS MECÁNIC AS
Peso de la cápsula fonocaptora 5 g
Peso de seguimiento de pista 1,5 – 2,0 g (15-20 mN)
Tipo de aguja Stylus 5E
ESPECIFICACIONES FÍSICAS
Dimensiones de la unidad (Ancho x Alto
x Profundo) con la tapa abajo
Peso neto 4 kg (8,8 libras)
Peso de expedición 7 kg (15,4 libras)
Las especicaciones están sujetas a cambios sin previo aviso. Para
actualizaciones en la documentación y las características, visite www.
NADelectronics.com y obtendrá las últimas novedades sobre su C 556.
447 x 115 x 360 mm
17 / x 4 / x 14 / pulgadas
ENGLISHPORTUGUÊS FRANÇAISESPAÑOLITALIANODEUTSCHNEDERLANDSSVENSKAРУССКИЙ
9
Page 10

ENGLISH PORTUGUÊSFRANÇAIS ESPAÑOL ITALIANO DEUTSCH NEDERLANDS SVENSKA РУССКИЙ
UTILIZAR O C 556
O presente gira-discos foi concebido de forma a proporcionar uma
reprodução musical de extrema qualidade. O design tem inerentes
inúmeras características que contribuem para melhorar a qualidade do som
e focar os custos de fabrico nos pontos em que são mais necessários.
Exemplo: A alteração da velocidade de rotação é realizada através da
deslocação manual da correia de accionamento de uma polia para outra,
tal como ilustrado abaixo.
A poupança atingida através da alteração manual da velocidade de rotação
permite utilizar um motor de baixa vibração extremamente dispendioso
e com uma precisão extremamente superior à utilizada nos modelos
convencionais.
OBSERVAÇÕES SOBRE A INSTALAÇÃO
1 O gira-discos deverá ser montado numa superfície rígida e nivelada.
Uma alcova ou uma prateleira leve, aparafusada à parede, constituem
locais ideais. Deverá evitar proceder-se à montagem em armários ocos
ou pesados ou em quaisquer móveis assentes em chão de madeira.
2 NÃO levantar o cubo central do respectivo suporte. Dado que o
suporte é montado em fábrica e que lhe é aplicada uma camada de
lubricante espesso, a interferência com o suporte pode provocar
desgaste e problemas graves a nível da variação das rotações.
3 O braço do gira-discos está automaticamente ligado à terra (ou à
massa) através do cabo blindado do braço e, por consequência, não é
necessário efectuar qualquer outra ligação à terra.
4 A embalagem deverá ser guardada para o caso de ser necessário
transportar o gira-discos noutras ocasiões.
6 Não deverão ser utilizados acessórios de limpeza que funcionem
enquanto os discos estão a ser reproduzidos, nem quaisquer produtos
de limpeza à base de água ou de outros líquidos. Nunca se deve
tocar na superfície de reprodução dos discos. O pó visível que nela
esteja acumulado será limpo simplesmente pela agulha qualquer pó
acumulado nesta última pode ser facilmente soprado.
7 Não deverão ser utilizados produtos de polimento quer no gira-
discos quer na tampa. Para se limpar a unidade ou retirar o pó deverá
passar-se cuidadosamente um pano de algodão macio (ligeiramente
humedecido, caso seja necessário).
DESFRUTE A MÚSICA!
INICIAÇÃO RÁPIDA PARA A CÁPSULA FONOCAPTORA
O C 556 foi concebido para ser congurado e utilizado de forma
homogénea. Siga as instruções a seguir para congurar a cápsula
fonocaptora instalada de fábrica.
1 Aproxime o contrapeso o máximo
possível do ponto de paragem, de
modo a atingir o peso de tracção
correcto. Desta forma, o braço do
gira-discos é automaticamente
congurado para o intervalo de tracção
recomendado para a agulha instalada
de fábrica (1,5 g – 2,0 g).
2 Dena o dispositivo anti-resvalo para
o mesmo valor do peso de tracção Por
exemplo, peso de tracção de 1,5 g =
1,5 g no dispositivo anti-resvalo.
Stop point
Tonearm
Counterweight
Bias slider
CONSELHOS E SUGESTÕES
1 A tampa do gira-discos deverá ser mantida fechada enquanto
se procede à reprodução dos discos. Desta forma, impede-se a
acumulação de pó sobre os discos e pode também obter-se uma
melhoria a nível do som.
2 De preferência, o gira-discos deverá ser mantido em funcionamento até
ao m das sessões de reprodução de discos. Deverá ser ligado antes
do início das mesmas e ser desligado apenas depois de terminada a
reprodução do último disco. A substituição de discos enquanto o prato
se encontra em rotação constitui uma operação mais simples do que
pode parecer à primeira vista!
3 Quando o disco atingir o m do lado que está a ser reproduzido, deverá
certicar-se de levantar a agulha para fora da superfície do disco,
utilizando o mecanismo de levantamento / descida.
4 Aquando da comutação do gira-discos para o modo de Ligado,
sobretudo a 45 rpm, é aconselhável rodar rapidamente o prato no
sentido dos ponteiros do relógio em simultâneo com a pressão do
botão de “ON”. Esta acção destina-se a aliviar a tensão exercida sobre o
motor e a correia.
5 Em princípio não é necessário proceder a quaisquer operações de
manutenção e, por consequência, se o gira-discos estiver a funcionar
correctamente o utilizador não deverá interferir com o mesmo. O apoio
dos pés anti-vibração poderá provocar uma ligeira inclinação do giradiscos para trás, depois de decorridos alguns meses, no entanto trata-se
de algo normal e que não constitui motivo para preocupações.
CONFIGURAÇÃO AVANÇADA
Quando substituir a cápsula fonocaptora instalada de fábrica por uma
cápsula nova ou diferente, é necessário um indicador de pressão de
tracção para aplicar correctamente a força descendente exigida. A
força descendente tem de corresponder ao limite superior do intervalo
recomendado pelo fabricante da cápsula fonocaptora.
1 Alinhe a nova cápsula fonocaptora correctamente.
A
Stylus tip
2 Ajuste a posição da cápsula fonocaptora na cabeça, para que a ponta
da agulha que verticalmente alinhada com a frente do orifício
identicado com A.
3 Assegure-se de que a cápsula fonocaptora assenta na perfeição na
cabeça antes de apertar até ao m. Não aperte demasiado!
4 Dena o dispositivo anti-resvalo para o mesmo valor do peso de tracção
A
LIGAR O C 556
Utilize o cabo de áudio externo para ligar o C 556 a um amplicador. Se
o seu amplicador não possuir um pré-amplicador de áudio integrado,
utilize um pré-amplicador de áudio externo (qualquer um da série de préamplicadores da NAD).
10
Page 11

CARACTERÍSTICAS TÉCNICAS
GERAL
GIRA-DISCOS
Sistema de accionamento Accionamento por correia
Motor Motor síncrono de binário alto
Duração 33,3 e 45,1 rpm
Sistema de suspensão 3 pés de borracha sintética amortecedores
da energia
BRAÇO DO GIRA-DISCOS
Funcionamento Manual
Comprimento 289 mm Comprimento total;
244 mm do eixo à agulha
Peso efectivo 9 g
Distância da agulha ao centro do prato 19,1 mm
Capacitância do cabo 150-400 pF
ESPECIFICAÇÕES DA CÁPSULA FONOCAPTORA ORTOFON OM5E
CARACTERÍSTICAS DO TRANSDUTOR
Resposta em frequência ±2 dB (20 Hz – 20 kHz)
Balanço de canais 2 dB a 1 kHz
Separação de canais 22 dB a 1 kHz, 15 dB a 15 kHz
Tensão de saída 4 mV a 1 kHz, 5 cm/s
Força de tracção vertical 1,75 g (17,5 mN)
Ângulo de tracção vertical 20 graus
Raio da agulha Elíptico 0,00072 x 0,0003 polegada;
18µ x 8µ
Tipo da agulha r/R 8/18µ
CARACTERÍSTICAS ELÉC TRICAS
Resistência da carga 47 kohms
Capacitância da carga 200–600 pF
Indutância interna 450 mH
Resistência interna 750 ohms
CARACTERÍSTICAS MECÂNIC AS
Peso da cápsula fonocaptora 5 g
Peso de tracção 1,5 – 2,0 g (15-20 mN)
Tipo da agulha Stylus 5E
ESPECIFICAÇÕES FÍSICAS
Dimensões do aparelho (W x H x D) com
a tampa descida
Peso líquido 4 kg (8,8 libras)
Peso de transporte 7 kg (15,4 libras)
As especicações estão sujeitas a alterações sem aviso prévio. Para obter
documentação e características actualizadas entre em www.nadelectronics.
com onde pode encontrar as informações mais recentes sobre o C 556.
447 x 115 x 360 mm
17 / x 4 / x 14 / polegadas
ENGLISHPORTUGUÊS FRANÇAISESPAÑOLITALIANODEUTSCHNEDERLANDSSVENSKAРУССКИЙ
11
Page 12

ENGLISH PORTUGUÊSFRANÇAIS ESPAÑOL ITALIANO DEUTSCH NEDERLANDS SVENSKA РУССКИЙ
UTILIZZO DI C 556
Questa giradischi girevole è stata progettata per orire una riproduzione
musicale estremamente buona. Insite nel design, vi sono diverse
funzionalità che migliorano la qualità del suono e focalizzano i costi di
fabbricazione laddove sono più necessari.
Esempio: La modica della velocità si ottiene manualmente spostando la
cinghia di trasmissione da una puleggia all’altra, come illustrato di seguito.
Il risparmio sui costi proveniente dalla modica di velocità manuale
consente un motorino a vibrazioni ridotte molto costoso con una
precisione che supera quella dei design convenzionali da utilizzare.
NOTE RELATIVE ALL’INSTALLAZIONE
1 Tentare di montare il giradischi girevole su una supercie rigida ed
orizzontale. L’ideale sarebbe un ripiano leggero avvitato alla parete o
in una rientranza. Evitare il montaggio su armadi vuoti o pesanti, o su
qualcosa che sia montato su un pavimento in legno.
2 NON sollevare il mozzo centrale dal suo supporto. Il supporto
è montato in fabbrica con una pellicola di lubricante spesso.
Spostandolo si potrebbero provocare seri problemi di variazione della
velocità ed usura.
3 Il braccio del rivelatore acustico viene messo a terra (o a massa)
automaticamente attraverso lo screening del cavo del braccio. Non
dovrebbe essere necessaria alcun’altra messa a terra.
4 Conservare l’imballaggio, in caso occorra trasportare il giradischi
girevole in futuro.
SUGGERIMENTI E CONSIGLI
1 Tentare di tenere il coperchio chiuso durante la riproduzione dei dischi.
Ciò eviterà che cada della polvere sui dischi e renderà inutile la pulizia.
Potrebbero inoltre esservi dei miglioramenti nel suono.
2 Tentare di lasciare il giradischi girevole in funzione durante una sessione
di riproduzione del disco. Accendere prima dell’avvio e spegnere solo
dopo la ne dell’ultimo disco. Cambiare i dischi mentre la piastra gira è
più facile di quanto sembri!
3 Quando il disco raggiunge la ne di un lato, ricordare di sollevare lo stilo
dalla supercie usando il meccanismo di sollevamento/abbassamento.
4 Quando si accende il giradischi, specialmente a 45 giri/min., si consiglia
di dare alla piastra un rapido tocco in senso orario mentre si preme
l’interruttore “ON” (Acceso). Ciò allenta la sollecitazione sul motorino e
sulla cinghia.
5 Non dovrebbe essere necessaria alcuna manutenzione. Se il giradischi
girevole funziona bene, lasciarla andare. Alcune impostazioni del
piedino antivibrazioni potrebbero provocare una leggera inclinazione
all’indietro delil giradischi girevole dopo qualche mese, ma non è una
cosa preoccupante.
6 Non usare un pulitore per dischi che funzioni durante la riproduzione
del disco, o alcun pulitore che impieghi acqua o liquidi. Non toccare la
supercie di riproduzione dei dischi. La polvere visibile sulla supercie
del disco viene spazzolata via semplicemente dallo stilo e l’eventuale
polvere che si raccolga può essere facilmente soata via.
7 Non usare sostanze per lucidare sulil giradischi girevole o sul coperchio.
Per pulire o spolverare, stronare delicatamente con un panno da
polvere in cotone soce (leggermente umido, solo se necessario).
CONFIGURAZIONE RAPIDA DELLA TESTINA
PREINSTALLATA IN FABBRICA
Il C 556 è progettato per essere congurato e utilizzato senza problemi.
Per congurare la testina preinstallata in fabbrica, attenersi alle istruzioni
seguenti.
1 Spingere il contrappeso il più vicino
possibile al punto di arresto per
ottenere il peso di tracciamento
corretto. In tal modo il braccio del
rivelatore acustico viene impostato
automaticamente sulla gamma di
tracciamento consigliata per lo stilo
preinstallato in fabbrica (1,5 – 2,0 g).
2 Impostare la barra di regolazione
dell’impulso di inclinazione sullo stesso
numero del peso di tracciamento. Ad
esempio, peso di tracciamento 1,5
g = 1,5 g sulla barra di regolazione
dell’impulso di inclinazione.
Stop point
Tonearm
Counterweight
Bias slider
CONFIGURAZIONE AVANZATA
Quando si sostituisce la testina preinstallata in fabbrica con una nuova
o diversa, è necessario un misuratore della pressione di tracciamento
per applicare la corretta pressione verso il basso. Quest’ultima deve
corrispondere al limite superiore della gamma consigliata dal produttore
della testina.
1 Allineare la nuova testina correttamente.
A
Stylus tip
2 Regolare la posizione della testina nell’alloggiamento in modo che
la puntina dello stilo sia allineata verticalmente al davanti del foro
contrassegnato dalla lettera A.
3 Assicurarsi che la testina sia inserita correttamente nell’alloggiamento
prima di serrare le viti, evitando di stringerle eccessivamente.
4 Impostare la barra di regolazione dell’impulso di inclinazione sullo
stesso numero del peso di tracciamento.
A
COLLEGAMENTO DEL C 556
Utilizzare i cavi phono esterni per collegare il C 556 a un amplicatore.
Se l’amplicatore non è dotato di uno stadio phono integrato, utilizzare
un preamplicatore phono esterno (ad esempio. uno della serie di
preamplicatori phono NAD).
GODETEVI LA MUSICA!
12
Page 13

CARATTERISTICHE TECNICHE
GENERALI
GIRADISCHI
Sistema di comando Trasmissione a cinghia
Motorino Motore sincrono ad alta coppia
Velocità 33,3 e 45,1 giri/min.
Sistema di sospensione 3 piedini in gomma sintetici per
assorbimento energia
BRACCIO DEL RIVELATORE ACUSTICO
Funzionamento Manuale
Lunghezza 289 mm. lunghezza totale - 244 mm.
articolazione stilo
Massa eettiva 9 g
Capacitanza cavo 150-400 pF
SPECIFICHE TESTINA: ORTOFON OM5E
CARATTERISTICHE TRASDUTTORE
Risposta di frequenza ±2 dB (20 Hz - 20 kHz)
Bilanciamento canale 2 dB a 1 kHz
Separazione canali 22 dB a 1 kHz, 15 dB a 15 kHz
Tensione di uscita 4 mV a 1 kHz, 5cm/sec.
Angolo di tracciamento verticale 20 gradi
Raggio dello stilo Ellittico 0,00072 x 0,0003 pollice;
(18µ x 8µ)
Tipo di stilo r/R 8/18µ
CARATTERISTICHE ELETTRICHE
Resistenza di carico 47 kohm
Capacitanza di carico 200–600 pF
Induttanza interna 450 mH
Resistenza interna 750 ohm
CARATTERISTICHE MECCANICA
Peso testina 5 g
Peso di tracciamento 1,5-2,0 g (15-20 mN)
Tipo di stilo Stylus 5E
SPECIFICHE FISICHE
Dimensione unità (L x A x P) con il
coperchio antipolvere abbassato
Peso netto 4 kg (8,8 libbre)
Peso lordo (con imballo) 7 kg (15,4 libbre)
Le speciche siche sono soggette a variazione senza obbligo di preavviso.
Visitare il sito www.nadelectronics.com per ottenere informazioni
aggiornate sul C 556 e sulle relative funzioni e sulla documentazione.
447 x 115 x 360 mm
17 / x 4 / x 14 / pollici
ENGLISHPORTUGUÊS FRANÇAISESPAÑOLITALIANODEUTSCHNEDERLANDSSVENSKAРУССКИЙ
13
Page 14
ENGLISH PORTUGUÊSFRANÇAIS ESPAÑOL ITALIANO DEUTSCH NEDERLANDS SVENSKA РУССКИЙ
VERWENDEN DES C 556
Dieser Plattenspieler wurde für eine besonders hochwertige
Musikreproduktion entwickelt. Zu seinem Design gehören veschiedene
Merkmale zur Verbesserung der Tonqualität. Außerdem wurde auf die
Herstellungskosten geachtet, wo diese stark ins Gewicht fallen.
7 Verwenden Sie für den Plattenspieler oder die Abdeckhaube keine
Poliermittel. Zum Reinigen oder Abstauben genügt das vorsichtige
Abwischen mit einem weichen Baumwoll-Staubtuch (nur bei Bedarf
leicht angefeuchtet).
Beispiel: Der Geschwindigkeitswechsel wird dadurch erreicht, dass der
Antriebsriemen manuell von einer Riemenscheibe auf die andere gesetzt
wird (siehe Abbildung unten).
Die Kosteneinsparung durch eine manuelle Geschwindigkeitsumschaltung
ermöglicht den Einsatz eines sehr teueren Motors mit extrem niedrigen
Vibrationen und einer Genauigkeit, die jene von konventionellen Designs
weit übertrit.
HINWEISE ZUR INSTALLATION
1 Stellen Sie den Plattenspieler auf einer festen und ebenen Fläche auf.
Ein leichtes, an der Wand befestigtes Regal oder eine Wandaussparung
wäre ideal. Vermeiden Sie die Aufstellung in hohlen oder schweren
Schränken, oder auf Möbeln, die auf einem Holzboden stehen.
2 Die Mittelachse NICHT aus ihrem Lager heben. Das Lager ist werkseitig
mit einem dicken Schmiermittellm montiert. Eine Störung dieser
Anordnung kann schwere Probleme mit der Laufgeschwindigkeit und
Verschleiß verursachen.
3 Der Tonarm wird automatisch über die Abschirmung des Tonarmkabels
geerdet. Normalerweise ist keine andere Erdung erforderlich.
4 Für den Fall, dass der Plattenspieler wieder transportiert werden muss,
bewahren Sie die Verpackung auf.
TIPPS UND VORSCHLÄGE
1 Schließen Sie beim Abspielen von Schallplatten die Abdeckhaube.
Dadurch ist die Schallplatte vor Staub geschüzt und muss nicht
mehr gereinigt werden. Möglicherweise erreichen Sie so auch eine
Klangverbesserung.
2 Schalten Sie den Plattenspieler zwischen dem Abspielen von
Schallplatten nicht aus. Schalten Sie ihn ein und erst wieder aus, wenn
die letzte Schallplatte abgespielt ist. Das Wechseln von Schallplatten
bei sich drehendem Plattenteller ist einfacher als man denkt!
3 Achten Sie darauf, die Nadel beim Abspielen am Ende einer
Schallplattenseite von der Schallplatte abzuheben. Benutzen Sie dazu
den Tonarmlift.
4 Beim Einschalten des Plattenspielers, besonders bei 45 U/Min, wird
empfohlen, nach dem Betätigen des ON-Schalters den Plattenteller kurz
im Uhrzeigersinn anzustoßen. Dadurch wird die Belastung von Motor
und Antriebsriemen verringert.
5 Eine Wartung ist normalerweise nicht erforderlich. Solange der
Plattenspieler einwandfrei funktioniert, brauchen Sie nichts zu tun.
Nach ein paar Monaten kann das Setzen der Antivibrationsfüße dazu
führen, dass der Plattenspieler sich leicht nach hinten neigt. Aber das ist
kein Problem.
6 Verwenden Sie keine Schallplattenreiniger zum Einsatz während
des Abspielens oder üssige Reinigungsmittel. Berühren Sie die
Abspieloberäche von Schallplatten nicht. Sichtbarer Staub auf der
Schallplattenoberäche wird einfach von der Nadel beseitigt, und Staub,
der sich an der Nadel sammelt, kann ganz leicht weggeblasen werden.
VIEL SPASS BEIM MUSIKHÖREN!
SCHNELLSTART FÜR DAS WERKSEITIG INSTALLIERTE
TONABNEHMERSYSTEM
Der C 556 ist für eine einfache Einrichtung und Verwendung konzipiert.
Richten Sie das werkseitig installierte Tonabnehmersystem anhand der
folgenden Anweisungen ein.
1 Drücken Sie das Gegengewicht so nah
wie möglich an den Stopppunkt, um
die korrekte Auagekraft zu erhalten.
Dadurch wird der Tonarm automatisch
auf den empfohlenen Bereich für
die werkseitig installierte Nadel
eingerichtet (1,5 g – 2,0 g).
2 Stellen Sie den Anti-Skating-
Einsteller auf denselben Wert wie die
Auagekraft ein. Beispiel: Auagekraft
von 1,5 g = 1,5 g auf dem Anti-SkatingEinsteller.
Stop point
Tonearm
Counterweight
Bias slider
ERWEITERTE EINRICHTUNG
Ein Auagekraft-Druckmesser ist für einen ordnungsgemäßen Druck
erforderlich, wenn der werkseitig installierte Tonabnehmer durch einen
neuen oder anderen Tonabnehmer ersetzt wird. Die Kraft muss der
oberen Grenze des vom Tonabnehmerhersteller empfohlenen Bereichs
entsprechen.
1 Richten Sie den neuen Tonabnehmer wie gezeigt ordnungsgemäß aus.
A
Stylus tip
2 Stellen Sie die Tonabnehmerposition im Headshell so ein, dass die
Nadelspitze vertikal mit der Vorderseite der mit A gekennzeichneten
Önung ausgerichtet ist.
3 Stellen Sie sicher, dass der Tonabnehmer vor der endgültigen
Befestigung ordnungsgemäß im Headshell sitzt. Nicht zu fest anziehen!
4 Stellen Sie den Anti-Skating-Einsteller auf denselben Wert wie die
Auagekraft ein.
A
ANSCHLIESSEN DES C 556
Verwenden Sie externe Phonokabel, um den C 556 an einem Verstärker
anzuschließen. Verwenden Sie einen externen Phonovorverstärker (z. B.
einen aus der Phonovorverstärkerreihe von NAD), falls Ihr Verstärker keine
integrierte Phonostufe hat.
14
Page 15

TECHNISCHE DATEN
ALLGEMEIN
PLATTENSPIELER
Antriebssystem Riemenantrieb
Motor Synchronmotor mit hohem Drehmoment
Geschwindigkeiten 33,3 und 45,1 U/Min
Aufhängung 3 energieabsorbierende,
Synthetikgummifüße
TONARM
Bedienung Manuell
Länge 289 mm Gesamtlänge;
244 mm Drehgelenk bis Nadel
Eektive Masse 9 g
Überhang 19,1 mm
Kabelkapazität 150 - 400 pF
TONABNEHMERSYSTEMDATEN: ORTOFON OM5E
ÜBERTRAGUNGSEIGENSCHAFTEN
Frequenzgang ±2 dB (20 Hz - 20 kHz))
Kanalbalance 2 dB bei 1 kHz
Kanaltrennung 22 dB bei 1 kHz, 15 dB bei 15 kHz
Ausgangsspannung 4 mV bei 1 kHz mit 5 cm/s
Vertikaler Spurwinkel 20 Grad
Nadelradius Eliptisch 0,00072 x 0,0003 Zoll;
18µ x 8µ
Nadeltyp r/R 8/18µ
ELEKTRISCHE EIGENSCHAFTEN
Abschlussimpedanz 47 kOhm
Lastkapazität 200 – 600 pF
Spuleninduktivität 450 mH
Innenwiderstand 750 Ohm
MECHANISCHE EIGENSCHAFTEN
Systemgewicht 5 g
Auagekraft 1,5 – 2,0 g (15-20 mN)
Nadeltyp Stylus 5E
MECHANISCHE DATEN
Abmessungen des Geräts (B x H x T) bei
geschlossener Abdeckhaube
Nettogewicht 4 kg (8,8 lbs)
Versandgewicht 7 kg (15,4 lbs)
Änderungen der technischen Daten sind ohne Vorankündigung vorbehalten.
Aktuelle Dokumentation und Informationen über neue Eigenschaften des
C 556 nden Sie auf der Website www.nadelectronics.com.
447 x 115 x 360 mm
17 / x 4 / x 14 / Zoll
ENGLISHPORTUGUÊS FRANÇAISESPAÑOLITALIANODEUTSCHNEDERLANDSSVENSKAРУССКИЙ
15
Page 16

ENGLISH PORTUGUÊSFRANÇAIS ESPAÑOL ITALIANO DEUTSCH NEDERLANDS SVENSKA РУССКИЙ
DE C 556 GEBRUIKEN
Deze draaitafel werd voor een extreem goede muziekweergave ontworpen.
In het ontwerp zijn enkele kenmerken opgenomen die de geluidskwaliteit
verbeteren en die het mogelijk maken dat de fabricagekosten daar worden
gebruikt, waar zij het hardst nodig zijn.
BEKNOPTE HANDLEIDING VOOR HET INGEBOUWDE ELEMENT
De C 556 is ontworpen om probleemloos ingesteld en gebruikt te kunnen
worden. Volg de onderstaande aanwijzingen om het af fabriek ingebouwde
element in te stellen.
Voorbeeld: De toerentalverandering wordt tot stand gebracht door de
aandrijfriem handmatig van de ene poelie om de andere te leggen; zie
hieronder.
De kostenbesparing die voortvloeit uit de handmatige
snelheidsverandering maakt het gebruik van een zeer dure motor met
weinig trillingen mogelijk. Deze is veel nauwkeuriger dan de conventionele
ontwerpen die worden gebruikt.
AANTEKENING BIJ DE INSTALLATIE
1 Plaats de draaitafel op een niet trillende, vlakke ondergrond. Een lichte
plank die tegen de muur is bevestigd of een nis zouden ideaal zijn.
Vermijd holle of zware kasten en meubelstukken die op een houten
vloer staan.
2 Til de middelste naaf NIET op van het lager. Het lager wordt in de
fabriek gemonteerd met een lm van dik smeermiddel. Als deze lm
wordt verstoord, kan dit tot ernstige problemen met de draaisnelheid
en tot slijtage leiden.
3 De toonarm wordt automatisch tegen aarde gelegd via de afscherming
van de toonarmkabel. Er zou geen andere aarding nodig moeten zijn.
4 Bewaar de verpakking in geval de draaitafel in de toekomst moet
worden getransporteerd.
1 Duw het contragewicht zo dicht
mogelijk bij het stoppunt om het juiste
tracking-gewicht te verkrijgen. Dit
zal de toonarm automatisch instellen
binnen het aanbevolen tracking-bereik
van de af fabriek ingebouwde naald
(1,5 g - 2,0 g).
2 Stel de antiskating-afsteller in op
dezelfde waarde als het trackinggewicht. Bijvoorbeeld, 1,5 g trackinggewicht = 1,5 g op de antiskatingafsteller.
Stop point
Tonearm
Counterweight
Bias slider
GEAVANCEERDE INSTELLING
Een naalddrukmeter is nodig om de juiste benodigde neerwaartse druk
te verkrijgen bij het verwisselen van het ingebouwde element met een
nieuw of ander element. De neerwaartse druk moet overeenkomen met de
bovengrens van het bereik aanbevolen door de fabrikant van het element.
1 Lijn het nieuwe element correct uit.
A
A
TIPS EN SUGGESTIES
1 Houd het deksel dicht tijdens het afspelen van platen. Op deze manier
wordt voorkomen dat er stof op de platen valt en hoeven deze niet te
worden gereinigd. Ook kan hierdoor het geluid verbeteren.
2 Zet de draaitafel niet uit om een plaat te verwisselen. Schakel de
eenheid in alvorens er een plaat op te leggen en schakel hem pas uit
wanneer de laatste plaat is gespeeld. Platen verwisselen terwijl de
draaitafel draait, is gemakkelijker dan het lijkt!
3 Wanneer het einde van een zijde van de plaat is bereikt, til de naald dan
met het omhoog-/omlaag mechanisme van de plaat af.
4 Het wordt aanbevolen bij het inschakelen van de draaitafel, met name
bij 45 tpm, de draaitafel snel even met de klok mee te draaien terwijl de
AAN-schakelaar wordt ingedrukt. Hierdoor wordt de spanning van de
motor en riem afgenomen.
5 Onderhoud zou niet nodig moeten zijn. Als de draaitafel goed werkt,
laat deze dan met rust. Doordat de dempers zich zetten, kan het zijn
dat de draaitafel na een paar maanden wat naar achteren leunt, maar
dit is niet iets om zich zorgen om te maken.
6 Gebruik geen platenreiniger die moet worden gebruikt terwijl de plaat
wordt gedraaid en geen reinigers waarbij water of andere vloeistoen
worden gebruikt. Raak het speeloppervlak van de platen niet aan.
Zichtbare stof op de plaat wordt door de naald weggeveegd en stof op
de naald kan worden weggeblazen.
7 Gebruik geen poetsmiddelen op de draaitafel of het deksel. Reinigen of
stofvegen kan worden gedaan met een zachte katoenen stofdoek (licht
bevochtigd indien nodig).
Stylus tip
2 Stel de positie van het element in de headshell zo in dat de tip van de
naald verticaal uitgelijnd is met de voorzijde van gat A.
3 Zorg ervoor dat het element goed in de headshell rust voor het volledig
aan te draaien. Niet te vast aandraaien!
4 Stel de antiskating-afsteller in op dezelfde waarde als het tracking-
gewicht.
DE C 556 AANSLUITEN
Gebruik de externe phono-kabels om de C 556 op een versterker aan
te sluiten. Gebruik een externe phono-voorversterker (zoals één van de
Phono-voorversterkers van NAD) als uw versterker geen geïntegreerde
phonotrap heeft.
GENIET VAN DE MUZIEK!
16
Page 17

SPECIFICATIES
ALGEMEEN
DRAAITAFEL
Aandrijfsysteem Diemaandrijving
Motor Synchroonmotor met hoog koppel
Snelheid 33,3 en 45,1 tpm
Ophangingssysteem 3 energie absorberende synthetische
rubberen voeten
TOONARM
Werking Manueel
Lengte totale lengte 289 mm, draaipunt tot naald
244 mm
Eectieve massa 9 g
Overhang 19,1 mm
Capaciteit kabel 150-400 pF
SPECIFICATIE ELEMENT: ORTOFON OM5E
KARAKTERISTIEKEN TRANSDUCTOR
Frequentierespons ±2 dB (20 Hz – 20 kHz)
Kanaalbalans 2 dB bij 1 kHz
Kanaalscheiding 22 dB bij 1 kHz, 15 dB bij 15 kH z
Uitgangsspanning 4 mV bij 1 kHz, 5cm/sec.
Vertical tracking angle 20 graden
Naaldradius Elliptisch 0.00072 x 0.0003 inch;
18µ x 8µ
Naaldtype r/R 8/18µ
ELEKTRISCHE KARAKTERISTIEKEN
Belastingsweerstand 47 kOhm
Belastingscapaciteit 200-600 pF
Interne inductantie 450 mH
Belastingscapaciteit 750 Ohm
MECHANISCHE KARAKTERISTIEKEN
Gewicht element 5 g
Naalddruk 1,5 – 2,0 g (15-20 mN)
Naaldtype Stylus 5E
FYSIEKE SPECIFICATIES
Afmetingen van de unit (B x H x D) met
stofdeksel omlaag
Nettogewicht 4 kg (8,8 lbs)
Transportgewicht 7 kg (15,4 lbs)
Specicaties kunnen zonder kennisgeving vooraf worden gewijzigd.
Bezoek voor de laatste nieuwe documentatie en bijzonderheden www.
nadelectronics.com, u vindt hier de meest recente informatie over uw
C 556.
447 x 115 x 360 mm
17 / x 4 / x 14 / inch
ENGLISHPORTUGUÊS FRANÇAISESPAÑOLITALIANODEUTSCHNEDERLANDSSVENSKAРУССКИЙ
17
Page 18

ENGLISH PORTUGUÊSFRANÇAIS ESPAÑOL ITALIANO DEUTSCH NEDERLANDS SVENSKA РУССКИЙ
HUR DU ANVÄNDER C 556
Denna skivspelare har tagits fram för att ge en extremt god musikalisk
återgivning. I konstruktionen nns det era detaljer som förbättrar
ljudkvaliteten och fokusera tillverkningskostnaderna på de detaljer som
påverkar ljudet.
SNABBGUIDE FÖR FABRIKSMONTERAD PICKUP
C 556 ÄR designad för att sättas upp och användas snabbt och enkelt.
Du kommer igång med den fabriksmonterade pickupen med följande
instruktioner.
Exempel: Ändring av hastighet sker manuellt genom att man yttar
drivremmen mellan de olika drivhjulen enligt bilden nedan.
Besparingen medför att man använt en betydligt mer sostikerad motor än
vad man annars kunnat med automatisk hastighetsomkoppling.
BRA ATT VETA VID INSTALLATION
1 Skivspelaren bör monteras på en stabil plan yta. En hylla monterad på
en stabil vägg är idealiskt. Undvik placering på skåp eller andra möbler
som står på trägolv.
2 Lyft aldrig ur undertallriken ur sitt lager! Lagret är monterat på fabriken
med en tunn lm med smörjmedel. Om denna lm ändras kan det
skapa problem med hastighetsvariationer och ett ökat slitage.
3 Tonarmen jordas automatiskt genom skärmen i tonarmskablarna.
Ingen ytterliggare jordning behövs.
4 Spara kartongen ifall skivspelaren skulle behöva transporteras i
framtiden.
TIPS OCH FÖRSLAG
1 Ha som regel att stänga locket medan du spelar skivor. Detta hindrar
damm på skivorna och minskar behovet av rengöring. Ljudet kan också
förbättras något.
2 Lämna skivspelaren snurrande hela tiden om du spelar era skivor. Sätt
på skivspelaren innan du börjar och stäng inte av den förrän du spelat
alla skivorna du vill höra. Det är mycket lättare att byta skiva medan
skivtallriken snurrar än det låter.
3 Skivspelaren har ingen automatik som stänger av och lyfter tonarmen.
När skivan tar slut skall du inte glömma att lyfta tonarmen med
lyftarmen.
4 När man sätter på skivspelaren, speciellt vid 45varv/min,
rekommenderar vi att man skjuter på lätt med handen medsols när
man trycker på ”ON”. Detta minskar belastningen på motor och rem.
5 Normalt behövs inget underhåll. Om skivspelaren fungerar bra skall
man inte göra något. Skivspelarens fötter kan sjunka ihop lite efter ett
tag men det är inget att fästa någon uppmärksamhet vid.
6 Använd inga skivborstar som rengör skivan medan den spelas, eller
någon form av rengöring som använder vatten eller annan vätska.
Vidrör aldrig avspelningsytan på skivorna. Synligt damm på skivorna
föses undan av pickupens nål och det som samlas upp kan lätt blåsas
bort.
7 Använd ingen typ av polish på skivspelaren eller på locket. För att
rengöra skivspelaren räcker det med att torka av den med en mjuk
trasa, eventuellt lätt fuktad.
1 Tryck på motvikten så långt som m
öjligt mot stoppet så att du får korrekt
nåltryck. Detta ger automatiskt
tonarmen den korrekta nåltrycket för den
fabriksmonterade pickupen (1.5g – 2.0g).
2 Ställ in antiskatingreglaget på samma
värde som nålvikten. Exempelvis, 1.5g
nåltryck = 1.5g på antiskatingreglaget.
Stop point
Tonearm
Counterweight
Bias slider
AVANCERAD INSTÄLLNING
Du behöver en nålvåg för att kunna ställa in nåltrycket korrekt om du byter
till en annan typ av pickup. Nåltrycket skall ligga på den högre vikten inom
tillverkarens rekommendationer.
1 Justera in den nya pickupen korrekt.
A
Stylus tip
2 Justera in pickupens position i pickuphuset så att nålspetsen är vertikalt
i linje med framsidan på hålet märkt A.
3 Försäkra dig om att pickupen sitter rekt i pickupjuset innan skruvarna
dras åt. Spänn inte för hårt!
4 Ställ in antiskatingreglaget på samma värde som nålvikten.
A
ANSLUTNING AV C 556
Anslut signalkablarna från C 556 till en förstärkare. Använd en RIIAförstärkare (som exempelvis NADs egna Phono Preamplier serie) om din
förstaärkare inte har något inbyggt grammofonsteg.
GLÖM INTE ATT NJUTA AV MUSIKEN!
18
Page 19

SPECIFIKATIONER
ALLMÄNT
SKIVSPELARE
Drivning Remdrivning
Motor Synkronmotor med högt vridmoment
Hastighet 33,3 och 45,1 varv/min
Upphängning
TONARM
Drift Manuell
Längd
Eektiv massa 9 g
Överhäng 19,1 mm
Kabel kapacitans 150-400 pF
PICKUP SPECIFIKATION: ORTOFON OM5E
ÖVERFÖRINGSKARAKTÄRISTIK
Frekvensgång ±2 dB (20 Hz – 20 kHz)
Kanalbalans 2 dB vid 1 kHz
Kanalseparation 22 dB vid 1 kHz, 15 dB vid 15 kHz
Utsignalnivå 4 mV vid 1 kHz, 5 cm/sec.
Vertikal spårvinkel 20 grader
Nålradie
Nåltyp r/R 8/18µ
3 energi absorberande syntetiska
gummifötter
289 mm totallängd;
244 mm vridpunkt till nål
Elliptisk 0,00072 x 0,0003 Tum;
18µ x 8µ
ELEKTRISK KARAKTÄRISTIK
Lastresistans 47 kOhm
Last kapacitans 200–600 pF
Intern induktans 450 mH
Intern resistans 750 Ohm
MEKANISK KARAKTÄRISTIK
Pickupvikt 5 g
Nåltryck 1,5 – 2,0 g (15-20 mN)
Nåltyp Stylus 5E
FYSISKA MÅTT
Apparatens mått (B x H x D) med locket
nedfällt
Nettovikt 4 kg (8,8 Pounds)
Bruttovikt 7 kg (15,4 Pounds)
Specikationerna kan ändras utan föregående meddelande. För
uppdaterad dokumentation och ändrade funktioner hänvisar vi till www.
NADelectronics.com där du hittar den senaste informationen om din C 556.
447 x 115 x 360 mm
17 / x 4 / x 14 / Tum
ENGLISHPORTUGUÊS FRANÇAISESPAÑOLITALIANODEUTSCHNEDERLANDSSVENSKAРУССКИЙ
19
Page 20

www.NADelectronics.com
©2011 NAD ELECTRONICS INTERNATIONAL
A DIVISION OF LENBROOK INDUSTRIES LIMITED
All rights reserved. NAD and the NAD logo are trademarks of NAD Electronics International, a division of Lenbrook Industries Limited.
No part of this publication may be reproduced, stored or transmitted in any form without the written permission of NAD Electronics International.
C556_8LANG_O M_V04 07/11
 Loading...