

Page 1

m
be certain.
Component RPC® Pro Software Reference
Volume 1 of 2
100-114-916 L
Page 2

Copyright information © 2011 MTS Systems Corporation. All rights reserved.
Tradema rk in for m ation MTS, RPC, and Component RPC are registered trademarks and cRPC, eTIM,
SWIFT, MAST, and Remote Parameter Control are trademarks of MTS Systems
Corporation within the United States. These trademarks may be protected in
other coun t ries.
Proprietary information Software use and license is governed by MTS’s End User License Agreement
which defines all rights retained by MTS and granted to the End User. All
Software is proprietary, confidential, and owned by MTS Systems Corporation
and cannot be copied, reproduced, disassembled, decompiled, reverse
engineered, or distributed without express written consent of MTS.
Software validation and
verification
Publication information
MTS software is developed using established quality practices in accordance
with the requirements detailed in the ISO 9001 standards. Because MTSauthored software is delivered in binary format, it is not user accessible. This
software will not change over time. Many releases are written to be backwards
compatible, creating another form of verification.
The status and validity of MTS’s operating software is also checked during
system verification and routine calibration of MTS hardware. These controlled
calibration processes compare the final test results after statistical analysis
against the predicted response of the calibration standards. With these established
methods, MTS assures its customers that MTS products meet MTS’s exacting
quality standards when initially installed and will continue to perform as intended
over time.
MANUAL PART NUMBER PUBLICATION DATE
100-114-916 L September 2011
Page 3

Contents
Technical Support 17
How to Get Technical Support 17
Before You Contact MTS 18
If You Contact MTS by Phone 19
Problem Submittal Form in MTS Manuals 20
Preface 21
Before You Begin 21
Documentation Conventions 21
Component RPC Pro Software Reference
3
Page 4

Installation and System Settings 23
RPC PC Requirements 25
Data Manager Server PC Requirements 27
Software License Agreement 29
Software Product Installation 32
Install RPC Pro or Component RPC Pro 35
Install MTS Licensing Software 36
Update License File when Server Name Changes 38
Install RPC HOSTEXEC Service 39
Install RPC Controller Status 40
Install or Upgrade to SQL Server Express 2008 41
Install RPC Data Manager Server 42
Data Manager Administrative Tasks 44
Controller Entries in Hosts File 45
Hosts File Controller Identifiers 48
Hosts File Controller Examples 50
Remote PC 58
Remote PC Setup on Windows XP Systems 61
Remote PC Setup on Windows Vista and Windows 7 73
Xtest Protocol 86
Controller Network Protocol 88
Firewall Setup for RPC License Software 90
Windows XP/Vista Firewall Setup for RPC License Software 91
Windows 7 Firewall Setup for RPC License Software 95
Firewall Setup for Remote PC 97
Windows XP/Vista Firewall Setup for Remote PC 98
Windows 7 Firewall Setup for Remote PC 104
System Performance 114
Multiple RPC User Accounts 121
4
Component RPC Pro Software Reference
Page 5

Introduction 123
About the MTS RPC Software 125
RPC Process Overview 127
RPC Six Step Process 128
Floating Point Time Histories 131
Start the RPC Project Manager 133
Software License Agreement 134
License Diagnostics Wizard 136
RPC Project Manager 142
Project Explorer 146
User Descriptions 148
Create a New Project 149
Open an Existing Project 150
Start an RPC Application 151
Seamless Application Switching 152
About the RPC Applications 153
Create or Open Setup Window 155
Attach to Controller 156
Setup Template Overview 157
Create Setup 158
Create Setup from a User Template 164
Open Setup 166
Application Workspace Overview 167
Workspace Template Overview 168
Create Workspace without User Templates 169
Create Workspace from a User Template 171
Create New Data Set 172
Open Existing Workspace 173
Application Templates 174
Tools and Process Overview 176
Shortcuts in Project Manager Taskbar 177
Project Options 178
License Checkout 182
Generating Reports 184
Component RPC Pro Software Reference
5
Page 6

Project Report Generation 186
Application Report Overview 190
Modify Application or Project Report Template 191
Filter and Sort File Names in a List 193
How to Filter File Names in a List 194
Sorting File Names in a List 197
Different File List Options 198
Virtual Test Option 199
Online Help 204
6
Component RPC Pro Software Reference
Page 7

Setup Pro 215
Setup Pro Features 217
Setup Pro Window 218
Station Drive Tab 221
Define Drive Channels in Setup 226
Station Response Tab 229
Define Response Channels in Setup 233
Computed Response Channel Expressions 235
Define Computed Response Channels in Setup 237
Computed Response Channel Example 239
Event Action Tab 241
Events Supported by MTS Controllers 242
Actions Supported by MTS Controllers 245
How to Link Actions to Events 248
How to Create Generic Events 249
Chain Events 250
How to Create Action Groups 252
How to Delete Action Groups 254
How to Use the Event Editor 255
How to Change Digital Output States 257
Display and Log Message Action 258
Time Delay Before Action 259
Extra Header Data Tab 260
Header Data in New Setup 262
Import Header Data 263
Copy and Paste Header Data Between Setups 264
Guidelines for Adding Extra Header Data 265
Filter Settings Tab 266
Setup Pro Channel Properties 268
Add Active Channel Properties 269
Generate Channel Descriptors 270
Add a Controller Hosts Entry 271
Attach to Controller and Station 275
Import Setup 277
Component RPC Pro Software Reference
7
Page 8

Import/Export Setup Limits 281
Setup Pro Save Options 285
Setup Pro Print Options 286
Open Setup from an RPC Application 287
Setup Options 289
Setup Pro Application Report 293
Acquire Pro 295
About the Acquire Application 296
Getting Acquired Data into the Project 297
Selecting Existing Time Histories 299
Checking Time History Data 301
Viewing Problems 309
Running a Process on Selected Time Histories 319
Acquire Options 320
Acquire Pro Application Report 333
8
Component RPC Pro Software Reference
Page 9

Analyze Pro 337
About the Analyze Pro Application 338
The Analyze Pro Desktop 339
Editing Data 342
Working with Data 343
Editing Time History Data 344
Saving Time Histories 347
Copying Data 348
Saving a Workspace 350
Saving a Data Set 351
Using Regions 352
Selecting Regions 354
Saving Regions 363
Opening a Region Set 364
Edit and Analysis Operations 366
Guidelines to Follow Prior to Editing 368
Explanation of Operations 369
When Editing is Complete 371
Using Data Flags 372
Using Triggers 374
Analyze Options 376
Component RPC Pro Software Reference
9
Page 10

Model Pro 381
Model Pro Features 382
White Noise Time History Generation Methods 383
FRF Process 384
Model Drive Setup 385
Sequential Excitation Mode 386
Simultaneous Excitation Mode 388
Sequential XDrive Excitation Mode 390
General Mode 392
Drive Shape Tab 395
Drive Shape Tabular Definition 396
Drive Shape Existing Definition 398
Drive Amplitude Tab 399
Playout White Noise Drive 401
System Model Analysis 404
Model Options 411
Model Pro Application Report 414
10
Component RPC Pro Software Reference
Page 11

Simulate Pro 417
Simulate Pro Features 418
Simulate Pro Requirements 419
Simulate Iteration Process 420
Simulate Drive Setup 421
Response Tab 423
Model Tab 426
Limits Tab 428
RMS Error Limits 429
Drive Limits 430
Response Limits 431
Damage Limits 432
Execute Tab 434
Execute Tab Iteration Control 435
Execute Tab General Plots 438
Execute Tab Damage Monitoring Types 441
Execute Tab Standard Damage 442
Execute Tab ZXP Damage 445
Execute Tab Gains 449
Execute Simulation Iterations 453
Finish Tab 455
Turbo Adaptive Model 459
Turbo FRF Outputs 460
Turbo Parameters 461
Analyze Simulation Iterations 464
Simulate Options 467
Simulate Pro Application Reports 474
Component RPC Pro Software Reference
11
Page 12

Test Pro 481
Test Performance Guidelines 482
Sequence and Non-Sequence Mode 484
About the Test Pro Application 485
The Test Pro Desktop 486
Using Test Pro to Run Tests 488
Define Sequences Tab 489
Defining Sequences 492
Sequence Builder 497
Matrix Depletion Algorithm (MDA) 497
Drive File Randomizer 499
Sequence Builder - Save and Import 502
Sequence Builder - Options 502
Adding/Removing Sequence Events 504
Equivalent Usage 510
Define Monitoring Tab 512
Point-by-Point Monitoring 513
Trend Monitoring 518
Fatigue Per-Pass Monitoring 536
Fatigue Cumulative Monitoring 549
Spectral Monitoring 553
ZXP Monitoring 557
Execute Test Tab 567
Status Tab 576
Test Status 580
Point-by-Point Status 582
Trend Status 584
Fatigue Status 589
Spectral Status 593
ZXP Status 596
Test Options 599
Test Pro Application Report 604
12
Component RPC Pro Software Reference
Page 13

RPC Plotters 611
Time History Plotter 612
Time History Editor 622
Running a Pre-configured Tool 640
Adding a Tool to the Interactive Plot Menu 641
Configuring a Tool or Process in Editor Plot 643
Removing a Tool from the Interactive Plot Menu 643
Save Plot Menu Tool Configurations for Use in Future Projects 644
XY Regression of Time History Data 645
Matrix Plotter 647
Histogram Plotter 656
File and Channel Information Window 663
Plotter Properties 664
About Plotter Properties 664
Areas Properties 665
Legend Properties 666
Title Properties 668
Trace Properties 669
X-Axis Properties 670
Y-Axis Properties 673
Z-Axis Properties 676
Color Window 679
Font Window 679
Manage Plotter Settings 680
Component RPC Pro Software Reference
13
Page 14

Reference 683
Project Explorer 684
Working with Project Data 686
Header Viewer 692
Opening the Header Viewer in Project Explorer 693
Explorer File Management 693
File Name Filter 694
Log Files 697
Project Log 697
Error Log 699
Error Messages 701
Signal Level Indicator 702
Offline SLI 702
Drive Statistics SLI 704
Online SLI 705
SLI Statistics tab 707
SLI Miscellaneous tab 709
Control Panel 712
Controller Status Utility 716
Header Editor 718
Application Menus 720
File Menu 720
Mode Menu 722
View Menu 723
Tools Menu 724
Window Menu 724
Help Menu 724
14
Component RPC Pro Software Reference
Page 15

cRPC III Project Converter 725
About the cRPC III Project Converter Utility 726
Using the cRPC III Project Converter Utility 727
CRPC III Conversion Process Notes 729
Setup 729
Model 730
Simulate 731
Component RPC Hardware Setup 733
Overview 734
Component RPC Setup 735
Component RPC Hardware 736
Circuit Board Installation 742
Circuit Board Configurations 745
ACQPC Board Configuration 745
FILPC Board Configuration 751
Digital I/O 753
Calibration 755
Controller Setup 767
Introduction 768
RPC Software Setup 769
FlexTest IIs 770
FlexTest IIm and FlexTest II CTM 772
Component RPC Pro Software Reference
15
Page 16

Tools Introduction 779
Accessing Tools 780
User Tool Groups 783
Using Wildcards 789
Selecting Input Data 794
Naming Output Data 795
File List Filtering and Sorting 796
Creating Reports 801
Configuring Channel Tables 802
Using Tools in a Process 804
Tools Options 807
Project Level Fatigue Tool Defaults 814
Histogram Bin Size Calculation 818
Component RPC Pro Tools 819
Coherence 820
Filter 824
Spectrums 826
Index 833
16
Component RPC Pro Software Reference
Page 17

Technical Support
How to Get Technical Support
Start with your
manuals
Technical support
methods
The manuals supplied by MTS provide most of the information you need to
use and maintain your equipment. If your equipment includes software, look
for online help and README files that contain additional product
information.
If you cannot find answers to your technical questions from these sources, you
can use the Internet, e-mail, telephone, or fax to contact MTS for assistance.
MTS provides a full range of support services after your system is installed. If
you have any questions about a system or product, contact Technical Support
in one of the following ways.
www.mts.com The web site provides access to our technical support staff by means of an
online form:
www.mts.com > Contact MTS > Service & Technical Support button
E-mail RPC@mts.com
Telephone MTS Call Center 800-328-2255
Weekdays 7:00 A.M. to 5:00 P.M., Central Time
Fax 952-937-4515
Please include “Technical Support” in the subject line.
Outside the U.S. For technical support outside the United States, contact your local sales and
service office. For a list of worldwide sales and service locations and contact
information, use the Global MTS link at the MTS web site:
www.mts.com > Global MTS > (choose your region in the right-hand
column) > (choose the location closest to you)
Component RPC Pro Software Reference Technical Support
17
Page 18

Before You Contact MTS
MTS can help you more efficiently if you have the following information
available when you contact us for support.
Know your site
number and system
number
Know information
from prior technical
The site number contains your company number and identifies your equipment
type (such as material testing or simulation). The number is typically written on
a label on your equipment before the system leaves MTS. If you do not know
your MTS site number, contact your sales engineer.
Example site number: 571167
When you have more than one MTS system, the system job number identifies
your system. You can find your job number in your order paperwork.
Example system number: US1.42460
If you have contacted MTS about this problem before, we can recall your file
based on the:
assistance
• MTS notification number
• Name of the person who helped you
Identify the problem Describe the problem and know the answers to the following questions:
• How long and how often has the problem occurred?
• Can you reproduce the problem?
• Were any hardware or software changes made to the system before the
problem started?
Know relevant
computer information
18
Technical Support
• What are the equipment model numbers?
• What is the controller model (if applicable)?
• What is the system configuration?
For a computer problem, have the following information available:
• Manufacturer’s name and model number
• Operating software type and service patch information
• Amount of system memory
• Amount of free space on the hard drive where the application resides
Component RPC Pro Software Reference
Page 19

• Current status of hard-drive fragmentation
• Connection status to a corporate network
Know relevant
For software application problems, have the following information available:
software information
• The software application’s name, version number, build number, and (if
available) software patch number. This information can typically be found
in the About selection in the Help menu.
• The names of other applications on your computer, such as:
– Anti-virus software
– Screen savers
– Keyboard enhancers
–Print spoolers
– Messaging applications
If You Contact MTS by Phone
A Call Center agent registers your call before connecting you with a technical
support specialist. The agent asks you for your:
• Site number
• Name
• Company name
• Company address
• Phone number where you can be reached
If your issue has a notification number, please provide that number. A new
issue will be assigned a unique notification number.
Identify system type To enable the Call Center agent to connect you with the most qualified
technical support specialist available, identify your system as one of the
following types:
• Electromechanical material test system
• Hydromechanical material test system
• Vehicle test system
Component RPC Pro Software Reference Technical Support
19
Page 20

• Vehicle component test system
• Aero test system
Be prepared to
Prepare to perform troubleshooting while on the phone:
troubleshoot
• Call from a telephone close to the system so that you can implement
suggestions made over the phone.
• Have the original operating and application software media available.
• If you are not familiar with all aspects of the equipment operation, have an
experienced user nearby to assist you.
Write down relevant
In case Technical Support must call you:
information
• Verify the notification number.
• Record the name of the person who helped you.
• Write down any specific instructions.
After you call MTS logs and tracks all calls to ensure that you receive assistance for your
problem or request. If you have questions about the status of your problem or
have additional information to report, please contact Technical Support again
and provide your original notification number.
Problem Submittal Form in MTS Manuals
Use the Problem Submittal Form to communicate problems with your
software, hardware, manuals, or service that are not resolved to your
satisfaction through the technical support process. The form includes check
boxes that allow you to indicate the urgency of your problem and your
expectation of an acceptable response time. We guarantee a timely response—
your feedback is important to us.
20
Technical Support
Access the Problem Submittal Form:
• In the back of many MTS manuals (postage paid form to be mailed to
MTS)
• www.mts.com > Contact Us > Problem Submittal Form button
(electronic form to be e-mailed to MTS)
Component RPC Pro Software Reference
Page 21

Preface
Before You Begin
Safety first! Before you use your MTS product or system, read and understand the Safety
manual and any other safety information provided with your system. Improper
installation, operation, or maintenance can result in hazardous conditions that
can cause severe personal injury or death, or damage to your equipment and
specimen. Again, read and understand the safety information provided with
your system before you continue. It is very important that you remain aware of
hazards that apply to your system.
Other MTS manuals In addition to this manual, you may receive additional manuals in paper or
electronic form.
You may also receive an MTS System Documentation CD. It contains an
electronic copy of the manuals that pertain to your test system, such as:
• Hydraulic and mechanical component manuals
• Assembly drawings
• Parts lists
• Operation manual
• Preventive maintenance manual
Controller and application software manuals are typically included on the
software CD distribution disc(s).
Documentation Conventions
The following paragraphs describe some of the conventions that are used in
your MTS manuals.
Hazard conventions Hazard notices may be embedded in this manual. These notices contain safety
information that is specific to the activity to be performed. Hazard notices
immediately precede the step or procedure that may lead to an associated
hazard. Read all hazard notices carefully and follow all directions and
recommendations. Three different levels of hazard notices may appear in your
manuals. Following are examples of all three levels.
Component RPC Pro Software Reference Preface
21
Page 22

Note For general safety information, see the safety information provided
with your system.
DANGER
Danger notices indicate the presence of a hazard with a high level of risk which,
if ignored, will result in death, severe personal injury, or substantial property
damage.
WARNING
Warning notices indicate the presence of a hazard with a medium level of risk
which, if ignored, can result in death, severe personal injury, or substantial
property damage.
CAUTION
Caution notices indicate the presence of a hazard with a low level of risk which,
if ignored, could cause moderate or minor personal injury or equipment damage,
or could endanger test integrity.
Notes Notes provide additional information about operating your system or highlight
easily overlooked items. For example:
Special terms The first occurrence of special terms is shown in italics.
Illustrations Illustrations appear in this manual to clarify text. They are examples only and
Electronic manual
conventions
Hypertext links The electronic document has many hypertext links displayed in a blue font. All
22
Preface
Note Resources that are put back on the hardware lists show up at the
end of the list.
do not necessarily represent your actual system configuration, test application,
or software.
This manual is available as an electronic document in the Portable Document
File (PDF) format. It can be viewed on any computer that has Adobe Acrobat
Reader installed.
blue words in the body text, along with all contents entries and index page
numbers, are hypertext links. When you click a hypertext link, the application
jumps to the corresponding topic.
Component RPC Pro Software Reference
Page 23

Installation and System Settings
Contents RPC PC Requirements 25
Data Manager Server PC Requirements 27
Software License Agreement 29
Software Product Installation 32
Install RPC Pro or Component RPC Pro 35
Install MTS Licensing Software 36
Update License File when Server Name Changes 38
Install RPC HOSTEXEC Service 39
Install RPC Controller Status 40
Install or Upgrade to SQL Server Express 2008 41
Install RPC Data Manager Server 42
Data Manager Administrative Tasks 44
Controller Entries in Hosts File 45
Hosts File Controller Identifiers 48
Hosts File Controller Examples 50
Remote PC 58
Remote PC Setup on Windows XP Systems 61
Remote PC Setup on Windows Vista and Windows 7 73
Xtest Protocol 86
Controller Network Protocol 88
Firewall Setup for RPC License Software 90
Windows XP/Vista Firewall Setup for RPC License Software 91
Windows 7 Firewall Setup for RPC License Software 95
Firewall Setup for Remote PC 97
Windows XP/Vista Firewall Setup for Remote PC 98
Windows 7 Firewall Setup for Remote PC 104
System Performance 114
Component RPC Pro Software Reference Installation and System Settings
23
Page 24

Multiple RPC User Accounts 121
Installation and System Settings
24
Component RPC Pro Software Reference
Page 25

RPC PC Requirements
Overview Before installing the RPC software, ensure the PC meets the minimum system
requirements. Ideally, the PC should meet the recommended syst em requirements
for improved performance.
RPC PC Requirements
PC hardware
requirements
COMPONENT MINIMUM RECOMMENDED
Processor
RAM
Available disk space
Monitor
Supported operating
The following table lists the requirements that the PC must have in order to run
the software.
Intel Pentium, 1.0 GHz Intel Core Duo, 3.16 GHz
1 GB 2 GB
3 GB 6 GB (or more)
17 inch monitor
Resolution 1024 x 768
65,536 or high colors
The RPC software can run on any of the following operating systems:
21 inch monitor
Resolution 1280 x 1024
High or true colors
systems
• Windows XP 32 bit Professional with Service Pack 3
• Windows Vista 32 bit Business with Service Pack 2
• Windows Vista 64 bit Business with Service Pack 2
• Windows 7 32 bit Professional
• Window 7 64 bit Professional
Localization The RPC software can run on a supported operating system in any of the
following language versions:
• English
• German
• French
• Japanese
Component RPC Pro Software Reference Installation and System Settings
25
Page 26

RPC PC Requirements
Application software The RPC software requires one of the following applications:
• Office 2003
• Office XP
• Office 2007
• Office 2010
Documentation
The following software is needed to view the online documentation:
software
• Microsoft Internet Explorer 7, or later, is needed to view the online help.
• Acrobat Reader 7, or later, is needed to view the PDF manuals.
Installation and System Settings
26
Component RPC Pro Software Reference
Page 27

Data Manager Server PC Requirements
Data Manager Server PC Requirements
Overview Before installing the Data Manager Server software, ensure the PC meets the
minimum system requirements. Ideally, the PC should meet the recommended
system requirements for improved performance.
PC hardware
requirements
COMPONENT MINIMUM RECOMMENDED
Server type
Processor
RAM
Hard drive
Available disk space
Monitor
Supported operating
systems
The following table lists the requirements that the PC must have in order to run
the Data Manager Server software.
If the RPC Pro/Component RPC Pro software and the Data Manager Server
software will be installed on the same PC, make sure the PC meets the
requirements of both. Where the component requirements overlap, the Data
Manager Ser ver requirem ents should be used.
Single-user server Multi-user server
Intel Pentium, 1.0 GHz Intel Core Duo, 3.16 GHz
1 GB 2 GB
20 GB 50 GB (or mo re), RAID-5 Disk
Array
15 GB 40 GB (or more)
17 inch monitor
Resolution 1024 x 768
65,536 or high colors
Data Manager Server software can run on any of the following operating
systems:
21 inch monitor
Resolution 1280 x 1024
High or true colors
• Windows XP 32 bit Professional with Service Pack 3
• Windows Vista 32 bit Business with Service Pack 2
• Windows Vista 64 bit Business with Service Pack 2
• Windows 7 32 bit Professional
• Window 7 64 bit Professional
Component RPC Pro Software Reference Installation and System Settings
27
Page 28

Data Manager Server PC Requirements
Localization Data Manager Se rver sof twar e can run on a s uppor ted op erating sys tem in any of
the following language versions:
• English
• German
• French
• Japanese
Installation and System Settings
28
Component RPC Pro Software Reference
Page 29
Software License Agreement
You have two opportunities to accept the terms of the MTS Software License
Agreement:
• When the software is installed
• When you launch the software
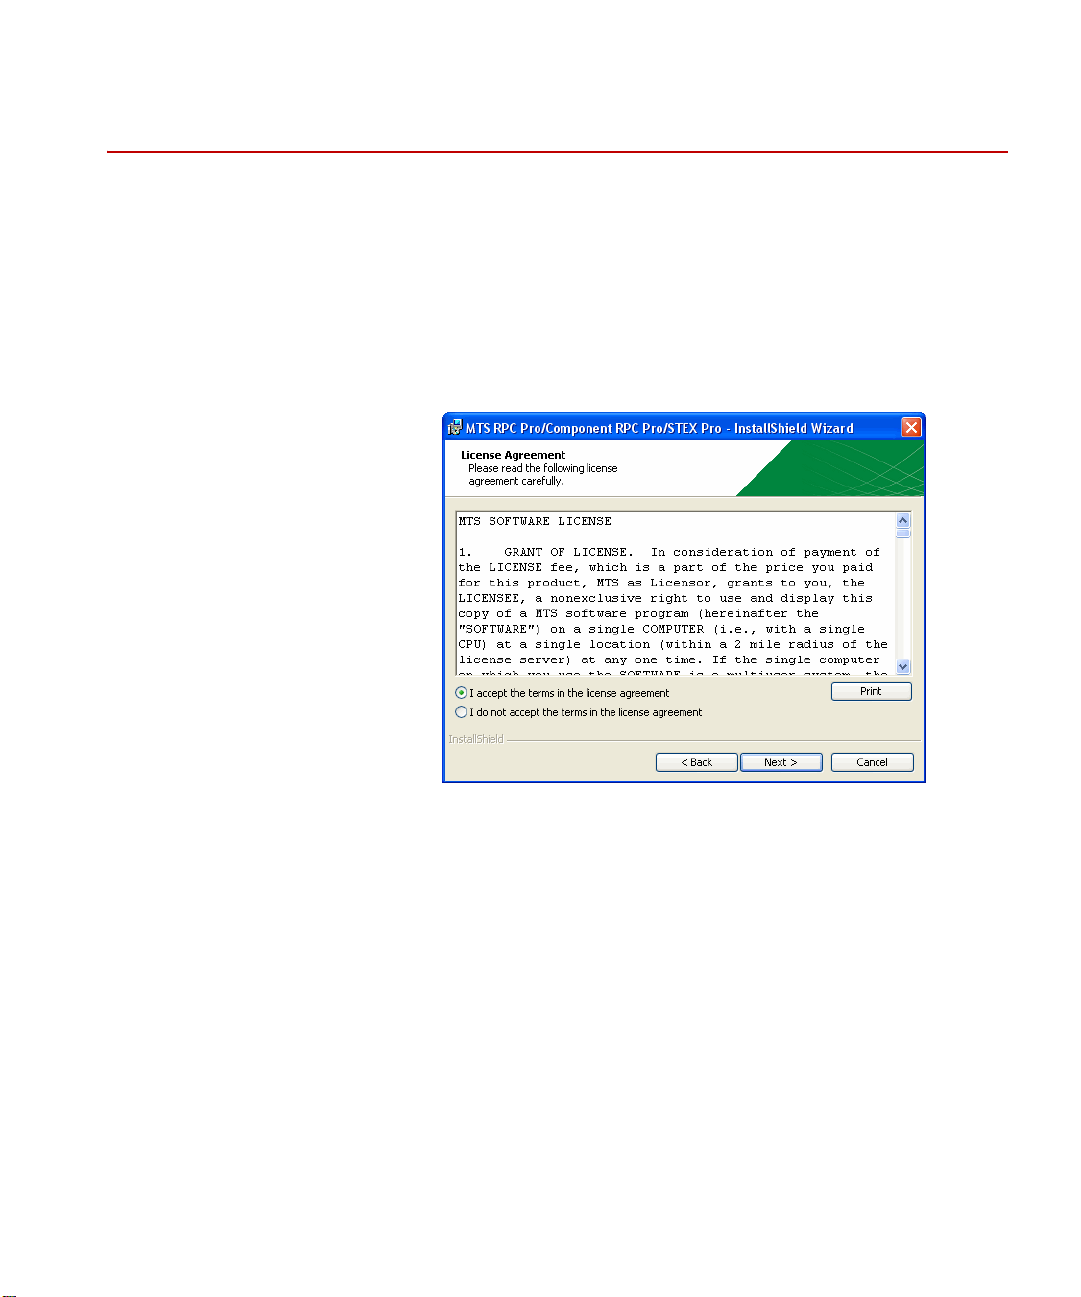
At installation Near the beginning of the software installation process, the MTS Software License
Agreement is displayed in the following window:
Software License Agreement
You must click I accept the terms in the license agreement and Next to proceed
with the installation process. If you click I do not accept the terms in the license
agreement and Next, the installation process is terminated and no software is
installed.
Component RPC Pro Software Reference Installation and System Settings
29
Page 30
Software License Agreement
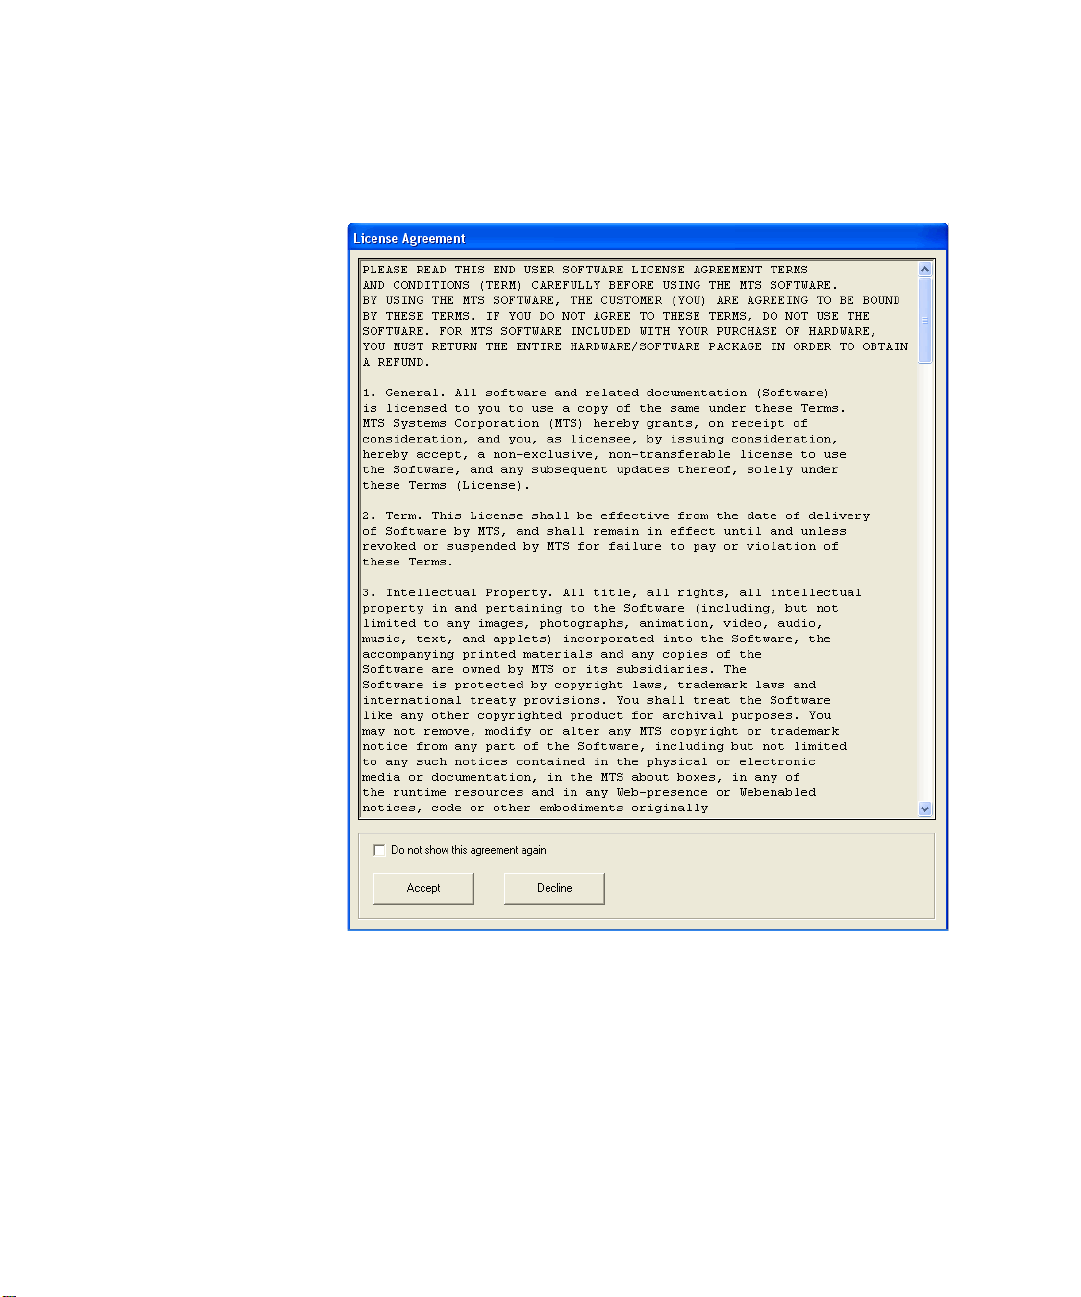
At launch Regardless of whether the license agreement is accepted at installation, the
acceptance of the terms must also be verified when the so ftware is launched. This
verification need only be done once. The first time you launch the software
(Project Manager) the following window appears:
Installation and System Settings
30
Component RPC Pro Software Reference
Page 31

Software License Agreement
Here are your choices:
• If you check the Do not show this agreement again check box and click
Accept, the software launches and you are never asked to accept the terms
of the agreement again unless you re-install or upgrade the software.
• If you click Accept but do not check the Do not show this agreement
again check box, the software launches. However, the window appears
again the next time you launch the software.
• If you click Decline, the software exits.
Component RPC Pro Software Reference Installation and System Settings
31
Page 32

Software Product Installation
Software Product Installation
Getting started with
the installations
Important If prompted, restart the computer at the end of each installation. When the
Main RPC Software
Product Installation
Log onto the computer using an account that has Administrator privileges.
Close all applications and place the Installation DVD in its drive.
The RPC Pro, Component RPC Pro, and STEX Pro Software and MTS Licen sing
Software installations are on the first DVD. All other product installations are on
the second DVD.
Some components may not be applicable to your system. Install only the
components that you purchased.
computer is restarting, log on to Windows using the same administrator account
that the software was installed under. Doing this allows the installation program
to finish setting up the files. Then, start the software to verify that it is properly
installed. After that, users can log on using their own account.
The first installation DVD provides the following options.
Installation and System Settings
32
Click Install Products to open the Install Products page, where you can then
choose to install RPC Pro, Component RPC Pro, STEX Pro, or MTS Licensing
Software.
Component RPC Pro Software Reference
Page 33

Software Product Installation
Click View Readme Files to access the Installation Help, Readme file, License
Agreement, and Software Assistance form. The Readme file contains important
information.
Click Contact Us to learn the best method for contacting MTS.
Click Exit to exit the installation program.
Other RPC Software
The second installation DVD provides the following options.
Product Installations
Component RPC Pro Software Reference Installation and System Settings
33
Page 34

Software Product Installation
Click Install Products to open the Install Products page, where you can then
choose to install RPC HOSTEXEC Service, RPC Controller Status, Component
RPC Hardware settings, SQL Server Express 2008, or RPC Data Manager
Server.
Installation and System Settings
34
Click Contact Us to learn the best method for contacting MTS.
Click Exit to exit the installation program.
Component RPC Pro Software Reference
Page 35

Install RPC Pro or Component RPC Pro
Software Product Installation
Installation
instructions
1. Ensure the computer meets the System Requirements.
2. Click on RPC Pro or Component RPC Pro in the Ins tall Produ c ts page.
3. Follow the instructions that are provided in the setup windows.
The setup program automatically detects and removes any previous version
of MTS RPC Software.
Setup will then guide you through the installation steps. First, the MTS RPC
Software will be installed, and then Data Manager client software will be
installed.
4. Restart the computer at the end of the installation.
5. Log on to Windows using the same administrator account that the software
was installed under.
Doing this allows the installation program to finish setting up the files.
6. Start the MTS RPC Software to verify that it is properly installed. After that,
users can log on using their own account.
Component RPC Pro Software Reference Installation and System Settings
35
Page 36

Software Product Installation
Install MTS Licensing Software
Who should install Anyone who received an RPC license CD must install the MTS Licensing
Software on the appropriate computer(s). This includes customers upgrading to
the latest version of RPC software, new customers or customers that have
purchased advanced features.
MTS Licensing
Software overview
Client versus server
license install
Installation
instructions
MTS Licensing Software must reside on the RPC workstation(s). If the latest
version of Data Manager Server software is going to be installed on a separate
computer, make sure to install the MTS Licensing Software on that computer as
well.
Determine whether the licensing software should be installed as a client or serv er .
If you have an RPC License CD that contains the license file specifically for your
computer’s physical network address, your computer will be acting as a license
server for itself.
If the MTS Licensing Software is installed using a license file built for another
computer’s physical network address, your computer will be the license client.
1. Click MTS Licensing Software in the Install Products page.
2. Follow the instructions that are provided in the setup windows.
3. When prompted, choose to install as Client or as Server.
Installation and System Settings
36
4. Follow these steps when prompted for the location of the MTS license file:
Component RPC Pro Software Reference
Page 37

Software Product Installation
A. Insert the RPC License CD.
B. If you already know the drive letter for the CD, enter it in the box (for
example E:\), or click Browse and then choose the drive for the CD in
the window that appears.
C. Click Next to install the MTS license.
5. Restart the computer at the end of the installation.
6. If you want to install more RPC software, insert the RPC Installation CD
after the computer has restarted.
Component RPC Pro Software Reference Installation and System Settings
37
Page 38

Software Product Installation
Update License File when Server Name Changes
License update
examples
If the name of the license server computer changes some time after the MTS
license software was installed, the license file would need updating to reflect the
computer name change.
• If the license server is used to serve itself, the license file would need
updating (locally) to reflect the new name of the computer.
• If the license server is used to serve other client computers, the license file
on the server and client computers would need updating to reflect the new
name of the license server. If the name of the license client computer
changes, the license file would not need updating.
Note If the computer’s network card has changed since the MTS license
software was installed, contact MTS.
Location of license file The mts_license.dat file is typically located in the C:\MTS\License directory. The
location of the license directory may vary depending on your installation.
Update server name in
license file
The first line of the mts_license.dat file specifies the computer name. For
example:
SERVER old-computer-name 0011550D6047
In this example, replace <old-computer-name> with the new Host name of the
computer.
Installation and System Settings
38
After the license file is updated, restart the computer to restart the FLEXlm
License Manager service.
Component RPC Pro Software Reference
Page 39

Software Product Installation
Install RPC HOSTEXEC Service
Who should install New MTS RPC customers using an MTS 498 ASC controller should install the
HOSTEXEC Service.
RPC HOSTEXEC
Service overview
Installation
instructions
RPC HOSTEXEC Service controls data flow between the RPC software and the
MTS 498 ASC controller.
1. Click RPC HOSTEXEC Service in the Install Products page.
2. Follow the instructions that are provided in the setup windows.
The setup program automatically detects any previous version of RPC
HOSTEXEC Service. If setup finds a previous version, choose to Uninstall
the Previous Version, and then also choose to Remove All Shared
Components when prompted.
After the previous version of software is removed, setup will continue to
guide you through the installation steps.
3. Restart the computer if prompted at the end of the installation.
Component RPC Pro Software Reference Installation and System Settings
39
Page 40

Software Product Installation
Install RPC Controller Status
Who should install New customers who purchased a li cense for RPC Controll er S tatus sho uld install
this software.
RPC Controller Status
overview
Installation
instructions
The RPC Controller Status utility is used for monitoring the state of a specified
controller station.
RPC Controller Status is a licensed option, so you must also install the MTS
Licensing Software.
1. Click RPC Controller Stat us in the Install Products page.
2. Follow the instructions that are provided in the setup windows.
3. Restart the computer if prompted at the end of the installation.
Installation and System Settings
40
Component RPC Pro Software Reference
Page 41

Software Product Installation
Install or Upgrade to SQL Server Express 2008
Overview Data Manager Server is now supported on SQL Server Express 2008.
Data Manager Server will work with MSDE, so upgrading to SQL Server
Express 2008 is not required.
Who should install New RPC Data Manager Server customers should install SQL Server Express
2008 on the computer that will have the Data Manager Server software installed.
Who can upgrade Previous RPC Data Manager Server users can upgrade MSDE to SQL Server
Express 2008 on the computer that will have the Data Manager Server software
installed.
This upgrade will maintain your existing databases and bring them forward from
MSDE to SQL Serve r Express 2008.
Instructions If you plan to us e SQL Serv er Expres s 2008 , it must be in stalle d or upg raded and
configured before RPC Data Manager Server can be properly installed.
T o upgrad e MSDE to SQL Server Expr ess 2008 , open the M SDE to SQL Server
Express 2008 Upgrade.doc file in the ..\\DataMgrSupport folder on the second
RPC Installation disk, and then follow the instructions in that document.
To install SQL Server Express 2008, open the SQL Server Express 2008
Installation Instructions.doc file in the ..\\DataMgrSupport folder on the
second RPC Installation disk, and then follow the instructions in that document.
Component RPC Pro Software Reference Installation and System Settings
41
Page 42

Software Product Installation
Install RPC Data Manager Server
Who should install MTS RPC customers who plan to use Data Manager to manage, archive and
retrieve test information must install the RPC Data Manager Server software.
Install the RPC Data Manager Server software on the computer that is licensed to
run the software.
RPC Data M an ager
Server Installation
Summary
Installation
instructions
RPC Data Manager Server software can operate on the same computer with the
MTS RPC and Data Manager client software.
For storage and administrative reasons, you may find it best to install the RPC
Data Manager Server software on a separate computer.
If Data Manager Server is installed on a computer separate from RPC Pro, you
will need to install the MTS Licensing Software on both computers.
1. Ensure the computer meets the System Requirements.
2. Ensure that the database software is installed first. New customers should
install SQL Server Express 2008. Existing customers using MSDE can
optionally upgrade to SQL Server Express 2008.
3. Click RPC Data Manager Server in the Install Products page.
Follow the instructions that are provided in the setup windows.
During installation, setup looks for a previous version of Data Manager.
Choose to uninstall the previous version of Data Manager if prompted by
the setup. A previous version can be the Data Manager client which is
installed with the RPC Pro/Component RPC Pro software.
During the installation, you will be prompted to Enter SA account password.
Enter the default password:
Installation and System Settings
42
sa
Component RPC Pro Software Reference
Page 43

Software Product Installation
Setup will continue to guide you through the remaining installation steps.
Change the “sa”
account password
Change the “sa” account password after the RPC Data Manager Server software
is installed.
1. Open a DOS Command Prompt window.
2. Enter the following at the command prompt:
osql –S (local)\Datamgr –U sa –P sa
3. At the 1> prompt, enter the following to specify the new password (except,
replace xxx with your new desired password):
exec sp_password @new=’xxx’, @loginame=’sa’
4. At the 2> prompt, enter the following to execute the password change:
go
5. Observe the “Password changed” message and new 1> prompt.
6. At the 1> prompt, enter the following to terminate the program:
quit
Important Remember the account p ass word (record it an d keep i t in a secure
place). If you forget the password, you could potentially lose
access to the database.
Component RPC Pro Software Reference Installation and System Settings
43
Page 44

Data Manager Administrative Tasks
Data Manager Administrative Tasks
After the Data Manager client and server software are installed on the licensed
computers, the person with Administrator privileges for Data Manager must
complete all of the following tasks. Refer to the Data Manager documentation for
more information.
Instructions 1. Add all users to a group with access privileges to shared network folders.
2. Add all users to the RPC Database and define their security role.
3. Review backup jobs that are automatically scheduled.
4. Plan and set up offline storage for historical or very large archives.
5. Define user keywords, set up restricted keyword values, define any
additional product system keywords, and make sure appropriate system
keywords are set as “required.”
6. Add new users to the RPC Database and define their security role.
7. Add new users to the group with access privileges to shared network
folders.
Installation and System Settings
44
Component RPC Pro Software Reference
Page 45

Controller Entries in Hosts File
Overview Co ntroller entries in the Windows Hosts file allow the RPC software to attach to
and communicate with the controller.
Most users will not have to manually modify the Windows Hosts file. The
software will automatically add the required controller entry to the Windows
Hosts file when you follow the steps to create a new Setup and attach to a
controller with the Setup Pro application.
If you cannot select a different controller for an existing Setup, the controller
entry will have to be added to the Windows Hosts file. The software makes this
easy to do via the Tools menu > Add a Controller Host Entry option.
Basically, if you can select and attach to the desired controller, then you do not
need to modify the Windows Hosts file.
Controller Entries in Hosts File
How RPC uses the
Windows Hosts File
IP Address Computer Host Name Controller Identifier
The RPC software uses the Hosts file to determine where the test server is
located. The test server software is used by the RPC software to communicate
with the controller.
The RPC software looks at the IP address, computer (Host) name, and controller
identifier in the Hosts file when trying to connect to the test server. The RPC
software knows the name of the computer on which it is running. If the RPC
software finds its own computer information in the Hosts file, it knows the test
server is on the same computer as the RPC software. I f the RPC application does
not find its own comp uter infor mation i n the Hosts f ile, but instead fin ds dif ferent
computer information in the Hosts file, it searches for the test server on that
different computer.
The following information is required on the same line in the Hosts file in the
following order, separated by at least one space or tab.
Component RPC Pro Software Reference Installation and System Settings
45
Page 46

Controller Entries in Hosts File
• The IP Address identifies the Internet Protocol address of the computer that
is connected to the controller. This must be specified in the first column of
the entry .
• The computer’s Host Name identifies the name of the computer that is
connected to the controller. Specify the computer’s name as its known on
the network. This must be specified in the second column of the entry.
• The controller identifier denotes the type of controller. This must be
specified in the third column of the entry.
The following shows an example entry in the Hosts file:
123.456.78.912 Controller_PC #793FT
If you are using only one computer to run both the controller software and RPC
software, the Hosts file must sp e c i f y its own computer’s IP address, Host name,
and controller identifier in its Hosts file.
If you are using one computer to run the controller software and one or more
computers to run the RPC software, you must set up the Hosts file on all of the
RPC computers to specify the controller computer’s IP address, computer name,
and controller identifier in their respective Hosts file.
The list of controllers that the RPC software displays when you try to attach a
controller to a setup, comes from the Windows Hosts file. The Hosts file must
have the proper address information fo r all the controller dev ices that yo u want to
connect to within your network. Otherwise, the devices will not be recognized by
the RPC software.
Location of Hosts file The W indows Hosts file is typically located in the C:\Winnt\system32\drivers\etc
directory. Where C: is the drive where your system32 folder is located.
To open the Hosts file, right-click on the file and select Open With and then
choose Notepad. After making any necessary changes to the file in Notepad,
select Save on the File menu to retain the changes.
How to edit the Hos t s
Installation and System Settings
46
file
Open and edit the Hos t s fi le u sin g Windows Notepad software. You should leave
any existing entries in the Hosts file and add any new entries to the end of the
file, using new lines for each separate controller. RPC software uses the
following convention to specify the controllers that you want to connect to.
# symbol at the beginning of a line denotes that all text that follows on that line is
a comment, and it will be ignored by the system. Required entries do not start
with a # symbol.
For every different controller in your network, there needs to be a separate line
which will be used to locate the test server for the controller.
Component RPC Pro Software Reference
Page 47

Controller Entries in Hosts File
Each line, which is used to specify a controller, has three key pieces of
information. Separate these three pieces of information with a space or tab
delimiter.
Component RPC Pro Software Reference Installation and System Settings
47
Page 48

Controller Entries in Hosts File
Hosts File Controller Identifiers
The following information is required on the same line in the Windows Hosts file
in the following order, separ ated by a space or tab. This infor mation is nec essary
for the RPC software to communicate with the controller.
IP Address Computer Host Name Controller Identifier
This section will help you determine what the controller identifier should be for
your specific controller type.
The IP address and computer Host name is specific to the computer that is
running the RPC software. The IP address and computer Host name can be
obtained from your system administrator (if necessary).
In the following table:
• The first column lists the types of MTS controllers that are able to run the
RPC software.
• The second column lists the identifier that corresponds to the controller.
CONTROLLER TYPE CONTROLLER IDENTIFIER TO USE
IN HOSTS FILE
MTS 498 ASC (Automated Site Controller) # 498ASC
MTS FlexTest controllers running 793 software (including
FlexTest GT, CTC, CTM, IIm, and 494 FlexTest 40, 60, 100,
200)
MTS TestStar controllers running 793 software (including
TestStar
MTS FlexTest IIs controllers (including MAST, 320 Road
Simulators, 329 Road Simulators)
MTS Component RPC hardware boards in the PC # CRPC
48
IIs and TestStar IIm)
Installation and System Settings
# 793FT
# 793TS
# FTIIS
Component RPC Pro Software Reference
Page 49

Controller Entries in Hosts File
CONTROLLER TYPE CONTROLLER IDENTIFIER TO USE
IN HOSTS FILE
Emulator
# Demo
This is not a physical controller. It allows you to run most of the
RPC software without actually communicating with a physical
controller. The IP address for this controller type is 1.0.1.101
To use the Emulator, enter the following line in the Hosts
file:1.0.1.101
emulator # DEMO
Xtest compatible controllers (usually for non-MTS controllers) # XTEST+
Before release 3.0 of RPC Pro, 793 FlexTest and 793 TestStar
# FTIIM
type controllers used this identifier. So if your RPC Pro software
is earlier than release 3.0, you must continue to use the #
FTIIM
identifier.
The # FTIIM identifier can still be used in newer releases
because MTS will continue to support it.
Alternatively if your RPC Pro software is at release 3.0 or newer,
you can replace the #
#
793TS controller identifiers instead.
FTIIM identifier with the newer # 793FT or
Component RPC Pro Software Reference Installation and System Settings
49
Page 50

Controller Entries in Hosts File
Hosts File Controller Examples
The following illustrations show how to set up the Hosts file for various
controller and computer configurations.
One PC with 793 FlexTest
793 FlexTest Controller
Dedicated Internal
IP Address
148.150.203.190
Do Not use this
address in Hosts file
Computer
Controller Software
RPC Software
Windows Network
Public/External
IP Address
123.456.789.123
Installation and System Settings
50
At DOS prompt, enter:
ipconfig/all
Get information
Host Name......: One_PC
IP Address.......: 123.456.789.123
Open Hosts file, and enter:
123.456.789.123 One_PC #793FT
Component RPC Pro Software Reference
Page 51

One PC with 793 TestStar
793 TestStar Controller
Dedicated Internal
IP Address
148.150.203.190
Do Not use this
address in Hosts file
Computer
Controller Software
RPC Software
At DOS prompt, enter:
ipconfig/all
Get information
Host Name......: One_PC
IP Address.......: 123.456.789.123
Public/External
IP Address
123.456.789.123
Controller Entries in Hosts File
Windows Network
Open Hosts file, and enter:
123.456.789.123 One_PC #793TS
Component RPC Pro Software Reference Installation and System Settings
51
Page 52

Controller Entries in Hosts File
FlexTest IIs MAST and
320 and 329 Road Simulators
One PC with FlexTest IIs
Controller
Dedicated Internal
IP Address
148.150.203.190
Do Not use this
address in Hosts file
Computer
Controller Software
RPC Software
At DOS prompt, enter:
ipconfig/all
Get information
Host Name......: One_PC
IP Address.......: 123.456.789.123
Public/External
IP Address
123.456.789.123
Windows Network
Installation and System Settings
52
Open Hosts file, and enter:
123.456.789.123 One_PC #FTIIS
Component RPC Pro Software Reference
Page 53

One PC with Component RPC Pro
Computer
Component RPC Pro
(with resident
controller boards)
At DOS prompt, enter:
ipconfig/all
Get information
Host Name......: CRPC_PC
IP Address.......: 123.456.789.123
Open Hosts file, and enter:
123.456.789.123 CRPC_PC #CRPC
Public/External
IP Address
123.456.789.123
Controller Entries in Hosts File
Windows Network
Component RPC Pro Software Reference Installation and System Settings
53
Page 54

Controller Entries in Hosts File
Remote PCs with 793 FlexTest
Windows Network
793 FlexTest Controller
Dedicated Internal
IP Address
148.150.203.190
Do Not use this
address in Hosts file
Computer
Controller Software
Public/External
IP Address
123.456.789.123
At DOS prompt, enter:
ipconfig/all
Get information
Host Name......: FT_PC
IP Address.......: 123.456.789.123
Remote Computer #1
RPC Software
Open Hosts file, and enter:
123.456.789.123 FT_PC #793FT
Run dcomcnfg as explained in
Remote PC Setup section
Remote Computer #2
RPC Software
Open Hosts file, and enter:
123.456.789.123 FT_PC #793FT
Installation and System Settings
54
Run dcomcnfg as explained in
Remote PC Setup section
Component RPC Pro Software Reference
Page 55

Remote PCs with 793 TestStar
Windows Network
Controller Entries in Hosts File
793 TestStar Controller
Dedicated Internal
IP Address
148.150.203.190
Do Not use this
address in Hosts file
Computer
Controller Software
Public/External
IP Address
123.456.789.123
At DOS prompt, enter:
ipconfig/all
Get information
Host Name......: TS_PC
IP Address.......: 123.456.789.123
Remote Computer #1
RPC Software
Open Hosts file, and enter:
123.456.789.123 TS_PC #793TS
Run dcomcnfg as explained in
Remote PC Setup section
Remote Computer #2
RPC Software
Open Hosts file, and enter:
123.456.789.123 TS_PC #793TS
Run dcomcnfg as explained in
Remote PC Setup section
Component RPC Pro Software Reference Installation and System Settings
55
Page 56

Controller Entries in Hosts File
Controller
FlexTest IIs MAST and
320 and 329 Road Simulators
Dedicated Internal
IP Address
148.150.203.190
Do Not use this
address in Hosts file
Computer
Remote PCs with FlexTest IIs
Windows Network
Remote Computer #1
RPC Software
Open Hosts file, and enter:
123.456.789.123 FTIIS_PC #FTIIS
Controller Software
Public/External
IP Address
123.456.789.123
At DOS prompt, enter:
ipconfig/all
Get information
Host Name......: FTIIS_PC
IP Address.......: 123.456.789.123
Run dcomcnfg as explained in
Remote PC Setup section
Remote Computer #2
RPC Software
Open Hosts file, and enter:
123.456.789.123 FTIIS_PC #FTIIS
Run dcomcnfg as explained in
Remote PC Setup section
Installation and System Settings
56
Component RPC Pro Software Reference
Page 57

498 Automated Site Controller
Public/External
IP Address
321.987.654.321
IP Address supplied
Computer
(498ASC_PC)
RPC Software
Open PC Hosts file, and enter:
1
321.987.654.321 498ASC_PC #498ASC
Note, some information you need to enter
will be different. Refer following section
on how to obtain this information.
by MTS with system
Public/External
IP Address
123.456.789.123
Controller Entries in Hosts File
One PC with 498 ASC
Windows Network
498 ASC Hosts file:
123.456.789.123 498ASC_PC
Run RPC ASC Utilities program to
2
Add Host to ASC
RPC ASC Utilities program reads PCs Host
Name and IP address and automatically adds
information to 498 ASC Hosts file
Component RPC Pro Software Reference Installation and System Settings
57
Page 58

Remote PC
Remote PC
Overview Remote PC refers to multiple computers networked together where one of the
computers runs the controller software and other computer(s) run the RPC
software and communicate with the controller remotely. An example Remote PC
network configuration is shown below.
Windows Network
793 FlexTest Controller
Dedicated Internal
IP Address
148.150.203.190
Do Not use this
address in Hosts file
Computer
Controller Software
Public/External
IP Address
123.456.789.123
At DOS prompt, enter:
ipconfig/all
Get information
Host Name......: FT_PC
IP Address.......: 123.456.789.123
Remote Computer #1
RPC Software
Open Hosts file, and enter:
123.456.789.123 FT_PC #793FT
Run dcomcnfg as explained in
Remote PC Setup section
Remote Computer #2
RPC Software
Open Hosts file, and enter:
123.456.789.123 FT_PC #793FT
Installation and System Settings
58
Run dcomcnfg as explained in
Remote PC Setup section
Component RPC Pro Software Reference
Page 59

Remote PC
Recommended system
configuration
User accounts Remote PC requires that both the controller compu ter and RPC computer use the
To achieve optimal system performance, the following configuration is
recommended with multiple computers running Remote PC.
PC RECOMMENDED COMPONENTS
Controller Computer
Controller software
RPCProProjects directory
System Temp directory
Test Server software
RPC Computer
RPC software
Ensure that the RPC Project and Tempo rary directories are on the same computer
disk drive.
Ensure both the RPC and controller computers are in the s ame Windows network
(either the same workgroup or domain). If they are not, contact your system
administrator if you need help configuring the computers in the same windows
network.
Note Remote PC is supported in RPC software version 2.1a or later.
same user name and password. You can accomplish this in either of the following
ways:
Windows Domain
If the computers are part of a larger windows
domain, you can establish a single user account in
that is accessible to both PCs. In order to use
Remote PC, both the controller computer and RPC
computer must be logged onto using the same
account user name and password.
Local Domain
If the computers are not part of a larger windows
domain, you can establish a local user accounts on
each computer that has the same user name and
password. In order to use Remote PC, both the
controller computer and RPC computer must be
logged onto using the local account with the same
user name and password.
Component RPC Pro Software Reference Installation and System Settings
59
Page 60

Remote PC
File sharing In order for Remote PC to share project information, the RPCProProjects folder
containing the information must be accessible to both the controller computer
and the RPC computer.
The RPCProProjects folder can reside on either computer, but it must be shared
and mapped on the other computer. For performance reasons, the recommended
location for the RPCProProjects folder is on the controller computer. That is
because the controller has less networking to do to transfer files.
For more information about sharing and mapping networked drives, refer to the
Windows online help.
Hosts file Make sure the Hosts file is set up on each computer prior to setting up the
computers for remote communication.
Installation and System Settings
60
Component RPC Pro Software Reference
Page 61

Remote PC Setup on Windows XP Systems
Overview These instructions describe the necessary settings to enable Remote PC on two
Windows XP computers.
Remote PC
Disable Simple File
Sharing
In order for Remote PC to work properly, “simple file sharing” must be disabled
on the Windows XP computer that contains the RPCProProjects directory.
1. Open Folder Options in the Windows Control Panel.
2. Click on the View tab in the Folder Options window.
3. Clear the check box for Use simple file sharing (Recommended).
Component RPC Pro Software Reference Installation and System Settings
61
Page 62

Remote PC
4. Click Apply to All Folders, and then click OK to close the Folder Options
window.
Configure the RPC
computer
1. Ensure the RPC computer has the required test server registered.
The test server was first introduced for FlexTest IIs at version 4.3. The test
server was first introduced for 793 FlexTest at version 3.1.
A. Logon to the RPC computer as an Ad ministr ator and enter the required
password for the computer.
B. Click the Windows Start button, and then click Run. Enter dcomcnfg
in the Open box and press OK.
C. After the Component Services window opens, click on the DCOM
Config folder to expand its contents (the folder may take a while to
display its contents). Scroll through the alphabetical list to verify that
the correct test server is registered. If the appropriate test server is
listed, then its registered.
Installation and System Settings
62
If the FlexTest controller is running 793 software, look for RPC2mS
Controller in the list.
If the controller is a FlexT est IIs , look for FlexII Document in the list.
Component RPC Pro Software Reference
Page 63

Remote PC
2. If the required test server is not registered:
A. Share the bin or ntbin directory for the FlexTest programs on the
FlexTest computer. Whether the directory is bin or ntbin depends on
the type of c ontroller. Make sure Everyone has Sharing permissions
and Full Control for this directory.
B. Map the same directory on the RPC computer.
C. Open a Command Prompt and change the directory to the newly shared
and mapped bin directory.
D. From the Command Prompt, run the FlexTest test server with the “/
regserver” option. Doing this registers the test server on the RPC
computer.
FlexTest IIs: use the FlexIIsServer.exe /regserver command
793 FlexTest: use the RPC2mSrv.exe /regserver command
Component RPC Pro Software Reference Installation and System Settings
63
Page 64

Remote PC
E. Remove the mapping to the shared bin director y on the RPC comp uter,
and then remove the sharing from the FlexT est compu ter . This mapping
and sharing is no longer needed.
F. Open the Component Services window again, expand the DCOM
Config folder, and then scroll through the alphabetical list to find the
test server in the folder to verify that the required test server is
registered.
3. Set the security for the test server on the RPC computer.
You need to set the Authentication Level to None for the test server name
in the DCOM Config folder.
A. Right click on the test server name (RPC2mS Controller or FlexII
Document) in the DCOM Config folder, and then select Properties.
B. On the General tab, select None for the Authentication Level.
C. In the test s e rver's Properties window, click Apply and OK.
4. Set the security for the applications on the RPC computer.
You need to set the Authentication Level to None for the following
applications in the DCOM Config folder:
Installation and System Settings
64
• RPCSetup.App
• RPCProApplication.IAppForm
A. Right click on the application name in the DCOM Config folder, and
then select Properties.
B. On the General tab, select None for the Authentication Level.
C. Repeat sub-steps A and B for each application.
5. For Windows XP SP2 and SP3—Allow anonymous users remote access
permissions.
A. In Component Services, expand the tree view and right click on My
Computer and then select Properties.
Component RPC Pro Software Reference
Page 65

Remote PC
B. On the COM Security tab, select Access Permissions Edit Limits.
C. Select ANONYMOUS LOGON and then check the Allow box for
Remote Access.
Component RPC Pro Software Reference Installation and System Settings
65
Page 66

Remote PC
6. Click OK to close the Access Permissions window.
7. Click OK to close the My Computer Properties window.
Configure the FlexTest
controller computer
Installation and System Settings
66
8. Close the Component Services window.
1. Ensure the FlexTest computer has the required test server registered.
A. Logon to the FlexTest computer as an Administrator and enter the
required password for the computer.
B. Click the Windows Start button, and then click Run. Enter dcomcnfg
in the Open box and press OK.
Component RPC Pro Software Reference
Page 67

Remote PC
C. After the Component Services window opens, click on the DCOM
Config folder to expand its contents (the folder may take a while to
display its contents). Scroll through the alphabetical list to verify that
the correct test server is registered. If the appropriate test server is
listed, then its registered.
If the FlexTest controller is running 793 software, look for RPC2mS
Controller in the applications list.
If the controller is a FlexTest IIs, look for FlexII Document in the
applications list.
D. If the required test server is not registered, install the FlexTest software
on the FlexTest computer. The install should automatically register the
required test server. After the FlexTest software installation is
complete, locate the test server again in the Component Services
window > DCOM Config folder to verify that the required test server
is registered.
2. Set the security for the test server on the FlexTest computer.
A. Right click on the test server name (RPC2mS Controller or FlexII
Document) in the DCOM Config folder, and then select Properties.
Component RPC Pro Software Reference Installation and System Settings
67
Page 68

Remote PC
B. On the General tab, select None for the Authentication Level.
C. Click on the Security tab in the Properties window.
D. For the Launch Permissions, select Customize, and then click the
Edit button.
E. In the Launch Permissions window > Security tab, select Add.
F. In the Select Users and Groups window, type in Everyone in the
Enter the object names to select box, and then click OK.
G. Verify launch permissions:
For Windows XP SP1—In the Launch Permissions window,
Everyone should now be in the list, with the Allow Launch
Permissions box checked for Everyone. C lick OK to accept the change
to the permissions.
For Windows XP SP2 and SP3—In the Launch Permissions
window, Everyone should now be in the list, with the Local Launch,
Remote Launch, Local Activation, and Remote Activation boxes
checked for Everyone. Click OK to accept the change to the
permissions.
Installation and System Settings
68
3. Select the test server identity on the FlexTest computer.
A. In the test server's Properties window, click on the Identity tab. This
window asks the questi on Which user account do you want to use to
run this application?.
B. Select The interactive user and then press Apply to make the change.
4. In the test server's Properties window, click Apply and OK.
5. For Windows XP SP2 and SP3—Allow anonymous users remote access
permissions.
A. In Component Services, expand the tree view and right click on My
Computer and then select Properties.
Component RPC Pro Software Reference
Page 69

Remote PC
B. On the COM Security tab, select Access Permissions Edit Limits.
C. Select ANONYMOUS LOGON and then check the Allow box for
Remote Access.
Component RPC Pro Software Reference Installation and System Settings
69
Page 70

Remote PC
6. For Windows XP SP2 and SP3—Allow everyone remote launch and
remote activation permissions.
Installation and System Settings
70
A. On the COM Security tab, select Launch and Activation
Permissions Edit Limits.
Component RPC Pro Software Reference
Page 71

Remote PC
B. Select Everyone and then check the Allow boxes for Remote Launch
and Remote Activation (ensure all boxes for Local Launch, Local
Activation, Remote Launch, And Remote Activation are checked).
Component RPC Pro Software Reference Installation and System Settings
71
Page 72

Remote PC
Installation and System Settings
72
Component RPC Pro Software Reference
Page 73

Remote PC Setup on Windows Vista and Windows 7
Overview These instructions describe the necessary settings to enable Remote PC on two
Windows Vista or Windows 7 computers.
The window examples used in the setup instructions are for Windows Vista.
However, the same window settings apply for Windows 7.
Remote PC
Disable File Sharing
Wizard
In order for Remote PC to work properly, the “File Sharing Wizard” must be
disabled on the Windows Vista or Windows 7 computer that contains the
RPCProProjects directory.
1. Open Folder Options in the Windows Control Panel.
2. Click on the View tab in the Folder Options window.
3. Clear the check box for Use Sharing Wizard (Recommended).
Component RPC Pro Software Reference Installation and System Settings
73
Page 74

Remote PC
4. Click Apply to All Folders, and then click OK to close the Folder Options
window.
Configure the RPC
computer
1. Ensure the RPC computer has the required test server registered.
The test server was first introduced for FlexTest IIs at version 4.3. The test
server was first introduced for 793 FlexTest at version 3.1.
A. Logon to the RPC computer as an Ad ministr ator and enter the required
password for the computer.
B. Select Windows Start > All Programs > Accessories > Run. Enter
MMC comexp.msc /32 in the Open box and press OK.
C. After the Component Services window opens, click on the DCOM
Config folder to expand its contents (the folder may take a while to
display its contents). Scroll through the alphabetical list to verify that
the correct test server is registered. If the appropriate test server is
listed, then its registered.
Installation and System Settings
74
If the FlexTest controller is running 793 software, look for RPC2mS
Controller in the list.
If the controller is a FlexT est IIs , look for FlexII Document in the list.
Component RPC Pro Software Reference
Page 75

Remote PC
2. If the required test server is not registered:
A. Share the bin or ntbin directory for the FlexTest programs on the
FlexTest computer. Whether the directory is bin or ntbin depends on
the type of controller.
B. Map the same directory on the RPC computer.
C. Open a Command Prompt and change the directory to the newly shared
and mapped bin directory.
D. From the Command Prompt, run the FlexTest test server with the “/
regserver” option. Doing this registers the test server on the RPC
computer.
FlexTest IIs: use the FlexIIsServer.exe /regserver command
793 FlexTest: use the RPC2mSrv.exe /regserver command
E. Remove the mapping to the shared bin director y on the RPC comp uter,
and then remove the sharing from the FlexT est computer . This mapping
and sharing is no longer needed.
Component RPC Pro Software Reference Installation and System Settings
75
Page 76

Remote PC
F. Open the Component Services window again, expand the DCOM
Config folder, and then scroll through the alphabetical list to find the
test server in the folder to verify that the required test server is
registered.
3. Set the security for the test server on the RPC computer.
You need to set the Authentication Level to None for the test server name
in the DCOM Config folder.
A. Right click on the test server name (RPC2mS Controller or FlexII
Document) in the DCOM Config folder, and then select Properties.
B. On the General tab, select None for the Authentication Level.
C. In the test s e rver's Properties window, click Apply and OK.
4. Set the security for the applications on the RPC computer.
You need to set the Authentication Level to None for the following
applications in the DCOM Config folder:
• RPCSetup.App
• RPCProApplication.IAppForm
Installation and System Settings
76
A. Right click on the application name in the DCOM Config folder, and
then select Properties.
B. On the General tab, select None for the Authentication Level.
C. Repeat sub-steps A and B for each application.
5. Allow anonymous users remote access permissions.
A. In Component Services, expand the tree view and right click on My
Computer and then select Properties.
Component RPC Pro Software Reference
Page 77

Remote PC
B. On the COM Security tab, select Access Permissions Edit Limits.
Component RPC Pro Software Reference Installation and System Settings
77
Page 78

Remote PC
C. Select ANONYMOUS LOGON and then check the Allow box for
Remote Access.
Configure the FlexTest
controller computer
Installation and System Settings
78
6. Click OK to close the Access Permissions window.
7. Click OK to close the My Computer Properties window.
8. Close the Component Services window.
1. Ensure the FlexTest computer has the required test server registered.
A. Logon to the FlexTest computer as an Administrator and enter the
required password for the computer.
B. Select Windows Start > All Programs > Accessories > Run. Enter
MMC comexp.msc /32 in the Open box and press OK.
Component RPC Pro Software Reference
Page 79

Remote PC
C. After the Component Services window opens, click on the DCOM
Config folder to expand its contents (the folder may take a while to
display its contents). Scroll through the alphabetical list to verify that
the correct test server is registered. If the appropriate test server is
listed, then its registered.
If the FlexTest controller is running 793 software, look for RPC2mS
Controller in the applications list.
If the controller is a FlexTest IIs, look for FlexII Document in the
applications list.
Component RPC Pro Software Reference Installation and System Settings
79
Page 80

Remote PC
Installation and System Settings
80
D. If the required test server is not registered, install the FlexTest software
on the FlexTest computer. The install should automatically register the
required test server. After the FlexTest software installation is
complete, locate the test server again in the Component Services
window > DCOM Config folder to verify that the required test server
is registered.
2. Set the security for the test server on the FlexTest computer.
A. Right click on the test server name (RPC2mS Controller or FlexII
Document) in the DCOM Config folder, and then select Properties.
B. On the General tab, select None for the Authentication Level.
C. Click on the Security tab in the Properties window.
D. For the Launch Permissions, select Customize, and then click the
Edit button.
E. In the Launch Permissions window > Security tab, select Add.
F. In the Select Users and Groups window, type in Everyone in the
Enter the object names to select box, and then click OK.
Component RPC Pro Software Reference
Page 81

Remote PC
G. Verify launch permissions:
In the Launch Permissions window, Everyone should now be in the
list, with the Local Launch, Remote Launch, Local Activati on, and
Remote Activation boxes checked for Everyone. Click OK to accept
the change to the permissions.
3. Select the test server identity on the FlexTest computer.
A. In the test server's Properties window, click on the Identity tab. This
window asks the questi on Which user account do you want to use to
run this application?.
B. Select The interactive user and then press Apply to make the change.
4. In the test server's Properties window, click Apply and OK.
5. Allow anonymous users remote access permissions.
A. In Component Services, expand the tree view and right click on My
Computer and then select Properties.
B. On the COM Security tab, select Access Permissions Edit Limits.
Component RPC Pro Software Reference Installation and System Settings
81
Page 82

Remote PC
Installation and System Settings
82
Component RPC Pro Software Reference
Page 83

Remote PC
C. Select ANONYMOUS LOGON and then check the Allow box for
Remote Access.
6. Allow everyone remote launch and remote activation permissions.
A. On the COM Security tab, select Launch and Activation
Permissions Edit Limits.
Component RPC Pro Software Reference Installation and System Settings
83
Page 84

Remote PC
Installation and System Settings
84
B. Select Everyone and then check the Allow boxes for Remote Launch
and Remote Activation (ensure all boxes for Local Launch, Local
Activation, Remote Launch, And Remote Activation are checked).
Component RPC Pro Software Reference
Page 85

Remote PC
Component RPC Pro Software Reference Installation and System Settings
85
Page 86

Xtest Protocol
Xtest Protocol
Instructions 1. Ensure the Hosts file is properly set up for connection to the Xtest
controller.
2. Start the RPC software, and then open the Setup application.
3. Select and attach to the Xtest controller. Make any changes necessary and
save the setup.
Note You cannot edit the Event Action tab because the Xtest protocol does
not support event action.
4. If you plan on using the Xtest protocol from another PC, the Xtest shared
directory must be mapped on the client (R PC compu t er) or on the controller
computer (the one connected to the FlexTest controller).
• On the FlexTest IIs computer, the shared directory is hard-coded to be
TimeHist or TimeHist\Xtest. In other words, the path is typically one
of the following:
C:\FlexIIS\TimeHist
Installation and System Settings
86
C:\FlexIIS\TimeHist\Xtest.
• On the 793 FlexTest computer, the shared directory is defined by where
the example time history drive file is found for the MPT process.
5. Set up the controller's computer to use Xtest. For more information, see the
MTS 793 Software documentation.
6. Use Model Pro, Simulate Pro, or Test Pro and the Control Panel as you
would normally.
When you press the Load button the first time, a window will pop up asking
you to select the XTEST+ shared directory. Browse and select the shared
directory.
If you choose a directory that is not the one that the controller is using, you
will receive an error. If this happens, press the Load button again, and then
reselect the correct directory.
Once the Load button changes to Run, click Run to start the test. The test
will progress until finished, but all of the control panel buttons are disabled.
This is because the Xtest protocol only supports aborting from the
controller's computer.
Component RPC Pro Software Reference
Page 87

RPC APPLICATION/COMPONENT IMPORTANT NOTES
Xtest Protocol
Setup > Station Drive
Setup > Station Response
Computed Response
Drive channel full scales in Setup must match the full scale on the
FlexTest IIs channel configuration.
Number of Drive channels and the channel order in Setup need to match
the number of channels and channel order in FlexTest IIs THP Channel
Selection.
Sample rates need to match what is selected in FlexTest IIs RPC/Time
History Data Recorder.
Frame size is automatically adjusted to 1024. This is the only frame size
that is supported by t he Fl exTest IIs controller data recor der. Group points
is automatically set to 2048.
Response channel full scales in Setup must match the full scale in the
FlexTest IIs channel configuration
Number of channels and channel order must match the number of
channels and channel order selected in FlexTest IIs Data Recorder.
The response time history is recorded by the FlexTest IIs data recorder, so
the actual number of channels recorded, channel order, channel
descriptors, and so on is all determined by the FlexTest IIs setup.
However, these items should also be defined in Setup Pro to match the
FlexTest IIs configuration because several tools and processes use this
information from Setup Pro.
Computed channels work normally.
Event Action
Controls in this tab are disabled. All event actions are configured and
performed in the FlexTest IIs controller software.
Model
Sequential Drive play out does not work with x-test protocol, as each
channel is a single drive file in Pro. When playing out, it always plays the
drive file out on the first chan nel in th e FlexTest IIs THP channel selection
list.
Model, Simulate, and Test
The Control Panel is only used for loading and running. Abort, and Hold
are non-functional. To abort the test, use the Stop button in the FlexTest
IIs Time History function gene rator panel.
Test
Because the x-test protocol does not support event action relationships,
test monitoring in RPC Test Pro is not supported.
Component RPC Pro Software Reference Installation and System Settings
87
Page 88

Controller Network Pr otocol
Controller Network Protocol
Network protocol for
FlexTest controllers
The MTS RPC Software requires “Client for Microsoft Networks” on the
computer. If the same computer will have FlexTest software, the FlexTest
installation instructions indicate that the Client for Microsoft Networks should be
deselected (unchecked). This can be done, but do not uninstall the Client for
Microsoft N etworks.
To determine if the software is installed, find the connection you are currently
using.
For Windows XP, go to Windows Start menu > Settings > Control Panel >
Network Connections. Then, right click on the connection and select Properties.
Installation and System Settings
88
Component RPC Pro Software Reference
Page 89

Controller Network Protocol
For Windows Vista, go to Windows Start menu > Control Panel > Network and
Sharing Center. Click Manage Network Connections. Then, right-click on the
connection and select Properties.
When you locate the network connection properties:
• Make sure that Client for Microsoft Networks is listed in the Properties
window for the network connection that you are using.
• If Client for Microsoft Networks exists, but is not selected (as a
requirement for FlexTest), it will not cause a conflict with the RPC
licensing.
Network protocol for
Non-FlexTest
controllers
Component RPC Pro Software Reference Installation and System Settings
If you are using a different controller (besides FlexTest), the Client for
Microsoft Networks may be checked or not, depending on your network
requirements.
89
Page 90

Firewall Setup for RPC License Software
Firewall Setup for RPC License Software
Overview Firewall software can block licensing programs from acces sing the network. As a
result, the MTS RPC Software will not be able to check out a license.
There are two types of license servers that can be affected by firewall software:
• A computer that is acting as a license server for itself
• A computer that is acting as a license server for other computers
Follow the instructions to configure Windows Firewall on the computer that is
acting as the license server.
Installation and System Settings
90
Component RPC Pro Software Reference
Page 91

Firewall Setup for RPC License Software
Windows XP/Vista Firewall Setup for RPC License Software
You must be logged on as an administrator to perform these steps.
Component RPC Pro Software Reference Installation and System Settings
91
Page 92

Firewall Setup for RPC License Software
1. Open Windows Firewall control panel.
For Windows XP: Start menu > Settings > Control Panel > Windows
Firewall.
Installation and System Settings
92
For Windows Vista: Windows Start menu > Control Panel > Windows
Firewall.
Component RPC Pro Software Reference
Page 93

Firewall Setup for RPC License Software
Windows Firewall can be turned o n or of f for dif fer ent network co nnections.
If Windows Firewall is turned Off, the programs will not be blocked and
therefore the remaining steps may be ignored. Turning Windows Firewall
Off is not recommended.
2. If Windows Firewall is turned On in the General tab, ens ure that excep tions
are allowed.
For Windows XP: Un-check the Don’t allow exceptions box.
For Windows Vista: Un-check the Block all incoming connections box.
3. Click on the Add Program button in the Exceptions tab.
4. Click on the Browse button in the Add a Program window.
5. Browse to the C:\MTS\License directory, select lmgrd.exe, and then click
Open in the Browse window.
6. Click OK in the Add a Program window.
7. Repeat steps 3 through 6 for the mtsd.exe and mtsdmon.exe programs.
8. Ensure lmgrd.exe, mtsd.exe, and mtsdmon.exe pro grams are selected on the
Windows Firewall Exceptions tab.
Component RPC Pro Software Reference Installation and System Settings
93
Page 94

Firewall Setup for RPC License Software
9. Click OK to save changes to the Windows Firewall.
Installation and System Settings
94
Component RPC Pro Software Reference
Page 95

Firewall Setup for RPC License Software
Windows 7 Firewall Setup for RPC License Software
You must be logged on as an administrator to perform these steps.
1. Open Windows Start menu > Control Panel > System and Security >
Windows Firewall.
Windows Firewall can be turned o n or of f for dif fer ent network co nnections.
If Windows Firewall is turned Off, the programs will not be blocked and
therefore the remaining steps may be ignored. Turning Windows Firewall
Off is not recommended.
2. Click Allow a program or feature through Windows Firewall.
3. Click on the Allow another program button.
Component RPC Pro Software Reference Installation and System Settings
95
Page 96

Firewall Setup for RPC License Software
Installation and System Settings
96
4. Click on the Browse button in the Add a Program window.
5. Browse to the C:\MTS\License directory, select lmgrd.exe, and then click
Open in the Browse window.
6. Click OK in the Add a Program window.
7. Verify that the program is allowed on the appropriate network(s).
8. Repeat steps 3 through 7 for the mtsd.exe and mtsdmon.exe programs.
Note that when mtsd gets added to the program list, its display name will
change to lmgrd326b.
9. Click OK to save changes to the Windows Firewall.
Component RPC Pro Software Reference
Page 97

Firewall Setup for Remote PC
Overview Windows Firewall can block ports and prog rams from accessing the network. As
a result, Remote PC may not work properly.
Follow the instructions to configure Windows Firewall on computers that are
connected by Remote PC.
Firewall Setup for Remote PC
Component RPC Pro Software Reference Installation and System Settings
97
Page 98

Firewall Setup for Remote PC
Windows XP/Vista Firewall Setup for Remote PC
You must be logged on as an administrator to perform these instructions.
Installation and System Settings
98
Component RPC Pro Software Reference
Page 99

Firewall Setup for Remote PC
Steps for all Remote
PC computer s
1. Open the Windows Firewall control panel.
For Windows XP: Go to Windows Start menu > Settings > Control Panel >
Windows Firewall.
For Wind ows Vista: Go to Windows Start menu > Control Panel > W indo ws
Firewall.
Component RPC Pro Software Reference Installation and System Settings
99
Page 100

Firewall Setup for Remote PC
Installation and System Settings
100
Windows Firewall can be turned o n or of f for dif fer ent network co nnections.
Settings in the General tab turn on/off the entire firewall. If the general
firewall is on, you can use the settings in the Advanced tab to turn on/off the
firewall for each individual network connection.
If Windows Firewall is turned Off, the programs will not be blocked and
therefore the remaining steps may be ignored. Turning Windows Firewall
Off is not recommended.
2. If Windows Firewall is turned On in the General tab, ens ure that excep tions
are allowed.
For Windows XP: Un-check the Don’t allow exceptions box.
For Windows Vista: Un-check the Block all incoming connections box.
3. Ensure that File and Printer Sharing is enabled on the Exceptions tab.
Component RPC Pro Software Reference
 Loading...