

Page 1

be certain.
RPC® Data Manager Software Reference
100-172-934 D
Page 2

Copyright information © 2010 MTS Systems Corporation. All rights reserved.
Tradema rk in for m ation MTS, RPC, and Component RPC are registered trademarks and cRPC, eTIM,
SWIFT, MAST, and Remote Parameter Control are trademarks of MTS Systems
Corporation within the United States. These trademarks may be protected in
other coun t ries.
Proprietary information Software use and license is governed by MTS’s End User License Agreement
which defines all rights retained by MTS and granted to the End User. All
Software is proprietary, confidential, and owned by MTS Systems Corporation
and cannot be copied, reproduced, disassembled, decompiled, reverse
engineered, or distributed without express written consent of MTS.
Software validation and
verification
Publication information
MTS software is developed using established quality practices in accordance
with the requirements detailed in the ISO 9001 standards. Because MTSauthored software is delivered in binary format, it is not user accessible. This
software will not change over time. Many releases are written to be backwards
compatible, creating another form of verification.
The status and validity of MTS’s operating software is also checked during
system verification and routine calibration of MTS hardware. These controlled
calibration processes compare the final test results after statistical analysis
against the predicted response of the calibration standards. With these established
methods, MTS assures its customers that MTS products meet MTS’s exacting
quality standards when initially installed and will continue to perform as intended
over time.
MANUAL PART NUMBER PUBLICATION DATE
100-172-934 A April 2007
100-172-934 B May 2008
100-172-934 C May 2009
100-172-934 D February 2010
Page 3

Contents
Technical Support 7
How to Get Technical Support 7
Before You Contact MTS 8
If You Contact MTS by Phone 9
Problem Submittal Form in MTS Manuals 10
Preface 11
Before You Begin 11
Documentation Conventions 11
Installation and System Settings 13
Data Manager Server PC Requirements 14
Software Product Installation 16
Install MTS Licensing Software 20
Update License File when Server Name Changes 22
Install or Upgrade to SQL Server Express 2008 23
Install RPC Data Manager Server 24
Data Manager Administrative Tasks 26
Firewall Setup for RPC License Software 27
Windows XP/Vista Firewall Setup for RPC License Software 28
Windows 7 Firewall Setup for RPC License Software 31
RPC Data Manager Software Reference
3
Page 4

Introduction to Data Manager 33
About Data Manager 34
Archiving Projects - RPC Project Manager 35
Search, Data Retrieval, and Administration 36
About Archives 37
Keywords 38
Keyword Values 43
User Security Roles 45
RPC Data Manager Views 48
Administration Views 49
Server Selector Utility 50
Archiving a Project 57
Getting Started Archiving 58
Creating a New Archive 60
Updating an Existing Archive 67
Archiving when Disconnected from Network 75
Locating and Retrieving Archived Data 83
Archives View 84
Searching for Archived Data 89
Retrieving Archived Data 99
Deleting Archives 111
Locking and Unlocking Archives 112
Making Archives Remote or Local 114
Renaming Archives 118
Modifying Keywords in Archived Data 119
Modifying Archive Comments 124
4
RPC Data Manager Software Reference
Page 5

Queries 127
Query Builder Window 128
Creating or Modifying a Query 134
Defining Query Expressions 136
Locking and Unlocking Queries 143
Deleting Queries 145
Administration 147
Role of the Administrator 148
Improving Security for Shared Folders 149
User Administration 152
Backup and System Management Tasks 157
Archive Management 159
Keyword Administration 164
Index 179
RPC Data Manager Software Reference
5
Page 6

6
RPC Data Manager Software Reference
Page 7

Technical Support
How to Get Technical Support
Start with your
manuals
Technical support
methods
The manuals supplied by MTS provide most of the information you need to
use and maintain your equipment. If your equipment includes software, look
for online help and README files that contain additional product
information.
If you cannot find answers to your technical questions from these sources, you
can use the Internet, e-mail, telephone, or fax to contact MTS for assistance.
MTS provides a full range of support services after your system is installed. If
you have any questions about a system or product, contact Technical Support
in one of the following ways.
www.mts.com The web site provides access to our technical support staff by means of an
onlineform:
www.mts.com > Contact MTS > Service & Technical Support button
E-mail RPC@mts.com
Telephone MTS Call Center 800-328-2255
Weekdays 7:00 A.M. to 5:00 P.M., Central Time
Fax 952-937-4515
Please include “Technical Support” in the subject line.
Outside the U.S. For technical support outside the United States, contact your local sales and
service office. For a list of worldwide sales and service locations and contact
information, use the Global MTS link at the MTS web site:
www.mts.com > Global MTS > (choose your region in the right-hand
column) > (choose the location closest to you)
RPC Data Manager Software Reference Technical Support
7
Page 8

Before You Contact MTS
MTS can help you more efficiently if you have the following information
available when you contact us for support.
Know your site
number and system
number
Know information
from prior technical
The site number contains your company number and identifies your equipment
type (such as material testing or simulation). The number is typically written on
a label on your equipment before the system leaves MTS. If you do not know
your MTS site number, contact your sales engineer.
Example site number: 571167
When you have more than one MTS system, the system job number identifies
your system. You can find your job number in your order paperwork.
Example system number: US1.42460
If you have contacted MTS about this problem before, we can recall your file
based on the:
assistance
• MTS notification number
• Name of the person who helped you
Identify the problem Describe the problem and know the answers to the following questions:
• How long and how often has the problem occurred?
• Can you reproduce the problem?
• Were any hardware or software changes made to the system before the
problem started?
Know relevant
computer information
8
Technical Support
• What are the equipment model numbers?
• What is the controller model (if applicable)?
• What is the system configuration?
For a computer problem, have the following information available:
• Manufacturer’s name and model number
• Operating software type and service patch information
• Amount of system memory
• Amount of free space on the hard drive where the application resides
RPC Data Manager Software Reference
Page 9

• Current status of hard-drive fragmentation
• Connection status to a corporate network
Know relevant
For software application problems, have the following information available:
software information
• The software application’s name, version number, build number, and (if
available) software patch number. This information can typically be found
in the About selection in the Help menu.
• The names of other applications on your computer, such as:
– Anti-virus software
– Screen savers
– Keyboard enhancers
–Print spoolers
– Messaging applications
If You Contact MTS by Phone
A Call Center agent registers your call before connecting you with a technical
support specialist. The agent asks you for your:
• Site number
• Name
• Company name
• Company address
• Phone number where you can be reached
If your issue has a notification number, please provide that number. A new
issue will be assigned a unique notification number.
Identify system type To enable the Call Center agent to connect you with the most qualified
technical support specialist available, identify your system as one of the
following types:
• Electromechanical material test system
• Hydromechanical material test system
• Vehicle test system
RPC Data Manager Software Reference Technical Support
9
Page 10

• Vehicle component test system
• Aero test system
Be prepared to
Prepare to perform troubleshooting while on the phone:
troubleshoot
• Call from a telephone close to the system so that you can implement
suggestions made over the phone.
• Have the original operating and application software media available.
• If you are not familiar with all aspects of the equipment operation, have an
experienced user nearby to assist you.
Write down relevant
In case Technical Support must call you:
information
• Verify the notification number.
• Record the name of the person who helped you.
• Write down any specific instructions.
After you call MTS logs and tracks all calls to ensure that you receive assistance for your
problem or request. If you have questions about the status of your problem or
have additional information to report, please contact Technical Support again
and provide your original notification number.
Problem Submittal Form in MTS Manuals
Use the Problem Submittal Form to communicate problems with your
software, hardware, manuals, or service that are not resolved to your
satisfaction through the technical support process. The form includes check
boxes that allow you to indicate the urgency of your problem and your
expectation of an acceptable response time. We guarantee a timely response—
your feedback is important to us.
10
Technical Support
Access the Problem Submittal Form:
• In the back of many MTS manuals (postage paid form to be mailed to
MTS)
• www.mts.com > Contact Us > Problem Submittal Form button
(electronic form to be e-mailed to MTS)
RPC Data Manager Software Reference
Page 11

Preface
Before You Begin
Safety first! Before you use your MTS product or system, read and understand the Safety
manual and any other safety information provided with your system. Improper
installation, operation, or maintenance can result in hazardous conditions that
can cause severe personal injury or death, or damage to your equipment and
specimen. Again, read and understand the safety information provided with
your system before you continue. It is very important that you remain aware of
hazards that apply to your system.
Other MTS manuals In addition to this manual, you may receive additional manuals in paper or
electronic form.
You may also receive an MTS System Documentation CD. It contains an
electronic copy of the manuals that pertain to your test system, such as:
• Hydraulic and mechanical component manuals
• Assembly drawings
• Parts lists
• Operation manual
• Preventive maintenance manual
Controller and application software manuals are typically included on the
software CD distribution disc(s).
Documentation Conventions
The following paragraphs describe some of the conventions that are used in
your MTS manuals.
Hazard conventions Hazard notices may be embedded in this manual. These notices contain safety
information that is specific to the activity to be performed. Hazard notices
immediately precede the step or procedure that may lead to an associated
hazard. Read all hazard notices carefully and follow all directions and
recommendations. Three different levels of hazard notices may appear in your
manuals. Following are examples of all three levels.
RPC Data Manager Software Reference Preface
11
Page 12

Note For general safety information, see the safety information provided
with your system.
DANGER
Danger notices indicate the presence of a hazard with a high level of risk which,
if ignored, will result in death, severe personal injury, or substantial property
damage.
WARNING
Warning notices indicate the presence of a hazard with a medium level of risk
which, if ignored, can result in death, severe personal injury, or substantial
property damage.
CAUTION
Caution notices indicate the presence of a hazard with a low level of risk which,
if ignored, could cause moderate or minor personal injury or equipment damage,
or could endanger test integrity.
Notes Notes provide additional information about operating your system or highlight
easily overlooked items. For example:
Special terms The first occurrence of special terms is shown in italics.
Illustrations Illustrations appear in this manual to clarify text. They are examples only and
Electronic manual
conventions
Hypertext links The electronic document has many hypertext links displayed in a blue font. All
12
Preface
Note Resources that are put back on the hardware lists show up at the
end of the list.
do not necessarily represent your actual system configuration, test application,
or software.
This manual is available as an electronic document in the Portable Document
File (PDF) format. It can be viewed on any computer that has Adobe Acrobat
Reader installed.
blue words in the body text, along with all contents entries and index page
numbers, are hypertext links. When you click a hypertext link, the application
jumps to the corresponding topic.
RPC Data Manager Software Reference
Page 13

Installation and System Settings
Contents Data Manager Server PC Requirements 14
Software Product Installation 16
Install MTS Licensing Software 20
Update License File when Server Name Changes 22
Install or Upgrade to SQL Server Express 2008 23
Install RPC Data Manager Server 24
Data Manager Administrative Tasks 26
Firewall Setup for RPC License Software 27
Windows XP/Vista Firewall Setup for RPC License Software 28
Windows 7 Firewall Setup for RPC License Software 31
RPC Data Manager Software Reference Installation and System Settings
13
Page 14

Data Manager Server PC Requirements
Data Manager Server PC Requirements
Overview Before installing the Data Manager Server software, ensure the PC meets the
minimum system requirements. Ideally, the PC should meet the recommended
system requirements for improved performance.
PC hardware
requirements
COMPONENT MINIMUM RECOMMENDED
Server type
Processor
RAM
Hard drive
Available disk space
Monitor
The following table lists the requirements that the PC must have in order to run
the Data Manager Server software.
If the RPC Pro/Component RPC Pro software and the Data Manager Server
software will be installed on the same PC, make sure the PC meets the
requirements of both. Where the component requirements overlap, the Data
Manager Server requirements should be used.
Single-user server Multi-user server
Intel Pentium, 1.0 GHz Intel Core Duo, 3.16 GHz
1 GB 2 GB
20 GB 50 GB (or more), RAID-5 Disk
Array
15 GB 40 GB (or more)
17 inch monitor
Resolution 1024 x 768
65,536 or high colors
21 inch monitor
Resolution 1280 x 1024
High or true colors
Supported operating
systems
14
Installation and System Settings
Data Manager Server software can run on any of the following operating
systems:
• Windows XP 32 bit Professional with Service Pack 3
• Windows Vista 32 bit Business with Service Pack 2
• Windows Vista 64 bit Business with Service Pack 2
• Windows 7 32 bit Professional
• Window 7 64 bit Professional
RPC Data Manager Software Reference
Page 15

Data Manager Server PC Requirements
Localization Data Manager Server software can run on a supported operating system in any
of the following language versions:
• English
• German
• French
• Japanese
RPC Data Manager Software Reference Installation and System Settings
15
Page 16

Software Product Installation
Software Product Installation
Getting started with
the installations
MTS RPC License
Software Installation
RPC Data Manager
Server Installation
Summary
Log on to the computer using an account that has Administrator privileges.
Close all applications and place the Installation CD in its drive.
The RPC Pro/Component RPC Pro Software and MTS Licensing Software
installations are on the first CD. All other product installations are on the
second CD.
Install MTS Licensing Software.
Install the following components on the computer that will be used to run the
RPC Data Manager Server software. RPC Data Manager Server software can
operate on the same computer with the MTS RPC and Data Manager client
software.
For storage and administrative reasons, you may find it best to install the RPC
Data Manager Server software on a separate computer.
If Data Manager Server is installed on a computer separate from RPC Pro, you
will need to install the MTS Licensing Software on both computers.
1. Install and configure SQL Server Express 2008.
2. Install RPC Data Manager Server.
Important If prompted, restart the computer at the end of each installation. When the
16
Installation and System Settings
3. Perform Data Manager administrative tasks.
computer is restarting, log on to Windows using the same administrator
account that the software was installed under. Doing this allows the installation
program to finish setting up the files. Then, start the software to verify that it is
properly installed. After that, users can log on using their own account.
RPC Data Manager Software Reference
Page 17
Software Product Installation
Main RPC Software
Product Installation
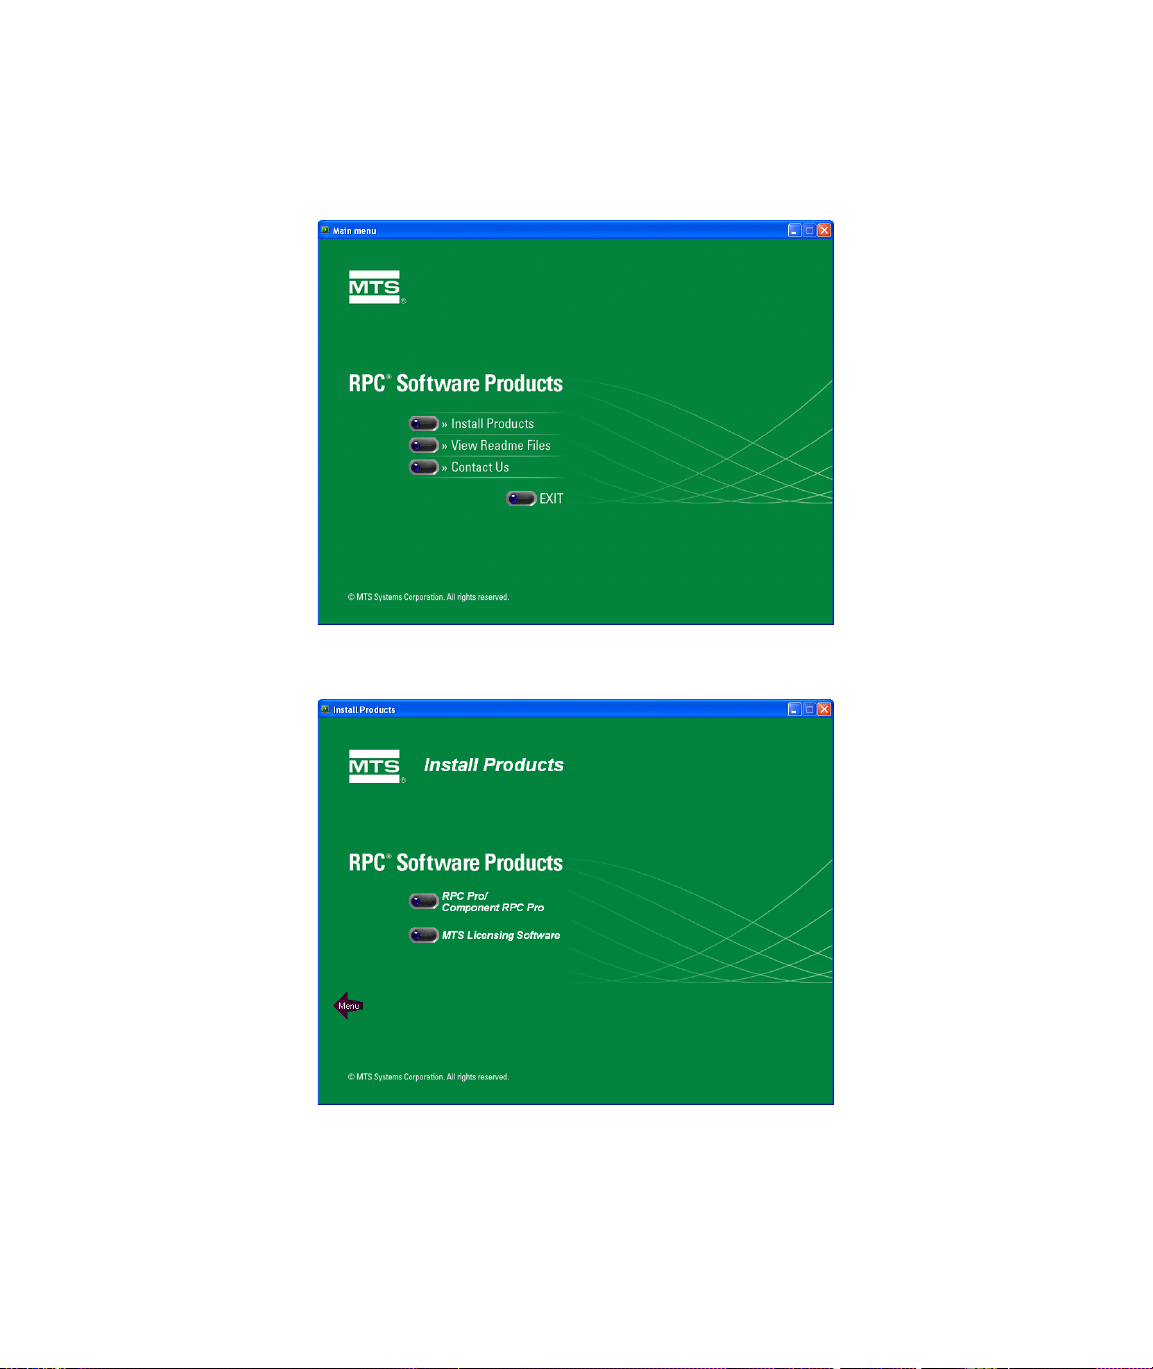
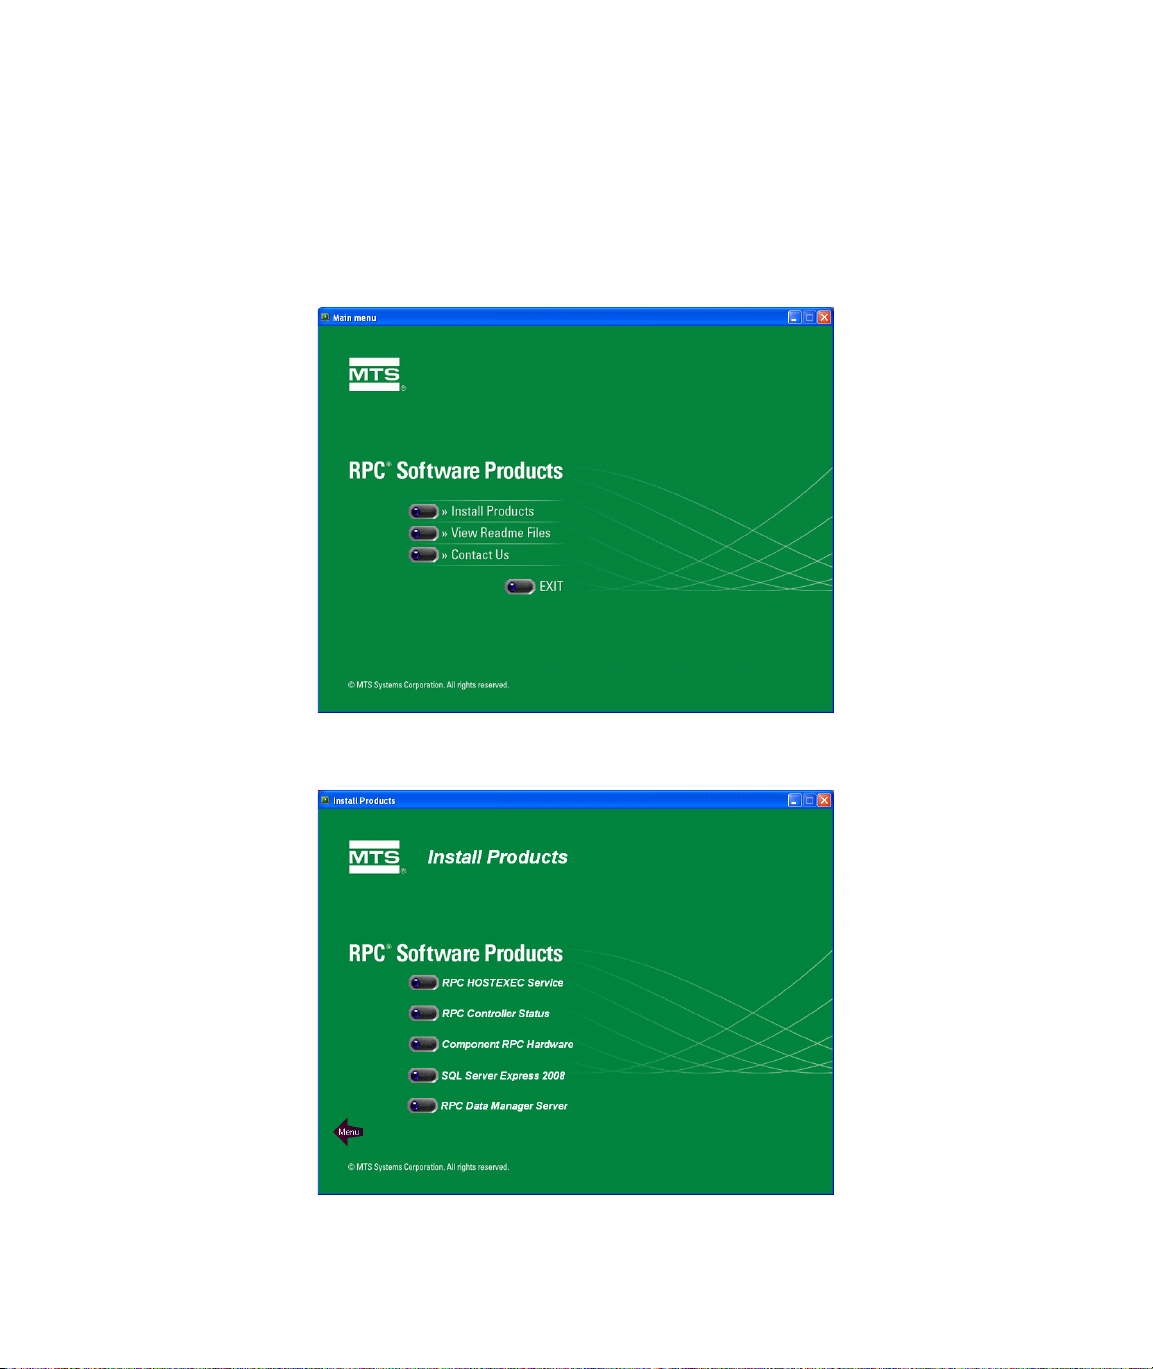
The first installation CD provides the following options.
Click Install Products to open the following install screen:
Click View Readme Files to access the Readme file, License Agreement, and
Software Assistance form. The Readme file contains important installation
information.
RPC Data Manager Software Reference Installation and System Settings
17
Page 18
Software Product Installation
Click Contact Us to learn the best method for contacting MTS.
Click Exit to exit the installation program.
Other RPC Software
Product Installations
The second installation CD provides the following options.
Click Install Products to open the following install screen:
18
Installation and System Settings
RPC Data Manager Software Reference
Page 19

Software Product Installation
Click Contact Us to learn the best method for contacting MTS.
Click Exit to exit the installation program.
RPC Data Manager Software Reference Installation and System Settings
19
Page 20
Software Product Installation
Install MTS Licensing Software
Who should install Anyone who received an RPC license CD must install the MTS Licensing
Software on the appropriate computer(s). This includes customers upgrading to
the latest version of RPC software, new customers or customers that have
purchased advanced features.
MTS Licensing
Software overview
Client versus server
license install
Installation
instructions
MTS Licensing Software must reside on the RPC workstation(s). If the latest
version of Data Manager Server software is going to be installed on a separate
computer, make sure to install the MTS Licensing Software on that computer
as well.
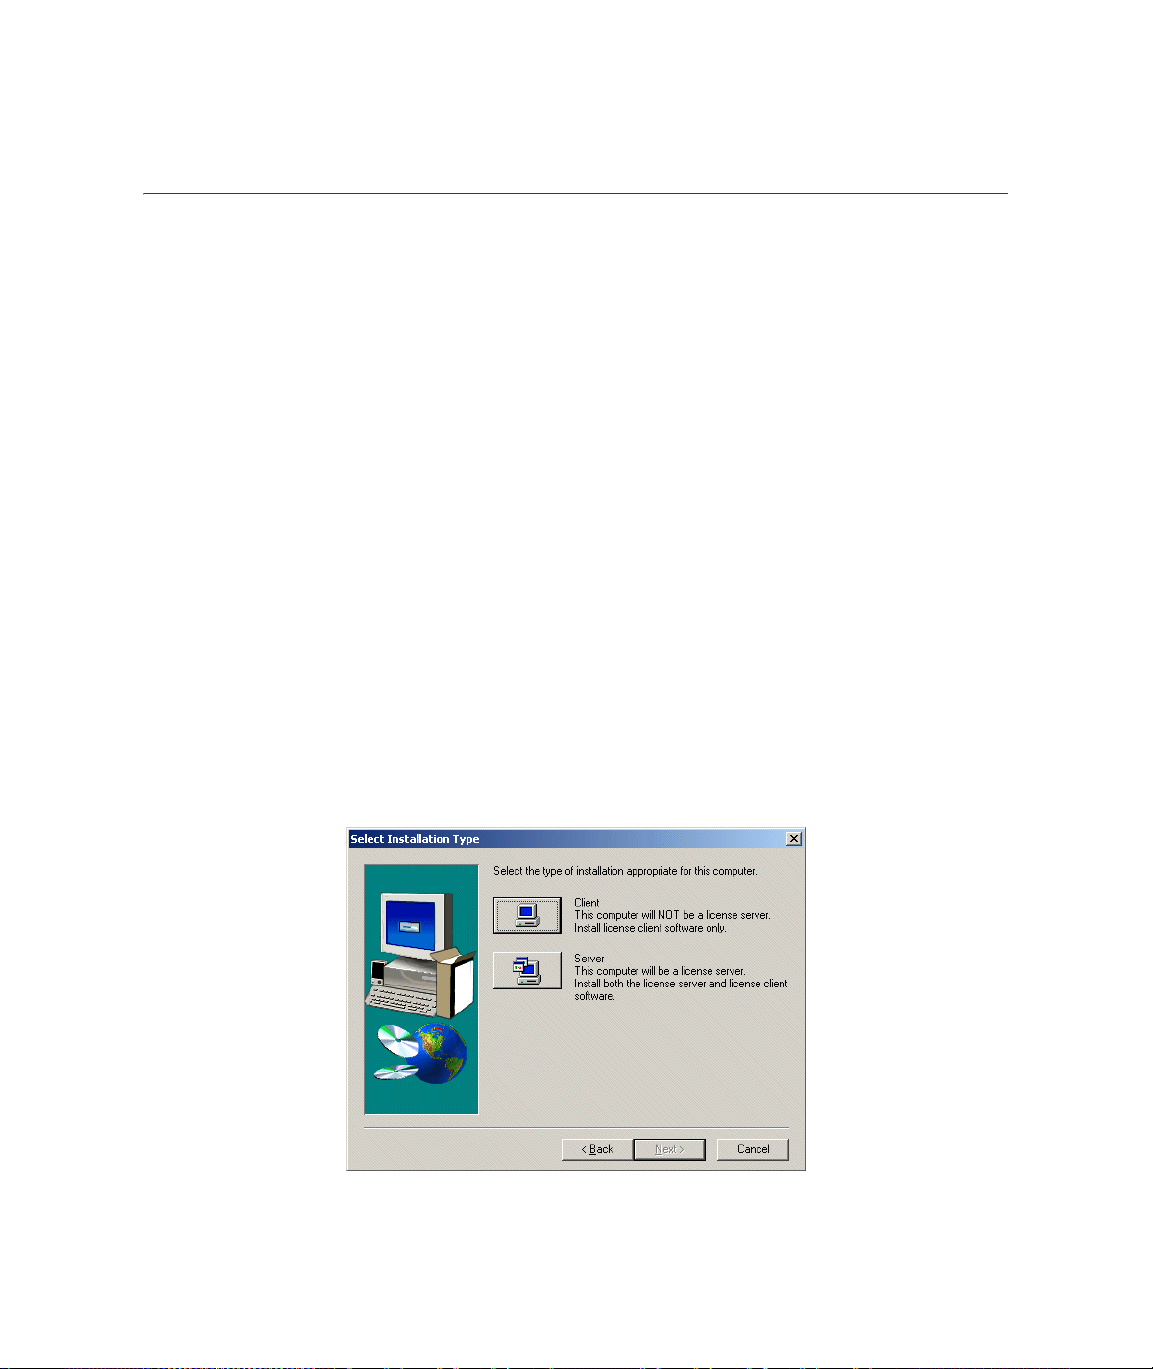
Determine whether the licensing software should be installed as a client or
server.
If you have an RPC License CD that contains the license file specifically for
your computer’s physical network address, your computer will be acting as a
license server for itself.
If the MTS Licensing Software is installed using a license file built for another
computer’s physical network address, your computer will be the license client.
1. Click MTS Licensing Software in the Install Products page.
2. Follow the instructions that are provided in the setup windows.
3. When prompted, choose to install as Client or as Server.
20
Installation and System Settings
RPC Data Manager Software Reference
Page 21
Software Product Installation
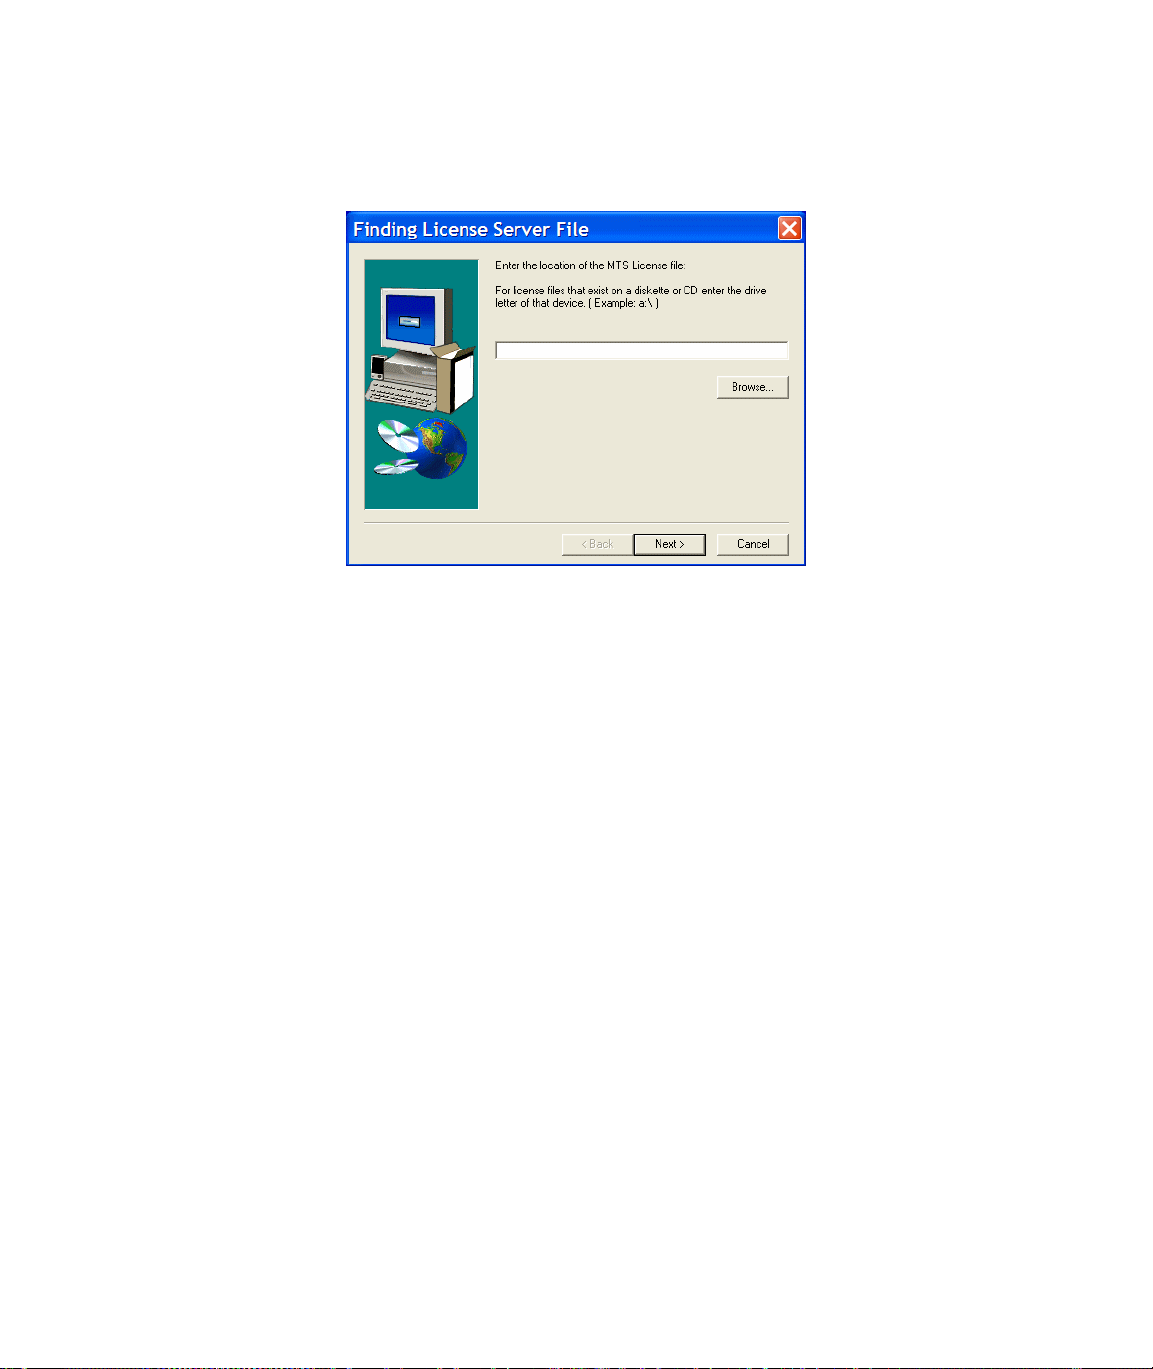
4. Follow these steps when prompted for the location of the MTS license
file:
A. Remove the RPC Installation CD, and insert the RPC License CD.
B. If you already know the drive letter for the CD, enter it in the box
(for example E:\), or click Browse and then choose the drive for the
CD in the window that appears.
C. Click Next to install the MTS license.
5. Restart the computer at the end of the installation.
6. If you want to install more RPC software, insert the RPC Installation CD
after the computer has restarted.
RPC Data Manager Software Reference Installation and System Settings
21
Page 22

Software Product Installation
Update License File when Server Name Changes
License update
examples
Location of license
file
Update server name
in license file
If the name of the license server computer changes some time after the MTS
license software was installed, the license file would need updating to reflect the
computer name change.
• If the license server is used to serve itself, the license file would need
updating (locally) to reflect the new name of the computer.
• If the license server is used to serve other client computers, the license file
on the server and client computers would need updating to reflect the new
name of the license server. If the name of the license client computer
changes, the license file would not need updating.
Note If the computer’s network card has changed since the MTS license
software was installed, contact MTS.
The mts_license.dat file is typically located in the C:\MTS\License directory.
The location of the license directory may vary depending on your installation.
The first line of the mts_license.dat file specifies the computer name. For
example:
SERVER old-computer-name 0011550D6047
In this example, replace <old-computer-name> with the new Host name of the
computer.
22
Installation and System Settings
After the license file is updated, restart the computer to restart the FLEXlm
License Manager service.
RPC Data Manager Software Reference
Page 23

Software Product Installation
Install or Upgrade to SQL Server Express 2008
Overview Data Manager Server is now supported on SQL Server Express 2008.
Data Manager Server will work with MSDE, so upgrading to SQL Server
Express 2008 is not required.
Who should install New RPC Data Manager Server customers should install SQL Server Express
2008 on the computer that will have the Data Manager Server software
installed.
Who can upgrade Previous RPC Data Manager Server users can upgrade MSDE to SQL Server
Express 2008 on the computer that will have the Data Manager Server software
installed.
This upgrade will maintain your existing databases and bring them forward
from MSDE to SQL Server Express 2008.
Instructions If you plan to use SQL Server Express 2008, it must be installed or upgraded
and configured before RPC Data Manager Server can be properly installed.
To upgrade MSDE to SQL Server Express 2008, open the MSDE to SQL
Server Express 2008 Upgrade.doc file in the ..\\DataMgrSupport folder
on the RPC Pro Media 2 CD, and then follow the instructions in that
document.
To install SQL Server Express 2008, open the SQL Server Express 2008
Installation Instructions.doc file in the ..\\DataMgrSupport folder on the
RPC Pro Media 2 CD, and then follow the instructions in that document.
RPC Data Manager Software Reference Installation and System Settings
23
Page 24
Software Product Installation
Install RPC Data Manager Server
Who should install MTS RPC customers who plan to use Data Manager to manage, archive and
retrieve test information must install the RPC Data Manager Server software.
Install the RPC Data Manager Server software on the computer that is licensed
to run the software.
Installation
instructions
1. Ensure the computer meets the System Requirements.
2. New customers should install SQL Server Express 2008. Existing
customers using MSDE can optionally upgrade to SQL Server Express
2008.
3. Click on RPC Data Manager Server in the Install Products page.
Follow the instructions that are provided in the setup windows.
During installation, setup looks for a previous version of Data Manager.
Choose to uninstall the previous version of Data Manager if prompted by
the setup. A previous version can be the Data Manager client which is
installed with the RPC Pro software.
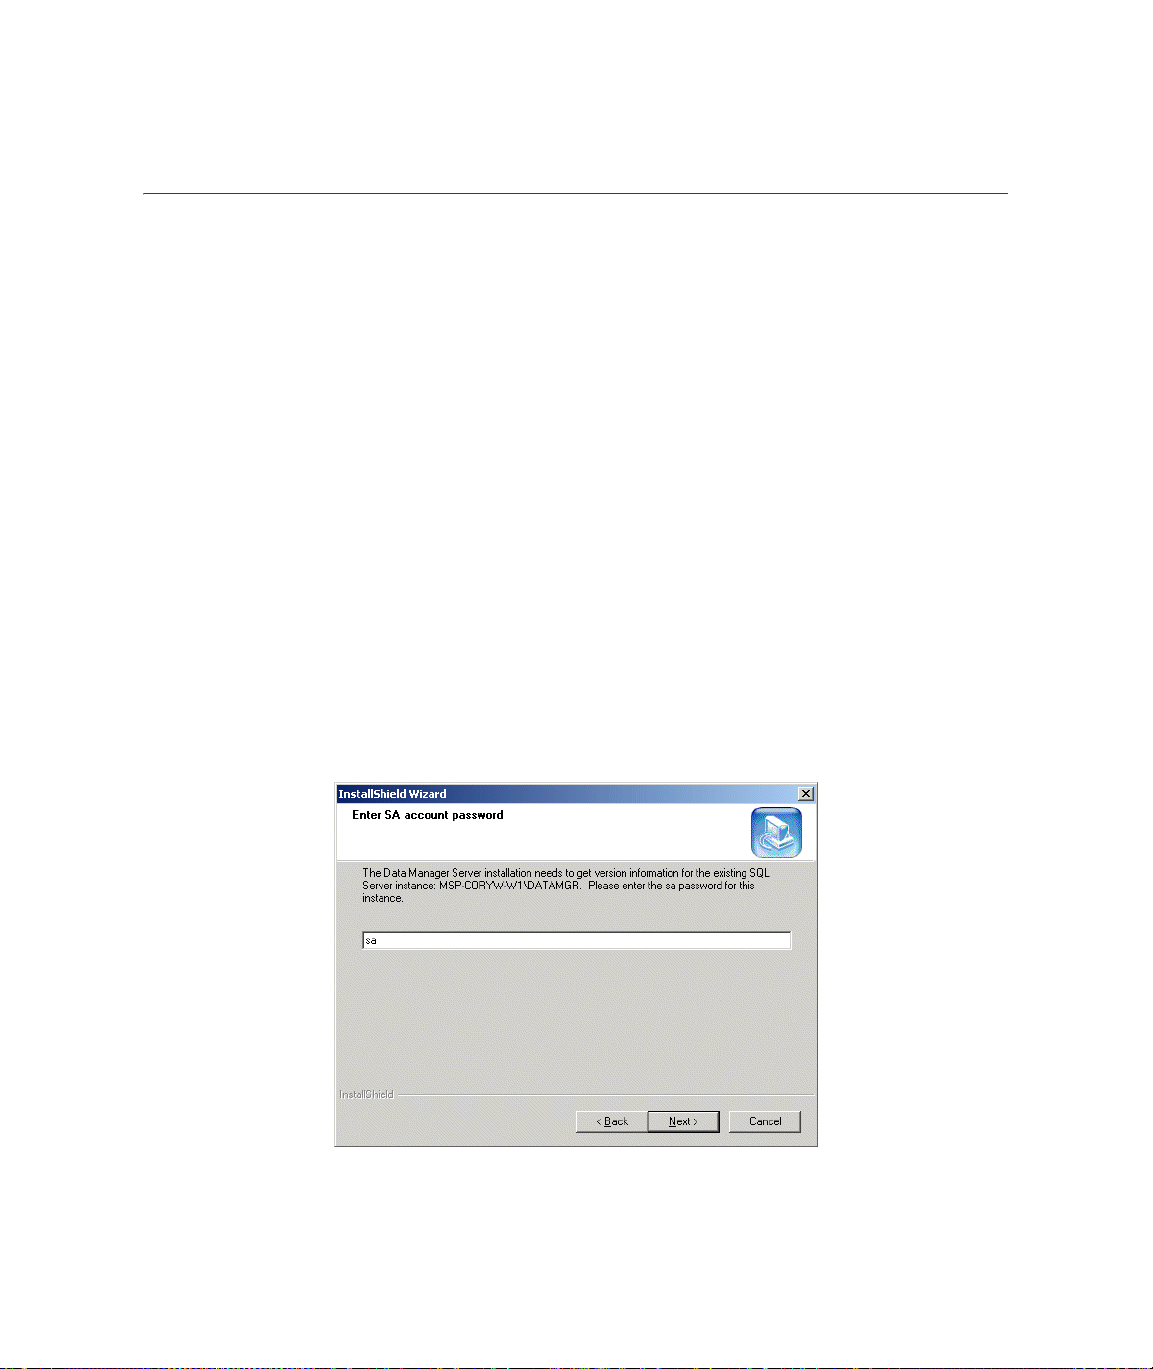
During the installation, you will be prompted to Enter SA account
password. Enter the default password:
sa
24
Installation and System Settings
Setup will continue to guide you through the remaining installation steps.
RPC Data Manager Software Reference
Page 25

Software Product Installation
Change the “sa”
account password
Change the “sa” account password after the RPC Data Manager Server
software is installed.
1. Open a DOS Command Prompt window.
2. Enter the following at the command prompt:
osql –S (local)\Datamgr –U sa –P sa
3. At the 1> prompt, enter the following to specify the new password
(except, replace xxx with your new desired password):
exec sp_password @new=’xxx’, @loginame=’sa’
4. At the 2> prompt, enter the following to execute the password change:
go
5. Observe the “Password changed” message and new 1> prompt.
6. At the 1> prompt, enter the following to terminate the program:
quit
Important Remember the account password (record it and keep it in a
secure place). If you forget the password, you could
potentially lose access to the database.
RPC Data Manager Software Reference Installation and System Settings
25
Page 26

Data Manager Administrative Tasks
Data Manager Administrative Tasks
After the Data Manager client and server software are installed on the licensed
computers, the person with Administrator privileges for Data Manager must
complete all of the following tasks. Refer to the Data Manager documentation
for more information.
Instructions 1. Add all users to a group with access privileges to shared network folders.
2. Add all users to the RPC Database and define their security role.
3. Review backup jobs that are automatically scheduled.
4. Plan and set up offline storage for historical or very large archives.
5. Define user keywords, set up restricted keyword values, define any
additional product system keywords, and make sure appropriate system
keywords are set as “required.”
6. Add new users to the RPC Database and define their security role.
7. Add new users to the group with access privileges to shared network
folders.
26
Installation and System Settings
RPC Data Manager Software Reference
Page 27

Firewall Setup for RPC License Software
Firewall Setup for RPC License Software
Overview Firewall software can block licensing programs from accessing the network. As
a result, the MTS RPC Software will not be able to check out a license.
There are two types of license servers that can be affected by firewall software:
• A computer that is acting as a license server for itself
• A computer that is acting as a license server for other computers
Follow the instructions to configure Windows Firewall on the computer that is
acting as the license server.
RPC Data Manager Software Reference Installation and System Settings
27
Page 28
Firewall Setup for RPC License Software
Windows XP/Vista Firewall Setup for RPC License Software
You must be logged on as an administrator to perform these steps.
1. Open Windows Firewall control panel.
For Windows XP: Start menu > Settings > Control Panel > Windows
Firewall.
28
Installation and System Settings
RPC Data Manager Software Reference
Page 29
Firewall Setup for RPC License Software
For Windows Vista: Windows Start menu > Control Panel > Windows
Firewall.
Windows Firewall can be turned on or off for different network
connections.
If Windows Firewall is turned Off, the programs will not be blocked and
therefore the remaining steps may be ignored. Turning Windows Firewall
Off is not recommended.
2. If Windows Firewall is turned On in the General tab, ensure that
exceptions are allowed.
For Windows XP: Un-check the Don’t allow exceptions box.
For Windows Vista: Un-check the Block all incoming connections box.
3. Click on the Add Program button in the Exceptions tab.
4. Click on the Browse button in the Add a Program window.
5. Browse to the C:\MTS\License directory, select lmgrd.exe, and then
click Open in the Browse window.
6. Click OK in the Add a Program window.
RPC Data Manager Software Reference Installation and System Settings
29
Page 30

Firewall Setup for RPC License Software
7. Repeat steps 3 through 6 for the mtsd.exe and mtsdmon.exe programs.
8. Ensure lmgrd.exe, mtsd.exe, and mtsdmon.exe programs are selected on
the Windows Firewall Exceptions tab.
9. Click OK to save changes to the Windows Firewall.
30
Installation and System Settings
RPC Data Manager Software Reference
Page 31

Firewall Setup for RPC License Software
Windows 7 Firewall Setup for RPC License Software
You must be logged on as an administrator to perform these steps.
1. Open Windows Start menu > Control Panel > System and Security >
Windows Firewall.
Windows Firewall can be turned on or off for different network
connections.
If Windows Firewall is turned Off, the programs will not be blocked and
therefore the remaining steps may be ignored. Turning Windows Firewall
Off is not recommended.
2. Click Allow a program or feature through Windows Firewall.
3. Click on the Allow another program button.
RPC Data Manager Software Reference Installation and System Settings
31
Page 32

Firewall Setup for RPC License Software
32
Installation and System Settings
4. Click on the Browse button in the Add a Program window.
5. Browse to the C:\MTS\License directory, select lmgrd.exe, and then
click Open in the Browse window.
6. Click OK in the Add a Program window.
7. Verify that the program is allowed on the appropriate network(s).
8. Repeat steps 3 through 7 for the mtsd.exe and mtsdmon.exe programs.
Note that when mtsd gets added to the program list, its display name will
change to lmgrd326b.
9. Click OK to save changes to the Windows Firewall.
RPC Data Manager Software Reference
Page 33

Introduction to Data Manager
Contents About Data Manager 34
Archiving Projects - RPC Project Manager 35
Search, Data Retrieval, and Administration 36
About Archives 37
Keywords 38
Keyword Values 43
User Security Roles 45
RPC Data Manager Views 48
Administration Views 49
Server Selector Utility 50
RPC Data Manager Software Reference Introduction to Data Manager
33
Page 34

About Data Manager
About Data Manager
Data Manager is a client-server data management solution focused on the
management, archival, and retrieval of test information. It allows multiple users
in test and analysis areas to archive and retrieve data intelligently in order to
better manage and leverage the valuable information that they produce.
To make searches as efficient as possible, Data Manager maintains the database
(which contains information about the archived data) and the archived data in
separate locations. Data Manager also supports offline storage of archived data.
This allows historical data or very large projects to be physically stored offline,
while users continue to browse and search for all data in the database. (To open
items or retrieve the data, the archive must be stored locally.)
As a Data Manager user, you can:
• Archive your current project in a new archive or use current project data
to update an existing archive. The familiar project structure is maintained
in the archive.
• Select a saved query, create a new query, or modify an existing query to
search for archived data from previous projects.
34
Introduction to Data Manager
• Browse archived data and open archived items to verify their contents
before retrieval.
• If you are the archive owner or an Administrator, you can lock and unlock
archives, delete archives, rename archives, make archives local or remote,
and modify user-assigned keywords used to identify items in the archive.
• Retrieve historical project information into your current project.
The Data Manager Administrator has access to these user functions plus
additional functions for managing users in the database and managing the
master list of keyword definitions used to search for and retrieve archived data.
The Administrator is also responsible for moving archives between local and
offline storage and for managing backups for both the Data Manager database
and archived data.
RPC Data Manager Software Reference
Page 35

Archiving Projects - RPC Project Manager
Archiving Projects - RPC Project Manager
Archiving with Data Manager means archiving your current project in either a
new archive or archiving current project data to update an existing archive.
Each time you archive a project, keywords and values that describe the data are
assigned to the top-level archive and its contents. These keywords can be used
later to search for archived data with these specific characteristics.
Archiving always begins in the RPC Project Manager, with the current project
open and all other RPC applications closed. See
57 for specific instructions.
“Archiving a Project” on page
RPC Data Manager Software Reference Introduction to Data Manager
35
Page 36

Search, Data Retrieval, and Administration
Search, Data Retrieval, and Administration
Data Manager’s search, retrieval, and administration functions can be accessed
from any RPC application (except Project Manager and Setup) by clicking the
Data Manager icon in the tool bar. Use these Data Manager functions to search
the database, to open archived files so you can verify their contents, to retrieve
archived data, and to create queries used to search for archived data. In
addition, the Data Manager Administrator can access functions used to manage
the master keyword list and to manage users.
When you open Data Manager, the Archives view opens automatically. From
there, the functions and views that you can access depend on your user role in
Data Manager. See
“User Security Roles” on page 45.
36
Introduction to Data Manager
RPC Data Manager Software Reference
Page 37

About Archives
The archive is the primary storage unit in Data Manager. When you archive a
project, you create an archive and information about the archive is stored in the
Data Manager database. The archived data has the same structure as the project
that was archived, with the project folder just below the top-level archive in the
archive hierarchy.
The Data Manager Archives view provides a list of all archives in the database
and displays the keywords and values associated with each item. The Archives
list displays the project structure and uses the same icons to identify project
items as a Project Explorer window.
About Archives
RPC Data Manager Software Reference Introduction to Data Manager
37
Page 38

Keywords
Keywords
When data is archived, keywords and values are assigned to the data that
describe its properties. Later, you can define queries to search for items in the
archive that have these keywords and values assigned.
Keyword types
overview
Data Manager defines several types of keywords that can be assigned to
archived data:
• User-assigned keywords, assigned by the archive owner with the user-
specified values when the data is archived. These keywords maybe
assigned to all data, or to data associated with a specific product (such as
RPC).
• Product system keywords, which are assigned automatically when the data
is archived. Keyword values are extracted from the data, typically from a
keyword in the file header. These keywords are always associated with a
specific product.
• Standard keywords, which are assigned to all archived data to identify its
general characteristics, such as the archive date, item type, archive owner,
etc.
User keywords User keywords are created and defined by the Administrator. Users can then
assign these keywords and their values when they archive the data.
Note With some restrictions, the archive owner and the Administrator
can also modify user keywords that were assigned to archived data.
See “Modifying Keywords in Archived Data” on page 119.
• Each user keyword definition specifies that it can be assigned to all data
(“all products”) or only to data associated with a specific product (such as
RPC).
Product system
keywords
38
Introduction to Data Manager
• If a user keyword is defined as “required,” it is automatically selected when
data is archived, provided any data selected for archiving has the same
product association as the keyword. Required keywords must be assigned
and cannot be removed, but you can specify their values.
User keywords are displayed in the Archives view for the selected item and can
also be displayed from the search results windows.
Product system keywords are always associated with a specific product (such as
RPC), and they are assigned automatically during the archive process, with the
RPC Data Manager Software Reference
Page 39

Keywords
keyword value extracted from the data being archived, if all of the following
conditions are true:
• The keyword and the data are associated with the same product (such as
RPC).
• The keyword is defined as required.
• The archiving software can obtain the keyword value from the data
(typically, from the file header).
Data Manager provides a set of product system keywords for RPC. However,
the Administrator can also create additional product system keywords for
special purposes. Product system keyword names typically identify the product
(for example, RPC product system keywords start with “RPC”).
Product system keywords are displayed in the Archives view, but they cannot
be removed and their values cannot be changed. These keywords can also be
used in queries to search for archived data.
Product system keywords User keywords
Standard keywords Standard keywords are also assigned automatically when data is archived, but
these keywords are not associated with any product. They are used to identify
general properties, such as the archive date, archive owner, item type, etc.
RPC Data Manager Software Reference Introduction to Data Manager
39
Page 40
Keywords
In the Archives view, standard keywords are displayed in the Item Properties
pane. Standard keywords cannot be removed, and their values cannot be
changed. Like other types of keywords, they can be used in queries to search for
archived data.
Note Property names do not always exactly match standard keyword
names.See
“Standard keywords” on page 39 for a list of standard
keyword names and data types.
KEYWORD DATA TYPE VALUE
Archive Contents
Text Value Comma-delimited list of product drivers used to
archive the data. If no product-specific data exists in
the archive, this value is set to “Generic.”
Archive Creation Date
Archive Last Updated
Archive Locked
Archive Name
Date/Time Date and time the archive was created.
Date/Time Date and time the archive was last updated.
Boolean Specifies whether the archive is locked or unlocked.
Text Value Archive name in the database. Displayed in the Item
Properties as “Parent Archive.”
40
Introduction to Data Manager
.
RPC Data Manager Software Reference
Page 41

KEYWORD DATA TYPE VALUE
Keywords
Archive Owner
Comments
Item Archived Date
Item Date
Item Last Updated
Item Name
Item Path
Item Size
Item Type Name
Original Computer
Text Value User name that archived the data in this format:
domain\username
Text Value Any text, up to 64k in length. This text consists of the
archive comments that were assigned when the data
was archived, or as last modified in the Archives
view.
Date Date the item was first stored in this archive.
Date Date the item was created or last modified (same as
File System date).
Date/Time Date and time that the item was last archived via an
Archive Update operation.
Text Value Typically the folder (directory) name or file name of
the archived item.
Text Value Original path name of the archived item. Displayed as
“Path” in search results windows and as “Original
Location” in the Item Properties.
Numeric The item size is displayed in kilobytes (KB).
Text Value
(Restricted)
Identifies the item type (displayed in Item Properties as
“Item Name”). Examples are Archive, Directory, File.
Text Value Identifies the computer used to originally create the
archive. This property applies to all items in the
archive, including items that may have been added to
the archive in an update from a different computer.
Original Location
Text Value Identifies the path name of the item at the time it was
archived. Data Manger uses this property in an archive
update to determine whether an item selected for the
archive update will replace an existing item in the
archive.
Product
Text Value
(Restricted)
Product association for the archived item. The
keyword value is a specific product (such as RPC) or
“File System” (for items not associated with a specific
product).
Remote Archive
Comments
Text Value Any text, up to 64k in size. The value of this keyword
is the entire text of the Remote Archive Comments that
were assigned when the archive was made remote.
RPC Data Manager Software Reference Introduction to Data Manager
41
Page 42

Keywords
KEYWORD DATA TYPE VALUE
Remote Archive Date
Stored Remotely
Date Date that the archive was made remote. (This property
is not displayed in the Archives view nor in the Item
Properties dialog accessed from the search results
windows.)
Boolean This value is FALSE if the item is in a local archive, and
TRUE if the item is in a remote archive.
42
Introduction to Data Manager
RPC Data Manager Software Reference
Page 43

Keyword Values
Each keyword value must match the keyword value type (text, Boolean, date)
specified in the keyword definition. Keyword values for all data types must be
256 characters or less.
Note Number and date formats for keyword values must be consistent
KEYWORD VALUE
Keyword Values
with your computer’s operating system locale.
Numeric keywords
Te x t k ey w o r d s
Te x t k e yw o rd s w it h
restricted values
Type a positive or negative numeric value in
the range of 0.0000000000001 to
999,999,999,999,999 (and zero). The numeric
format may be integer, real number, or
exponent (for example, 1e+5).
Click in the Valu es field to enable editing, then
type the value (maximum 256 characters).
Keyword values are restricted to a pre-defined
list, and a value must be selected from the list.
RPC Data Manager Software Reference Introduction to Data Manager
43
Page 44

Keyword Values
KEYWORD VALUE
Boolean keywords
Date keywords
Click on the Val ue s field and select True or
False from the list.
Type the date in a valid date format or click
the arrow in the Va lue s field to open a
selection calendar. Find the date in the
calendar and click on it.
44
Introduction to Data Manager
RPC Data Manager Software Reference
Page 45

User Security Roles
Data Manager provides three security roles for its users, with increasing levels
of privileges — Guest, Test Engineer, and Administrator. Your security role
determines which Data Manager functions are available.
Guest role Guest users can search for and retrieve archived data, but they cannot archive
data. Guests can create queries and modify existing queries to search for
archived data, but they cannot save new queries or overwrite existing queries.
User Security Roles
Test engineer role Test Engineer users have all Guest privileges, plus the ability to archive their
projects, to delete, rename, lock and unlock archives and to change keywords
and archive comments for archives that they own. They cannot change, delete,
or lock and unlock archives that are owned by other users.
Test Engineers can save queries that they have created or modified, and they
can delete, overwrite, and lock or unlock queries that they own. They cannot
overwrite, delete, or lock and unlock queries that are owned by other users.
RPC Data Manager Software Reference Introduction to Data Manager
45
Page 46
User Security Roles
Administrator role The Administrator has all Test Engineer privileges, plus the ability to perform
operations on archives that are owned by other users. In addition, the
Administrator can access views on the Administration task bar to manage
keyword definitions, to add or delete users, to monitor user sessions, and to
assign a security role to each user.
46
Introduction to Data Manager
RPC Data Manager Software Reference
Page 47

User Security Roles
The Administrator is also responsible for these additional tasks:
• Probably most important -- monitoring backups and restoring from
backups if necessary.
• Managing remote storage, including storage of archives off-line.
• Managing hardware and software, including supporting failed hardware,
database diagnostics, antivirus software, defragmenting disks, and future
drive expansion.
See “Administration” on page 147 for specific information about these
Administrator tasks.
RPC Data Manager Software Reference Introduction to Data Manager
47
Page 48

RPC Data Manager Views
RPC Data Manager Views
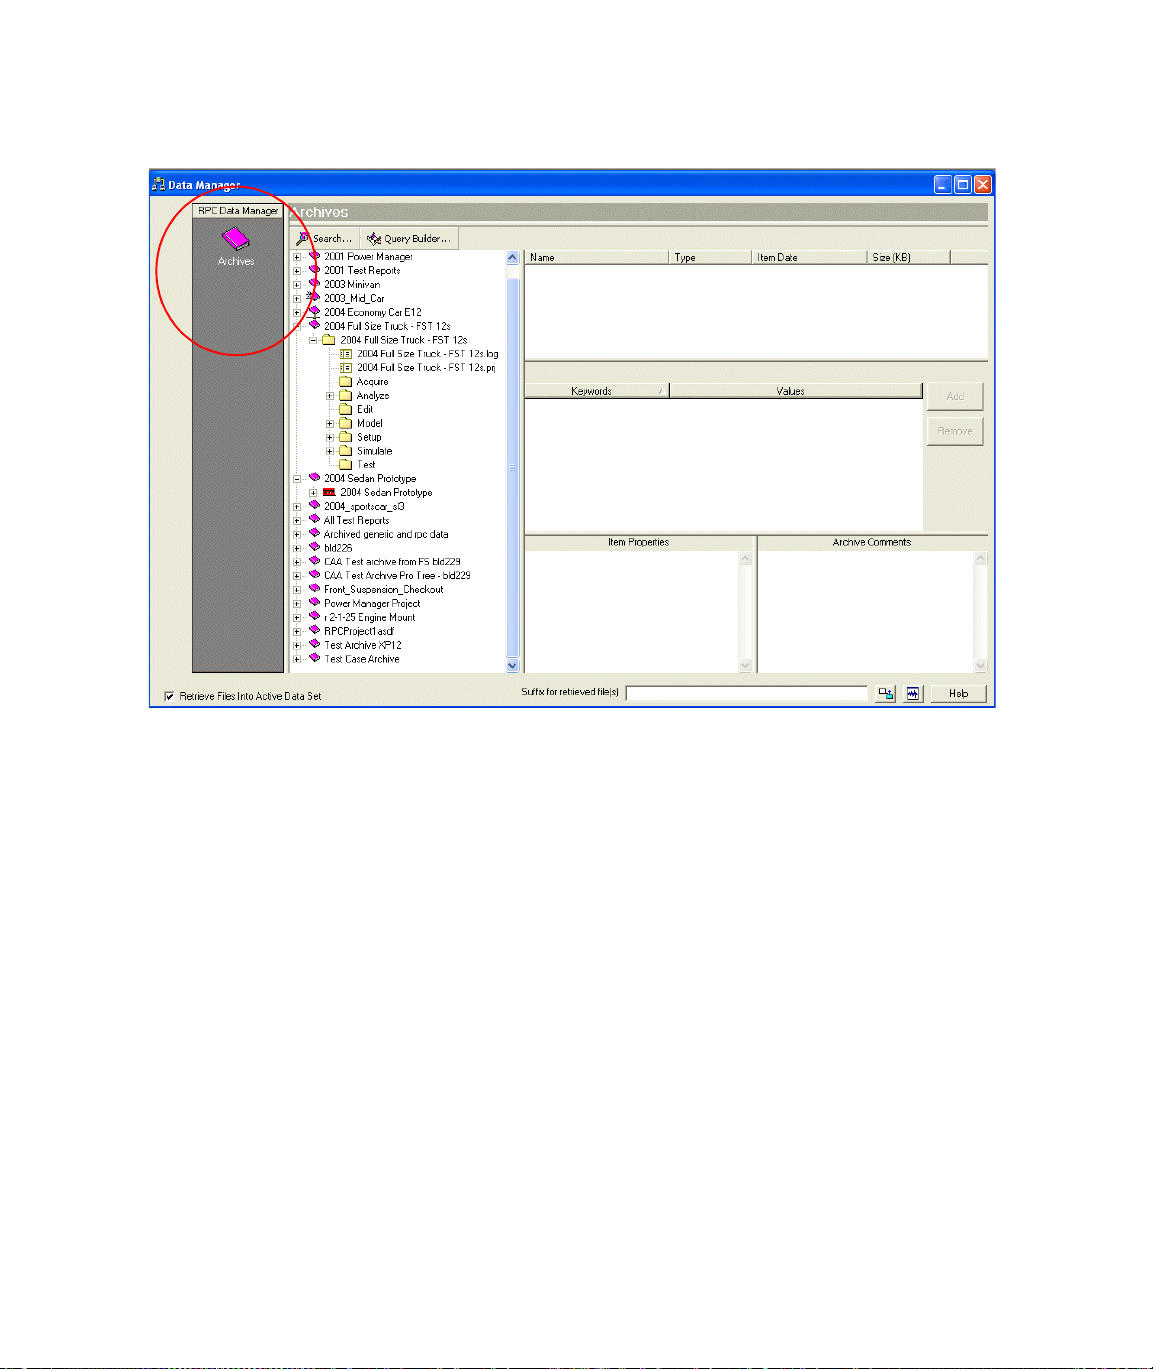
Archives view Use the Archives view to browse the hierarchy of archived data, to search for
archived data, to retrieve archived data, and to create or modify queries. If you
are the archive owner or the Administrator, you can also use this view to
modify keywords in archived data, to change the archive comments, to delete or
rename archives, to lock or unlock archive, or to make an archive remote or
local. This view opens automatically when you open Data Manager.
48
Introduction to Data Manager
RPC Data Manager Software Reference
Page 49

Administration Views
These views provide special functions for the Data Manager Administrator.
Keywords view The Keywords view displays the master list of available keywords and allows an
Administrator to add, delete, and change keyword definitions (with some
restrictions).
Users view The Users view displays the list of users and their security privilege and allows
the Administrator to add or delete users, to assign or change user security
privileges, and to monitor user sessions.
Administration Views
RPC Data Manager Software Reference Introduction to Data Manager
49
Page 50

Server Selector Utility
Server Selector Utility
When to use Before you can archive a project or search for and retrieve archived data, you
must use the Server Selector Utility to configure the server and database.
Once you have used the Server Selector utility to specify these names, Data
Manager will automatically connect to the server and database each time you
start the application.
Server and database
names
If Data Manager
cannot find the server
The Data Manager administrator is the person responsible for installing and
setting up the RPC Data Manager Server. Ask the Data Manager Administrator
for the server name and the database name, which has this format:
database_name on server_name/instance_name
If the server and database names have not been configured when you start Data
Manager, a Configuration error dialog will appear. Click Yes to open the Open
Database dialog.
Note See also “Connecting to database if server name has changed” on
page 52.
Configuring the server
and database
If the Open Database selection list displays the database you need, you can
simply open it (see
database does not appear in the selection list, you will have to add the database
to the selection list before you can open it.
“Opening the database” on page 51). However, if the
Adding the database To add database to the Open Database selection list:
50
Introduction to Data Manager
RPC Data Manager Software Reference
Page 51

Server Selector Utility
1. Click the Add button in the Open Database window. The Select Server
and Database dialog will open.
DEMORPC Database
2. In the Server field, type the server name with the instance name or select
the name from the drop-down list. You must use datamgr as the
instance name.
Example: DEMO-SERVER\datamgr
Note If you see a “not a valid user” message after entering the server
name, make sure that you entered the correct name for the server
and instance name.
3. The Database list will now contain a list of databases for the specified
server. Select RPC Database in the drop-down list. There may be other
database names in the list, however you must use RPC Database.
4. Click OK to add the database to the list.
Opening the database To open the Data Manager database once it appears in the Open Database
selection list:
1. Click on the Data Manager database name in the Open Database dialog.
2. Click Open to open this database and close the dialog.
Note The database will open only if the Administrator has defined you as
a user. See
RPC Data Manager Software Reference Introduction to Data Manager
“Users view” on page 152.
51
Page 52

Server Selector Utility
Connecting to
database if server
name has changed
Follow these steps to establish connection to the database if the server name
has changed.
1. As a prerequisite, ensure the new computer name is updated in any files
that rely on a host name, such as the HOSTS files on other computers or
the RPC license file.
For example, if the Data Manager Server is also acting as a license server,
ensure the new computer name is updated in the license file(s).
2. Remove old server from database.
A. Open the MTS Data Manager Explorer.
B. In the first Database Error, select OK to acknowledge.
C. In the next Database Error, select Retry.
D. In th e Open Database window, select the old server name and then
click on the Remove button.
3. Add new server to database.
A. Click the Add button in the Open Database window. The Select
Server and Database dialog will open.
52
Introduction to Data Manager
RPC Data Manager Software Reference
Page 53

Server Selector Utility
Ensure correct computer
name is entered here,
followed by \datamgr
DEMORPC Database
B. In the Server field, type in the new server (computer) name with the
instance name or select the name from the drop-down list. You must
use datamgr as the instance name.
Example: NEW-SERVER\datamgr
Note If you see a “not a valid user” message after entering the server
name, make sure that you entered the correct name for the server
and instance name.
C. The Database list will now contain a list of databases for the
specified server. Select RPC Database in the drop-down list. There
may be other database names in the list, however you must use RPC
Database.
D. Click OK.
E. In the Open Database window, select the new server name and click
the Open button.
F. In the Database Error dialog, click the Cancel button.
G. In the Application Initialization Error dialog, click the OK button.
4. Add the correct authorized user.
A. Log on to the computer using a local Administrator account.
B. Open a command prompt window, and then enter:
osql -S (local)\DATAMGR -U sa -P sa
Note If the “sa” account password was changed after installing MSDE,
enter the new password after -P, instead of “sa”.
RPC Data Manager Software Reference Introduction to Data Manager
53
Page 54

Server Selector Utility
C. At the 1> prompt, enter:
use [RPC Database]
D. At the 2> prompt, enter:
exec DeleteUser 'oldname\Administrator', 1
Note Substitute the original computer name for “oldname”.
E. At the 3> prompt, enter:
exec master..sp_dropuser
'oldname\Administrator'
Note Substitute the original computer name for “oldname”.
F. At the 4> prompt, enter:
exec AddUser 'newname\Administrator', 3
Note Substitute the new computer name for “newname”.
G. At the 5> prompt, enter:
go
H. At the 1> prompt, enter:
quit
5. Restart eTIMServer service.
A. Open the Services tool. For example: Start menu > Control Panel
> Performance and Maintenance > Administrative Tools >
Services.
B. Locate the entry named eTIM Server.
C. Right-click on eTIM Server, and then select All Tasks > Restart.
D. Wait for restart process to finish and then close the Services tool.
6. Modify Location table entries.
A. Open a command prompt window, and then enter:
osql -S (local)\DATAMGR -U sa -P sa
54
Introduction to Data Manager
RPC Data Manager Software Reference
Page 55

Server Selector Utility
Note If the “sa” account password was changed after installing MSDE,
enter the new password after -P, instead of “sa”.
B. At t he 1> prompt, enter:
use [RPC Database]
C. At the 2> prompt, enter:
UPDATE Location SET Location = REPLACE(Location,
'oldname', 'newname')
Note Substitute the original computer name for “oldname” and substitute
the new computer name for “newname”.
D. At the 3> prompt, enter:
go
E. At the 1> prompt, enter:
quit
RPC Data Manager Software Reference Introduction to Data Manager
55
Page 56

Server Selector Utility
56
Introduction to Data Manager
RPC Data Manager Software Reference
Page 57

Archiving a Project
Contents Getting Started Archiving 58
Creating a New Archive 60
Updating an Existing Archive 67
Archiving when Disconnected from Network 75
RPC Data Manager Software Reference Archiving a Project
57
Page 58

Getting Started Archiving
Getting Started Archiving
To archive a project, close all RPC applications, leaving just the RPC Project
Manager open. Then click on the Data Manager icon.
Click here to archive the current project.
After you click on the Data Manager icon in the Project Manager, the software
will open the necessary windows. For example, each time Data Manager is
opened, the software searches for a valid server. If Data Manager client cannot
find the server, the software prompts you to configure a server. The server only
needs to be selected initially the first time you use Data Manager. After that, the
next time Data Manager is opened, the software skips the server selector and
opens the necessary window(s) for archiving.
58
Archiving a Project
RPC Data Manager Software Reference
Page 59

Getting Started Archiving
First time use of Data
Manager archive
Subsequent use of
Data Manager
archive
If you are a first time user of Data Manager, you may get a Configuration
Error message stating there is no server set up for this client. If this is the case,
click Yes to configure the server. The
appear.
If this is also your first time archiving a project (meaning there are no project
archives created by your user name on the server), you may not be prompted to
update an archive when Data Manager is opened. Instead, a window will appear
for creating a new archive. The update/create archive prompt will not appear if
you have no archives, or if you do not have access privileges to update any other
users archives. If this is the case, see
When subsequent archives are performed, the user will be prompted to update
or create a new archive when Data Manager is opened. If this is the case, see
“Creating a New Archive” on page 60 or “Updating an Existing Archive” on
page 67.
“Server Selector Utility” on page 50 will
“Creating a New Archive” on page 60.
RPC Data Manager Software Reference Archiving a Project
59
Page 60

Creating a New Archive
Creating a New Archive
If you select the option to create a new archive, Data Manager will store the
project in a new archive. After selecting this option, if you specify an archive
name that already exists, the existing archive will be overwritten.
How keywords are
assigned in a new
archive
Initiate the archive
process
When you archive a project into a new archive, keywords are assigned to the
archive and its contents as follows:
1. Data Manager examines the first file to be archived, extracts values for
product system keywords from the file, and assigns these keywords and
values.
2. Standard system keywords and user keywords are then assigned to the file
as appropriate.
3. Steps 1 and 2 are repeated for each file to be archived.
4. Archived folders and the top-level archive are assigned the “All Products”
user keywords and applicable standard keywords.
To archive your current project in a new archive:
Note Data Manager will archive the current project, so make sure that the
project you want to archive is open.
1. Close all RPC applications except RPC Project Manager. (Archiving is not
allowed if any applications are open.)
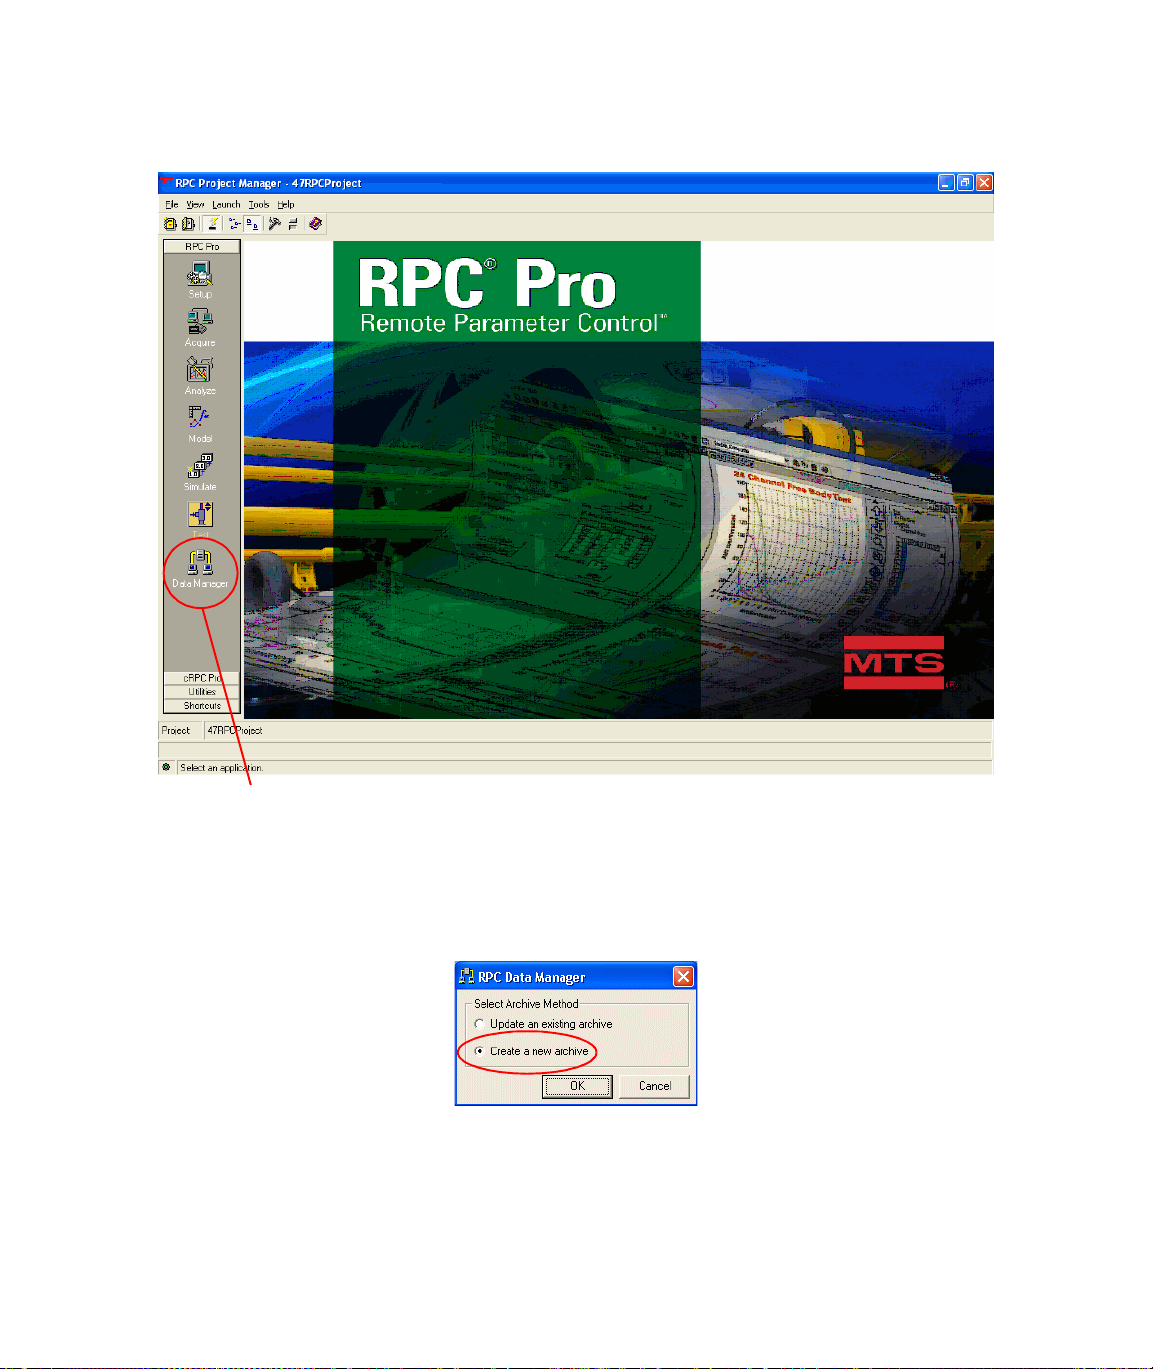
2. From the Project Manager window, click the Data Manager icon to
start the archive process.
60
Archiving a Project
RPC Data Manager Software Reference
Page 61
Creating a New Archive
Click here to archive the current project.
Select create a new
archive
Enter the archive
name
RPC Data Manager Software Reference Archiving a Project
3. Select the Create new archive method and click OK to continue. The
Create Archive window will open, with required user keywords
automatically selected.
4. Type the archive name in the Archive Name field. Archive names must
be between 1 and 64 characters in length, and they may contain letters,
numbers, special characters, and blanks:
61
Page 62

Creating a New Archive
Note Although archive names with leading blanks are accepted, they are
difficult to search for and so are not recommended.
Enter values for
required keywords
Add more user
keywords
5. Enter a value for all keywords that show up when the window is opened
(these keywords are required). See
keyword has a default value, it will be entered, but you can change it.
6. Optional. Add more user keywords to help locate the data once it is
archived.
To add a keyword:
A. Click the Add button.The Add New Keyword and Value dialog
opens.
B. Click in the Keyword field to open a list of available keywords. Click
the keyword to add.
C. Enter the keyword value in the Va lu e field. See “Keyword Values”
on page 43 for specific information.
D. To add another keyword, click Add and repeat steps 6B and 6C.
When you have finished adding keywords, click OK.
“Keyword Values” on page 43. If a
62
Archiving a Project
RPC Data Manager Software Reference
Page 63

Creating a New Archive
Removing keywords
you have added
E. If you decide to remove a keyword that you added, click on the
keyword to remove, click on the Remove button, and respond to the
confirmation dialog. Required keywords cannot be removed.
Archive comments 7. Enter the archive comments in the Comments field.
Archive comments apply to the entire archive. To enter comments, type
them in the Comments field or copy and paste up to 64k characters into
the Comments field.
Note Long archive comments can affect refresh rates. In general, the
longer the comments without inserting a carriage return, the longer
it takes to refresh the display.
RPC Data Manager Software Reference Archiving a Project
63
Page 64

Creating a New Archive
Start the archive
operation
8. Click Archive to start the archive operation.
Note Archiving will not begin if any keyword values are missing.
64
Archiving a Project
RPC Data Manager Software Reference
Page 65

Creating a New Archive
If the archive already
exists
When archiving
begins
When you click the Archive button, an Overwrite Archive dialog will appear if
the archive name you specified already exists in the database you are currently
using.
Important The existing archive will be deleted immediately when you
click OK. The archive cannot be recovered even if you abort
the archive operation before it is complete.
• Click OK to overwrite the existing archive. The archive is deleted
immediately, then the archive operation begins.
Note An Override message will appear if you have the Administrator role
and are overwriting an archive owned by another user.
• Click Cancel to cancel the archive operation and return to the Create
Archive dialog. Enter a new archive name and click the Archive button
again.
When archiving begins, the Cancel button label changes to Abort, and the
Add and Remove buttons are disabled because keywords cannot be added or
removed while data is being archived. (To cancel an archive in progress, see
cancel an archive in progress” on page 66.)
“To
When archiving is
complete
RPC Data Manager Software Reference Archiving a Project
When the archive operation is complete, you will see an Archive Complete
dialog. Click OK to close the Create Archive dialog and return to the RPC
Project Manager.
65
Page 66

Creating a New Archive
To cancel an archive
in progress
To cancel an archive operation once it has started, click the Abort button.
When the confirmation dialog appears, click OK to return to the Create
Archive dialog (then click Cancel to return to the RPC Project Manager). The
new archive is not created, and the project is not archived.
Note If the archive operation was overwriting an existing archive, the
existing archive was deleted before archiving began and cannot be
recovered.
66
Archiving a Project
RPC Data Manager Software Reference
Page 67

Updating an Existing Archive
Updating an Existing Archive
Update restrictions These restrictions apply to updating an existing archive:
• Only the archive owner or Administrator can update an existing archive.
• Locked archives cannot be updated. See “Unlocking an archive” on page
113.
• Remote archives cannot be updated. See “Making an archive local” on
page 116.
Update archive rules During the update process, the top-level items in the current project are
compared to items in the archive to be updated.
• If the path name of an item to be archived exactly matches the original
path name of an item in the existing archive, the new item will replace the
existing one (UNLESS the item being archived has an earlier time stamp
than the item already in the archive, in which case the newer item in the
existing archive will remain there and the older item will not be archived).
• Items in the archive to be updated that are not replaced will remain in the
archive.
• If the path name of an item to be archived does not exactly match the
original path name of any item in the existing archive, it will be added to
the archive as a new item. This is true even if the file names are the same
and the files contain exactly the same information.
How keywords are
When you update an archive, two general rules apply:
assigned in updated
archives
Product system
keywords
• Each item that is added to the archive in the update inherits keywords and
values from its parent item in the updated archive.
• Replacement items (folders and files) inherit keywords and values from
the item that they are replacing.
Product system keywords are added to items being added to the archive in the
same manner as for a new archive.
User keywords User keywords are assigned when you update an archive according to the
following rules.
RPC Data Manager Software Reference Archiving a Project
67
Page 68

Updating an Existing Archive
TYPE OF KEYWORD UPDATE ARCHIVE RULES
“All Product” user
keywords
Product user keywords
Updating an existing
archive
“All Product” user keywords cannot be added or modified in the
Update Archive dialog.
New “All Product” keywords that are required. If any “All Product”
keywords were added to the master keywords list since the archive
was created or last updated and are defined as required, they will be
automatically assigned in the updated archive. Items in the archive
that already have these keywords assigned will keep their existing
values.
User keywords associated with a specific product can be added in the
Update Archive dialog with the user-specified value, even if they
were already assigned in the archive. If selected, these keywords will
be added (with the user-specified value) to new items in the updated
archive and to existing items that do not already have the keyword
assigned, provided they have the same product association. Archive
items that already have these keywords assigned will keep their
existing values.
If defined as required: If defined as required, these keywords will be
automatically added in the Update Archive dialog and cannot be
removed. These keywords (with the user-specified value) will be
added to items as previously described.
Follow these steps to use current project data to update an existing archive.
1. Close all RPC applications except RPC Project Manager. (Archiving is not
allowed if any applications are open.)
68
Archiving a Project
2. From the Project Manager window, click the Data Manager icon to
start the archive process.
RPC Data Manager Software Reference
Page 69

Updating an Existing Archive
Select Update an
3. Select the Update an existing archive method, then click OK.
existing archive
Select the archive to
update
RPC Data Manager Software Reference Archiving a Project
4. Select the name of the archive to update. If the project you are archiving
matches an existing archive, that archive is selected as the default. If no
archive is selected, select one from the list.
69
Page 70

Updating an Existing Archive
Assign values for
required user
keywords
5. Enter a value for any keyword that is in dark type. See “Keyword Values”
on page 43.
Keywords in dark type are either required keywords that have the same
product association as items to be archived or required “All Products”
keywords that were added to the master keywords list since the archive
was created or last updated.
User keywords in light type are those that will inherit their values from the
parent item in the updated archive. User keyword values cannot be
changed.
Add product-specific
user keywords and
values
70
Archiving a Project
6. Optional. You can add product-specific user keywords and values when you
update an archive. See
on page 67.
Note Available keywords in the Add New Keyword window are user
keywords with the same product association as items being
archived (if required, they were added automatically).
To add a keyword:
“How keywords are assigned in updated archives”
RPC Data Manager Software Reference
Page 71

Updating an Existing Archive
A. Click the Add button. The Add New Keyword and Value dialog
opens.
B. In t he Add Keyword dialog, click in the Keyword field to open a list
of available keywords. Click the keyword to add.
C. Enter the keyword value in the Va lu e field. See “Keyword Values”
on page 43 for specific information.
D. To add another keyword, click Add and repeat steps 6B and 6C.
When you have finished entering keywords, click OK.
Removing keywords
you have added
RPC Data Manager Software Reference Archiving a Project
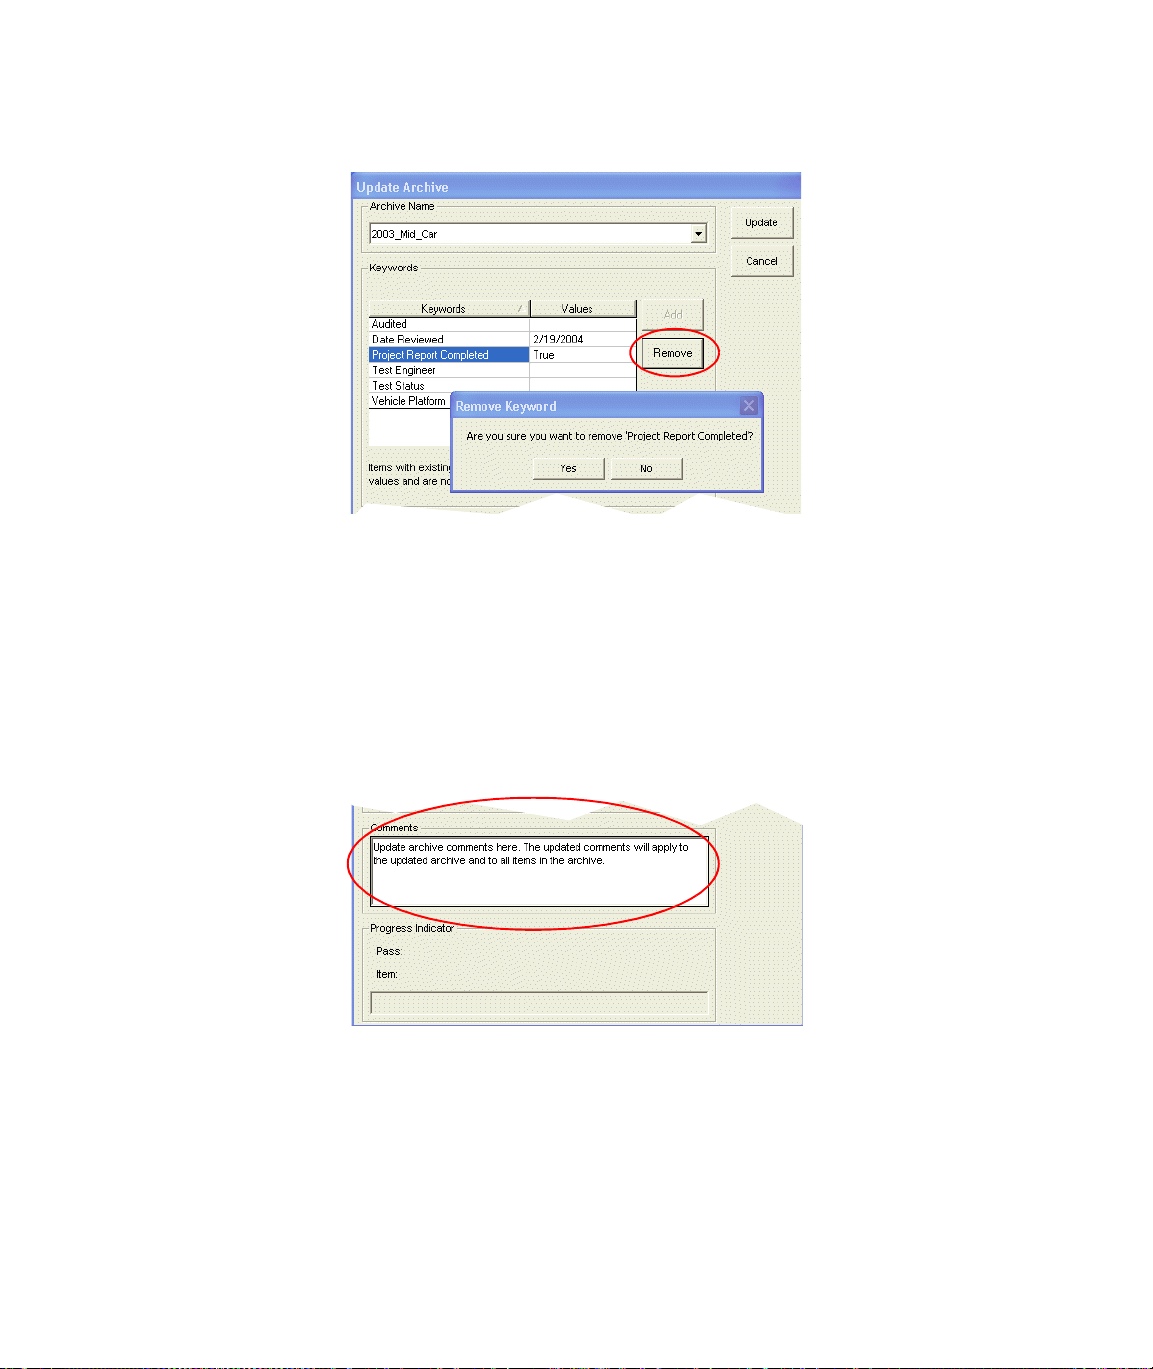
7. If you decide to remove a keyword that you added in the previous step,
click on the keyword to remove, click the Remove button, and respond to
the confirmation dialog. Required keywords cannot be removed.
71
Page 72
Updating an Existing Archive
Archive comments 8. Add or update archive comments in the Comments field.
Archive comments apply to the entire archive. To enter or edit comments,
type them in the Comments field or copy and paste up to 64k characters
into the Comments field.
Start the update
72
Archiving a Project
operation
Note Long archive comments can affect refresh rates. In general, the
longer the comments without inserting a carriage return, the more
tim required to refresh the display.
9. Click the Update button to start the update operation. The operation will
not start if any keyword values are missing.
RPC Data Manager Software Reference
Page 73

Updating an Existing Archive
When updating
begins
When the update is
complete
When the update operation begins, the Cancel button changes to Abort, the
Add and Remove buttons are disabled (you cannot add or remove keywords
once archiving begins), and the Progress Indicator shows the progress of the
update operation.
When the operation is complete, an Update Complete dialog appears. Click
OK to return to the RPC Project Manager.
RPC Data Manager Software Reference Archiving a Project
73
Page 74

Updating an Existing Archive
To cancel an update
in progress
To cancel an update operation once it has started, click the Abort button.
When the confirmation dialog appears, click OK to return to the Update
Archive dialog (then click Cancel to return to the RPC Project Manager). All
updates are discarded, and the existing archive remains unchanged.
74
Archiving a Project
RPC Data Manager Software Reference
Page 75

Archiving when Disconnected from Network
Archiving when Disconnected from Network
Data Manager uses a UNC path (\\computername\sharename) to read and
write to archived data. The use of the UNC path is dependent on a TCP/IP
network connection. If the Data Manager server is an off-line computer (such
as, a portable laptop) that is disconnected from the network, the operating
system will automatically disable the TCP/IP protocol. The work-around is to
create a virtual network adapter (Microsoft Loopback Adaptor) and assign an
IP address to it. This will allow local access of the UNC path even when
disconnected from the network.
The network settings shown in this section are for Windows XP.
1. Right-click on the My Computer icon on your desktop, and select
Properties.
2. Configure a Microsoft Loopback Adaptor as shown below.
RPC Data Manager Software Reference Archiving a Project
75
Page 76

Archiving when Disconnected from Network
76
Archiving a Project
RPC Data Manager Software Reference
Page 77

Archiving when Disconnected from Network
RPC Data Manager Software Reference Archiving a Project
77
Page 78

Archiving when Disconnected from Network
78
Archiving a Project
RPC Data Manager Software Reference
Page 79

Archiving when Disconnected from Network
RPC Data Manager Software Reference Archiving a Project
79
Page 80

Archiving when Disconnected from Network
3. Configure an IP address for the Microsoft Loopback Adaptor network
connection. From the Windows Start button, select Settings > Network
Connections. Right click to select Properties on the newly created Local
Area Network connection.
80
Archiving a Project
Note The Local Area Network connection will have Microsoft Loopback
Adaptor listed as the Device Name.
4. Select Internet Protocol (TCP/IP) and then click on the Properties
button.
RPC Data Manager Software Reference
Page 81

Archiving when Disconnected from Network
5. Select Use the following IP address, and then specify values for the IP
address, Subnet mask and Default Gateway. Next, select Use the
following DNS server address, and then specify a value for the
Preferred DNS server. The values are not important, but they must
follow TCP/IP convention (for example, you may use the values shown in
the following window).
6. Select OK to close the window.
RPC Data Manager Software Reference Archiving a Project
81
Page 82

Archiving when Disconnected from Network
82
Archiving a Project
RPC Data Manager Software Reference
Page 83

Locating and Retrieving Archived Data
Contents Archives View 84
Searching for Archived Data 89
Retrieving Archived Data 99
Deleting Archives 111
Locking and Unlocking Archives 112
Making Archives Remote or Local 114
Renaming Archives 118
Modifying Keywords in Archived Data 119
Modifying Archive Comments 124
RPC Data Manager Software Reference Locating and Retrieving Archived Data
83
Page 84

Archives View
Archives View
Use the Archives view in Data Manager to browse archived data, to search for
archived data with specific keywords and values assigned, to open archived files
to verify their contents, and to retrieve archived data. In addition, archive
owners and the Administrator can also use the Archives view to modify
keywords assigned to archived data, to modify archive comments, to make an
archive local or remote, to rename archives, to lock and unlock archives, and to
delete archives.
To access this view, start Data Manager from any application that allows access
to tools, or (if you are already using Data Manager) by clicking the RPC Data
Manager tab, then clicking on the Archives icon.
84
Locating and Retrieving Archived Data
The left pane of the Archives view displays a list of archives and allows you to
browse the hierarchy of archived data. The right pane displays more detailed
information about the item selected in the hierarchical Archives tree.
From the Archives view you can also:
RPC Data Manager Software Reference
Page 85

Archives View
• Search for archived data with specific keywords and values.
• Access the Query Builder window, to create a new query or modify an
existing one. (If you have Test Engineer or Administrator privileges, you
can also save queries.)
• View keywords and properties for archived data.
• Open archived data, to verify its contents before retrieving.
• Retrieve an archive, folder, project or file, provided that the archive is
local. As an option, you can retrieve items into the active dataset.
• Modify keywords or archive comments for archived data (if you own the
archive or have Administrator privileges).
• Delete archives, lock or unlock archives, rename archives, and make
archives remote or local (if you own the archive or have Administrator
privileges).
Exploring in the
Archives view
Archives right-click
menu
The left pane of the Archives view lists all archives in the Data Manager
database (in alphabetical order) and allows you to explore the hierarchy or
archives in a manner similar to Microsoft Windows Explorer.
To expand the hierarchy of an archive or a folder, click on the plus sign (+) next
to it in the Archives tree. To collapse the hierarchy, click on the minus sign (-).
You can also expand or collapse archives or folders by selecting the item and
then using the Expand Branch or Collapse Branch functions in the rightclick menu.
Clicking on an archive or a folder in the Archives hierarchy (left pane), displays
the contents of that item in the right list pane. It also displays its keywords and
values, archive comments, and item properties. See
on page 86.
Left click to select an item in the Archives hierarchy. With an item selected, you
can right click to display a menu of functions that apply to the selected item
(these functions are described separately). Additional items on the menu allow
you to refresh the display and to expand or collapse the hierarchy for the
selected item.
Which menu items are active depends on what type of item is selected (most of
these functions apply only to top-level archives), your security role, whether you
are the archive owner, whether the archive is locked, and whether the archive is
remote or local. Functions that are valid are active in the menu; all other
functions are disabled.
“List Pane (Archives View)”
RPC Data Manager Software Reference Locating and Retrieving Archived Data
85
Page 86

Archives View
Archive
Refreshing the
display
Right-click menu
Note Refreshing the display will collapse the Archives hierarchy to the
archive level.
List Pane (Archives
View)
Sorting items in the
list pane
Opening files in the
list pane
86
Locating and Retrieving Archived Data
To up d ate the Archives view (primarily to display changes made by other users
since you opened or last refreshed this view), click Refresh in the right-click
menu (or press the <F5> key).
The upper right pane of the Archives view is a list pane. When you left click on
an archive or a folder in the Archives list, the list pane displays an alphabetical
list of folders and files that the selected item contains. The list pane also
displays the item name, item type, date the item was created or last modified,
and the item size.
You can sort items in the list pane in different ways by clicking on the column
headings. For example, to sort items in the list by date, click on the Date
heading. To sort items the same way, but in reverse order, click the column
heading again.
Opening files allows you to verify the contents of archived items before you
retrieve them. To open a file from the Archives view, the file must appear in the
RPC Data Manager Software Reference
Page 87

Archives View
right list pane, it must be in a local archive, and the associated viewing program
must be installed on your computer.
Note Items in remote archives cannot be opened. See “Making an archive
local” on page 116.
• To open one item, double click on it in the list. Alternately, you can right click
on an item to select it and open the menu, then click Open in the menu.
• To open multiple items, hold down the <Ctrl> key and click on individual
items. Or, hold down the <Shift> key and select a range of items. Then
right click and select Open from the menu.
If you selected different types of files, multiple viewing programs may open.
Each type of file will open in a different instance of the viewer, up to the limits
of the viewing program.
Keywords and Values
pane
The Keywords and values pane lists keywords and values (except standard
keywords) that are assigned to the selected item (if multiple items are selected,
keywords are for the last item that was selected). With some restrictions, the
archive owner or an Administrator can also use this pane to add, remove, or
change keywords. See
“Modifying Keywords in Archived Data” on page 119.
Item Properties pane The Item Properties pane lists properties for the selected item and typically
shows standard keyword values (in some cases keyword names and displayed
property names do not match exactly). See
Archive Comments
pane
RPC Data Manager Software Reference Locating and Retrieving Archived Data
The Archive Comments pane displays comments that apply to the entire
archive. These comments may be up to 64k characters in length. The archive
owner or the Administrator can use this pane to change the archive comments.
See
“Modifying Archive Comments” on page 124.
“Standard keywords” on page 39.
87
Page 88

Archives View
88
Locating and Retrieving Archived Data
RPC Data Manager Software Reference
Page 89

Searching for Archived Data
All users can use queries to search for archived data, and all users can modify
saved queries to search for archived data in different ways.
Initiating a search To search for archived data:
1. From the Archives view, click the Search... button (or right click
anywhere in the left Archives pane and then click Search... in the menu).
The Search window will open with no query selected.
2. Select a saved query from the drop-down list. The search results for that
query are then displayed in the same window.
Searching for Archived Data
Copy search results Clicking on the Copy icon button will copy all columns of data in the search
results to the Windows clipboard. This allows you to paste the results into
another application, such as Microsoft Excel.
RPC Data Manager Software Reference Locating and Retrieving Archived Data
89
Page 90

Searching for Archived Data
Other search
functions
From any search results window you can do any of the following:
• Explore the hierarchy of items listed in the search results.
• Initiate a new search and display the results in a new search results
window. This allows you to view the results of multiple searches at the
same time.
• Select another query and display the results in the same window.
• Modify the current query and use the modified query to search the entire
database again. See
• Open archived items to verify their contents. See “Opening Items from a
search results window” on page 92.
• Retrieve archived items. See “Retrieving Archived Data” on page 99.
• Return to the Archives view with the archive or item automatically
selected. See
93.
• Add or remove keyword columns in the right list pane. See “Add in g or
removing keyword columns” on page 95.
• Display properties for the selected item. See “Displaying properties for
search results” on page 97.
“Modifying a query” on page 91.
“Locating a Search Results in Archives Hierarchy” on page
Search results
windows
Multiple search
results windows
90
Locating and Retrieving Archived Data
The title bar of a search results window lists the name of the query that
produced the search results and the database that was searched.
A new search results window each time you click the Search button in the
Archives view. The window will remain open until you either close it or exit
Data Manager. This allows you to view the results of multiple searches at the
same time.
Selecting a different query will display the search results for that query in the
same window.
RPC Data Manager Software Reference
Page 91

Searching for Archived Data
Left pane The left pane displays a list of items (maximum 1,000 items) that fit the search
criteria. Items are in alphabetical order first by item name and then by path
name. You can explore the hierarchy of these items in the same way as in the
Archives view. See
Left click on any item in the search results list to select it. A right-click menu
provides access to functions for the selected item.
“Exploring in the Archives view” on page 85 for details.
Right list pane The right list pane shows the contents of the item that is currently selected in
the left pane. Items in this list can be sorted in different ways by clicking on the
column headings. For example, to sort items by type, click the Type column.
To sort items by the same criteria, but in reverse order, click the same column
heading again. You can also add columns to display other keyword values. See
“Adding or removing keyword columns” on page 95.
Modifying a query From any search results window you can click the Modify Query button to
open the Query Builder window, where the query will be automatically
selected. From there, you can modify the current query and use it to search for
the archived data again. (Users with Test Engineer or Administrator privileges
can also save their modified queries.)
Clicking the Query Builder button in the Archives view also opens the Query
Builder window, but no query is selected.
See “Creating or Modifying a Query” on page 134 to learn how to use the
Query Builder window to create, modify, and run queries.
RPC Data Manager Software Reference Locating and Retrieving Archived Data
91
Page 92

Searching for Archived Data
Opening Items from a
search results
window
92
Locating and Retrieving Archived Data
If the program required to view the item is installed on your computer, you can
open files listed in a search results window.
Note Archives, folders, and items in remote archives cannot be opened.
• To open one item, double click on it. You can also left click on one item, right
click to open the menu, and then click Open.
• To open multiple items, hold down the <Ctrl> key and click on individual
items. You can also hold down the <Shift> key and select a range of
items. When you have finished selecting items, right click to open the
menu, then click Open. Or, continue to hold down the <Shift> key or
the <Ctrl> key and double click to open all selected items.
If you selected different types of items, multiple viewing programs may open.
Each file will open in a different instance of the viewer, up to the limits of the
viewing program.
RPC Data Manager Software Reference
Page 93
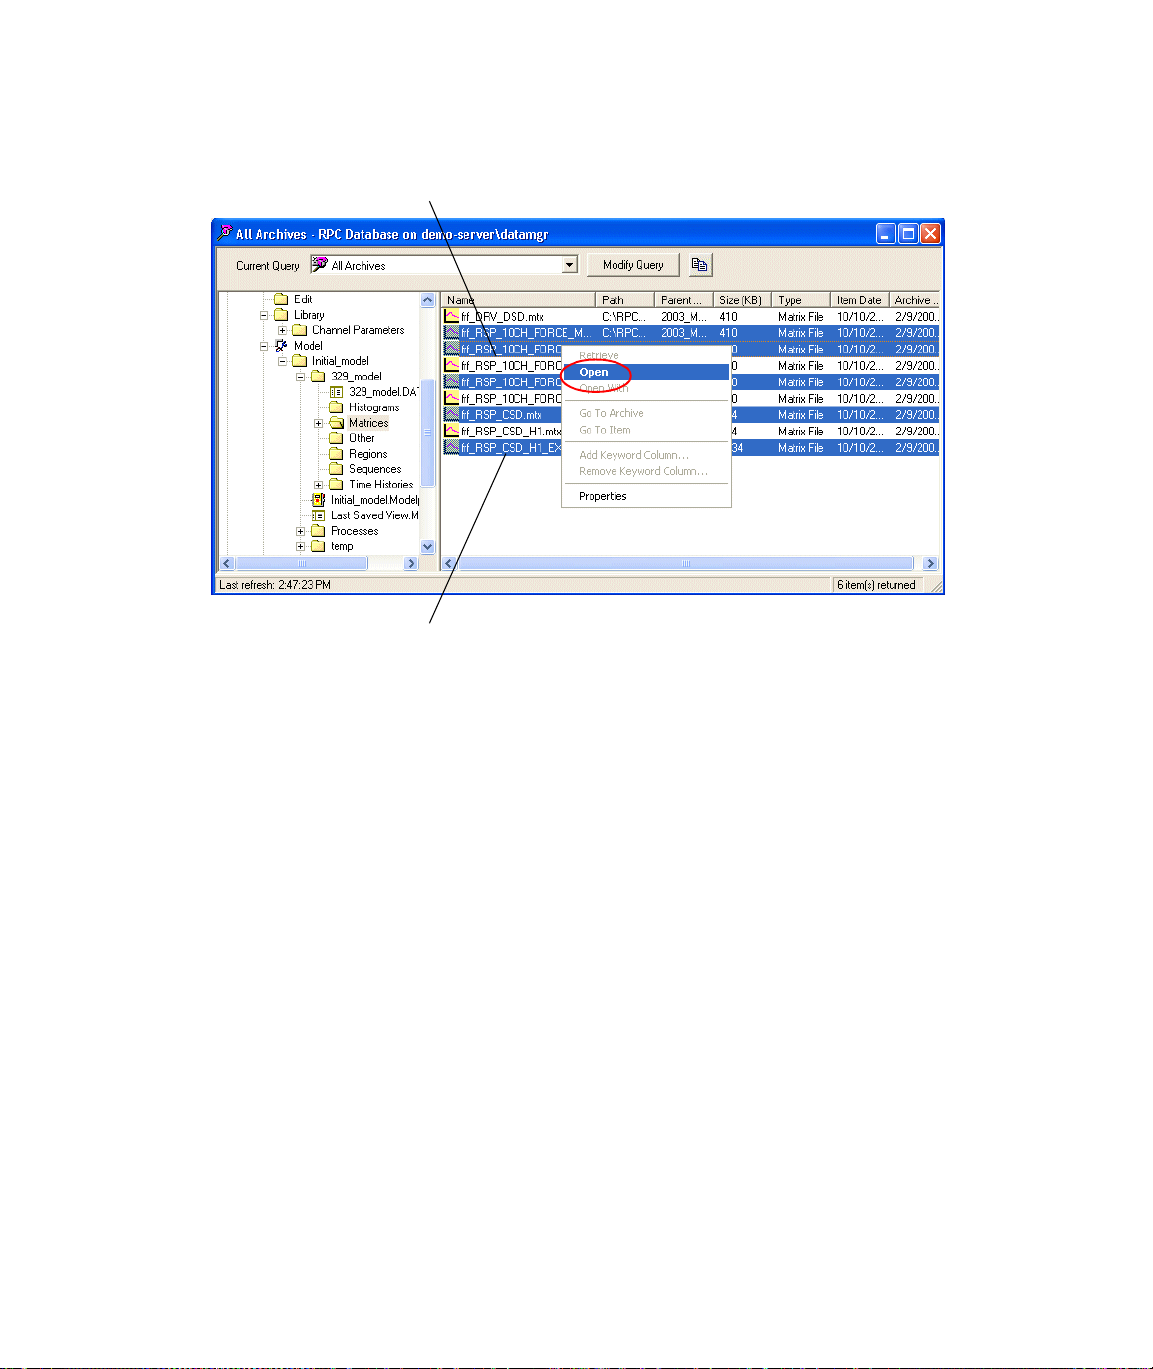
Press < Shift> and click to select a range of items.
Left click to select one item, or hold down the
<Ctrl> key and click on multiple items.
Searching for Archived Data
Locating a Search
Results in Archives
Hierarchy
In a list of search items you may or may not be able to identify the parent
archive or where the item is located in the Archives hierarchy. The Go To Item
and Go To Archives functions help you locate search results items in the
hierarchy by jumping to the Archives view with the selected item or the parent
archive automatically selected.
Go to Archive Use the Go To Archive function to find the parent archive for the selected
item.
1. Left click on the item to select it (left or right pane).
2. Right click to open the menu, then click Go To Archive. (This menu item
is disabled when multiple items are selected.)
RPC Data Manager Software Reference Locating and Retrieving Archived Data
93
Page 94

Searching for Archived Data
Go To Item Use the Go To Item function to locate the selected item in its archive
94
Locating and Retrieving Archived Data
hierarchy.
1. Left click on the item in the search results window to select it.
2. Right click to open the menu, then click Go To Item. (this menu item is
disabled when multiple items are selected.)
RPC Data Manager Software Reference
Page 95

Searching for Archived Data
Adding or removing
keyword columns
RPC Data Manager Software Reference Locating and Retrieving Archived Data
If the query includes user-assigned keywords that are not displayed in the right
list pane of a search results window, you can add new columns in the list pane
to display them. This is especially helpful when the query does not specify a
single value for the keyword in question (for example, it specifies a wildcard
value).
Although some keyword columns in the right pane are required, columns that
you have added can be removed.
95
Page 96

Searching for Archived Data
Adding a keyword
column
To add a keyword column to the right list pane:
1. Left click on any item in the right list pane to select it, then right click to
open the menu. Click Add Keyword in the menu. (If this menu item is
disabled no keyword columns can be added.)
2. Select keywords to add in the Add Keyword Columns dialog, then click
OK.
The new columns will remain in this search results window until you run
another query that does not contain these keywords or until you exit Data
Manager, whichever occurs first.
Removing a keyword
column
96
Locating and Retrieving Archived Data
If you added keyword columns to a search results window, you can also remove
them. (Note that some keyword columns are required and cannot be removed.)
1. Left click on any item in the right list pane, then right click to open the
menu. Click Remove Keyword in the menu. (If the menu item is disabled,
there are no keyword columns that can be removed.)
2. Select the keyword or keywords to remove in the e Remove Keyword
Columns dialog, then click OK.
RPC Data Manager Software Reference
Page 97

Searching for Archived Data
Displaying properties
for search results
Item properties, keywords, and comments about a selected item can also be
displayed from any search results window.
1. Select an item, right click on it, and click Properties in the menu.
2. When the window opens, click Keywords to display keywords and values,
click Archive Comments to display the archive comments, or click Item
Properties to display properties for the selected item.
To close the window, click OK.
RPC Data Manager Software Reference Locating and Retrieving Archived Data
97
Page 98

Searching for Archived Data
98
Locating and Retrieving Archived Data
RPC Data Manager Software Reference
Page 99

Retrieving Archived Data
Retrieving Archived Data
About retrieving All users can retrieve an archive, folder (including a project folder), or file that is
displayed in the Archives view or a search results window, whether the data is
located in a local archive, remote archive, or resides in off-line storage. Before
retrieving, you can specify the retrieve name, retrieve destination, and overwrite
options for the retrieved data. See
page 99.
When the software preforms a data retrieve, it automatically looks in the local
Archives folder first, then the Remote Archives folder. If the software does not
find the data in these locations, a browse window will appear. In this case, users
are allowed to point to the location of the data, such as an off-line storage
location.
Some special rules and options apply when you are retrieving an entire project.
See
“Retrieving Projects” on page 105.
If the item selected for retrieval is at or below the data set level in the project
structure, you have the option of retrieving the data into the active data set. To
prevent overwriting other files, you can specify a suffix to add to the retrieved
file or files, and you can automatically open files upon retrieval. See
into the Active Dataset” on page 109.
“Retrieving an archive, folder, or file” on
“Retrieving
Retrieving an archive,
folder, or file
RPC Data Manager Software Reference Locating and Retrieving Archived Data
Note To retrieve an entire project, see “Retrieving Projects” on page 105.
To retrieve into the active data set, see “Retrieving into the Active
Dataset” on page 109.
To retrieve an entire archive or a folder or file to your local computer:
1. Locate the archive, folder, or file to retrieve by exploring in the Archives
view or searching the database. See
page 85 or “Searching for Archived Data” on page 89.
Note If you select a top-level archive for retrieval, you will not be able to
rename it during the retrieve process.
2. Ensure the Retrieve into active dataset check box (in the lower left
corner of the Data Manager window) is not selected. If selected, the data
will be retrieved into the active dataset.
3. Make sure that your computer has enough disk space to store the retrieved
data.
“Exploring in the Archives view” on
99
Page 100

Retrieving Archived Data
4. Left click on the archive, folder, or file to select it. Then right click and
select Retrieve in the menu. The Retrieve dialog opens.
Note Retrieve is not available when multiple items are selected.
100
Locating and Retrieving Archived Data
5. If you are retrieving a folder or a file, you can change its retrieve name.
The retrieved item will have the specified name. (The retrieve name for an
archive cannot be changed.) Type the name in the Retrieve Name field.
Note If you change the retrieve name for a project, the Specify Project
Name dialog will appear and special renaming rules apply. See
“Retrieving Projects” on page 105.
6. To automatically open files upon retrieval, click the button next to the
Retrieve Name field so that it appears “pushed in.” If the program
associated with the file is installed on your computer, files will open
automatically as soon as it they are retrieved.
RPC Data Manager Software Reference
 Loading...