MSD 8987 Installation

Start and Step Retard Control
PN 8987
ONLINE PRODUCT REGISTRATION: Register your MSD product online and you’ll be entered in our monthly 8.5mm Super Conductor Spark Plug Wire give-away! Registering your product will help if there is ever a warranty issue with your product and helps the MSD R&D team create new products that you ask for! Go to www.msdperformance.com/registration.
Parts Included:
1 – Control
4 – Mounting Screws
WARNING: During installation, disconnect the battery cables. When disconnecting the
battery, always remove the negative cable first and install it last.
Note: Must be used with an MSD Ignition.
OPERATION
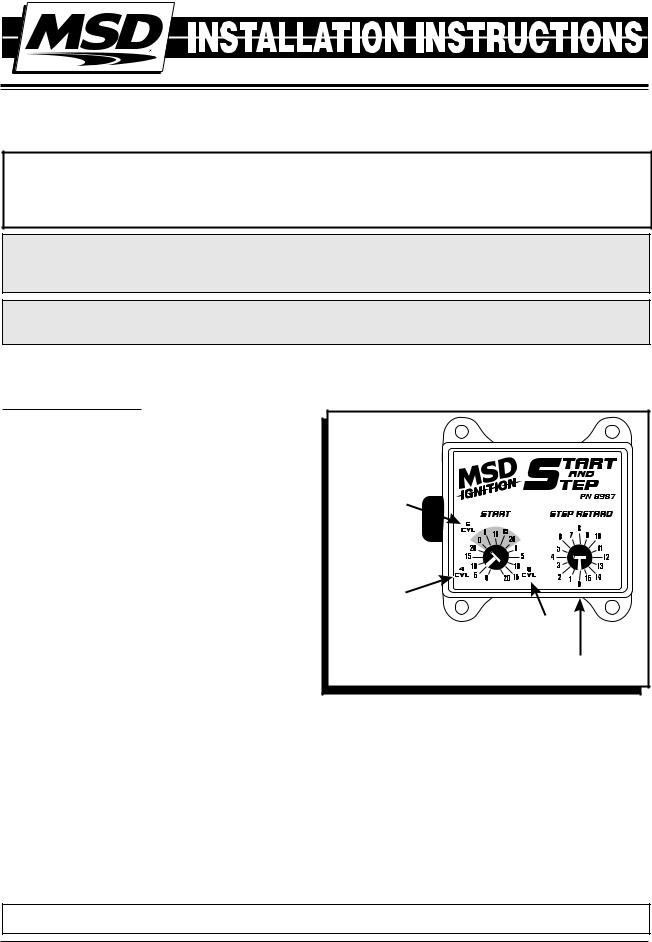
The Start and Step Retard provides two retard |
|
features; a start retard and a step retard. The |
|
Control can be connected to distributors using |
|
a magnetic pickup, amplifier or breaker point. It |
|
is recommended that the centrifugal advance |
6-CYLINDER |
of the distributor be locked-out. The amount |
ENGINE |
|
|
of retard is selected with the two rotary dials |
|
(Figure 1). |
|
Start Retard: The Start Retard is adjusted with the |
|
rotary dial on the left. It is adjustable in 5° increments |
4-CYLINDER |
for 4, 6 or 8-cylinder engines from 0°-20° The |
ENGINE |
|
|
number of cylinders must be selected, even when |
8-CYLINDER |
no start retard will be used. Simply rotate to dial to |
ENGINE |
|
|
the desired position. |
|
The Start Retard is activated as soon as the engine
begins to crank. Between 400 and 600 rpm, the timing begins to ramp back to zero retard (your total
timing setting). The start retard will not activate again until the engine rpm drops to 400 rpm (the timing will also ramp on again between 600-400 rpm).
Step Retard: The Step Retard is adjusted with the dial on the right. The retard is adjustable from 0°- 15° in one degree increments. The Step Retard is activated by the Pink wire. When the Pink wire is connected to 12 volts, the retard is activated. The most common application is to splice the Pink wire into the activation trigger wire of a nitrous system. That way, the retard is activated with the nitrous.
The Controller also has a very accurate magnetic pickup compensation circuit built-in and will hold the timing steady throughout the entire rpm range of the engine. This is why there will be a 4° change in the engine timing when the Control is installed.
Important: After installation the engine’s mechanical timing must be checked and reset.
M S D • W W W . M S D P E R F O R M A N C E . C O M • ( 9 1 5 ) 8 5 7 - 5 2 0 0 • F A X ( 9 1 5 ) 8 5 7 - 3 3 4 4

2 |
INSTALLATION INSTRUCTIONS |
|
|
MOUNTING
It is suggested to mount the unit within easy reach for adjustments. The Control can be mounted under the hood but should be away from direct engine heat sources. Make sure the wiring reaches the connections and mark the mounting holes. Use an 1/8” bit to drill mounting holes and mount the unit.
WIRING:
Red: |
On/Off. Connects to a switched 12 volts. |
Black: |
Ground. Connects to ground. |
Yellow: |
Trigger output. Connects to the MSD Ignition’s White wire or Points input terminal. |
Green/Violet: |
Magnetic Pickup Input. This 2-Pin connector plugs into the MSD crank trigger pickup |
|
or magnetic pickup of an MSD Distributor. (Never use when the White wire is used). |
White: |
"Points" or Amplifier Input. Connects to points or amplifier trigger. (Never use when the |
|
mag pickup is used). |
Pink: |
Retard activation wire. Activated when connected to 12 volts. |
Important: After installation the engine’s mechanical timing must be checked and reset.
ORANGE |
|
|
BLACK |
|
|
|
|
MAG PICKUP |
|
|
(NOT USED) |
POINTS |
|
|
DISTRIBUTOR |
|
|
|
PINK |
STEP RETARD |
|
|
|
WHITE |
WHITE |
|
Figure 2 Wiring the Control with an MSD 6 Series Ignition Control.
M S D • W W W . M S D P E R F O R M A N C E . C O M • ( 9 1 5 ) 8 5 7 - 5 2 0 0 • F A X ( 9 1 5 ) 8 5 7 - 3 3 4 4
 Loading...