MSD 8401 Installation

HEI Dust Cover Conversion for a Blaster 2 Coil
PN 8401
WARNING: During installation, disconnect the battery cables. When disconnecting the battery, always remove the Negative cable first and install it last.
Parts Included:
1 - MSD HEI Dust Cover
1 - Y-spliced Pink Wire
1 - Brown Wire
The PN 8401 Dust Cover allows the use of an external Blaster 2 coil with an internal coil GM HEI distributor.
INSTALLATION
1.Disconnect the 3-pin wiring harness and the single Pink wire connector from the distributor cap.
2.Remove the dust cover from the original coil and remove the internal coil.
Note: Leave the rotor bushing in place.
3.Install the MSD Dust Cover using the original screws.
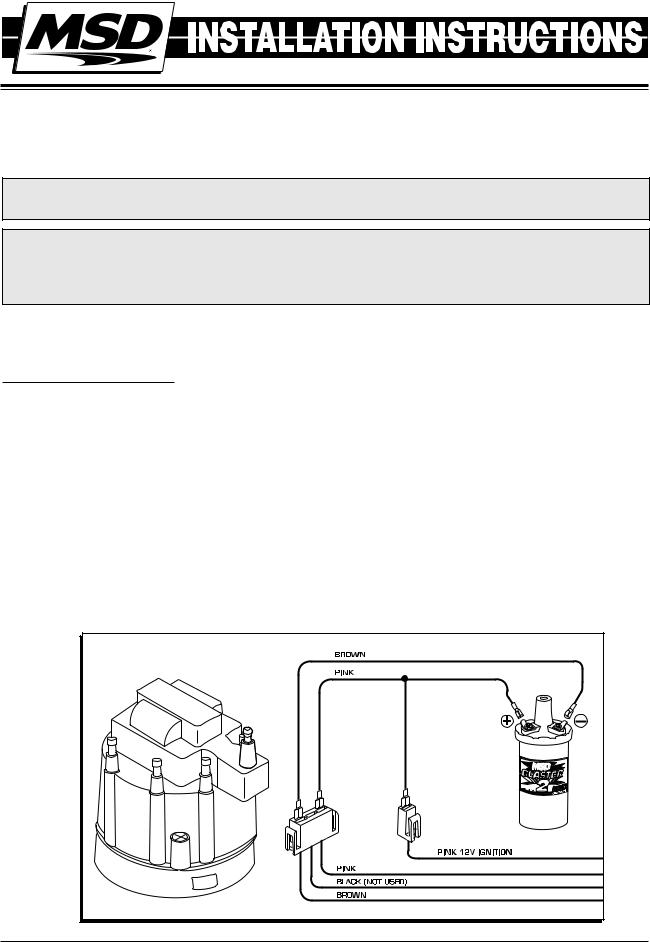
4.Connect the supplied Brown wire to the Brown wire of 3-pin distributor connector. Connect the other end of the Brown wire to the coil negative (-) terminal.
5.Connect the supplied Y-Spliced Pink wire to the single Pink wire (switched 12 volts) and the Pink wire of the 3-pin distributor connector. Connect the other end to the coil positive (+) terminal.
Note: The middle terminal of the 3-pin connector (Black wire) is not used. 6. Install the coil wire to the Cover.
Note: If you plan to install a tachometer, the trigger wire connects to the coil negative terminal.
Figure 1 Wiring Diagram.
M S D • W W W . M S D P E R F O R M A N C E . C O M • ( 9 1 5 ) 8 5 7 - 5 2 0 0 • F A X ( 9 1 5 ) 8 5 7 - 3 3 4 4
 Loading...