


Digital 2-Step
PN 8732
For the Digital 6AL Ignition Control, PN 6425
ONLINE PRODUCT REGISTRATION: Register your MSD product online and you’ll be entered in our monthly 8.5mm Super Conductor Spark Plug Wire give-away! Registering your product will help if there is ever a warranty issue with your product and helps the MSD R&D team create new products that you ask for! Go to www.msdignition.com/registration.
Parts Included:
1 – Control
4 – Mounting Screws
WARNING: During installation, disconnect the battery cables. When disconnecting the
battery, always remove the negative cable first and install it last.
Note: Must be used with an MSD Digital 6AL Ignition, PN 6425.
OPERATION
The Digital 2-Step Control is designed specifically for the MSD Digital 6AL Ignition Control, PN 6425. It provides the ability to set an rpm limit to be used during the launch of the vehicle through a switch or tied into a line-lock device or trans-brake.
There is a Blue wire coming out of the 2-Step, that controls when the launch rpm limit is activated. When this wire is connected to 12 volts, the 2-Step is activated. When released, the rpm limit that is set in the Digital 6AL Ignition is active. This wire can be tied into a transbrake circuit, a clutch switch or simply a stand alone switch.
RPM LIMIT
BLACK |
TO GROUND |
|
TO
SWITCHED 12V
RED
|
|
X1000 |
X100 |
BLUE |
GRAY |
|
|
|
|
|
|
ACTIVATE THE |
|
|
|
2-STEP WITH |
|
|
|
12 VOLTS |
|
|
|
|
TO |
ALWAYS SET THE RPM VALUE |
|
|
TACH WIRE |
||
|
ON MSD 6AL |
WITH THE PRINTED NUMBER ON |
|
|
PN 6425 |
THE HOUSING. THIS FIGURE |
|
|
|
SHOWS A SETTING OF 3000 RPM. |
|
Figure 1
The rpm limit is set with the two rotary dials, in 100 rpm increments. The limit can be programmed from 2,000 rpm to 11,800 rpm. (The position for 11,900 is reserved for use with MSD's Power Grid ignition system.)
LED
There is a useful LED built into the Digital 2-Step. This LED will illuminate when 12 volts are applied to the Blue wire and the low rpm limit of the 2-Step is active. When 12 volts are removed from the Blue wire the 2-Step rev limit and the LED will turn off.
3-STEP
If you prefer to have three different rev limits, a second PN 8732 could be used to provide a third rev limit, such as for use during the burnout.
MSD IGNITION • WWW . MSDIGNITION . COM • (915) 857-5200 • FAX (915) 857-3344
2 |
INSTALLATION INSTRUCTIONS |
|
|
MOUNTING
It is suggested to mount the unit within easy reach for adjustments. The Control can be mounted under the hood but should be away from direct engine heat sources. Make sure the wiring reaches the connections and mark the mounting holes. Use an 1/8” bit to drill mounting holes and mount the unit.
WIRING
|
WIRING |
Red |
Power. Connect to a switched 12 volts. |
Black |
Ground. Connect to ground. |
Blue |
Launch RPM Activation wire. When connected to 12 volts the launch rpm value is active. |
Gray |
Tach Signal. Connect to the Gray Tach Output wire of the MSD PN 6425. |
12 VOLTS IGNITION KEY |
RED |
|
|
|
|
|
|
|
|
ORANGE |
|
|
|
|
|
|
REV |
|
|
|
|
LIMITER |
|
|
BLACK |
|
|
DIGITAL 6AL |
|
WHITE |
|
GRAY |
|
|
|
|
|
|
|
|
VIOLET |
GREEN |
|
TACH |
DISTRIBUTOR |
|
OUTPUT |
||
|
|
|||
|
|
|
||
POINTS/AMPLIFIER |
|
|
|
|
OR |
|
GRAY |
|
|
MAGNETIC PICKUP |
|
|
|
|
|
|
X1000 |
X100 |
|
|
|
|
|
|
|
|
RED |
BLACK |
TO GROUND |
SWITCH OR |
|
12 VOLTS |
|
|
TO 12V |
|
|
|
|
MICRO SWITCH |
|
|
|
|
|
BLUE |
|
|
|
PN 8820 |
|
|
|
|
TO LINE LOCK |
|
|
|
|
OR TRANS-BRAKE |
|
|
|
|
SOLENOID |
|
|
|
|
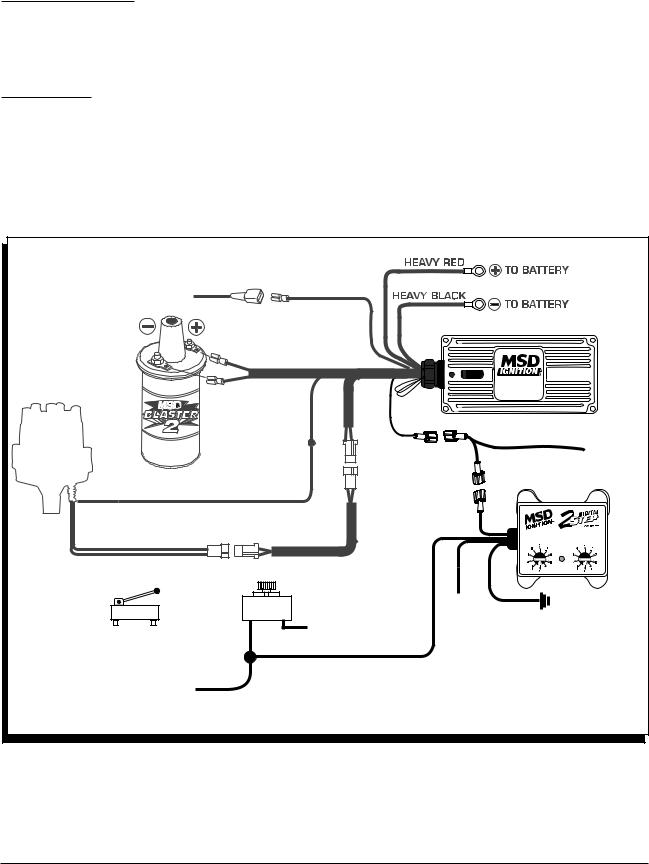
Figure 2 Wiring the Control with an MSD Digital 6AL Ignition Control.
MSD IGNITION • WWW . MSDIGNITION . COM • (915) 857-5200 • FAX (915) 857-3344
 Loading...