Mio R403, R303 Operating Guide

Moov R303/R403-Series
User Manual

Important safety information
PLEASE READ CAREFULLY BEFORE INSTALLING PRODUCT IN VEHICLE
This is the safety alert symbol. It is used to alert you to potential personal injury hazards. Obey all safety messages that follow this symbol to avoid possible injury or death.
WARNING indicates a potentially hazardous situation which, if not avoided, could result in death or serious injury.
CAUTION indicates a potentially hazardous situation which, if not avoided, may result in minor or moderate injury.
CAUTION used without the safety alert symbol indicates a potentially hazardous situation which, if not avoided, may result in property damage.
Removing original equipment, adding accessories or modifying your vehicle could affect the vehicle’s safety or make it illegal to operate in some jurisdictions.
Follow all product instructions and all instructions in your vehicle owner’s manual regarding accessories or modifications.
Consult your country’s and/or state’s laws regarding operation of a vehicle with any accessories or modifications.
It is your sole responsibility to place, secure and use your Mio in a manner that will not cause accidents, personal injury or property damage. Always observe safe driving practices.
Do not mount your Mio in a way that may interfere with the safe operation of the vehicle, the deployment of air bags or other safety equipment.
Do not operate your Mio while driving.
Before you use your Mio for the first time, familiarize yourself with your device and its operation.
On main roads, the distance to an exit calculated by the Mio may be further than the distance shown on road signs. Road signs show the distance to the start of an exit while the Mio shows the distance to the next intersection, i.e., the end of the exit ramp or road. To prepare to exit a road, always follow distance information on road signs.
The use of information regarding safety or speed camera locations may be subject to local laws in the country of use. You are responsible for checking that you can legally use the information in your country or in the country where the information will be used.
Do not handle the Mio while it is hot. Let the product cool, out of direct sunlight.
Do not expose the Mio to direct sunlight in an unattended vehicle for prolonged periods. Overheating may damage the unit.
Note: To discourage theft, do not leave the Mio, mounting bracket or any cables in plain view in an unattended vehicle.
2

Home Charger-specific safety information
To charge your Mio from the mains power, use the home charger supplied by Mio as an accessory (may be sold separately). Using other home chargers with your Mio could result in serious injury or property damage.
Never use the charger if the plug or cord is damaged.
Do not expose the charger to moisture or water. Do not use the charger in a high moisture environment. Exposure to water may cause electrical sparks or fires.
Never touch the charger when your hands or feet are wet.
Allow adequate ventilation around the charger when using it to operate your Mio or charge the Mio internal battery. Do not cover the charger with paper or other objects that will reduce ventilation. Do not use the charger while it is inside a carrying case or other container.
Ensure that the charger is connected to a power source with the correct fitting and voltage requirements. The voltage requirements can be found on the home charger casing and/or packaging.
Do not attempt to service the charger as this could result in personal injury. Replace the charger if it is damaged or exposed to excess moisture.
Internal battery-specific safety information
The Mio contains a non-replaceable internal lithium-ion polymer battery. The battery may burst or explode if mishandled, releasing hazardous chemicals. To reduce the risk of fire or burns, do not disassemble, crush or puncture the battery.
Recycle or dispose of the battery safely and properly according to local laws and regulations. Do not dispose of the battery in fire or water.
Only use the correct home charger (sold separately) or in-car charger supplied by Mio to charge the Mio internal battery. Only use the Mio internal battery with the Mio unit.
The Mio battery will stop charging when the ambient temperature is less than 0ºC (32ºF) or more than 40ºC (104ºF).
Failure to adhere to these warnings and cautions may lead to death, serious injury or property damage. Mio disclaims all liability for installation or use of the Mio that causes or contributes to death, injury or property damage or that violates any law.
Warning Notice to Drivers in the United States
State law may prohibit drivers in states such as Arizona, California and Minnesota from mounting objects on their windshields while driving. Please make sure you research and follow your most current State laws. An alternative mounting option is provided in the box with your product, also, stores offer additional mounting alternatives. Mio does not take any responsibility for any fines, penalties, or damages that may be incurred as a result of disregarding this notice.
3

Caring for your Mio
Taking good care of your Mio will ensure trouble-free operation and reduce the risk of damage to your Mio.
Keep your Mio away from excessive moisture and extreme temperatures.
Avoid exposing your Mio to direct sunlight or strong ultraviolet light for extended periods of time.
Do not place anything on top of your Mio or drop objects on your Mio.
Do not drop your Mio or subject it to severe shock.
Do not subject your Mio to sudden and severe temperature changes. This could cause moisture condensation inside the unit, which could damage your Mio. In the event of moisture condensation, allow the Mio to dry out completely before use.
The screen surface can easily be scratched. Avoid touching it with sharp objects. Non-adhesive generic screen protectors designed specifically for use on portable devices with LCD panels may be used to help protect the screen from minor scratches.
Never clean your Mio with it powered on. Use a soft, lint-free cloth to wipe the screen and the exterior of your Mio.
Do not use paper towels to clean the screen.
Never attempt to disassemble, repair or make any modifications to your Mio. Disassembly, modification or any attempt at repair could cause damage to your Mio and even bodily injury or property damage and will void any warranty.
Do not store or carry flammable liquids, gases or explosive materials in the same compartment as your Mio, its parts or accessories.
4

Contents |
|
Important safety information .......................................................................................................................... |
2 |
Home Charger-specific safety information .............................................................................................. |
3 |
Internal battery-specific safety information ............................................................................................ |
3 |
Warning Notice to Drivers in the United States ...................................................................................... |
3 |
Caring for your Mio ....................................................................................................................................... |
4 |
Welcome.............................................................................................................................................................. |
9 |
Important information for using the manual ........................................................................................... |
9 |
How do I install my Mio? ................................................................................................................................ |
10 |
Moov R303-Series Installation.................................................................................................................. |
10 |
Moov R403-Series Installation................................................................................................................... |
11 |
Receiving TMC information ........................................................................................................................ |
11 |
Getting to know your Mio .............................................................................................................................. |
12 |
Moov R303-Series ....................................................................................................................................... |
12 |
Moov R403-Series ....................................................................................................................................... |
13 |
Turning on and off ....................................................................................................................................... |
14 |
Shutdown and hardware reset .................................................................................................................. |
14 |
How do I monitor the battery status?..................................................................................................... |
14 |
How do I charge the battery?.................................................................................................................... |
14 |
Navigating on the screen ........................................................................................................................... |
15 |
How do I adjust the volume? .................................................................................................................... |
15 |
How do I get started?...................................................................................................................................... |
16 |
How do I turn my Mio on for the first time? .......................................................................................... |
16 |
What are the main screens I will use? .......................................................................................................... |
18 |
Main Menu screen ........................................................................................................................................ |
18 |
Map screens .................................................................................................................................................. |
18 |
How do I navigate with GPS?......................................................................................................................... |
20 |
How does my Mio receive GPS signals? .................................................................................................. |
20 |
How do I view my GPS status? ................................................................................................................. |
20 |
How do I go from A to B? ............................................................................................................................... |
21 |
What if I miss a turn?.................................................................................................................................. |
21 |
How do I search for an address? ............................................................................................................... |
22 |
Case Study: How do I search for an address? .................................................................................... |
22 |
Using the Keyboard screen .................................................................................................................... |
24 |
Using the Destination Search screen.................................................................................................... |
24 |
How do I create a trip with multiple stops? ........................................................................................... |
26 |
Case Study: How do I navigate to multiple addresses? ................................................................... |
26 |
How do I skip a waypoint during a multi-stop trip? ......................................................................... |
29 |
How do I search for a Point of Interest (POI)? ....................................................................................... |
30 |
Case Study: How do I search for a Point of Interest?....................................................................... |
30 |
How do I save Favourites and My Home?.................................................................................................... |
33 |
Can I save a NavPixTM to a Favourite?................................................................................................ |
33 |
How do I save a Favourite or My Home? ................................................................................................ |
33 |
How do I navigate to a Favourite?............................................................................................................ |
34 |
How do I navigate to My Home?.............................................................................................................. |
34 |
Option 1 - Via the Main Menu .............................................................................................................. |
34 |
5

Option 2 - Via the Favourite Destinations screen .............................................................................. |
34 |
How do I edit the name of a Favourite? .................................................................................................. |
35 |
How do I delete a Favourite?..................................................................................................................... |
36 |
How do I navigate to a recent location? ...................................................................................................... |
37 |
How do I view my route?................................................................................................................................ |
38 |
3D Map screen.............................................................................................................................................. |
38 |
2D Map screen............................................................................................................................................. |
40 |
Traffic Overview screen (select models only) ........................................................................................ |
42 |
Route Overview screen.............................................................................................................................. |
44 |
Turn-by-Turn screen.................................................................................................................................... |
46 |
How do I use the Map Menu?................................................................................................................... |
48 |
Displaying the Map Menu ..................................................................................................................... |
48 |
Map Menu options.................................................................................................................................. |
48 |
How do I avoid an area? ............................................................................................................................. |
49 |
How do I add an Avoid Area?................................................................................................................ |
49 |
How do I delete an Avoid Area?........................................................................................................... |
49 |
How do I delete all Avoid Areas? ......................................................................................................... |
49 |
How do I preview a route?.............................................................................................................................. |
50 |
How do I view my route statistics?............................................................................................................... |
51 |
How do I view statistics on my current route? ...................................................................................... |
51 |
How do I view statistics of my trips to date? ......................................................................................... |
52 |
How do I view my trip logs? ...................................................................................................................... |
53 |
How do I use NavPixTM? ............................................................................................................................ |
54 |
How do I manage my NavPixTM?......................................................................................................... |
54 |
Album management............................................................................................................................... |
54 |
NavPixTM management...................................................................................................................... |
55 |
How do I view a NavPixTM in full-screen? ..................................................................................... |
56 |
How do I navigate to a NavPixTM? ...................................................................................................... |
58 |
How do I save a NavPixTM to a favourite? ......................................................................................... |
59 |
How do I save a NavPixTM to a POI?................................................................................................... |
60 |
What is Mio Connect (Local Search)?........................................................................................................... |
61 |
How do I search for a POI using Mio Connect?...................................................................................... |
61 |
How do I receive current traffic information? (Select models only) ...................................................... |
62 |
How does my Mio receive traffic information?...................................................................................... |
62 |
Traffic status ............................................................................................................................................ |
62 |
How will I know when a Traffic Event occurs? ....................................................................................... |
63 |
How do I view a list of all events on my route? ..................................................................................... |
64 |
How do I view traffic details?.................................................................................................................... |
65 |
How do I know if a detour is recommended?......................................................................................... |
66 |
How do I avoid an event on my route?............................................................................................... |
66 |
How do I cancel a detour around an event on my route? ............................................................... |
66 |
How do I automatically avoid all traffic and clearance events on my route? ............................. |
66 |
Traffic Messages........................................................................................................................................... |
67 |
Detour Not Available messages........................................................................................................... |
67 |
Detour recommended messages.......................................................................................................... |
67 |
What can I customise? .................................................................................................................................... |
68 |
Route Options .............................................................................................................................................. |
69 |
Route Calculation 1/5............................................................................................................................. |
69 |
Road Types 2/5........................................................................................................................................ |
70 |
6

Road Types 3/5........................................................................................................................................ |
71 |
Driver Alerts 4/5 ..................................................................................................................................... |
72 |
Data Recording 5/5................................................................................................................................. |
73 |
Map Display .................................................................................................................................................. |
74 |
Map Display 1/3....................................................................................................................................... |
74 |
Map Display 2/3 ...................................................................................................................................... |
75 |
Select Map 3/3 ........................................................................................................................................ |
76 |
Map POIs....................................................................................................................................................... |
77 |
Volume .......................................................................................................................................................... |
78 |
Screen ............................................................................................................................................................ |
79 |
POI Alerts..................................................................................................................................................... |
80 |
GPS................................................................................................................................................................. |
81 |
GPS Status................................................................................................................................................ |
81 |
Resetting your GPS fix ........................................................................................................................... |
81 |
Setting your GPS mode.......................................................................................................................... |
82 |
Language ....................................................................................................................................................... |
83 |
Traffic............................................................................................................................................................ |
84 |
Traffic System Status ............................................................................................................................ |
84 |
Traffic Event Notification ...................................................................................................................... |
85 |
Select event sorting type....................................................................................................................... |
86 |
Power ............................................................................................................................................................. |
87 |
Keyboard ...................................................................................................................................................... |
88 |
How does predictive text (abc, def…) work? ................................................................................... |
88 |
Units............................................................................................................................................................... |
89 |
Units 1/2 ................................................................................................................................................... |
89 |
Units 2/2................................................................................................................................................... |
90 |
Start-up ......................................................................................................................................................... |
91 |
Saved Info ..................................................................................................................................................... |
92 |
Tutorial .......................................................................................................................................................... |
93 |
About ............................................................................................................................................................. |
94 |
Shop Demo ................................................................................................................................................... |
94 |
What is MioMore Desktop?............................................................................................................................ |
95 |
Can I use MioMore Desktop with my computer?.............................................................................. |
95 |
How do I install a map for the first time? .......................................................................................... |
95 |
How do I install MioMore Desktop onto my computer?...................................................................... |
96 |
MioMore Desktop features ........................................................................................................................ |
97 |
How do I keep MioMore Desktop up-to-date? ...................................................................................... |
98 |
How do I update MioMore Desktop? .................................................................................................. |
98 |
MioMore Desktop Preferences ............................................................................................................. |
98 |
Mio Online .................................................................................................................................................... |
98 |
Mio Connect ................................................................................................................................................. |
99 |
How do I search for a POI using Mio Connect?................................................................................. |
99 |
How do I install POIs from my computer to my Mio? ................................................................... |
100 |
How do I delete a POI from my Mio?................................................................................................ |
100 |
My Maps ...................................................................................................................................................... |
101 |
How do I install maps onto my Mio? ................................................................................................ |
101 |
How do I install maps from DVD? ..................................................................................................... |
102 |
How do I remove maps from my Mio? ............................................................................................. |
103 |
How do I know which map contains a particular city or town? ................................................... |
104 |
How do I download maps to my computer? ................................................................................... |
104 |
What is a Major Road Network map? ............................................................................................... |
105 |
My Subscriptions........................................................................................................................................ |
106 |
Alerts....................................................................................................................................................... |
106 |
How do I install Safety Camera information? ................................................................................. |
106 |
7

How do I know which Safety Camera information is available?.................................................. |
106 |
Purchase a Subscription....................................................................................................................... |
106 |
Activate your Subscription.................................................................................................................. |
107 |
How do I update Safety Camera information on my Mio? ........................................................... |
107 |
Image Search .............................................................................................................................................. |
108 |
How do I download NavPixTM from the internet?..................................................................... |
108 |
How do I import NavPixTM to Photo Album? ............................................................................. |
108 |
Photo Album............................................................................................................................................... |
109 |
Toolbar.................................................................................................................................................... |
109 |
How do I copy NavPixTM or albums from my Mio to Photo Album? ..................................... |
110 |
How do I transfer pictures from Photo Album to my Mio? .......................................................... |
110 |
How can I view and edit pictures or albums on my computer? .................................................... |
111 |
Photo Album Preferences.................................................................................................................... |
112 |
Custom POIs............................................................................................................................................... |
113 |
How do I install custom Points of Interest?..................................................................................... |
113 |
How do I delete a Custom POI File from my Mio? ......................................................................... |
114 |
Mileage Reporter ....................................................................................................................................... |
115 |
How do I input my trip data?.............................................................................................................. |
115 |
How do I export a mileage report?.................................................................................................... |
116 |
How do I delete travel logs from my Mio?....................................................................................... |
116 |
Mileage Reporter preferences............................................................................................................. |
116 |
Voice Transfer ............................................................................................................................................. |
117 |
How do I install a voice file? ................................................................................................................ |
117 |
How do I remove a voice file?.............................................................................................................. |
117 |
How do I backup my Mio?........................................................................................................................ |
118 |
How do I Backup my Mio?................................................................................................................... |
118 |
How do I Restore a Backup to my Mio?............................................................................................ |
118 |
How do I Delete a Backup? ................................................................................................................. |
118 |
Reference ......................................................................................................................................................... |
119 |
Troubleshooting......................................................................................................................................... |
119 |
Point of Interest categories...................................................................................................................... |
120 |
Branded Points of Interest................................................................................................................... |
121 |
Point of Interest categories by Mio.................................................................................................... |
121 |
Point of Interest categories by subscription .................................................................................... |
121 |
Traffic and other TMC Events.................................................................................................................. |
121 |
Safety Camera POIs .................................................................................................................................. |
123 |
Disclaimer ................................................................................................................................................... |
123 |
Compliance................................................................................................................................................. |
123 |
Federal Communications Commission (FCC) statement .............................................................. |
123 |
Copyright .................................................................................................................................................... |
124 |
For more information .................................................................................................................................... |
125 |
8

Welcome
Thank you for purchasing this Mio. This manual has been prepared to guide you through the operation of your Mio from first set-up through to continuous use. Please read this manual carefully before using your Mio for the first time. Keep this manual in a safe place and use as your first point of reference.
Important information for using the manual
It is important to understand the terms and typographical conventions used in this manual.
Formatting
The following formatting in the text identifies special information:
Convention |
Type of Information |
|
|
Bold |
Mio components or items displayed on screen, including buttons, headings, field names and options. |
|
|
Italics |
Indicates the name of a screen. |
|
|
Terms
The following terms are used throughout this manual to describe user actions.
Term |
Description |
|
|
Tap |
Press and release an item displayed on the touch screen. |
|
|
Tap and hold |
Tap and hold an item displayed on the touch screen for 2-3 seconds. |
|
|
Select |
Tap an item in a list or tap a command from a menu. |
|
|
9
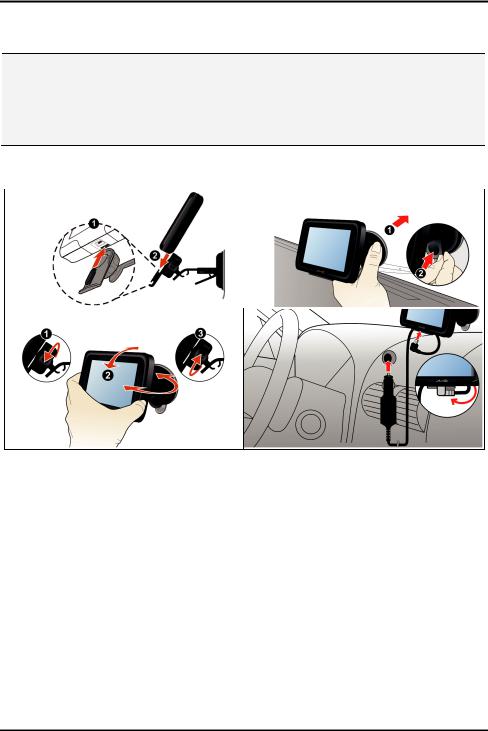
How do I install my Mio?
CAUTION:
Select an appropriate location for mounting the Mio in a vehicle. Never place the Mio where the driver’s field of vision is blocked.
If the car’s windscreen is tinted with a reflective coating, it may be athermic and impact the GPS reception. In this instance, please mount your Mio where there is a “clear area.”
To protect your Mio against sudden surges in current, connect the car charger only after the car engine has been started.
Moov R303-Series Installation
1 |
2 |
|
|
3 |
4 |
10
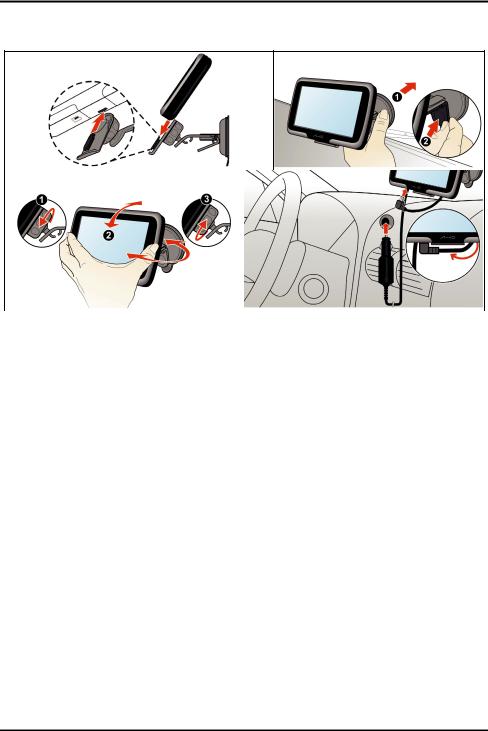
Moov R403-Series Installation |
|
1 |
2 |
3 |
|
4 |
|
|
|
|
|
Receiving TMC information
Note: Not available on all models.
You can receive current traffic information on your Mio via an optional traffic accessory. To receive traffic information, you must connect your Mio to the in-car charger.
TMC information is monitored by the navigation software. Once the information is received, you can view it on your device and traffic icons will appear in the map view. Certain roads with reported traffic will be highlighted and you can choose to avoid those roads and an alternate route will be automatically calculated. For more information, see “How does my Mio receive traffic information?” on page 62.
11
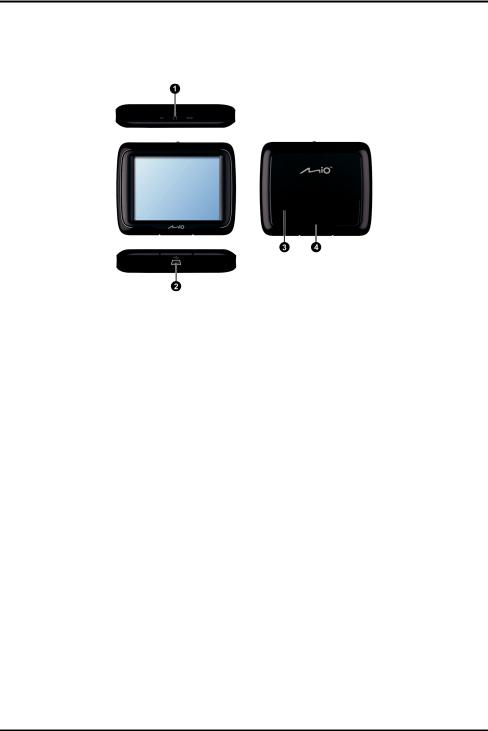
Getting to know your Mio
Moov R303-Series
nPower Switch
oSocket for in-car charger, USB cable (not supplied), home charger (may be sold separately) and TMC accessory kit (may be sold separately)
p q
Speaker
Cradle Socket
12
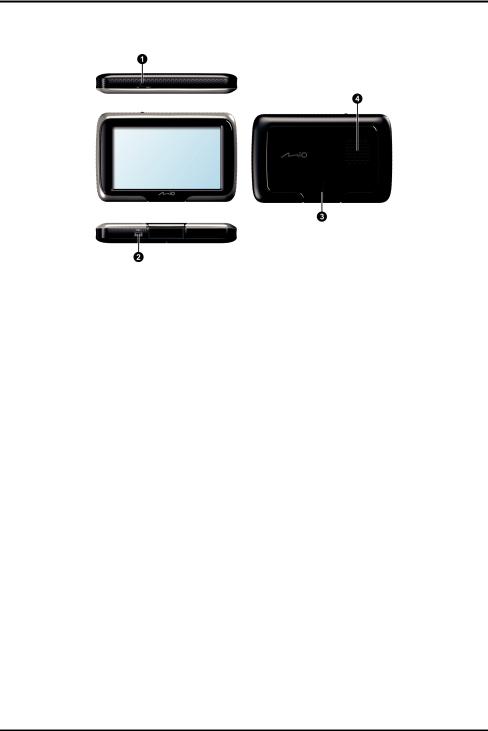
Moov R403-Series
nPower Switch
oSocket for in-car charger, USB cable (not supplied), home charger (may be sold separately) and TMC accessory kit (may be sold separately)
p q
Cradle Socket
Speaker
13
Turning on and off
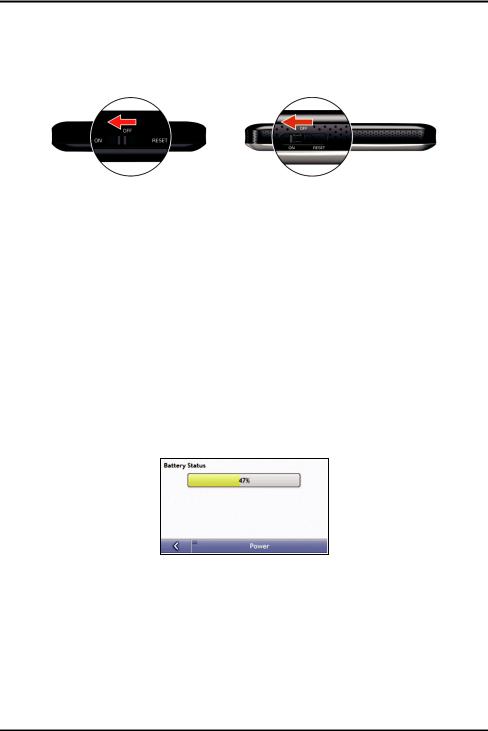
For normal operation, turn off your Mio by sliding the power switch to the OFF position. Your Mio enters a suspended state. To use it again, slide the power switch to the ON position. Your Mio will be back to where you left off.
Moov R303-Series |
Moov R403-Series |
Shutdown and hardware reset
Occasionally, you may need to perform a hardware reset when your Mio stops responding; or appears to be “frozen” or “locked-up.”
You can perform a hardware reset by shutting down your Mio and then turning it back on. To shut down your Mio, slide the power switch to the RESET position. To turn on your Mio after shutting it down, slide the power switch to the ON position.
NOTE: Switching to the Reset position turns the battery off. It is recommended you move the switch to this position if you are planning to store your Mio for any length of time.
How do I monitor the battery status?
Your Mio has an internal battery that when fully charged, should provide power for up to 3 hours. You can monitor battery power status on the Power screen.
Note: The battery may not be fully charged when you use your Mio for the first time.
To access the Power screen, tap  .
.
How do I charge the battery?
The Battery Status bar displays External Power while the battery is charging; when the battery is fully charged, the Battery Status bar will display at 100%.
To charge your Mio in a vehicle, plug the in-vehicle charger to the  bottom of your Mio and the other end into the vehicle power socket, as shown in the” How do I install my Mio?” section.
To charge your Mio using your computer, see later section for details.
To charge your Mio using a mains power socket, plug the mains power charger cable to the  bottom of your Mio and the mains power charger pack into the mains power socket.
14

Note: The mains power charger is not included with all models and may be purchased separately.
Navigating on the screen
To operate your Mio, touch the screen with your fingertip. You can perform the following actions:
Moov R303-Series |
Moov R403-Series |
Tap
Touch the screen once with your fingertip to open items or select onscreen buttons or options.
Drag
Hold your fingertip on the screen and drag up/down/left/right or across the screen. (This is not supported by all applications.)
Tap and hold
Tap and hold your fingertip until an action is complete, or a result or menu is shown. (This is not supported by all applications.)
How do I adjust the volume?
The volume on your Mio can be adjusted by the volume control on the Volume preference screen. To mute the volume from the map screens, tap  and then tap
  .
.
For more information on how to adjust the volume on your Mio, see “Volume” on page 78.
15
How do I get started?
Note: The first time you use your Mio, it may take several minutes to establish a GPS connection. For more information about GPS, refer to the GPS Frequently Asked Questions guide on the enclosed DVD.
How do I turn my Mio on for the first time?
To get started for the first time, complete the following steps:
1.Read the Important Safety Information on page 2.
2.Position your Mio
Follow the instructions on page 10.
Note: Ensure that your Mio does not obstruct the driver's view, or interfere with the operation of the vehicle airbags and safety devices.
3.Turn your Mio on
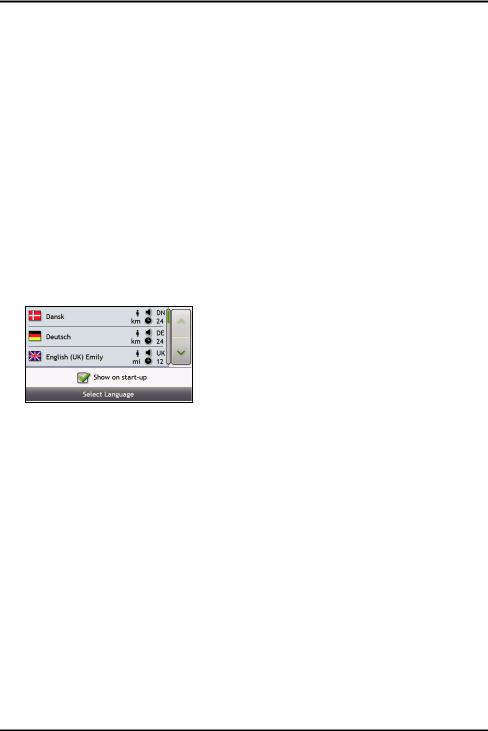
Your Mio will turn on and display the Language screen.
4.Select your preferred language
From the Select Language screen, tap your preferred language.
To prevent the Select Language screen from displaying on each start-up, clear the Show on start-up check box.
You can change your preferred language while using your Mio, see “Language” on page 83.
5.Read the warning message
a)The Safety Agreement screen will display after you have selected your preferred language. Read the Safety Agreement message.
b)To confirm that you have read and understood the message, tap Accept. The Tutorial will display.
6.View the Tutorial
When you have accepted the Safety Agreement, the first Tutorial screen will display.
To prevent the Tutorial from displaying again on start-up, clear the “Show tutorial on start-up” check
box.
To move forward through the Tutorial screens, tap  . To view the previous screen, tap
  .
.
To view the Tutorial again while using your Mio, see “Tutorial” on page 93.
Note: If you have maps installed from multiple continents, you may be prompted to select the maps you require. To use maps from a different continent at a later time, you can select a different map via the Select Map screen in the Select Map 3/3 preferences; refer to page 76.
16

When you have finished the Tutorial, the 3D Map screen will display. If you have a GPS fix, your current location will be displayed on the map.
17

What are the main screens I will use?
Main Menu screen
The Main Menu screen is your starting point for searching for a destination. The Main Menu screens also allow you to enter an address for your destination and customise preferences.
The Main Menu can be accessed from the map screens by tapping  or by tapping the status bar at the bottom of any screen.
Note: The Main Menu screens may differ from those displayed above, depending on your Mio model.
Map screens
There are five map screens used to view the route to your destination:
3D Map
2D Map
Traffic Overview (Not available on all models)
Route Overview
Turn-by-Turn™
The Map screens can be accessed from the Main Menu screen by tapping  .
.
You can cycle through the different map screens by tapping  on any map screen (the name of the map screen will display briefly as your cycle through).
18

For more information on the map screens, see “How do I view my route?” on page 38.
For information on using the Map menu from the 3D Map and 2D Map screens, see “How do I use the Map Menu?” on page 48.
19
How do I navigate with GPS?
The Global Positioning System (GPS) is available at any time, free of charge, and is accurate to within 5m (15ft). GPS navigation is made possible by a network of satellites that orbit the Earth at around 20,200km (12,552mi). Each satellite transmits a range of signals which are utilised by GPS receivers, such as your Mio, to determine an exact location. Although a GPS receiver can detect signals from up to 12 satellites at any time, only four signals are required to provide a position or “GPS fix” (latitude and longitude), for vehicle navigation systems.
How does my Mio receive GPS signals?
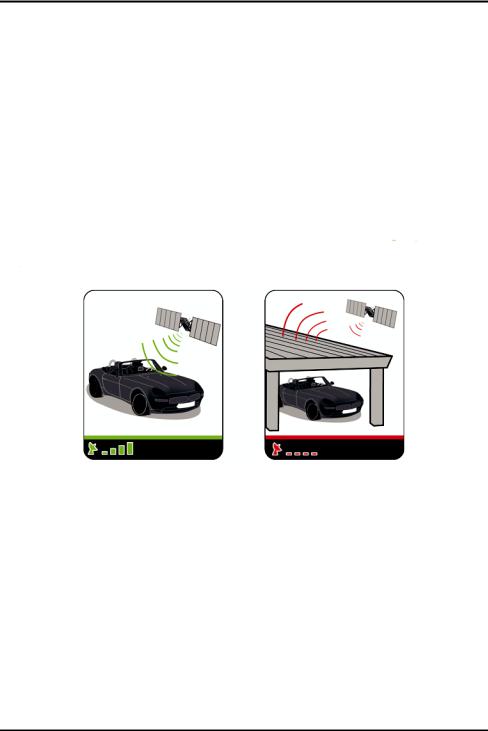
Your Mio receives GPS signals via the internal GPS antenna. To guarantee the optimum GPS signal strength, ensure your Mio is outdoors, or in a vehicle outdoors, and has an unobstructed view of the sky. GPS reception is not usually affected by weather, however, very heavy rain or snow may have a negative effect on your reception.
How do I view my GPS status?
You can view your GPS status at any time from the map screens or the Viewfinder screen. 


 displays green when a GPS fix is established and red when a GPS fix is unavailable. To indicate the reception strength of a GPS fix,


 displays between one and four green vertical bars.
To view your GPS status in more detail, see “GPS Status” on page 81.
To set your GPS mode, see “Setting your GPS mode” on page 82.
For more information about GPS, refer to the GPS Navigation - Frequently Asked Questions guide on the MioMore Desktop DVD.
20

How do I go from A to B?
Your Mio is equipped with maps that provide street-level detail for door-to-door navigation, including Points of Interest (POIs) such as accommodation, parking areas, petrol stations, railway stations and airports.
When you ... |
Then ... |
|
|
know the address of your destination |
use the address-entry wizard to enter the address “How do I search for an |
|
address?” on page 22. |
|
|
want to make multiple stops |
use the Multi-stop Trip Planner screen to enter multiple waypoints “How do I |
|
create a trip with multiple stops?” on page 26. |
|
|
need to find a named site, feature, |
search for a Point of Interest "How do I search for a Point of Interest (POI)?” on |
landmark or public venue |
page 30. |
|
|
search for live POI information |
search for a POI using Mio Connect “How do I search for a POI using Mio |
|
Connect?” on page 61. |
|
|
want to navigate to a NavpixTM |
use the Go To NavPix screen to navigate to a preinstalled NavpixTM “How do I |
location |
navigate to a NavpixTM?” on page 58. |
|
|
|
|
WARNING: For your safety, enter destination information before you start a journey. Do not enter a destination while driving.
What if I miss a turn?
Back-On-Track™ Automatic Rerouting
You will be redirected if you make a wrong turn. A message informing you that your route is being re-calculated will display at the top of the screen.
To cancel a route re-calculation tap  . A warning will display, asking you to confirm the cancellation. If confirmed, both the re-calculation and your current route will be cancelled.
21
How do I search for an address?
Enter a destination using the Destination Search, Keyboard and Preview screens, which used together form an address-entry wizard.
This section provides a case study to help guide you through setting your destination.
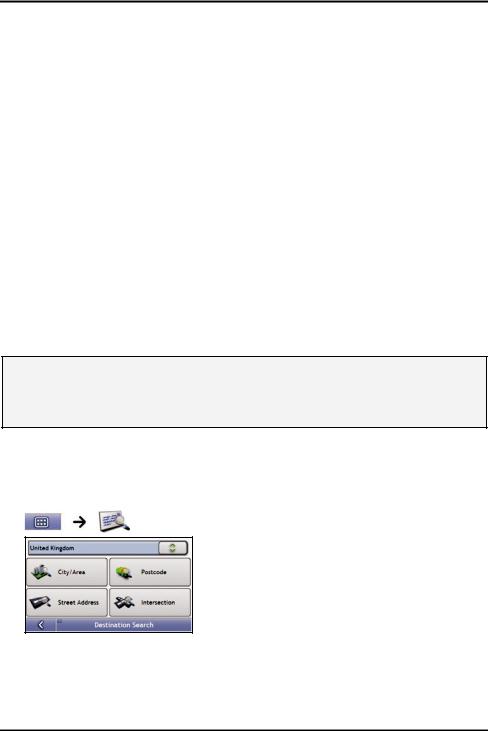
Note: In some countries, you can search for your destination by postcode or zip code. If you are in the United Kingdom, and you know the postcode of your destination, you can search for it from the Destination Search screen by tapping Postcode, then entering a postcode of up to eight characters.
Quick Steps
1.Open the Destination Search screen
2.Select the country
3.Search for the city/area
4.Search for the street
5.Search for the house number
6.Tap  .
.
Case Study: How do I search for an address?
This case study will show you how to enter an address and how to navigate to it.
The address used in this example is
1 Cheyne Walk Street
Horley
Surrey
AB1 2CD,
United Kingdom.
Note: The above address is fictitious and used as an example only.
Tip: Before you enter your destination address, ensure that you have set your route preferences. For more information, see “Route Options” on page 69.
1.Open the Destination Search screen
The Destination Search screen will display.
Note: If this is the first time you are setting your destination and you have maps from more than one country installed, then the Select a map screen will display instead of the Destination Search screen. Go directly to step 2b. The next time you perform this procedure, the Destination Search screen will open as expected.
22
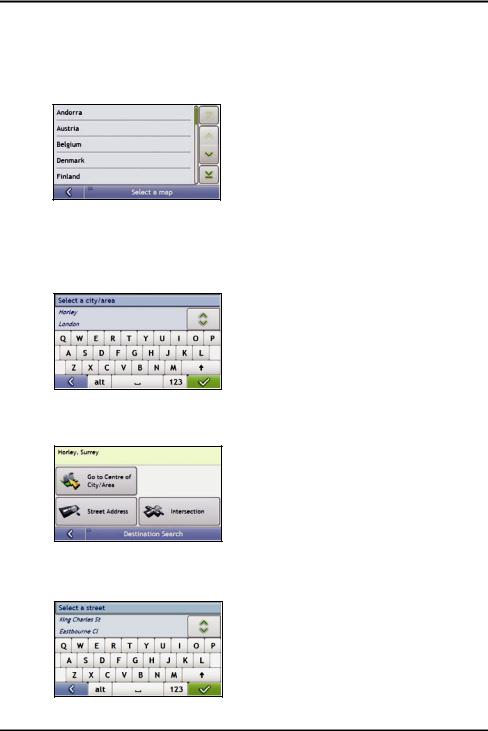
2.Select the country
Note: If you only have the maps of one country installed and selected, that country is selected for your destination by default and cannot be changed. Go to step 3.
a)From the Destination Search screen, tap  . The Select a map screen will display.
b)Select United Kingdom from the list. The Destination Search screen will display.
3.Search for the City/Area
a)From the Destination Search screen, tap City/Area. The Keyboard screen will display.
b)Use the Keyboard screen to search for Horley as the city or area of your destination, then tap the search result.
The Destination Search screen will display.
4.Search for the street name and house number
a)From the Destination Search screen, tap Street Address. The Keyboard screen will display.
23
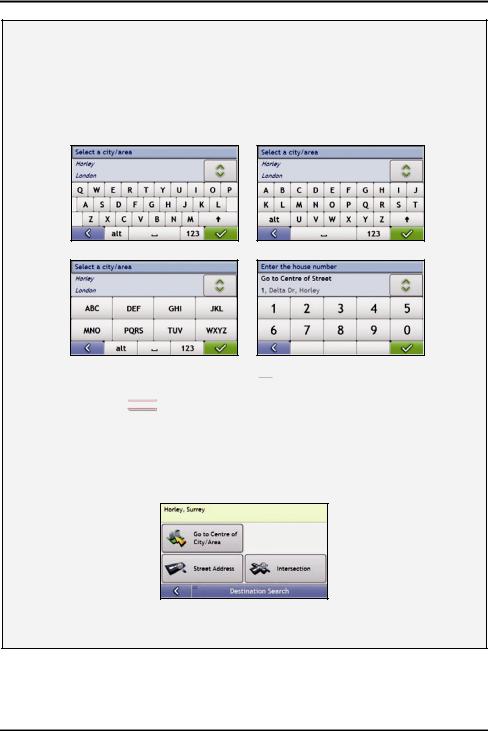
Using the Keyboard screen
The Keyboard screen will display when you are required to enter text, such as when searching for a street name. Search results will be listed in matching order, with the closest matches appearing at the top of the list. A maximum of 99 results will display.
The Keyboard screen can display with various layouts depending on the information you need to enter, including alphabet, number, alternate characters and combinations of these.
You can also choose the type of keyboard you prefer from alphabetic, QWERTY and keypad. For more information, see “Keyboard” on page 88.
As you select each character, the first two results will display. Tap  , then scroll to see more search results.
zTo select a character or a search result, tap the character or search result.
zTo delete a character, tap  .
.
zTo display more characters, tap 123, alt or abc, if available.
Using the Destination Search screen
The Destination Search screen is used to select your destination by area, street, postal or ZIP code, Points of Interest, intersection, city, area, state or country.
As you specify each part of the address, it will display at the top of the screen.
The available options will change to reflect the parts of the address still to be completed.
24
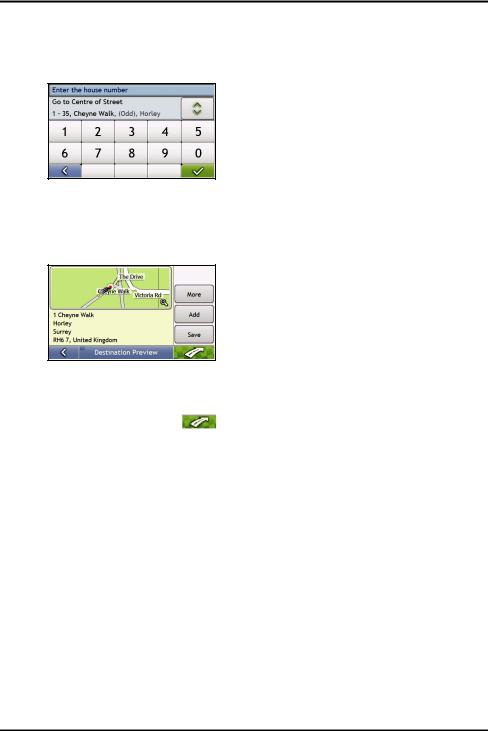
b)Use the Keyboard screen to enter Cheyne Walk as the street name of your destination, then tap the search result.
Note: There may be multiple matches for a particular street name. Long streets that run through several neighbouring areas, and common street names will produce search results ordered by their city or area name.
c)Use the Keyboard screen to enter 1 as the house number of your destination, then tap the search result. The Preview screen will display.
Note: If house numbers are available, but not the one that you require, you may have to choose the same street in a
neighbouring area. Tap  and select another search result. If house numbers are not available for your selected section of the street the Preview screen will display.
d) Complete the following:
If you want to ... |
Then ... |
|
|
|
|
navigate to your selected destination |
tap |
. |
|
Your route is calculated; the 3D Map screen will display. |
|
|
|
|
view the position on the map screen |
tap the map to display the position on the 2D Map screen. |
|
|
|
|
view more information about your |
tap More. |
|
destination |
The Destination Details screen will display. |
|
|
||
|
|
|
add the destination to a multi-stop trip |
tap Add. |
|
|
The Multi-stop Trip Planner screen will display. The address is listed as a waypoint |
|
|
on the multi-stop trip. See “How do I create a trip with multiple stops?” on page |
|
|
26. |
|
|
|
|
save the destination as My Home |
tap Save. |
|
|
The New Favourite screen will display. |
|
|
tap Save as My Home. |
|
|
|
|
save the destination as a favourite |
tap Save. |
|
|
The New Favourite screen will display. |
|
|
tap Save as Favourite. |
|
|
|
|
25

How do I create a trip with multiple stops?
You can use the Multi-stop Trip Planner screen to set multiple stops or waypoints for your trip. Your route will be calculated to go via each of these points in the specified order.
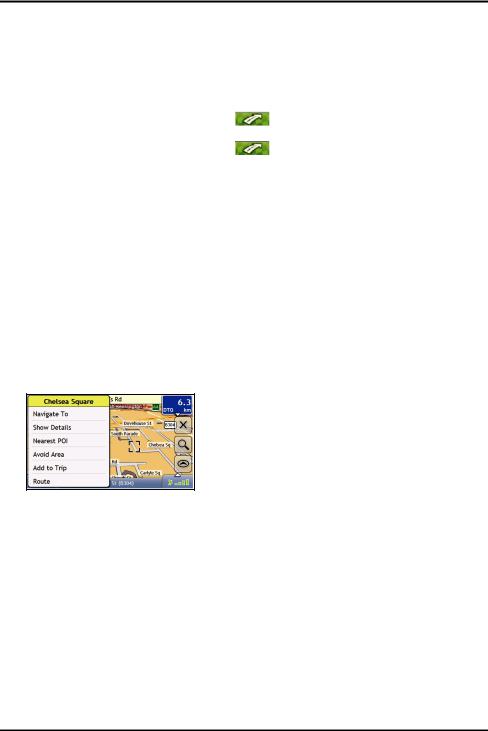
Waypoints can be added via the Multi-stop Trip Planner screen or by selecting Location, then Add to Trip from the pop-up Map menu on the 2D Map or 3D Map screen. You can save up to 198 multi-stop trips, each with up to 14 waypoints.
Note: Waypoints added, updated or deleted after a multi-stop trip has commenced will not affect the current route.
Quick Steps
1.Start your Multi-stop trip
2.Select the country
3.Search for the city/area
4.Search for the street and house number
5.Add additional waypoints
6.Tap  .
.
Case Study: How do I navigate to multiple addresses?
This case study will show you how to set a multi-stop trip by entering multiple waypoints.
The address used in this example is:
1 Cheyne Walk Street
Horley
Surrey
AB1 2CD,
United Kingdom.
Note: The above address is fictitious and used as an example only.
Tip: Before you enter your destination address, ensure that you have set your route preferences. For more information, see “Route Options” on page 69.
1.Open your Multi-stop Trip screen
The Multi-stop Trip Planner screen will display.
26
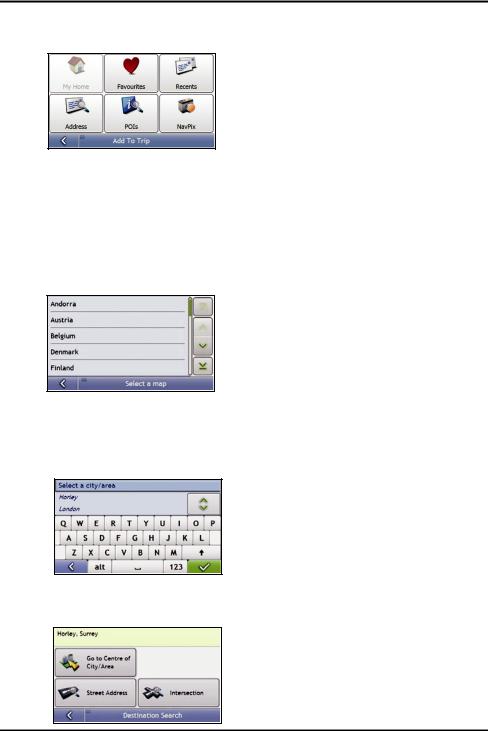
a)Tap Add.
The Add to Trip Menu will display.
b)Tap Address.
The Destination Search screen will open.
Note: You can also add waypoints using favourites, recent destinations, POI locations and NavpixTM.
2.Select the country
Note: If you only have the maps of one country installed and selected, that country is selected for your destination by default and cannot be changed. Go to step 3.
a)From the Destination Search screen, tap  . The Select a map screen will display.
b)Select United Kingdom from the list. The Destination Search screen will display.
3.Search for the City/Area
a)From the Destination Search screen, tap City/Area. The Keyboard screen will display.
b)Use the Keyboard screen to search for Horley as the city or area of your destination, then tap the search result.
The Destination Search screen will display.
27
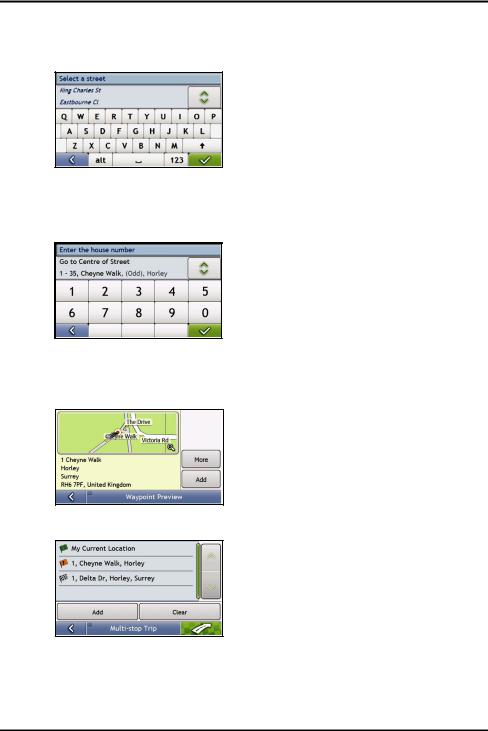
4.Search for the street name and house number
a)From the Destination Search screen, tap Street Address. The Keyboard screen will display.
b)Use the Keyboard screen to enter Mio Street as the street name of your destination, then tap the search result.
Note: There may be multiple matches for a particular street name. Long streets that run through several neighbouring areas, and common street names will produce search results ordered by their city or area name.
c)Use the Keyboard screen to enter 1 as the house number of your destination. The Preview screen will display.
Note: If house numbers are available, but not that you require, you may have to choose the same street in a neighbouring area. If house numbers are not available for your selected section of the street the Destination Preview screen will display.
d)Tap Add.
The waypoint is automatically saved and the Multi-stop-Trip screen will display.
28
e) |
Complete the following: |
|
|
|
|
|
|
If you want to ... |
Then ... |
|
|
|
|
|
|
add another waypoint |
tap Add. |
|
|
Note: Waypoints added after a multi-stop trip has |
The Add To Trip Menu will display. |
||
|
|
||
commenced will not be included in the current route. |
return to step 1a. |
||
|
|
|
|
navigate to your selected destination |
tap |
|
|
|
|
The Preview screen will display. |
|
|
|
tap |
. |
|
|
The 3D Map screen will display the calculated route. |
|
|
|
||
change the order of your waypoints |
tap a destination point to move. |
||
|
|
The Preview screen will display. |
|
|
|
tap Up or Down. |
|
|
|
The Multi-stop Trip Planner screen will redisplay. |
|
|
|
|
|
delete all waypoints |
tap Clear. |
|
|
|
|
||
delete one waypoint |
tap a destination point to delete. |
||
|
|
The Preview screen will display. |
|
|
|
tap Delete. |
|
|
|
The Multi-stop Trip Planner screen will redisplay. |
|
|
|
|
|
How do I skip a waypoint during a multi-stop trip?
To skip a waypoint during a multi-stop trip, complete the following:
1.Tap the map.
The Map Menu will display.
2.Tap Route, then Skip Waypoint.
The next waypoint will be skipped and the route recalculated to the following waypoint.
29
How do I search for a Point of Interest (POI)?
A POI is a named site, feature, landmark or public venue which can be displayed as an icon on the map. POIs are grouped by type, such as petrol stations, parking, beaches and museums.
Select a POI using the Destination Search, Keyboard and Preview screens, which used together to form a POI-entry wizard.
Tip: You can also quickly search for certain POIs based upon your current location via the Main Menu screen.
This section provides a case study to help guide you through finding or setting your POI as a destination.
Quick Steps
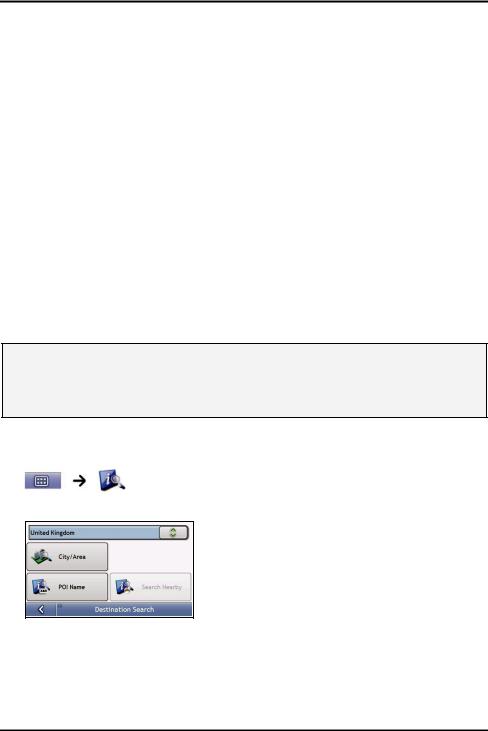
1.Open the Destination Search screen
2.Select a country
3.Search for the City/Area
4.Search for a POI
5.Tap  .
.
Case Study: How do I search for a Point of Interest?
This case study will show you how to enter an address and navigate to it.
The address used in this example is:
Waterloo Railway Station
Road (A301), Waterloo
London
SE1 8UD
United Kingdom.
Note: The above address is fictitious and used as an example only.
1.Open the Destination Search screen
The Destination Search screen will display.
Note: If this is the first time you are setting your destination and you have maps from more than one country installed, then the Select a map screen will display instead of the Destination Search screen. Go directly to step 2b.
The next time you perform this procedure, the Destination Search screen will open as expected.
30
 Loading...