


User Manual

 Series

Table of Contents |
|
Getting to know the recorder......................................................................................................... |
2 |
Power key..................................................................................................................................... |
3 |
LED indicators............................................................................................................................. |
3 |
Function keys............................................................................................................................... |
4 |
System icons................................................................................................................................ |
5 |
Inserting a memory card................................................................................................................. |
6 |
Using your recorder in a vehicle..................................................................................................... |
7 |
Connecting to external devices...................................................................................................... |
9 |
Connecting to your computer.................................................................................................. |
9 |
Connecting to a High Definition (HD) device....................................................................... |
9 |
Operating basics............................................................................................................................. |
10 |
Turning the recorder ON and OFF......................................................................................... |
10 |
Setting the date and time....................................................................................................... |
10 |
Recording in driving mode....................................................................................................... |
11 |
Recording in Parking mode..................................................................................................... |
12 |
Camera mode............................................................................................................................ |
13 |
Playback mode.......................................................................................................................... |
13 |
Safety camera alerts...................................................................................................................... |
14 |
Adding safety camera.............................................................................................................. |
15 |
Updating safety camera data................................................................................................. |
15 |
System settings............................................................................................................................... |
16 |
Settings Menu........................................................................................................................... |
16 |
MiVue Manager............................................................................................................................... |
19 |
Installing MiVue Manager....................................................................................................... |
19 |
Playing the recording files....................................................................................................... |
19 |
For more information..................................................................................................................... |
22 |
Precautions and notices.......................................................................................................... |
22 |
Safety precautions................................................................................................................... |
22 |
About GPS.................................................................................................................................. |
23 |
Caring for your device.............................................................................................................. |
24 |
Regulatory information (CE).................................................................................................. |
25 |
WEEE........................................................................................................................................... |
25 |
1
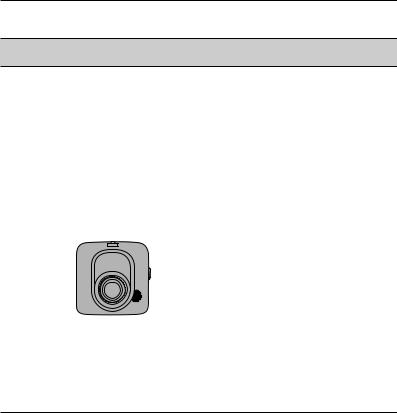
Getting to know the recorder
NOTE: The screenshots and other presentations shown in this manual may differ from the actual screens and presentations generated by the actual product.
1 Device mount socket
For the device mount.
2 Mini-USB connector
Connects to the charger or computer.
3 HD OUT connector*
Connects to an external device.
4 LCD screen
5 Function keys
6 LED indicator 1
Indicates the system status of the recorder.
7 Power key
8 Memory card slot
Videos are recorded to a MicroSD card.
9 Speaker
Outputs audio.
10 Camera lens
11 LED indicator 2*
Parking mode indicator.
12 Microphone
Allows you to record the video with sounds.
* For selected models only.
2
Power key
Once the vehicle engine is started, the recorder automatically turns on. By default, the recording will start right after the recorder turns on.
You can perform the following using the Power key:
To manually turn the recorder on and off, press and hold the Power key for 2 seconds.
When the recorder is turned on, press and release the Power key to switch the LCD screen on/off.
LED indicators
Status |
LED 1 |
LED 2* |
|
|
|
The power cable is connected and the |
|
|
recorder is on: |
|
|
The battery is charging, and |
|
|
- the recording is in progress. |
Green, Amber / Blinking |
OFF |
- the recording is stopped. |
Green / On |
OFF |
The battery is fully charged, and |
|
|
- the recording is in progress. |
Red / Blinking |
OFF |
- the recording is stopped. |
OFF |
OFF |
|
|
|
The recorder switches to Parking mode, and: |
|
|
The parking recording is in progress. |
Red / Blinking |
Red / Blinking |
The parking recording is stopped. |
OFF |
Red / Blinking |
* For selected models only.
3
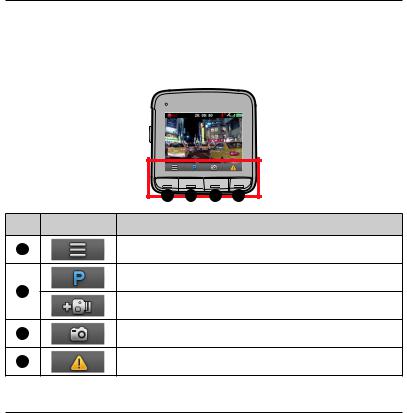
Function keys
The device provides four function keys to control the corresponding icons displayed at the bottom of the LCD screen. The key’s function may vary on different screens. For example, the device will display four icons as shown below while continuous recording is in progress.
Example:
|
1 |
2 |
3 |
4 |
Icon |
Description |
|
|
|
1 |
Press to enter the Settings Menu. |
|||
|
Press to manually activate Parking mode.* |
|||
2 |
|
|
|
|
|
Press to add a custom safety camera in the current location.* |
|||
3 |
Press to take a photo. |
|
||
4 |
Press to manually start an emergency recording. |
|||
* For selected models only.
4
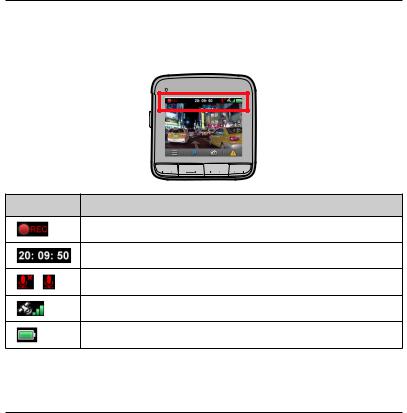
System icons
Various System icons on the title bar at the top of the screen provide the status information of your device. The icons displayed will vary depending on your device model and state.
Example:
Icon Description
The REC icon blinks while recording is in progress.
Displays the current time.
/ |
Recording with sound is disabled/enabled. |
The GPS signal icon indicates the GPS status.*
The Battery icon indicates the remaining battery power.
* For selected models only.
5
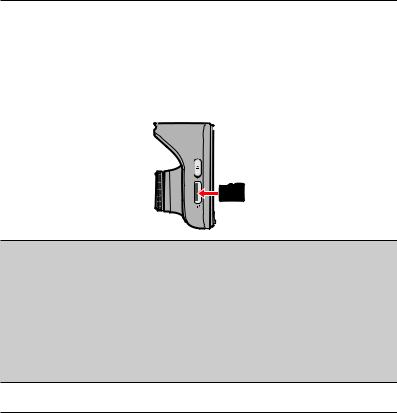
Inserting a memory card
You must insert a memory card (may be sold separately) before you can start recording.
1.Hold the card by the edges and gently insert it into the slot with the label facing the rear side of the recorder.
2.To remove a card, gently push the top edge of the card inwards to release it, and pull it out of the slot.
CAUTION:
DO NOT apply pressure to the centre of the memory card.
You are advised to use a Class 6 memory card with at least 8GB capacity. The recorder supports memory cards with up to 32GB capacity.
MiTAC does not guarantee the product’s compatibility with memory cards from all manufacturers.
Before you start recording, please format the memory card to avoid malfunction caused by files not created by the recorder. You can format the card on your computer or on the recorder (by selecting Settings Menu > Format).
You are recommended to turn the device off before removing the memory card.
6

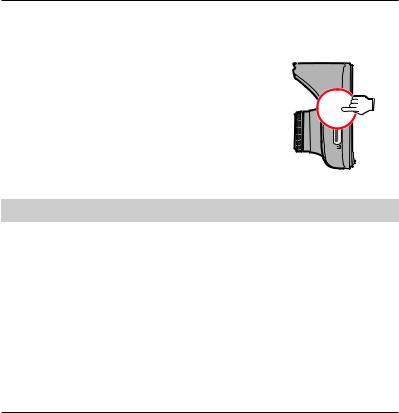
Using your recorder in a vehicle
1.Make sure that your car is parked on a level ground.
2.Follow the instruction below to mount your recorder in a vehicle securely.
3. Connect the car charger to the cigarette lighter. Route the cables through the top ceiling and the A-pillar so that it does not interfere with driving. Ensure the cable installation does not interfere with the vehicles airbags or other safety features.
7
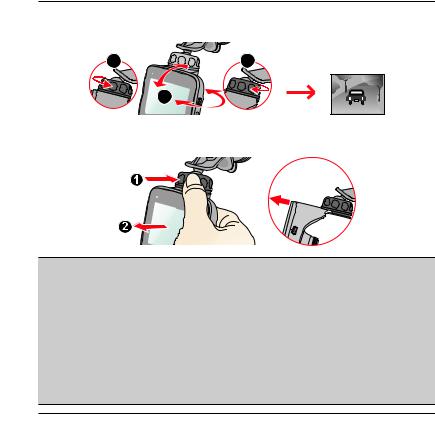
4.When adjusting the angle of mounting, make sure that the camera’s view is parallel with the level ground, and the ground/sky ratio is close to 6/4.
1 |
3 |
2
5.When not using the recorder, follow the instruction below to remove the recorder from the holder.
NOTE:
To ensure the highest quality recordings, you are advised to place the recorder near the rear view mirror.
Select an appropriate location for mounting the device in a vehicle. Never place the device where the driver’s field of vision is blocked.
(For selected models only) If the car’s windscreen is tinted with a reflective coating, it may be athermic and impact the GPS reception. In this instance, please mount your device where there is a “clear area.”
The system will automatically calibrate the G sensor of the device during boot up. To avoid G sensor malfunction, always turn the device on AFTER you mount it in the vehicle properly.
8
 Loading...