


MiVue 338

1
English en 3 Français fr 27
Deutsch de 11 Italiano it 35
Español es 19 Nederlands nl 43

2
Revision: R00
(10/2012)
Trademarks
All brand and product names are trademarks or registered trademarks of their respective
companies.
Disclaimer
Specifications and documents are subject to change without notice. Mio Technology does not
warrant this document is error-free. Mio Technology assumes no liability for damage incurred
directly or indirectly from errors, omissions, or discrepancies between the device and the
documents.
Notes
Not all models are available in all regions.
Depending upon the specific model purchased, the color and look of your device and
accessories may not exactly match the graphics shown in this document.

3
en
Welcome
Thank you for purchasing MiVue 338. This Quick Start Guide guides you through a successful
setup and familiarizes you with the basic skills of using the recorder.
Precautions and notices
For your own safety, do not operate the controls of the product while driving.
A window mount is needed when using the recorder in a car. Make sure that you place
the recorder in an appropriate place, so as not to obstruct the driver’s view or
deployment of airbags.
Make sure that no object is blocking the camera lens and no reflective material appears
near the lens. Please keep the lens clean.
If the car’s windscreen is tinted with a coating, it may impact the recording quality.
4
en
Getting to know the recorder
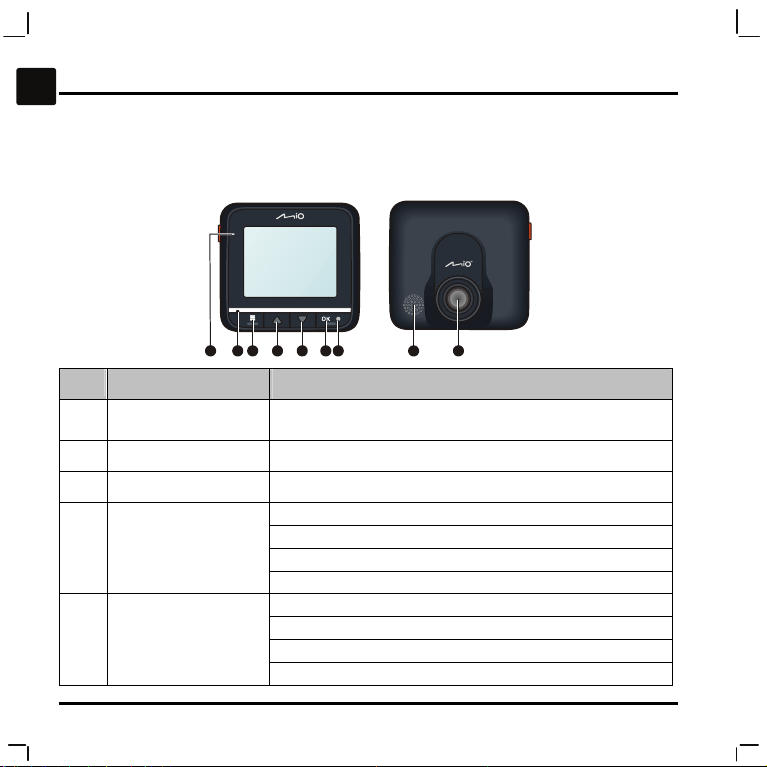
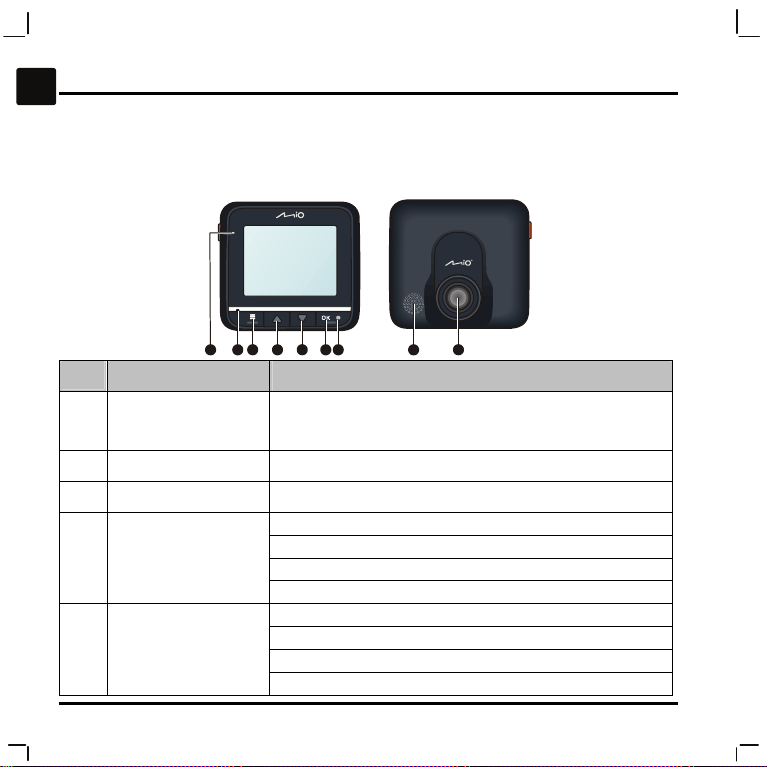
Front and rear components
7 6 5
89 4 3
2
1
Name Description
Camera lens
Make sure that no object is blocking the camera lens and no
reflective material appears near the lens.
Speaker
Record indicator
Glows in red when recording is in progress.
OK/Record key
Stops the current recording.
Acts as the shutter to takes photos.
Enters a setting item.
Saves the changes you make in settings.
Down key
Zooms out of an image.
Turns OFF the screen during recording.
Moves to the next item in a list.
Adjusts the value of a setting option.

5
en
Name Description
Up key
Zooms in to an image.
Turns ON the screen during recording.
Moves to the previous item in a list.
Adjusts the value of a setting option.
Menu key
Locks to save the current recording.
When recording is not in progress, press twice to enter System
SETUP.
Enters the change mode for a setting option.
Microphone
Charge indicator
Indicates the level of battery charge:
Green - battery full or recorder is turned ON
Amber - battery charging
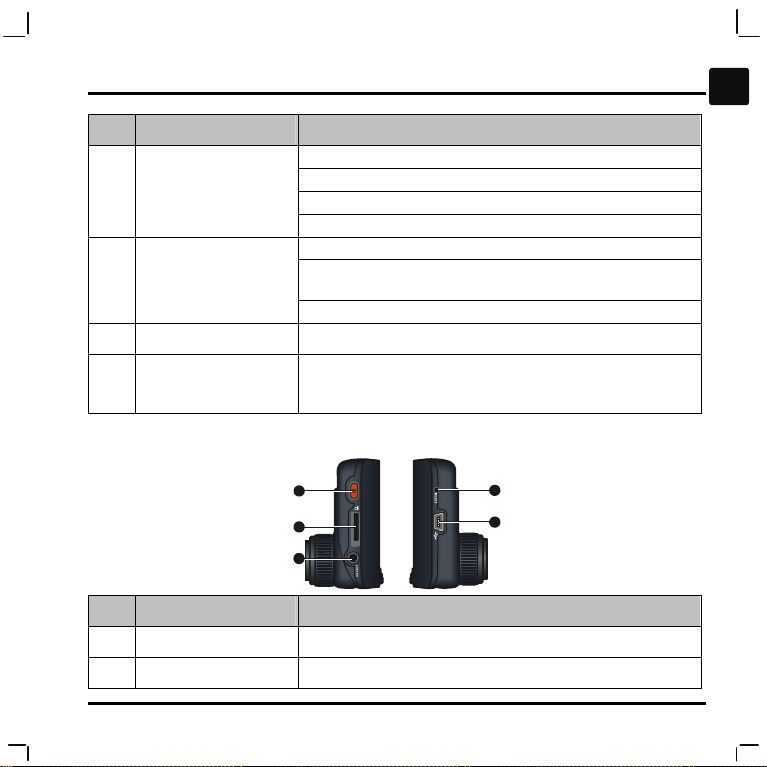
Side components
3
4
5
2
1
Name Description
Reset switch
Restarts the recorder.
Mini-USB connector
Connects to the charger.
6
en
Name Description
Power key
When using battery power, press and hold this key to turn ON
and OFF the recorder.
Toggles through Recording, Camera and Playback mode.
Memory card slot
Data is recorded to a MicroSD card.
Note: You are advised to use a Class 6 memory card with at
least 4GB capacity.
AV OUT connector
Connects to an external device.
Note: This connector (3.5 mm) supports the PAL and NTSC
(interlace) formats.
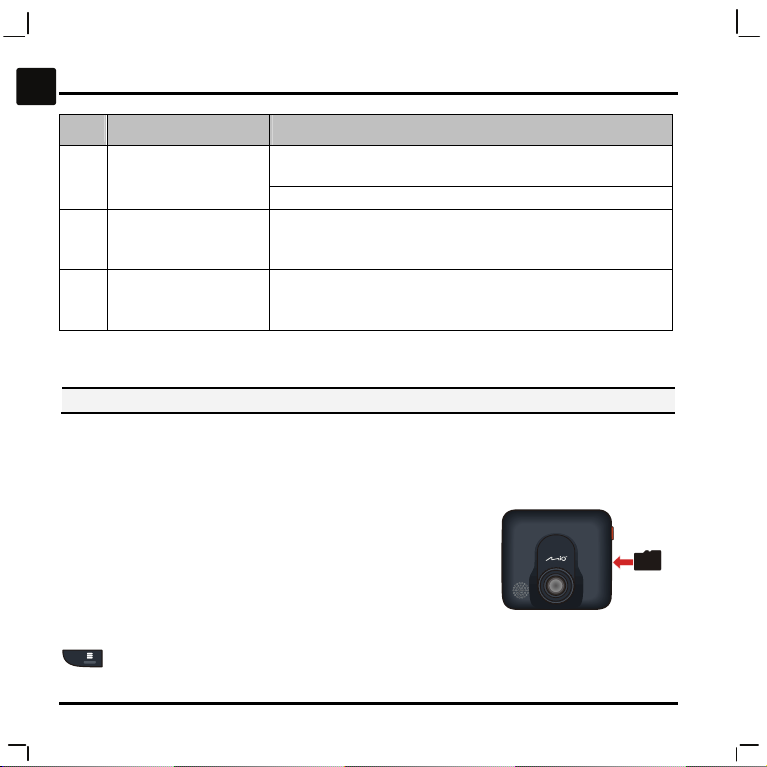
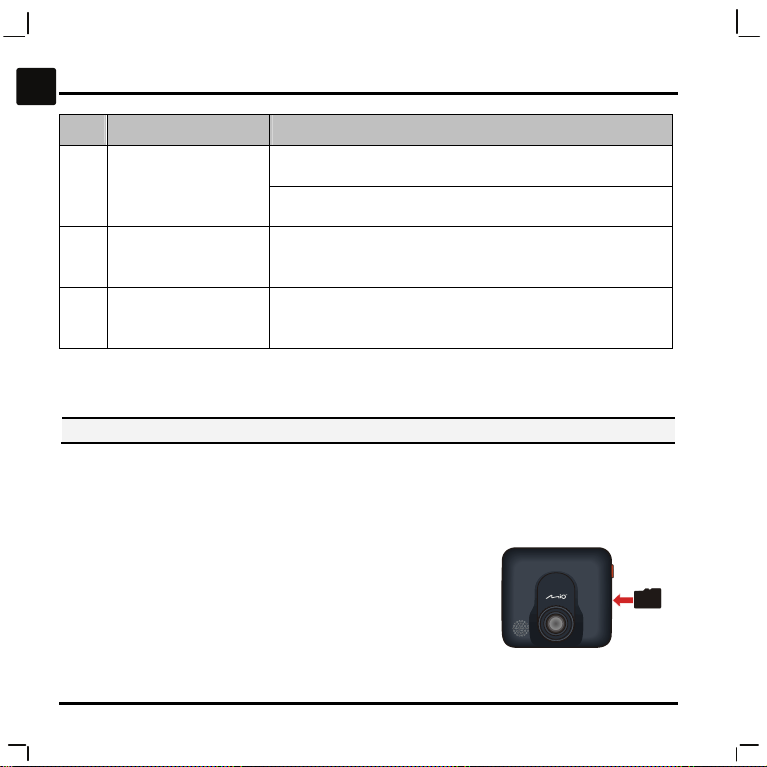
Inserting a memory card
CAUTION: Do not apply pressure to the centre of the memory card.
Note: You are recommended to use Class 6 MicroSD cards.
You have to insert a memory card before you can start recording.
The recorder supports MicroSD cards with up to 32GB capacity. You are advised to use a
memory card with at least 4GB capacity.
Hold the card (MicroSD) by the edges and gently insert it into
the slot with the label facing the front of your Mio.
To remove a card, gently push the top edge of the card
inwards to release it, and pull it out of the slot.
Note: Before you start recording, please format the MicroSD card to avoid malfunction caused by files not
created by MiVue 338. You can format the card on your computer or on MiVue 338 (pressing the Menu key
twice to enter System SETUP when recording is not in progress and then select the format feature).
7
en
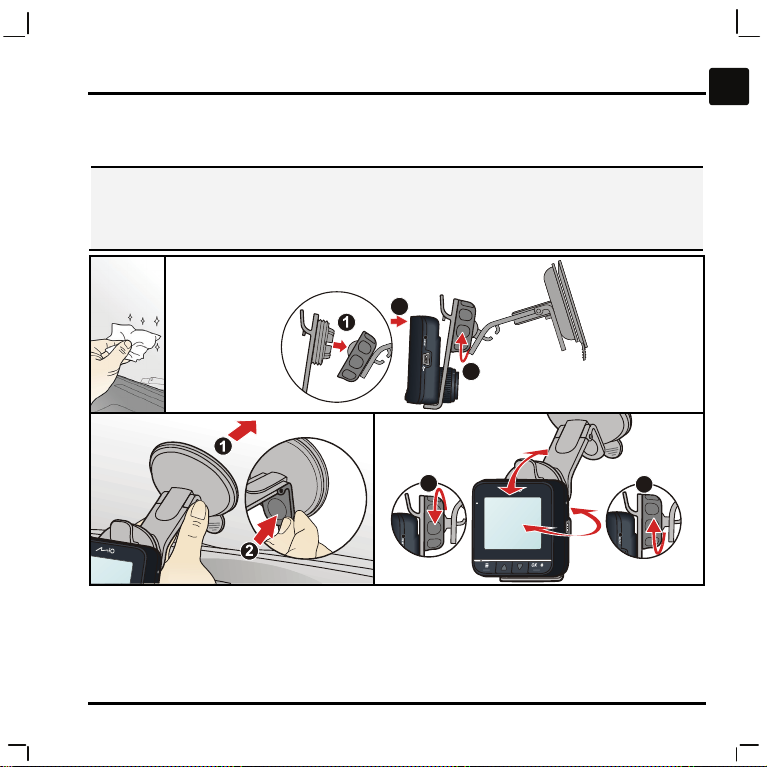
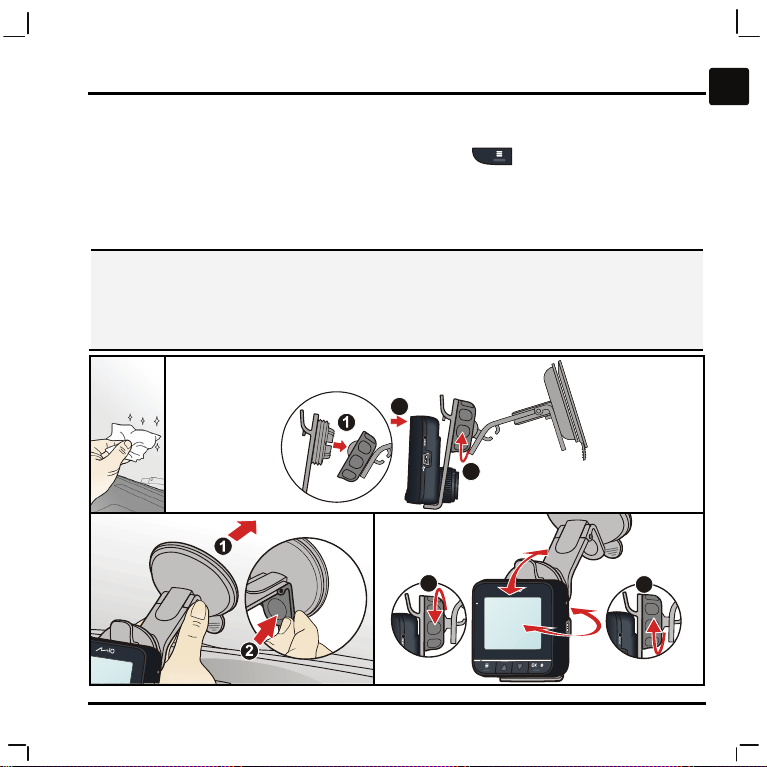
Using your recorder in a vehicle
CAUTION:
Select an appropriate location for mounting the device in a vehicle. Never place the device where
the driver’s field of vision is blocked.
DO NOT insert or remove the memory card when operating the recorder.
2
3
2
3
1
2
3
1
2
4
8
en
2
2
1
Operating basics
Before you begin recording, please take note of the following:
DO NOT remove or insert the memory card while recording.
When the record indicator does not glow in red when recording is in progress, the
MicroSD card may be full or damaged. Please check the MicroSD card.
Recording mode
Continuous recording
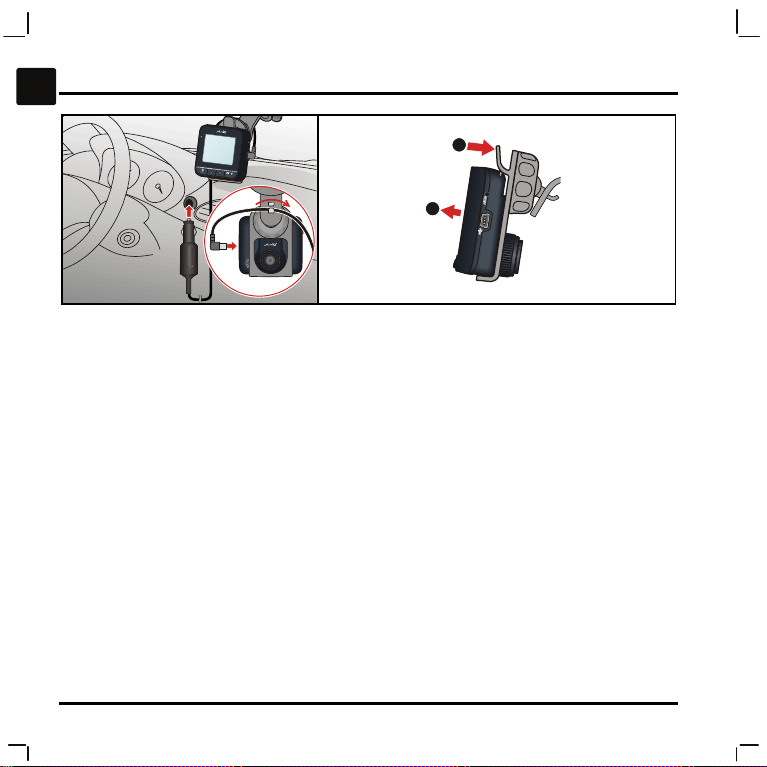
Connect the recorder to the car charger according to the installation instructions in the
previous “Using your recorder in a vehicle” section.
When you connect the car charger to the cigarette lighter in the car and then start the car’s
engine, the recorder will start continuous recording automatically.
For continuous recording, the recording will be divided into several temporary video clips;
recording will not stop between video clips. Each video clip is 70MB in size and may be about
5
6
9
en
1~2 minutes long. These video clips are temporary recording files until they are locked/saved
by pressing the Menu key
.
If continuous recording is ongoing but there is not enough space on your memory card, new
temporary video clips will replace the old ones.
To stop recording, press the OK/Record key
.
G-sensor event recording
If an event happens, such as sudden damage, high-speed driving, an overdone turn or an
accidental crash, the G sensor will prompt the recorder to lock and save the recording.
The locked/saved recordings will not be replaced by temporary video clips.
Manual event recording
In addition to automatic event recording prompted by the G sensor, you can also start and
save the recording manually.
Simply tap lightly on the recorder. The G sensor will prompt the recorder to lock and save the
recording.
The locked/saved recordings will not be replaced by temporary video clips.
Note: To change Camera settings, press the Menu key .
Camera mode
Use the Power key to toggle to the Camera mode.
When ready, press the the OK/Record key
to take the photo.
Note: To change Camera settings, press the Menu key .
10
en
Playback mode
Use the Power key to toggle to the Playback mode.
You can do the following in Playback mode:
Play the videos or photos on the MicroSD card.
Select and delete files to free up more space for recording.
Adjust the volume during playback.
Turning off the recorder
To turn off the recorder, disconnect the car charger from the cigarette lighter. The recorder
will turn off automatically in 10 seconds after the car’s engine is turned off.
Compliance
Hereby, Mio Technology declares that this MiVue 338 is in compliance with the
essential requirements and other relevant provisions of Directive 2004/108/EC.
Visit Mio website (mio.com) for the full text of the declaration for your Mio.
This product must not be disposed of as normal household waste, in
accordance with the EU directive for waste electrical and electronic equipment
(WEEE – 2002/96/EC). Instead, it should be disposed of by returning it to the
point of sale, or to a municipal recycling collection point.
11
de
Willkommen
Wir bedanken uns bei Ihnen für den Kauf des MiVue 338. Diese Schnellstartanleitung führt Sie
durch die Konfiguration und macht Sie mit den Grundlagen der Bedienung des Rekorders
vertraut.
Vorsichtsmaßnahmen und Hinweise
Zu Ihrer eigenen Sicherheit dürfen Sie die Regler der Produkts nicht während des Fahrens
bedienen.
Für die Verwendung des Rekorders in einem Fahrzeug ist eine Fensterhalterung
erforderlich. Sie müssen den Rekorder an einer geeigneten Stelle anbringen, an der er
nicht die Sicht des Fahrers oder die Entfaltung von Airbags behindert.
Achten Sie darauf, dass das Kameraobjektiv nicht verdeckt ist und sich keine
reflektierenden Materialien in der Nähe des Objektivs befinden. Halten Sie das Objektiv
sauber.
Ist die Windschutzscheibe des Fahrzeugs getönt, könnte dies die Aufnahmequalität
beeinträchtigen.
12
de
Die Komponenten des Rekorders
Komponenten an der Vorder- und der Rückseite
7 6 5
89 4 3
2
1
Bezeichnung Beschreibung
Kameraobjektiv
Achten Sie darauf, dass das Kameraobjektiv nicht verdeckt ist
und sich keine reflektierenden Materialien in der Nähe des
Objektivs befinden.
Lautsprecher
Aufnahmeanzeige
Leuchtet rot während der Aufnahme.
OK/Aufnahmetaste
Stoppt die aktuelle Aufnahme.
Fungiert als Blende beim Fotografieren.
Ruft ein Einstellungsoption auf.
Speichert Änderungen von Einstellungen.
Nach-unten-Taste
Verkleinert ein Bild.
Schaltet den Bildschirm während der Aufnahme aus.
Geht zum nächsten Element in einer Liste.
Passt den Wert einer Einstellungsoption an.
13
de
Bezeichnung Beschreibung
Nach-oben-Taste
Vergrößert ein Bild.
Schaltet den Bildschirm während der Aufnahme ein.
Geht zum vorherigen Element in einer Liste.
Passt den Wert einer Einstellungsoption an.
Menütaste
Sperrt die Karte, um die aktuelle Aufnahme zu speichern.
Ruft bei zweimaligem Drücken das System-SETUP auf, wenn
keine Aufnahme läuft.
Ruft den Änderungsmodus für eine Einstellungsoption auf.
Mikrofon
Ladeanzeige
Zeigt die Akkukapazität an:
Grün - Akku ist aufgeladen oder Rekorder ist eingeschaltet
Orange - Akku wird aufgeladen
Komponenten an der Seite
3
4
5
2
1
Bezeichnung Beschreibung
Rücksetzschalter
Startet den Rekorder neu.
Mini-USB-Anschluss
Stellt eine Verbindung zum Ladegerät her.
14
de
Bezeichnung Beschreibung
Ein/Aus-Taste
Drücken und halten Sie diese Taste, um den Rekorder ein- und
auszuschalten, wenn er mit Akkustrom versorgt wird.
Für Wechsel zwischen Aufnahme-, Kamera- und
Wiedergabemodus.
Steckplatz für
Speicherkarte
Daten werden auf einer MicroSD-Karte aufgezeichnet.
Hinweis: Es wird empfohlen, eine Class 6-Speicherkarte mit
einer Kapazität von mindestens 4GB zu verwenden.
AV OUT-Anschluss
Stellt eine Verbindung zu einem externen Gerät her.
Hinweis: Dieser 3,5-mm-Anschluss unterstützt PAL- und
NTSC-(Interlace-) Formate.
Einsetzen einer Speicherkarte
VORSICHT: Üben Sie keinen Druck auf die Mitte der Speicherkarte aus.
Hinweis: Es wird empfohlen, Class 6-MicroSD-Karten zu verwenden.
Sie müssen eine Speicherkarte einsetzen, bevor Sie mit dem Aufnehmen beginnen können.
Der Rekorder unterstützt MicoSD-Karten mit einer Kapazität bis zu 32 GB. Es wird empfohlen,
eine Class 6-Speicherkarte mit einer Kapazität von mindestens 4 GB zu verwenden.
Halten Sie die Karte (MicroSD) an ihren Kanten fest und
stecken Sie sie vorsichtig in den Steckplatz hinein, wobei ihr
Etikett zur Vorderseite Ihres Mio-Geräts weist.
Um eine Karte zu entnehmen, drücken Sie die Oberkante der
Karte vorsichtig in den Steckplatz hinein, sodass sie sich löst,
und ziehen Sie sie heraus.
15
de
Hinweis: Formatieren Sie die MicroSD-Karte noch vor den Aufnahmen, um Probleme aufgrund von Dateien
zu vermeiden, die nicht vom MiVue 338 erstellt wurden. Sie können die Karte auf Ihrem Computer oder auf
dem MiVue 338 formatieren (drücken Sie zweimal die Menü-Taste
, um das System-SETUP
aufzurufen, wenn keine Aufnahme läuft, und wählen Sie dann die Formatierfunktion).
Der Rekorder in einem Fahrzeug
VORSICHT:
Wählen Sie eine geeignete Stelle für die Befestigung des Geräts in einem Fahrzeug. Platzieren Sie
das Gerät nie dort, wo das Sichtfeld des Fahrers blockiert wird.
Während der Bedienung des Rekorders dürfen Sie die Speicherkarte NICHT einsetzen oder
entnehmen.
2
3
2
3
1
2
3
1
2
4
 Loading...