


MioMap-v3.3-QSG
Copyright © 2007 Mio Digiwalker. All rights reserved.
The name Mio Digiwalker is a trademark of Mio Technology Limited, Inc.
All other trademarks, products and company names are the property of their respective owners.
1
Mio Technology Limited
www.mio-tech.com
This is a Quick Start Guide of MioMap v3.3
If you need more in-depth information about this navigation software, you can see the User Manual supplied on the disc.
Quick Start Guide
for MioMap v3.3
Mio Technology Limited
English, Français, Español |
www.mio-tech.com |
|
|
2006. 11. 15. |
13:39:59 |
|
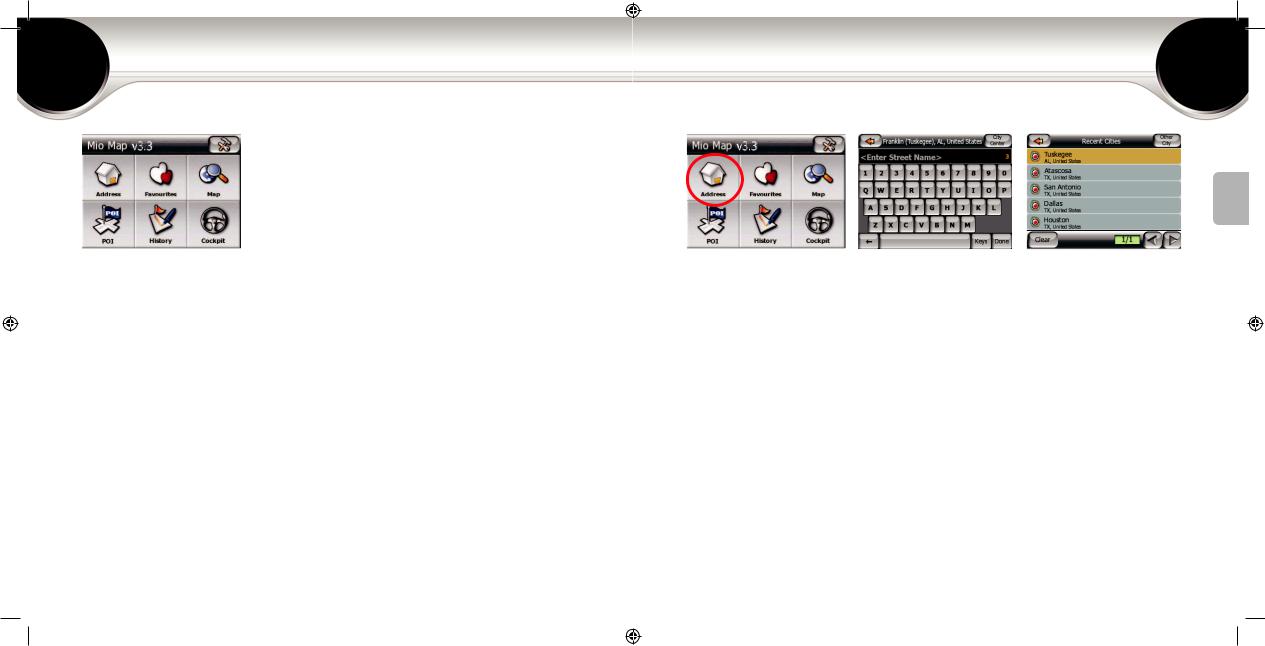
The Main menu |
When Mio Map is started, the Main menu screen appears. From here you can reach all parts of Mio Map using the buttons described below.
●To customise the way Mio Map works, tap  (see Page 11)
●Tap to specify an address as your destination (see Page 3)
●For one of your favorite destinations tap  (see Page 10)
●Use the button to browse the map (see Page 9)
●To select one of the stored Points of Interest, tap  (see Page 6)
●There is also a history of recent destinations (see Page 10)
●To reach the map screen for navigation, tap  (see Page 9)
2-3
Find an address |
|
The screen’s header shows the city you are in.
●Tap  if your destination is in a different city or country.
●If the destination is the centre of the city, tap  .
.
●Use the keyboard  to enter the name of the street. Change City will open a list of recently visited cities.
●Tap one to select it as your destination. 
●Tap  to select a city not shown in the list, or to change the country.
XXXXXX XXXXXX XXXXXX XXXXXX XXXXXX XXXXXX XXXXXX English
2006. 11. 15. 13:39:59
|
Find an address |
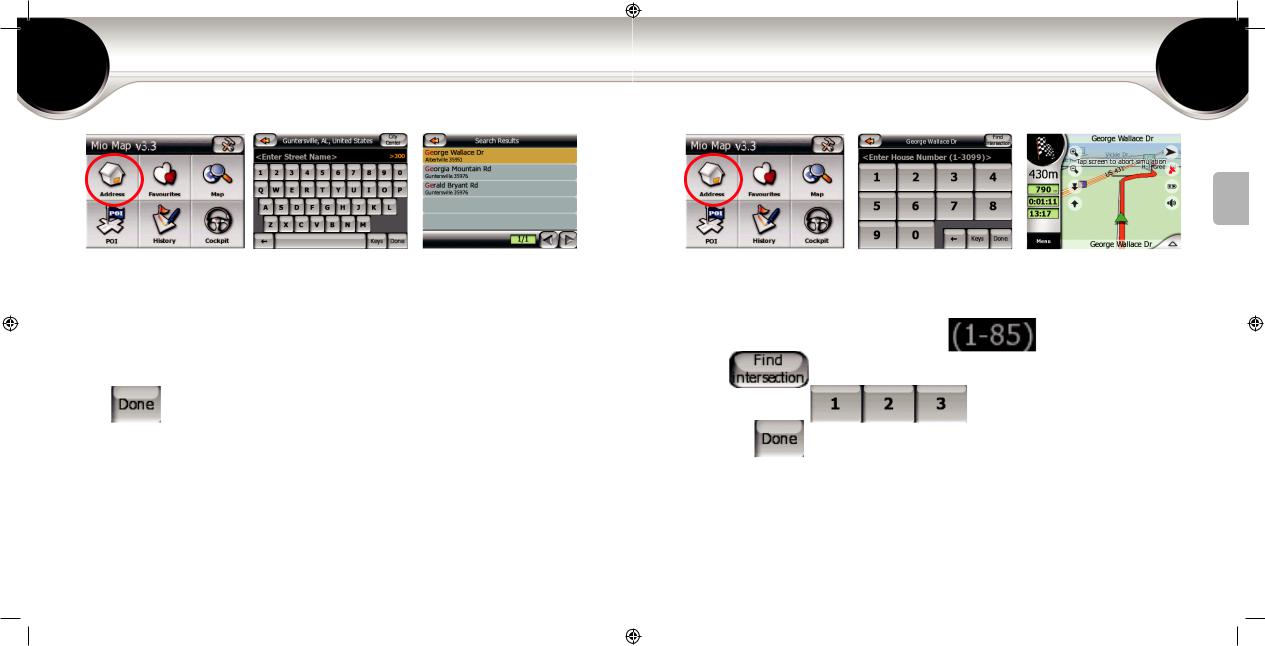
After selecting the city, start entering the name of the street. Once your entry matches five street names or less, all results will be displayed on the screen automatically  .
.
Tap any time to display a full list of matching streets immediately.
From the list of matching streets:
●Tap any of the list items to select the street, or
●Use the  buttons to see additional results.
4-5
Find an address |
|
|
|
|
English |
|
|
|
XXXXXX |
With city and street selected, house number is next. |
|
XXXXXX |
|
|
|
||
● The range of available house numbers |
is displayed. |
XXXXXX |
|
● Tap |
to select one of the cross streets, or |
|
|
● Use the keypad |
to enter the house number, |
XXXXXX |
|
|
|||
●And tap |
when finished. |
|
XXXXXX |
Onceyoucompletesettingthedestination,theroutewillbeimmediatelyplanned |
|||
and you can start driving right away. |
|
XXXXXX |
|
|
|
|
|
|
|
|
XXXXXX |
|
|
2006. 11. 15. |
13:40:00 |

Find a POI
To select a POI, you need to open the Find menu using  , then tap
  to get the list of POI groups.
From this list you can:
●Tap any of the POI groups to open a list of their subgroups.
●Tap  to search by name.
●For a complete list of POIs, tap .
.
●Use the  buttons to see additional POI groups.
●To find POIs around a different location, tap  .
.
6-7
Find a POI |
|
|
|
|
|
English |
|
|
|
|
XXXXXX |
Finally you will get a list of POIs. |
|
|
XXXXXX |
|
|
|
|
||
● Tap |
to narrow the list by entering a part of the POI name. |
XXXXXX |
||
● To see the name and address of additional POIs, tap |
. |
|||
● When you select one item |
from the list, |
|
XXXXXX |
|
|
|
|||
a new View POI window opens with the details of the selected POI. |
|
XXXXXX |
||
● Tap |
to return to the list and select another POI, or |
|
||
● To complete your search, and return to the Cockpit screen with the selected |
XXXXXX |
|||
POI highlighted on the map, tap |
. |
|
||
|
XXXXXX |
|||
|
|
|
|
|
|
|
|
2006. 11. 15. |
13:40:00 |
|
Navigate the route |
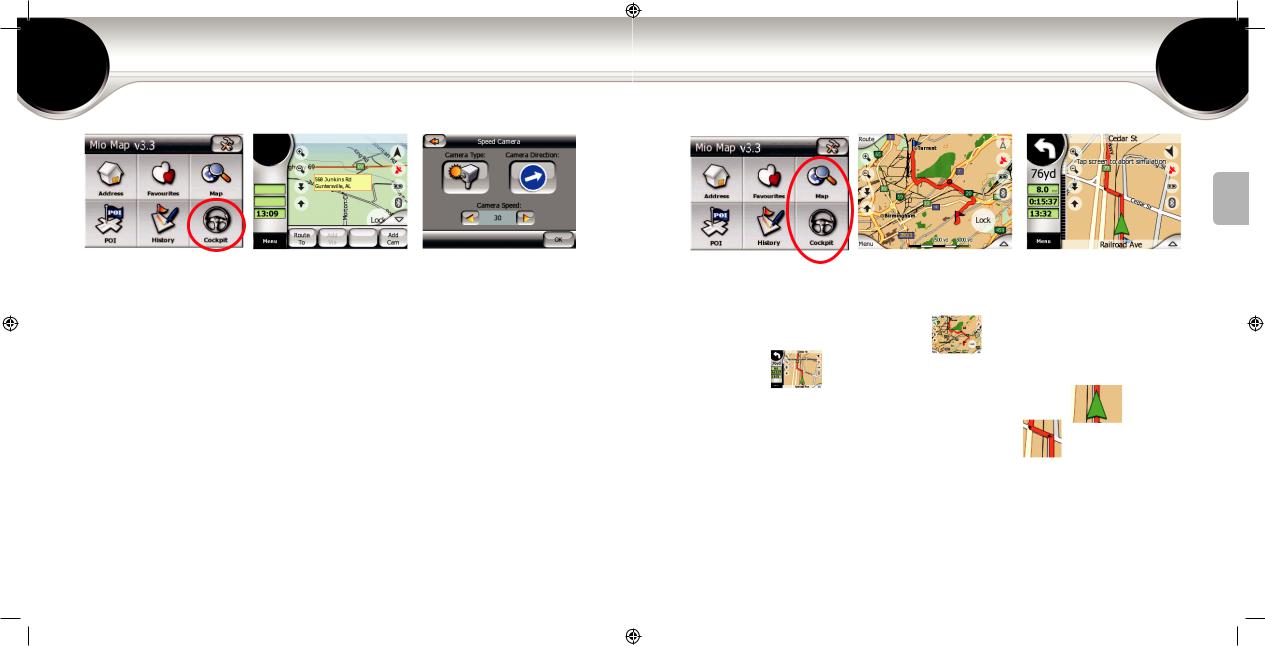
Whenever you select a point on the map, the Cursor menu appears:
●Tap to replace the previous destination with this point.
●To insert it as an intermediary destination, tap  .
.
●Tap to append it to the end of the route, or
●To add this point to the built-in database of speed cameras, tap  , select the type
  and the direction
 of the monitored traffic, and set the speed limit.
Mio Map will warn you whenever you approach one of these points.
8-9
Map and Cockpit
|
|
|
|
English |
|
|
|
|
XXXXXX |
Mio Map has two map screens that show the same map, but have a slightly |
XXXXXX |
|||
|
||||
different look and set of controls. Map |
is mainly for map browsing, |
XXXXXX |
||
and Cockpit |
is for navigation. |
|
|
|
The map looks like a conventional road-map.Agreen arrow |
|
XXXXXX |
||
|
|
|||
represents your current position, and an orange line |
shows the |
XXXXXX |
||
recommended route. There are several screen icons on the right, and data |
||||
fields on the left to help you navigate. Their functions are explained in detail in |
XXXXXX |
|||
the Mio Map User Manual. |
|
|
||
|
|
XXXXXX |
||
|
|
|
|
|
|
|
|
2006. 11. 15. |
13:40:01 |
 Loading...