

Page 1
User instructions
Moisture Plus d
Automatic programmes
Automatic c
To avoid the risk of accidents or
damage to the appliance, it is
essential to read the Operating and installation instructions
before it is installed and used for the
first time.
en - AU, NZ
M.-Nr. 09 284 970
Page 2

2
Page 3

Contents
Cooking with steam injection ........................................4
Steam injection system ..............................................4
Preparing the steam injection system.................................5
Number of bursts of steam and when they are injected .....................5
Automatic c ...................................................5
Moisture Plus d ................................................5
Moisture Plus function d ..........................................6
Using Moisture Plus d..............................................6
Automatic burst of steam (Aut§).....................................9
Injecting bursts of steam manually (i to 3) .............................9
Cancelling a cooking programme ..................................11
Automatic c ....................................................12
Notes on using these programmes ....................................13
Cancelling a cooking programme ..................................13
To use an Automatic programme .....................................14
Evaporating the residual moisture...................................18
The residual moisture evaporation process ...........................18
Starting the residual moisture evaporation ............................19
Cancelling the residual moisture evaporation .........................20
Descaling F .....................................................21
When to run the descaling programme .................................21
Descaling programme (overview) .....................................22
Preparation ......................................................22
Starting the descaling programme ....................................23
3
Page 4

Cooking with steam injection
The increase in the humidity level in the
oven optimises cooking processes
during baking and roasting.
The Automatic c and Moisture Plus
d functions utilise the steam injection
system for cooking.
There is a total of 25 Automatic
programmes available with the Auto
matic c function.
Cooking with steam is especially suited
to preparing bread, bread rolls,
croissants, meat, oven bakes and
soufflés.
You can use the recipes found in the
"Culinario" book.
Moisture Plus is not suitable for
mixtures which contain a lot of
moisture, such as choux pastry and
meringues, as the addition of steam
does not allow them to dry out
sufficiently. These doughs have to be
dried out during the baking process.
-
Steam injection system
Your oven is equipped with a steam
injection system.
This system is used for the Moisture
Plus d function and all Automatic
programmes.
Risk of damage!
,
Only use fresh tap water with steam
cooking processes.
Other liquids will damage the
appliance.
Water is taken in via the tube
underneath the control panel on the left.
The water is then injected as bursts of
steam into the oven compartment
during the cooking process.
A soon as a burst of steam is released,
the water travels from the water tank to
the boiler and the resulting steam is
injected into the oven cavity.
The steam inlets are located at the rear
left corner of the roof of the oven.
The steam is evenly distributed across
the food with the help of the oven fan.
4
Page 5

Cooking with steam injection
Preparing the steam injection system
The steam injection system should be
rinsed through before using Moisture
Plus d or an Automatic programme
for the first time.
During this process, operate the oven
with the following settings:
Function: Moisture Plus d
Temperature: 160 °C
Time: 30 minutes
Burst of
steam:
Follow the description under "Moisture
Plus function d".
Aut§ (Automatic)
Number of bursts of steam and
when they are injected
Automatic c
In the Automatic programmes the
function, temperature, cooking
duration, number of bursts of steam
and when they are injected are already
determined.
Moisture Plus d
When using the Moisture Plus d
function, you will need to enter the
temperature and the number of bursts
of steam.
You have the option of activating a
burst of steam automatically or
activating up to three bursts of steam
manually.
You can also enter the cooking
duration.
The number of bursts of steam and
when they are injected will depend on
the type of food being cooked:
– Dough mixtures will rise better if
steam is injected at the beginning of
the programme.
– Bread and rolls also rise better if
exposed to steam at the start.
Injecting a burst of steam at the end
of the programme will give the bread
and rolls a glistening crust.
–
When roasting meat with a high fat
content, injecting steam at the
beginning of roasting will help render
the fat.
You can use the recipes found in the
"Culinario" book.
5
Page 6

Moisture Plus function d
After selecting Moisture Plus d, you
need to set the number of bursts of
steam.
Automatic burst of steam (Aut§)
–
The burst of steam will be injected
into the oven automatically after the
heating-up phase.
Steam is injected for about
8 minutes.
1 burst of steam (i)
–
2 bursts of steam (2)
–
3 bursts of steam (3)
–
The bursts of steam need to be
activated manually.
The earliest point at which steam can
be injected is after the heating-up
phase has been completed.
One burst of steam takes approx.
5–8 minutes.
Set the minute minder to remind you
when to inject the bursts of steam.
Using Moisture Plus d
A Prepare the food and place it in the
oven.
B Fill a suitable container with the
quantity of water specified.
Automatic burst of steam: approx. 100
ml
Injecting bursts of steam manually:
1 burst of steam: approx. 100 ml
2 bursts of steam: approx. 150 ml
3 bursts of steam: approx. 250 ml
C Select the Moisture Plus d function.
"Aut§" will appear in the display and the
triangle V will flash underneath the *
symbol.
Aut§
*
V
Using the V or W sensor, you can call
up further options for bursts of steam (i,
2, 3), as well as the descaling
programme (E0).
This setting E0is used to start the
descaling programme, see
"Descaling F".
D Confirm "Aut§", "i", "2"or"3" with the
OK sensor.
6
Page 7
The recommended temperature will
appear in the display and the triangle
V will start flashing underneath the %
symbol:
i60
%
V
E Use the temperature selector to alter
the temperature, if required.
Moisture Plus function d
F Touch the OK sensor.
This confirms the temperature.
The prompt for the water intake
process will appear:
U
*
V
G Open the door.
H Pull the water intake tube forwards
(located below the control panel on
the left).
I Place the water intake tube into the
container filled with water.
J Touch the OK sensor.
The water intake process will begin.
The operation of the pump will be
audible.
The amount of solution specified can
be more than the amount which is
actually taken in, which means that
some of the solution will be left in the
container at the end of descaling.
This ensures that no air is taken in and
that there is sufficient water available
for the bursts of steam.
If air is taken in, however, the steam
injection system will not be damaged
by it.
You can interrupt and then continue the
water intake process at any time by
touching the OK sensor.
K After the water intake process has
finished, remove the container.
L Close the door.
7
Page 8

Moisture Plus function d
You will hear the pump briefly as the
remaining water in the water intake tube
is drawn into the oven.
The heating-up phase starts.
The oven heating will come on.
The temperature indicator light will
illuminate.
You can only inject the burst(s) of
steam after the heating-up phase
has finished.
If you attempt to do this earlier, a
buzzer will sound if it is switched on
(See "Settings % – P:2"inthe
Operating and installation
instructions).
During the heating-up phase the
display will show the temperature
rising.
Then a burst of steam will be
activated automatically (Aut§)oryou
can activate the bursts of steam
(i to 3) manually.
Danger of injury!
,
Do not open the door while a burst
of steam is being injected. Escaping
steam could cause scalding.
Condensation on the sensors could
make them react more slowly.
The cooking result may also be
affected.
It is quite normal for condensation to
form on the inside of the door during
steam injection. This will dissipate
during the course of the cooking
programme.
95
% * m
V
When the temperature selected has
been reached,
–
the temperature indicator light
goes out.
–
a buzzer will sound, if the buzzer is
switched on (see "Settings % – P:2"
in the Operating and installation
instructions).
8
Page 9

Moisture Plus function d
Automatic burst of steam (Aut§)
The burst of steam will be injected
automatically after the heating-up
phase has been completed.
The following will appear in the display:
h
0:08
% * m
V
The water will vaporise in the oven
compartment.
You can follow the duration of the
injection of the burst of steam counting
down in the display.
The last two minutes will be shown
counting down in seconds.
After the burst of steam has been
injected, "0" will appear for a while:
Injecting bursts of steam manually
(i to 3)
The options for the number of bursts of
steam will appear in the display after
the heating-up phase (e.g. 3).
3
% * m
V
You can now inject the bursts of steam.
Depending on the preparation of the
food, the bursts of steam will be
required at difference times. You can
use the recipes found in the "Culinario"
book as a guide.
Use the minute minder N as a
reminder to activate bursts of steam
(See "Minute minder N"inthe
Operating and installation
instructions).
0
% * m
V
The display will then change to show
the temperature:
i60
% * m
V
M Continue cooking until the end of the
cooking duration.
M When it is time to inject the burst of
steam, touch the * sensor.
The following will appear in the display:
h
0:05
% * m
V
You can follow the duration of the burst
of steam injection counting down in the
display.
9
Page 10

Moisture Plus function d
You can check how many bursts of
steam are left at any time by moving
the triangle V underneath the *
symbol with the V or W sensor.
While a burst of steam is being
injected, the number of remaining
bursts of steam will include the
current one. Once a burst of steam
has been completed, only the
remaining bursts of steam will be
displayed.
After the second burst of steam has
been injected, the remaining bursts of
steam will appear in the display:
i
% * m
V
O When it is time to inject the burst of
steam, touch the * sensor.
The following will appear in the display:
After the first burst of steam has been
injected, the remaining bursts of steam
will appear in the display:
2
% * m
V
N When it is time to inject the burst of
steam, touch the * sensor.
The following will appear in the display:
h
0:05
% * m
V
You can follow the duration of the burst
of steam injection counting down in the
display.
h
0:08
% * m
V
You can follow the duration of the burst
of steam injection counting down in the
display.
After the final burst of steam has been
injected, "0" will appear for a while:
0
% * m
V
10
Page 11

Moisture Plus function d
The display will then change to show
the temperature:
i60
% * m
V
P Continue cooking until the end of the
cooking duration.
Cancelling a cooking programme
If you wish to cancel a cooking
programme prematurely which uses
Moisture Plus d, the oven must be
switched off.
If water has already been taken in, the
* symbol will appear in the display to
indicate this residual water.
When Moisture Plus d is next
selected, a time will appear and the
triangle V will start flashing underneath
the * symbol.
Residual moisture will need to be
evaporated.
You can confirm the evaporation of
residual water by touching the OK
sensor, or cancel it by touching the V
sensor. See "Evaporating the residual
moisture".
11
Page 12

Automatic c
Your appliance has 25 Automatic
programmes to enable you to achieve
excellent results with ease.
These Automatic programmes can be
called up by selecting the Automat
ic c function with the function
selector.
For each Automatic programme, the
function, temperature, cooking
duration, as well as the number of
bursts of steam and when they are
injected, are stored in the oven's
electronics.
The function and temperature cannot
be changed, but the duration can be
altered at the start or end of an Automatic programme.
All Automatic programmes use steam
injection.
Therefore, fill a container with 250 ml of
water if you wish to use an Automatic
programme.
You can use Moisture Plus d if you
don't wish to use an Automatic
programme. In this case, prepare
enough water and use the settings
stated for the relevant recipe.
These can be found in the "Culinario"
cookbook.
-
Choice of Automatic programmes:
P 1 Prove dough
P 2 White bread
P 3 Flat bread
P 4 White bread in tin
P 5 Rye bread
P 6 Multigrain bread
P 7 Yeast rolls
P 8 Butter cake
P 9 Plaited loaf
P 10 Sea bream
P 11 Salmon trout
P 12 Salmon fillet
P 13 Pollock fillet/snapper
P 14 Trout
P 15 Fillet of beef: rare
P 16 Fillet of beef: medium
P 17 Fillet of beef: well done
P 18 Pork casserole
P 19 Saddle of venison
P 20 Saddle of lamb
P 21 Chicken breast
P 22 Chicken quarters
P 23 Turkey thighs
P 24 Potato gratin
P 25 Lasagne
12
Page 13

Automatic c
Notes on using these
programmes
The oven interior should be at room
–
temperature before starting an Auto
matic programme.
To achieve the best cooking results,
–
we recommend using the quantities
and trays described in the recipe
book.
Every Automatic programme
–
contains a heating-up phase. This
has finished when ~|#appears in
the display.
A buzzer will also sound if the buzzer
is switched on (see "Settings % –
P:2" in the Operating and
installation instructions).
Place the food in the oven once this
pre-heating time has been
completed.
– Use shelf level 2 for all Automatic
programmes.
Cancelling a cooking programme
If you wish to cancel an Automatic
programme prematurely, the oven must
be switched off.
-
If water has already been taken in, the
* symbol will appear in the display to
indicate the residual water.
A time will appear and the triangle V
will flash underneath the * symbol the
next time an Automatic programme is
selected:
Residual moisture will need to be
evaporated.
You can confirm the evaporation of
residual water by touching the OK
sensor, or cancel it by touching the V
sensor. See "Evaporating the residual
moisture".
–
If the food isn't placed in the oven
within 5 minutes by opening and
closing the door, the programme
begins automatically.
–
The weight of the food needs to be
entered for meat and poultry recipes.
The weight is entered in steps of
100 g.
If you are cooking more than one
piece of meat, enter the weight for
the largest piece, not the combined
weight.
–
If by the end of an Automatic
programme the food is not cooked
enough, the cooking duration can be
extended.
13
Page 14

Automatic c
To use an Automatic
programme
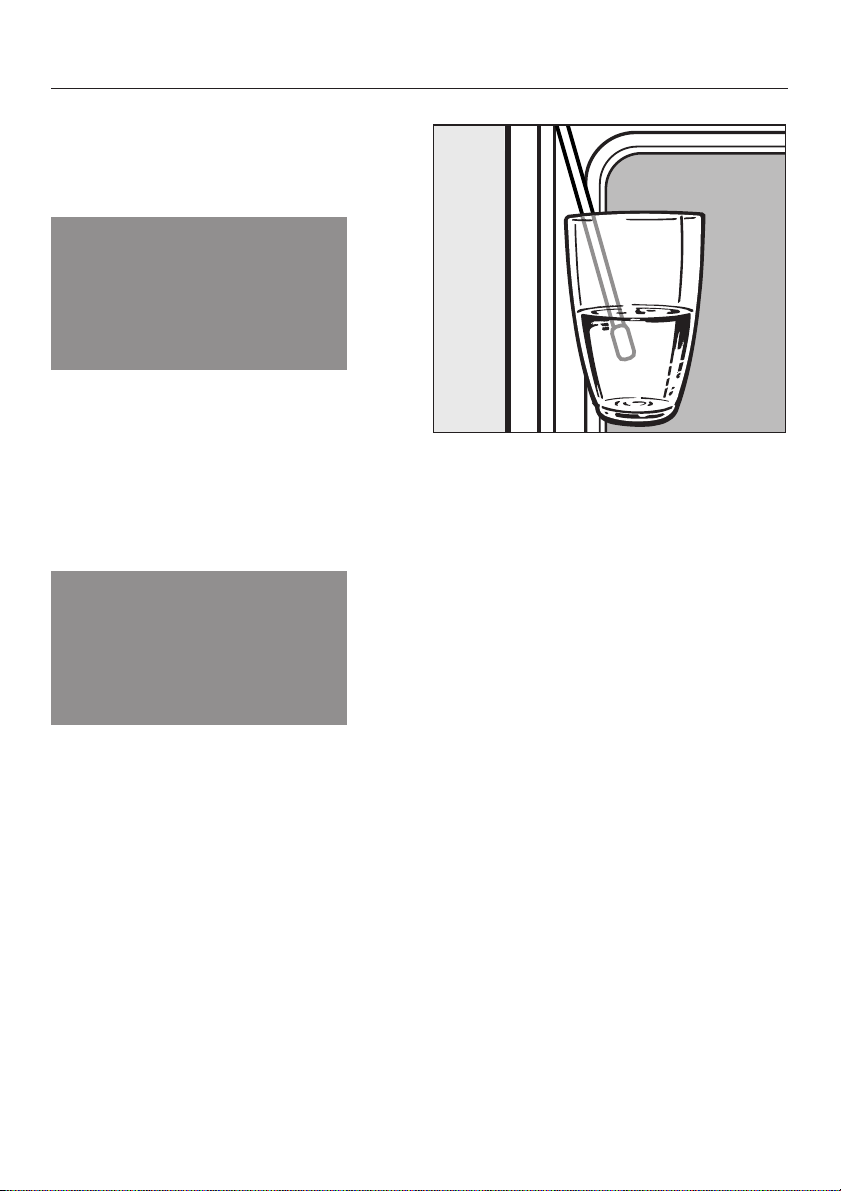
A For Automatic programmes that use
moisture, prepare a glass with
250 ml water.
B Select Automatic c.
PI
*
"PI" will appear in the display.
C Touch the V or W sensor repeatedly
until the number for the required Automatic programme appears.
D Touch the OK sensor.
The required programme will be
selected.
A prompt to enter weight appears for
some meat programmes:
The recommended cooking duration
immediately appears for
programmes which don't require a
weight to be entered.
G The duration of the selected Auto
matic programme will appear.
h
0:45
T
V
You can change the cooking
duration with the V or W sensor if you
have established with previous
attempts that the cooking result is
not to your liking.
H Touch the OK sensor.
The prompt for the water intake
process will appear:
-
g
I200
E Enter the weight of the food with the
V or W sensor.
F Touch the OK sensor.
14
U
*
V
I Open the appliance door.
J Pull the water intake tube forwards
(located below the control panel on
the left).
Page 15

Automatic c
The pre-heating time begins.
At the beginning, the following appears:
~
% m T
V
Halfway through the pre-heating time
the following appears:
K Place the water intake tube into the
container filled with water.
L Touch the OK sensor.
The water intake process will begin.
The operation of the pump will be
audible.
The amount of solution specified can
be more than the amount which is
actually taken in, which means that
some of the solution will be left in the
container at the end of descaling.
M After the water intake process has
finished, remove the container.
N Close the door.
You will hear the pump briefly as the
remaining water in the water intake tube
is drawn into the oven.
The Automatic programme will begin.
The oven heating will come on.
The temperature indicator light will
illuminate.
~|
% m T
V
O Wait for the pre-heating time to finish.
At the end of the pre-heating time
– a buzzer will sound every 30
seconds if this option is selected
(see "Settings % – P:2"inthe
Operating and installation
instructions.
–
the temperature indicator light
goes out.
–
the p flashes.
–
~|#appears in the display:
~|#
p m T
V
15
Page 16

Automatic c
The end of the cooking programme
can be delayed within the first two
minutes of the pre-heating time:
Touch the W sensor repeatedly until
^
the triangle V is underneath the S
symbol. The end of the cooking time
will be displayed.
Touch the OK sensor.
^
Whilst the triangle V is flashing,
^
enter the end of the cooking time with
the temperature selector or the W
sensor.
The oven heating will switch off and the
name of the Automatic programme will
be displayed. The S symbol indicates
that the end of the cooking time has
been delayed.
PI
m TS
After the selected time has been
completed, the cooking programme will
start and the duration will appear.
P Open the door.
Q Place the food on shelf level 2.
R Close the door.
The cooking process begins after the
door has been opened and closed.
If the door is not opened within five
minutes of the pre-heating time
finishing, the cooking process will
begin automatically.
The cooking duration can be seen
counting down in the display, but can
no longer be altered.
h
0:29
m T
V
The bursts of steam are released
automatically according to the preset
times in the Automatic programme.
It is quite normal for condensation to
form on the inside of the door during
steam injection. This will dissipate
during the course of the cooking
programme.
16
Page 17

Danger of injury!
,
Do not open the door while a burst
of steam is being injected. Escaping
steam could cause scalding.
Automatic c
If the cooking result is not to your
liking, you can extend the cooking
time:
Touch the OK sensor.
^
Condensation on the sensors could
make them react more slowly.
The cooking result may also be
affected.
At the end of the duration
the selected Automatic programme
–
will appear in the display.
– the T symbol will flash.
– a buzzer will sound three times if the
buzzer is switched on (see "Settings
% – P:2" in the Operating and
installation instructions).
– the oven heating will switch off
automatically.
– the cooling fan will continue to run for
a while.
h
0:00
T
V
Extend the cooking time using the
^
temperature selector or the W sensor.
^ Touch the OK sensor.
S Remove the food from the oven once
it is cooked to your liking.
T Turn the function selector to the "0"
position.
The buzzer will stop and the symbols in
the display will go out.
17
Page 18

Evaporating the residual moisture
If a cooking programme using Moisture
Plus d or Automatic c is completed
without interruption, all of the water will
be evaporated via the bursts of steam.
However, if a Moisture Plus or Automat
ic programme is interrupted manually
or due to a power cut, water which has
still to be evaporated will remain in the
system.
To alert you to this residual water, the *
symbol will appear in the display when
the function selector is at the "0"
position:
i5:23
* m
V
Prompt to start the residual moisture
evaporation
The next time the Moisture Plus d
function or an Automatic programme is
selected a time will appear and a
triangle V will flash underneath the *
symbol:
This prompt will not appear in the
display for any other function.
You now have the possibility of carrying
out the residual moisture evaporation or
cancelling it.
-
It is best to start the evaporation of
residual water straight away so that
only fresh water is used during a
cooking programme.
If you cancel the residual moisture
evaporation, you can immediately start
a cooking programme using steam.
The residual moisture evaporation
process
The oven will heat up and the residual
water in the oven cavity will evaporate.
How long this takes will depend on the
amount of water in the system.
Depending on the amount of water, this
can take up to approximately
30 minutes.
h
0:28
*
V
The time shown in the display will
depend on the amount of residual water
in the system.
18
Page 19

Evaporating the residual moisture
Starting the residual moisture
evaporation
Danger of injury!
,
Do not open the door while the burst
of steam is being injected. Escaping
steam can cause scalding.
Steam will condense on the door
and the oven cavity, and the
moisture will then need to be wiped
off after the oven has cooled down.
Select the Moisture Plus d function
^
or an Automatic programme.
A time, depending on the amount of
water present, will appear and the
triangle V will flash underneath the *
symbol:
h
0:22
*
V
^
Touch the OK sensor.
The evaporation process will begin.
The duration will count down in the
display.
During the evaporation process, the
duration may be adjusted by the
system according to how much water is
currently present.
The last two minutes will be shown
counting down in seconds.
At the end of the evaporation process
the following will appear in the display:
0
% * m
V
^ Touch the OK sensor.
"Aut§" appears in the display:
Aut§
*
V
You can now use the Moisture Plus d
function or call up an Automatic
programme.
19
Page 20

Evaporating the residual moisture
Cancelling the residual moisture
evaporation
Do not cancel the prompt for
,
residual moisture evaporation too
often, as this might cause the steam
unit to overflow when taking in more
water.
You have selected the Moisture Plus
d function or an Automatic
programme and the prompt to
evaporate the residual moisture
appears.
A time, depending on the amount of
water present, will appear and the
triangle V will flash underneath the *
symbol:
h
0:22
*
V
"Aut§" appears in the display:
Aut§
*
V
You can now use the Moisture Plus d
function or an Automatic programme.
^
Touch the OK sensor.
The time will be set to "0:00".
0:00
*
V
^
Touch the OK sensor.
20
h
Page 21

Descaling F
When to run the descaling
programme
The frequency of descaling also
depends on the water hardness level in
your area.
The descaling programme can be run
at any time.
However, to ensure the oven functions
correctly, you will be automatically
prompted to run the descaling
programme after a certain number of
programmes.
If Moisture Plus d or an Automatic
programme is selected, a number will
appear in the display showing the
number of programmes remaining until
descaling needs to be carried out:
F
I0
The number of remaining cooking
programmes before descaling counts
down until F 0 appears in the display.
F
0
0
V
After this the use of Automatic
programmes and the Moisture Plus d
function will be locked.
These will be unlocked only once a
descaling programme has been carried
out.
You will now only be able to cook using
the Moisture Plus d function or an
Automatic programme a further 10
times before a descaling programme
needs to be carried out.
The prompt goes out after a few
seconds. You can also delete it by
touching the OK sensor.
You can continue to use all of the other
oven functions as normal.
21
Page 22

Descaling F
Descaling programme
(overview)
The descaling programme takes
approx. 90 minutes and includes a
number of stages:
E0: Drawing in the descaling solution
Ei: Activation phase
E2: Rinse 1
E3: Rinse 2
E4: Rinse 3
E5: Evaporating the residual moisture
You can check the current stage of the
descaling programme at any time by
moving the triangle V underneath the
temperature symbol %.
F
Ei
% S
V
Preparation
Only use the descaling tablets
supplied with the appliance. These
have been specially formulated and
are available from Miele or via the
internet at www.miele-shop.com.
Other types of descaling agents will
damage the oven.
Follow the instructions on the
package carefully to avoid
damaging the oven.
Clean the oven interior after
descaling to ensure that all traces of
descaling agent have been
removed.
A Dissolve one descaling tablet in
approx. 600 ml of cold mains tap
water.
B Place the universal tray on the top
shelf level to collect the descaling
solution after it has been used.
22
Page 23

Descaling F
C Place the container with the
descaling solution on the floor of the
oven.
A plastic tube (with clip) is supplied
with your oven so that you do not
have to hold the container with the
descaling agent underneath the
water intake tube.
D Attach one end of the plastic tube to
the end of the water intake tube.
Place the other end of the plastic
tube in the bottom of the descaling
solution container and secure it to
the container with the clip.
E Close the door.
Starting the descaling
programme
F Select the Moisture Plus d function.
If the Moisture Plus function and
Automatic programmes are locked,
you can start the descaling
programme immediately by touching
the OK sensor.
F
E0
V
G Touch the V sensor until "E0"
appears in the display.
H Touch the OK sensor.
The prompt for the water intake process
will appear:
U
*
V
I Touch the OK sensor.
The water intake process will begin.
The operation of the pump will be
audible.
The amount of solution specified can
be more than the amount which is
actually taken in, which means that
some of the solution will be left in the
container at the end of descaling.
23
Page 24

Descaling F
J Open the door.
K Leave the container with the plastic
tube connected to the intake tube in
the oven and top the container up
with approx. 300 ml of water, as the
system will need to draw in some
more liquid during the activation
phase.
The activation phase Eistarts:
F
Ei
V
You can follow the duration as it counts
down from 1 hour.
h
i:00
%
V
At the end of the activation phase a
buzzer will sound if this option is
selected (see chapter "Settings % –
P:2").
The steam injection system will need to
be cleaned at the end of the
descaling process to remove all traces
of descaling solution.
Cleaning is carried out by flushing
approx. 1 litre of mains tap water
through the system. The water is
collected in the universal tray.
L Take the universal tray out of the
oven and empty it. Place the tray
back in the oven again on the top
shelf level.
M Unclip the plastic hose from the
container.
N Rinse the container and fill it with
approx. one litre of tap water.
O Place the container back in the oven,
insert the plastic tube and secure it
to the container with the clip.
The system will take in more liquid at
approximately five minute intervals. You
will hear the noise of the pump when
this is occurring.
The oven lighting will remain on during
the entire process.
The last minute will be shown counting
down in seconds.
24
Page 25

Descaling F
The first rinse will be shown in the
display as "E2".
F
E2
V
P Touch the OK sensor.
The prompt for the water intake process
will appear:
U
*
V
Q Touch the OK sensor.
The water intake process will begin.
The water will be flushed through the
system and will then collect in the
universal tray.
The second rinse will be shown in the
display as "E3".
F
E3
V
T Touch the OK sensor.
The prompt for the water intake process
will appear:
U
*
V
U Touch the OK sensor.
The water intake process will begin.
The water will be flushed through the
system and will then collect in the
universal tray.
R Take the universal tray out of the
oven and empty it. Place the tray
back in the oven again on the top
shelf level.
S Unclip the plastic tube from the
container. Fill it with approx. one litre
of tap water.
Place the container back in the oven,
insert the plastic tube and secure it
to the container with the clip.
V Take the universal tray out of the
oven and empty it. Place the tray
back in the oven again on the top
shelf level.
W Unclip the plastic tube from the
container. Fill it with approx. one litre
of tap water.
Place the container back in the oven,
insert the plastic tube and secure it
to the container with the clip.
25
Page 26

Descaling F
The third rinse will be shown in the
display as "E4".
F
E4
V
X Touch the OK sensor.
The prompt for the water intake process
will appear:
U
*
V
Y Touch the OK sensor.
The water intake process will begin.
The water will be flushed through the
system and will then collect in the
universal tray.
After the third rinse, the Evaporate
residual moisture process needs to be
carried out. This stage is shown as
"E5".
Before proceeding, remove the
plastic tube and the container from
the oven.
The following will appear in the display:
F
E5
V
Z Touch the OK sensor.
The oven cavity will heat up.
h
0:25
* T
V
Leave the universal tray (with the
water which has collected in it) on
the top shelf level in the oven whilst
the evaporation of the residual
moisture procedure takes place.
26
The duration will count down in the
display.
During the evaporation process, the
duration may be adjusted by the
system according to how much water is
currently present.
Page 27

At the end of the evaporation process
a buzzer will sound three times, if the
–
buzzer is switched on (see "Settings
% – P:2" in the Operating and
installation instructions).
0:00" will appear and the T symbol
–
will flash.
h
0:00
T
V
[ Switch off the appliance.
Danger of burning!
,
Allow the oven to cool down before
starting cleaning.
\ Remove the universal tray and empty
it. Clean the oven interior to remove
any condensation and descaling
agent residue.
Descaling F
Leave the oven door open until the
oven interior is completely dry.
27
Page 28

Alteration rights reserved / 22 / 2112
(User Instructions for H 5147, H 5247)
M.-Nr. 09 284 970 / 01
 Loading...