


G 803
Operating instructions
for G 803 dishwasher
To prevent accidents and
machine damage read
the Operating Instructions
before installing or using
the machine. M.-Nr. 05 255 481
ö]

Contents
Contents
Guide to the appliance . . . . . . . . . . . . . . . . . . . . . . . . . . . . . . . . . . . . . . . . . . . . . 4
View of the dishwasher . . . . . . . . . . . . . . . . . . . . . . . . . . . . . . . . . . . . . . . . . . . . . . 4
Control panel (11) . . . . . . . . . . . . . . . . . . . . . . . . . . . . . . . . . . . . . . . . . . . . . . . . . . 5
IMPORTANT SAFETY INSTRUCTIONS. . . . . . . . . . . . . . . . . . . . . . . . . . . . . . . . . 6
INSTRUCTIONS IMPORTANTES SUR LA SÉCURITÉ . . . . . . . . . . . . . . . . . . . . . 8
Caring for the environment . . . . . . . . . . . . . . . . . . . . . . . . . . . . . . . . . . . . . . . . . 10
Disposing of the packing material . . . . . . . . . . . . . . . . . . . . . . . . . . . . . . . . . . . . . 10
Disposing of an old machine . . . . . . . . . . . . . . . . . . . . . . . . . . . . . . . . . . . . . . . . . 10
Energy saving washing . . . . . . . . . . . . . . . . . . . . . . . . . . . . . . . . . . . . . . . . . . . . . 10
Before using for the first time. . . . . . . . . . . . . . . . . . . . . . . . . . . . . . . . . . . . . . . 11
To open the door . . . . . . . . . . . . . . . . . . . . . . . . . . . . . . . . . . . . . . . . . . . . . . . . . . 12
To close the door . . . . . . . . . . . . . . . . . . . . . . . . . . . . . . . . . . . . . . . . . . . . . . . . . 12
Water softener . . . . . . . . . . . . . . . . . . . . . . . . . . . . . . . . . . . . . . . . . . . . . . . . . . . . 13
Programming and setting the water hardness level . . . . . . . . . . . . . . . . . . . . . . . 13
Programming the water hardness. . . . . . . . . . . . . . . . . . . . . . . . . . . . . . . . . . . 13
Setting the water hardness level selector in the wash cabinet. . . . . . . . . . . . . 18
Filling the salt reservoir. . . . . . . . . . . . . . . . . . . . . . . . . . . . . . . . . . . . . . . . . . . . . . 19
Salt indicator. . . . . . . . . . . . . . . . . . . . . . . . . . . . . . . . . . . . . . . . . . . . . . . . . . . . . . 20
Rinse aid . . . . . . . . . . . . . . . . . . . . . . . . . . . . . . . . . . . . . . . . . . . . . . . . . . . . . . . . 21
Adding rinse aid . . . . . . . . . . . . . . . . . . . . . . . . . . . . . . . . . . . . . . . . . . . . . . . . . . 21
Rinse aid indicator . . . . . . . . . . . . . . . . . . . . . . . . . . . . . . . . . . . . . . . . . . . . . . . . . 22
Setting the dosage. . . . . . . . . . . . . . . . . . . . . . . . . . . . . . . . . . . . . . . . . . . . . . . . . 23
Loading the dishwasher . . . . . . . . . . . . . . . . . . . . . . . . . . . . . . . . . . . . . . . . . . . 24
Loading examples . . . . . . . . . . . . . . . . . . . . . . . . . . . . . . . . . . . . . . . . . . . . . . . . . 25
Upper basket . . . . . . . . . . . . . . . . . . . . . . . . . . . . . . . . . . . . . . . . . . . . . . . . . . 25
Adjusting the Upper basket . . . . . . . . . . . . . . . . . . . . . . . . . . . . . . . . . . . . . . . 26
Lower basket . . . . . . . . . . . . . . . . . . . . . . . . . . . . . . . . . . . . . . . . . . . . . . . . . . 27
Cutlery tray . . . . . . . . . . . . . . . . . . . . . . . . . . . . . . . . . . . . . . . . . . . . . . . . . . . . 28
Items not suitable for dishwashers: . . . . . . . . . . . . . . . . . . . . . . . . . . . . . . . . . . . . 29
2

Contents
Operating the dishwasher. . . . . . . . . . . . . . . . . . . . . . . . . . . . . . . . . . . . . . . . . . 30
Adding detergent. . . . . . . . . . . . . . . . . . . . . . . . . . . . . . . . . . . . . . . . . . . . . . . . . . 30
Program selection . . . . . . . . . . . . . . . . . . . . . . . . . . . . . . . . . . . . . . . . . . . . . . . . . 31
Turning on the dishwasher. . . . . . . . . . . . . . . . . . . . . . . . . . . . . . . . . . . . . . . . . . . 32
Starting a program. . . . . . . . . . . . . . . . . . . . . . . . . . . . . . . . . . . . . . . . . . . . . . . . . 32
End of a program. . . . . . . . . . . . . . . . . . . . . . . . . . . . . . . . . . . . . . . . . . . . . . . . . . 32
Turning off the dishwasher. . . . . . . . . . . . . . . . . . . . . . . . . . . . . . . . . . . . . . . . . . . 32
Changing a program . . . . . . . . . . . . . . . . . . . . . . . . . . . . . . . . . . . . . . . . . . . . . . . 33
Interrupting a program. . . . . . . . . . . . . . . . . . . . . . . . . . . . . . . . . . . . . . . . . . . . . . 33
Additional features. . . . . . . . . . . . . . . . . . . . . . . . . . . . . . . . . . . . . . . . . . . . . . . . . 34
Heated drying. . . . . . . . . . . . . . . . . . . . . . . . . . . . . . . . . . . . . . . . . . . . . . . . . . 34
End of program buzzer. . . . . . . . . . . . . . . . . . . . . . . . . . . . . . . . . . . . . . . . . . . 36
Unloading the dishwasher . . . . . . . . . . . . . . . . . . . . . . . . . . . . . . . . . . . . . . . . . . 38
Cleaning and care . . . . . . . . . . . . . . . . . . . . . . . . . . . . . . . . . . . . . . . . . . . . . . . . 39
Cleaning the filters in the wash cabinet. . . . . . . . . . . . . . . . . . . . . . . . . . . . . . . . . 39
Cleaning the spray arms . . . . . . . . . . . . . . . . . . . . . . . . . . . . . . . . . . . . . . . . . . . . 41
Cleaning the wash cabinet . . . . . . . . . . . . . . . . . . . . . . . . . . . . . . . . . . . . . . . . . . 42
Cleaning the door and the door seal . . . . . . . . . . . . . . . . . . . . . . . . . . . . . . . . . . . 42
Cleaning the control panel. . . . . . . . . . . . . . . . . . . . . . . . . . . . . . . . . . . . . . . . . . . 42
Cleaning the door panel . . . . . . . . . . . . . . . . . . . . . . . . . . . . . . . . . . . . . . . . . . . . 42
Problem solving guide. . . . . . . . . . . . . . . . . . . . . . . . . . . . . . . . . . . . . . . . . . . . . 43
Solving problems. . . . . . . . . . . . . . . . . . . . . . . . . . . . . . . . . . . . . . . . . . . . . . . . . 48
Cleaning the water intake filter . . . . . . . . . . . . . . . . . . . . . . . . . . . . . . . . . . . . . . . 48
Checking the water level . . . . . . . . . . . . . . . . . . . . . . . . . . . . . . . . . . . . . . . . . . . . 49
Increasing the water intake time . . . . . . . . . . . . . . . . . . . . . . . . . . . . . . . . . . . . . . 50
Cleaning the drain pump and non-return valve . . . . . . . . . . . . . . . . . . . . . . . . . . 52
After sales service . . . . . . . . . . . . . . . . . . . . . . . . . . . . . . . . . . . . . . . . . . . . . . . . 54
Special accessories . . . . . . . . . . . . . . . . . . . . . . . . . . . . . . . . . . . . . . . . . . . . . . 55
Transport . . . . . . . . . . . . . . . . . . . . . . . . . . . . . . . . . . . . . . . . . . . . . . . . . . . . . . . 56
Technical data . . . . . . . . . . . . . . . . . . . . . . . . . . . . . . . . . . . . . . . . . . . . . . . . . . . 57
Program chart. . . . . . . . . . . . . . . . . . . . . . . . . . . . . . . . . . . . . . . . . . . . . . . . . . . . 58
3
Guide to the appliance
Guide to the appliance
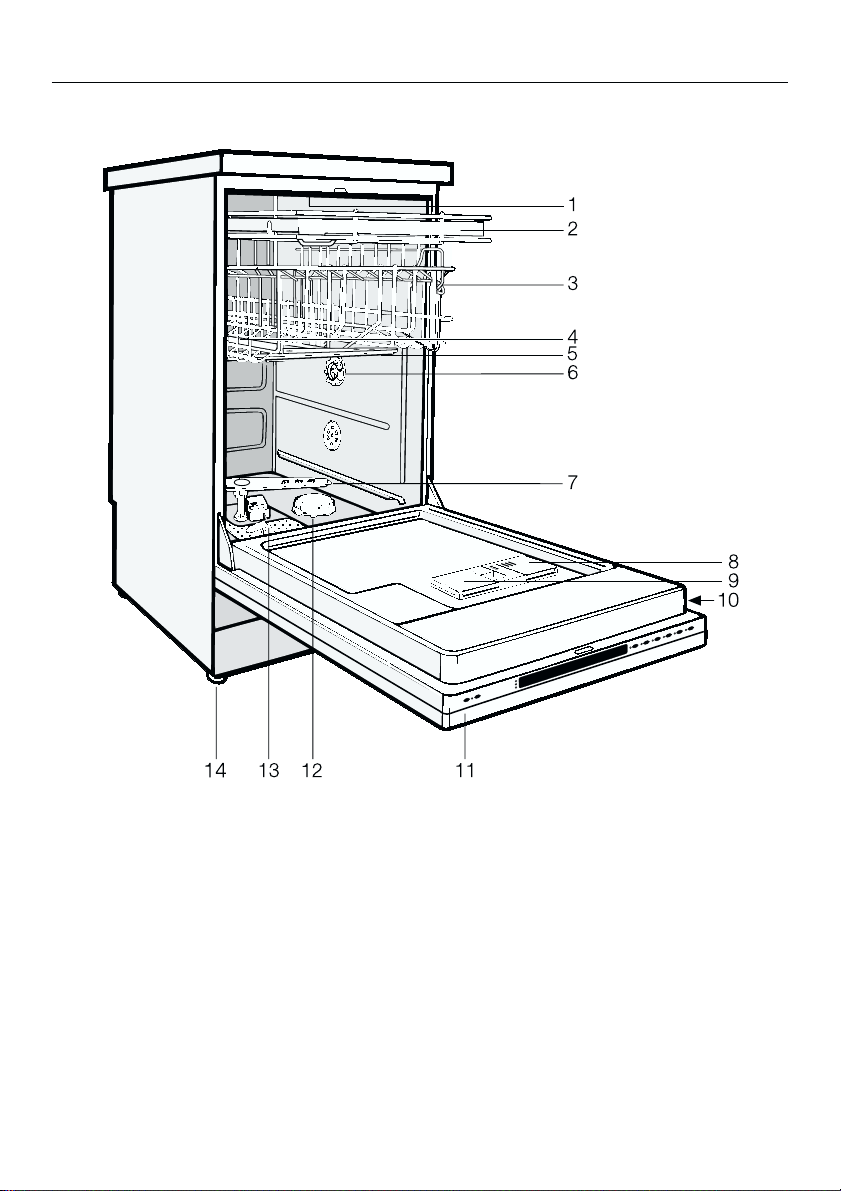
View of the dishwasher
1 Upper spray arm (not visible)
2 Cutlery tray (select models)
3 Upper basket
4 Water feed for middle spray arm
5 Middle spray arm
6 Water hardness selector
7 Lower spray arm
8 Rinse aid dispenser
(with dosage selector)
4
9 Dual compartment detergent
dispenser
10 Data plate
11 Control panel
12 Salt reservoir
13 Filter combination
14 Four height adjustable feet

Control panel (11)
15 “On” button
16 “Off” button
17 Check/Refill indicators
18 Program list
19 Program buttons
Please note:
The program list is covered by a protective film.
^ Please pull this protective film off be-
fore using the appliance.
Guide to the appliance
5

IMPORTANT SAFETY INSTRUCTIONS
IMPORTANT SAFETY INSTRUCTIONS
WARNING
Please follow all basic safety
precautions when operating
this dishwasher.
This appliance conforms with
all uniform safety codes and
regulations. To avoid injury
and machine damage, read
the operating instructions
carefully.
Repairs should only be performed
by a qualified and competent per
son. Disconnect the appliance from the
power supply before servicing (pull out
the plug or “trip” the circuit breaker).
This dishwasher should only be in
stalled under a continuous
countertop secured to adjacent
cabinetry.
The dishwasher must be electri
cally grounded. Install the dish
washer as outlined in the included In
stallation instructions.
-
-
-
-
-
The manufacturer cannot be held
responsible for damage or injury
caused by improper use or for uses
other than those for which the appliance is intended.
Only use detergents and rinse aids
recommended for residential dishwashers.
Do not use the dishwasher unless
all panels are in place.
Do not allow children to play in or
on the dishwasher.
Keep all detergents and rinse aids
out of the reach of children.
Dishwasher detergents contain
Sodium Silicate and Sodium
Carbonate. In case of eye contact,
immediately flush with water.
Call a physician or poison control.
Do not tamper with the
controls.
Do not drink water from the dish
washer.
-
6

IMPORTANT SAFETY INSTRUCTIONS
When loading dishes and
cutlery:
– Place sharp items away from the
door seal to prevent damaging the
seal.
– Load knives pointing down to
prevent injuries.
Do not wash plastic items unless
they are labeled “dishwasher safe”.
For items not labeled, check the manu
facturer’s recommendations.
Do not abuse, sit, or stand on the
door or baskets of the dishwasher.
Remove the front door and cut off
the power cord of the dishwasher
before disposing. This will help protect
children from injury and accidentally
locking themselves in.
Under certain conditions, hydrogen
gas may be produced in a hot water system that has not been used for
two weeks or more. HYDROGEN GAS
IS EXPLOSIVE. If the hot water system
has not been used for such a period,
turn on all hot water faucets and let the
water flow from each for several min
utes before using the dishwasher. This
will release any accumulated hydrogen
gas. Do not smoke or use an open
flame during this time.
-
-
SAVE THESE INSTRUCTIONS
7

INSTRUCTIONS IMPORTANTES SUR LA SÉCURITÉ
INSTRUCTIONS IMPORTANTES SUR LA SÉCURITÉ
AVERTISSEMENT
Au moment d’utiliser votre
lave-vaisselle, veuillez ob
server toutes les mesures de
sécurité de base.
Cet appareil électroménager
est conforme à tous les
règlements et codes sur la
sécurité. Pour éviter de vous
blesser et d’endommager
l’appareil, veuillez lire
soigneusement les instructions sur l’utilisation.
Le fabricant ne peut être tenu
responsable des dommages ou
blessures causés par une utilisation
inadéquate ou par des utilisations
autres que celles auxquelles
l’appareil est destiné.
-
Les réparations doivent être
effectuées uniquement par une
personne compétente. Débrancher
l’appareil de la prise de courant avant
d’en faire l’entretien (enlever la fiche de
la prise ou fermer le disjoncteur).
Installer uniquement ce
lave-vaisselle sous un comptoir
continu qui est fixé à des meubles
adjacents.
Vous devez mettre le lave-vaisselle
à la terre. Installer le lave-vaisselle
en observant les instructions pour
l’installation ci-jointes.
Utiliser uniquement des détersifs et
des produits de rinçage
recommandés pour les lave-vaisselle
domestiques.
Ne pas utiliser le lave-vaisselle à
moins que tous les panneaux
soient bien en place.
Ne pas permettre aux enfants de
jouer dans ou sur le lave-vaisselle.
Ranger tous les détersifs et
produits de rinçage hors de la
portée des enfants.
Les détersifs pour lave-vaisselle
contiennent du silicate de soude et
du carbonate de soude. En cas de
contact avec les yeux, les rincer
immédiatement à grande eau.
Téléphoner à un médecin ou à un cen
tre de traitement antipoison.
Ne pas modifier les commandes.
Ne pas boire l’eau du meuble de
lavage.
8
-

INSTRUCTIONS IMPORTANTES SUR LA SÉCURITÉ
Au moment de remplir le
lave-vaisselle :
– Mettre les articles pointus de
manière à ce qu’ils n’endommagent
pas le seau étanche de la porte.
– Mettre le tranchant des couteaux
vers le bas afin d’éviter les risques de
blessure.
Ne pas laver les articles en
plastique à moins qu’ils n’indiquent
‘’Va au lave-vaisselle’’. Vérifier les
recommandations du fabricant pour les
articles non étiquetés.
Ne pas abuser et ne pas vous
asseoir ni vous tenir sur la porte ou
sur les paniers du lave-vaisselle.
Enlever la porte et couper le cor-
don du lave-vaisselle avant de
l’enlever aux déchets afin d’empêcher
les enfants de se blesser ou de
s’enfermer dans l’appareil par accident.
Dans certaines conditions, un
système d’eau chaude qui n’a pas
été utilisé pendant plus de deux
semaines, peut dégager de l’azote.
L’AZOTE EST EXPLOSIF. Si le système
d’eau chaude n’a pas été utilisé pen
dant une telle période de temps, ouvrir
tous les robinets d’eau chaude et
laisser l’eau couler pendant plusieurs
minutes avant d’utiliser le lave-vaisselle.
Ceci dissipera tout l’azote accumulé.
Ne pas fumer ni utiliser une flamme nue
durant ce temps.
-
CONSERVER CES INSTRUCTIONS.
9

Caring for the environment
Caring for the environment
Disposing of the packing
material
The cardboard box and packing mate
rial protects the appliance during ship
ping. These materials are biodegrad
able and recyclable, please recycle.
Disposing of an old machine
Before disposing of an old appliance,
please make child resistant as outlined
in the “Important Safety Instructions” by
removing power cords and doors.
-
-
-
Energy saving washing
This dishwasher is exceptionally economical in the use of water and electric
ity. For best results follow these tips:
The dishwasher can internally heat wa
ter to the temperatures required by the
wash program. This capability allows
the option of connecting the machine to
either a hot or cold water source.
For lowest energy consumption and
^
the gentlest washing of china and
crystal, connect the dishwasher to a
cold water source.
^ For fastest possible wash times, yet
higher energy consumption, connect
the dishwasher to a hot water source.
^ For the most economical washing
make full use of the baskets without
overloading the dishwasher.
-
-
10
^ Choose the program best suited for
the type of dishware being washed
and the degree of soiling.
^
Select the Economy program for
energy saving dishwashing.
^
Use the correct amount of detergent.
^
Use only 2/3 the usual amount of de
tergent when baskets are only half
full.
^
Turn off the heated drying feature to
conserve more energy (see “Addi
tional features”).
-
-

Before using for the first time
Before using for the first time
Before using for the first time,
please note the following points.
Setting the water softener.
The water softener must be set to corre
spond to the water hardness in your
area. This can be obtained from your
local water company, or by using a test
kit that can be purchased from the
Miele Parts Department.
The salt reservoir must only be filled
with water and salt. Never fill it with de
tergent.
Adding rinse aid.
Inadvertently filling the rinse aid reservoir with detergent will damage the reservoir.
Only
use detergents and rinse aids for-
mulated for domestic dishwashers.
Choose the correct program.
Different wash programs should be se
lected for different loads and different
degrees of soiling. See the program
chart for further program descriptions.
Add the correct amount of detergent.
Generally, 1 ½ tablespoons
detergent is enough for most wash
loads. Not enough or too much deter
gent can lead to poor wash results.
-
Cleaning results vary among detergent
brands. If you are not satisfied with the
wash results, try another brand of de
tergent.
Load dishes correctly.
Load dishes so that water can reach all
-
surfaces. Check that the spray arms
are not blocked by items that are too
tall for the baskets or hang through the
bottom of the baskets. If necessary,
manually rotate the spray arms to
check clearance.
The combination filter in the base of
the wash cabinet and the spray arms
must be kept clean.
These should be regularly inspected
and cleaned, if necessary.
See the corresponding sections for de
tailed information on the above points.
Every dishwasher is tested before
leaving the factory. Any water re
maining in the machine is from
these tests and does not indicate
that the machine has been used.
of
-
-
-
-
11
Before using for the first time
To open the door
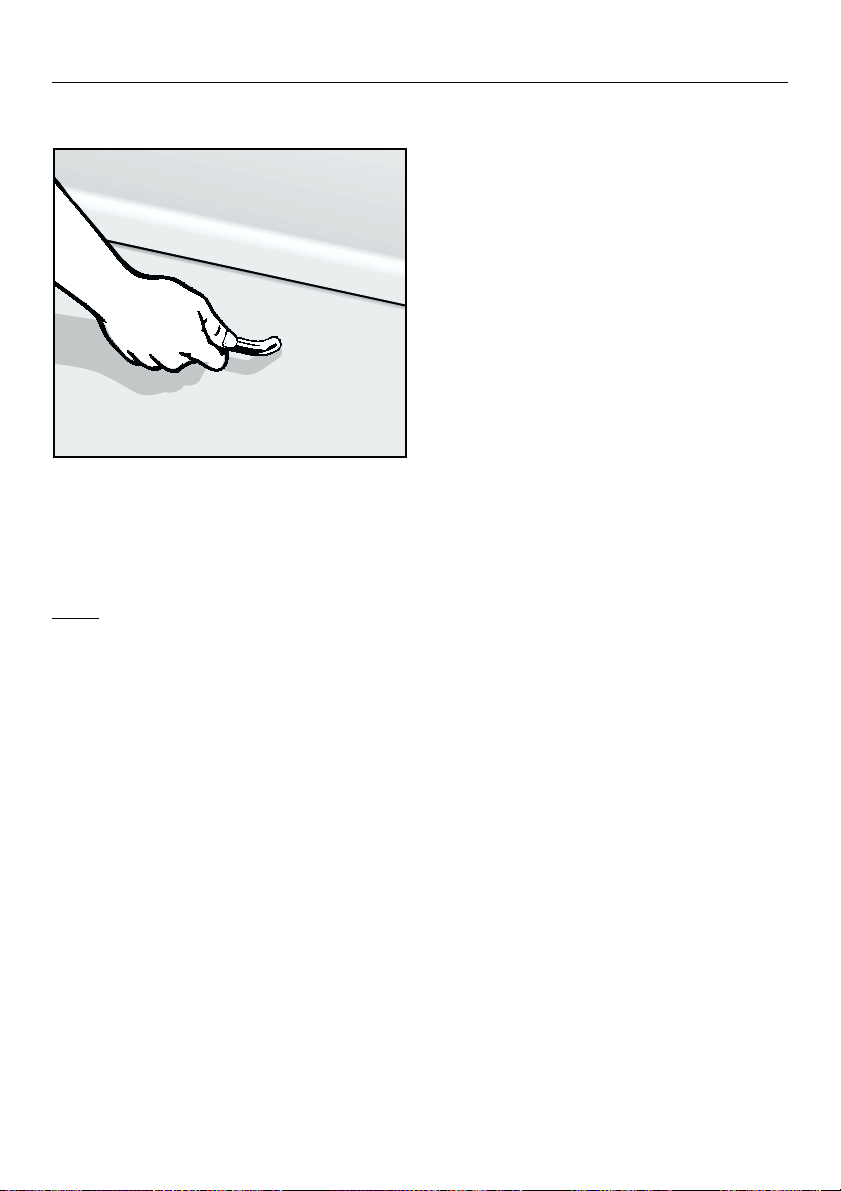
^ Pull the handle.
If the door is opened during operation,
the wash program is automatically interrupted.
Note:
Instructions on how to open the dishwasher if a door panel has not yet been
installed can be found in Section 3 of
the Installation Instructions; “Installing
the custom door panel”
To close the door
Push the baskets in.
^
Lift the door and push until it clicks
^
into position.
12

Before using for the first time
Water softener
For good cleaning results, the dish
washer needs to operate with soft wa
ter. Hard water results in the build up of
calcium deposits on dishes and in the
dishwasher.
If water hardness is above 4 gr/gal
(70 ppm), the water should be soft
ened. This takes place automatically in
the integrated water softener.
The water softener must be filled with
–
dishwasher salt for reactivation.
The dishwasher must be pro
–
grammed to correspond to the water
hardness in your area.
– Your water company can tell you the
highest level of water hardness in
your area.
If your tap water is consistently lower
than 4 gr/gal (= 70 ppm) do not add
dishwasher salt. However, the dishwasher must still be programmed to
correspond to the water hardness in
your area.
-
-
-
-
Programming and setting the
water hardness level
The water hardness of your water sup
ply must be programmed into the dish
washer using the buttons on the control
panel.
The water hardness selector in the
wash cabinet must also be set to the
water hardness in your area.
Programming the water hardness
The programmed water hardness can
be checked and adjusted using the
buttons on the control panel. The indi
cators will light after each button is
pressed (n) on the control panel.
While programming, the water hardness
can be cancelled by turning off the
dishwasher with the “Off” button.
The water hardness is preset to
1 - 5 gr/gal (20 - 90 ppm).
-
-
-
Where water hardness fluctuates e.g.
between 8 - 17 gr/gal (140 - 310 ppm),
always program the dishwasher to the
higher value (in this example 17 gr/gal /
310 ppm)!
If there is a fault it will help the service
technician to know the hardness of your
tap water.
^
Enter the water hardness below:
gr/gal (ppm)
13

Before using for the first time
Procedure... lights flashes
Open the door.
^
Turn off the dishwasher using the “Off” (o) button.
^
Hold the buttons
^
turn the dishwasher on with the “On” (g) button.
Release the buttons
^
Note: If any other indicators flash the process must
be repeated.
The following indicators will light, if:
– rinse aid was never added or needs to be refilled, Rinse aid
– Heated drying is deactivated (see “Additional fea-
tures“),
– the water intake time has been increased (see “In-
creasing water intake time”),
– the end of program buzzer is deactivated
(see “Additional features”).
^ Press the
As the water hardness is programmed an additional
indicator will also light.
If the water hardness is programmed between
15 gr/gal and 70 gr/gal (270 -1260 ppm) an additional
indicator will also light.
c button. On Salt
b and d in and at the same time
b and d. On Salt + c
1 - 5 gr/gal ( 20 - 90 ppm):
6 - 7 gr/gal (110 - 130 ppm):
8 gr/gal (140 ppm):
9 - 11 gr/gal (160 - 200 ppm):
12 - 14 gr/gal (220 - 250 ppm):
On Salt
b
d
e
b
c
d
e
f
14

Before using for the first time
Procedure... lights flashes
The correct water hardness is now programmed:
Turn off the dishwasher with the “Off” (o) button.
^
To change the water hardness:
Press the button that corresponds to the water hard
^
ness of your area. As long as the button is held in the
indicator will remain lit.
1 - 5 gr/gal ( 20 - 90 ppm): button
6 - 7 gr/gal (110 - 130 ppm): button c
8 gr/gal (140 ppm): button d
9 - 11 gr/gal (160 - 200 ppm): button e
12 - 14 gr/gal (220 - 250 ppm): button f
15 - 70 gr/gal (270 -1260 ppm): see the following page
b
-
On + b
On + c
On + d
On + e
On + f
Salt
Salt
Salt
Salt
Salt
^ Release the button. On Salt +
Other indicators may light depending on which features
have been selected:
^ Press g button. On + g Salt
^ Press the
^ Turn the dishwasher off with the “Off” (o) button.
The programmed water hardness level is now stored in
the program memory.
^
To check the setting of the water hardness selector
(see “Setting the water hardness level in the wash
cabinet”).
g button once more. On Salt + g
c
15

Before using for the first time
Procedure... lights flashes
For water hardness levels greater than 14 gr/gal:
Press the
^
If the water hardness level is programmed between
15 gr/gal and 70 gr/gal, an additional indicator will light:
The correct water hardness level is now programmed:
^ Turn off the dishwasher with the “Off” (o) button.
To program a different water hardness level:
^ Press the button that corresponds to the water hard-
ness of your area. As long as the button is held in the
indicator will remain lit.
15 - 16 gr/gal (270 - 290 ppm): button
17 - 21 gr/gal (310 - 380 ppm): button c
22 - 24 gr/gal (400 - 430 ppm): button d
25 - 31 gr/gal (450 - 560 ppm): button e
32 - 70 gr/gal (580 -1260 ppm): button f
^
Release the button On Salt +
Other indicators may light depending on which features
have been selected:
g button. On+g Salt
15 - 16 gr/gal (270 - 290 ppm):
17 - 21 gr/gal (310 - 380 ppm):
22 - 24 gr/gal (400 - 430 ppm):
25 - 31 gr/gal (450 - 560 ppm):
32 - 70 gr/gal (580 -1260 ppm):
b
b
c
d
e
f
On+g + b
On+g + c
On+g + d
On+g + e
On+g + f
Salt
Salt
Salt
Salt
Salt
c
16

Before using for the first time
Procedure... lights flashes
Press the
^
g button. On + g Salt
Press the
^
Turn off the dishwasher with the “Off” (o) button.
^
The water hardness level is now saved in the program
memory.
Check the setting of the water hardness level inside
^
the wash cabinet and make any necessary adjust
ments (see “Setting the water hardness level in the
wash cabinet”).
g button once more. On Salt + g
-
17
Before using for the first time
Setting the water hardness level
selector in the wash cabinet
The water hardness level selector in the
wash cabinet must be set according to
the following table.
Selecting the correct setting will help
minimize the effects of dishwashing on
glass surfaces. Too high a setting will
lead to poor cleaning results and an in
crease in water spots left on dishes and
cutlery.
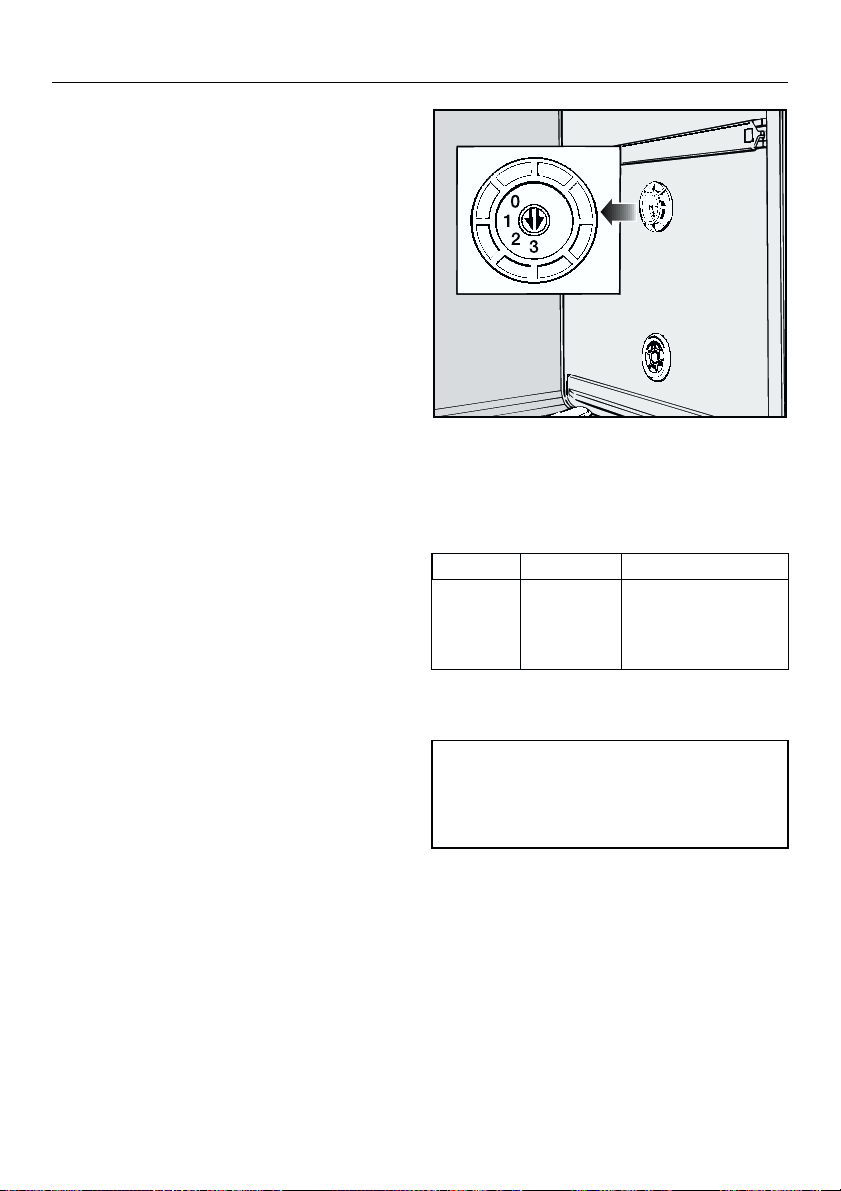
Use a screwdriver to take the cover
^
off the water hardness level selector
in the wash cabinet.
-
Use a coin or screwdriver to adjust
^
the water hardness level selector in
the wash cabinet. There is a click as
each setting is reached.
gr/gal ppm Selector setting
1 - 8 20 - 140 3
9 - 11 160 - 200 2
12 - 16 220 - 290 1
17 - 70 310 -1260 0
The water hardness selector is preset
to setting 3.
18
Example:
For a water hardness 9 gr/gal.
The water hardness selector is set on
2 (9 - 11 gr/gal).
^
Replace the cover on the water hard
ness level selector.
-
 Loading...