

Page 1
Operating instructions
G 663 Plus
G 863 Plus
To prevent accidents
and machine damage,
read these instructions
before
installation or use.
UV
M.-Nr. 05 724 281
Page 2

Contents
IMPORTANT SAFETY INSTRUCTIONS . . . . . . . 4
CONSIGNES DE SÉCURITÉ. . . . . . . . . . . . . . . . . . . . . . . 7
Caring for the environment . . . . . . . . . . . . . . . . . . . . . . . . . . . . . . . . . . . . . . . . . 10
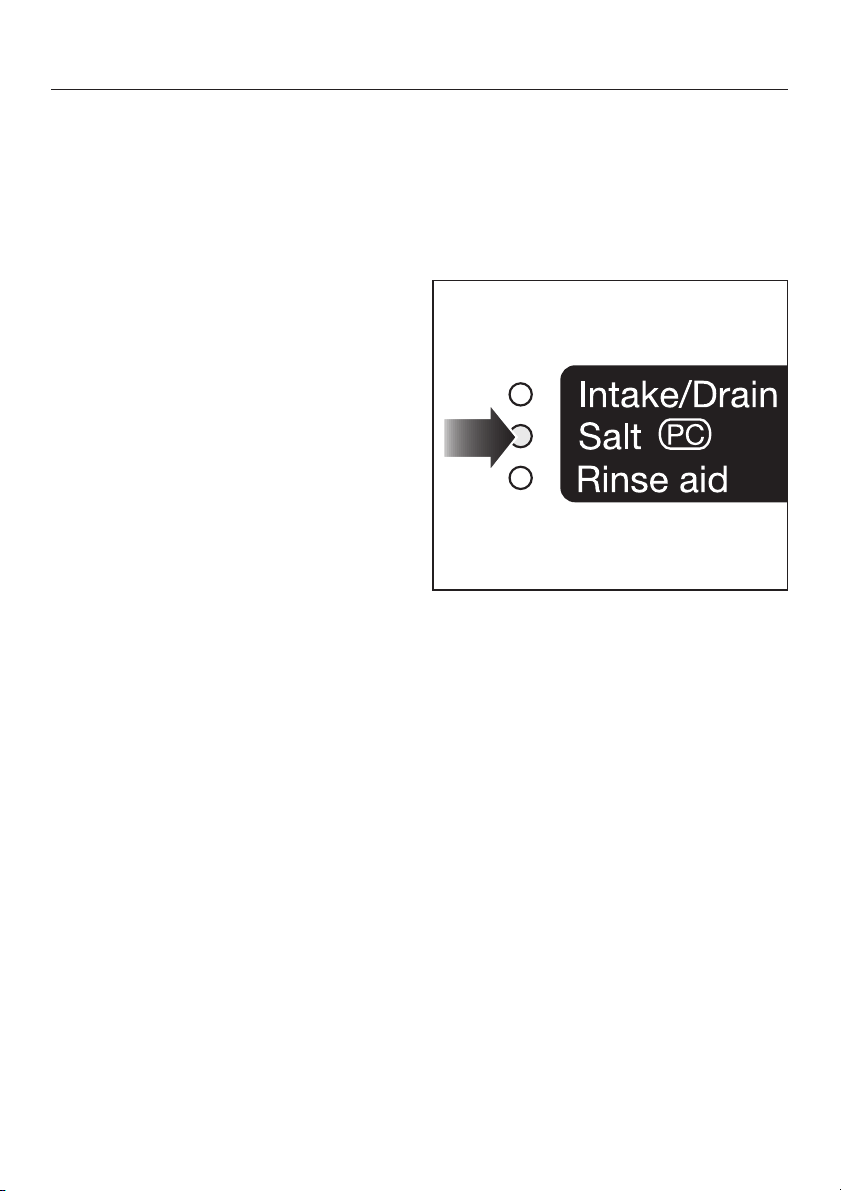
Energy saving washing . . . . . . . . . . . . . . . . . . . . . . . . . . . . . . . . . . . . . . . . . . . . . 10
Guide to the dishwasher . . . . . . . . . . . . . . . . . . . . . . . . . . . . . . . . . . . . . . . . . . . 11
Wash cabinet . . . . . . . . . . . . . . . . . . . . . . . . . . . . . . . . . . . . . . . . . . . . . . . . . . . . . 11
Control panel . . . . . . . . . . . . . . . . . . . . . . . . . . . . . . . . . . . . . . . . . . . . . . . . . . . . . 12
Before using for the first time. . . . . . . . . . . . . . . . . . . . . . . . . . . . . . . . . . . . . . . 13
To open the door . . . . . . . . . . . . . . . . . . . . . . . . . . . . . . . . . . . . . . . . . . . . . . . . . . 13
To close the door . . . . . . . . . . . . . . . . . . . . . . . . . . . . . . . . . . . . . . . . . . . . . . . . . . 13
Water softener . . . . . . . . . . . . . . . . . . . . . . . . . . . . . . . . . . . . . . . . . . . . . . . . . . . . 14
Salt indicator . . . . . . . . . . . . . . . . . . . . . . . . . . . . . . . . . . . . . . . . . . . . . . . . . . . . . 16
Rinse aid . . . . . . . . . . . . . . . . . . . . . . . . . . . . . . . . . . . . . . . . . . . . . . . . . . . . . . . . 17
Adding rinse aid . . . . . . . . . . . . . . . . . . . . . . . . . . . . . . . . . . . . . . . . . . . . . . . . . . 17
Adjusting the dosage. . . . . . . . . . . . . . . . . . . . . . . . . . . . . . . . . . . . . . . . . . . . . . . 18
Rinse aid indicator . . . . . . . . . . . . . . . . . . . . . . . . . . . . . . . . . . . . . . . . . . . . . . . . . 18
Loading the dishwasher . . . . . . . . . . . . . . . . . . . . . . . . . . . . . . . . . . . . . . . . . . . 19
Items not recommended for dishwashing . . . . . . . . . . . . . . . . . . . . . . . . . . . . . . . 20
Cutlery tray (SC units) . . . . . . . . . . . . . . . . . . . . . . . . . . . . . . . . . . . . . . . . . . . . . . 21
Upper basket . . . . . . . . . . . . . . . . . . . . . . . . . . . . . . . . . . . . . . . . . . . . . . . . . . . . . 22
Adjusting the upper basket . . . . . . . . . . . . . . . . . . . . . . . . . . . . . . . . . . . . . . . 22
Adjustable cup racks . . . . . . . . . . . . . . . . . . . . . . . . . . . . . . . . . . . . . . . . . . . . 23
Coffee bar. . . . . . . . . . . . . . . . . . . . . . . . . . . . . . . . . . . . . . . . . . . . . . . . . . . . . 23
Lower basket . . . . . . . . . . . . . . . . . . . . . . . . . . . . . . . . . . . . . . . . . . . . . . . . . . . . . 24
Lower basket inserts . . . . . . . . . . . . . . . . . . . . . . . . . . . . . . . . . . . . . . . . . . . . . . 25
Removing an insert. . . . . . . . . . . . . . . . . . . . . . . . . . . . . . . . . . . . . . . . . . . . . . 25
Inserting an insert . . . . . . . . . . . . . . . . . . . . . . . . . . . . . . . . . . . . . . . . . . . . . . . 25
Foldable spike insert. . . . . . . . . . . . . . . . . . . . . . . . . . . . . . . . . . . . . . . . . . . . . 26
Plateguard Plus with StemGuard . . . . . . . . . . . . . . . . . . . . . . . . . . . . . . . . . . . 27
Tall Glassware Insert for lower basket . . . . . . . . . . . . . . . . . . . . . . . . . . . . . . . 28
Vase / Bottle holder. . . . . . . . . . . . . . . . . . . . . . . . . . . . . . . . . . . . . . . . . . . . . . 28
Basket accessories . . . . . . . . . . . . . . . . . . . . . . . . . . . . . . . . . . . . . . . . . . . . . . . 29
2
Page 3

Contents
Operating the dishwasher. . . . . . . . . . . . . . . . . . . . . . . . . . . . . . . . . . . . . . . . . . 30
Adding detergent. . . . . . . . . . . . . . . . . . . . . . . . . . . . . . . . . . . . . . . . . . . . . . . . . . 30
Running the dishwasher . . . . . . . . . . . . . . . . . . . . . . . . . . . . . . . . . . . . . . . . . . . . 31
At the end of a program. . . . . . . . . . . . . . . . . . . . . . . . . . . . . . . . . . . . . . . . . . . . . 31
Interrupting a program. . . . . . . . . . . . . . . . . . . . . . . . . . . . . . . . . . . . . . . . . . . . . . 32
Changing a program . . . . . . . . . . . . . . . . . . . . . . . . . . . . . . . . . . . . . . . . . . . . . . . 32
Program guide . . . . . . . . . . . . . . . . . . . . . . . . . . . . . . . . . . . . . . . . . . . . . . . . . . . . 33
Additional features. . . . . . . . . . . . . . . . . . . . . . . . . . . . . . . . . . . . . . . . . . . . . . . . . 34
"Top Solo" (2) . . . . . . . . . . . . . . . . . . . . . . . . . . . . . . . . . . . . . . . . . . . . . . . . . . 34
Delay start (d) . . . . . . . . . . . . . . . . . . . . . . . . . . . . . . . . . . . . . . . . . . . . . . . . . 35
Frequently asked questions . . . . . . . . . . . . . . . . . . . . . . . . . . . . . . . . . . . . . . . . 37
After sales service . . . . . . . . . . . . . . . . . . . . . . . . . . . . . . . . . . . . . . . . . . . . . . . . 42
Transport . . . . . . . . . . . . . . . . . . . . . . . . . . . . . . . . . . . . . . . . . . . . . . . . . . . . . . . 43
User Maintenance Instructions. . . . . . . . . . . . . . . . . . . . . . . . . . . . . . . . . . . . . . 45
Cleaning the filter in the wash cabinet. . . . . . . . . . . . . . . . . . . . . . . . . . . . . . . . . . 46
Cleaning the spray arms . . . . . . . . . . . . . . . . . . . . . . . . . . . . . . . . . . . . . . . . . . . . 48
Cleaning the wash cabinet . . . . . . . . . . . . . . . . . . . . . . . . . . . . . . . . . . . . . . . . . . 49
Cleaning the door and door seal . . . . . . . . . . . . . . . . . . . . . . . . . . . . . . . . . . . . . . 49
Cleaning the optic indicator reflector. . . . . . . . . . . . . . . . . . . . . . . . . . . . . . . . . . . 49
Cleaning the control panel. . . . . . . . . . . . . . . . . . . . . . . . . . . . . . . . . . . . . . . . . . . 50
Cleaning the exterior . . . . . . . . . . . . . . . . . . . . . . . . . . . . . . . . . . . . . . . . . . . . . . . 50
Cleaning the water inlet filter . . . . . . . . . . . . . . . . . . . . . . . . . . . . . . . . . . . . . . . . . 51
Cleaning the drain pump and non-return valve. . . . . . . . . . . . . . . . . . . . . . . . . . . 52
3
Page 4

IMPORTANT SAFETY INSTRUCTIONS
WARNING –
When using your dishwasher, follow
basic precautions, including the
following:
Read all instructions before installa
tion or use of the dishwasher to pre
vent injury and machine damage.
The manufacturer cannot be held re
sponsible for damage or injury
caused by improper use of this appliance.
Use the dishwasher only for its intended purpose. This appliance is
intended for residential use only.
Keep these operating instructions in
a safe place and pass them on to
any future user.
Electrical safety
Before installation make sure that
the voltage and frequency listed on
the data plate correspond with the
household electrical supply. This data
must correspond to prevent injury and
machine damage. Consult a qualified
electrician if in doubt.
Before installation or service, dis
connect the power supply to the
work area by unplugging the unit, “trip
ping” the circuit breaker or removing
the fuse.
Do not use an extension cord to
connect this appliance to electric
ity. Extension cords do not guarantee
the required safety of the appliance
(e.g. danger of overheating).
-
-
-
Be certain your appliance is prop
erly installed and grounded by a
qualified technician. To guarantee the
electrical safety of this appliance, conti
nuity must exist between the appliance
and an effective grounding system. It is
imperative that this basic safety require
ment be met. If there is any doubt, have
the electrical system of the house
checked by a qualified electrician. The
manufacturer cannot be held responsible for damages caused by the lack, or
inadequacy of, an effective grounding
system.
Installation
Installation and repair work should
be by a Miele authorized service
technician. Work by unqualified persons could be dangerous and could
void the warranty.
, WARNING - Fire hazard
Do not cover or crush the plug of
an electric appliance. Ensure that the
cabinet opening for the dishwasher
provides ample space for the plug.
Installing the dishwasher in a tight
space may crimp the power cord or put
pressure on the plug which may cause
overheating.
-
-
-
-
-
-
4
Page 5

IMPORTANT SAFETY INSTRUCTIONS
This equipment is not designed for
maritime use or for use in mobile
installations such as caravans or air
craft. However, under certain conditions
it may be possible for an installation in
these applications. Please contact the
nearest Miele dealer or the Miele Tech
nical Service Department with specific
requirements.
Inspect the dishwasher for ship
ping damage. Do not install or op
erate a damaged unit. Contact the
place of purchase.
Ensure that any plastic wrappings,
bags etc. are disposed of safely
and kept out of the reach of babies and
young children. Danger of suffocation!
This dishwasher should only be in-
stalled under a continuous
countertop secured to adjacent
cabinetry.
Do not install this dishwasher be-
neath a cooking surface, oven or
any appliance that radiates heat.
High temperatures from these units may
damage the dishwasher.
Do not, under any circumstances
cut the intake hose or submerge in
liquid. This hose contains electrical
components that could cause injury or
property damage if cut or submerged.
-
-
-
-
Use
Only use the dishwasher if all pan
els are properly in place.
Do not tamper with the controls.
To reduce the risk of injury, do not
allow children to play in, on, or
near the dishwasher.
Do not abuse, sit, or stand on the
door or baskets of the dishwasher.
Under certain conditions, hydrogen
gas may be produced in a hot
water system that has not been used
for two weeks or more. HYDROGEN
GAS IS EXPLOSIVE. If the hot water
system has not been used for such a
period, turn on all hot water faucets and
let water flow from each for several minutes before using the dishwasher. This
will release any accumulated hydrogen
gas. Do not smoke or use an open
flame during this time.
Do not wash plastic items unless
they are labeled "dishwasher safe"
or the equivalent. For items not labeled,
check the manufacturer’s recommenda
tions.
-
-
5
Page 6

IMPORTANT SAFETY INSTRUCTIONS
When loading tableware, place
sharp items away from the door
seal to prevent damage to the seal.
Load knives pointing downwards to
prevent injuries.
Only use detergents and rinse aids
recommended for residential dish
washers. Keep all detergents and rinse
aids out of the reach of children.
Do not drink water from the dish
washer! Harmful residues could be
present.
For dishwashers with visible heating
element
Do not touch the heating element
during or immediately after use.
-
Disposal of an appliance
If the appliance is removed from its
installation and will not be used,
the door to the wash cabinet should be
removed to prevent children from being
locked in the machine. When discard
ing an old dishwasher, unplug it from
the power outlet, remove the door to the
wash cabinet and cut off the power
cord.
SAVE THESE
INSTRUCTIONS
-
6
Page 7

CONSIGNES DE SÉCURITÉ
AVERTISSEMENT –
Au moment d’utiliser votre
lave-vaisselle, prenez des
précautions essentielles, dont :
Lisez attentivement l’ensemble des
consignes avant d’installer ou
d’utiliser le lave-vaisselle afin de
prévenir les blessures et éviter
d’endommager l’appareil.
Le fabricant ne peut être tenu
responsable de dommages ou
blessures causés par l’usage
inapproprié de l’appareil.
Tout usage inapproprié est
déconseillé. Cet appareil est
destiné à un usage domestique
uniquement.
Conservez ces consignes dans un
lieu sûr et transmettez-les à tout
utilisateur futur.
Sécurité électrique
Avant l’installation, assurez-vous
que la tension et la fréquence indi
quées sur la plaque signalétique cor
respondent bien à celles de l’alimenta
tion électrique de la résidence afin de
prévenir les blessures et éviter d’en
dommager l’appareil. Dans le doute,
consultez un électricien qualifié.
Avant l’installation ou l’utilisation,
coupez l’alimentation électrique,
soit en débranchant l’appareil, soit en
faisant basculer le disjoncteur ou en
enlevant le fusible.
N’utilisez pas de rallonge pour
brancher l’appareil à la source
d’alimentation électrique. Les rallonges
ne garantissent pas la sécurité requise
pour l’appareil - si vous utilisez une rallonge, cela peut causer la surchauffe.
Assurez-vous que votre appareil
est installé correctement et mis à la
terre par un technicien qualifié. Pour
garantir la sécurité électrique de l’ap
pareil, il faut le raccorder à un dispositif
de mise à la terre approprié. Il est es
sentiel de respecter cette exigence de
base en matière de sécurité. Dans le
doute, faites vérifier l’installation élec
trique de la résidence par un électricien
qualifié. Le fabricant ne peut être tenu
responsable de dommages causés par
l’absence d’un dispositif de mise à la
terre ou par un dispositif inadapté.
-
-
-
-
-
-
-
7
Page 8

CONSIGNES DE SÉCURITÉ
Installation
L’installation et les réparations de
vraient être effectuées uniquement
par un technicien de service autorisé
Miele. Les travaux effectués par des
personnes non qualifiées peuvent
s’avérer dangereux et rendre nulle la
garantie.
, ATTENTION - Risque d’incendie
Ne recouvrez et n’écrasez jamais
la fiche d’un appareil électrique. Assu
rez-vous que dans l’espace occupé par
le lave-vaisselle il y a suffisamment de
volume libre pour la fiche. Si vous ins
tallez le lave-vaisselle dans un espace
trop petit, le cordon d’alimentation
pourrrait être comprimé ou une pression pourrait être exercée sur la fiche,
ce qui risque de causer la surchauffe.
Cet appareil n’est pas conçu pour
usage sur un bateau ou dans des
engins mobiles, tels les avions ou les
véhicules récréatifs. Toutefois, son installation est possible dans certaines circonstances. Veuillez communiquer vos
exigences particulières au détaillant
Miele le plus près de chez vous ou au
service du soutien technique.
-
-
-
Vérifiez si votre lave-vaisselle n’a
pas subi de dommage lors du
transport. N’installez pas et n’utilisez
pas un appareil endommagé. Commu
niquez avec le point de vente où vous
l’avez acheté.
Assurez-vous que les emballages,
les sacs, matières plastiques et au
tres sont correctement éliminés et tenus
hors la portée de bébés et d’enfants.
Risque de suffocation!
Le lave-vaisselle doit être installé
uniquement sous un comptoir
continu fixé à des armoires adjacentes.
N’installez pas ce modèle de
lave-vaisselle sous une plaque de
cuisson, un four ou tout autre appareil
qui diffuse de la chaleur.
Les hautes températures que diffusent
ces appareils pourraient endommager
le lave-vaisselle.
En aucun cas, vous ne devez cou-
per le tuyau d’arrivée d’eau ou l’immerger, car il contient des composants
électriques qui pourraient causer des
blessures ou endommager la rési
dence.
-
-
-
8
Page 9

CONSIGNES DE SÉCURITÉ
Utilisation
N’utilisez le lave-vaisselle que
lorsque tous les panneaux sont
bien en place.
Ne jouez pas avec les
commandes.
Afin de diminuer le risque de bles
sures, ne laissez pas les enfants
jouer près de l’appareil ni monter de
dans ou dessus.
Évitez de malmener la porte ou les
paniers du lave-vaisselle ou de
vous y appuyer ou asseoir.
Dans certaines circonstances, tout
système d’eau chaude qui n’a pas
servi durant deux semaines ou davantage peut produire de l’hydrogène.
L’HYDROGÈNE EST UN GAZ
INFLAMMABLE. Si le système d’eau
chaude n’a pas servi durant une telle
période, ouvrez tous les robinets d’eau
chaude et laissez l’eau couler plusieurs
minutes avant d’utiliser le lave-vaisselle.
Cette action libérera l’hydrogène qui
aura pu s’y accumuler. Entre-temps,
abstenez-vous de fumer et n’utilisez
pas de flamme nue.
Ne lavez pas des articles en plas
tique non étiquetés "résiste au
lave-vaisselle" ou une formulation équi
valente. Consultez les recommanda
tions du fabricant pour les articles non
étiquetés.
-
-
-
-
Au moment de charger la vaisselle,
ne disposez pas les articles cou
pants à proximité du joint d’étanchéité
de la porte afin d’éviter de l’endomma
ger. Placez les couteaux avec la pointe
vers le bas afin d’éviter les blessures.
Utilisez seulement les détergents
et les produits de rinçage recom
mandés pour les lave-vaisselle à usage
domestique. Conservez tous ces pro
duits hors de la portée d’enfants.
Ne consommez pas l’eau du
lave-vaisselle! Elle peut contenir
des résidus dangereux.
Lave-vaisselle munis d’un élément
chauffant visible
Ne touchez pas l’élément chauffant
pendant ou immédiatement après
l’utilisation.
Mise au rebut de l’appareil
Si vous désinstallez l’appareil et
comptez ne plus vous en servir,
détachez-en la porte pour éviter que
des enfants se retrouvent enfermés
dans le tambour. Lorsque vous mettez
un lave-vaisselle au rebut, débran
chez-le de la source d’alimentation
électrique, détachez-en la porte et cou
-
pez le cordon d’alimentation.
-
-
-
-
-
-
CONSERVEZ
CES CONSIGNES
9
Page 10

Caring for the environment
Energy saving washing
This dishwasher is exceptionally eco
nomical in the use of water and electric
ity. For best results follow these tips:
For lowest energy consumption and
^
the gentlest washin of china and
crystal, connect the dishwasher to a
cold water source.
For fastest possible wash times, yet
^
higher energy consumption, connect
the dishwasher to a hot water source.
Make full use of the baskets without
^
overloading for the most economical
washing.
^ Choose a program that best suits the
degree of soiling and the type of
dishes being washed.
^ For small loads:
Select the "Top Solo" feature (see
"Additional features").
^ Use the correct amounts of detergent
and rinse aid.
-
-
10
Page 11
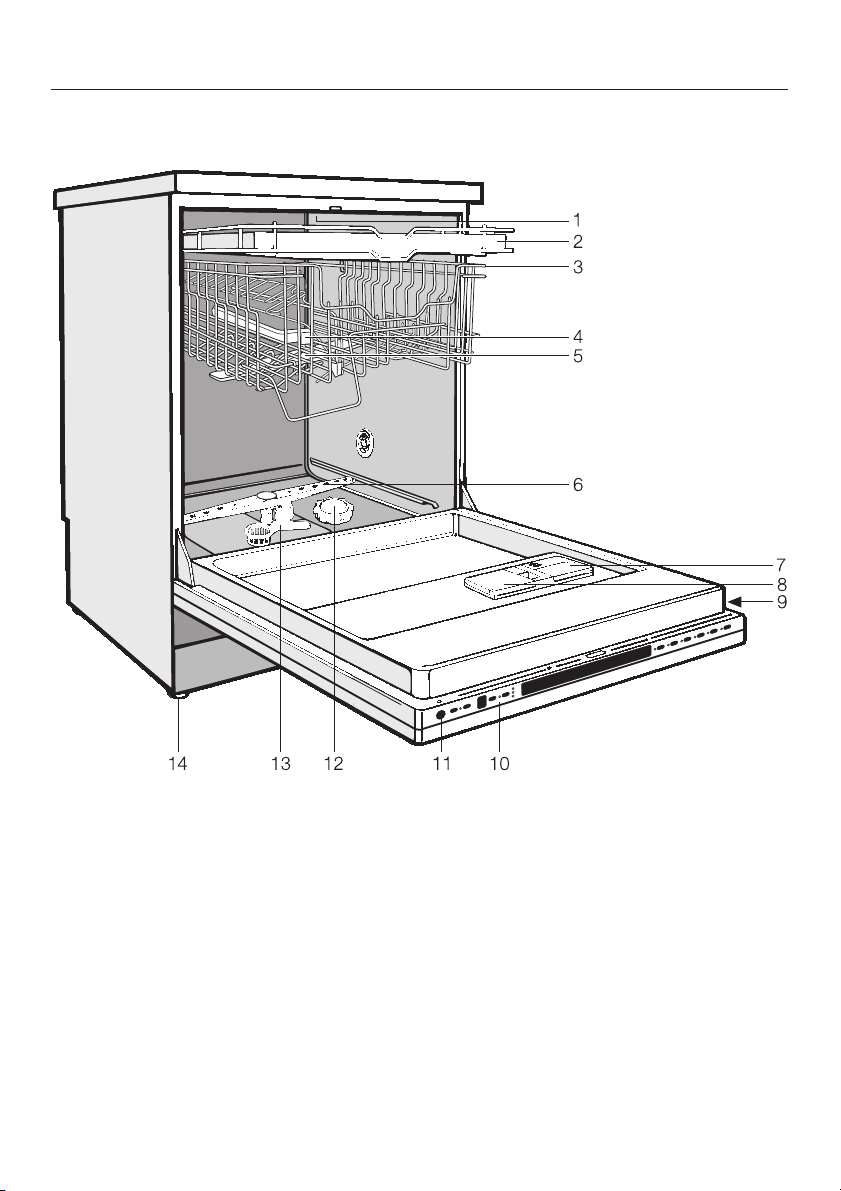
Wash cabinet
Guide to the dishwasher
1 Upper spray arm (not visible)
2 Cutlery tray
3 Upper basket
4 Water feed for middle spray arm
5 Middle spray arm
6 Lower spray arm
7 Rinse aid reservoir
(with dosage selector)
8 Detergent dispenser
9 Data plate
10 Control panel
11 Optic indicator
12 Salt reservoir
13 Triple Filter System
14 Four height adjustable feet
11
Page 12
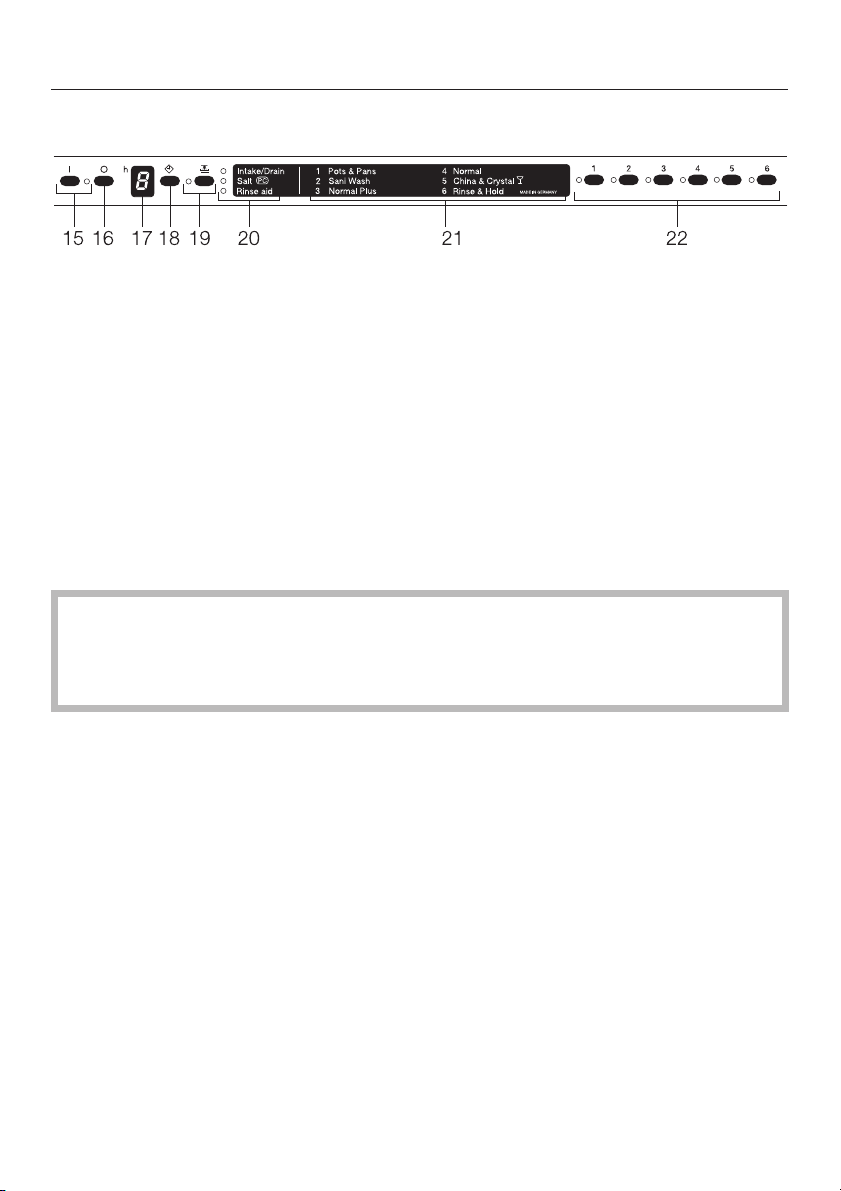
Guide to the dishwasher
Control panel
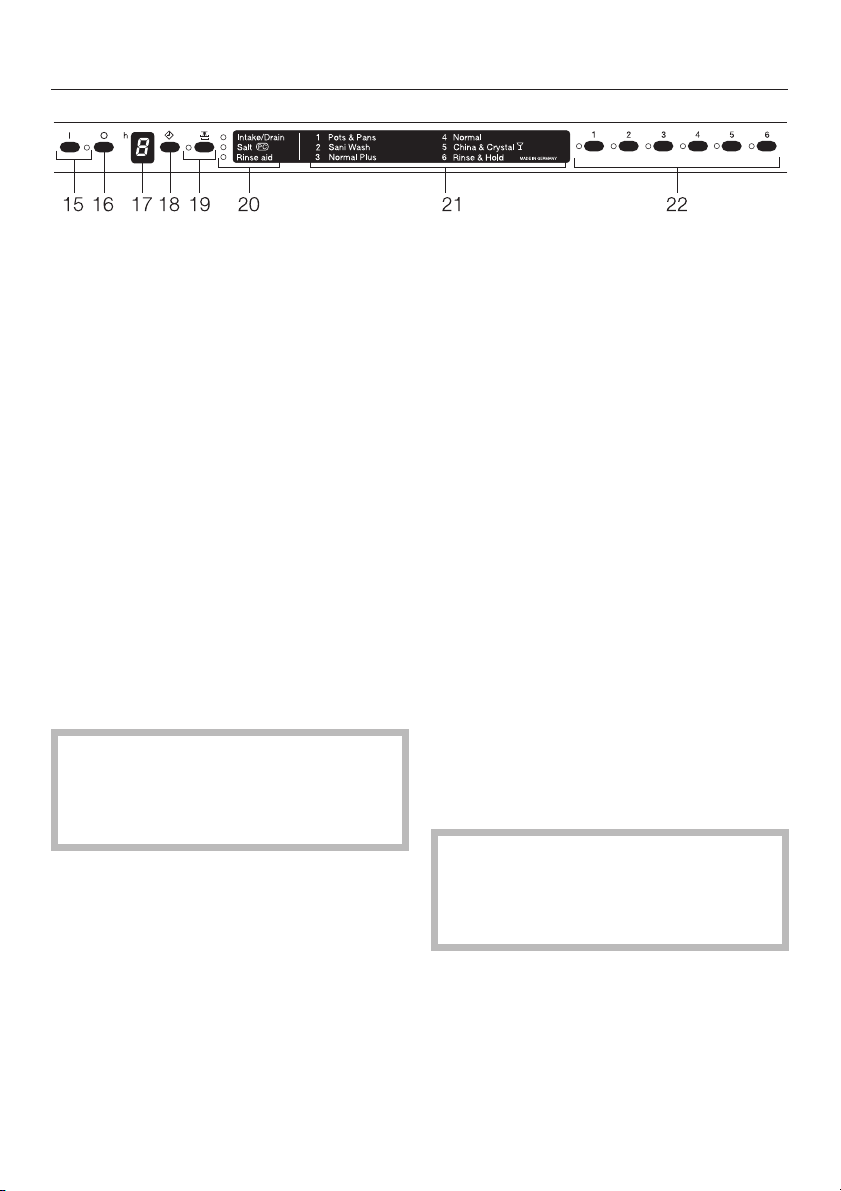
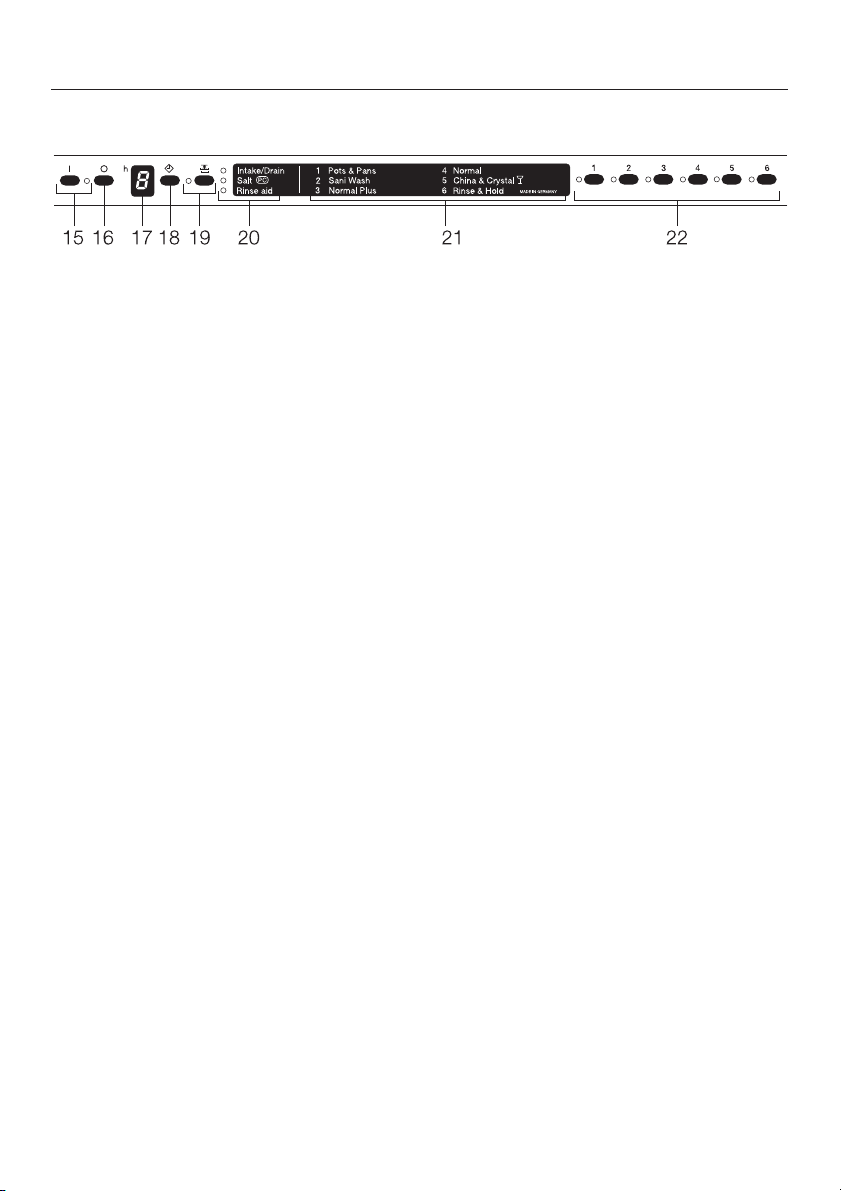
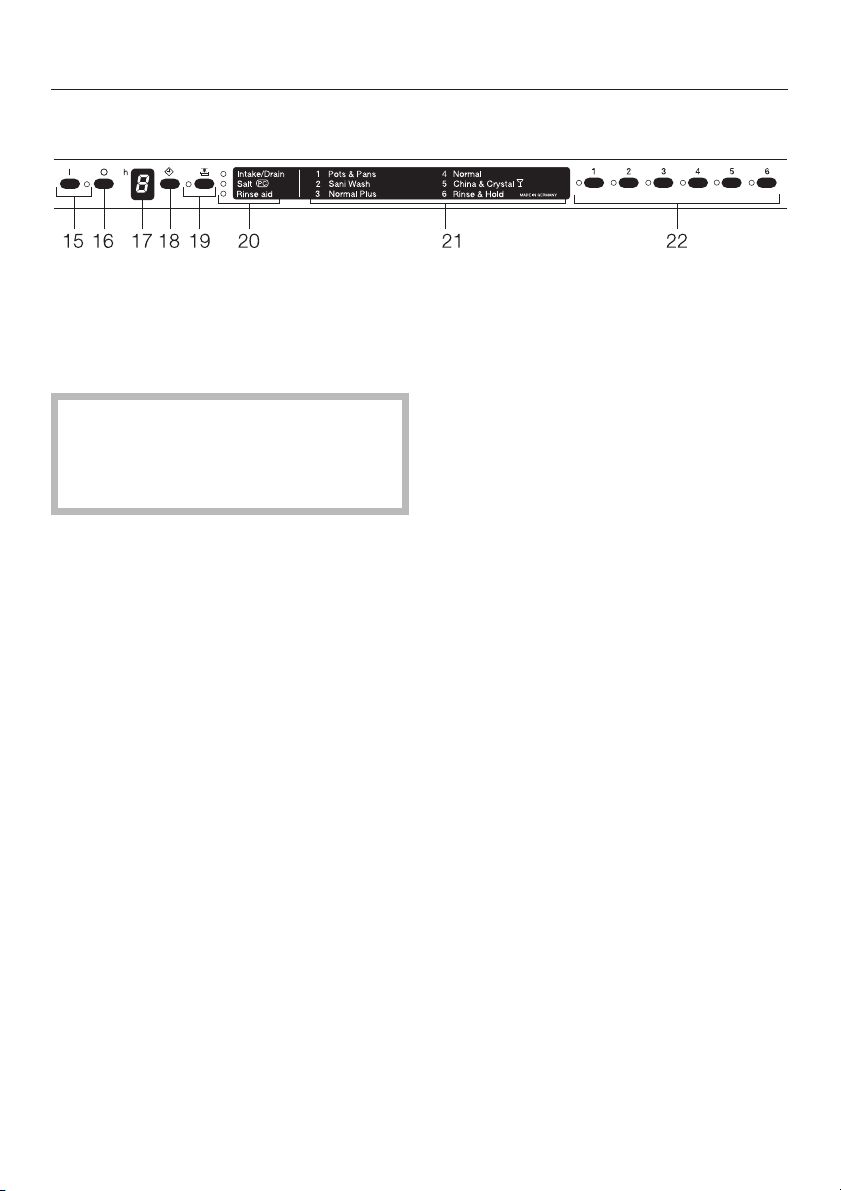
15 On button / Indicator
16 Off button
17 Delay Start Display
18 Delay Start button
Note:
Remove the protective film from the
program list before the first use.
Every dishwasher is tested before leaving the factory. Any water remaining in
the machine is from these tests and does not indicate that the machine has
been used. The data plate is located on the right hand side of the door when
open.
19 Top Solo button / Indicator
20 Check / Refill indicators
21 Program list
22 Program selection buttons /
indicators
12
Page 13
Before using for the first time
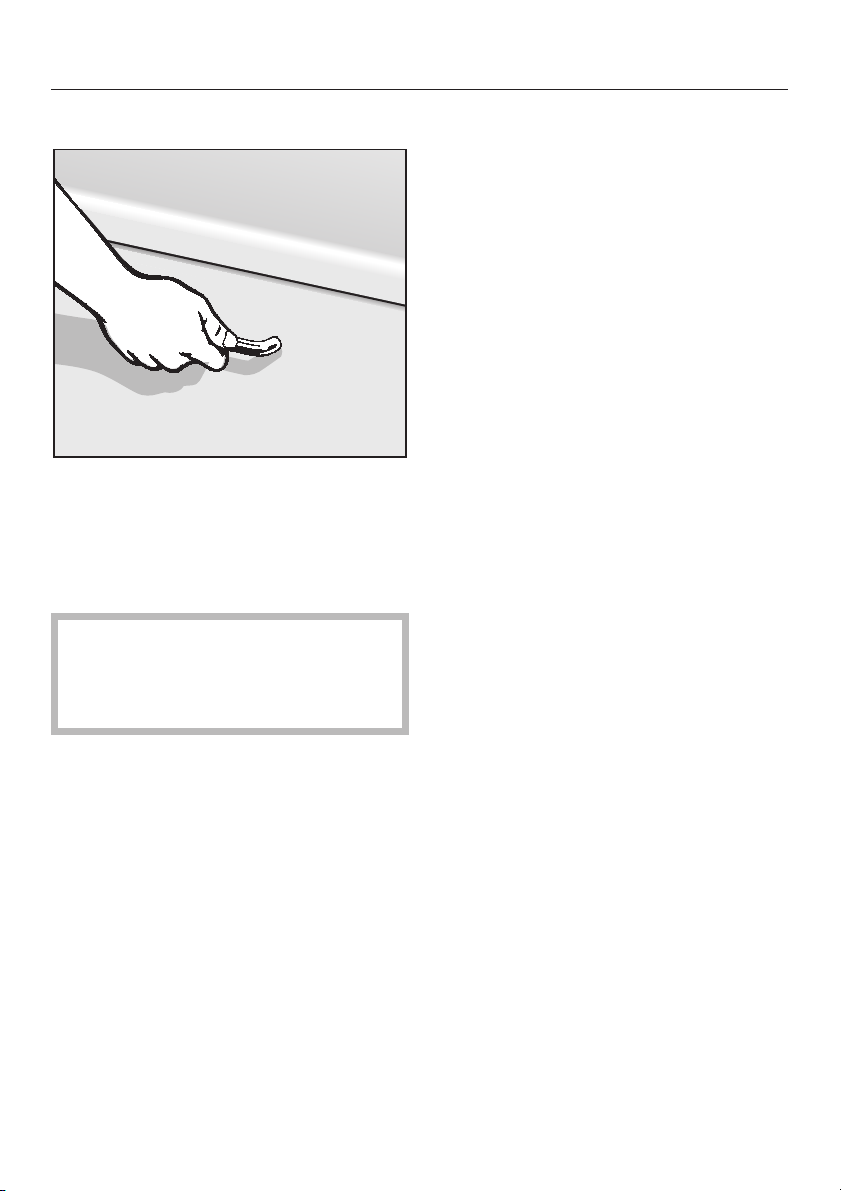
To open the door
^ Pull the handle.
If the door is opened during operation,
the dishwasher will stop running. Once
the door is closed the program will restart.
Instructions on how to open the
dishwasher if a door panel has not
yet been installed can be found in
the Installation Instructions.
To close the door
Push the baskets in.
^
Lift the door and push until it clicks
^
into position.
13
Page 14
Before using for the first time
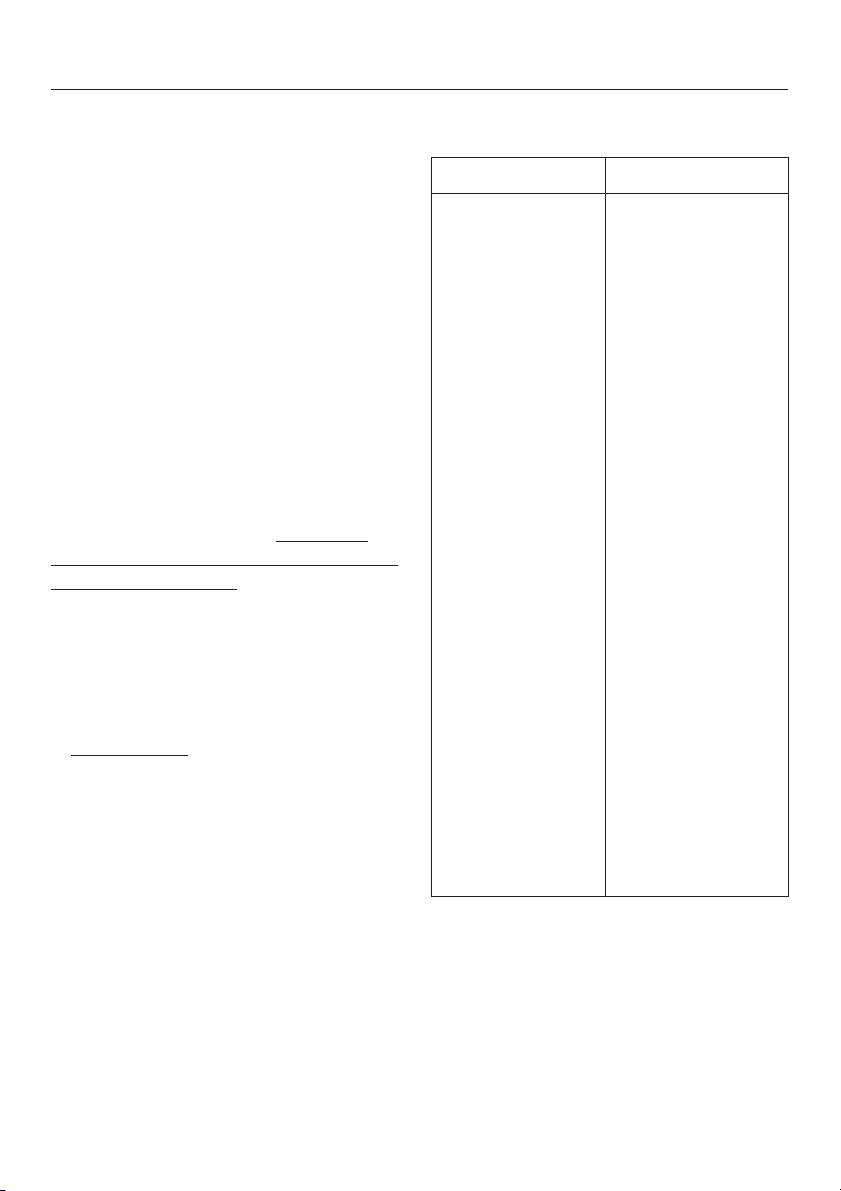
Water softener
To achieve good cleaning results, the
dishwasher needs soft water. Hard
water results in calcium deposits on
dishware and in the dishwasher.
If your tap water hardness is above
8 gr/gal (140 ppm), the water should be
softened. This takes place automati
cally in the unit’s integrated water
softener.
Your local water authority will be able
–
to advise you of the water hardness
level in your area.
– The water softener must be filled with
dishwasher salt for reactivation.
If your water hardness is lower than
8 gr/gal (140 ppm), you do not need to
add dishwasher salt.
If there is a fault, it will help the service
technician to know the hardness of your
local water supply.
^ Enter the water hardness below:
gr/gal (ppm)
-
Water hardness
gr/gal* ppm
1
2
3
4
5
6
7
8
9
10
11
12
13
14
15
16
17
18
19
20
21
22
23
24
25
26
27
28
29
30
31
32
33
34
35
36-70
20
40
50
70
90
110
130
140
160
180
200
220
230
250
270
290
310
320
340
360
380
400
410
430
450
470
490
500
520
540
560
580
590
610
630
650-1260
14
* US gallons
Page 15
Before using for the first time
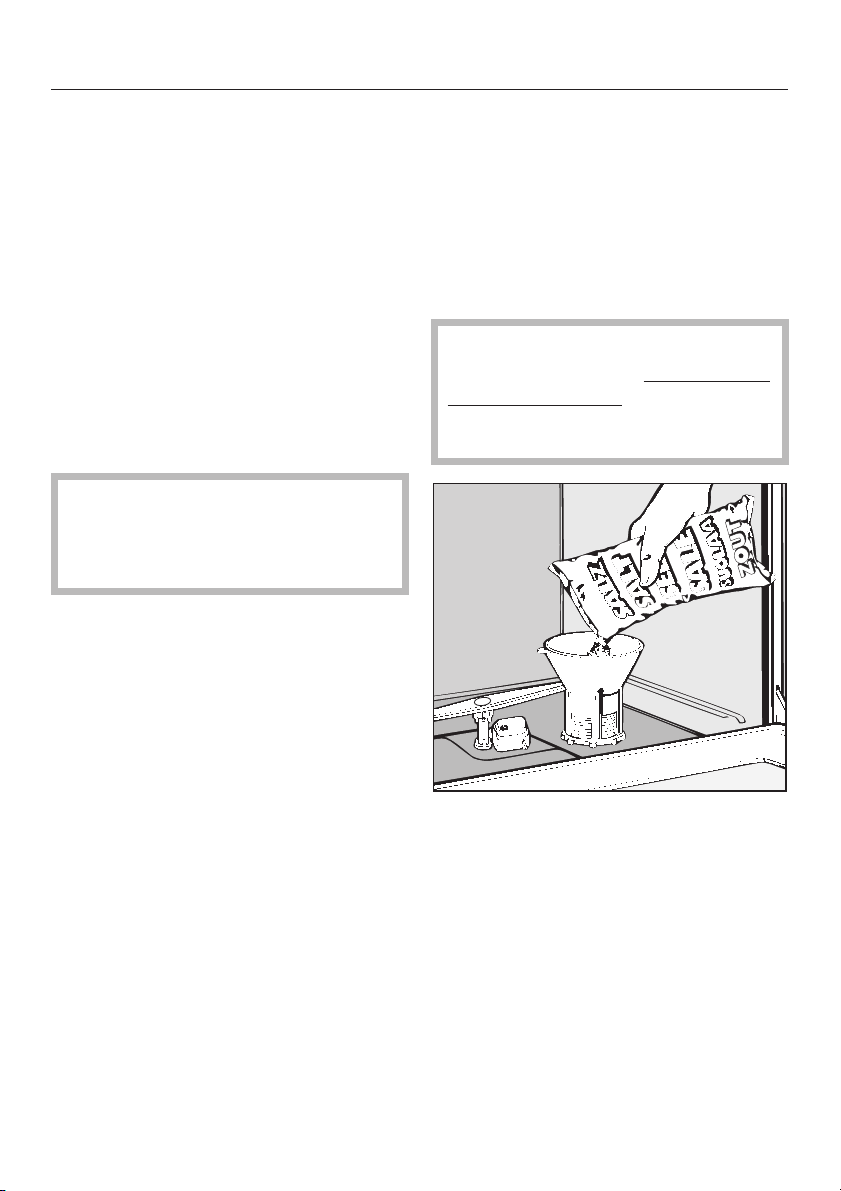
Filling the salt reservoir
If your water hardness level is greater
than 8 gr/gal (140 ppm), the salt reser
voir should be filled before the first use
and when the "Salt" indicator lights.
Only use water softener salt specially
formulated for dishwashers. Other salts
may contain insoluble additives which
can impair the water softener.
The proper salt can be purchased from
your Miele dealer or Miele’s Technical
Service Department.
Inadvertently filling the salt
,
reservoir with dishwashing detergent will damage the water softener.
To fill the salt reservoir:
Remove the lower basket
^
Unscrew and remove the salt reser
^
voir cap located on the floor of the
wash cabinet.
Place the provided funnel over the
^
salt reservoir.
The salt reservoir must be filled with
2 quarts (2 l) of water before adding
salt for the first time. Water does not
have to be added with subsequent
refills.
-
^
Carefully fill with salt. The salt reser
voir holds approx. 4.5 lbs (2 kg) of
salt. As it is filled, water will run out.
^
Clean any excess salt from the
threads of the reservoir opening.
^
Screw the cap on firmly.
^
If the dishwasher will not be used im
mediately, run the "Rinse & Hold" pro
gram. This will remove any traces of
salt from inside the wash cabinet.
-
-
-
15
Page 16
Before using for the first time
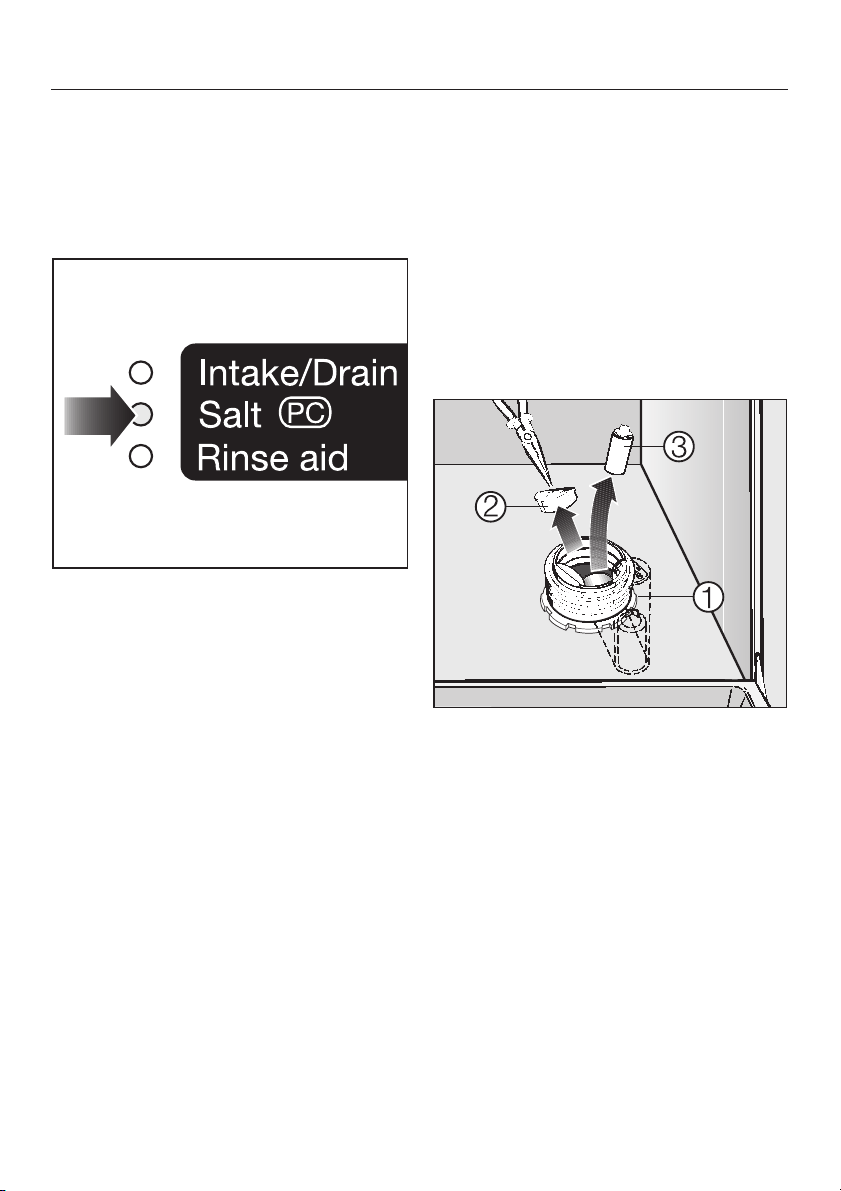
Salt indicator
When the salt reservoir is empty, the
"Salt-PC" indicator will light, indicating
that it should be refilled with reactiva
tion salt.
After the reservoir has been filled, the
water softener is automatically reactivated the next time the dishwasher is
started. The "Salt" indicator will be lit
during this process.
Bypassing the Salt indicator
If you have soft water (below 8 gr/gal
(140 ppm)), the salt reservoir should
not be filled with salt. The indicator will
remain lit and should be disregarded or
bypassed.
Remove the salt reservoir cap.
^
Looking into the salt reservoir, you will
see the top of the float chamber on the
right hand side, a.
16
^
Using a screwdriver, carefully pivot
the float chamber towards the center
of the reservoir.
^
Using the needle nose pliers, first pull
the cap, b, off of the float chamber,
then remove the float, c.
Replace the float chamber cap, push
the chamber back into its upright posi
tion, and replace the salt reservoir cap.
The "Salt" indicator should no longer be
lit.
-
Page 17
Rinse aid
Rinse aid is recommended to prevent
spotting on dishes and glassware.
Filling the rinse aid reservoir with
,
detergent will damage the reservoir.
Only pour rinse aid formulated for
residential dishwashers into the res
ervoir.
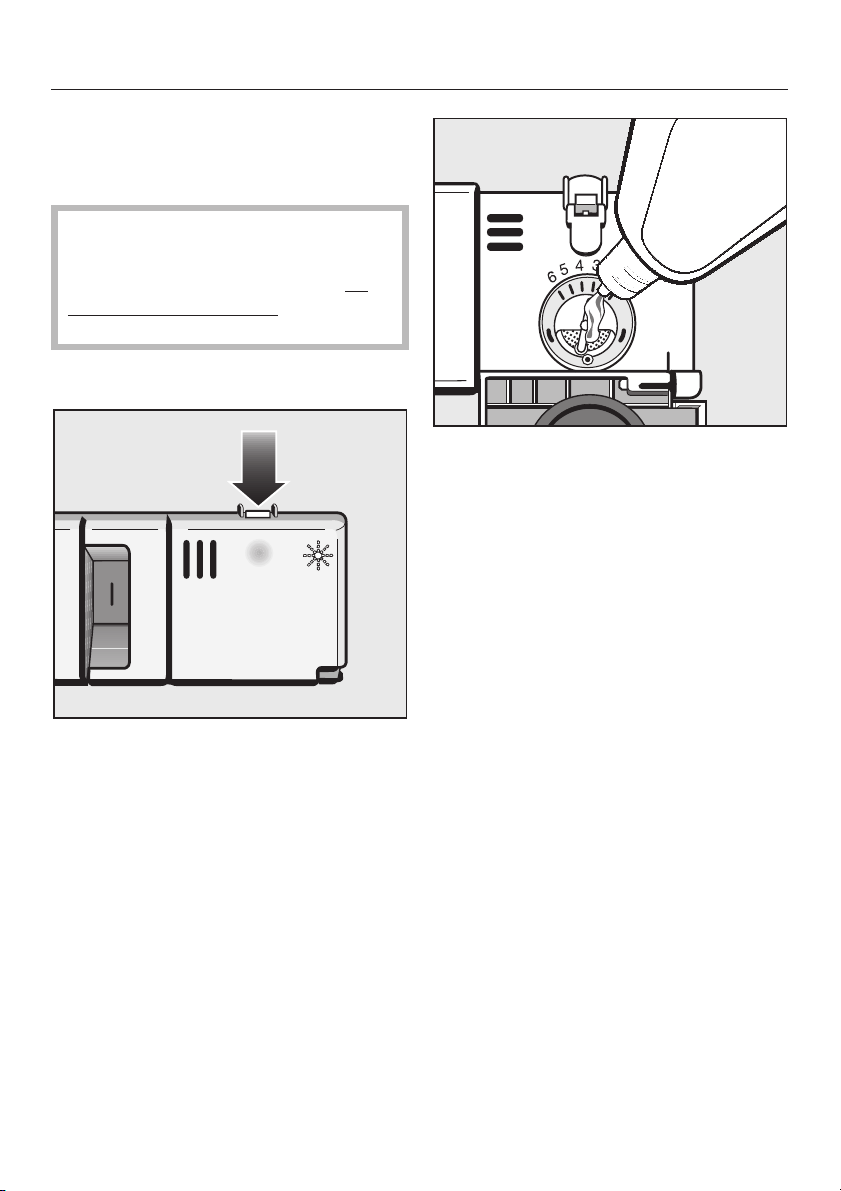
Adding rinse aid
Before using for the first time
-
Pour liquid rinse aid into the reservoir
^
until it its visible on the surface of the
screen.
^ Press on the flap until you hear it
click shut. Failure to close it all the
way will allow water to enter the reservoir during the wash program.
^
Add rinse aid before the first use and
whenever the "Rinse aid" indicator
lights.
^
Press the button in the direction of
the arrow until the flap springs open.
^ Wipe up any spilled rinse aid. The
flap will remain closed during normal
operation.
17
Page 18
Before using for the first time
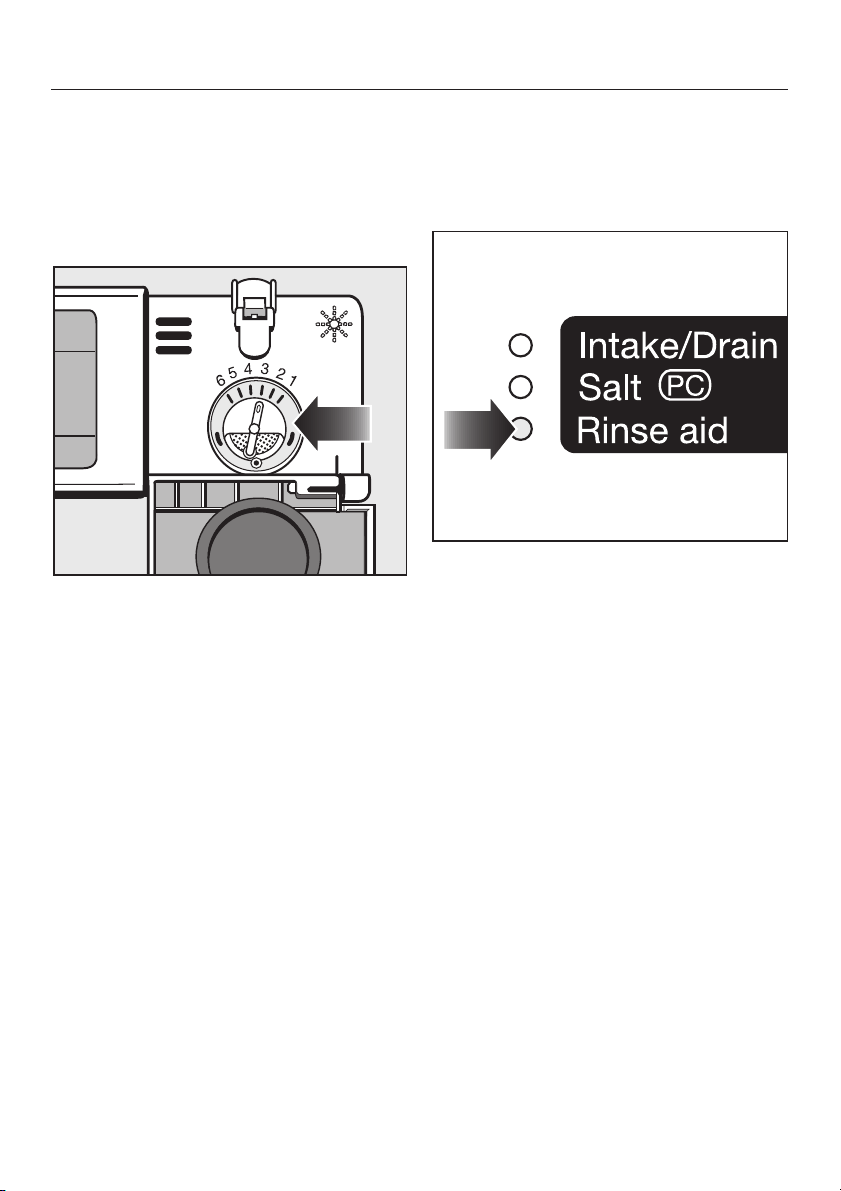
Adjusting the dosage
The dosage selector is preset to 3. This
dispenses approximately 3 ml of rinse
aid per program. It can be adjusted
from 1 to 6.
^ Use a higher setting if spots appear
on dry glassware.
^ Use a lower setting if streaking ap-
pears on dishes or glasses.
Rinse aid indicator
The rinse aid indicator on the control
panel will light when the rinse aid reser
voir needs refilling.
When the indicator first comes on, there
will be enough rinse aid left for 2 -3
washes.
-
18
Page 19
Do not wash items soiled with
,
ash, sand, wax, grease or paint in
the dishwasher.
Ash and sand do not dissolve and
will be distributed through out the in
side of the dishwasher.
Wax, grease and paint will cause
permanent discoloration or damage
to the dishwasher.
Scrape food from dishes before plac
^
ing in the dishwasher.
Do not rinse dishes.
^ Load dishes so that water can reach
all surfaces. Do not place dishes and
cutlery inside other pieces.
^ Hollow items such as cups and
glasses should be placed upside
down in the upper basket.
^ Concave based items, such as mugs
or bowls, should be placed at an angle so that water does not pool.
Loading the dishwasher
The spray arms must not be blocked
^
by items that are too tall or hang
through the baskets. Check clear
ance by manually rotating the spray
arms.
Food residue and spilt liquids should
^
be cleaned from the sides of the
dishwasher door. These are outside
of the wash cabinet and are not
cleaned by water from the spray
arms.
-
-
^
To ensure good water coverage tall,
narrow, hollow pieces, such as a
vase, should be placed in the center
of the basket, rather than in the cor
ners.
^
Small cups and glasses should be
placed on the cup racks. Taller mugs
and glasses can be placed beneath
the rack.
^
Place very small items in the cutlery
tray or basket so they do not fall to
the bottom of the wash cabinet.
-
19
Page 20

Loading the dishwasher
Items not recommended for
dishwashing
Cutlery with wooden handles.
–
Wooden cutting boards.
–
Glued items such as old knives with
–
handles glued together around the
shank of the blade.
Hand made craft items, antique,
–
metal trimmed or decorative glass
ware.
Lead crystal.
–
Copper, brass, tin or pewter.
–
– Plastic items that are not heat resis-
tant.
– Dishes with color painted over the
glaze. These dishes may fade over
time.
– Cast iron pots and pans.
Glassware:
There are no standard guidelines for
–
washing glassware but, when in
doubt wash by hand.
Wash delicate glassware with a low
–
temperature program and without the
extended drying feature to reduce
the risk of clouding. See the "Pro
gram guide".
-
If crystal or delicate glasses will be
–
washed frequently, connect the dish
washer to cold, rather than hot water.
Clouding or etching may occur on
–
glasses after frequent washing.
– When purchasing new dishes,
glasses and cutlery, make sure they
are dishwasher safe.
Silver and aluminum:
– Silver or aluminum items may tarnish.
– Silverware previously cleaned with a
silver polish may be damp or spotted
at the end of a program where water
has adhered to the polish. This can
be rubbed off with a soft, dry cloth.
Silver that has been cleaned in an
immersion dip is usually dry at the
end of a program, but may tarnish.
-
-
20
–
If left to dry, foods containing sulfur
can discolor silver. These include
egg yolk, onions, mayonnaise, mus
tard, legumes, fish, fish brine and
marinades.
–
Silverware may tarnish or pit if
washed next to stainless steel.
Leave space between these metals.
-
Page 21
Cutlery tray (SC units)
Loading the dishwasher
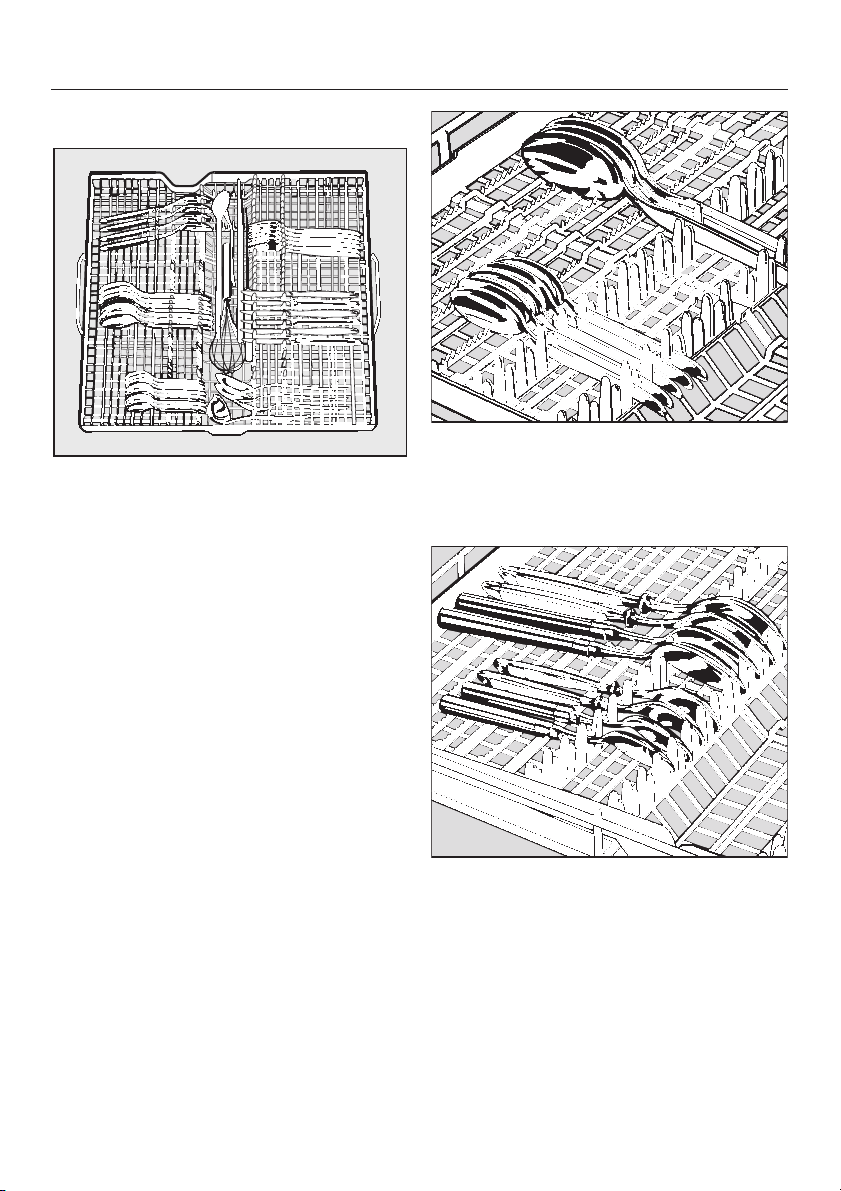
The removable cutlery tray makes unloading flatware easy. Simply carry the
cutlery tray to where the flatware is
stored and put the entire basket away
in one trip.
For easier unloading cutlery should be
grouped in zones, one for knives, one
for forks, one for spoons, etc.
Place knives with the cutting edge and
forks with the prongs between the hold
ers. Spoons should be placed in the
opposite direction with the handles
between the holders.
Longer items such as soup ladles, cake
slices, mixing spoons and long knives
should be placed lengthwise in the in
dentation of the cutlery tray.
-
Spoon heads should be placed in con
tact with at least one of the serrated retainers of the cutlery tray to ensure that
water runs off freely.
-
Spoons with thick handles may have to
be placed as knives and forks with their
heads in the holders.
-
21
Page 22
Loading the dishwasher
Upper basket
Adjusting the upper basket
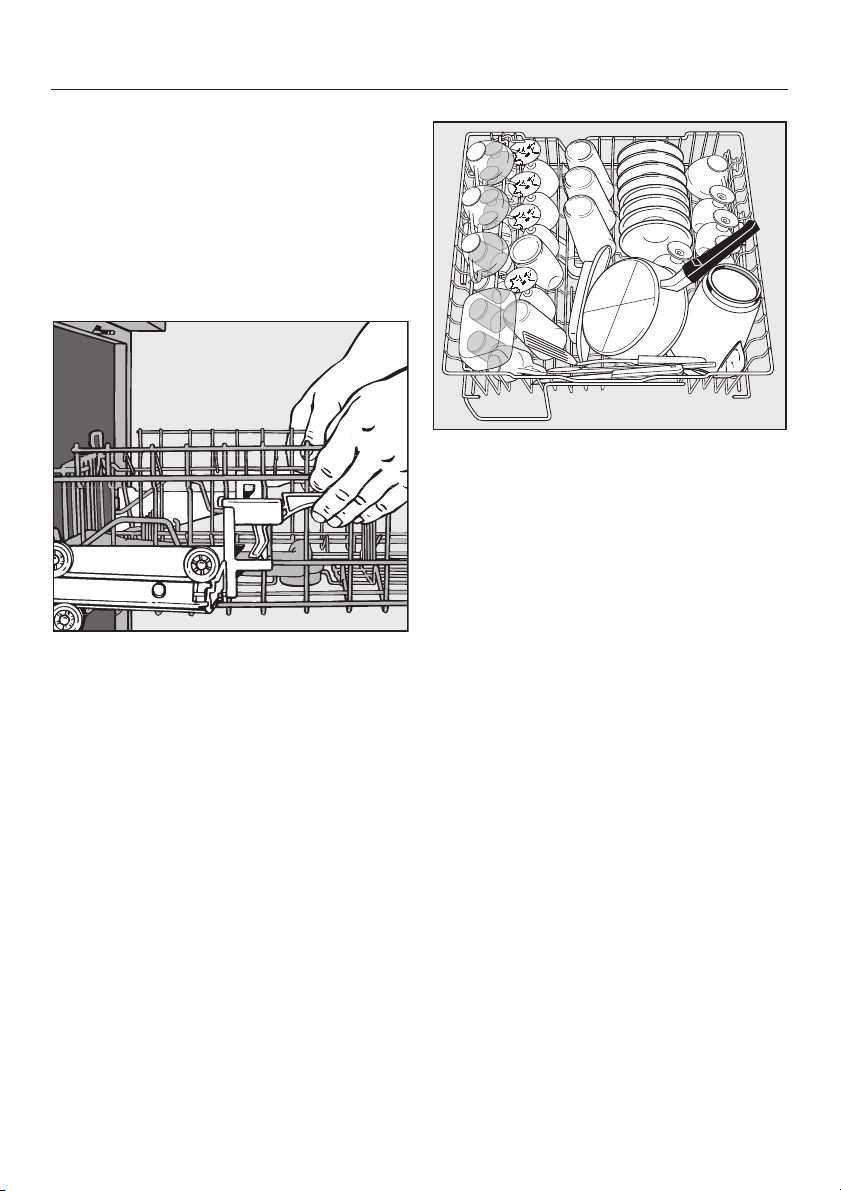
On select models, the upper basket
can be raised or lowered to accommo
date tall items.
Slide out the upper basket.
^
-
^ Pull up the levers at the sides of the
upper basket and adjust the basket
height.
^
Release the levers and the basket will
lock in place.
The basket can also be angled to fit tall
items in both, the lower and upper bas
kets. The angles should not be set to
opposite extremes. This will block the
middle spray arm. Take care when slid
ing the basket in and out in this posi
tion.
-
Load the upper basket with small, light
weight, or delicate items such as cups,
saucers, glasses, dessert bowls and
flat pans.
Long items such as soup ladles, mixing
spoons and knives can be set across
the front of the upper basket.
-
-
-
22
Page 23
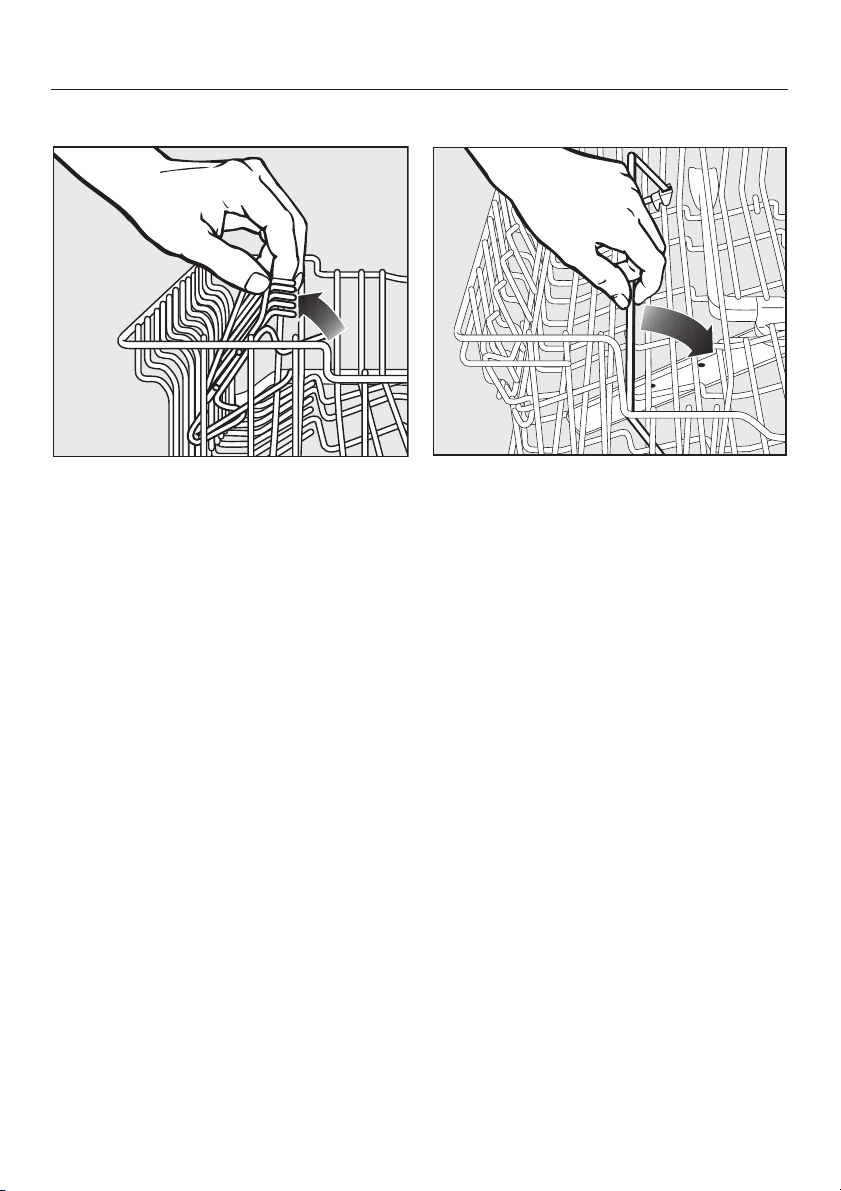
Loading the dishwasher
Adjustable cup racks
Raise the rack to make room for tall
glasses. Lower it to double stack
smaller pieces.
Coffee bar
To allow water to run off the bottom of
coffee mugs, place slanted on top of
the coffee bar. The bar can also be
used to separate two rows of glasses.
To stack wide items, flip the bar to the
right.
23
Page 24
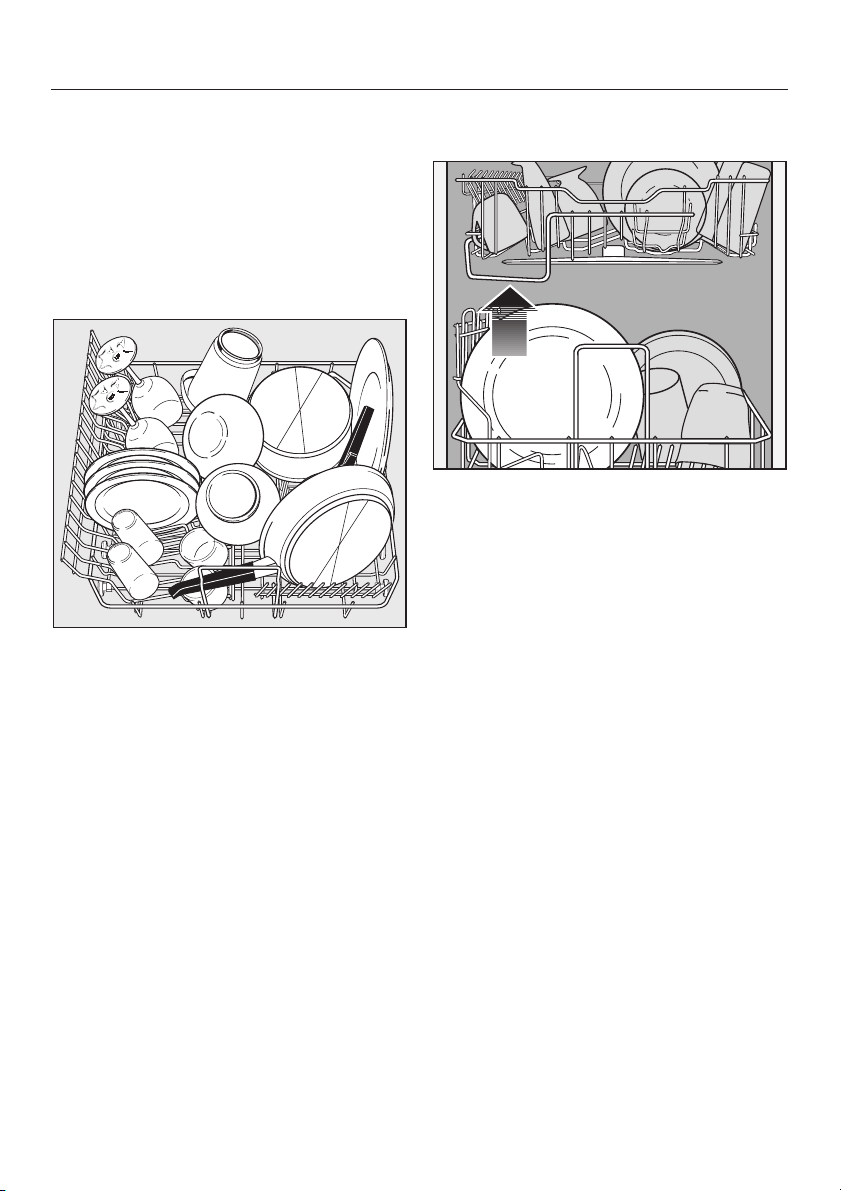
Loading the dishwasher
Lower basket
For larger and heavier items such as
plates, serving platters, sauce pans,
bowls.
Stemmed glassware can also be
placed in the lower basket when se
cured with the StemGuard.
Height limit
-
The guide at the front of the upper basket determines the maximum height for
items placed in the lower basket so that
the middle spray arm is not blocked.
24
Page 25
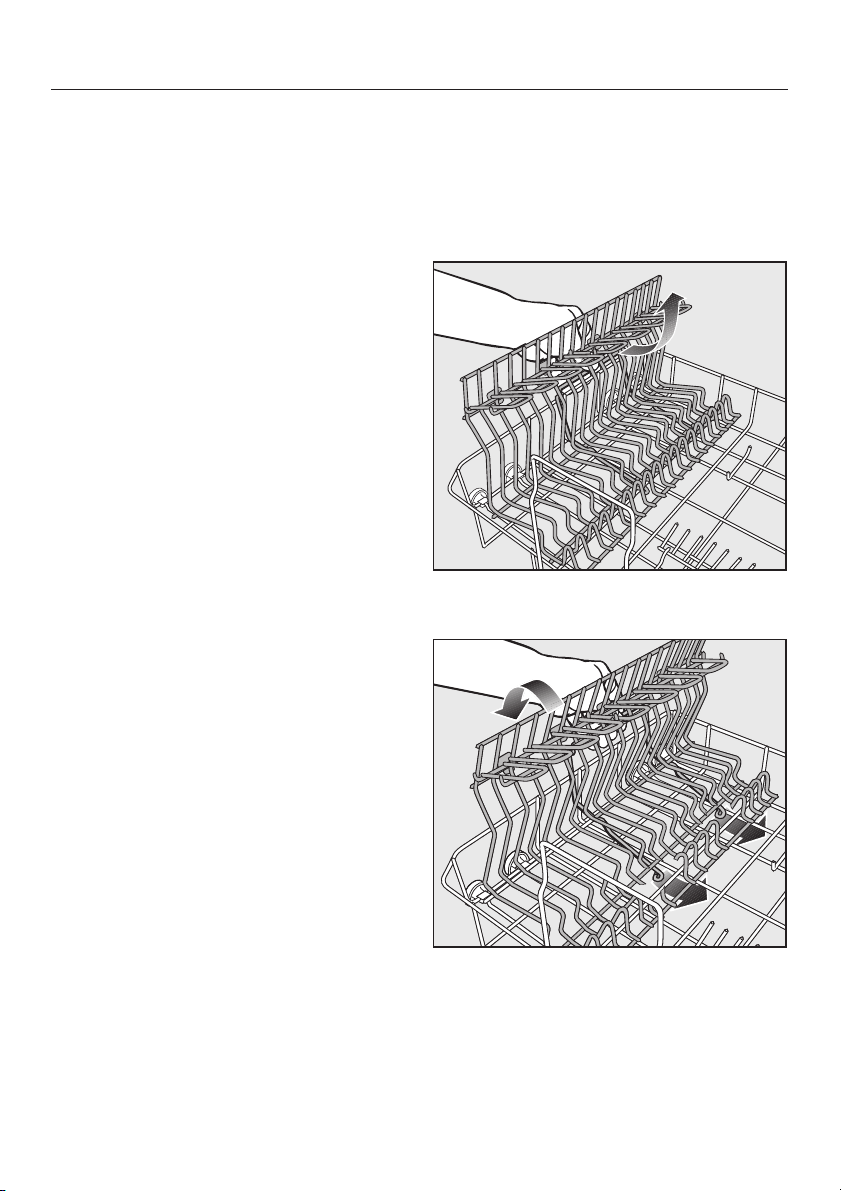
Lower basket inserts
Various removable inserts are available for the lower basket to accomodate spe
cial items to be washed.
Removing an insert
To remove an insert, gently pull up on
^
the handle.
Inserting an insert
^ Slid the hitches of the insert under
the vertical struts of the lower basket.
-
25
Page 26
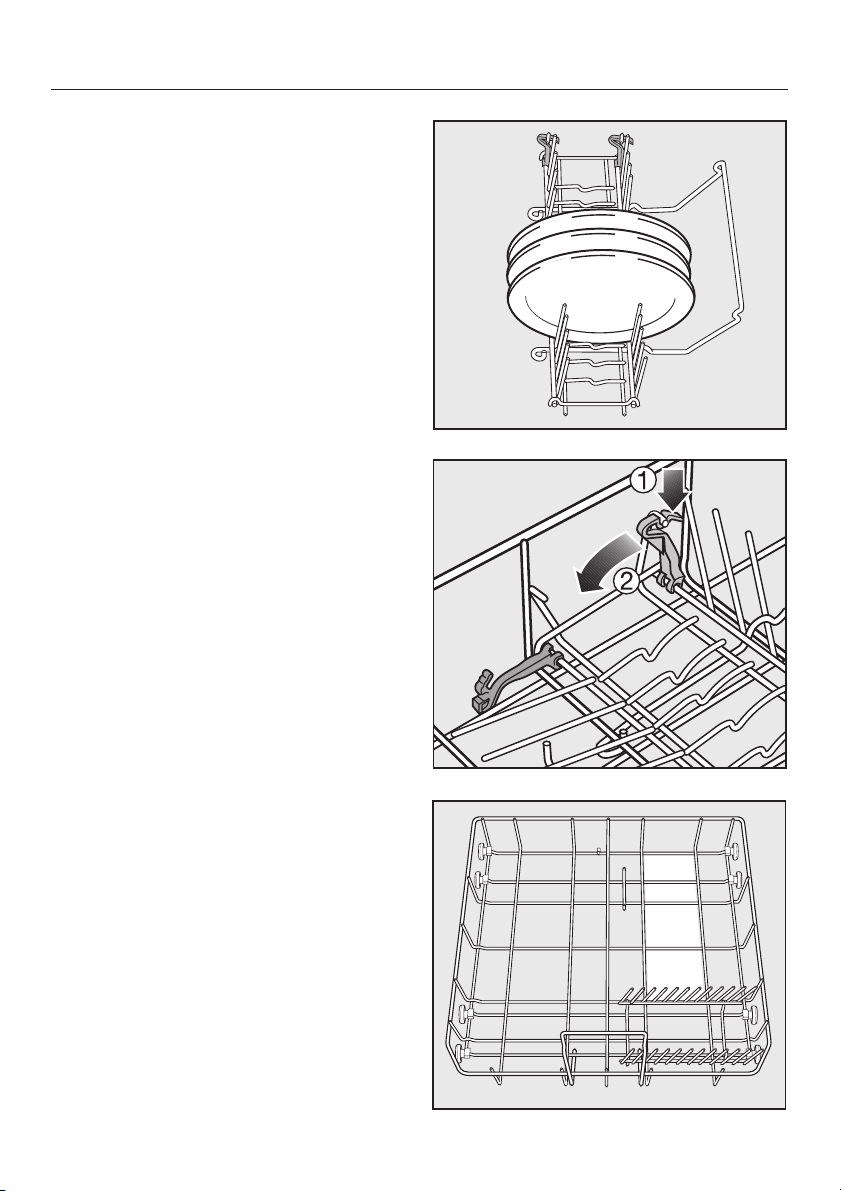
Lower basket inserts
Foldable spike insert
A highly flexible design holds tableware
securely. It can be folded out of the way
for pots, pans and other large items.
This insert secures plates and platters.
Foldable spikes
Two rows of spikes can be folded down
to create more room for larger dishware
e.g. pots, pans and bowls.
^ Press on the yellow levers, a, to fold
down the spikes, b.
^
Hook the foldable spike insert into the
back right corner of the lower basket,
the area marked in white.
26
Page 27
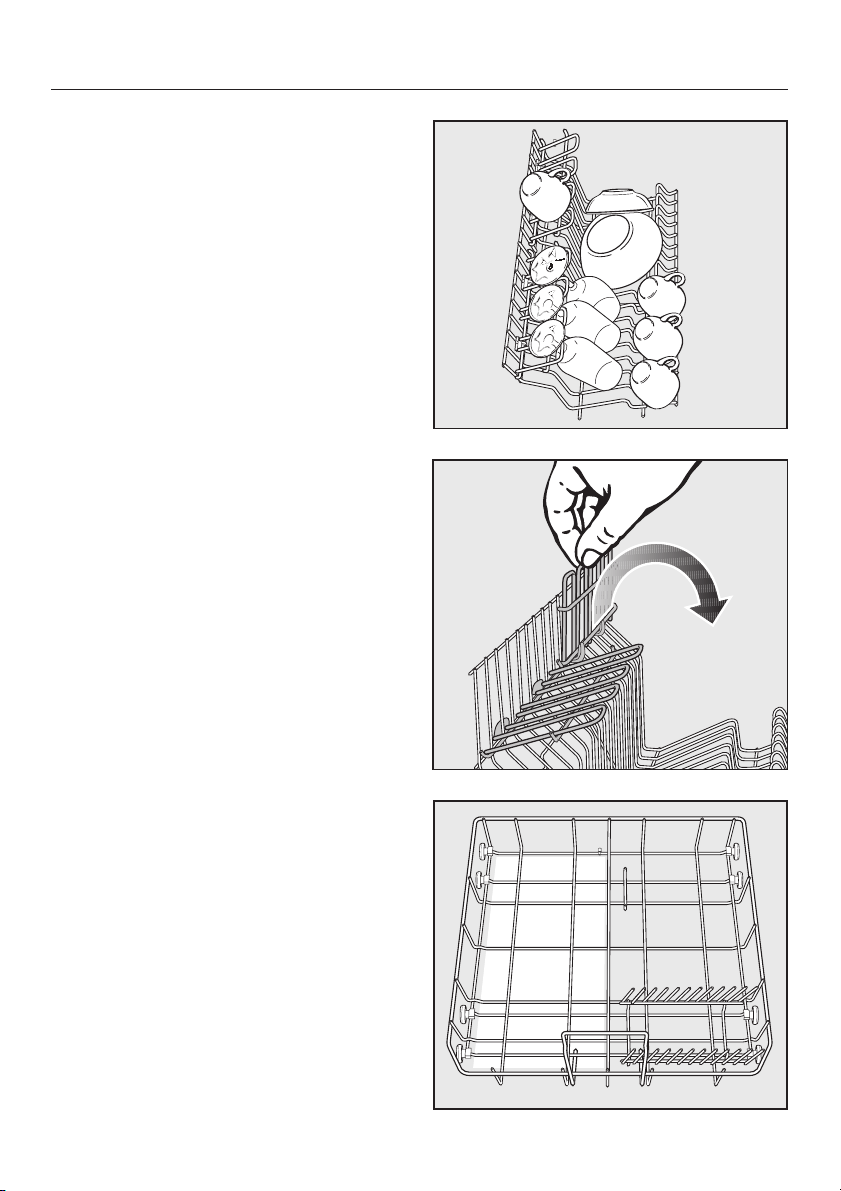
Plateguard Plus with StemGuard
This special attachment cradles
delicate stemware. It can also hold
teacups.
Place stems of glasses into the slots.
^
Cups can be placed on top of the
StemGuard. Never place items on
top of glassware.
^ Lower the rack to place cups on top.
Raise the rack to make room for tall
items.
Lower basket inserts
^
Hook the Plateguard Plus with
StemGuard insert into the left half of
the lower basket, the area marked in
white.
27
Page 28
Lower basket inserts
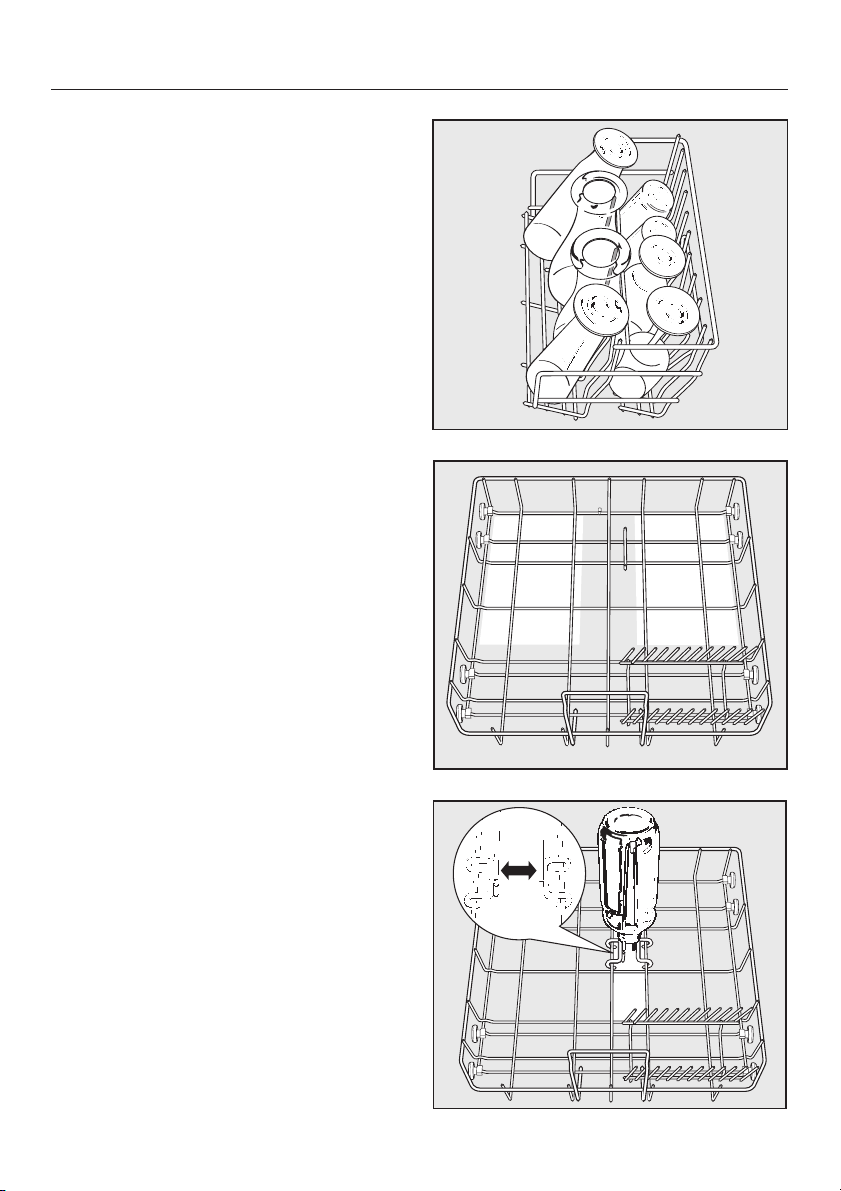
Tall Glassware Insert for lower basket
(select models)
This insert for tall glasses holds glasses
securely with the vertical supports.
^ Hook the glassware insert into the left
or right rear of the lower basket, the
areas marked in white.
Vase / Bottle holder
The bottle holder e.g. for milk or baby
bottles, can be inserted into the bottom
basket in more than one place. Position
in any area marked white in the illustra
tion. Do not place the insert in the cor
ners of the lower basket, water cannot
properly cover bottles in these areas.
28
-
-
Page 29
Basket accessories
Additional inserts for the upper and lower baskets may be purchased from your
Miele dealer or the Miele Technical Service Department.
Lower Basket Cup Insert to wash a large number of cups
attaches to the lower basket
Large Diameter Plate Insert to wash plates with a diameter
up to 12
1
/2" (32 cm)
attaches to the lower basket
Mini Cutlery Basket to wash additional cutlery
for units with cutlery tray
attaches to the lower basket
Upper Basket Glassware Insert to wash long stemmed glassware
attaches to the upper basket
29
Page 30
Operating the dishwasher
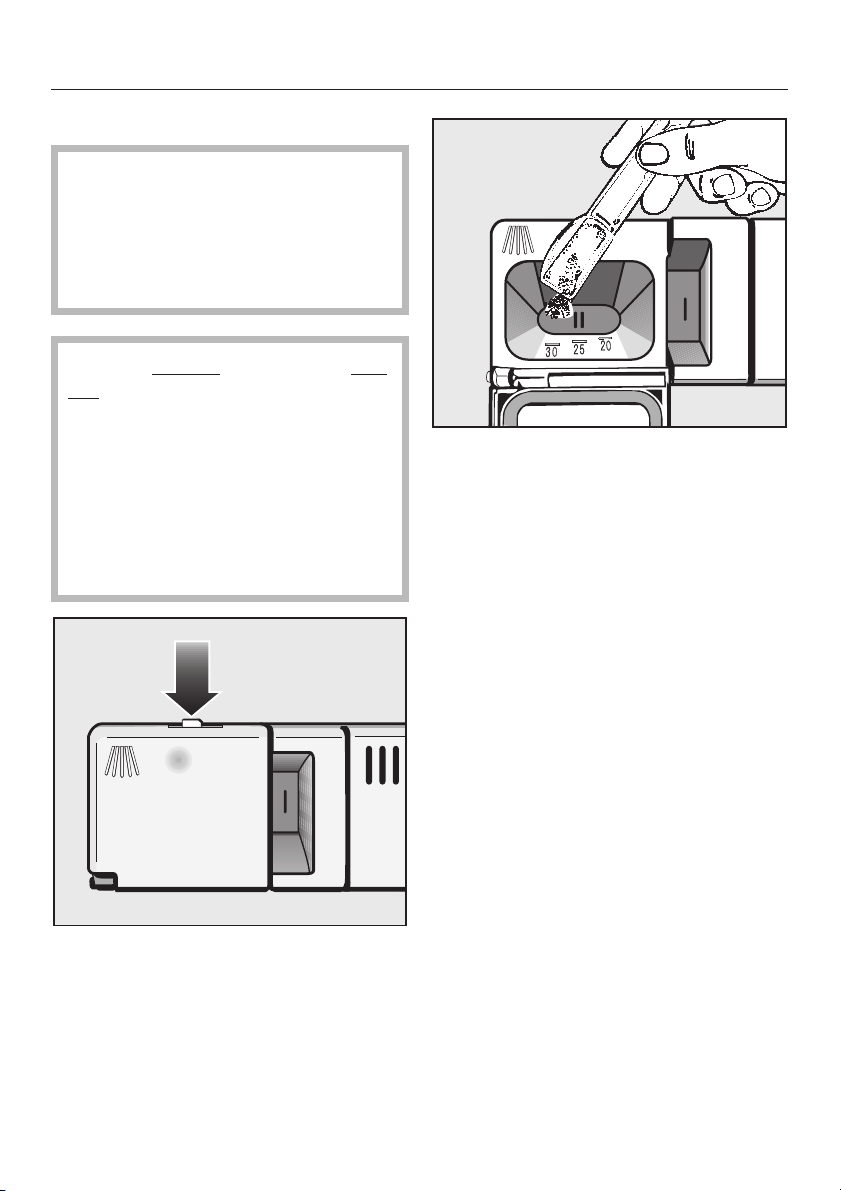
Adding detergent
Dishwasher detergents contain
,
irritant or corrosive ingredients.
Keep children away from detergent.
Do not fill the detergent dispenser
until you are ready to start the dish
washer.
-
Only use powder detergents or tab
lets formulated for residential dish
washers. The use of gel or liquid de
tergent is not recommended. Never
fill the detergent dispenser to ca
pacity.
Do not use more than the recommended amount of detergent. Continued use of too much detergent
may cause machine damage.
^
To open, press the latch on the deter
gent dispenser.
-
-
-
-
The horizontal marks in Compartment II
indicate levels of approximately 1
3
1
/4and 2 tablespoons (20, 25 and
30 ml) respectively.
^ With the dishwasher door fully open
fill compartment II with 2 tablespoon
(30 ml) of powder detergent, or one
detergent tablet.
^ Close the cover. The cover will al-
ways open at the end of a wash program except in "Rinse & Hold".
2 tablespoon (30 ml) of detergent is
enough for most normally soiled loads.
For heavily soiled loads, or if food has
dried on the dishes, a program contain
ing a prewash cycle should be se
lected. Add an extra tablespoon (15 ml)
of detergent to compartment I.
Less detergent is needed in homes with
-
very soft water and when washing
lightly soiled dishes.
1
/4,
-
-
30
Page 31
Operating the dishwasher
Running the dishwasher
Open the door.
^
Make sure the spray arms are not
^
blocked.
Turn on the dishwasher using the
^
"On" button (15).
Select a wash program using the pro
^
gram selection buttons (22). The selected program indicator will light.
^ Refer to the "Program guide" for de-
tails.
^ Select "Top Solo" or "Delay Start" if
desired. See "Additional features".
^ Close the door.
The red optic indicator will come on.
The program will begin.
Do not end a program prematurely!
Important program steps could be
omitted (e. g. reactivating the water
softener).
Waterproof System
All Miele dishwashers are specially de
signed to shut off the water intake and
drain the wash cabinet in the rare event
of an internal water valve failure.
For this feature to be active, the ma
chine must be "On" (not necessarily
-
running), and the door must be closed.
At the end of a program
At the end of a program the optic indicator will flash.
The optic indicator will go out after an
hour, or sooner if the door is opened.
After a program has ended:
^ Open the door.
The optic indicator and the program in
dicator will go out.
^
Press the "Off" button (16).
Allow dishes to cool before unloading.
It is advisable to turn off the water
supply if the dishwasher will not be
used for a period of time (e.g. while
vacationing).
-
-
-
31
Page 32
Operating the dishwasher
Interrupting a program
A program is interrupted as soon as the
door is opened.
If the door is closed, the program will
continue from where it was interrupted.
Water in the dishwasher may be
,
hot. There is a danger of being
burned!
Only open the door if absolutely
necessary.
Changing a program
If the door has not been closed yet:
Press the program button of the new
^
program.
Close the door.
^
The optic indicator will come on.
The program will begin.
If the door has already been closed
and the program is running:
Open the door.
^
Press the "Off" button (16).
^
^ Press the "On" button (15).
^ Select a new program using the pro-
gram selection buttons (22).
^ Close the door.
The optic indicator will come on.
The new program will begin.
32
Page 33
Operating the dishwasher
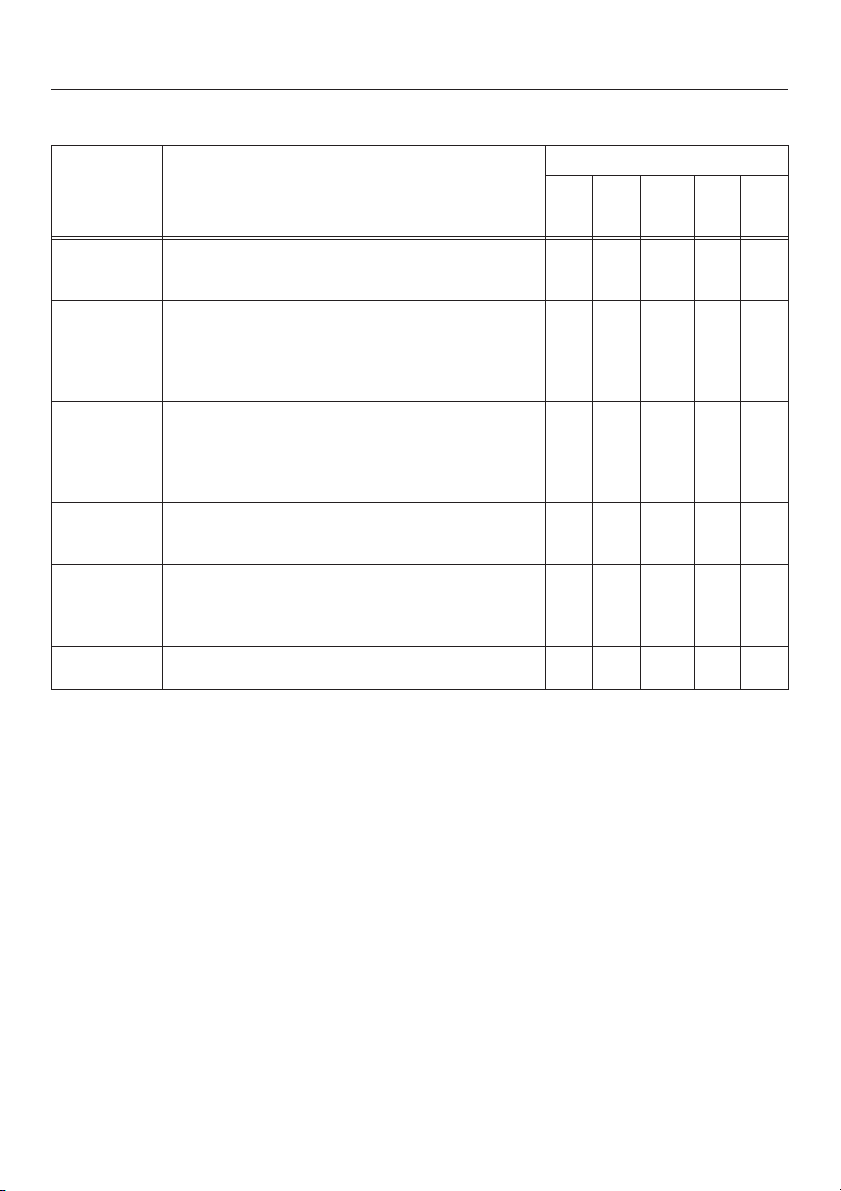
Program guide
Program When to use Program cycle
Main
wash
Interim
rinse
12
Pots & Pans
Sani Wash
Normal Plus
Normal
China &
Crystal o
Rinse & Hold for rinsing dishes when a complete cycle is not needed
1) Eco sensor active in this program.
Usage and run-times may vary.
2) Standard for Energy Label
1)
for heavily soiled pots and pans with dried on food
Main wash temperature 170 °F (75 °C)
Run-time 142 min
1)
extended wash time
for sanitizing normally soiled dishware with dried
on food
Main wash temperature 150 °F (65 °C)
Run-time 147 min
1)
higher wash temperature helps to clean
normally soiled dishware with stubborn dried on
food or greasy residues
Main wash temperature 150 °F (65 °C)
Run-time 145 min
2)
for normally soiled dishware
Main wash temperature 130 °F (55 °C)
Run-time 143 min
"Gentle program"
1)
for lightly soiled and heat sensitive tableware
Main wash temperature 115 °F (45 °C)
Run-time 82 min
Run-time 11 min
Pre-
wash
12
XX X X - X X
-X X XX X X
XX X X - X X
XX X X - X X
-X X X- X X
-X - -- - -
Final
rinse
Dry-
ing
When washing a full load in Pots & Pans, Sani Wash and the Normal programs use at least 2 table
spoons (30 ml) of detergent. For the Pots & Pans program add an additional teaspoon (5 ml) to com
partment I.
If "Top Solo" is selected, reduce the amount of detergent to 1
Program times are based on a hot water connection. If the unit is connected to cold water, program
times will increase by approximately 25 minutes.
1
/4tablespoons (20 ml).
-
-
33
Page 34
Operating the dishwasher
Additional features
"Top Solo" (2)
Press the "On" button (15).
^
Using "Top Solo" will save water and
energy.
This program is recommended when
there is only a small load to clean. "Top
Solo" can be selected with all pro
grams.
With this feature, water is directed only
to the top and middle spray arms. This
means that the water jets are only
aimed at items in the upper basket and
the cutlery tray.
The middle spray arm also directs
water downwards, so lightly soiled
plates or platters can be placed in the
lower basket.
When using this program, do not place
bowls or other hollow containers in the
lower basket.
Because a smaller load is being
washed the amount of detergent used
can be reduced to 1
(20 ml).
1
/4tablespoons
-
The "On" indicator (15) will light.
Select a program using the program
^
selection buttons (22).
The selected program indicator will
light.
^ Press the 2 (19) button.
The 2 (19) indicator will light.
^ "Delay Start" may also be selected at
this time (see next page).
^ Close the door.
The optic indicator will come on.
The program will begin.
34
Page 35
Delay start (d)
The start time of a program can be de
layed from 1 to 9 hours.
Operating the dishwasher
Press the "On" button (15).
^
Select a program using the program
^
selection buttons (22).
The delay start is set in one hour steps.
When using delay start, make sure
the detergent compartment is dry
before adding detergent. Wipe dry if
necessary.
The selected program indicator will
light.
Press the d (18) button.
^
1 will appear in the delay start display
(17). A delayed start time of one hour is
set.
^ Press the d button (18) until the de-
sired delayed start time appears in
the time display (17).
The delay start is set in one hour steps
up to 9 hours. If the "Delay Start" d (18)
button is pressed after the 9 hour mark
the delay start feature will be cancelled
and must be reselected.
^
The "Top Solo" feature may also be
selected at this time (see previous
page).
^
Close the door.
Once the delay start period has
elapsed, the selected program will be
gin automatically.
-
35
Page 36

Operating the dishwasher
To start a program before the delay
start period has elapsed:
Open the door.
^
Press the "Off" button (16).
^
Press the "On" button (15).
^
Select a program using the program
^
selection buttons (22).
Select "Top Solo", if needed.
^
Close the door.
^
The optic indicator will come on.
The program will begin.
36
Page 37
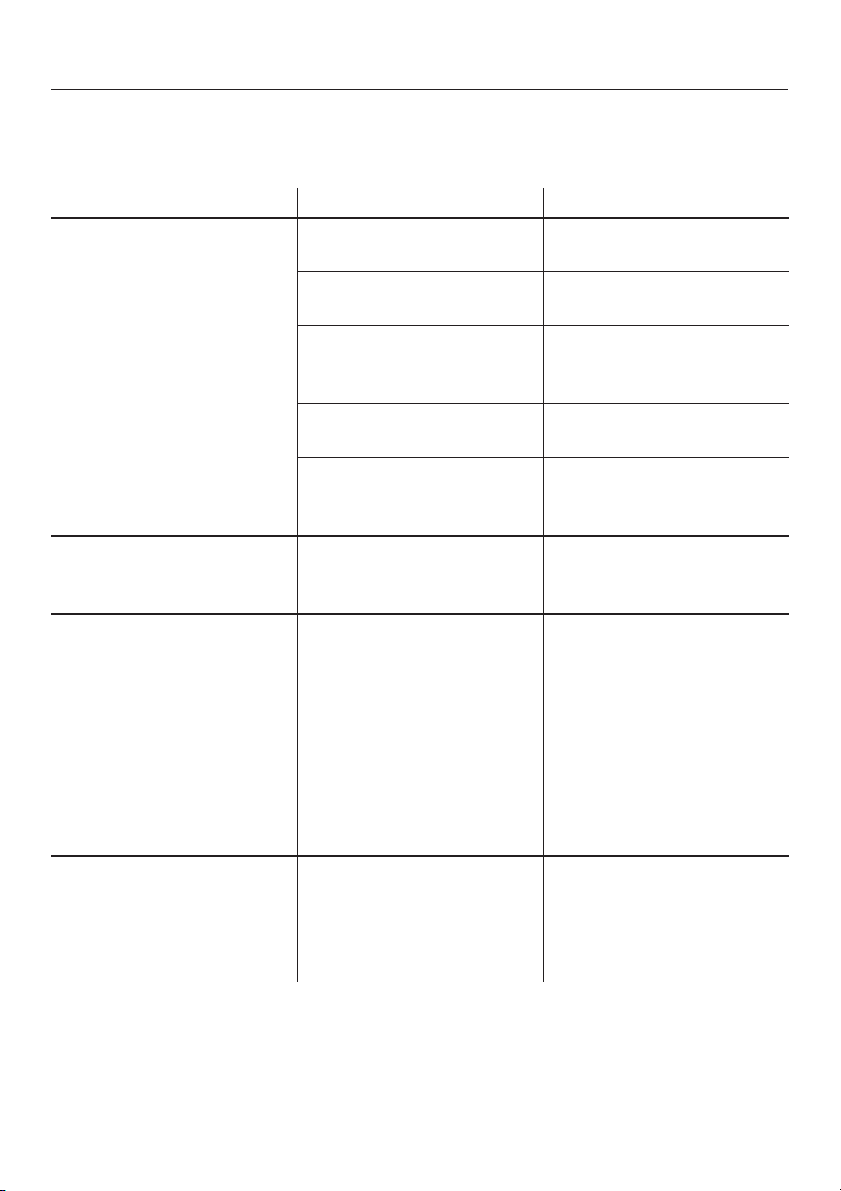
Frequently asked questions
With the aid of the following guide, minor problems can be fixed without a service
call.
What if ... Possible fault Fix
the dishwasher does not
start?
the dishwasher stops
during a program?
the dishwasher stops
running, shortly after
starting a program and
the optic indicator
flashes?
after starting a program,
the optic indicator does
not shine?
The door is not properly
closed.
The machine is not
plugged in.
The fuse is defective or
the breaker has tripped.
The dishwasher is not
turned on.
No program is selected. Select a program with the
The fuse is defective or
the breaker has tripped.
Water intake error.
The "Drain" indicator
flashes / lights.
The optic indicator reflec
tor was not placed in the
steam deflector properly.
Close the door firmly.
Insert the plug.
Reset the circuit breaker.
Make sure it is a 15 A
circuit breaker.
Press "On", select pro
gram.
program selection buttons.
Reset the circuit breaker.
Make sure it is a 15 A
circuit breaker.
– Turn off the dishwasher.
– Open the water valve.
– Clean the water inlet fil-
ter, see maintenance in
structions.
The waterproof system
has activated.
–
Call the Miele Technical
Service Department.
-
Install the optic indicator
reflector correctly.
See Installation manual,
"1. Install the steam
deflector".
-
-
37
Page 38
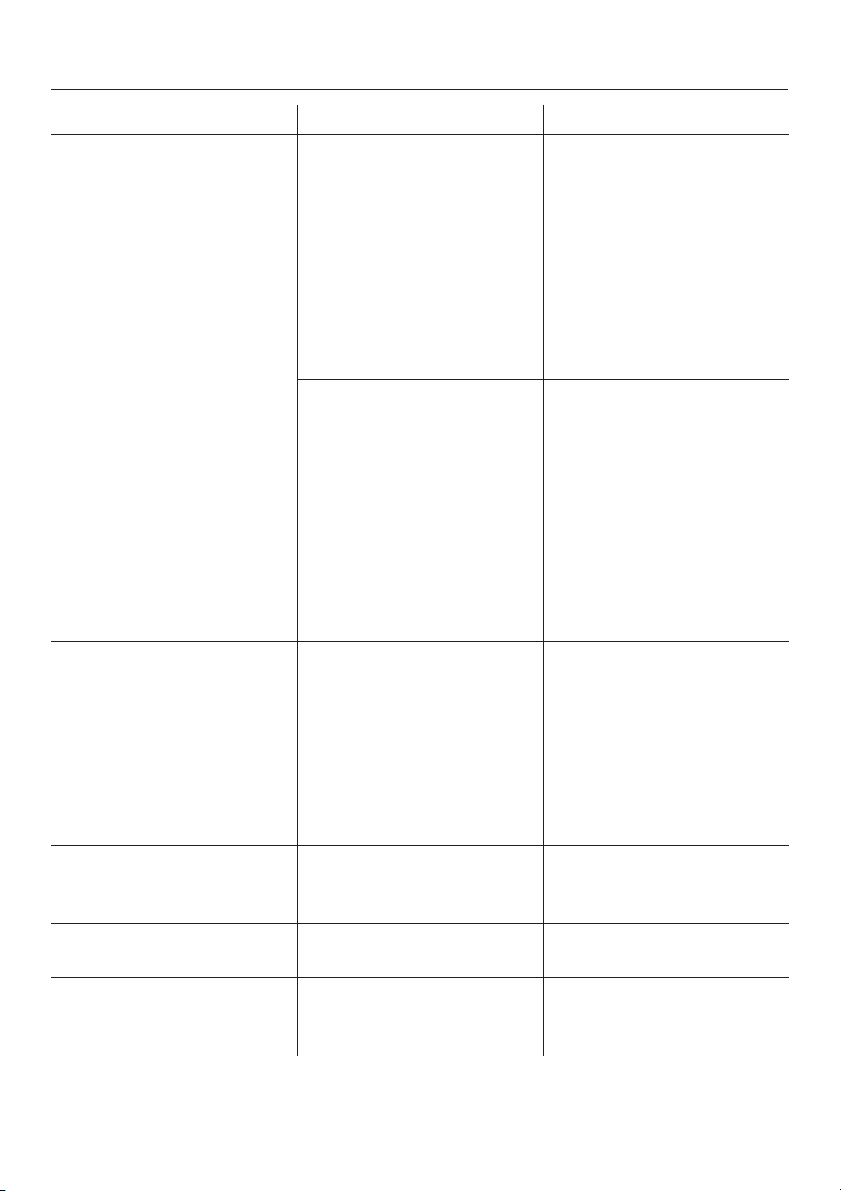
Frequently asked questions
What if ... Possible fault Fix
shortly after starting a
program, the dishwasher
stops running and the
optic indicator flashes?
Water intake error.
The "Drain" indicator
flashes.
–
–
–
–
Turn off the dishwasher.
Open the water valve.
Clean the water inlet
filter, see maintenance
instructions.
The water pressure is
less than 4.5 psi
(0.3 bar).
Contact a plumber.
Drain error. Water remains
in the wash cabinet.
The "Drain" indicator
flashes.
after a program has
ended, the optic indicator and the program indicators flash?
there is a knocking
noise in the wash cabi
net?
there is a rattling noise? Items are not secure in
there is a knocking
noise in the water
pipes?
There may be a technical
fault.
The spray arm is hitting
-
an item in the basket.
the wash cabinet.
This may be caused by
the installation or the di
ameter of the pipe.
Turn off the dishwasher.
–
Clean the triple filter.
–
See maintenance
instructions.
– Clean the drain pump
and the non-return
valve, see maintenance
instructions.
– Remove any kinks in
the drain hose.
– Turn the dishwasher off.
Despite the problem the
dishwasher can be used.
If the indicator lights flash
again after the next pro
gram cycle, call the Miele
Technical Service Depart
ment.
Interrupt the program and
rearrange items blocking
the spray arms.
Interrupt the program and
rearrange loose pieces.
This has no effect on the
-
dishwasher. If in doubt
contact a plumber.
-
-
38
Page 39
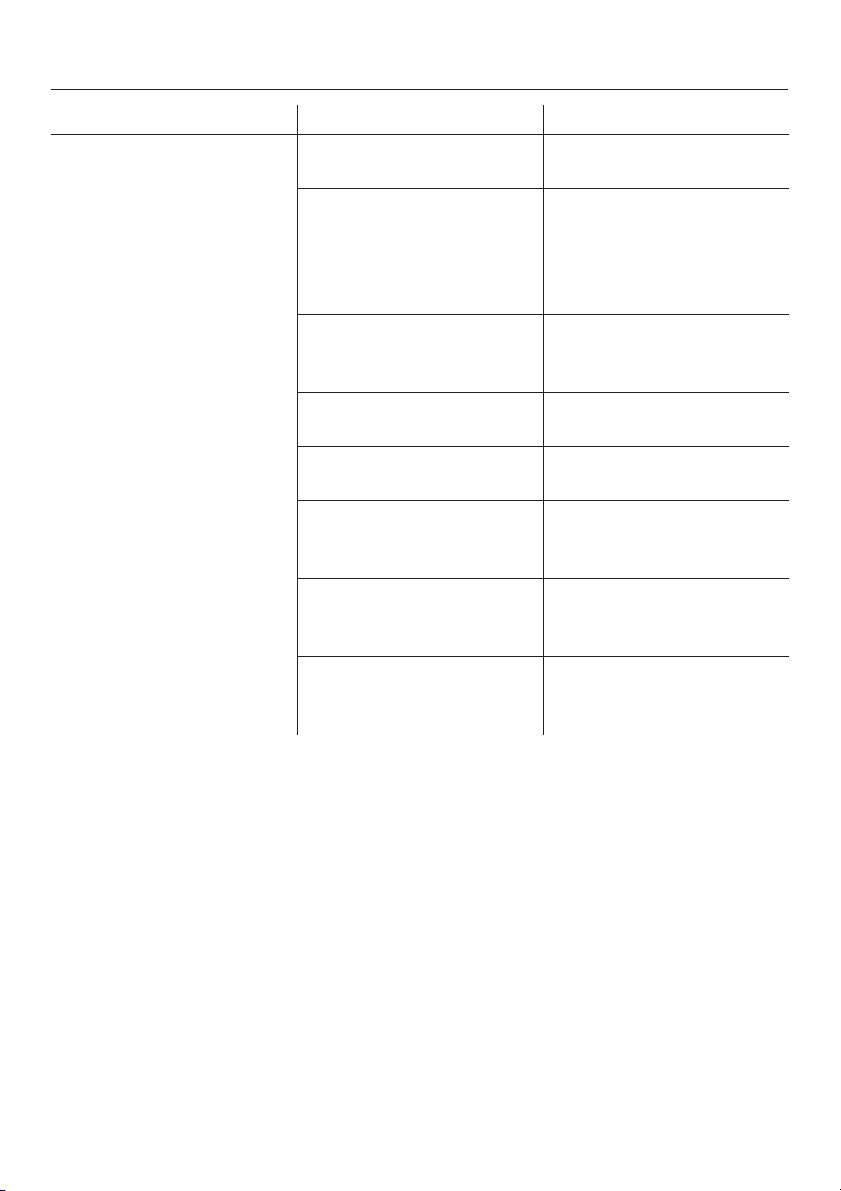
Frequently asked questions
What if ... Possible fault Fix
dishes are not clean? The dishes were not
loaded correctly.
The water feed for the
middle spray arm was
covered. Not enough
water flowed into the
middle spray arm.
The program was not
powerful enough.
Not enough detergent
was used.
The spray arms were
blocked by tall items.
The spray arm jets are
clogged.
The triple filter is clogged
or not correctly seated.
The drain pump or the
non-return valve is
blocked.
See "Loading the dish
washer".
Rearrange items in the
upper basket so that the
opening is not covered.
Select a more intensive
program, see "Program
guide".
Use more detergent, see
“Adding detergent”.
Check that spray arms ro
tate freely before washing.
Clean the spray arm jets,
see maintenance instructions.
Clean and reseat the triple
filter, see maintenance instructions.
Clean the drain pump and
the non-return valve, see
maintenance instructions.
-
-
39
Page 40
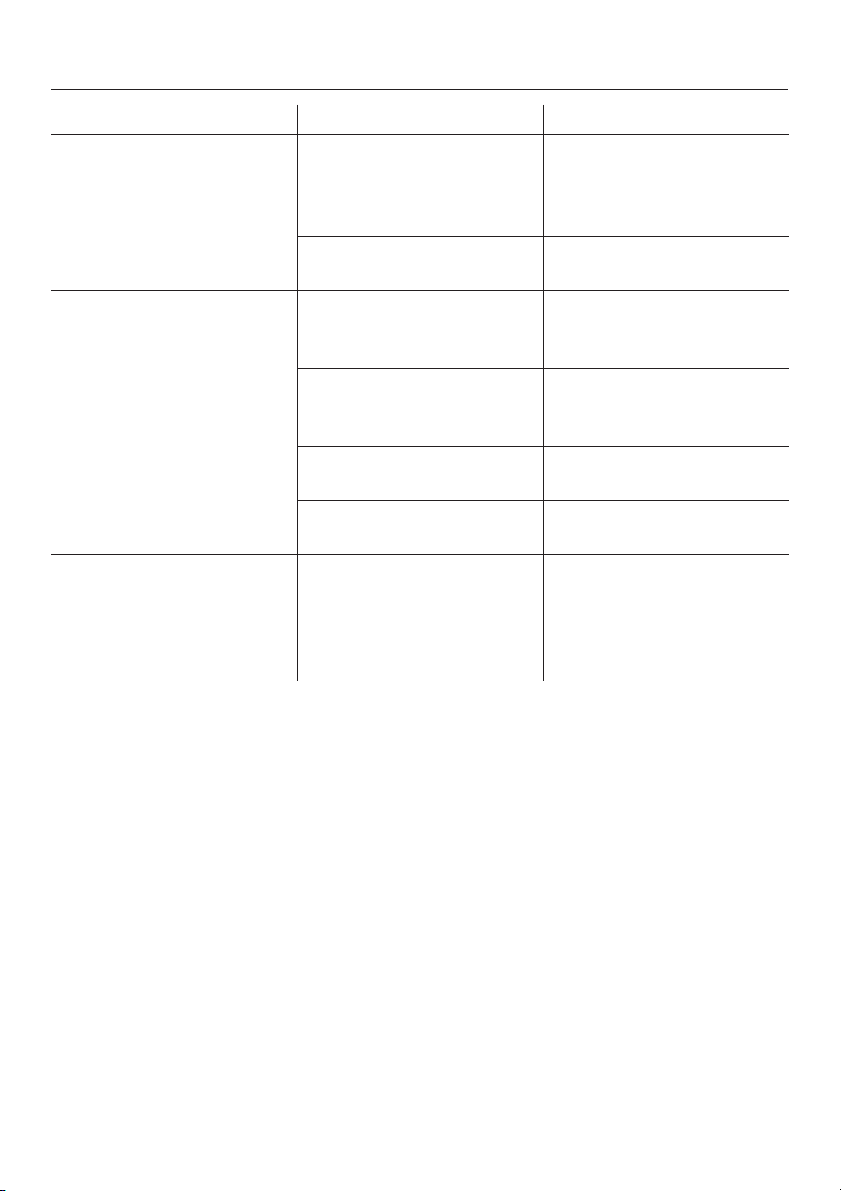
Frequently asked questions
What if ... Possible fault Fix
dishes are not dry,
glasses and cutlery are
spotted?
white residue is visible
on cutlery and dishes,
clouding occurs on
glassware and film can
be wiped off?
there are smears on
glasses and cutlery, bluish sheen on the surface
of glasses and film can
be wiped off?
The rinse aid setting may
be too low, or the rinse aid
reservoir is empty.
Dishes were taken out too
soon.
Not enough rinse aid was
used.
The salt reservoir is
empty.
The salt reservoir cap was
not correctly screwed on.
The incorrect detergent
was used.
The rinse aid dosage is
set too high.
Increase the dosage or
refill the reservoir, see "Be
fore using for the first
time".
Leave dishes in longer.
Increase the dosage, see
"Before using for the first
time".
Add reactivation salt, see
"Before using for the first
time".
Reseat it making sure it
screws back on correctly.
Only use powder detergent or tablets.
Reduce the dosage, see
"Before using for the first
time".
-
40
Page 41
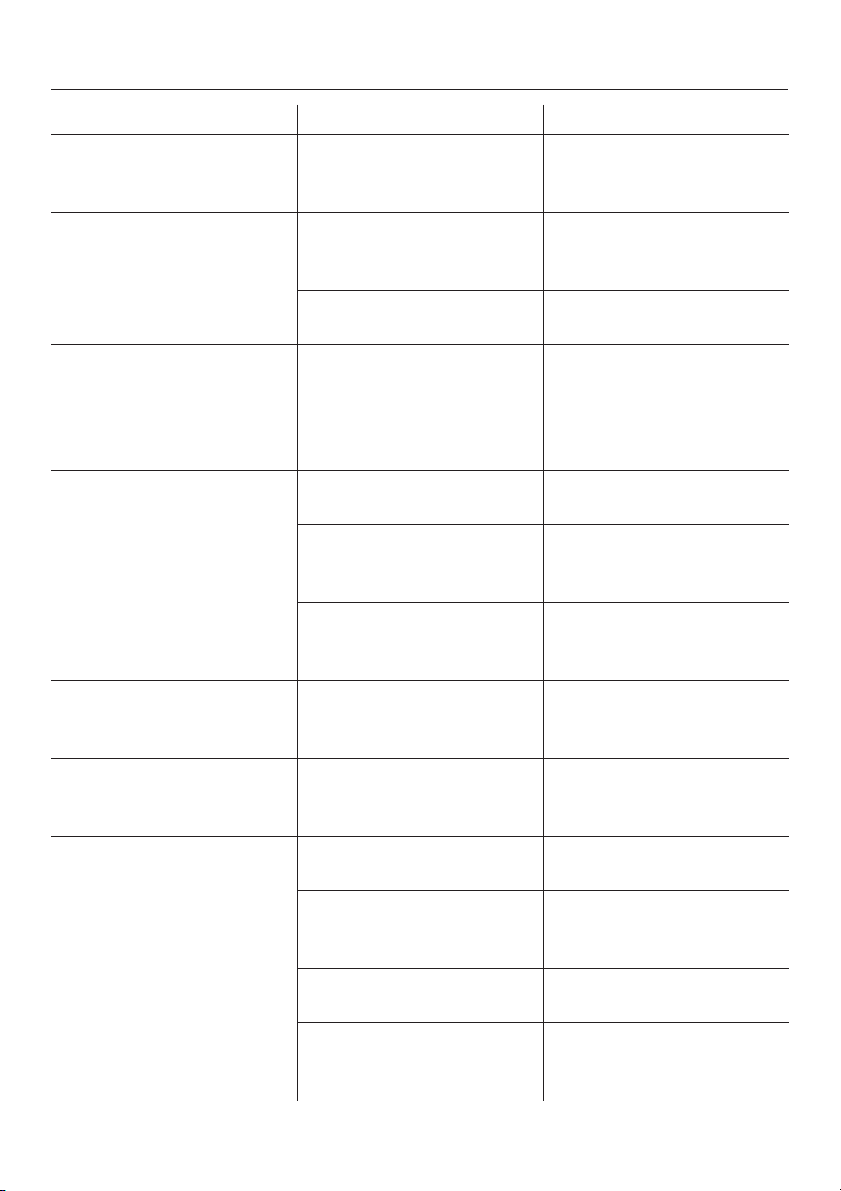
Frequently asked questions
What if ... Possible fault Fix
glasses are dull and dis
colored and film cannot
be wiped off?
tea or lipstick stains
have not been com
pletely removed?
plastics are discolored? Natural dyes e. g. from
there are rust stains on
cutlery?
the detergent dispenser
lid can not be closed
properly?
detergent is left in the
dispenser at the end of a
program?
water remains in the
wash cabinet at the end
of a program?
-
Glasses are not dish
-
washer safe.
The wash temperature of
the selected program was
too low.
Not enough detergent
was used.
vegetables may be the
cause. Not enough deter
gent was used to break
down natural dyes.
The salt reservoir cap was
not correctly screwed on.
The affected items are not
corrosion resistenat.
A program was not run
soon after filling the salt
reservoir.
Detergent residue is
blocking the catch.
The dispenser was damp
when detergent was
added.
The triple filter in the wash
cabinet is clogged.
The drain pump or the
non-return valve may be
blocked.
The drain hose is kinked. Remove any kinks in the
A program was not run
soon after filling the salt
reservoir.
-
There is no remedy.
Only wash dishwasher
safe glasses.
Select a program with a
higher temperature.
Use more detergent.
Use more detergent, see
"Adding detergent".
Discoloration is perma
nent.
Reseat and screw the cap
on firmly.
There is no remedy.
Only wash dishwasher
safe cutlery.
Always run a program after refilling the salt reservoir.
Remove the residue.
Dry the dispenser before
adding detergent.
Clean the triple filter. See
maintenance instructions.
Clean the drain pump and
the non-return valve, see
maintenance instructions.
drain hose.
Always run a program af
ter refilling the salt reser
voir.
-
-
-
41
Page 42
After sales service
In the event of a fault which you cannot
correct yourself please contact:
Your Miele Dealer
–
or
The Miele Technical Service Depart
–
ment.
USA 1-800-999-1360
CDN1-800-565-6435
When contacting the Miele Technical
Service Department, please quote the
model and serial number of your appliance.
These can be found on the data plate
on the upper inside edge of the dishwasher door.
Program update function - PC
The "PC" indicator has the function of
Program Correction (PC). This allows a
technician to update the programming
of the dishwasher to make use of new
-
technological developments.
For example, if a detergent that gives
good wash results using only cold
water were to become available, the
wash programs can be modified to take
advantage of this.
42
Page 43

To transport the dishwasher, e. g. when
moving to a new home, note the follow
ing:
Empty the dishwasher.
–
Secure any loose parts, e. g. hoses,
–
cables, cutlery baskets.
Transport the dishwasher in the up
–
right position.
If unavoidable it may be transported
on its back.
Do not transport it on its side or on
the door. Residual water in the ma
chine could leak and cause electrical
damage.
-
-
Transport
-
43
Page 44

44
Page 45
User Maintenance Instructions
To prevent accidents
and machine damage,
read these instructions
before installation or use.
Page 46
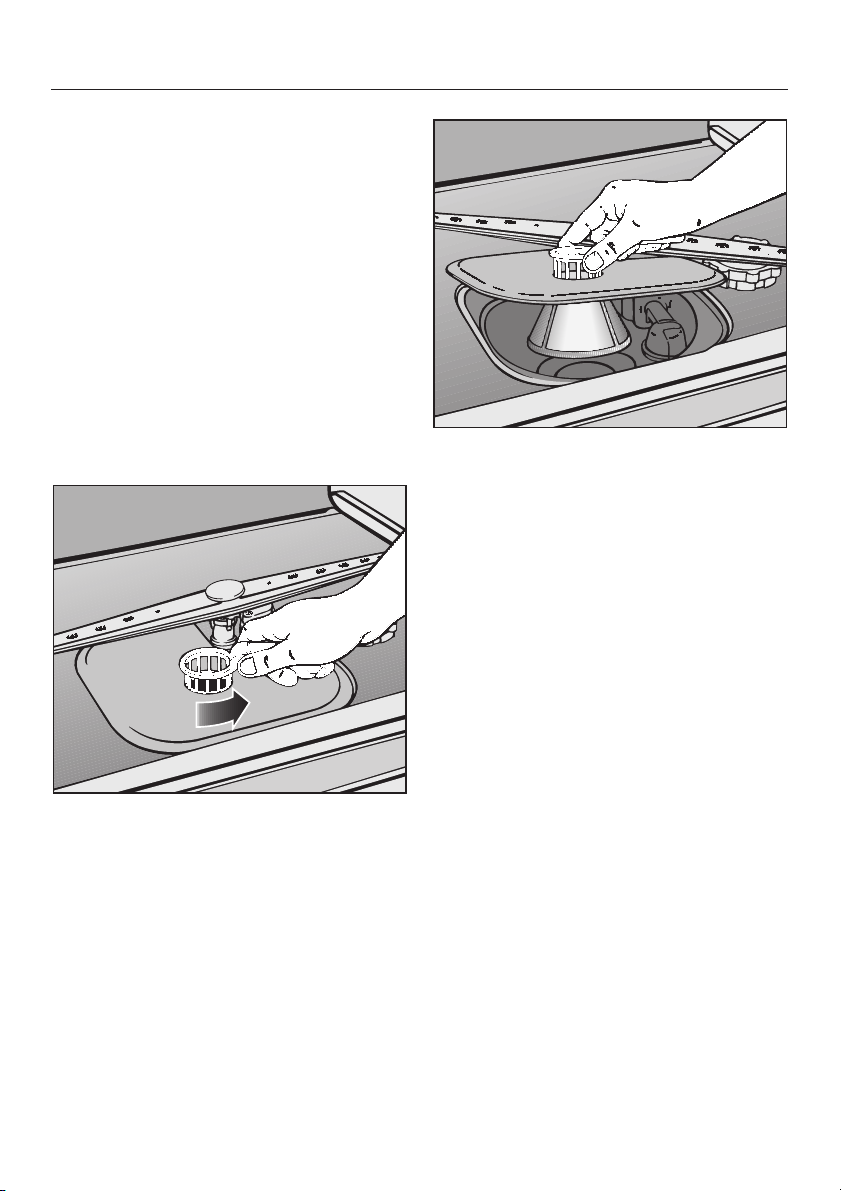
Triple filter system
The triple filter system in the base of the
wash cabinet prevents food from being
redeposited on dishes. It also protects
the circulation pump from damage
caused by foreign objects (e.g. broken
glass, bones).
The filter system should be cleaned ev
ery 4 - 6 months or whenever a foreign
object is trapped.
Cleaning the filter in the wash
cabinet
^
Turn off the dishwasher before clean
ing.
^
Turn the handle counterclockwise to
release the triple filter system.
-
Lift the filter out of the machine. Re
^
move any solid particles and rinse
under running water. Scrub with a nylon brush if necessary.
-
-
46
Page 47
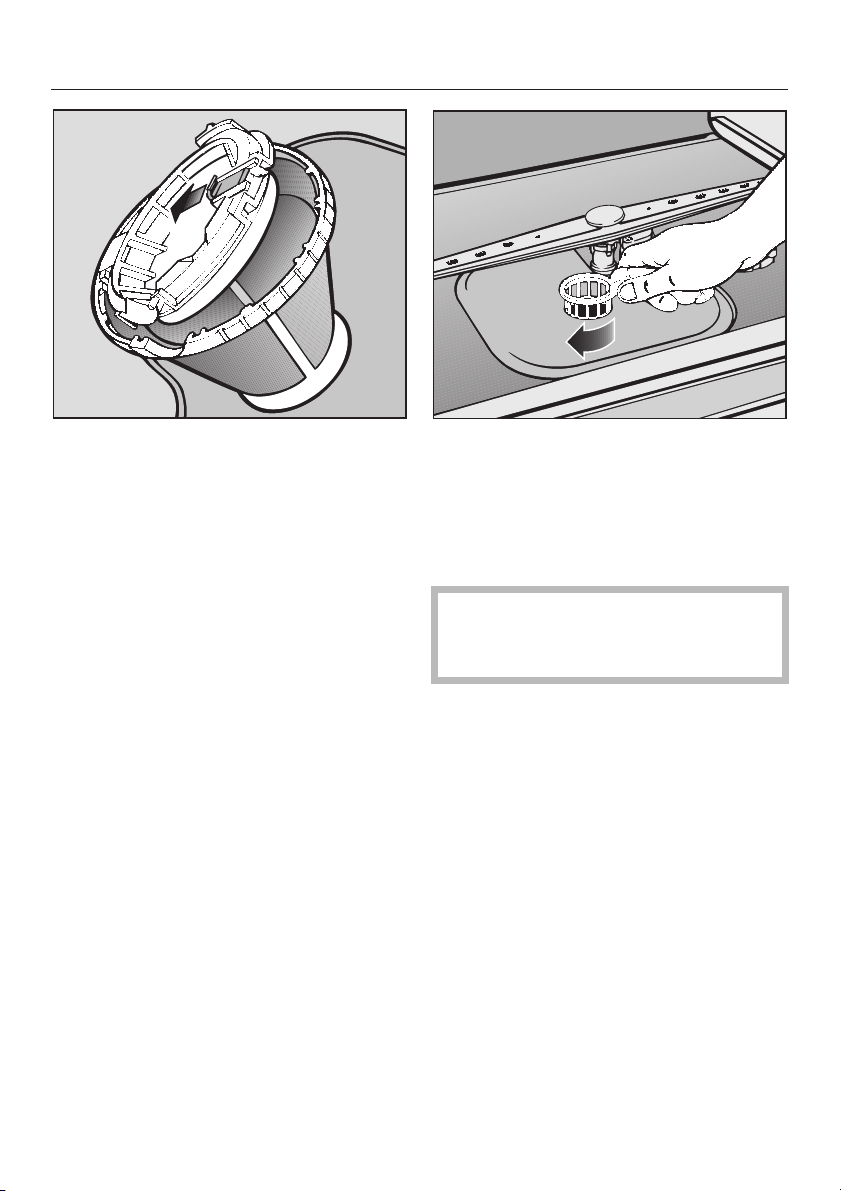
To clean the underside of the filter, the
flap must be opened:
Return the filter so it lies flat in the
^
base of the wash cabinet.
^ Pull back the yellow clip.
^ Rinse all parts under running water.
Scrub with a nylon brush if necessary.
^ Close the flap so that the clip en-
gages.
^ Lock the filter by turning the handle
clockwise.
,
The dishwasher must not be
used without the filter locked in
place.
47
Page 48
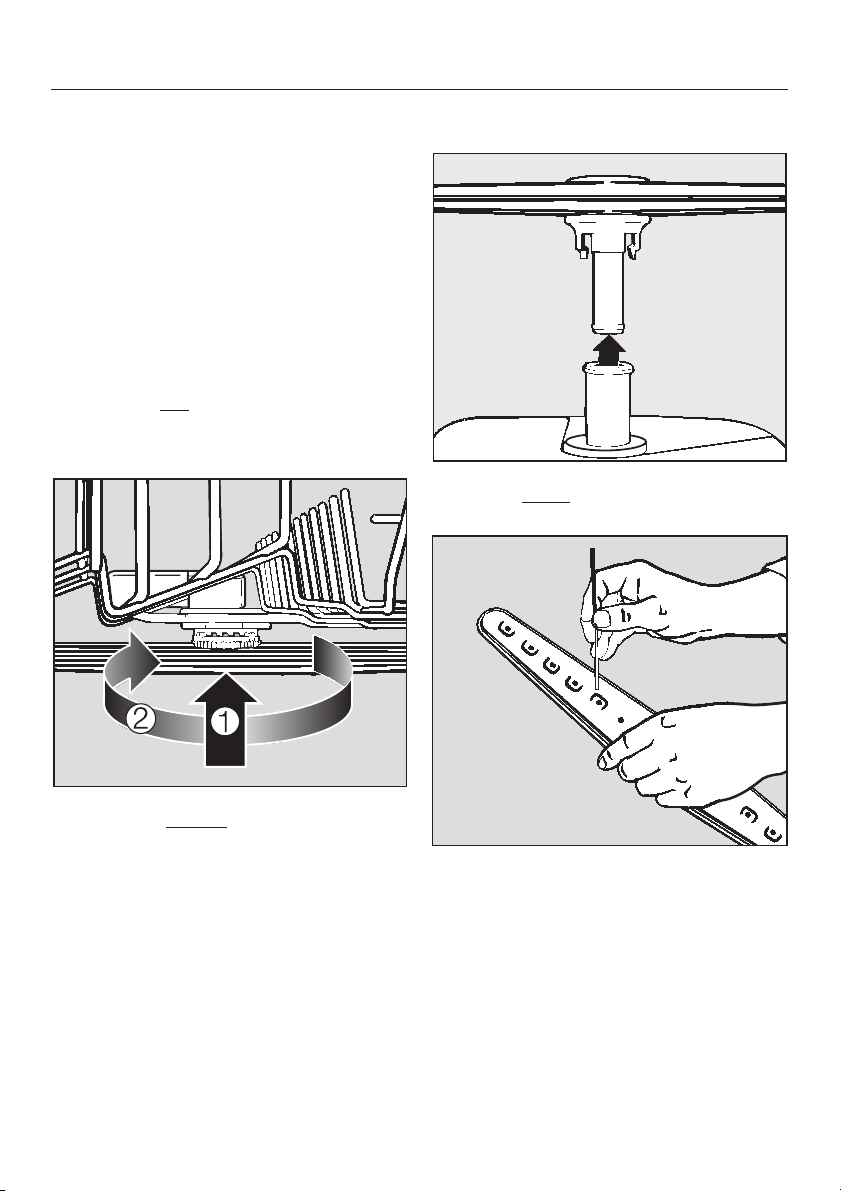
Cleaning the spray arms
Sometimes particles of food get stuck
in the spray arm jets. The spray arms
should be inspected and cleaned every
4 - 6 Months.
Turn off the dishwasher before clean
^
ing.
Remove the spray arms as follows:
Remove the cutlery tray (if present).
^
Remove the lower basket.
^
-
Press the top
^
engage the inner ratchet and un
screw the spray arm.
^
Lift up the middle
engage the ratchet and unscrew the
spray arm, b.
spray arm upwards to
spray arm, a, to
-
^ Pull the lower
wards to remove.
^
Use a pointed object such as a tooth
pick to push food articles into the
spray am jets.
^
Rinse thoroughly under running
water.
spray arm firmly up-
-
48
^
Return the spray arms and check
that they rotate freely.
Page 49
Cleaning the wash cabinet
Generally, the wash cabinet is self
cleaning if the correct amount of dish
washer detergent is used.
The wash cabinet can be cleaned with
a dishwasher cleaner such as Dis
Cleaner available from your Miele
dealer or the Miele Technical Service
Department.
-
Cleaning the door and door
seal
Wipe the door seal with a damp cloth
^
to remove any food particles.
^ Food residue and spilt liquids should
be wiped from the sides of the dishwasher door. These are outside of the
wash cabinet and are not cleaned by
water from the spray arms.
Cleaning the optic indicator
reflector
The optic indicator reflector is located
in the steam deflector under the
countertop.
To clean the optic indicator reflector:
Open the door and remove the reflec
^
tor from the plastic mounting.
Clean the reflector and the plastic
^
mounting with a damp cloth.
Do not use abrasive, glass or all
,
purpose cleaners! These will
age the surface!
dam-
-
49
Page 50
Cleaning the control panel
clean the control panel with a
Only
^
damp cloth.
Do not use too much water when
,
cleaning the controls. Water could
penetrate into the electronics and
cause damage.
Do not use abrasive, glass or all
,
purpose cleaners. They will
the surface.
damage
Cleaning the exterior
Never use abrasive cleaners,
,
scouring pads, steel wool or caustic
(oven) cleaners on the dishwasher.
They will
Plastic
All plastic surfaces can be cleaned with
warm water and liquid dish soap ap
plied with a soft sponge.
Wipe dry using a soft cloth.
Stainless steel
Stainless steel surfaces can be cleaned
using a non-abrasive stainless steel
cleaner.
To help prevent resoiling, a conditioner
for stainless steel can also be used.
Apply sparingly with even pressure.
Stainless steel colored controls
damage the surface.
-
50
These controls can be cleaned with
warm water and liquid dish soap.
These controls may become discolored
or damaged if not cleaned regularly.
Do not use a stainless steel cleaner on
the knobs or buttons.
Wood
Panels made from wood should be
cleaned using a soft damp cloth and an
appropriate wood cleaner.
Page 51
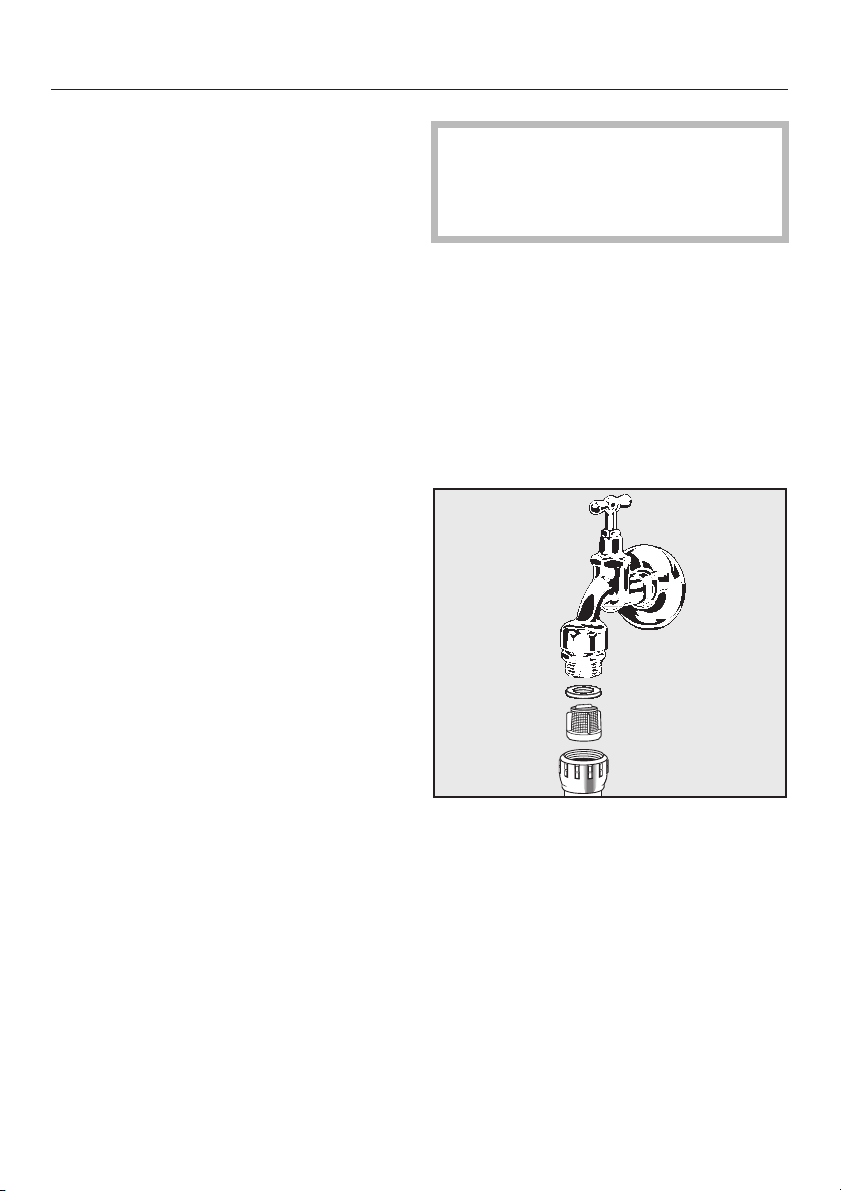
Cleaning the water inlet filter
A filter is incorporated in the intake
hose attached to the dishwasher’s shut
off valve. If your water is hard, or the
pipes contain sediment, this filter may
clog and prevent enough water from
entering the wash cabinet.
Installing an in-line water filter
If your water contains a large number of
insoluble substances, a filter between
the water valve and the intake hose
connection is recommended. These fil
ters can be pruchased from Miele’s
Technical Service Department.
The plastic valve housing on the
,
intake hose contains electrical com
ponents and should not be im
mersed, or run through water.
Cleaning the filter:
Disconnect the dishwasher from
^
electricity (unplug it or "trip" the cir
cuit breaker).
Turn off the water valve.
^
Unscrew the intake hose.
^
Carefully remove the rubber seal.
^
-
-
-
^
Remove the filter using a needle nose
plier and rinse under running water.
^
Return the filter and seal. Make sure
they are seated correctly.
^
Screw the intake hose back on the
water valve, checking that it is not
cross-threaded.
^
Slowly turn on the valve and test for
leaks.
51
Page 52
Cleaning the drain pump and
non-return valve
If the dishwasher is not completely
drained at the end of a program, the
drain pump or non-return valve may be
blocked.
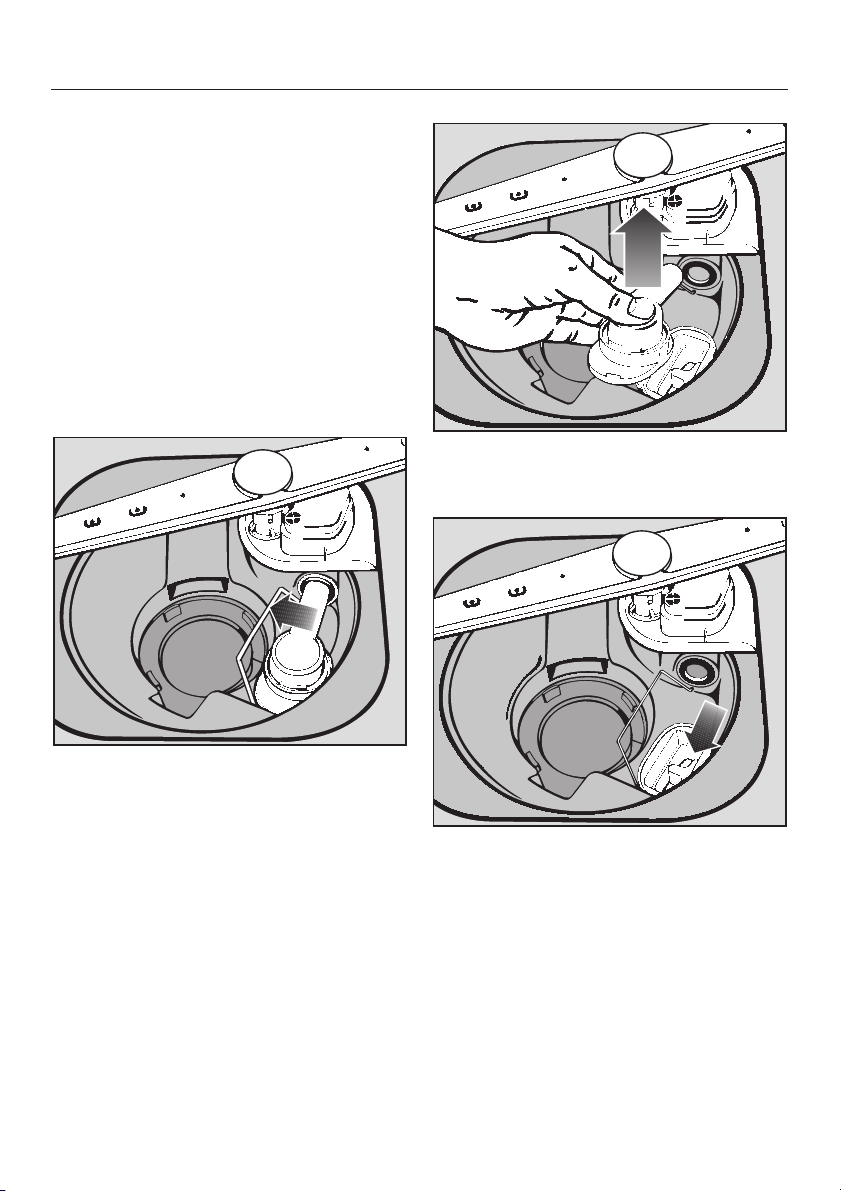
Turn off the dishwasher.
^
Remove the triple filter (see "Cleaning
^
the filter in the wash cabinet").
Use a jug or bowl to scoop water out
^
of the wash cabinet.
Pull out the non-return valve and
^
rinse well under running water.
^
Tilt the locking clamp to the side.
525354
The drain pump is beneath the non-re
turn valve (see arrow).
^
Before returning the non-return valve,
check that the drain pump is not
blocked. Spin the propeller several
times in both directions to check for
obstructions.
^
Carefully refit the non-return valve
and secure it with the locking clamp.
^
Refit and lock the filter in place.
-
Page 53

Page 54

Page 55

55
Page 56
Alterations rights reserved / (G 663 / G863 Plus) / 1403
This bio-friendly paper was bleached without the use of chlorine.
M.-Nr. 05 724 281 / V00
 Loading...