


 Loading...
Operating instructions
Dishwasher
Always read the operating instructions and the installation sheet before setting up, installing, and commissioning the appliance. This prevents both personal injury and damage to the machine.
en-CA |
HG07-W |
M.-Nr. 11 859 220 |

Contents |
|
Warnings and safety instructions .................................................................... |
6 |
Guide to the appliance...................................................................................... |
16 |
Machine overview................................................................................................ |
16 |
Control panel....................................................................................................... |
18 |
Caring for the environment .............................................................................. |
21 |
Initial commissioning ........................................................................................ |
22 |
Opening the door ................................................................................................ |
22 |
Door opening aid................................................................................................. |
23 |
Closing the door.................................................................................................. |
23 |
Miele@home ........................................................................................................ |
24 |
Basic settings...................................................................................................... |
25 |
Setting the language ...................................................................................... |
25 |
Setting up Miele@home ................................................................................. |
25 |
Setting the time .............................................................................................. |
26 |
Setting the water hardness ............................................................................ |
26 |
Activating AutoDos......................................................................................... |
27 |
Reactivation salt.................................................................................................. |
28 |
Filling the salt reservoir................................................................................... |
29 |
Refilling the salt .............................................................................................. |
30 |
Rinse aid.............................................................................................................. |
31 |
Adding rinse aid ............................................................................................. |
32 |
Filling the rinse aid reservoir........................................................................... |
32 |
Settings .............................................................................................................. |
33 |
Opening the Settings menu................................................................................. |
33 |
Changing settings ............................................................................................... |
33 |
Closing the Settings menu .................................................................................. |
33 |
Language ......................................................................................................... |
34 |
Time..................................................................................................................... |
34 |
Water hardness ................................................................................................... |
34 |
AutoDos (automatic dispensing) ......................................................................... |
35 |
Rinse aid.............................................................................................................. |
36 |
Miele@home ........................................................................................................ |
36 |
Remote control.................................................................................................... |
39 |
Remote Update ................................................................................................... |
40 |
SmartStart ........................................................................................................... |
41 |
EcoStart............................................................................................................... |
41 |
Temperature ........................................................................................................ |
43 |
Display brightness............................................................................................... |
43 |
Volume................................................................................................................. |
44 |
Memory ............................................................................................................... |
44 |
2

|
Contents |
Refill indicators.................................................................................................... |
44 |
AutoOpen ............................................................................................................ |
45 |
2nd interim rinse.................................................................................................. |
45 |
Knock2open ........................................................................................................ |
45 |
SaniWash Cycle .................................................................................................. |
46 |
Software version.................................................................................................. |
46 |
Legal Information................................................................................................. |
46 |
Copyrights and licenses for operator and control software ................................ |
46 |
Copyrights and licenses for the communication module.................................... |
47 |
Showroom ........................................................................................................... |
47 |
Factory default..................................................................................................... |
47 |
Caring for the environment .............................................................................. |
48 |
Energy-saving dishwashing................................................................................. |
48 |
Loading the dishwasher.................................................................................... |
49 |
General information ............................................................................................. |
49 |
Loading examples ............................................................................................... |
51 |
Upper basket....................................................................................................... |
53 |
Adjusting the upper basket ................................................................................. |
55 |
Lower basket....................................................................................................... |
56 |
Filters................................................................................................................... |
59 |
Cutlery tray .......................................................................................................... |
60 |
Loading the 3D MultiFlex Tray ........................................................................ |
60 |
Detergent ........................................................................................................... |
61 |
Active ingredients ............................................................................................... |
61 |
Detergent dispensing .......................................................................................... |
62 |
Automatic dispensing / AutoDos......................................................................... |
63 |
Activating AutoDos......................................................................................... |
63 |
Inserting a PowerDisk..................................................................................... |
64 |
Manual detergent dispensing.............................................................................. |
66 |
Detergent dispensing ..................................................................................... |
66 |
Adding detergent............................................................................................ |
66 |
Operation............................................................................................................ |
68 |
Switching on the dishwasher .............................................................................. |
68 |
Selecting a program ............................................................................................ |
68 |
Display of program cycle time............................................................................. |
69 |
Starting a program .............................................................................................. |
69 |
End of program.................................................................................................... |
70 |
Energy management ........................................................................................... |
70 |
Switching off the dishwasher .............................................................................. |
71 |
Unloading the dishwasher................................................................................... |
71 |
3

Contents |
|
Interrupting a program......................................................................................... |
72 |
Cancelling or changing a program ...................................................................... |
72 |
Options ............................................................................................................... |
73 |
Timer .............................................................................................................. |
73 |
Activating “Remote start”.................................................................................... |
77 |
Program overview ............................................................................................. |
78 |
Extra options...................................................................................................... |
82 |
Selecting extra options........................................................................................ |
82 |
Cleaning and care ............................................................................................. |
84 |
Cleaning the wash cabinet .................................................................................. |
84 |
Cleaning the door and the door seal................................................................... |
85 |
Cleaning the control panel .................................................................................. |
86 |
Cleaning the reflector panel ................................................................................ |
86 |
Cleaning the appliance front ............................................................................... |
86 |
Cleaning the AutoDos ......................................................................................... |
87 |
Cleaning the spray arms...................................................................................... |
89 |
Checking the filters in the wash cabinet ............................................................. |
92 |
Cleaning the filters............................................................................................... |
92 |
Cleaning the drain pump ..................................................................................... |
94 |
Frequently Asked Questions ............................................................................ |
96 |
Technical problems ............................................................................................. |
96 |
Fault messages ................................................................................................... |
97 |
Door release ........................................................................................................ |
98 |
Water intake fault................................................................................................. |
99 |
Water drainage fault ............................................................................................ |
100 |
Fault in the AutoDos (automatic dispensing)....................................................... |
101 |
Spray arm fault .................................................................................................... |
103 |
General dishwasher problems............................................................................. |
104 |
Noises.................................................................................................................. |
106 |
Poor cleaning results ........................................................................................... |
107 |
Technical Service............................................................................................... |
111 |
Contact in the event of a fault ............................................................................. |
111 |
Warranty .............................................................................................................. |
111 |
Optional accessories ........................................................................................ |
112 |
Installation.......................................................................................................... |
114 |
Water intake ........................................................................................................ |
114 |
Water drainage .................................................................................................... |
116 |
4

|
Contents |
Electrical connection ........................................................................................... |
118 |
Sound emission testing .................................................................................... |
120 |
5

Warnings and safety instructions
This dishwasher complies with all current local and national safety requirements. Inappropriate use can, however, lead to personal injury and material damage.
Please observe the installation sheet and read the operating instructions carefully before setting up the dishwasher and using it for the first time. They both contain important information on the installation, safety, use, and maintenance of the machine. This prevents both personal injury and damage to the dishwasher.
In accordance with standard IEC 60335-1, Miele expressly and strongly advises that you read and follow the instructions in the section on installing the dishwasher as well as the safety instructions and warnings.
Miele cannot be held liable for injury or damage caused by noncompliance with these instructions.
Keep the installation sheet and the operating instructions in a safe place and pass them on to any future owner.
6

Warnings and safety instructions
Correct application
This dishwasher is intended for use in domestic households and similar residential environments.
This dishwasher is not suitable for outdoor use.
This dishwasher is intended for use at altitudes of up to 4,000 m above sea level.
This dishwasher must only be used for cleaning domestic dishware and cutlery. All other types of use are not permitted.
This dishwasher is not intended for use by people with reduced physical, sensory, or mental capabilities or lack of experience and knowledge, unless they have been given supervision and instruction concerning its use by a person responsible for their safety. They may only use the dishwasher without supervision if they have been shown how to use it in a safe manner. They must be able to recognize and understand the possible consequences of incorrect operation.
7

Warnings and safety instructions
Safety with children
Children under 8 years of age must be kept away from the dishwasher unless they are constantly supervised.
Children must not be allowed to clean or maintain the appliance.
Children should be supervised in the vicinity of the dishwasher. Never allow children to play with the dishwasher. There is a danger that children might shut themselves in the dishwasher.
If the automatic door opening mechanism is active (depending on the model), keep young children away from the area in which the dishwasher door opens. There is a danger of injury in the unlikely event of a fault with the opening mechanism.
Danger of suffocation. While playing, children may become entangled in packaging material (such as plastic wrapping) or pull it over their head, presenting the risk of suffocation. Keep packaging material away from children.
Keep children away from detergents. Detergents cause severe skin burns and severe eye damage. They can cause burning in the mouth and throat, or inhibit breathing. It is therefore important to keep children away from the dishwasher when the door is open. Detergent residues could still be present in the machine. Seek medical advice immediately if a child has swallowed or inhaled any detergents.
8

Warnings and safety instructions
Technical safety
Unauthorized installation, maintenance, and repairs can cause considerable danger for the user. Installation, maintenance, and repairs must only be carried out by a qualified technician.
Damage to the dishwasher can compromise your safety. Before using the dishwasher and in particular following transport, check it for any visible damage. Never use a damaged dishwasher.
The electrical safety of the dishwasher can only be guaranteed when correctly grounded. It is most important that this basic safety requirement is fulfilled. If in doubt, the electrical installation should be checked by a qualified electrician.
Miele cannot be held liable for the consequences of an inadequate or lack of grounding system (e.g., electric shock).
Reliable and safe operation of this dishwasher can only be assured if it has been connected to the domestic electricity supply.
If the dishwasher is plugged into the domestic electricity supply using a 3-pin plug with a grounding contact (it must not be hardwired), the electrical socket must be easily accessible after the dishwasher is installed so that it can be disconnected from the domestic electricity supply at any time.
There must be no electrical sockets behind the dishwasher because the building-in niche may be too small. Danger of overheating and fire risk if the dishwasher were to be pushed up against a plug.
The dishwasher must not be installed underneath a cooktop. The high temperatures radiated by cooktops could damage the dishwasher below. For the same reason, the dishwasher must not be installed next to open fires or other appliances that give off heat, such as heaters etc., not normally found in a kitchen.
9

Warnings and safety instructions
Ensure that the connection data on the dishwasher’s data plate (fuse rating, frequency, and voltage) match the domestic electricity supply. This data must correspond in order to avoid the risk of damage to the dishwasher. Compare these before connecting the appliance to the electricity supply. If in any doubt, consult a qualified electrician.
Do not connect the dishwasher to the domestic electricity supply until it has been fully installed and any adjustments have been made to the door springs.
The dishwasher may only be operated if the door opening mechanism is working correctly. Otherwise there could be a risk of danger while the automatic door opening mechanism (depending on the model) is active.
To check that the door opening mechanism is working correctly:
-The door springs must be evenly adjusted on both sides. They are correctly adjusted when the door remains stationary when left half open (approx. 45° opening angle). It is also important that the door cannot fall open.
-The door locking pins automatically retract when the door opens at the end of the drying phase.
Multi-socket adapters and extension leads do not guarantee the required safety of the appliance (risk of fire). Do not connect the dishwasher to the domestic electricity supply using a power bar or an extension cord.
The dishwasher must not be used in a non-stationary location (e.g., on a ship).
Do not install the dishwasher in a room where there is a risk of frost. Frozen hoses are at risk of tearing or bursting. The reliability of the electronic control unit may be impaired at temperatures below freezing point.
To avoid any damage to the dishwasher, it must only be operated when it is connected to a fully vented plumbing system.
10
Warnings and safety instructions
The water-connection pressure needs to be between 50 and 1,000 kPa.
A damaged dishwasher could be dangerous. If the dishwasher gets damaged, turn it off at the electricity supply immediately and contact your Miele dealer or Miele Service.
The manufacturer’s warranty will be invalidated if the appliance is not repaired by a Miele authorized service technician.
We recommend replacing defective components with original spare parts. If original Miele spare parts are installed correctly, Miele ensures full compliance with safety requirements and the warranty remains valid.
During installation, maintenance, and repair work, the dishwasher must be disconnected from the domestic electricity supply (turn it off and withdraw the plug from the socket).
If the power cable is damaged, it must only be replaced with a specific cable of the same type (available from Miele Service). For safety reasons, this must only be done by Miele Service or a service technician authorized by Miele.
Do not sit the dishwasher on the hose. The hose needs to be free of kinks and able to move freely after installation. Do not place the hose or power cord next to a heat source e.g., hot water pipes. Do not expose the hose or power cord to corrosive substances (e.g., chloride). Damage to the hose or power cord could cause electrical shock or water damage.
This dishwasher is supplied with a special lamp (depending on the model) to cope with particular conditions (e.g., in terms of temperature, moisture, chemical resistance, abrasion resistance, and vibration). This lamp must only be used for the purpose for which it is intended. The lamp is not suitable for room lighting. Replacement lamps may only be installed by a Miele authorized technician or by Miele Service.
11

Warnings and safety instructions
Correct installation
The dishwasher must be installed and connected in compliance with the supplied installation sheet.
Be careful before and while installing the dishwasher. Some metal parts pose a risk of injury / being cut. Wear protective gloves.
The dishwasher must be correctly aligned horizontally to ensure problem-free operation.
In order to ensure stability, built-under and integrated dishwashers must only be installed under a continuous countertop which is secured to adjacent cabinetry.
The dishwasher must only be built into a tall unit if additional safety precautions are taken. In order to safely install the appliance in a tall unit, please use the tall unit installation kit and observe the installation sheet provided. Otherwise there is the danger of the unit tipping over.
The door springs must be evenly adjusted on both sides. They are correctly adjusted when the door remains stationary when left half open (approx. 45° opening angle). It is also important that the door cannot fall open.
The appliance must only be operated with properly adjusted door springs.
If the door cannot be adjusted properly, contact Miele Service.
The maximum weight of the front panel that can be aligned with the factory fitted door springs is 10–12 kg (depending on model).
Correct use
Do not use solvents in the wash cabinet. There is a danger of
explosion.
12

Warnings and safety instructions
Dishwasher detergents can cause burning on the skin and in the eyes, nose, mouth, and throat. Avoid contact with detergents. Do not inhale powder detergents. Do not swallow dishwasher detergents. Seek medical attention immediately if detergent has been swallowed or inhaled.
Avoid leaving the dishwasher door open unnecessarily. You could injure yourself on the opened door or trip over it.
Do not sit, stand, or lean on the opened door. The dishwasher could tip over. This could injure you or damage the dishwasher.
Dishware may be very hot at the end of the program. Allow dishware to cool until it is comfortable enough to handle before unloading them.
Only use detergent and rinse aid formulated for domestic dishwashers. Do not use liquid dish soap.
Do not use any commercial or industrial detergents. These may cause material damage, and there is a risk of a severe explosive chemical reaction (such as an explosive oxyhydrogen gas reaction).
Do not fill the rinse aid reservoir with powder or liquid detergent. This will cause damage to the rinse aid reservoir.
Do not fill the AutoDos (depending on model) with powder or liquid detergent. Loose detergent will damage the AutoDos.
Do not fill the salt reservoir with powder or liquid detergent. Dishwasher detergent will damage the water softener.
Use only special, coarse-grained reactivation salt or other pure evaporated salt. Other types of salt may contain insoluble components which can cause the water softener to malfunction.
13

Warnings and safety instructions
In dishwashers with a cutlery basket (depending on model), knives and forks should be placed with the handles upwards in the basket for safety reasons. Knives and forks placed with the handles downwards pose a danger of injury. However, cutlery placed handle down in the basket will come out cleaner and drier.
Plastic items which cannot withstand being washed in hot water, such as disposable plastic containers or plastic cutlery, should not be cleaned in the dishwasher. The high temperatures in the dishwasher may cause them to melt or lose shape.
If you use the timer option (depending on model), the detergent compartment must be dry. Wipe dry with a cloth first if necessary. The detergent will clump together if the detergent compartment is not dry, and this may mean that it is not fully rinsed out.
Accessories and spare parts
Only use original Miele accessories. If other parts are used, warranty, performance, and, if applicable, product liability claims will be invalidated.
Miele will guarantee to supply functional spare parts for a minimum of 10 years and up to 15 years following the discontinuation of your dishwasher.
Transport
Damage to the dishwasher can compromise your safety. Before using the dishwasher, check it for any visible transport damage. Never use a damaged dishwasher.
Only transport the dishwasher in an upright position so that no water flows into the electrical controls, as this would cause faults.
If you wish to transport the dishwasher, empty it and securely fasten all loose parts such as baskets, hoses, and power cables.
14

Warnings and safety instructions
Disposal of your old dishwasher
Remove the door of the dishwasher so that children cannot
become trapped inside.
15

Guide to the appliance
Machine overview
a Door locking pins
b Top spray arm
c 3D MultiFlex Cutlery Tray (depending
on model)
d Upper basket (depending on model)
e Middle spray arm
f Aeration valve
g Lower spray arm
h Filter combination
i Salt reservoir
j Data plate
k Rinse aid reservoir
l Detergent compartment
m AutoDos detergent outlet
n AutoDos (automatic dispensing)
o Door locking pins
p Top spray arm
q 3D MultiFlex Cutlery Tray (depending
on model)
r Upper basket (depending on model)
16
|
Guide to the appliance |
s Middle spray arm |
v Filter combination |
t Aeration valve |
w Salt reservoir |
u Lower spray arm |
x Data plate |
|
y Rinse aid reservoir |
|
z Detergent compartment |
|
{ AutoDos detergent outlet |
|
| AutoDos (automatic dispensing) |
17
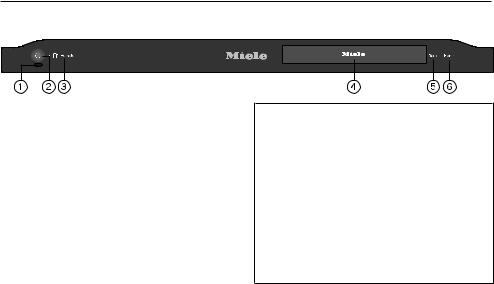
Guide to the appliance
Control panel
These operating instructions apply to several different dishwasher models of different heights.
The different dishwasher models will be named as follows:
normal = dishwasher measuring 80.5 cm high (built-in appliance) or 84.5 cm high (freestanding appliance)
XXL = dishwasher measuring 84.5 cm high (built-in appliance).
18
Guide to the appliance
Display functions
The display is used to select or set the following:
-the program
-the options
-the timer
-the Settings
The display can show the following:
-the program name
-the program stage
-the estimated time left for the program to run
-any relevant fault messages and information
To save energy, the dishwasher turns off after a few minutes if you do not press any sensor buttons during this time.
Touch the sensor button to turn the dishwasher back on.
The sensor buttons on the control panel and in the display react to fingertip contact.
The touch display can be scratched by pointed or sharp objects, e.g., pens.
Only touch the display with your fingers.
Touch the required menu option to select it.
The currently selected setting is marked in orange and can be changed.
The OK sensor button in the display is used to confirm a message or setting and to move to another menu level.
To exit a sub-menu again, use the Back sensor button.
Touch the Home sensor button at any time to return to the Programs menu.
If you do not press any sensor buttons for several seconds, the display will revert to the previous menu. You will then have to enter your settings again.
19

Guide to the appliance
Examples of how to operate the appliance
Main menu
Use the Back sensor button to switch from the Programs menu to the main menu.
Programs Settings
In the main menu, you can choose the Programs menu to select programs as well as the Settings menu.
You can alter the dishwasher’s controls to suit changing requirements in the Settings menu (see “Settings”).
Option lists
You can scroll to the right or the left by swiping your finger across the display.
|
|
|
|
China & |
Quick |
||
Normal |
Pots & Pans Crystal |
IntenseWash |
|
|
|
|
|
The orange scroll bar at the bottom of the display indicates that further options are available.
You can change the order of programs listed in the Programs menu by pressing and holding a program name and dragging it to the place you want.
Normal Extra Clean |
Extra Dry |
Estimate |
After selecting a program, the Extra options menu is displayed. This is where you can select any options you want, activate the timer, and view the energy and water consumption with the
Estimate function.
Numerical values
You can set numerical values in some menus.
|
|
11:45 |
|
|
OK |
|
You can set the numbers by touching the numerical keypad that you want to change.
You can then set the numbers using the
sensor buttons.
Use the OK sensor button to accept the set numerical value.
Keeping the relevant or sensor button pressed will increase or decrease the time automatically.
20
Caring for the environment
Disposal of the packaging
material
The cardboard box and packaging materials protect the appliance during shipping. They have been designed to be biodegradable and recyclable.
Recycling the packaging reduces the use of raw materials in the manufacturing process and also the amount of waste.
Disposal of your old appliance
Electronic and electrical appliances contain many valuable materials. They also contain certain materials, compounds and components which were essential for the proper functioning and safe use of the equipment. These could be hazardous to your health and to the environment if disposed of with general waste or if handled incorrectly. Therefore, please do not dispose of your old appliance with general waste.
Consult with local authorities, dealers or Miele in order to dispose of and recycle electrical and electronic appliances.
Miele assumes no responsibility for deleting any personal data left on the appliance being disposed. Please ensure that your old appliance is kept away from children until removal. Observe safety requirements for appliances that may tip over or pose an entrapment hazard.
21
Initial commissioning
Every dishwasher is tested at the factory. There will be residual water in the machine from this test. It is not an indication that the dishwasher has been used previously.
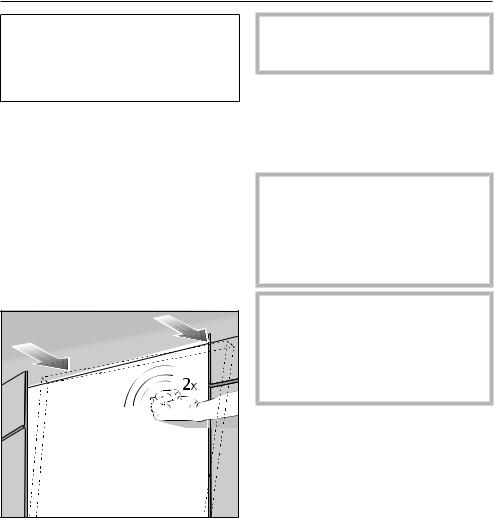
Opening the door
In some programs, the door automatically opens slightly to assist the drying process.
This function can be deactivated, if preferred (see “AutoOpen” under “Settings”).
This dishwasher has a motorized door opener which is activated by knocking on the door front (“Knock2open function”).
Knock twice in quick succession on the top third of the door front.
The door will open a little.
Hold the door at the top edge and pull the door out of the lock.
The door locking pins will retract.
To prevent a technical fault, do not hold the door locking pins firmly when they are retracting.
If the door is opened during operation, all functions are automatically interrupted.
You can deactivate this function (see “Settings – Knock2open”).
Risk of scalding due to hot water.
During operation, water in the dishwasher may be very hot.
During operation, only open the door with extreme caution.
Risk of injury due to door opening automatically.
The door may open automatically at the end of a program.
Keep the area around the door free of obstructions.
22
Initial commissioning
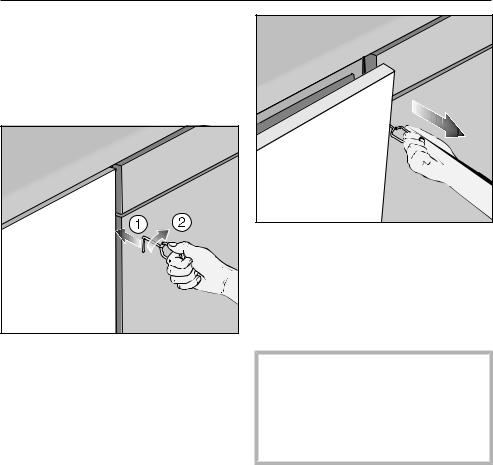
Door opening aid
If the door will not open when knocked or if there is a power failure, the door can be opened manually with the door opening aid supplied with the dishwasher.
Push the door opening aid into the gap between the dishwasher front and the neighbouring unit door about 5 7/8" (15 cm) below the countertop.
Turn the door opening aid clockwise
until it engages behind the dishwasher front.
Then use it to pull the door open. |
Closing the door
Push the baskets in.
Push the door until it clicks shut. The door will then close automatically.
Risk of crushing due to the door closing.
When closing the door, you are at risk of shutting your fingers in it.
Do not put your hand inside the door as it is closing.
23
Initial commissioning
Miele@home
Your dishwasher is equipped with an integrated WiFi module.
To use this feature, you will need:
-a WiFi network
-the Miele app
-a Miele user account The user account can be created via the Miele app.
The Miele app will guide you as you connect your dishwasher to your home WiFi network.
Once your dishwasher is connected to your WiFi network, you can use the app, for example, to carry out the following activities:
-Control your dishwasher remotely.
-Call up information on the operating status of your dishwasher.
-Call up information on the program sequence of your dishwasher.
Connecting your dishwasher to your WiFi network will increase energy consumption, even when the dishwasher is turned off.
Make sure that your WiFi network signal strength is strong enough at the installation site of your dishwasher.
Availability of the WiFi connection
The WiFi connection shares a frequency range with other appliances (including microwave ovens and remote control toys). This may result in sporadic or even complete connection failures. Therefore, the availability of featured functions cannot always be guaranteed.
Miele@home availability
The ability to use the Miele app depends on the availability of the Miele@home service in your country.
The Miele@home service is not available in every country.
For information about availability, please visit www.miele.com.
Miele app
The Miele App is available to download free of charge from the Apple App Store® or from the Google Play™ store.
24
Initial commissioning
Basic settings
Switching on the dishwasher
Open the door.
Turn the dishwasher on using the
sensor button.
The welcome screen will appear when the dishwasher is turned on and the welcome melody will sound.
For further information about the display functionality, see “Display functions” under “Guide to the appliance”.
Setting the language
The display will change automatically to the screen for setting the language.
Select the language you want as well as the country if applicable.
For further information on setting the language, see “Language” under “Settings”.
The set language is marked orange.
Setting up Miele@home
The message Activate Miele@home? will
appear on the display.
If you want to set up Miele@home now, select the Yes option.
Useful tip: To postpone setup until later, select the No option.
There are 2 ways of connecting your dishwasher to your WiFi network:
Select the connection method you wish to use.
1.App
2.WPS
You will then be guided by the display and the Miele app.
For further information on Miele@home, see “Miele@home” under “Settings”.
25

Initial commissioning
Setting the time
The time is updated automatically if a connection is established with the WiFi network.
The display will then change to the screen for setting the clock format and the time of day.
The current time of day must be set before you can use the timer option.
Select the setting you want for the clock format.
Set the hours and the minutes and confirm by pressing OK.
Setting the water hardness
The display changes to the screen for setting the water hardness.
-You should program the dishwasher to the correct water hardness for your area.
-Your local water authority will be able to advise you of the water hardness level in your area.
-Where the water hardness fluctuates, e.g., between 10–16 gr/gal (10–
15 °dH), always program the dishwasher to the higher value (16 gr/ gal (15 °dH) in this example).
It is useful to know your water hardness so that you can provide the service technician with this information in the event of any service calls.
Enter the water hardness below:
____________ gr/gal (°dH)
The dishwasher is programmed at the factory for a water hardness level 1 gr/ gal (1 °dH).
Set the water hardness level in your area and confirm with OK.
See “Water hardness” under “Settings” for more information.
26

Initial commissioning
Activating AutoDos
The display changes to the settings screen for AutoDos (see “Automatic dispensing / AutoDos” under “Detergent”).
Even if you do not wish to use AutoDos, you must remove the transport locking device from the PowerDisk compartment before running the first program (see “Activating AutoDos” under “Detergent”).
You can activate AutoDos.
If you do not wish to use AutoDos, you can manually dispense the detergent via the detergent compartment (see “Manual detergent dispensing” under “Detergent”).
Select the setting you want and confirm with OK.
This setting applies to all programs and you can change it in a program’s Extra options menu.
Finally, prompts will appear in the display.
After confirming these prompts with
OK, the messages Refill salt and start
the “QuickIntenseWash” program with the
“Express” option without a load and
Refill rinse aid may appear.
Add salt and rinse aid if necessary (see “Reactivation salt” and “Rinse aid” under “Initial commissioning”).
Select OK to confirm the messages.
The selected program will be shown briefly in the display.
The display will then show the estimated program cycle time for the program selected.
27

Initial commissioning
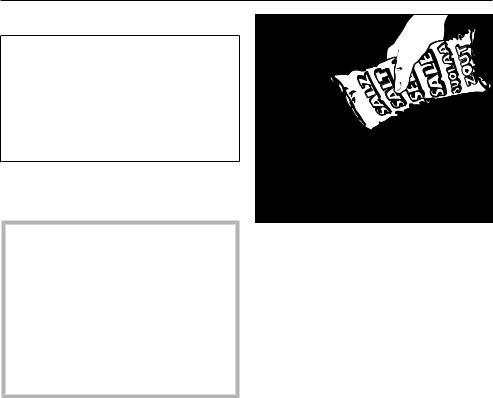
Reactivation salt
In order to achieve good cleaning results, the dishwasher needs to operate with soft water. Hard water results in a build-up of calcium deposits on dishware and in the dishwasher. Domestic water with a hardness level higher than 5 gr/gal (5 °dH) must be softened. This occurs automatically in the integrated water softener. The water softener is suitable for a water hardness level of up to 73 gr/gal (70 °dH).
In order to be reactivated, the water softener requires reactivation salt. Depending on the water hardness level (< 22 gr/gal, or < 21 °dH), reactivation salt may not be required if combination detergents are being used (see “Active ingredients” under “Detergents”).
If the water in your area is very soft and constantly lower than 5 gr/gal (5 °dH), you do not need to add reactivation salt. The salt refill indicator will automatically turn off after the water hardness has been set accordingly (see “Water hardness” under “Settings”).
Damage to the water softener from detergent.
Dishwasher detergent will damage the water softener.
Do not fill the salt reservoir with powder or liquid detergent.
Damage caused by using unsuitable salts.
Some types of salt may contain insoluble components which can cause the water softener to malfunction.
Use only special, coarse-grained reactivation salt or other pure evaporated salt.
If you only ever use combination detergent products in your dishwasher, you can turn off both refill reminders if you wish (see “Refill reminders” under “Settings”).
Please make sure that if you stop using combination detergents, you refill the reactivation salt and rinse aid. Turn the refill reminders back on if required.
28
Initial commissioning
Filling the salt reservoir
Before filling the salt reservoir for the first time, you must fill it with approx. 2 l of water to enable the salt to dissolve.
Once the dishwasher has been used once, there is always sufficient water in the salt reservoir.
Remove the lower basket from the wash cabinet and unscrew the salt reservoir cap.
Danger of corrosion due to saline solution.
Water or saline solution will run out of the salt reservoir when the cap is opened. Salt solution that runs out can cause corrosion in the wash cabinet and to the wash items. The cap should therefore only be removed in order to refill the salt reservoir.
Fill the salt reservoir with approx. 2 l of water (first use only).
Place the funnel provided over the salt reservoir and carefully fill with reactivation salt until the reservoir is full. The salt reservoir holds up to
2 kg of salt, depending on the type of salt used.
Clean off salt residues from around the salt reservoir opening. Next, screw the salt reservoir cap on again firmly.
Immediately after filling the salt reservoir and each time you remove the salt reservoir cap, run the
65°C QuickIntenseWash program with the Express program option selected without wash items in the dishwasher to dissolve and remove any traces of salt from the wash cabinet.
29

Initial commissioning
Refilling the salt
Fill the salt reservoir with reactivation
salt when Refill salt and start the
“QuickIntenseWash” program with the
“Express” option without a load appears
in the display.
Confirm with OK.
The salt refill indicator will go out.
Danger of corrosion due to saline solution.
Salt solution that runs out can cause corrosion in the wash cabinet and to the wash items.
Each time you remove the salt reservoir cap, you must run the
65°C QuickIntenseWash program with the Express program option selected without wash items in the dishwasher. This will dissolve and remove any traces of salt from the wash cabinet.
After the salt reservoir has been filled, the refill indicator may still appear in the display if the salt concentration has not yet reached the correct level. In this case, still confirm the message again with OK.
The salt refill indicator will be turned off if you have programmed the dishwasher for a water hardness below 5 gr/gal
(5 °dH).
30
Loading...