


Side By Side
Refrigerator
Power supply: 115 V
Frequency: 60 Hz
Capacity: 26.3 cu. ft.
Warning:
Before using this product, please read this manual carefully and keep it for future reference. The design and specifications are subject to change without prior notice for product improvement. Consult with your dealer or manufacturer for details.
en
Free 3 months extension of the original limited warranty period!* Simply text a picture of your proof of purchase to:
1-844-224-1614
*The warranty extension is for the three months immediately following the completion of the product’s original warranty period.
MODEL NUMBER MRS26D5AST
version A - 10 - 2020 |
www.midea.com |

Dear user
THANK YOU and CONGRATULATIONS on your purchase of this high-quality Midea product. Your Midea refrigerator is designed for reliable, trouble-free performance. Please take a moment to register your new refrigerator.
Register your new refrigerator at www.midea.com under the
Support tab.
For future reference, record your product model and serial numbers located on the back of the refrigerator above the compressor compartment.
Model Number________________________________________
Serial Number_________________________________________
REFRIGERATOR SAFETY ................................................................. |
3 |
OPERATION REQUIREMENTS ......................................................... |
7 |
Location Requirements.......................................................................... |
7 |
Electrical Requirements......................................................................... |
8 |
Water Supply Requirements ................................................................ |
9 |
PARTS AND FEATURES .................................................................. |
10 |
INSTALLATION.................................................................................. |
11 |
Unpack......................................................................................................... |
11 |
Door Removal (only if needed).......................................................... |
11 |
Connect to Water ................................................................................... |
14 |
Move to Final Location......................................................................... |
16 |
Install Water Filter................................................................................... |
17 |
Door Alignment (If needed) ............................................................... |
19 |
Level Refrigerator.................................................................................. |
20 |
BEFORE USE .................................................................................... |
20 |
Waiting Period........................................................................................ |
20 |
Cleaning .................................................................................................... |
20 |
REFRIGERATOR USE...................................................................... |
21 |
General ...................................................................................................... |
21 |
Controls..................................................................................................... |
22 |
Ice Maker................................................................................................... |
25 |
Dispenser.................................................................................................. |
26 |

Drip Tray.................................................................................................... |
27 |
REFRIGERATOR CARE.................................................................... |
28 |
Cleaning .................................................................................................... |
28 |
Moving ....................................................................................................... |
29 |
Storage ...................................................................................................... |
29 |
Replacing Lights .................................................................................... |
29 |
TROUBLESHOOTING ..................................................................... |
30 |
General ...................................................................................................... |
30 |
Ice and Water.......................................................................................... |
33 |
Error Codes.............................................................................................. |
36 |
PERFORMANCE DATA SHEET ...................................................... |
37 |
WARRANTY..................................................................................... |
38 |
REFRIGERATOR SAFETY |
|
YOUR SAFETY AND THE SAFETY OF OTHERS ARE VERY |
|
IMPORTANT |
|
To prevent injury to the user or other people and property damage, the instructions shown here must be followed. Incorrect operation due to ignoring of instructions may cause harm or damage, including death.
The level of risk is shown by the following indications.
This symbol indicates the possibility of death or serious injury.
WARNING
This symbol indicates the possibility of injury or damage to property.
CAUTION
This symbol indicates the possibility of dangerous voltage constituting a risk of electrical shock is present that could
result in death or serious injury.
WARNING
| <![if ! IE]> <![endif]>Safety |
<![if ! IE]> <![endif]>Refrigerator |
|
|
| <![if ! IE]> <![endif]>Requirements |
<![if ! IE]> <![endif]>Operating |
|
|
| <![if ! IE]> <![endif]>Features |
<![if ! IE]> <![endif]>and Parts |
|
|
| <![if ! IE]> <![endif]>Installation |
|
|
|
| <![if ! IE]> <![endif]>Use |
<![if ! IE]> <![endif]>Before |
|
|
| <![if ! IE]> <![endif]>Use |
<![if ! IE]> <![endif]>Refrigerator |
|
|
| <![if ! IE]> <![endif]>Care |
<![if ! IE]> <![endif]>Refrigerator |
|
|
| <![if ! IE]> <![endif]>Troubleshooting |
|
3

| <![if ! IE]> <![endif]>Safety |
<![if ! IE]> <![endif]>Refrigerator |
|
|
| <![if ! IE]> <![endif]>Requirements |
<![if ! IE]> <![endif]>Operating |
|
|
| <![if ! IE]> <![endif]>Features |
<![if ! IE]> <![endif]>and Parts |
|
|
| <![if ! IE]> <![endif]>Installation |
|
|
|
| <![if ! IE]> <![endif]>Use |
<![if ! IE]> <![endif]>Before |
|
|
| <![if ! IE]> <![endif]>Use |
<![if ! IE]> <![endif]>Refrigerator |
|
|
| <![if ! IE]> <![endif]>Care |
<![if ! IE]> <![endif]>Refrigerator |
|
|
| <![if ! IE]> <![endif]>Troubleshooting |
|
IMPORTANT SAFETY INSTRUCTIONS
WARNING
GENERAL APPLIANCE SAFETY
•Read all safety warnings, instructions, illustrations and specifications provided with this appliance. Failure to follow all instructions listed below may result in electric shock, fire and/or serious injury.
•Save all warnings and instructions for future reference.
ELECTRICAL SAFETY
•Plug into a grounded 3 prong outlet.
•Do not remove ground prong.
•Do not use an adapter.
•Unplug the power cord by holding the plug, never by pulling the cord.
•Do not turn the appliance on or off by plugging in or unplugging the power cord.
•Do not use an extension cord.
•Unplug the refrigerator before cleaning or defrosting.
NOTE: Power to the refrigerator cannot be disconnected by pressing a control on the control panel.
Grounding requirement
•This refrigerator must be grounded. This refrigerator is equipped with a grounding plug. The plug must be inserted into an outlet that is properly installed and grounded.
•Improper use of the grounding plug can result in a risk of electric shock. Consult a qualified electrician or service person if the grounding instructions are not completely understood or if doubt exists as to whether the refrigerator is properly grounded.
LOCATION SAFETY
•This refrigerator is intended to be used in household and similar environments.
•Install in accordance with the manufacturer’s instructions.
•This refrigerator should not be recessed or built-in an enclosed cabinet. It is designed for freestanding installation only. WARNING - Keep ventilation openings, in the refrigerator, clear of obstruction.
•When moving the refrigerator, do not roll over or damage the power supply cord.
•Do not install near any heat sources, such as radiators, heat registers, stoves, other cooking appliances or in direct sunlight.
•Keep flammable materials and vapors, such as gasoline, away from refrigerator.
4

USE AND CARE SAFETY
•Flammable refrigerant used. Follow handling instructions carefully. Risk of fire or explosion due to puncture of refrigerant tubing.
•Flammable refrigerant used. Do not use mechanical devices to defrost freezer. Do not puncture refrigerant tubing.
•Do not store or use gasoline or any flammable liquids inside or in the vicinity of this refrigerator.
•Use two or more people to move and install refrigerator.
•Connect refrigerator to a potable water supply only for ice maker and dispenser use.
•This appliance is not intended for use by persons (including children) with reduced physical, sensory or mental capabilities, or lack of experience and knowledge, unless they have been given supervision or instruction concerning use of the appliance by a person responsible for their safety.
•Children should be supervised to ensure that they do not play with the appliance.
•Keep fingers out of the “pinch point” areas; clearances between the doors and between the doors and cabinet are necessarily small. Be careful closing doors when children are in the area.
•Do not use electrical appliances inside the food storage compartments of the appliance, unless they are of the type recommended by the manufacturer.
•Do not touch the interior of the freezer with wet hands. This could result in frostbite.
•Use nonflammable cleaner. Clean only with a damp cloth.
•In refrigerators with automatic icemakers, avoid contact with the moving parts of the ejector mechanism, or with the heating element that releases the cubes. Do not place fingers or hands on the automatic ice making mechanism while the refrigerator is plugged in.
•Do not use electrical appliances on the top of the refrigerator, unless they are of the type recommended by the manufacturer.
•Do not place heavy objects on the top of the refrigerator considering that objects may fall when doors are opened and closed.
•Do not store beer, beverages or other fluid contained in bottles or enclosed containers in the freezer. The bottles or containers may crack due to freezing.
SERVICE SAFETY
•Disconnect power before servicing.
•Flammable refrigerant used. To be repaired only by trained service personnel. Do not puncture refrigerant tubing.
| <![if ! IE]> <![endif]>Safety |
<![if ! IE]> <![endif]>Refrigerator |
|
|
| <![if ! IE]> <![endif]>Requirements |
<![if ! IE]> <![endif]>Operating |
|
|
| <![if ! IE]> <![endif]>Features |
<![if ! IE]> <![endif]>and Parts |
|
|
| <![if ! IE]> <![endif]>Installation |
|
|
|
| <![if ! IE]> <![endif]>Use |
<![if ! IE]> <![endif]>Before |
|
|
| <![if ! IE]> <![endif]>Use |
<![if ! IE]> <![endif]>Refrigerator |
|
|
| <![if ! IE]> <![endif]>Care |
<![if ! IE]> <![endif]>Refrigerator |
|
|
| <![if ! IE]> <![endif]>Troubleshooting |
|
5
| <![if ! IE]> <![endif]>Safety |
<![if ! IE]> <![endif]>Refrigerator |
|
|
| <![if ! IE]> <![endif]>Requirements |
<![if ! IE]> <![endif]>Operating |
|
|
| <![if ! IE]> <![endif]>Features |
<![if ! IE]> <![endif]>and Parts |
|
|
| <![if ! IE]> <![endif]>Installation |
|
|
|
| <![if ! IE]> <![endif]>Use |
<![if ! IE]> <![endif]>Before |
|
|
| <![if ! IE]> <![endif]>Use |
<![if ! IE]> <![endif]>Refrigerator |
|
|
| <![if ! IE]> <![endif]>Care |
<![if ! IE]> <![endif]>Refrigerator |
|
|
| <![if ! IE]> <![endif]>Troubleshooting |
|
•Refer all servicing to qualified service personnel. Do not repair or replace any part of this appliance unless specifically recommended in this manual. Servicing is required when the appliance has been damaged in any way, such as the power supply cord or plug is damaged, liquid has been spilled or objects have fallen into the appliance, the appliance has been exposed to rain or moisture, does not operate normally, or has been dropped.
•If the supply cord is damaged, it must be replaced by the manufacturer, its service agent, or similarly qualified person, in order to avoid a hazard.
•If component part is damaged, it must be replaced by the manufacturer, its service agent or similarly qualified persons in order to avoid a hazard.
•Replace all parts and panels before operating.
SAVE THESE INSTRUCTIONS
THIS APPLIANCE IS FOR HOUSEHOLD USE ONLY
State of California Proposition 65 Warnings:
WARNING: Cancer and Reproductive Harm
-www.P65Warnings.ca.gov.
PROPER DISPOSAL
WARNING
Suffocation Hazard
Before you throw away your old refrigerator:
•Remove the doors and drawers so that children cannot hide or get trapped inside your old appliance.
•Leave any shelves in place so that children may not easily climb inside.
•Failure to follow these instructions can result in death or brain damage.
IMPORTANT: Refrigerant and cyclopentane foaming material used for the appliance are flammable. It is the consumer’s responsibility to comply with Federal and Local regulations when disposing of this product. Refrigerants must be evacuated by a licensed, EPA certified refrigerant technician in accordance with established procedures.
6

| <![if ! IE]> <![endif]>Safety |
<![if ! IE]> <![endif]>Refrigerator |
|
|
| <![if ! IE]> <![endif]>Requirements |
<![if ! IE]> <![endif]>Operating |
|
|
| <![if ! IE]> <![endif]>Features |
<![if ! IE]> <![endif]>and Parts |
|
|
| <![if ! IE]> <![endif]>Installation |
|
|
|
| <![if ! IE]> <![endif]>Use |
<![if ! IE]> <![endif]>Before |
|
|
| <![if ! IE]> <![endif]>Use |
<![if ! IE]> <![endif]>Refrigerator |
|
|
| <![if ! IE]> <![endif]>Care |
<![if ! IE]> <![endif]>Refrigerator |
|
|
| <![if ! IE]> <![endif]>Troubleshooting |
|
ELECTRICAL REQUIREMENTS
WARNING
Electrical Shock Hazard
•Plug into a grounded 3 prong outlet.
•Do not remove the ground prong from the power cord plug.
•Do not use an adapter.
•Do not use an extension cord.
•Failure to do so can result in death, fire or electrical shock.
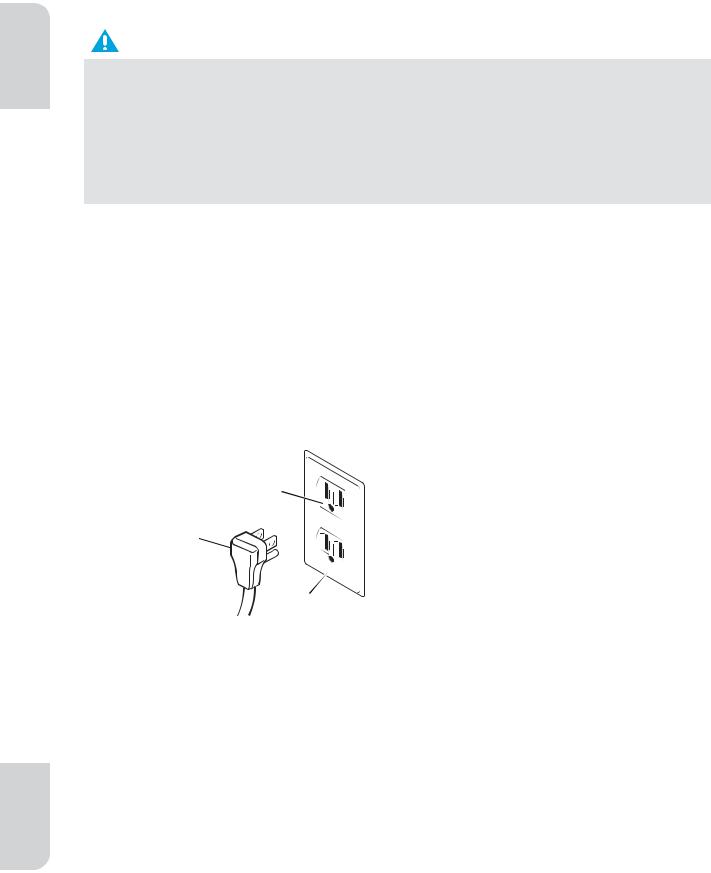
IMPORTANT: A 115 Volt, 60 Hz., AC only, 15-amp fused, grounded electrical supply is required.
•Use an electrical outlet that accepts the grounding prong.
NOTE: The power cord is equipped with a 3-prong (grounding) plug which mates with a standard 3-prong (grounding) electrical outlet.
•We recommend that the refrigerator be plugged into an electrical circuit serving ONLY this appliance.
•Use an electrical outlet that cannot be turned off with a switch or pullchain.
•DO NOT use an extension cord.
|
b |
|
|
|
a 3-prong plug |
|
|
|
|||
|
|
||||
|
|
|
|
|
|
|
|
|
|
|
|
a |
|
|
|
|
b 3-prong receptacle |
|
|
|
|
||
|
|
|
|
c Receptacle box cover |
|
|
|
|
|
||
|
|
|
|
|
|
|
|
|
|
|
c
8

WATER SUPPLY REQUIREMENTS
A cold water supply with water pressure between 30 and 100 psi (207 and 689 kPa) is required to operate the water dispenser and ice maker. If
you have questions about your water pressure, call a licensed, qualified plumber.
IMPORTANT: Operation outside the water pressure range may cause malfunction and severe, damaging water leaks.
NOTE: If the water pressure is less than what is required, the flow of water from the water dispenser could decrease or ice cubes could be hollow or irregularly shaped.
Reverse Osmosis Water Supply (if applicable)
IMPORTANT: The pressure of the water supply coming out of a reverse osmosis system going to the water inlet valve of the refrigerator needs to be between 30 and 100 psi (207 and 689 kPa).
If water pressure is too low:
Check to see whether the sediment filter in the reverse osmosis system is blocked. Replace the filter if necessary.
Allow the storage tank on the reverse osmosis system to refill after heavy use. The tank capacity could be too small to keep up with the requirements of the refrigerator.
If your refrigerator has a water filter, it may further reduce the water pressure when used in conjunction with a reverse osmosis system. Remove the water filter.
| <![if ! IE]> <![endif]>Safety |
<![if ! IE]> <![endif]>Refrigerator |
|
|
| <![if ! IE]> <![endif]>Requirements |
<![if ! IE]> <![endif]>Operating |
|
|
| <![if ! IE]> <![endif]>Features |
<![if ! IE]> <![endif]>and Parts |
|
|
| <![if ! IE]> <![endif]>Installation |
|
|
|
| <![if ! IE]> <![endif]>Use |
<![if ! IE]> <![endif]>Before |
|
|
| <![if ! IE]> <![endif]>Use |
<![if ! IE]> <![endif]>Refrigerator |
|
|
| <![if ! IE]> <![endif]>Care |
<![if ! IE]> <![endif]>Refrigerator |
|
|
| <![if ! IE]> <![endif]>Troubleshooting |
|
9
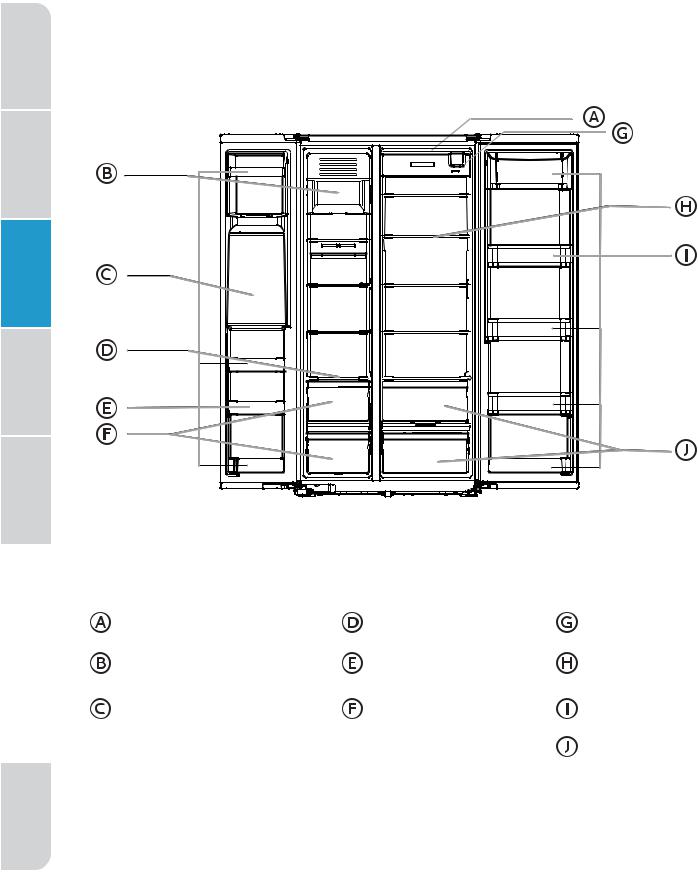
PARTS AND FEATURES
Safety Refrigerator Freezer compartment Refrigerator compartment
<![if ! IE]><![endif]>OperatingRequirements
<![if ! IE]><![endif]>PartsFeatures
<![if ! IE]><![endif]>and
| <![if ! IE]> <![endif]>Installation |
|
| <![if ! IE]> <![endif]>Use |
<![if ! IE]> <![endif]>Before |
| <![if ! IE]> <![endif]>Use |
<![if ! IE]> <![endif]>Refrigerator |
|
|
| <![if ! IE]> <![endif]>Care |
<![if ! IE]> <![endif]>Refrigerator |
|
|
| <![if ! IE]> <![endif]>Troubleshooting |
|
LED Light |
Glass Shelf |
Water Filter |
Ice Storage Bin |
Door Bin |
Glass Shelf |
Ice / Water Dispenser |
Drawer Bin |
Door Bin |
|
|
Drawer Bin |
10
SPECIFICATIONS
Dimension (WxDxH) |
35.8" x 33.9" x 69.9" |
|
(91 x 86 x 178 cm) |
|
|
Width with door open 90° |
40.9" (104 cm) |
|
|
Width with door open 130° |
61.4" (156 cm) |
|
|
Weight |
284 lbs. (129 kg) |
|
|
Power requirements |
115 V ~ 60 Hz, 15A minimum requirement |
|
|
Power cord length |
66.9" (170 cm) |
|
|
INSTALLATION
UNPACK
WARNING
Fire or Explosion Hazard
·Do not puncture refrigerant tubing.
·Follow handling instructions carefully.
·Flammable refrigerant used.
·Failure to do so can result in death, explosion or fire.
IMPORTANT: Remove ALL exterior and interior packing materials including the foam packing between the exterior condenser and the refrigerator cabinet.
DOOR REMOVAL
(ONLY IF NEEDED)
Measure the refrigerator to make sure it will fit through the doorway. If the refrigerator cannot pass easily through the doorway, follow the instructions to remove the refrigerator compartment doors and the freezer compartment doors.
WARNING
Electrical Shock Hazard
·Disconnect power before removing doors.
·Reconnect ground wire before operating.
·Failure to do so could result in death or electric shock.
TOOLS NEEDED
·Phillips screwdriver
·8 mm Socket wrench
| <![if ! IE]> <![endif]>Safety |
<![if ! IE]> <![endif]>Refrigerator |
|
|
| <![if ! IE]> <![endif]>Requirements |
<![if ! IE]> <![endif]>Operating |
|
|
| <![if ! IE]> <![endif]>Features |
<![if ! IE]> <![endif]>and Parts |
|
|
| <![if ! IE]> <![endif]>Installation |
|
|
|
| <![if ! IE]> <![endif]>Use |
<![if ! IE]> <![endif]>Before |
|
|
| <![if ! IE]> <![endif]>Use |
<![if ! IE]> <![endif]>Refrigerator |
|
|
| <![if ! IE]> <![endif]>Care |
<![if ! IE]> <![endif]>Refrigerator |
|
|
| <![if ! IE]> <![endif]>Troubleshooting |
|
11
| <![if ! IE]> <![endif]>Safety |
<![if ! IE]> <![endif]>Refrigerator |
|
|
| <![if ! IE]> <![endif]>Requirements |
<![if ! IE]> <![endif]>Operating |
|
|
| <![if ! IE]> <![endif]>Features |
<![if ! IE]> <![endif]>and Parts |
|
|
| <![if ! IE]> <![endif]>Installation |
|
|
|
| <![if ! IE]> <![endif]>Use |
<![if ! IE]> <![endif]>Before |
|
|
| <![if ! IE]> <![endif]>Use |
<![if ! IE]> <![endif]>Refrigerator |
|
|
| <![if ! IE]> <![endif]>Care |
<![if ! IE]> <![endif]>Refrigerator |
|
|
| <![if ! IE]> <![endif]>Troubleshooting |
|
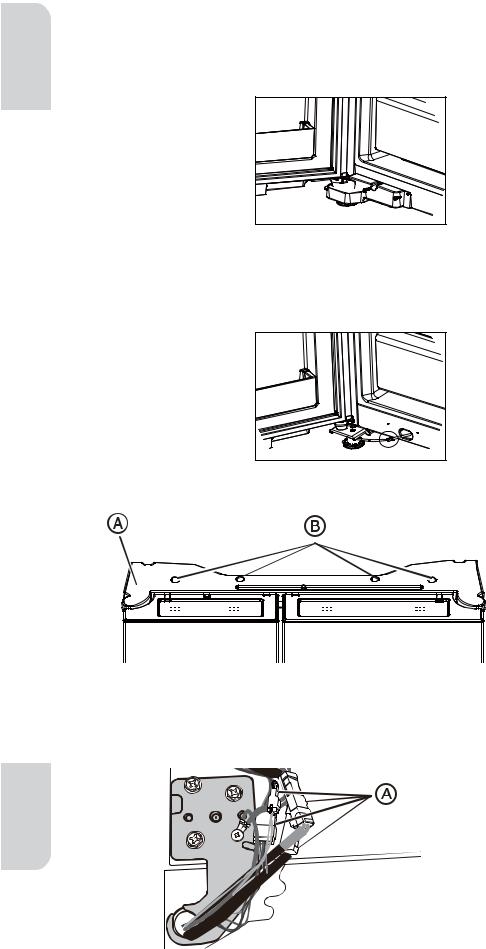
REMOVE DOORS
IMPORTANT: Keep the refrigerator doors closed until you are ready to lift them from the cabinet.
1. Remove the Freezer bottom hinge cover screws and hinge cover.
2.Pull out the locking washer from the water pipe connector and the pull out the freezer door water pipe from quick connector.
Note: please be noted the fast connector can’t be left at the end of water pipe of door.
3.Using a Phillips screwdriver, remove the four screws attaching the hinge cover to the top of the cabinet.
 Hinge cover
 Screws
4.Slowly lift the hinge cover, keeping the wire harnesses attached.
5.Disconnect the wiring harnesses by pressing the release catch
on each wire harness connector, and then pulling the ends apart (lefthand door hinge only).
 Wiring harnesses
12
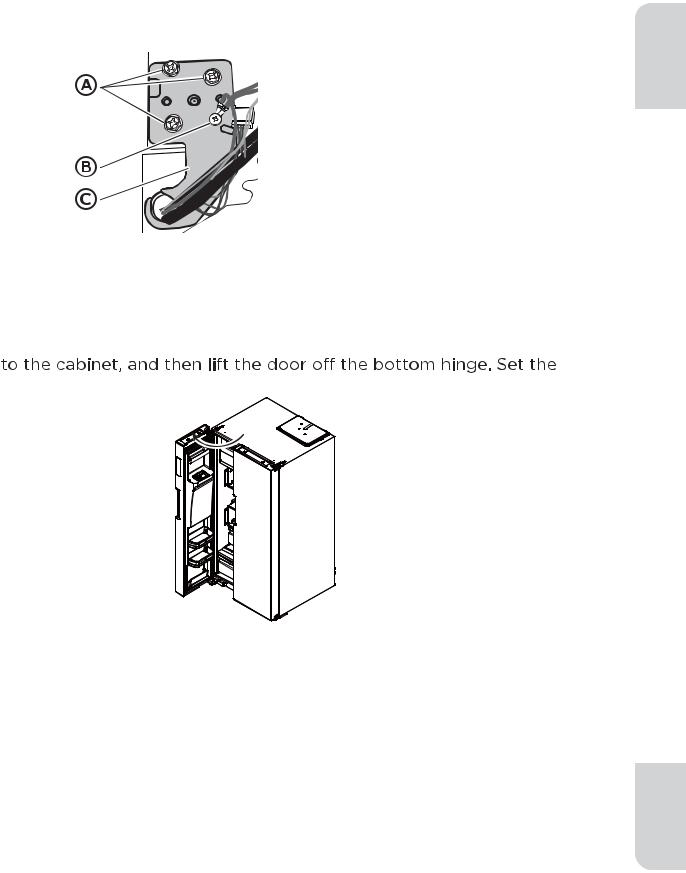
6.Using an 8 mm socket wrench, remove the three hinge screws.
7.Using a Phillips screwdriver, remove the ground screw (left freezer door ).
 Hinge screws
 Ground screw
 Top hinge
NOTE: Provide additional support for the door while the hinge is being removed. Do not depend on the door gasket magnets to hold the door in place while you are working.
8.Remove the top left freezer door hinge.
9.Using both hands, slowly swing the door until it is open to a 90° angle
door onto a soft surface to protect the finish.
90°
10.Repeat this procedure to remove the right refrigerator door.
REPLACE DOORS
NOTE: The hinge pin extends from the bottom edge of the door.
1.Insert the hinge pin into the opening in the bottom hinge.
2.Insert the top hinge into the top of the door.
3.Using the hinge screws removed earlier, fasten the top hinge to the top of the cabinet.
4.Replace the ground screw (left door).
5.Reconnect the water tube.
6.Replace the left door following steps 1 through 3.
7.Using the four screws removed earlier, fasten the hinge cover to the top of the cabinet.
| <![if ! IE]> <![endif]>Safety |
<![if ! IE]> <![endif]>Refrigerator |
|
|
| <![if ! IE]> <![endif]>Requirements |
<![if ! IE]> <![endif]>Operating |
|
|
| <![if ! IE]> <![endif]>Features |
<![if ! IE]> <![endif]>and Parts |
|
|
| <![if ! IE]> <![endif]>Installation |
|
|
|
| <![if ! IE]> <![endif]>Use |
<![if ! IE]> <![endif]>Before |
|
|
| <![if ! IE]> <![endif]>Use |
<![if ! IE]> <![endif]>Refrigerator |
|
|
| <![if ! IE]> <![endif]>Care |
<![if ! IE]> <![endif]>Refrigerator |
|
|
| <![if ! IE]> <![endif]>Troubleshooting |
|
13

| <![if ! IE]> <![endif]>Safety |
<![if ! IE]> <![endif]>Refrigerator |
|
|
| <![if ! IE]> <![endif]>Requirements |
<![if ! IE]> <![endif]>Operating |
|
|
| <![if ! IE]> <![endif]>Features |
<![if ! IE]> <![endif]>and Parts |
|
|
| <![if ! IE]> <![endif]>Installation |
|
|
|
| <![if ! IE]> <![endif]>Use |
<![if ! IE]> <![endif]>Before |
|
|
| <![if ! IE]> <![endif]>Use |
<![if ! IE]> <![endif]>Refrigerator |
|
|
| <![if ! IE]> <![endif]>Care |
<![if ! IE]> <![endif]>Refrigerator |
|
|
| <![if ! IE]> <![endif]>Troubleshooting |
|
CONNECT TO WATER
A cold water supply with water pressure of between 30 and 100 psi (207 and 689 kPa) is required to operate the water dispenser and ice maker. If you have questions about your water pressure, call a licensed, qualified plumber.
IMPORTANT:
•Connect only to a drinking (potable) water supply.
•Plumbing shall be installed in accordance with the International Plumbing Code and any local codes and ordinances.
Connect to Water Line
Gather the required tools and parts before starting installation.
• |
Flat-blade screwdriver |
• |
ПШИ" Drill bit |
|
• |
ПШЖ" Wrench or 2 Adjustable |
• |
ПШИ" Compression nut |
|
• |
wrenches |
• |
Ferrule (sleeve) |
|
Cordless drill |
||||
|
|
1.Find a ПШЖ" to 1ПШИ" (12.7 mm to 31.8 mm) vertical cold water pipe near the refrigerator.
IMPORTANT: Make sure it is a cold water pipe.
NOTE: Horizontal pipe will work; however, you must drill on the top side of the pipe, not the bottom. Drilling on the top side will keep water away from the drill and keep normal sediment from collecting in the valve.
2.Determine the length of copper tubing you need. Measure from the
connection on the back of the refrigerator to the water pipe. Add 7 ft (2.1 m) to allow for cleaning. Use ПШИ" (6.35 mm) O.D. (outside diameter) copper tubing. Be sure both ends of copper tubing are cut square.
1"
3.Using a cordless drill, drill a ПШИ" (6.35 mm) hole in the cold water pipe.
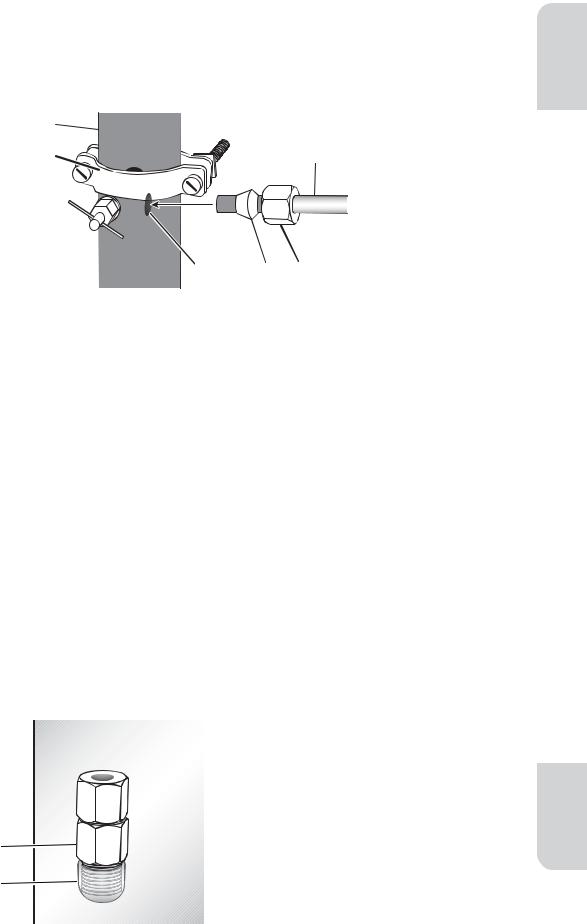
4.Fasten the shutoff valve to the cold water pipe with the pipe clamp. Be sure the outlet end is solidly in the ПШИ" (6.35 mm) drilled hole in the water pipe and that the washer is under the pipe clamp.
5.Tighten the packing nut. Tighten the pipe clamp screws slowly and evenly so the washer makes a watertight seal. Do not overtighten.
a |
|
b |
g |
c


|
d |
e f |
a Household supply line |
e Ferrule (sleeve) |
|
b Saddle valve |
f Compression nut |
|
c Packing nut |
g ПШИ" Water line |
|
dShutoff valve
6.Slip the compression sleeve and compression nut on the copper tubing as shown. Insert the end of the tubing into the outlet end squarely as far as it will go. Screw compression nut onto outlet end with adjustable wrench. Do not overtighten or you may crush the water line.
7.Place the free end of the tubing in a container or sink, and then turn ON the main water supply. Flush the tubing until water is clear. Turn OFF the shutoff valve on the water pipe.
Connect to Refrigerator
1.Unplug refrigerator or disconnect power.
2.Close shut-off valve.
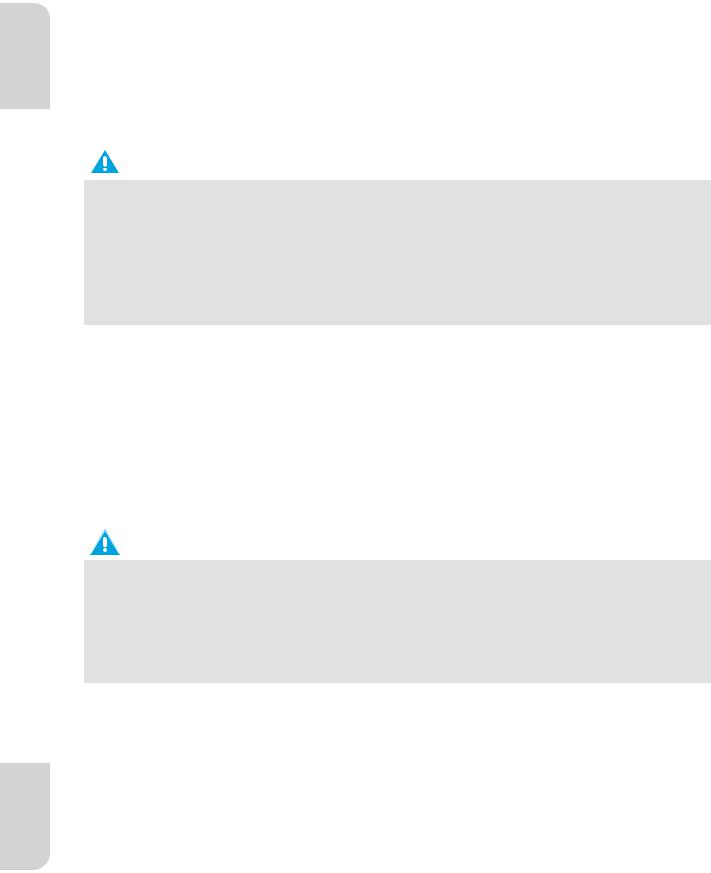
3.Thread a brass compression nut and ferrule (sleeve) onto the free end of the water line.
4.Remove the plastic cap from the end of the refrigerator water line.
a
a Refrigerator water line
b |
b Compression |
nut |
|
c |
c Plastic cap |
|
| <![if ! IE]> <![endif]>Safety |
<![if ! IE]> <![endif]>Refrigerator |
|
|
| <![if ! IE]> <![endif]>Requirements |
<![if ! IE]> <![endif]>Operating |
|
|
| <![if ! IE]> <![endif]>Features |
<![if ! IE]> <![endif]>and Parts |
|
|
| <![if ! IE]> <![endif]>Installation |
|
|
|
| <![if ! IE]> <![endif]>Use |
<![if ! IE]> <![endif]>Before |
|
|
| <![if ! IE]> <![endif]>Use |
<![if ! IE]> <![endif]>Refrigerator |
|
|
| <![if ! IE]> <![endif]>Care |
<![if ! IE]> <![endif]>Refrigerator |
|
|
| <![if ! IE]> <![endif]>Troubleshooting |
|
1#
| <![if ! IE]> <![endif]>Safety |
<![if ! IE]> <![endif]>Refrigerator |
|
|
| <![if ! IE]> <![endif]>Requirements |
<![if ! IE]> <![endif]>Operating |
|
|
| <![if ! IE]> <![endif]>Features |
<![if ! IE]> <![endif]>and Parts |
|
|
| <![if ! IE]> <![endif]>Installation |
|
|
|
| <![if ! IE]> <![endif]>Use |
<![if ! IE]> <![endif]>Before |
|
|
| <![if ! IE]> <![endif]>Use |
<![if ! IE]> <![endif]>Refrigerator |
|
|
| <![if ! IE]> <![endif]>Care |
<![if ! IE]> <![endif]>Refrigerator |
|
|
| <![if ! IE]> <![endif]>Troubleshooting |
|
5.Insert the water line directly into the fitting on the end of the refrigerator water line. Tighten the compression nut. Do not overtighten.
6.Confirm connection is secure by gently pulling on the water line.
7.Turn on the water supply to refrigerator and check for leaks. Correct any leaks.
Complete the Installation
WARNING
Electrical Shock Hazard
•Plug into a grounded 3 prong outlet.
•Do not remove the ground prong from the power cord plug.
•Do not use an adapter.
•Do not use an extension cord.
•Failure to do so can result in death, fire or electrical shock.
1.Plug into a grounded 3 prong outlet.
NOTE: This refrigerator begins operating as soon as it is connected to the power supply.
2.Move the refrigerator into its final location, making sure to maintain the recommended clearance.
MOVE TO FINAL LOCATION
WARNING
Fire or Explosion Hazard
•Do not puncture refrigerant tubing.
•Follow handling instructions carefully.
•Flammable refrigerant used.
•Failure to do so can result in death, explosion or fire.
IMPORTANT:
•If the refrigerator has been in a horizontal position for any period of time, wait 24 hours to allow the refrigerant to settle before plugging in the refrigerator.
•When moving the refrigerator, DO NOT tilt it beyond 45° from upright.
NOTE: Tilting the refrigerator more than 45° could damage the compressor and the sealed system.
•Avoid placing excessive stress on the doors or top when moving the refrigerator.
1$
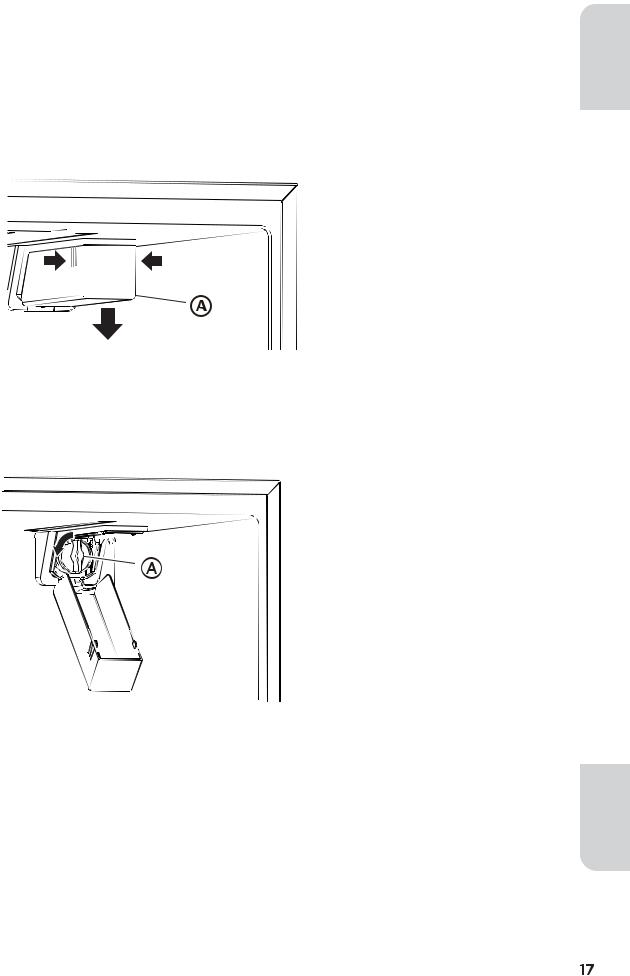
INSTALL WATER FILTER
REMOVE BYPASS PLUG
1.Turn off the water supply to refrigerator.
2.Squeeze the sides of the filter cover where marked, and then pull downward to open the cover.
 Filter cover
3.Turn the bypass plug counterclockwise, and then pull out to remove.
IMPORTANT: Keep the bypass plug for later use. The ice maker and dispenser will not operate unless either a water filter or the bypass plug is properly installed.
 Bypass plug
| <![if ! IE]> <![endif]>Safety |
<![if ! IE]> <![endif]>Refrigerator |
|
|
| <![if ! IE]> <![endif]>Requirements |
<![if ! IE]> <![endif]>Operating |
|
|
| <![if ! IE]> <![endif]>Features |
<![if ! IE]> <![endif]>and Parts |
|
|
| <![if ! IE]> <![endif]>Installation |
|
|
|
| <![if ! IE]> <![endif]>Use |
<![if ! IE]> <![endif]>Before |
|
|
| <![if ! IE]> <![endif]>Use |
<![if ! IE]> <![endif]>Refrigerator |
| <![if ! IE]> <![endif]>Care |
<![if ! IE]> <![endif]>Refrigerator |
|
|
<![endif]>Troubleshooting

| <![if ! IE]> <![endif]>Safety |
<![if ! IE]> <![endif]>Refrigerator |
|
|
| <![if ! IE]> <![endif]>Requirements |
<![if ! IE]> <![endif]>Operating |
|
|
| <![if ! IE]> <![endif]>Features |
<![if ! IE]> <![endif]>and Parts |
|
|
| <![if ! IE]> <![endif]>Installation |
|
|
|
| <![if ! IE]> <![endif]>Use |
<![if ! IE]> <![endif]>Before |
|
|
| <![if ! IE]> <![endif]>Use |
<![if ! IE]> <![endif]>Refrigerator |
|
|
| <![if ! IE]> <![endif]>Care |
<![if ! IE]> <![endif]>Refrigerator |
|
|
| <![if ! IE]> <![endif]>Troubleshooting |
|
INSTALL WATER FILTER
4.Remove the water filter from its packaging, and then remove the clear, plastic cap from the filter head.
5.Align the tabs on the filter head with the notches in the opening, and then insert the water filter into the opening. Press inward, while turning the filter clockwise to install.
NOTE: The housing allows the filter to move slightly upward and downward.
 Water filter
6.Turn on the water supply to refrigerator.
7.Close the filter cover.
REPLACE WATER FILTER
The Water Filter icon on the control panel will illuminate after 150+ days to indicate that it is time to order a replacement water filter. After 180+ days the icon will illuminate and flash to indicate it is time to replace the water filter.
1.Turn off the water supply to refrigerator.
2.Turn the water filter counterclockwise, and then pull out to remove.
3.Install a new water filter following steps 4 to 7 in the previous section.
4.Press and hold the Water Filter control for 3 seconds to clear and reset the filter status clock.
NOTE: T
FLUSH THE WATER SYSTEM
After installing the replacement water filter it is important to flush air from the water line so that water will not drip from the water dispenser.
1.Turn on the main water supply.
2.Dispense 2.5 gallons of water (flush for approximately 5 minutes) to remove trapped air and contaminants from the system.
NOTE: Do not dispense the entire 2.5 gallon amount continuously. Depress and release the dispenser pad for cycles of 30 seconds ON and 60 seconds OFF. In some homes, additional flushing may be required.
3.Open the refrigerator door to make sure there are no water leaks coming from the water filter.
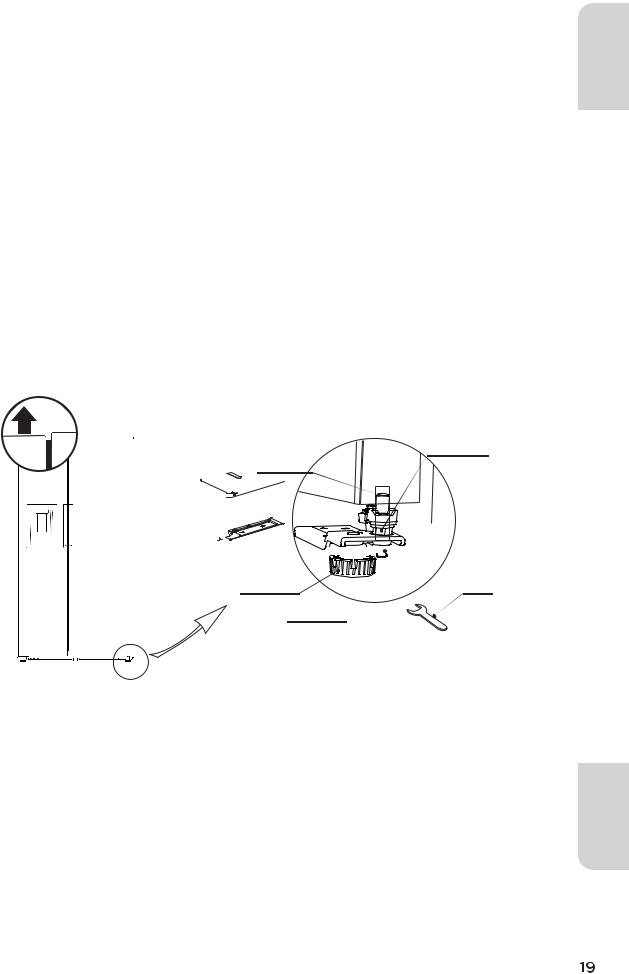
DOOR ALIGNMENT (IF NEEDED)
Door alignment or adjustment can be done on side-by-side model refrigerators.
Adjusting nut
Fixed shaft

 Left
Left

 Right
Right
Leveling feet |
Wrench |
Locking nut
1.Locate the adjusting screws found on the underside of the bottom corner of the refrigerator door.
2.After loosening the locking nut by turning it clockwise, turn the door adjusting screw clockwise to raise the door or counter-clockwise to lower it.
3.After one or two turns of the wrench, open and close the refrigerator door, and check the alignment at the top of the doors.
4.Tighten the locking nut by turning it counter-clockwise.
| <![if ! IE]> <![endif]>Safety |
<![if ! IE]> <![endif]>Refrigerator |
|
|
| <![if ! IE]> <![endif]>Requirements |
<![if ! IE]> <![endif]>Operating |
|
|
| <![if ! IE]> <![endif]>Features |
<![if ! IE]> <![endif]>and Parts |
|
|
| <![if ! IE]> <![endif]>Installation |
|
|
|
| <![if ! IE]> <![endif]>Use |
<![if ! IE]> <![endif]>Before |
|
|
| <![if ! IE]> <![endif]>Use |
<![if ! IE]> <![endif]>Refrigerator |
|
|
| <![if ! IE]> <![endif]>Care |
<![if ! IE]> <![endif]>Refrigerator |
|
|
| <![if ! IE]> <![endif]>Troubleshooting |
|
NOTE: If necessary, repeat the above steps until the doors are aligned.

| <![if ! IE]> <![endif]>Safety |
<![if ! IE]> <![endif]>Refrigerator |
|
|
| <![if ! IE]> <![endif]>Requirements |
<![if ! IE]> <![endif]>Operating |
|
|
| <![if ! IE]> <![endif]>Features |
<![if ! IE]> <![endif]>and Parts |
|
|
| <![if ! IE]> <![endif]>Installation |
|
|
|
| <![if ! IE]> <![endif]>Use |
<![if ! IE]> <![endif]>Before |
|
|
| <![if ! IE]> <![endif]>Use |
<![if ! IE]> <![endif]>Refrigerator |
|
|
| <![if ! IE]> <![endif]>Care |
<![if ! IE]> <![endif]>Refrigerator |
|
|
| <![if ! IE]> <![endif]>Troubleshooting |
|
LEVEL REFRIGERATOR
IMPORTANT: Level the refrigerator for proper operation and to avoid cooling, frost and moisture problems that can occur if the doors do not close completely.
1.Move the refrigerator to its final location. See “Move to Final Location.”
2.Place a carpenter's level on the top of the cabinet to check that the refrigerator is level from side to side and tilted slightly downward toward the back. If the refrigerator is not level, go to steps 3 and 4 to adjust.
NOTE: The doors will close easier when the front of the refrigerator is slightly higher than the back of the refrigerator.
3.Using two or more people, adjust the leveling feet (one foot located at each of the two front corners of the refrigerator cabinet).
4.With one person pressing against the top front of the refrigerator to take weight off the leveling feet, the other(s) can then turn the leveling feet to adjust the height of each side.
5.Use the carpenter's level to check the level and tilt.
To Raise - Turn the leveling feet clockwise.
To Lower - Turn the leveling feet counterclockwise.
BEFORE USE
WAITING PERIOD
•Before plugging the refrigerator into a grounded 3-prong electrical outlet, allow it to stand upright for approximately 2 hours.
NOTE: This reduces the possibility of a malfunction in the cooling system caused by improper handling during transportation.
•Allow the refrigerator to cool for 2 to 3 hours before adding food.
CLEANING
1.Wash the refrigerator interior using a soft cloth dampened with a baking soda solution (2 tablespoons baking soda mixed with 1 quart of warm water).
2.Using a soft cloth, thoroughly dry all surfaces.
2
REFRIGERATOR USE
GENERAL
•The storage life of frozen foods varies and the recommended storage time should not be exceeded.
•Place frozen food into the freezer as quickly as possible after purchase.
•Do not refreeze frozen foods which have thawed completely.
WARNING
Electrical Shock Hazard
•Plug into a grounded 3 prong outlet.
•Do not remove the ground prong from the power cord plug.
•Do not use an adapter.
•Do not use an extension cord.
•Failure to do so can result in death, fire or electrical shock.
1.Plug refrigerator into a grounded 3 prong outlet.
2.Wait 30 minutes, and then open the refrigerator door to determine if the refrigerator is cooling.
3.Load items into the refrigerator and freezer compartments.
ENERGY SAVING TIPS
•Allow hot foods to cool to room temperature before placing them in the freezer. Foods that freeze too slowly may lose quality or spoil.
•Do not overload the refrigerator with a large amount of unfrozen food. Overloading forces the compressor to run longer, which decreases the cooling efficiency of the refrigerator.
•Wrap foods properly and wipe containers dry before placing them in the refrigerator. This decreases frost build-up inside the refrigerator.
•Do not line refrigerator storage shelves with aluminum foil, wax paper or paper toweling. Liners interfere with cold air circulation, making the refrigerator less efficient.
•Organize and label food to reduce the number of door openings, and length of time the door or drawer is open. Remove the items needed at one time, and then close the door as soon as possible.
| <![if ! IE]> <![endif]>Safety |
<![if ! IE]> <![endif]>Refrigerator |
|
|
| <![if ! IE]> <![endif]>Requirements |
<![if ! IE]> <![endif]>Operating |
|
|
| <![if ! IE]> <![endif]>Features |
<![if ! IE]> <![endif]>and Parts |
|
|
| <![if ! IE]> <![endif]>Installation |
|
|
|
| <![if ! IE]> <![endif]>Use |
<![if ! IE]> <![endif]>Before |
|
|
| <![if ! IE]> <![endif]>Use |
<![if ! IE]> <![endif]>Refrigerator |
|
|
| <![if ! IE]> <![endif]>Care |
<![if ! IE]> <![endif]>Refrigerator |
|
|
| <![if ! IE]> <![endif]>Troubleshooting |
|
2
| <![if ! IE]> <![endif]>Safety |
<![if ! IE]> <![endif]>Refrigerator |
|
|
| <![if ! IE]> <![endif]>Requirements |
<![if ! IE]> <![endif]>Operating |
|
|
| <![if ! IE]> <![endif]>Features |
<![if ! IE]> <![endif]>and Parts |
|
|
| <![if ! IE]> <![endif]>Installation |
|
|
|
| <![if ! IE]> <![endif]>Use |
<![if ! IE]> <![endif]>Before |
|
|
| <![if ! IE]> <![endif]>Use |
<![if ! IE]> <![endif]>Refrigerator |
|
|
| <![if ! IE]> <![endif]>Care |
<![if ! IE]> <![endif]>Refrigerator |
|
|
| <![if ! IE]> <![endif]>Troubleshooting |
|
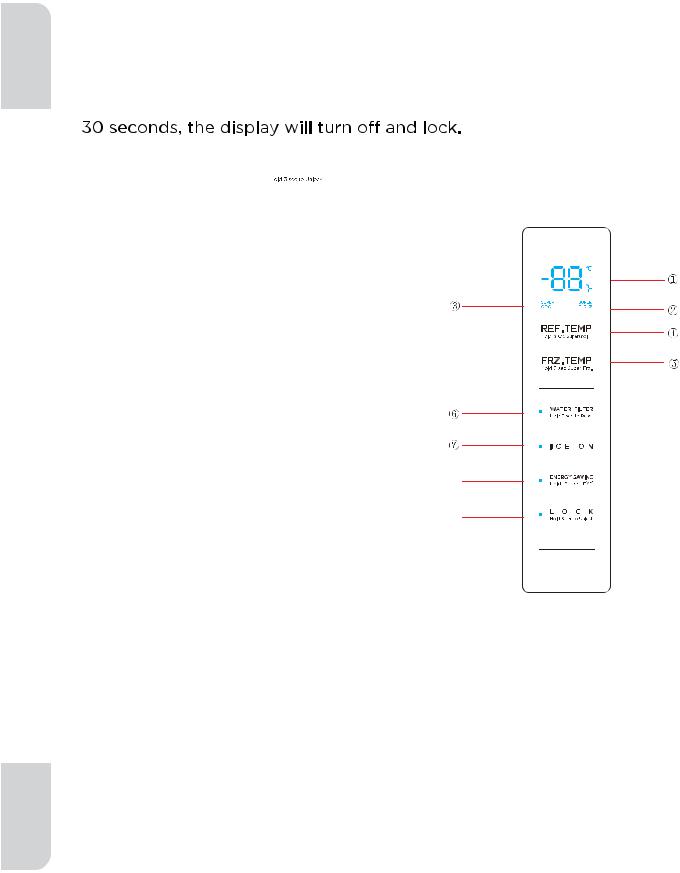
CONTROLS
The control panel is located on right side of freezer door.
When the refrigerator is first plugged into the electrical outlet, the display will begin to illuminate and scroll; after which the display icons will fully illuminate for 3 seconds and a tone will sound.
Under normal conditions, if no door is opened or no control is pressed for
When the display is not illuminated, press any control to illuminate, and then press and hold 


 for 3 seconds to unlock the control panel.
Temp i*dicator
Super freezer indicator
Super cool indicator
Refrigerator temperature buttonŏ
reezer temperature button
Water filter reset indicator and button

ENERGY SAVING indicator and button
Lock/unlock indicator and button
ĨThe picture above is only for reference. The actual configuration will
depend on the physical product or statement by the distributor
2

TEMPERATURE
When the refrigerator is first plugged into a power source, the default temperature settings will be displayed.
The temperature of each compartment is adjustable within its specified range.
Refrigerator Compartment 
Default temperature setting: 39°F (4°C).
The temperature range for the refrigerator compartment is 34°F to 44°F (1°C to 7°C).
Freezer Compartment 
Default temperature setting: 0°F (-18°C).
The temperature range for the freezer compartment is -7°F to 7°F (-22°C to -14°C).
To adjust the temperature of the refrigerator and/or freezer compartments:
1. Select the compartment by pressing either 


 or
or 


2. Press |
or |
to either raise or lower the temperature in |
increments of 1° until the desired temperature is reached.
TEMPERATURE UNIT DISPLAY
The compartment temperatures can be viewed in either degrees Fahrenheit (°F) or degrees Celsius (°C).
Press and hold |
|
controls for 3 seconds to change the unit |
display from degrees Fahrenheit (°F) to degrees Celsius (°C) or vice versa.
| <![if ! IE]> <![endif]>Safety |
<![if ! IE]> <![endif]>Refrigerator |
|
|
| <![if ! IE]> <![endif]>Requirements |
<![if ! IE]> <![endif]>Operating |
|
|
| <![if ! IE]> <![endif]>Features |
<![if ! IE]> <![endif]>and Parts |
|
|
| <![if ! IE]> <![endif]>Installation |
|
|
|
| <![if ! IE]> <![endif]>Use |
<![if ! IE]> <![endif]>Before |
|
|
| <![if ! IE]> <![endif]>Use |
<![if ! IE]> <![endif]>Refrigerator |
|
|
| <![if ! IE]> <![endif]>Care |
<![if ! IE]> <![endif]>Refrigerator |
|
|
| <![if ! IE]> <![endif]>Troubleshooting |
|
23
| <![if ! IE]> <![endif]>Safety |
<![if ! IE]> <![endif]>Refrigerator |
|
|
| <![if ! IE]> <![endif]>Requirements |
<![if ! IE]> <![endif]>Operating |
|
|
| <![if ! IE]> <![endif]>Features |
<![if ! IE]> <![endif]>and Parts |
|
|
| <![if ! IE]> <![endif]>Installation |
|
|
|
| <![if ! IE]> <![endif]>Use |
<![if ! IE]> <![endif]>Before |
|
|
| <![if ! IE]> <![endif]>Use |
<![if ! IE]> <![endif]>Refrigerator |
|
|
| <![if ! IE]> <![endif]>Care |
<![if ! IE]> <![endif]>Refrigerator |
|
|
| <![if ! IE]> <![endif]>Troubleshooting |
|
LOCK/UNLOCK CONTROLS
To Unlock the Controls:
Press and hold 


 for 3 seconds. A tone will sound,and the display will illuminate.
To Lock the Controls:
Press and hold 


 for 3 seconds. A tone will sound,and the display
NOTE: After 30 seconds, if no control is pressed, the controls will automatically lock.
SUPER COOL MODE
Press and hold |
for 3 seconds to enter Super Cool |
mode,the temperature in the compartment will lower to 34°F (1°C).
Press and hold 


 again for 3 seconds to exit the Super Cool mode. The light will turn o
 , and the refrigerator compartment
temperature will return to the previously set temperature.
SUPER FREEZE MODE
Press and hold 


 for 3 seconds to enter the Super
Freeze mode,the temperature in the compartment will lower to -7°F (-22°C).
Press and hold 


 again for 3 seconds to exit the Super Freeze mode. The light will turn o
 , and the freezer compartment
temperature will return to the previously set temperature.
ENERGY SAVING MODE
Press |
|
|
|
to enter and exit Energy Saving mode. |
|
||||
|
Energy Saving will illuminate to indicate the mode is activated and turn  vated.
When Energy Saving mode is activated, the refrigerator compartment temperature is 44°F (7°C) and the freezer compartment temperature is 7°F (-14°C).
When Energy Saving mode is turned o , the refrigerator and freezer compartment temperatures will revert to the previously set temperatures.
NOTE: If a temperature was set to either Super Freeze or Super Cool mode, it will be automatically cancelled.
24
ICE MAKER
Freezer Ice Maker
Press 


 to turn ON/OFF the freezer compartment ice maker. When the .!!6!.ŏ% !ŏ) '!. is on, the control will be illuminated.
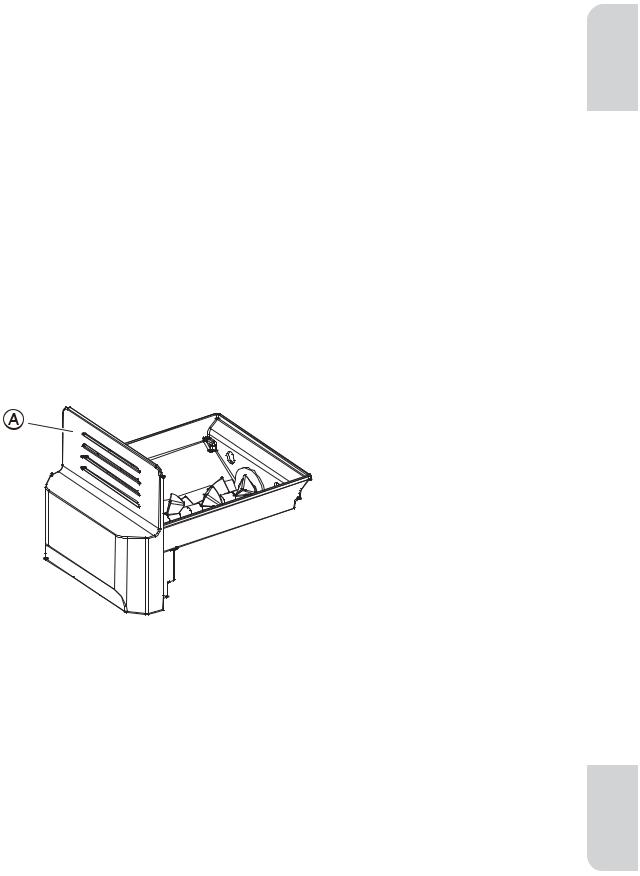
Freezer Ice Bin
The freezer compartment ice bin is removable for cleaning or emptying when a large amount of cubed ice is needed.
After emptying and/or cleaning, replace the ice bin immediately. The ice maker will continue to make ice, and the cubes will drop into the ice making compartment if the ice bin is not properly installed.
To Remove the Ice Bin:
1.Open the freezer door as soon as possible .
2.Grasp the Ice storage bin and pull the bin out of the compartment.
 Ice storage bin
To Replace the Ice Bin:
1.Remove any ice cubes that may have fallen into the ice compartment.
2.Slide the ice bin into the compartment.
| <![if ! IE]> <![endif]>Safety |
<![if ! IE]> <![endif]>Refrigerator |
|
|
| <![if ! IE]> <![endif]>Requirements |
<![if ! IE]> <![endif]>Operating |
|
|
| <![if ! IE]> <![endif]>Features |
<![if ! IE]> <![endif]>and Parts |
|
|
| <![if ! IE]> <![endif]>Installation |
|
|
|
| <![if ! IE]> <![endif]>Use |
<![if ! IE]> <![endif]>Before |
|
|
| <![if ! IE]> <![endif]>Use |
<![if ! IE]> <![endif]>Refrigerator |
|
|
| <![if ! IE]> <![endif]>Care |
<![if ! IE]> <![endif]>Refrigerator |
|
|
| <![if ! IE]> <![endif]>Troubleshooting |
|
25

| <![if ! IE]> <![endif]>Safety |
<![if ! IE]> <![endif]>Refrigerator |
|
|
| <![if ! IE]> <![endif]>Requirements |
<![if ! IE]> <![endif]>Operating |
|
|
| <![if ! IE]> <![endif]>Features |
<![if ! IE]> <![endif]>and Parts |
|
|
| <![if ! IE]> <![endif]>Installation |
|
|
|
| <![if ! IE]> <![endif]>Use |
<![if ! IE]> <![endif]>Before |
|
|
| <![if ! IE]> <![endif]>Use |
<![if ! IE]> <![endif]>Refrigerator |
|
|
| <![if ! IE]> <![endif]>Care |
<![if ! IE]> <![endif]>Refrigerator |
|
|
| <![if ! IE]> <![endif]>Troubleshooting |
|
7KH GLVSHQVHU FRQWURO LQFRUSRUDWHV EDFNOLW /(' LFRQV WR GHVLJQDWH WKH RSHUDWLQJ PRGH RI WKH GLVSHQVHU 7KHUH DUH WZR GLVSOD\ PRGHV WKDW \RX FDQ FKRRVH EHWZHHQ 6WDQGE\ 0RGH DQG $FWLYH 0RGH <RX FDQ VZLWFK WKH PRGHV E\ IROORZLQJ WKH LQVWUXFWLRQ LQ EHORZ $V WKH IDFWRU\ GHIDXOW WKH GLVSHQVH FRQWURO LV LQ 6WDQGE\ 0RGH
,Q 6WDQGE\ 0RGH WKH GLVSHQVHU LFRQV DUH KLGGHQ XQWLO DFWLYDWHG 7KH LFRQV FDQ EH DFWLYDWHG E\ VZLSLQJ \RXU ILQJHU DFURVV WKH FRQWURO VXUIDFH 7KH GLVSHQVHU LFRQV ZLOO WXUQ RII DIWHU VHFRQGV DXWRPDWLFDOO\ 6WDQGE\ 0RGH SURYLGHV D PLQLPDOLVW ORRN ZKLFK VRPH XVHUV SUHIHU
,Q $FWLYH 0RGH WKH GLVSHQVHU LFRQV &XEHG :DWHU &UXVKHG DUH DOZD\V RQ 7KH FRQWURO XVHV EULJKWHU /(' LFRQ WR LQGLFDWH ZKDW GLVSHQVLQJ PRGH LV VHOHFWHG
6ZLWFKLQJ EHWZHHQ $FWLYH 0RGH DQG 6WDQGE\ 0RGH 3UHVV DQG KROG :$7(5 DQG &586+(' LFRQV IRU VHFRQGV 7KH GLVSHQVHU FRQWURO ZLOO IODVK IRU VHFRQGV FRQILUPLQJ WKH PRGH LV FKDQJH
'LVSHQVHU OLJKW WXUQV RQ ZKHQ GLVSHQVLQJ ZDWHU DQG LFH 7KH /(' OLJKW ZLOO WXUQ RII DIWHU VHFRQGV
$
7R XVH DV D QLJKW OLJKW RU H[WHQG WKH GXUDWLRQ WKDW WKH GLVSHQVHU OLJKW LV RQ SUHVV DQG KROG :DWHU DQG &XEHG LFRQV WRJHWKHU IRU VHFRQGV 7KH GLVSHQVHU OLJKW ZLOO WXUQ RII DXWRPDWLFDOO\ DIWHU KRXUV 7R WXUQ RII KROG WKH VDPH EXWWRQV DJDLQ IRU VHFRQGV
Dispensing Crushed Ice
1.Press the Crushed button  . The Crushed indicator will illuminate.
2.Using your finger or container, press the pad to dispense crushed ice.
3.Release the dispensing pad to stop dispensing ice.
DRIP TRAY
The drip tray is removable for cleaning.
 Drip tray
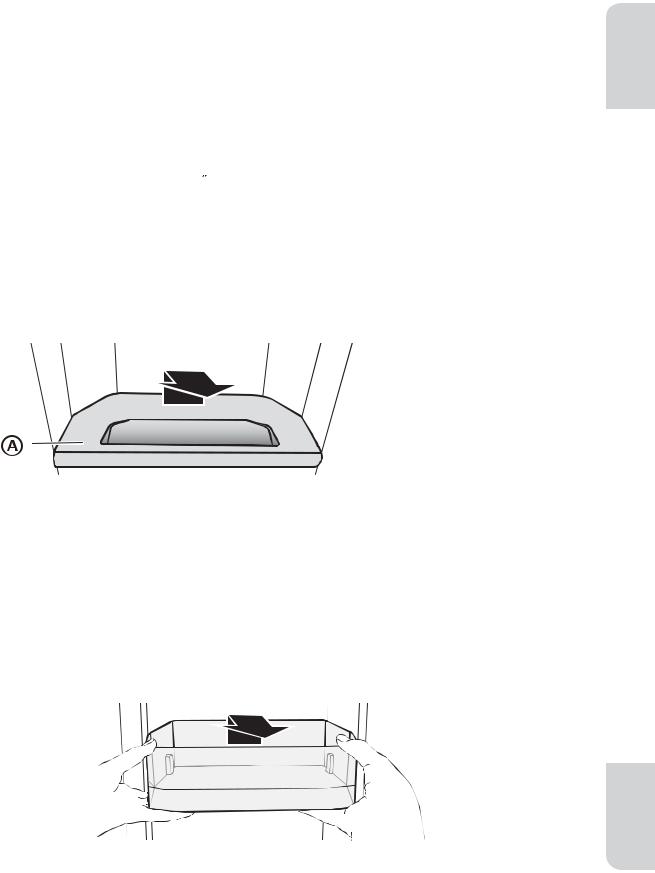
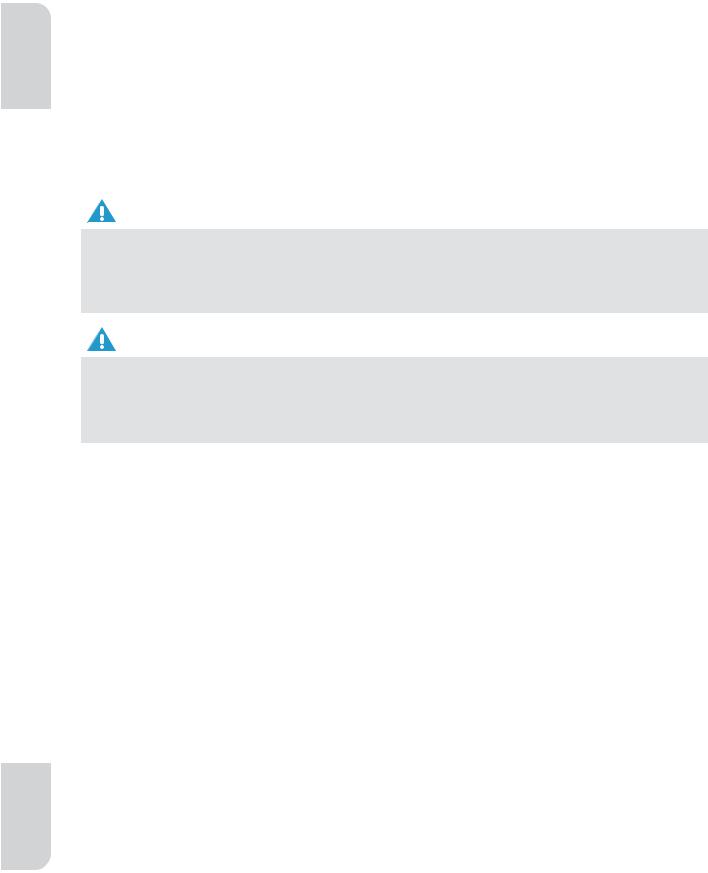
REMOVABLE DOOR BINS
The door bins are removable for easier cleaning.
To Remove:
1.Remove all items from the door bin.
2.Grasp the sides of the bin, lift the bin up and pull it outward.
To Replace:
1.Insert bin into the door liner above the support, and then press downward to engage.
| <![if ! IE]> <![endif]>Safety |
<![if ! IE]> <![endif]>Refrigerator |
|
|
| <![if ! IE]> <![endif]>Requirements |
<![if ! IE]> <![endif]>Operating |
|
|
| <![if ! IE]> <![endif]>Features |
<![if ! IE]> <![endif]>and Parts |
|
|
| <![if ! IE]> <![endif]>Installation |
|
|
|
| <![if ! IE]> <![endif]>Use |
<![if ! IE]> <![endif]>Before |
|
|
| <![if ! IE]> <![endif]>Use |
<![if ! IE]> <![endif]>Refrigerator |
|
|
| <![if ! IE]> <![endif]>Care |
<![if ! IE]> <![endif]>Refrigerator |
|
|
| <![if ! IE]> <![endif]>Troubleshooting |
|
%
| <![if ! IE]> <![endif]>Safety |
<![if ! IE]> <![endif]>Refrigerator |
|
|
| <![if ! IE]> <![endif]>Requirements |
<![if ! IE]> <![endif]>Operating |
|
|
| <![if ! IE]> <![endif]>Features |
<![if ! IE]> <![endif]>and Parts |
|
|
| <![if ! IE]> <![endif]>Installation |
|
|
|
| <![if ! IE]> <![endif]>Use |
<![if ! IE]> <![endif]>Before |
|
|
| <![if ! IE]> <![endif]>Use |
<![if ! IE]> <![endif]>Refrigerator |
|
|
| <![if ! IE]> <![endif]>Care |
<![if ! IE]> <![endif]>Refrigerator |
|
|
| <![if ! IE]> <![endif]>Troubleshooting |
|
REFRIGERATOR CARE
Both the refrigerator and freezer compartments defrost automatically and require minimal cleaning and maintenance. To keep your refrigerator running efficiently and odor free, we recommend that you wipe up spills immediately and clean the refrigerator regularly.
CLEANING
WARNING
Electrical Shock Hazard
•Unplug your appliance or disconnect power before cleaning.
•Failure to do so can result in death, electric shock or personal injury.
WARNING
Explosion Hazard
•Use nonflammable cleaner.
•Failure to do so can result in death, explosion or fire.
IMPORTANT: To prevent damage to the finish, DO NOT use gasoline, benzine, thinner or other solvents, and DO NOT use abrasive cleaners.
1.Unplug the refrigerator from the electrical outlet.
2.Remove all food.
3.Remove and wash the shelves with a mild detergent solution.
&

4.Wash the refrigerator interior using a soft cloth dampened with a baking soda solution (2 tablespoons baking soda mixed with 1 quart of warm water).
5.Clean the gasket around the door. Gently wipe the gasket using a soft cloth dampened with a mild detergent solution.
NOTE: Gaskets must be kept clean and pliable to assure a proper seal.
6.Using a soft cloth, thoroughly dry all surfaces.
7.Plug in or reconnect power.
MOVING
IMPORTANT: When moving your refrigerator, DO NOT tilt it beyond 45° from upright.
1.Unplug your refrigerator from the wall outlet.
2.Remove all food.
3.Securely tape down all loose items inside your refrigerator.
4.Tape the door shut.
STORAGE
IMPORTANT: Do not store refrigerator in a location that is accessible to children.
1.Unplug your refrigerator from the electrical outlet.
2.Remove all food.
3.Clean the refrigerator.
4.Leave the door open slightly to avoid possible formation of condensation, mold or odor.
REPLACING LIGHTS
Any replacement or maintenance of the LED lights is intended to be made by the manufacturer, its service agent or similarly qualified person.
| <![if ! IE]> <![endif]>Safety |
<![if ! IE]> <![endif]>Refrigerator |
|
|
| <![if ! IE]> <![endif]>Requirements |
<![if ! IE]> <![endif]>Operating |
|
|
| <![if ! IE]> <![endif]>Features |
<![if ! IE]> <![endif]>and Parts |
|
|
| <![if ! IE]> <![endif]>Installation |
|
|
|
| <![if ! IE]> <![endif]>Use |
<![if ! IE]> <![endif]>Before |
|
|
| <![if ! IE]> <![endif]>Use |
<![if ! IE]> <![endif]>Refrigerator |
|
|
| <![if ! IE]> <![endif]>Care |
<![if ! IE]> <![endif]>Refrigerator |
|
|
| <![if ! IE]> <![endif]>Troubleshooting |
|
'

| <![if ! IE]> <![endif]>Safety |
<![if ! IE]> <![endif]>Refrigerator |
|
|
| <![if ! IE]> <![endif]>Requirements |
<![if ! IE]> <![endif]>Operating |
|
|
| <![if ! IE]> <![endif]>Features |
<![if ! IE]> <![endif]>and Parts |
|
|
| <![if ! IE]> <![endif]>Installation |
|
|
|
| <![if ! IE]> <![endif]>Use |
<![if ! IE]> <![endif]>Before |
|
|
| <![if ! IE]> <![endif]>Use |
<![if ! IE]> <![endif]>Refrigerator |
|
|
| <![if ! IE]> <![endif]>Care |
<![if ! IE]> <![endif]>Refrigerator |
|
|
| <![if ! IE]> <![endif]>Troubleshooting |
|
TROUBLESHOOTING
IMPORTANT: DO NOT try to repair your refrigerator yourself. Doing so invalidates the warranty.
GENERAL
PROBLEM
The refrigerator is not on or is not cooling
The refrigerator door does not close completely
The LED lights do not come on
POSSIBLE CAUSE
The refrigerator is unplugged.
The fuse on the circuit is blown or the circuit breaker is tripped.
Power failure.
Temperature control is not set to correct temperature.
The clearance between the refrigerator and surrounding cabinets or wall is insufficient.
Food packages are interfering with the door.
The door gaskets are dirty.
The refrigerator may not be level.
The refrigerator is unplugged.
LED light is burned out.
SOLUTION
Make sure that the refrigerator power cord is fully plugged into the electrical outlet.
Check the house fuse / circuit breaker box and replace the fuse or reset the circuit breaker.
If a power failure occurs, the refrigerator turns off. Wait until the power is restored.
Adjust the temperature to a lower setting.
Make sure there is adequate clearance around the refrigerator, and remove all items from the top of the
refrigerator to maximize air circulation. See “Location Requirements.”
Move or remove some food items.
Clean the door gaskets.
Level the refrigerator.
Plug refrigerator into a grounded 3 prong outlet.
Contact a qualified technician to replace the burned out LED.
!
 Loading...