


2.0 Cu. Ft. Ventless
Washer Dryer Combo
User’s Manual
Model MCSCWD20W3
PLEASE READ THIS MANUAL CAREFULLY BEFORE USING YOUR WASHER DRYER COMBO AND KEEP IT FOR FUTURE REFERENCE.

PRODUCT REGISTRATION
Thank you for purchasing a Magic Chef® product. The first step to protect your new product is to complete the product registration on our website: www.mcappliance.com/register. The benefits of registering your product include the following:
1.Registering your product will allow us to contact you regarding a safety notification or product update.
2.Registering your product will allow for more efficient warranty service processing when warranty service is required.
3.Registering your product could act as your proof of purchase in the event of insurance loss.
Once again, thank you for purchasing a Magic Chef product.
2
CONTENTS
PRODUCT REGISTRATION 2 PRECAUTIONS 4 IMPORTANT SAFETY INSTRUCTIONS 7 SPECIFICATIONS 9 INSTALLATION REQUIREMENTS 10 INSTALLATION INSTRUCTIONS 12 PARTS AND FEATURES 15 BEFORE USE 19 OPERATION INSTRUCTIONS 21 CARE AND MAINTENANCE 24 TROUBLESHOOTING 26 LIMITED WARRANTY 28
3
PRECAUTIONS
 NOTE: Before using your Combo Washer/Dryer, read this manual carefully and keep it for future reference.
READ THIS USER MANUAL
Inside this manual, you will find helpful information on how to properly use and maintain your Combo Washer/ Dryer. You will find many answers to common problems in the Troubleshooting section. Review this manual to ensure safe and proper operation of your appliance.
UNPACKING YOUR WASHING MACHINE
1.Inspect and remove all packaging material including two bottom blocks of foam.
2.Inspect and remove all remaining packing, tape, and removable printed materials before starting your Combo Washer/Dryer.
 WARNING: Risk of child entrapment
Child supervision is necessary. This appliance is to be used only for its intended purpose as described in this manual. Read all recommended safeguards thoroughly.
ELECTRICAL INSTRUCTIONS
 WARNING: For personal safety
•DO NOT use an extension cord or an adapter plug with this appliance.
•DO NOT, under any circumstances, cut or remove the grounding connection from the power cord.
Ensure the rating voltage and frequency of the power outlet corresponds to those on the rating label. Use the required fuse 10 amp, time delay fuse or circuit breaker recommended.
GROUNDING INSTRUCTIONS
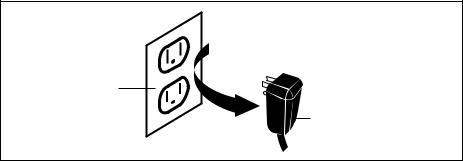
This appliance must be grounded. In the event of a malfunction or breakdown, grounding will reduce the risk of electric shock. This appliance is equipped with an equipment-grounding conductor cord and grounding plug. The appliance must be plugged into an outlet that is properly installed and grounded.
Figure 1
DO NOT, under any circumstances, cut, remove, or bypass the grounding prong.
Wall outlet with
a 3-prong receptacle
Power supply cord with 3-prong grounding plug
 WARNING: Improper use of the grounding plug and/or outlet can result in a risk of electric shock. Consult a qualified electrician or serviceperson if the grounding instructions are not completely understood.
 WARNING: This washing machine must be connected to a circuit separately from other electrical appliances. Otherwise, circuit breaker may be tripped or fuse may burn out.
4
BEFORE OPERATING THIS APPLIANCE
•Packing materials may be dangerous to children. Keep all packing materials (plastic bags, foams, etc.) away from children.
•Ensure that water and electrical devices are properly connected by a qualified technician in accordance with the manufacturer’s instructions (refer to “Installation Requirements” on page 10) and local safety regulations.
•Before operating this machine, all packaging and transport bolts must be removed. (Refer to “Remove Transport Bolts” on page 12.) Otherwise, the washing machine may be seriously damaged during operation.
•Before washing clothes for the first time, the washing machine must be operated in “Cotton” and “Hot Water” settings without any clothes inside. (Refer to “Washing Clothes” on page 21.)
•This washing machine is for indoor use only.
PROTECTING THIS APPLIANCE
•DO NOT climb on or sit on the top cover of this appliance.
•DO NOT lean against the door.
•DO NOT close the door with excessive force. If the door is difficult to close, check the unit is not overloaded and clothes are properly distributed inside the machine.
CAUTION DURING HANDLING
•Before transporting, transport bolts must be reinstalled onto the machine by a qualified person.
•Any accumulated water must be drained out of the machine.
•Handle the appliance carefully. NEVER hold or lift the appliance by a protruding part.
CAUTION WHEN WASHING CLOTHES
•Cold and hot water must be connected in accordance to local ordinances.
•This machine is only for household use and is only designed for clothes and garments suitable for machine washing and drying.
•Flammable, explosive or toxic solvents are forbidden. Gasoline, alcohol, etc. must not be used as detergents. Only use detergents that are suitable for machine washing, especially for front loading machines.
•DO NOT wash carpets or rugs.
•This washing machine drains hot water and unit and parts, including the unit door, may become very hot. Exercise caution.
•NEVER refill the water by hand during a washing cycle.
•After a wash/dry cycle is completed, open the door after the bell and disconnect the power supply to the machine.
•Disconnect water and power supply immediately after the clothes are washed/dried.
•ALWAYS follow the fabric care instructions recommended by the clothing manufacturer. (Refer to “Common Fabric Care Symbols” on page 27.)
•DO NOT use the washing machine if it has a worn/damaged power cord or loose plug. Contact an authorized service agent.
5
•DO NOT operate the washing machine if any guards, panels and/or fasteners, except transport fixing bolts, have been removed. Check the fill hose connections on a regular basis to ensure they are tight and not leaking.
•DO NOT operate the washing machine if parts are missing or broken.
 NOTE: ALWAYS contact the manufacturer or a qualified service agent about any manual instructions that are unclear.
 WARNING: Installation
•Install the appliance according to the manufacturer’s instructions and local codes.
•Certain conditions may obstruct proper dryer airflow and increase the risk of fire.
•To reduce the risk of severe injury or death, follow all installation instructions carefully.
•To reduce the risk of fire, this appliance must be properly secured to the floor.
 WARNING: Disposal
•For proper disposal, contact your local waste disposal service regarding local regulations.
•Cut off the power cord prior to disposal.
•Failure to comply with these warning may result in serious personal injury or death.
6
IMPORTANT SAFETY INSTRUCTIONS
 WARNING: Proper Use
To reduce the risk of fire, electric shock, or personal injury when using your appliance, follow these basic precautionary guidelines, which includes the following:
1.Read all instructions before using the appliance. Unit must be properly installed as described in this manual before use.
2.ALWAYS unplug the washing machine from the power supply before attempting any service. Disconnect the power cord by grasping the plug, not the cord. NEVER pull out power plug with wet or damp hands.
3.DO NOT wash articles that have been previously cleaned in, washed in, soaked in, or spotted with gasoline, dry-cleaning solvents, or other flammable or explosive substances, as they may contain vapors that could ignite or explode.
4.DO NOT add gasoline, dry-cleaning solvents, or other flammable or explosive substances to the wash water. These substances could ignite or explode.
5.If the hot water system has not been used for 2 weeks or more, turn on all hot-water faucets and let water flow for several minutes before using the washing machine. Under certain conditions, hydrogen gas (which is EXPLOSIVE) may be produced in a hot water system that has not been in use. This will release any accumulated hydrogen gas. DO NOT smoke or use an open flame during this process, as hydrogen gas is highly flammable.
6.To reduce the risk of fire, clothes, cleaning rags, mop heads and the like which have traces of any flammable substance (i.e. vegetable oil, cooking oil, petroleum based oils or distillates, waxes, fats, etc.) must not be placed in the washing machine. These items may contain flammable substances which, even after washing, may smoke or catch fire.
7.NEVER place items in the washer that have been dampened with gasoline or any combustible or explosive substance. DO NOT wash or dry anything that has been soaked in or spotted with any type of oil (including cooking oils). Doing so can result in fire, explosion, or death.
8.DO NOT allow children to play on or in the appliance. Close supervision of children and pets around the appliance is necessary, as they may climb into or tamper with the machine. Check the machine before each use.
9.Glass door or protector may become very hot during and after operation. Keep kids and pets far away from the machine during and after each operation.
10.This washing machine is not intended for use by persons (including children) with reduced physical, sensory or mental capabilities, or lack of experience and knowledge.
11.When children become old enough to operate the appliance, it is the legal responsibility of the parents or legal guardians to ensure that they are instructed in safe practices by qualified persons.
12.DO NOT machine wash fiberglass materials (such as curtains and window coverings that contain fiberglass materials). Small particles may remain in the washing machine and stick to fabrics in subsequent wash loads which can cause skin irritation.
13.DO NOT reach into the appliance if the tub or agitator is moving. Before loading, unloading, or adding items, press [START/PAUSE] button and allow the drum to coast to a complete stop before reaching inside.
14.DO NOT install or store this appliance where it will be exposed to outdoor weather conditions or temperatures below freezing.
15.DO NOT tamper with controls.
7
16.NEVER stop a tumble dryer before the end of the cycle and spread out clothes so heat can be dissipated.
17.Disconnect plug from the power receptacle before attempting any cleaning or maintenance.
18.Ensure water inside the drum has been completely drained before opening the door. DO NOT open the door if there is any water visible.
19.If the plug or power cord is damaged, it must be replaced by the manufacturer or a qualified service agent to avoid any danger.
20.This washer must be plugged into a 120 V, 60 Hz grounded outlet. Ensure the power voltage and frequency meets the requirements of the washing machine.
21.To ensure your safety, power plug must be completely inserted into a properly grounded 3-prong receptacle. Check carefully and make sure your receptacle is properly and reliably grounded.
22.To reduce the risk of fire, DO NOT dry articles containing foam rubber or similarly textured rubber like materials.
23.Before the appliance is removed from service or discarded, remove the door and cut off the power cord.
24.It is recommended to disconnect the plug and cut off water supply after operation.
25.DO NOT repair or replace any part of the appliance or attempt any service unless specifically recommended in the user manual. Contact a qualified service center/agent through the manufacturer for any and all repairs beyond manual recommendations.
READ AND FOLLOW THIS SAFETY INFORMATION CAREFULLY
SAVE THESE INSTRUCTIONS
8

SPECIFICATIONS
Figure 2
23. |
|
|
5” |
(595 |
mm) |
|
||
|
|
Height |
|
|
|
Width |
23.5” (595mm) |
|
|
Depth |
|
|
|
Depth with Door Opened |
41.0” (1035mm) |
|
|
Weight |
174.0 lbs. (79.0 kg) |
|
|
Voltage / Frequency |
AC 120V~60Hz |
|
|
Rated Current |
12A |
|
|
Washing Capacity |
|
|
|
Dry Capacity |
7.7 lbs. (3.5 kg) |
|
|
Drum Size |
2.0 cu. ft. |
|
|
Standard Water Pressure |
0.05Mpa - 1.0Mpa |
|
|
9
INSTALLATION REQUIREMENTS
TOOLS AND PARTS
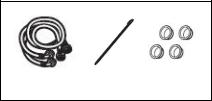
Gather the required tools and parts before starting installation. The parts supplied are in the washer drum. (Refer to Figure 3).
Recommended Tools (NOT included with unit purchase) Included Parts
• 1/4” nut driver 3/8” socket with ratchet
•3/8” open-end wrench
•Adjustable wrench or 7/16 socket with ratchet
•Adjustable wrench or 9/16 open-end wrench
• |
Channel-lock adjustable pliers |
|
|
Transport |
|
Water Hoses (2) |
Cable Tie |
Hole Plugs (4) |
|||
|
|
•Carpenter’s level
UNPACKING THE WASHING MACHINE
•Unpack your washing machine and check for any damage.
•Make sure all the Included Parts (as shown in Figure 3) are received in the included bag.
•If there is any damage to the washing machine or any item is missing, Contact your local dealer immediately.
DISPOSE OF PACKING MATERIALS
The packing materials for this appliance may be dangerous to children and must be kept away from children and disposed of properly. Dispose the related packing materials according to the relevant local regulations.
LOCATION REQUIREMENTS
Selecting the proper location for your washing machine improves performance, minimizes noise and prevents possible washer “walk”. Your washer can be installed under a custom counter, in a basement, laundry room, closet, or recessed area. Refer to “Drain System Options” on page 12 for instructions on proper draining protocol. Companion appliance location requirements should also be considered. DO NOT install your unit in a bathroom (or damp room) or rooms that may contain explosive or caustic gases. Proper installation is important for the operation of your Washer Dryer Combo unit. Before installing the washing machine, the location must be carefully selected based on the following requirements:
•Rigid, dry, and level surface (if surface is not level, adjust the leg levelers. (Refer to “Leveling the Washer” on page 13).
•Avoid exposure of appliance to direct sunlight.
•Allow sufficient ventilation.
•Room temperature must be above 32°F (0°C).
•Keep far away from any heat sources such as coal or gas.
•Make sure the washing machine will not stand on power cord.
•DO NOT install the washing machine on carpeted floor or on a rug.
10
You will need:
•A water heater set to deliver 120°F (49°C) water to the washer.
•A grounded electrical outlet located within 6 ft. (1.8 m) of where the power cord is attached to the back of the washer. Refer to “Grounding Instructions” on page 4.
•Hot and cold water faucets located within 4 ft. (1.2 m) of the hot and cold water fill valves, and water pressure of 20-100 psi (137.9 - 689.6 kPa) .
•A level floor with a maximum slope of 1” (25 mm) under entire washer. DO NOT install the washer on soft floor surfaces, such as carpets or surfaces with foam backing.
•A sturdy and solid floor to support the washer with a total weight (water and load) of 200lbs.
•DO NOT operate your washer in temperatures below 32°F (0°C) . Some water can remain in the washer and can cause damage in low temperatures.
INSTALLATION CLEARANCES
•The location must be large enough to allow the washer door to be fully opened.
•Additional spacing should be considered for ease of installation and servicing. The door opens more than 90° and it is NOT reversible.
•Additional clearances might be required for wall, door and floor moldings.
•Additional spacing of 1” (25mm) on all sides of the washer is recommended to reduce noise transfer.
•Companion appliance spacing should also be considered.
RECOMMENDED SPACING FOR UNDER-COUNTER INSTALLATION
Figure 4
2.0” (50 mm)
33.5” (850 mm)
1.0” (25 mm) |
|
|
23.5” (595 mm) |
|
|
1.0” (25 mm) |
||||
|
|
|
|
|
|
|
|
|
|
|
|
|
|
|
|
|
|
|
|
|
|
11
INSTALLATION INSTRUCTIONS
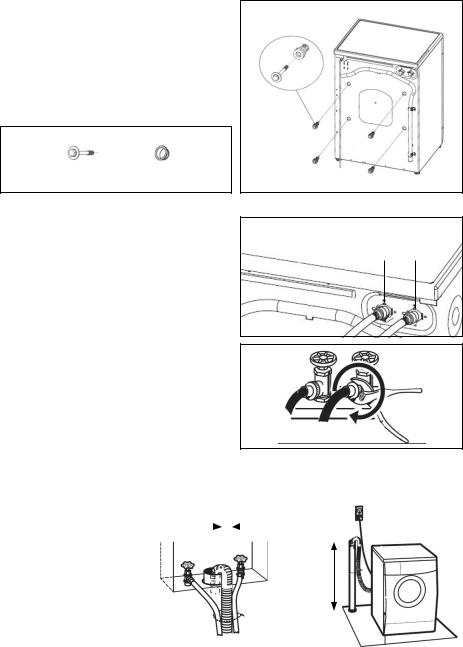
REMOVE TRANSPORT BOLTS
Before using this washing machine, transport bolts must be removed from the backside of this machine. Take the following steps to remove the bolts:
1.Loosen all bolts with wrench and then remove.
2.Cover the holes with included transport hole plugs.
3.Store the transport bolts properly for future use.
Figure 5
Transport Bolts (4) |
Transport Hole Plugs (4) |
CONNECT INLET PIPE
Connect the inlet pipe as indicated in Figure 7.
For models with a hot valve, connect the hot valve to hot water tap.
INSTALL INLET PIPE
1.Connect the elbow to the tap and fasten it clockwise. (Refer to Figure 8.)
2.Connect the other end of inlet pipe to the inlet valve at the backside of washing machine and fasten the pipe tightly clockwise.
 NOTE: After connection, if there is any leakage from the hose, repeat the above steps to connect inlet pipe. If tap is square or too big, then standard tap must be changed to allow proper fitting.
Figure 6
Figure 7
Hot Cold
Figure 8
DRAIN SYSTEM OPTIONS
Standpipe Drain System |
|
|
|
|
|
|
|
|
|
|
|
|
|
|
|
|
|
|
|
|
Figure 9 |
|
|
|
|
Figure 10 |
|||
Wall (Figure 9) or Floor (Figure 10) |
|
|
|
|
|
|
|
|
|
|
||||
2” (50 mm) |
|
|
|
|
|
|
|
|
|
|||||
|
|
|
|
|
|
|
||||||||
The standpipe drain requires a |
|
|
|
|
|
|
|
|
|
|
|
|
|
|
|
|
|
|
|
|
|
|
|
|
|
|
|
|
|
minimum diameter standpipe of |
|
|
|
|
|
|
|
|
|
|
minimum |
|
|
|
2” (50 mm). The minimum flow |
|
|
|
|
|
|
|
|
|
|
|
|
||
|
|
|
|
|
|
|
|
|
|
23” (600 mm) |
|
|
||
capacity must be no less than 17 |
|
|
|
|
|
|
|
|
|
|
maximum |
|
|
|
gallons (64 L) per minute. |
|
|
|
|
|
|
|
|
|
|
39” (1000 mm) |
|
|
|
The top of the standpipe must be |
|
|
|
|
|
|
|
|
|
|
|
|
|
|
|
|
|
|
|
|
|
|
|
|
|
|
|
|
|
at least 23” (60 cm) high and no |
|
|
|
|
|
|
|
|
|
|
|
|
|
|
higher than 39” (100 cm) from the |
|
|
|
|
|
|
|
|
|
|
|
|
|
|
bottom of the washer. |
|
|
|
|
|
|
|
|
|
|
|
|
|
|
12

Laundry Tub Drain System (Figure 11) |
Floor Drain System (Figure 12) |
|
|
The laundry tub needs a minimum 20 gallons (76 L) |
The floor drain system requires a siphon break that |
||
capacity. The top of the laundry tub must be at least 23” |
may be purchased separately. The siphon break must |
||
(60 cm) above the floor. |
be a minimum of 28” (710 mm) from the bottom |
||
|
of the washer. |
|
|
Figure 11 |
Figure 12 |
||
(Additional hose |
|||
|
|
||
|
purchase may be |
|
|
|
required.) |
|
|
|
|
|
|
LEVELING THE WASHER
1.When positioning the washing machine, check that the legs are closely attached to the cabinet. If not, turn them to their original positions with hand or spanner and tighten the nuts.
2.After positioning the washing machine, press the four (4) corners on top cover of washing machine in sequence. If the washing machine is not stable when pressed, the leg must be adjusted.
3.Ensure the position of the washing machine.
Loosen the lock nut with wrench and turn the leg by hand until it contacts the floor. (Refer to Figure 13.) Press the leg with one hand and fasten the nut closely to the cabinet with the other hand.
4.After being locked properly, press the four
(4) corners again to ensure the legs have been adjusted properly. If it is still unstable, repeat Steps 2 and 3.
5.Use a carpenter’s level on all four (4) sides to ensure the appliance is level.
ELECTRICAL CONNECTION
•As the maximum current through the unit is 12A, when using the heating (dryer) function, make sure the power supply system (current, power voltage and wire) at your home meets the requirements of this appliance.
•Connect the power to a receptacle which is correctly installed and properly grounded.
•Make sure the power voltage is compatible with the machine’s rating label.
•Power plug must match the receptacle and unit must be properly and effectively grounded.
•DO NOT use a multi-purpose plug, receptacle or extension cord.
13
•DO NOT connect and disconnect plug with wet hands.
•When connecting and disconnecting the plug, hold the plug tightly by the base and then pull out. DO NOT pull power plug forcibly or by the cord.
 NOTE: Damaged Power Cord
•DO NOT operate the machine with a damaged power cord.
•DO NOT attempt to repair a damaged power cord.
14
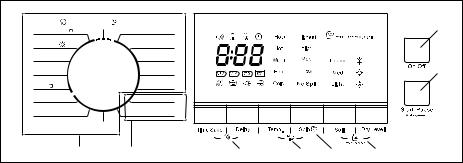
PARTS AND FEATURES
CONTROL PANEL
|
|
|
|
|
|
|
Figure 15 |
Time Save |
My Cycle |
|
|
|
|
|
a |
Normal / Cotton |
Quick |
|
|
|
|
|
|
Heavy Duty |
Delicate |
|
|
|
|
|
|
Bulky |
Sanitize |
|
|
|
|
|
|
Sheets |
Wool |
|
|
|
|
|
b |
Sports |
Undergarments |
|
|
|
|
|
|
Spin |
De-Wrinkle |
|
|
|
|
|
|
Rinse & Spin |
Dry |
e |
f |
g |
h |
i |
j |
|
|
||||||
|
Tub Clean |
|
|
|
|
|
|
c |
d |
|
n |
|
k |
l |
m |
a.On/Off: Press [On/Off] to turn the unit ON with LCD display. Press the button again to turn the unit OFF.
 NOTE: If the washer is paused and the current wash cycle is not resumed within 10 minutes, the cycle will be cancelled and the unit will automatically turn OFF.
b.Start/Pause: Press [Start/Pause] to start a wash cycle. Press [Start/Pause] again to pause the cycle when the washer is running. Press [Start/Pause] once more to resume.
c.Wash Cycles
1.Normal/Cotton: Select this option for regularly used cottons and fabrics.
•Extended wash cycle with stronger intensity
•Recommended fabrics: cotton, linens, bed sheets, t-shirts, towels, jeans, etc.
•Dry cycle can be added.
2.Heavy Duty: Select this option for washing heavy clothing.
•Dry cycle can be added.
3.Bulky: Select this option for bulky/large items.
•Extended wash cycle
4.Sheets: Select this option for sheets and duvet covers.
5.Sports: Select this option for sportswear.
•Wash cycle cleans heavily soiled clothes.
6.Spin: Select this option to spin a load separately from a regular wash cycle.
•Soap water or rinse water must be drained before spinning.
7.Rinse & Spin: Select this option to rinse and spin a load separately from a regular wash cycle.
•This can be helpful in preventing fresh stains from setting in fabrics.
8.Quick: Select this option to wash few clothes that are not very dirty quickly.
9.Delicate: Select this option for delicate fabrics such as dress shirts, nylons, etc.
•Wash cycle operates at a lower temperature.
10.Sanitize: Select this option to remove detergent buildup and other residue.
•Uses high temperature sterilization on clothing.
•DOES NOT drain the water. You must select another program to complete the process.
15
11.Wool: Only use this option to wash wool clothing articles labeled “Machine Washable”.
•Proper detergent must be selected for wool textiles.
•Lower spin speed and less agitation
12.Undergarments: Select this option to wash a few or lightly soiled clothes.
•Wash cycle includes additional rinse.
•Dry cycle can be added.
13.My Cycle: Select this option to save a commonly used washing program as a preset.
•To program, select the settings you wish to use. Then press [Spin] and hold it for 3 seconds to save.
d.Dry Cycles
 NOTE: Important Notes for Dry Cycles
If the machine is to be used to dry a load, then the wash load must be reduced by half for effective drying performance. If a full load is washed, remove half the clothes prior to starting the dry cycle. Refer to “Control Panel” on page 15 to learn how to pause a cycle.
DO NOT cut off water supply or remove hose attachments during dry cycle. This is a ventless unit that releases moisture during dry cycles.
The dryer is equipped with a door-locking safety feature to ensure safe temperatures and avoid burns and other safety hazards. The door will remain LOCKED during dry cycle until the unit reaches a safe temperature. After a safe temperature is reached, the door should open and function normally.
Dry Only Cycles
1.De-Wrinkle: Select this option to de-wrinkle clothes. There is only air during this cycle. The maximum drying time is 31 minutes.
 NOTE: the unit will automatically stop drying after 31 minutes even if items are not fully dry.
2. Dry: This option is for only drying a load of clothes. Select the Dry Level according to the load. Combo Wash/Dry Cycles
•Select this option to dry clothes immediately after washing with the Normal/Cotton, Heavy Duty or Sports cycles. The unit will transit from wash to dry.
•You must select this option before starting the wash cycle.
•First select desired wash cycle (refer to chart on Page 22 to see drying compatible cycles). Then, add dry option by clicking the [Dry Level] button to the desired level. A sun icon should be displayed on the screen, indicating added dry time.
 NOTE: Pay attention to the load size when using this option. Only wash loads at capacity of dryer. (Refer to “Washing and Drying Capacity” on page 20).
e.Time Save: Press [Time Save] to decrease the washing time.
f.Delay: Press [Delay] to set a delay time for the wash to begin.
•The delay start light will flash to indicate the delay time. You can delay the start time of the cycle from 1 - 24 hours.
g.Temp.: Press [Temp.] to set your desired washing temperature.
h.Spin: Press [Spin] to increase spin speed.
•Washer drum spins at a speed up to 1200 RPM which reduces drying time and saves energy.
•Press the button until desired speed is lit (No Spin, Low, Med, High, Highest).
•Some fabrics (i.e. delicates) require a slower spin speed.
•High spin speeds are not available on all cycles.
16
i.Soil: Press [Soil] to increase time for heavier soiled items.
•There are three (3) soil levels options.
•Each bar increases the base wash time by 5 minutes.
j.Dry Level: Adds a dry cycle to the end of the wash cycle (not available on all cycles).
k.Extra Rinse: Press the [Temp.] and [Spin] button at the same time to add an extra rinse to the selected cycle.
l.My Cycle: After a wash cycle is modified, hold down [Spin] to save your settings.
•You can quickly choose this cycle for your next wash by turning the dial to My Cycle.
•Override saved settings by holding the [Spin] button down again after a different cycle and options are selected.
m.Child Lock: Press [Soil] and [Dry Level] at the same time to Unlock/Lock the control panel.
n.Sound: Press [Time Save] and [Delay] at the same time to turn the sound on or off.
o.Change cycles and options: Not all options are available with all Cycles. Cycles and Options can be changed anytime before [Start/Pause] is pressed.
p.To cancel a cycle:
•Press and hold [On/Off] for 3 seconds to turn the unit OFF.
•Wash cycle can be changed at this time.
•Press [On/Off] once and select the desired setting. Then press [Start/Pause] to start the unit.
q.To manually drain the washer:
•Press [On/Off] to turn the unit ON.
•Select the Spin cycle.
•Press [Start/Pause] to start the cycle to drain the washer.
•When the spin cycle is completed, the door will unlock. Items can now be removed from the washer.
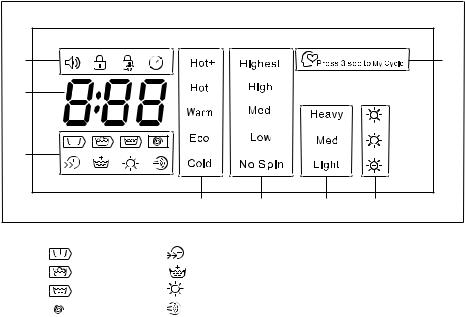
LCD DISPLAY
Figure 16
c |
|
|
c |
b |
|
|
|
a |
|
|
|
d |
e |
f |
g |
a.Cycle Indicator: Indicates stage of wash/dry cycle.
• |
|
: Prewash |
• |
|
: Speed Wash |
• |
|
: Wash |
• |
|
: Extra Rinse |
• |
|
: Rinse |
• |
|
: Dry |
• |
|
: Spin |
• |
|
: Air Wash |
|
|
||||
|
17
b.Clock: Indicates time left until the end of wash/dry cycle.
c.Feature Indicator: Indicates features that are active.
• Sound: Sound is on.
• Door Lock: Machine is locked for duration of cycle.
• Child Lock: Child lock is on.
• Delay: Delay Timer is active.
• My Cycle: Custom Cycle is active.
d.Water Temperature: Indicates the selected temperature.
e.Spin Speed: Indicates the selected spin speed.
f.Soil Level Indicator: Indicates the selected soil level.
g.Dry Level: Indicated the selected dry level.
18
 Loading...