

Page 1
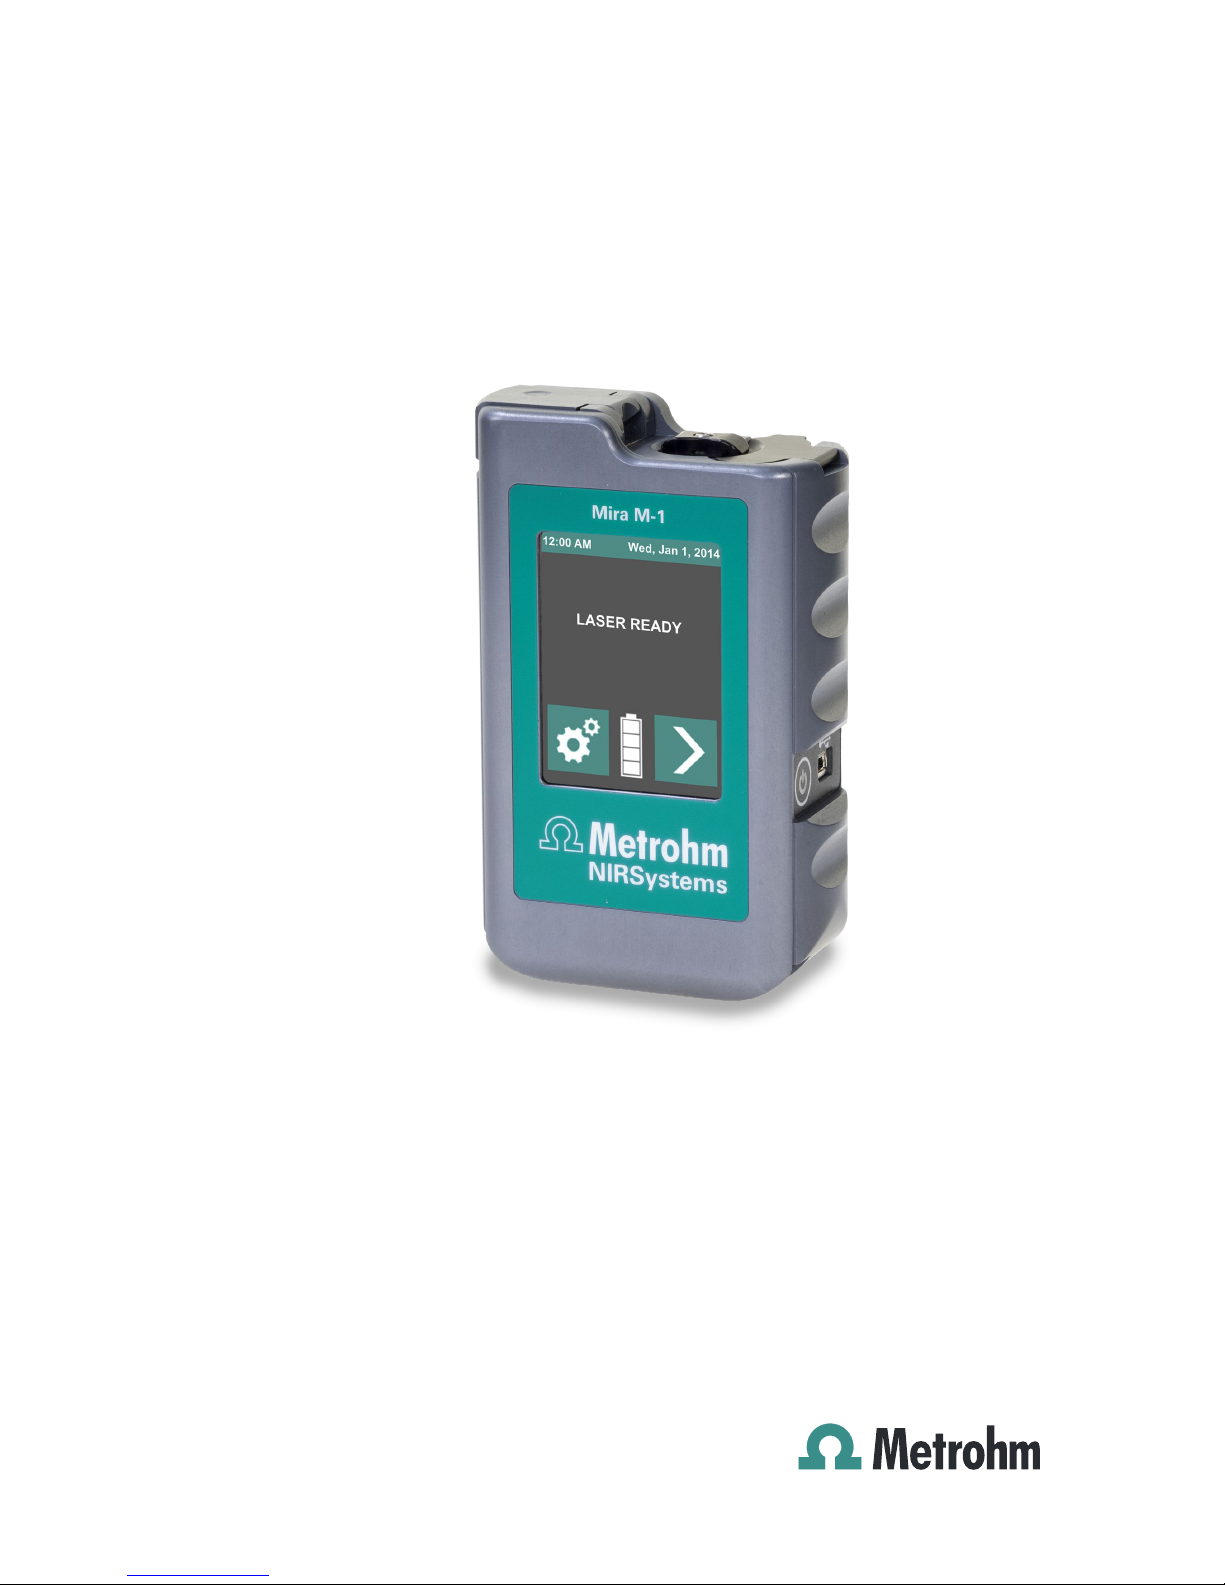
Mira M-1
Manual
8.923.8001EN / 2015-11-17
Page 2

Page 3

Metrohm AG
CH-9100 Herisau
Switzerland
Phone +41 71 353 85 85
Fax +41 71 353 89 01
info@metrohm.com
www.metrohm.com
Mira M-1
Manual
8.923.8001EN / 2015-11-17
ahag
Page 4

Technische Dokumentation
Metrohm AG
CH-9100 Herisau
techdoc@metrohm.com
This documentation is protected by copyright. All rights reserved.
This document has been prepared with great care. However, errors can
never be entirely ruled out. Please send comments regarding possible
errors to the address above.
Page 5

■■■■■■■■■■■■■■■■■■■■■■
Table of contents
■■■■■■■■
III
Table of contents
1 Introduction 1
1.1 Instrument description ......................................................... 1
1.1.1 Model versions ........................................................................ 1
1.1.2 Power supply ........................................................................... 2
1.1.3 Interfaces ................................................................................ 2
1.2 Intended use ......................................................................... 2
1.3 About the documentation ................................................... 2
1.3.1 Symbols and conventions ........................................................ 2
1.4 Safety instructions ................................................................ 3
1.4.1 General notes on safety ........................................................... 3
1.4.2 Laser safety ............................................................................. 4
1.4.3 Warning stickers on the instrument ......................................... 4
1.4.4 Electrical safety ........................................................................ 6
1.4.5 Flammable solvents and chemicals ........................................... 7
1.4.6 Recycling and disposal ............................................................. 7
2 Overview of the instrument 8
2.1 Front ...................................................................................... 8
2.2 Rear ........................................................................................ 9
3 Installation 10
3.1 Unpacking and inspecting the instrument ....................... 10
3.1.1 Packaging .............................................................................. 10
3.1.2 Checks .................................................................................. 10
3.2 Power supply ...................................................................... 10
3.2.1 Operation with exchangeable or rechargeable battery ........... 10
3.2.2 Operation via power supply unit or USB connection socket .... 11
3.3 Initial configuration ............................................................ 11
3.4 Inserting vial holder or attachment lenses ....................... 12
3.4.1 Mira M-1 with vial holder (laser class 1) ................................. 12
3.4.2 Mira M-1 with SWD attachment lens (class 3B) ...................... 13
3.4.3 Mira M-1 with LWD attachment lens (class 3B) ...................... 15
3.5 Installing firmware update ................................................ 17
4 Operation 18
4.1 Autonomous operation ...................................................... 18
4.2 Configuration ...................................................................... 21
4.3 Operation with Mira Cal .................................................... 29
Page 6

Table of contents
■■■■■■■■■■■■■■■■■■■■■■
IV
■■■■■■■■
5 Operation and maintenance 30
5.1 General notes ...................................................................... 30
5.1.1 Care ...................................................................................... 30
5.1.2 Maintenance by Metrohm Service .......................................... 30
5.2 Quality management and qualification with Metrohm .. 30
6 Troubleshooting 32
6.1 Basic function ..................................................................... 32
6.2 Measuring result ................................................................. 32
7 Appendix 33
7.1 Spectral libraries ................................................................. 33
8 Technical specifications 35
8.1 Operating specifications .................................................... 35
8.2 Measured value memory ................................................... 35
8.3 Screen .................................................................................. 36
8.4 Interfaces ............................................................................. 36
8.5 Power supply ...................................................................... 36
8.6 Runtime ............................................................................... 36
8.7 Housing specification ......................................................... 37
8.8 Safety specifications ........................................................... 37
8.9 Electromagnetic compatibility (EMC) ................................ 37
8.10 Ambient temperature ......................................................... 38
8.11 Reference conditions .......................................................... 38
8.12 Dimensions and materials .................................................. 38
9 Accessories 39
Index 40
Page 7

■■■■■■■■■■■■■■■■■■■■■■
Table of figures
■■■■■■■■
V
Table of figures
Figure 1 Instrument with warning sticker ........................................................ 5
Figure 2 Sticker - laser emergence ................................................................... 5
Figure 3 Sticker - laser data / serial number / standards ................................... 5
Figure 4 Sticker - Basic model version with vial holder ..................................... 6
Figure 5 Sticker - Advanced model version with attachment lenses .................. 6
Figure 6 Mira M-1 - front ................................................................................ 8
Figure 7 Mira M-1 - rear ................................................................................. 9
Figure 8 Inserting the batteries ...................................................................... 11
Figure 9 Vial holder ....................................................................................... 12
Figure 10 Vial holder with calibration standard ............................................... 13
Figure 11 Vial holder with vial ......................................................................... 13
Figure 12 SWD attachment lens ...................................................................... 14
Figure 13 Example with direct measurement ................................................... 15
Figure 14 LWD attachment lens ...................................................................... 16
Figure 15 Example with measurement through a bottle .................................. 16
Page 8

Page 9
■■■■■■■■■■■■■■■■■■■■■■
1 Introduction
■■■■■■■■
1
1 Introduction
This manual gives you a comprehensive overview of the installation, functioning and operation of the Mira M-1 instrument.
NOTE
You can request application descriptions in the form of
Application Notes and Application Bulletins from your
Metrohm representative or download them from
http://www.metrohm.com.
1.1 Instrument description
The Metrohm Instant Raman Analyzers (Mira) are handheld, high-power
Raman spectrometers designed for the rapid, nondestructive identification
of chemical and pharmaceutical samples, both liquid and solid. Barely
larger than a smartphone, the Mira spectrometers are the only handheld
Raman spectrometers currently on the market with Orbital Raster Scan
(ORS) technology.
1.1.1 Model versions
Mira M-1 instruments are available in the following versions:
Table 1
Model versions
2.923.0010 Mira M-1 Basic
With vial holder
Laser class 1
2.923.0020 Mira M-1 Advanced
With SWD and LWD attachment lenses
Laser class 3B
NOTE
The accessories for a given model version can be created as a PDF list
on the Internet at http://partslists.metrohm.com.
Page 10
1.2 Intended use
■■■■■■■■■■■■■■■■■■■■■■
2
■■■■■■■■
1.1.2 Power supply
The instrument is powered by exchangeable or rechargeable batteries of
the AA / LR6 type or via the USB socket with a power supply unit or a connector to a PC.
1.1.3 Interfaces
A data connection to a PC can be established via the USB interface.
1.2 Intended use
This instrument is suitable for measuring in chemicals and flammable samples. Usage of the Mira M-1 therefore requires the user to have basic
knowledge and experience in handling toxic and caustic substances.
Knowledge with respect to the application of the fire prevention measures
prescribed for laboratories or production plants is also mandatory.
The Mira M-1 Advanced model version with attachment lenses is specified with the laser class 3B, which requires appropriate protective measures to ensure personnel safety.
1.3 About the documentation
NOTE
Please read through this documentation carefully before putting the
instrument into operation.
The documentation contains information and warnings which the user
must follow in order to ensure safe operation of the instrument.
1.3.1 Symbols and conventions
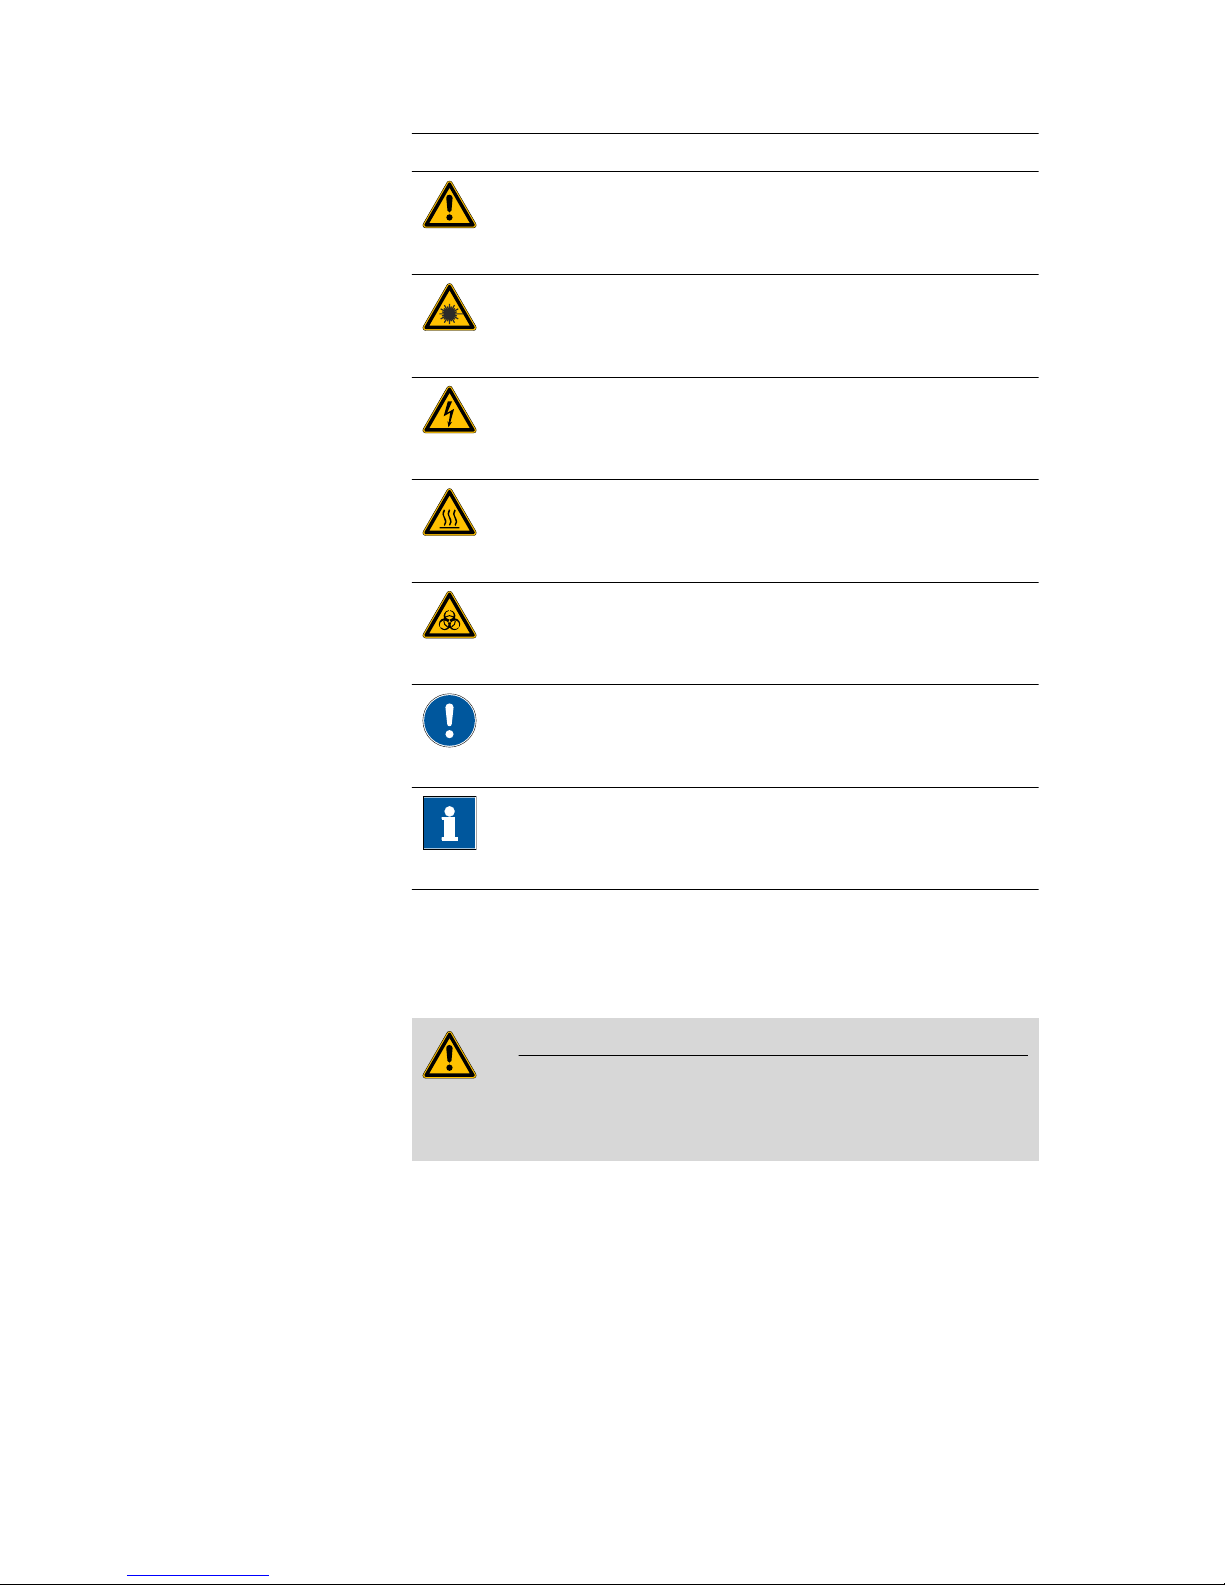
The following symbols and formatting may appear in this documentation:
Cross-reference to figure legend
The first number refers to the figure number, the second to the instrument part in the figure.
Instruction step
Carry out these steps in the sequence shown.
Method Dialog text, parameter in the software
File ▶ New Menu or menu item
Page 11
■■■■■■■■■■■■■■■■■■■■■■
1 Introduction
■■■■■■■■
3
[Next] Button or key
WARNING
This symbol draws attention to a possible life-threatening hazard or risk of injury.
WARNING
This symbol draws attention to a possible hazard due
to laser radiation.
WARNING
This symbol draws attention to a possible hazard due
to electrical current.
WARNING
This symbol draws attention to a possible hazard due
to heat or hot instrument parts.
WARNING
This symbol draws attention to a possible biological
hazard.
CAUTION
This symbol draws attention to possible damage to
instruments or instrument parts.
NOTE
This symbol highlights additional information and
tips.
1.4 Safety instructions
1.4.1 General notes on safety
WARNING
This instrument may only be operated in accordance with the specifications in this documentation.
This instrument has left the factory in a flawless state in terms of technical
safety. To maintain this state and ensure non-hazardous operation of the
instrument, the following instructions must be observed carefully.
Page 12
1.4 Safety instructions
■■■■■■■■■■■■■■■■■■■■■■
4
■■■■■■■■
1.4.2 Laser safety
NOTE
NOHD
The information below contain details of the NOHD calculation for the
Mira M-1 instrument in accordance with the international standard IEC
60825-1, "Safety of laser products".
WARNING
Laser radiation
The Mira M-1 Advanced instrument is a class 3B laser instrument
which emits laser light with a power of up to 100 mW and a wavelength of 785 nm (NIR) during data acquisition.
The laser radiation can cause serious eye injuries if the safety measures
are not followed.
Uses, settings or procedures that are not described in this manual can
lead to hazardous laser radiation exposure.
■ This instrument is intended for use by trained personnel only.
■ The provided protective glasses must be worn when using an attach-
ment lens.
The provided protective glasses is designed specific for laser wavelength and laser power of Mira M-1. The provided protective glasses
may possibly not protect you from other laser sources.
■ The nominal ocular hazard distance (NOHD) is 66 cm ± 5 cm.
■ Instruments of the laser class 3B may only be used in protected and
labeled rooms.
■ Follow the provisions of the IEC 60825-1 standard "Safety of laser
products" and the regulations for the use of laser systems in your
country.
1.4.3 Warning stickers on the instrument
The instrument is equipped with stickers that warn of potential hazards.
These warning stickers are listed and explained below.
Page 13
■■■■■■■■■■■■■■■■■■■■■■
1 Introduction
■■■■■■■■
5
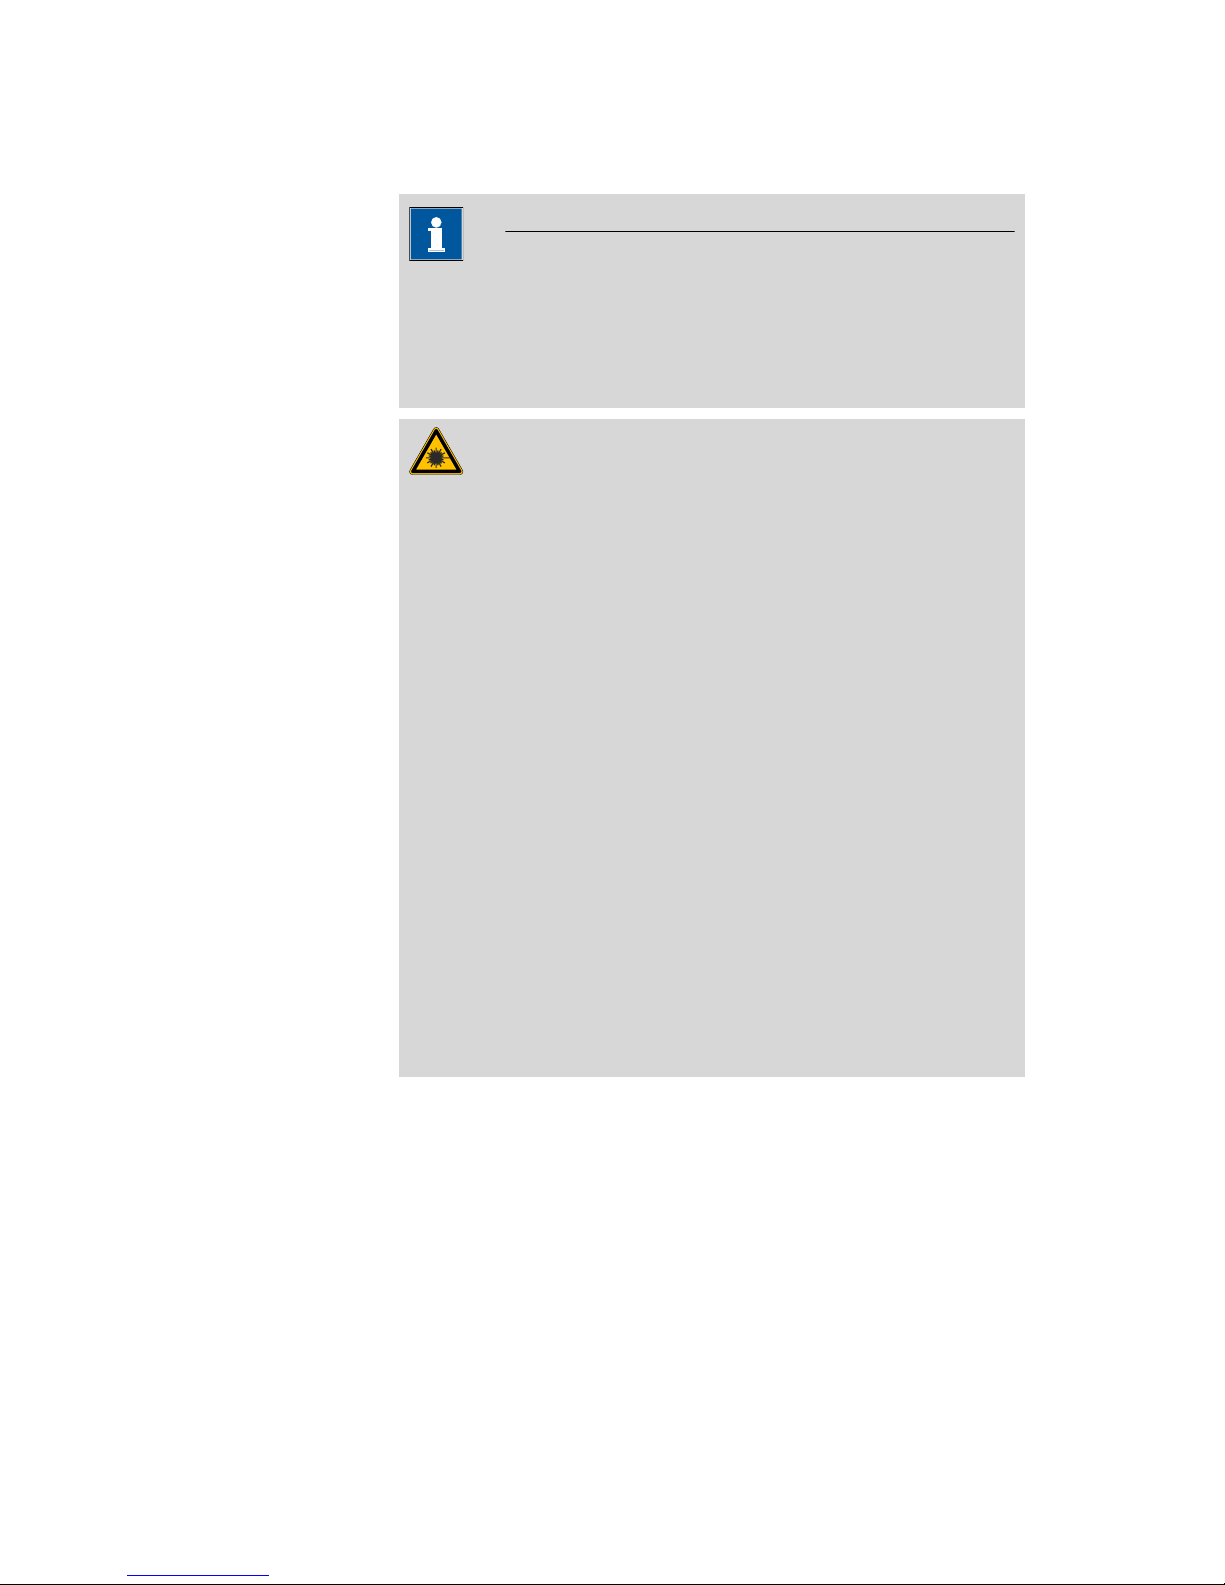
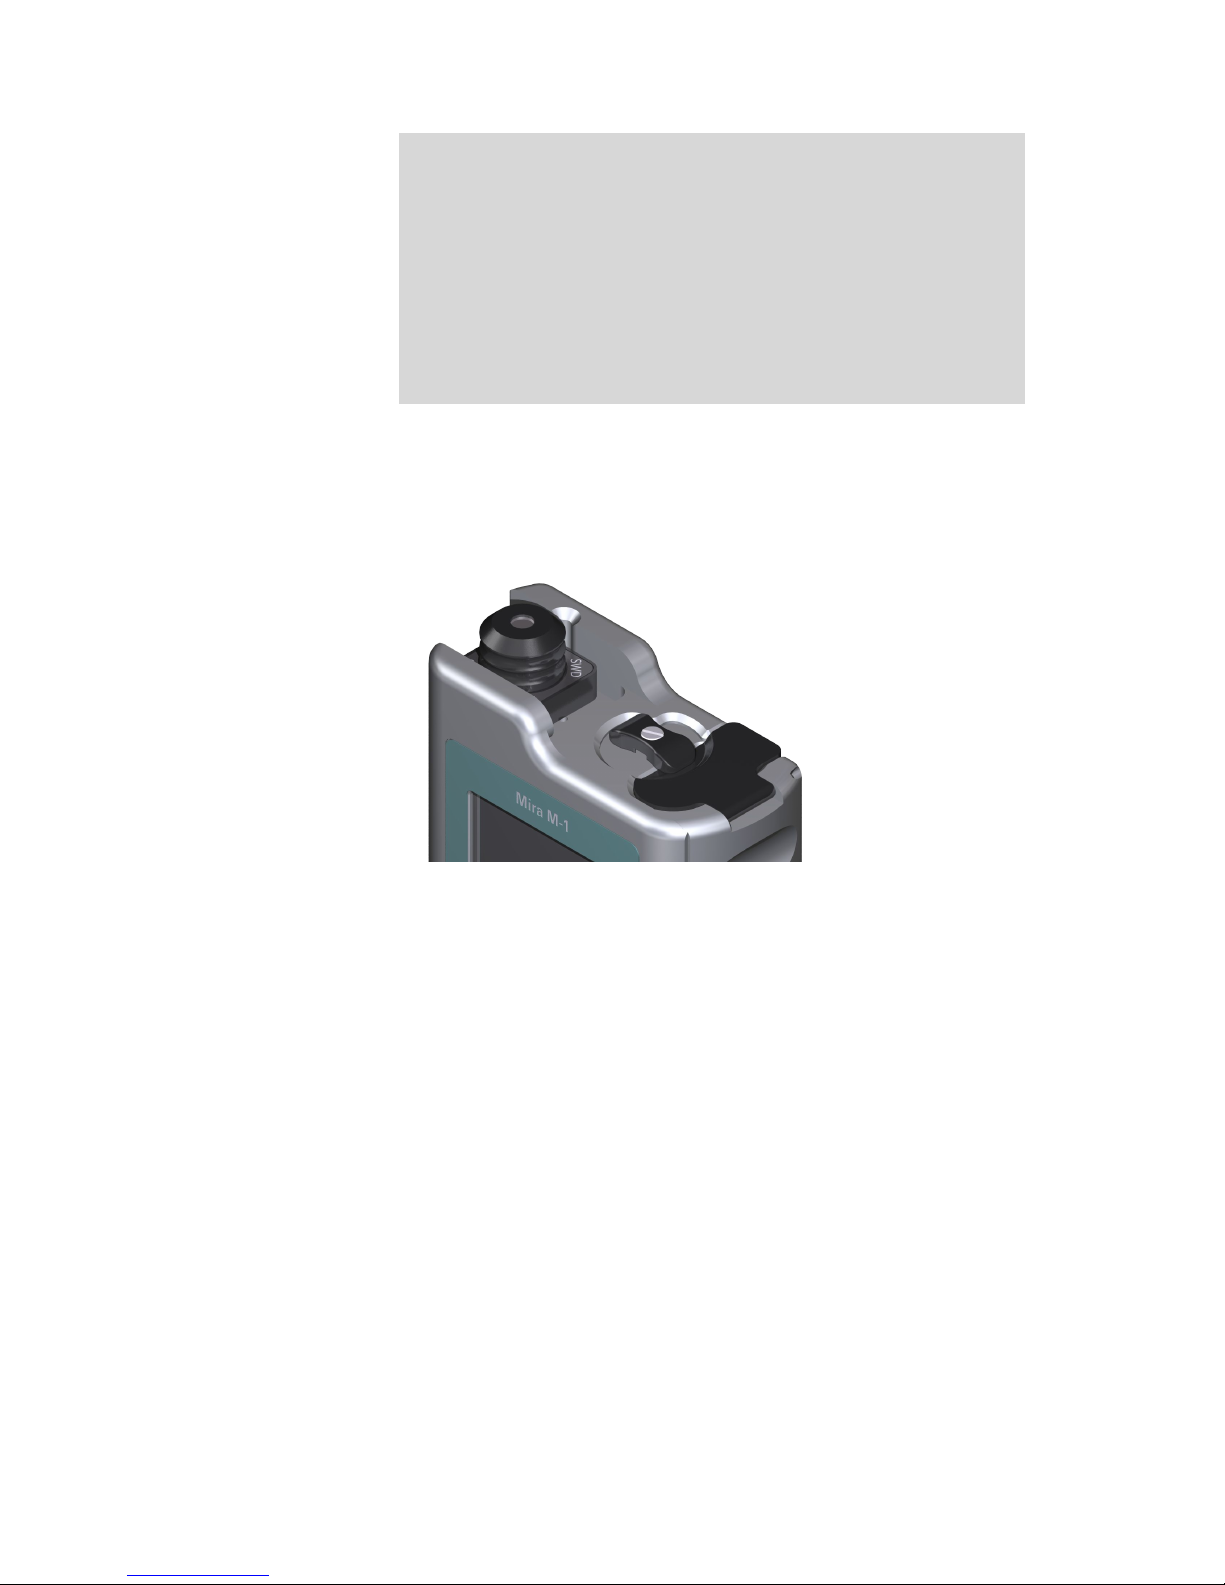
Figure 1 Instrument with warning sticker
1
Laser aperture
2
Type plate
3
Laser specification / serial number
4
Laser class
Laser aperture
The sticker marks the direction and position of the emerging laser beam
when using attachment lenses.
Figure 2
Sticker - laser emergence
Laser specification / serial number
The sticker contains the laser data, the serial number and the applicable
standards.
Figure 3
Sticker - laser data / serial number / standards
Laser class
The two stickers specify the laser class for the respective model version.
Page 14

1.4 Safety instructions
■■■■■■■■■■■■■■■■■■■■■■
6
■■■■■■■■
Figure 4 Sticker - Basic model version with vial holder
Figure 5 Sticker - Advanced model version with attachment lenses
1.4.4 Electrical safety
The electrical safety when working with the instrument is ensured as part
of the international standard IEC 61010.
WARNING
Only personnel qualified by Metrohm are authorized to carry out service
work on electronic components.
WARNING
Never open the housing of the instrument. The instrument could be
damaged by this. There is also a risk of serious injury if live components
are touched.
There are no parts inside the housing which can be serviced or replaced
by the user.
Supply voltage
WARNING
An incorrect supply voltage can damage the instrument.
Only operate this instrument with a supply voltage specified for it (see
rear panel of the instrument).
Page 15

■■■■■■■■■■■■■■■■■■■■■■
1 Introduction
■■■■■■■■
7
Power supply unit
WARNING
Use the power supply unit only for its intended purpose. Inappropriate
use or use of non-approved or incompatible power supply units may
cause fires or explosions and result in the revocation of the license or
warranty.
If you think that the power supply unit has been damaged, have it
checked by a service center. Do not use damaged power supply units.
Do not charge your instrument during thunderstorms.
Do not use the power supply unit outdoors.
1.4.5 Flammable solvents and chemicals
WARNING
All relevant safety measures are to be observed when working with
flammable solvents and chemicals.
■ Set up the instrument in a well-ventilated location (e.g. fume cup-
board).
■ Keep all sources of flame far from the workplace.
■ Clean up spilled liquids and solids immediately.
■ Follow the safety instructions of the chemical manufacturer.
1.4.6 Recycling and disposal
This product is covered by European Directive 2002/96/EC, WEEE – Waste
from Electrical and Electronic Equipment.
The correct disposal of your old equipment will help to prevent negative
effects on the environment and public health.
More details about the disposal of your old equipment can be obtained
from your local authorities, from waste disposal companies or from your
local dealer.
Page 16
2.1 Front
■■■■■■■■■■■■■■■■■■■■■■
8
■■■■■■■■
2 Overview of the instrument
2.1 Front
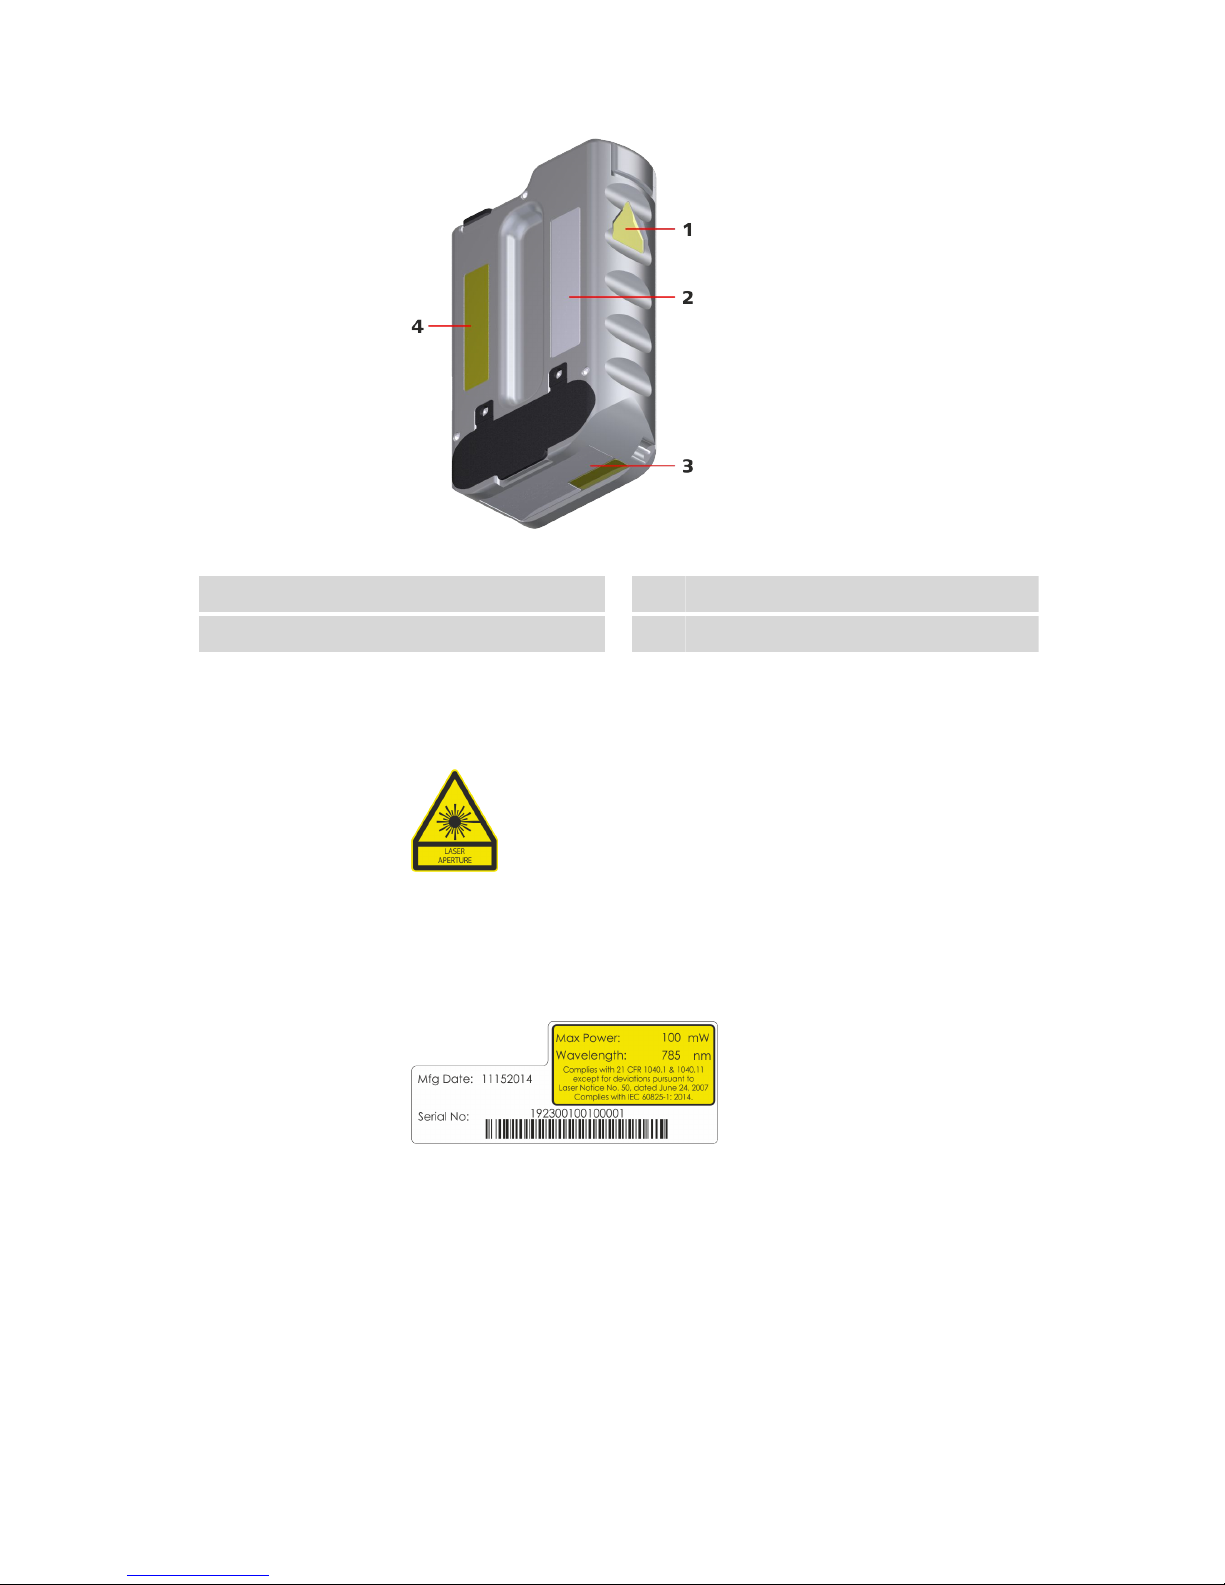
Figure 6 Mira M-1 - front
1
Vial holder
2
Touch screen
3
Battery compartment
4
Type B mini USB connector
5
On/off switch
Page 17
■■■■■■■■■■■■■■■■■■■■■■
2 Overview of the instrument
■■■■■■■■
9
2.2 Rear
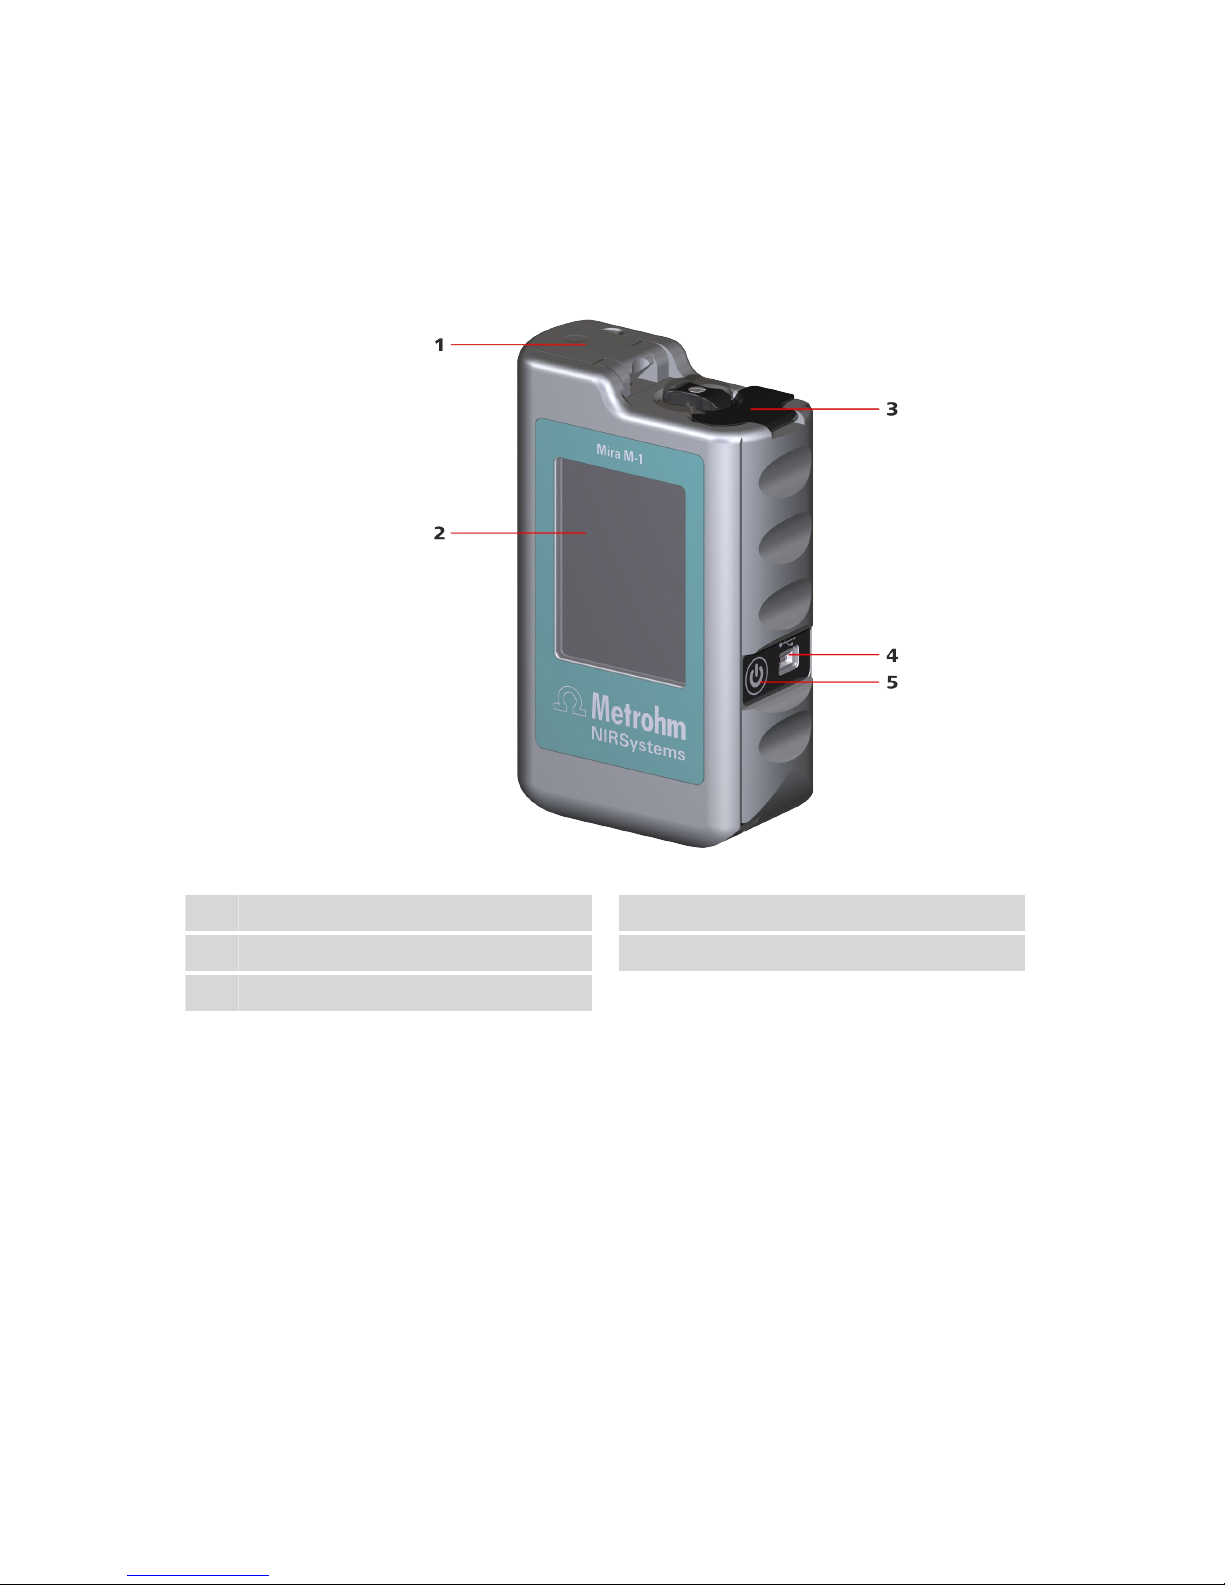
Figure 7 Mira M-1 - rear
1
Accessories covering
2
SWD attachment lens (class 3B)
3
LWD attachment lens (class 3B)
Page 18
3.1 Unpacking and inspecting the instrument
■■■■■■■■■■■■■■■■■■■■■■
10
■■■■■■■■
3 Installation
3.1 Unpacking and inspecting the instrument
3.1.1 Packaging
The instrument is supplied in highly protective special packaging together
with the separately packed accessories. Keep this packaging, as only this
ensures safe transportation of the instrument.
3.1.2 Checks
Immediately after receipt, check whether the shipment has arrived complete and without damage by comparing it with the delivery note.
3.2 Power supply
3.2.1 Operation with exchangeable or rechargeable battery
The instrument is operated with exchangeable or rechargeable batteries of
the AA / LR6 type.
NOTE
Battery type
We recommend using lithium-ion batteries.
NOTE
Power save mode
If used with batteries, the device will automatically shut-down after 10
minutes not in use.
Page 19
■■■■■■■■■■■■■■■■■■■■■■
3 Installation
■■■■■■■■
11
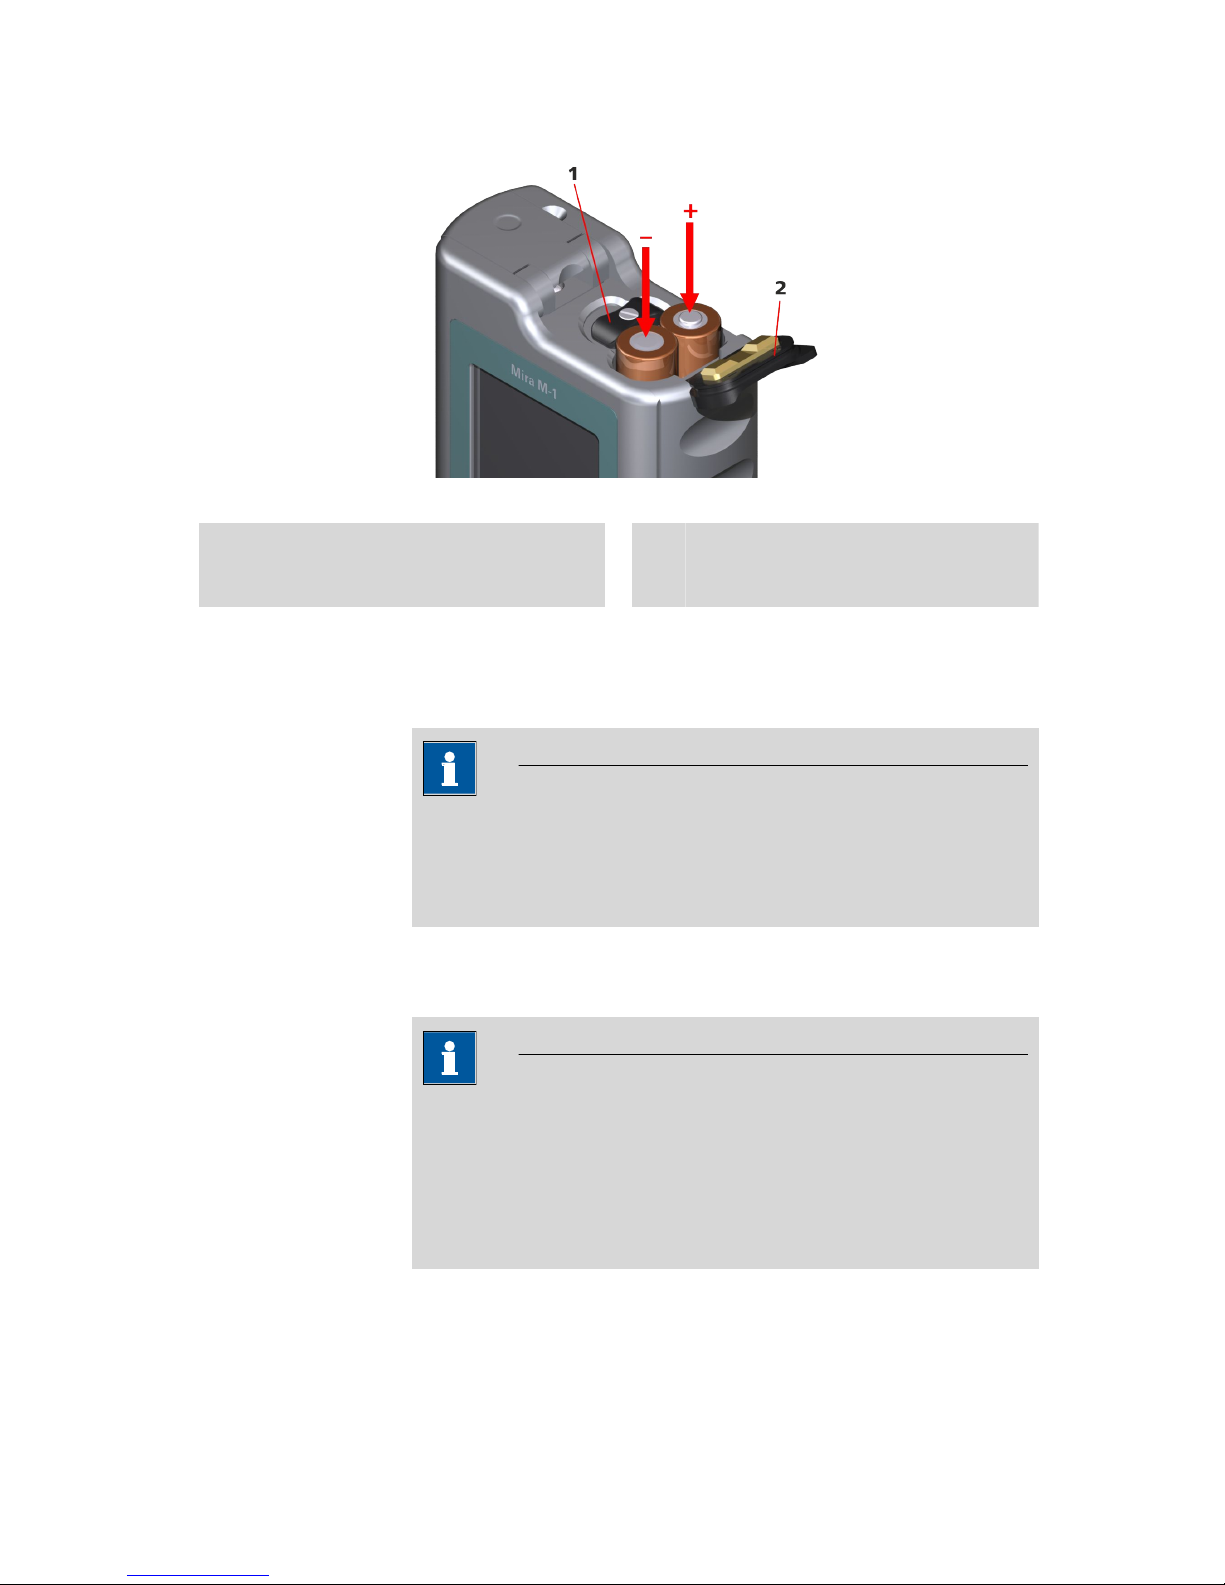
Figure 8 Inserting the batteries
1
Locking mechanism
Rotary locking mechanism to open and close
the battery compartment.
2
Hinged cover
The polarity for the batteries is marked on
the inside.
3.2.2 Operation via power supply unit or USB connection socket
For stationary use in the laboratory, the instrument can be operated via a
power supply unit or the USB interface of a PC.
NOTE
Battery charging function
The instrument has no charging function for rechargeable batteries.
Used up batteries must be replaced.
3.3 Initial configuration
NOTE
Configuration
Instrument settings and the installation of the spectral libraries are carried out with the Mira Cal software.
You can find detailed information on the procedure in the tutorial for
the Mira Cal software.
Page 20
3.4 Inserting vial holder or attachment lenses
■■■■■■■■■■■■■■■■■■■■■■
12
■■■■■■■■
3.4 Inserting vial holder or attachment lenses
Samples may either be measured using the vial holder with the supplied
vials or the attachment lenses. The use of attachment lenses allows measurement through packaging of different thicknesses (e.g. plastics or glass/
amber glass).
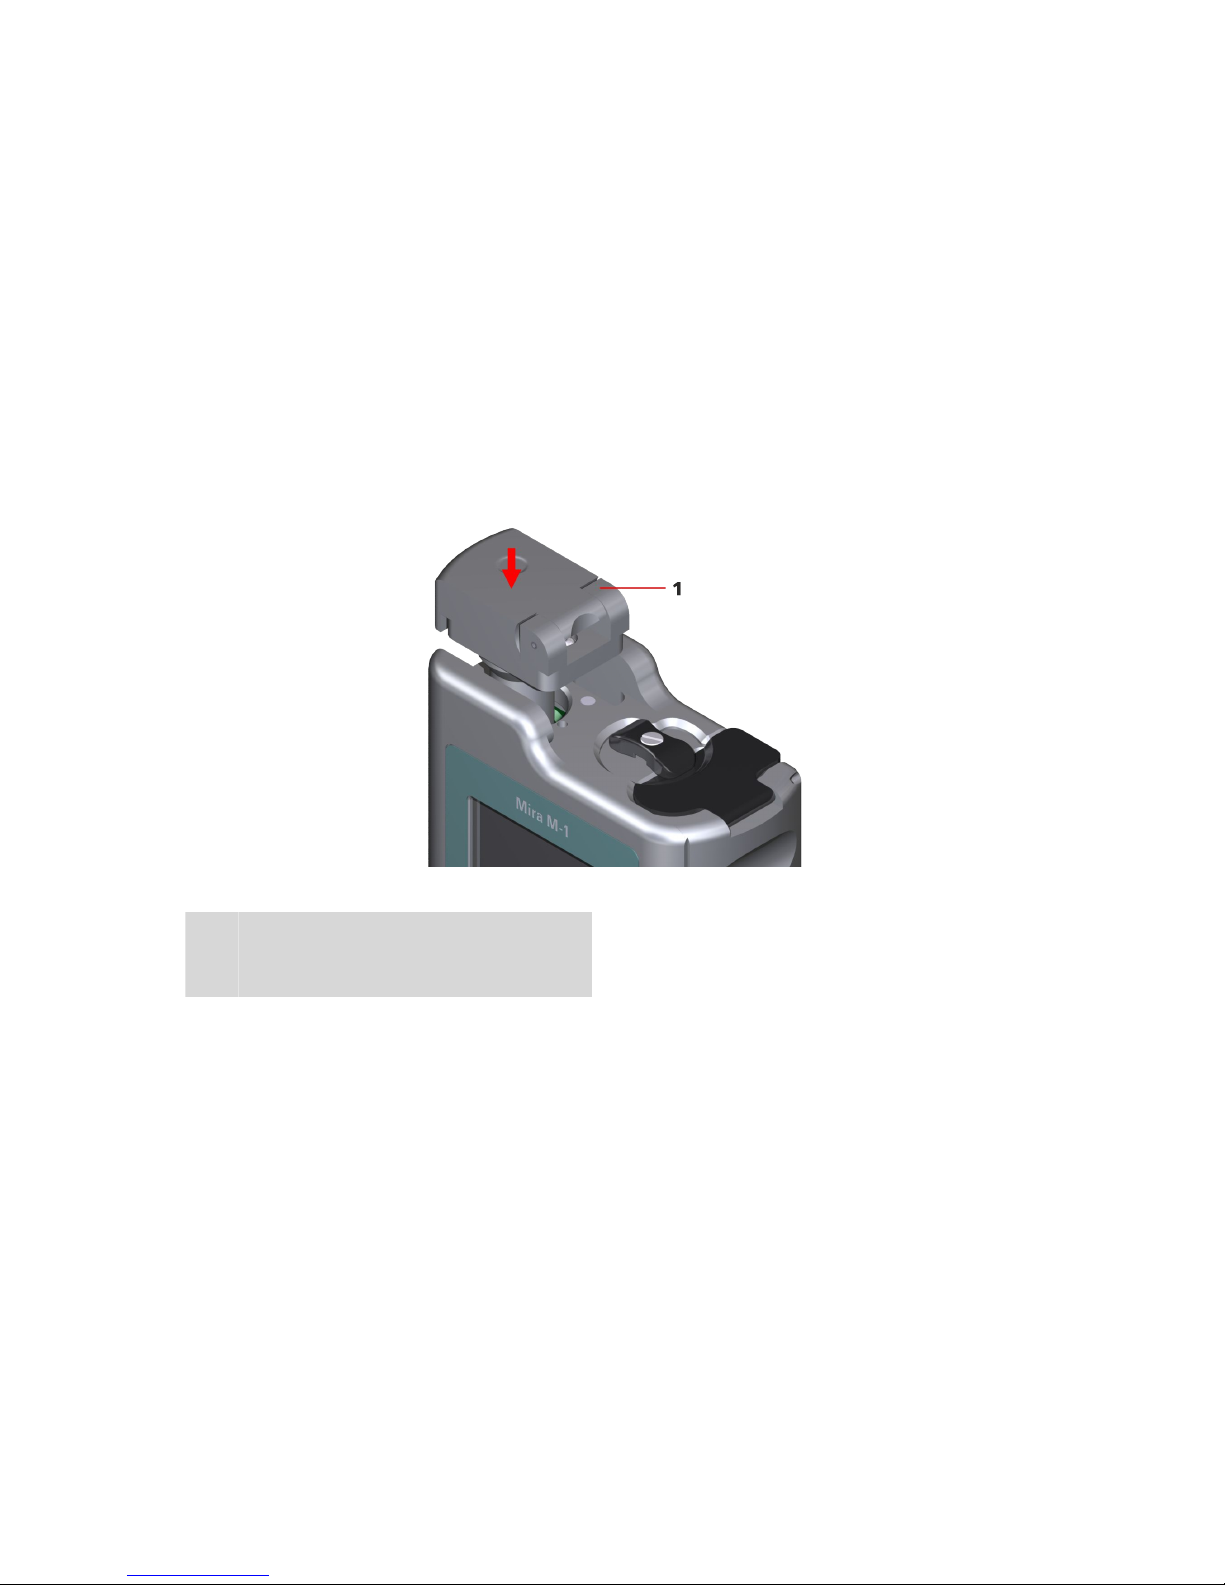
3.4.1 Mira M-1 with vial holder (laser class 1)
The instrument is supplied with vials with the dimensions 12 x 32 mm.
Closing the covering prevents laser radiation from emerging.
The covering also contains a safety feature which stops the measurement
and turns off the laser if it is opened.
Figure 9
Vial holder
1
Vial holder
Attachable vial holder that can hold vials
and the calibration standard.
Page 21
■■■■■■■■■■■■■■■■■■■■■■
3 Installation
■■■■■■■■
13
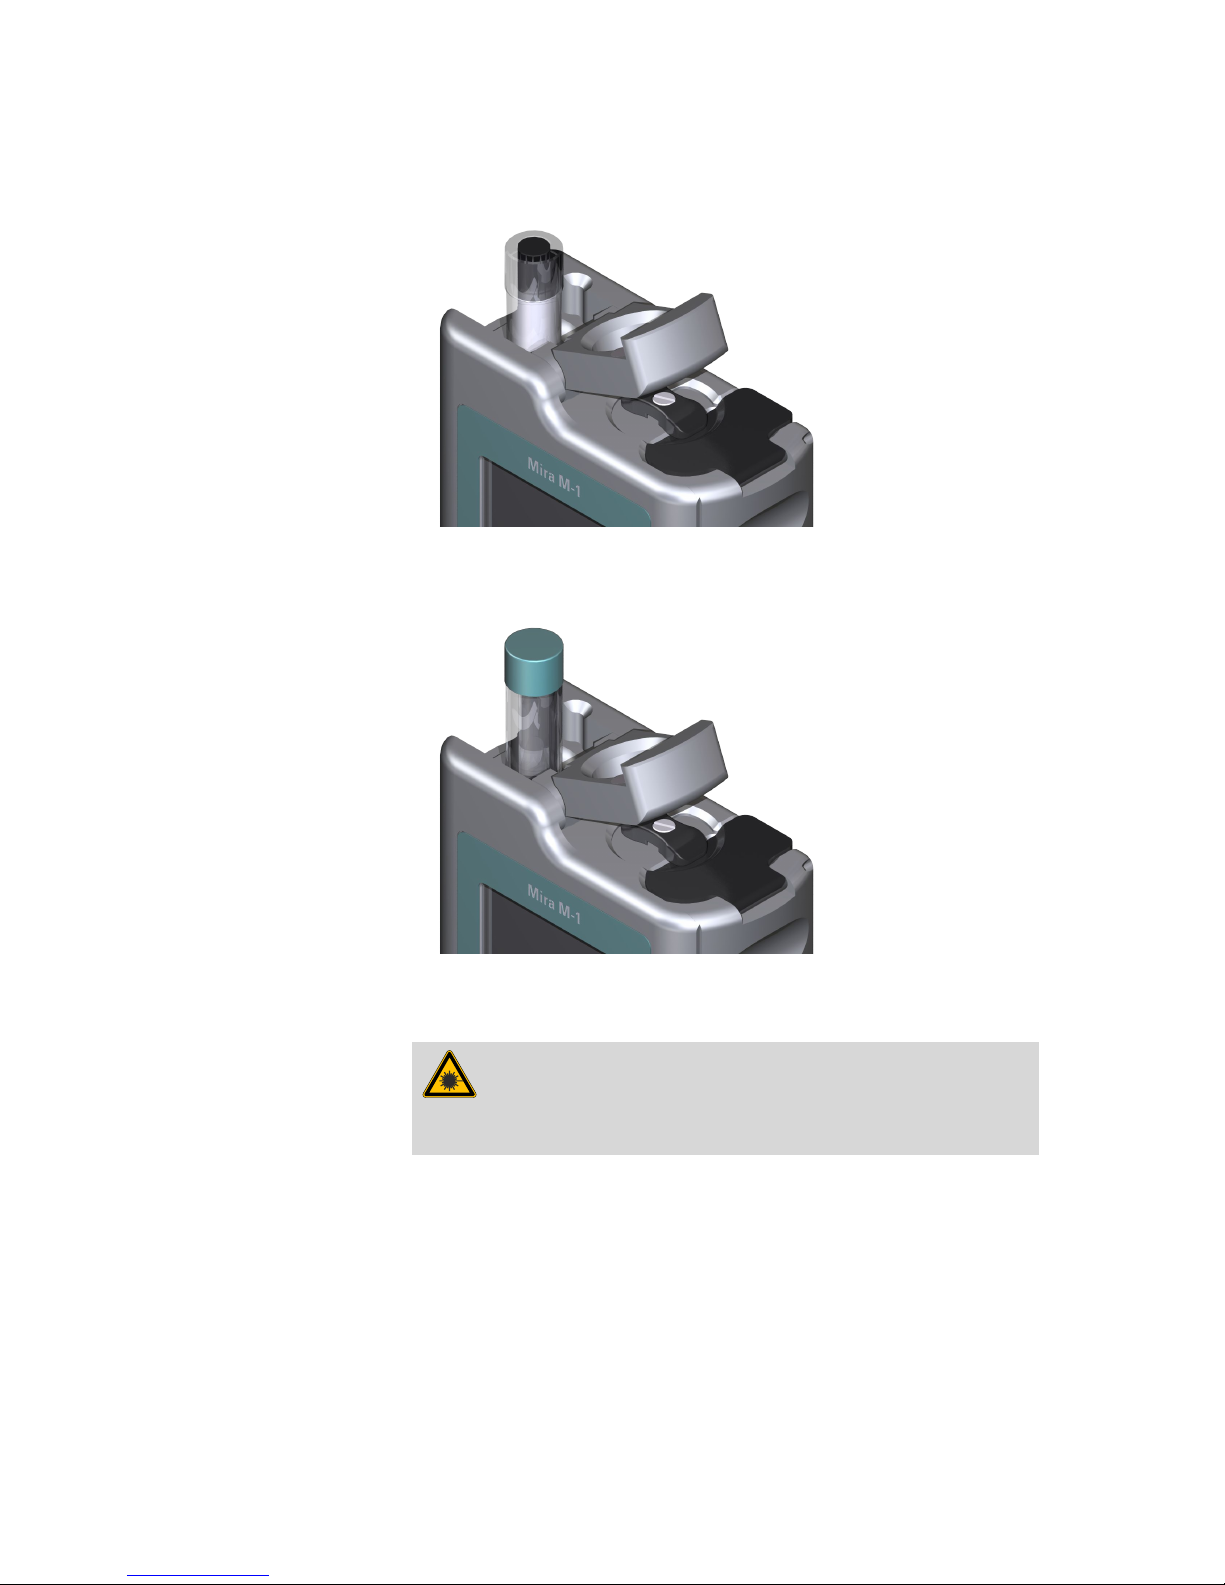
Calibrating the instrument with the calibration standard
Figure 10 Vial holder with calibration standard
Measuring with vials
Figure 11
Vial holder with vial
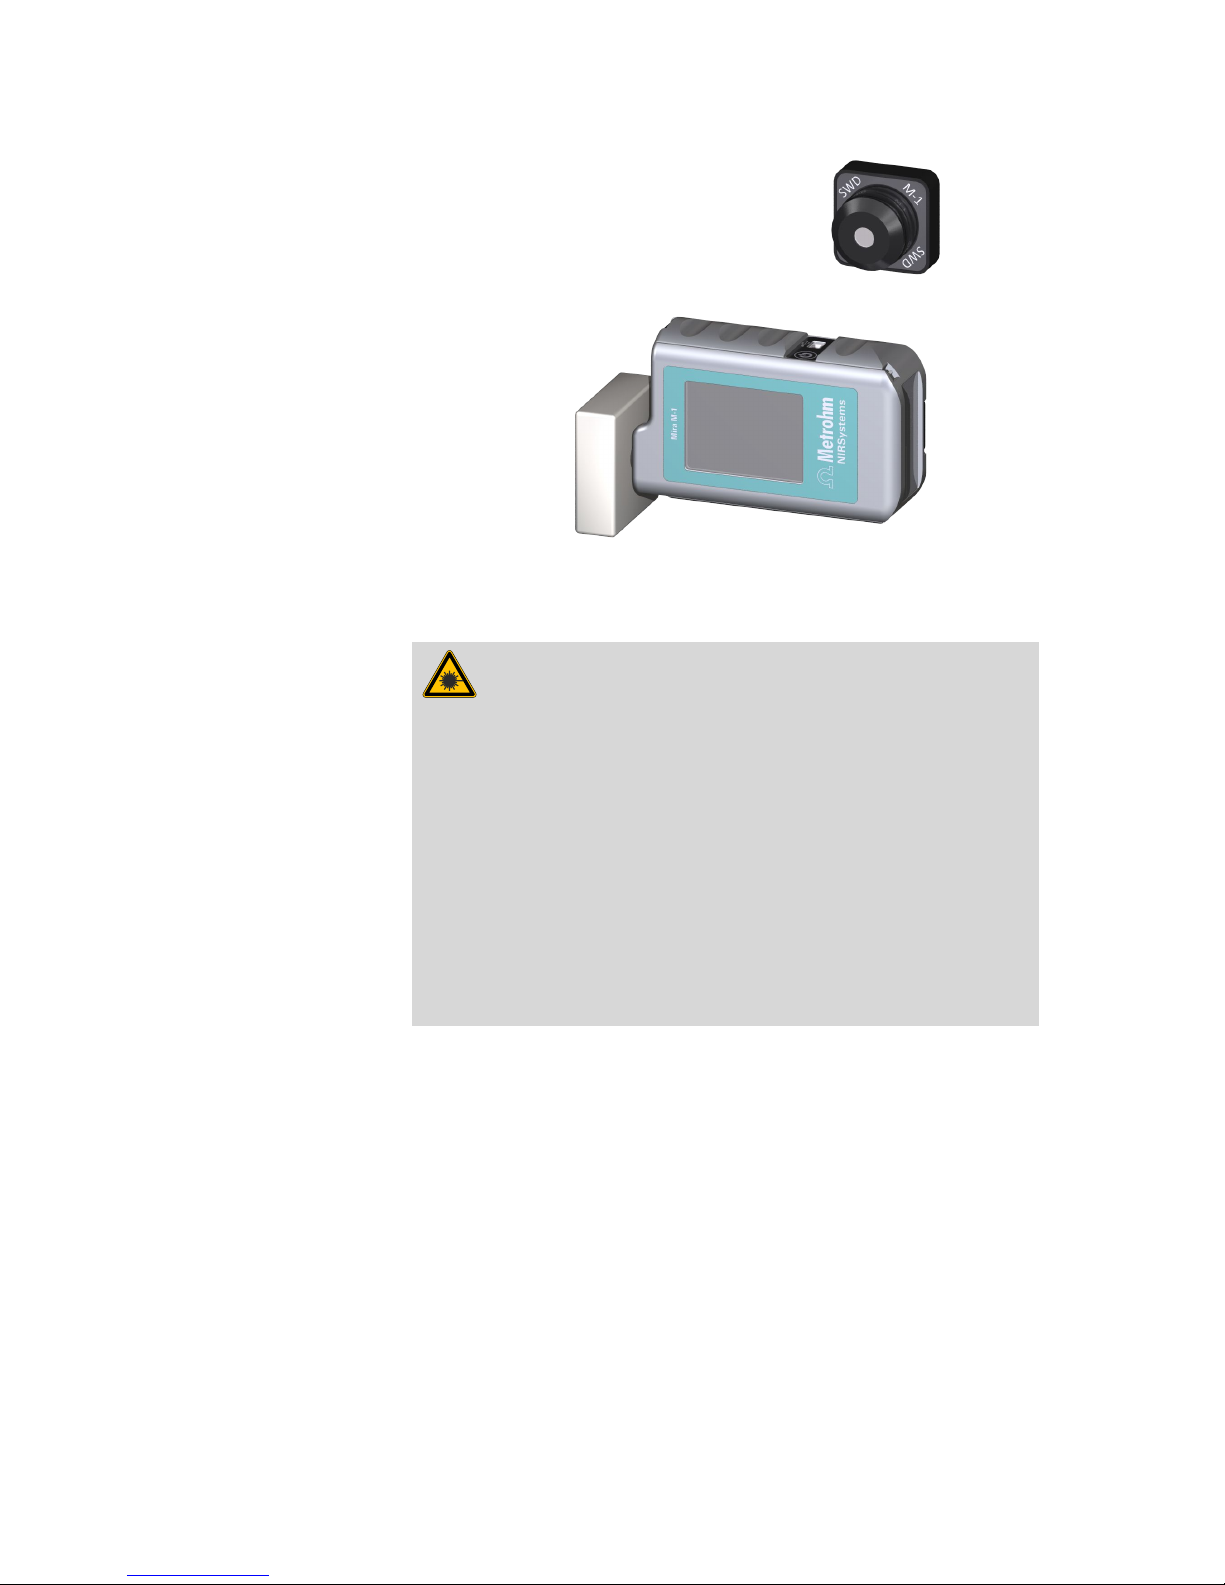
3.4.2 Mira M-1 with SWD attachment lens (class 3B)
WARNING
Laser radiation
Page 22
3.4 Inserting vial holder or attachment lenses
■■■■■■■■■■■■■■■■■■■■■■
14
■■■■■■■■
The Mira M-1 Advanced instrument is a class 3B laser instrument
which can emit laser light with a power of up to 100 mW and a wavelength of 785 nm (NIR) during data acquisition.
The laser radiation can cause serious eye injuries if the safety measures
are not followed.
■ The provided protective glasses must be worn when using an attach-
ment lens.
■ The safety regulations must be observed (see Chapter 1.4.2, page
4).
The SWD attachment lens is used for samples with direct contact or in
thin plastic bags.
The focal point is approximately 0.85 mm from the end of the adapter.
Figure 12
SWD attachment lens
Page 23
■■■■■■■■■■■■■■■■■■■■■■
3 Installation
■■■■■■■■
15
Figure 13 Example with direct measurement
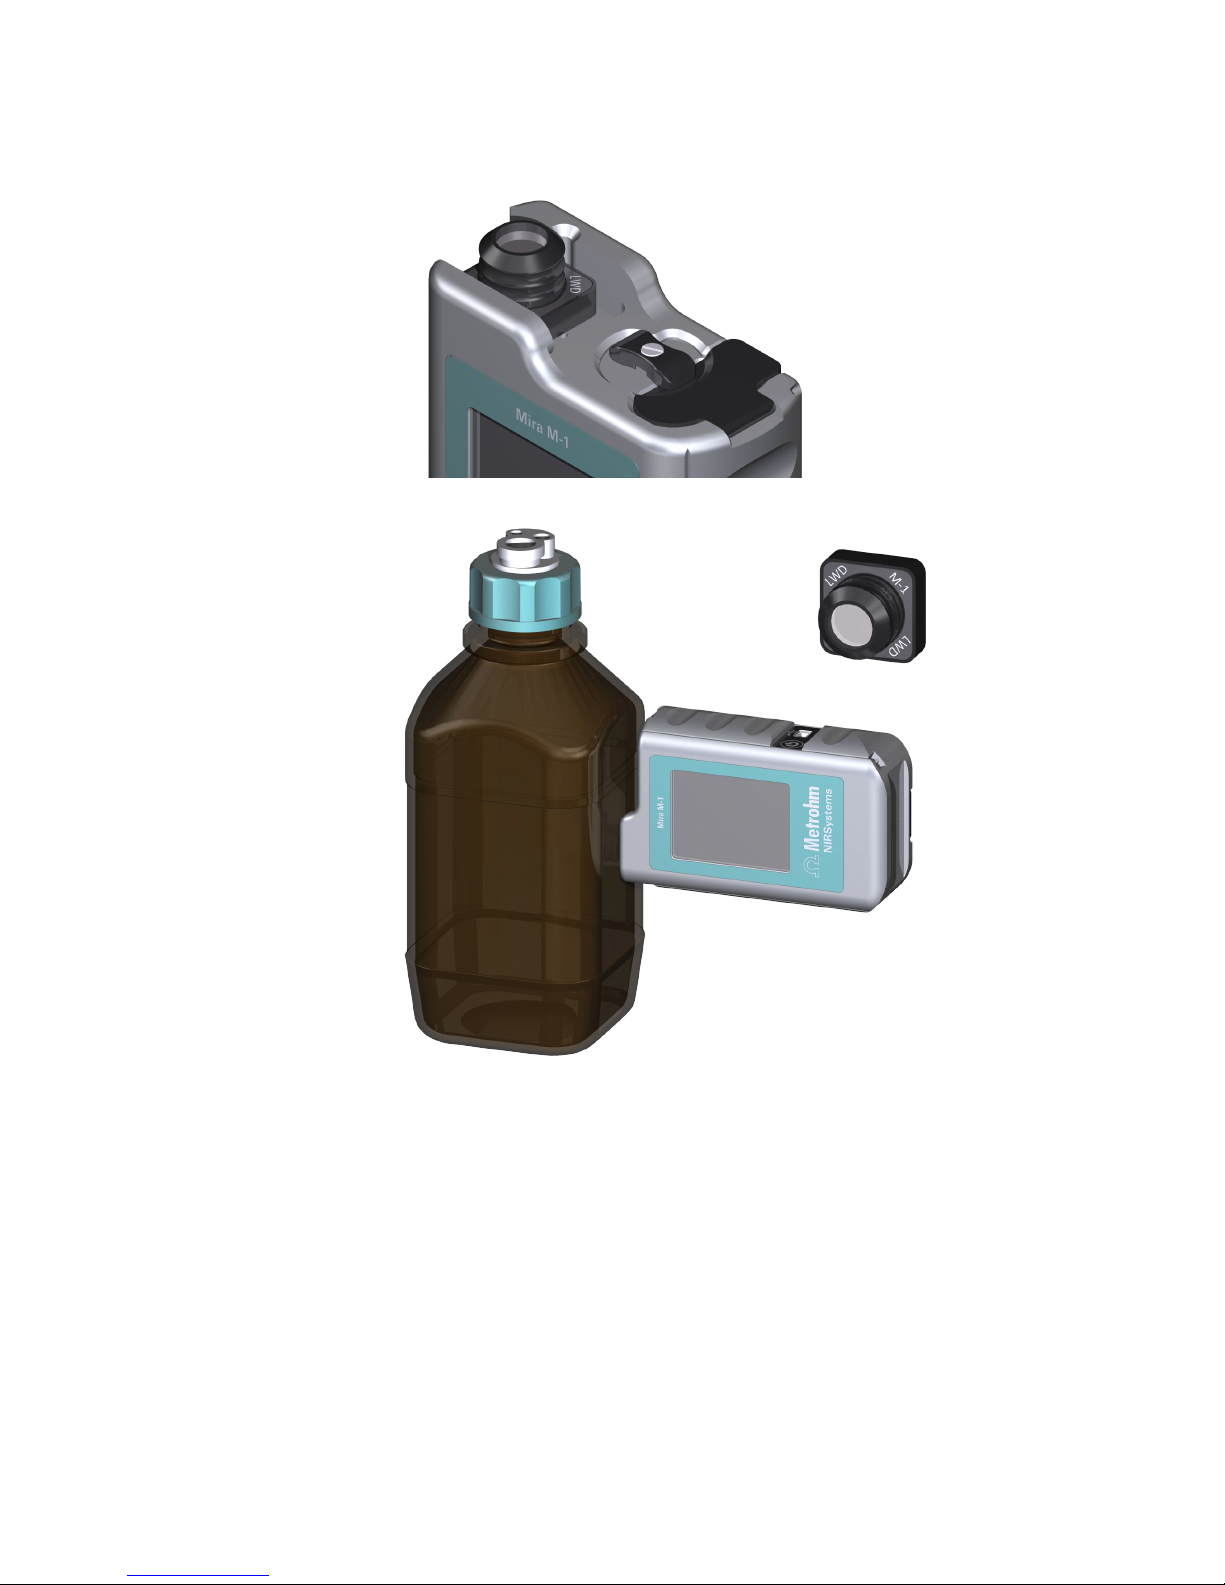
3.4.3 Mira M-1 with LWD attachment lens (class 3B)
WARNING
Laser radiation
The Mira M-1 Advanced instrument is a class 3B laser instrument
which can emit laser light with a power of up to 100 mW and a wavelength of 785 nm (NIR) during data acquisition.
The laser radiation can cause serious eye injuries if the safety measures
are not followed.
■ The provided protective glasses must be worn when using an attach-
ment lens.
■ The safety regulations must be observed (see Chapter 1.4.2, page
4).
The LWD attachment lens is used for samples in thick-walled bottles.
The bottles can be clear or amber. The focal point is approximately 8 mm
from the top of the attachment lens.
Page 24
3.4 Inserting vial holder or attachment lenses
■■■■■■■■■■■■■■■■■■■■■■
16
■■■■■■■■
Figure 14 LWD attachment lens
Figure 15 Example with measurement through a bottle
Page 25

■■■■■■■■■■■■■■■■■■■■■■
3 Installation
■■■■■■■■
17
3.5 Installing firmware update
NOTE
Firmware update
The installation of firmware updates is carried out via the Mira Cal
software.
You can find detailed information on the procedure in the tutorial for
the Mira Cal software.
Page 26

4.1 Autonomous operation
■■■■■■■■■■■■■■■■■■■■■■
18
■■■■■■■■
4 Operation
4.1 Autonomous operation
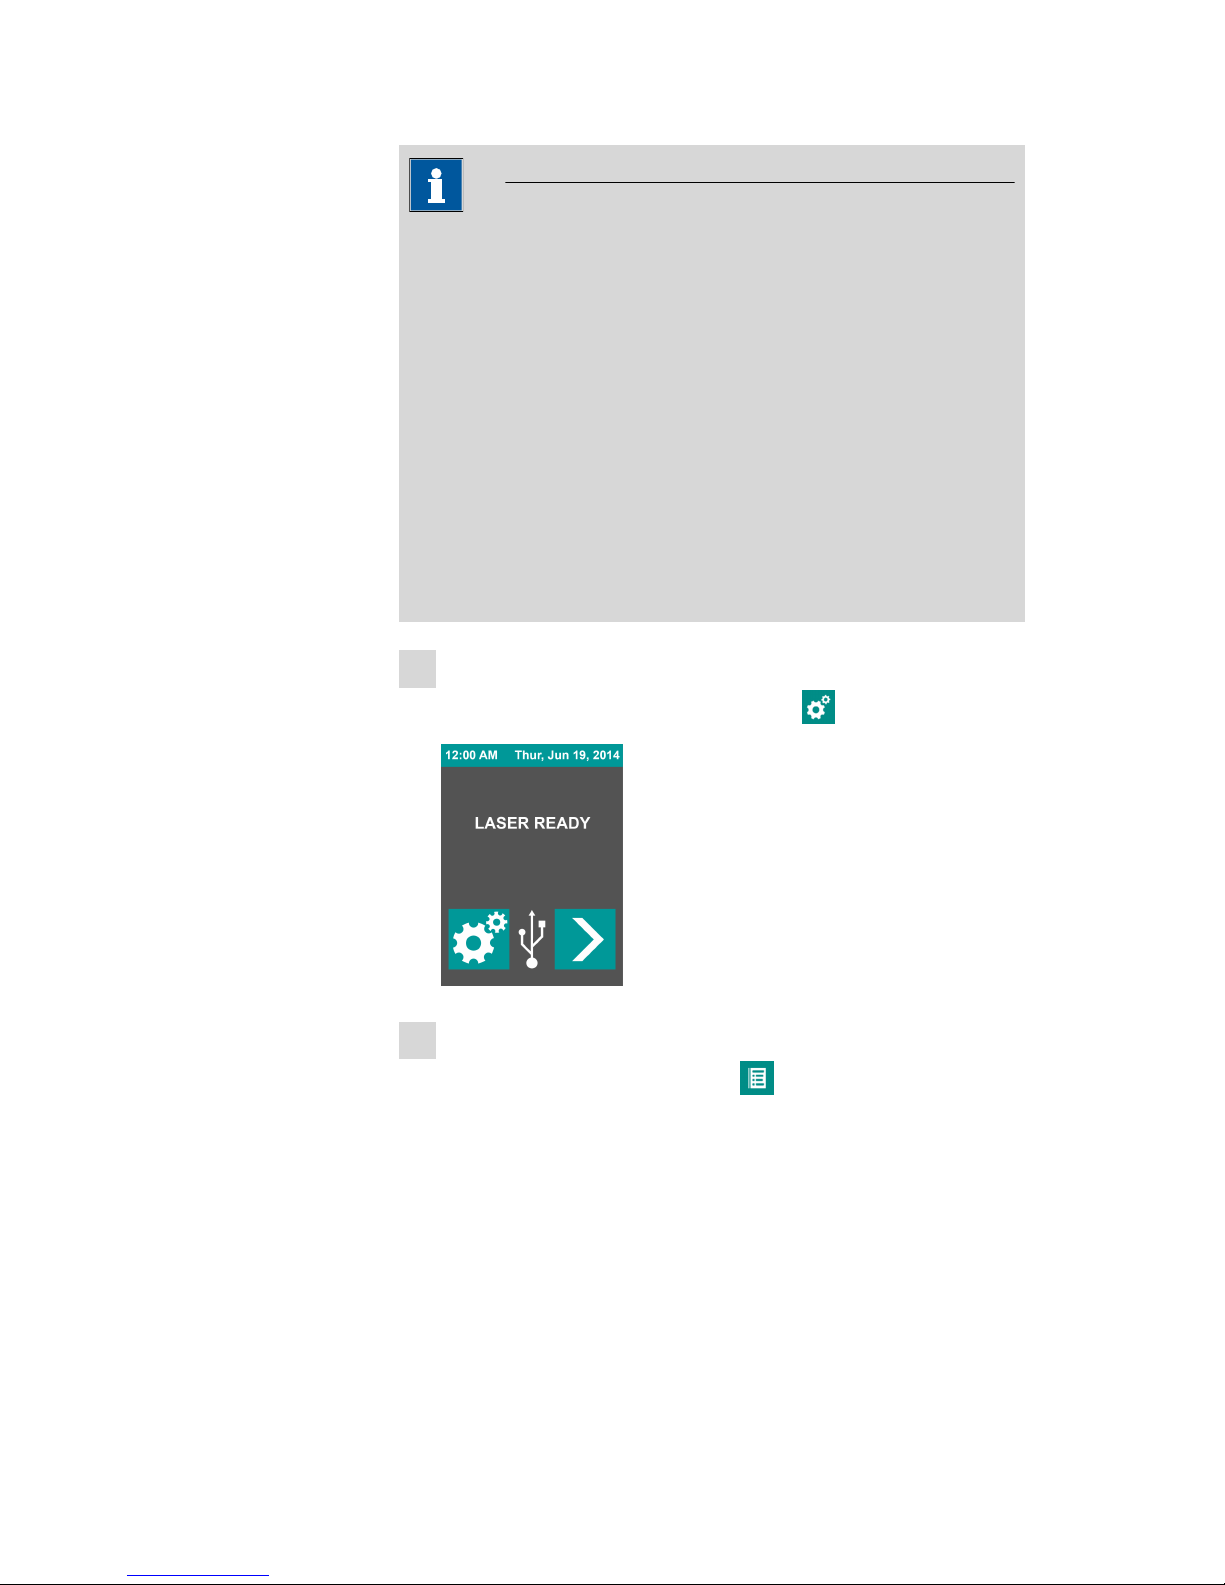
The following steps show how samples can be identified in autonomous
operation without being connected to a PC.
1
Switching on the instrument
■ Make sure the instrument is connected to the power supply.
■ Switch on the instrument using the on/off switch.
2
Entering the secret number
■ Enter the four-digit secret number (PIN).
Default factory setting: 1234
■ Confirm the entry with the key.
3
Preparing the sample measurement
WARNING
Laser radiation
The laser radiation can cause serious eye injuries if the safety
measures are not followed.
■ Wear the provided protective glasses when using an attach-
ment lens.
■ Observe the safety regulations (see Chapter 1.4.2, page 4).
■ Insert the sample vial or aim at the sample.
Page 27

■■■■■■■■■■■■■■■■■■■■■■
4 Operation
■■■■■■■■
19
■ Tap on the key in the main menu.
The instrument is now ready for measuring.
4
Measuring the sample
NOTE
Laser safety
The key of the Mira M-1 Advanced instrument must be
pressed during measurement.
■
Start the measurement with the key (and keep the key
pressed down until the result is displayed).
■ Wait for the end of the measurement and the result.
■ Display during measurement:
Page 28

4.1 Autonomous operation
■■■■■■■■■■■■■■■■■■■■■■
20
■■■■■■■■
5
Displaying and saving the result
■ After the measurement, all activated spectral libraries are auto-
matically searched and the result of the identification is displayed
with:
– Name of the identified substance
– Sample spectrum
– Library spectrum
– Match rate
■
Save the measurement with the key.
6
Designating the sample
NOTE
Key functions
■ : Switch editor over to alphabetic characters
■ : Switch editor over to numeric characters
■
: Delete last character
■
: Cancel the entry
Page 29

■■■■■■■■■■■■■■■■■■■■■■
4 Operation
■■■■■■■■
21
■ Enter a sample ID or a sample designation.
■ Confirm the entry with the key.
NOTE
Saved measured data
The saved measured data can be transferred into the Mira Cal
software for further processing and evaluation.
You can find information on this procedure in the tutorial for the
Mira Cal software.
4.2 Configuration
The following steps explain how the instrument is configured.
The following settings can be adjusted in the configuration menu of the
running instrument:
■ Change secret number (PIN)
(see "Changing the secret number (PIN)", page 21)
■ Activate/deactivate spectral libraries
(see "Activating/deactivating spectral libraries", page 23)
■ Calibrate the instrument
(see "Calibrating the instrument", page 26)
Changing the secret number (PIN)
For the safety of your instrument, the secret number (PIN) can be
changed.
Page 30

4.2 Configuration
■■■■■■■■■■■■■■■■■■■■■■
22
■■■■■■■■
NOTE
Storing the secret number
Store the secret number (PIN) in a safe place.
1
Selecting the configuration menu
■ Select the configuration menu with the key.
2
Selecting the secret number menu
■ Select the secret number menu with the key.
3
Entering the current secret number
■ Enter the current four-digit secret number.
Default factory setting: 1234
Page 31

■■■■■■■■■■■■■■■■■■■■■■
4 Operation
■■■■■■■■
23
4
Entering a new secret number
■ Enter the new four-digit secret number.
5
Confirming the new secret number
■ Confirm the new secret number.
6
Completing the entry
■ Complete the entry with the key.
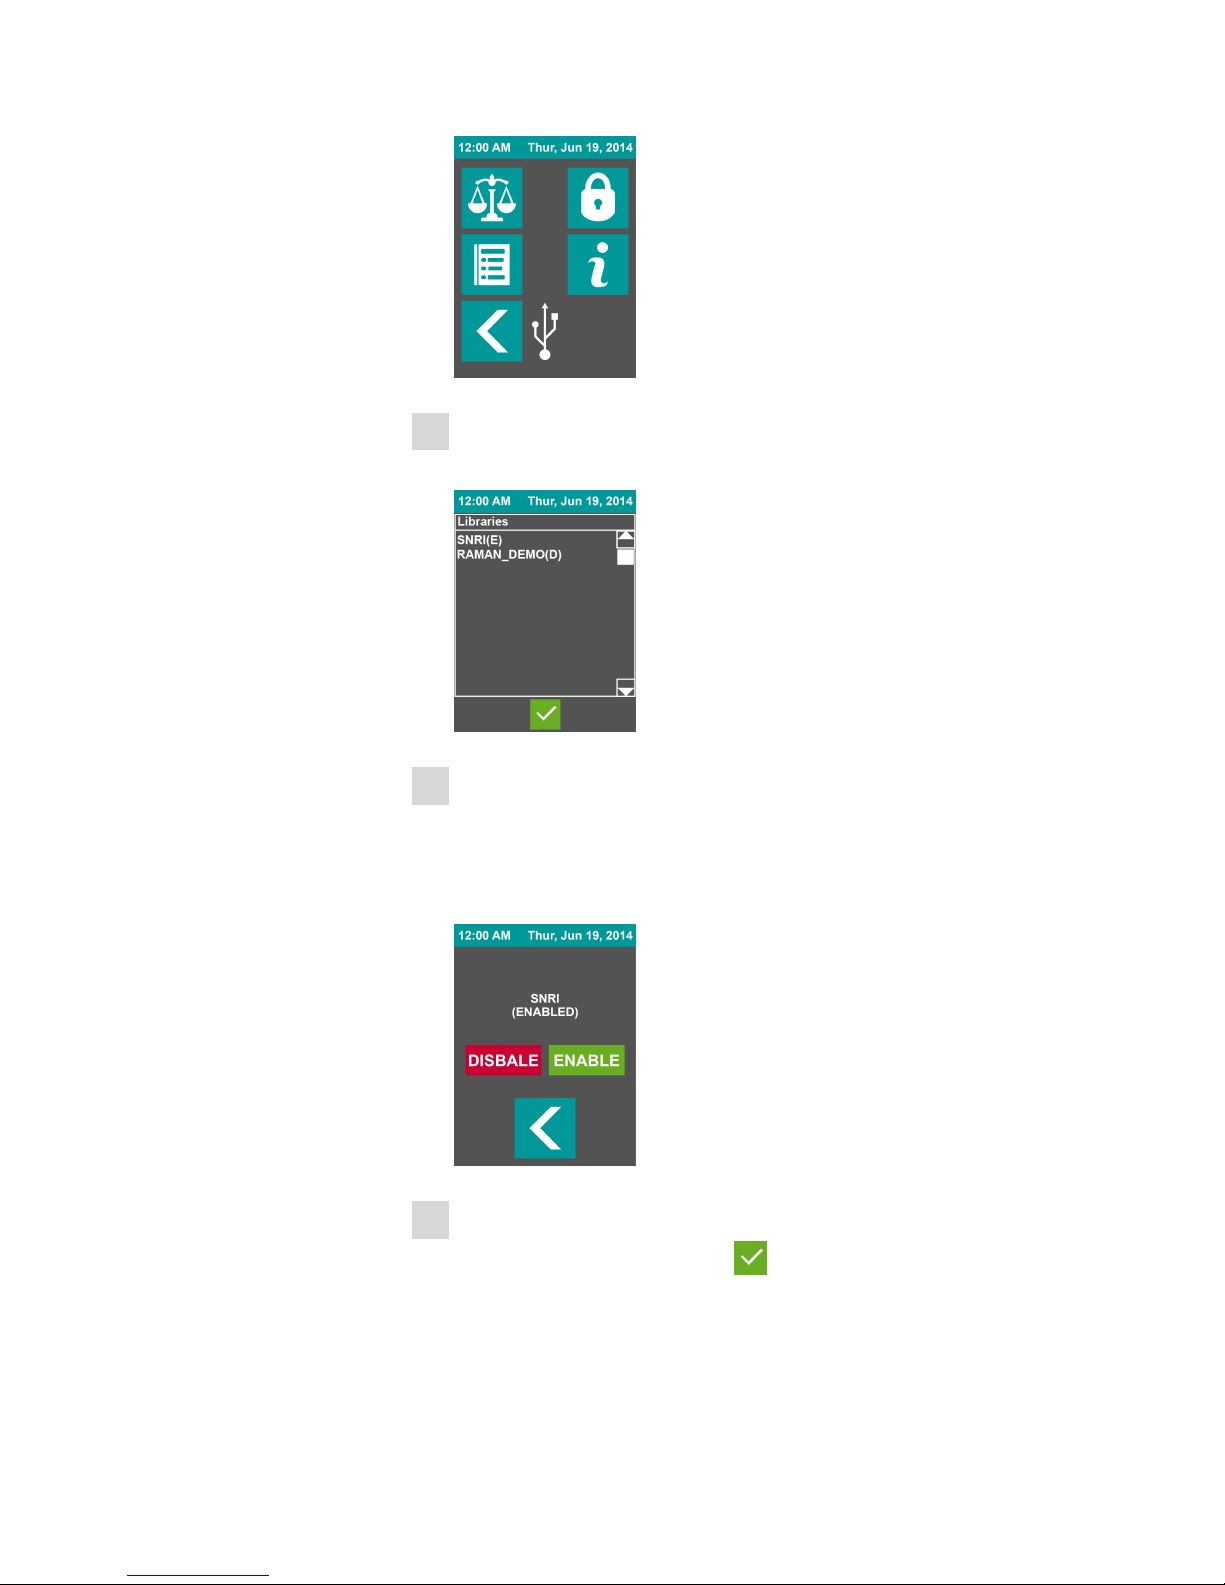
Activating/deactivating spectral libraries
The libraries that were searched during the identification can be activated
or deactivated in the Mira M-1 instrument.
Page 32
4.2 Configuration
■■■■■■■■■■■■■■■■■■■■■■
24
■■■■■■■■
NOTE
Applying spectral library
■ The fewer libraries are activated for the spectral comparison, the
shorter the search.
■ If many libraries are activated, the sample may have a high match
rate for several library substances and thus be difficult to identify.
It is advisable to incorporate previous knowledge of the sample into
the identification.
For this reason, the libraries are arranged according to subjects. We
recommend activating only those substance classes that fit the sample.
■ The settings chosen in this menu only determine whether a library is
included in the search.
Newly purchased libraries first have to be unlocked in the Mira Cal
software.
1
Selecting the configuration menu
■ Select the configuration menu with the key.
2
Selecting the library menu
■ Select the library menu with the key.
Page 33
■■■■■■■■■■■■■■■■■■■■■■
4 Operation
■■■■■■■■
25
3
Selecting the spectral library
■ Tap twice on the desired spectral library.
4
Activating/deactivating the spectral library
■ Activate the spectral library with the [ENABLE] key or deactivate
it with the [DISABLE] key.
■ Activate or deactivate additional spectral libraries following the
previous steps if needed.
5
Exiting the library menu
■ Exit the library menu with the key.
Page 34
4.2 Configuration
■■■■■■■■■■■■■■■■■■■■■■
26
■■■■■■■■
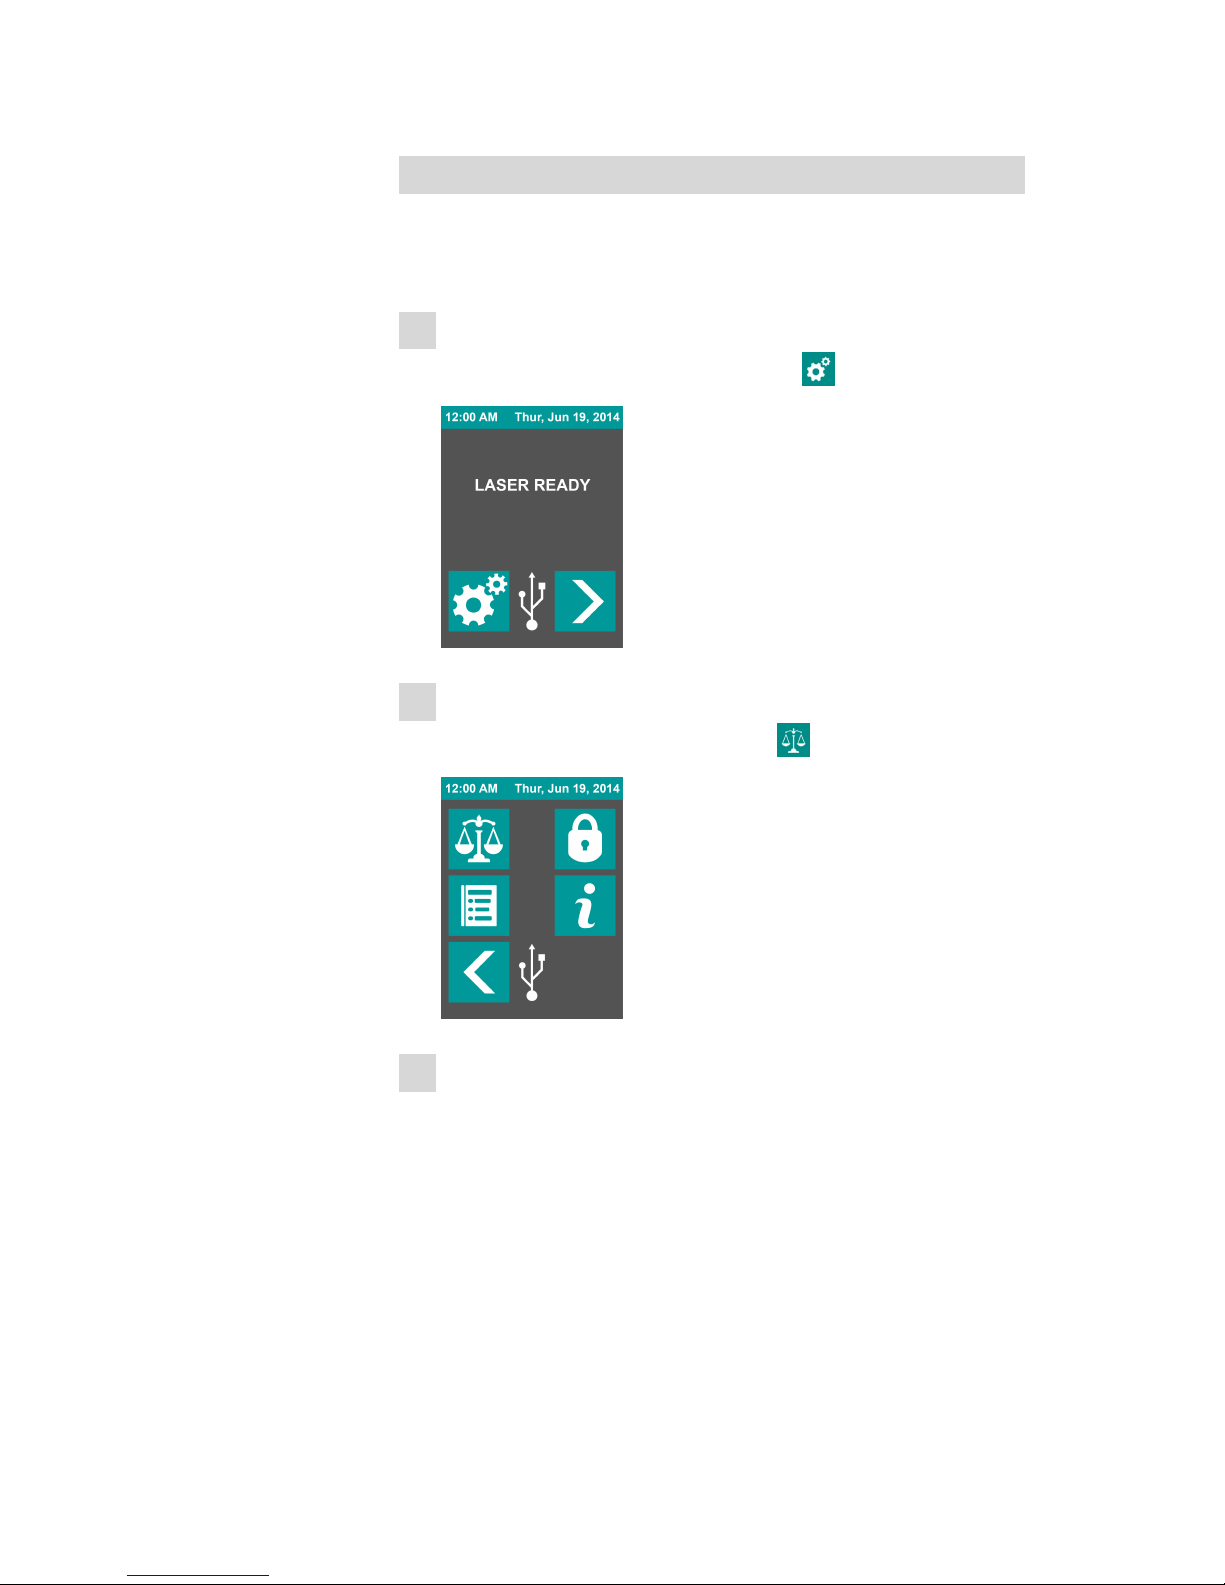
Calibrating the instrument
The Mira M-1 instrument is very robust and stable and does not necessarily require regular calibration. In certain cases, a recalibration should be
carried out, e.g. after the instrument was dropped.
1
Selecting the configuration menu
■ Select the configuration menu with the key.
2
Selecting the calibration menu
■ Select the calibration menu with the key.
3
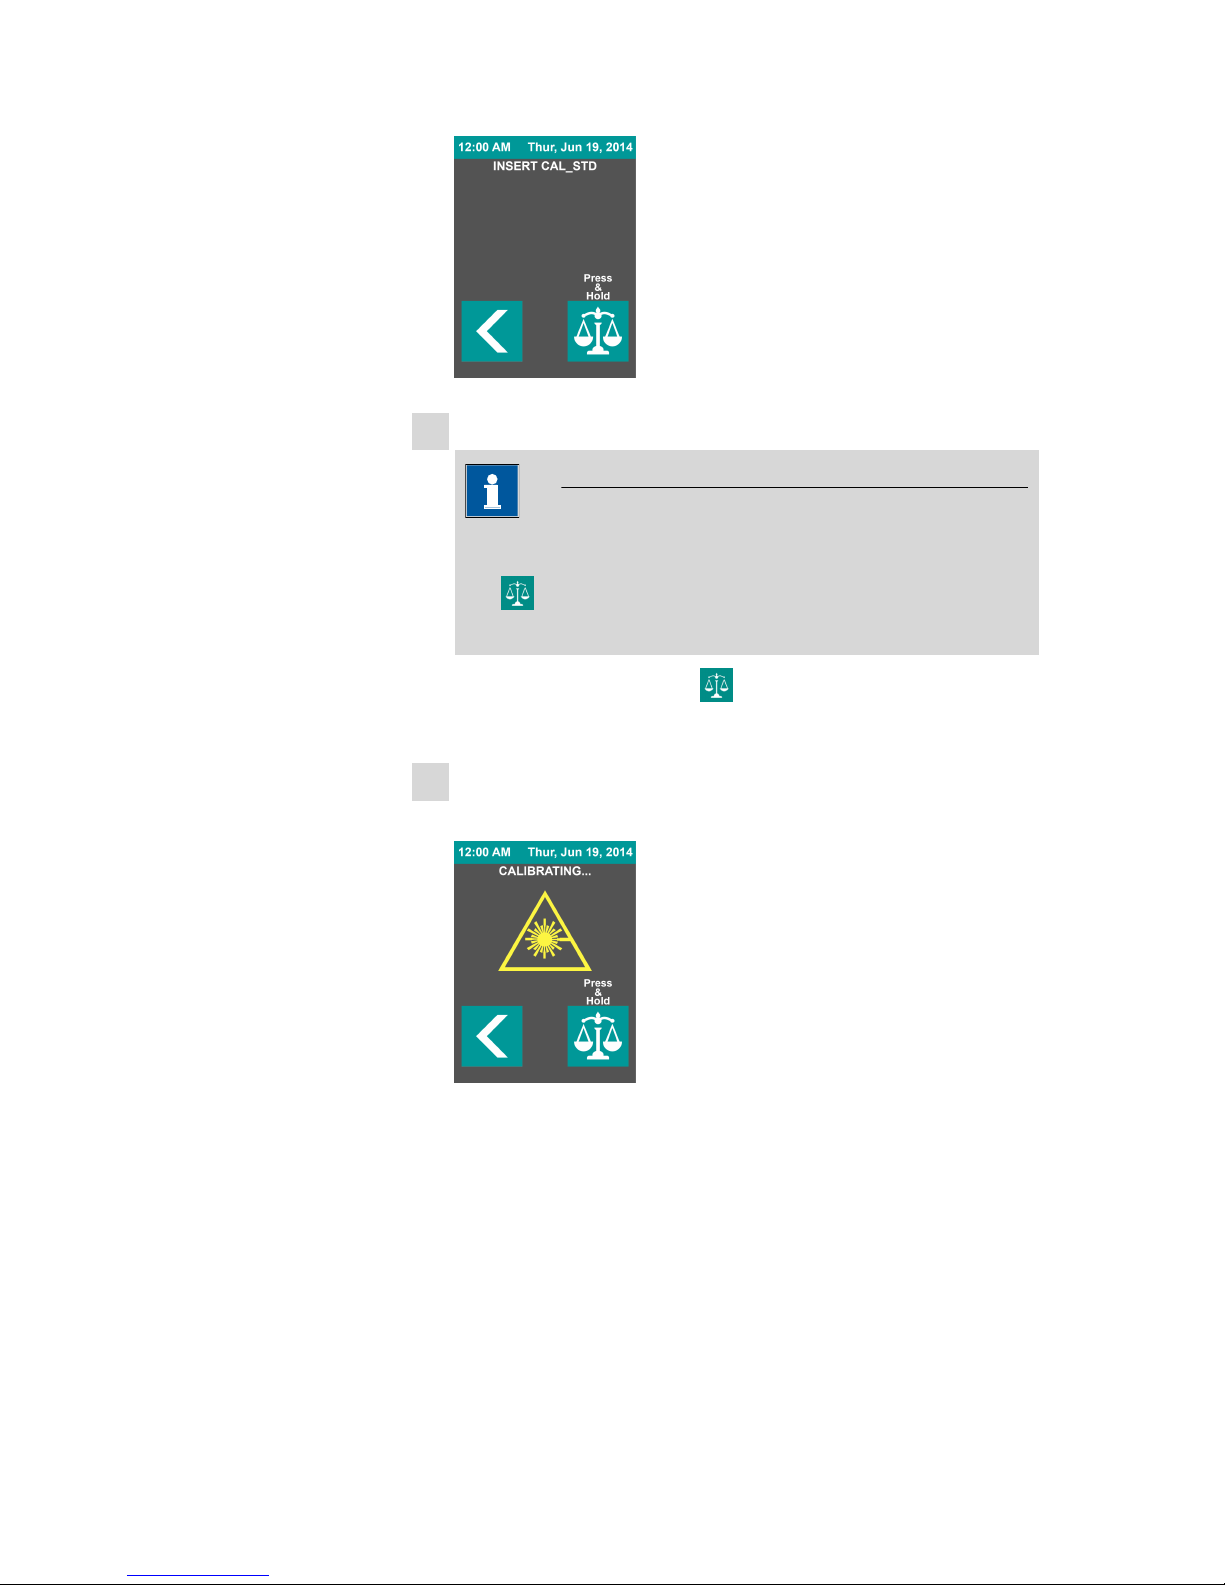
Inserting the calibration standard
■ Open the cover of the vial holder.
■ Insert the calibration standard.
■ Close the cover of the vial holder.
Page 35
■■■■■■■■■■■■■■■■■■■■■■
4 Operation
■■■■■■■■
27
4
Starting the calibration
NOTE
Laser safety
The key of the Mira M-1 Advanced instrument must be
pressed during calibration.
Start the calibration with the key (and keep the key pressed
down until the result is displayed).
5
Waiting for calibration
■ Wait for the calibration to start, until the message is displayed.
Page 36
4.2 Configuration
■■■■■■■■■■■■■■■■■■■■■■
28
■■■■■■■■
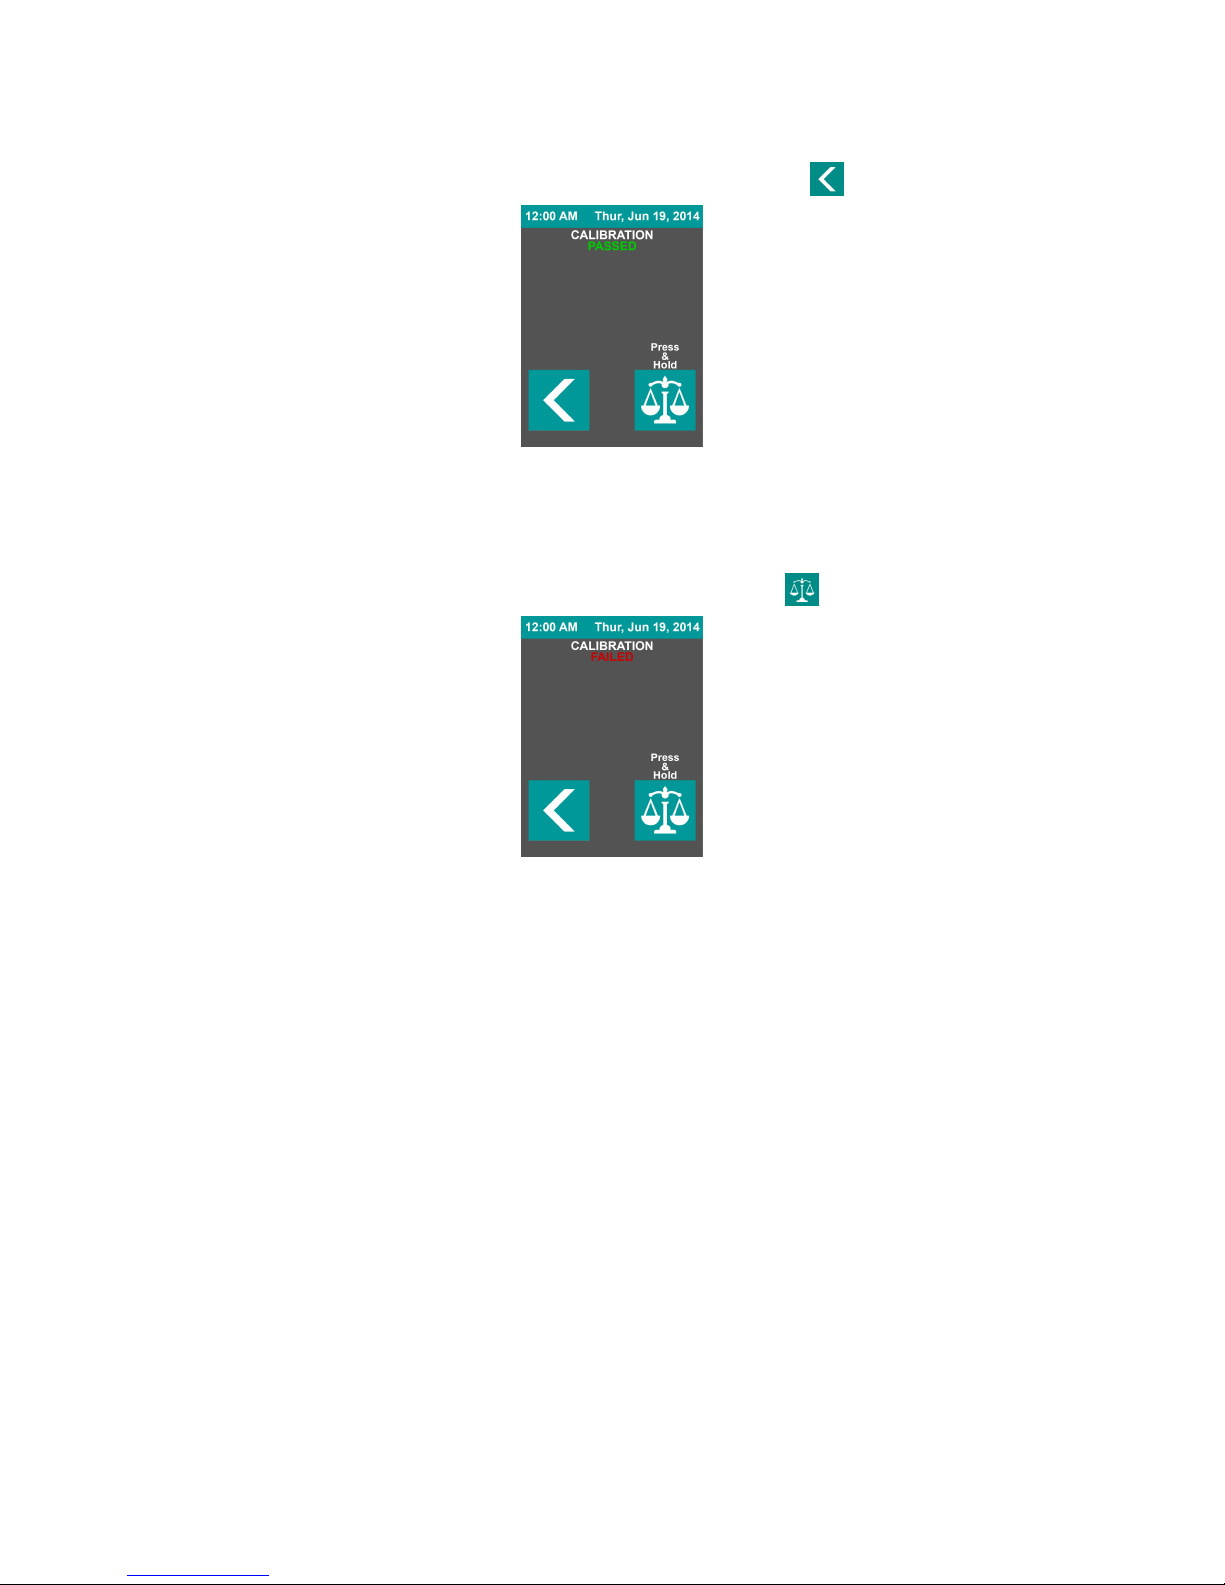
■ The calibration is successful:
– Exit the calibration menu with the key.
■ The calibration is not successful:
– Remove the calibration standard and check for contamina-
tion and damages.
– Reinsert the calibration standard.
–
Restart the calibration with the key.
Page 37

■■■■■■■■■■■■■■■■■■■■■■
4 Operation
■■■■■■■■
29
4.3 Operation with Mira Cal
NOTE
Operation
The following functions are carried out with the Mira Cal software:
■ Configuration of the Mira M-1 instrument.
■ Remote operation of the Mira M-1 instrument.
■ Update and activation of the spectral libraries.
■ Automatic updating of date and time.
■ Installation of new instrument firmware.
■ Management and evaluation of results.
You can find detailed information on the procedure in the tutorial for
the Mira Cal software.
Page 38
5.1 General notes
■■■■■■■■■■■■■■■■■■■■■■
30
■■■■■■■■
5 Operation and maintenance
5.1 General notes
5.1.1 Care
Mira M-1 instruments require appropriate care. Excess contamination of
the instruments may result in functional disruptions and a reduction in the
service life of the otherwise sturdy mechanics and electronics.
Spilled chemicals and solvents should be removed immediately. In particular, the plug connections should be protected from contamination.
CAUTION
Although this is largely prevented by design measures, Metrohm Service
should immediately be notified if aggressive media have found their
way into the instrument.
5.1.2 Maintenance by Metrohm Service
Maintenance of the Mira M-1 is best carried out as part of annual service, which is performed by specialist personnel from Metrohm. A shorter
maintenance interval may be necessary if you frequently work with caustic
and corrosive chemicals.
Metrohm Service offers every form of technical advice for maintenance
and service of all Metrohm instruments.
5.2 Quality management and qualification with
Metrohm
Quality management
Metrohm offers you comprehensive support in implementing quality management measures for instruments and software.
Qualification
Please contact your local Metrohm representative for support in qualification of instruments and software. The Installation Qualification (IQ)
and Operational Qualification (OQ) are offered by Metrohm representatives as a service. They are carried out by trained employees using standardized qualification documents and in accordance with the currently
applicable requirements of the regulated industry.
Page 39

■■■■■■■■■■■■■■■■■■■■■■
5 Operation and maintenance
■■■■■■■■
31
Maintenance
The electronic and mechanical functional groups of Metrohm instruments
can and should be checked by specialist personnel from Metrohm as part
of a regular preventive maintenance schedule. Please ask your local
Metrohm representative regarding the precise terms and conditions
involved in concluding a corresponding maintenance agreement.
For detailed information on this topic, please visit www.metrohm.com.
Page 40

6.1 Basic function
■■■■■■■■■■■■■■■■■■■■■■
32
■■■■■■■■
6 Troubleshooting
6.1 Basic function
Problem Cause Remedy
The display flickers. The voltage of the batteries
is too low.
■ Insert new or charged batteries into the
instrument.
The instrument does
not start.
The batteries are dead. ■ Insert new or charged batteries into the
instrument.
The batteries are inserted
incorrectly.
■ Check the polarity of the batteries.
■ Make sure the battery cover is closed cor-
rectly.
6.2 Measuring result
Problem
Cause Remedy
The spectrum cannot find a match.
No spectral library loaded
in the instrument.
■ Update the library.
The measuring signal is not
clear due to a weak voltage.
■ Insert new or charged batteries into the
instrument.
The spectrum is
noisy.
The sample is out of focus. ■ Choose the correct attachment lens that
corresponds with the sample.
– SWD attachment lens for direct
measurement.
– LWD attachment lens for measure-
ment through a bottle.
The spectrum is not
created.
The sample is missing. ■ Fill the sample into a vial and insert it into
the instrument.
The vial holder or the
attachment lens is inserted
incorrectly.
■ Insert the accessory part correctly.
The calibration is faulty. ■ Carry out a calibration and repeat the mea-
surement.
Page 41

■■■■■■■■■■■■■■■■■■■■■■
7 Appendix
■■■■■■■■
33
7 Appendix
7.1 Spectral libraries
Metrohm provides an extensive collection of Raman spectra for Mira spectrometers. These are suitable for not only identifying unknown Raman
spectra, but also characterizing a whole range of different materials. The
spectral library that is available comprises more than 9,000 Raman spectra
which have been measured in the National Institute of Advanced Industrial Science and Technology (AIST) in Japan and by scientists at S.T. Japan,
Inc. in Tokyo. This complete library is subdivided into 21 sub-libraries,
which can be combined as required.
NOTE
Subject to modifications
The spectral libraries and their scope are continuously updated.
You can find the current offers for the spectral libraries under the
optional accessories on the Metrohm website (see Chapter 9, page
39).
Table 2
Spectral libraries
Article number Designation Number of spectra
6.6071.601 Complete Raman spectral library. > 8,690
6.6071.602 Raman spectra of active substances and auxiliary materials that are
relevant to the pharmaceutical industry and medical research.
> 1,170
6.6071.603 Raman spectra of solvents. > 460
6.6071.604 Raman spectra of polymers, polymer additives, plastics, plasticizers
and packaging materials.
> 920
6.6071.605 Raman spectra of aliphatic and aromatic aldehydes and ketones. > 1,070
6.6071.606 Raman spectra of alcoholic and phenolic compounds. > 890
6.6071.607 Raman spectra of esters, lactones and anhydrides. > 2,930
6.6071.608 Raman spectra of hydrocarbons and halogenated hydrocarbons. > 560
6.6071.609 Raman spectra of chemical substances that are used in the semiconductor industry.
> 370
6.6071.610 Raman spectra of selected hazardous substances that are listed in the
"EPA Cameo Database for Chemical Emergencies and Responders"
and the "USCG CHRIS Hazardous Chemicals Database".
> 1,360
Page 42

7.1 Spectral libraries
■■■■■■■■■■■■■■■■■■■■■■
34
■■■■■■■■
Article number Designation Number of spectra
6.6071.611 Raman spectra of selected hazardous substances that are listed in the
"EPA Cameo Database for Chemical Emergencies and Responders",
"USCG CHRIS Hazardous Chemicals Database" and "NIOSH Guide to
Chemical Hazards Databases", as well as chemicals that are regulated
by the "Toxic Substances Control Act".
> 3,030
6.6071.612 Raman spectra of substances that are relevant to forensic analysis. > 740
6.6071.613 Raman spectra of pesticides, insecticides, herbicides, fungicides, algicides and similar agricultural chemicals.
> 460
6.6071.614 Raman spectra of selected dyes, colorants, pigments and indicators. > 300
6.6071.615 Raman spectra of sulfur and phosphorus compounds. > 970
6.6071.616 Raman spectra of substances with a high production volume, as listed
in the "HPV Challenge Program Chemical List".
> 690
6.6071.617 Raman spectra of minerals and inorganic materials (not included in
the complete library (6.6071.601)).
> 1,410
6.6071.618 Raman spectra of minerals (extracted from the 6.6071.617 library). > 450
6.6071.619 Raman spectra of inorganic materials (extracted from the 6.6071.617
library).
> 960
6.6071.620 Raman spectra of food additives, including FDA-controlled substances.
Additionally, spectra of indirect food additives and substances that
come into contact with foodstuffs, such as packaging materials and
associated processing chemicals.
> 1,070
6.6071.621 Raman spectra of biochemicals, including vitamins, resins, starches,
glycerins, fatty acids, sugars, carbohydrates, proteins, and peptides.
> 1,900
6.6071.622 Raman spectra of flavors, scents, and other substances that are used
for manufacturing cosmetics.
> 1,030
Page 43

■■■■■■■■■■■■■■■■■■■■■■
8 Technical specifications
■■■■■■■■
35
8 Technical specifications
8.1 Operating specifications
Table 3 Specification of the measuring parameters
Aspect Specification
Laser wavelength 785 nm
Laser output power ≤ 100 mW
Wavenumber range 400 - 2,300 cm
–1
Spectral resolution 12 - 14 cm–1 (FWHM) across the whole range
Collection optics NA = 0.50, 1 mm and 7.6 mm working distance; 0.2 -
2.5 mm measuring spot size
Beam divergence 7.2 degrees
Detection technique Orbital Raster Scan (ORS) to average over the sample
Laser class according to EN 60825-1 ■ Mira M-1 Basic
Class 1
■ Mira M-1 Advanced
Class 3B
Protection Level according to EN 207 D LB5 775 - 795 nm
NOHD - Nominal Ocular Hazard Distance
SWD attachment lens : 66 cm ± 5 cm
LWD attachment lens : 64 cm ± 5 cm
8.2 Measured value memory
Memory size
8 GB (measured values and spectral library)
Page 44

8.3 Screen
■■■■■■■■■■■■■■■■■■■■■■
36
■■■■■■■■
8.3 Screen
Display size 2.8 inch, resistive touch screen
8.4 Interfaces
USB connector Type A/B mini USB connector (USB 2.0) with the following functions:
■ Power supply
■ Data transmission
with USB cable (6.2151.110)
8.5 Power supply
Battery
2 x 1.5 V, size AA / LR6
Nominal input
voltage
5 V DC
Power consumption
1,000 mA max.
Power supply unit No. 6.2166.100
Nominal input
voltage
100 - 240 V AC
Frequency 50 - 60 Hz
Output voltage 5 V DC
Nominal output
current
1,500 mA max.
8.6 Runtime
NOTE
Runtimes
The runtimes may vary according to the configuration used and the
usage habits.
The following values are based on operation under reference conditions.
Uptime
Up to 11 hours with lithium-ion batteries.
Page 45

■■■■■■■■■■■■■■■■■■■■■■
8 Technical specifications
■■■■■■■■
37
8.7 Housing specification
Leak-tightness Protected against dust and splash water.
8.8 Safety specifications
This instrument fulfills the following electrical safety requirements:
CE marking in accordance with the EU directives:
■ 2006/95/EC (Low Voltage Directive, LVD)
■ 2004/108/EC (EMC Directive, EMC)
■ EN/IEC 60825-1 (Safety of laser products)
Safety instructions This document contains safety instructions which have to be followed
by the user in order to ensure safe operation of the instrument.
■ EN 207 (Personal eye-protection equipment – Filters and eye-pro-
tectors against laser radiation (laser eye-protectors))
8.9 Electromagnetic compatibility (EMC)
Emission
Standards fulfilled:
■ EN/IEC 61326-1
■ EN/IEC 61000-6-3
■ EN 55011 / CISPR 11
Immunity Standards fulfilled:
■ EN/IEC 61326-1
■ EN/IEC 61000-6-2
■ EN/IEC 61000-4-2
■ EN/IEC 61000-4-3
■ EN/IEC 61000-4-4
■ EN/IEC 61000-4-5
■ EN/IEC 61000-4-6
■ EN/IEC 61000-4-11
■ EN/IEC 61000-4-14
■ EN/IEC 61000-4-28
Page 46

8.10 Ambient temperature
■■■■■■■■■■■■■■■■■■■■■■
38
■■■■■■■■
8.10 Ambient temperature
Operation –20 °C - +40 °C (at a max. of 93% humidity)
Storage/transport –20 °C - +70 °C (at a max. of 93% humidity)
8.11 Reference conditions
Ambient temperature
+25 °C (±3 °C)
Relative humidity ≤ 60%
Instrument status > 5 min in operation
Validity of the
data
After adjustment
8.12 Dimensions and materials
Dimensions
Length 131 mm
Width 85 mm
Height 39 mm
Weight 650 g (net incl. batteries)
Material
Housing Aluminum anodized
Accessories
covering
Thermoplastic elastomers (TPE-E)
Page 47

■■■■■■■■■■■■■■■■■■■■■■
9 Accessories
■■■■■■■■
39
9 Accessories
Up-to-date information on the scope of delivery and optional accessories
for your instrument can be found on the Internet. You can download this
information using the article number as follows:
Downloading the accessories list
1
Type http://partslists.metrohm.com into your Internet browser.
The Partslists webpage will be displayed.
2
Select the desired output language.
3
Enter the article number (e.g. 2.884.0010) and click on the Generate PDF command.
The PDF file with the accessories data will be created in the language
selected.
NOTE
When you receive your new instrument, we recommend downloading
the accessories list from the Internet, printing it out and keeping it
together with the manual for reference purposes.
Page 48

Index
■■■■■■■■■■■■■■■■■■■■■■
40
■■■■■■■■
Index
A
Attachment lens 1, 2, 4, 9, 12, 13,
15, 18
C
Calibration .......................... 26, 32
I
Initial configuration .................. 11
Installation qualification ............ 30
Interface ..................................... 2
M
Maintenance agreement .......... 30
Metrohm Service ...................... 30
Mira Cal ................. 11, 17, 21, 29
O
Operational qualification .......... 30
P
Power supply ........................ 2, 10
Q
Quality management ................ 30
S
Safety instructions ...................... 3
Service ....................................... 6
Spectral library .. 11, 21, 23, 29, 33
Supply voltage ............................ 6
T
Touch screen .............................. 8
Tutorial ................... 11, 17, 21, 29
U
Update ..................................... 17
 Loading...