

Page 1
IC-Ausrüstung
IC-Ausrüstung: MiPT (6.5330.180)
Manual
8.110.8035EN / 2014-05-22
Page 2

Page 3

Metrohm AG
CH-9100 Herisau
Switzerland
Phone +41 71 353 85 85
Fax +41 71 353 89 01
info@metrohm.com
www.metrohm.com
IC-Ausrüstung
IC-Ausrüstung: MiPT (6.5330.180)
8.110.8035EN / 2014-05-22
Manual
zst
Page 4

Teachware
Metrohm AG
CH-9100 Herisau
teachware@metrohm.com
This documentation is protected by copyright. All rights reserved.
Although all the information given in this documentation has been
checked with great care, errors cannot be entirely excluded. Should you
notice any mistakes please send us your comments using the address
given above.
Documentation in additional languages can be found on
http://documents.metrohm.com.
Page 5

■■■■■■■■■■■■■■■■■■■■■■
Table of contents
1 Introduction 1
1.1 Description ............................................................................ 1
1.2 About the documentation ................................................... 2
1.2.1 Symbols and conventions ........................................................ 2
2 Overview 4
2.1 Parts of the IC-Ausrüstung: MiPT ....................................... 4
2.2 Parts of the Liquid Handling Station .................................. 5
2.3 Mode of operation of intelligent Partial Loop Injec-
3 Installation 7
3.1 Installing the Liquid Handling Station ................................ 7
Table of contents
tion ......................................................................................... 6
3.2 Installing the Dosino ............................................................ 7
3.3 Equipping the supply bottle ................................................ 9
3.4 Installing the FEP tubing .................................................... 10
3.5 Installing the transfer capillary ......................................... 10
3.6 Installing capillaries ............................................................ 11
3.7 Replacing the sample loop ................................................ 12
4 Operation and maintenance 13
4.1 Dosing unit (6.3032.120) ................................................... 13
5 Accessories 14
Index 16
IC-Ausrüstung: MiPT
■■■■■■■■
III
Page 6

Table of figures
Table of figures
Figure 1 Overview MiPT .................................................................................. 1
Figure 2 IC-Ausrüstung: MiPT – Parts .............................................................. 4
Figure 3 Liquid Handling Station – Parts .......................................................... 5
■■■■■■■■■■■■■■■■■■■■■■
■■■■■■■■
IV
IC-Ausrüstung: MiPT
Page 7
■■■■■■■■■■■■■■■■■■■■■■
1 Introduction
1.1 Description
The IC-Ausrüstung: MiPT expands your ion chromatography system to
include the Metrohm intelligent Partial Loop Injection Technique (MiPT).
This technique allows you to fill the 250 µL sample loop with a precisely
measured volume. In this process, an 800 Dosino with a 2 mL dosing unit
performs the precise dosing increments. MiPT enables calibration with
only one standard solution, as the injection volume can be freely selected.
The same also applies to sample injection, so that you can for instance
select a small injection volume for a highly concentrated sample.
The sample needle is rinsed with ultrapure water in the rinsing unit of the
Liquid Handling Station (6.2841.120) after each sample aspiration. The
Liquid Handling Station (6.2841.120) can be mounted on any Sample Processor equipped with a Swing Head.
1 Introduction
IC-Ausrüstung: MiPT
Figure 1
Overview MiPT
■■■■■■■■
1
Page 8

1.2 About the documentation
1.2 About the documentation
This manual describes the installation of the IC-Ausrüstung: MiPT and the
connection of the capillary connections between the supply bottle, the
Dosino and the injection valve in the ion chromatograph.
CAUTION
Please read through this documentation carefully before putting the
equipment into operation. The documentation contains information
and warnings which the user must follow in order to ensure safe operation of the equipment.
Additional documentation
Topic Document
■■■■■■■■■■■■■■■■■■■■■■
Mounting the Liquid Handling Station on
the Sample Processor
Installing the Dosino Manual for the Dosino
Care and maintenance of the dosing unit Manual for the dosing unit
1.2.1 Symbols and conventions
The following symbols and formatting may appear in this documentation:
Method Dialog text, parameter in the software
File ▶ New Menu or menu item
[Next] Button or key
Manual for the Liquid Handling Station
Cross-reference to figure legend
The first number refers to the figure number, the second to the instrument part in the figure.
Instruction step
Carry out these steps in the sequence shown.
WARNING
■■■■■■■■
2
This symbol draws attention to a possible life-threatening hazard or risk of injury.
WARNING
This symbol draws attention to a possible hazard due
to electrical current.
IC-Ausrüstung: MiPT
Page 9

■■■■■■■■■■■■■■■■■■■■■■
1 Introduction
WARNING
This symbol draws attention to a possible hazard due
to heat or hot instrument parts.
WARNING
This symbol draws attention to a possible biological
hazard.
CAUTION
This symbol draws attention to possible damage to
instruments or instrument parts.
NOTE
This symbol highlights additional information and
tips.
IC-Ausrüstung: MiPT
■■■■■■■■
3
Page 10
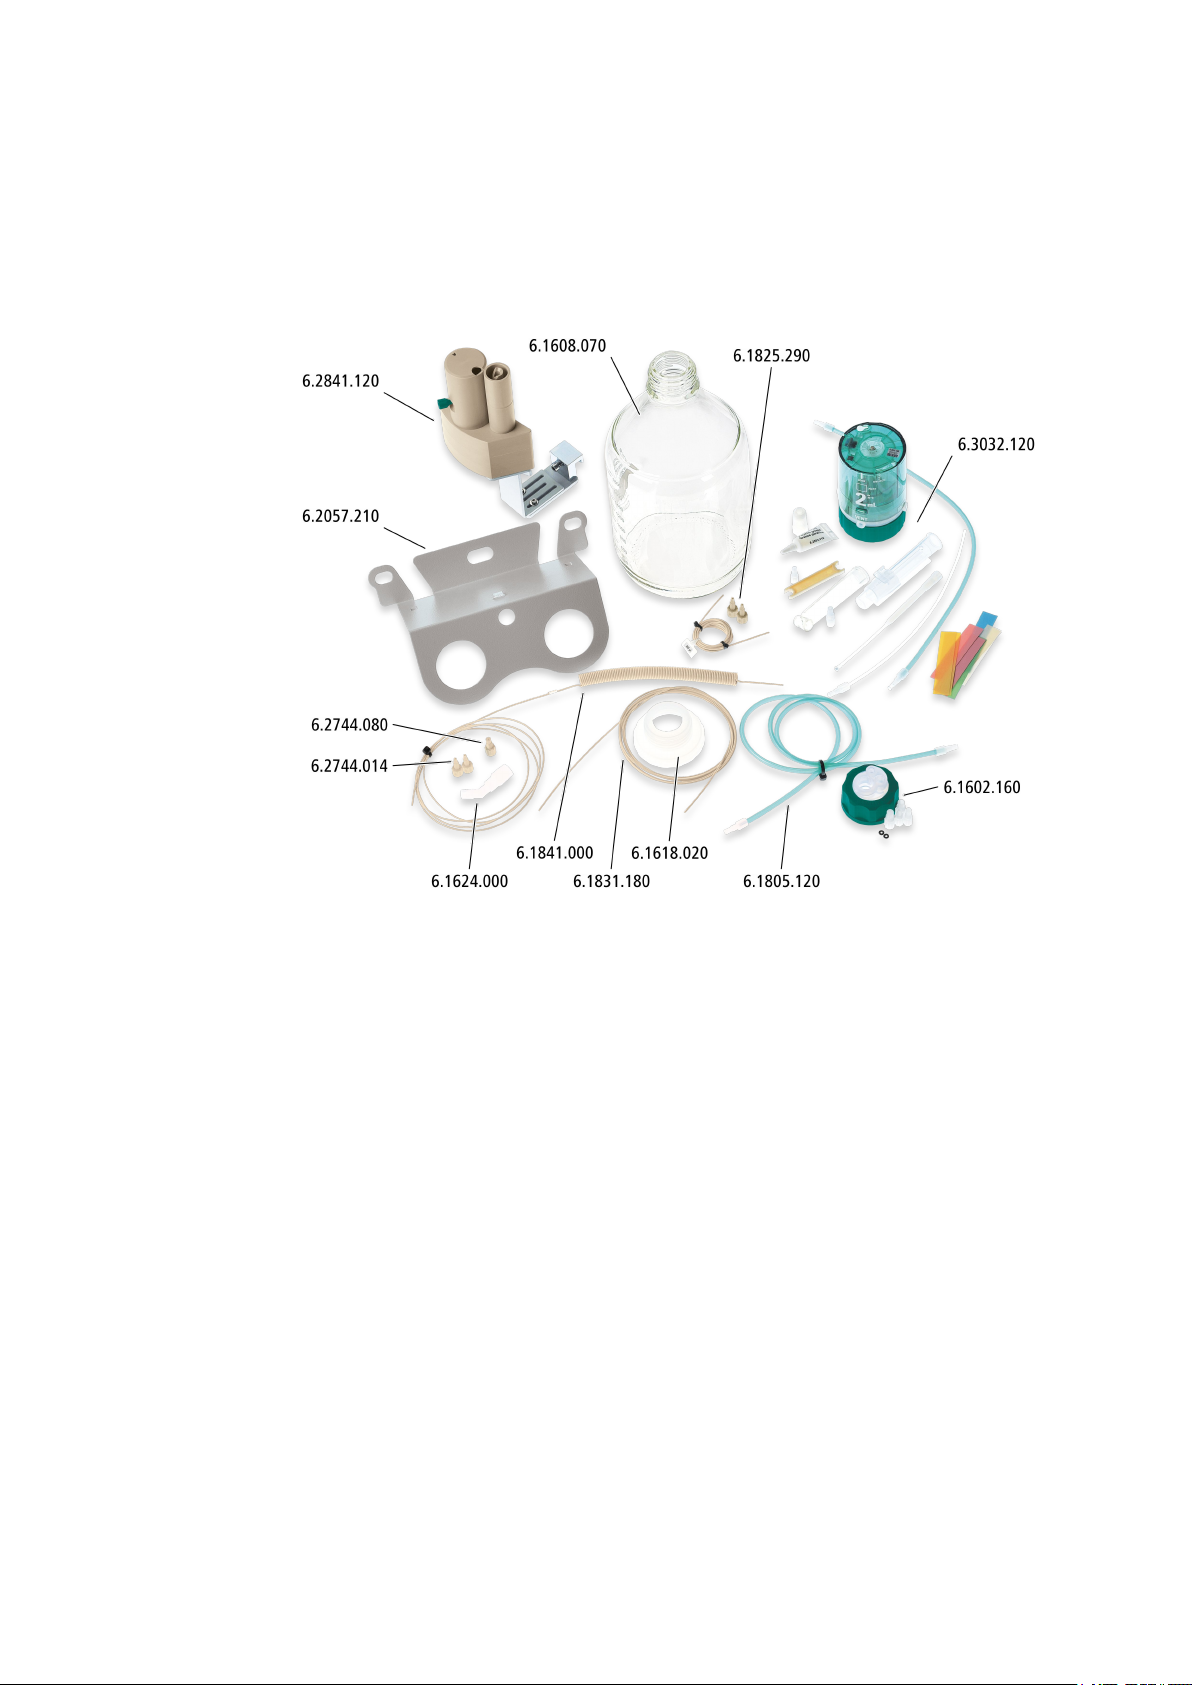
2.1 Parts of the IC-Ausrüstung: MiPT
2 Overview
2.1 Parts of the IC-Ausrüstung: MiPT
■■■■■■■■■■■■■■■■■■■■■■
Figure 2 IC-Ausrüstung: MiPT – Parts
■■■■■■■■
4
IC-Ausrüstung: MiPT
Page 11

■■■■■■■■■■■■■■■■■■■■■■
2.2 Parts of the Liquid Handling Station
2 Overview
Cover
1
For the mixing vessel.
Main body
3
With magnetic stirrer dummy.
Clamping fastener
5
Support bracket
7
Waste connector
9
Mixing vessel
11
Figure 3 Liquid Handling Station – Parts
Rinsing unit
2
Rinsing unit inlet
4
Sealed with threaded stopper.
Base plate
6
Cable clip
8
Mixing vessel outlet
10
Sealed with threaded stopper.
IC-Ausrüstung: MiPT
■■■■■■■■
5
Page 12

2.3 Mode of operation of intelligent Partial Loop Injection
■■■■■■■■■■■■■■■■■■■■■■
2.3 Mode of operation of intelligent Partial Loop Injection
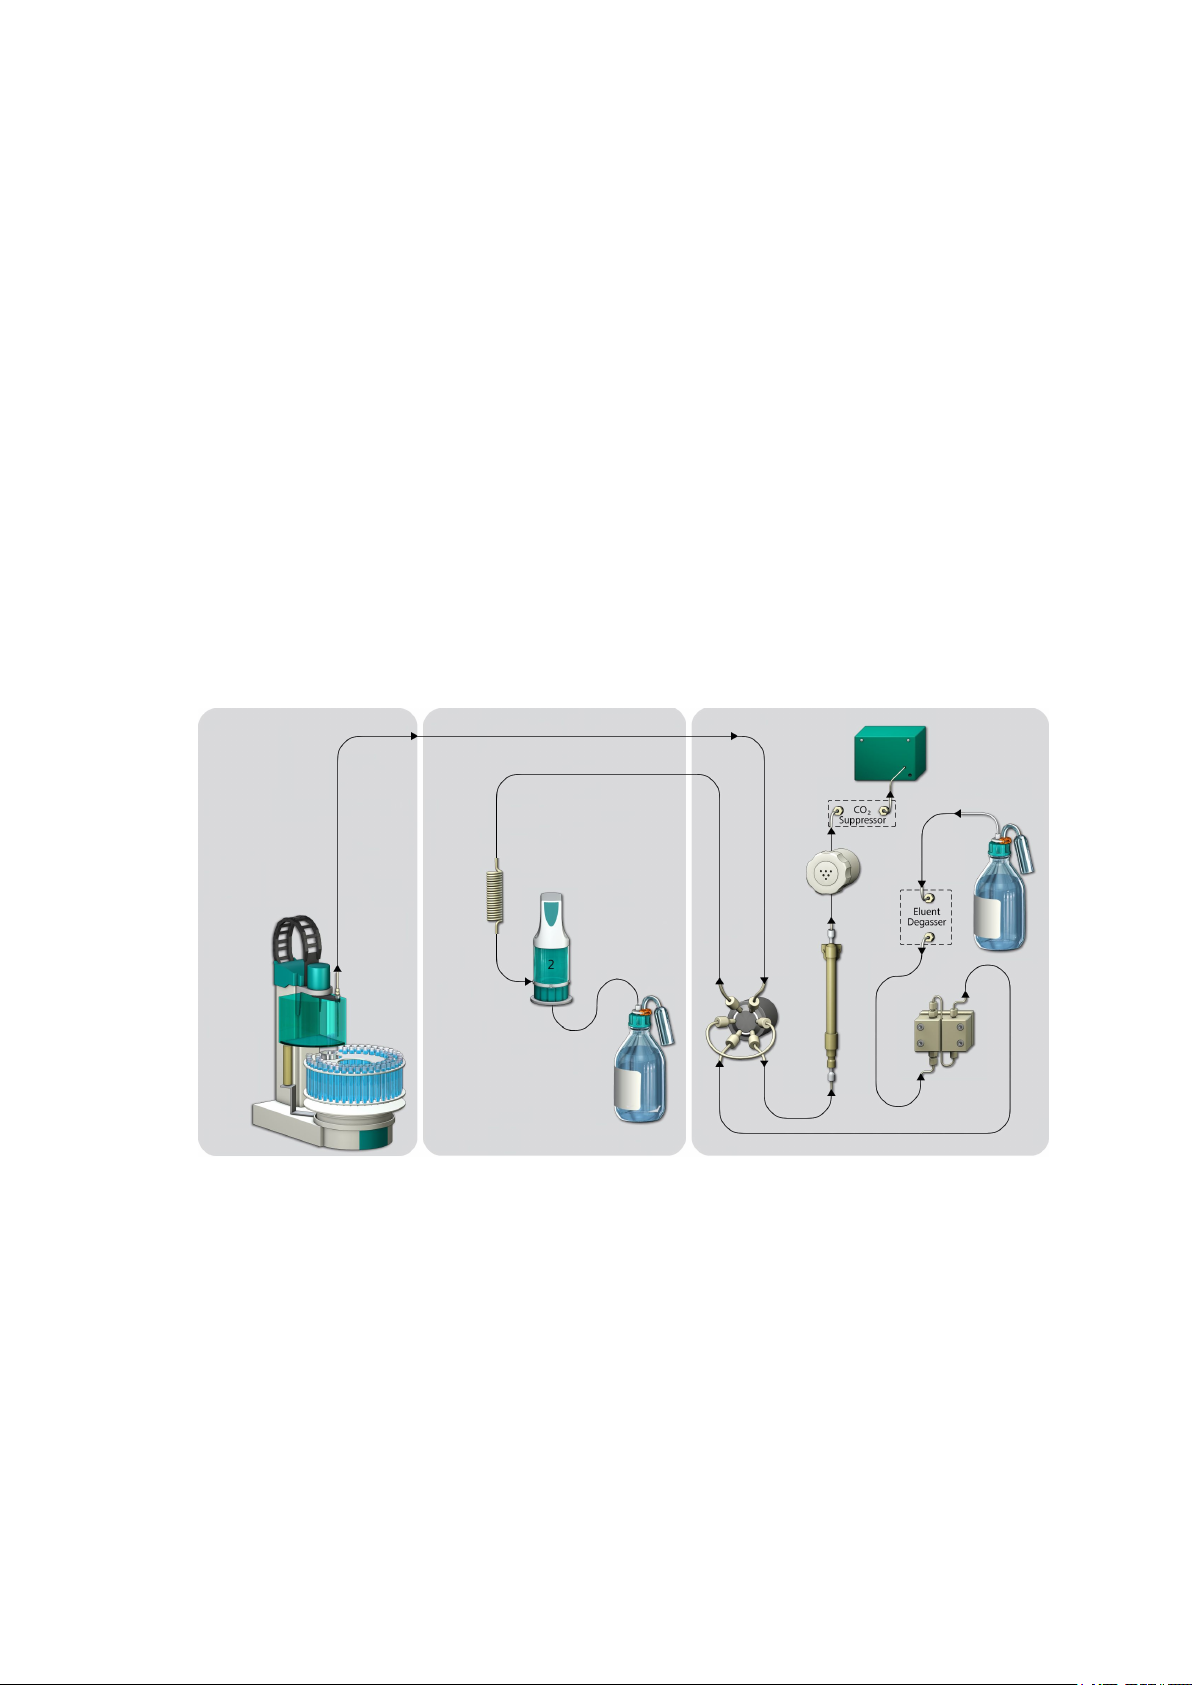
1. At the beginning of the determination, the Dosino's 2 mL dosing unit
is emptied.
2. Aspirating sample
a. The sample (or the standard solution) is aspirated with the 2
mL dosing unit into the transfer capillary.
b. The Sample Processor needle is moved to the waste position
(outer area of the rinsing unit).
3. Filling the sample loop
a. The injection valve is switched to the Fill position.
b. The 800 Dosino doses the injection volume from the transfer
tubing to the 250 µL sample loop.
c. Excess sample is transferred to the needle and discarded over
the waste position.
4. Injecting and rinsing
a. The injection valve is switched to the Inject position. The sam-
ple is injected into the separation column with the eluent.
b. At the same time, the Sample Processor needle is moved to
the rinse position (inner area of the rinsing unit) and cleaned.
■■■■■■■■
6
IC-Ausrüstung: MiPT
Page 13

■■■■■■■■■■■■■■■■■■■■■■
3 Installation
3.1 Installing the Liquid Handling Station
The Liquid Handling Station forms part of the IC-Ausrüstung: MiPT.
1
Installing the Liquid Handling Station
Install the Liquid Handling Station on the left side of the Sample Processor (see manual for the Liquid Handling Station).
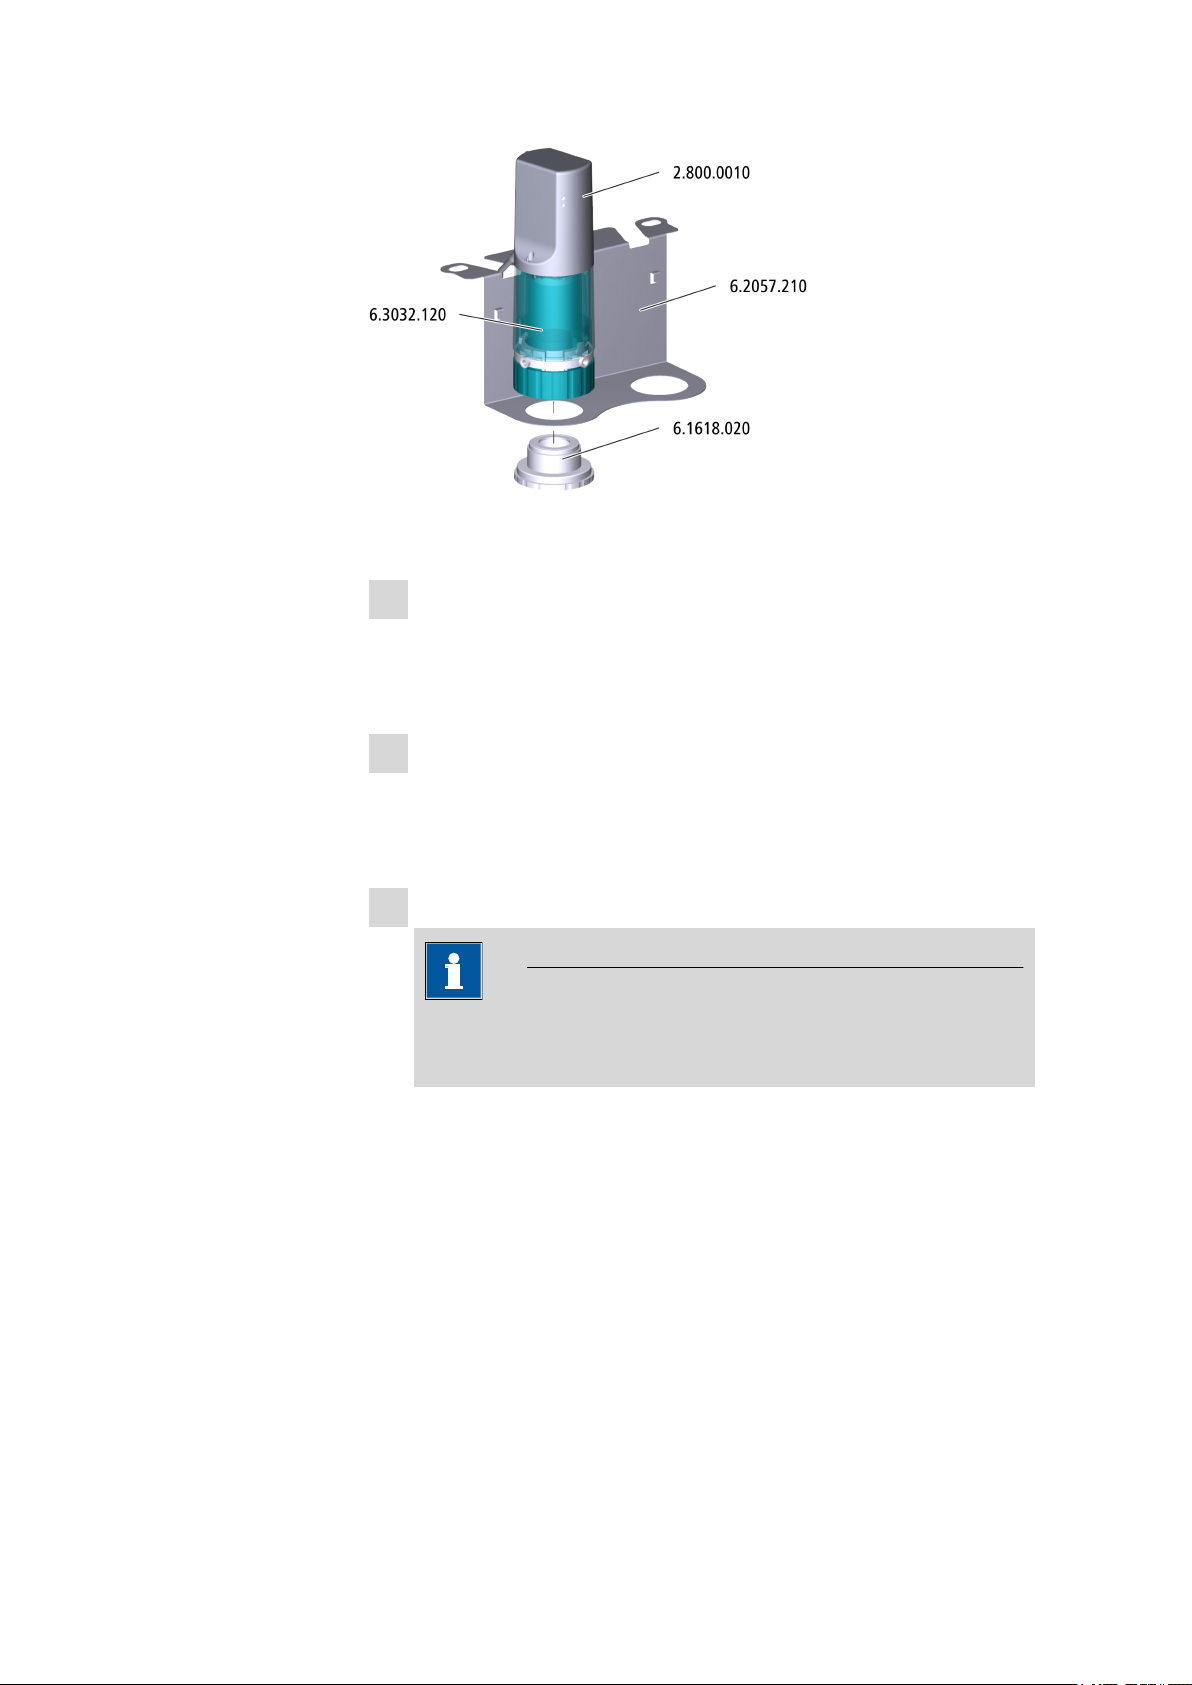
3.2 Installing the Dosino
Attaching the Dosino to the 807 Dosing Unit
3 Installation
Required accessories
Required accessories
■ 800 Dosino (2.800.0010)
■ 807 Dosing Unit 2 mL (6.3032.120)
CAUTION
Please read through the correct procedure in the manual for the 800
Dosino before you attach the Dosino to the dosing unit.
Place the Dosino on the dosing unit (see manual for the 800 Dos-
1
ino).
Attaching the Dosino to the ion chromatograph
■ Dosino (2.800.010) with dosing unit (6.3032.120)
■ Dosino holder (6.2057.210)
■ Thread adapter (6.1618.020)
IC-Ausrüstung: MiPT
■■■■■■■■
7
Page 14
3.2 Installing the Dosino
■■■■■■■■■■■■■■■■■■■■■■
1
Hanging the Dosino holder onto the ion chromatograph
■ Loosen the bottle holder on the ion chromatograph.
■ Clamp the Dosino holder under it.
■ Fasten the bottle holder again.
2
Attaching the Dosino to the holder
■ Place the Dosino onto the Dosino holder.
■ Fasten the Dosino to the Dosino holder by tightening the thread
adapter from below.
3
Connecting the Dosino to the ion chromatograph
■■■■■■■■
8
NOTE
The ion chromatograph must be switched off when the Dosino is
being plugged to the MSB connector.
■ Check whether the ion chromatograph is switched on.
If this is the case, switch off the ion chromatograph.
■ Plug the Dosino cable into one of the ion chromatograph's MSB
connectors.
Alternatively, the Dosino can also be mounted to the Sample Processor
(see the manual for the Dosino).
IC-Ausrüstung: MiPT
Page 15

■■■■■■■■■■■■■■■■■■■■■■
3.3 Equipping the supply bottle
Required accessories ■ Bottle (6.1608.070) filled with ultrapure water
■ Eluent bottle cap (6.1602.160)
■ Adsorber tube (6.1619.000), included in the accessories for the dosing
unit (6.3032.120)
■ Adapter for adsorber tube (6.1624.000)
■ FEP aspiration tubing (6.1819.110)
■ M8 stopper (6.1446.080), included in the accessories for the eluent
bottle cap (6.1602.160)
3 Installation
1
Mounting the aspiration tubing
■ Insert the aspiration tubing into the M6 opening of the eluent
bottle cap.
■ Use the capillary cutter to cut the aspiration tubing to such a
length that it touches the bottom of the bottle.
2
Inserting the stopper
■ Tighten the M8 stopper in the M8 opening of the eluent bottle
cap.
3
Mounting the adsorber tube
■ Fill the adsorber tube with some cotton and adsorber material.
■ Place the adsorber tube on the adapter.
■ Insert the adapter into the SGJ opening of the eluent bottle cap.
IC-Ausrüstung: MiPT
■■■■■■■■
9
Page 16

3.4 Installing the FEP tubing
4
Mounting the eluent bottle cap
■ Screw the eluent bottle cap onto the bottle filled with ultrapure
water.
3.4 Installing the FEP tubing
Required accessories ■ FEP tubing (6.1805.120)
■■■■■■■■■■■■■■■■■■■■■■
■ Tighten one end of the FEP tubing in the M6 opening of the elu-
1
ent bottle cap.
■ Tighten the other end of the FEP tubing in Port 2 of the Dosino.
3.5 Installing the transfer capillary
Required accessories
■ Transfer capillary (6.1841.000)
■ Pressure screws (6.2744.014)
■ Coupling M6 / UNF (6.2744.080)
■■■■■■■■
10
IC-Ausrüstung: MiPT
Page 17

■■■■■■■■■■■■■■■■■■■■■■
■ Tighten the coupling to Port 1 of the Dosino.
1
■ Tighten one end of the transfer capillary to the coupling using a
2
pressure screw.
3.6 Installing capillaries
3 Installation
Required accessories
■ Transfer capillary (6.1841.000)
■ PEEK capillary, 0.5 mm ID / 3 m (6.1831.180)
■ Capillary cutter (6.2621.080)
1
Connecting the transfer capillary
■ Guide the free end of the transfer capillary through one of the ion
chromatograph's capillary feed-throughs.
■ Tighten the end of the transfer capillary to Port 2 of the injection
valve.
■ Tighten the PEEK capillary to Port 1 of the injection valve.
2
■ Guide the capillary out of the ion chromatograph through one of
the capillary feed-throughs.
■ Shorten the capillary using the capillary cutter in such a way that
it can be easily connected to the Sample Processor needle. Keep
the dead volume to a minimum.
■ Tighten the shortened capillary to the Sample Processor's needle
holder using a pressure screw.
IC-Ausrüstung: MiPT
■■■■■■■■
11
Page 18

3.7 Replacing the sample loop
3.7 Replacing the sample loop
Required accessories ■ Sample loop 250 µL (6.1825.290)
Replace the sample loop on the injection valve with the 250 µL sam-
1
ple loop (see the manual for the ion chromatograph).
■■■■■■■■■■■■■■■■■■■■■■
■■■■■■■■
12
IC-Ausrüstung: MiPT
Page 19

■■■■■■■■■■■■■■■■■■■■■■
4 Operation and maintenance
4.1 Dosing unit (6.3032.120)
Maintenance work on the dosing unit has to be performed regularly.
Information on the care and maintenance of the dosing unit can be found
in the manual for the 807 Dosing Unit.
4 Operation and maintenance
IC-Ausrüstung: MiPT
■■■■■■■■
13
Page 20

5 Accessories
Up-to-date information on the scope of delivery and optional accessories
for your instrument can be found on the Internet.
When you receive your new instrument, we recommend downloading
the accessories list from the Internet, printing it out and keeping it
together with the manual for reference purposes.
Instruments currently sold
If you do not know the article number of your instrument, proceed as follows:
Downloading the accessories list
■■■■■■■■■■■■■■■■■■■■■■
NOTE
Go to the Metrohm website http://www.metrohm.com/com.
1
2
Click on .
The Search webpage will be displayed.
Enter a search term relating to the instrument into the search field
3
and click on Find.
The search results will be displayed.
In the search results, select the Devices tab (if it is not already
4
selected) and then click on the Metrohm article number of the
required instrument (e.g. 2.852.0050).
The page with information pertaining to the searched article is displayed.
Select the Parts tab.
5
The complete list of accessories with the scope of delivery and the
optional accessories will be displayed.
6
Click on .
■■■■■■■■
14
IC-Ausrüstung: MiPT
Page 21

■■■■■■■■■■■■■■■■■■■■■■
5 Accessories
The Partslists webpage will be displayed.
Select the desired output language.
7
With the article number entered, click on the command Generate
8
PDF.
The PDF file with the accessories data will be created in the language
selected.
Direct access for all instruments
If you are unable to find your instrument using the search as described
above, this may be due to the instrument not being sold anymore. Using
the article number, you can download accessories lists for all instruments
as follows:
Downloading the accessories list
Type http://partslists.metrohm.com into your Internet browser.
1
The Partslists webpage will be displayed.
Select the desired output language.
2
Enter the article number and click on the Generate PDF command.
3
The PDF file with the accessories data will be created in the language
selected.
IC-Ausrüstung: MiPT
■■■■■■■■
15
Page 22

Index
Index
■■■■■■■■■■■■■■■■■■■■■■
B
Bottle
Equip .................................... 9
D
Dosing unit
Maintenance ...................... 13
Dosino
Install ................................... 7
F
FEP tubing
Install ................................. 10
I
Install
Bottle cap ............................. 9
Dosino ................................. 7
FEP tubing .......................... 10
Liquid Handling Station ......... 7
Transfer capillary ................ 10
L
Liquid Handling Station
Install ................................... 7
M
Maintenance
Dosing unit ......................... 13
S
Sample loop
Replace .............................. 12
T
Transfer capillary
Install ................................. 10
■■■■■■■■
16
IC-Ausrüstung: MiPT
 Loading...