

Page 1

Metrohm AG
CH-9100 Herisau
Switzerland
Phone +41 71 353 85 85
Fax +41 71 353 89 01
info@metrohm.com
www.metrohm.com
Installation MagIC Net 2.x
1 Minimum system requirements
Operating system 32 bit version of:
■ Windows 2000 SP4
■ Windows XP Professional SP2
■ Windows Vista Business / Enterprise / Ultimate
■ Windows 7 Professional / Ultimate / Enterprise
64 bit version of:
■ Windows 7 Professional / Ultimate / Enterprise
RAM Windows 2000 / Windows XP: 1 GB
Windows Vista, Windows 7: 2 GB
Storage capacity Program: 1 GB
Data: 2 GB
Serial ports for devices with RS-232 interface
USB ports for devices with USB interface
Screen Resolution 1024 x 768
The windows user must have administrator rights in order to be able to install
the MagIC Net software.
Additional requirements for the MagIC Net server:
Operating system 32 bit version of:
■ Windows 2000 SP4
■ Windows XP Professional SP2
■ Windows Vista Business / Enterprise / Ultimate
■ Windows 7 Professional / Ultimate / Enterprise
■ Windows 2000 Server
■ Windows Server 2003
■ Windows Server 2008
■ Windows Server 2008 R2
8.102.8045EN
64 bit version of:
■ Windows 7 Professional / Ultimate / Enterprise
■ Windows Server 2008 R2
1
Page 2
Network 10 Mbit/s, stable and permanent
Communication via TCP/IP
Caution
During a determination data loss may occur when the PC switches over to
the standby mode. In the energy settings of the operating system the
standby mode should therefore be deactivated.
2 Single workplace installation
With the single workplace version MagIC Net Basic, MagIC Net Compact
or MagIC Net Professional the MagIC Net client as well as the server will be
installed on your computer.
On inserting the CD into the drive of your computer the installation will
1
be started automatically. If this option is deactivated on your computer,
double click the file setup.exe.
If the minimum system requirements are not met (see above) a message
appears. Click on [Yes] if you like to install the program nonetheless.
Afterwards, click on [Next >].
After having read the license agreement for MagIC Net and accepted it
2
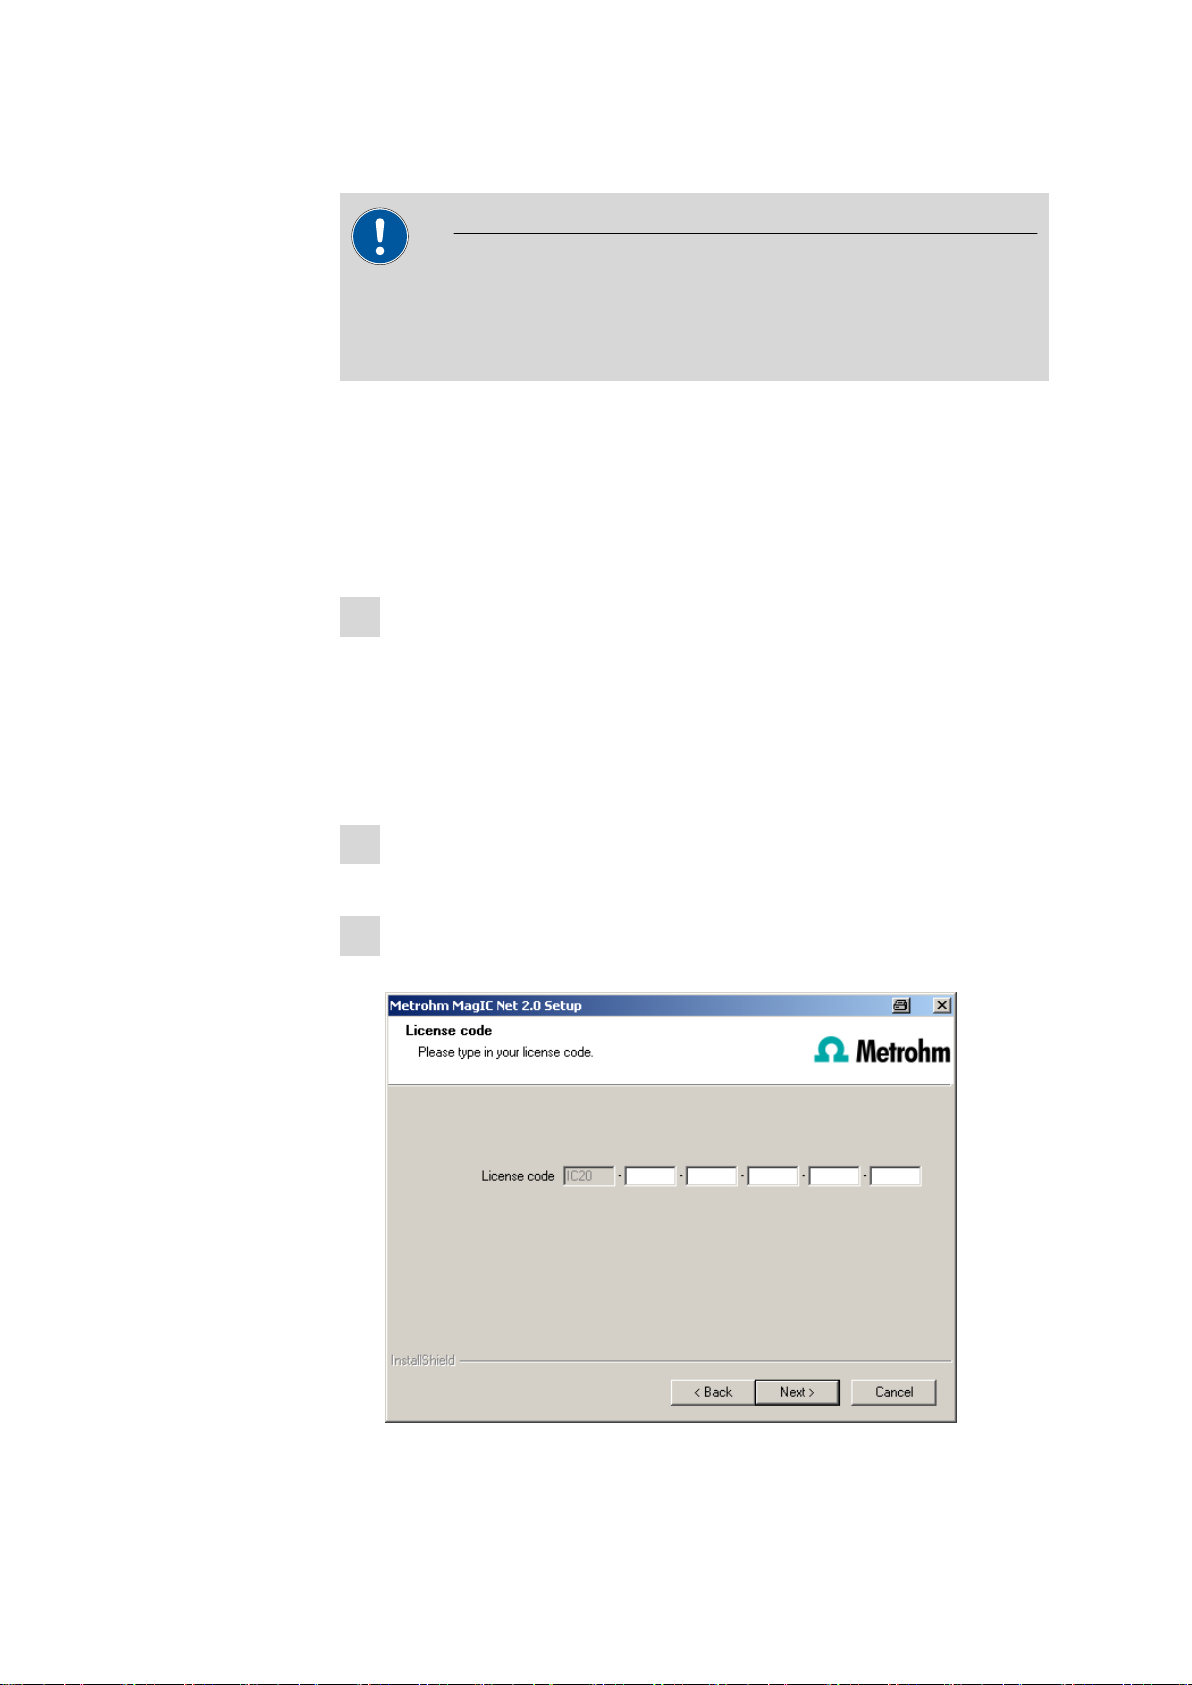
with [Yes], a window will appear where you can enter the license code.
Enter the license code for MagIC Net Basic, MagIC Net Compact or
3
MagIC Net Professional and click on [Next >].
2
8.102.8045EN
Page 3
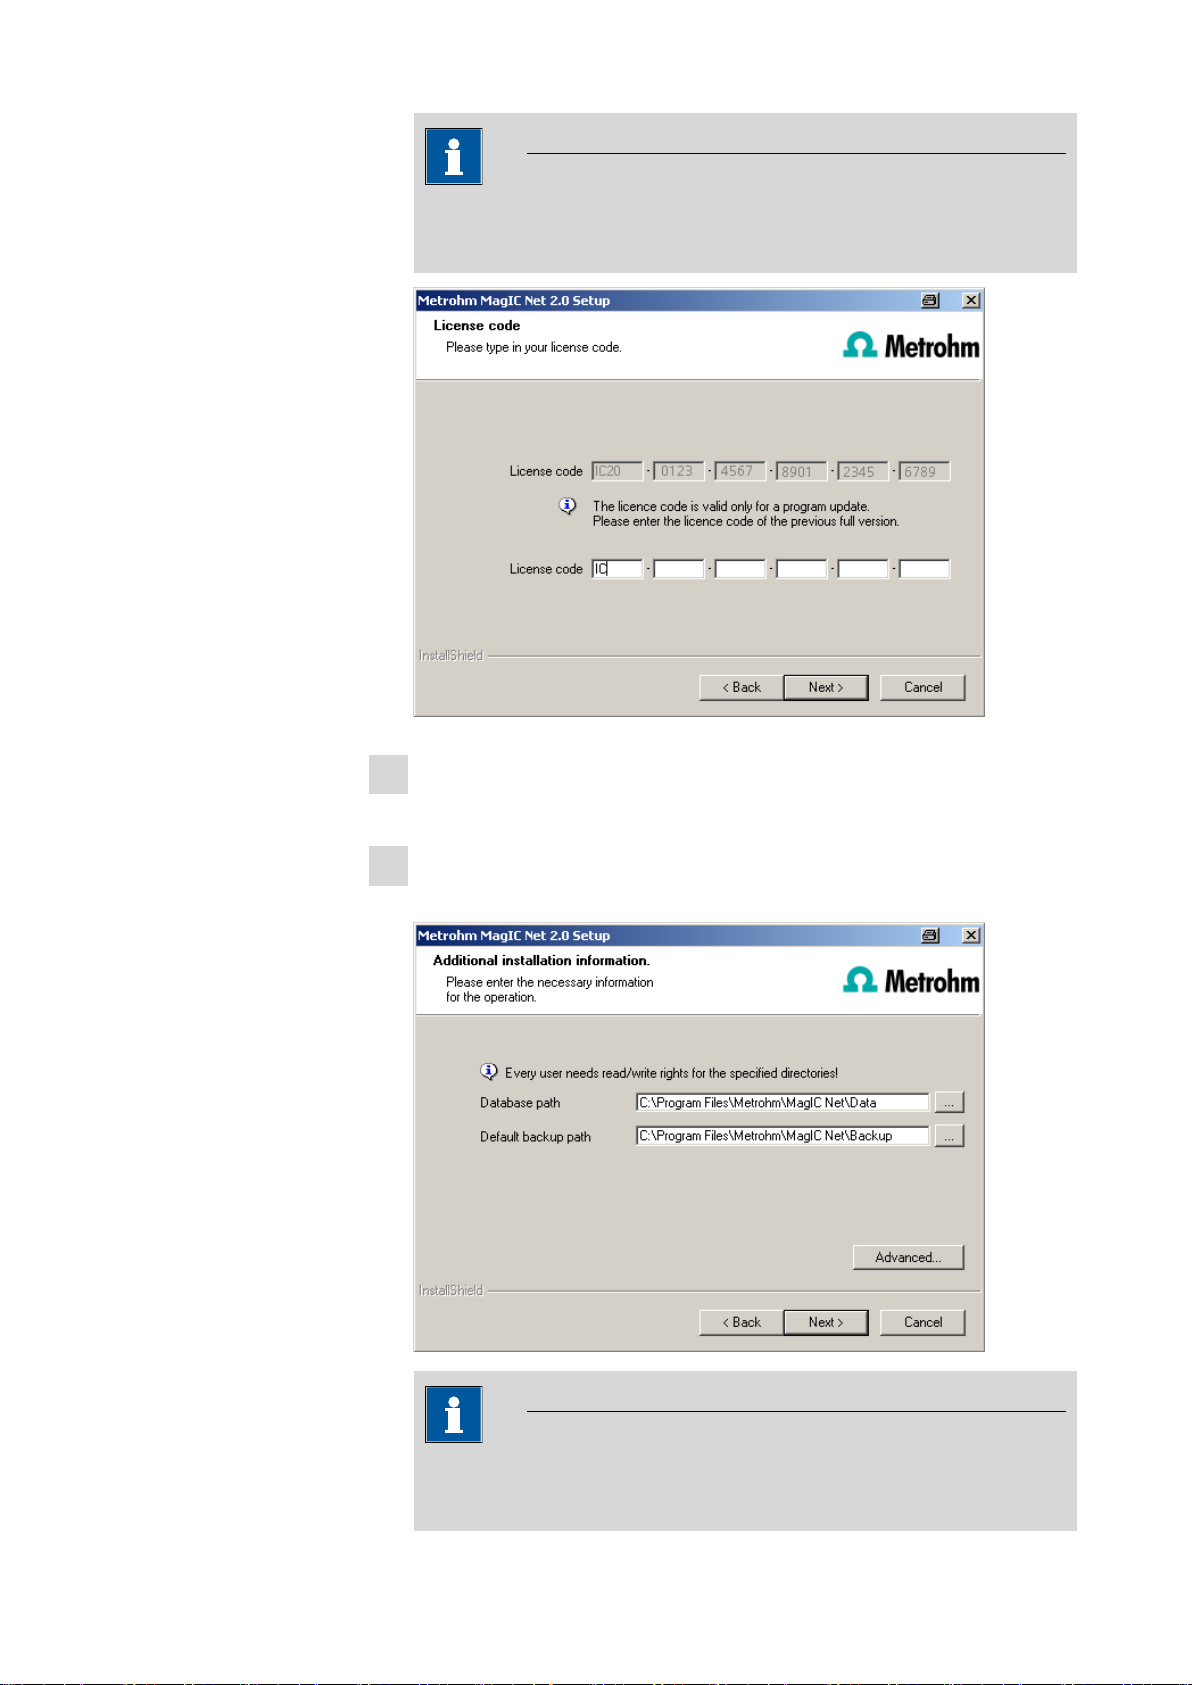
Note
If you have entered the license code of an update license, then the
license code of the previous full version will additionally be requested.
Now confirm the target folder for the MagIC Net installation with [Next
4
>] or select a different target folder with [Browse…].
In the dialog window Additional installation information you can
5
define the paths for the database and backup files:
8.102.8045EN
Note
The default paths are different for Windows 2000, Windows XP, Windows Vista and Windows 7.
3
Page 4
With the button [Advanced…] the ports MagIC Net uses to communicate with the database and administration server can be modified. If the
ports are already used, an appropriate error message will appear. Ask
your system administrator for more information about this. Continue with
[Next >].
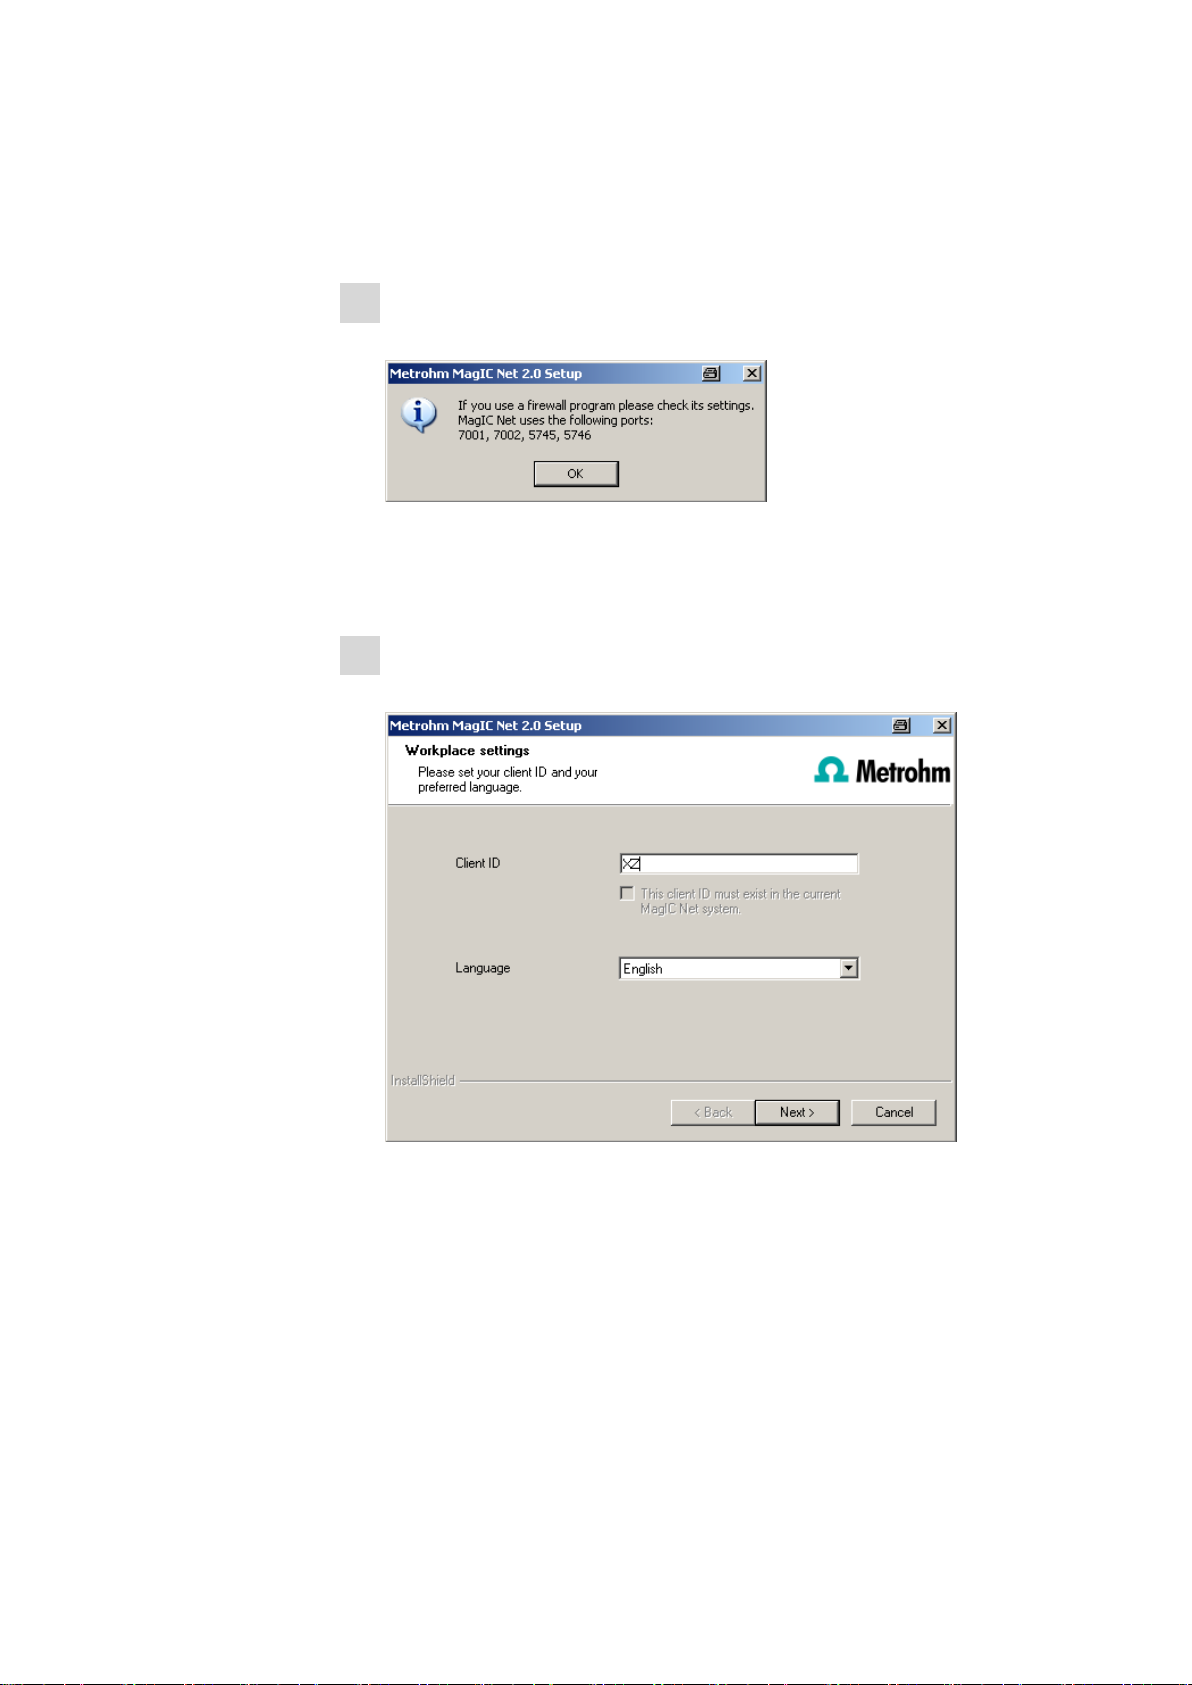
Follow the instructions of the program until the following message
6
appears:
This message points out which ports MagIC Net uses. Write down these
ports and inform your system administrator in case MagIC Net is not
able to connect to the database. Confirm the message with [OK].
As soon as the copying procedure has been finished you can set further
7
workplace settings:
4
8.102.8045EN
Page 5
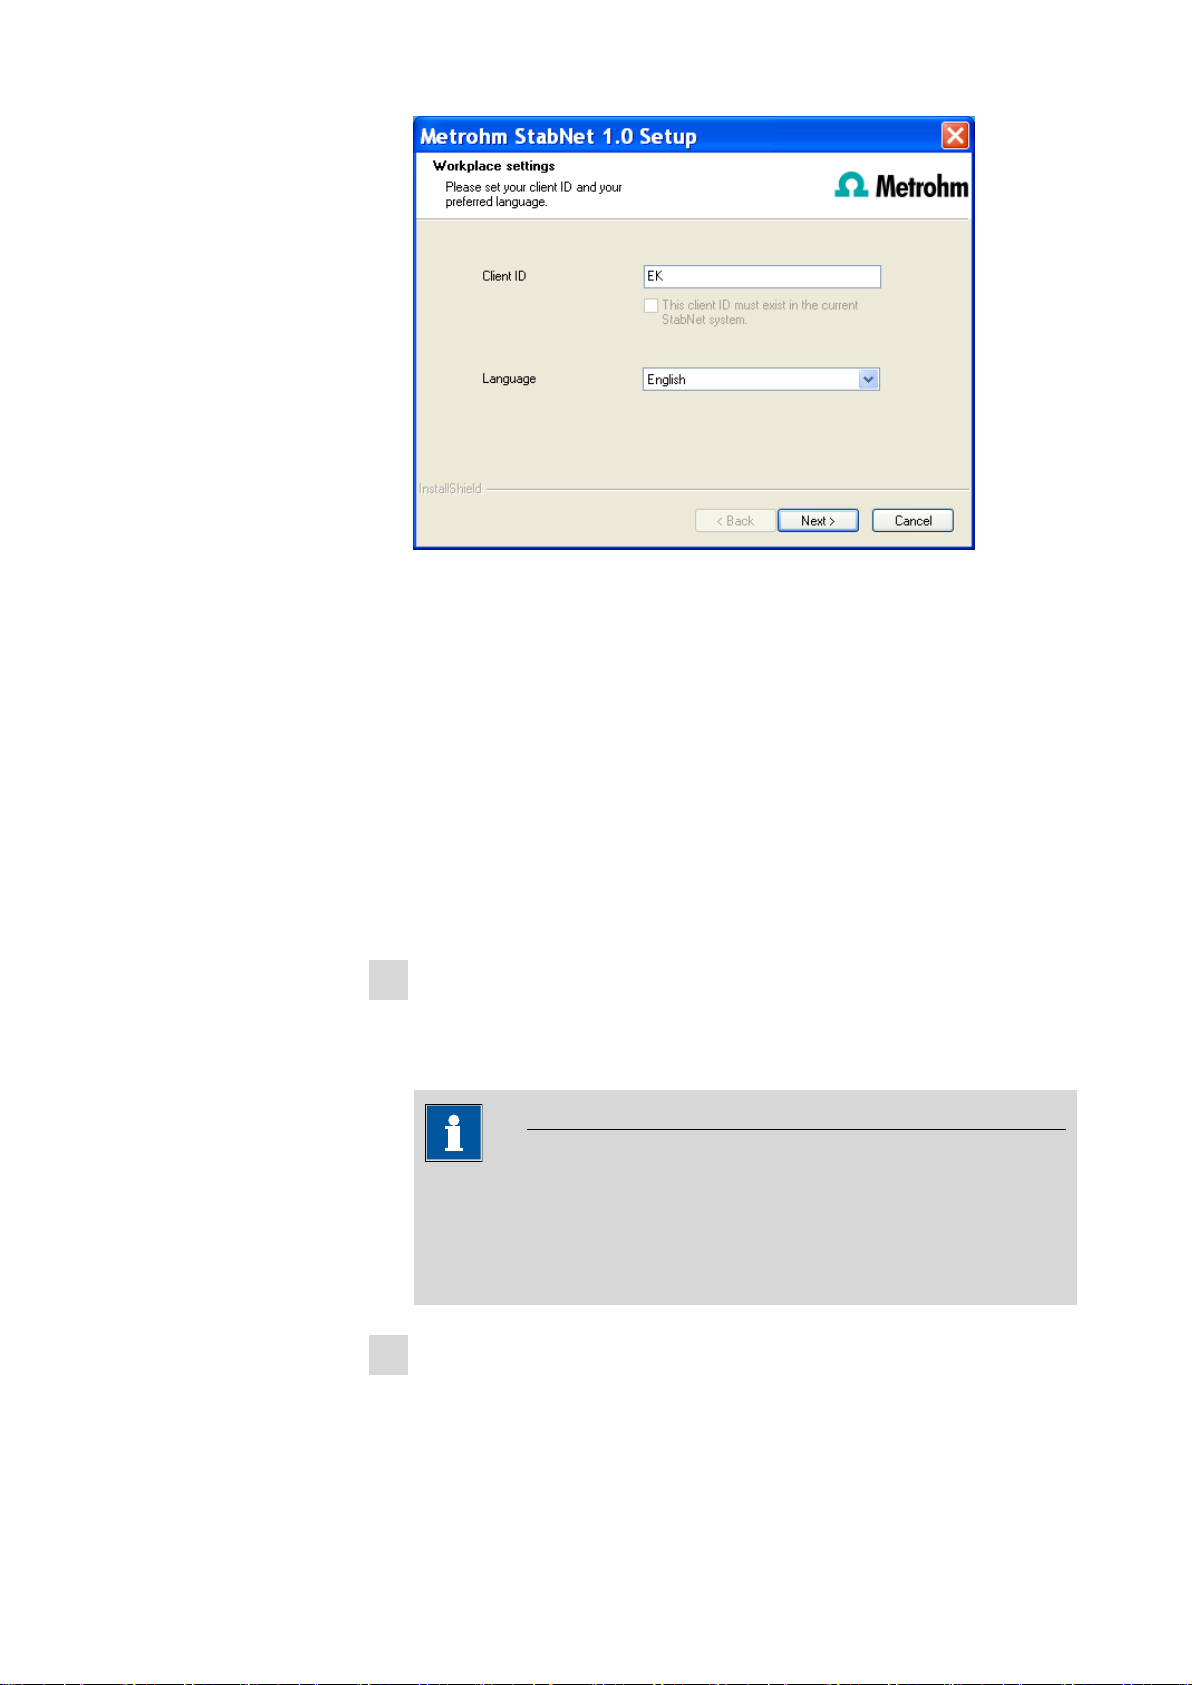
The option This client ID must exist in the current MagIC Net system is only selectable if a database from a previous installation already
exists on your computer or if you want to connect to a database server
which has been installed on another computer.
If you activate this option, then MagIC Net checks whether the identifier
you have entered exists in the database. If this is true the identifier and all
associated settings will be adopted. With this option reinstalling a client is
much easier.
Click on [Next >]. If the database ports are not available, an appropriate
error message will appear and the installation will be canceled. In this
case, check your server and firewall settings before installing the program
again.
At the end of the installation, the file info.txt will be created which con-
8
tains all relevant information concerning your current MagIC Net installation. Save this file on your hard disk in case of need in future and print it
(add to IQ).
Note
8.102.8045EN
An InstallLog file can be found in the installation directory of
MagIC Net under …bin\InstallLog. It contains a listing of all files cop-
ied to your computer during the installation and a confirmation that
the installation has been successfully completed.
Complete the installation with [Finish].
9
5
Page 6

3 Client/server installation
With the MagIC Net Multi version (multiple workplace version with 3 licenses) you can select during the installation whether you want to install a
MagIC Net client or the MagIC Net client plus server on your computer.
If you want to install a client only on your computer, a server, to which the
client will be connected, must have been previously installed on another computer.
On inserting the CD into the drive of your computer the installation will
1
be started automatically. If this option is deactivated on your computer,
double click the file setup.exe.
If the minimum system requirements are not met (see above) a message
appears. Click on [Yes] if you like to install the program nonetheless.
Afterwards, click on [Next >].
After having read the license agreement for MagIC Net and accepted it
2
with [Yes], a window will appear where you can enter the license code.
Enter the license code for MagIC Net Multi and click on [Next >].
3
Note
If you have entered the license code of an update license, then the
license code of the previous full version will additionally be requested.
6
8.102.8045EN
Page 7

Now confirm the target folder for the MagIC Net installation with [Next
4
>] or select a different target folder with [Browse…].
The dialog window Additional installation information appears
5
where you can select whether you want to install a client or the server:
8.102.8045EN
The option Client/Server installs the client and the database server on
your computer. Select this option if your computer will be used as server.
With Client, only the client will be installed and you have to select the
database server (has to be installed in advance!), to which you want to
connect, with . The network server name or the IP address are accepted.
With the button [Advanced…] the ports MagIC Net uses to communicate with the database and administration server can be modified. If the
ports are already used, an appropriate error message will appear. Ask
your system administrator for more information about this. Continue with
[Next >].
7
Page 8

All further installation steps correspond to those of the single workplace
6
installation on from point 6.
4 Modifying / repairing / removing the installation
and upgrading the license
In order to carry out modifications on the current MagIC Net installation, start
the file setup.exe on the installation CD or click under:
■ Windows XP and older - Control Panel ▶ Software
■ Windows Vista / Windows 7 - Control Panel ▶ Programs and Features
on Metrohm MagIC Net. Then select Change/Remove:
Modify
Repair/Update
With this option you can change the paths to the database and backup files
and set the ports which MagIC Net uses for communication. With the
MagIC Net Multi version you can additionally change the path to the database server.
If the database path is changed, the existing databases are automatically copied to the new location.
With this option you can repair an existing defective installation or update an
older installation.
■ Repairing the installation
In case of a defective MagIC Net installation because e.g. a DLL file is missing or a program file has been deleted by mistake, MagIC Net can be
repaired with this option.
■ Updating the installation
In case an older version of MagIC Net is installed, it will be updated to the
new version of MagIC Net.
8
8.102.8045EN
Page 9

License upgrade
Remove
Caution
During updating older MagIC Net versions the databases will be converted
to the new version. Depending on the size of the database, this can take
some time. For each database a progress bar is displayed which informs
about the status of the conversion.
The computer or Windows must not be restarted or shut down as long as
the conversion is running!
A direct upgrade of your current installation to a MagIC Net version with
additional features is possible:
■ MagIC Net Compact to MagIC Net Professional or MagIC Net Multi
■ MagIC Net Professional to MagIC Net Multi
In order to do this, enter your new license code in the next dialog window.
This option removes your MagIC Net installation. Data which has been generated after the installation (e.g. database entries, log files, exported data etc.)
will remain on your hard disk.
5 Program update with MagIC Net Compact/Pro-
fessional
During the program update, the configuration database (system configuration,
methods, templates) and the determination databases are automatically
updated for further use with the new version of MagIC Net Compact/Pro-
fessional.
Note
The files in the database and backup directory will be retained when updating the program.
Files in the subdirectories bin, jre, lib, res, doc and examples will be overwritten by the update. Files in these directories which have not been overwritten by the update will be deleted. The deleted files are listed in the
InstallLog.
Save the configuration database into an external directory using the
1
backup function of MagIC Net. In the program part Configuration,
select the menu item File ▶ Save ▶ Manually. Select the Backup direc-
tory, enter a name for the backup file and click on [Start]. The backup is
8.102.8045EN
9
Page 10

carried out automatically. It is recommended to copy the backup file to
CD/DVD.
If desired, export the methods in addition to the automatic backup of the
2
configuration database (see above) into an external directory. In the program part Method, select the menu item File ▶ Method manager….
Select the desired Method group, mark all methods to be exported and
click on [Edit] ▶ Export…. Select the desired export directory and click
on [OK]. The methods are exported into the desired directory. It is recommended to copy the exported methods to CD/DVD.
Save all determination databases created by yourself into an external
3
directory using the backup function of MagIC Net. In the program part
Database, select the menu item File ▶ Database manager…. Select
the desired database and click on [Backup]. Select the Backup directory, enter a name for the backup file and click on [Start]. The backup is
carried out automatically. It is recommended to copy the backup file to
CD/DVD.
Save further files created by yourself in the installation directory (e.g.
4
export files) into an external directory or to CD/DVD.
Close MagIC Net. Insert the installation CD and double-click the file
5
setup.exe. Then select Repair/Update and click on [Next].
10
Enter the update license code for MagIC Net Compact or MagIC Net
6
Professional and click on [Next].
8.102.8045EN
Page 11

7
During updating older MagIC Net versions to MagIC Net 2.x the databases will be converted to the new version. Depending on the size of
the database, this can take some time. For each database a progress
bar is displayed which informs about the status of the conversion.
The computer or Windows must not be restarted or shut down as long
as the conversion is running!
Complete the installation with [Finish].
An UpdateLog file with a list of all files having been copied to your computer and with a confirmation for a successful installation is saved in the
MagIC Net installation folder (default: C:\Program Files\Metrohm
\MagIC Net) under bin\InstallLog.
Caution
6 Program update with MagIC Net Multi
8.102.8045EN
During the program update, the configuration database (system configuration,
methods, templates, user-specific data for all clients) and the determination
databases on the server are automatically updated for further use with the new
version of MagIC Net Multi.
11
Page 12

Note
The files in the database and backup directory will be retained when updating the program.
Files in the subdirectories bin, jre, lib, res, doc and examples will be overwritten by the update. Files in these directories which have not been overwritten by the update will be deleted. The deleted files are listed in the
InstallLog.
Make sure MagIC Net Multi is closed on all clients.
1
Note
In the subdirectory bin of the MagIC Net installation there is the
application Clients.exe, with which all clients and their status can be
displayed.
Open MagIC Net Multi on the server and save the configuration data-
2
base into an external directory using the backup function of MagIC Net.
In the program part Configuration, select the menu item
File ▶ Save ▶ Manually. Select the Backup directory, enter a name
for the backup file and click on [Start]. The backup is carried out automatically. It is recommended to copy the backup file to CD/DVD.
If desired, export the methods in addition to the automatic backup of the
3
configuration database (see above) into an external directory. In the program part Method, select the menu item File ▶ Method manager….
Select the desired Method group, mark all methods to be exported and
click on [Edit] ▶ Export…. Select the desired export directory and click
on [OK]. The methods are exported into the desired directory. It is recommended to copy the exported methods to CD/DVD.
Save all determination databases on the server into an external directory
4
using the backup function of MagIC Net. In the program part Database, select the menu item File ▶ Database manager…. Select the
desired database and click on [Backup]. Select the Backup directory,
enter a name for the backup file and click on [Start]. The backup is carried out automatically. It is recommended to copy the backup file to CD/
DVD.
Save further files in the installation directory (e.g. export files) into an
5
external directory or to CD/DVD.
12
8.102.8045EN
Page 13

6
Updating the server
Close MagIC Net Multi on the server and on all clients. Insert the installation CD on the server and double-click the file setup.exe. Then select
Repair/Update and click on [Next].
Enter the update license code for MagIC Net Multi and click on [Next].
7
8
Note
8.102.8045EN
The update of MagIC Net Multi consists of the server license and
three client licenses. If an existing installation contains additional licenses, these will be deleted.
Click on [OK] in the corresponding message in order to continue the
installation.
13
Page 14

9
During updating older MagIC Net versions to MagIC Net 2.x the databases will be converted to the new version. Depending on the size of
the database, this can take some time. For each database a progress
bar is displayed which informs about the status of the conversion.
The computer or Windows must not be restarted or shut down as long
as the conversion is running!
Complete the installation with [Finish].
An UpdateLog file with a list of all files having been copied to the server
and with a confirmation of a successful installation is saved in the
MagIC Net server's installation folder (default: C:\Program Files\Metrohm
\MagIC Net) under bin\InstallLog.
In case additional licenses have been removed during the server update,
10
or if further additional licenses are to be added, the Administrator can
enter them in MagIC Net (dialog: Configuration ▶ Tools ▶ Program
administration ▶ Licenses ▶ Add licenses).
Caution
11
Updating clients
For each client, insert the installation CD and double-click the file
setup.exe. Then select Repair/Update and click on [Next]. Complete
the installation with [Finish].
Note
In order to facilitate updating many clients, the installation can be copied from the CD to a writeable medium and the file magic_init.ini can
be modified. There, user-defined parameters (license code, installation
path, server name, …) for the installation can be set in advance, which
allows you to only having to click through the installation.
An UpdateLog file with a list of all files having been copied to the client
computer and with a confirmation for a successful installation is saved in
the MagIC Net client's installation folder (default: C:\Program Files
\Metrohm\MagIC Net) under bin\InstallLog.
7 Installation of drivers
In normal cases, the installation routine of MagIC Net automatically installs all
the drivers necessary for controlling the supported devices.
If you are using a 64-bit operating system it may be necessary to install drivers
manually in combination with a few devices. This is the case if the operating
systems displays a message when connecting a device to the computer, e.g.
14
8.102.8045EN
Page 15

Device driver software was not successfully installed. No driver
found. The message should also show the name of the corresponding device.
Note this name and proceed as follows to install the driver manually:
Note
The following description applies for Windows 7 (64-bit version). It may
slightly vary for your system.
Open the Windows Device Manager. Under Other devices the corre-
1
sponding device can be found.
Click on the device with the right mouse button. The context menu
2
opens.
In the context menu, select Update Driver Software.... A dialog win-
3
dow opens.
Select Browse my computer for driver software. The file selection
4
dialog opens.
Navigate to the installation folder of MagIC Net (default: C:\Program
5
Files\Metrohm\MagIC Net).
In the installation folder, open the subfolder drivers. This folder contains
6
the subfolder 889, in which you can find the driver for the 889 IC Sample
Center and the Combustion Module.
Apply the selection with [OK]. A safety prompt is displayed. In order to
7
install the driver, click on [Install].
After the successful installation, close the Device Manager.
8
8 Adding additional licenses with Windows Vista
or newer
General
Since Windows Vista, Microsoft has introduced the UAC (User Account Control), which permits running tasks either as non-administrator or as administrator (without changes of user, switching off or similar).
http://technet.microsoft.com/en-us/library/cc709691%28WS.10%29.aspx
http://technet.microsoft.com/en-us/magazine/2007.06.uac.aspx
This function can, however, cause difficulties with client-server installations of
MagIC Net.
8.102.8045EN
15
Page 16

Problem description
One would like to add additional licenses for the program; the license code for
an additional 5 licenses, for example, is added (on the server) in the program
part Configuration in the dialog window Program administration (accessible via menu item &Tools ▶ &Program administration..., tab Licenses).
The file license.mlic, which contains the standard license code and the additional license codes, is stored in the bin directory of the program installation
(C:\Program Files\Metrohm\MagIC Net\bin).
If one adds the 5 licenses and then looks at this file license.mlic, only the
standard license code will be listed (for 3 licenses).
If one highlights the file license.mlic and presses Compatibility files in the
bar, then one will arrive in the directory C:\Users\'User'\AppData\Local\Vir-
tualStore\Program Files\Metrohm\MagIC Net\bin ('User' being the
abbreviation (UID) for the user logged in on the operating system). The file
license.mlic with the license codes for the standard licenses and the 5 newly
added licenses is to be found here, i.e. the additional licenses are stored in the
VirtualStore only for the Windows user who was logged in on the PC at the
time the additional licenses were added.
On the server, the program recognizes all of the licenses; the operating system
adds the file license.mlic from the directory C:\Users\'User'\AppData\Local
\VirtualStore\Program Files\MagIC Net\bin to the detail list of the directory C:\Program Files\Metrohm\MagIC Net\bin.
For the client-server functionality of the database server, however, the file
license.mlic in the directory C:\Program Files\Metrohm\MagIC Net\bin is
relevant, and here only the basic license is listed. Therefore, problems are to be
anticipated when adding additional clients (more than the 3 clients present in
the default settings).
Remedy
■ For new installations
– To enter additional licenses, the program must be started as adminis-
trator (position the mouse on the Program icon and click the right
mouse button – select Run as administrator there).
– If one then adds the license code for additional licenses in the usual
way, then the file license.mlic in the directory C:\Program Files
\Metrohm\MagIC Net\bin will contain both license codes.
16
8.102.8045EN
Page 17

■ For existing installations
– First of all, the file license.mlic in the directory C:\Users
\'User'\AppData\Local\VirtualStore\Program Files\Metrohm
\MagIC Net\bin must be deleted.
This file must not be present in the VirtualStore of any user – a
check must be made to make sure of this, and any such files which
may be found must be deleted.
– Afterwards, the program must be started as administrator (position
the mouse on the Program icon and click the right mouse button –
select Run as administrator).
If one then adds the license code for additional licenses in the usual
way, then the file license.mlic in the directory C:\Program Files
\Metrohm\MagIC Net\bin will contain both license codes.
9 User rights for MagIC Net
In order that the logged in user be able to access all functions with
MagIC Net, the windows system administrator must ensure that the permissions are set for the directories as listed below:
Directory
Permission Group name or
user name
Database directory
Directory where the databases will be saved (…\Data)
Backup directory
Modify SYSTEM
User
Modify User
Directory where the backups will be stored (…\Backup)
%ALLUSERSPROFILE%\Application Data\Metrohm
(Windows 2000, Windows XP)
**
%PROGRAMDATA%\Metrohm (Windows Vista, Win-
dows 7)
**
Export directories
Modify User
Modify User
Modify User
Directories where the exported files are to be saved.
PDF directories
Modify User
Directories where the PDF files are to be saved.
Desktop Modify User
%PROGRAMFILES%\Metrohm\MagIC Net Read Execute User
*
*
*
*
*
*
*
*
*
User = name of the user who is logged in
**
During installation of MagIC Net the permission Full Control is set for the following groups:
SYSTEM, Administrators, User, Guests, Main users.
8.102.8045EN
17
 Loading...