Mcculloch MC1275 User Manual

Model MC1275
Modelo MC1275
Modéle MC1275
Multi-Use Steam Canister
Limpiadora A Vapor De Usos Múltiples
Nettoyeur Vapeur Multi-Usages
Owner’s Guide
Guía Del Usuario
Mode D’emploi
English p. 2
Español p. 18
Français p. 34
KEEP YOUR RECEIPT FOR WARRANTY PURPOSES
Please read all instructions before use.
GUARDE SU RECIBO A EFECTOS DE LA GARANTÍA
Lea todas las instrucciones antes de usarlo.
GARDEZ VOTRE REÇU AUX FINS DE LA GARANTIE
Veuillez lire toutes les instructions avant l’utilisation.

IMPORTANT SAFETY INSTRUCTIONS
!WARNING: To reduce the risk of fire, electrical shock, or injury, the following basic safety precautions should always be followed when using an electrical appliance.
READ ALL INSTRUCTIONS BEFORE USE
!DANGER
Any appliance is electrically live even when switched off. To reduce risk of electrical shock:
1.Always unplug power cord immediately after using.
2.Do not place or store unit where it can fall or be pulled into a sink or tub.
3.Do not place in, or drop into water or other liquid.
4.If unit falls into water, immediately unplug power cord. Do not reach into the water.
!WARNING
To reduce risk of burns, electrocution, fire, or injury to persons:
1.Use Multi-Use Steam Canister only for its intended purpose as indicated in this manual.
2.If an extension cord is necessary, use a properly rated cord (15 ampere, 14 gauge). Use care to position extension cord where it is least likely to be damaged or tripped over during use.
3.Before plugging power cord into electrical outlet, be sure that all electrical information on rating label agrees with your power supply.
4.To reduce likelihood of circuit overload, DO NOT operate another high wattage appliance on the same circuit as this unit.
5.To protect against risk of electrical shock, do not immerse unit in water or other liquids. Do not use power cord as handle, let it hang over edges of counters, or be crimped or closed in doors.
6.Never yank power cord to disconnect from outlet; instead, grasp plug and pull to disconnect.
7.Do not operate unit with a damaged power cord or if the unit has been dropped or damaged. To avoid risk of electrical shock, do not disassemble unit; contact Steamfast Consumer Service for examination and repair. Incorrect reassembly can cause a risk of electrical shock when unit is used.
8.Close supervision is required for any appliance being used near children, pets and plants. Do not leave unit unattended while plugged in.
9.This unit is not intended for use by persons (including children) with reduced physical, sensory or mental capabilities, or lack of experience and knowledge, unless they have been given supervision or instruction concerning use of the unit by a person responsible for their safety.
10.Do not use unit where aerosol-based products are being used, or where oxygen is being administered.
11.Unit is only meant to be used with recommended Multi-Use Steam Canister (model MC1275) accessories. Using other types of attachments may cause damage to unit or injury.
12.If Lighted On/Off Switch does not illuminate when set to “On” position while power cord is plugged in, unit is not operating normally. Immediately disconnect cord from power supply, then refer to Troubleshooting guide on Page 15 of this manual for assistance.
13.Always turn unit off and unplug power cord before filling Water Reservoir with water. Do not attempt to use unit without properly filling Reservoir.
2 | ENGLISH

IMPORTANT SAFETY INSTRUCTIONS
!WARNING: To reduce the risk of electrical shock, this appliance has a threepronged plug. This plug will fit in a polarized wall outlet only one way. If the plug does not fit fully in the outlet, contact a licensed electrician to install a proper outlet. DO NOT attempt to modify the plug or defeat this safety feature.
14.When filling Water Reservoir, only water should be used in unit – other cleaning agents could damage unit or cause injury. Distilled or de-mineralized water is highly recommended, in order to minimize potential build-up of mineral deposits. Do not fill Water Reservoir with more than 48 oz. (1,420 ml.) of water.
15.To avoid burns from escaping steam when removing Water Reservoir cap to refill unit:
•Always allow unit to cool for 20 minutes.
•Press and hold Steam Button to release ALL remaining steam.
16.To reduce risk of contact with hot water emitting from steam nozzle, check appliance before each use by positioning it away from body and turning it on. Do not operate unit if Steam Nozzle is blocked.
17.Burns can occur from touching hot metal parts, hot water, or steam. Do not touch Main Nozzle or attempt to connect accessories while unit is in use. Do not touch bottom of Mop Head or attempt to attach a Microfiber Pad by hand while unit is in use. Use caution when you turn unit upsidedown – there may be hot water in Water Reservoir.
18.Use caution when using unit on uneven surfaces, such as stairs.
19.When steaming any surface for the first time, it is recommended that you consult the manufacturer’s guidelines for material being steamed. For items in question, test on an inconspicuous area before proceeding.
20.Steaming unsealed hardwood or unglazed ceramic surfaces is not recommended, and may result in warping or damage to the surface. Steam may remove the sheen from surfaces treated with wax.
21.When steam mopping, never leave unit resting in one spot on any surface for any period of time – prolonged exposure to heat and moisture may damage floor surfaces.
22.Do not allow power cord to touch hot surfaces during use. Bundle cord loosely when storing.
23.Always allow Multi-Use Steam Canister to cool completely (at least 30 minutes) and empty Water Reservoir before storing. Do not store unit with a damp Microfiber Pad still attached.
SAVE THESE INSTRUCTIONS!
FOR HOUSEHOLD USE ONLY
Questions or comments?
•www.mccullochsteam.com
•consumerservice@mccullochsteam.com
•1-800-711-6617
ENGLISH | 3


 Product Information
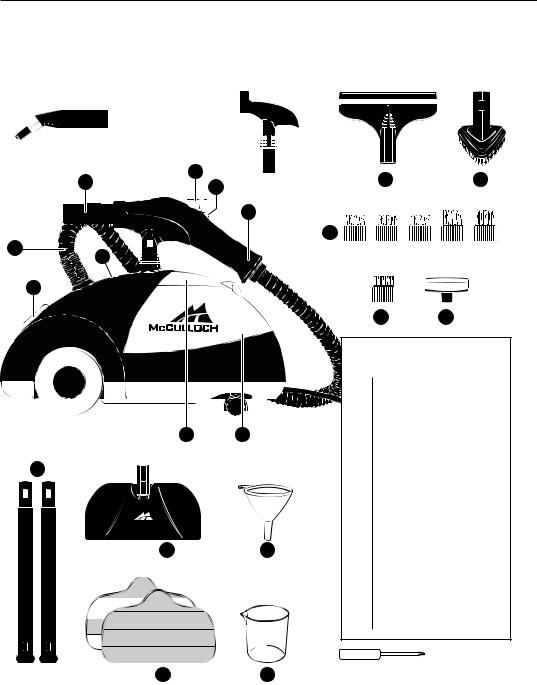
The following features and accessories are included with your Multi-Use Steam Canister. Carefully inspect the packing material for all parts listed below. To obtain possible missing parts, refer to Product Support on Page 16 of this manual.
T275-101


 11
11
9
10
2
1
A275-008-B
12
A275-019 13
8
A275-016
7
6
5
3 4
A275-014
15
A275-015
A275-020 |
14 |
16 |
|
4 | ENGLISH
A275-005 A275-001
17 |
|
|
|
18 |
|||||||
A275-002 |
A275-003 |
||||||||||
19 |
|
|
|
|
|
|
|
|
|
|
|
A275-004 A275-010 |
|||||||||||
|
|
|
|
|
|
|
|
|
|
|
|
20 |
|
|
|
|
21 |
||||||
UNIT FEATURES & ACCESSORIES
1Lighted On/Off Switch
2Steam Ready Light
3Storage Compartment
4Water Reservoir (internal)
5Handle
6Steam Lock Switch
7Steam Button
8Carry Handle
9Main Nozzle
10Steam Hose
11Steam Jet Nozzle
12Extension Wands (2)
13Mop Head
14Microfiber Pads (2)
15Water Funnel
16Measuring Cup
17Squeegee
18Triangle Brush
19Nylon Utility Brushes (5)
20Brass Utility Brush
21Scrub Pad
Screwdriver included for Carry Handle assembly.


 Product Information
•The Lighted On/Off Switch (1) powers the unit On and Off.
•The Steam Ready Light (2) illuminates while the unit is heating, then turns off when it is ready to begin steaming.
•The Storage Compartment (3) provides a convenient place to store small accessories; it also houses the Water Reservoir.
•The Water Reservoir (4) is the internal tank in which water is stored and heated. It is accessed through the Storage Compartment. There must be a sufficient amount of water in the Water Reservoir in order for the unit to function properly.
•The Handle (5) is designed to stay cool while providing the optimum amount of safety and user comfort.
•The Steam Lock Switch (6) is pushed forward to lock the Steam Button down and provide continuous steam, without continuously pressing the Steam Button.
•The Steam Button (7) provides full steam-on-demand control, releasing hot, penetrating steam from the Main Nozzle when pressed.
•The Carry Handle (8) functions as a convenient holder for the Main Nozzle, and is designed for carrying the unit.
•The Main Nozzle (9) emits a powerful flow of steam when the Steam Button is pressed.
•The Steam Hose (10) safely channels the flow of steam from the Water Reservoir to the Main
Nozzle.
•The Steam Jet Nozzle (11) focuses the flow of steam from the Main Nozzle, and serves as the base to which the Utility Brushes and Scrub Pad connect.
•The Extension Wands (12) connect to the Main Nozzle. Used with mop attachment or for high or hard-to-reach places.
•The Mop Head (13) connects to the Extension Wands, and is designed for steam cleaning a variety of hard floor surfaces.
•The Microfiber Pads (14) attach to the Mop Head, and are designed for removing scuffs and stains from hard floors. The Pads are reusable and machine washable.
•The Water Funnel (15) and the Measuring Cup (16) are provided for ease in filling the Water Reservoir. The optimum amount of water is (16 - 48 oz. / 473 - 1,420 ml.).
•The Squeegee (17) connects to either the Main Nozzle or Extension Wands, and can be used to clean mirrors, windows and other smooth glass surfaces.
•The Triangle Brush (18) connects to the Main Nozzle or Extension Wands, and is designed for cleaning corners and other difficult angles.
•The assorted Nylon Utility Brushes (19) connect to the Steam Jet Nozzle, providing extra scrubbing power for removing exceptionally tough dirt and stains.
•The Brass Utility Brush (20) connects to the Steam Jet Nozzle and is designed for removing tough stuck-on grease and grime from durable surfaces such as ovens and grills.
NOTE: Use careful judgement when deciding what surface to clean with the Brass Utility Brush. Some delicate surfaces, such as stainless steel, may be scratched or damaged by the brass bristles. If you are unsure whether or not a surface will be damaged, it is recommended that you test a small inconspicuous spot before proceeding.
•The Scrub Pad (21) connects to the Steam Jet Nozzle and is designed to scrub tough dirt and scuffs from surfaces.
ENGLISH | 5

Assembling Your Multi-Use


 Steam Canister
STEAM MOPPING ACCESSORIES
WARNING: Do not try to connect accessories while unit is emitting steam.
EXTENSION WANDS
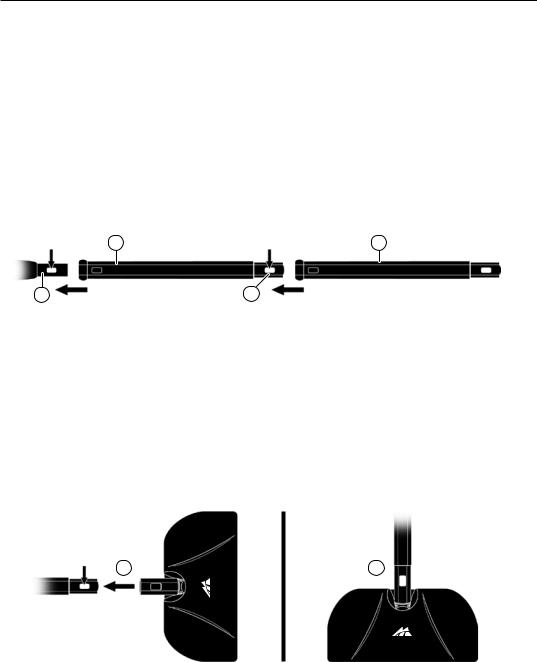
1.Select one of the Extension Wands. Insert end (A) of Wand into Main Nozzle (B). Align hole in Wand with grey lock/release button on Nozzle.
2.Press down on grey lock/release button. While continuing to hold button down, slide Extension Wand onto Main Nozzle until button snaps through hole on Wand.
3.Slide remaining Extension Wand (C) onto end of assembled Wand (D), this time lining up rectangular hole of remaining Wand with grey lock/release button of first Wand. Press and hold button, and firmly push second Wand onto end of first Wand until button snaps through hole. Both Extension Wands should now be connected to the Main Nozzle.
A C
B D
MOP HEAD
1.Align Mop Head with open end of Extension Wand, so that rectangular hole in Mop Head aligns with grey lock/release button on Wand.
2.Press down on grey lock/release button. While continuing to hold button down, slide Mop Head onto Extension Wand (See figure 1-A). Press on firmly until button snaps through hole (See figure 1-B).
NOTE: Do not use excessive force when mopping or using Extension Wands as this may cause the Wands to break.
A |
B |
FIGURE 1
6 | ENGLISH
 Loading...